

AEOTEC WallMote operation manual
AEOTEC
WallMote
SKU: AEOEZW129
Quickstart
This is a WallMote for Europe. To run this device please insert fresh * Rechargable batteries. Please make sure the internal battery is fully charged.
1. Let your Z-Wave primary controller/gateway enter into pairing/inclusion mode.
2. Take your WallMote near to your primary controller. Press the Action Button once on your WallMote, the LED will blink with green color.
3. If your WallMote has been successfully added to your Z-Wave network, its green LED will be solid for 2 seconds and then off. If the adding was unsuccessful
and the red LED will be solid for 2 seconds and then off, repeat the above steps.
What is Z-Wave?
Z-Wave is the international wireless protocol for communication in the Smart Home. This device is suited for use in the region mentioned in the Quickstart section. (For
more information about frequency regulations please refer to the frequency coverage overview at Sigma Designs Website ).
Z-Wave ensures a reliable communication by reconfirming every message (two-way communication) and
every mains powered node can act as a repeater for other nodes (meshed network) in case the receiver is not
in direct wireless range of the transmitter.
This device and every other certified Z-Wave device can be used together with any other certified Z-Wave
device regardless of brand and origin as long as both are suited for the same frequency range.
If a device supports secure communication it will communicate with other devices secure as long as this
device provides the same or a higher level of security. Otherwise it will automatically turn into a lower level of
security to maintain backward compatibility.
For more information about Z-Wave technology, devices, white papers etc. please refer to www.z-wave.info.
Product Description
Aeotec WallMote is an intelligent Z-Wave remote controller that mounted on a wall. It has 2 touch buttons that you can easily control the Z-Wave devices in your home
network via touching, long pressing or sliding the button areas. Its surface has a RGB LED to indicate the button actions also accompanied by touch beep and
vibration. The WallMote is also a security Z-Wave device and supports Over The Air (OTA) feature for the products firmware upgrade.
Prepare for Installation / Reset
Please read the user manual before installing the product.
In order to include (add) a Z-Wave device to a network it must be in factory default state. Please make sure to reset the device into factory default. You can do this
by performing an Exclusion operation as described below in the manual. Every Z-Wave controller is able to perform this operation however it is recommended to use
the primary controller of the previous network to make sure the very device is excluded properly from this network.
Reset to factory default
This device also allows to be reset without any involvement of a Z-Wave controller. This procedure should only be used when the primary controller is inoperable.
Press and hold the Action button (20 seconds). The LED should blink between green, purple, then red which will flash rapidly until a green LED becomes solid for 2
seconds to indicate a successful factory reset. Let go of the Action Button.
Safety Warning for Batteries
The product contains batteries. Please remove the batteries when the device is not used. Do not mix batteries of different charging level or different brands.
Inclusion/Exclusion
On factory default the device does not belong to any Z-Wave network. The device needs to be added to an existing wireless network to communicate with the
devices of this network. This process is called Inclusion.
Devices can also be removed from a network. This process is called Exclusion. Both processes are initiated by the primary controller of the Z-Wave network. This
controller is turned into exclusion respective inclusion mode. Inclusion and Exclusion is then performed doing a special manual action right on the device.
Inclusion
Press the Action Button on your WallMote Quad.
Exclusion
Press the Action Button on your WallMote Quad.
Product Usage
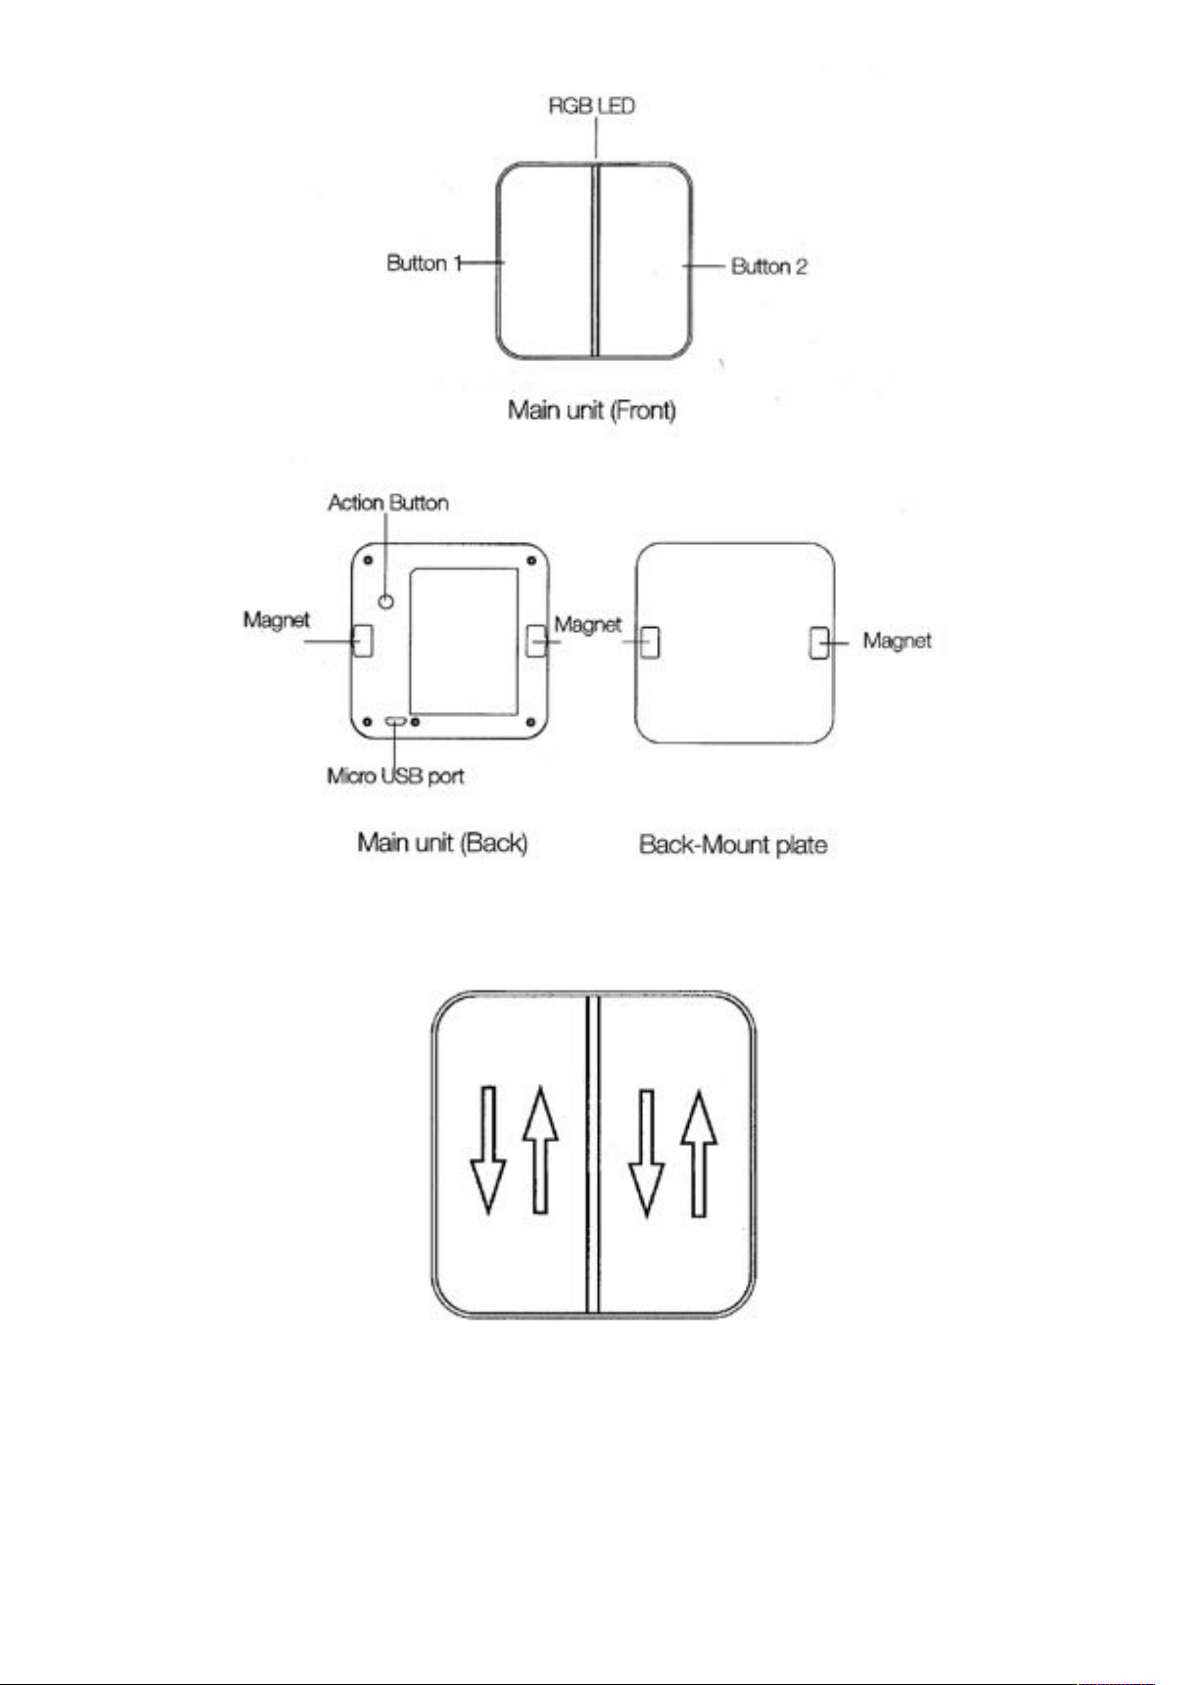
Dimmer control via sliding the button area.
The WallMote also supports sliding control, when the parameter 4 is set to 3, you can slide up or down on the button area to control the dimmer device.
Your WallMote battery.
Your WallMote has a internal rechargeable lithium battery that will allow you to charge it when it is in low battery. The charger’s output should be a micro USB terminal
with the specification of output DC 5V/1A. When the WallMote is in charge state, the orange LED will be on. If the orange LED is off and the green LED remains on,
then it indicates that the battery charge is complete.
Note: When the WallMote is in low battery, you will see the orange LED will blink when you touch the control buttons. Otherwise, if the blue LED blinks when touching
the buttons, which means the battery is in normal level.
Node Information Frame
The Node Information Frame (NIF) is the business card of a Z-Wave device. It contains information about the device type and the technical capabilities. The inclusion
 Loading...