

Page 1
17-08-13
Micr o Smart Dimmer 2E manual - Aeotec
aeotec.com/z-wave-in-wall-switches/877-micro-sei-2e-manual-instructions.html
1/10
Micro Smart
Dimmer 2E
manual
IMPORTANT
The electricity to the circuit must be shut off during installation
for safety and to ensure that wires are not short circuited
during installation which will cause damage to the Micro
Module.
The following instructions have been designed to assist in the
installation of the Aeotec by Aeon Labs Z-Wave in wall Smart
Dimmer. Please note that the instructions are for the 2nd
Edition of the Micro Smart Dimmer.
In-Wall Electrical
Installation Instructions:
Page 2
17-08-13
Micr o Smart Dimmer 2E manual - Aeotec
aeotec.com/z-wave-in-wall- switches/877-micro-sei-2e-manual-instructions.html
2/10
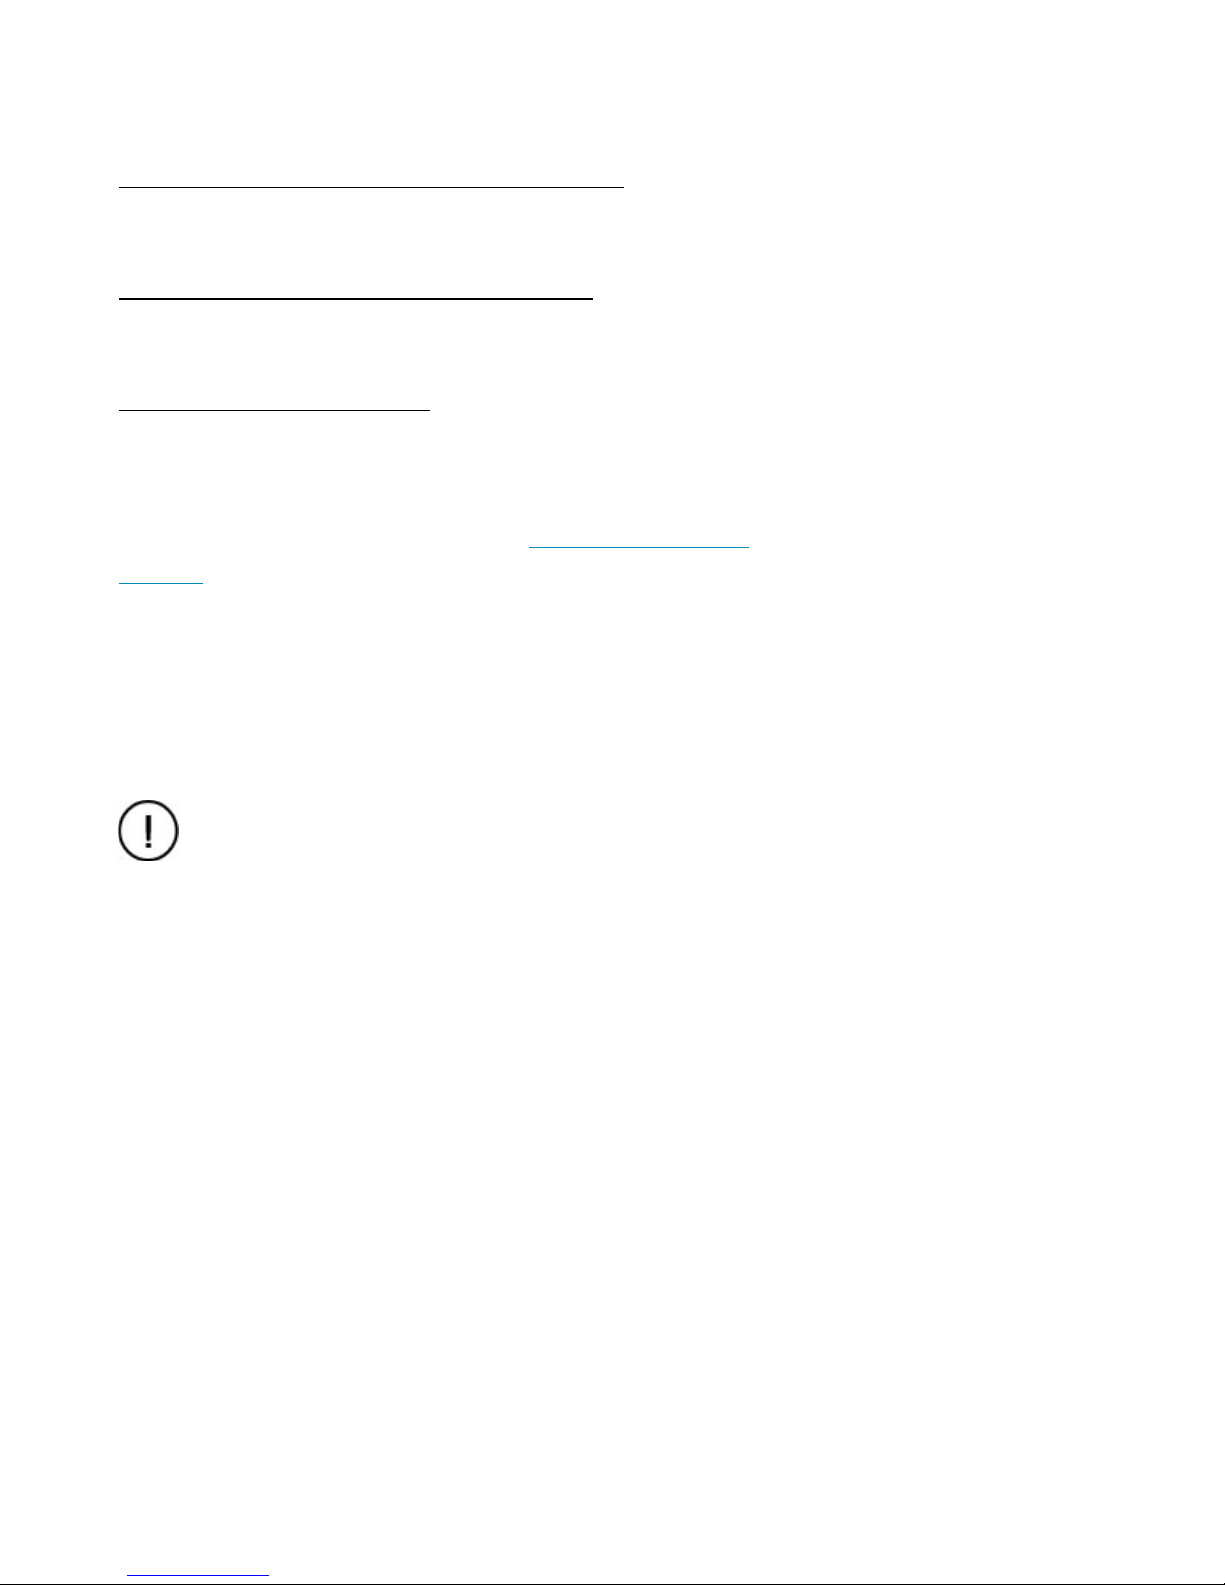
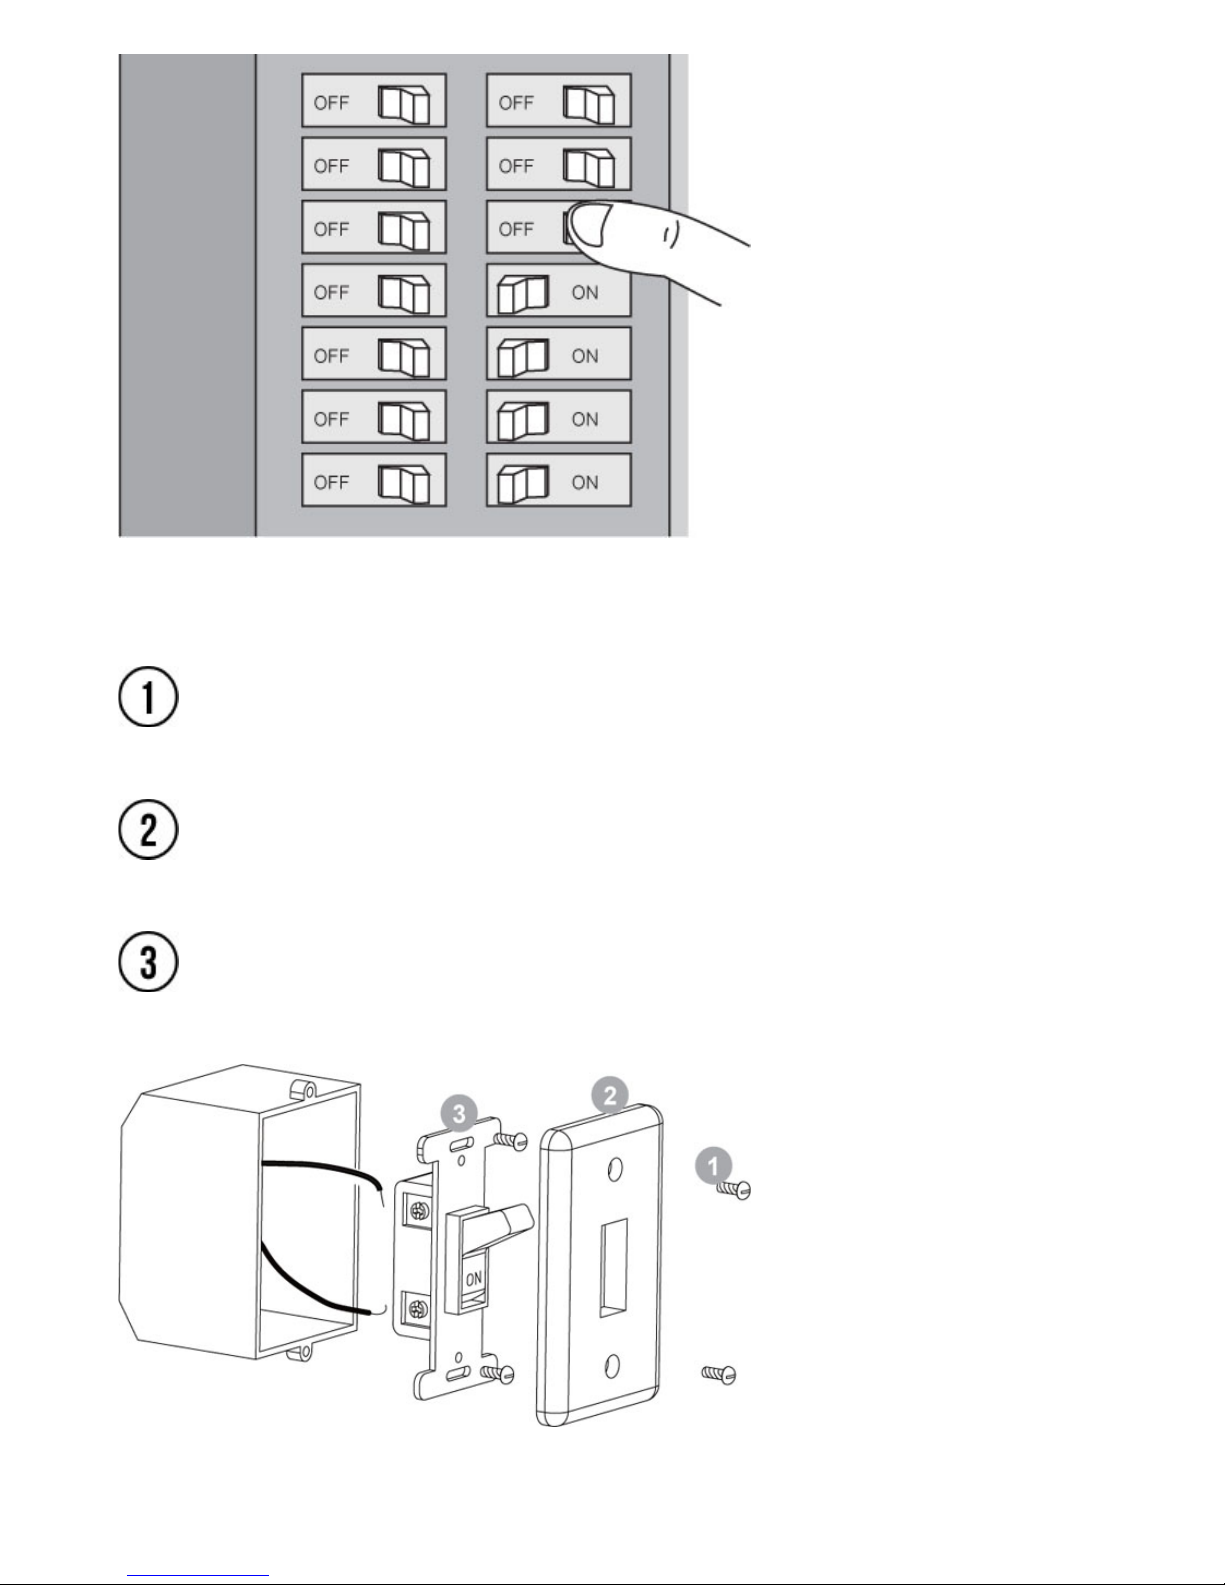
Remove the two screws securing the cover plate.
Remove the wall switch cover plate.
Remove the two screws securing the wall switch to the wall
box. Disconnect both wires from the wall switch.
Dismounting In Wall Box.
Page 3
17-08-13
Micr o Smart Dimmer 2E manual - Aeotec
aeotec.com/z-wave-in-wall- switches/877-micro-sei-2e-manual-instructions.html
3/10
Live – Hot wire (Black wire) Connect to Live terminal of Micro
Smart Energy Illuminator G2.
Neutral (White wire) Note! If this wire is not present in the
box, a neutral wire must be pulled into the box.
Load wire – Connect to Load terminal of Micro Smart Energy
Illuminator G2.
Preparing and Connecting
Wires
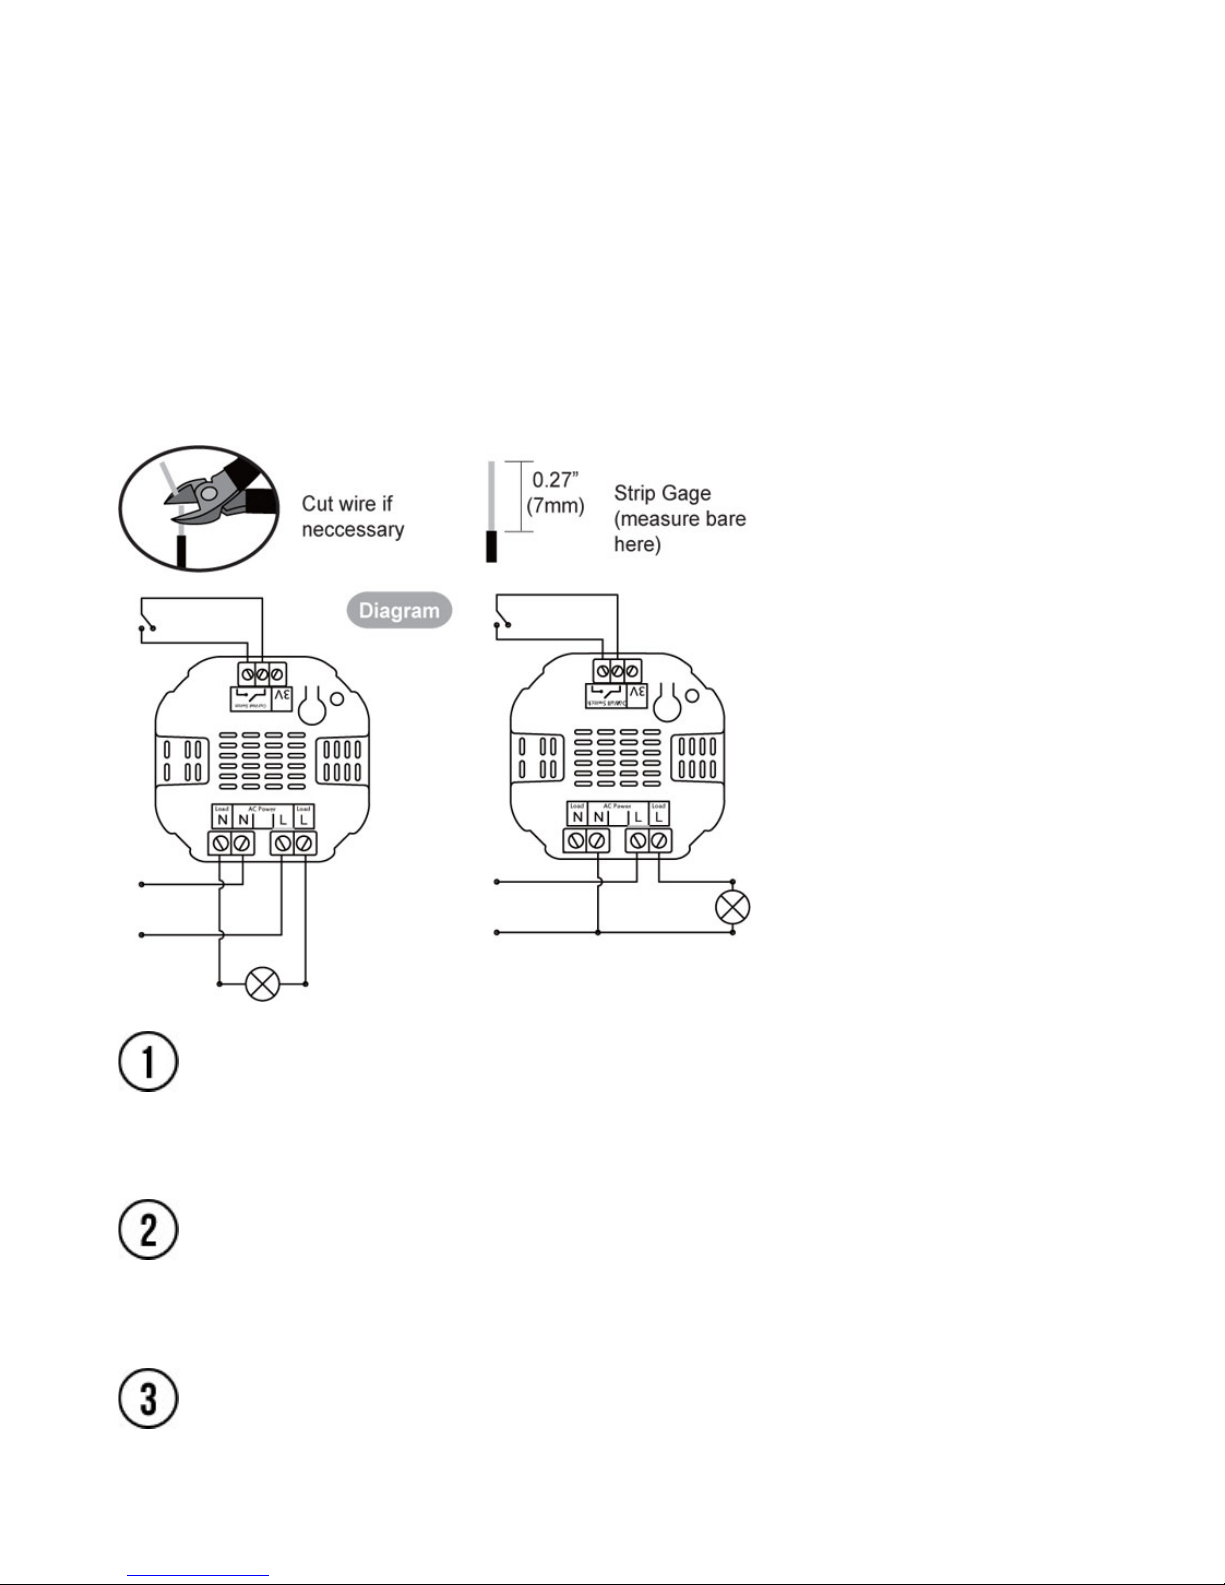
The Aeotec Micro Smart Energy Illuminator G2 must first be
powered by a 3-wire system in order to operate. The wiring
diagram is as follows:
Note
The “3V Out” terminal should be used only with the Aeon
Micro Touch.
Page 4

17-08-13
Micr o Smart Dimmer 2E manual - Aeotec
aeotec.com/z-wave-in-wall- switches/877-micro-sei-2e-manual-instructions.html
4/10
Signal connection – Using two 18 AWG copper wires,
connect the terminals of the wall switch to Micro Smart
Energy Illuminator G2 as shown.
Make sure that the ends of the wires from the wall
box are straight (cut if neccessary).
Remove insulation from each wire and the wall box
as shown.
Side wire connection
Position all wires to provide room for the device. Place Micro
Smart Energy Illuminator G2 inside the wall box towards the
back of the box.
Position the antenna towards the back of the box, away from
all other wiring.
Reinstall the wall switch to the wall box.
Mounting In Wall Box.
Page 5

17-08-13
Micr o Smart Dimmer 2E manual - Aeotec
aeotec.com/z-wave-in-wall- switches/877-micro-sei-2e-manual-instructions.html
5/10
Reinstall the cover plate onto the wall box.
Restore Power
Restore power at the circuit breaker or fuse. Installation is
complete.
Z-Wave Network
Instructions:
The Aeotec Micro Smart Energy Illuminator G2 must be
paired (included) into a Z-Wave network before it can receive
Z-Wave commands to turn on/off/dim and report its energy
usage. The Micro Smart Energy Illuminator G2 can only
communicate to devices within it’s own Z-Wave network.
Note
The LED on the Micro Smart Energy Illuminator G2 will blink
Page 6

17-08-13
Micr o Smart Dimmer 2E manual - Aeotec
aeotec.com/z-wave-in-wall- switches/877-micro-sei-2e-manual-instructions.html
6/10
Press the button labeled “Include” on the Aeotec Minimote to
begin the Z-Wave inclusion process.
Note
To include the Aeotec Micro Smart Energy Illuminator G2
with other controllers, please consult the operation manual for
these controllers on how to include Z-Wave products into an
existing network.
While the Micro Smart Energy Illuminator G2 is powered in a
3-wire system, the external switch/button can be toggled to
initiate pairing into the Z-Wave network. Or the internal button
can be pushed to initiate pairing into the Z-Wave network, if
Micro Smart Energy Illuminator G2 was not put into in-wall
box.
if it is currently not paired into a Z-Wave network.
Adding/Including/Pairing the
Micro Smart Energy Illuminator
G2 into a Z-Wave Network
Page 7

17-08-13
Micr o Smart Dimmer 2E manual - Aeotec
aeotec.com/z-wave-in-wall- switches/877-micro-sei-2e-manual-instructions.html
7/10
Troubleshooting
If the Aeotec Micro Smart Energy Illuminator G2 was not
successfully included into any Z-Wave network, the LED will
be blinking slowly continually. If the Aeotec Micro Smart
Energy Illuminator G2 was successfully included to a Z-Wave
network, the Status Indication LED will either be solid on or
off (depending on if the switch is on or off).
Press the button labeled “Remove” on the Aeotec Minimote
to begin the Z-Wave removal process.
Note
Removing/Resetting the Micro
Smart Energy Illuminator G2
from your Z-Wave Network
Page 8

17-08-13
Micr o Smart Dimmer 2E manual - Aeotec
aeotec.com/z-wave-in-wall- switches/877-micro-sei-2e-manual-instructions.html
8/10
To remove the Aeotec Micro Smart Energy Illuminator G2
from other controllers, please consult the operation manual
for these controllers on how to remove Z-Wave products from
an existing network.
While the Micro Smart Energy Illuminator G2 is powered in a
3-wire system, the external switch/button can be toggled 10
times in quick succession to initiate removing from the Z-
Wave network. or the internal button can be pushed to initiate
pairing into the Z-Wave network, if Micro Smart Energy
Illuminator G2 was not put into in-wall box.
Troubleshooting
If the Aeotec Micro Smart Energy Illuminator G2 was
removed from the Z-Wave network, the Status Indication LED
will be blinking. If the Aeotec Micro Smart Energy Illuminator
G2 was not successfully removed from the Z-Wave network,
the Status Indication LED will either be solid on or off
(depending on if the switch is on or off).
Note
Another way to reset Aeotec Micro Smart Energy Illuminator
G2 is pressing and holding the button which is on Micro
Smart Energy Illuminator G2 20 seconds, if Micro Smart
Energy Illuminator G2 was not put into in-wall box.
Turning On/Off/Dim the Micro
Page 9

17-08-13
Micr o Smart Dimmer 2E manual - Aeotec
aeotec.com/z-wave-in-wall- switches/877-micro-sei-2e-manual-instructions.html
9/10
Smart Energy Illuminator G2
Use any of the below methods to allow power through or cut
power from the Micro Smart Energy Illuminator G2.
Through the usage of Z-Wave commands built into ZWave certified controllers and gateways. (The specific ZWave commands supporting this function are the Basic
Command Class
Pressing the button on the Micro Smart Energy Illuminator
G 2 will toggle power flow (on/off) through the Micro
Smart Energy Illuminator G2. By holding the button, the
lamp will be dimmed up or down.
Change Mode on the External
Switch/Button Control
The Aeotec Micro Smart Energy Illuminator G2 is set to
be controlled via 2-state(flip/flop) external wall switch by
default. Pushing and holding the button 6 seconds on the
Micro Smart Energy Illuminator G2 will swap between this
default mode and the momentary push button external
wall switch mode.
Through the usage of Z-Wave command built into Z-Wave
certified controllers and gateways. (The specific Z-Wave
command supporting this funtion is Configuration
Command Class) Please consult the operation manual
for these controllers for specific instructions on changing
external wall switch mode of the Aeotec Micro Smart
Energy Illuminator G2.
Monitoring Energy
Consumption
The Aeotec Micro Smart Energy Illuminator G2 can report
wattage energy usage or kWh energy usage to a Z-Wave
gateway or controller when requested. If this function is
supported by the gateway/controller, the energy consumption
will be displayed in the user interface of the
gateway/controller. (The specific Z-Wave commands
supporting energy monitoring are the Meter Command
Page 10

17-08-13
Micr o Smart Dimmer 2E manual - Aeotec
aeotec.com/z-wave-in-wall- switches/877-micro-sei-2e-manual-instructions.html
10/10
Class. Automatic reports are sent to association group 1,
which is setup via the Association Command Class.) Please
consult the operation manual for these gateways/controllers
for specific instructions on monitoring the Micro Smart
Energy lluminator G2.
Note
The Micro Illuminator G2 (without the words “Smart Energy”)
does not have the ability to monitor energy consumption.
 Loading...