

AEO Photo Micro Pro 3.0 User Manual

AEO Lightning Strike! Pro Trigger Micro Series Version 3.0
The AEO Lighting Stri k e! Pr o is a Lightning Shutter Trigger. Enhancements in our “Pr o” series tr iggers
include bot h sensitivity over ride adjustment, as well as a locking hot shoe / tri pod m ount.
Lightning Mode:
Test your new device right out of the box: Set the mode switch to “Lightning”. Turn the power on. The
red LED will flash every time the device triggers. It’s normal for it to trigger once on power up. If it
continues to trigger, check for light sources leaking into the room. (If you cover the window of the
device with your hand, it should not trigger). Set off a camera flash (using another camera or a flash
attachment). The flash should trigger the device.
Manual adjustment of the sensitivity is accomplished by adjusting the “trim screw” accessible on the left
side of the device (looking from above). The port in the aft position is the sensitivity adjustment. (The
“forward port” is your cable connection). The Sensitivity Trim is a SINGLE TURN adjustment. CAUTION:
DO NOT ATTEMPT TO FORCE THE ADJUSTMENT BEYOND IT’S MECHANICAL STOPS. DOING SO MAY
DAMAGE THE SENSITIVITY ADJUSTMENT. Use a small jeweler’s screwdriver standard or Phillips) to
make the adjustments. Full CLOCKWISE sets the sensitivity at 120% of the factory set point. Full
COUNTER CLOCKWISE sets the sensitivity at 20% of the factory set point. We recommend for most
situations to use the normal set point which is approximately ¼ turn CCW from the full sensitivity point.
Other photography scenarios may dictate different settings at the professional photographer’s
discretion.
Theory of Operation: The device triggers on the first bolt it det ec ts. Your camera shutter mechanism is
not fast enough to cat c h that fir st bolt, but fortunately, most bolts are followed by m any m ore. Thus, you
want to have the camera shutt er open for a fairly long time to capture those subsequent bol ts (we’ve used
10 seconds with good result s).
Photographing Lightning is as much Art as it is Science. Getting the right c onditions and settings can be
challenging, and some folks have a better knack for it than others. But to get you started, here ar e some
basic “recommendat ions”:
1. The camera should be mounted on a tripod. You want it stable during the exposure.
2. Mount the device in your camer a’s hot shoe mount with the red semi-clear window facing the
direction you ar e photographing. Insert the supplied plug int o your cam er a r em ote shutt er
interface.
3. Point the camera at the storm or in the direc tion you see lightning activity.
4. Set your Auto Focus feature to OFF or Disable.
5. Set the focus to infinit y . (If the lightning is closer than that, you’re too close to it!!!)
6. We’ve found that when photographi ng lightning at night, an f-stop of 5.6 works well.
7. Shutter speed should be long, example around 10 seconds. (This won’t work during the day . For
daytime shots, don’t exceed 1 second and you’ll need a smaller apertur e/ larger f-stop as well ) .
AEOPhoto Page 1 of 2 Revised:7-May-12
8. Turn the lightning trigger device power on FIRST before you power up the camer a. (When the
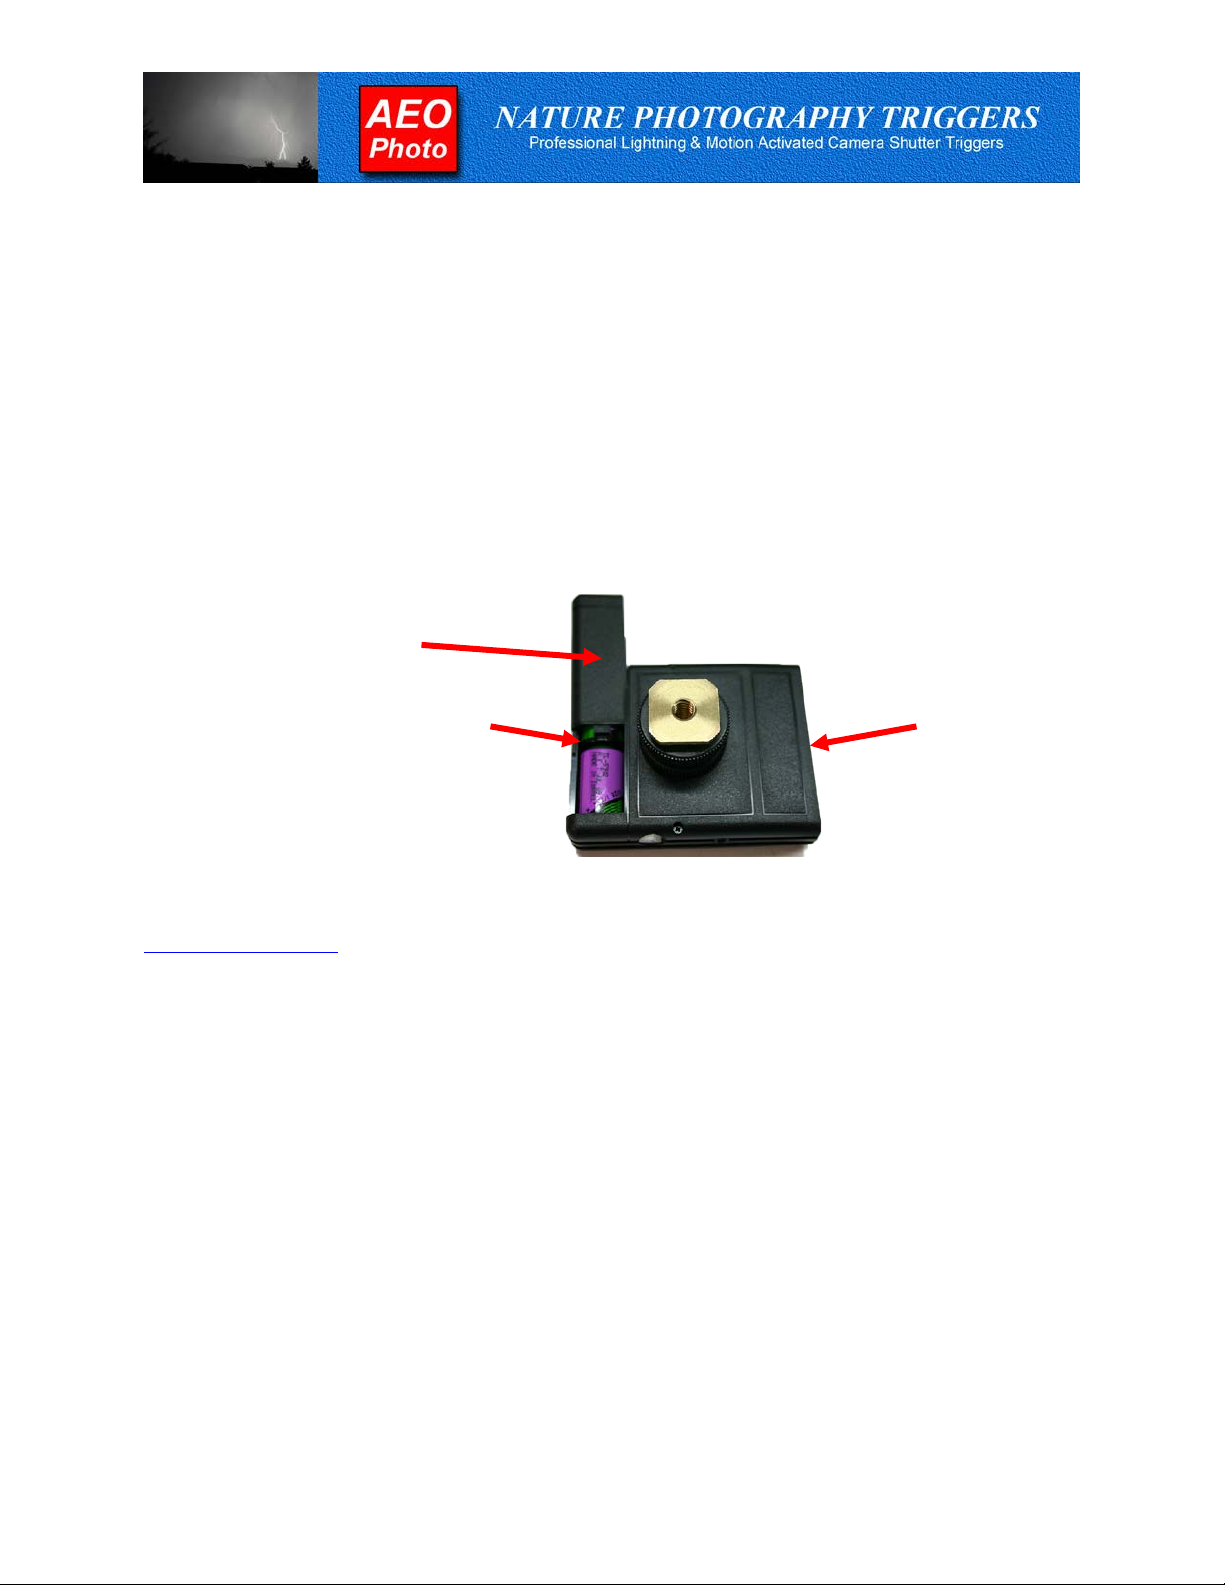
Front of Micro Trigger
•
trigger is first tuned on, it will trigger once on power up . . . not a big deal for digital photogr aphy ,
but if you use film, you’ll lose one fr am e.)
9. Avoid using your cell phone near the device while it’s operating. Your light ning shutter trigger is
a sensitive devi c e and can be tri gger ed inadvertently by strong, nearby RF transmissions.
10. Gr ab y our f av orite r efreshi ng beverage and wait for the show to start!
Battery Replacement:
Your LS Micro is designed to accept a variety of ½ AA batteries available where most batteries are sold.
The first set of batteries is included.
Types of batteries:
Lithium 3.6 volt ½ AA – designed for longer life
Alkaline camera batteries, such as Energizer A544 6 volt ½ AA or compatible.
Slide battery case open.
• Batteries may pop out.
• When done replacing new batteries
be sure cover in aligned properly
and gently slide back into place.
• +/- are printed on the bottom of the
battery compartment.
If you have questions, or if y ou wouldn’t mind sending us some of your photographs, contact us at
sales@aeophoto.com
or by mail at 1435 Tally Ho Lane, Norco, CA 92860
HAVE FUN!
AEOPhoto Page 2 of 2 Revised:7-May-12
 Loading...