

Page 1
Aeotec by Aeon Labs Key Fob Gen5.
Remote controls revolutionised the way we
could do things. They changed the way we
watch TV. They changed the way we listen to
music. They even changed the way we park
ous cars. And then they stopped revolutionising
and instead evolved to become more and more
complex. They became bigger. They became
weighed down with too many buttons, too many
coufusing things that you could to.
Your Aeotec by Aeon Labs Key Fob Gen5 takes
the remote back to what it should be. It’s easy
to use. It’s simple. It’s small. It’s there when you
need it and it’s out of sight when you don’t. And
while your Key Fob remote is back to what it
should be, it remains forwards looking. Your
Aeotec by Aeon Labs Key Fob Gen5 has been
designed to give you everything you need from
®
a Z-Wave remote control.
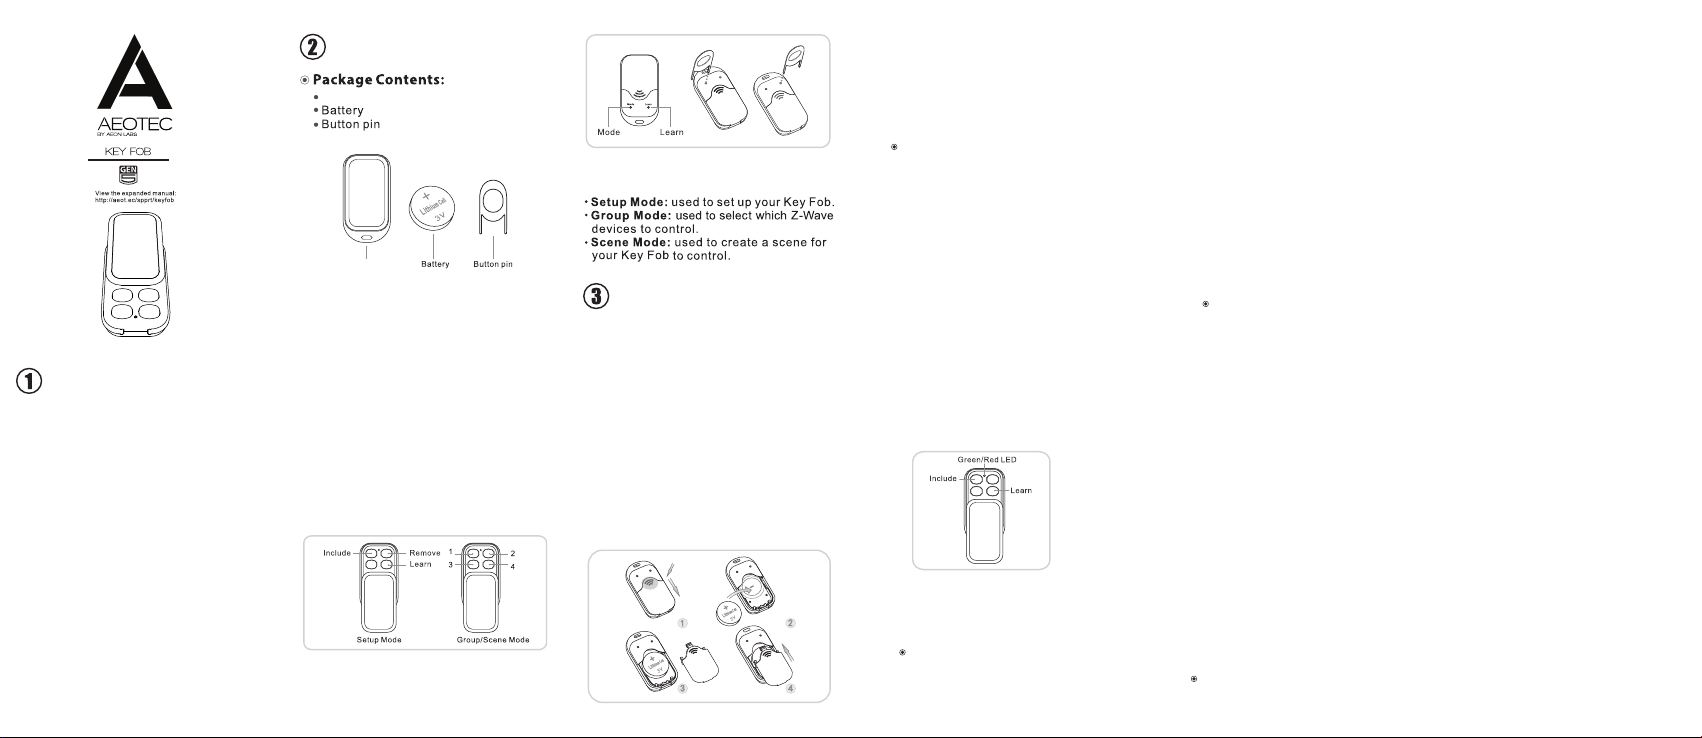
Familiarise yourself with your Key Fob
Gen5.
Key Fob Gen5
Key Fob Gen5
The compactness of your Aeotec by Aeon Labs
Key Fob Gen5 means that the one device
operates in three different modes: setup, group,
and scene modes.
When you remove it from the packaging, your
remote control is in Setup Mode. This allows
you to do everything from creating a new
Z-Wave network through to removing devices
from one. In this mode the buttons operate as
follows:
When you change your remote to be in Group
Mode or Scene Mode, the buttons operate as
follows.
For particular setup functions you’ll need to use
your remote’s Mode and Learn buttons.
Your remote’s three different modes
function as follows:
Quick start.
Your Aeotec by Aeon Labs Key Fob Gen5 is a
fully featured Z-Wave remote control and scene
controller that uses wireless tehnology to talk to
your Z-Wave network. To prepare it for both
setup and use, you’ll first need to insert its
batteries.
1.
Slide the rear battery cover away from your
remote to expose the battery compartment.
2.
Insert the provided battery into the
compartment, ensuring that the + side of the
battery, which is the flatter of the two sides
and has text, is facing up.
3.
Reattach the rear battery cover to your
remote and firmly close it.
With your Key Fob prepared for setup, it’s now
time to activate its Z-Wave functions. If you’re
adding your Key Fob to an existing Z-Wave
network, carry on with the following
instructions. If you’re creating a new Z-Wave
network with your Key Fob, then skip to ‘For a
new Z-Wave network’.
For an existing Z-Wave network
Your Key Fob works perfectly as an additional
remote control within an existing Z-Wave
network. To create this scenario, you’ll need to
be near your existing
and have the Key Fob with you.
1.
Slide open the main panel of your Key Fob
so that you can see its light.
2.
Press the Include button on your primary
Z-Wave controller. If you’re unsure of how to
do this, refer to its user manual.
3.
Using the provided Button pin, press the
Learn button on the rear Key Fob.
4.
If successful, the green and red LED on the
front of your Key Fob will alternatively blink
followed by the green LED illuminating for 2
seconds.
5.
If unsuccessful, the red LED will illuminate
for 2 seconds. Of this occurs, repeat the
process again ensuring that your
Z-Wave controller is in Include mode.
Your Key Fob will now work as a remote control
within your Z-Wave network. Skip to ‘From
setup to use’ to contunue configuring your Key
Fob.
primary Z-Wave controller
primary
For a new Z-Wave network
Your Key Fob can be set up as the primary
controller of a Z-Wave network. This is ideal for
a sit uation where y ou don’t already have a
Z-Wave network set up and you’re either
starting our or intending to set up only a small
system. As the primary controller of a new
Z-Wave network, your Key Fob will be able to
operate in setup and group modes.
In this case you need to associate Z-Wave
hardware(e.g.Smart Switches and Micro
Controllers) with the Key Fob. This will, by
default, set up a new Z-Wave network for you.
To create a new Z-Wave network, refer to
‘Adding devices to your Z-Wave network’ in the
Advanced Functions part of this manual, and
follow the instructions.
Once done, your Key Fob will work as a remote
control within, and the primary controller of,
your new Z-Wave network.
From setup to use
Now that your Key Fob is a part of a Z-Wave
network, It’s time to change your remote’s
mode. Your Key Fob remote control has three
key modes: Setup Mode, Group Mode, and
Scene Mode. Out of the box, it’s in Setup Mode.
Your Key Fob’s three modes change the way
that its buttons work, and you can understand
the differences between the different modes by
reading the ‘Familiarise yourself with your
remote control’ part of this guide.
To change your remote to Group Mode:
1.
Slide open the main panel of the Key Fob so
that you can see the internal light.
2.
Using the provided Button pin, press the
Mode button.
3.
The light will illuminate for a second to
confirm that the mode has been
successfully changed to Group Mode.
If you wish to change your remote’s mode to
Scene Mode, you’ll need to send it an
instruction via your gateway. If you’re unsure of
how to do this, please refer to the gateway’s
user manual.
Selecting which devices to
control: Group Mode
When using your Key Fob in Group Mode
are able to control different Z-Wave devices
with each of your remote’s 4 buttons. In Group
Mode, each button is capable of controlling up
to 50 Z-Wave devices.
During the following steps you’ll associate
Z-Wave devices with a particular button and
also determine precisely how the button will
affect the device. For instance, a button may
turn an Aeotec by Aeon Labs Micro Smart
Dimmer on to 50% brightness. As such, you
need to ensure that each Z-Wave device is not
at the same settling as the desired outcome. In
this example, before beginning, the Micro
Smart Dimmer should be turned off.
If your Key Fob
Scene Mode, follow the instructions of the
‘Changing the buttons’
your Key Fob into Group Mode.
Ensure that
control is turned off. See the introductory
paragraph above for clarification.
Take your Key Fob to within 3 metres
device you wish to remove from
network.
Slide open the main panel of your Key Fob.
Press, hold and do not release for several
steps 1 of the 4 buttons that you want
control a device. Your remote’s green LED will
blink quickly when it’s ready to associate
devices with a button.
Press the
device that you wish to control. If you’re
unsure of how to do this, refer to its user
manual.
Your remote’s green LED will stop blinking
and stay on to let you know that the device
can now be controlled by the button.
Change the Z-Wave device’s status to match
the desired outcome of the associated button’s
being pushed. For instance, turn your Z-Wave
device from off to on if that’s what you want
your Key Fob’s button to do. Should the device
have degrees of functionality, such as lighting
that can be dimmed or blinds that can be half
opened, set the Z-Wave device to the desired
level.
is in either Setup Mode or
mode’ section to put
the Z-Wave device you want to
Z-Wave network button on the
you
of the
your Z-Wave
to use
Page 2
Release the button that you’re holding down
9.
on your Key Fob.
10.
Repeat the above steps to associate further
Z-W
ave devices with any of your Key Fob’s
buttons.
Using your Key Fob: Controlling a group
With Z-Wave devices now associated with your
Key Fob’s action buttons, your Key Fob will now
work akin to a normal remote control. You push
a button to control a device. However, unlike a
normal remote control. pushing a button on
your Key Fob might not simply turn a device on
or off. Instead it will change to match the status
that you selected in part 8 of the ‘Selecting
which devices to control: Group Mode’ section
of this guide. Accordingly, it might turn a light on
or off, or it might dim one to 50% brightness.
There is an additional functionality built into
each of your Key Fob’s action buttons that you
may choose to use-dimming. When held down,
the action button will send up and down
instructions to any compatible Z-Wave devices
it is associated with. With a dimmable light,
holding down an action button would see it
brighten or dim depending on its current level of
brightness. With a motorised blind, the same
functionality would tell the blind to open or
close.
Advanced functions.
Adding devices to your Z-Wave network
When your Key Fob has been setup as your
Z-Wave network’s primary controller, it’s able to
add Z-Wave devices to your network.
1.
If your Key Fob is in either Group Mode or
Scene Mode, follow the Instructions of the
‘Changing the buttons’ mode’ section to put
your remote control into Setup Mode.
2.
Take your Key Fob to within 3 metres of the
device you wish to add to your Z-Wave
network.
3.
Slide open the main panel of your Key Fob
and press the Include button. Your Key
Fob’s green light will blink. If the red light
illuminates for 2 seconds before turning off,
then your Key Fob has been set up as a
secondary controller of your Z-Wave
network and is not able to add new devices
to your network.
4.
Press the Z-Wave network button on the
device that you wish to add. If you’re unsure
of how to do this, refer to its user manual.
Once the device has been included, the
5.
green light on your Key Fob will
seconds then begin to pulse again. If the
device wasn’t successfully added, the red
light on the Key Fob will stay lit for 2
seconds before the red light begins blinking
again.
6.
Repeat from step 2 for any other devices
you wish to add to your network.
7.
Once you’re finished, press any button on
the Key Fob to exit this inclusion mode.
stay lit for 2
Removing devices from your Z-Wave
network
When your Key Fob has been setup as your
Z-Wave network’s primary controller or in the
case that your network’s existing controller
allows it, your Key Fob remote control is able to
permanently remote Z-Wave devices from your
network.
If your Key Fob is in either Group Mode or
1.
Scene Mode, follow the instructions of the
‘Changing the buttons’ mode’ section to put
your Key Fob into Setup Mode.
2.
Take your Key Fob to within 3 metres of the
device you wish to remove from your
Z-Wave network.
Slide open the main panel of your Key Fob
3.
and press the Remove button. Your Key
Fob’s red LED will pulse. If the red LED
illuminates for 2 seconds before turning off
then your Key Fob has been set up as a
secondary controller of your Z-Wave
network and is not able to removes devices
from your network.
Press the Z-Wa ve network button on the
4.
device that you wish to remove. If you’re
unsure of how to do this, refer to its user
manual.
Once the device has been removed from the
5.
network, the green LED on your Key Fob will
stay lit for 2 seconds then the red LED
again. If the removal wasn’t successful , the
red LED on the Key Fob will stay lit for 2
seconds. If this is the case, please repeat
the process from step 1 ensuring that your
primary Z-Wave controller is in its removal
mode.
6.
Repeat step 2 for any other devices you
wish to remove from your network.
7.
Once you’re finished, press any button on
your Key Fob to exit device removal mode.
blink
Associate devices with action buttons in
Scene Mode
When using your Key Fob in Scene Mode you
are abel to control multiple Z-Wave devices
with each of your remote’s 4 buttons. In Scene
Mode,
each button is capable of controlling two
scenes. Each scene can contain 1 to 5 Z-Wave
devices.
To configure each scene, you’ll need to use
your gateway, Please refer to the relevant
section of its manual to do this.
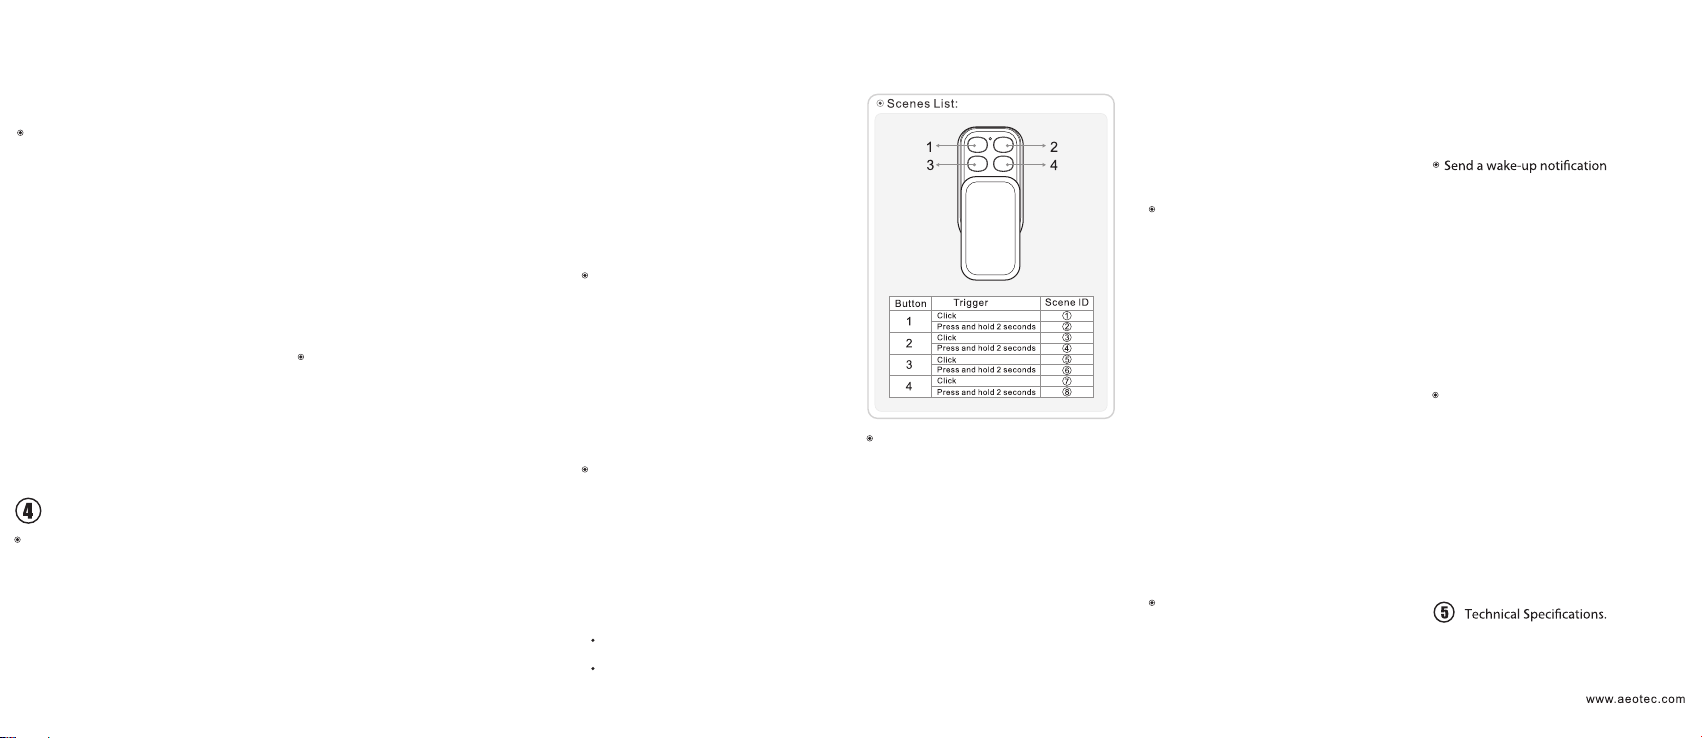
Using your Key Fob: Controlling a scene
With your Key Fob now in Scene Mode it’s time
to familiarise yourself with using it by controlling
scenes. Your Key Fob have 4 action buttons.
When in Scene Mode, each of these buttons is
capable of controlling 2 different scenes, called
the primary and secondary scene. Both of
these scenes can include up to 5 Z-Wave
devices.
You can use each scene as follows:
To use the primary scene, click an action
button
To use a secondary scene, press and hold
an action button for 2 seconds before
releasing
Each of the 8 scenes has a unique number, 1
through 8. This number is only important for
operating a scene should your gateway require
it.
Disassociating devices from a button
There may come a time when you want to
disassociate a device from a button on your
Key Fob.
1.
If your Key Fob is in either Setup Mode or
Scene Mode, follow the instructions of the
‘Changing the buttons’ mode’ section to put
your Key Fob into Group Mode.
2.
Take your Key Fob to within 3 metres of the
device you wish to remove from your
Z-Wave network.
3.
Slide open the main panel of your Key Fob.
4.
Press, hold and do not release for several
steps the button that you want to
disassociate the Z-Wave device from. Your
remote’s green LED will blink quickly when
it’s ready to remove devices from an action
button.
5.
Press the Z- Wave network button on the
device that you wish to disassociate. If
you’re unsure of how to do this, refer to its
user manual.
6.
Once your remote’s green LED has stopped
blinking and its red LED has illuminated for 2
seconds, release the button you held down
several steps ago.
7.
The Z-Wave device has now been
disassociated with the selected button.
Repeat the above steps to disassociate
8.
other Z-Wave devices.
Remove your Key Fob from your Z-Wave
network
To remove your Key Fob from your Z-Wave
network, effectively removing its ability to
control your network:
1.
Slide open the main panel of your Key Fob
so that you can see its light.
2.
Press the Exclude button on your
primary Z-Wave cont roller. If you’re
of how to do t his, refer to its u ser
unsure
manual.
3.
Using the provided Button pin, press the
Learn button on t he rear Key Fob.
4.
If s uccessful, the green and red LE D on
the front of your Key Fob will
alternatively blink followed by the green
LED illuminating for 2 seconds.
5.
If unsuccessful, the red LED will
illuminate for 2 seconds. If t his occurs,
repeat the process again ensuring that
your primary Z-Wav e controller is in
Exclude mode.
Your Key Fob has now been removed from your
Z-Wave network and a factory default reset of
your remote, as described in the following
section, has been automatically performed.
Resetting your Key Fob
If you ever want to completely reset your Key
Fob’s settings, you can.
1.
Slide open the main panel of your Key Fob
so that you can see its light.
2.
Using the provided B utton pin, press and
hold the Mode B utton for 20 s econds.
3.
If s uccessful, the green and red LE D on
the f ront of your remote
in an alternat e pattern followed b y the
green LE D illuminating f or 2 seconds .
4.
If unsuccessful, the red LED will
illuminate for 2 seconds. If t his occurs,
repeat the process again.
Some Z-Wave gateways will require you to
send a wake-up notification from your Key Fob
in order for it to receive configuration
information. To do this:
1.
Slide open the main panel of your Key
Fob so t hat you can see i ts light .
2.
Using the provided B utton pin, press and
hold the Learn B utton for 3 seconds.
3.
If successful, t he green LED will
illuminate. Your Key Fob will now stay
awake while it receives configurat ion
commands from your gateway bef ore
putting it self back to sleep.
control will blink
Tip: Changing the battery
Batteries eventually do run out and there will
come a time when you’ll need to change your
Key Fob’s battery.
1.
Push down on the grip on the bottom and
slide the battery cover away from the
remote.
2.
Remote the existing battery.
3.
Replace it with a lithium cell CR2450 3 volt
battery by placing a new one in the battery
cover with the positive touching the plastic.
4.
Slide the battery cover back on to your
remote control.
Operating distance: Up to 300ft(100 metres)
outdoors.
Battery: lithium cell CR2450 3 volt battery.
Operating Temperature: -10℃ to + 50℃.
Vers ion:5 01008 80000 1-AA
Page 3

Warranty.
Aeon Labs warrants to the original purchaser of
Products that for the Warranty Period (as
defined below), the Products will be free from
material defects in materials and workmanship.
The foregoing warranty is subject to the proper
installation, operation and maintenance of the
Products in accordance with installation
instructions and the operating manual supplied
to Customer. Warranty claims must be made by
Customer in writing within thirty (30) days of the
manifestation of a problem. Aeon Labs' sole
obligation under the foregoing warranty is, at
Aeon Labs' option, to repair, replace or correct
any such defect that was present at the time of
delivery, or to remove the Products and to
refund the purchase price to Customer.
The "Warranty Period" begins on the date the
Products is delivered and continues for 12
months.
Any repairs under this warranty must be conducted
by an authorized Aeon Labs service representative
and under Aeon Labs' RMA policy. Any repairs
conducted by unauthorized persons shall void
this warranty.
Excluded from the warranty are problems due
to accidents, acts of God, civil or military
authority, civil disturbance, war, strikes, fires,
other catastrophes, misuse, misapplication,
storage damage, negligence, electrical power
problems, or modification to the Products or its
components.
Aeon Labs does not authorize any person or
party to assume or create for it any other
obligation or liability in connection with the
Products except as set forth herein.
Aeon Labs will pass on to Customer all
manufacturers' Material warrant ies to t he
extent that they are transferable, but will not
independently warrant any Material.
Customer must prepay shipping and
transportation charges for returned Products,
and insure the shipment or accept the risk of
loss or damage during such shipment and
transportation. Aeon Labs will ship the repaired
or replacement products to Customer freight
prepaid.
Customer shall indemnify, defend, and hold
Aeon Labs and Aeon Labs' affiliates,
shareholders, directors, officers, employees,
contractors, agents and other representatives
harmless from all demands, claims, actions,
causes of action, proceedings, suits,
assessments, losses, damages, liabilities,
settlements, judgments, fines, penalties,
interest, costs and expenses (including fees
and disbursements of counsel) of every kind (i)
based upon personal injury or death or injury to
property to the extent any of the foregoing is
proximately caused either by a defective
product (including strict liability in tort) or by the
negligent or willful acts or omissions of
Customer or its officers, employees,
subcontractors or agents, and/or (ii) arising
from or relating to any actual or alleged
infringement or misappropriation of any
trademark, mask work, copyright, trade secret
or any actual or alleged violation of any other
intellectual property rights arising from or in
connection with the products, except to the
extent that such infringement exists as a result
of Aeon Labs' manufacturing processes.
IN NO EVENT SHALL AEON LABS BE LIABLE
FOR ANY INDIRECT, INCIDENTAL,
PUNITIVE, SPECIAL OR C ONSEQUENTIAL
patent,
Page 4

DAMAGES, OR DAMAGES FOR LOSS OF
PROFITS, REVENUE, OR USE INCURRED
BY CUSTOMER OR ANY THIRD PARTY,
WHETHER IN AN ACTION IN CONTRACT, OR
TORT, OR OTHERWISE EVEN IF ADVISED
OF THE POSSIBILITY OF SUCH DAMAGES.
AEON LABS' LIABILITY AND CUSTOMER'S
EXCLUSIVE REMEDY FOR ANY CAUSE OF
ACTION ARISING IN CONNECTION WITH
THIS AGREEMENT OR THE SALE OR USE
OF THE PRODUCTS, WHETHER BASED ON
NEGLIGENCE, STRICT LIABILITY, BREACH
OF WARRANTY, BREACH OF AGREEMENT,
OR EQUITABLE PRINCIPLES, IS EXPRESSLY
LIMITED TO, AT AEON LABS' OPTION,
REPLACEMENT OF, OR REPAYMENT OF
THE PURCHASE PRICE FOR THAT PORTION
OF PRODUCTS WITH RESPECT TO WHICH
DAMAGES ARE CLAIMED. ALL CLAIMS OF
ANY KIND ARISING IN CONNECTION WITH
THIS AGREEMENT OR THE SALE OR USE
OF PRODUCTS SHALL BE DEEMED WAIVED
UNLESS MADE IN WRITING WITHIN THIRTY
(30) DAYS FROM AEON LABS'S DELIVERY,
OR THE DATE FIXED FOR DELIVERY IN THE
EVENT OF NONDELIVERY.
THE INDEMNITY AND WARRANTY IN
ABOVE ARE EXCLUSIVE AND IN LIEU OF
ALL OTHER INDEMNITIES OR
WARRANTIES, WHETHER EXPRESS OR
IMPLIED, INCLUDING THE IMPLIED
WARRANTIES OF MERCHANTABILITY AND
FITNESS FOR A PARTICULAR PURPOSE.
FCC NOTICE (for USA)
The manufacturer is not responsible for any
radio or tv interference caused by
unauthorized modifications or change to this
equipment. Such modifications or change
could void the user’s authority to operate the
equipment.
This device complies with Part 15 of the FCC
Rules. Operation is subject to the following two
conditions:
1.This device may not cause harmful
interference
2.
This device must accept any interference
received, including interference that may
cause undesired operation.
This equipment has been tested and found to
comply with the limits for a Class B digital
device, pursuant to part 15 of the FCC Rules.
These limits are designed to provide
reasonable protection against harmful
interference in a residential installation.
This equipment generates, uses and can
radiate radio frequency energy and, if not
installed and used in accordance with the
instructions, may cause harmful interference
to radio communications. However, there
no guarantee that interference will not occur
in a particular installation. If
cause harmful interference to radio or
does
television reception, which can be determined
by turning the equipment off and on, the user
is encouraged to try to correct the interference
by one or more of the following measures:
Reorient or relocate the receiving antenna.
Increase the separation between the
equipment and receiver.
Connect the equipment into an outlet on a
circuit different from that to which the
receiver is connected.
Consul the dealer or an experienced
radio/TV technician for help.
Do not dispose of electrical appliances as
unsorted municipal waste, use separate
is
collection facilities.
this equipment
Contact your local government for information
regarding the collection systems available.
Z-Wave and Z-Wave Plus are registered trademarks of Sigma
Designs and its subsidiaries in the United States and other
countries
Version: 501008800002 AA
 Loading...