

Page 1
ZW122-A User Manual
Page 1
Water Sensor 6
[Line art drawing of Water Sensor 6 ]
Next Section
[Heading 1]FANTEM by Aeon Labs Water Sensor 6 [/Heading 1]
FANTEM by Aeon Labs Water Sensor 6 brings intelligence to a new level, one that is suited to
both safety and convenience. It contains 4 sensor probes, which would be more accurately to
detect the presence and absence of water or detect whether there is water leak in some places
of your home. The Water Sensor 6 has an inbuilt buzzer that can play alarm sounds to let you
know when the water is detected.
The Water Sensor 6 is also a security Z-Wave device that supports Over The Air (OTA)
for firmware updates.
Next Section
[Heading 1 ]Familiarize yourself with your Water Sensor 6.[/Heading
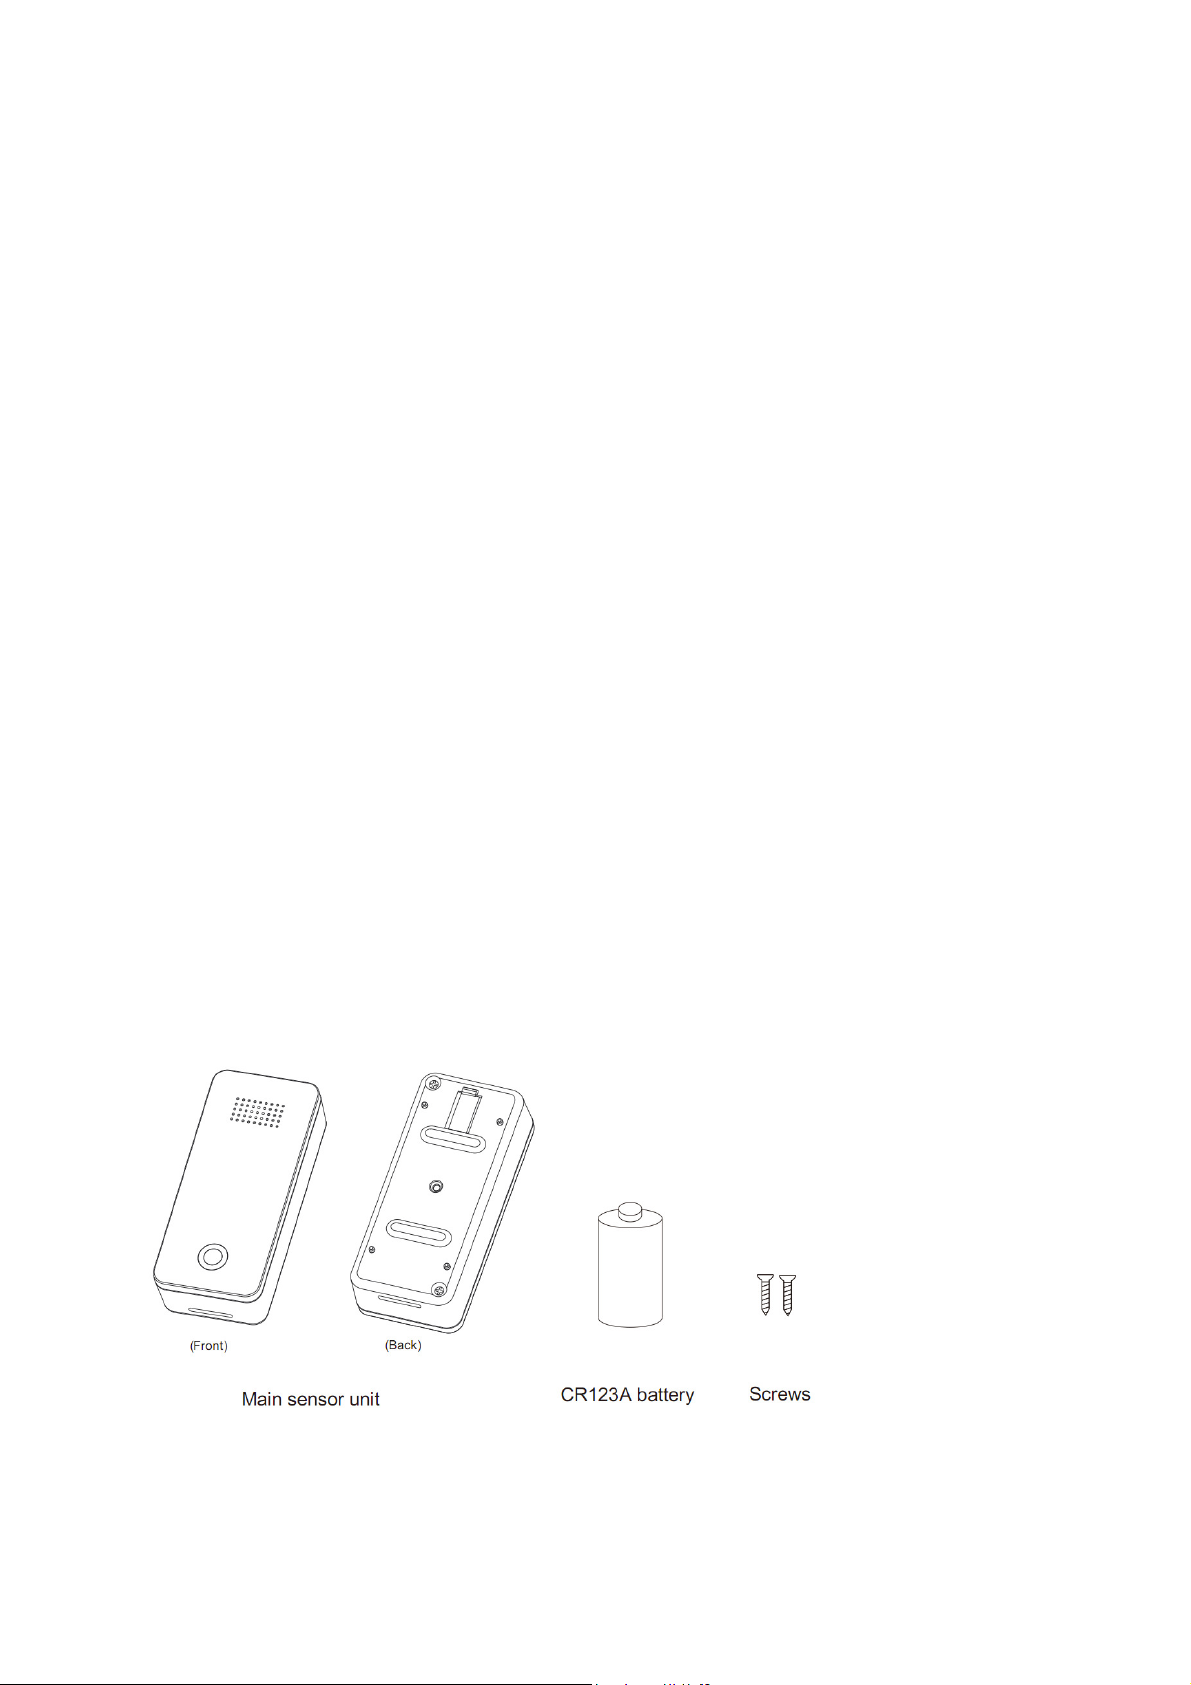
1] Package contents:
1. Main sensor unit (×1).
2. CR123A battery (×1).
3. Screw (×2).
Page 2
Next Section
[Heading 1]Quick Start.[/Heading 2]
[Heading 2]Power on your Sensor.[/Heading 2]
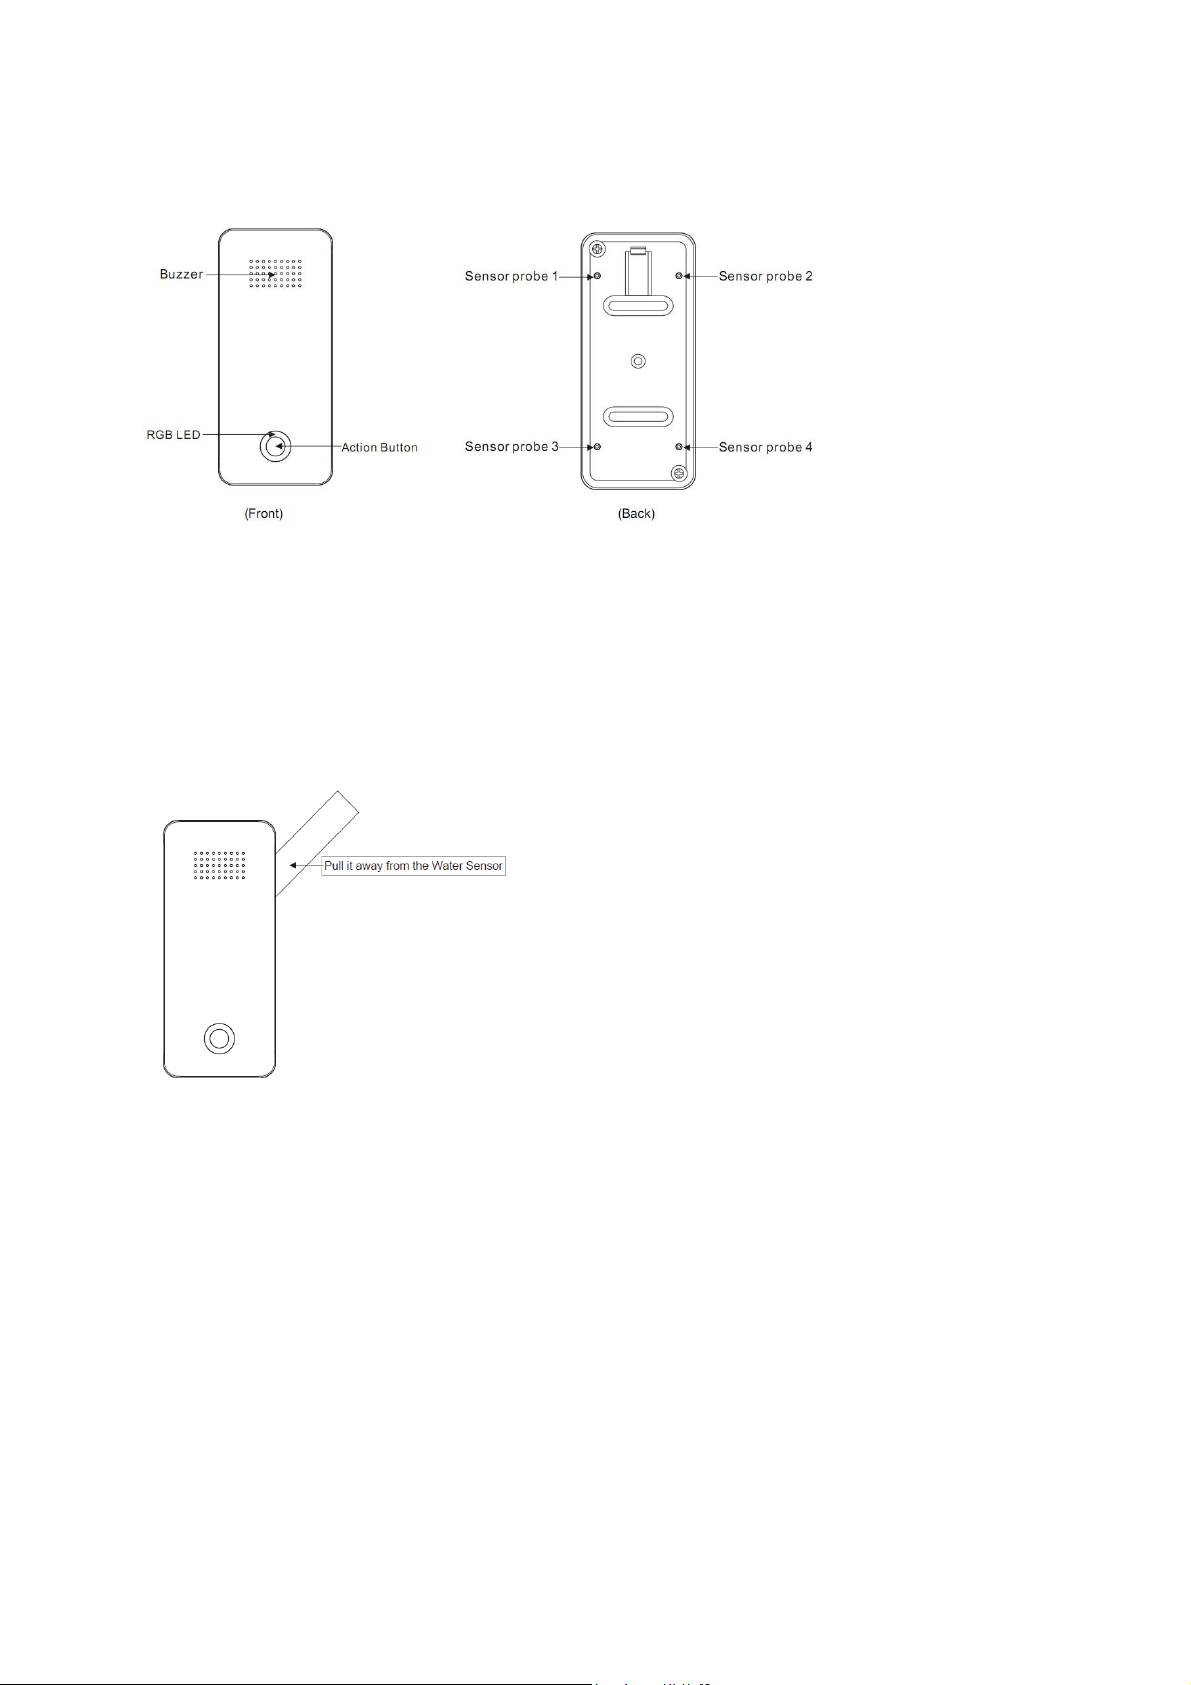
1.
Remove the clear battery insulator by pulling it away from the Water Sensor 6.
Now, you can try pressing the Sensor’s Action Button, if you can see the RGB LED blinks, which
indicates that the Sensor is powered on.
2. Secure the Sensor plate using the screws provided.
Page 3
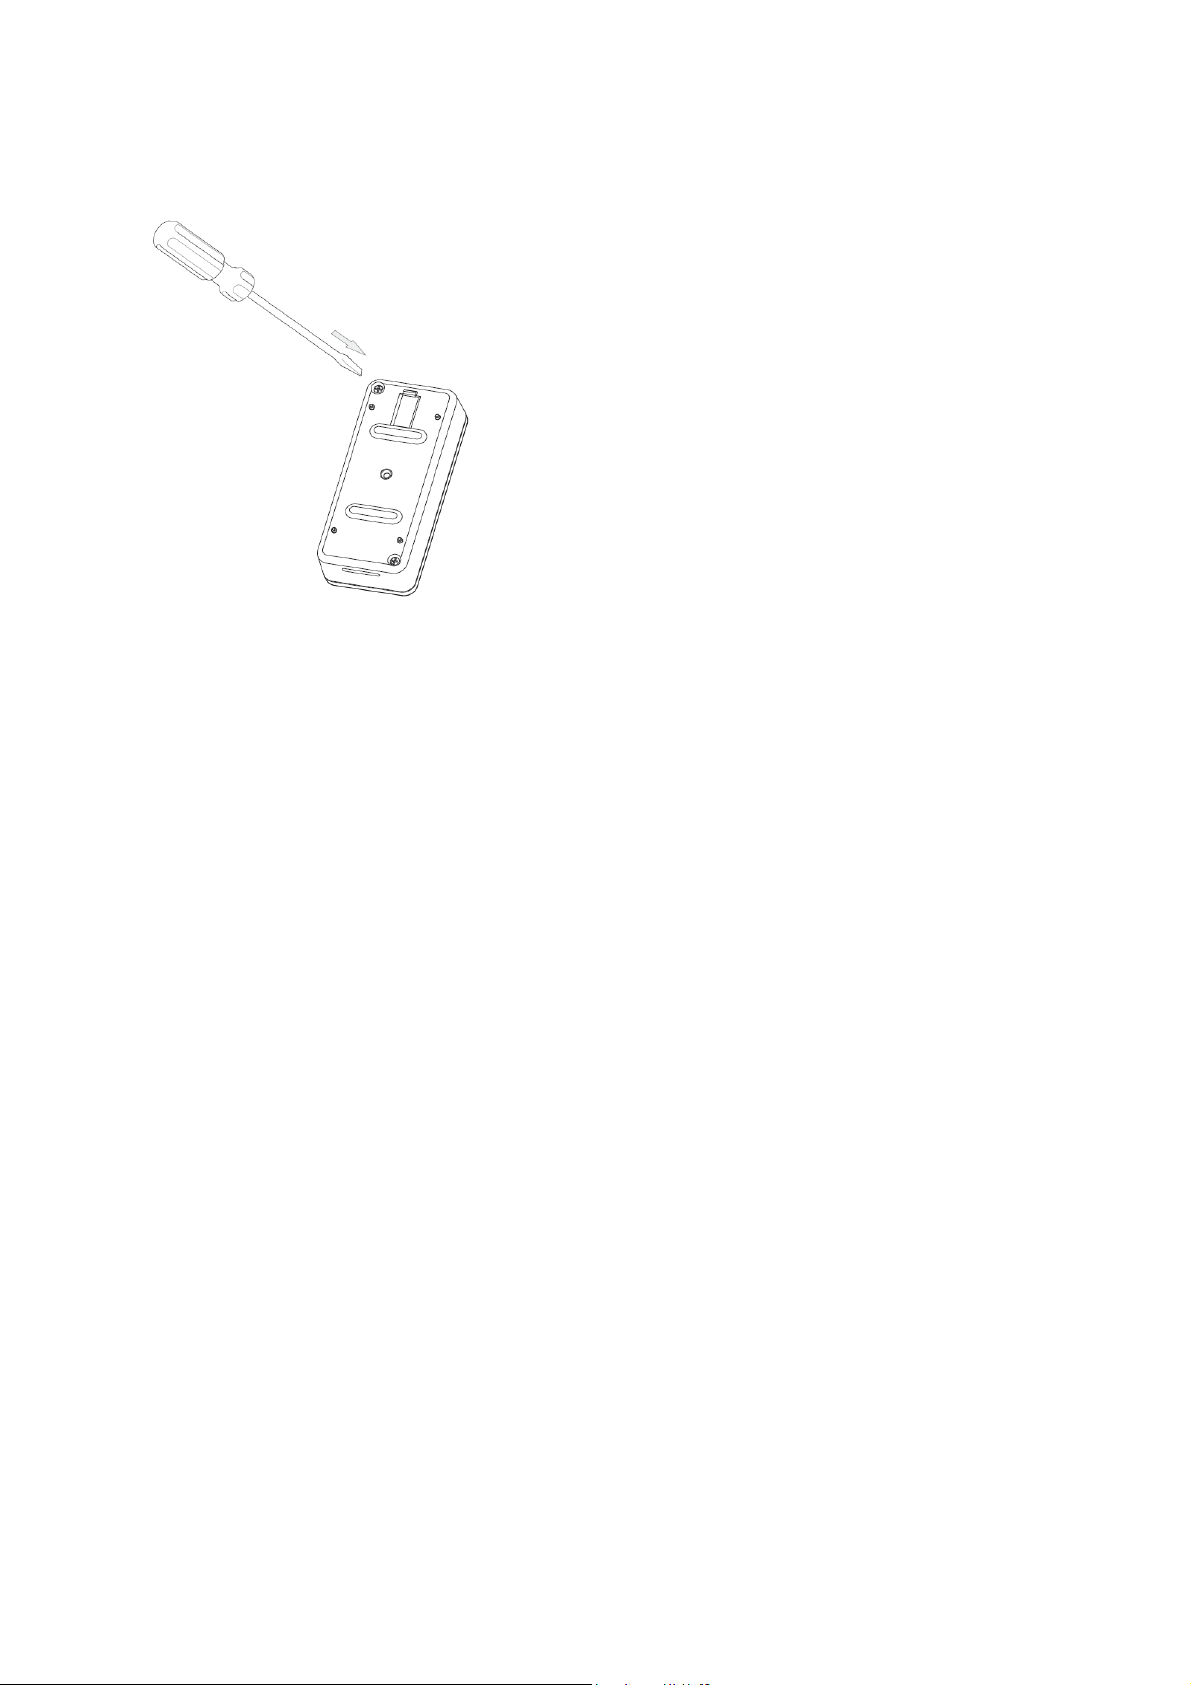
After complete the securing of the Sensor plate, your Water Sensor 6 unit will possess the
high waterproof level of IP65.
Your Water Sensor 6 also can be powered by the Dock, if you want to know more about it,
please refer to the Dock manual.
[Heading 2] Adding your Sensor to your Z-Wave network.[/Heading 2]
With your sensor is powered on, it’s time to add it to your Z-Wave network.
1. Let your Z-Wave primary controller/gateway enter into adding/inclusion mode.
2.
Take your Sensor near to your primary controller.
Press the Action Button once on your Sensor, the green LED will blin
3.
If your Water Sensor 6 has been successfully added to your Z-Wave network, its green LED will
4.
be solid for 2 seconds and then the orange LED will fast blink for 10 minutes if the Sensor does
not receive the Wake Up No More info Command from Controller. If the adding was
unsuccessful and the red LED will be solid for 2 seconds and then become colourful gradient
for a few seconds before it turns off, repeat the above steps.
k.
With your Sensor now working as a part of your smart home, you’ll be able to configure it from
your home control software or phone application. Please refer to your software’s user guide for
precise instructions on configuring the Water Sensor 6 to your needs.
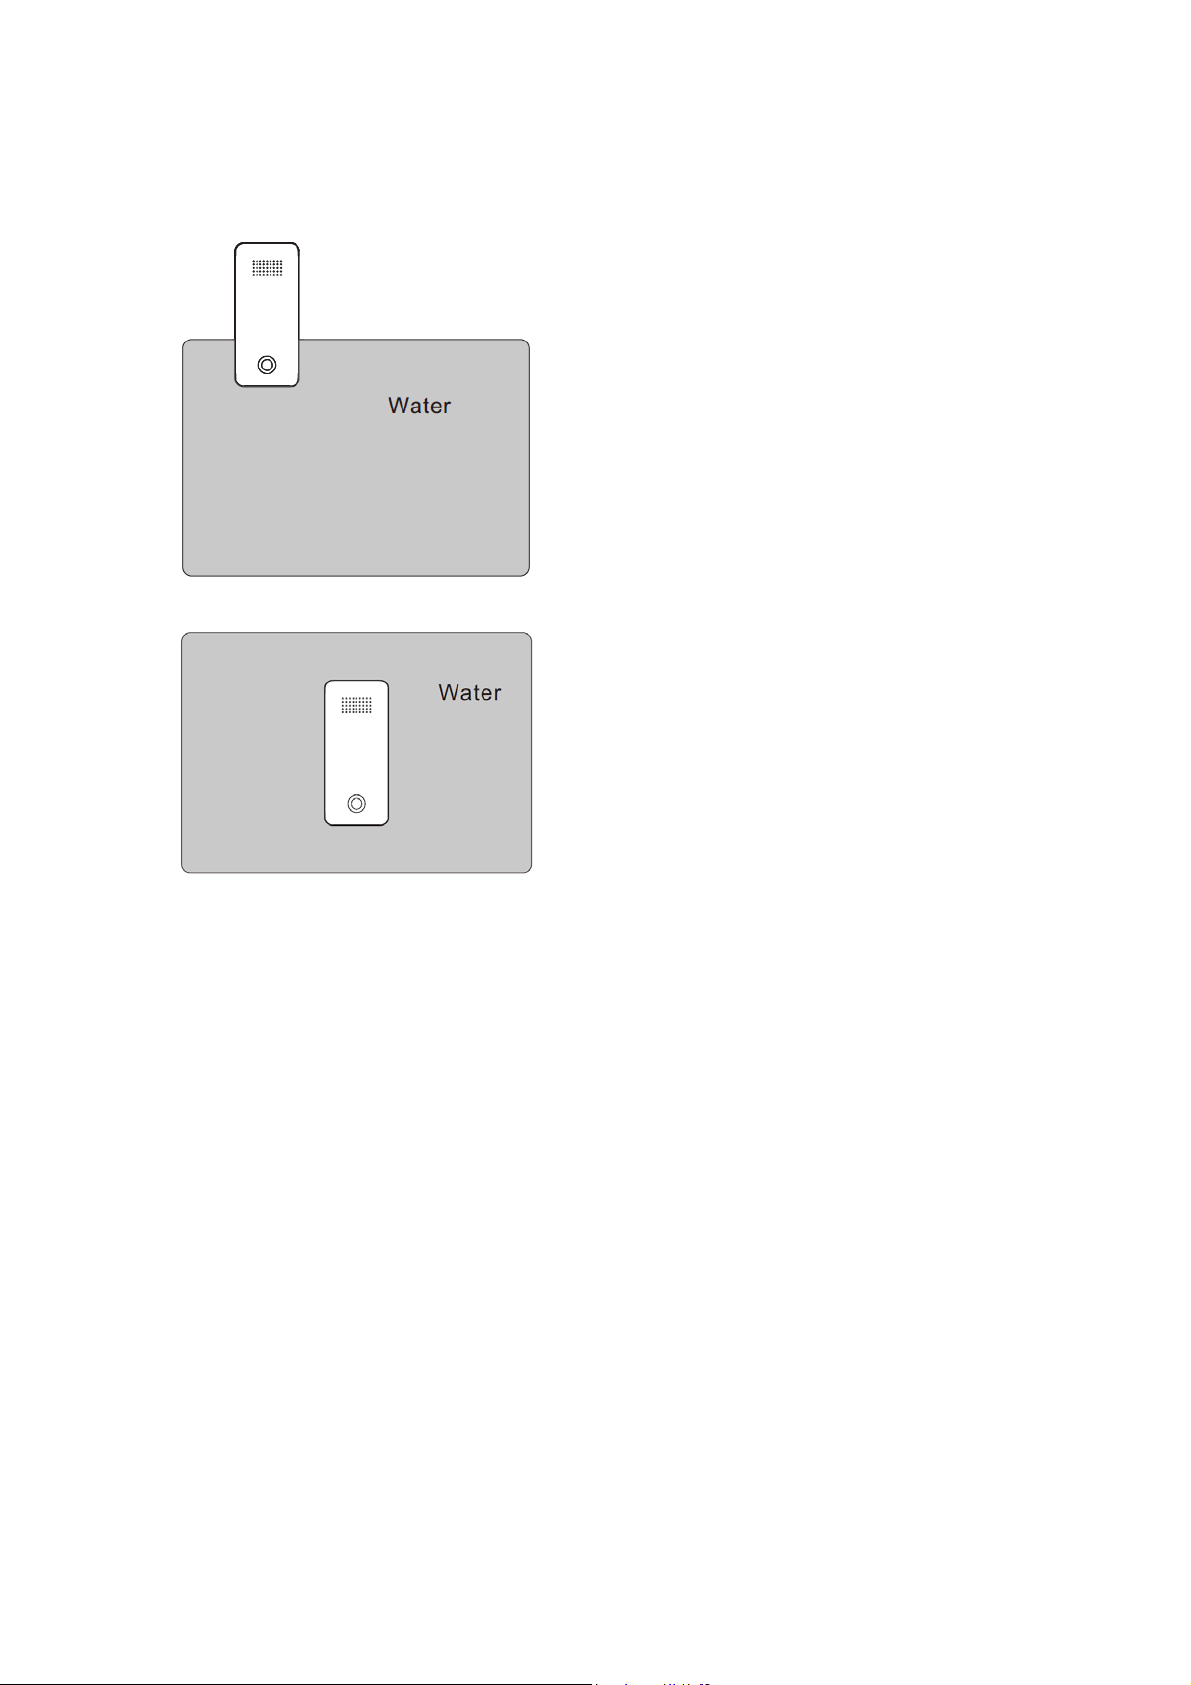
[Heading 2]Installing your Water Sensor 6 .[/Heading 2]
The installation of your Water Sensor 6 is very simple, since you just need to select where you'll
place your Water Sensor 6 in your home to detect whether there is water leakage.
For example, you can put it on the floor or somewhere of your washroom or kitchen and so on. In
case, your washroom’s water pipe is ruptured or the water leakage happens without knowing it.
However, the Water Sensor 6 detected this water leakage event, it sends out the notification
message immediately to tell your home gateway to shut off the main water gate of your home for
avoiding water leakage accident. At the same time, the buzzer keeps playing alarm sounds to tell
the people at home that the water leak is detected.
Page 4
If you want to detect whether or not there would be water leakage from the fridge, you can put
the Water Senor near to the fridge. Just note that the Water Sensor cannot be put inside the
fridge or other metal container, since the metal container will affect the signal strength of the
Sensor unit and your main controller.
[Heading 2]Some conditions of the water can be detected by the Sensor.[/Heading 2]
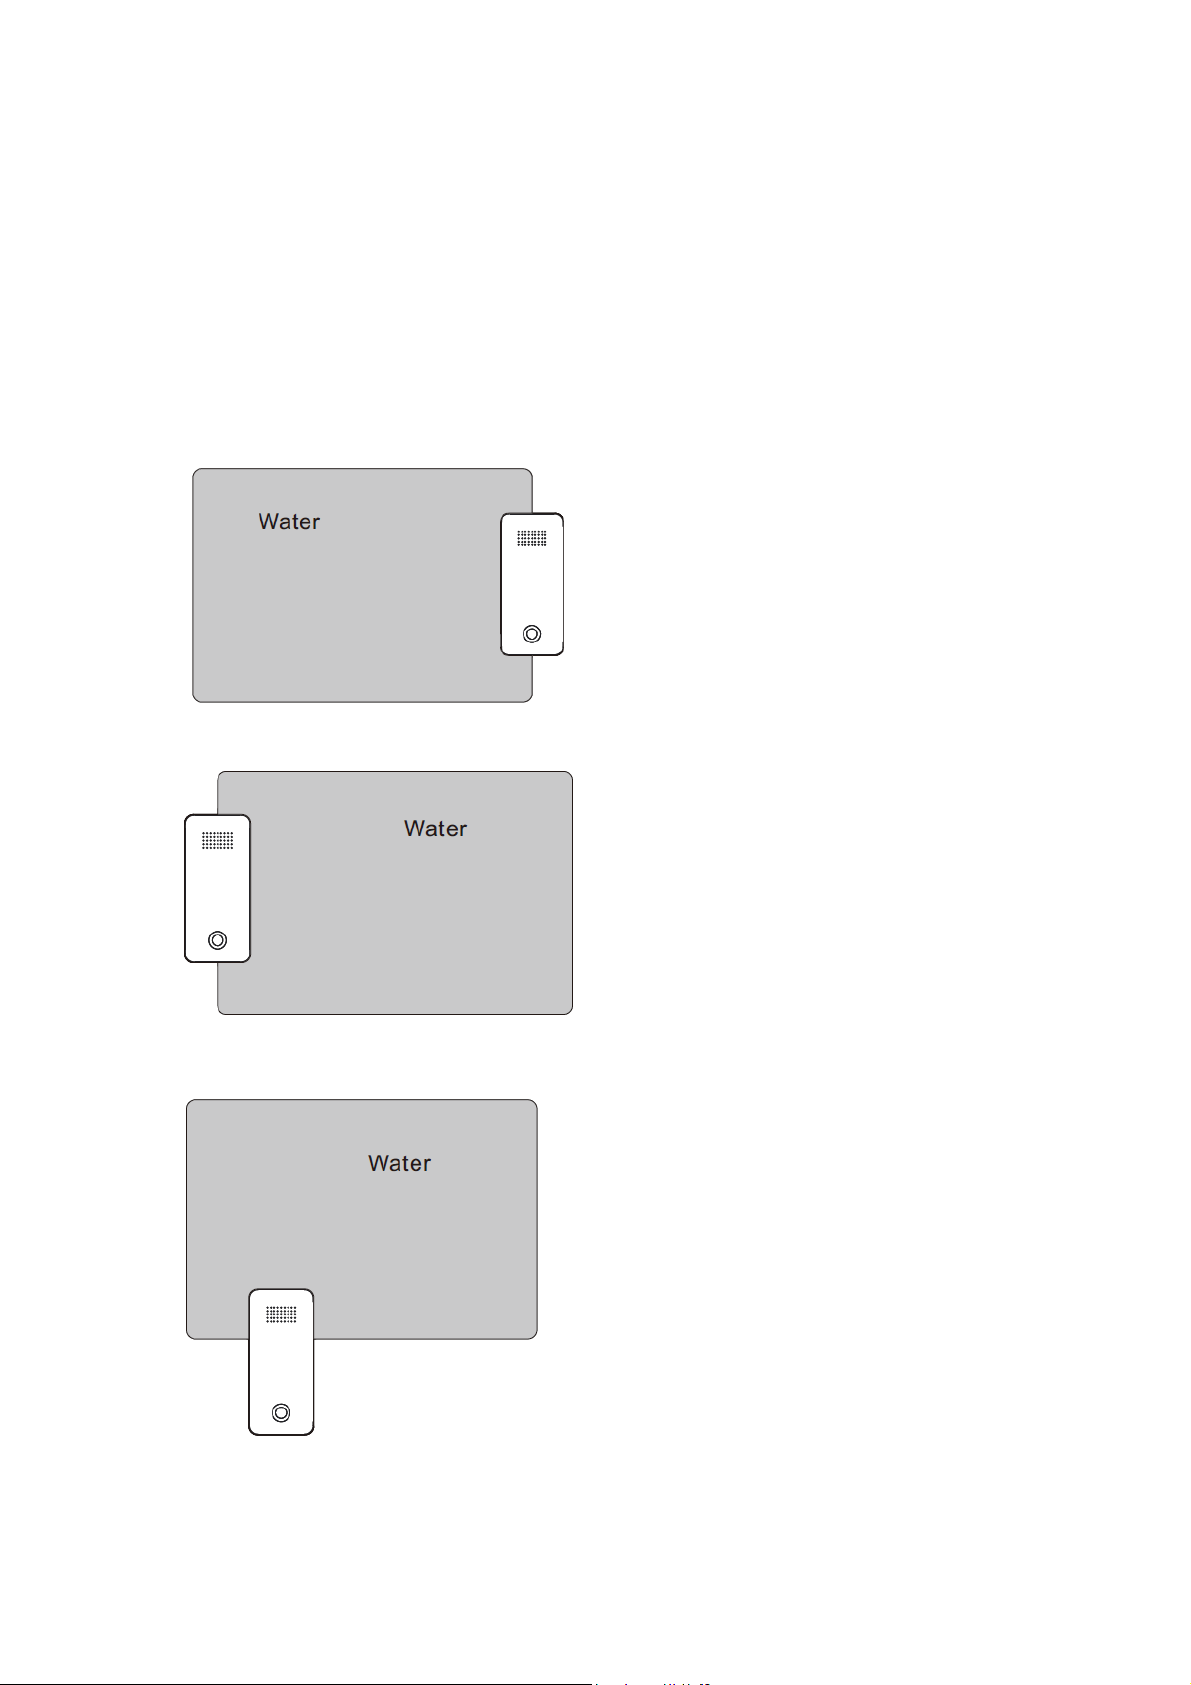
The Water Sensor 6 will be triggered when the water leak happens in below situations:
1. Water is detected by the Sensor’s probe 2 and 4
2. Water is detected by the Sensor’s probe 1 and 3
3. Water is detected by the Sensor’s probe 1 and 2
Page 5
4. Water is detected by the Sensor’s probe 3 and 4
5. Water is detected by the Sensor’s probe 1,2,3 and 4
Next Section
[Heading 1]Advanced.[/Heading 1]
[Heading 2]Send a wake up notification.[/Heading 2]
In order to send your Sensor new configuration commands from your Z-Wave controller or
gateway, it will need to be woken up.
ss the Action Button on the Sensor unit and then release the Action Button. This will trigger
1. Pre
and send a wake up notification command to your controller/gateway.
ou want your Sensor to keep awake for a longer time, press and hold the Action Button on
2. If y
the back of the Sensor unit for 3 seconds, then your Sensor will wake up for 10 minutes and the
orange LED will fast blink while it is awake.
[Heading 2]Removing your Sensor from your Z-Wave network.[/Heading 2]
Your sensor can be removed from your Z-Wave network at any time. You'll need to use your
Z-Wave network's main controller/gateway. To do this, please refer to the part of their respective
manuals that tell you how to remove devices from your network.
Page 6
Turn your primary controller into device removal mode
1.
Take the Sensor unit near to your primary controller.
2.
3. Press the Action Button on your Sensor.
4.
If your Water Sensor 6 is successfully removed from the Z-Wave network, the RGB LED
will become a colourful gradient for a few seconds and then turn off. If the removing was
unsuccessful, the blue LED will be solid for 2 seconds and then turn off, repeat the above
s
teps.
[heading 2] Security or Non-security feature of your Sensor in Z-Wave network.[/heading 2]
Including Water Sensor 6 as a non-secure device:
If you want your Sensor as a non-security device in your Z-Wave network, you just need to press
the Action Button once on Water Sensor 6 when you use a controller/gateway to add/include
your Sensor. The green LED will be on for 2 seconds and then the orange LED will fast blink for
10 minutes (if the Sensor does not receive the Wake Up No More Info command from primary
Controller) to indicate the inclusion is successful.
Including Water Sensor 6 as a secure device:
In order to take full advantage of all functionality the Water Sensor 6 , you may want your
Sensor is a security device that uses secure/encrypted message to communicate in Z-wave
network, so a security enabled controller/gateway is needed for the Water Sensor 6 to be used
as a security device. You need to press the Sensor’s Action Button 2 times within 1 second when
your security controller/gateway starts the network inclusion. The blue LED will be on for 2
seconds and then the orange LED will fast blink for 10 minutes (if the Sensor does not receive
the Wake Up No More Info command from primary Controller) to indicate the inclusion is
successful.
[heading 2]Factory reset your Sensor.[/heading 2]
If your primary controller is missing or inoperable, you may wish to reset all of your Water
Sensor’s settings to their factory defaults. To do this, press and hold the Action Button for 20
seconds and the green LED will be solid for 2 seconds and then be colourful gradient to confirm
a success.
.
[heading 2]Your Sensor’s battery.[/heading 2]
Your Water Sensor 6 has a internal lithium battery that will last about 2 years when it is in
normal use condition. If you find the Water Sensor’s battery is drained, you will need to replace
it with a new CR123A battery, refer to the below steps to replace the battery:
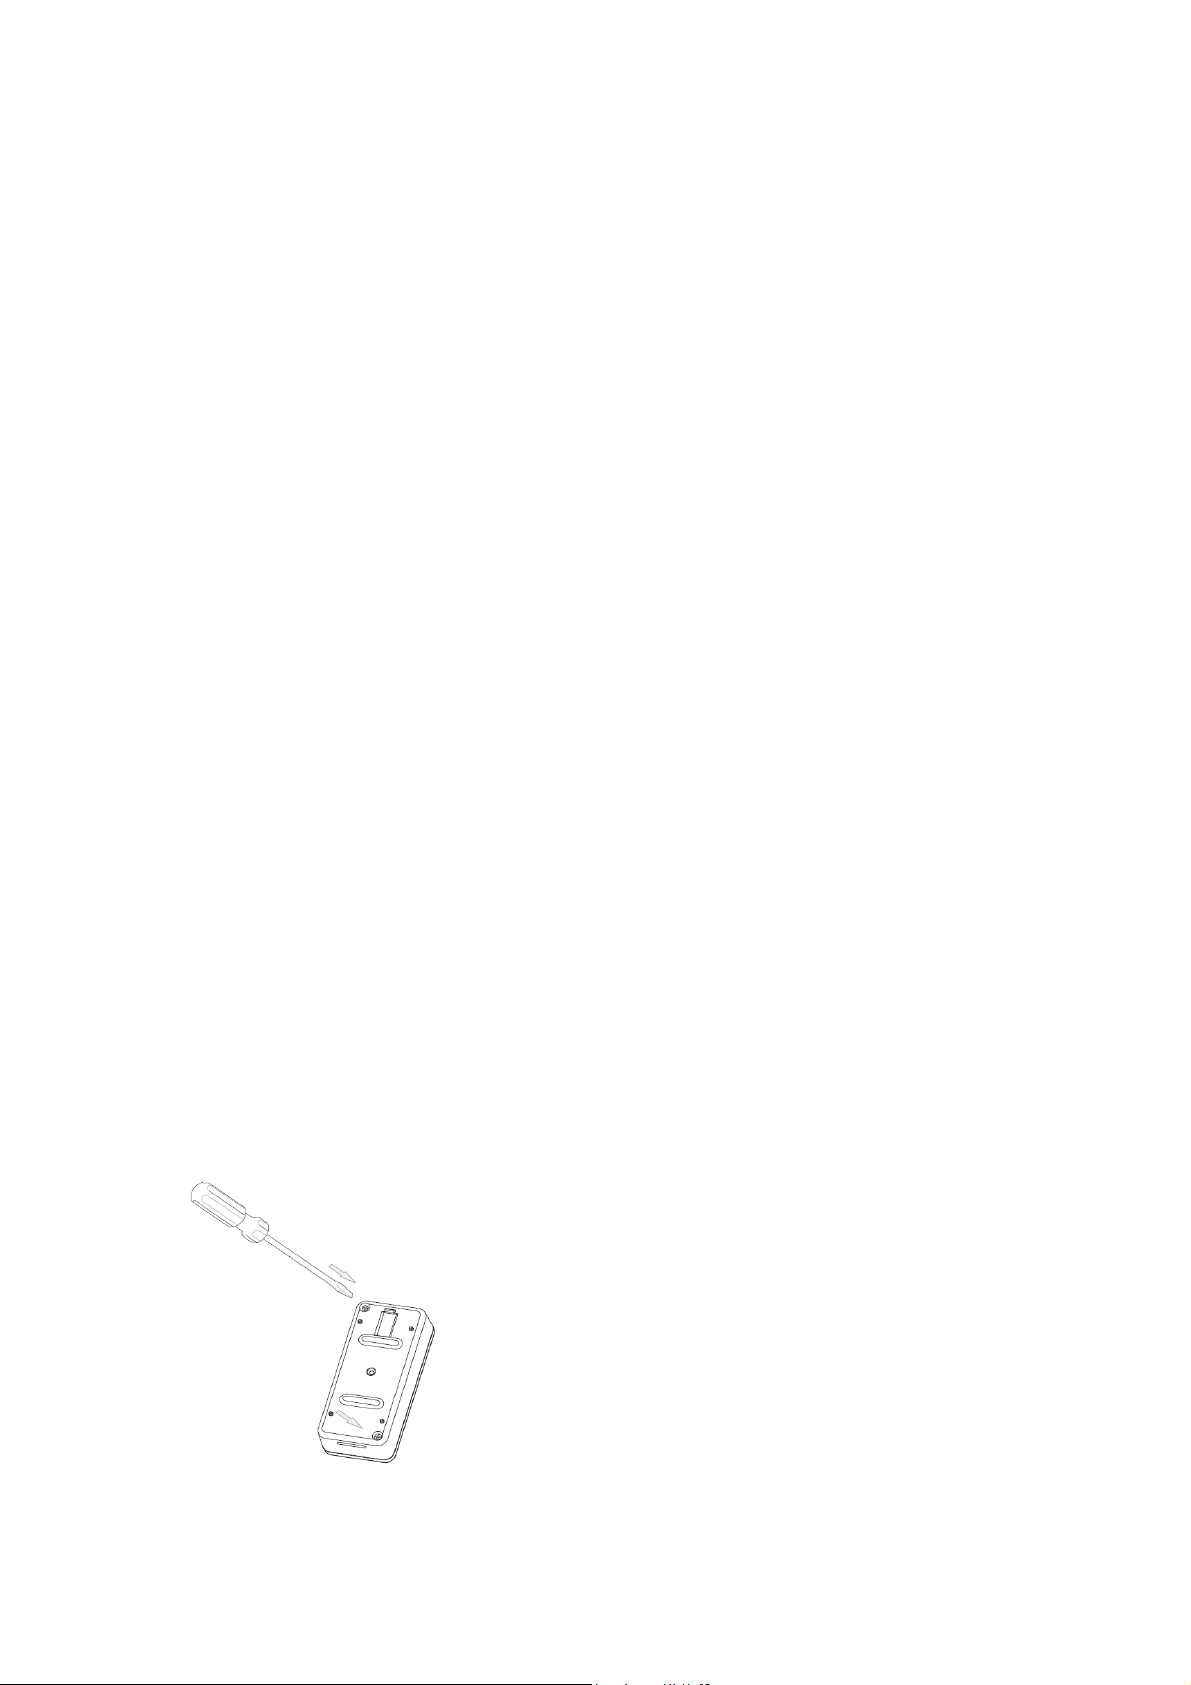
1. Unscrew the 2 screws from the Sensor.
Page 7
Separate the battery cover from the Sens
2.
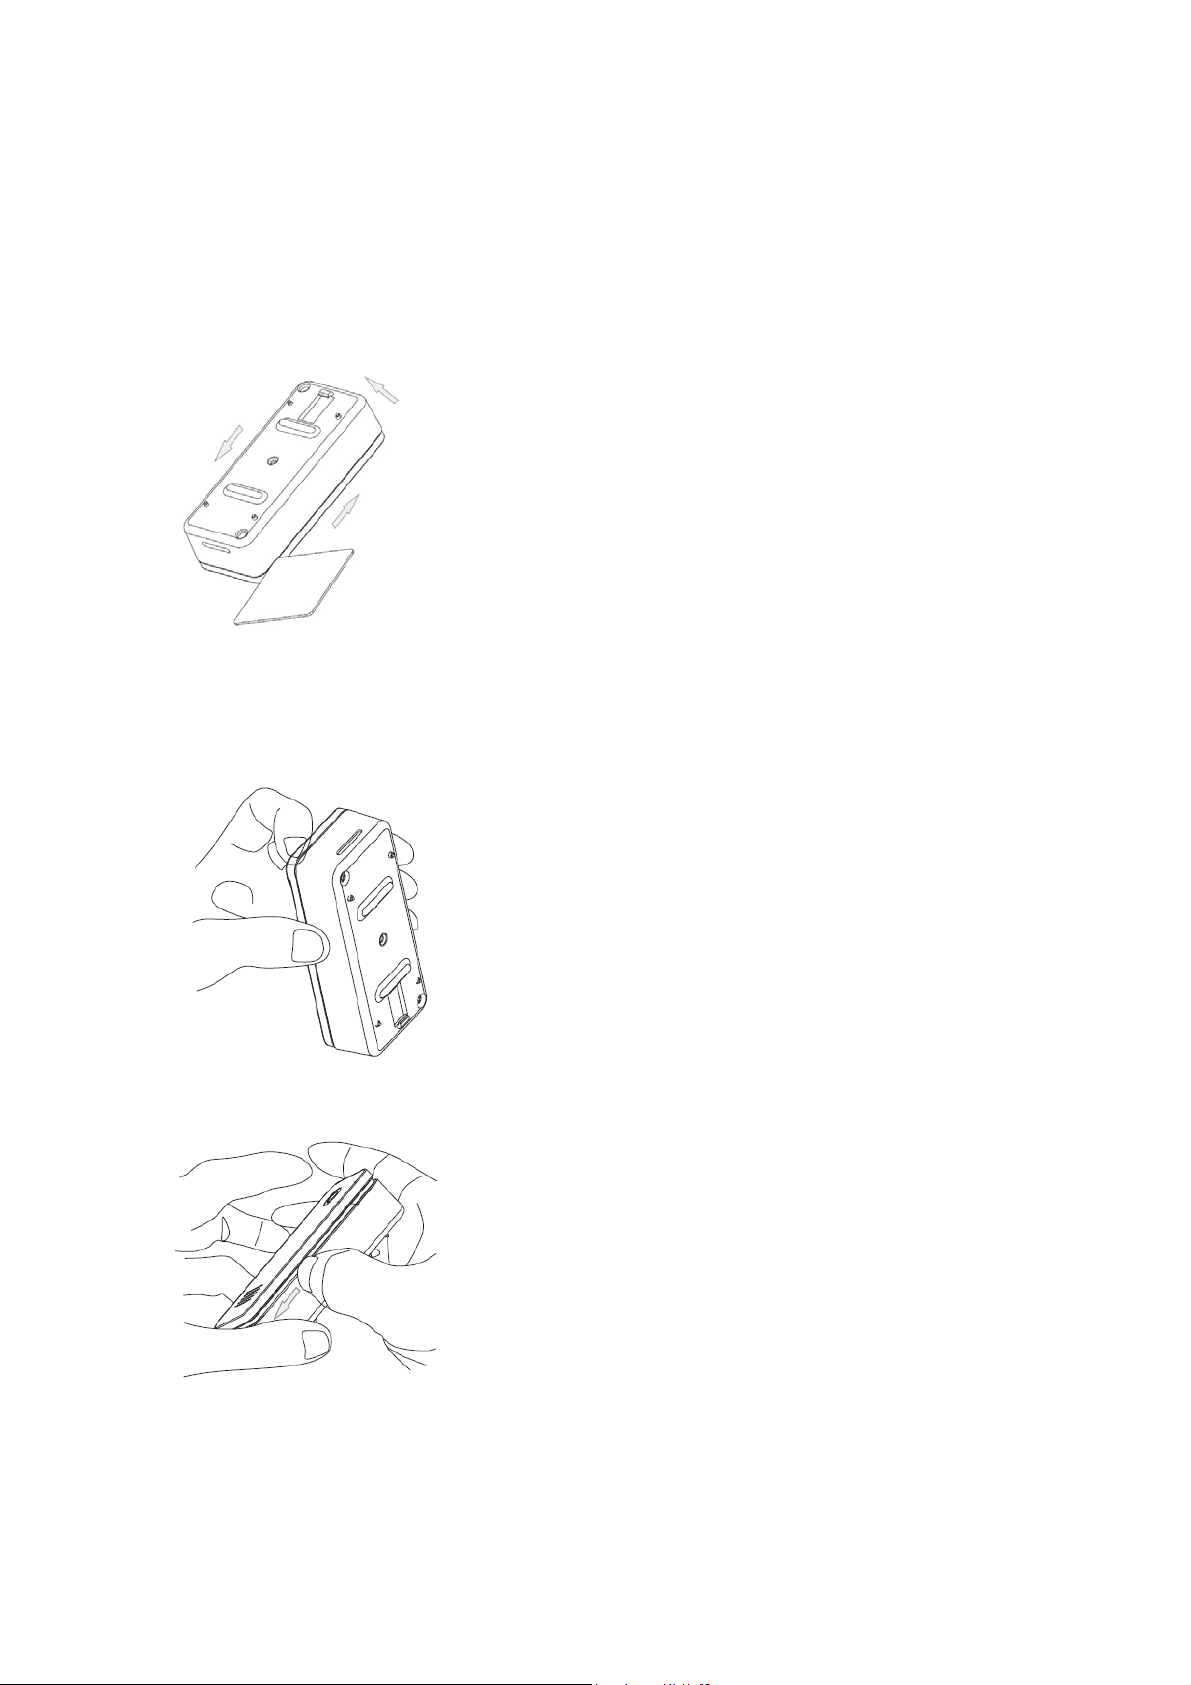
you have a hard plastic board( about 0.8 to 1.0mm thickness) on hand, you can use it to
If
separate the battery cover direct
Pu
sh or move the plastic board along the gap between battery cover and Sensor unit, refer to
ly:
the direction of arrows, see the figure belo
Yo
u can also open the battery cover through your fingers if you are confident about this way.
or unit.
w:
Find the position of the screw side, see the operating steps below:
Pull open a small gap between the battery cover and Sensor uni
a.
t.
Push or move your fingernail along the gap between battery cover and Sensor unit, as
b.
below:
3. Battery cover is separated from the Sensor unit
Page 8

Next Section
[heading 1]Technical specifications. [/heading 1]
Model number: FT122-A.
Power supply: CR123A lithium battery, 3V, 1500mAh.
Operating temperature: 0°C to 40°C.
Storage temperature: -20°C to 60°C.
Water proofing: IP65.
Max volume of buzzer: 60dB at 2 meters away.
Operating distance: Up to 100 feet/30 metres indoors or 492 feet/150 metres outdoors.
Next Section
[heading 1]Warranty.[/heading 1]
[As is defined for the whole company]
Next Section
[heading 1]Certifications.[/heading 1]
FCC ID:XBAFT122
Page 9

FCC Part 15.19 Warning Statement
THIS DEVICE COMPLIES WITH PART 15 OF THE FCC RULES. OPERATION
IS SUBJECT TO THE FOLLOWING TWO CONDITIONS: (1) THIS DEVICE MAY
NOT CAUSE HARMFUL INTERFERENCE, AND (2) THIS DEVICE MUST
ACCEPT ANY INTERFERENCE RECEIVED, INCLUDING INTERFERENCE THAT
MAY CAUSE UNDESIRED OPERATION.
FCC Part 15.21 Warning Statement
NOTE: THE GRANTEE IS NOT RESPONSIBLE FOR ANY CHANGES OR
MODIFICATIONS NOT EXPRESSLY APPROVED BY THE PARTY RESPONSIBLE FOR
COMPLIANCE. SUCH MODIFICATIONS COULD VOID THE USER’S AUTHORITY TO
OPERATE THE EQUIPMENT.
FCC Part 15.105 Warning Statement
Note: This equipment has been tested and found to comply with the limits for a Class B digital
device, pursuant to part 15 of the FCC Rules. These limits are designed to provide
reasonable protection against harmful interference in a residential installation. This equipment
generates, uses and can radiate radio frequency energy and, if not installed and used in
accordance with the instructions, may cause harmful interference to radio communications.
However, there is no guarantee that interference will not occur in a particular installation. If
this equipment does cause harmful interference to radio or television reception, which can be
determined by turning the equipment off and on, the user is encouraged to try to correct the
interference by one or more of the following measures:
—Reorient or relocate the receiving antenna.
—Increase the separation between the equipment and receiver.
—Connect the equipment into an outlet on a circuit different from that to which the receiver is
connected.
—Consult the dealer or an experienced radio/TV technician for help.
RF warning statement:
The device has been evaluated to meet general RF exposure requirement.
To maintain compliance with FCC's RF exposure guidelines, this equipment should be
installed and operated with a minimum distance of 20cm between the radiator and your body.
 Loading...