

Page 1
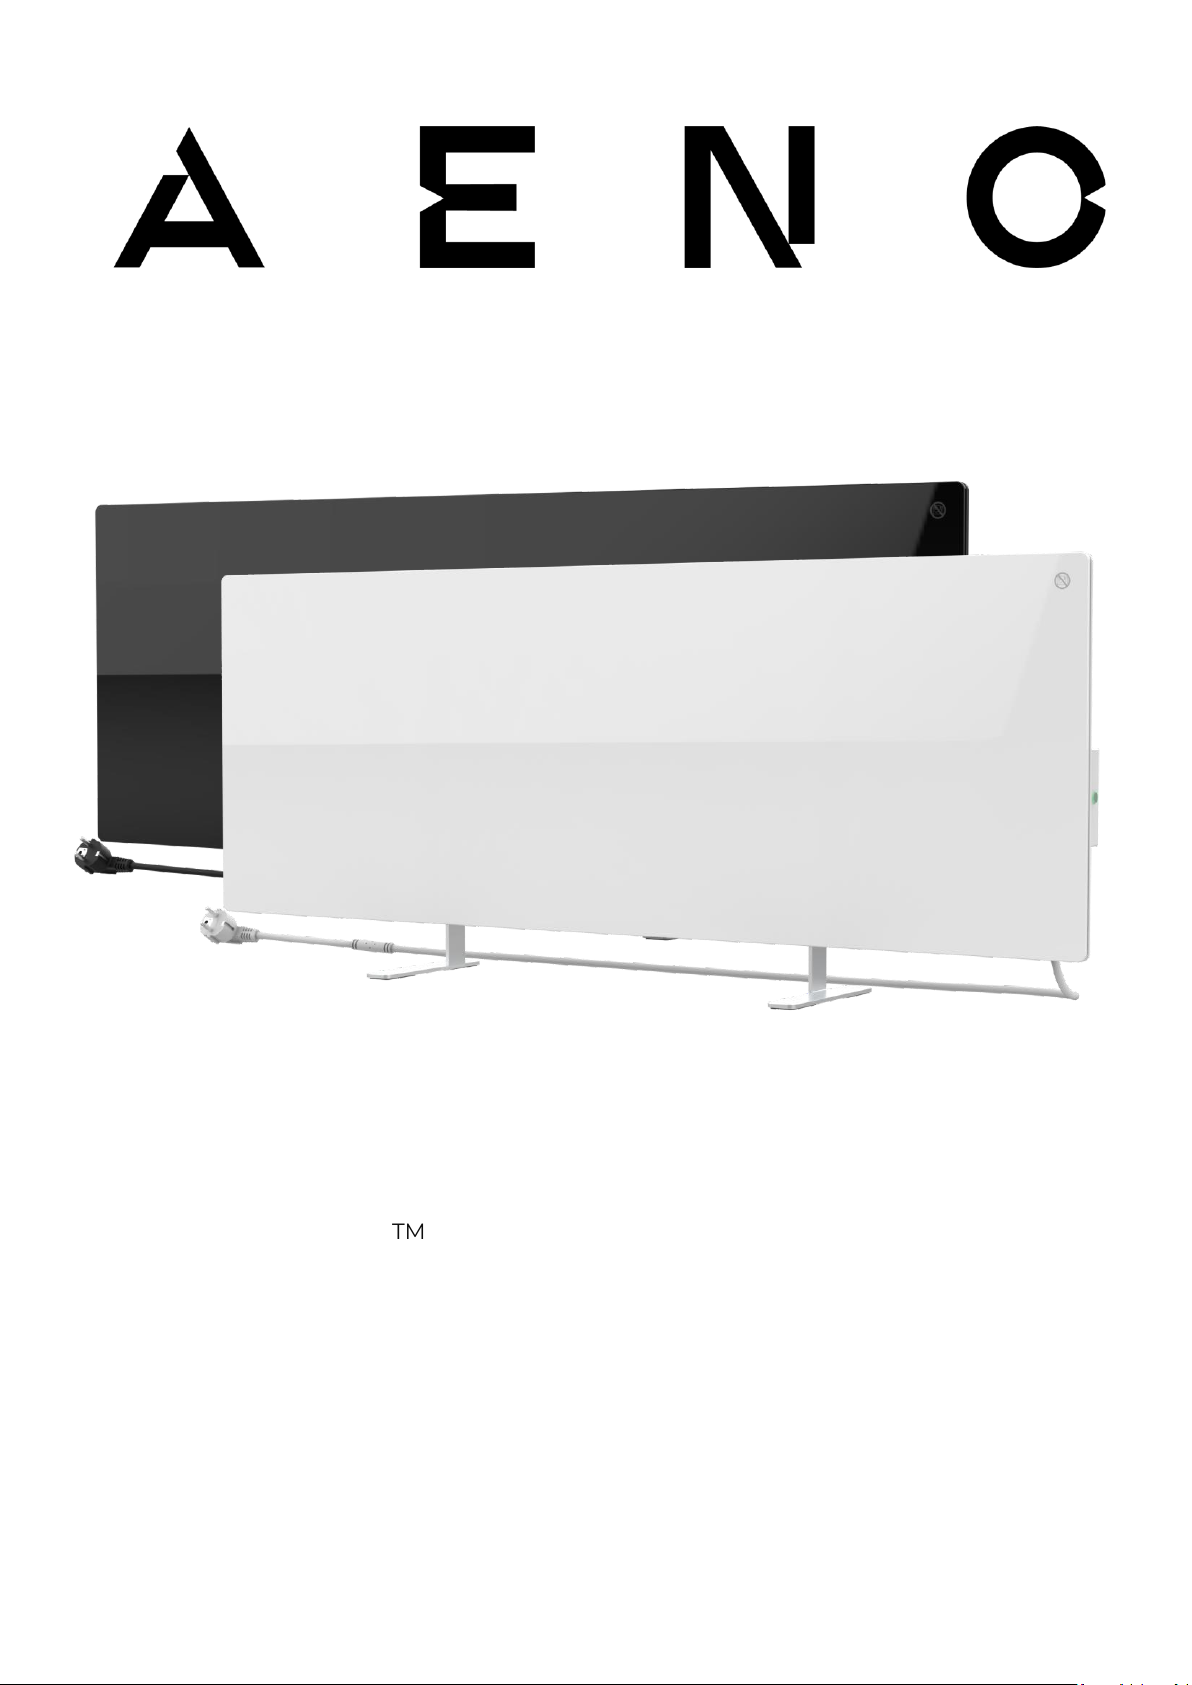
AENOTM Premium Eco Smart Heater
Installation and Operation Manual
Articles: GH1S (-IT, -CH, -UK), GH2S (-IT, -CH, -UK)
Version 1.0.3 | August 2022
Page 2

Page 3

AENOTM Premium Eco Smart Heater
Installation and Operation Manual
© ASBISc Enterprises PLC.. All rights reserved Document version: 1.0.3, aeno.com
Page 3 of 68
Introduction
AENOTM heater is designed for heating residential and office spaces.
The present Manual contains a detailed description of the device, as well as instructions
for its installation and operation.
Copyrights
Copyright of ©ASBISc Enterprises PLC. All rights reserved.
The AENOTM trademark is owned by ASBIS GROUP OF COMPANIES (hereinafter
referred to as the ASBIS). All other similar trademarks and names, as well as logos and
other symbols are the property of their respective owners *.
All materials under AENOTM tradename contained therein are protected in accordance
with international and local laws including Acts on Copyrights and related rights.
Any reproduction, copying, publication, as well as further distribution or public display
of material contained in the present document (whether in full or in part) shall not be
allowed until an appropriate permission of the copyright owner is obtained.
Any unauthorized usage of materials contained herein may lead to civil liability and
criminal prosecution in accordance with applicable laws.
Any eventual mentioning of other company names and equipment in the present
document is made solely for the purpose of clarifying and describing the device
operation and shall not infringe on the third party’s intellectual property rights.
* Google Play and Google Home are trademarks of Google Inc.; App Store is the registered trademarks of
Apple Inc.; Yandex is the registered trademark of YANDEX LLC.; Amazon Alexa is the registered trademark
of Amazon Technologies, Inc.
Page 4

AENOTM Premium Eco Smart Heater
Installation and Operation Manual
Document version: 1.0.3, aeno.com © ASBISc Enterprises PLC. All rights reserved
Page 4 of 68
Responsibility and Technical Support
This document was prepared in accordance with all necessary legal requirements and
contains detailed and complete information on operation and maintenance of the
device. The information is current as of the date indicated in this document. Strict
adherence to the instructions in this manual will ensure correct, safe and reliable
operation of the device.
Both this manual and the Quick Start Guide are an integral part of the device and
should always be available to the user for reference.
ASBIS reserves the right to modify the device and make corrections or changes to this
document without prior notice of the user, and shall not be responsible for any
potential negative consequences which may arise from the use of an outdated version
of the document, as well as for any possible technical and/or typographical errors,
either omitted or accidental, or any related damage that may result from the document
transfer or the use of the devices.
In case of any discrepancies between language versions of this document, the Russian
version of this User Manual shall prevail.
ASBIS shall make no guarantee with respect to any data contained herein including
but not limited to the device merchantability and fitness for a particular purpose.
If you have any technical questions, please contact your local ASBIS representative or
the technical support department at aeno.com. The most common issues are
described in Section 7 (Troubleshooting) of this document.
Please visit aeno.com/documents to download the latest version of this manual.
User information including personal data is protected from unauthorized access and
disclosure in accordance with GDPR requirements. You can read the Privacy Policy at
aeno.com/privacy-policy.
Page 5

AENOTM Premium Eco Smart Heater
Installation and Operation Manual
© ASBISc Enterprises PLC.. All rights reserved Document version: 1.0.3, aeno.com
Page 5 of 68
Conformance to Standards
The device is CE certified and complies with requirements of the following
Directives of the European Union:
• 2014/35/EU Low Voltage Directive;
• 2004/30/EU Electromagnetic Compatibility Directive.
The device complies with the UKCA marking requirements for selling the
device in the UK
The device has passed all procedures of assessments established in
Technical Regulations of the Customs Union and conforms with standards
of the Customs Union
The device complies with the requirements of Restriction of the Use of
Certain Hazardous Substances (RoHS) in Electronic and Electrical
Equipment (2011/65/EU Directive)
Additional confirmation of the product safety and quality by TÜV NORD
The national conformity mark of the Ukraine indicating that the device
meets requirements of all applicable technical regulations
The crossed-out trash can symbol is used to label electrical and electronic
equipment, and indicates its separate collection.
The symbol is given in accordance with the Directive 2012/19/EU on Waste
Electrical and Electronic Equipment (WEEE) and indicates that this
equipment requires separate collection at the end of its life and must be
disposed of separately from unsorted household waste.
To protect the environment and human health, please dispose of used
electrical and electronic equipment according to approved safe disposal
guidelines
AT
BE
BG
CH
CZ
CY
DE
DK
EE
ES
FI
FR
GR
HR
HU
IE
IT
KZ
LT
LV
LU
MT
NL
NO
PL
PT
RO
RS
SE
SK
SL
UK
Page 6
AENOTM Premium Eco Smart Heater
Installation and Operation Manual
Document version: 1.0.3, aeno.com © ASBISc Enterprises PLC. All rights reserved
Page 6 of 68
Limitations and Warnings
Prior to installation and operation of the device, the User shall carefully read and
understand information contained herein.
WARNING!
Do not cover the heater to avoid overheating.
WARNING!
Do not install the heater directly under a plug socket.
WARNING!
Do not use the heater if the glass panels are damaged.
ATTENTION!
The warnings, precautions, and instructions contained in this document may not
contain every possible hazardous situation. Use common sense when using the
device.
Warning symbols and icons
Hot surface. The risk of burns in the case of contact with heated surfaces.
Do not touch heating panel until completely cooled down and do not allow
the power cable to contact the heating panel
To avoid overheating, do not cover the device or dry clothes on it
The device is intended for indoor use only
IP44
Degree of protection of the device casing that is protection against the
ingress of solid objects larger than 1 mm in size, as well as drops and
splashes falling from any angle
General warning icon
The device is Class II for protection against electric shock (double
insulation)
Do not repair the device on your own as this may result in electric shock or
other injury and will void the manufacturer's warranty
Page 7
AENOTM Premium Eco Smart Heater
Installation and Operation Manual
© ASBISc Enterprises PLC.. All rights reserved Document version: 1.0.3, aeno.com
Page 7 of 68
Do not expose the device to liquids
The eco-label symbol on the package indicating its recyclability
Recyclable corrugated cardboard packaging
No moving parts in the design of the device prevents the formation of dust
Indication that the device may be broken or damaged if not handled
carefully
Indication that the device must be protected from moisture
Toxic substances are not available in the materials from which the device is
made
Function of maintaining the set temperature (for remote control)
The device is certified according to the standards applicable in the
countries of sale
Packaging is RoHS & REACH compliant and contains no prohibited
materials
Innovative design
Producer of raw materials for packaging was certified by the Forest
Stewardship Council (FSCTM)
Producer of raw materials for making packaging confirms responsible
forest management
Page 8

AENOTM Premium Eco Smart Heater
Installation and Operation Manual
Document version: 1.0.3, aeno.com © ASBISc Enterprises PLC. All rights reserved
Page 8 of 68
Safety Operation Rules
1. The device shall be installed and used as described in this manual only. Any other
use not specified therein may cause fire and other hazards, as well as injury to
persons.
2. The device is intended for operation in a room with an ambient temperature of
0 °C... +40 °C.
3. Keep children and pets away from the area of installation of the Eco Smart
Heater, as contact with the device in operation may result in burns.
4. The device may only be operated when it is properly mounted on brackets or
special legs as supplied within the scope of delivery.
5. In the case of wall installation, the installation height shall not be higher than 1 m.
6. The included hooks and dowels are designed to mount the unit on a reinforced
concrete wall only. When installing on another type of wall, you should choose
the appropriate fasteners that are suitable for both the wall and the device
weight of more than 10 kg. The manufacturer shall not be liable for any damage
resulting from the use of unsuitable fasteners.
7. The installation area shall be level, i.e. without any bends or warps (flat vertical or
horizontal surface). If the device is in the wrong position when connected to the
source of power, it will emit short beeps.
8. Do not bend the device or otherwise use force for wall installation using screws.
9. When moving the device, you may only hold it by brackets on its back. Do not
move the device by the glass panel while it is switched on or hot.
10. If the device is connected to the mains, it is strongly recommended to ensure
quick and easy way to disconnect it from the source of power.
11. Do not mount the device directly under or on top of an electrical socket!
12. Do not allow the power cable to come into contact with the heating panel!
13. To avoid supply network overloading and the risk of fire, do not use an extension
cord to connect the device to the power source, or connect the device to the
mains socket along with other household appliances.
14. Do not touch the heating panel during operation of the device.
15. Do not use the device in the case of damage or cracks, or any signs of damage to
any other parts thereof, e.g. the power cable.
16. If the power cable is damaged, it may only be replaced by an authorized service
center or other authorized party.
17. Do not drop, throw, disassemble or attempt to repair the device on your own.
Stop using the device, it is has fallen.
18. Do not expose the device to direct sunlight or moisture, oils, chemical or other
organic liquids, or vibrations.
19. Do not use the device in a combustible, explosive and/or dusty environment, as
well as in areas where corrosion of its materials is possible.
Page 9

AENOTM Premium Eco Smart Heater
Installation and Operation Manual
© ASBISc Enterprises PLC.. All rights reserved Document version: 1.0.3, aeno.com
Page 9 of 68
20. Do not operate the device in areas with high level of humidity, such as
bathrooms, showers or swimming pools.
21. Do not dry clothes or any other items with the device, and do not place it less
than 1 meter away from any fabrics, decorative objects or other flammable
objects. WARNING! Violation of these recommendations is at the user's risk, and
the manufacturer shall not be liable for any damages resulting from this
violation.
22. Do not operate the device on carpets!
23. If the device is not used (heating mode switched off) for a long period of time, it
shall be disconnected from the source of power.
24. To avoid an unpleasant “burnt” smell, it is recommended to keep the device clean
and free of dust accumulation.
25. To clean the device, use a water-dampened cotton cloth followed by a dry streak-
free cloth cleaning. Do not clean the device until it is switched off and deenergized. Do not use cleaning agents or detergents to clean the device.
26. The device is not intended for use by children under 12 years, or by persons of
limited physical, sensory or mental capabilities who have no adequate
experience or knowledge in using the device, unless they are supervised or
instructed by a person responsible for their safety.
27. Do not use the device in areas with people who are unable to leave the room on
their own or who are not under the constant supervision of a person responsible
for their safety.
WARNING!
Any damage to the device as a result overturning or falling will void the
manufacturer's warranty.
Page 10

AENOTM Premium Eco Smart Heater
Installation and Operation Manual
Document version: 1.0.3, aeno.com © ASBISc Enterprises PLC. All rights reserved
Page 10 of 68
Table of Contents
Introduction ............................................................................................................................................................................. 3
Copyrights ................................................................................................................................................................................ 3
Responsibility and Technical Support .................................................................................................................. 4
Conformance to Standards .......................................................................................................................................... 5
Limitations and Warnings ............................................................................................................................................ 6
Table of Contents ............................................................................................................................................................... 10
1 General Description and Specifications ......................................................................................................... 12
1.1 General Purpose ...................................................................................................................................................... 12
1.2 Labeling Rules and the Date of Manufacture .................................................................................. 17
1.3 Types of Electrical Outlets and Plugs ..................................................................................................... 19
1.4 Technical Specifications .................................................................................................................................. 19
1.5 Scope of Delivery .................................................................................................................................................... 21
1.6 Packaging and Labeling ................................................................................................................................. 22
2 Installation and Operation ..................................................................................................................................... 23
2.1 First Installation and Setup ........................................................................................................................... 24
2.1.1 Unpacking and Preparing for Installation/Mounting .......................................................... 25
2.1.2 Preparing the Installation area ........................................................................................................... 25
2.1.3 Floor Installation (Option 1) .................................................................................................................... 26
2.1.4 Horizontal Wall Mounting (Option 2) ............................................................................................. 29
2.1.5 Vertical Wall Mounting (Option 3) .................................................................................................... 32
2.1.6 Wall Mounting with 4 Hooks (Additional Fixation) .............................................................. 35
2.1.7 Hardwiring Option ....................................................................................................................................... 36
2.1.8 Ceiling Mounting .......................................................................................................................................... 36
2.2 Initial Power On .................................................................................................................................................... 37
2.3 Manual Control ..................................................................................................................................................... 37
2.4 Remote Control via the AENO App ....................................................................................................... 38
2.4.1 App Installation .............................................................................................................................................. 38
2.4.2 Registering a New Account ................................................................................................................. 38
2.4.3 Logging into an Existing Account ................................................................................................... 39
2.4.4 Eco Smart Heater Activation Process .......................................................................................... 39
2.4.5 Control Panel of the Eco Heater ...................................................................................................... 44
2.4.6 Operating Mode Selection ................................................................................................................... 45
2.4.7 Setting the Heater Schedule .............................................................................................................. 46
2.4.8 Setting the Countdown Timer .......................................................................................................... 47
2.4.9 Energy and Power Statistics ............................................................................................................... 48
2.4.10 Changing Settings .................................................................................................................................... 49
2.4.11 Additional Settings .................................................................................................................................... 49
2.4.12 Scenarios and Automations ............................................................................................................... 53
2.5 Child Lock Mode .................................................................................................................................................. 58
Page 11

AENOTM Premium Eco Smart Heater
Installation and Operation Manual
© ASBISc Enterprises PLC.. All rights reserved Document version: 1.0.3, aeno.com
Page 11 of 68
2.6 Remote control via voice assistants ...................................................................................................... 58
3 Maintenance and Repair ......................................................................................................................................... 59
4 Warranty Obligations ................................................................................................................................................60
4.1 AENOTM Service Centers .................................................................................................................................. 61
4.2 Warranty Service Procedure ....................................................................................................................... 61
4.3 Limitation of Liability ........................................................................................................................................ 61
5 Storage, Transportation and Disposal of Devices ................................................................................. 63
6 Other Information ........................................................................................................................................................ 65
7 Troubleshooting ............................................................................................................................................................ 66
8 Glossary ................................................................................................................................................................................ 67
Figures and Tables
Figure 1 – Appearance ................................................................................... 13
Figure 2 – Buttons, ports and indicators ........................................................... 14
Figure 3 – Mounting accessories ..................................................................... 16
Figure 4 – Package contents .......................................................................... 21
Figure 5 – Examples of heater installation ......................................................... 24
Figure 6 – Mounting on legs (on the floor) ......................................................... 26
Figure 7 – Installation of the brackets ............................................................... 30
Figure 8 – Preparing of the wall (horizontal mounting) ....................................... 31
Figure 9 – Preparing the wall (vertical mounting) ............................................... 33
Figure 10 – Vertical installation (wall mounting) ................................................. 34
Table 1 – Power button functions ..................................................................... 16
Table 2 – Power button LED indication ............................................................. 17
Table 3 – Basic Technical Specifications ............................................................ 19
Table 4 – Typical problems and solutions .......................................................... 66
Page 12

AENOTM Premium Eco Smart Heater
Installation and Operation Manual
Document version: 1.0.3, aeno.com © ASBISc Enterprises PLC. All rights reserved
Page 12 of 68
1 General Description and Specifications
1.1 General Purpose
The AENOTM heater is an electric heating device with a combined heat output designed
for primary, supplementary and local heating of domestic and other premises
(apartments, offices, trade enterprises, gyms, educational institutions, catering
enterprises, etc.).
Key benefits of the heater AENOTM are as follows:
• Combined infrared and convection heating;
• Connection via Wi-Fi (2.4 GHz);
• Low power consumption;
• Automatic maintenance of desired temperature in the room;
• Ability to set the maximum temperature of the heating panel;
• Electronic thermostat and tilting sensor;
• Large heat-emitting surface area;
• Possibility of leg installation, as well as horizontal or vertical wall mounting;
• Low dust content in the air due to lower convection (thermal movement of air
volumes);
• Remote control via a mobile app or voice assistants, as well as manual control;
• Installation of legs and brackets without tools;
• Elegant glass surface;
• The use of non-toxic materials in production;
• Minimum size of the control unit and matching accessories with the color of the
heating panel.
Page 13
AENOTM Premium Eco Smart Heater
Installation and Operation Manual
© ASBISc Enterprises PLC.. All rights reserved Document version: 1.0.3, aeno.com
Page 13 of 68
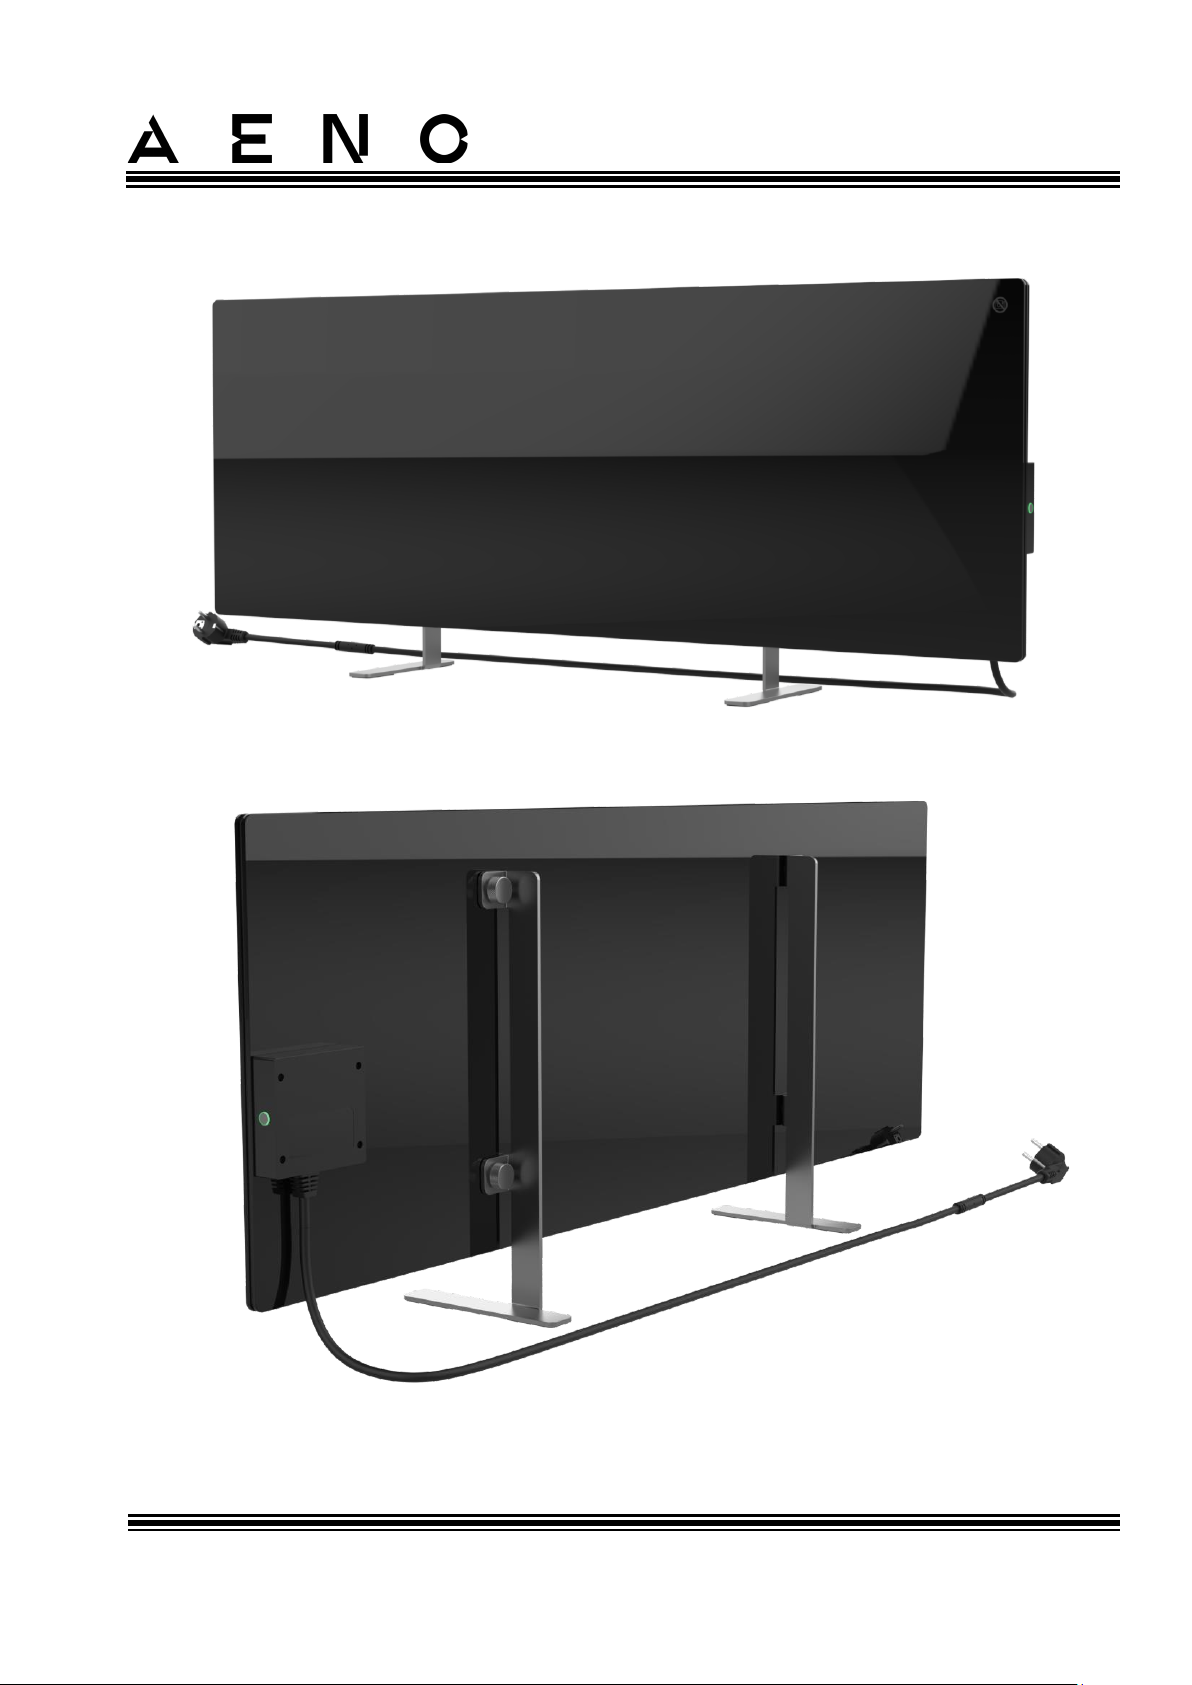
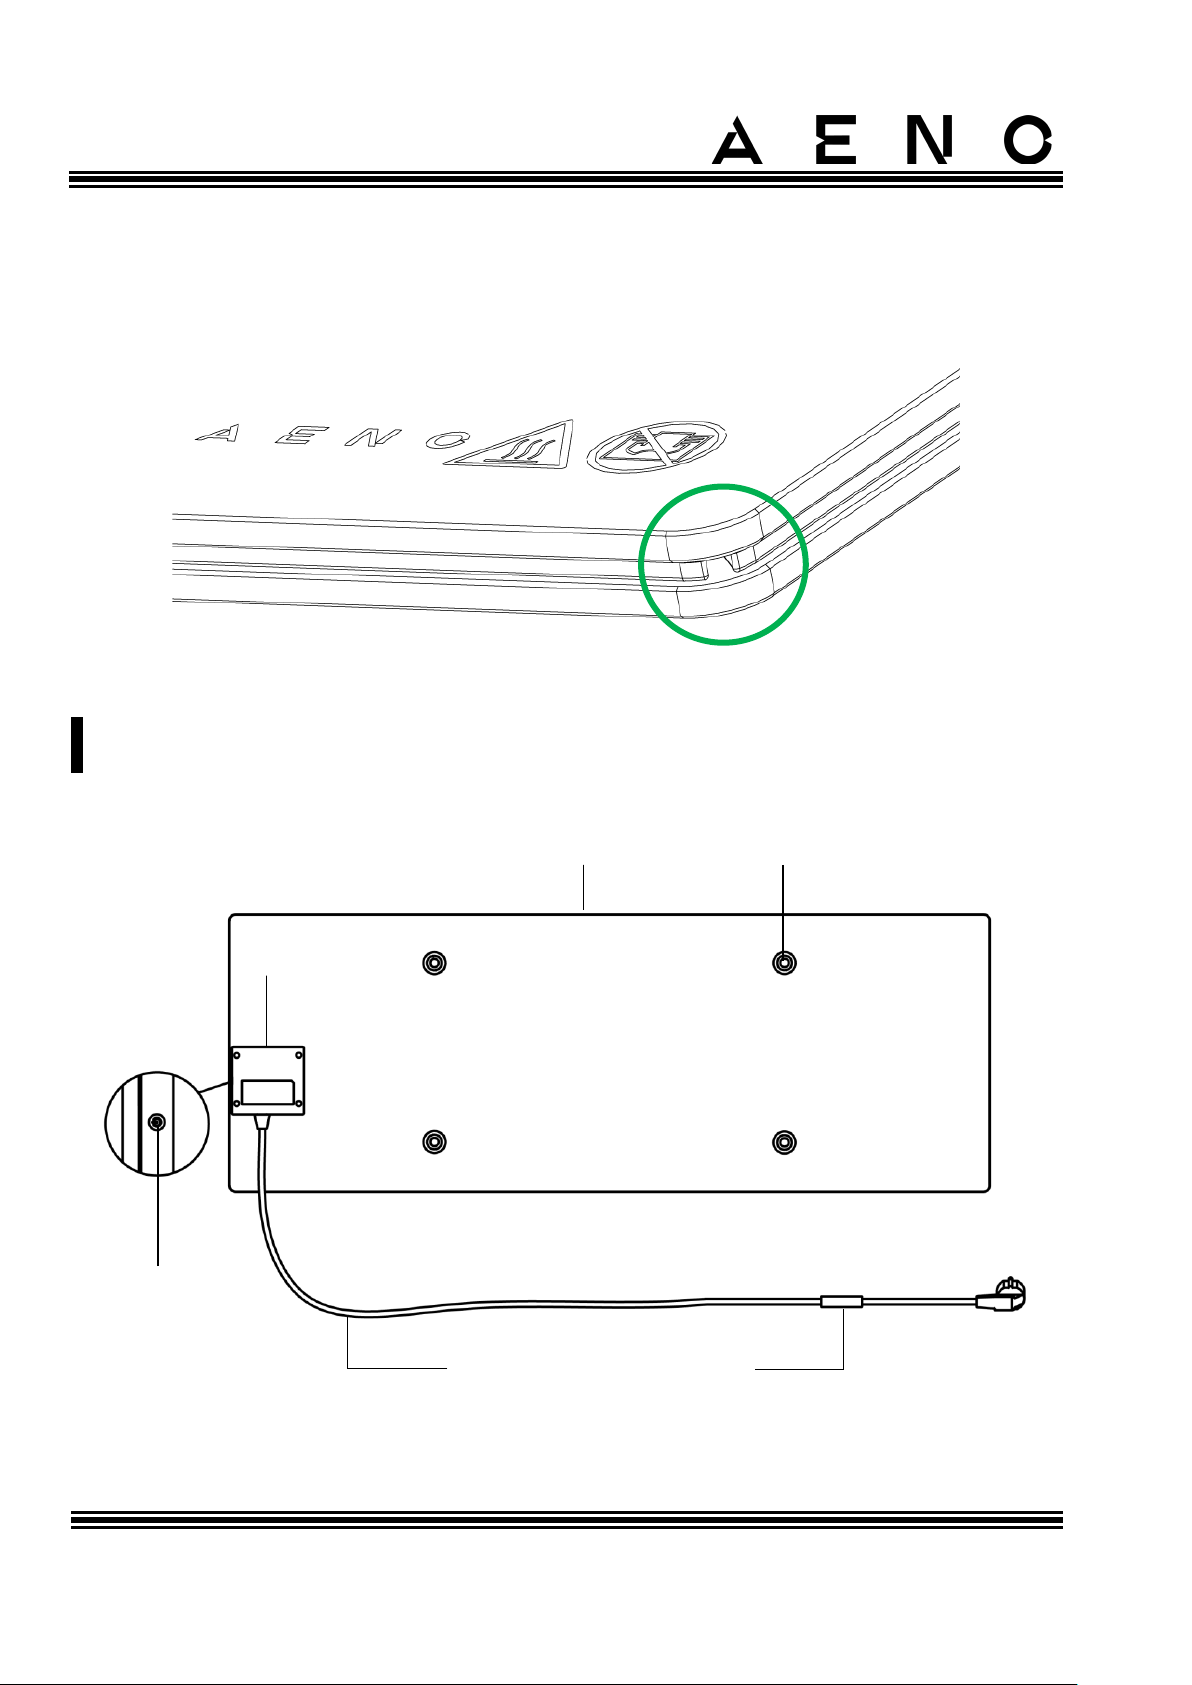
Figure 1 – Appearance
Page 14
AENOTM Premium Eco Smart Heater
Installation and Operation Manual
Document version: 1.0.3, aeno.com © ASBISc Enterprises PLC. All rights reserved
Page 14 of 68
Venting hole
The venting hole in the heater body is required to ensure proper air circulation and is
not a defect in the device.
Its location may differ for some models of heaters.
WARNING!
It is forbidden to block the venting hole of the device.
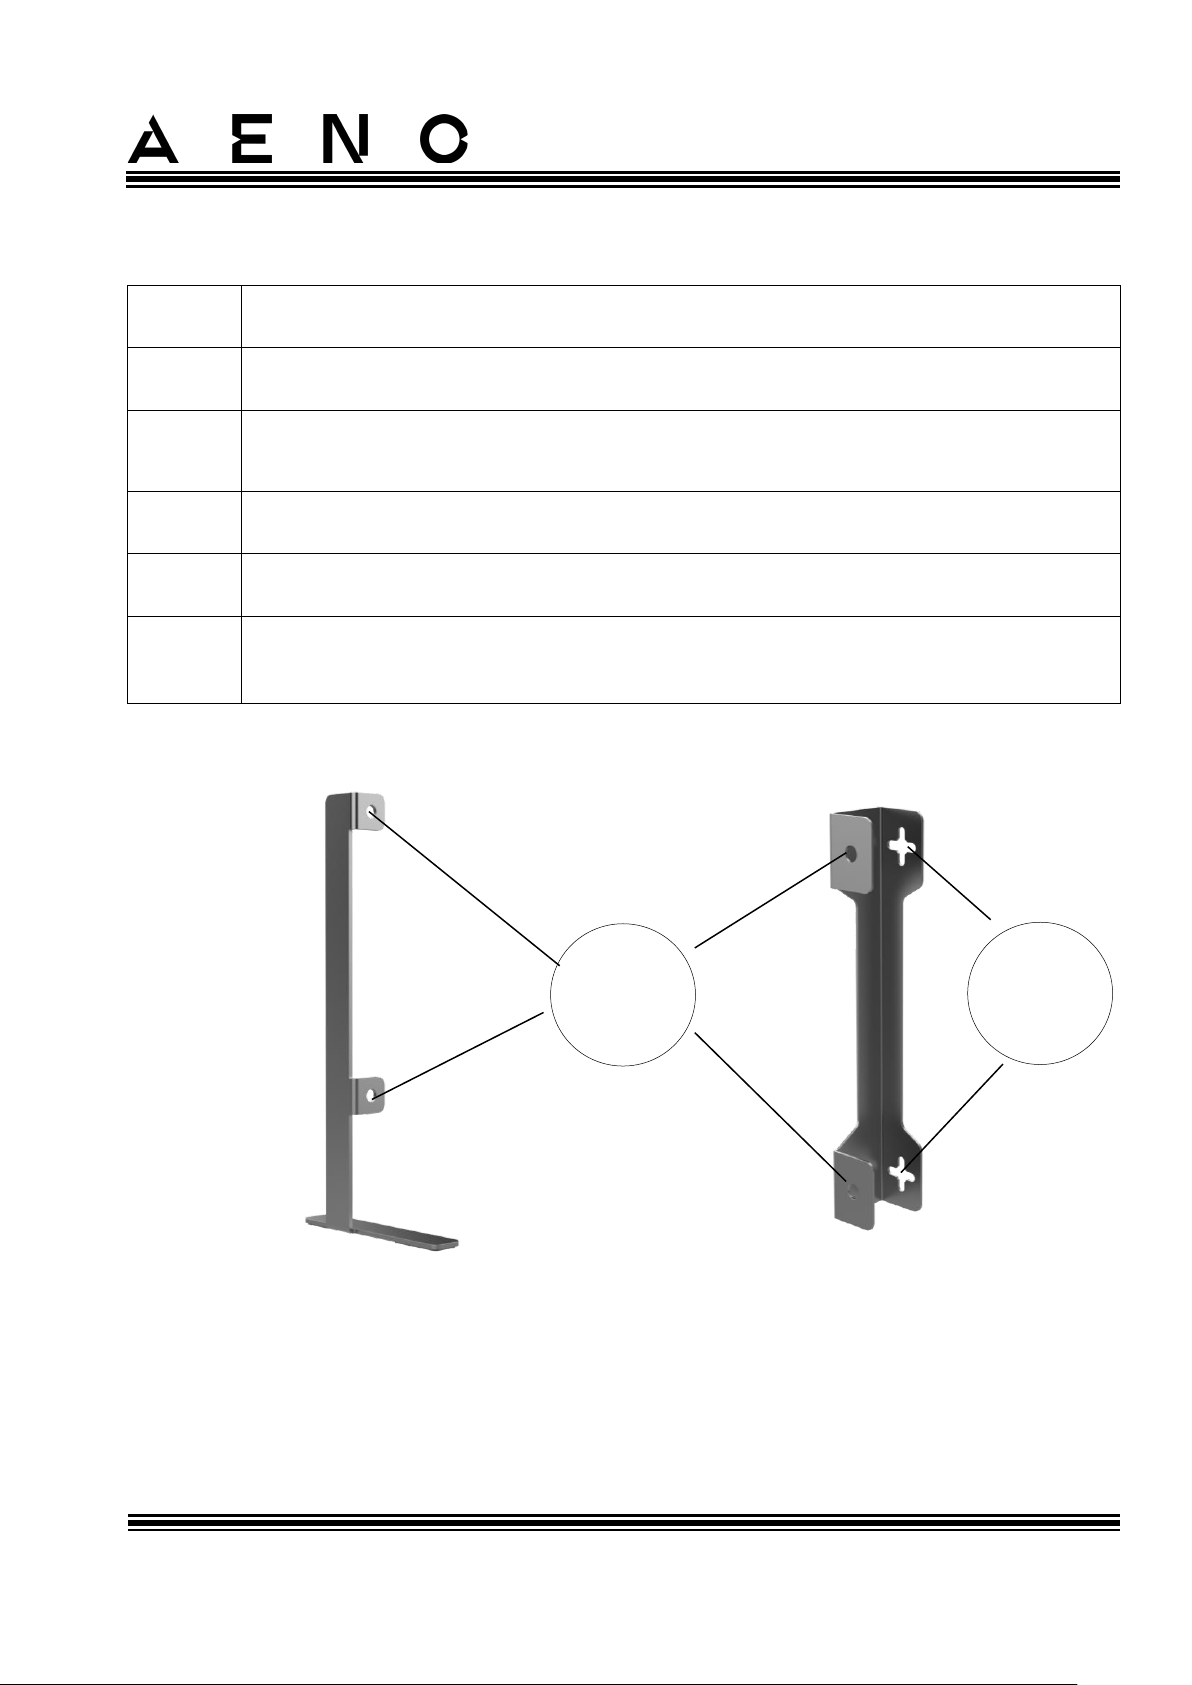
Figure 2 – Buttons, ports and indicators
❶
❹
❺
❻
❸
❷
Page 15
AENOTM Premium Eco Smart Heater
Installation and Operation Manual
© ASBISc Enterprises PLC.. All rights reserved Document version: 1.0.3, aeno.com
Page 15 of 68
Legend for buttons, ports and indicators
❶
Heating panel of the device that is emitting heat to warm the room
❷
Hole in the panel for a mounting bolt for screwing legs or wall brackets
❸
Electronic module for the heater control which includes a signaling
component (piezo siren) to audibly notify users of the device statuses
❹
LED button for switch the heating mode on and off
❺
Power cable to connect the heater to the mains socket
❻
Sensor that measures the ambient air temperature and ensures accuracy
when maintaining the required heating temperature
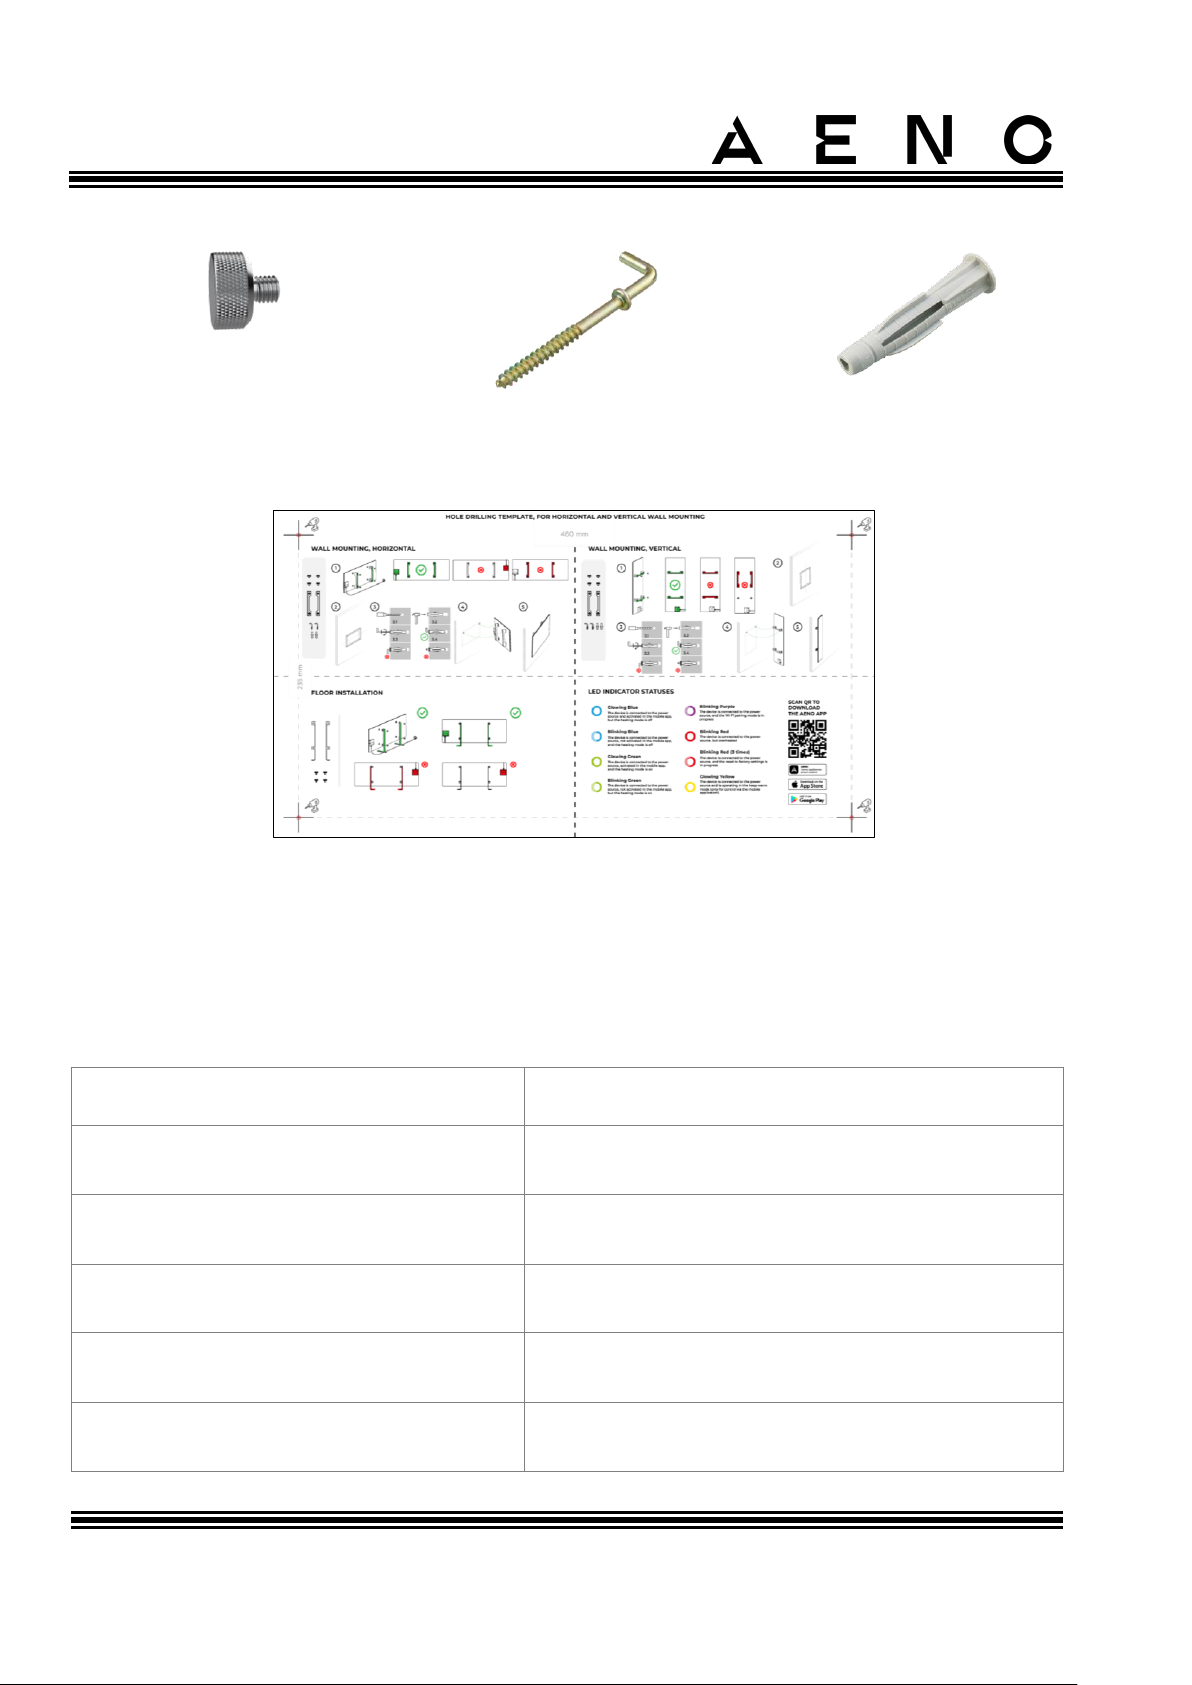
Leg for floor installation*
Bracket for wall mounting*
Holes for
mounting
bolts
Holes for
wall
mounting
Page 16
AENOTM Premium Eco Smart Heater
Installation and Operation Manual
Document version: 1.0.3, aeno.com © ASBISc Enterprises PLC. All rights reserved
Page 16 of 68
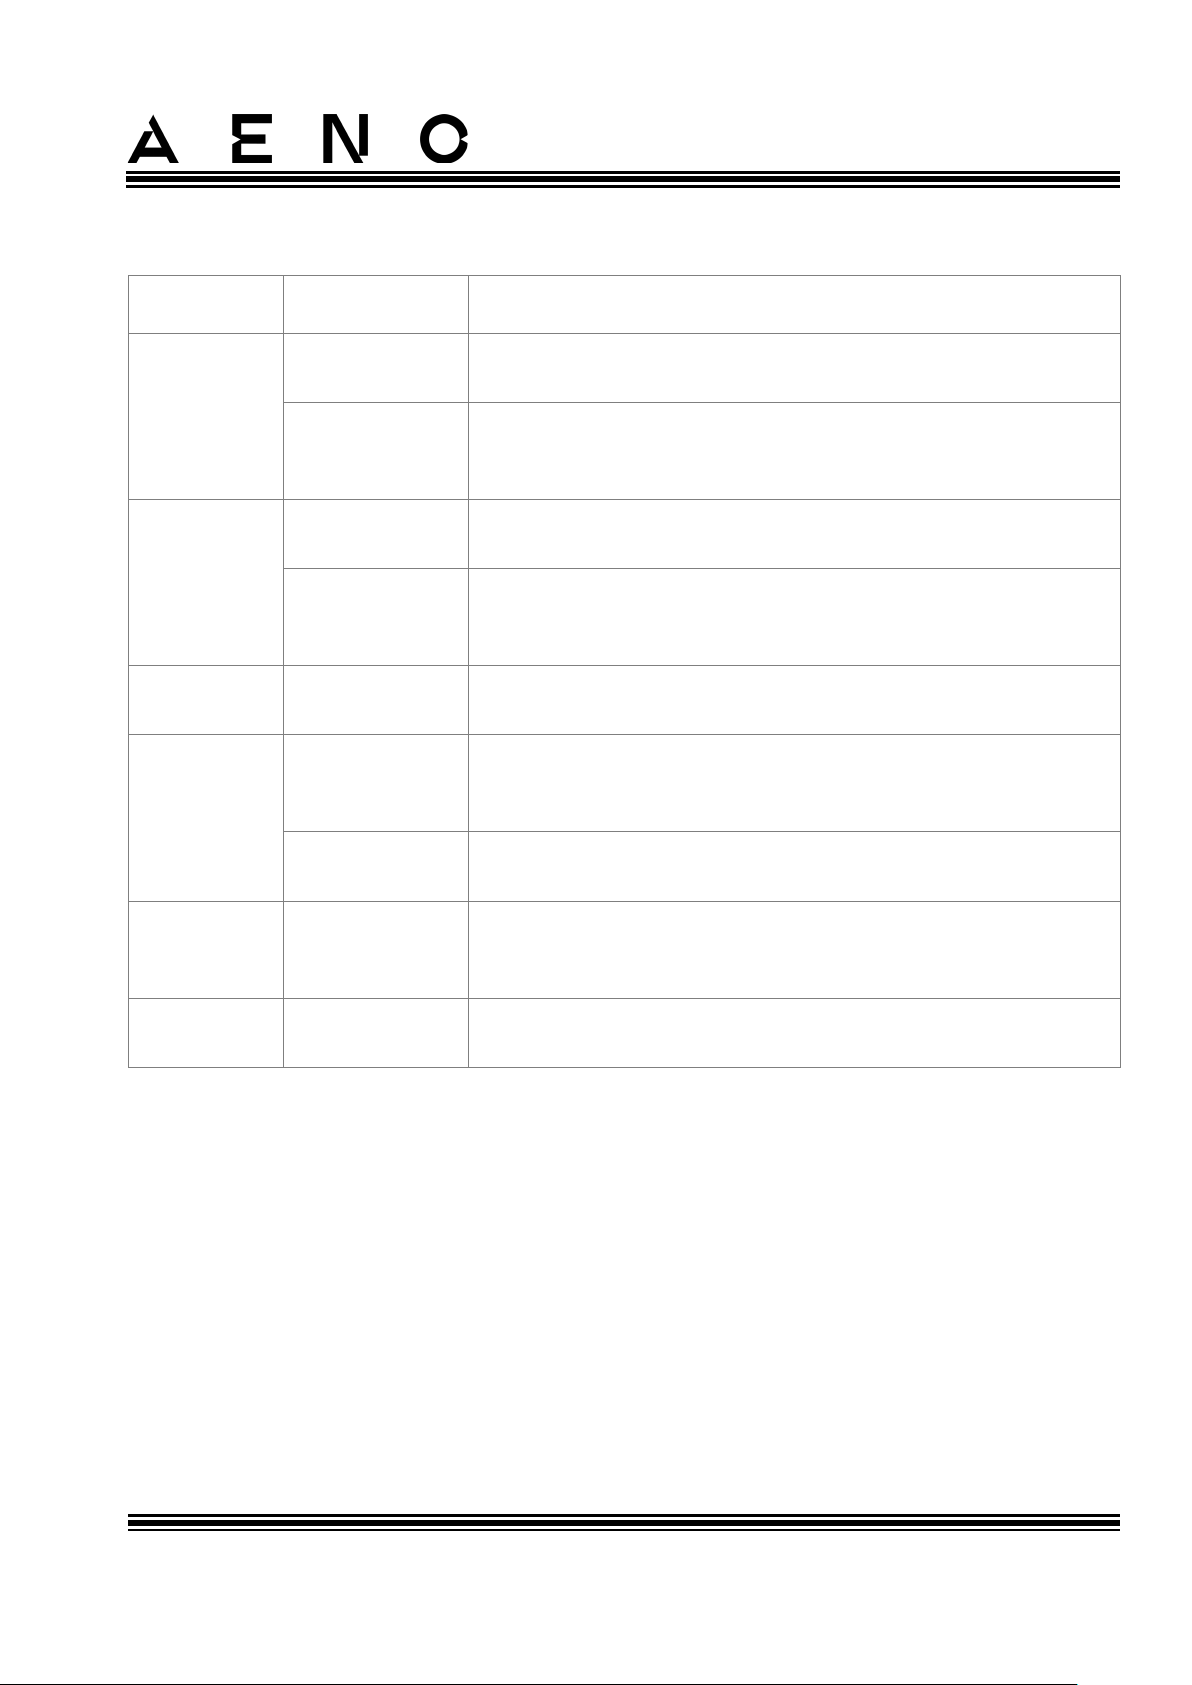
Mounting bolt*
Screw*
Dowel*
Template for drilling holes in the wall
Figure 3 – Mounting accessories
* The images of accessories are for illustrative purposes only.
Table 1 – Power button functions
Action
Description
Press and hold the power button for
no more than 3 seconds
Switching the device from Off to On mode
and vice versa
Press and hold the power button for
more than 3 seconds
Resetting the fault condition (blinking red)
and switching to the Off mode
Press and hold the power button for
4 to 10 seconds
Switching to activation mode in the AENO
mobile app
Press and hold the power button for
more than 10 seconds
Factory reset
Press the power button 5 times in 4
seconds
Manual disabling of the Child Lock mode
Page 17
AENOTM Premium Eco Smart Heater
Installation and Operation Manual
© ASBISc Enterprises PLC.. All rights reserved Document version: 1.0.3, aeno.com
Page 17 of 68
Table 2 – Power button LED indication
Color
Status
Description
Blue
On
The device is connected to the mains and activated in
the mobile app, but the heating mode is switched off
Flickering
The device is connected to the mains, but not
activated in the mobile app, and heating mode is
switched off
Green
On
The device is connected to the mains and activated in
the mobile app, and the heating mode is switched on
Flickering
The device is connected to the mains, but not
activated in the mobile app, and heating mode is
switched on
Purple
Blinking fast
The device is connected to the mains, and the process
of activation in the mobile app was started
Red
Blinking
The device is connected to the mains, but an error has
occurred (Incorrect orientation, safety mechanism
actuation, etc.)
Blinking fast
(3 times)
Factory reset process was initiated
Yellow
On
The device is connected to the mains, and the
temperature maintenance mode is on (for remote
control via the mobile app only)
Off
The device is not connected to the mains, or a power
failure occurred
Blinking means that the LED is on for 500 ms, and then is off for 500 ms.
Blinking fast means that the LED is on for 100 ms, and then is off for 100 ms.
Flickering means that the LED is on for 3,000 ms, and then is off for 300 ms.
1.2 Labeling Rules and the Date of Manufacture
The date of manufacture is indicated on a sticker on the individual packaging and is
also encoded in the serial number specified on the box and the device body.
The serial number is formed as follows:
NNNNNNYWWXXXXX,
Page 18

AENOTM Premium Eco Smart Heater
Installation and Operation Manual
Document version: 1.0.3, aeno.com © ASBISc Enterprises PLC. All rights reserved
Page 18 of 68
where
NNNNNN is internal alphanumeric device model identifier (for example, “AGN101”),
Y is the numeric identifier of the year of production, starting from 2020 (e.g., “2” stands
for 2022),
WW is a numeric identifier of the production week (for example, “10” is the tenth week
of the specified calendar year),
XXXXX is a numeric identifier of the serial number of the manufactured device.
Thus, the date of manufacture is encoded in the three characters of the serial number
(seventh through ninth in order).
In this case, the configuration features of the device are encoded in the model
designation.
The model name of the device is formed as follows:
A
GH
0001
S
-IT
Features of the power cord plug:
IT = plug type L
CH = plug type J
UK = plug type G
If there is no marking, the device is equipped with a standard
plug type E/F
The possibility of remote control:
S = Smart device activated via the AENO app
If there is no marking, the device is operated manually only
Model number of the AENOTM devices
Device type:
GH = glass heater
Brand name of the device:
A = AENOTM device
Page 19
AENOTM Premium Eco Smart Heater
Installation and Operation Manual
© ASBISc Enterprises PLC.. All rights reserved Document version: 1.0.3, aeno.com
Page 19 of 68
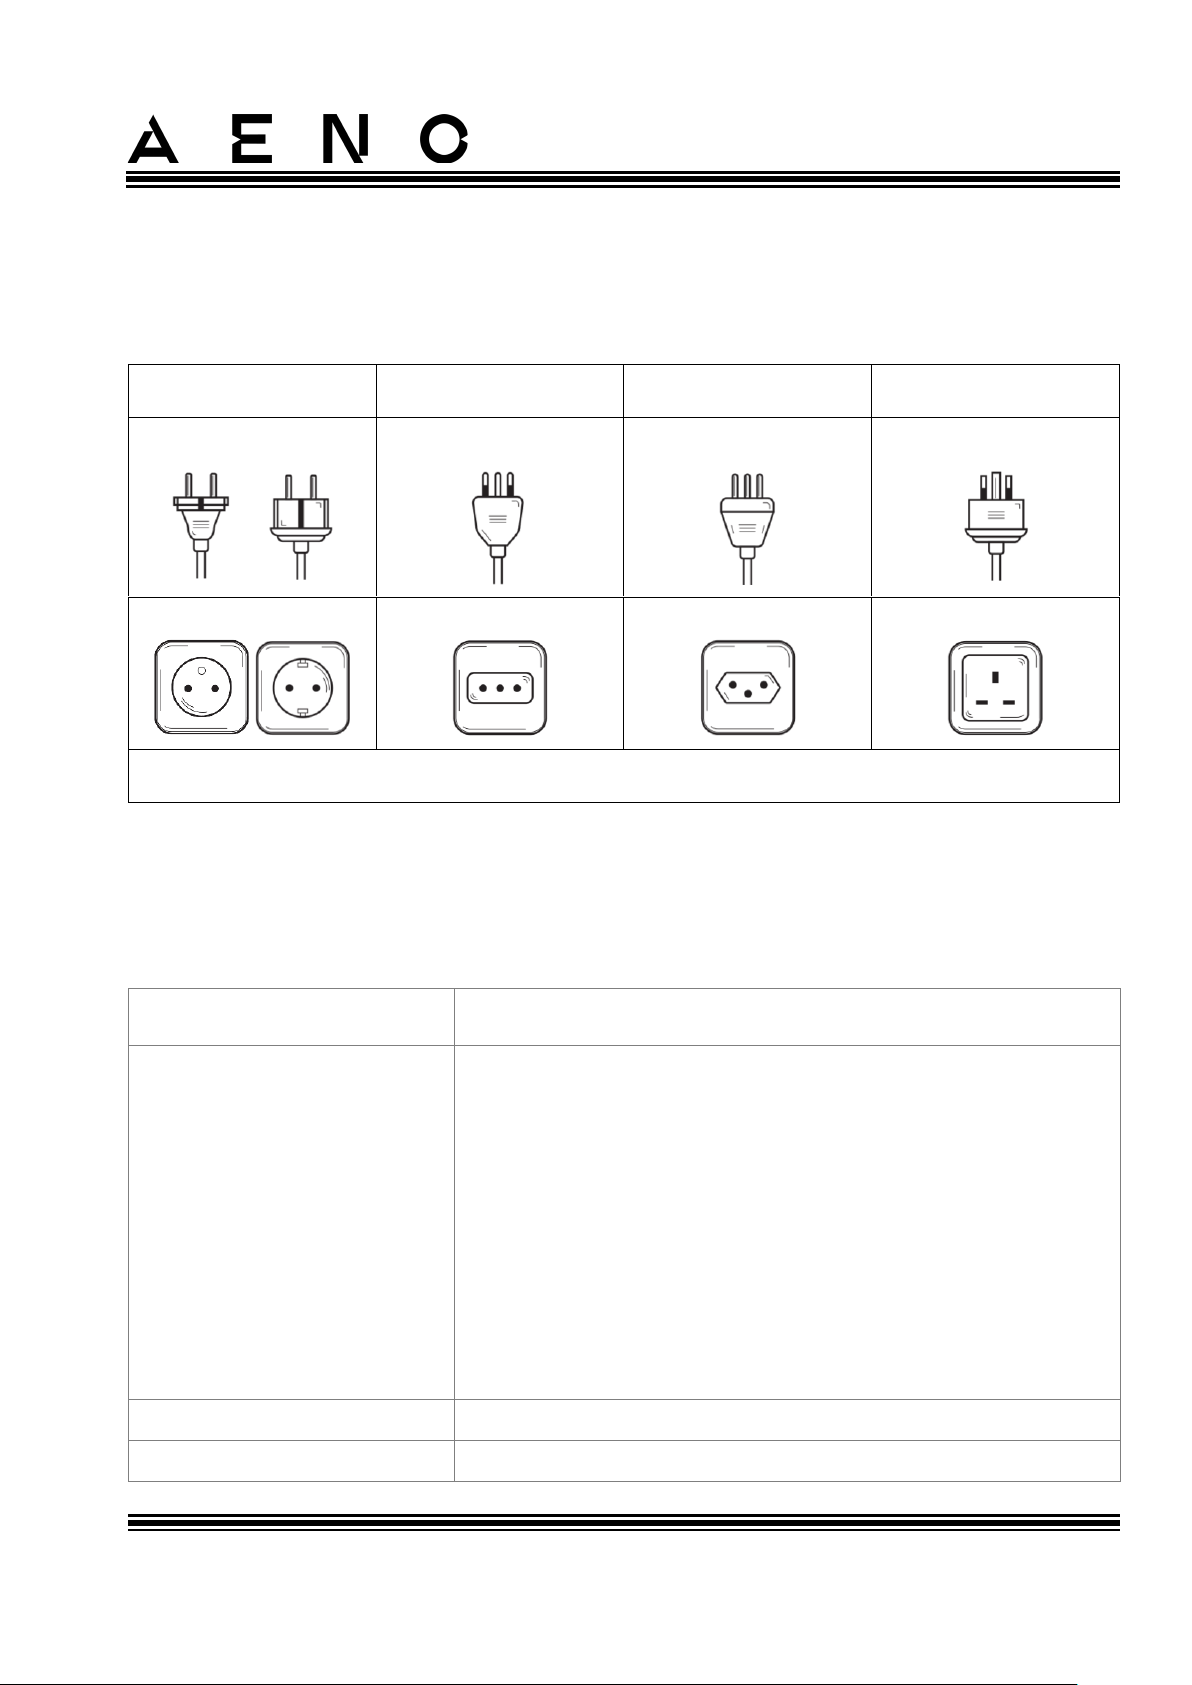
1.3 Types of Electrical Outlets and Plugs
Since electrical outlet standards may vary from country to country, there are several
versions of the AENOTM heater plugs depending on the country of sale.
GH1S
GH1S-IT
GH1S-CH
GH1S-UK
Plug type E/F:
Plug type L:
Plug type J:
Plug type G:
For E, F outlets:
For L outlets:
For J outlets:
For G outlets:
Voltage: 230 V, Frequency: 50 Hz
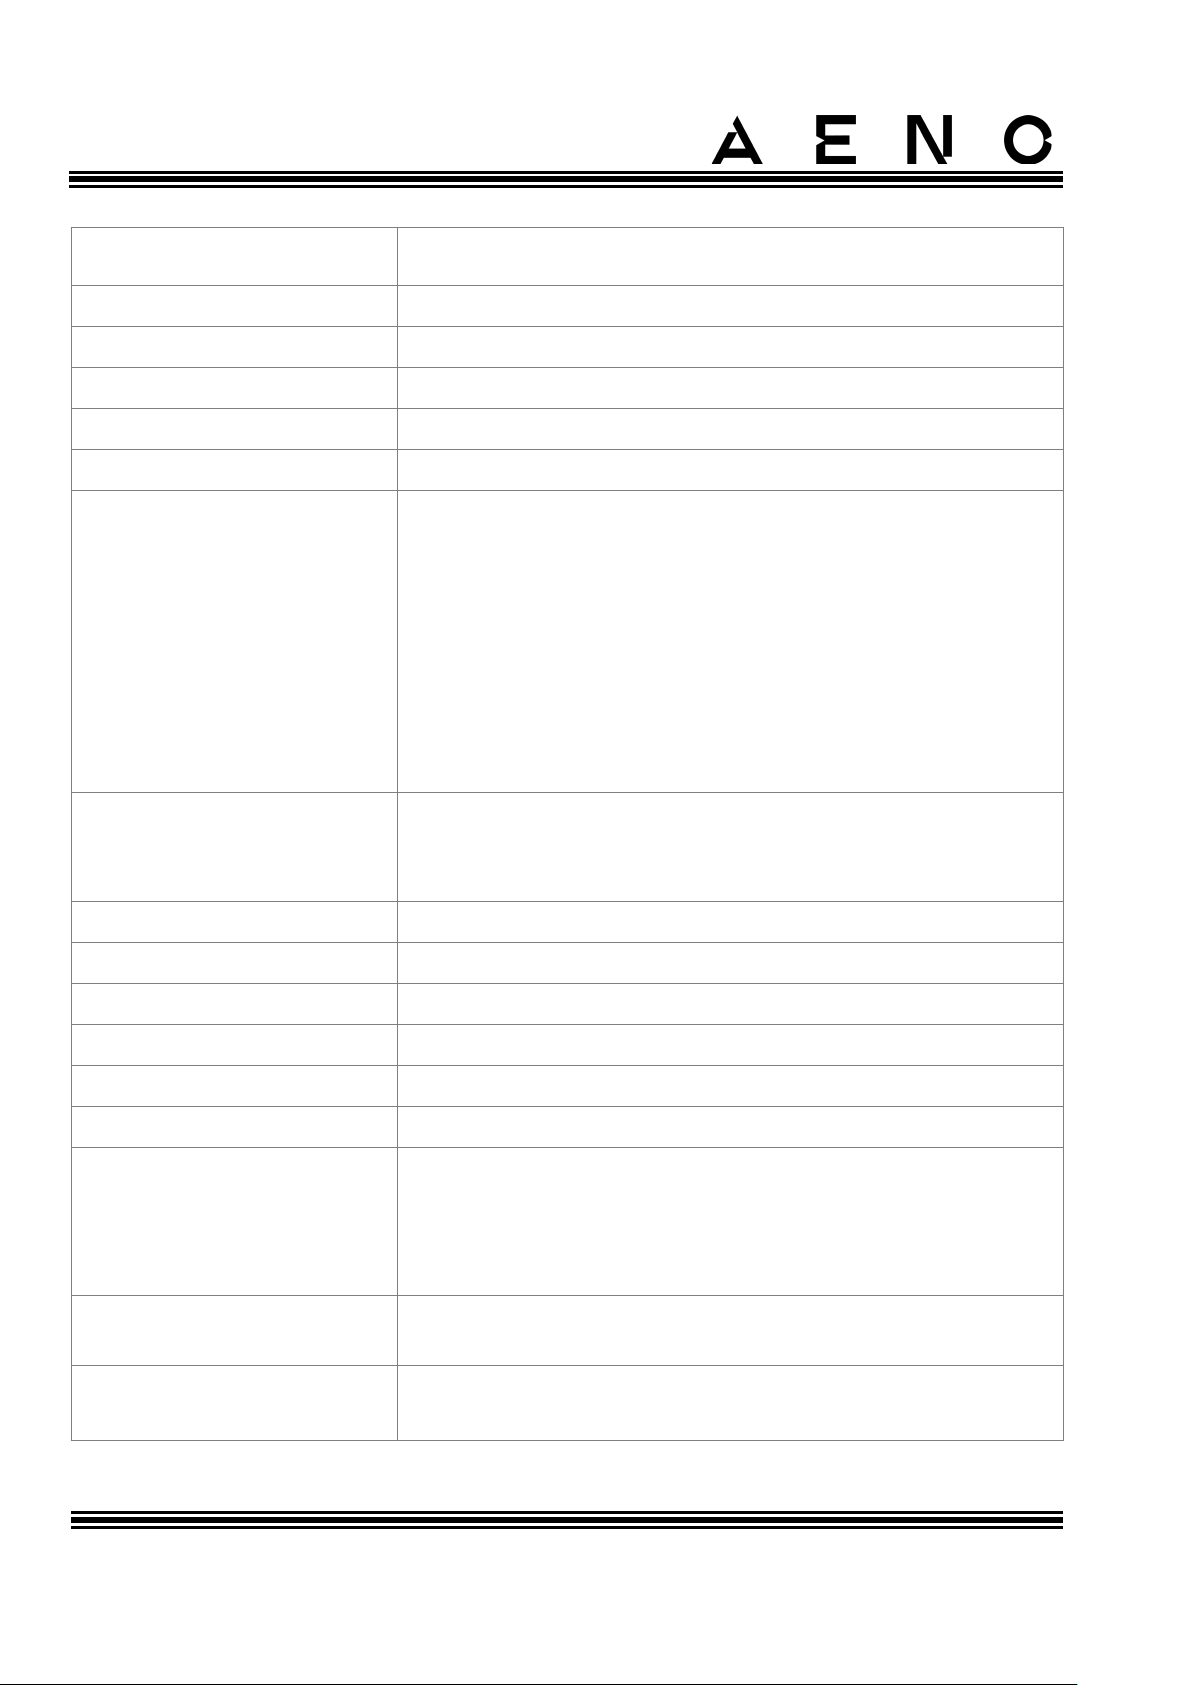
1.4 Technical Specifications
Table 3 – Basic Technical Specifications
Parameter
Value
Article
White:
GH1S (Model AGH0001S)
GH1S-IT (Model AGH0001S-IT)
GH1S-CH (Model AGH0001S-CH)
GH1S-UK (Model AGH0001S-UK)
Black:
GH2S (Model AGH0002S)
GH2S-IT (Model AGH0002S-IT)
GH2S-CH (Model AGH0002S-CH)
GH2S-UK (Model AGH0002S-UK)
Communication Standard
Wi-Fi (IEEE 802.11b/g/n), 18.2 dBm max (~66 mW)
Operating frequency
2,400-2,483.5 GHz
Page 20
AENOTM Premium Eco Smart Heater
Installation and Operation Manual
Document version: 1.0.3, aeno.com © ASBISc Enterprises PLC. All rights reserved
Page 20 of 68
Parameter
Value
Integration
Google Assistant, Amazon Alexa
Server
Cloud
IR angle
Up to 300° (depending on installation area)
IR wavelength
95-100 µm
Room area
Not more than 30 m2 (depends on the room insulation)
Power
Power supply voltage:
220V to 230 V (AC), 50 Hz
Permissible voltage range:
180-253 V (AC)
Rated current:
3.0 A (no more than 0.01 A in standby mode)
Rated power:
700 W (not more than 2 W in standby mode)
Types of protection
Current protection: 6.3 A
Voltage protection: 260 V
Panel temperature protection: +135 °С
Protection Class
IP44
Electronic gyroscope
Tip-over shutdown
Operating temperature
0 °C to +40 °C
Operating humidity
up to 75% RH (without condensation)
Storage temperature
-20 °C to +70 °C
Storage humidity
up to 75% RH (without condensation)
Installation options
On a flat horizontal surface (horizontal floor installation).
On a flat vertical surface (horizontal or vertical wall
mounting).
Designed for indoor installation only.
Installation height (wall
mounting)
Not higher than 1 meter from the floor
Case Material
Heating plate: tempered glass
Control unit: PC plastic
Page 21
AENOTM Premium Eco Smart Heater
Installation and Operation Manual
© ASBISc Enterprises PLC.. All rights reserved Document version: 1.0.3, aeno.com
Page 21 of 68
Parameter
Value
Color
Traffic White, Jet Black
Dimensions (L × W × H)
1000×165×417 mm (floor installation)
1000×62×365 mm (wall mounting)
Net Weight
8.7 kg (with accessories)
Warranty period
2 years
Service life
2 years
Certificates
CE, EAC, RoHS
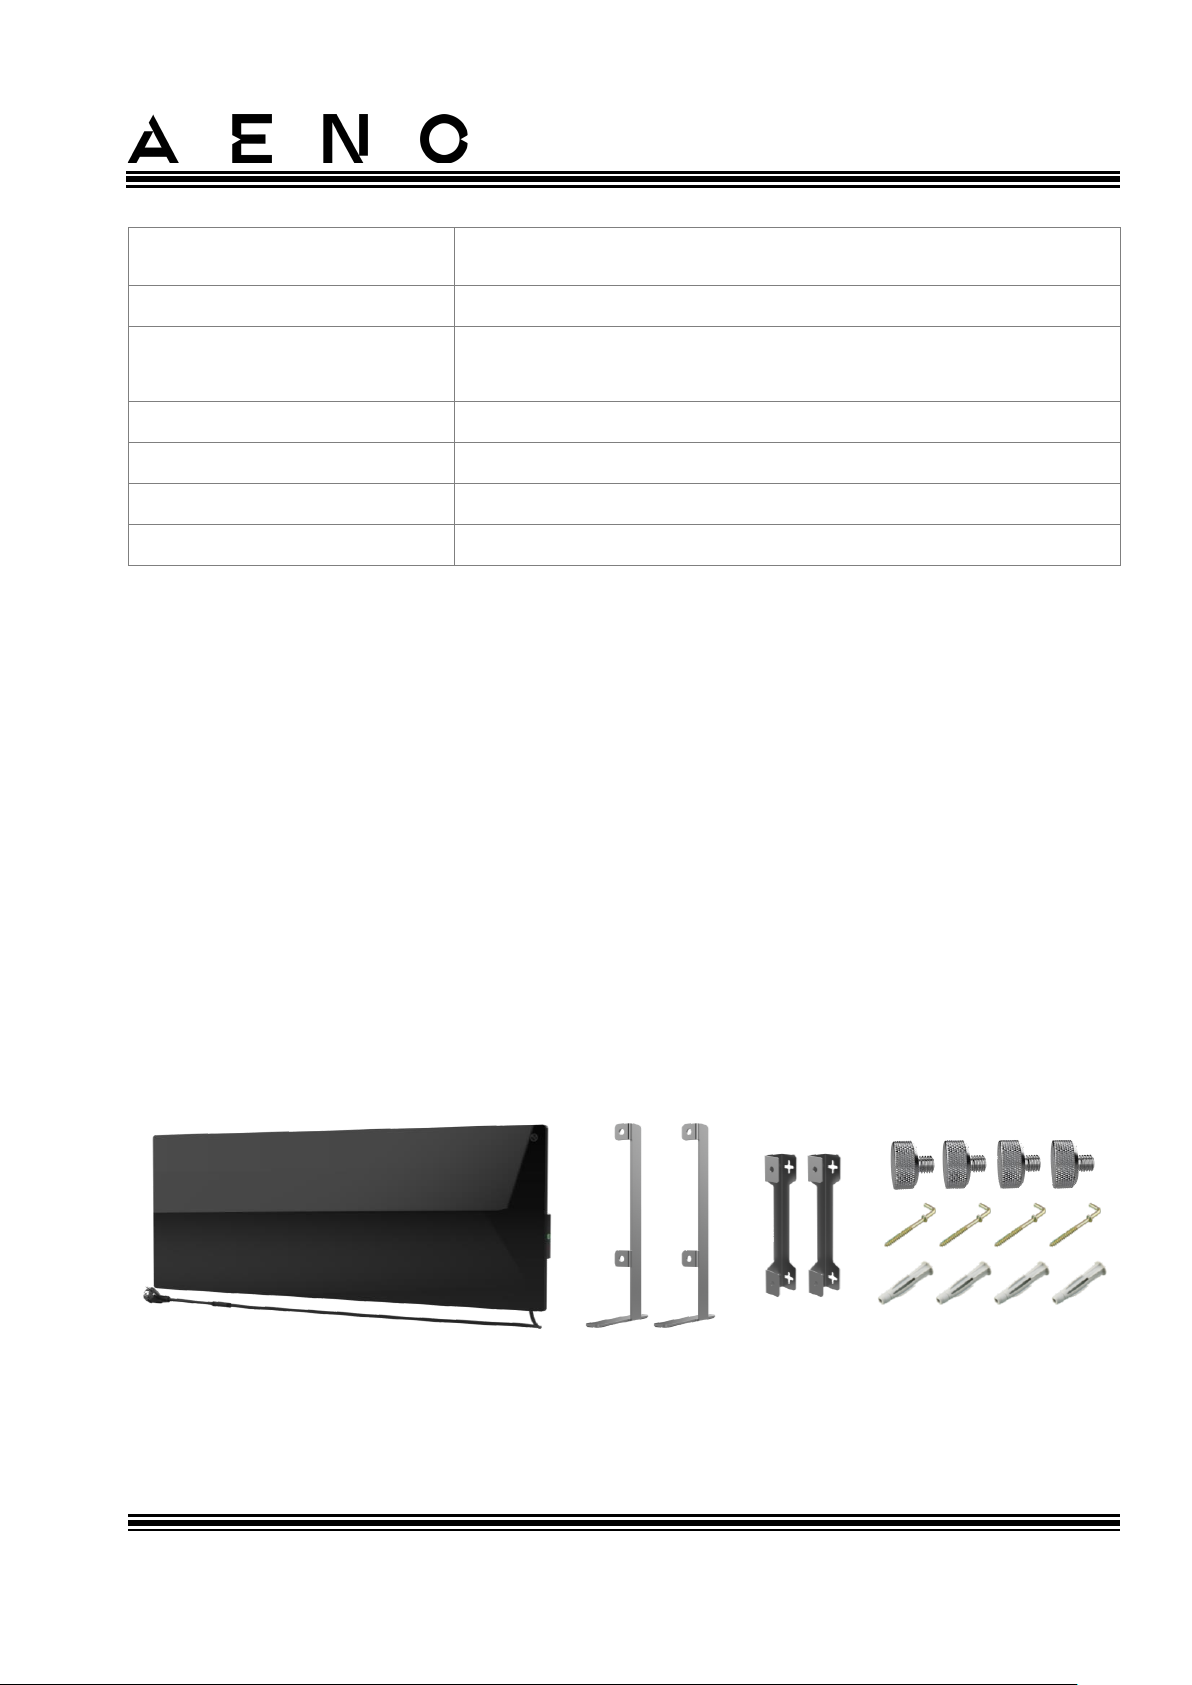
1.5 Scope of Delivery
The AENOTM heater comes with the following devices and accessories:
1. Premium Eco Smart Heater AENO
TM
– 1 pc.
2. Legs for floor installation – 2 pcs.
3. Brackets for wall mounting
(assembled with the heater, or separately) – 2 pcs.
4. Mounting kit, namely:
mounting bolts – 4 pcs.
hooks – 4 pcs.
dowels – 4 pcs.
5. Template for drilling holes in the wall – 1 pc.
6. Quick Start Guide – 1 pc.
7. Warranty Card – 1 pc.
1
2 3 4*
Figure 4 – Package contents
* The images of accessories are for illustrative purposes only.
Page 22

AENOTM Premium Eco Smart Heater
Installation and Operation Manual
Document version: 1.0.3, aeno.com © ASBISc Enterprises PLC. All rights reserved
Page 22 of 68
1.6 Packaging and Labeling
The AENOTM heater is supplied in an individual carton package of 107×43×9,1 cm
(L×W×H) containing the full name and marking of the device, the list of accessories
provided and basic technical specifications thereof, as well as the date of manufacture
and information about the Manufacturer of devices.
Weight of the carton:
• Net weight: 8.7 kg;
• Gross weight: 10.9 kg.
Page 23
AENOTM Premium Eco Smart Heater
Installation and Operation Manual
© ASBISc Enterprises PLC.. All rights reserved Document version: 1.0.3, aeno.com
Page 23 of 68
2 Installation and Operation
Before installation, the User shall select one of the following possible locations and for
the device:
• On a flat and stable horizontal surface for installation on legs;
• on a flat non-tilted vertical surface for mounting on brackets.
The User shall also make sure that the selected location meets the following
requirements:
• Availability of a power source at the place where the heater is installed;
• Acceptable location of the electrical outlet and the power cable (see Limitations
and Warnings);
• Ambient temperature is above 0 °C.
WARNING!
It is strongly recommended that the Eco Smart Heater is installed out of the reach
of children and pets, as contact with the device in operation may result in burns.
Do not use the Eco Smart Heater on carpets or near curtains or upholstered
furniture.
NOTE
It is not recommended to install the device in areas with a high level of noise and
a high-frequency interference. Reinforced concrete floors may reduce the
distance of wireless signal transmission.
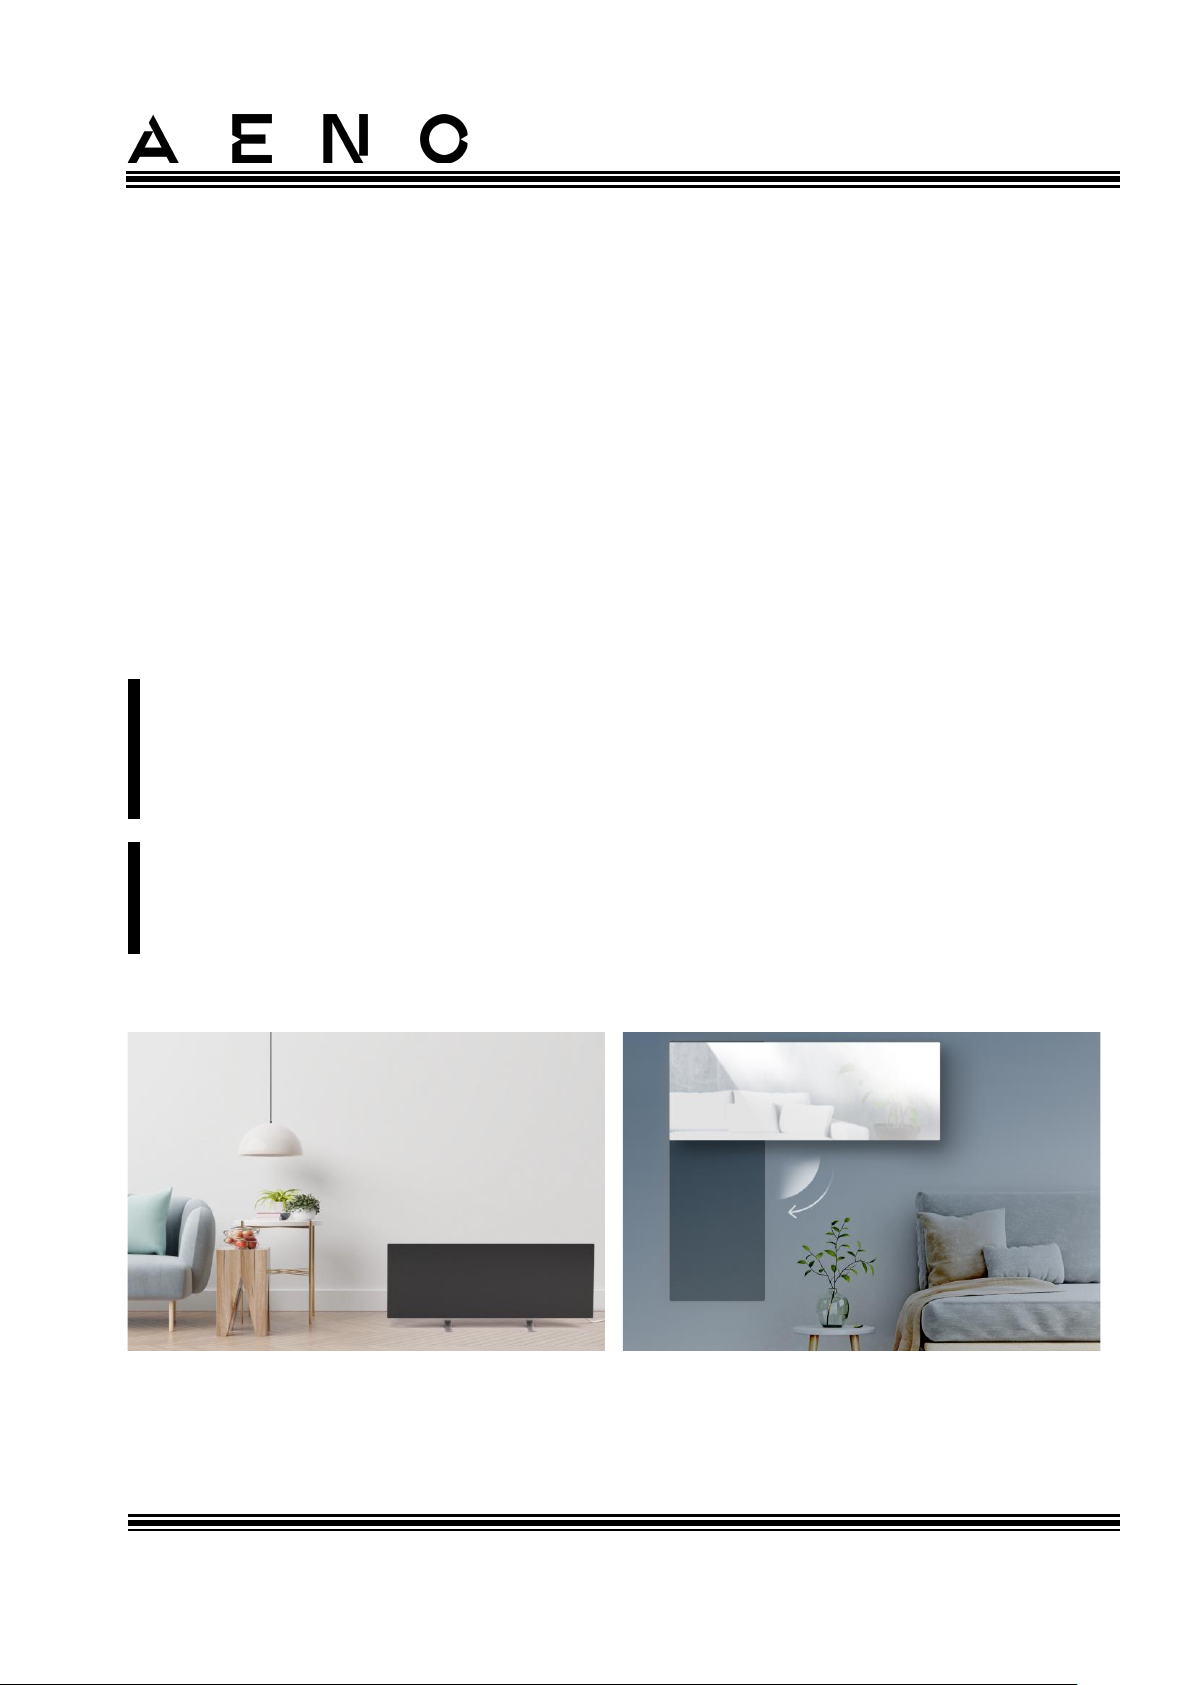
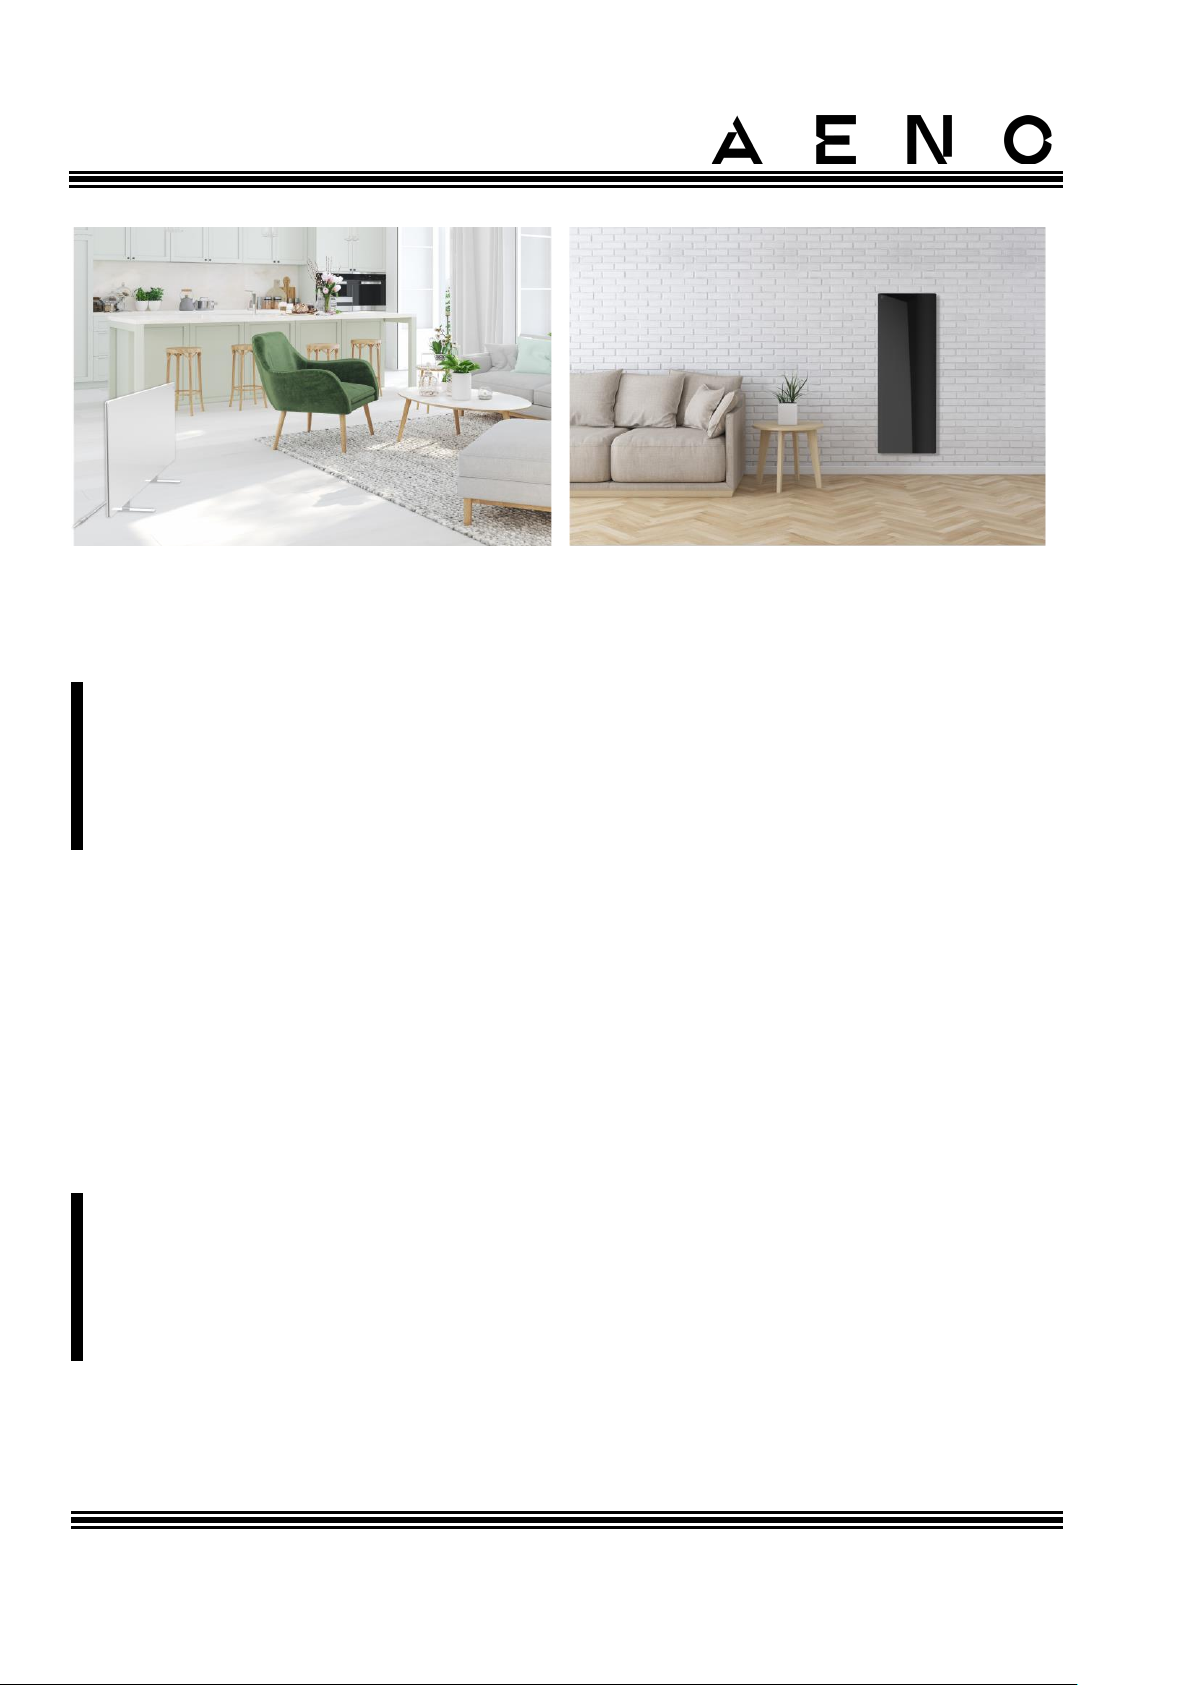
See below possible installation locations for the Eco Smart Heater.
Page 24
AENOTM Premium Eco Smart Heater
Installation and Operation Manual
Document version: 1.0.3, aeno.com © ASBISc Enterprises PLC. All rights reserved
Page 24 of 68
Figure 5 – Examples of heater installation*
* The images are for illustrative purposes only
WARNING!
Vertical orientation of the heater is only possible when mounted on the wall. In
this case, you should also consider the length of the power cable and the distance
to the electrical outlet, as well as the position of the control unit where the power
button is located (inconvenient orientation of the power button may interfere
with manual control of the heater).
2.1 First Installation and Setup
To ensure proper installation and proper operation of the heater, the following steps
must be followed:
1. Unpack the device, install it in the desired location and connect it to the source
of power supply with the power cable.
2. If necessary, activate the device in the mobile app.
IMPORTANT!
After the first activation in the mobile app, the process of updating the heater
firmware can be started (the user will receive a corresponding notification). Do
not unplug the device from the mains until the update process is completed!
Also, do not disconnect the device from the mains for 5 minutes after resetting
to factory settings.
Page 25
AENOTM Premium Eco Smart Heater
Installation and Operation Manual
© ASBISc Enterprises PLC.. All rights reserved Document version: 1.0.3, aeno.com
Page 25 of 68
2.1.1 Unpacking and Preparing for Installation/Mounting
1. Unpack the heater and accessories carefully.
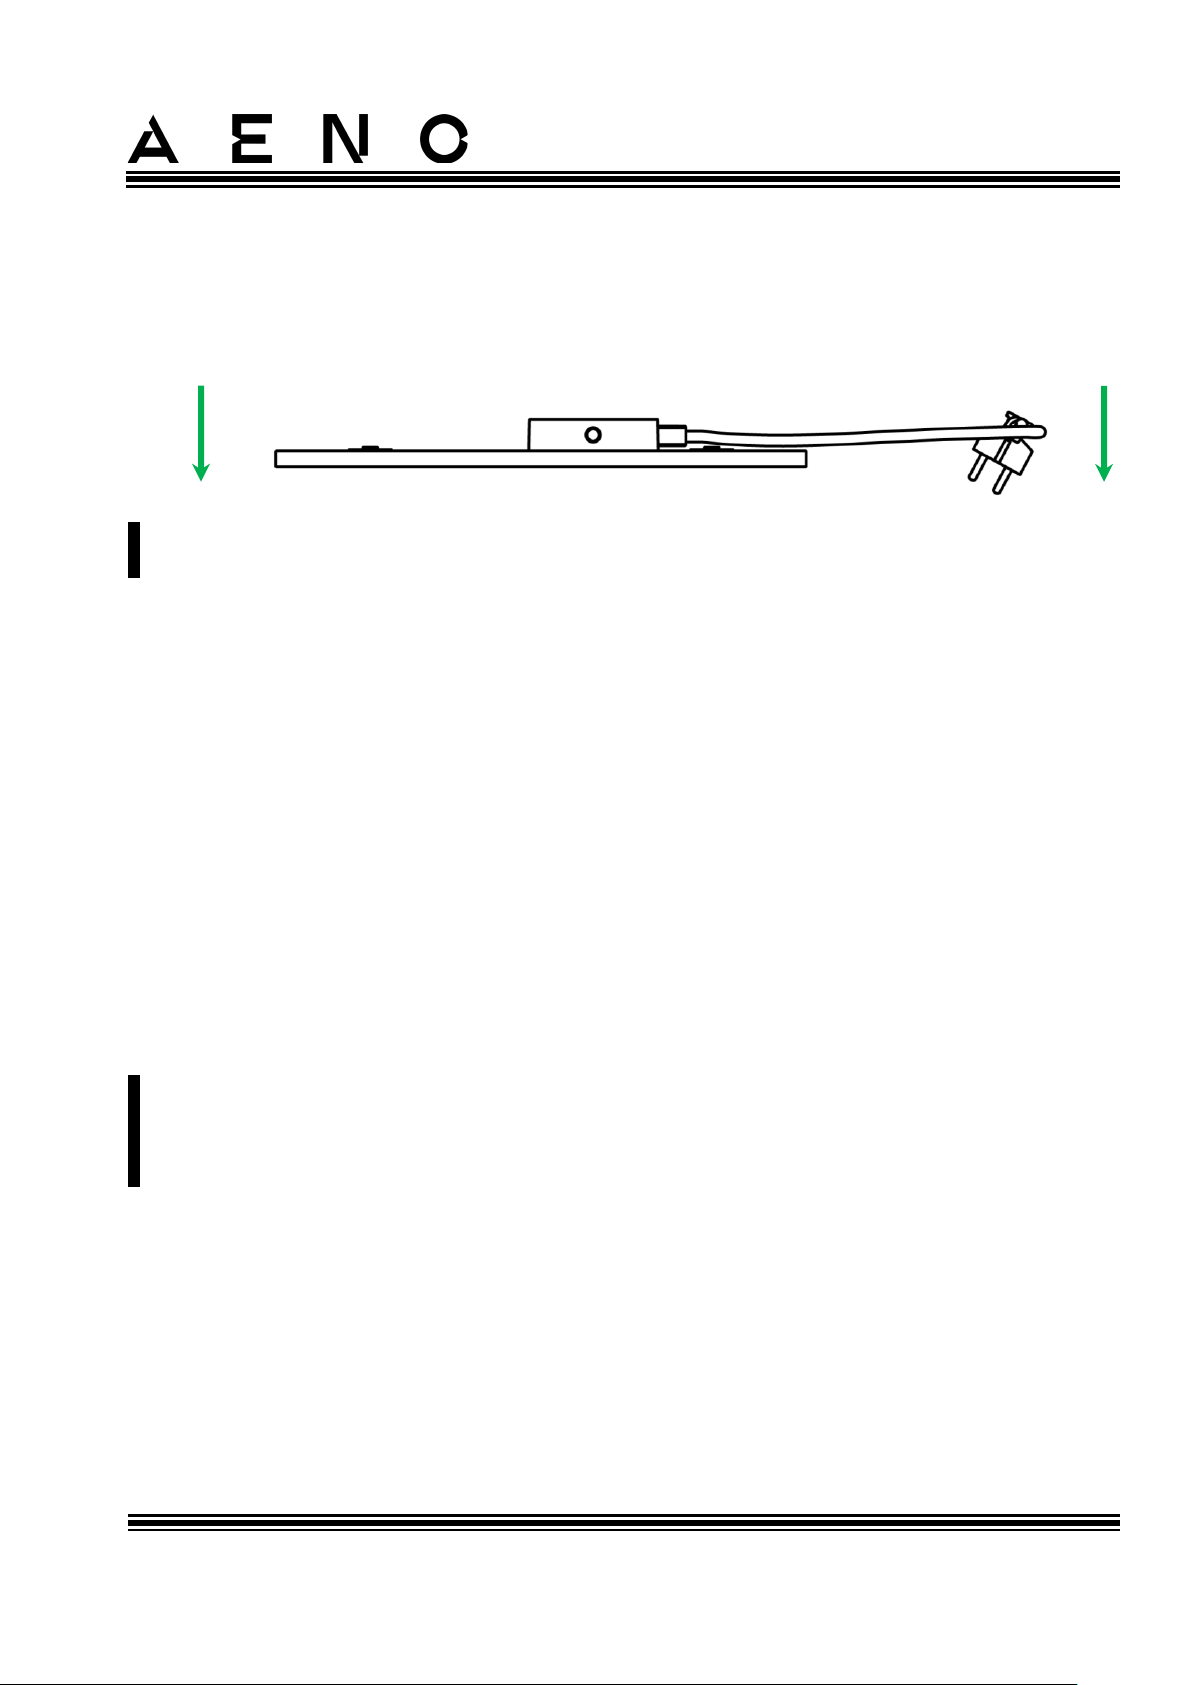
2. Place the device on a clean horizontal surface with the heating panel facing
down.
NOTE
It is recommended to place the device on a clean cloth surface.
3. Wipe both sides of the heating panel with a damp cloth soaked in a little water,
then with a dry cloth that does not leave streaks. Make sure that there are no
traces of dust and dirt on the device.
4. Prepare the installation area and install the heater according to the most
suitable option (See below).
2.1.2 Preparing the Installation area
For floor installation:
1. Only horizontal orientation is allowed when the heater is mounted on legs (See
Figure 1).
2. All types of fabrics, decorations and other flammable objects including rugs and
carpets must be kept at least 1 meter away from heater installation area.
For wall mounting:
WARNING!
Hooks and dowels supplied with the heater are designed to mount it on a
reinforced concrete wall only. When installing on a different type of wall you
should choose the appropriate fasteners.
1. The heater can be mounted horizontally or vertically on the wall (on 2 or 4 hooks).
2. All types of fabrics, decorations and other flammable objects including rugs and
carpets must be kept at least 1 meter away from heater installation area.
3. To drill holes in the wall, please use the special template supplied with the
heater.
Page 26
AENOTM Premium Eco Smart Heater
Installation and Operation Manual
Document version: 1.0.3, aeno.com © ASBISc Enterprises PLC. All rights reserved
Page 26 of 68
2.1.3 Floor Installation (Option 1)
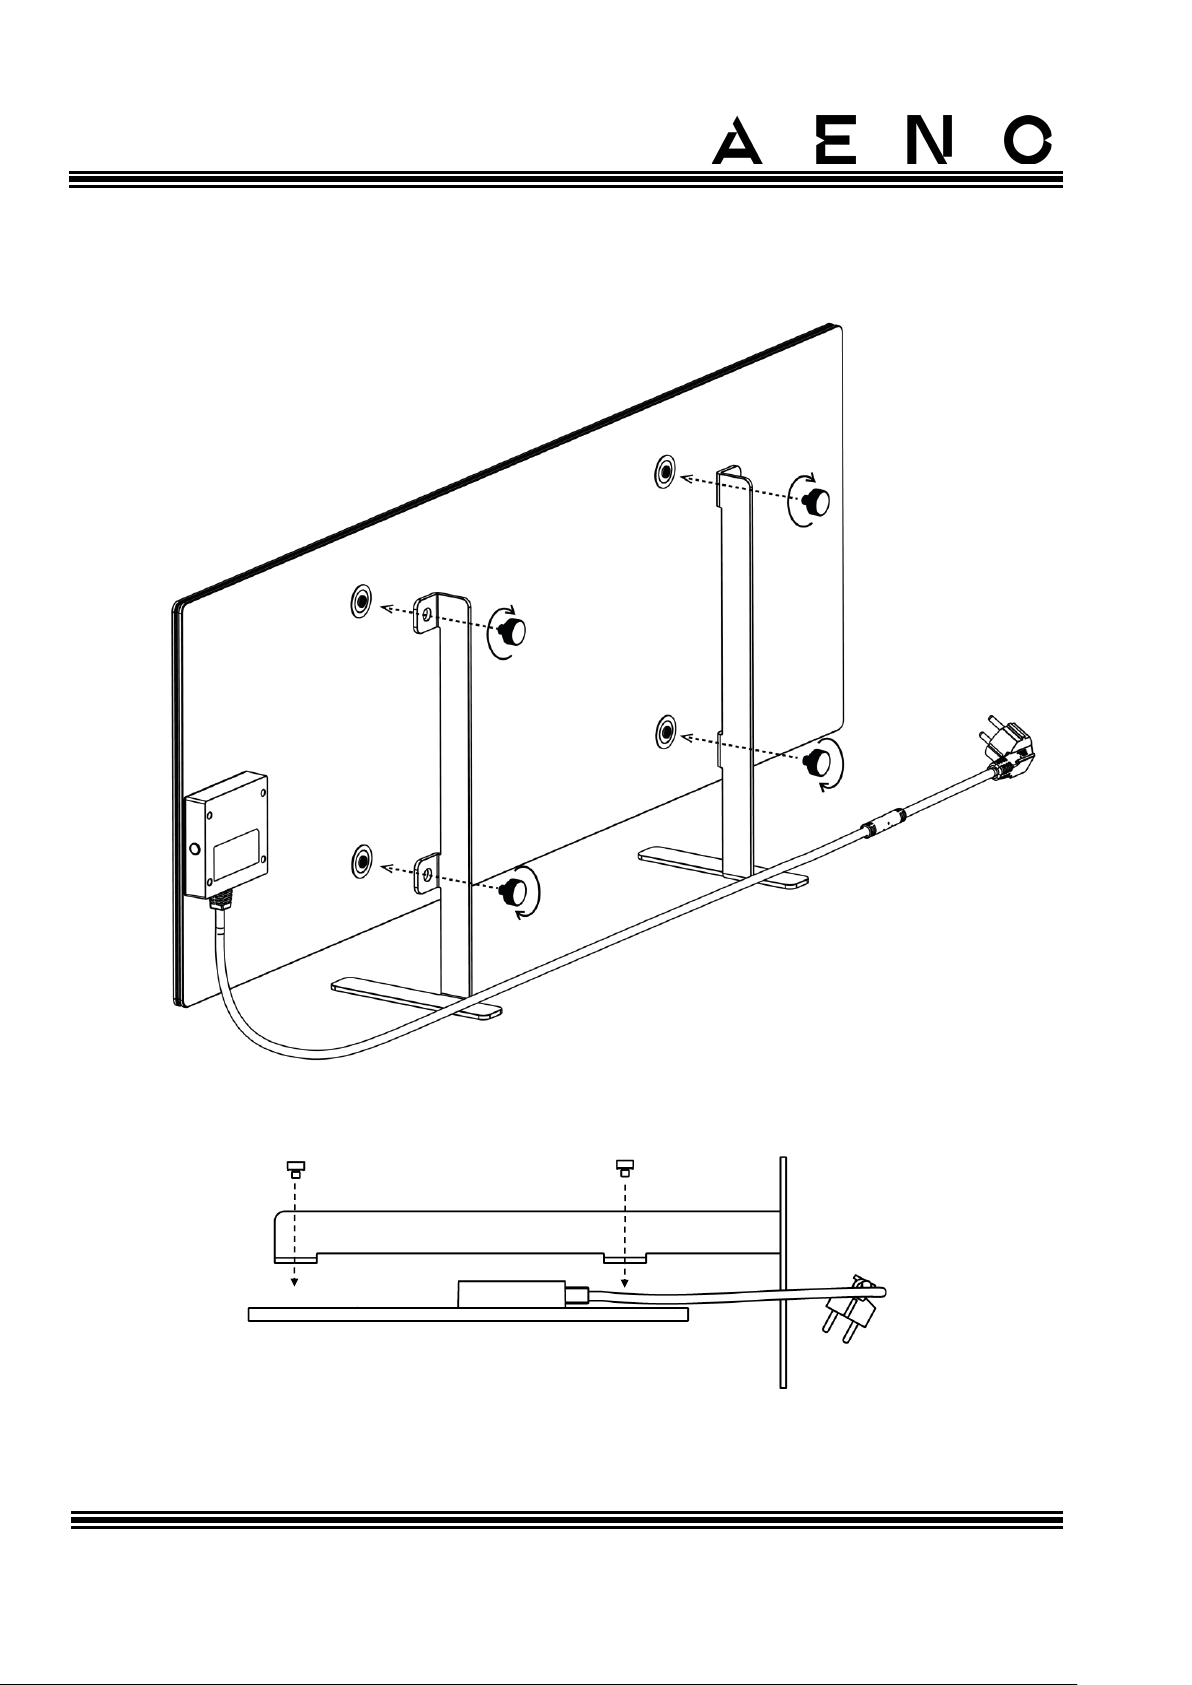
Figure 6 – Mounting on legs (on the floor)
Page 27
AENOTM Premium Eco Smart Heater
Installation and Operation Manual
© ASBISc Enterprises PLC.. All rights reserved Document version: 1.0.3, aeno.com
Page 27 of 68
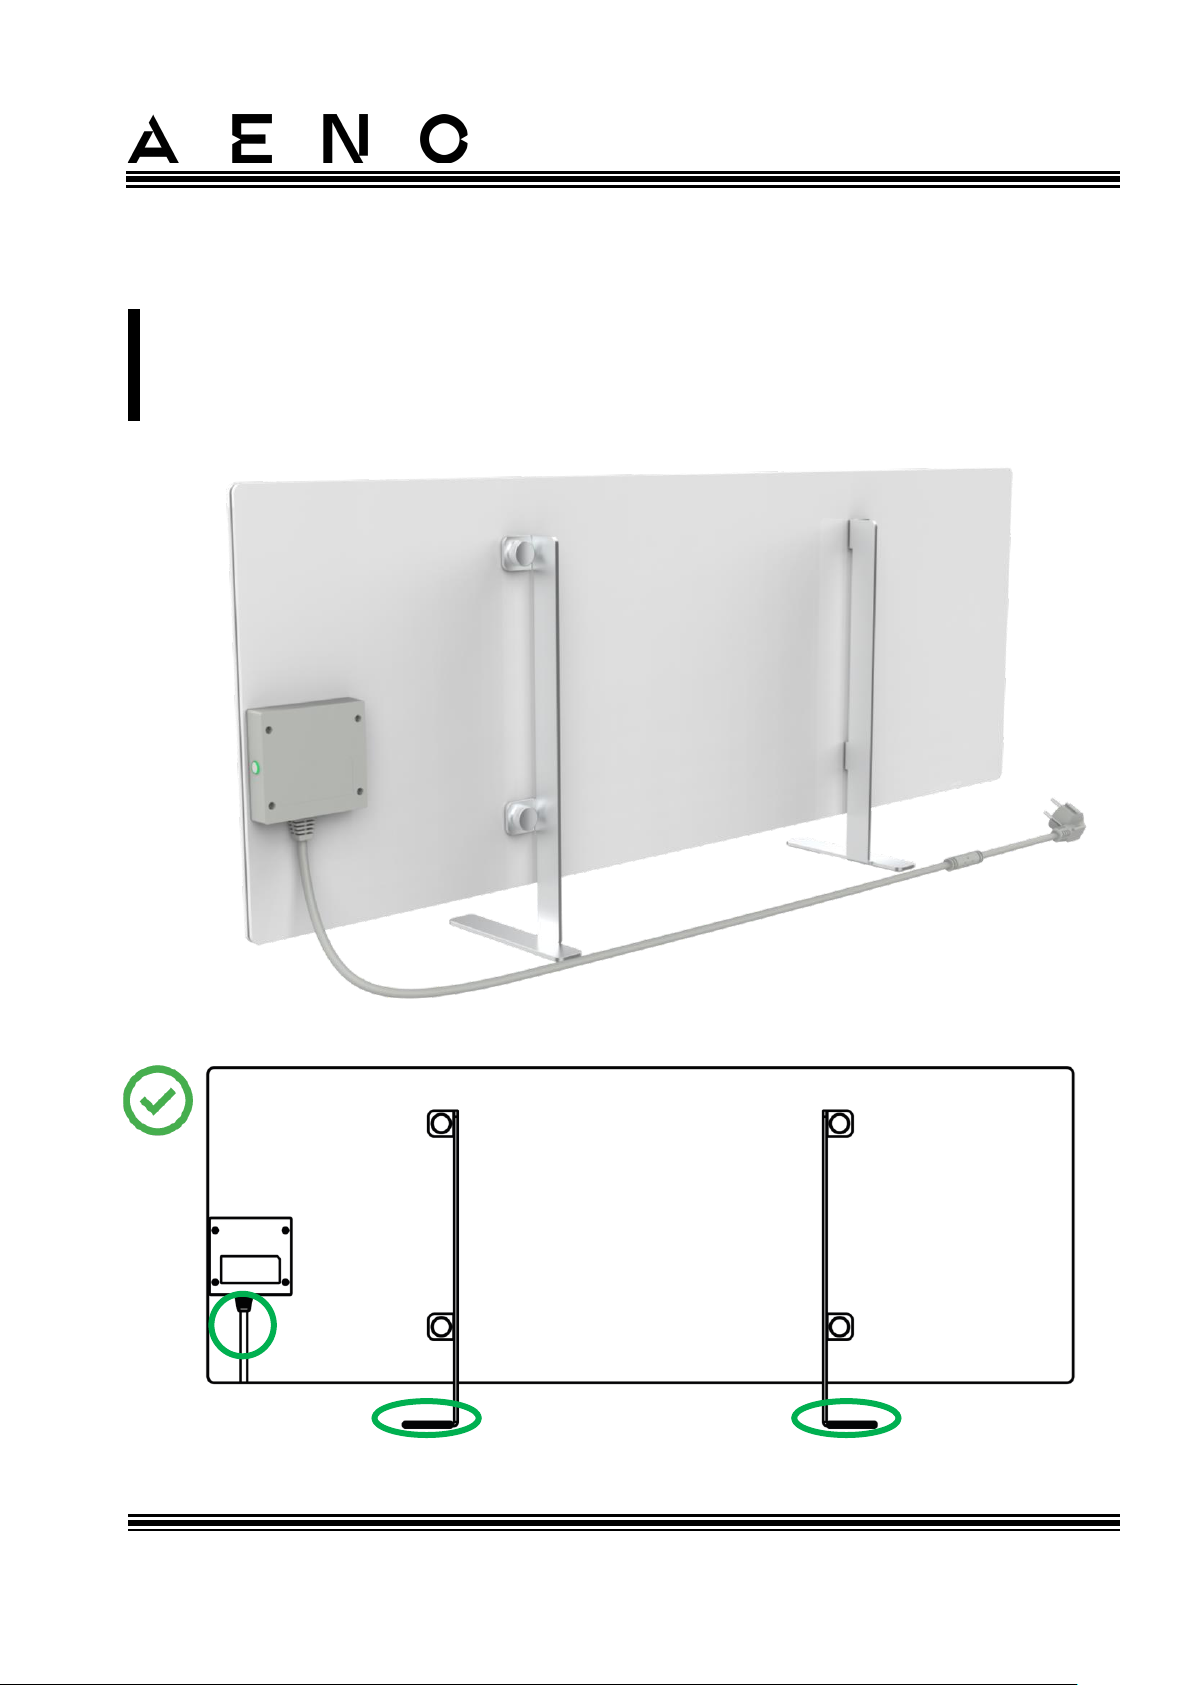
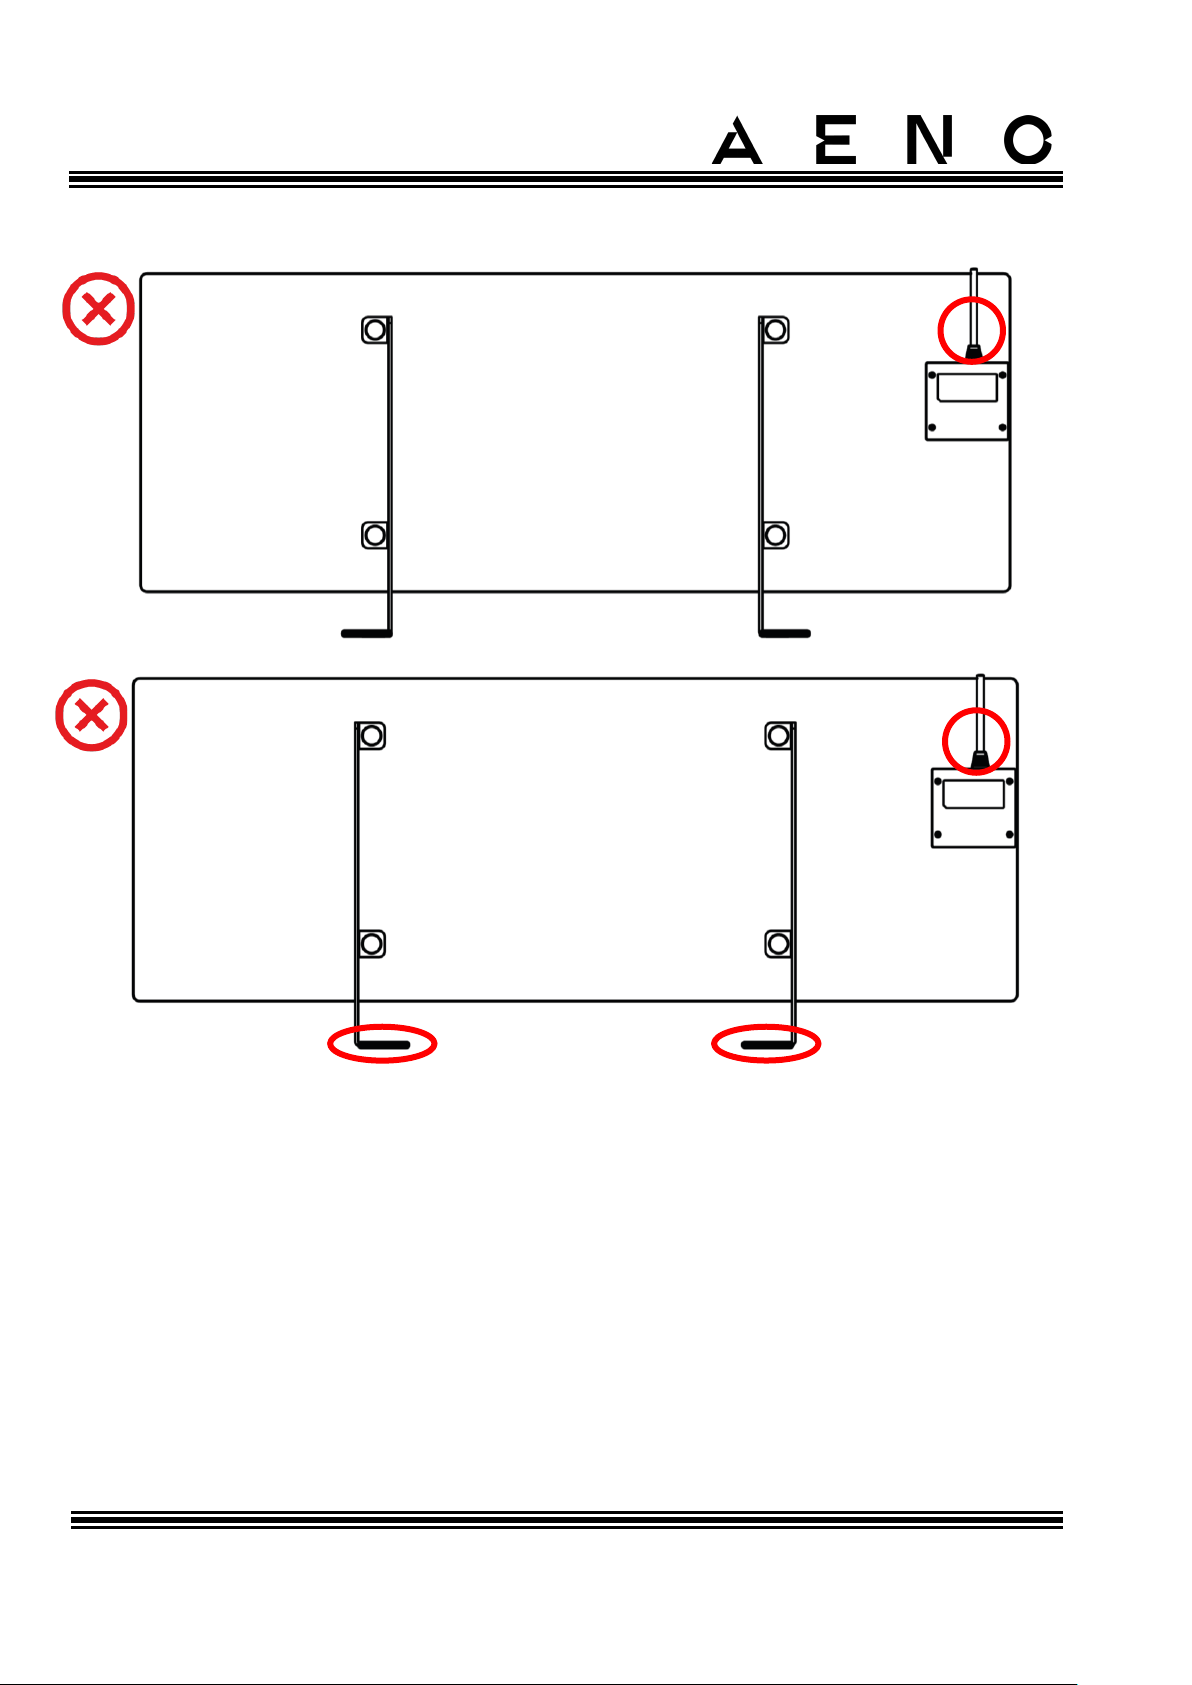
1. Screw the two metal legs to the heating panel with the mounting bolts (See
Figure above).
NOTE
During installation, make sure that the mounting bolts are tightened securely
and that legs are correctly oriented relative to the device body (i.e. the inlet of
the power cable to the control unit shall be from below).
Page 28
AENOTM Premium Eco Smart Heater
Installation and Operation Manual
Document version: 1.0.3, aeno.com © ASBISc Enterprises PLC. All rights reserved
Page 28 of 68
Page 29
AENOTM Premium Eco Smart Heater
Installation and Operation Manual
© ASBISc Enterprises PLC.. All rights reserved Document version: 1.0.3, aeno.com
Page 29 of 68
2.1.4 Horizontal Wall Mounting (Option 2)
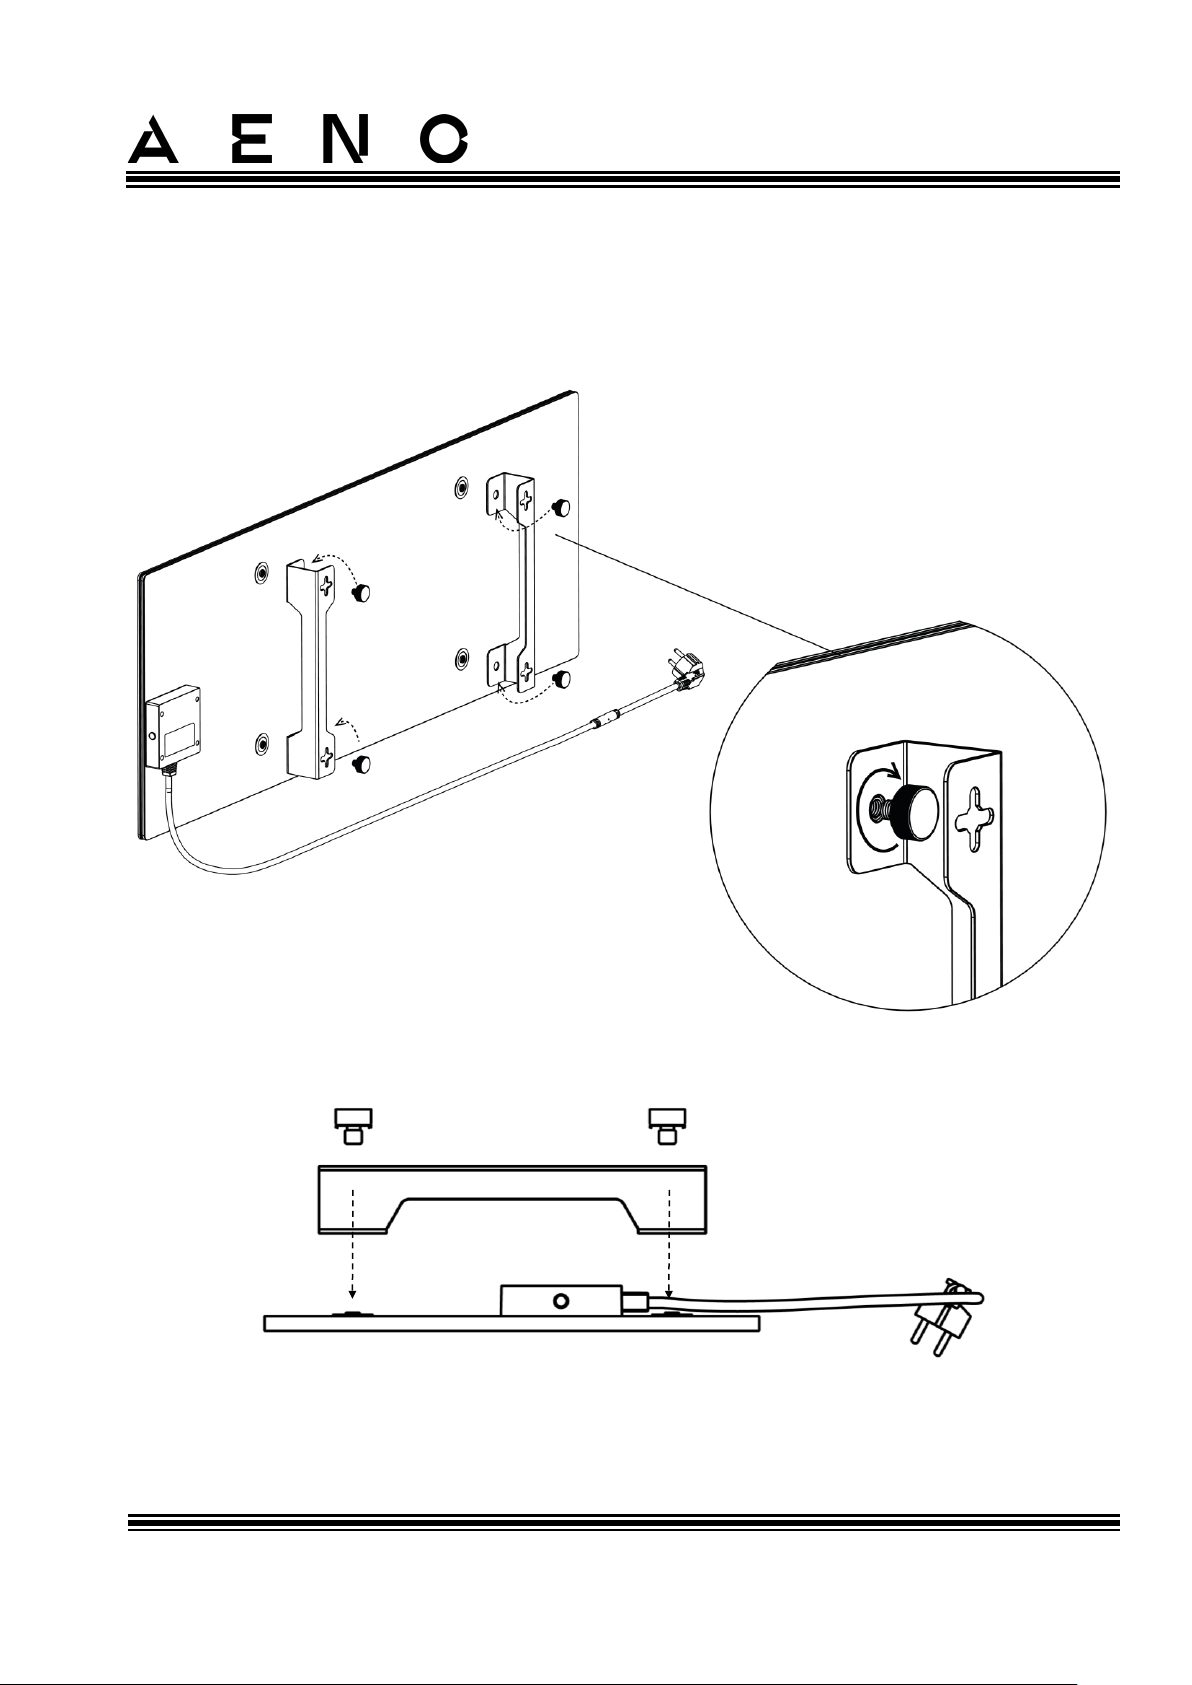
1. Select the desired orientation of the heater on the wall (horizontally).
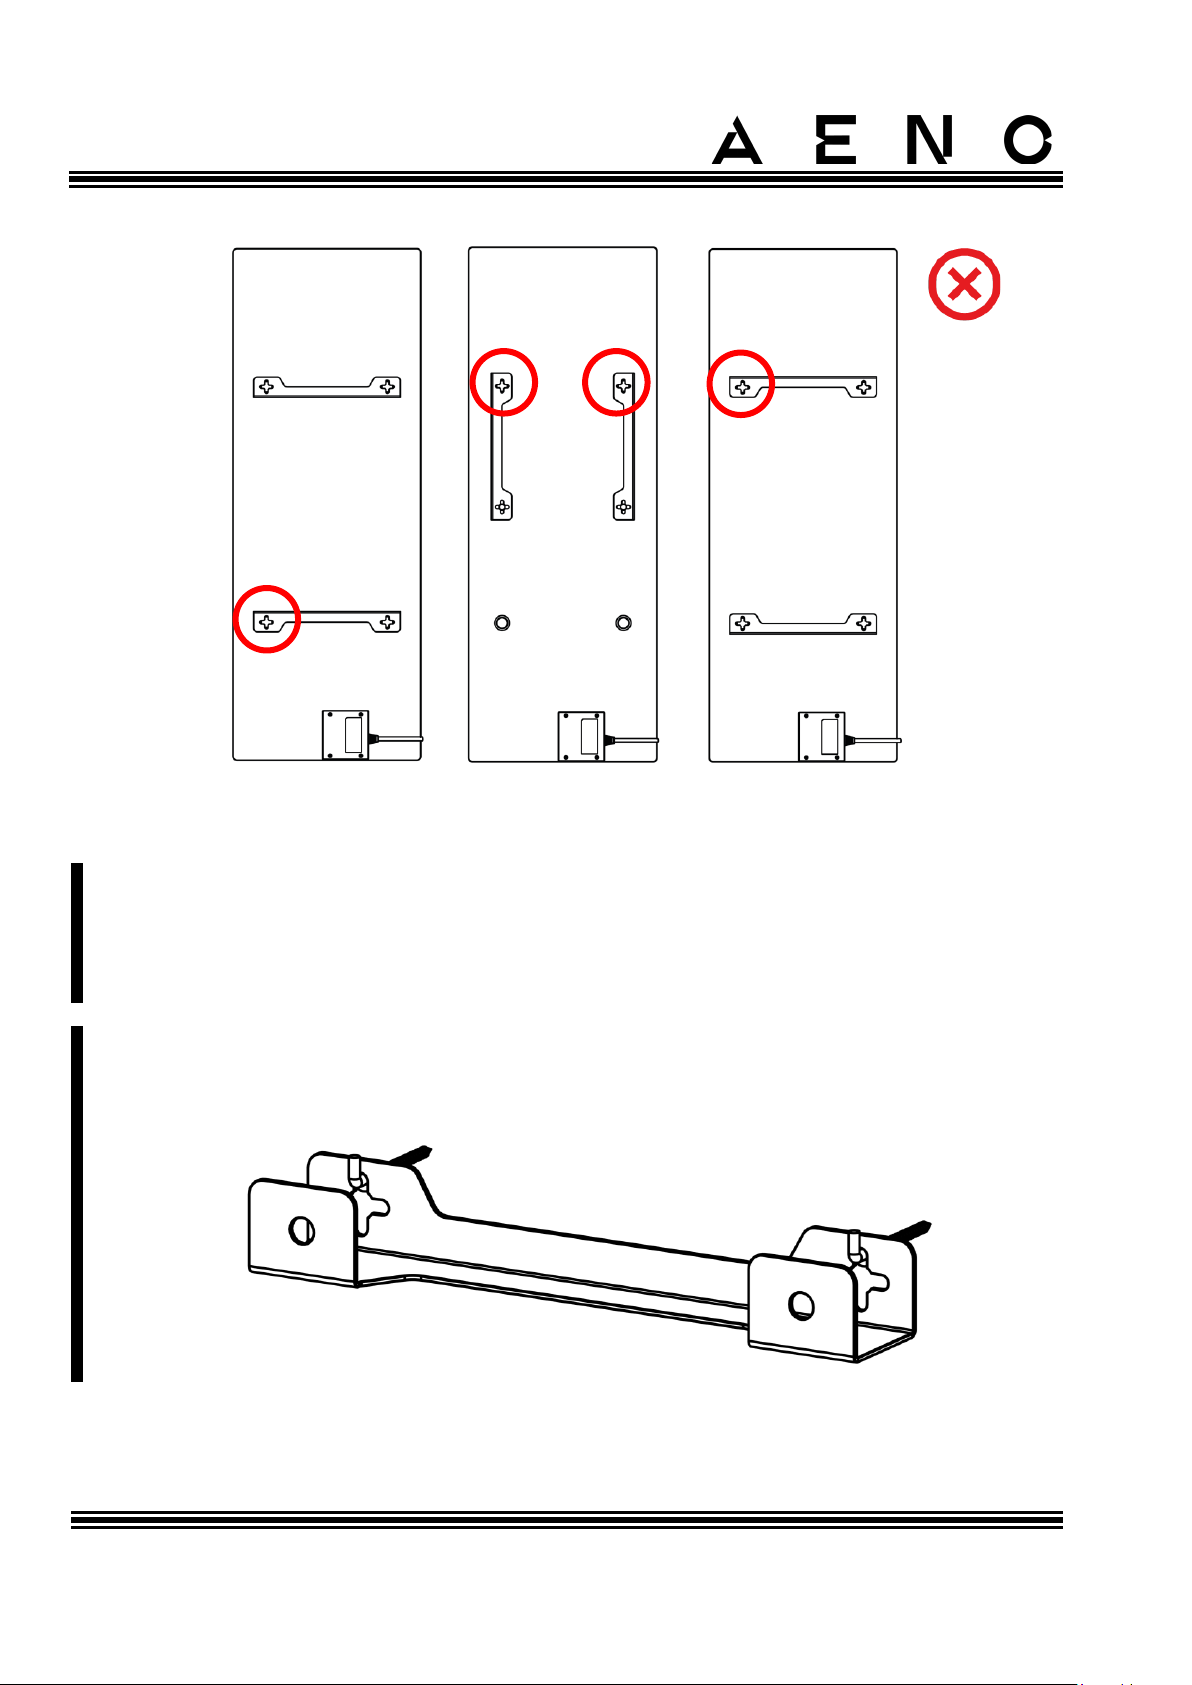
2. Screw mounting brackets to the rear surface of the panel correctly.
Page 30
AENOTM Premium Eco Smart Heater
Installation and Operation Manual
Document version: 1.0.3, aeno.com © ASBISc Enterprises PLC. All rights reserved
Page 30 of 68
Figure 7 – Installation of the brackets
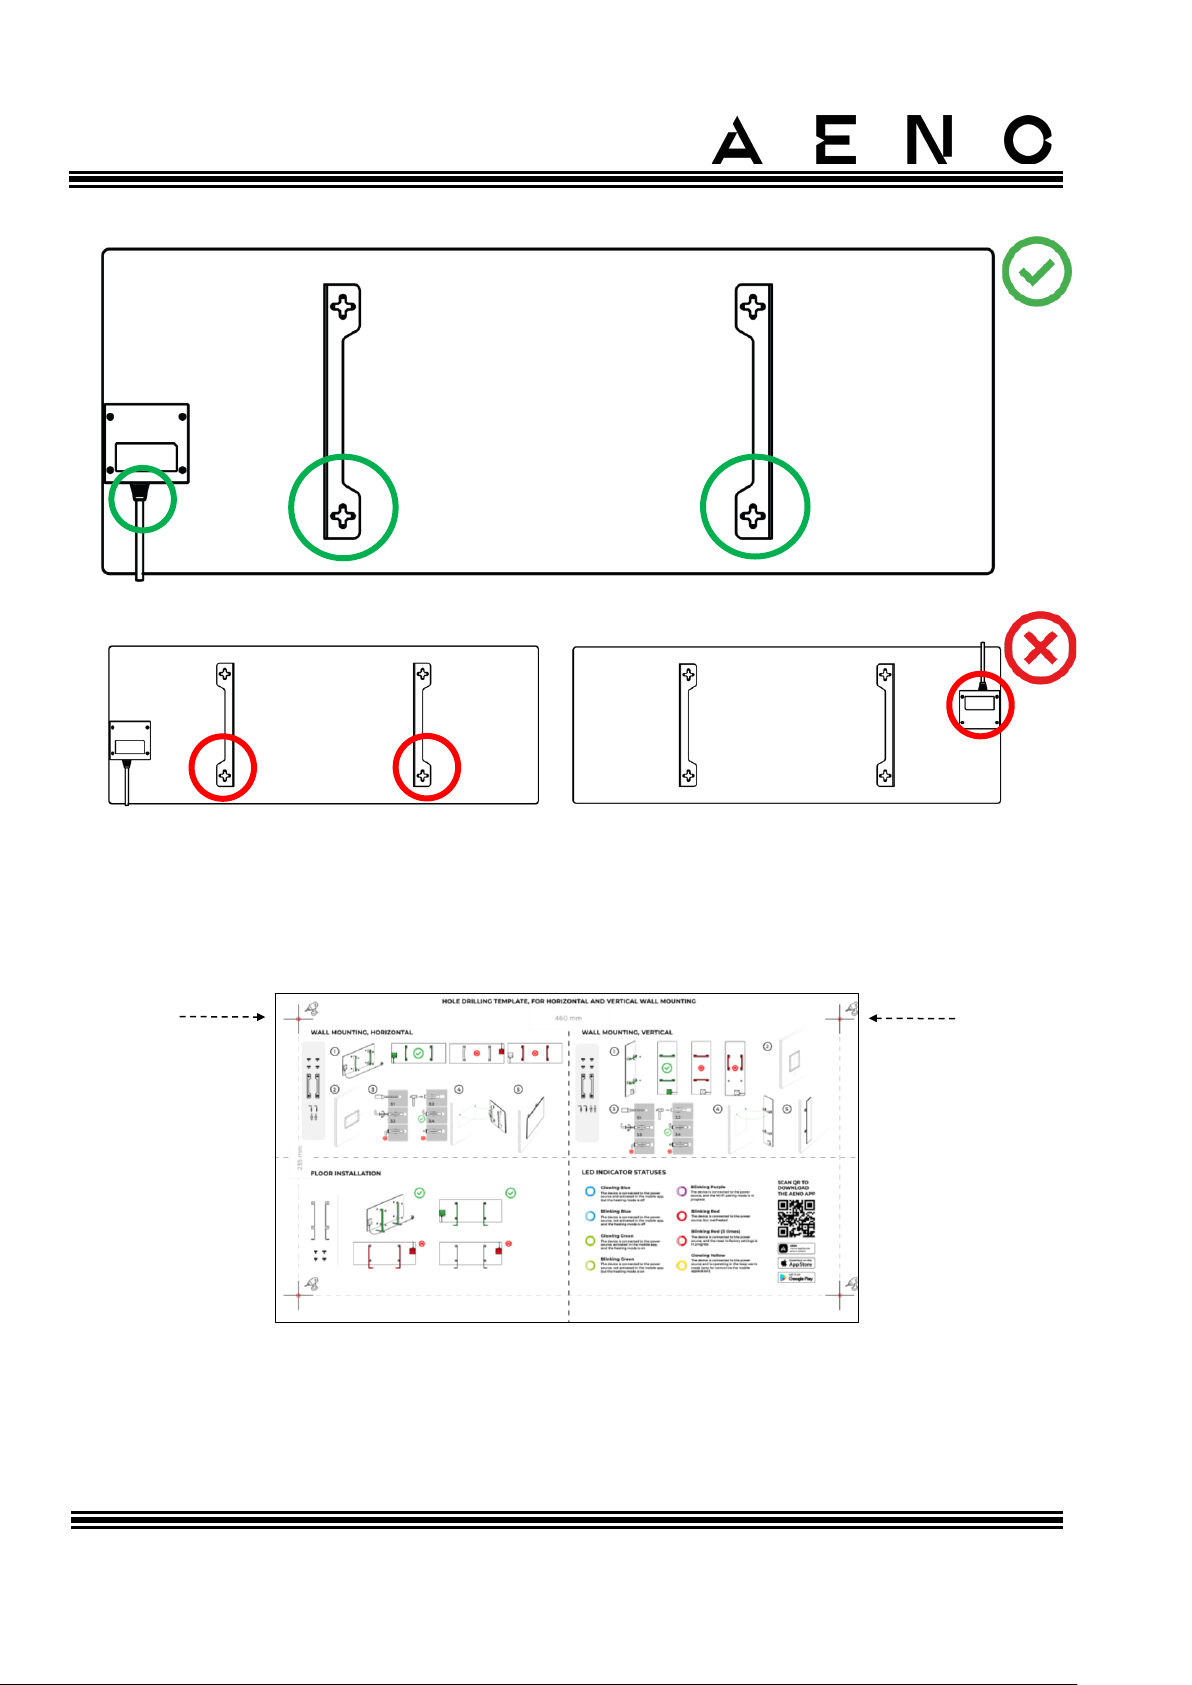
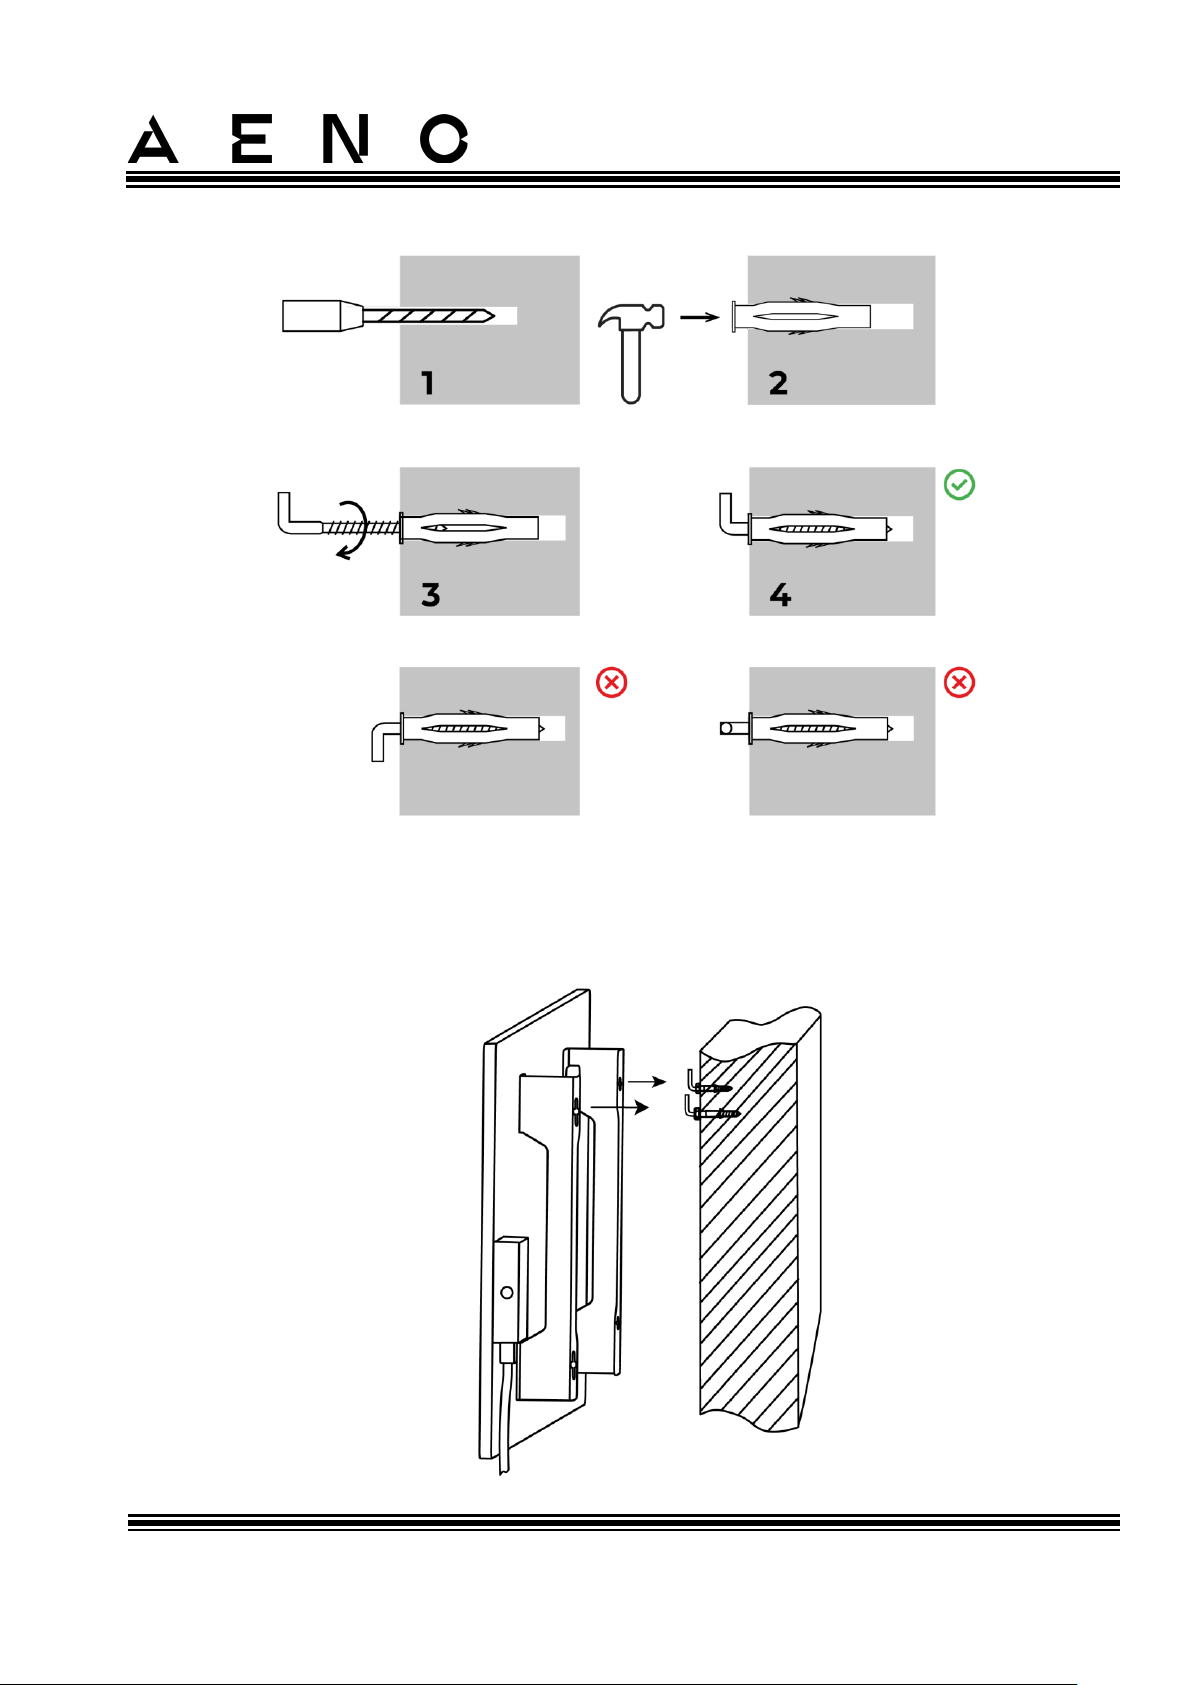
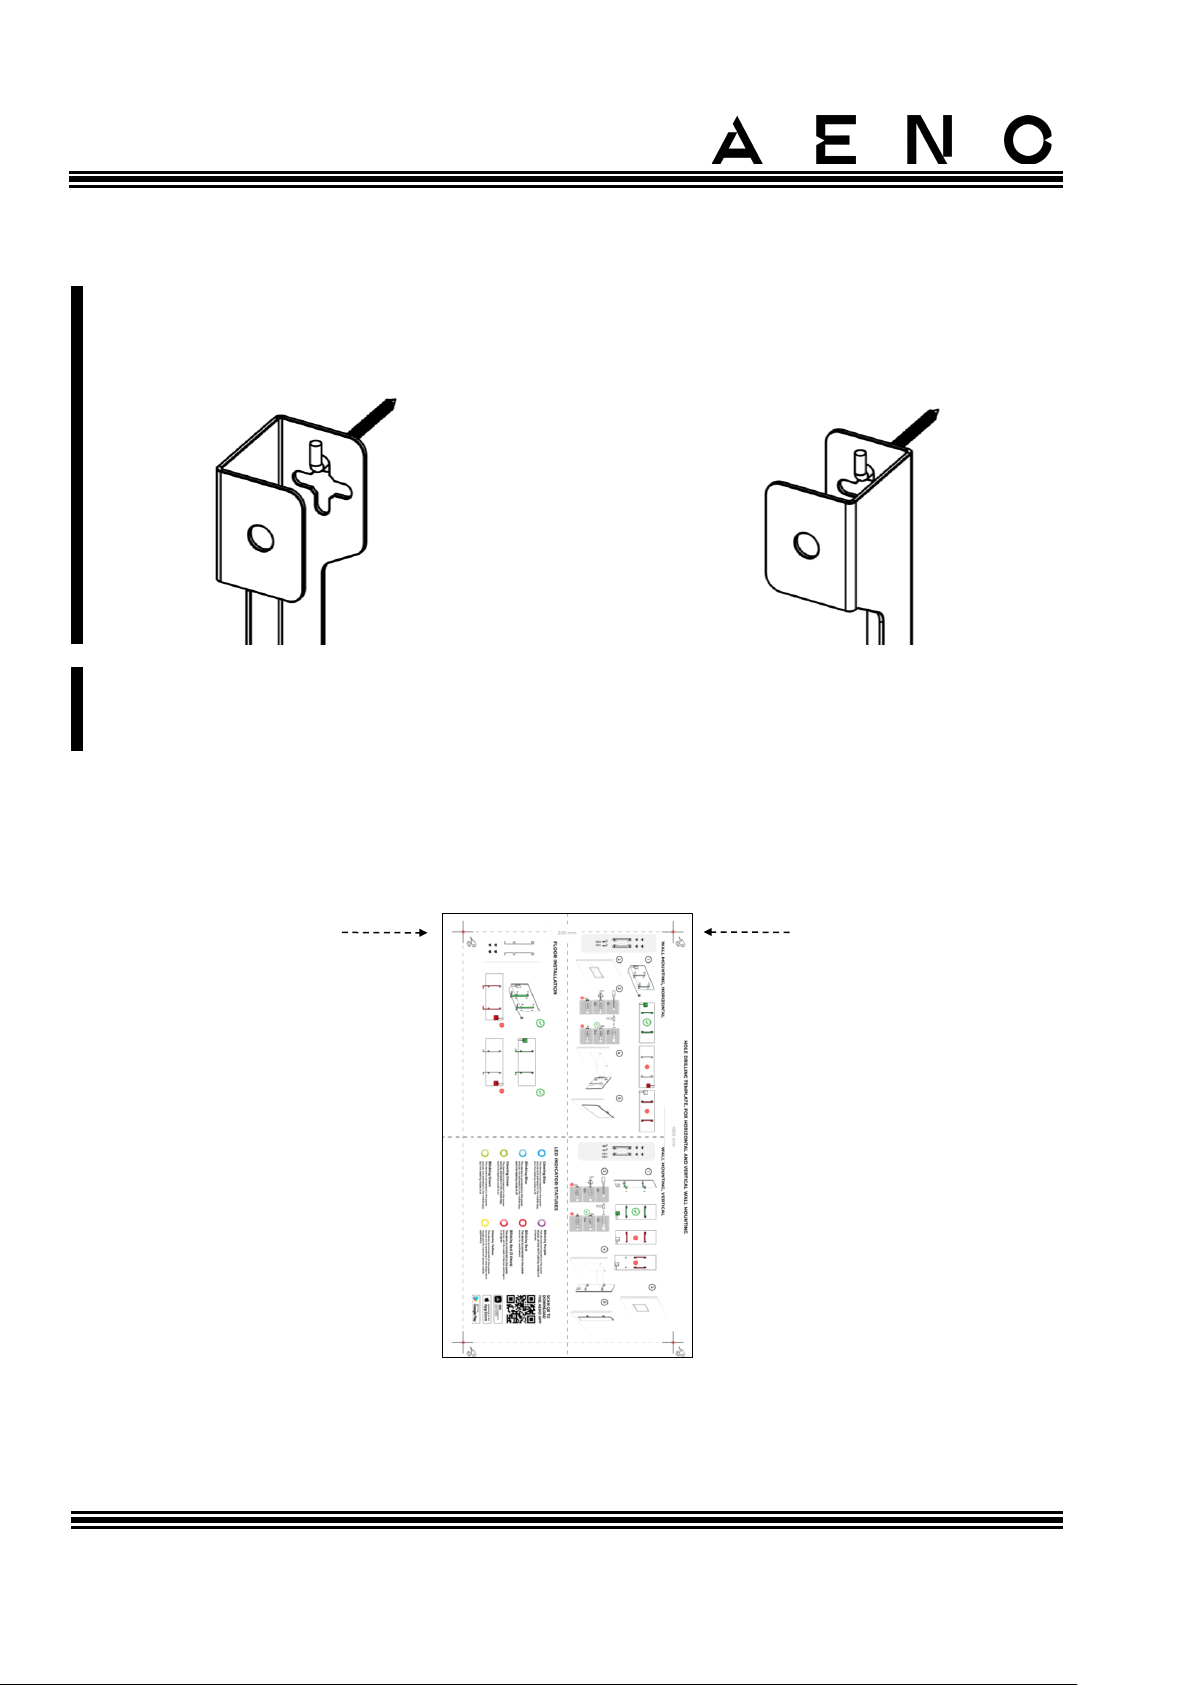
3. Drill 2 holes in the wall using the special paper template supplied with the device,
and then screw in the hooks.
Horizontal orientation of the template
Page 31
AENOTM Premium Eco Smart Heater
Installation and Operation Manual
© ASBISc Enterprises PLC.. All rights reserved Document version: 1.0.3, aeno.com
Page 31 of 68
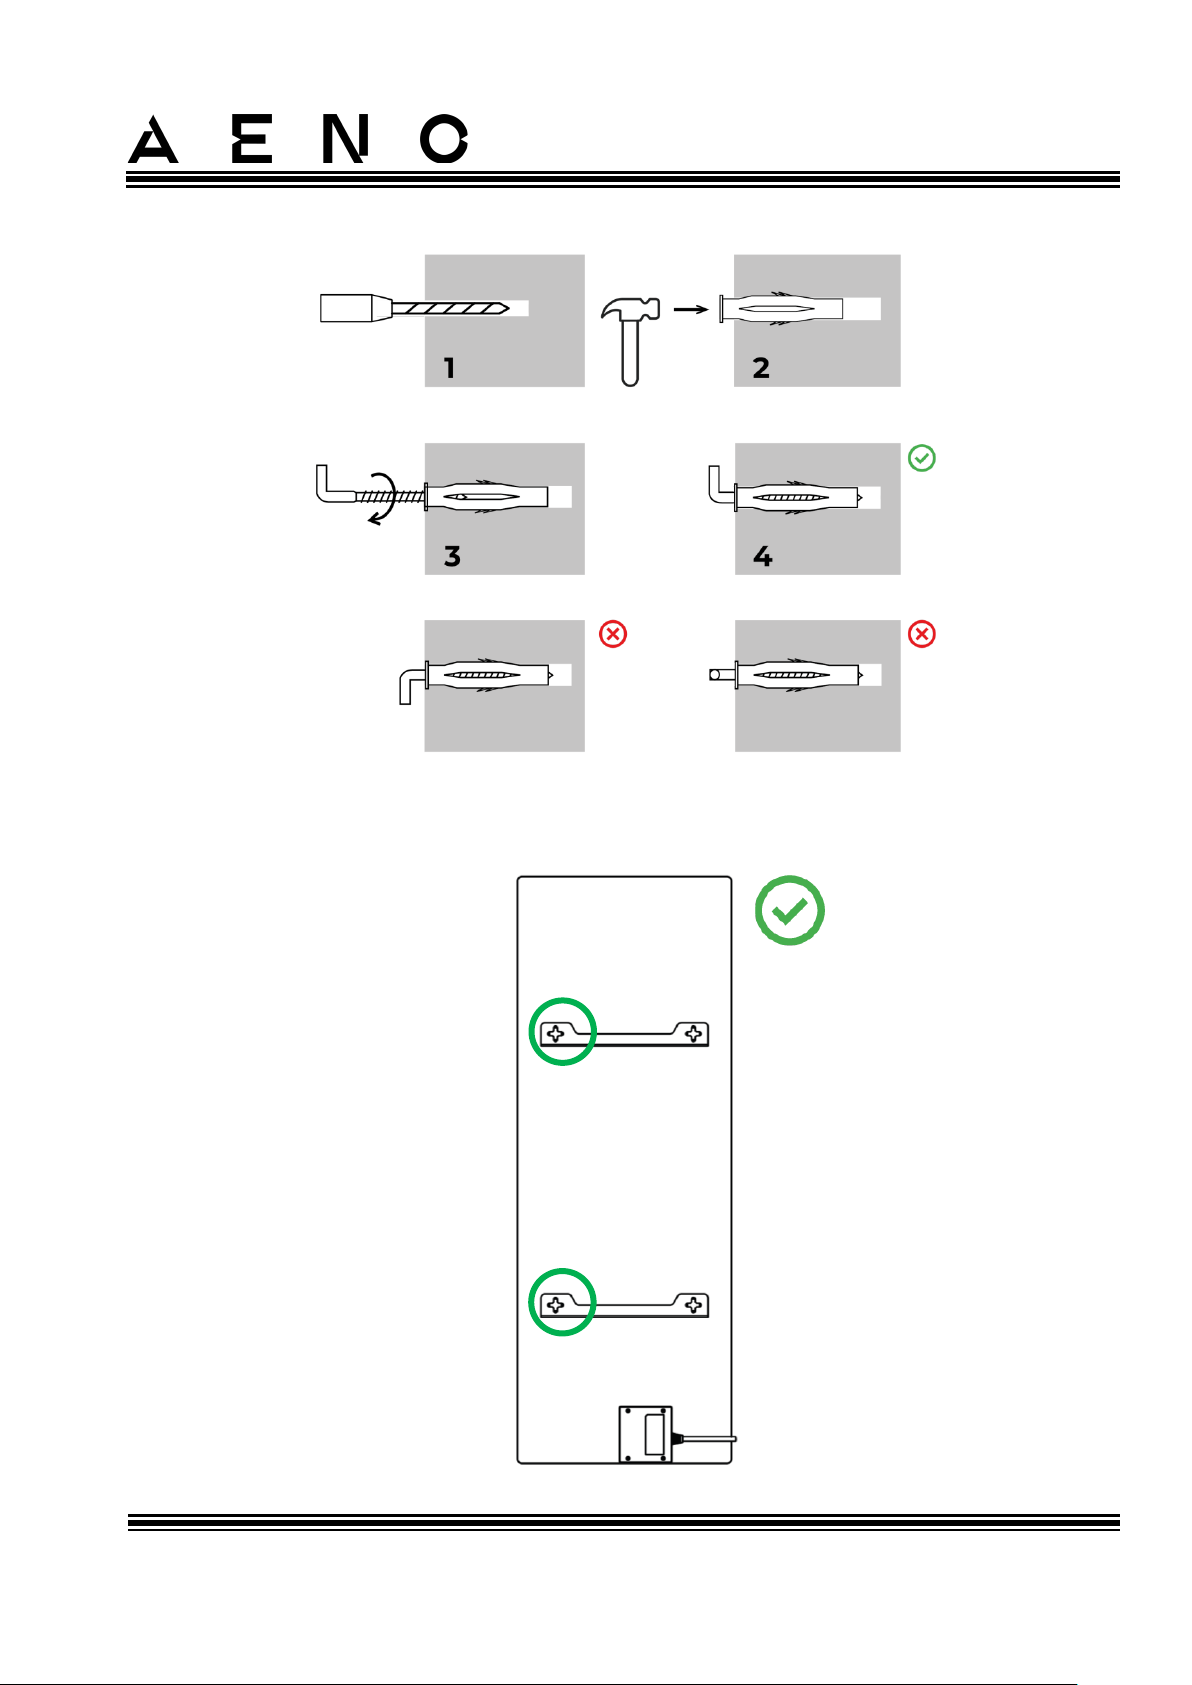
The process of screwing in the hooks
Figure 8 – Preparing of the wall (horizontal mounting)
4. Carefully hang the heater on both hooks at a time.
Page 32
AENOTM Premium Eco Smart Heater
Installation and Operation Manual
Document version: 1.0.3, aeno.com © ASBISc Enterprises PLC. All rights reserved
Page 32 of 68
5. Check that the device is securely fixed.
NOTE
During mounting, make sure that the hooks are securely tightened and oriented
strictly vertically.
WARNING!
When mounted on the wall, the installation height should not exceed one (1)
meter.
2.1.5 Vertical Wall Mounting (Option 3)
Vertical orientation of the template
Page 33
AENOTM Premium Eco Smart Heater
Installation and Operation Manual
© ASBISc Enterprises PLC.. All rights reserved Document version: 1.0.3, aeno.com
Page 33 of 68
The process of screwing in the hooks
Figure 9 – Preparing the wall (vertical mounting)
Page 34
AENOTM Premium Eco Smart Heater
Installation and Operation Manual
Document version: 1.0.3, aeno.com © ASBISc Enterprises PLC. All rights reserved
Page 34 of 68
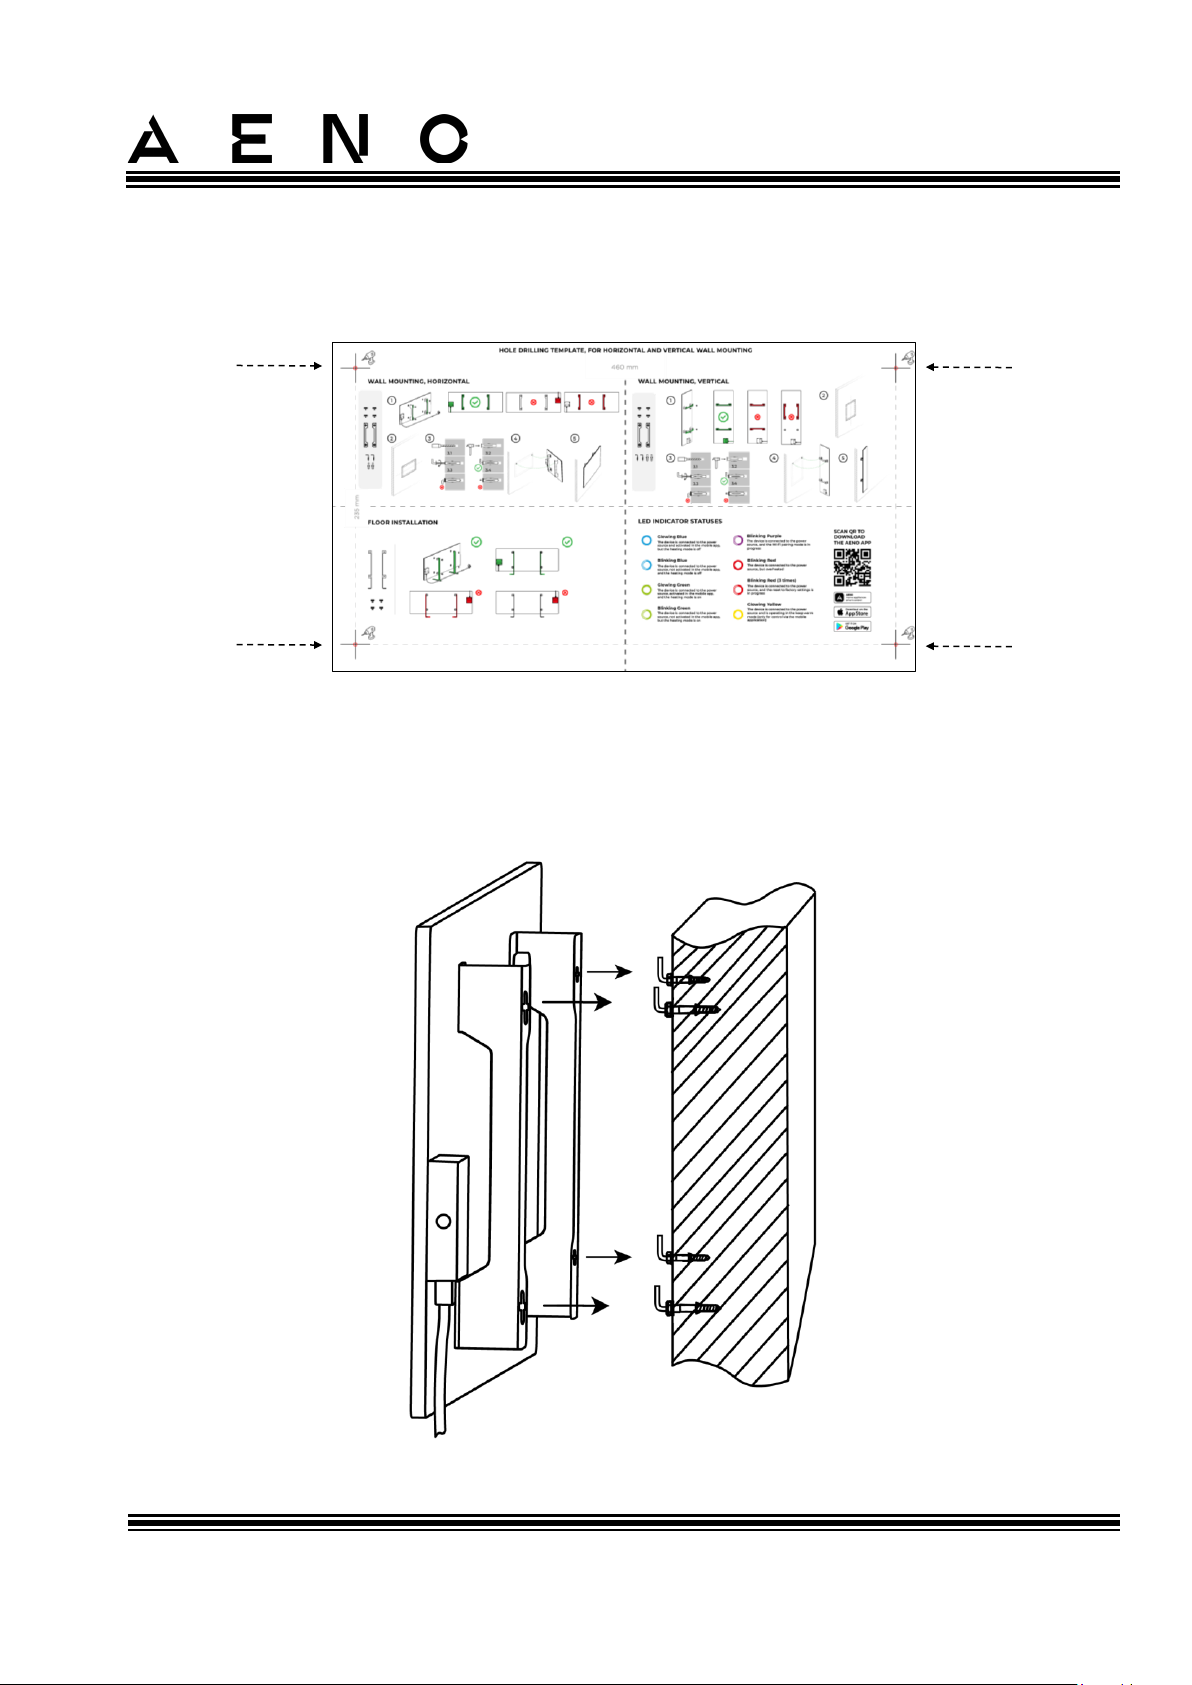
Figure 10 – Vertical installation (wall mounting)
NOTE
The option of mounting the heater with the control unit being on top is
acceptable, if the device is installed at a low height and when the location of the
electrical outlet does not prevent the heater from being quickly de-energized, as
well as if the power cable does not contact the heating panel.
NOTE
During mounting, make sure that the hooks are securely tightened and oriented
strictly vertically.
Page 35
AENOTM Premium Eco Smart Heater
Installation and Operation Manual
© ASBISc Enterprises PLC.. All rights reserved Document version: 1.0.3, aeno.com
Page 35 of 68
2.1.6 Wall Mounting with 4 Hooks (Additional Fixation)
When mounting on 4 hooks, you need to drill 4 holes in the wall with a template.
Then follow the instructions for assembling the heater as outlined in par. 2.1.4 or
par. 2.1.5 above.
Hang the device on 4 hooks at a time.
Page 36
AENOTM Premium Eco Smart Heater
Installation and Operation Manual
Document version: 1.0.3, aeno.com © ASBISc Enterprises PLC. All rights reserved
Page 36 of 68
2.1.7 Hardwiring Option
If you decide to mount the heater into the wall in such a way as to hide its power cable
or to embed the device in the wall, then you should understand and agree to the
following:
• The manufacturer's warranty for the device shall become void;
• The manufacturer shall not be liable for possible changes in functionality or poor
operation of the device;
• Any installation operations must only be carried out by qualified installers only
who have sufficient knowledge and skills to carry out correct and safe hardwiring
of the heater;
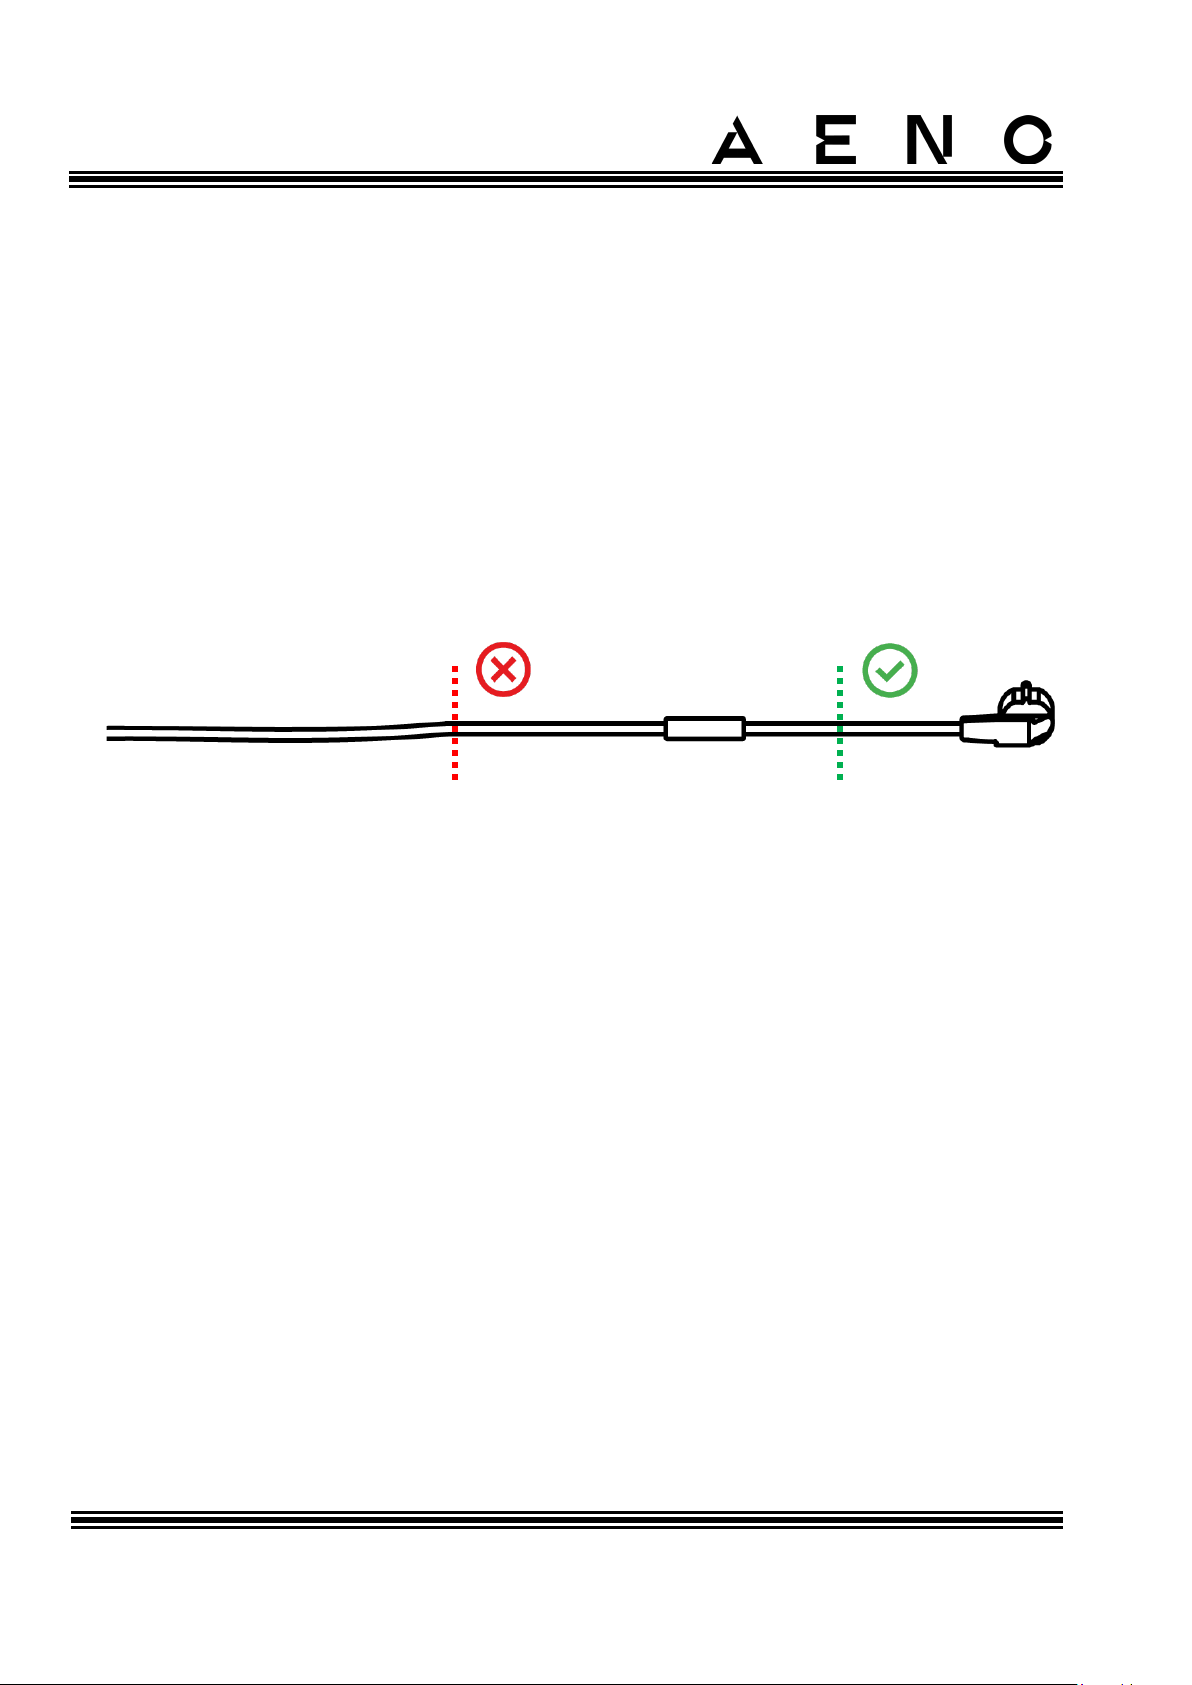
• When cutting the power cable, it is not allowed to cut off the temperature sensor;
• The device must be installed in such a way as to provide its adequate ventilation
and location of the temperature sensor unhidden, i.e. exposed to the room air.
2.1.8 Ceiling Mounting
If you decide to mount the heater on the ceiling, then you should understand and agree
to the following:
• Any installation operations must only be carried out by qualified installers only
who have sufficient knowledge and skills to carry out correct and safe mounting
of the heater on the ceiling;
• The manufacturer shall not be liable for possible installation errors, including but
not limited to the use of unsuitable fasteners, as well as for any loss or damage
resulting from improper installation work;
• The power cable must not come into contact with the heating surface;
• The device must be installed in such a way as to provide its adequate ventilation
and location of the temperature sensor unhidden, i.e. exposed to the room air.
Page 37

AENOTM Premium Eco Smart Heater
Installation and Operation Manual
© ASBISc Enterprises PLC.. All rights reserved Document version: 1.0.3, aeno.com
Page 37 of 68
2.2 Initial Power On
To turn the heater on, you should plug it into an electrical outlet using the power cable
and press the power button (See Table 1).
NOTE
By default, the heater will be in a pairing mode for 3 minutes after the first power
on. After that, the device will be switched to the standby mode (heating off mode).
Next, you should select one of the ways to control the device:
1. Manual control.
2. Remote control via the mobile app.
3. Remote control via voice assistants.
2.3 Manual Control
The heater may be managed with the power button located on the control unit of the
device.
1. Press and hold the power button for no more than 3 seconds to turn it on for
heating.
2. To stop heating, press and hold the power button again for no more than
3 seconds, and the device will be switched to the standby mode.
NOTE
See Table 1 above for more information on the functions of the power button.
Please unplug the power cable from the electrical outlet in order to de-energize
the heater completely.
Page 38
AENOTM Premium Eco Smart Heater
Installation and Operation Manual
Document version: 1.0.3, aeno.com © ASBISc Enterprises PLC. All rights reserved
Page 38 of 68
2.4 Remote Control via the AENO App
2.4.1 App Installation
• Connect your smartphone to the Internet (2.4 GHz)
and download the free AENO mobile app from
Google Play or the App Store.
• Register a new account or log in to an existing
account.
2.4.2 Registering a New Account
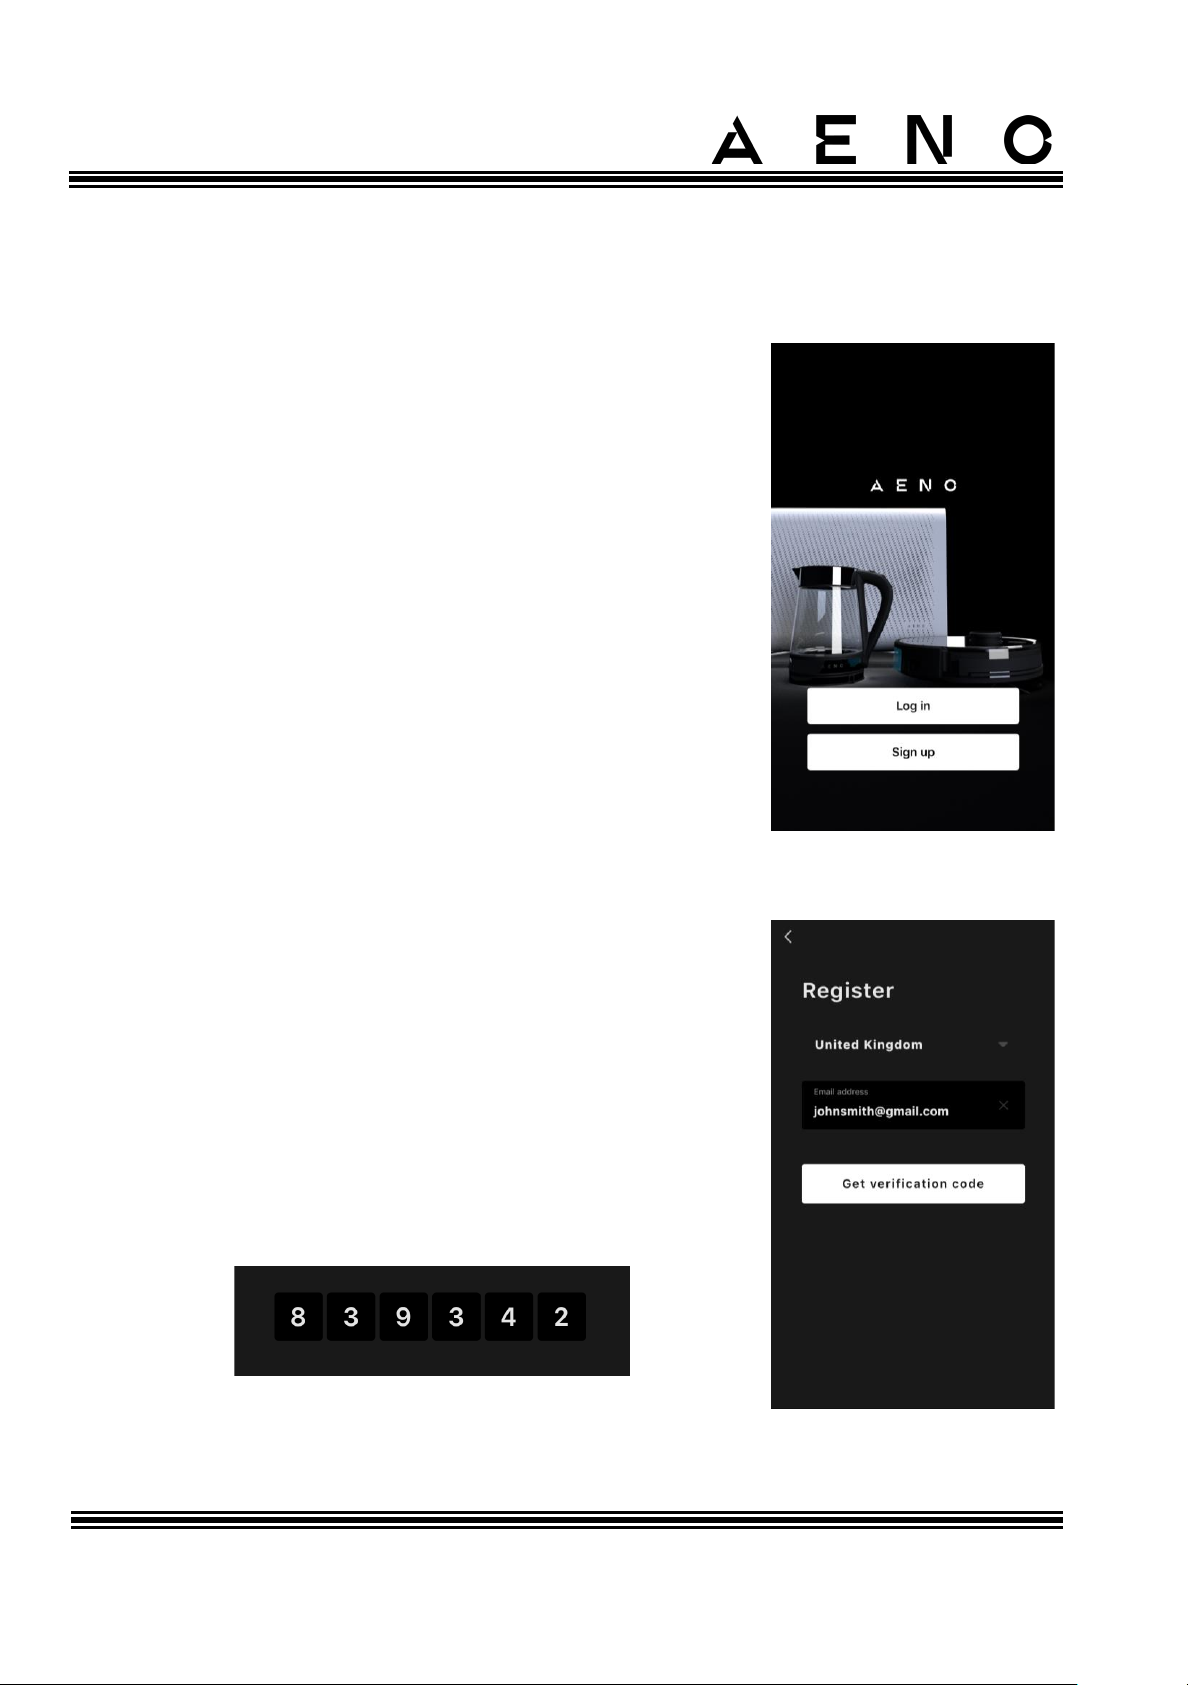
• Launch the AENO app and tap the “Sign Up” button.
• Accept the terms of the user agreement and the
Privacy Policy.
• Fill out the following information:
o Select your country of residence;
o Enter your email address.
• Tap “Get verification code”.
• An email with the registration verification code will
be sent to the specified email address. Please enter
this code in a special screen of the mobile app.
Page 39
AENOTM Premium Eco Smart Heater
Installation and Operation Manual
© ASBISc Enterprises PLC.. All rights reserved Document version: 1.0.3, aeno.com
Page 39 of 68
If you don’t receive the verification code to your email, it is recommended that you do
the following:
• Make sure you entered the correct email address.
• Check your Spam folder if the email is not in your Inbox.
• Try registering an account with a different email address if your firewall has
blocked the email.
If none of the above tips are helpful, please contact our support team via the contact
form on aeno.com. In the request, please provide your email address and the
timestamp of your registration.
• After the verification code is successfully entered, you should set a password (6 to
20 characters including at least one letter and one number) and tap “Done”.
Confirm consent to access the data. If you refuse, some of the data associated
with the use of the product will be unavailable for you.
• Confirm your consent to receive notifications and promotional applications.
You will not receive notifications from the app, if you opt out.
• Tap the button to switch to the app.
2.4.3 Logging into an Existing Account
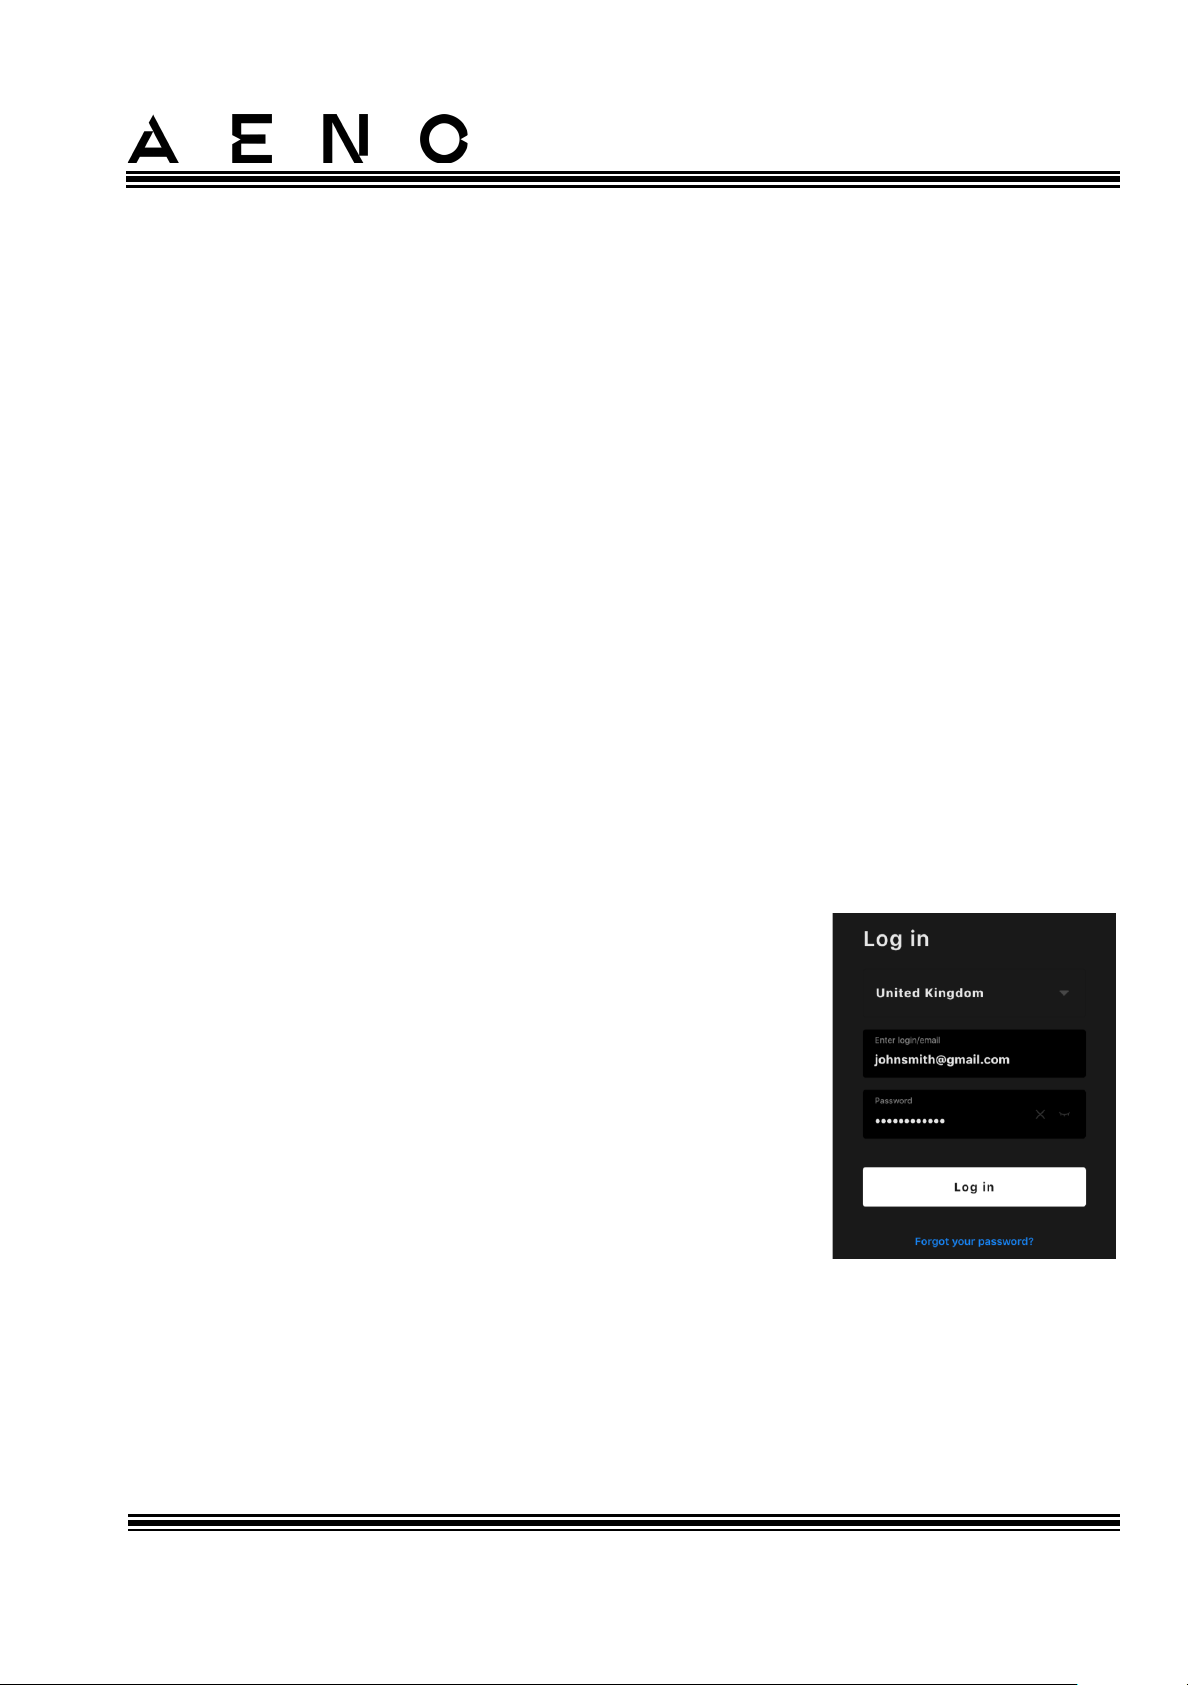
• Select your country of residence.
• Enter your email address.
• Enter your password and tap the “Log in” button.
If necessary, you may recover your password by taping the
“Forgot your password?” text. An email with instructions
on changing your password will be sent to the email
address linked to your user account.
2.4.4 Eco Smart Heater Activation Process
There are several options for activating the heater in the AENO mobile app:
• Initial activation with automatic detection;
• Further activation in the Auto search mode;
Page 40
AENOTM Premium Eco Smart Heater
Installation and Operation Manual
Document version: 1.0.3, aeno.com © ASBISc Enterprises PLC. All rights reserved
Page 40 of 68
• Further activation in the Manual mode.
Initial activation with automatic detection
NOTE
This method can be used to activate the device in the app upon its connection to
the mains outlet for the first time.
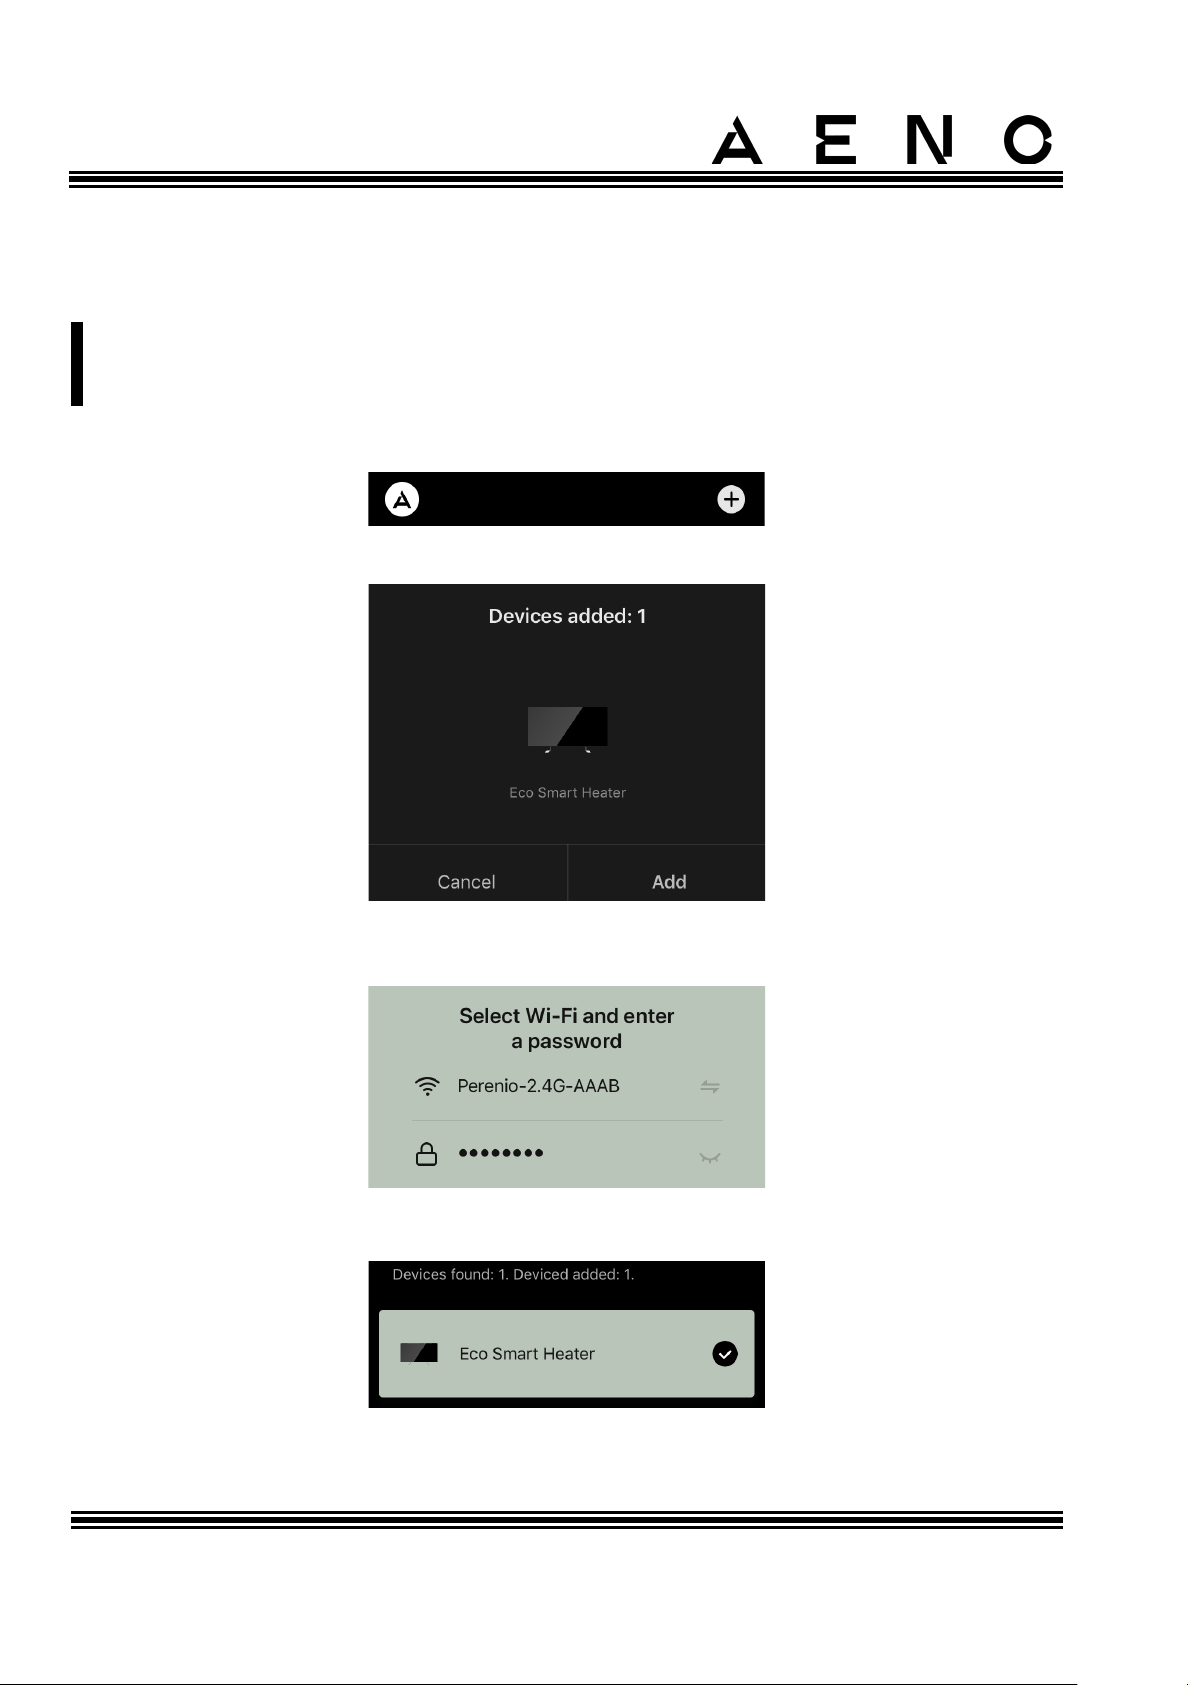
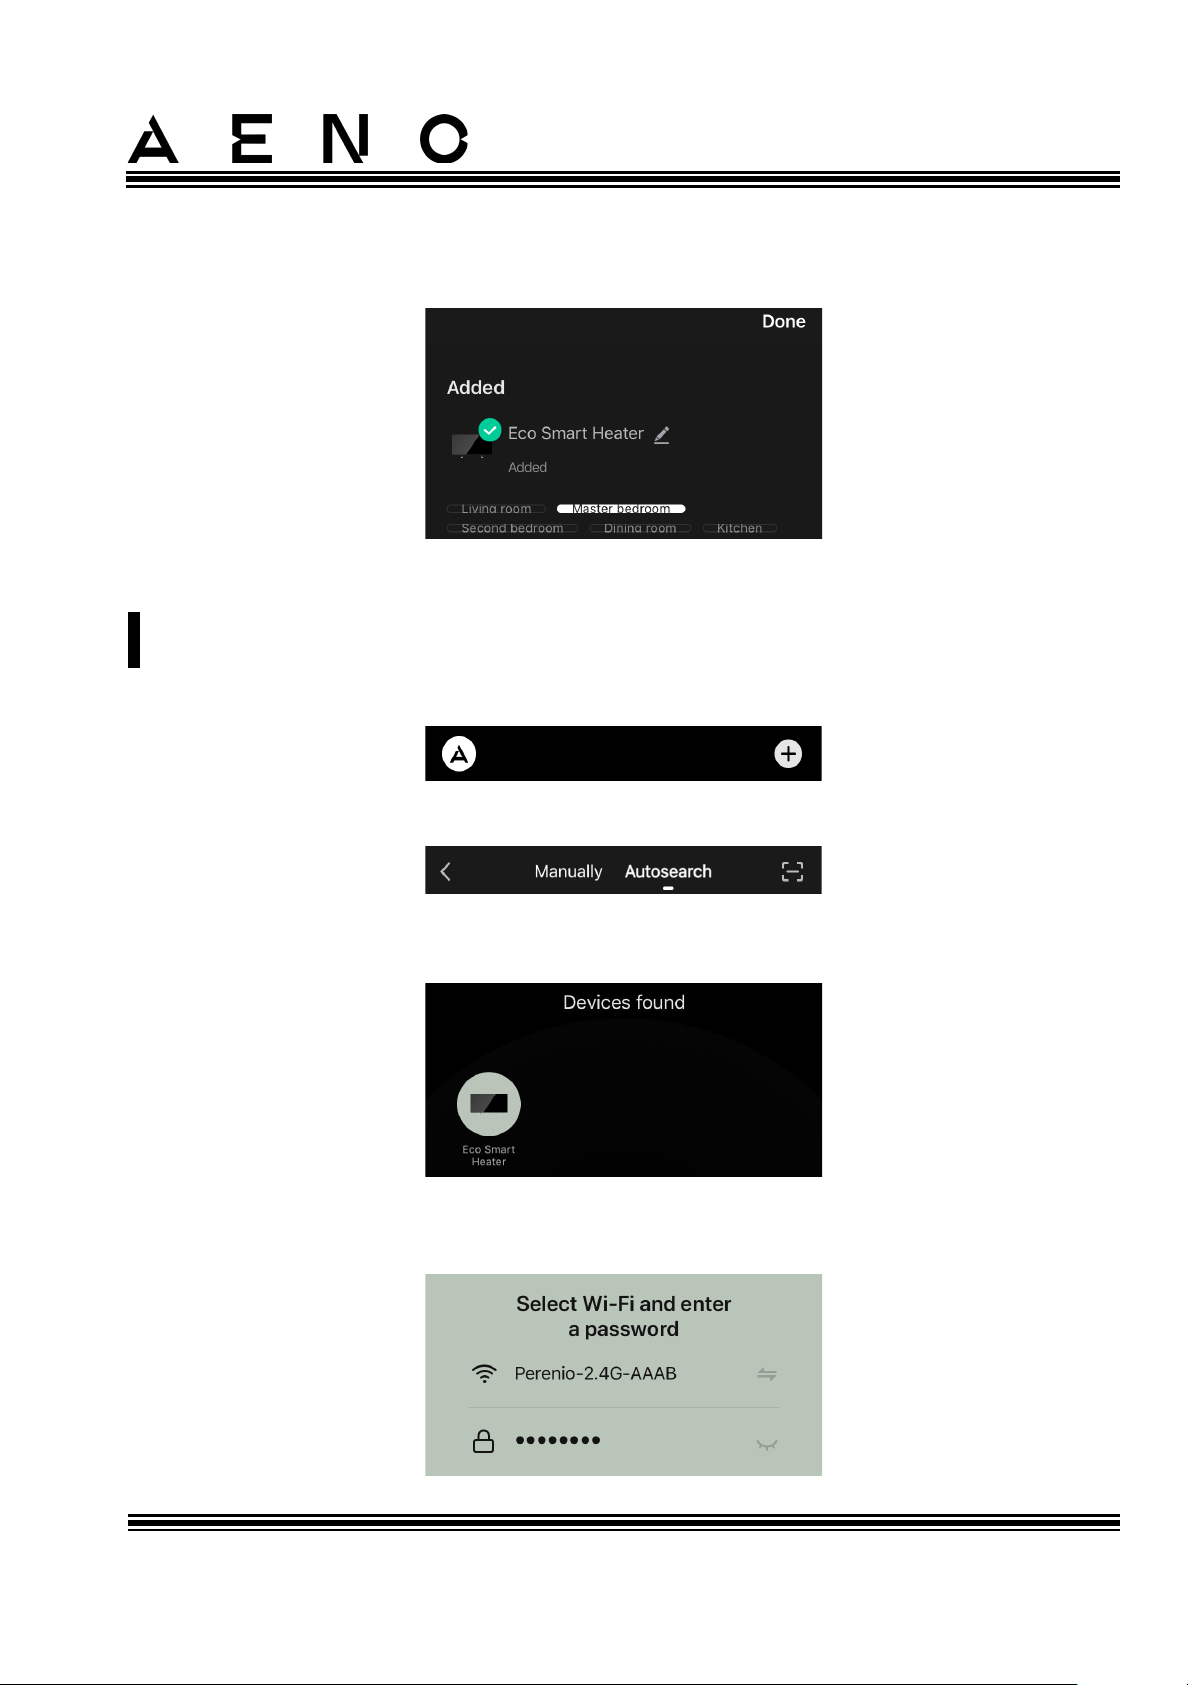
1. After logging into your account, tap the “+” icon in the “Home” tab.
2. Wait till the image of the heater appears in the pop-up window and tap “Add”.
3. Enter the Wi-Fi network password to which the device will be connected (you
can choose another network if it is of 2.4 GHz).
4. Wait for the device to be connected to the app and tap “Next”.
Page 41
AENOTM Premium Eco Smart Heater
Installation and Operation Manual
© ASBISc Enterprises PLC.. All rights reserved Document version: 1.0.3, aeno.com
Page 41 of 68
5. Specify the desired name for the heater and select the room of installation from
the list. After that, tap “Done”.
Further activation in the Auto search mode
NOTE
This method can be used in all cases where the heater is in the pairing mode.
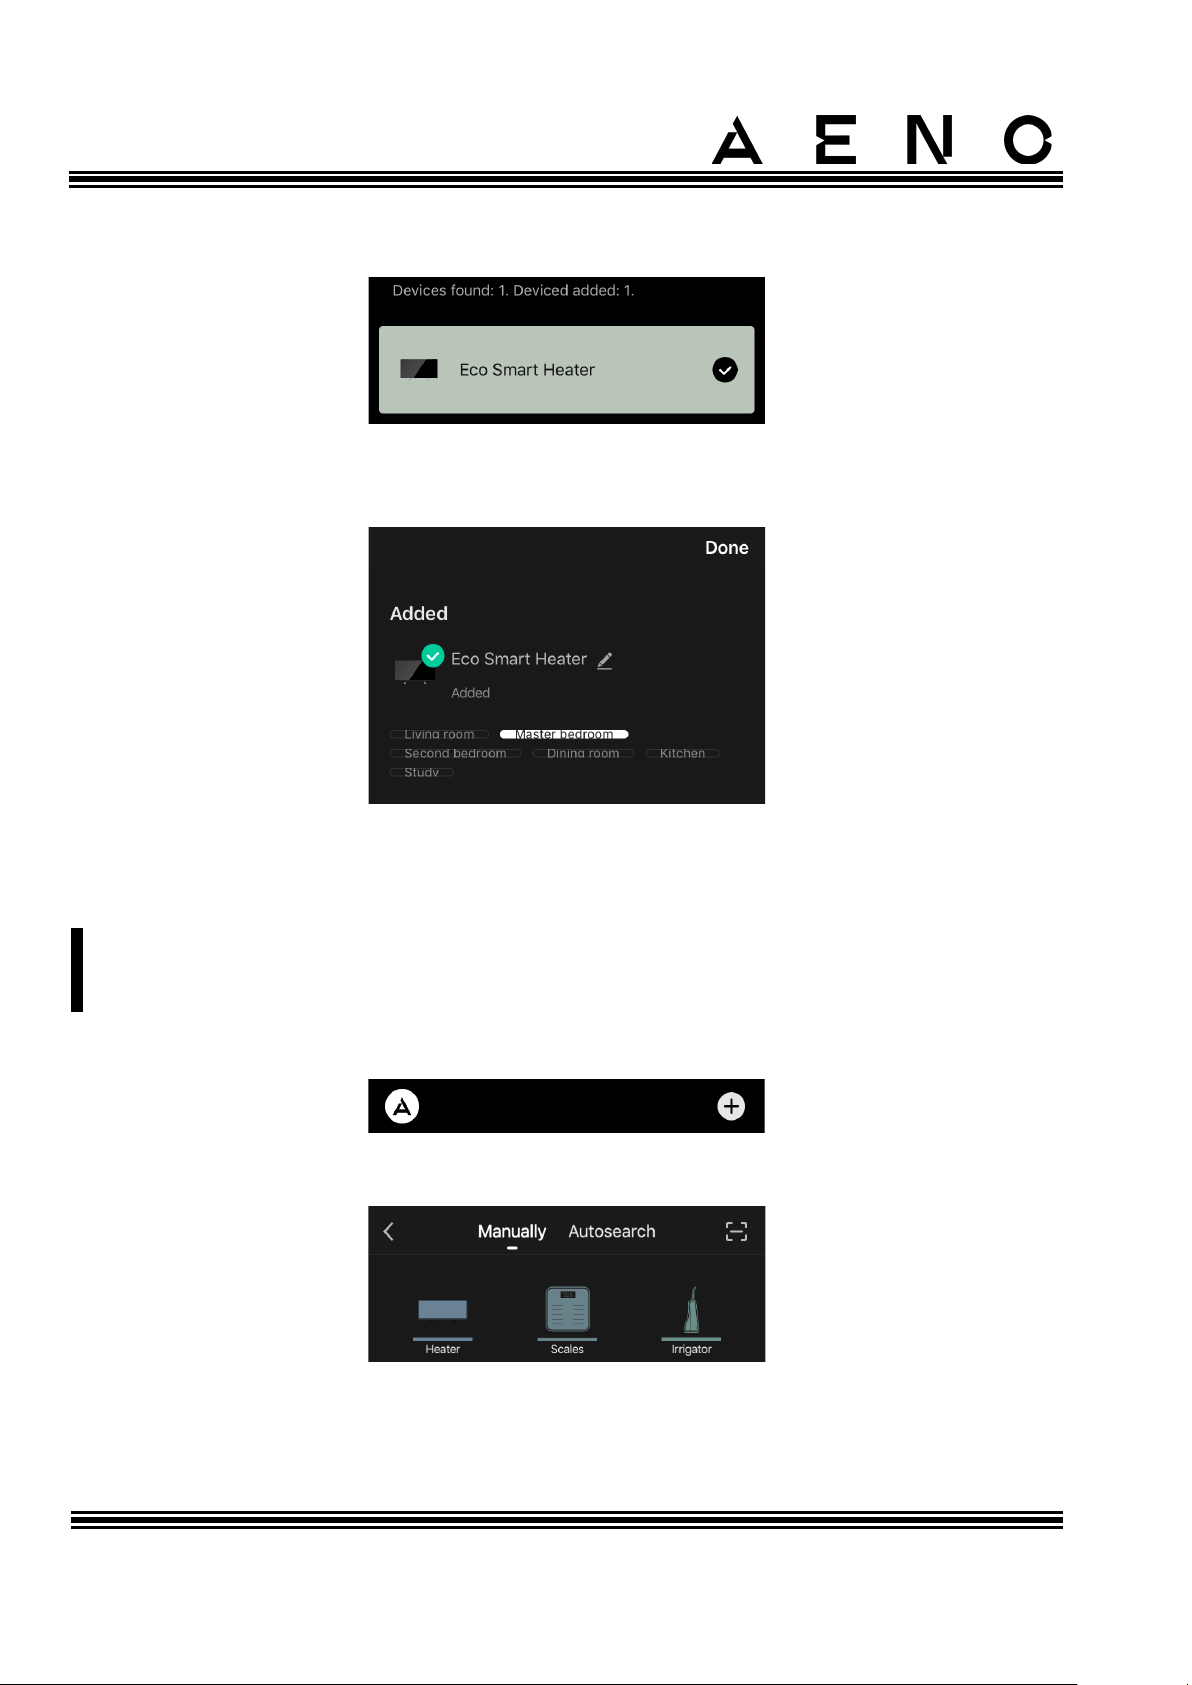
1. After logging into your account, tap the “+” icon in the “Home” tab.
2. Select the Auto Search tab at the top of the screen.
3. Provide the AENO app with all requested accesses.
4. Wait for the heater to be detected and tap the “Next” button.
5. Enter the Wi-Fi network password to which the device will be connected (you
can choose another network if it is of 2.4 GHz).
Page 42
AENOTM Premium Eco Smart Heater
Installation and Operation Manual
Document version: 1.0.3, aeno.com © ASBISc Enterprises PLC. All rights reserved
Page 42 of 68
6. Wait for the device to be connected to the app and tap “Next”.
7. Specify the desired name for the heater and select the room of installation from
the list. After that, tap “Done”.
Further activation in the Manual mode
NOTE
This method can be used in all cases where the heater is in the pairing mode and
when it was not automatically detected via other activation methods.
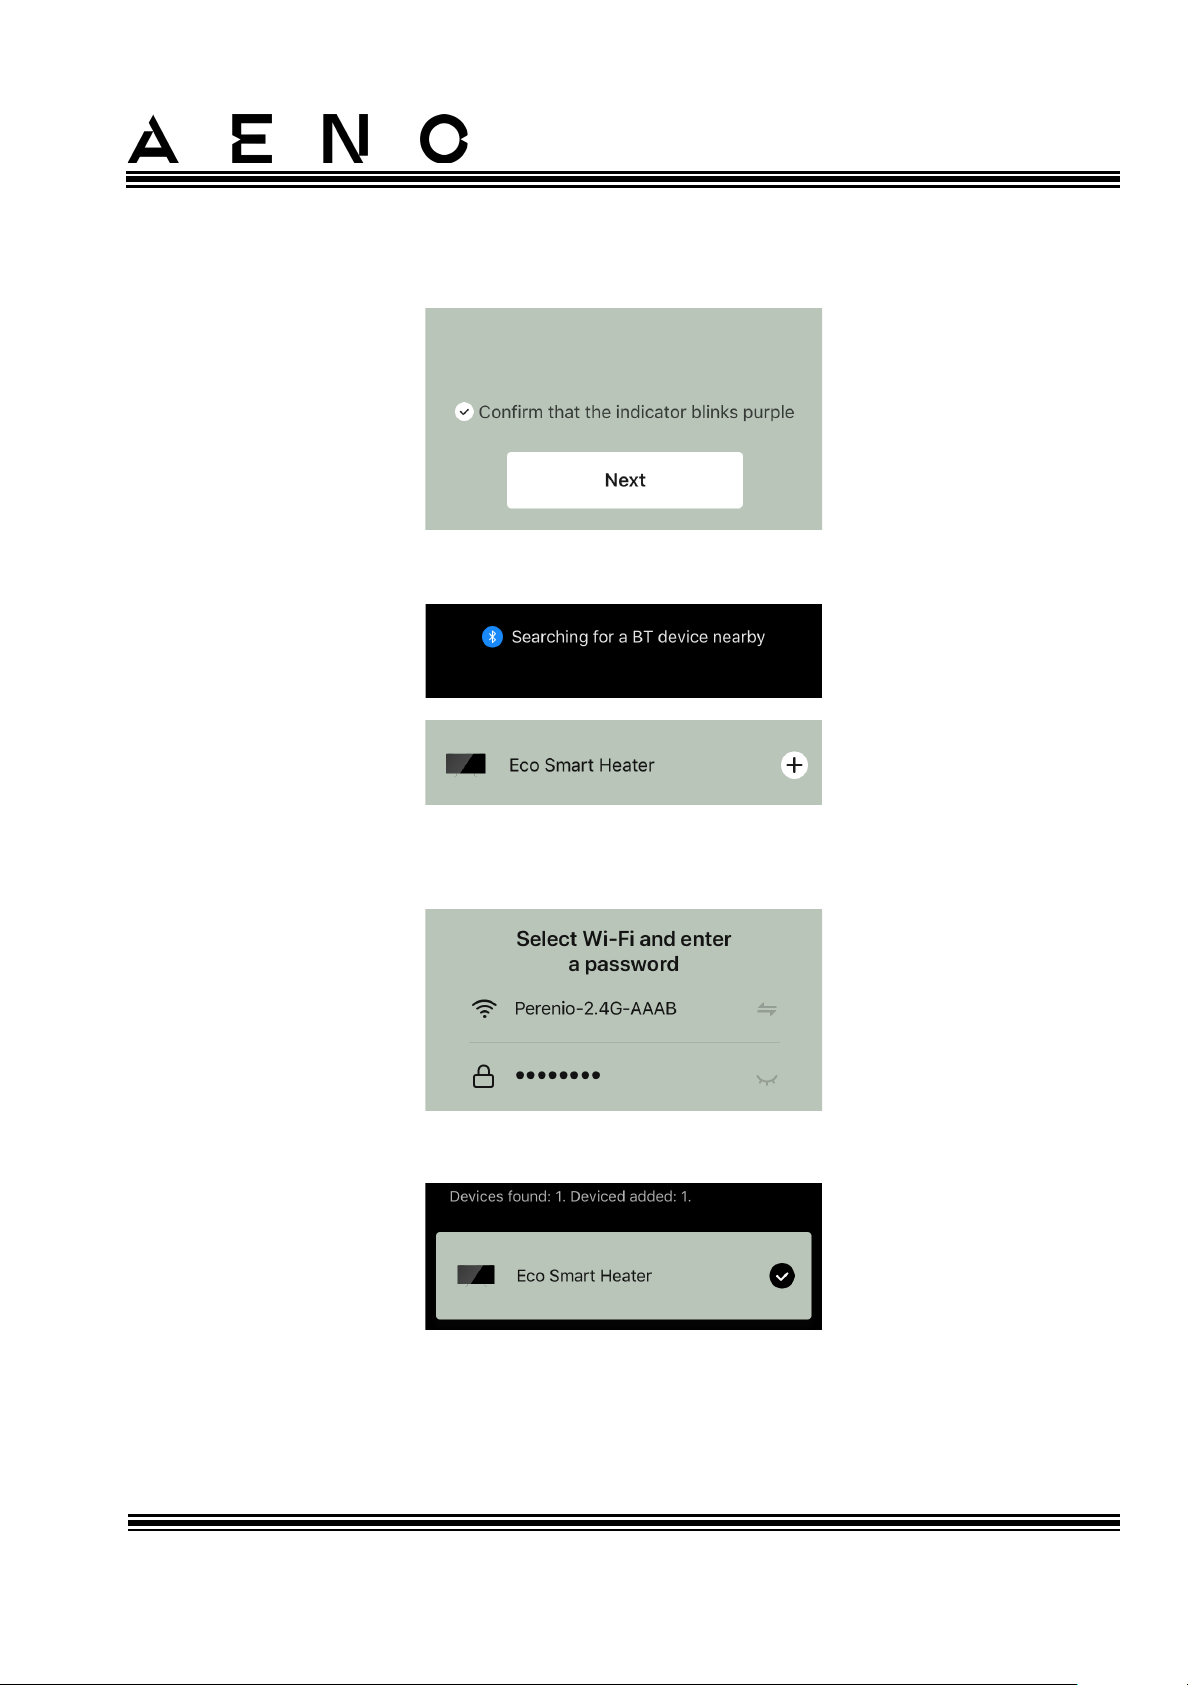
1. After logging into your account, tap the “+” icon in the “Home” tab.
2. Select the “Manually” tab at the top of the screen and then the “Heater” category.
3. Turn on the heater by pressing its power button once. The LED indicator light will
turn green.
4. Then press and hold the power button until the LED starts blinking purple.
Page 43
AENOTM Premium Eco Smart Heater
Installation and Operation Manual
© ASBISc Enterprises PLC.. All rights reserved Document version: 1.0.3, aeno.com
Page 43 of 68
5. On the screen with the connection instructions, confirm that the indicator is
blinking purple and tap “Next”.
6. Wait for the heater to be detected and tap on the "+" icon next to its name.
7. Enter the Wi-Fi network password to which the device will be connected (you
can choose another network if it is of 2.4 GHz).
8. Wait for the device to be connected to the app and tap “Next”.
Page 44
AENOTM Premium Eco Smart Heater
Installation and Operation Manual
Document version: 1.0.3, aeno.com © ASBISc Enterprises PLC. All rights reserved
Page 44 of 68
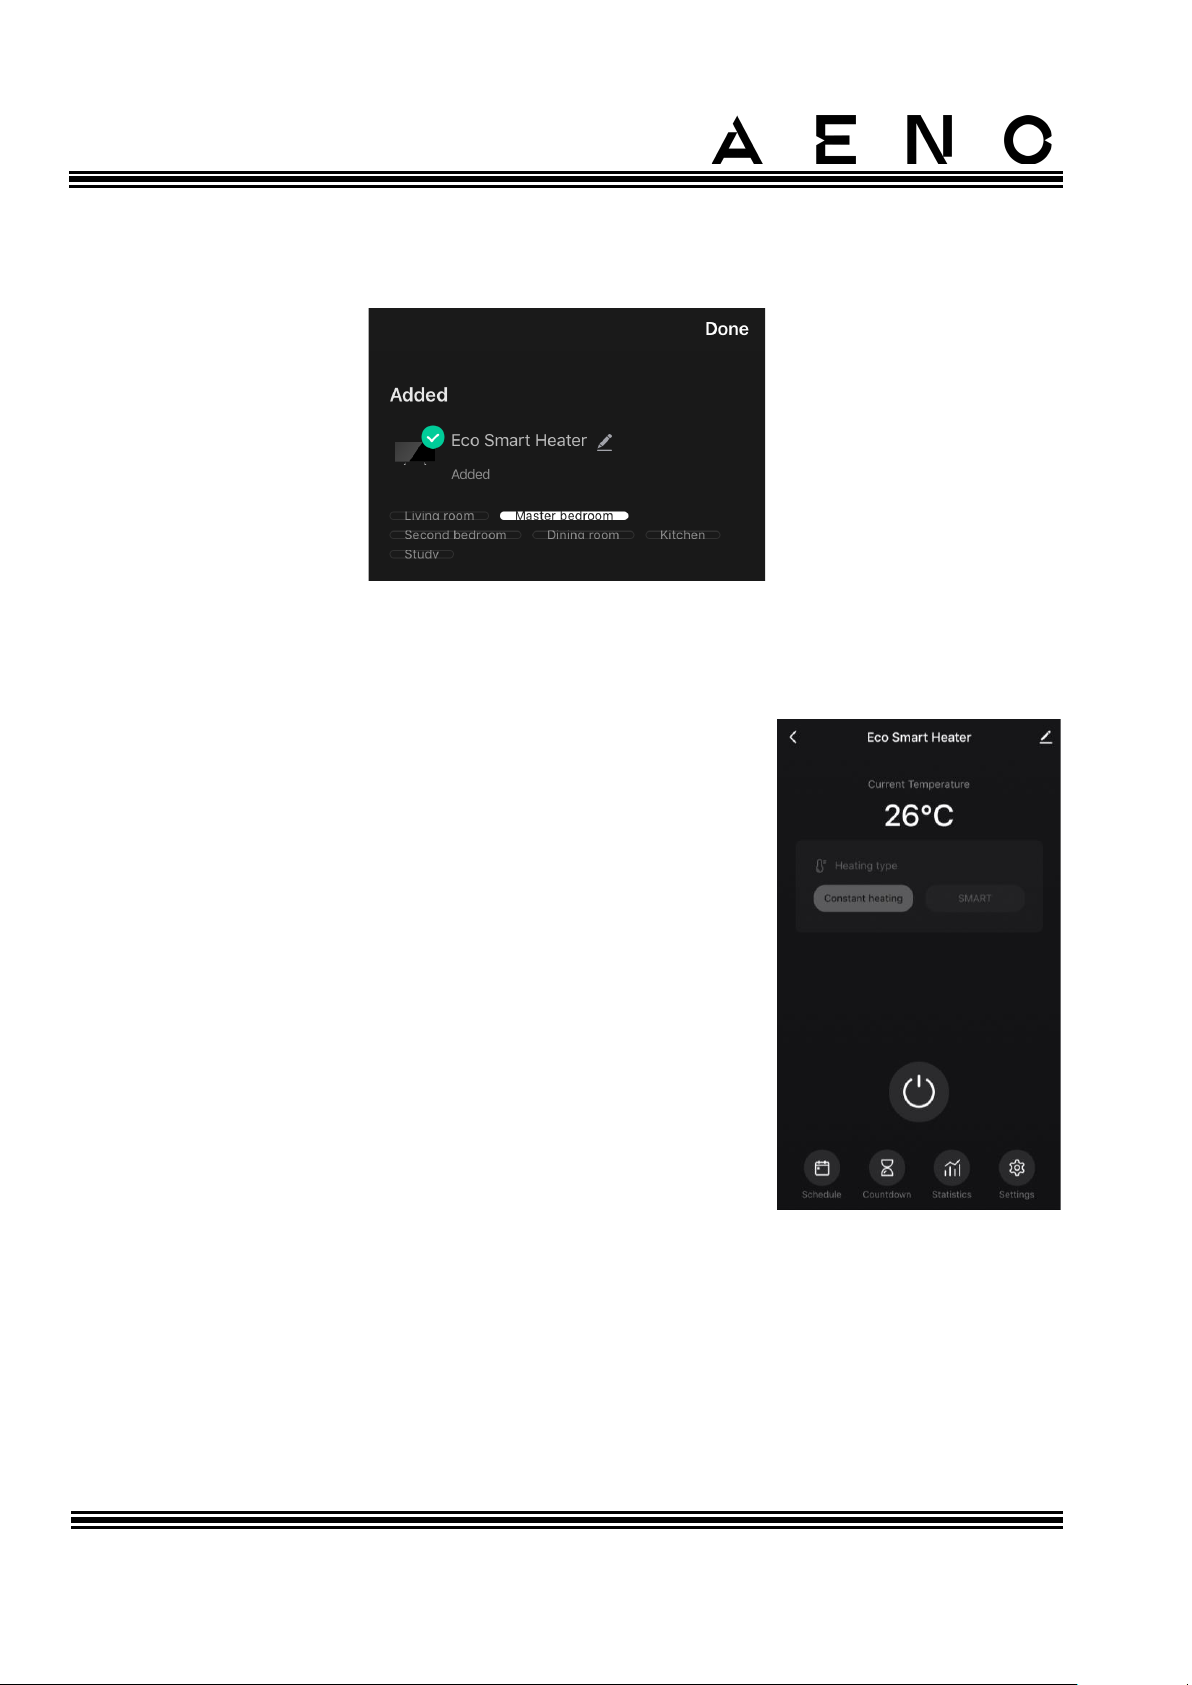
9. Specify the desired name for the heater and select the room of installation from
the list. After that, tap “Done”.
2.4.5 Control Panel of the Eco Heater
The heater’s control panel is displayed if you tap on its
image in the list of connected devices in the “Home” tab.
In the control panel the user can:
• View the current room temperature;
• Set the desired room temperature;
• Turn the device on and off and select its operating
mode;
• Set timers and view power consumption statistics;
• Change the settings.
Page 45
AENOTM Premium Eco Smart Heater
Installation and Operation Manual
© ASBISc Enterprises PLC.. All rights reserved Document version: 1.0.3, aeno.com
Page 45 of 68
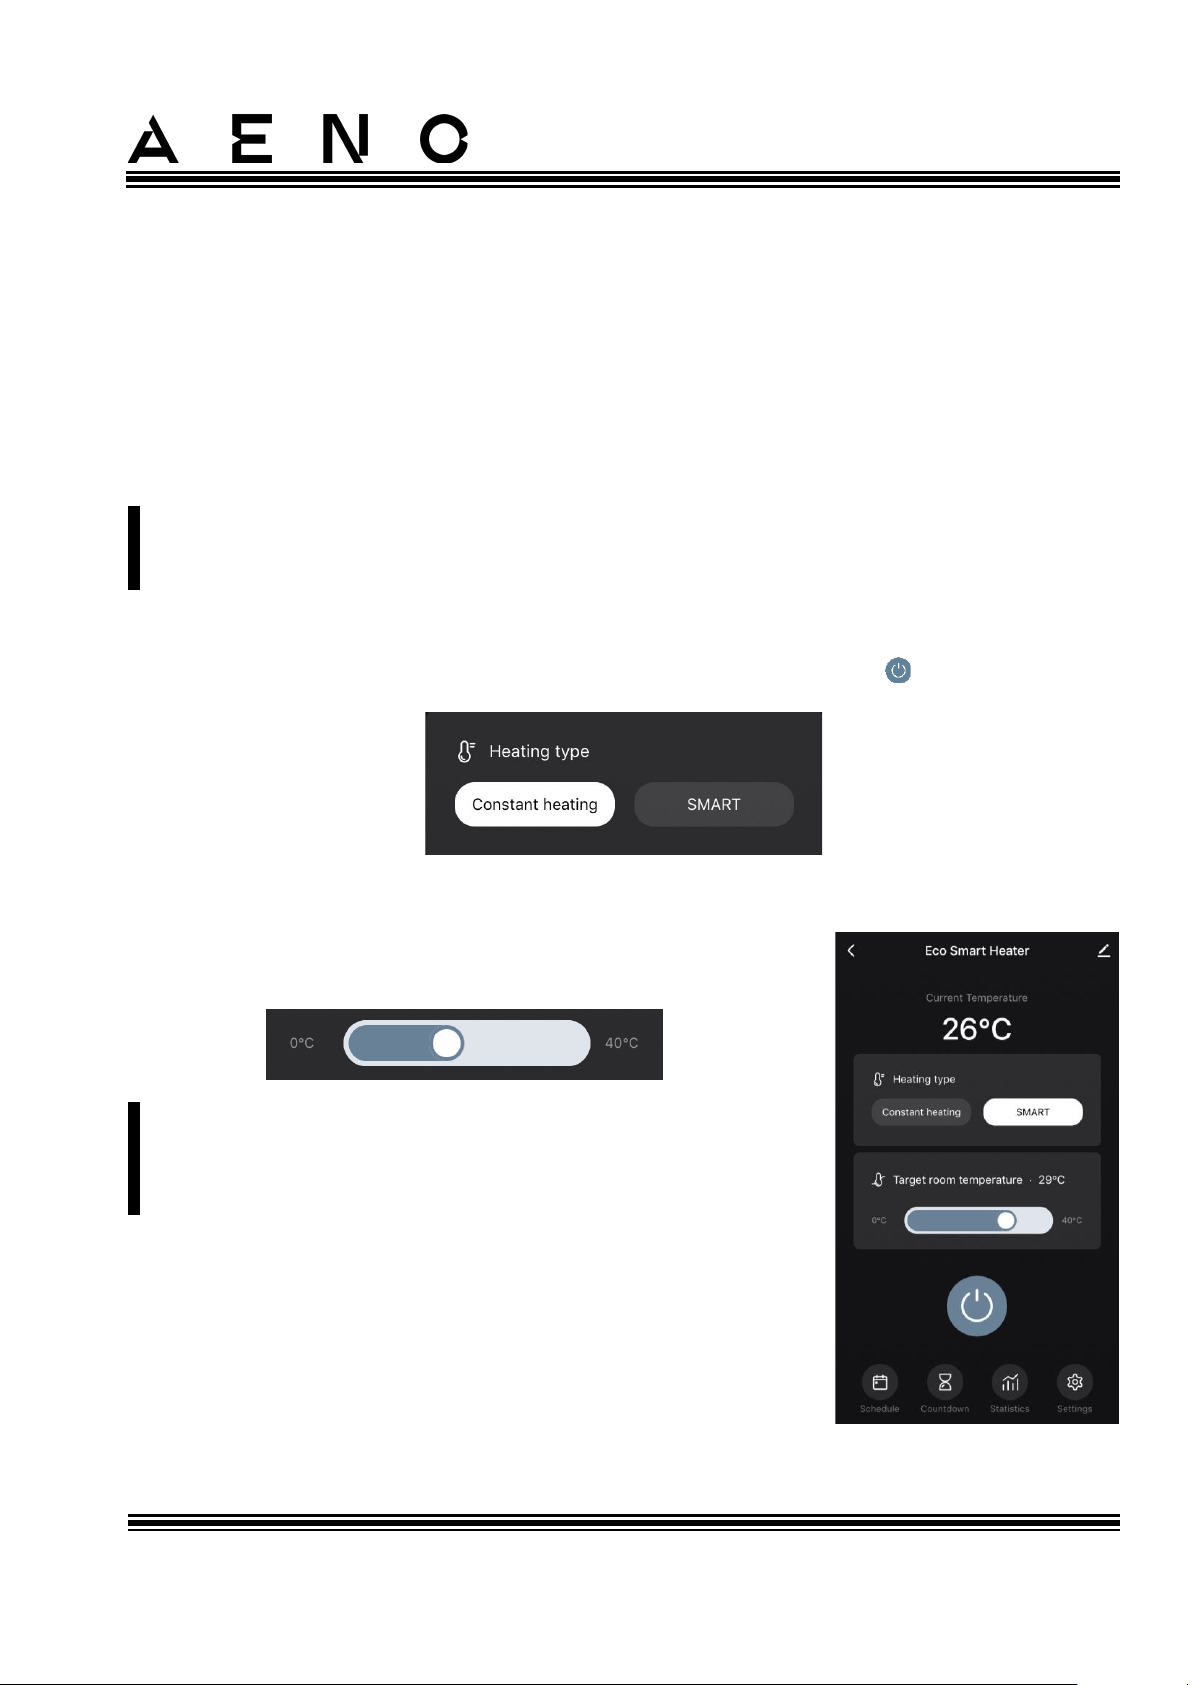
2.4.6 Operating Mode Selection
There are two modes of operation available in the heater’s control panel:
• Constant heating, where the heater is switched on and off manually by the user,
and the temperature of the room heating cannot be adjusted;
• SMART, where the room temperature is controlled by a built-in sensor. The set
value is maintained without the user, i.e. the heating element is switched on or off
as needed.
NOTE
The default setting after the heater is activated in the app for the first time is
manual operation.
You can select the operating mode only after turning on the heater. You can turn it on
manually or from the control panel by pressing the power button .
SMART mode settings
The SMART mode allows you to set the desired room
heating temperature from 0 to 40 °C.
NOTE
If the set temperature is lower than the current
room temperature, the device will be switched to
the standby mode, i.e. the heating will be turned off.
The step for changing the desired temperature value is 1 °C.
Page 46
AENOTM Premium Eco Smart Heater
Installation and Operation Manual
Document version: 1.0.3, aeno.com © ASBISc Enterprises PLC. All rights reserved
Page 46 of 68
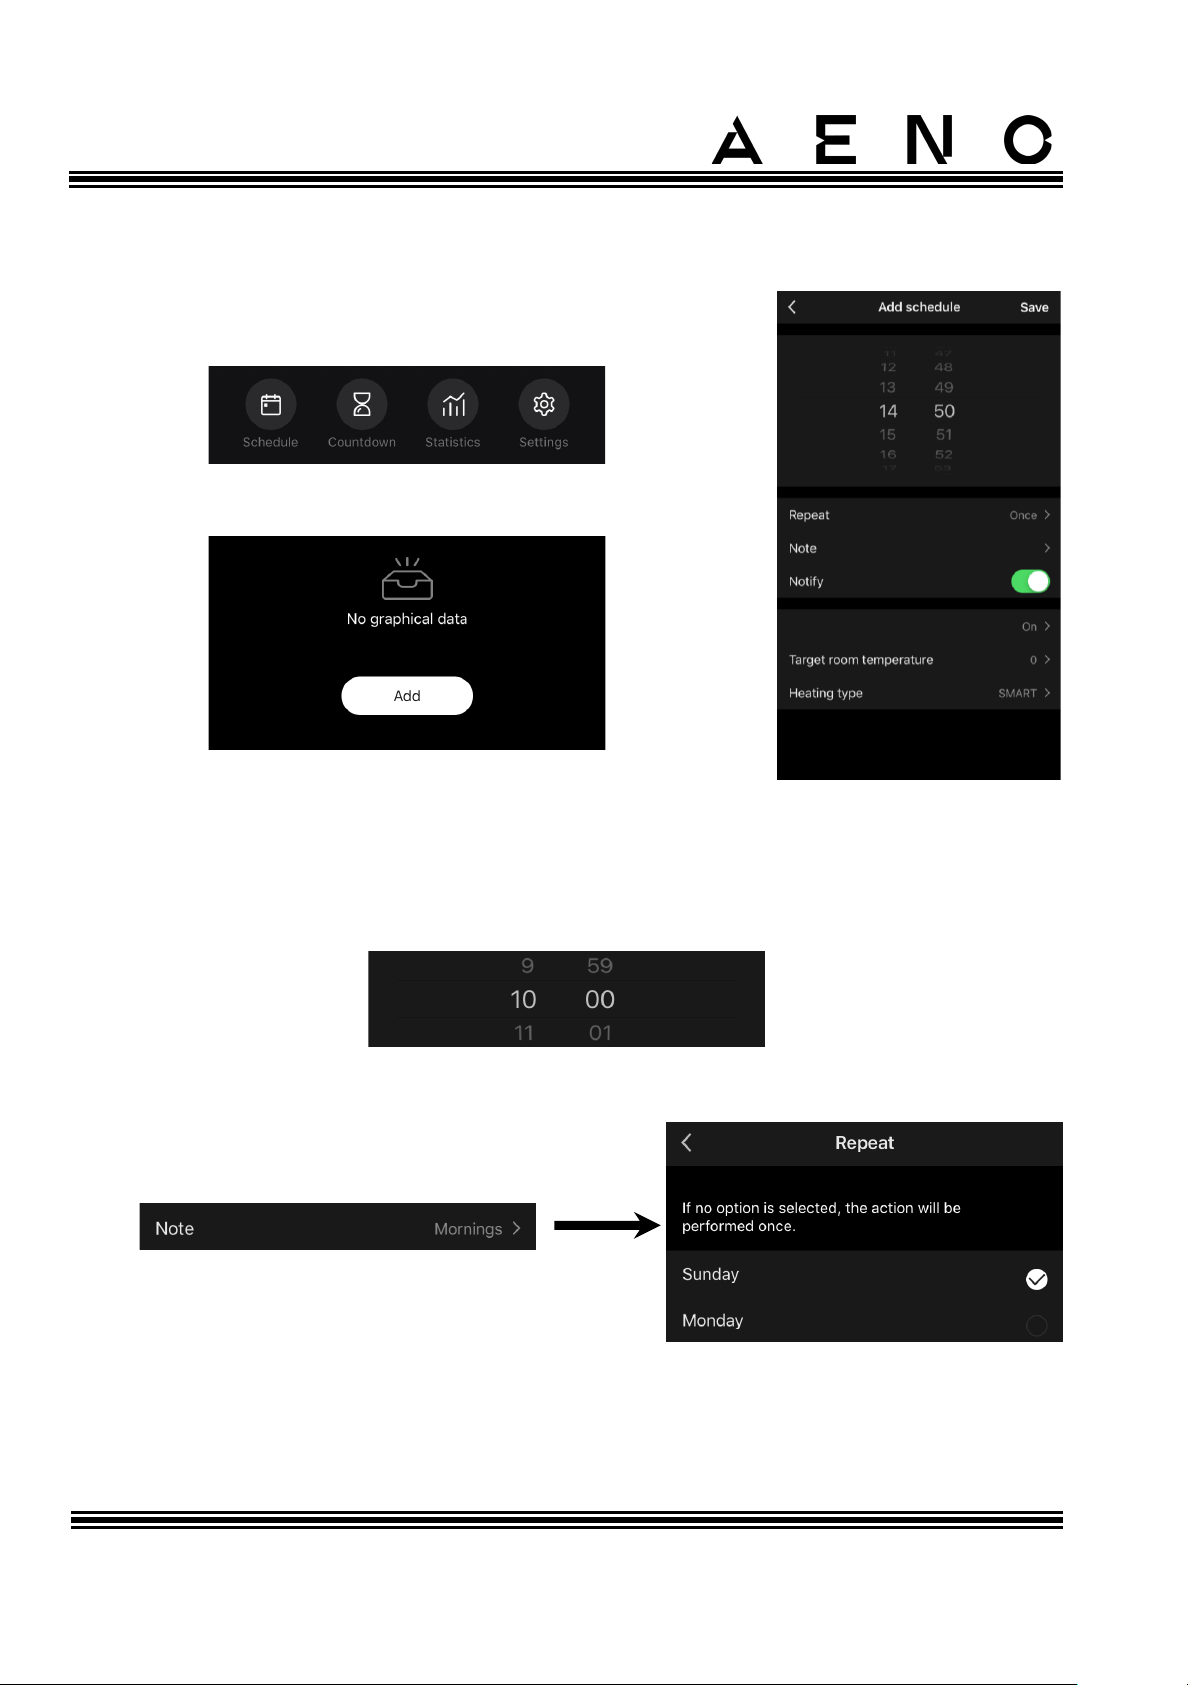
2.4.7 Setting the Heater Schedule
To operate the heater on a schedule, you should tap the
“Schedule” tab in the control panel of the device.
Next, tap on the “Add” button.
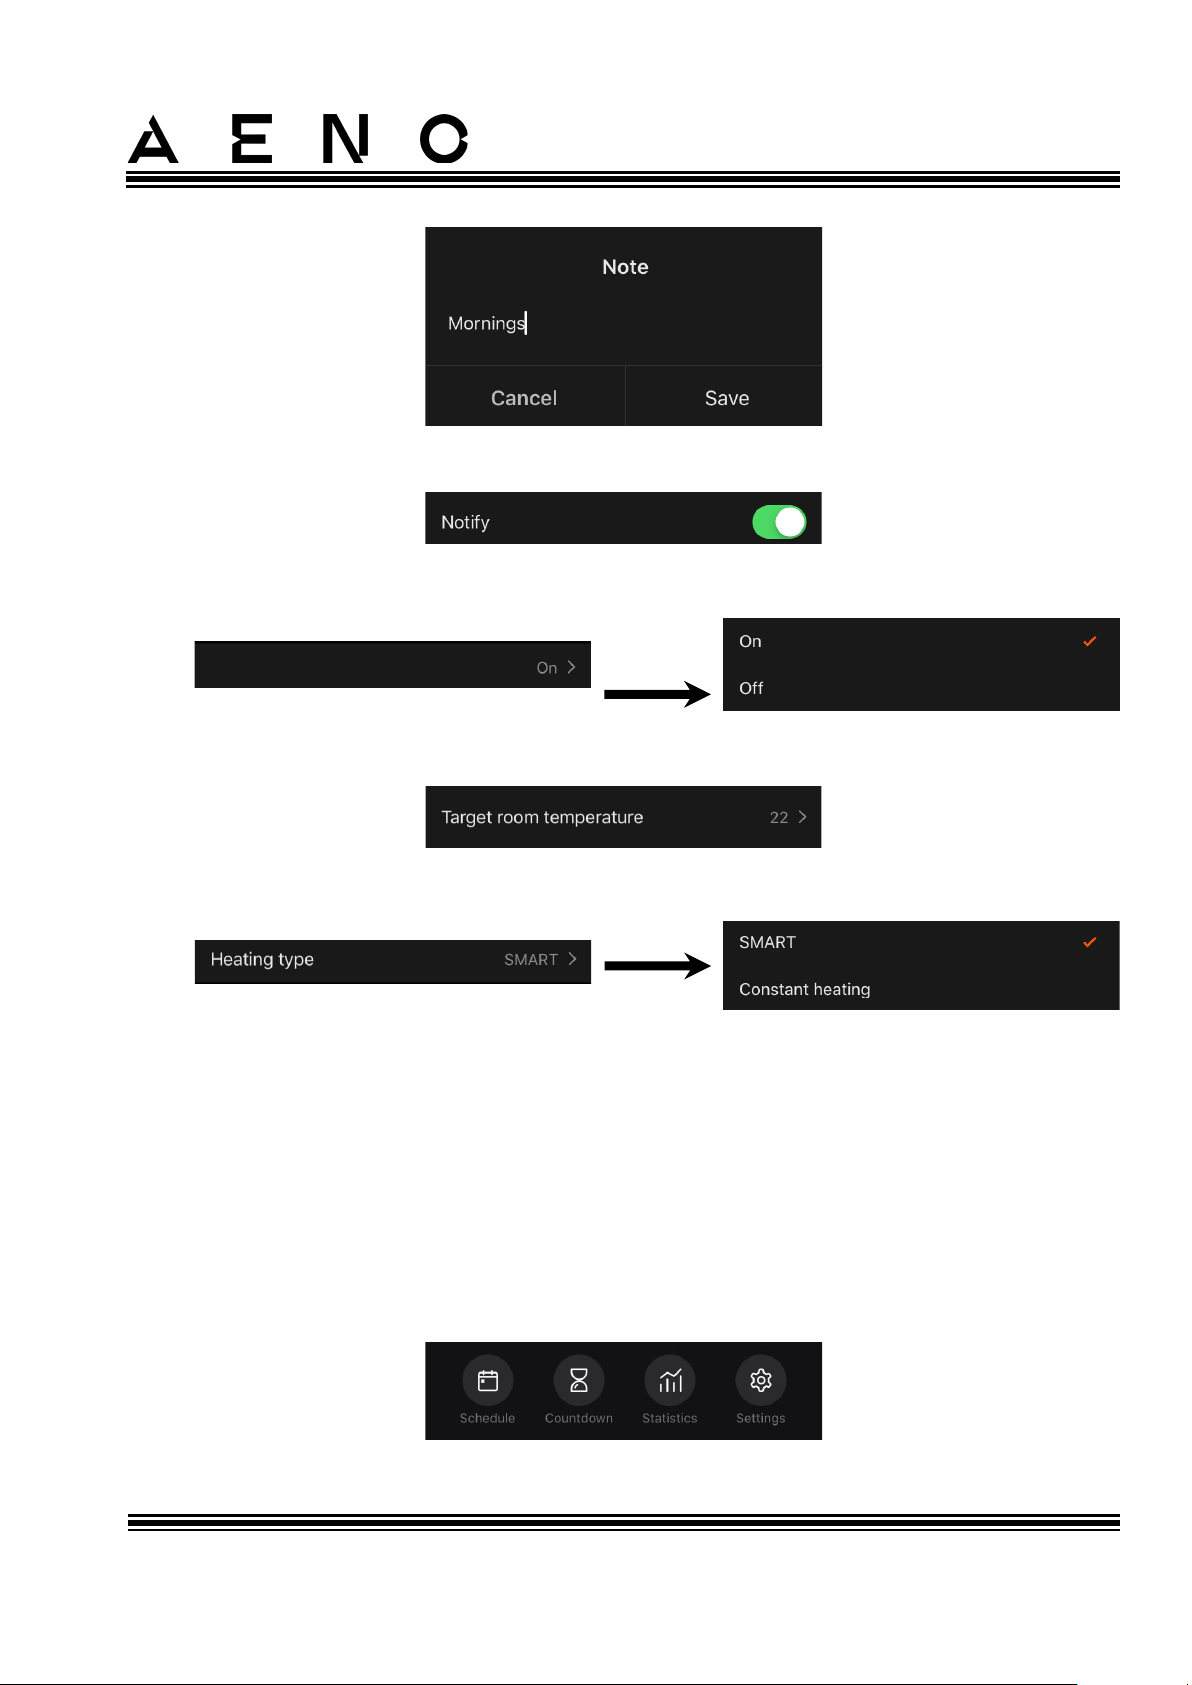
The following settings are available:
• Start time,
• Repetition by day of the week,
• Entering a user note that will be displayed in the list of schedules and push
notifications,
Page 47
AENOTM Premium Eco Smart Heater
Installation and Operation Manual
© ASBISc Enterprises PLC.. All rights reserved Document version: 1.0.3, aeno.com
Page 47 of 68
• Option to receive push notifications when this event starts,
• Action to be triggered by time (switching the heater on or off),
• The desired room temperature for the schedule for turning the heater on,
• The type of heating for the schedule for turning the heater on.
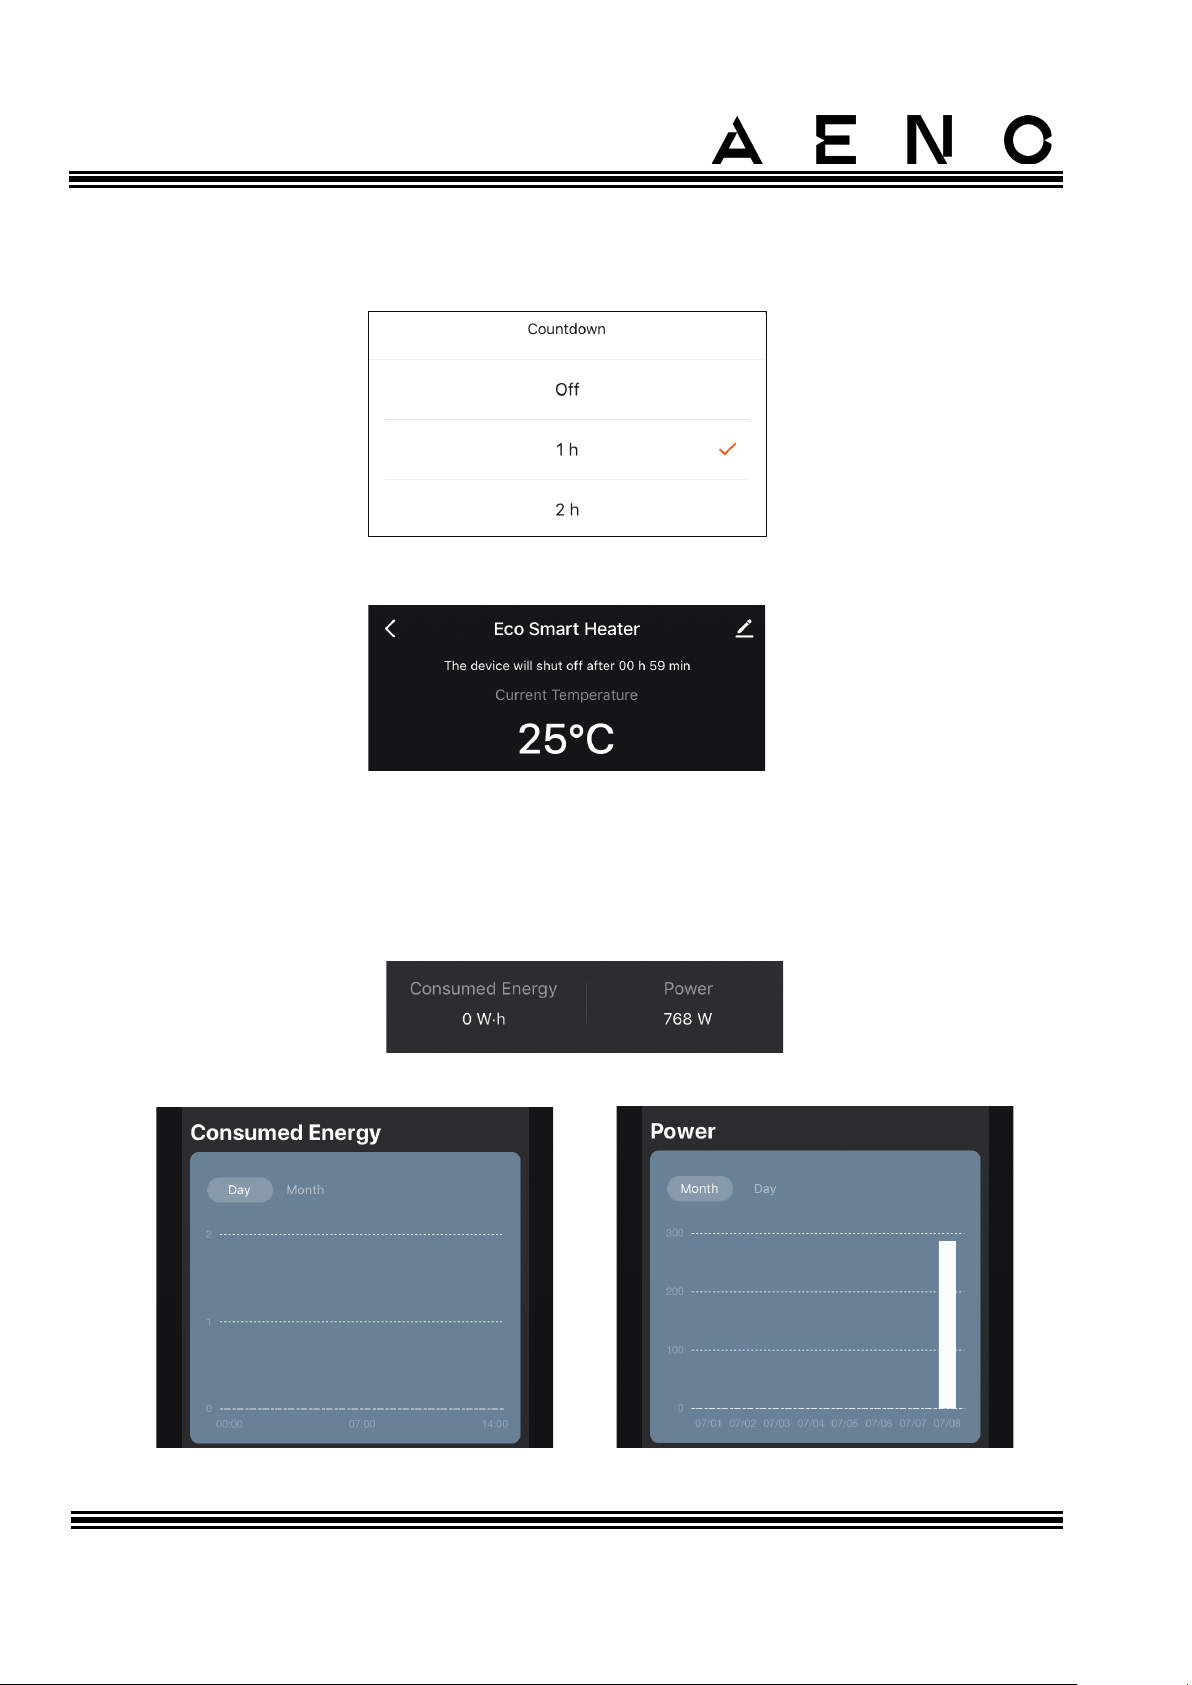
2.4.8 Setting the Countdown Timer
The countdown timer allows the device to be turned off automatically after a specified
interval of twenty-four (24) hours.
The time step is 1 hour.
To set the countdown timer, tap the “Timer” tab in the control panel of the heater.
Page 48
AENOTM Premium Eco Smart Heater
Installation and Operation Manual
Document version: 1.0.3, aeno.com © ASBISc Enterprises PLC. All rights reserved
Page 48 of 68
The timer is considered activated when a check mark is placed next to the value of the
time interval after which the heater will turn off. Tap “Done” to save the timer settings.
The time when the device is turned off will be displayed in the control panel.
2.4.9 Energy and Power Statistics
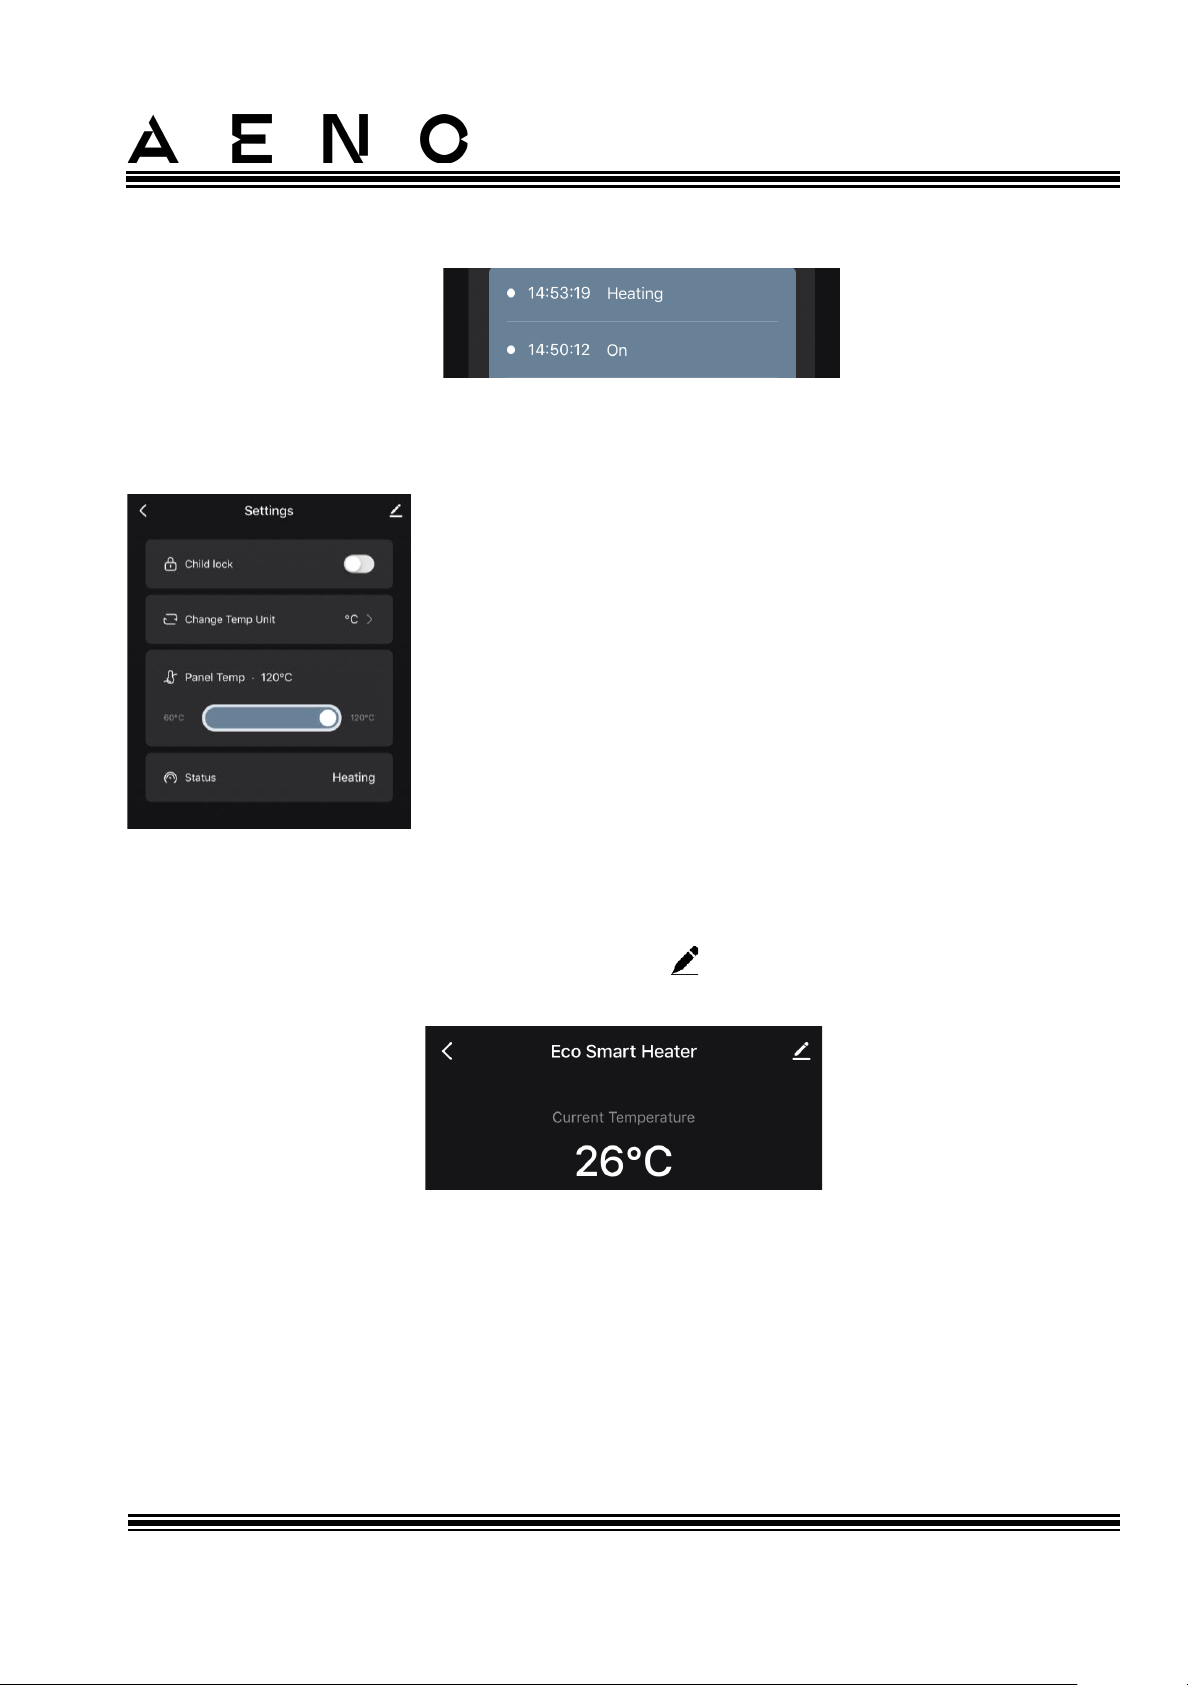
In the Statistics section, you can view the following information:
• Current power consumption and consumed energy of the heater;
• Energy consumption and power statistics diagrams for the day or the month;
Page 49
AENOTM Premium Eco Smart Heater
Installation and Operation Manual
© ASBISc Enterprises PLC.. All rights reserved Document version: 1.0.3, aeno.com
Page 49 of 68
• The list of heater statuses by days with timestamp of the event.
2.4.10 Changing Settings
In the “Settings” tab of the heater control panel, the user
can perform the following actions:
• Activate the Child Lock mode. When activated, the
heater will not respond to pressing a physical button,
and all control may be done through the app only;
• Select the temperature scale (°C or °F);
• Set the desired heating temperature of the panel;
• View the current status of the heater.
2.4.11 Additional Settings
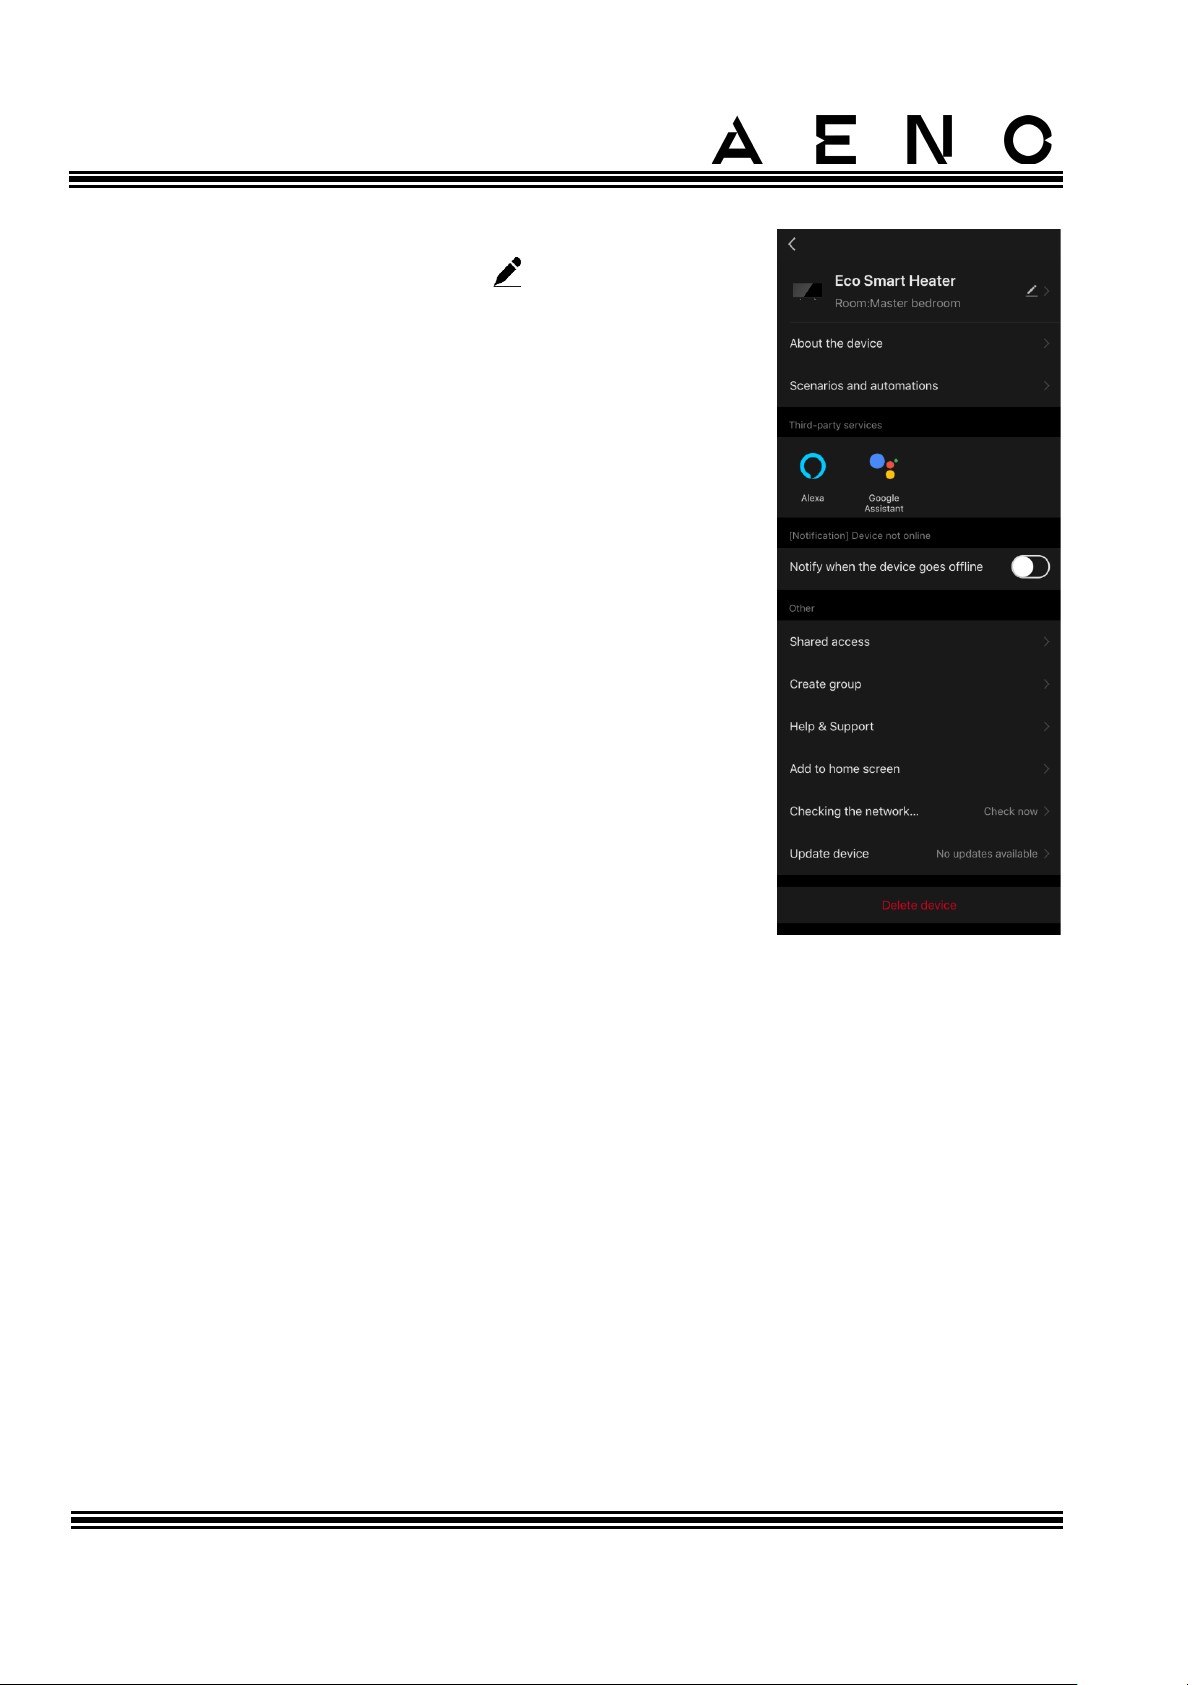
To open the additional settings screen, tap the icon in the upper right corner of the
device control panel.
In the additional settings panel, you can perform the following:
Page 50
AENOTM Premium Eco Smart Heater
Installation and Operation Manual
Document version: 1.0.3, aeno.com © ASBISc Enterprises PLC. All rights reserved
Page 50 of 68
• Change the screen saver, name and the room of
installation of the device (tap next to the heater
name);
• About the device: View reference information about
the device operation;
• Scenarios and automations: View scenarios where
the device is involved;
• Third-party services: Integrate the account with
Alexa and Google Assistant services for voice control
of devices;
• Notify when the device goes offline: Enable or
disable push notifications;
• Shared access: Provide access to device control to
another account, for example, for family members;
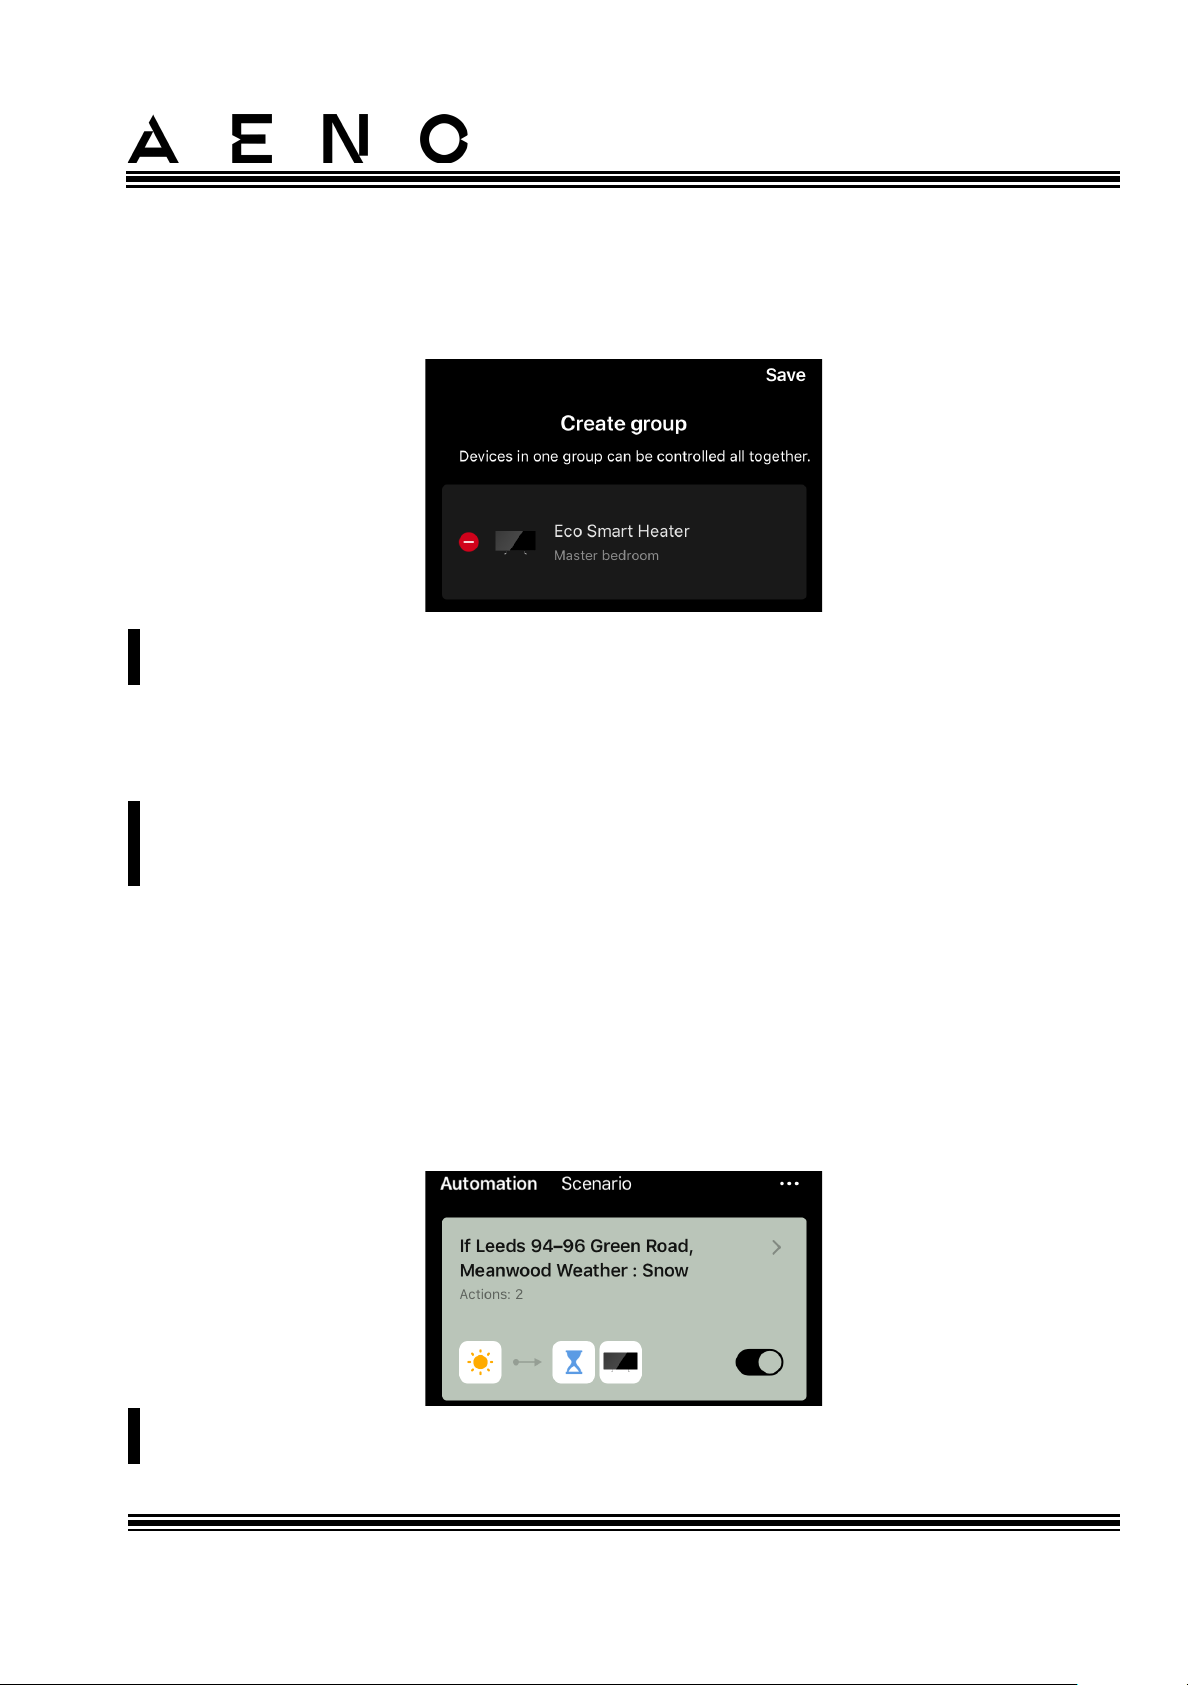
• Create group: Unite devices to manage them as a
single group;
• Help & Support: Get information about the most
common problems and how to solve them;
• Add to home screen: Add a device shortcut to your
smartphone's home screen for quick access to the
device control panel;
• Checking the network: Launch scanning the Wi-Fi
network, its signal strength and network connection
status;
• Update device: Check and install the latest updates for the device or activate the
automatic update;
• Delete device: Remove the device from the mobile app.
Page 51
AENOTM Premium Eco Smart Heater
Installation and Operation Manual
© ASBISc Enterprises PLC.. All rights reserved Document version: 1.0.3, aeno.com
Page 51 of 68
Shared Access
In the AENO app, a device can only be connected to one
account. However, the user may share this device with
other users.
Through sharing, other users can control the device,
change modes and operation settings, but cannot set or
modify device data, create scenarios, or remove devices
from the application.
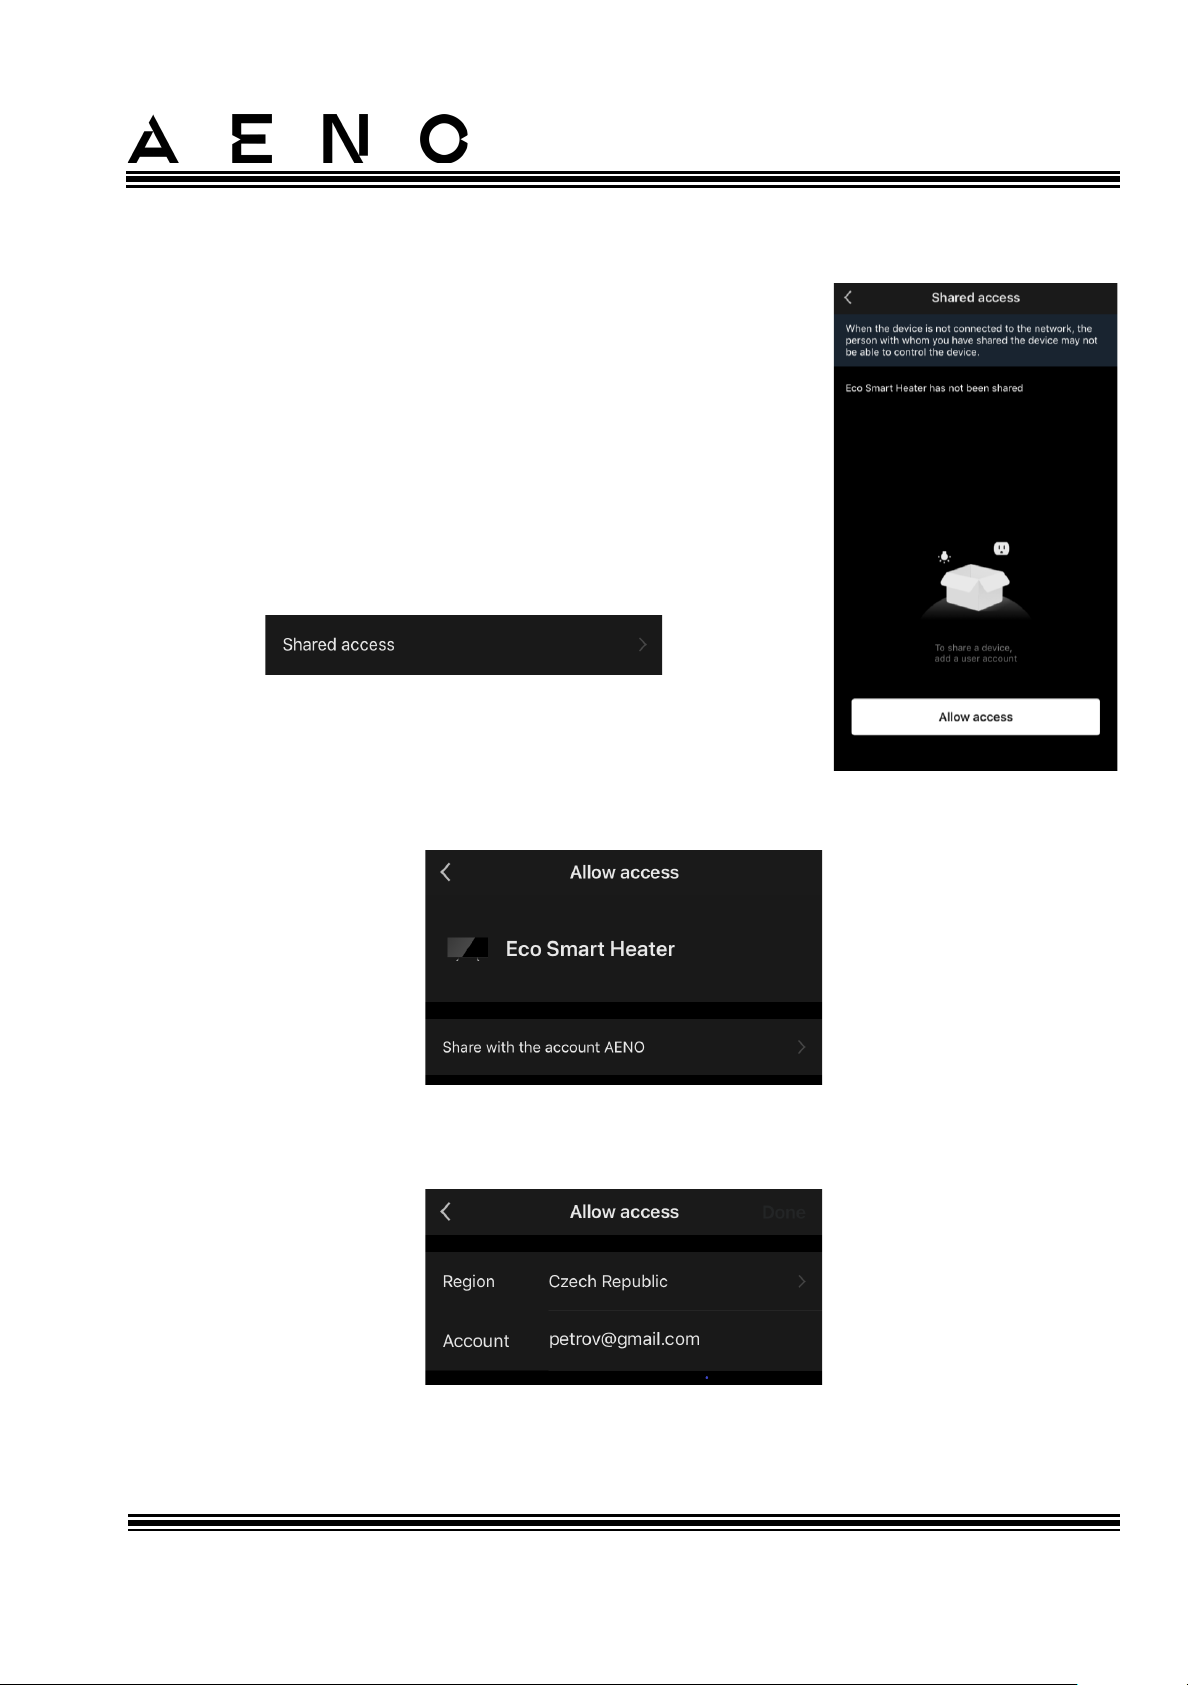
To share your device, open to the additional settings menu
and tap “Shared access”.
Tap “Allow Access” and tap “Share with the account AENO”.
Select the country of residence and the e-mail address of the user you want to share
access with. Tap “Done”.
Page 52
AENOTM Premium Eco Smart Heater
Installation and Operation Manual
Document version: 1.0.3, aeno.com © ASBISc Enterprises PLC. All rights reserved
Page 52 of 68
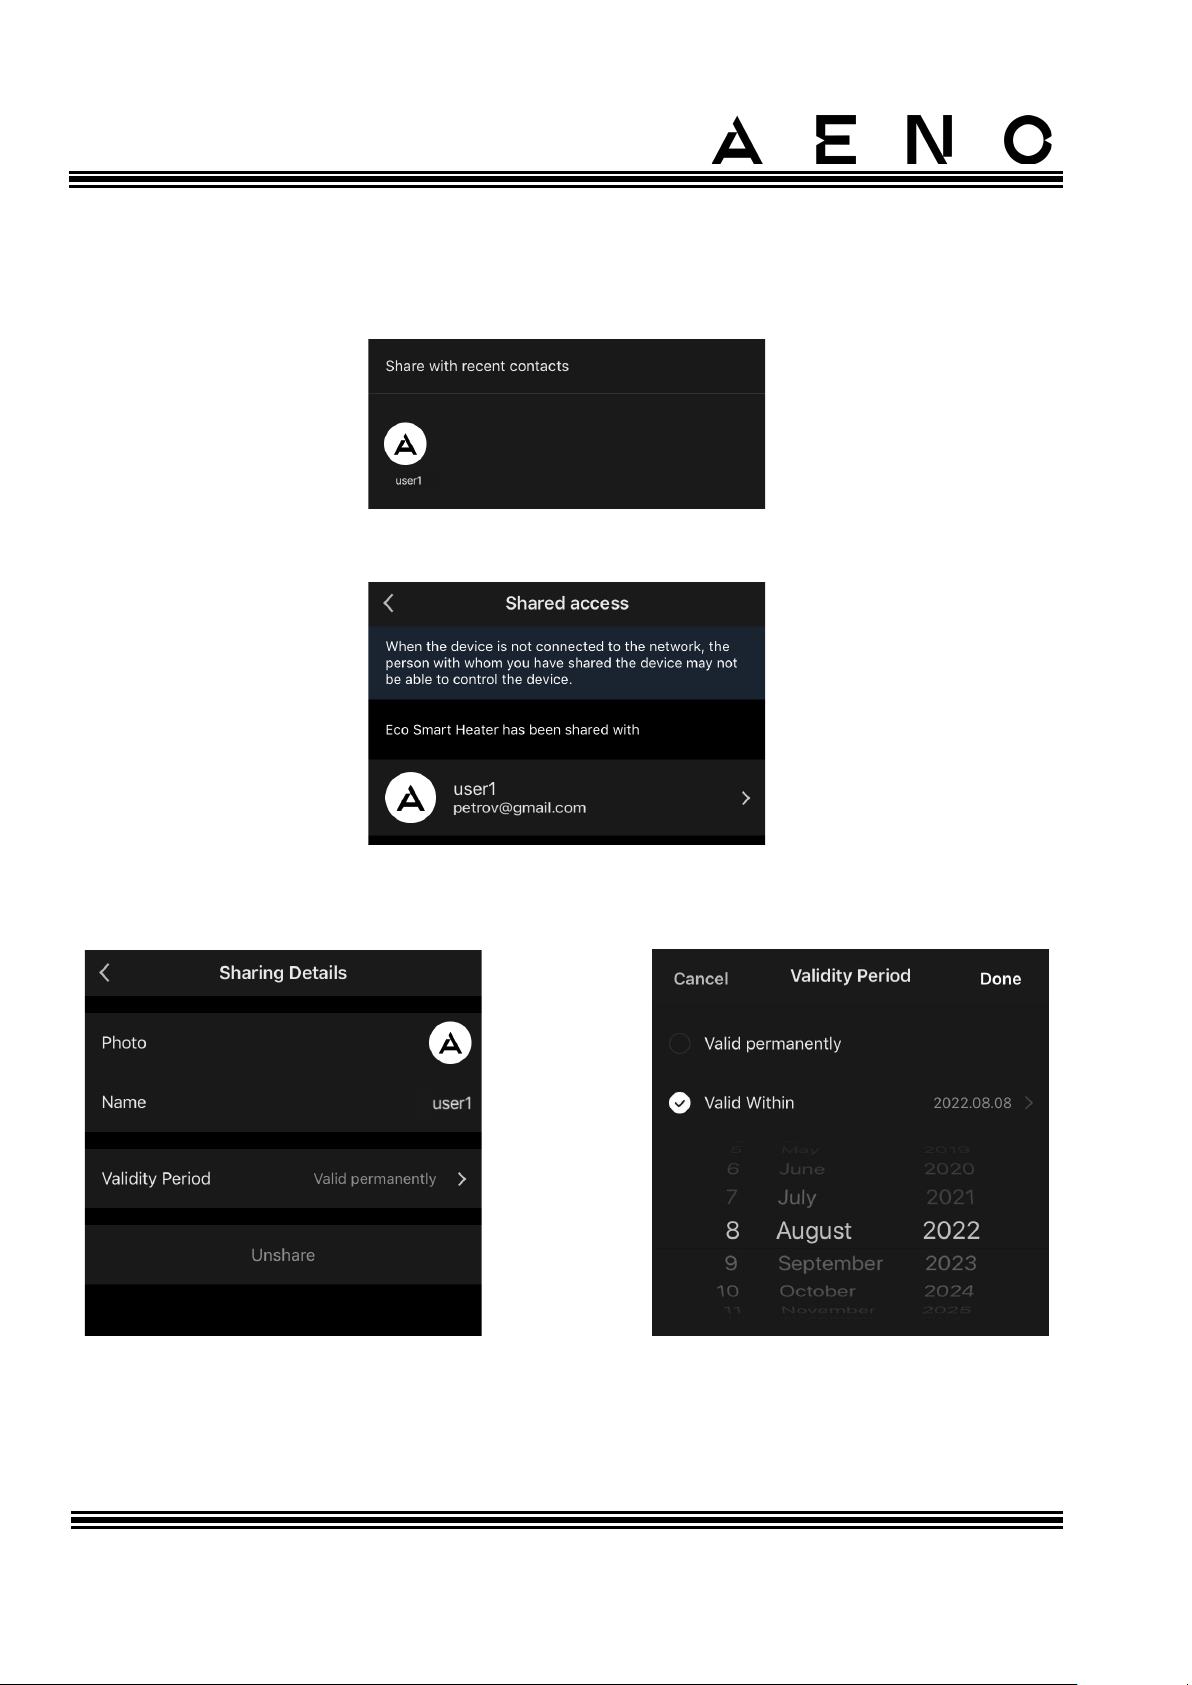
In the “Shared access” section, tap “Allow Access” again, and then tap the icon of the
desired user. The corresponding notification will appear that access has been
successfully granted.
Information about the user will be displayed in the “Shared access” section.
Tap on the line with the added account in this section to set the validity period for the
access or to cancel sharing.
This device will appear in the granted access section of the “Home” tab in this user
account.
Page 53
AENOTM Premium Eco Smart Heater
Installation and Operation Manual
© ASBISc Enterprises PLC.. All rights reserved Document version: 1.0.3, aeno.com
Page 53 of 68
Create Group
From the AENO app, you can manage individual devices or groups of devices. To group
devices, tap “Create group” and select the desired heaters from the list. Then, tap “Save”.
NOTE
Only devices of the same type can be grouped.
Then, set the desired name for the group and tap “Save”. The created group is displayed
in the “Home” tab.
NOTE
For more information on the AENO app functionality, see the corresponding
complete user manual available for downloading at aeno.com.
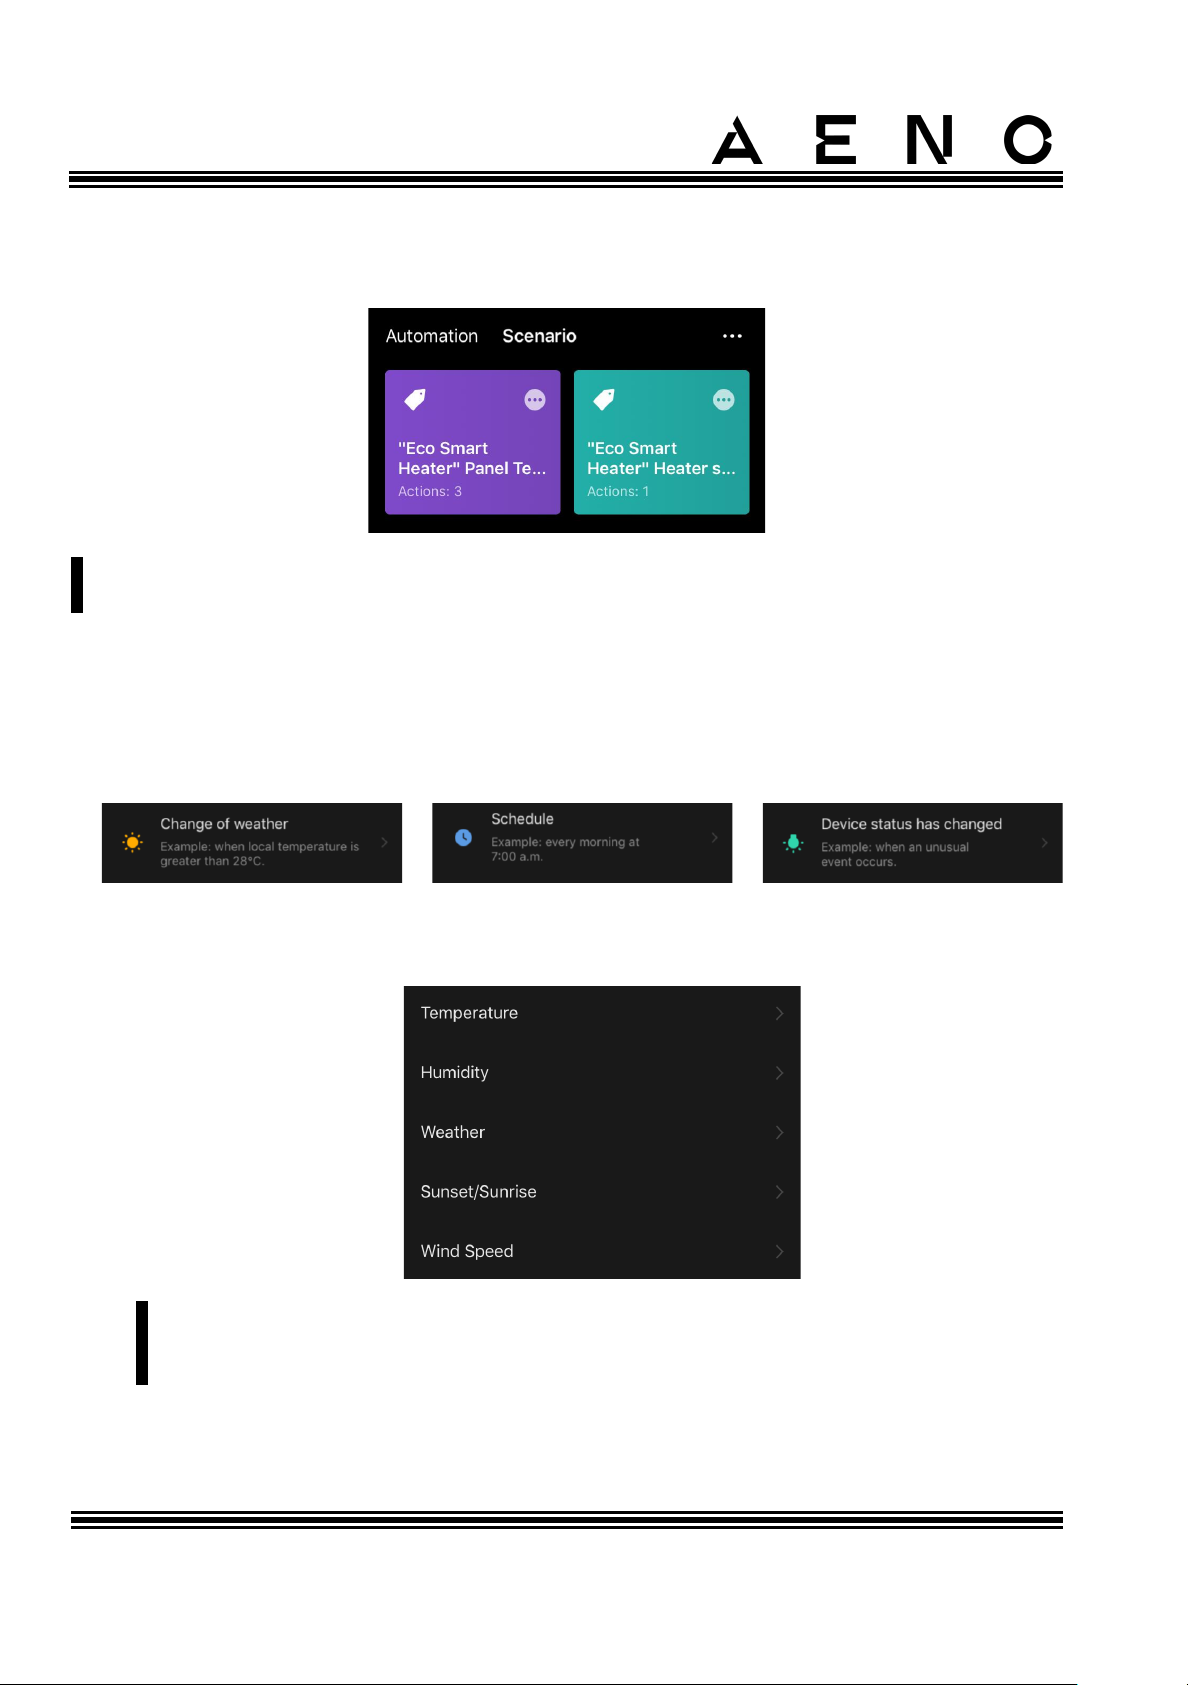
2.4.12 Scenarios and Automations
In the “Scenarios” tab, the user can select conditions for automation and/or create and
manually run scenario.
Automation is an event that starts automatically and is triggered every time the
conditions specified in it are met.
NOTE
In other words, it is an automatic scenario.
Page 54
AENOTM Premium Eco Smart Heater
Installation and Operation Manual
Document version: 1.0.3, aeno.com © ASBISc Enterprises PLC. All rights reserved
Page 54 of 68
Scenario is an event that is triggered manually at the user’s request and is executed
once if the conditions specified in it are met.
NOTE
In other words, it’s a manual scenario.
Automation (creating an automatic scenario)
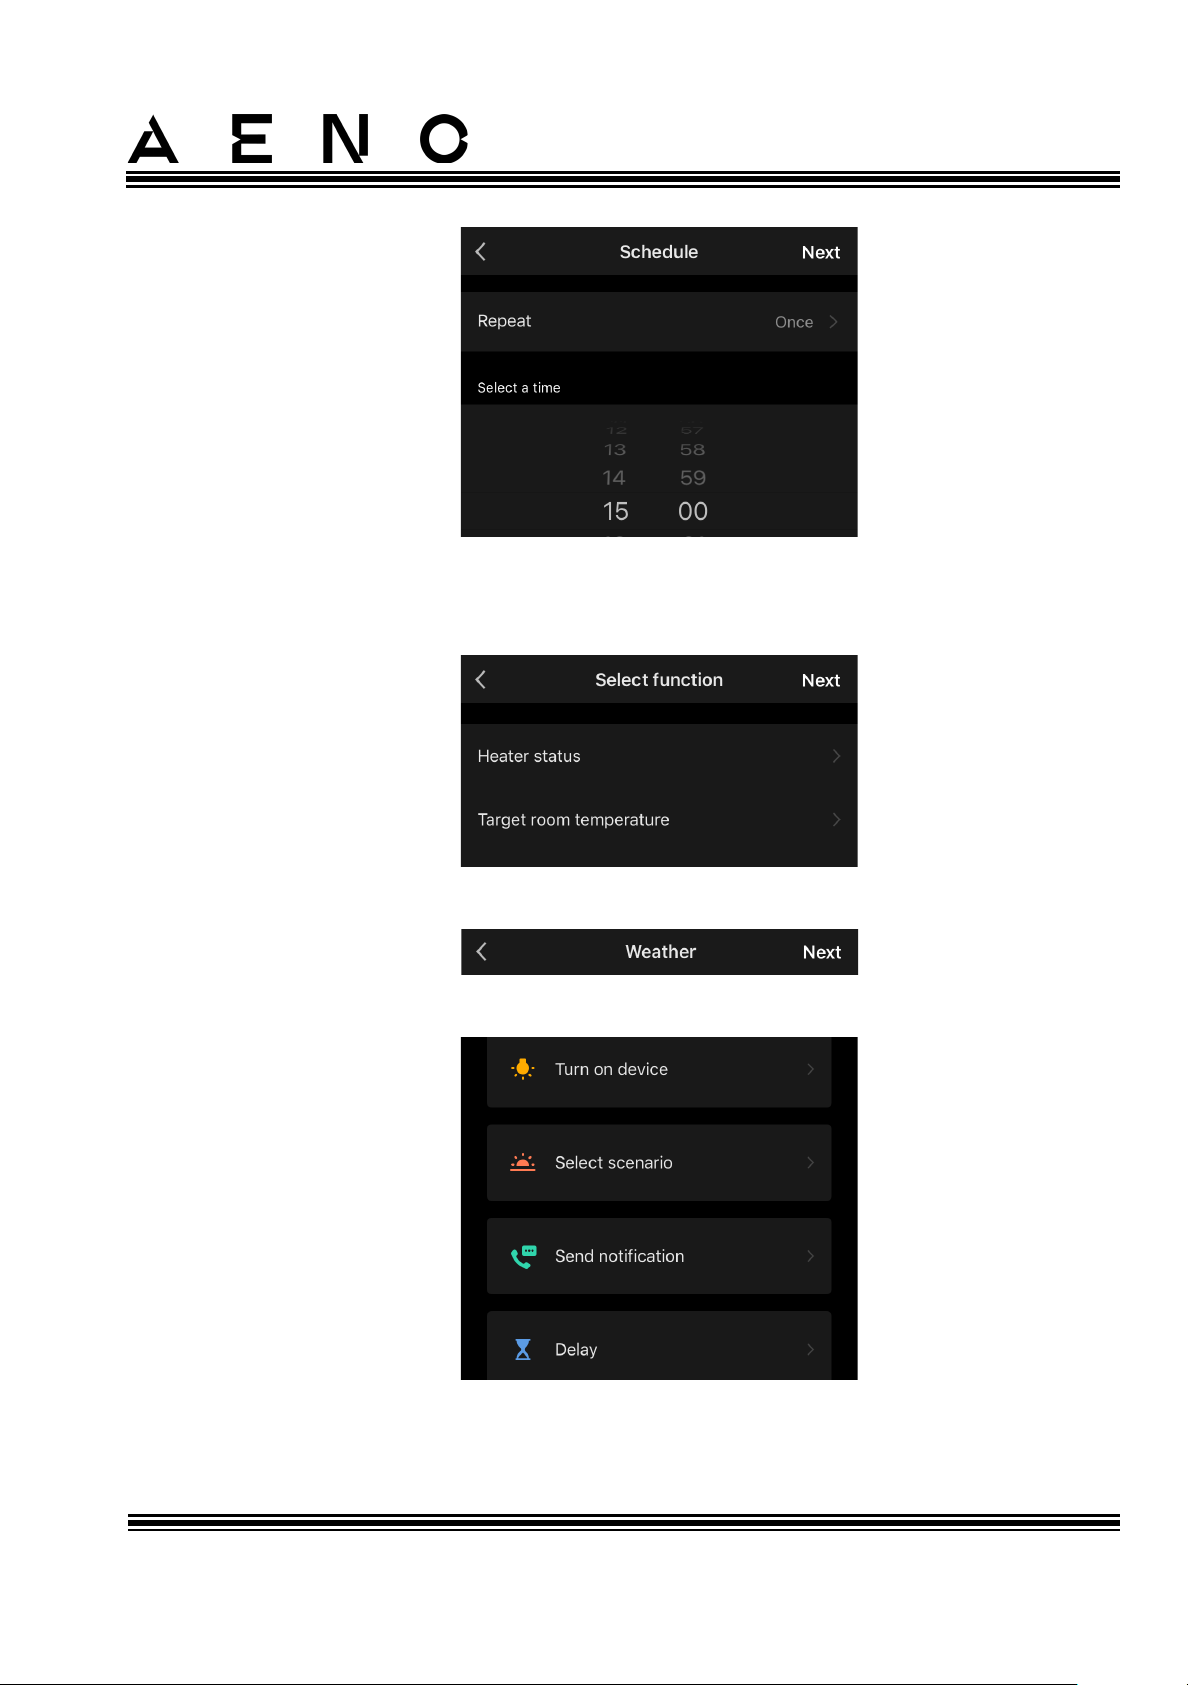
• Tap the “Scenarios” tab and then tap “+”.
• Select one of the conditions launch an automatic scenario.
Change of weather: The scenario will run when the weather conditions match
the parameter selected by the user. For example, when it gets wet.
NOTE
In order to start the automation correctly, it is necessary to specify the exact
address of the place where you want to read the weather conditions.
Schedule: The scenario will run at a specific time. Here you can also set the days
of the week to repeat this scenario.
Page 55
AENOTM Premium Eco Smart Heater
Installation and Operation Manual
© ASBISc Enterprises PLC.. All rights reserved Document version: 1.0.3, aeno.com
Page 55 of 68
Device status: The scenario will run when the selected event occurs. For example,
when the room temperature drops to 19°C or when the heater's power
consumption limit set by the user is exceeded.
• Tap “Next” at the top of the screen.
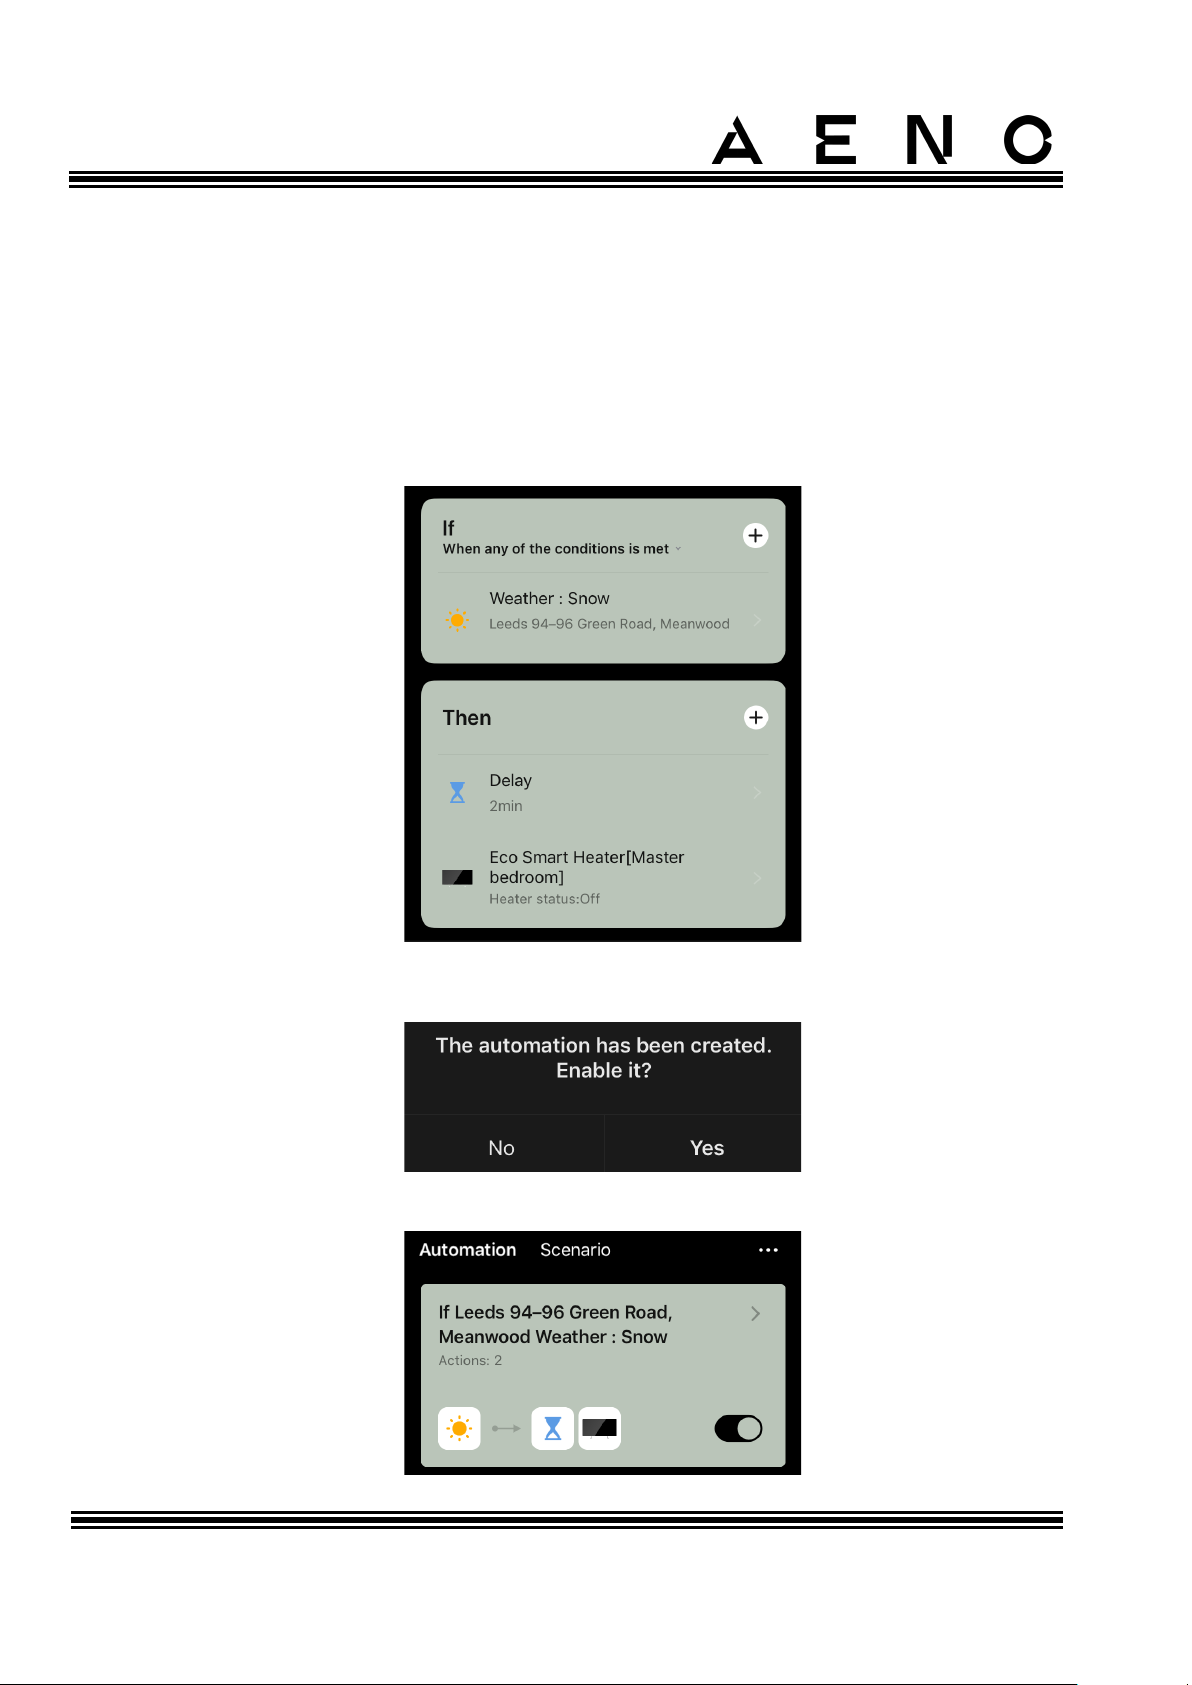
• Select one of the actions that will occur when selected condition appears:
Device status: The selected event will occur. For example, the heating type will
be changed or the panel heating temperature will increase to 100 °C.
Page 56
AENOTM Premium Eco Smart Heater
Installation and Operation Manual
Document version: 1.0.3, aeno.com © ASBISc Enterprises PLC. All rights reserved
Page 56 of 68
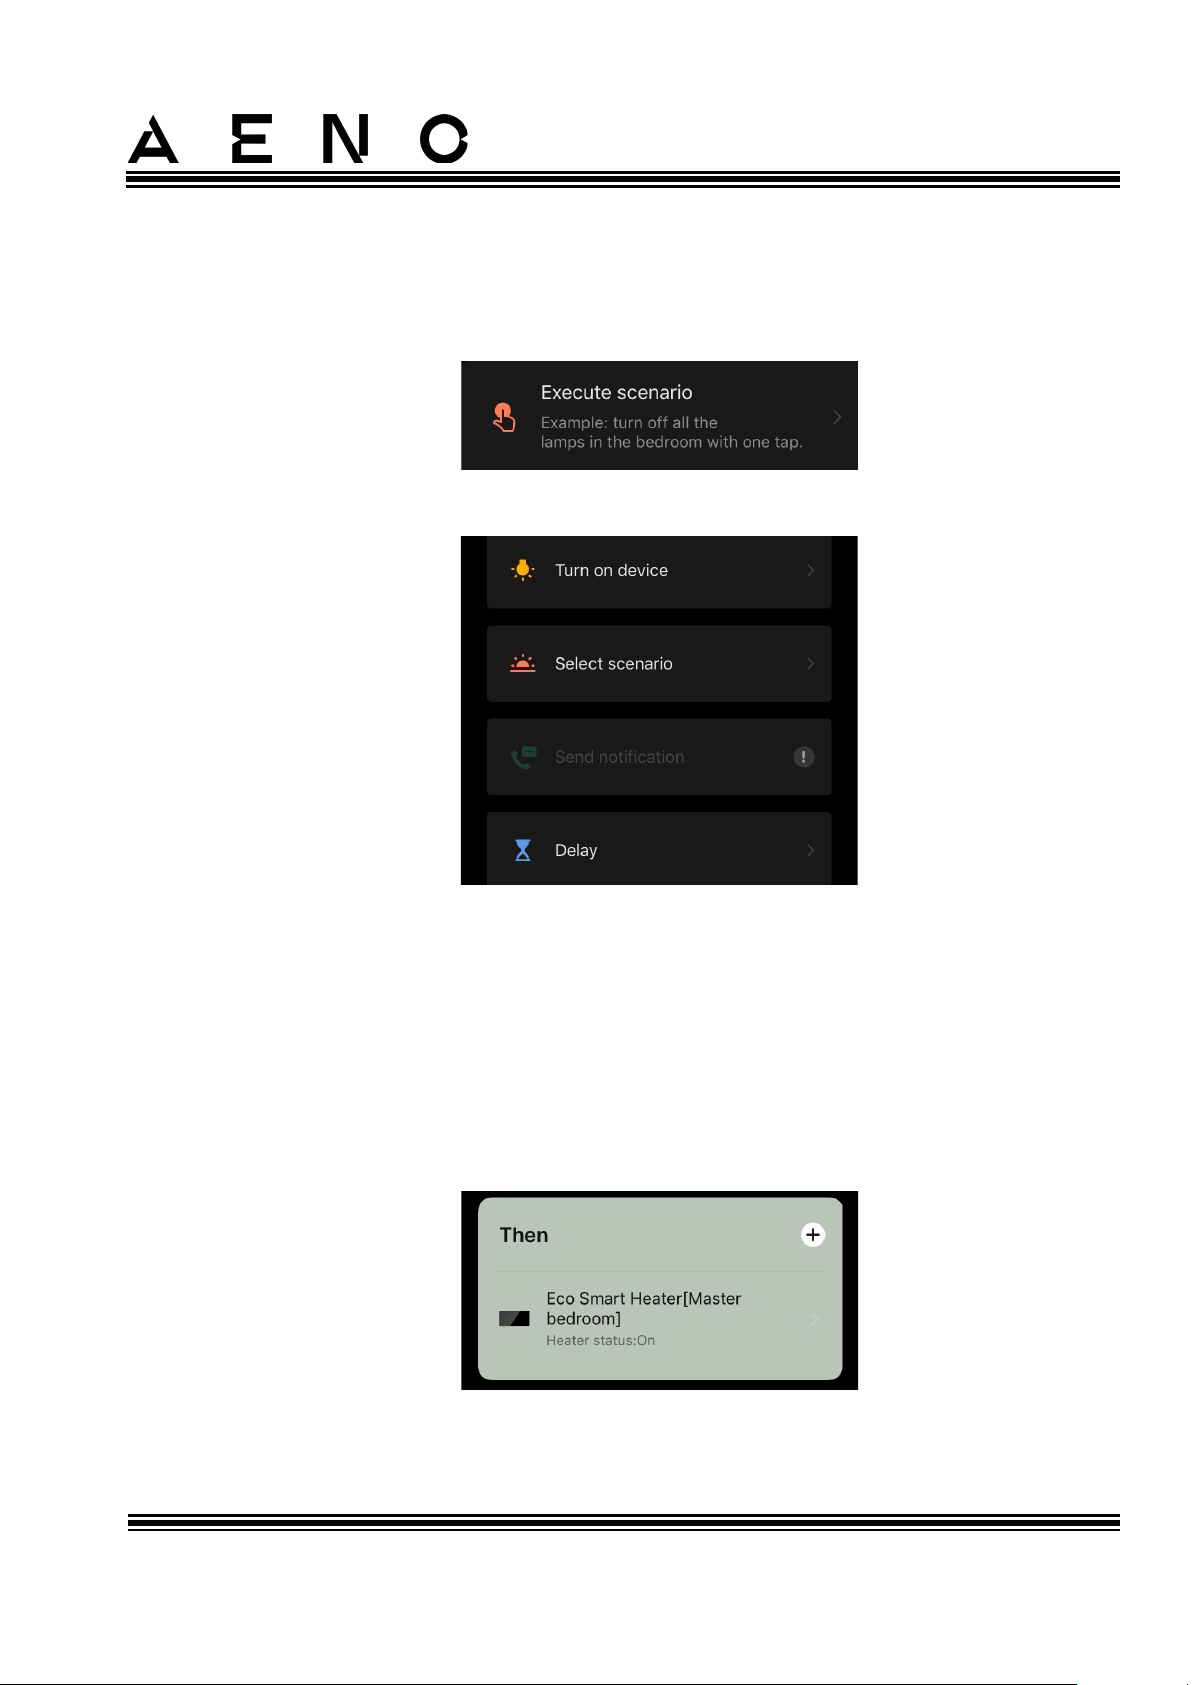
Select scenario: Previously created scenario or automation will run.
Send notification: The user will receive a notification via the message center.
Delay: The time delay will be set before the next action is triggered. In this case,
it is necessary to add one more action after the specified delay.
• Tap “Next” at the top of the screen.
• If necessary, add an additional condition and/or action by tapping “+” in the
corresponding block.
• Tap “Save”.
• Enable the created automation, if necessary.
• It can also be activated later in the “Automation” section.
Page 57
AENOTM Premium Eco Smart Heater
Installation and Operation Manual
© ASBISc Enterprises PLC.. All rights reserved Document version: 1.0.3, aeno.com
Page 57 of 68
Scenario (creating a manual scenario)
• Tap the “Scenarios” tab and then tap “+”.
• Select the “Execute scenario” condition.
• Select one of the actions that shall be performed after you run the scenario:
Device status: The selected event will occur. For example, the heating type will
be changed or the panel heating temperature will increase to 100 °C.
Select scenario: Previously created scenario or automation will run.
Delay: The time delay will be set before the next action is triggered. In this case,
it is necessary to add one more action after the specified delay.
• Tap “Next” at the top of the screen.
• If necessary, add an additional condition and/or action by tapping “+” in the
corresponding block.
• Tap “Save”.
Page 58
AENOTM Premium Eco Smart Heater
Installation and Operation Manual
Document version: 1.0.3, aeno.com © ASBISc Enterprises PLC. All rights reserved
Page 58 of 68
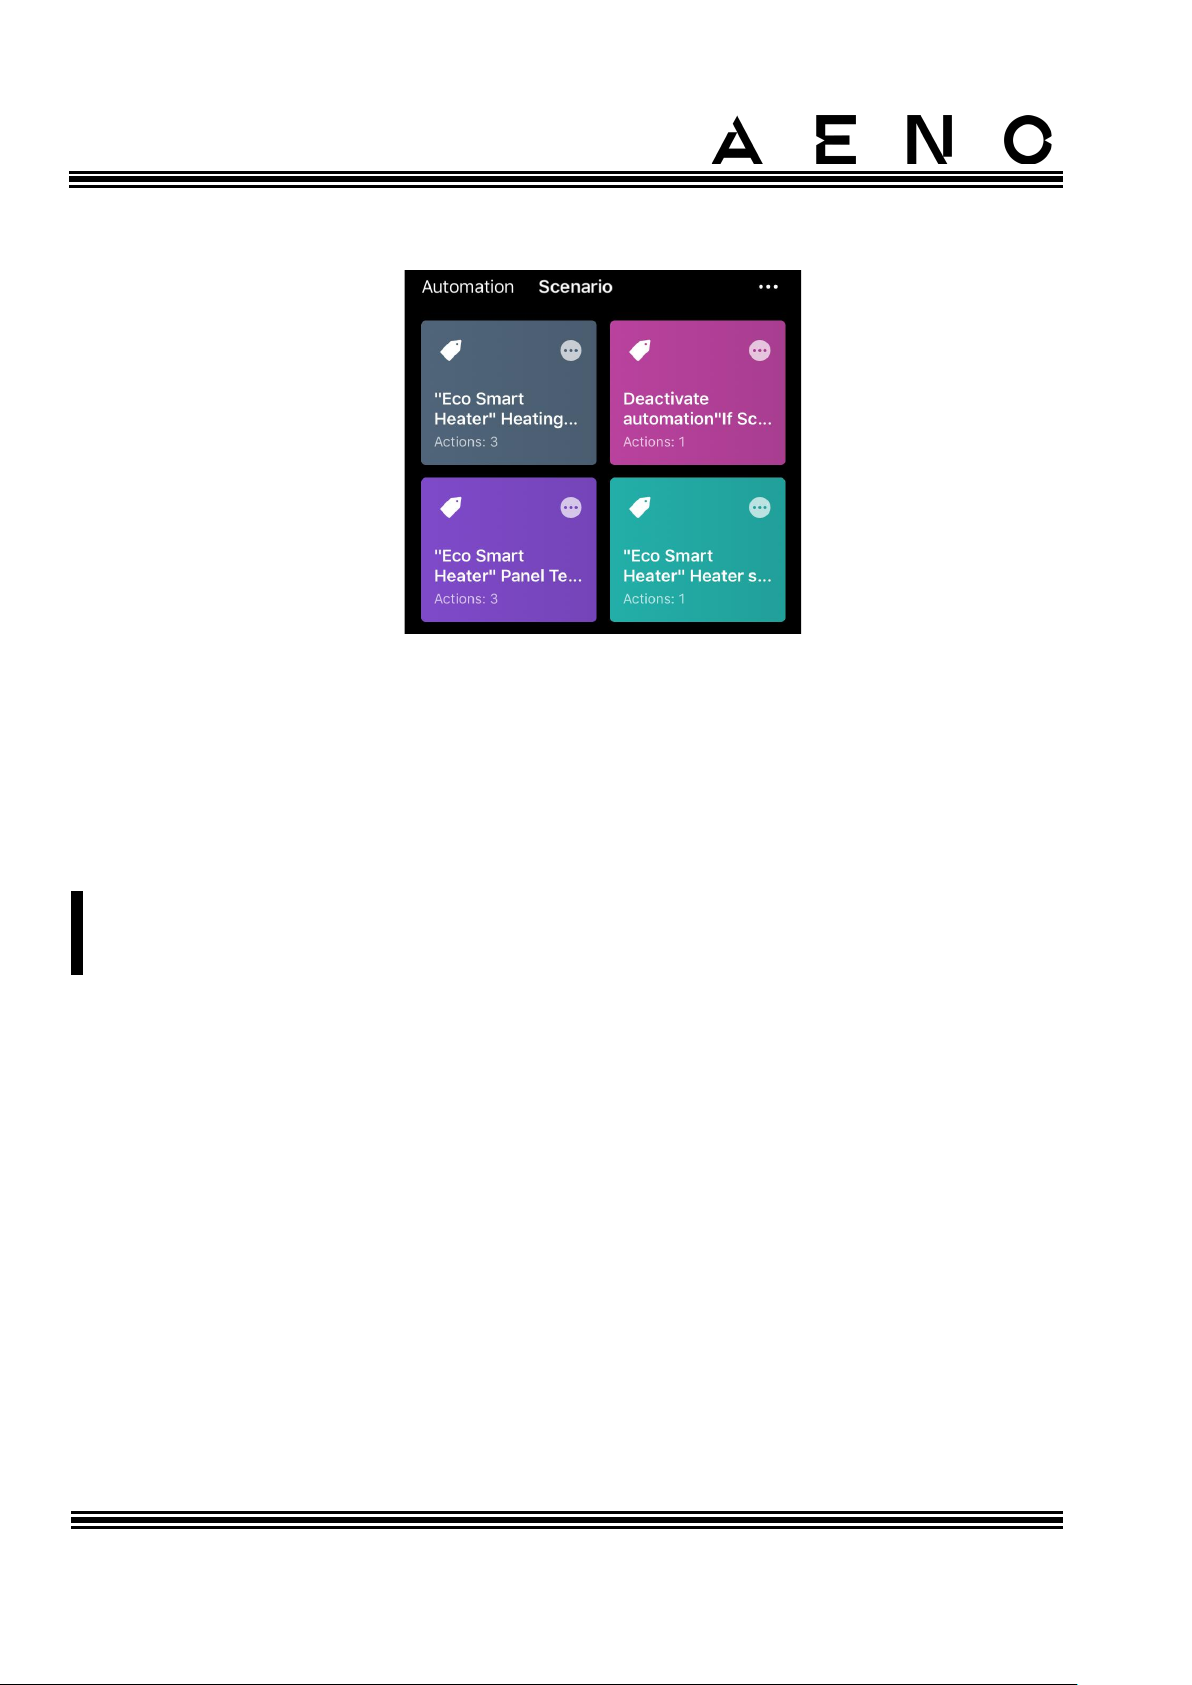
• The created scenario will be displayed in the “Scenario” section.
To run the scenario, you should tap its image in the list.
To make changes to the created script, tap “”.
2.5 Child Lock Mode
The Child Lock mode means locking the power button of the device via the mobile app.
NOTE
This mode can only be activated remotely after connecting the device via the
mobile app.
If the mode is activated, the heater will beep every time its power button is pressed.
The button itself will be locked.
There are two following ways to disable the Child Lock mode:
1. Remotely via the AENO app.
2. Manually by pressing the power button 5 times for 4 seconds.
2.6 Remote control via voice assistants
To control the heater via the Google Assistant or Amazon Alexa app, it must first be
activated in the AENO app.
Detailed instructions for managing the heater with voice assistants are available for
downloading from the respective manufacturers of these services.
Page 59

AENOTM Premium Eco Smart Heater
Installation and Operation Manual
© ASBISc Enterprises PLC.. All rights reserved Document version: 1.0.3, aeno.com
Page 59 of 68
3 Maintenance and Repair
The AENOTM heater does not require special maintenance in the normal course of
operation. However, in order to maintain the proper state and stable operation of the
device it is recommended to perform the following actions from time to time:
• Follow rules of safe operation of the device;
• Clean the device casing from dirt and dust from time to time (at least once per
the heating season);
• Check for updates of the mobile app (If auto update is not enabled);
• Repair mechanical damages to devices (in Service Centers).
The AENOTM heater repairs shall be carried out in Service Centers.
In the case of warranty repairs or replacement, the User shall provide the Seller with
the sales receipt and the purchased device.
For details on the replacement and repairs of the AENOTM heater, please contact your
local Company representative or the Tech Support Department at aeno.com.
Page 60

AENOTM Premium Eco Smart Heater
Installation and Operation Manual
Document version: 1.0.3, aeno.com © ASBISc Enterprises PLC. All rights reserved
Page 60 of 68
4 Warranty Obligations
The service life of the device is two (2) years. The manufacturer's warranty for this
product is two (2) years from the date of retail sale. The manufacturer's warranty on
accessories is two (2) years from the date of retail sale.
You may have other rights under the laws of your country that govern the sale of
consumer goods. This limited warranty does not affect such rights.
The manufacturer guarantees proper functioning of all materials, components and
assembly of AENOTM products provided that the rules of operation set forth in the user
manual of the device are followed during the warranty period.
For warranty replacement, the device must be returned to the retailer, along with the
receipt verifying the purchase.
The following are not considered defects:
• the smell of new plastic or rubber emitted by the device during the first days of
operation;
• change of color shade, gloss of equipment parts during operation;
• noises (not exceeding the sanitary norms) related to the principles of operation
of the individual components, namely:
o fans;
o water valves;
o electrical relays;
o electric motors;
o belts;
o compressors;
• noises caused by natural wear and tear (aging) of materials, namely:
o crackling during heating/cooling;
o creaks;
o minor knocking of moving mechanisms;
• the need to replace consumables and wear parts that have become unusable as
a result of their natural wear and tear.
Page 61

AENOTM Premium Eco Smart Heater
Installation and Operation Manual
© ASBISc Enterprises PLC.. All rights reserved Document version: 1.0.3, aeno.com
Page 61 of 68
4.1 AENOTM Service Centers
For a list of cities where the manufacturer's service is available, visit aeno.com.
4.2 Warranty Service Procedure
If you discover a suspected fault or defect in the device, you should contact an
authorized service centre before the warranty period expires and provide the following
information:
1. A device with an alleged fault or defect.
2. Original document confirming the purchase.
In the absence of an authorized service centre, the customer should contact the store
where the device was purchased.
Warranty service does not cover:
• the adjustments, setting, cleaning and other care of the product as specified in
this user manual;
• the replacement of consumables (batteries, filters, light bulbs, dust bags, etc.) as
specified in this document.
4.3 Limitation of Liability
Products with manufacturing defects are subject to warranty service during the
warranty period. In this case, the warranty period is extended for a period equal to the
duration of the repair.
AENOTM products are not eligible for free warranty service if the following damages or
defects are found:
• damage caused by force majeure, accidents, negligence, intentional or careless
actions (omissions) of the buyer or third parties;
• damage caused by the effects of other objects, including but not limited to
exposure to moisture, dampness, extreme temperatures, or environmental
conditions (or if they change drastically), corrosion, oxidation, ingress of food or
liquid and exposure to chemicals, animals, insects, and their products of vital
activity;
Page 62

AENOTM Premium Eco Smart Heater
Installation and Operation Manual
Document version: 1.0.3, aeno.com © ASBISc Enterprises PLC. All rights reserved
Page 62 of 68
• if the device (accessories, components) has been opened (the seals are broken),
altered or repaired by anyone other than an authorized service centre, or with
unauthorized replacement parts;
• defects or damage caused by improper use, misuse, including use contrary to
the operating instructions;
• defects caused by normal wear and tear, including bags, cases, battery packs, or
user manuals;
• if the serial number (factory stickers), manufacturing date or model name on the
device have been removed, erased, damaged, altered or is illegible in any way;
• in case of violation of the rules and conditions of operation, as well as the
installation of the device, set forth in the operating manual;
• cracks and scratches as well as other defects resulting from transportation,
operation by the purchaser or negligent handling on his part;
• mechanical damage that occurs after the device has been transferred to the
user, including damage caused by sharp objects, bending, crushing, dropping,
etc;
• damage caused by non-compliance with standards for parameters of power,
telecommunications, cable networks and external factors.
This limited warranty is the exclusive and sole warranty provided and is in lieu of any
other express or implied warranties. The manufacturer makes no warranty, either
express or implied, beyond the description contained herein, including an implied
warranty of merchantability and fitness for a particular purpose. It remains at the
discretion of the purchaser to use a faulty, defective and unacceptable device. The
manufacturer shall not be liable for damages to other property due to any defects in
the device, loss of use of the device, loss of time, or for any special, incidental, indirect
or consequential damages, punitive damages and losses, including but not limited to
commercial damages, loss of profits, loss of profits, loss of confidential or other
information, loss of business or operational interruption due to the device being found
to be defective, defective or deficient
NOTE
The manufacturer does not produce equipment for the field of "vital tasks".
Devices for "vital tasks" include life support systems, medical equipment, implantrelated medical devices, commercial transportation, nuclear equipment or
systems, and any other application where equipment failure could result in
personal injury or death, or property damage.
Page 63

AENOTM Premium Eco Smart Heater
Installation and Operation Manual
© ASBISc Enterprises PLC.. All rights reserved Document version: 1.0.3, aeno.com
Page 63 of 68
5 Storage, Transportation and Disposal of Devices
The device is not intended for use in areas exposed to hazardous and harmful factors.
Long-term storage is only permitted in the original packaging in dark, dry, clean, and
well-ventilated enclosed areas. To prevent damage to the glass heating element, it is
recommended to store the device in one layer, either vertically or horizontally.
In accordance with the Waste Electrical and Electronic Equipment (WEEE)*
regulations, all electrical and electronic products must be collected separately at the
end of their service life, and cannot be disposed of together with unsorted household
waste.
Parts of worn out devices must be separated and sorted by the material type. In this
way, every user can contribute to reuse, recycling and other forms of recovery of waste
electrical and electronic equipment. Proper collection, recycling, and disposal of such
devices will help avoid potential environmental and health impacts from the harmful
substances they contain.
To dispose of the device, it must be returned to the point of sale, or to a local waste
collection and recycling company recommended by the state or local authorities.
Disposal is carried out in accordance with the applicable laws and regulations of the
respective country.
For more details on how to properly dispose of your used device, please contact your
device supplier, your waste disposal service or the local authorities responsible for
waste disposal.
NOTE.
The User must comply with the temperature and humidity conditions of storage
and transportation specified in the Table of technical specifications of the present
Installation and Operation Manual.
* Waste Electrical and Electronic Equipment, or WEEE, means used electrical or electronic equipment,
including all components, assemblies, consumables that are part of the equipment at the time it is taken out
of service (including supplied batteries (if any), components containing mercury, etc.).
Page 64

AENOTM Premium Eco Smart Heater
Installation and Operation Manual
Document version: 1.0.3, aeno.com © ASBISc Enterprises PLC. All rights reserved
Page 64 of 68
The device may be shipped by any kind of covered vehicles (by rail, or road or in sealed
heated airplane compartments, etc.) in accordance with the requirements of current
regulatory documents applicable to fragile goods sensitive to moisture.
The device and its accessories shall be kept in original packaging during transportation.
Similar conditions shall apply to the device storage at the Seller’s warehouse.
If you need to move the assembled device, you should hold it by legs for floor
installation.
Do not dispose of the device together with unsorted municipal waste as this would be
harmful to the environment.
For the device disposal purposes, it shall be returned to the point of sale or to the local
processing center.
For detailed information on recycling of the present device, please contact your waste
management company.
Page 65
AENOTM Premium Eco Smart Heater
Installation and Operation Manual
© ASBISc Enterprises PLC.. All rights reserved Document version: 1.0.3, aeno.com
Page 65 of 68
6 Other Information
Information about the manufacturer
Name
ASBISc Enterprises PLC
Address
Iapetou 1, Agios Athanasios, 4101 Limassol, Cyprus
Contact info
Тел.: +357-25857090
asbis.com
Information about the importing company
Name
ASBISc Enterprises PLC
Address
Iapetou 1, Agios Athanasios, 4101 Limassol, Cyprus
Contact info
Тел.: +357-25857090
asbis.com
Quality Claims Acceptance and Warranty Service Company
Name
ASBISc Enterprises PLC
Address
Iapetou 1, Agios Athanasios, 4101 Limassol, Cyprus
Contact info
Тел.: +357-25857090
asbis.com
Info on Certificates and Declarations
Certificates
Declarations
The addresses of the service centers can be found at aeno.com under “Service and
Warranty”.
Page 66
AENOTM Premium Eco Smart Heater
Installation and Operation Manual
Document version: 1.0.3, aeno.com © ASBISc Enterprises PLC. All rights reserved
Page 66 of 68
7 Troubleshooting
The table below shows typical errors and problems that may occur while using the
device and possible solutions.
Table 4 – Typical problems and solutions
#
Problem
Possible Reasons
Solution
1
The heater does not
turn on
The electric outlet is deenergized or defective;
Damage to the power
cable or plug
Check the mains
voltage or make sure
the outlet, the mains
plug or the cable is in a
good operating
condition
2
The heater does not
heat when turned on
The desired temperature
is set incorrectly
Increase the desired
temperature above the
current room
temperature
3
The heater does not
respond to commands
from the app
Network connection
interrupted
Reconnect the device
and the smartphone to
the Wi-Fi hotspot
4
The heater does not
respond to pushing the
power button, and an
audible beep sounds
when it is pressed
Child lock mode is on
Turn off the mode via
the app or manually by
pressing the power
button 5 times in
4 seconds
5
During operation, the
heater beeps and the
power button is
blinking red
Heater tipping, i.e. panel
is tilted for more than
45° from its vertical
position
Return the heater to the
upright position
6
The power button of
the heater blinks red
Panel overheating or the
mains voltage surge
Press the power button
5 times for 4 seconds
Panel or room
temperature sensor
error
Page 67

AENOTM Premium Eco Smart Heater
Installation and Operation Manual
© ASBISc Enterprises PLC.. All rights reserved Document version: 1.0.3, aeno.com
Page 67 of 68
8 Glossary
Amazon Alexa
A virtual assistant that supports voice communication and
control of smart home devices
IoT
The Internet of Things is a system of Internet-connected
devices able to collect and exchange data coming from builtin services
IP44
The degree of protection, which indicates that the device is
only protected against occasional splashes (Small amounts of
moisture). It allows the devices to be used primarily in rooms
with a high level of humidity. The device with IP44 is not
intended for outdoor use, as it is not protected against rain,
snow or large amounts of dust
WEEE
Waste Electrical and Electronic Equipment means used
electrical or electronic equipment, including all components,
subassemblies, consumables that are part of the equipment at
the time it is taken out of service (including supplied
batteries/rechargeable batteries (if any), components
containing mercury, etc.)
Page 68

 Loading...