

Page 1

Auto OFF
INFRARED K-THERMOMETER
WITH LASER
CA876
ENGLISH
User Manual
Page 2

Owner’s Record
The serial number for the Model CA876 is located inside the battery compartment of the instrument. Please record this number and purchase date
for your records.
INFRARED K-THERMOMETER MODEL CA876
CATALOG #: 2121.34
SERIAL #: _______________________________________________
PURCHASE DATE: ________________________________________
DISTRIBUTOR: ___________________________________________
Page 3

Table of Contents
1. INTRODUCTION ........................................................................ 2
1.1 International Electrical Symbols .....................................................3
1.2 Receiving Your Shipment ............................................................... 3
1.3 Ordering Information ......................................................................3
2. PRODUCT FEATURES ............................................................... 4
2.1 Description .....................................................................................4
2.2 Button Functions ............................................................................5
2.2.1 Center (Yellow) Button - MEAS .........................................5
2.2.2 Mode Button ......................................................................5
2.2.3
2.2.4
3. SPECIFICATIONS ...................................................................... 7
3.1 Environmental Specications .........................................................7
3.1.1 Infrared ..............................................................................7
3.1.2 K-Type ...............................................................................8
3.2 General Specications ...................................................................9
3.3 Safety Specications ......................................................................9
4. OPERATION ............................................................................. 10
4.1 Infrared Measurement Considerations .........................................10
4.2 Recommendations before Operating ........................................... 11
4.3 Infrared Operation ........................................................................12
4.4 K-Thermocouple Operation ..........................................................12
4.5 Setting the Temperature Scale: °C or °F ......................................13
4.6 Continuous Measurement ...........................................................13
5. MAINTENANCE ....................................................................... 14
5.1 Replacing the Battery ..................................................................14
5.2 Cleaning .......................................................................................14
Repair and Calibration .................................................................................15
Technical and Sales Assistance ..................................................................15
Limited Warranty .........................................................................................16
Warranty Repairs .........................................................................................16
Back-light and ▲ Button ..............................................6
Laser and ▼ Button ....................................................6
Page 4

CHAPTER 1
INTRODUCTION
Warning
• Thermometers are not designed to touch live electrical samples.
• Do not use this instrument with Thermocouple K when voltages
at the sample point exceed 24VDC or 24Vrms.
• Do not make temperature measurement in microwave ovens.
Leaking microwaves may result in burns and serious injuries.
• To prevent sensor damage, do not point the sensor lens directly
at the sun or any other source of strong infrared light.
• Do not look directly into the laser beam, and do not aim the laser
beam into eyes.
• Do not place the infrared thermometer directly on or close to objects
at temperatures exceeding 158°F (70°C).
• To prevent measurement errors, do not expose the thermometer to strong electrical or electromagnetic elds.
• To prevent sensor damage and erroneous readings, do not
put the sensor lens into contact with any body or foreign/loose
material when measuring. Keep the sensor perfectly clean.
• Do not touch the sensor when taking measurements as it may
affect the readings.
• When the meter is exposed to sudden temperature changes
(hot or cold), allow 20 minutes of stabilization before taking a
reading.
• Be certain there is no condensation on the lens prior to taking
measurements. Allow 10 minutes for condensation to dissipate
as needed.
• The Model CA876 is not waterproof or dust-proof. Take necessary
precautions to protect it in wet or dusty environments.
• Repeated sharp exing can cause the thermocouple leads to
break. To prolong sensor life, avoid sharp bends in the thermocouple, especially near the connector.
2
Infrared K-Thermometer Model CA876
Page 5

1.1 International Electrical Symbols
This symbol on an instrument indicates a WARNING and that
the operator must refer to the user manual for instructions before
operating the instrument. In a manual, the symbol preceding
instructions indicates that if the instructions are not followed, bodily
injury, installation/sample and product damage may result.
Laser Radiation - DO NOT look into the laser beam.
Laser Output < 0.5mW, 670nm wavelength.
1.2 Receiving Your Shipment
Upon receiving your shipment, make sure that the contents are consistent
with the packing list. Notify your distributor of any missing items. If the
equipment appears to be damaged, le a claim immediately with the carrier and notify your distributor at once, giving a detailed description of any
damage. Save the damaged packing container to substantiate your claim.
1.3 Ordering Information
Infrared Thermometer Model CA876................................ Cat. #2121.34
Includes K-thermocouple, 9V Alkaline battery, rugged, shockproof, protective
safety holster and user manual.
Infrared K-Thermometer Model CA876
3
Page 6

CHAPTER 2
PRODUCT FEATURES
2.1 Description
The AEMC® Model CA876 is a portable, easy-to-use, compact-sized digi-
tal infrared and K-thermocouple input thermometer, designed for simple
one-hand operation. It uses an infrared sensor with a user adjustable
emmisivity setting.
The thermometer is simply aimed at the target to be measured without
any physical contact when in the IR mode (non-contact temperature measurement). An aiming laser enables the user to pinpoint the target. The
K-type thermocouple input may also be used. The thermometer includes a
programmable Alarm, which triggers on Hi or Lo, and a MIN or MAX Hold
function. The thermometer is supplied with a protective holster, built-in
sensor, and a K-type bead thermocouple. It also features a back-light LCD
display, an automatic data HOLD function, and Auto-OFF.
1
2
3
Auto OFF
4
5
1. 3½ digit display
2. Mode selector
3. Back-light/ Increase button
4. Laser/ Decrease button
5. Power/ Measure button
4
Infrared K-Thermometer Model CA876
Page 7

2.2 Button Functions
2.2.1 Center (Yellow) Button - MEAS
Press this button to turn the thermometer ON and perform a measure-
ment. When the button is released, the meter will automatically HOLD
(freeze) the last reading on the display for approximately 15 to 20 seconds
before automatically shuting OFF.
2.2.2 Mode Button
Pressing this button makes the thermometer enter and advance though
several functions including some programmable functions. The MODE
button is used to select a specic function (e.g. MIN, MAX) or to adjust an
Alarm or the emissivity.
To enter the mode program, press MODE once. SET is displayed in lower
right hand corner.
When pressed consecutively, it will scroll through the following settings:
ε → ε (Set) → ALM Hi (Set) → ALM Lo (Set) → MAX → MIN→ K→ ε
SET is displayed in the lower right hand corner of the display when a
selected function is programmable (ε, ALM Hi, ALM Lo).
ε: Emissivity may be adjusted with the and buttons to match a particu-
lar target. We recommend leaving it at 0.95 for general use.
ALM Hi: The Hi alarm set point is adjusted using the and buttons. When
this set point is reached the beeper will sound and ALM HI will be displayed.
ALM Lo: The Lo alarm set point is adjusted using the and buttons.
When this set point is reached the beeper will sound and ALM Lo will be
displayed.
MAX: The Max value measured will be displayed during measurement. While
in the MAX mode and when measuring, the MODE button will toggle the measurement between MAX – MIN – Present reading – MAX.
MIN: The Min value measured will be displayed during measurement. While
in the MIN mode and when measuring, the MODE button will toggle the measurement between MIN – Present reading – MAX – MIN.
K: The lower display will indicate the reading from the K-type thermocouple.
NOTE: If the thermometer is OFF, pressing the “MEAS” button for more than
4 seconds will set the thermometer in the MIN/MAX record mode when powered up.
Infrared K-Thermometer Model CA876
5
Page 8

2.2.3
Press the button to turn the Back-light ON. Press again to turn OFF.
In the settings ε, ALM Hi and ALM Lo, the button increases the numeri-
cal value displayed in the lower smaller display area. If held down, the
value change will increase in speed.
Back-light and Button
2.2.4 Laser and
Pressing the button turns the laser ON or OFF. The symbol is
displayed in the upper left hand corner when the laser is ON.
Remove the laser cover before use.
The laser is activated when the “MEAS” button is pressed during a measurement.
In the settings ε, ALM Hi and ALM Lo, the button decreases the numeri-
cal value displayed in the lower smaller display area. If held down, the
value change will decrease in speed.
NOTE: There is no ON/OFF button. The meter turns ON when the center
“MEAS” button is pressed, and will automatically shut OFF after approximately 15 to 20 seconds.
Button
6
Infrared K-Thermometer Model CA876
Page 9

CHAPTER 3
SPECIFICATIONS
3.1 Environmental Specifications
3.1.1 INFRARED
Temperature Scale:
Celsius (°C) or Fahrenheit (°F) user-selectable
Temperature Range:
-4°F to 1022°F (-20°C to 550°C)
Display Resolution:
1°F / 1°C
Accuracy:
< 212°F (100°C) ± 10°F (5°C)
212°F (100°C) ± 2% of Reading or ± 6°F (3°C), whichever is greater @
>
64.4 to 82.4°F (18 to 28°C) ambient operating temperature.
Temperature Coefcient:
Changes in accuracy operating temperature above 82.4°F/28°C or below
64.4°F/18°C: ±0.2% of Reading or ± 0.36°F/0.2°C, whichever is greater.
Response Time:
1 second
Laser:
Red, <0.5mW (670nm) Class II, 2 - 50 ft range
Spectral Response:
6 to 14μm nominal
Emissivity:
Pre-set @ 0.95, user-selectable from 0.10 to 1.00
Detection Element: Thermopile
Optical Lens: Fresnel Lens
Infrared K-Thermometer Model CA876
7
Page 10
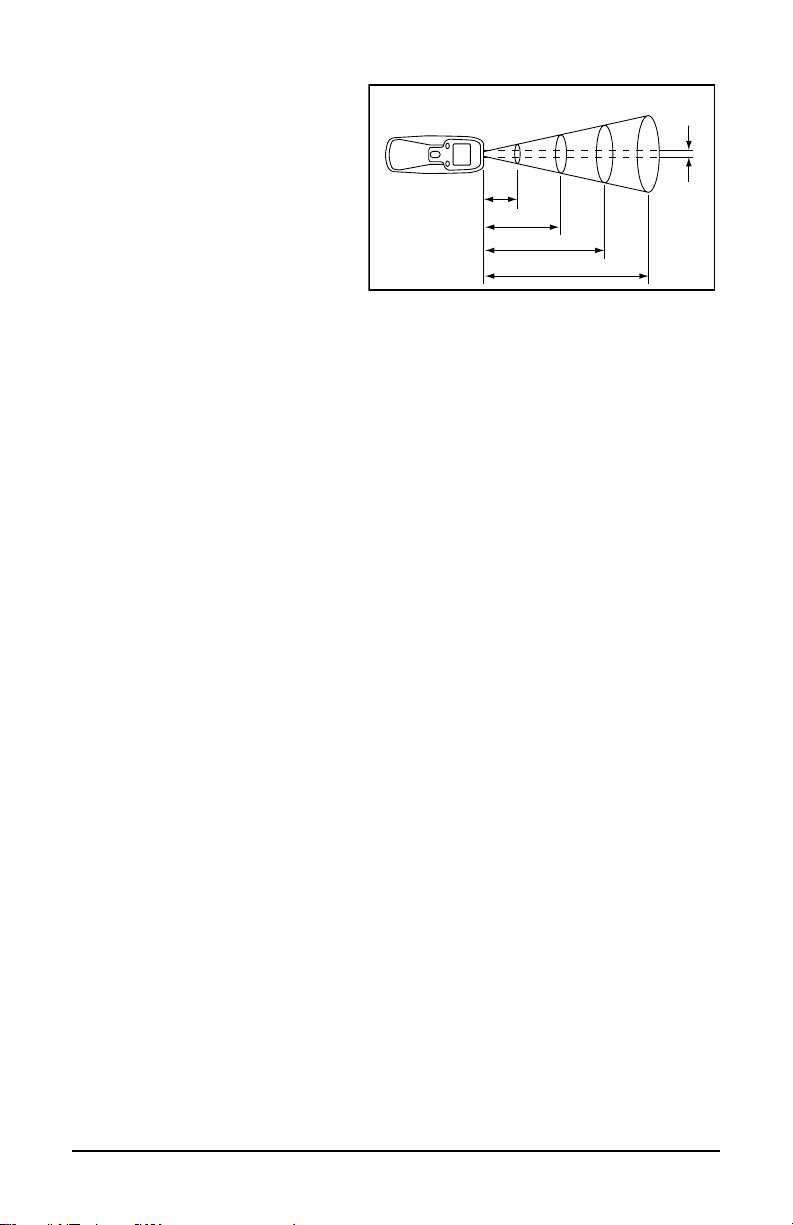
Field of View (FOV) ratio:
10:1 (Distance : Diameter)
The FOV is the ratio of the distance to the target to the target
diameter. When the target
diameter is small, it is important to bring the thermometer
closer to the target to ensure
Distance to
object
(25mm)
10"
(250mm)
20"
1" Ø
(500mm)
30"
2" Ø
(50mm)
(750mm)
40"
(1000mm)
3" Ø
(75mm)
4" Ø
(100mm)
0.63"
(16mm)
that only the target is mea-
sured, excluding the surroundings. Remember that the measurement size
is one-tenth the distance to the target. For example, if the thermometer is
at 10", then the size measured is 1".
3.1.2 K TYPE
Temperature Scale: Celsius (°C) or Fahrenheit (°F) - User-selectable
Measurement Range: -40° to 2000°F or -40° to 1350°C
Resolution: 0.1°F/°C or 1°F/°C
Accuracy: -328°F to 1999°F: ± 0.1% of Reading ± 2°F plus T.C.
-199°C to 1370°C: ± 0.1% of Reading ± 1°C plus T.C.
(Accuracy is specied for operating temperatures over the range of 64° to
82°F (18° to 28°C), for 1 year, excluding the sensor)
Temperature Coefcient:
0.1 times the applicable accuracy specication per °C from 0° to 18°C and
28° to 50°C
Input Protection:
24VDC or 24Vrms maximum input voltage on any combination of inputs
Sample Rate: 2.5 times per second
Input Connector:
Standard miniature thermocouple connectors (at blades spaced 7.9mm,
center-to-center)
Temperature Response:
Temperature indication follows Reference Temperature/Voltage Tables
N.I.S.T. Monograph 175 Revised to ITS-90 for K-type thermocouples
8
Infrared K-Thermometer Model CA876
Page 11

3.2 General Specifications
Display: 2000-count, 3½ digit liquid crystal display (LCD) with maximum
reading of 1999
Low Battery Indication:
is displayed when battery voltage drops
below required level
Sample Rate: 2.5 times per second, nominal
Operating Temperature: 32° to 122°F (0° to 50°C) at < 80% RH
Storage Temperature:
-4° to 140°F (-20° to 60°C), 0 to 80% RH with battery removed
Auto Power Off: 15 seconds approx
Altitude: 2000m max
Input Protection: 24VDC or 24rms maximum input voltage on any combi-
nation of inputs
Battery: Standard 9V battery (NEDA 1604, 6LR61 or equivalent)
Battery Life: 100 hours (continuity) typical with carbon zinc battery (back-
light not illuminated)
Dimensions: 6.81 x 2.38 x 1.5" (173 x 60.5 x 38mm)
Weight: Approx 9 oz (255g) including battery
3.3 Safety Specifications
EN 61010-1 (1995-A2), Protection Class III
Overvoltage Category (CAT III, 24V), Pollution Degree 2
Indoor Use
*All specications are subject to change without notice
Infrared K-Thermometer Model CA876
9
Page 12

CHAPTER 4
OPERATION
4.1 Infrared Measurement Considerations
MEASUREMENT THEORY
Every object emits infrared (IR) energy proportional to its temperature. By
measuring the amount of this radiant energy, it is possible to determine
the temperature of the emitting object. Infrared radiation is invisible light
(electromagnetic radiation), which easily travels through air and is easily
absorbed by solid matter. An IR thermometer, which operates by detecting
infrared radiation, can accurately measure an object surface temperature
without touching it and independently of the air temperature or the measurement distance.
Infrared radiation, which is emitted from the object, is focused into an infrared radiation sensor through an optical system. This system includes an
optical lens, which is transparent to infrared radiation, and a 5.3μm cut
off lter. The output signal from the infrared radiation sensor is input to an
electronic circuit, along with the output signal from a standard temperature
sensor, to calculate the temperature and display it on the meter display.
EMISSIVITY
All objects emit invisible infrared energy. The amount of IR energy emitted
is proportional to the object’s temperature and its natural ability to emit IR
energy. This ability, called emissivity, is based upon the object material
type and its surface nish. Emissivity values range from 0.10 for a very
reective object to 1.00 for a black body. Factory set emissivity value of
0.95 will cover 90-95% of typical applications.
If frost or other material/substance covers the measured surface, clean it
to expose the surface. If the surface to be measured is highly reective,
apply dull masking tape or matte black paint over the surface. If the ther-
mometer seems to be giving incorrect readings, check the front sensor.
There may be condensation or debris obstructing the sensor. Only clean
per instructions.
10
Infrared K-Thermometer Model CA876
Page 13

Material Emmisivity Material Emmissivity
Asphalt 0.90 to 0.98 Cloth (black) 0.98
Concrete 0.94 Human skin 0.98
Cement 0.96 Lather (Soap) 0.75 to 0.80
Sand 0.90 Charcoal (powder) 0.96
Earth 0.92 to 0.96 Lacquer 0.80 to 0.95
Water 0.92 to 0.96 Lacquer (matte) 0.97
Ice 0.96 to 0.98 Rubber (black) 0.94
Snow 0.83 Plastic 0.85 to 0.95
Glass 0.90 to 0.95 Timber 0.90
Ceramic 0.90 to 0.94 Paper 0.70 to 0.94
Marble 0.94 Chromium oxide 0.81
Plaster 0.80 to 0.90 Copper oxide 0.78
Mortar 0.89 to 0.91 Iron oxide 0.78 to 0.82
Brick (red) 0.93 to 0.96 Textiles 0.90
4.2 Recommendations before Operating
• If the measured surface target diameter is less than 2"/50mm Ø, then
place the sensor as close as possible to the target surface (<20"/50cm
away). See Field of View (FOV) information under Specications.
• If the target surface is covered with frost or any matter, clean it before
taking a measurement.
• If the target surface is highly reective put some matte tape, or matte
paint, over it before measuring.
• If the thermometer is erratic, or seems not to be measuring properly,
make sure that the sensor is clean and not covered by condensation.
Infrared K-Thermometer Model CA876
11
Page 14

4.3 Infrared Operation
1. Press and hold the yellow measurement button - MEAS.
The thermometer will display SET briey on the main display while it
auto-checks.
2. Aim the Thermometer towards the target.
3. If using the aiming laser, remove the laser cover, and press the
Button to turn the laser ON and OFF. The laser is activated when
MEAS is pressed.
4. Infrared thermometer sensors need a certain time to stabilize to
ambient temperature. Remember to let the IR meter reach ambient if
brought in from different temperature environment.
5. Press the
6. If the measured temperature is outside the measurement range,
will be displayed.
7. The thermometer will continue measuring as long as the MEAS button
is pressed. When the button is released the measurement will be held
in the display for 15-20 seconds. HOLD is displayed in the lower lefthand corner of the display.
8. The IR thermometer will shut OFF automatically after 15-20 seconds.
button to turn ON the back-light.
4.4 K-Thermocouple Operation
1. Connect the K-thermocouple to the instrument input.
2. Press MEAS to turn the thermometer ON.
3. Press the MODE button (six times) to enter the thermocouple mode. K
will be displayed in lower right hand corner of the display.
4. Put the thermocouple near or on the sample tested.
5. Press MEAS button to measure. Thermocouples need a certain time
to respond. Take the reading when the measurement has stabilized.
The reading is displayed in the smaller lower display in front of the K
symbol. The main larger display is the IR temperature reading.
6. The thermometer will continue measuring as long as the MEAS button
is pressed. When the button is released, the measurement will be held
in the display for 15-20 seconds.
12
Infrared K-Thermometer Model CA876
Page 15

7. When nished, remove the thermocouple from the sample, and
unplug the thermocouple from the meter. The thermometer will shut
OFF automatically after 15-20 seconds.
Note: IR measurements are active at the same time as the K t/c measurements.
4.5 Setting the Temperature Scale: °C or °F
The temperature scale is displayed on the upper part of the display.
To select the temperature scale:
• °C: When the thermometer is OFF, hold down the
press the MEAS button. °C will be displayed.
• °F: When the thermometer is OFF, hold down the
press the MEAS button. °F will be displayed.
The selected temperature scale will remain until changed by the user.
button, then
button, then
4.6 Continuous Measurement
The user may want to leave the thermometer ON to measure over an
extended time period without having to keep pressing the MEAS button.
To enter the continuous mode:
• Turn the thermometer OFF. Hold down the MODE button, then press
the MEAS button. This will set the thermometer in the continuous
mode. HOLD will not be displayed in the continuous mode and the
laser sighting will not run.
• When nished, press MEAS once. HOLD will be displayed and the
thermometer will shut down in 15-20 seconds. Alternatively, press
MEAS again to re-enter the continuous mode.
Infrared K-Thermometer Model CA876
13
Page 16

CHAPTER 5
MAINTENANCE
Use only factory specied replacement parts. AEMC® will not be held
responsible for any accident, incident, or malfunction following a repair
done other than by its service center or by an approved repair center.
5.1 Replacing the Battery
The symbol appears on the LCD display when replacement is needed.
Replace with a standard 9-volt alkaline battery (NEDA 1604, 6LR61).
To replace the battery:
• Turn the meter OFF.
• Remove the rubber holster.
• Remove the screw from the back of the meter and lift off the bat-
tery cover.
• Replace the battery, then put the rear cover and holster back on.
5.2 Cleaning
• Use a soft cloth lightly dampened with soapy water.
• Rinse with a damp cloth and then dry with a dry cloth.
• Do not use any abrasives or solvents.
• Do not let any liquid enter the case or sensor area.
14
Infrared K-Thermometer Model CA876
Page 17

Repair and Calibration
To ensure that your instrument meets factory specications, we recommend
that it be scheduled back to our factory Service Center at one-year intervals
for recalibration, or as required by other standards or internal procedures.
For instrument repair and calibration:
You must contact our Service Center for a Customer Service Authorization
Number (CSA#). This will ensure that when your instrument arrives, it will be
tracked and processed promptly. Please write the CSA# on the outside of the
shipping container. If the instrument is returned for calibration, we need to
know if you want a standard calibration, or a calibration traceable to N.I.S.T.
(Includes calibration certicate plus recorded calibration data).
Ship To: Chauvin Arnoux
15 Faraday Drive
Dover, NH 03820 USA
Phone: (800) 945-2362 (Ext. 360)
(603) 749-6434 (Ext. 360)
Fax: (603) 742-2346 or (603) 749-6309
E-mail: repair@aemc.com
(Or contact your authorized distributor)
Costs for repair, standard calibration, and calibration traceable to N.I.S.T. are
available.
NOTE: You must obtain a CSA# before returning any instrument.
®
, Inc. d.b.a. AEMC® Instruments
Technical and Sales Assistance
If you are experiencing any technical problems, or require any assistance
with the proper operation or application of your instrument, please call, fax or
e-mail our technical support team:
Contact:
Infrared K-Thermometer Model CA876
Chauvin Arnoux®, Inc. d.b.a. AEMC® Instruments
Phone: (800) 945-2362 (Ext. 351)
(603) 749-6434 (Ext. 351)
Fax: (603) 742-2346
E-mail: techsupport@aemc.com
15
Page 18

Limited Warranty
The Model 876 is warranted to the owner for a period of 2 years
from the
date of original purchase against defects in manufacture. This limited warranty
is given by AEMC
®
Instruments, not by the distributor from whom it was pur-
chased. This warranty is void if the unit has been tampered with, abused or if
the defect is related to service not performed by AEMC
®
Instruments.
For full and detailed warranty coverage, please read the Warranty
Coverage Information, which is attached to the Warranty Registration
Card (if enclosed) or is available at www.aemc.com. Please keep the
Warranty Coverage Information with your records.
What AEMC® Instruments will do:
If a malfunction occurs within the warranty period, you may return the instrument
to us for repair, provided we have your warranty registration information on
file or a proof of purchase. AEMC® Instruments will, at its option, repair or
replace the faulty material.
REGISTER ONLINE AT:
www.aemc.com
Warranty Repairs
What you must do to return an Instrument for Warranty Repair:
First, request a Customer Service Authorization Number (CSA#) by phone
or by fax from our Service Department (see address below), then return the
instrument along with the signed CSA Form. Please write the CSA# on the
outside of the shipping container. Return the instrument, postage or shipment
pre-paid to:
Ship To: Chauvin Arnoux
15 Faraday Drive • Dover, NH 03820 USA
Phone: (800) 945-2362 (Ext. 360)
(603) 749-6434 (Ext. 360)
Fax: (603) 742-2346 or (603) 749-6309
E-mail: repair@aemc.com
®
, Inc. d.b.a. AEMC® Instruments
Caution: To protect yourself against in-transit loss, we recommend you insure
your returned material.
NOTE: You must obtain a CSA# before returning any instrument.
16
Infrared K-Thermometer Model CA876
Page 19

Notes:
Page 20

03/18
99-MAN 100246 v6
Chauvin Arnoux
®
, Inc. d.b.a. AEMC® Instruments
15 Faraday Drive • Dover, NH 03820 USA • Phone: (603) 749-6434 • Fax: (603) 742-2346
www.aemc.com
 Loading...