

Page 1
Model: DGXDSDV112
ENGLISH (EN)
DEUTSCH (DE)
FRANCAIS (FR)
NEDERLANDS (NL)
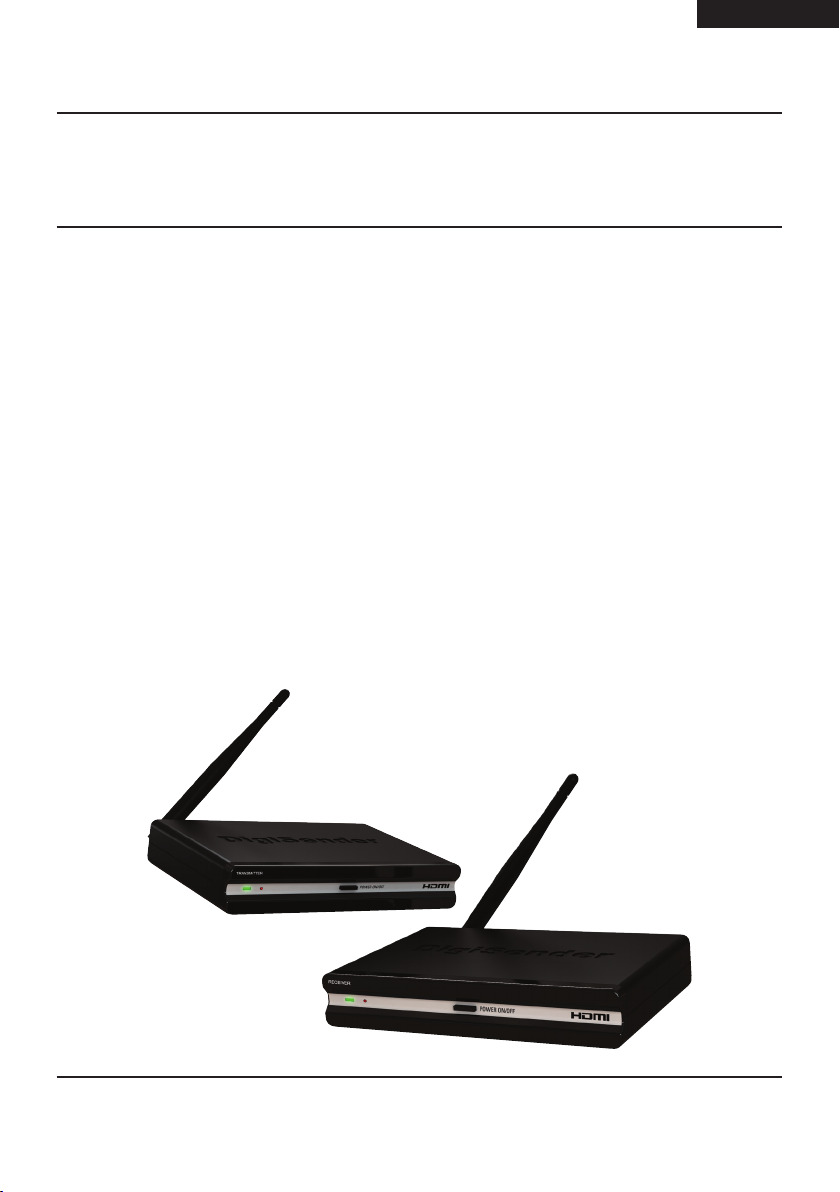
Single Input HDMI AV Sender System
WATCH A VIDEO
WATCH A VIDEO
INSTALLATION
INSTALLATION
& TROUBLESHOOTING GUIDE
& TROUBLESHOOTING GUIDE
Available online at: www.aei.eu/video
Available online at: www.aei.eu/video
Page 2
(EN) ENGLISH
DGXDSDV112 - DigiSender® XDHDMI - Single Input HDMI AV Sender System
Contents
English
Introduction 03
Installing Your DigiSender® XDHDMI 04 - 10
Step 1 - Unpack Your DigiSender® XDHDMI 04
Step 2 - Install The Transmitter 05
Step 3 - Install The IR Systeme Technik™ 06
Step 4 - Install The Receiver 07
Step 5 - Test Your Setup Using The Test Mode 08-10
Using Your DigiSender® XDHDMI 11 - 12
Standard Operation 11
Re-Syncing The Transmitter And Receiver 12
Troubleshooting 13 - 14
Frequently Asked Questions 13
Technical Support 14
Deutsch
Einleitung 15
Installation Ihres DigiSender® XDHDMI 16 - 22
Schritt 1 - Packen Sie Ihren DigiSender® XDHDMI Aus 16
Schritt 2 - Installieren Sie Den Sender 17
Schritt 3 - Installieren Sie Das IR Systeme Technik™ 18
Schritt 4 - Installieren Sie Den Empfänger 19
Schritt 5 - Testen Sie Ihre Anlage Mit Dem
Diagnosticprogramm 20-22
Gebrauch Ihres DigiSender® XDHDMI 23 - 24
Standartanwendung 23
Re-Synchronisierung Des Senders Und Empfängers 24
Fehlerbehebung 25 - 26
Häufig Gestellte Fragen 25
Technischer Support 26
Francais
Présentation 27
Installation Du DigiSender® 28 - 34
Étape 1 - Déballage Du DigiSender® XDHDMI 28
Étape 2 - Installation De L’émetteur 29
Étape 3 - Installation De IR Systeme Technik™ 30
Étape 4 - Installation Du Récepteur 31
Étape 5 - Vérification De La Configuration À L’aide
Du Mode Diagnostic 32-34
Utilisation Du DigiSender® XDHDMI 35 - 36
Opération Normale 35
Synchronisation De L’émetteur Et Du Récepteur 36
Dépannage 37 - 38
Foire Aux Questions 37
Assistance Technique 38
Nederlands
Inleiding 39
Uw DigiSender® Installeren 40 - 46
Stap 1 - Pak Uw DigiSender® XDHDMI Uit 40
Stap 2 - Installeer De Zender 41
Stap 3 - Installeer De IR Systeme Technik™ 42
Stap 4 - Installeer De Ontvanger 43
Stap 5 - Test Uw Installatie Met De Diagnosemodus 44-46
De DigiSender® XDHDMI Gebruiken 47 - 48
Standaardbediening 47
De Zender En Ontvanger Opnieuw Synchroniseren 48
Problemen Oplossen 49 - 50
Veelgestelde Vragen 49
Technische Ondersteuning 50
Warning! For Indoor Use Only
Achtung! Gebrauch Nur Für Den Innenbereich
Attention! Usage Intérieur Uniquement
Waarschuwing! Alleen Voor Gebruik Binnenshuis
Warning! Do Not Open. Risk Of Electric Shock
Achtung! Nicht Öffnen – Elektrischer Schlag Möglich
Attention! Ne Pas Ouvrir. Risque D’électrocution
Waarschuwing! Niet Openen. Kans Op Elektrische Schokken
Page 02 Please read the instructions carefully prior to installation
Page 3
ENGLISH (EN)
DGXDSDV112 - DigiSender® XDHDMI - Single Input HDMI AV Sender System
Introduction
Congratulations on purchasing the new DigiSender® XDHDMI from AEI Security & Communications
Ltd. This product represents the absolute pinnacle of state-of-the-art wireless audio video distribution
technology, at exceptional value for money.
You can now enjoy DVD quality video and Hi-Fi stereo sound from your Satellite, Cable, DTV, DVD, DVR
or VCR in another room in your home, without the worry of interference from other wireless products.
Its use of spread spectrum digital technology means that signals will not only pass through walls and
ceilings effortlessly, but that the signal will not degrade or be affected by interference from similar
wireless devices. In fact, this technology coexists so seamlessly with other wireless technologies, that
it can be set up and run right next to a wireless router or microwave, something that has never before
been possible.
With innovative features like HDMI throughpass, the IR Systeme Technik™ Remote Relay Kit and a
Test Mode you can rest assured that you have purchased one of the most advanced video sender
systems available on the market today.
Page 03Please read the instructions carefully prior to installation
Page 4
(EN) ENGLISH
DGXDSDV112 - DigiSender® XDHDMI - Single Input HDMI AV Sender System
Installing your DigiSender® XDHDMI
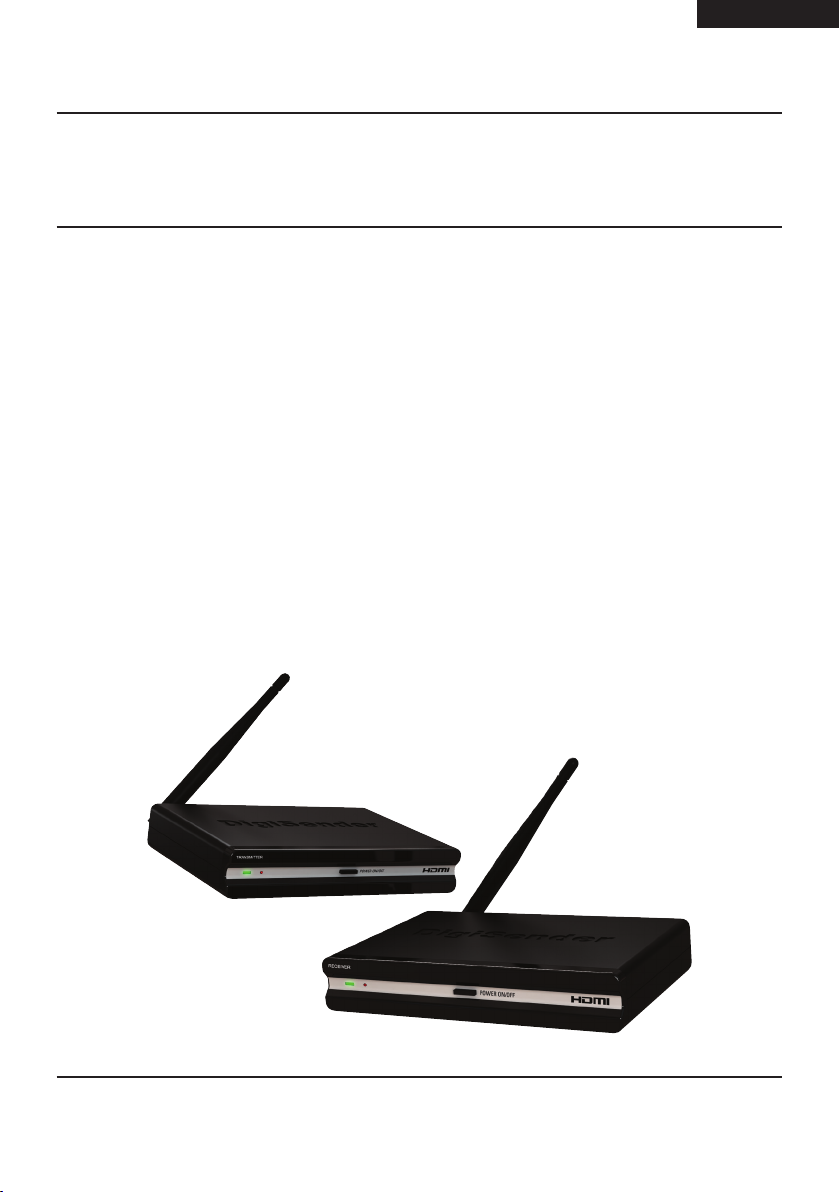
Step 1 - Unpack your DigiSender® XDHDMI
All DigiSender® orders are computer weight checked when packed. However, it is a good idea to check
all kit contents are present before proceeding with the installation.
IR Systeme Technik™ Kit
2x Power Supply Units
2x HDMI Cables
POWER
Transmitter
POWER
Receiver
Page 04 Please read the instructions carefully prior to installation
Page 5
ENGLISH (EN)
ANT
ANT
HDMI OUT
ANT
HDMI OUTHDMI IN
DGXDSDV112 - DigiSender® XDHDMI - Single Input HDMI AV Sender System
Installing your DigiSender® XDHDMI
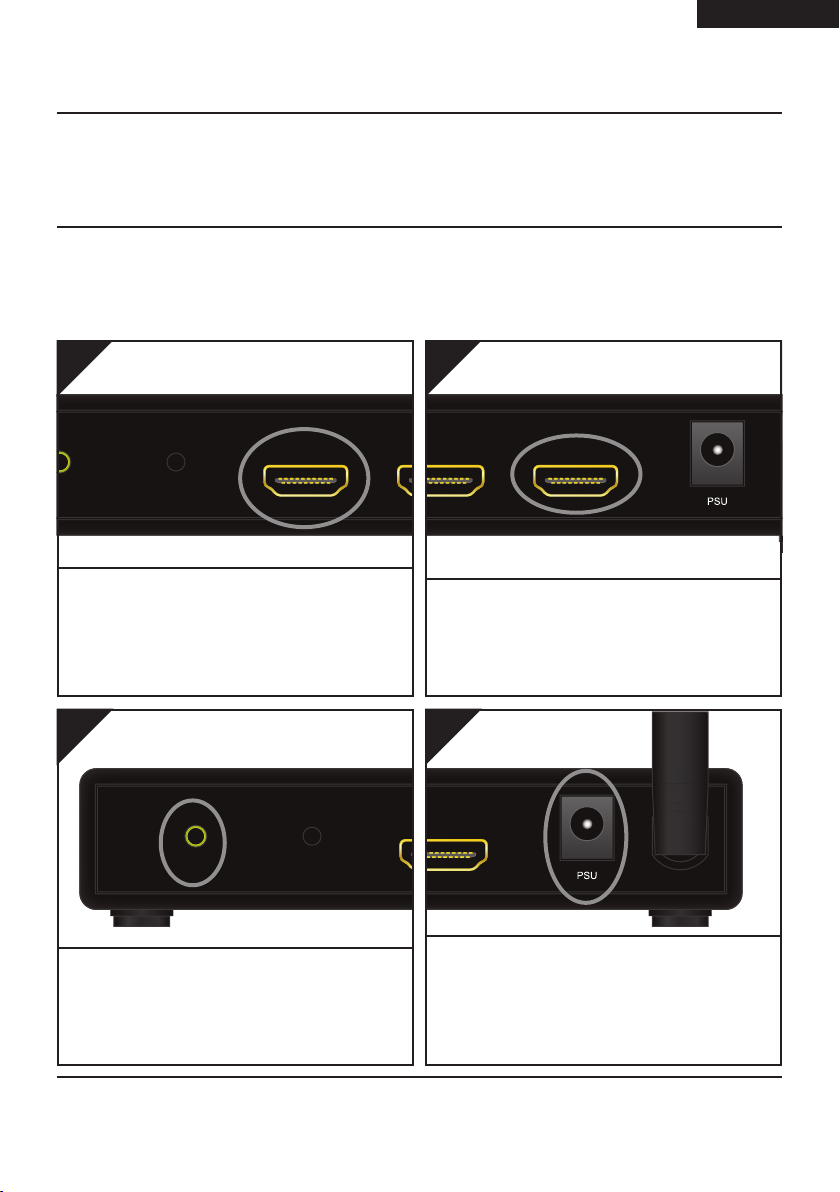
Step 2 - Install the Transmitter
The Transmitter will send the audio and video from a connected source (your Satellite Receiver for
example) to the Receiver, located in another room in your home.
1.
PAIR
Locate the HDMI cable that goes from your Satellite
receiver or Cable box to your TV. Unplug the HDMI
cable from the back of your TV, and connect it to
the socket labelled ‘HDMI IN’ on the back of the
DigiSender® Transmitter.
HDMI IN
3.
PAIR
IR
2.
HDMI OUT
Use one of the included HDMI cables and connect
it to the socket labelled ‘HDMI OUT’ on the back
of the DigiSender® Transmitter and the HDMI input
on your TV.
4.
T
ANT
Connect the IR Emitter to the socket labelled ‘IR’ on
the back of the DigiSender® Transmitter. See Page
06 for more information on installing the IR Systeme
Technik™ Remote Relay Kit.
Connect the Power Supply Unit (PSU) to the socket
labelled ‘PSU’ on the back of the DigiSender® Transmitter and plug it into an available mains socket.
The Power Indicator will light up Red to indicate that
the unit is in Standby Mode.
Page 05Please read the instructions carefully prior to installation
Page 6
(EN) ENGLISH
DGXDSDV112 - DigiSender® XDHDMI - Single Input HDMI AV Sender System
Installing your DigiSender® XDHDMI
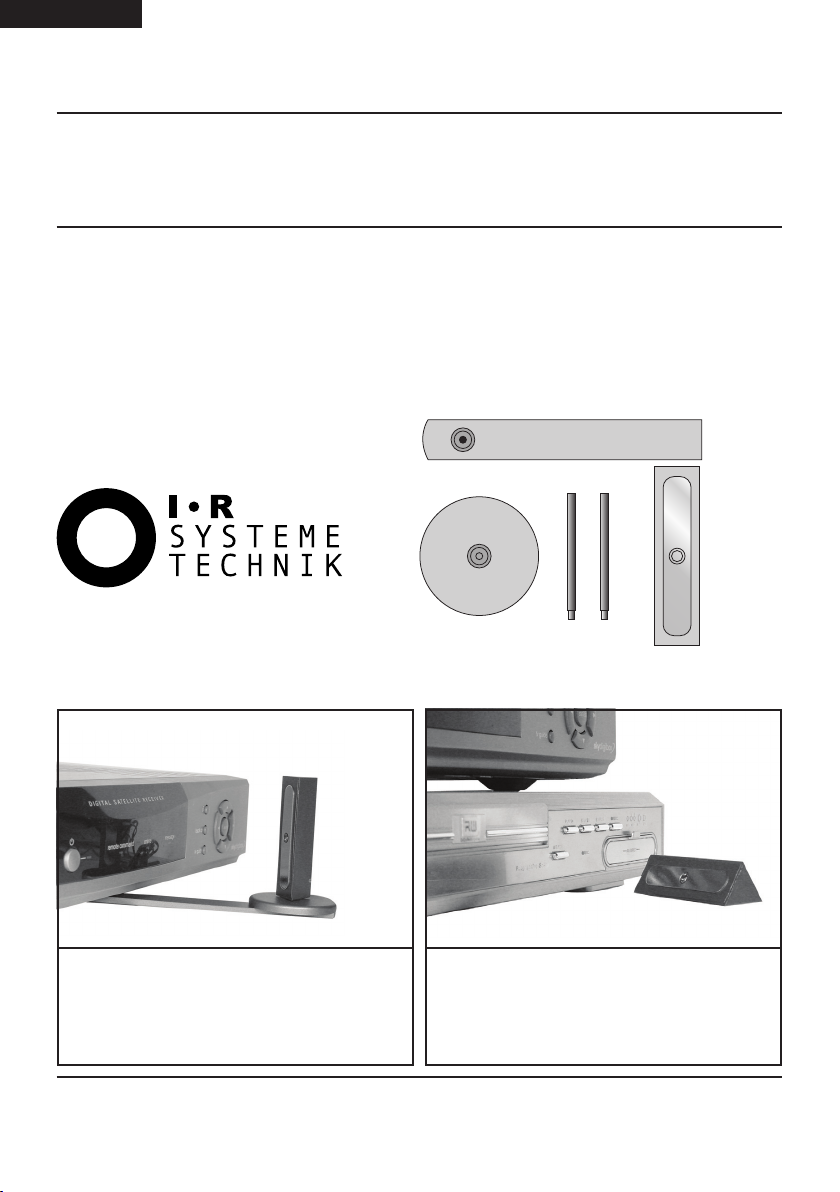
Step 3 - Install the IR Systeme Technik Remote Relay Kit™
The IR Systeme Technik™ Remote Relay Kit includes various accessories that will help you in setting it
up the Remote Relay system correctly.
Once set up, this Remote Relay system will enable you to control your source equipment (your satellite
receiver for example), with its remote control, from the receiving location.
Example 1: Mount the IR Emitter vertically using
accessories 1 and 2. Ensure the LED is facing the IR
sensor on your source equipment.
Accessory #1
Accessory #2
Example 2: Mount the IR Emitter horizontally using
the supplied sticky pad. Ensure the LED is facing the
IR sensor on your source equipment.
Extension Pieces
IR Emitter
Page 06 Please read the instructions carefully prior to installation
Page 7
ENGLISH (EN)
ANT
DGXDSDV112 - DigiSender® XDHDMI - Single Input HDMI AV Sender System
Installing your DigiSender® XDHDMI
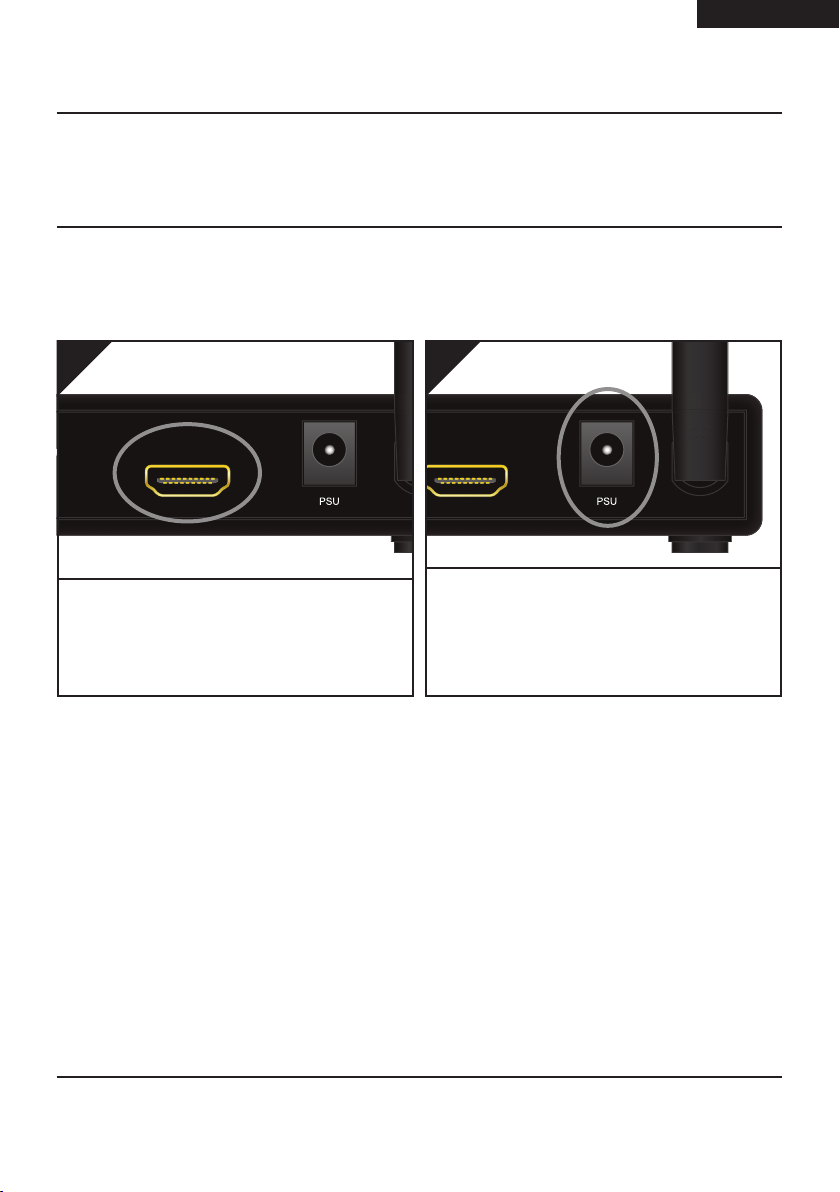
Step 4 - Install the Receiver
The Receiver will pick up the signals being sent by your Transmitter and output them to a connected
TV.
1.
T
Use one of the included HDMI cables and connect
it to the socket labelled ‘HDMI OUT’ on the back of
the DigiSender® Receiver and the HDMI input on
your receiving TV.
HDMI OUT
2.
HDMI OUT
ANT
Connect the Power Supply Unit (PSU) to the socket
labelled ‘PSU’ on the back of the DigiSender® Receiver and plug it into an available mains socket.
The Power Indicator will light up Red to indicate that
the unit is in Standby Mode.
Page 07Please read the instructions carefully prior to installation
Page 8
(EN) ENGLISH
DGXDSDV112 - DigiSender® XDHDMI - Single Input HDMI AV Sender System
Installing your DigiSender® XDHDMI
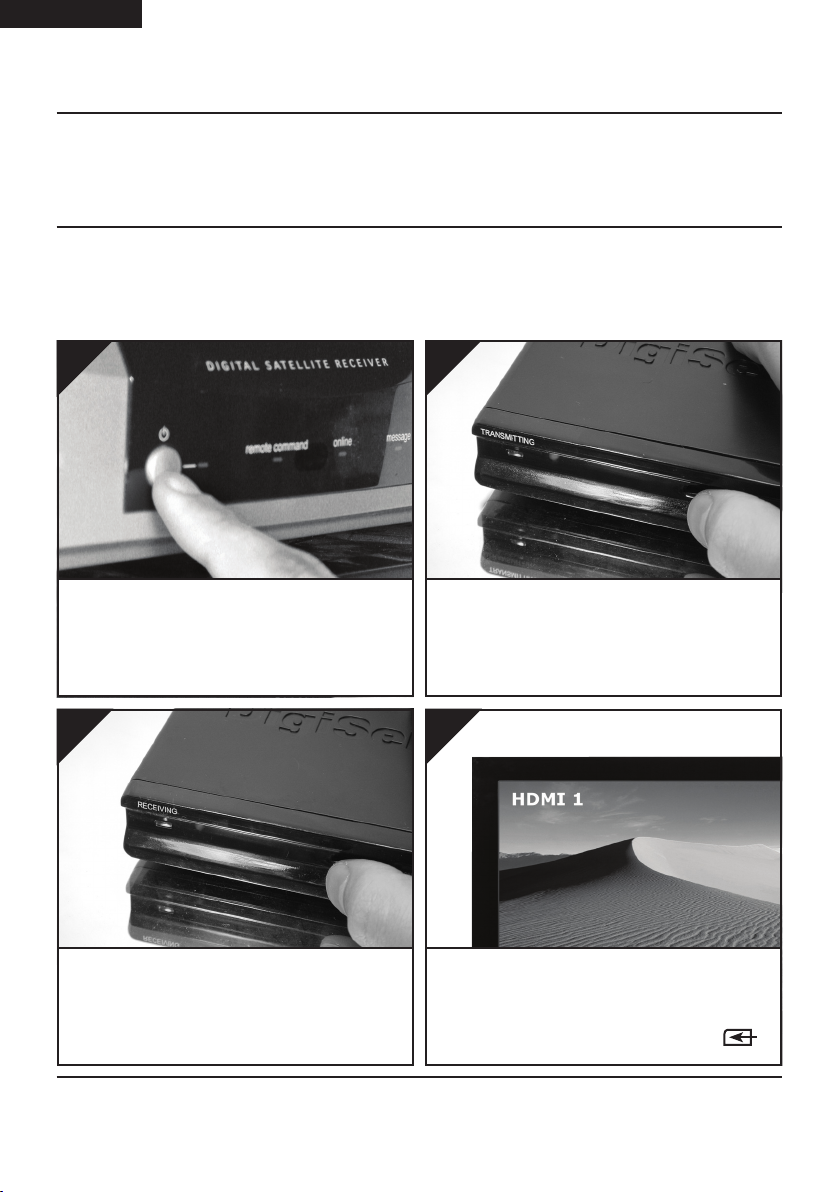
Step 5 - Test your Setup Using the Test Mode
Your DigiSender® XDHDMI is set to Test Mode by default and will aid you in getting the best possible
picture and help identify any problems that may arise during installation.
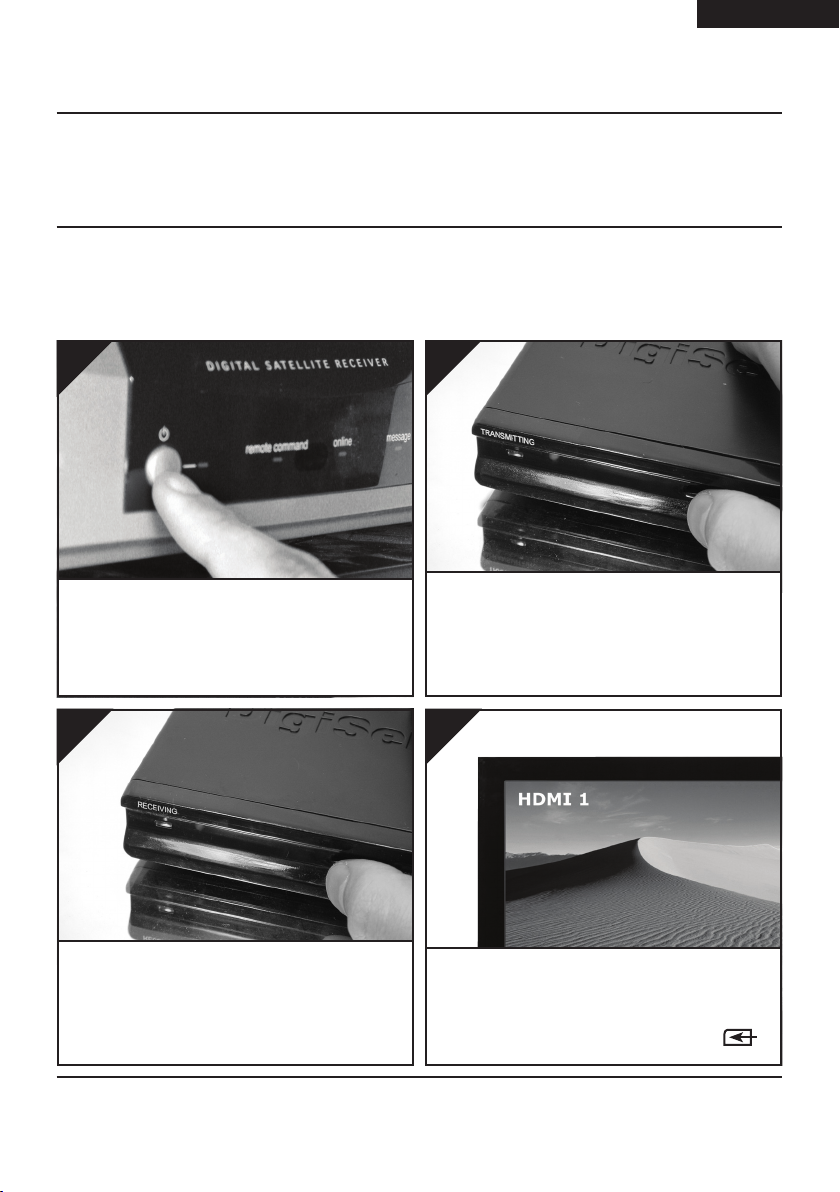
1.
Switch on the source equipment (Satellite, Freeview, DVD, VCR, etc.).
3.
2.
Turn on the DigiSender® Transmitter by pushing the
Power button on the front of the unit. The Power
Indicator will change from Red to Green to indicate
that the unit is switched on.
4.
Turn on the DigiSender® Receiver by pushing the
Power button on the front of the unit. The Power
Indicator will change from Red to Green to indicate
that the unit is switched on
Turn on the receiving TV, and select the HDMI channel assigned to the HDMI Input that you plugged
the DigiSender® Receiver in to. This may be labelled
as SOURCE, INPUT, AUX, AV, VIDEO, VCR or .
Page 08 Please read the instructions carefully prior to installation
Page 9
continued...
ENGLISH (EN)
DGXDSDV112 - DigiSender® XDHDMI - Single Input HDMI AV Sender System
5.
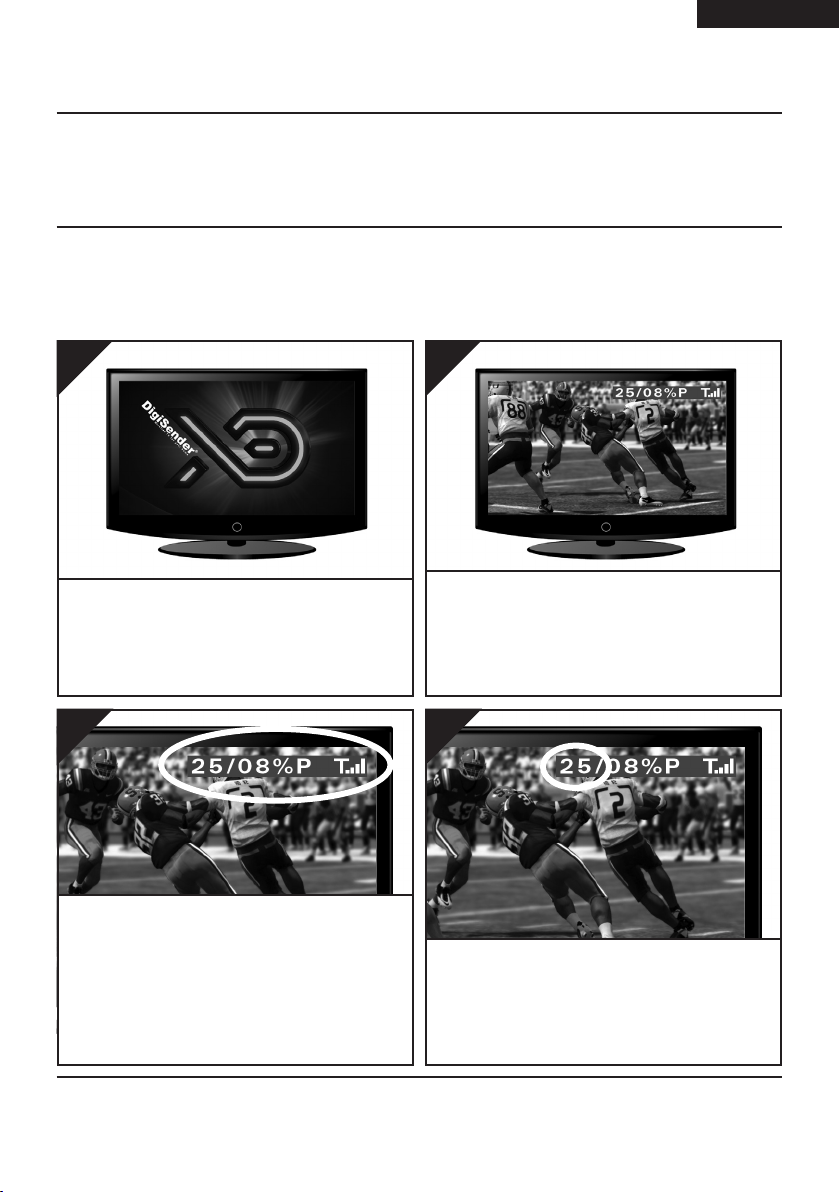
The DigiSender® XDHDMI Boot Screen will be displayed whilst the Receiver locks on to the Transmitters signal.
7.
You will notice that at the top right corner of the
screen is a blue Test Bar with some information on
it. If the Test Bar is not present, then your Receiver
may not be in Test Mode. Flick the Mode Switch on
the back from Normal to Test and turn the receiver
off and then back on again.
6.
After approximately 5 seconds the picture will
change to whatever you are transmitting. If the pic-
ture does not change, or changes to the DigiSender®
Test Card, you may need to re-sync the Transmitter
and Receiver. See page 12 for more details.
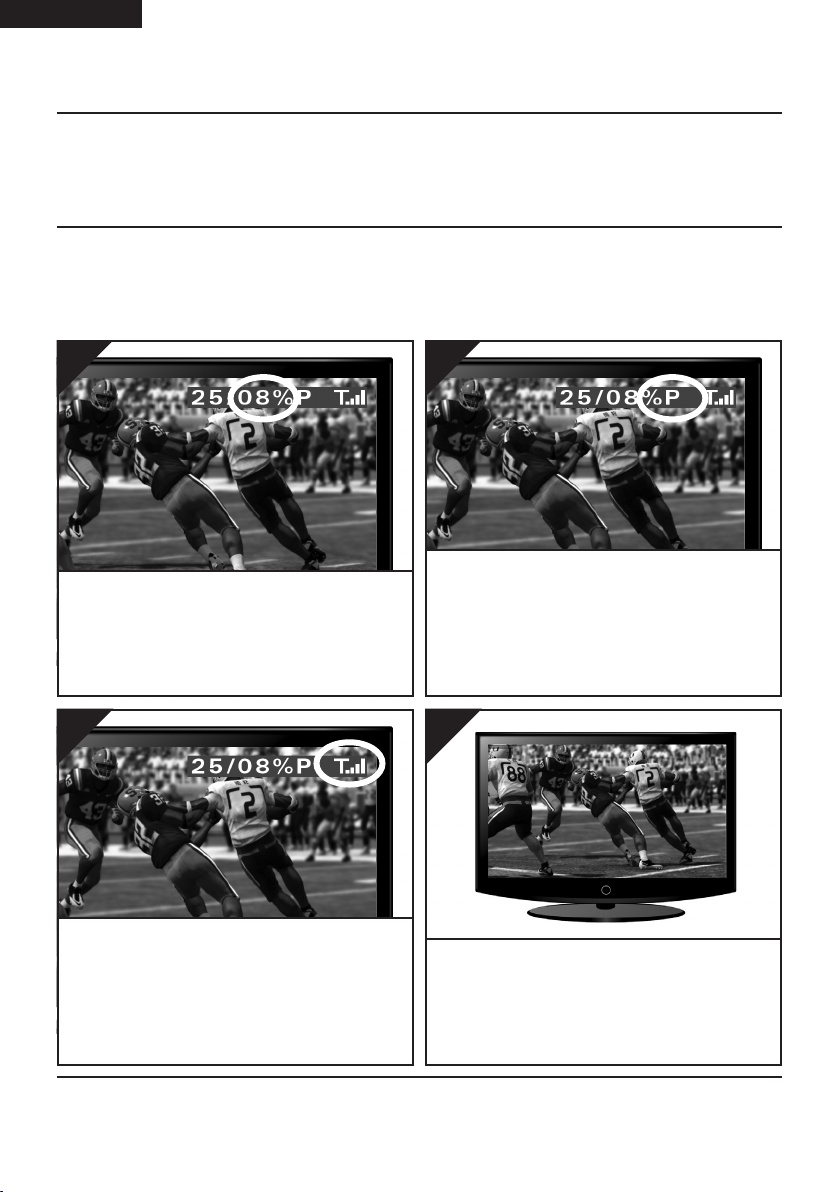
8.
The first number indicates the Frame Rate that the
Receiver is picking up from the Transmitter and outputting to your TV.
Page 09Please read the instructions carefully prior to installation
Page 10
(EN) ENGLISH
DGXDSDV112 - DigiSender® XDHDMI - Single Input HDMI AV Sender System
continued...
Note: When switching from Test Mode to Normal mode, or vice versa, it will be necessary to turn the
unit off and then back on again.
9.
The second number indicates the Packet Rate. This
is the percentage of data packets sent from the
Transmitter that are having to be reconstructed by
the Receiver.
11.
10.
‘P’ means that no noticeable losses should be visible in the picture quality and the frame rate should
remain steady at around 25. ‘F’ means that you may
notice subtle losses in the picture quality. As the
Packet Rate increases, the Frame Rate will also reduce.
12.
The last icon indicates Signal Level. This is key to
a good Frame Rate and Packet Rate. Endeavour to
keep this as high as possible. If you are getting a
low Frame Rate, Packet Rate or Signal Level, you
may need to adjust the positioning of the units and/
or aerials.
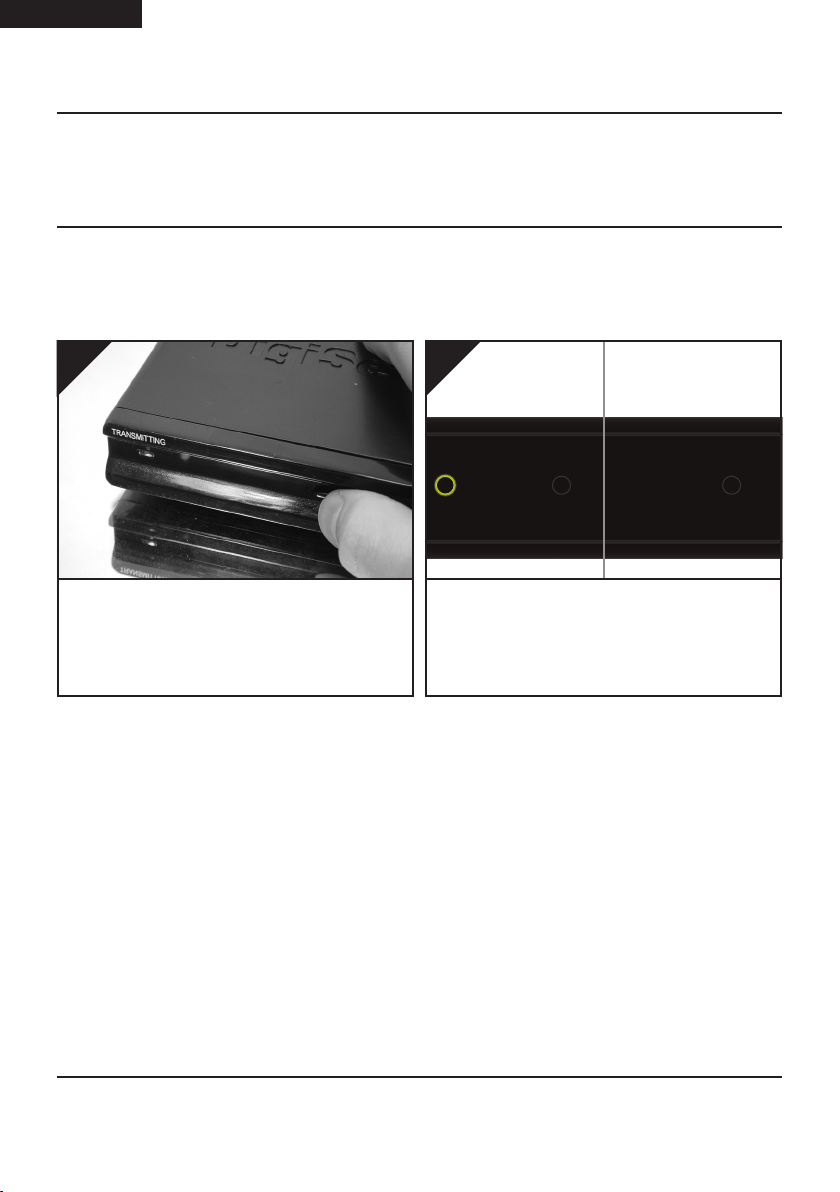
Having made any necessary adjustments, flick the
Mode Switch from Test to Normal and turn the unit
off. Installation is now complete and you can enjoy
your satellite channels on another TV in your home!
Page 10 Please read the instructions carefully prior to installation
Page 11
DGXDSDV112 - DigiSender® XDHDMI - Single Input HDMI AV Sender System
Using your DigiSender® XDHDMI
Standard Operation
ENGLISH (EN)
1.
Switch on the source equipment (Satellite, Freeview, DVD, VCR, etc.).
3.
2.
Turn on the DigiSender® Transmitter by pushing the
Power button on the front of the unit. The Power
Indicator will change from Red to Green to indicate
that the unit is switched on.
4.
Turn on the DigiSender® Receiver by pushing the
Power button on the front of the unit. The Power
Indicator will change from Red to Green to indicate
that the unit is switched on
Turn on the receiving TV, and select the HDMI channel assigned to the HDMI Input that you plugged
the DigiSender® Receiver in to. This may be labelled
as SOURCE, INPUT, AUX, AV, VIDEO, VCR or .
Page 11Please read the instructions carefully prior to installation
Page 12
(EN) ENGLISH
ANT
HDMI OUTHDMI IN
ANT
HDMI OUTAV OUT
DGXDSDV112 - DigiSender® XDHDMI - Single Input HDMI AV Sender System
Using your DigiSender® XDHDMI
Re-syncing the Transmitter and Receiver
Should you need to re-sync the Transmitter and Receiver at any point, this can be achieved by following the instructions below.
1.
Turn on both the Transmitter and the Receiver.
2.
PAIR
IR
Press and hold the ‘Pair’ button on the back of the
DigiSender® Transmitter and Receiver, simultaneously, for 5 seconds and then release.
PAIR
Please note that because you need to hold the Pair Button on both the Transmitter and Receiver simultaneously, you will need to have the Transmitter and Receiver in the same room as each other and within
reach. Alternatively, if you have someone that can help, they can hold the Transmitters Pair Button in the
lounge while you hold the Receivers Pair Button in the bedroom.
Page 12 Please read the instructions carefully prior to installation
Page 13

ENGLISH (EN)
DGXDSDV112 - DigiSender® XDHDMI - Single Input HDMI AV Sender System
Troubleshooting
Frequently Asked Questions
Q. I can only watch the same channel as the lounge, is that right?
A. That is correct. This is because your Satellite receiver, Cable box or Freeview box is only able to
output one channel at a time.
Q. The Remote Relay is intermittent or not working, how can i fix it?
A. Most of the time this is due to one of two things:
1. Make sure the IR Emitter cable does not run directly under or over your source equipment. Most
Satellite receivers, Cable boxes and Freeview boxes have built-in Hard Disk Drives that can put out
quite a bit of Electro Magnetic Interference when in use.
2. Ensure that the IR Emitter is positioned correctly. It should be positioned with the face of the IR
Emitter pointing directly at the IR Sensor on your Satellite receiver, Cable box or Freeview box.
2” - 4” away is usually best. It is often easiest to set up the Remote Relay system with the aid of a
friend. Get them to try and change channels from the receiving location, while you wave the IR
Emitter around in front of the source equipment. When either of you see the channels change, you
know that is the right place for the IR Emitter.
Q. My picture is jerky, how can I solve this?
A. This is an indication of poor Frame Rate. Put the system into Dignostics Mode (see page 08 - 10) and
check the Signal Level. Try adjusting the position of the antenna on both the DigiSender®
Transmitter and Receiver whilst another person monitors the Signal Level.
Page 13Please read the instructions carefully prior to installation
Page 14

(EN) ENGLISH
DGXDSDV112 - DigiSender® XDHDMI - Single Input HDMI AV Sender System
Troubleshooting
Technical Support
AEI Security & Communications Ltd is dedicated to providing our customers with first class customer
care and technical support.
1. Website
Free technical advice is available online 24/7 at our dedicated support web site: www.aei.eu
2. Online Videos
Watch online Installation and Troubleshooting Video Guides at: www.aei.eu/video
3. Email
Email our technical department directly at: support@aei.eu
4. Live Chat
Chat to one of our technical advisors live. See website for details.
5. Telephone
We have a dedicated helpline, open Monday to Friday, 8.30am - 4pm. Call 02071 931 413
WATCH A VIDEO
WATCH A VIDEO
INSTALLATION
INSTALLATION
& TROUBLESHOOTING GUIDE
& TROUBLESHOOTING GUIDE
Available online at: www.aei.eu/video
Available online at: www.aei.eu/video
Page 14 Please read the instructions carefully prior to installation
Page 15
DEUTSCH (DE)
DGXDSDV112 - DigiSender® XDHDMI - HDMI AV Sendesystem mit einem Eingang
Einleitung
Wir gratulieren zum Kauf des neuen DigiSender® XDHDMI von AEI Security & Communications Ltd.
Dies ist ein absolutes Spitzenprodukt der kabellosen Audio- und Video- Technologie, das Sie für diesen
Preis haben können.
Sie können hiermit DVD Qualität und Hi-Fi stereo – Klang von Ihrem Satellitenfernsehen, Kabel - TV,
DTV, DVD, DVR oder VCR in einem anderen Raum in Ihrer Wohnung empfangen, ohne irgendwelche
Interferenzen und Störungen von anderen drahtlosen Geräten fürchten zu müssen.
Der Gebrauch des aufgeteilten Spektrums der digitalen Technologie ermöglicht ein müheloses Durchdringen des Signals durch Wände und Decken, wobei das Signal nicht durch andere ebenfalls drahtlose Geräte gestört wird. Tatsächlich kann diese Technologie so nahtlos mit anderen dieser Techniken
betrieben werden, dass ein Aufstellen direkt neben einem Funkrouter oder sogar einer Mikrowelle
möglich ist. Das war früher überhaupt nicht möglich!
Mit den innovativen Ausstattungen wie dem HDMI-Anschlüsse, der IR Systeme Technik™ Remote
Relay Kit (Infrarot – Fernbedienung) und dem Diagnostikmodus können Sie sich sicher sein, das wohl
am weitesten entwickelte System zu haben, das es auf dem Markt gibt.
Page 15Lesen Sie diese Instruktionen bitte sorgfältig durch, bevor Sie die Installation beginnen
Page 16

(DE) DEUTSCH
DGXDSDV112 - DigiSender® XDHDMI - HDMI AV Sendesystem mit einem Eingang
Installation Ihres DigiSender® XDHDMI
Schritt 1 - Packen Sie Ihren DigiSender® XDHDMI Aus
Alle DigiSender® wurden mit einem Computer auf das Gewicht hin überprüft. Trotzdem ist es gut, alle
Teile auf Vollständigkeit zu prüfen, bevor Sie mit der Installation beginnen.
IR Systeme Technik™ Kit
2x Stromversorgung
2x HDMI Kabel
POWER
Sender
POWER
Empfänger
Page 16 Lesen Sie diese Instruktionen bitte sorgfältig durch, bevor Sie die Installation beginnen
Page 17

DEUTSCH (DE)
ANT
ANT
HDMI OUT
ANT
HDMI OUTHDMI IN
DGXDSDV112 - DigiSender® XDHDMI - HDMI AV Sendesystem mit einem Eingang
Installation Ihres DigiSender® XDHDMI
Schritt 2 - Installieren Sie Den Sender
Der Transmitter sendet das Audio- und Videosignal der angeschlossenen Quelle (Ihr Satellitenempfänger zum Beispiel) zum Empfänger, der in dem anderen Raum Ihrer Wohnung steht.
1.
PAIR
Finden Sie heraus, welches Kabel vom Satellitenempfänger oder der Kabelbox zu Ihrem TV führt.
Lösen Sie dieses von Ihrem Fernseher und verbinden Sie es mit dem Stecker, der mit “HDMI IN”
bezeichnet ist auf der Rückseite des DigiSender®
Senders.
HDMI IN
3.
PAIR
IR
Verbinden Sie den Infrarot- Impulsgeber mit dem
Stecker, mit “IR” bezeichnet, an der Rückseite des
Senders. Mehr unter Seite 18 als Information zur
Installation der IR Systemtechnik.
2.
HDMI OUT
Nehmen Sie eines der mitgelieferten HDMI Kabel
und verbinden Sie dieses mit dem Stecker, der die
Bezeichnung “HDMI OUT” trägt auf der Rückseite
des DigiSender® Senders und dem HDMI Eingang
Ihres Fernsehgerätes.
4.
T
ANT
Verbinden Sie den Netzstecker mit dem Anschluss,
der mit “PSU” am Ende des Senders bezeichnet ist
und stecken Sie den Netzstecker in eine verfügbare
Steckdose. Die Power – LED leuchtet rot auf und
signalisiert, dass das Gerät im Standbymodus zur
Verfügung steht.
Page 17Lesen Sie diese Instruktionen bitte sorgfältig durch, bevor Sie die Installation beginnen
Page 18

(DE) DEUTSCH
DGXDSDV112 - DigiSender® XDHDMI - HDMI AV Sendesystem mit einem Eingang
Installation Ihres DigiSender® XDHDMI
Schritt 3 - Installieren Sie das Infrarot - Fernbedienungssystem
Das Infrarotfernedienungssystem beinhaltet verschiedene Teile, die Ihnen helfen, das System korrekt
aufzustellen.
Wenn es installiert ist, ermöglicht es Ihnen, Ihr sendendes Gerät (Ihr Satellitenempfänger zum Beispiel)
vom Ihrem Empfänger aus zu bedienen.
Zubehörteile #1
Zubehörteile #2
IR Emitter
Beispiel 1: Montieren Sie den IR-Sender senkrecht
mit dem Zubehörteilen 1 und 2. Stellen Sie sicher
dass der IR – Sensor auf Ihr Gerät ausgerichtet ist.
Beispiel 2: Montieren Sie den IR-Sender
waagerecht und benutzen Sie den beigefügten
Klebestreifen. Stellen Sie sicher, dass die LED auf
den IR-Sensor Ihres Gerätes ausgerichtet ist.
Page 18 Lesen Sie diese Instruktionen bitte sorgfältig durch, bevor Sie die Installation beginnen
Page 19

DEUTSCH (DE)
ANT
DGXDSDV112 - DigiSender® XDHDMI - HDMI AV Sendesystem mit einem Eingang
Installation Ihres DigiSender® XDHDMI
Schritt 4 - Installieren Sie Den Empfänger
Der Empfänger nimmt das Signal auf, das von Ihrem Sender ausgeht und gibt es an das verbundene
TV - Gerät weiter.
1.
T
Nehmen Sie eines der mitgelieferten HDMI Kabel
und verbinden Sie dieses mit dem Stecker, der die
Bezeichnung “HDMI OUT” trägt auf der Rückseite
der DigiSender® Empfänger und dem HDMI Eingang Ihres Fernsehgerätes.
HDMI OUT
2.
HDMI OUT
ANT
Verbinden Sie den Netzstecker mit dem Anschluss,
der mit “PSU” am Ende der Empfänger bezeichnet
ist und stecken Sie den Netzstecker in eine verfügbare Steckdose. Die Power – LED leuchtet rot auf
und signalisiert, dass das Gerät im Standbymodus
zur Verfügung steht.
Page 19Lesen Sie diese Instruktionen bitte sorgfältig durch, bevor Sie die Installation beginnen
Page 20

(DE) DEUTSCH
DGXDSDV112 - DigiSender® XDHDMI - HDMI AV Sendesystem mit einem Eingang
Installation Ihres DigiSender® XDHDMI
Schritt 5 - Testen Sie Ihre Anlage Mit Dem Diagnosticprogramm
Ihr DigiSender® ist von der Grundeinstellung her im Diagnostikprogramm und wird Sie anleiten, das
bestmögliche Bild zu bekommen und helfen, eventuell auftretende Probleme bei der Installation zu
erkennen.
1.
Schalten Sie Ihr Sendegerät ein ( Satellitenempfänger, DVD, Videorekorder, usw.)
3.
2.
Schalten Sie den Sender ein, indem Sie den Einschaltknopf an der Vorderseite des Senders drücken. Die LED – Leuchte wechselt von Rot nach Grün
um Ihnen anzuzeigen, dass das Gerät eingeschaltet
ist.
4.
Schalten Sie den Empfänger ein, indem Sie den
Einschaltknopf an der Vorderseite des Senders
drücken. Die LED – Leuchte wechselt von Rot nach
Grün um Ihnen anzuzeigen, dass das Gerät eingeschaltet ist.
Schalten Sie das empfangende Fernsehgerät ein,
wählen Sie den HDMIkanal, der dem HDMIanschluß zugewiesen ist, in den Sie den Empfänger
eingesteckt haben. Dies kann als SOURCE, INPUT,
AUX, AV, VIDEO, VCR oder ausgewiesen sein.
Page 20 Lesen Sie diese Instruktionen bitte sorgfältig durch, bevor Sie die Installation beginnen
Page 21

DGXDSDV112 - DigiSender® XDHDMI - HDMI AV Sendesystem mit einem Eingang
Fortsetzung...
DEUTSCH (DE)
5.
Die DigiSender® XDHDMI Startanzeige wird auf
dem Bildschirm sichtbar, während sich der Empfänger in das Signal des Senders einwählt.
7.
Sie werden sehen, dass in der oberen rechten Ecke
des Bildschirms ein blauer Diagnostikabschnitt mit
Informationen zu sehen ist. Wenn dieser nicht zu
sehen ist, ist Ihr Gerät möglicherweise nicht im Diagnostikmodus. Schalten Sie den Knopf für den Modus
auf der Rückseite von „normal“ zu „Test“ , schalten
Sie den Empfänger aus und starten Sie dann erneut.
6.
Nach etwa 5 Sekunden wird das Bild zu dem wechseln, was Sie gerade übertragen. Wenn das Bild
sich nicht verändert, müssen Sie Sender und Empfänger neu synchronisieren. Lesen Sie dazu auf Seite
12 mehr Informationen.
8.
Die erste Zahl gibt an, in welcher Bildrate der Empfänger vom Sender empfängt und an das Fernsehgerät weiter gibt.
Page 21Lesen Sie diese Instruktionen bitte sorgfältig durch, bevor Sie die Installation beginnen
Page 22

(DE) DEUTSCH
DGXDSDV112 - DigiSender® XDHDMI - HDMI AV Sendesystem mit einem Eingang
Fortsetzung...
Beachten Sie bitte: Wenn Sie vom Diagnostikprogramm in den normalen Betrieb umschalten, oder
anders herum, ist es erforderlich, das Gerät aus- und wieder einzuschalten.
9.
Die zweite Nummer gibt die Anzahl der Datenpakete an, die vom Sender übermittelt werden und
beim Empfänger wieder umgewandelt werden
müssen.
11.
Das letzte Symbol gibt die Signalstärke an. Dies ist
der Schlüssel zu einer guten Datenpaket- und Bildrate. Versuchen Sie diese so hoch wie möglich zu
erreichen. Wenn Sie nur eine geringe Signalstärke,
wenig Datenpakete oder Bildrate erreichen, sollten
Sie die Position der Geräte neu anpassen.
10.
“P” bedeutet, dass nicht wahrnehmbare Verluste
der Bildqualität vorhanden sind und die Bildrate
stabil bei etwa 25 liegt. „F“ bedeutet, dass Sie minimale Verluste der Bildqualität haben. Bei erhöhter
Datenpakete wird die Bildrate sich verringern.
12.
Wenn Sie alle nötigen Anpassungen vorgenommen
haben, schalten Sie den Modeschalter auf “normal” und schalten Sie das Gerät aus. Die Installa-
tion ist jetzt komplett und Sie können Ihre Satellitenprogramme auf einem anderen Fernseher in Ihrer
Wohnung genießen.
Page 22 Lesen Sie diese Instruktionen bitte sorgfältig durch, bevor Sie die Installation beginnen
Page 23

DGXDSDV112 - DigiSender® XDHDMI - HDMI AV Sendesystem mit einem Eingang
Gebrauch Ihres DigiSender® XDHDMI
Standartanwendung
DEUTSCH (DE)
1.
Schalten Sie Ihr Gerät ein (Satellitenempfänger,
DVD, Videorekorder, usw…)
3.
2.
Schalten Sie den Sender ein, indem Sie den Einschaltknopf an der Vorderseite des Senders drücken. Die LED – Leuchte wechselt von Rot nach Grün
um Ihnen anzuzeigen, dass das Gerät eingeschaltet
ist.
4.
Schalten Sie den Empfänger ein, indem Sie den
Einschaltknopf an der Vorderseite des Senders
drücken. Die LED – Leuchte wechselt von Rot nach
Grün um Ihnen anzuzeigen, dass das Gerät eingeschaltet ist.
Schalten Sie das empfangende Fernsehgerät ein,
wählen Sie den HDMIkanal, der dem HDMIanschluß zugewiesen ist, in den Sie den Empfänger
eingesteckt haben. Dies kann als SOURCE, INPUT,
AUX, AV, VIDEO, VCR oder ausgewiesen sein.
Page 23Lesen Sie diese Instruktionen bitte sorgfältig durch, bevor Sie die Installation beginnen
Page 24

(DE) DEUTSCH
ANT
HDMI OUTHDMI IN
ANT
HDMI OUTAV OUT
DGXDSDV112 - DigiSender® XDHDMI - HDMI AV Sendesystem mit einem Eingang
Gebrauch Ihres DigiSender® XDHDMI
Re - Synchronisierung Des Senders Und Empfängers
Wenn Sie Sender und Empfänger neu synchronisieren müssen, kann das wie unten beschrieben ausgeführt werden.
1.
Schalten Sie Sender und Empfänger ein.
2.
PAIR
IR
Drücken und halten Sie die Pair Knöpfe auf der
Rückseite des Senders und Empfängers gleichzeitig
für 5 Sekunden und lassen Sie dann los.
PAIR
Beachten Sie bitte, dass aufgrund des gleichzeitigen Drückens der Knöpfe auf beiden Geräten (Sender
und Empfänger), Sie die Geräte zusammen in einem Raum und Reichweite haben müssen. Alternativ
können Sie jemand um Hilfe bitten, so dass jeder einzelne zu gleicher Zeit den Knopf drücken kann.
Page 24 Lesen Sie diese Instruktionen bitte sorgfältig durch, bevor Sie die Installation beginnen
Page 25

DEUTSCH (DE)
DGXDSDV112 - DigiSender® XDHDMI - HDMI AV Sendesystem mit einem Eingang
Fehlerbehebung
Häufig gestellte Fragen
Q. Mein Bild stockt, wie kann ich das beheben?
A. Ein stockendes Bild weist in der Regel auf eine zu geringe Bildrate hin. Setzen Sie das System in
den Diagnosemodus (siehe Seite 20 – 22) und überprüfen Sie die Signalstärke. Versuchen Sie die Position der Antennen beider Geräte neu auszurichten, , während eine weitere Person die Signalstärke im
Auge behält.
Q. Wie kann ich die Bildrate verbessern?
A. Eine schlechte Bildrate ist das Ergebnis eines entscheidenden Verlustes von Dateipaketen vom
Sender her. Der Empfänger kann das durch intelligentes Ersetzen in Grenzen ausgleichen. Versuchen
Sie die Position der Antennen beider Geräte neu auszurichten, bis das Problem behoben ist.
Q. Ich kann keine gute Datenpaketrate erreichen, kann ich das so lassen?
A. Ja. Der Empfänger ist so konzipiert, dass er mit einem Verlust der Pakete arbeiten kann, ohne dass
die Bildqualität darunter signifikant leidet und die Tonqualität auf jeden Fall erhalten bleibt.
Page 25Lesen Sie diese Instruktionen bitte sorgfältig durch, bevor Sie die Installation beginnen
Page 26

(DE) DEUTSCH
DGXDSDV112 - DigiSender® XDHDMI - HDMI AV Sendesystem mit einem Eingang
Fehlerbehebung
Technischer Support
AEI Security & Communications Ltd ist engagiert, um den Kunden mit ausgezeichneter Betreuung und
technischer Unterstützung zu Diensten zu stehen.
1. Website
Kostenfreie technische Beratung ist 24 Stunden am Tag verfügbar auf unserer Website unter:
www.aei.eu
2. Online Videos
Schauen Sie sich unsere Installations- und Fehlerbehebungsvideos unter www.aei.eu/video an.
3. Email
Kontaktieren Sie unsere technische Abteilung direkt durch eine Email unter:
hilfe@DigiSender®.net
WATCH A VIDEO
WATCH A VIDEO
INSTALLATION
INSTALLATION
& TROUBLESHOOTING GUIDE
& TROUBLESHOOTING GUIDE
Available online at: www.aei.eu/video
Available online at: www.aei.eu/video
Page 26 Lesen Sie diese Instruktionen bitte sorgfältig durch, bevor Sie die Installation beginnen
Page 27

FRANCAIS (FR)
DGXDSDV112 - DigiSender® XDHDMI - Kit de transmission HDMI audio-vidéo à entrée unique
Présentation
Félicitations ! Vous venez d’acheter le nouveau DigiSender® XDHDMI proposé par AEI Security & Communications Ltd. Ce produit, bien qu’économique, est le fruit de technologies de pointe en matière de
diffusion audio et vidéo sans fil.
Grâce à lui, vous pouvez désormais bénéficier de la vidéo de qualité DVD et du son stéréo haute fidélité
de votre décodeur (satellite, câble), lecteur DVD, magnétoscope ou numériscope dans une autre pièce,
sans avoir à vous préoccuper des interférences de vos appareils sans fil.
L’application de la solution numérique d’étalement du spectre permet aux signaux de traverser murs
et plafonds sans aucune difficulté, ainsi que sans détérioration ou interférence provenant d’appareils
sans fil similaires. La compatibilité de ce produit avec les autres périphériques sans fil est telle qu’il
peut être installé à côté d’un routeur sans fil ou d’un four à micro-ondes et fonctionner sans interférences, ce qui était jusque là impossible.
Des innovations telles que les connexions HDMI, le kit de relais infrarouge (IR) à distance Technik™ et
le mode Diagnostic font de votre DigiSender® l’un des kits de transmission vidéo les plus sophistiqués
du marché.
Page 27S’il vous plaît lire attentivement les instructions avant l’installation
Page 28

(FR) FRANCAIS
DGXDSDV112 - DigiSender® XDHDMI - Kit de transmission HDMI audio-vidéo à entrée unique
Installation Du DigiSender® XDHDMI
Étape 1 - Déballage du DigiSender® XDHDMI
Le poids de toutes les boîtes de DigiSender® est contrôlé par ordinateur avant expédition. Toutefois,
nous vous recommandons de vérifier que vous disposez bien de tous les composants avant de commencer l’installation.
IR Systeme Technik™ Kit
2x Blocs d’alimentation
2x HDMI Câbles
POWER
Emetteur
POWER
Réceptuer
Page 28 S’il vous plaît lire attentivement les instructions avant l’installation
Page 29

FRANCAIS (FR)
ANT
ANT
HDMI OUT
ANT
HDMI OUTHDMI IN
DGXDSDV112 - DigiSender® XDHDMI - Kit de transmission HDMI audio-vidéo à entrée unique
Installation Du DigiSender® XDHDMI
Étape 2 - Installation de l’émetteur
L’émetteur envoie les signaux audio et vidéo transmis par un équipement source auquel il est connecté (le décodeur satellite, par exemple) au récepteur, situé dans une autre pièce.
1.
PAIR
Identifiez le câble HDMI qui relie votre décodeur
satellite ou décodeur câble à votre télévision. Débranchez le câble HDMI de l’arrière de la télévision,
puis branchez-le sur la prise « HDMI IN » à l’arrière
de l’émetteur DigiSender®.
HDMI IN
3.
PAIR
IR
2.
HDMI OUT
Branchez l’un des câbles HDMI fournis à la prise «
HDMI OUT » à l’arrière de l’émetteur DigiSender® et
à l’entrée HDMI de votre télévision.
4.
T
ANT
Branchez ensuite l’émetteur infrarouge sur la prise
intitulée « IR », située à l’arrière de l’émetteur.
Consultez la page 30 pour en savoir davantage sur
l’installation du IR Systeme Technik™.
Reliez l’une des extrémités de l’unité d’alimentation
à la prise « PSU » à l’arrière de l’émetteur et l’autre
à la prise secteur. Le voyant d’alimentation devient rouge pour indiquer que l’appareil est en mode
veille.
Page 29S’il vous plaît lire attentivement les instructions avant l’installation
Page 30

(FR) FRANCAIS
DGXDSDV112 - DigiSender® XDHDMI - Kit de transmission HDMI audio-vidéo à entrée unique
Installation Du DigiSender® XDHDMI
Étape 3 - Installation du IR Systeme Technik™
Une fois la configuration terminée, l’extension de télécommande vous permet d’utiliser votre télécommande dans tous les endroits de la maison.
Les configurations peuvent varier en fonction de la façon dont vous installez l’extension de télécommande.
Accessoire #1
Accessoire #2
IR Emitter
Ex 1: Utilisez les éléments 1 et 2 pour assembler
à la verticale l’émetteur infrarouge. Le voyant infrarouge doit se trouver face au capteur de votre
équipement.
Ex 2: Assemblez l’émetteur infrarouge à l’horizontale
à l’aide du support antidérapant fourni. Vérifiez que
le voyant infrarouge se trouve face au capteur de
votre équipement.
Page 30 S’il vous plaît lire attentivement les instructions avant l’installation
Page 31

FRANCAIS (FR)
ANT
DGXDSDV112 - DigiSender® XDHDMI - Kit de transmission HDMI audio-vidéo à entrée unique
Installation Du DigiSender® XDHDMI
Étape 4 - Installation du récepteur
Le récepteur détecte les signaux envoyés par l’émetteur et les retransmet sur le téléviseur auquel il
est branché.
1.
T
Branchez l’un des câbles HDMI fournis à la prise «
HDMI OUT » à l’arrière de le récepteur DigiSender®
et à l’entrée HDMI de votre télévision.
HDMI OUT
2.
HDMI OUT
ANT
Reliez l’une des extrémités de l’unité d’alimentation
à la prise « PSU » à l’arrière de le récepteur et l’autre
à la prise secteur. Le voyant d’alimentation devient
rouge pour indiquer que l’appareil est en mode
veille.
Page 31S’il vous plaît lire attentivement les instructions avant l’installation
Page 32

(FR) FRANCAIS
DGXDSDV112 - DigiSender® XDHDMI - Kit de transmission HDMI audio-vidéo à entrée unique
Installation Du DigiSender® XDHDMI
Étape 5 - Vérification de la configuration à l’aide
du mode Diagnostic
Par défaut, le DigiSender® XDHDMI est configuré en mode Diagnostic pour vous aider à obtenir la meilleure qualité d’image possible et identifier les problèmes qui pourraient survenir lors de l’installation.
1.
Allumez l’équipement source (décodeur satellite,
Freeview, lecteur DVD, magnétoscope, etc.).
3.
2.
Puis, allumez l’émetteur en appuyant sur le bouton de marche/arrêt placé à l’avant. Le voyant
d’alimentation passe du rouge au vert pour indiquer
que l’appareil est allumé.
4.
Allumez le récepteur en appuyant sur le bouton de marche/arrêt placé à l’avant. Le voyant
d’alimentation passe du rouge au vert pour indiquer
que l’appareil est allumé.
Sur le téléviseur, sélectionnez le canal assigné à
la prise péritel à laquelle est branché le récepteur.
Il peut s’appeler SOURCE, INPUT, AUX, AV, VIDEO,
VCR ou .
Page 32 S’il vous plaît lire attentivement les instructions avant l’installation
Page 33

Suite ...
FRANCAIS (FR)
DGXDSDV112 - DigiSender® XDHDMI - Kit de transmission HDMI audio-vidéo à entrée unique
5.
L’écran de démarrage du DigiSender® XDHDMI
s’affiche pendant que le récepteur recherche le signal de l’émetteur.
7.
En haut à droite de l’écran figure une barre de
diagnostic comportant certaines informations. Si
vous ne voyez pas de barre de diagnostic s’afficher,
il est possible que votre récepteur ne se trouve pas
en mode Diagnostic. Passez du mode Normal au
mode Diagnostic à l’aide du bouton « Mode », puis
éteignez et rallumez le récepteur.
6.
Au bout de 5 secondes environ, les images transmises par votre équipement source devraient apparaître sur l’écran du téléviseur. Si ce n’est pas
le cas, vous devrez synchroniser l’émetteur et le
récepteur. Reportez-vous à la page 12 pour obtenir
plus d’informations.
8.
Le premier chiffre indique le taux de trame reçu par
le récepteur et transmis au téléviseur.
Page 33S’il vous plaît lire attentivement les instructions avant l’installation
Page 34

(FR) FRANCAIS
DGXDSDV112 - DigiSender® XDHDMI - Kit de transmission HDMI audio-vidéo à entrée unique
Suite ...
Remarque : lorsque vous changez de mode (Normal à Diagnostic et vice-versa), vous devez éteindre puis
rallumer l’appareil.
9.
Le deuxième chiffre indique le taux de paquets.
Il s’agit du pourcentage de paquets envoyé par
l’émetteur qui devra être reconstitué par le récepteur.
11.
La dernière icône indique la force du signal. Celleci est essentielle pour obtenir l’adéquation du taux
de trame et du taux de paquets. Veillez à ce qu’elle
soit toujours aussi élevée que possible. Si vous con-
statez un taux de trame, un taux de paquet ou une
force de signal faible, un réajustement de la position
de vos appareils ou des antennes peut être nécessaire.
10.
« P » signifie qu’aucune détérioration dans la qualité
de l’image ne devrait être constatée et que le taux
de trame devrait rester stable (aux alentours de 25).
« F » signifie qu’une perte subtile dans la qualité
de l’image peut être constatée. Lorsque le taux de
paquets augmente, le taux de trame diminue.
12.
Après avoir réorienté correctement les appareils
et les antennes, passez à nouveau du mode Diagnostic au mode Normal, puis éteignez l’appareil.
L’installation est terminée. Vous pouvez maintenant
regarder vos chaînes satellite préférées sur votre
deuxième télévision !
Page 34 S’il vous plaît lire attentivement les instructions avant l’installation
Page 35

DGXDSDV112 - DigiSender® XDHDMI - Kit de transmission HDMI audio-vidéo à entrée unique
Utilisation Du DigiSender® XDHDMI
Opération Normale
FRANCAIS (FR)
1.
Allumez l’équipement source (décodeur satellite,
Freeview, lecteur DVD, magnétoscope, etc.).
3.
2.
Puis, allumez l’émetteur en appuyant sur le bouton de marche/arrêt placé à l’avant. Le voyant
d’alimentation passe du rouge au vert pour indiquer
que l’appareil est allumé.
4.
Allumez le récepteur en appuyant sur le bouton de marche/arrêt placé à l’avant. Le voyant
d’alimentation passe du rouge au vert pour indiquer
que l’appareil est allumé.
Sur le téléviseur, sélectionnez le canal assigné à
la prise péritel à laquelle est branché le récepteur.
Il peut s’appeler SOURCE, INPUT, AUX, AV, VIDEO,
VCR ou .
Page 35S’il vous plaît lire attentivement les instructions avant l’installation
Page 36

(FR) FRANCAIS
ANT
HDMI OUTHDMI IN
ANT
HDMI OUTAV OUT
DGXDSDV112 - DigiSender® XDHDMI - Kit de transmission HDMI audio-vidéo à entrée unique
Utilisation Du DigiSender® XDHDMI
Synchronisation de l’émetteur et du récepteur
Si l’émetteur et le récepteur nécessitent une synchronisation, veuillez suivre les instructions ci-dessous.
1.
Allumez l’émetteur et le récepteur.
2.
PAIR
IR
Maintenez simultanément le bouton « Pair » appuyé
sur le récepteur et l’émetteur pendant 5 secondes.
PAIR
Dans la mesure où vous devrez maintenir le bouton « Pair » appuyé sur le récepteur et l’émetteur simultanément, vous devrez placer les deux appareils dans la même pièce, l’un à côté de l’autre pour effectuer
l’opération. Si une autre personne est présente, vous pouvez lui demander de maintenir le bouton « Pair
» enfoncé sur l’un des appareils, pendant que vous appuyez sur le bouton « Pair » de l’autre appareil,
dans une autre pièce.
Page 36 S’il vous plaît lire attentivement les instructions avant l’installation
Page 37

FRANCAIS (FR)
DGXDSDV112 - DigiSender® XDHDMI - Kit de transmission HDMI audio-vidéo à entrée unique
Dépannage
Foire aux questions
Q. L’image est saccadée, que dois-je faire ?
R. Une image saccadée indique généralement un mauvais taux de trame. Passez au mode Diagnostic (voir page 32 - 34) pour vérifier la force du signal. Tentez d’ajuster l’orientation des antennes de
l’émetteur et du récepteur, pendant qu’une autre personne vérifie la force du signal.
Q. Comment faire pour améliorer le taux de trame ?
R. Un mauvais taux de trame résulte d’une perte d’un grand nombre des paquets de données (mauvais
taux de paquets) envoyés par l’émetteur. Le récepteur a la capacité de reconstituer les paquets de
données « perdus », mais il doit pour cela estimer leur valeur. Tentez divers ajustements de la position
des antennes de l’émetteur et du récepteur, jusqu’à ce que le problème soit résolu.
Q. Le taux de paquets reste mauvais, quoi que je fasse. Est-ce que c’est grave ?
R. Non. Le récepteur a été spécialement conçu pour fonctionner même en cas de perte d’un grand
nombre de paquets de données et sans que cela n’entraîne une détérioration importante de la qualité
de l’image ou du son.
Page 37S’il vous plaît lire attentivement les instructions avant l’installation
Page 38

(FR) FRANCAIS
DGXDSDV112 - DigiSender® XDHDMI - Kit de transmission HDMI audio-vidéo à entrée unique
Dépannage
Assistance technique
AEI Security & Communications Ltd s’engage à apporter à nos clients un service à la clientèle et un
support technique de première classe.
Nous vous avons fourni 2 méthodes pour l’obtention d’un avis technique à propos de ce produit.
1. Sur Internet
Un service technique gratuit est disponible 24 heures/24 et 7 jours/7 sur notre site Internet dédié au
support : http://www.aei.eu
2. Par E-mail
Vous pouvez contacter nos ingénieurs par E-mail. Veuillez vous assurer d’expliquer clairement votre
modèle et d’indiquer le modèle d’appareil que vous avez acheté. aide@DigiSender®.net
WATCH A VIDEO
WATCH A VIDEO
INSTALLATION
INSTALLATION
& TROUBLESHOOTING GUIDE
& TROUBLESHOOTING GUIDE
Available online at: www.aei.eu/video
Available online at: www.aei.eu/video
Page 38 S’il vous plaît lire attentivement les instructions avant l’installation
Page 39

NEDERLANDS (NL)
DGXDSDV112 - DigiSender® XDHDMI - HDMI AV-zendersysteem met één ingang
Inleiding
Gefeliciteerd met de aankoop van de nieuwe DigiSender® XDHDMI van AEI Security & Communications Ltd. Met dit product haalt u tegen een zeer scherpe prijs het toonbeeld van hypermoderne draadloze audio-videodistributietechnologie in huis.
U kunt nu vanuit een andere kamer in uw huis genieten van video van dvd-kwaliteit en stereogeluid
van hifi-kwaliteit via uw satelliet-/kabeltelevisie, digitale televisie, dvd-speler, digitale videorecorder of
gewone videorecorder, zonder interferentie door andere draadloze producten.
Door het gebruik van digitale spread-spectrumtechnologie gaan signalen niet alleen moeiteloos door
muren en plafonds heen, maar gaat de kwaliteit van het signaal bovendien niet achteruit en heeft het
ook geen last van interferentie door vergelijkbare draadloze apparaten. Deze technologie kan probleemloos worden gecombineerd met andere draadloze technologieën zodat het product zelfs kan worden geïnstalleerd en gebruikt naast een draadloze router of magnetron, wat voorheen nooit mogelijk
was.
Vanwege de aanwezigheid van innovatieve functies als de HDMI-aansluitingen, de IR Systeme
Technik™-uitbreidingskit voor de afstandsbediening en een diagnosemodus hoeft u er niet aan te twijfelen dat u één van de meest geavanceerde videozendersystemen hebt aangeschaft die momenteel
te krijgen is.
Page 39Lees de instructies zorgvuldig alvorens het te installeren
Page 40

(NL) NEDERLANDS
DGXDSDV112 - DigiSender® XDHDMI - HDMI AV-zendersysteem met één ingang
Uw DigiSender® XDHDMI Installeren
Stap 1 - Pak Uw DigiSender® XDHDMI Uit
Van alle DigiSender®-bestellingen wordt het gewicht na het verpakken gecontroleerd door een computer. Het is echter toch aan te raden om te controleren of de kit compleet is voordat u doorgaat met
de installatie.
IR Systeme Technik™ Kit
2x Stroom
2x HDMI Kabels
POWER
Zender
POWER
Ontvanger
Page 40 Lees de instructies zorgvuldig alvorens het te installeren
Page 41

NEDERLANDS (NL)
ANT
ANT
HDMI OUT
ANT
HDMI OUTHDMI IN
DGXDSDV112 - DigiSender® XDHDMI - HDMI AV-zendersysteem met één ingang
Uw DigiSender® XDHDMI Installeren
Stap 2 - Installeer De Zender
De zender zendt de audio en video van een aangesloten bron (bijvoorbeeld uw satellietschotel) uit naar
de ontvanger, die zich in een andere kamer in uw huis bevindt.
1.
PAIR
Zoek de HDMI-kabel waarmee uw satellietschotel
of kabelbox op uw tv is aangesloten. Haal de HDMIkabel uit de achterzijde van uw tv en sluit deze aan
op de aansluiting met de aanduiding HDMI IN op
de achterzijde van de DigiSender®-zender.
HDMI IN
3.
PAIR
IR
2.
HDMI OUT
Sluit één van de meegeleverde HDMI-kabels aan
op de aansluiting met de aanduiding HDMI OUT op
de achterzijde van de DigiSender®-zender en op de
HDMI-ingang van uw tv.
4.
T
ANT
Sluit de infraroodzender aan op de aansluiting met
de aanduiding IR op de achterzijde van de zender.
Zie pagina 42 voor meer informatie over het installeren van de IR Systeme Technik™.
Sluit de voedingsadapter aan op de aansluiting met
de aanduiding PSU op de achterzijde van de zender
en steek de stekker in het stopcontact. Het voedingslampje licht rood op om aan te geven dat de
eenheid zich in de stand-bymodus bevindt.
Page 41Lees de instructies zorgvuldig alvorens het te installeren
Page 42

(NL) NEDERLANDS
DGXDSDV112 - DigiSender® XDHDMI - HDMI AV-zendersysteem met één ingang
Uw DigiSender® XDHDMI Installeren
Stap 3 - De IR Systeme Technik™
Als de extender voor de afstandsbediening eenmaal juist is ingesteld, kunt u hiermee uw afstandsbediening vanuit de andere kamer in uw huis gebruiken.
Aangezien iedereen andere instellingen gebruikt, kan de extender voor de afstandsbediening op verschillende manieren worden geïnstalleerd.
Het onderdeel #1
Het onderdeel #2
IR Emitter
Ex 1: Gebruik accessoires 1 en 2 om de infraroodzender verticaal te installeren zodat het infraroodlampje naar de afstandsbedieningssensor van
de bronapparatuur is gericht.
Ex 2: Installeer de infraroodzender horizontaal met
de meegeleverde dubbelzijdige sticker. Zorg ervoor
dat het infraroodlampje naar de afstandsbedieningssensor van de bronapparatuur is gericht.
Page 42 Lees de instructies zorgvuldig alvorens het te installeren
Page 43

NEDERLANDS (NL)
ANT
DGXDSDV112 - DigiSender® XDHDMI - HDMI AV-zendersysteem met één ingang
Uw DigiSender® XDHDMI Installeren
Stap 4 - Installeer De Ontvanger
De ontvanger vangt de signalen op die door uw zender worden uitgezonden en stuurt deze door naar
een aangesloten tv.
1.
T
Sluit één van de meegeleverde HDMI-kabels aan op
de aansluiting met de aanduiding HDMI OUT op de
achterzijde van de DigiSender®-ontvanger en op de
HDMI-ingang van uw tv.
HDMI OUT
2.
HDMI OUT
ANT
Sluit de voedingsadapter aan op de aansluiting met
de aanduiding PSU op de achterzijde van de ontvanger en steek de stekker in het stopcontact. Het
voedingslampje licht rood op om aan te geven dat
de eenheid zich in de stand-bymodus bevindt.
Page 43Lees de instructies zorgvuldig alvorens het te installeren
Page 44

(NL) NEDERLANDS
DGXDSDV112 - DigiSender® XDHDMI - HDMI AV-zendersysteem met één ingang
Uw DigiSender® XDHDMI Installeren
Stap 5 - Test Uw Installatie Met De Diagnosemodus
Uw DigiSender® XDHDMI is standaard ingesteld op de diagnosemodus. Deze helpt u bij het verkrijgen
van een zo goed mogelijk beeld en bij het signaleren van problemen die tijdens de installatie kunnen
optreden.
1.
Zet de bronapparatuur (satelliet, freeview, dvd, videorecorder, etc.) aan.
3.
2.
Zet de zender aan door op de aan-uitknop op de
voorzijde van de eenheid te drukken. Het voeding-
slampje wordt groen in plaats van rood om aan te
geven dat de eenheid is ingeschakeld.
4.
Zet de ontvanger aan door op de aan-uitknop op de
voorzijde van de eenheid te drukken. Het voeding-
slampje wordt groen in plaats van rood om aan te
geven dat de eenheid is ingeschakeld.
Zet de ontvangende tv aan en selecteer het HDMIkanaal dat is toegewezen aan de HDMI-aansluiting
die u voor de ontvanger hebt gebruikt. Deze kan de
aanduiding SOURCE, INPUT, AUX, AV, VIDEO, VCR of
hebben.
Page 44 Lees de instructies zorgvuldig alvorens het te installeren
Page 45

Vervolg ...
NEDERLANDS (NL)
DGXDSDV112 - DigiSender® XDHDMI - HDMI AV-zendersysteem met één ingang
5.
Het opstartscherm van de DigiSender® XDHDMI
wordt weergegeven terwijl de ontvanger probeert
het signaal van de zender op te vangen.
7.
In de rechterbovenhoek van het scherm ziet u een
blauwe diagnosebalk met informatie. Als de diag-
nosebalk niet aanwezig is, bevindt de ontvanger zich
mogelijk niet in de diagnosemodus. Zet de modusschakelaar op de achterzijde op Test (Diagnose) in
plaats van Normal (Normaal) en zet de ontvanger uit
en vervolgens weer aan.
6.
Na ongeveer 5 seconden schakelt het beeld over op
datgene wat u uitzendt. Als het beeld niet verandert,
moet u de zender en ontvanger mogelijk opnieuw
synchroniseren. Zie pagina 12 voor meer informatie.
8.
Het eerste getal is de framesnelheid die de ontvanger opvangt van de zender en doorstuurt naar de tv.
Page 45Lees de instructies zorgvuldig alvorens het te installeren
Page 46

(NL) NEDERLANDS
DGXDSDV112 - DigiSender® XDHDMI - HDMI AV-zendersysteem met één ingang
Vervolg ...
Opmerking: wanneer u tussen de diagnose- en de normale modus schakelt, moet u de eenheid uitzetten
en vervolgens weer aanzetten.
9.
Het tweede getal is de pakketsnelheid. Dit is het
percentage gegevenspakketten dat door de zender
is uitgezonden en dat door de ontvanger moet worden gereconstrueerd.
11.
Het laatste pictogram staat voor het signaalniveau.
Dit is cruciaal voor een goede frame- en pakketsnelheid. Probeer het signaalniveau zo hoog mogelijk te
houden. Als de framesnelheid, de pakketsnelheid of
het signaalniveau laag is, moet u mogelijk de positie
van de eenheden en/of antennes aanpassen.
10.
P betekent dat er geen beeldkwaliteitsverlies zichtbaar zou moeten zijn en dat de framesnelheid constant ongeveer 25 zou moeten zijn. F betekent dat
er mogelijk een klein beetje beeldkwaliteitsverlies
zichtbaar is. Als de pakketsnelheid stijgt, daalt de
framesnelheid.
12.
Nadat u de benodigde aanpassingen hebt doorgevoerd, zet u de modusschakelaar op Normal
(Normaal) in plaats van Test (Diagnose) en zet u de
eenheid uit. De installatie is nu voltooid en u kunt
nu genieten van uw satellietkanalen op een andere
tv in uw huis!
Page 46 Lees de instructies zorgvuldig alvorens het te installeren
Page 47

DGXDSDV112 - DigiSender® XDHDMI - HDMI AV-zendersysteem met één ingang
De DigiSender® XDHDMI Gebruiken
Standaardbediening
NEDERLANDS (NL)
1.
Zet de bronapparatuur (satelliet, freeview, dvd, videorecorder, etc.) aan.
3.
2.
Zet de zender aan door op de aan-uitknop op de
voorzijde van de eenheid te drukken. Het voeding-
slampje wordt groen in plaats van rood om aan te
geven dat de eenheid is ingeschakeld.
4.
Zet de ontvanger aan door op de aan-uitknop op de
voorzijde van de eenheid te drukken. Het voeding-
slampje wordt groen in plaats van rood om aan te
geven dat de eenheid is ingeschakeld.
Zet de ontvangende tv aan en selecteer het HDMIkanaal dat is toegewezen aan de HDMI-aansluiting
die u voor de ontvanger hebt gebruikt. Deze kan de
aanduiding SOURCE, INPUT, AUX, AV, VIDEO, VCR of
hebben.
Page 47Lees de instructies zorgvuldig alvorens het te installeren
Page 48

(NL) NEDERLANDS
ANT
HDMI OUTHDMI IN
ANT
HDMI OUTAV OUT
DGXDSDV112 - DigiSender® XDHDMI - HDMI AV-zendersysteem met één ingang
De DigiSender® XDHDMI Gebruiken
De zender en ontvanger opnieuw synchroniseren
Volg de onderstaande instructies op als u op enig moment de zender en ontvanger opnieuw moet
synchroniseren.
1.
Zet zowel de zender als de ontvanger aan.
2.
PAIR
IR
Houd de Pair-knop (Koppelen) op de achterzijde van
de zender en de ontvanger tegelijkertijd 5 seconden
lang ingedrukt en laat deze dan los.
PAIR
Let op: omdat u de Pair-knop (Koppelen) op de zender en de ontvanger tegelijkertijd ingedrukt moet
houden, moeten de zender en de ontvanger zich in dezelfde kamer en binnen handbereik bevinden. Als
er iemand is die u kan helpen, is het ook mogelijk dat één van u de Pair-knop (Koppelen) van de zender
ingedrukt houdt in bijvoorbeeld de zitkamer terwijl de ander de Pair-knop (Koppelen) van de ontvanger
ingedrukt houdt op de slaapkamer.
Page 48 Lees de instructies zorgvuldig alvorens het te installeren
Page 49

NEDERLANDS (NL)
DGXDSDV112 - DigiSender® XDHDMI - HDMI AV-zendersysteem met één ingang
Problemen Oplossen
Veelgestelde Vragen
V. Het beeld is schokkerig. Hoe kan ik dit verhelpen?
A. Een schokkerig beeld duidt op een lage framesnelheid. Zet het systeem in de diagnosemodus (zie
pagina 44 - 46) en controleer het signaalniveau. Pas de positie van de antenne van zowel de zender als
de ontvanger aan terwijl iemand anders het signaalniveau in de gaten houdt.
V. Hoe kan ik de framesnelheid verbeteren?
A. Een lage framesnelheid is het resultaat van een significant verlies van gegevenspakketten (een lage
pakketsnelheid) van de zender. De ontvanger kan de verloren gegevenspakketten wel reconstrueren,
maar moet hierbij een intelligente schatting doen van de waarde hiervan. Pas de positie van de antenne van zowel de zender als de ontvanger aan totdat het probleem is verholpen.
V. Het lukt me niet om een hoge pakketsnelheid te krijgen. Kan ik deze laten zoals deze is?
A. Jazeker. De ontvanger is zodanig ontworpen dat deze kan werken met een significant gegevenspakketverlies zonder dat de beeldkwaliteit hier ernstig onder te lijden heeft. De geluidskwaliteit heeft hier
zelfs helemaal niet onder te lijden.
Page 49Lees de instructies zorgvuldig alvorens het te installeren
Page 50

(NL) NEDERLANDS
DGXDSDV112 - DigiSender® XDHDMI - HDMI AV-zendersysteem met één ingang
Problemen Oplossen
Technische Ondersteuning
AEI Security & Communications Ltd verbindt zich ertoe hun klanten van een eersteklas klantendienst
en technische ondersteuning te voorzien.
Wij hebben 2 methodes voor u om technisch advies over dit product te krijgen.
1. Op het web
Gratis technisch advies is on-line beschikbaar 24/7 op onze speciaal daarvoor gemaakte ondersteunende website: http://www.aei.eu
2. Per e-mail
U kan onze ingenieurs contacteren per e-mail. Zorg er voor dat u uw probleem duidelijk uitlegt en dat
u vermeldt welk model u aangekocht hebt. hulp@DigiSender®.net
WATCH A VIDEO
WATCH A VIDEO
INSTALLATION
INSTALLATION
& TROUBLESHOOTING GUIDE
& TROUBLESHOOTING GUIDE
Available online at: www.aei.eu/video
Available online at: www.aei.eu/video
Page 50 Lees de instructies zorgvuldig alvorens het te installeren
Page 51

DECLARATION OF CONFORMITY
01022007/01/DG-DV-DX
We,
declare under our sole responsibility that the products bearing the series code prefi xed:
AEI Security & Communications Ltd.
Weslake Industrial Park, Harbour Road, Rye, East Sussex, TN31 7TE, United Kingdom
DGx, DVx, DXx (x refers to the specifi c model number)
are in conformity with the essential requirements of Directive 1995/5/EC. These products have been tested against the following
standards and specifi cations:
Low Voltage Directive
EN60950:2000 Safety of information technology equipment.
Electromagnetic Compatibility Directive
EN 301 489-3 V1.3.1: 11-2001 Specifi c conditions for Short-Range Devices (SRD) operating on frequencies between 9 KHz
and 40 GHz.
EN 301 489-1 V1.3.1: 09-2001 Electromagnetic compatibility and Radio spectrum Matters (ERM); Electromagnetic
Compatibility (EMC) standard for radio equipment and services; Part 1: Common technical
requirements.
Radio Spectrum
EN 300 440-1 V1.3.1: 09-2001 Electromagnetic compatibility and Radio spectrum Matters (ERM); Short Range Devices;
Radio equipment to be used in the 1 GHz to 40 GHz frequency range; Part 1: Technical
characteristics and test methods.
Power Supply
EN55022: 2003 Information technology equipment. Radio disturbance characteristics. Limits and methods
of measurement.
EN55024: 2003 Information technology equipment. Immunity characteristics. Limits and methods of
measurement.
IEC 61000-3-2: 2001 Electromagnetic Compatibility (EMC) - Part 3-2: Limits - Limits for harmonic current
emissions (equipment input current <= 16 A per phase).
IEC 61000-3-3: 2001 Electromagnetic Compatibility (EMC) - Part 3-3: Limits - Limitations of voltage changes,
voltage fl uctuations and fl icker in public low-voltage supply systems, equipment with rated
current <= 16 A per phase and not subject to conditional connection.
The product is marked with the CE marking and Notifi ed Body Number according to directive 1999/5/EC.
Original Document of Conformity has been signed.
Page 52

SPECIFICATIONS
Transmitter Connections
Receiver Outputs
HDMI version
HDCP
Operating Frequency
Remote Control Compatiblity
Audio Input Level
Audio Bandwidth
Range
Power
Dimensions
Weight
1x HDMI Input, 1x HDMI Output
1x HDMI
1.3
Compliant
2.4GHz Digital
RC5, RC6
1.0v PP (Mod 1KHz, Dev 15KHz)
20Hz - 22KHz (-3dB)
200m (clear line of sight)
5V DC, 1.0A
L: 90mm, W: 140mm, H: 25mm
0.23kg
CW160911-1
©2011 AEI Security & Communications Ltd. All rights reserved.
Registered in England: 02831823
AEI Security & Communications Ltd
Weslake Industrial Park
Rye Harbour Road, Rye
East Sussex
TN31 7TE
United Kingdom
IR Systeme Technik and DigiConnector are trademarks of AEI Security & Communications Ltd.
DigiSender® is a registered trademark of AEI Security & Communications Ltd.
 Loading...