

Page 1
Operating Instructions
Hand Held ISO Reader ARE H5
Page 2

Table of content
1 INTRODUCTION ............................................................................................................ 5
2 OVERVIEW .................................................................................................................... 5
2.1 Control elements ....................................................................................................................................... 6
3 SHORT FORM OPERATING INSTRUCTION .................................................................. 7
3.1 Installation of the battery .......................................................................................................................... 7
3.2 Power on / off ........................................................................................................................................... 7
3.3 Reading a transponder .............................................................................................................................. 7
3.4 Database ................................................................................................................................................... 7
4 DETAILED DESCRIPTION OF THE OPERATING MODES ............................................ 9
4.1 Stand-By mode.......................................................................................................................................... 9
4.2 Standard mode .......................................................................................................................................... 9
4.3 Start reading ............................................................................................................................................. 9
4.4 Data storage ............................................................................................................................................. 9
4.5 Built in memory ...................................................................................................................................... 10
4.6 Display of Accumulator Capacity ............................................................................................................. 10
5 FUNCTION OF THE MENUS ....................................................................................... 11
5.1 Menu: "Set Attribute" ............................................................................................................................. 12
5.2 The menu "Operating Mode" .................................................................................................................... 13
5.2.1 Operating Mode "Online" ................................................................................................................... 13
5.2.2 Transmission format used for the serial interface. ............................................................................. 14
5.2.3 Terminating the "Data>Serial" mode ................................................................................................. 14
5.2.4 Online H, Read/Transf. ..................................................................................................................... 14
5.2.5 The database mode ........................................................................................................................... 15
5.3 Interface ................................................................................................................................................. 16
5.4 Change Bluetooth Role ............................................................................................................................ 16
5.5 Change Bluetooth Partner ....................................................................................................................... 16
--------------------------------------------------------------------------------2/31--------------------------------------------------------------------------------
Page 3

5.6 The menu "Lock Up Reader" ................................................................................................................... 17
5.7 The menu "Clear memory" ....................................................................................................................... 18
5.8 The menu "Code format" to adjust for the ISO-data format. ..................................................................... 18
5.8.1 Formats available for representation of the code ............................................................................... 18
5.9 The menu "Set Date" ............................................................................................................................... 19
5.10 The menu "Set time" ............................................................................................................................ 19
5.11 The menu "Language" .......................................................................................................................... 20
5.12 The menu "timeout" ............................................................................................................................. 20
5.13 Software Verion .................................................................................................................................. 20
6 DEVICE ADJUSTMENTS BY AN EXTERNAL PC ....................................................... 21
7 ANNEX ........................................................................................................................ 22
7.1 Specification ........................................................................................................................................... 22
7.2 Type designations, supplied items and accessories ................................................................................... 23
7.3 Operation with other RF ID Equipment ................................................................................................... 23
7.4 Reading distance ..................................................................................................................................... 23
7.5 Safety Instruction.................................................................................................................................... 25
7.5.1 Reader ............................................................................................................................................. 25
7.5.2 Safety instructions for rechargeable li-ion batteries ........................................................................... 25
7.6 FCC Information ..................................................................................................................................... 26
7.7 Driver installation for USB devices .......................................................................................................... 27
7.8 Glossary .................................................................................................................................................. 30
7.9 Control Characters used in the "online mode"........................................................................................... 30
7.10 Documentation, References ................................................................................................................. 31
7.11 Notification of changes ........................................................................................................................ 31
7.12 Contacts .............................................................................................................................................. 31
--------------------------------------------------------------------------------3/31--------------------------------------------------------------------------------
Page 4

2001 by AEG Identifikationssysteme GmbH
All rights reserved. All product names are registered trademarks of the corresponding owner.
Microsoft and Windows are registered trademarks of Microsoft Corp.
--------------------------------------------------------------------------------4/31--------------------------------------------------------------------------------
Page 5

1 Introduction
The ARE H5 is a hand held, high performance reader especially designed for animal identification. It
can read the data content of several transponder systems, store these data in its memory and transfer
them into a PC at a later stage.
This multi mode reader is capable to read the following transponder types, according to ISO
11784/11785:
• FDX-B
• HDX
• Destron
• Datamars
• Trovan
• ASK 64bit Manchester coding (e.g. transponder equipped with the EM chip 4102).
The ARE H5 does not synchronize with other HDX readers operating in close vicinity.
Before the initial use of this ARE H5 reader please study this manual carefully. It will explain the different features and modes, in order to make optimum use of all the capabilities of the system.
2 Overview
The present manual is structured in the following way:
chapter 2.1 the control elements are described
chapter 3 contains a short form operating instruction for a quick test
chapter 4 describes in detail the features and operating modes of the ARE H5
chapter 5 the different menus are explained
chapter 6 give the interaction of the ARE H5 with an external data base
chapter 7 technical data, specifications and safety instructions
--------------------------------------------------------------------------------5/31--------------------------------------------------------------------------------
Page 6
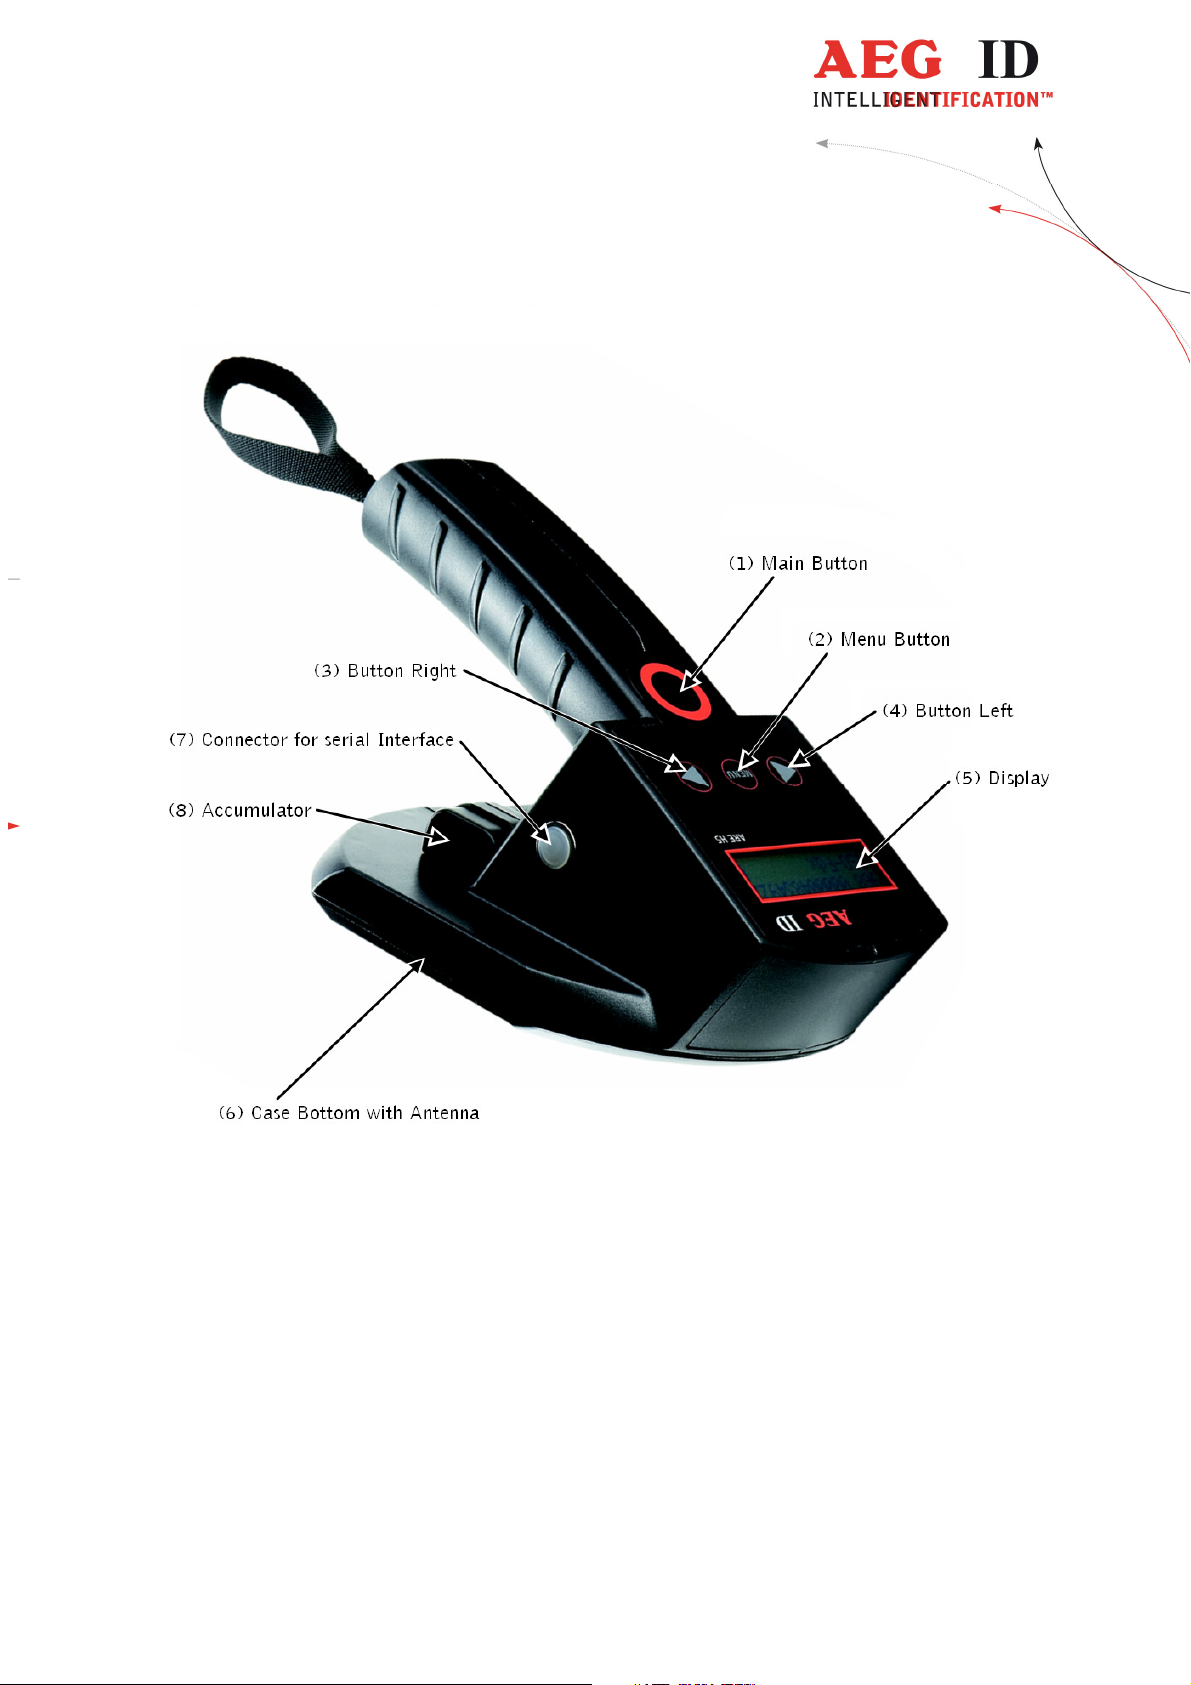
2.1 Control elements
Figure 2-1: location of the operating elements
--------------------------------------------------------------------------------6/31--------------------------------------------------------------------------------
Page 7
3 Short Form Operating Instruction
3.1 Installation of the battery
Slide the battery into its compartment until it clicks ((8) in Figure 2-1). Type of battery: Li-Ion
BP608 (AEG ID Order-NR. 70178).
Caution: Do use batteries Type Li-ion BP 608 only. The reader may be damaged by using batter-
!
!
ies which are not suitable. To charge the battery, remove it carefully from its compartment and
plug it into the appropriate charger.
Respect the dangers and follow the safety instructions about the proper use of rechargeable
lithium-ion batteries.
3.2 Power on / off
The reader is switched on by pressing the main button ((1) in Figure 2-1).
It is now in the Stand-by mode.
It will switch off again automatically, if no other buttons has been pressed within timeout.
3.3 Reading a transponder
• In the Stand-by mode: press the main button.
In the power off mode: press the main button twice.
• Now the reader starts the reading mode. The
display shows: Scanning....
• Approach a transponder with the reader1.
The reader emits a beep when the transponder has been read successfully. The
transponder code is shown on the display.
• If, no transponder has been read within 5 s,
the reader terminates the reading mode and
goes back to stand-by. The display shows: “ --- No Tag --- ”
12
11
1
2
10
9 3
8 4
7 5
6
10s
NoRead
12
11
1
2
10
9 3
8 4
7 5
6
5s
Off
Stand-by
code
read
Read
transponder
Press main button
Press main button
3.4 Database
When a reading had been accomplished successfully - i.e. it had been performed within the given time
frame - the database will be checked whether this transponder code is already stored.
--------------------------------------------------------------------------------7/31--------------------------------------------------------------------------------
1
Typical reading distances are given in chapter 7.1
Page 8

• If the new code is not found in the database, it will be stored as a new record. This record is com-
posed of the code, the transponder type, time and date, as well as an attribute. The attribute may
be selected from the 26 capital letters A to Z.
• If the new code is already stored in the database, it will be stored again only, when the attribute
(see chapter 5.1) differs from that of the old record.
• If the new code is already stored in the database with the very same attribute, no new record will
be stored. In this case the reader emits 2 successive beeps.
--------------------------------------------------------------------------------8/31--------------------------------------------------------------------------------
Page 9

4 Detailed description of the operating modes
4.1 Stand-By mode
Pressing the main button once puts the reader into the stand-by mode. Starting from this mode, it can
be transferred - either into the reading mode - or into the sub menus. These sub menus allow to change
the specific settings of the reader. Furthermore, the result of the last reading or the actual date and
time can be displayed in the stand-by mode. This is achieved by pressing the buttons "arrow left" and
"arrow right".
In order to save battery power, the reader shuts down automatically if no button has been pressed
within 10 s. The automatic shutdown is effective in the "Standard mode" and the "Online mode", however not in the "Database mode".
4.2 Standard mode
The reader is set to the "Standard mode" when it is shipped from the factory. This mode allows reading of different types of transponders and the code is shown in the display. At the same time the code
of each successfully read transponder is stored in the built in memory. This memory may be operated
in two different settings, as described in chapter 4.5 in detail. In the "Standard mode" the reader shuts
down after a certain period automatically, in order to save battery power.
4.3 Start reading
From the Stand-by mode the reading cycle is initiated by pressing the blue main button. After that the
display shows in its upper line the number of data records already stored; in its lower line the status
message: Scanning.... The reader now tries to read a transponder within the next 5s.
The reader emits a beep, as soon as the transponder code has been read. As a result, the code is shown
on the display. If within a time interval of 5s no transponder could be read, the reader switches off the
reading cycle and returns to Stand-by. On the display appears: “ --- No Tag --- ”.
Note: If the battery is low and has not sufficient power the contrast of the display will fail especially
during the scan process. It is recommended to have a second battery in reserve.
4.4 Data storage
In the initial setting -ex works- the reader stores the data records in the following way:
Whenever a transponder code has been read, the entire memory will be checked whether this data record has been stored already. If this is not the case, the record will be added to the database. The reader emits a single beep.
--------------------------------------------------------------------------------9/31--------------------------------------------------------------------------------
Page 10

The record in the database contains the code as well as type of transponder (e.g. FDX, HDX,
Datamars, trovan), time and date of the reading and the so called attribute (see chapter 5.1).
If the newly determined code is already stored in the data base a new record will be generated only if
the attribute is different.
In case code and attribute are already stored in the data base, no new record is generated or stored
and the reader emits 2 successive beeps.
However, in the operating "database mode" (see chapter 5.2.5) the following function can be activated as an alternative:
Each successful reading is stored in the database, including transponder type, time and date, as well
as the attribute. This is independent whether this record has been stored before or not (see chapter 6).
4.5 Built in memory
The built in memory has a capacity of 2047 data records. As an option the memory can be upgraded
for 3967 data records (Option -M).
The stored data will be preserved when the reader is switched off and even when the battery is
changed.
If the memory is full completely, the oldest set of 128 data records will be erased and overwritten by
the new records.
The memory can be cleared completely by applying the menu "clear memory" (see chapter 5.7).
4.6 Display of Accumulator Capacity
The hand held reader has no direct display function for the accumulator capacity. An insufficient accumulator capacity can be recognized by a obvious decreasing contrast of the display. To this point of
time the reading range is reduced to not more then 10% versus a full accumulator.
--------------------------------------------------------------------------------10/31--------------------------------------------------------------------------------
Page 11

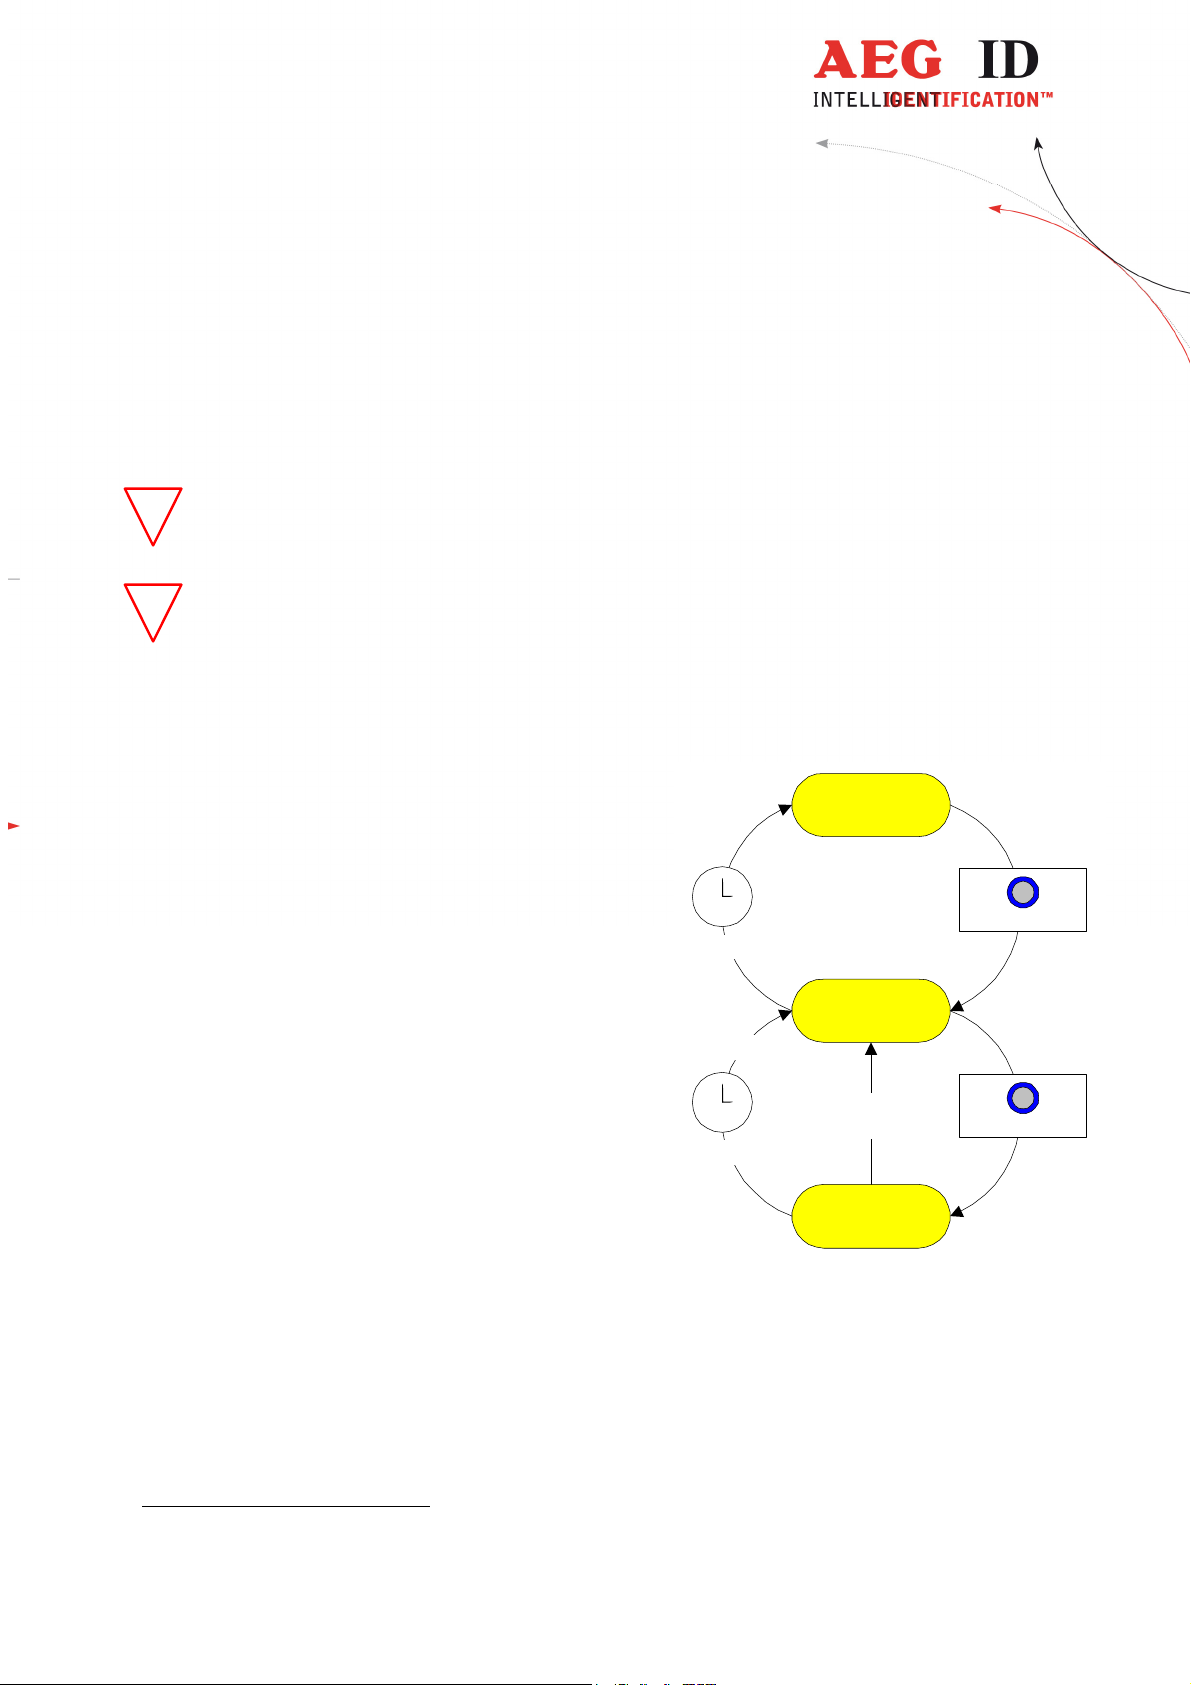
5 Function of the menus
By pressing the menu button during the Stand-by mode
the reader branches into the menus. By further pressing
the menu button the reader goes from menu to menu.
MENU
press Menu
button
This operation is always determined by the following
Stand-By
steps:
1) Select the menu with the menu button: Re-
peated pressing of the Menu button leads to the
submenu
menu requested. Note: The sequence can be followed in forward direction only.
2) Selection within the menu with the arrow button:
The setting within the menu will be adjusted by pressing the buttons "Arrow left" and "Arrow right".
3) Adopt the new setting: The new setting is stored by pressing the main button or alternatively
Leave the menu without changing by pressing the menu button.
The menus appear in the sequence as shown in fig 5-1.
Stand-By Attribute Operating Mode
Language Timeout
Fig 5-1: sequence of the sub menus
Interface
Code FormatDateTime
Softwareversion
Bluetooth Role Bluetooth Partner
Lock UpErase Memory
After adopting a new setting, the reader will resume with Stand-by mode.
--------------------------------------------------------------------------------11/31--------------------------------------------------------------------------------
Page 12

5.1 Menu: "Set Attribute"
The attribute is stored in conjunction with time and date, as well as code and type of the transponder
as a record, whenever a reading has been performed successfully. With the aid of the attribute additional information may be stored, such as: Location where the reading took place, condition of the
identified object, for containers: capacity, warehouse location, customer assignment etc. Ex works,
the default option for the 27 available attributes is set to A to Z (in capital letters) as well as #
(which means no attribute is set).
Attribute
The attribute can be set from A to Z including # by using the sub menu "Set Attribute". The attribute
may be formed out of several words within the frame of 14 characters.
Such an assignment is done in the sub menu "Database Mode" (see chapter 5.2.5 and chapter 6).
#
A
B
Y
Z
--------------------------------------------------------------------------------12/31--------------------------------------------------------------------------------
Page 13

5.2 The menu "Operating Mode"
Using the menu "Operating Mode" it can be switched between the standard mode, 3 online modes and
the database mode.
Operating Mode
Standard
Online
Online H
Read/Transf.
Database/PC
5.2.1 Operating Mode "Online"
"Online" is basically equivalent to the "Standard" mode of the reader. However in "Online" the reading
results are transmitted via the serial interface and not stored in the built in memory. In this way the
data records can be processed in a connected PDA, PC or terminal. The display shows in its upper line
the code, as usual, and in its lower line the word “-- Online –“.
If the reader is in the "Standard mode" you can activate the mode "Online Operation" by using the buttons the following sequence. The first step is to go from "Stand-by" to the menu "Operating mode".
MENU
AttributeStand-By Operating Mode
Important note: Correct function of the operating mode "Online operation" will be achieved on-
!
ly, if the reader is properly connected to a PC or computer terminal. Such connection should be
realized by using the special connection cable (AEG ID Order No 70180).
MENU
Standard
Online
--------------------------------------------------------------------------------13/31--------------------------------------------------------------------------------
Page 14

5.2.2 Transmission format used for the serial interface.
In the ex works configuration the following format is used: After a successful reading, the ID code is
transmitted as ASCII string, complemented by the control character <CR> <LF>2. Type designations
(trovan, Destron, ISO-FDX, ISO-HDX, ...) as well as the message "wrong data format" ( see para
5.8.1 ) will be suppressed. "No Reads" will not be transmitted to the interface.
The "Data>Serial" mode may be adjusted to specific customer requirements by using the database
mode (see chapter 5.2.5). However such a new configuration can be installed only by a PC via the
"Reader Terminal" program.
5.2.3 Terminating the "Data>Serial" mode
The "Data>Serial" can be closed by pressing the buttons in the following sequence:
MENU
AttributeStand-By Operating Mode
5.2.4 Online H, Read/Transf.
Alike operating mode “Online” in “Online H” and “Read/Transf.” the transponder code is sent via the
data interface.
If a transponder is read successfully in “Online H” (H like handshake) a “empty” telegram is sent
first: <STX> <ETX>. To secure reception of the data the reader expects the answer <STX> <ACK>
<ETX>. Until the recipient is sending this acknowledgement the reader shows the text “ wait for
host ”. As soon as the empty telegram is acknowledged, the transponder data is sent. They are
framed with <STX> and <ETX> not ended with <CR> <NL>. As answer to this data telegram a further <STX> <ACK> <ETX> is expected. If no communication partner is active that is supporting this
protocol the reader is trying to establish a connection until this is aborted by pressing both arrow buttons. The “Reader Terminal” program is supporting this protocol in its online view.
MENU
Online
Standard
With “Read/Transf.” (read and transfer separately) at first the reader shows the text “Function=Read”. Reading the transponder is the first action when the main button is pressed. If reading
was successful the text changes to “Function=TxCode”. If now the main button is pressed a second
time the transponder data is sent. Format is the same as in online mode.
2
A complete list of all control characters is given in the appendix.
--------------------------------------------------------------------------------14/31--------------------------------------------------------------------------------
Page 15

5.2.5 The database mode
The operating mode "Database/PC" is not an operating mode intended for reading transponders, but it
is dedicated to the communication between the reader and a computer.
In the database Mode the content of the database in the reader may be transferred to the PC and back
again. This allows to process the data records in the PC, as well as to add further information such as
text, for example.
These operations will be performed in an easy way by using the "Reader Terminal" program (for Windows operation systems). It was developed by AEG ID to show the user the range of capabilities provided by the database mode. All the steps necessary to set up communication between the ARE H5
handheld reader and a PC are presented in an "interactive" way. The "Reader Terminal" program allows a simple visualization of the data records, stored in the reader, and how they can be modified.
Furthermore it allows to change the setting of certain parameter (see also chapter 6).
The database mode is reached in the menu "Operating mode". Starting from "Stand-by" the buttons
have to be pressed in the following sequence:
!
!
MENU
MENU
AttributeStand-By Operating Mode
Standard
Online
Online H
Read/Transf.
Database/PC
Important note: Correct function of the operating modes "Database/PC" or "Data->Serial" will
be achieved only, if the reader is connected properly to a computer. Such connection may be
realized either by using the special connection cable or via Bluetooth or Infrared link. Make
sure that the terminal is set for the specified data format (see ARE H5 Specifications in chapter 7.1 and 7.9 ), especially if it is intended to use with individually made application software.
The ARE H5 handheld reader does not switch off automatically, when it is used in the database
mode. The user has to take care that the reader is set back to standard mode or online operation after he has completed the configuration changes; otherwise the batteries may be discharged in a destructive way.
Normally the database mode is terminated from the PC. As an alternative it can be terminated by
simultaneously pressing the buttons "arrow right" and "arrow left".
The specification of the transfer protocol used in the database mode is given in chapter 0 as reference
[1]. It is intended for those users, who will generate their own specific application software.
--------------------------------------------------------------------------------15/31--------------------------------------------------------------------------------
Page 16

5.3 Interface
With the menu point “Interface” the hardware can be chosen the data is sent with in online or database mode. Depending of the configuration of the reader the cable interface RS232 or USB and the
radio interface Bluetooth can be chosen.
5.4 Change Bluetooth Role
Interface
USB/RS232
Bluetooth
In Bluetooth communication, there are two possibilities for connection establishment:
• Master; the communication is established by the reader; connection is closed by the ARE H5 be-
fore it is switched off.
• Slave; the communication is established by the Bluetooth partner (PC, PDA, …); before the
reader is switched off it transmits <STX>DISCONNECT<ETX> to give the partner the possibility to close connection.
In the menu Bluetooth Role this can be changed.
5.5 Change Bluetooth Partner
In the menu Bluetooth Partner, in the first step, there is shown the actual Bluetooth Partner.
Bluetooth Role
Slave
Master
The choice of a new Bluetooth Partner can be started with the “arrow left” button. If the text “scanning” is shown the main button starts a scan of maximal five Bluetooth modules that can be reached
by the ARE H5. The name of the found, potential partners, are shown in the menu. With the Arrow
Buttons, the favored Partner can be chosen.
--------------------------------------------------------------------------------16/31--------------------------------------------------------------------------------
Page 17

Bluetooth Partner
scan
Partner1
Partner2
If the Main Button is pressed again the ARE H5 is pairing with the chosen module. Depending on the
partner module, there has to be verified the connection code “0000” (4 x zero). If pairing was successful the chosen module is the new Bluetooth partner.
5.6 The menu "Lock Up Reader"
Whenever the main button is pressed, the reader goes into "Stand-by". If, within the next 10s, the
main button is pressed again, the reader starts a reading process. This process is responsible for the
main power consumption. In order to avoid unintended triggering of the reading process, a switch on
protection may be activated. This is achieved by pressing the buttons in the following sequence:
Partner5
Lock Up Reader
unlocked
locked
MENU MENU MENU MENU
AttributeStand-By Operation Mode Lock Up Reader
unlocked
locked
Off
When the switch on protection is activated, pressing the main button brings nevertheless the reader into "Stand-by". However, it is not possible to branch from there into the reading process or into the
menus, as long as the switch on protection is activated.
The switch on protection is cancelled in the following way:
Press the buttons "arrow left" and "arrow right" simultaneously within the first 3s after the "Stand-by"
mode has been activated. After that the reader acts as usual in "Stand-by".
--------------------------------------------------------------------------------17/31--------------------------------------------------------------------------------
Page 18

5.7 The menu "Clear memory"
This menu is used to erase all the data records from the internal memory. For safety reasons this function is activated only, when the buttons "arrow left" and "arrow right" are pressed simultaneously.
5.8 The menu "Code format" to adjust for the ISO-data format.
The ISO 11784/11785 Standard specifies the data telegram and the animal code for FDX-B and HDX
transponders. The data telegram contains 128 bit, including header, identification code, checksum and
trailer. The identification code itself contains 64 bit, out of these 38 bit are defined as ID number
(National identification code for the animal) and 10 bit as country code or manufacturer code.
This standard defines two fields of application. They both make use of the 38 bit ID number:
• ISO 11784 animal
• ISO 11784 non-animal
Regionally there are further applications that make use of the ISO standard - as an example waste
management in Germany. There, within the 64 bit of the code, 22 bit are assigned to the number of
the container and 10 bit to the manufacturer code. This is called BDE3 format
5.8.1 Formats available for representation of the code
Set Code Format
Hexadecimal
ISO Animal
ISO Industry
BDE Format
TRUTEST
There is one common format, that represents the ID code of any application in an unambiguous way:
the hexadecimal format. The 64 user bits are represented as 16 hex characters.
In the four other formats only a sub set of the 64 user bits is represented: e.g. the manufacturer code
(10bit) and the unique animal number (38 bit ID code). These codes are shown in the decimal number
format 4.
Note: only those transponders will be presented, which the format has been selected for in the menu
"Set Code Format". For example: if the format is set for "ISO Animal" only those transponders will be
presented, where the animal flag is set.
Remark: In the database the ISO transponder are generally stored in hex format.
3
BDE stands for Bundesverband der Deutschen Entsorgungswirtschaft e.V.
4
this format is also called fragmented representation.
--------------------------------------------------------------------------------18/31--------------------------------------------------------------------------------
Page 19

5.9 The menu "Set Date"
Set Date
The correct date can be set in the menu "Set Date". This is achieved by the following procedure:
1) Select menu "Set Date" by pressing the menu button.
2) Enter sub menu: by pressing the main button once.
3) Set year: by pressing the buttons "arrow left" and "arrow right" correspondingly.
4) Confirm year: by pressing the main button once. At the same time the sub menu switches to the
next level: month.
5) Continue the procedure for month and day.
Note: Date and time may be set in the mode "Database/PC" in a more comfortable way, by using a PC
and the "Reader Terminal" program. See also chapter 6.
5.10 The menu "Set time"
Year Month Day
Hour Minute Second
Set Time
The time of the reader system is set in a corresponding way. This is done in the menu "Set Date" and
the steps are the same as in the set date procedure.
1) Select menu "Set Time" by pressing the menu button.
2) Enter sub menu: by pressing the main button once.
3) Set hour: by pressing the buttons "arrow left" and "arrow right" correspondingly.
4) Confirm hour: by pressing the main button once. At the same time the sub menu switches to the
next level: minute.
5) Continue the procedure for minute and second.
Note: Date and time may be set in the mode "Database" in a more comfortable way, by using a PC and
the "Reader Terminal" program. See also chapter 6.
--------------------------------------------------------------------------------19/31--------------------------------------------------------------------------------
Page 20

5.11 The menu "Language"
With aid of the Menu "Language" the text shown on the display may be switched between English and
German.
5.12 The menu "timeout"
Language
deutsch
english
In the menu timeout the, the time can be adjusted, the reader stays switched on, when no user interaction occurs. The parameter is accessible in the menu since Software Version 6.35. The adjustable
range is between 1 and 30 seconds. It can be set to bigger values in the database mode with the
“Reader Terminal” program.
Attention: a high timeout value reduces accumulator run-time.
!
5.13 Software Verion
In the last menu point the software version of the reader is displayed.
timeout
1
2
30
--------------------------------------------------------------------------------20/31--------------------------------------------------------------------------------
Page 21

6 Device adjustments by an external PC
In Database Mode (see chapter 5.2.5) all parameters of the reader are accessible. The parameters
from the menu and further parameters which can only be changed with the PC:
Interface selection - suppress Bluetooth interface in the menu
Database memory capacity
Multiple data sets - Save the same transponder number in the data base
Type output - Output the transponder type in front of the transponder code
Noread output
Show bad frame - Output wrong transponder format
Buzzer
Time output - Output time-stamp in front of the transponder code
Algorithms - Enable or disable every single algorithm
Timeout Read - Number of reading attempts
For further information, read „Data exchange Protocol for the ARE H5“ and „Operating instruction
for the Reader Terminal program“.
--------------------------------------------------------------------------------21/31--------------------------------------------------------------------------------
Page 22

Immunity against electric fields
IEC 61000
-4-3
10V/m
Electrostatic discharge on surface
IEC 61000
-4-2 ±4kV
Electrostatic discharge in air
IEC 61000
-4-2 ±8kV
Spurious emissions
EN 55022
Class B (living area)
ETS 300 683
Class 1
7 Annex
7.1 Specification
Dimensions 226mm x 140mm x 122mm (L x W x H)
Power supply 7,2 V DC provided by Li-Ion battery Type BP 608
Frequency 134,20 kHz
Antenna disc antenna incorporated in the housing
Type of readable transponder - FDX-B
- HDX
- Destron
- Datamars
- Trovan
- in addition transponder with ASK 64bit
Manchester coding ( e.g. Chip 4102 by EM)
Reading distance
(observe remarks on
test conditions given in
chapter 7.4 !)
Galvanic interface serial, half duplex, asynchronous, 19200baud, 8N1
Temperature range storage: -20°C to +70°C
Protection class IP54
Mass 475g
Permits CE Conformity declaration, ETS 300330
Electromagnetic Compatibility
Typical reading distance ranges for FDX ear tags of 30mm
diameter to about 25 cm; for FDX implantable transponder of
2,2mm diameter to about 15 cm.
HDX type transponder of the same dimensions yield about
20% more reading distance.
These values are valid only, if there is no electromagnetic interference.
RS232 or USB
operation: 0°C to +50°C
Other technical standards ETS 300330
--------------------------------------------------------------------------------22/31--------------------------------------------------------------------------------
Class 1
Page 23

Type
Description / Supplied I
tems Order Number
/B
with Bluetooth 2.0 class 2
B
attery
Li-
Ion battery 7,2V / 800mAh ( BP 608 )
70178
Charger national
Charger
for Li
-
Ion battery 7,2V
70179
Charge
r international
International charger for Li
-
Ion battery 7,2V
1001753
RS232 connection cable
RS232 connection cable to the computer
70180
USB connection cable
USB connection cable to the computer
1003392
Extension stick
1m extension stick to handle with
remote trigger
70228
tension stick
with remote trigger
7.2 Type designations, supplied items and accessories
ARE H5 – ISO /<Options>
Options:
/K
/E
/i
/N
/S
/D
/U
External antenna with ex-
Hand held ISO Reader with LCD display 2 x 16
characters, serial interface, memory for 2047 data
records, hand strap, rechargeable battery, charger
and connection cable
in aluminium case
in styrofoam package
with international charger with several adapters
with national charger
with extension stick
with external antenna with extension stick
with USB 2.0
1m extension stick with integrated antenna to handle
7.3 Operation with other RF ID Equipment
1002702
Note: As there may be electromagnetic interference between different readers, this reader shall
!
not be operated within a distance of 3m from any other HDX reader.
7.4 Reading distance
Typically the reading distance5 - measured between the handheld reader and a transponder - ranges
from 10 to 40 cm, depending on a number of criteria such as:
Position of the transponder relative to the reader:
To measure the reading distance the transponder has to be placed under the center of the antenna dish
(see figure below).
--------------------------------------------------------------------------------23/31--------------------------------------------------------------------------------
5
See also Specification in para 7.1
Page 24

flat transponders like disk or card rod-shaped transponders (i. e. in glas)
• Inclination between antenna and transponder:
The maximum reading distance is achieved for (see figure above):
- disc type transponder, if they are in parallel to the antenna dish
- glass (ferrite) transponder, if they are perpendicular to the antenna dish.
• Size and type of transponder
Generally speaking: The bigger the transponder, the larger the reading distance.
• Environment such as temperature, electromagnetic interference, metal:
The reader has to be operated within the specified temperature range. The best results are obtained in an undisturbed environment. Direct vicinity of metal may reduce the reading distance
considerably. Electromagnetic interference (caused by e.g. PC monitors, frequency controlled motors, generators for electric wire fences or other RFID reader) may also reduce the reading distance considerably.
• Other ISO readers:
Because of mutual interaction especially while using HDX-transponders, the hand held reader
should not operate with other ISO readers in the same 4m radius.
• Feedbacks:
To reach a maximal reading range, the ARE H5 uses a high sensitive multi channel amplifier. If
there is no transponder in the antenna field, following feedbacks are possible:
The fast clocked signal processor sends tiny disturb signals that inject into the amplifier. This way
a filter output can be produced, that is according to the signal of a transponder. Normally the in
the transponder code integrated error detection avoids, that such a signal is regarded as a valid
transponder code. Only with the datamars tansponder type in some rare case this way random
codes were generated. These codes stand out with cyclic number groups like EBEBEBEBEBEB or
00ABAB00ABAB.
If no datamars transponders are used in one application, we recommend to mask out the datamars
algorithm to avoid reading random codes. This can be done in the database operation mode. See
chapter 6.
--------------------------------------------------------------------------------24/31--------------------------------------------------------------------------------
Page 25

7.5 Safety Instruction
7.5.1 Reader
The manufacturer can not be held liable for damages caused by improper use or abuse, lack of reasonable care, or manipulations contrary to the recommendations given in this manual.
!
Do not open the reader! There are several spots inside the device, where high voltage is generated during the scanning process.
The ARE H5 Reader does not contain any parts to be repaired by the user. Any attempt to open the
reader may damage the device. Therefor it may be repaired only by authorized personal.
Environmental conditions, as given in chapter 7.1 specification, have to be observed during storage
and operation.
Protect the RS232 or USB interface socket as well as the contacts for the battery against dirt, moisture and dust.
For cleaning of the reader and cable use a moistened towel. Apply only water and household detergents; never use chemical solvents like e.g. acetone.
Do not submerge the reader in water.
7.5.2 Safety instructions for rechargeable li-ion batteries
Danger:
Rechargeable li-ion batteries can explode or catch fire if used improperly. The ingredients of the li-ion batteries can be dangerous to health.
Proper use:
To use the li-ion batteries safely please consider the following points:
- Do not expose to high temperatures, flames or acid fluids
- Do not short circuit
- Do not open, puncture or crush
- Remove rings, watches or objects with metal parts when you handle rechargeable li-ion batteries
(high short-circuit current can cause severe burns)
- Keep dry
- Do not use defect, deformed, or bloated rechargeable li-ion batteries
- Only use approved battery charger
- Rechargeable li-ion batteries have a higher voltage than normal AA batteries. Use rechargeable li-
ion batteries only in approved devices, unapproved devices can be damaged.
--------------------------------------------------------------------------------25/31--------------------------------------------------------------------------------
Page 26

7.6 FCC Information
Federal Communications Commissions (FCC) Statement
15.21
You are cautioned that changes or modifications not expressly approved by the part responsible for
compliance could void the user’s authority to operate the equipment.
15.105(b)
This equipment has been tested and found to comply with the limits for a Class B digital device, pursuant to part 15 of the FCC rules. These limits are designed to provide reasonable protection against
harmful interference in a residential installation. This equipment generates, uses and can radiate radio
frequency energy and, if not installed and used in accordance with the instructions, may cause harmful
interference to radio communications. However, there is no guarantee that interference will not occur
in a particular installation. If this equipment does cause harmful interference to radio or television reception, which can be determined by turning the equipment off and on, the user is encouraged to try to
correct the interference by one or more of the following measures:
- Reorient or relocate the receiving antenna.
- Increase the separation between the equipment and receiver.
- Connect the equipment into an outlet on a circuit different from that to which the receiver is connected.
- Consult the dealer or an experienced radio/TV technician for help.
--------------------------------------------------------------------------------26/31--------------------------------------------------------------------------------
Page 27

7.7 Driver installation for USB devices
In order to use the database or the online mode of the reader in connection with the PC, a driver has
to be installed on the PC to provide it a serial interface (COM port).
Therefore the ARE H5 has to be connected to the PC with the USB cable included.
Open the device manager of the PC by typing “devmgmt.msc” to the Windows command line and start
it with a mouse klick to the program or a carriage return.
If the driver is not installed jet, the ARE H5 occurs as “AEG ID HID Keyboard Emulation” with an
exclamation mark in “Other devices” at first.
--------------------------------------------------------------------------------27/31--------------------------------------------------------------------------------
Page 28

With a click of the right mouse button to the device and with the selection “Update Driver Soft-
ware…” the following dialog is opened:
Select “Browse my computer for driver software”.
Insert the with the ARE H5 included CD in your PC drive and select the path
<CD drive>:\ARE H5-CD\AEG ID Communication Port Driver\inf
Acknowledge the dialog with the “Next” button.
--------------------------------------------------------------------------------28/31--------------------------------------------------------------------------------
Page 29

When the driver installation has finished the PC has a new COM port available to communicate with
the reader.
--------------------------------------------------------------------------------29/31--------------------------------------------------------------------------------
Page 30

<CR>
13 0D
carriage return
<LF>
10 0A
line feed
<STX>
02 02
Start Text
<ACK>
06 06
Ackno
wledgement
<ETX>
03 03
End Text
7.8 Glossary
The terms, definitions and abbreviations, used in this Operating Instruction are explained in brief:
- ASCII-character
American Standard Code of Information Interchange.
A standardized code
that assigns a certain character (letter, figure, control character) unambiguously to each binary number. The 256 characters, which can be presented on
a monitor screen or a printer, are defined in the CCITT Code table NR. 5.
For example, the question mark ? corresponds to the hexadecimal value 3F.
- Hex character hex = hexadecimal; Representation of numbers on the basis 16. Instead of
using binary 0 and 1 (Basis2) , four binary bits are combined and represented by one character 0 to 9 and A to F ( 10 to 15 ).
- ID unambiguous number for identification of a transponder.
- Ident code = ID
- ISO-FDX-transponder transponder characterized by ISO-Standard 11784/11785 , using the "full
duplex" method
- ISO-HDX-transponder transponder characterized by ISO-Standard 11784/11785 , using the "half
duplex" method
- PC Personal Computer
- Transponder mobile data storage unit used for identification of animals or items. These
storage units operate without a separate power supply (battery); they are
energized from the reading device by magnetic coupling.
- Transponder code = ID
7.9 Control Characters used in the "online mode"
character value
decimal
--------------------------------------------------------------------------------30/31--------------------------------------------------------------------------------
value
hex
function
Page 31

7.10 Documentation, References
[1]: “Data exchange Protocol for the ARE H5” describes all available commands, parameters,
format of the transmission protocol, error codes and control characters, which are used in the
"Database mode" of the ARE H5.
[2]: “Operating instruction for the Reader Terminal program” describes the connection estab-
lishment of the ARE H5 with the PC, data transmission of actually read transponder codes,
up- and download of reader database and configuration of the ARE H5 with the PC.
7.11 Notification of changes
Date Description of Change Version Author
23.04.01 First edition 01
21.01.04 Change of Protection Class 03
12.02.07 Alignm ent with german edition 06 06
12.02.07 Format, IP protection class 07
27.09.10 Format, Reader Terminal instead of PC-Link 08
06.10.10 Replaced residual “PC-Link” with “Reader Terminal” 09
02.09.11
21.09.11 Battery operating time removed, mass value 11
14.11.14 New menu navigation since V2.20003 and V2.2000B 12
18.12.15 Safety instructions for rechargeable li-ion batteries 13
15.03.15 USB driver installation 14 MK
18.05.16 FCC Information 15 MK
21.06.16 FCC Information correction 16 MK
Serial instead of RS232, No Tag text, remove IRDA, “Type designations, supplied
items and accessories” table changes
7.12 Contacts
To improve our products, as well as its documentation is our permanent effort.
For any questions, feedback or comments please call:
10
Tel.: ++49 (0)731-140088-0
Fax: ++49 (0)731-140088-9000
e-mail: sales@aegid.de
http:\ www.aegid.de
--------------------------------------------------------------------------------31/31--------------------------------------------------------------------------------
 Loading...