

Page 1
Z 290
Instruction book .........................4
g
Mode d’emploi ...........................7
f
Gebruiksaanwijzing ..................10
l
Brugsanvisning.........................13
k
PAGE
Bruksanvisning......................... 16
s
Bruksanvisning......................... 19
n
Käyttöohje ................................ 21
q
Инструкцию по эксплуатации
u
.. 24
Page 2
2
Page 3

3
Page 4

g
Dear customer,
g
Please read these operating instructions through carefully. Above all
please follow the safety instructions on
the first few pages of these operating
instructions! Please keep the operating
instructions for future reference. If
applicable pass these instructions on to
the next owner of the appliance.
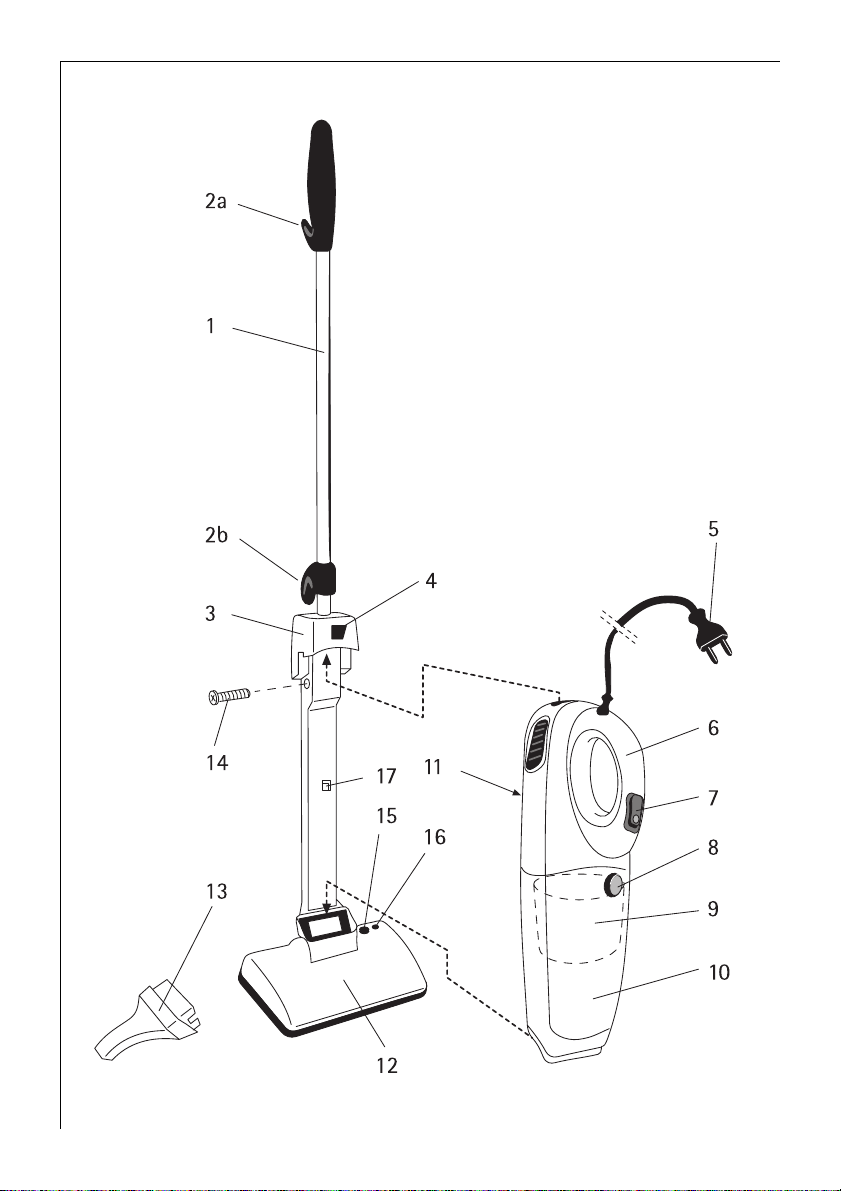
Description of the appliance
(fig. 1)
1 Handle with grip
2 Cable hook
3 Floor unit
4 Release button for handunit
5 Plug
6 Handunit
7 Start/stop button
8 Release button for dustcontainer
9 Filter
10 Dustcontainer
11 Data plate
12 Nozzle
13 Nozzle attachment
14 Screw for the stick
15 Operation lamp (brush)
16 Reset button (brush)
17 Connection contacts
1 Safety instructions
• Never pull, carry or hang up the
vacuum cleaner by the cord.
• Make sure the voltage corresponds ain
supply, see the data plate (11).
• Always unplug before cleaning and
maintaining the appliance.
• Never remove the mains plug from the
socket by pulling on the cable.
• Make sure the dust filter is properly in
place before using the vacuum cleaner.
• Keep the mains cable away from
sources of heat, oil, sharp edges and
rough surfaces.
• Do not use your vacuum cleaner on
wet surfaces or surfaces where
flammable solvents have been used,
until these have been allowed to dry
out completely.
• Do not vacuum up hot ash, matches or
cigarette ends.
• Never use the appliance with wet
hands or feet, or bare foot.
• Always store the appliance in a dry
place, away from sources of heat and
water.
• People and animals must not be vacuumed with appliance.
• Keep children away from the appliance.
• Do not use the appliance if:
– the mains lead is damaged,
– the housing shows visible signs of
damage.
• Avoid running over the mains lead
with the appliance. The insulation
could be damaged.
If the supply cord is damaged, it
1
must be replaced by the manufacturer or its service agent or a similarly
qualified person in order to aviod a
hazard.
• Repairs to electrical appliances may
only be performed by qualified service
engineers. Improper repairs may lead to
serious hazards for the user.
• When ordering spare parts please state
product number and type designation.
See the data plate (11). Always use original spare parts.
• In the event of failure of the product
please contact your local service office.
• We decline all responsibility for all
damages arising from any improper use
of the appliance or in cases of tampering with the appliance.
This appliance complies with the follo-
;
wing EC directives:
• 73/23/EEC of 19/2/1973 „Low
voltage directive", including the
Modification directive 93/68/EEC.
• 89/336/EEC of 3/5/1989 „EMC direc-
tive", including the Modification
directive 92/31/EEC
4
Page 5

g
Technical data
Power: 150 W
Suction Power: 25 W
Fitting and storing
The handle with the grip and the cable
hook (2b) are fitted to the handle as
shown in the figure on page 2.
Fit the stick to the vacuum cleaner and
fix it on tightly using the enclosed
screw (14).
After use, wind the cable around the
hooks on the stick as illustrated in
fig. 1. The vacuum cleaner is best
stored leaning against or hung up on a
wall, in a cupboard or similar. In the
upper hook on the handle is a hole in
which the cleaner can easily be hung
up (see fig. 2).
Use
Use the handheld appliance in the
floor unit for cleaning carpets or floors
(see Figure 3).
When cleaning furniture, tables or car
seats, detach and use the handunit
only (see fig. 4).
Note! The brush is fitted with automatic motor protection which trips if
the rotating brush becomes blocked.
This is shown by the operation lamp
(15) on the nozzle going out.
The problem can be remedied by:
0 turning off vacuum cleaner and
0 remove whatever is blocking the brush
and
0 then press the reset button (16) on the
nozzle.
The vacuum cleaner is then ready to be
used again.
Cleaning and care (fig. 4 and 5)
0 Important! Make sure the equipment
is unplugged. Always turn the vacuum
cleaner off before attempting to clean
it.
Cleaning the dustfilter
0 To remove the dust container, first
remove the hand-held appliance
(Figure 4), press button (8), then rotate
the container downwards.
0 Remove the dust filter from the dust-
container.
0 Empty the dustcontainer.
0 Brush away dirt and dust from the fil-
ter.
Hint: You can use your ordinary
vacuum cleaner to clean the filter. If
necessary, wash the filter in lukewarm
soapy water, rinsing throughly afterwards. Make sure the filter is completely dry before fitting it in the
dustcontainer.
0 Put the filter back into the dustcontai-
ner and snap it back into position.
Cleaning the brush
The rotating brush can be cleaned by
using a knife or pair of scissors to
remove any threads or similar, which
have become trapped round the brush
roller (see fig. 6). Caution: Take care
not hurt yourself!
2 Disposal
Dispose of the packaging!
Dispose of the packaging material of
your appliance correctly. All packaging
materials are environmentally friendly
and can be disposed of without any
danger or burnt in the refuse incinerator. The boxes are made from recycled
paper and should be returned to the
old paper collection.
Dispose of your old appliance!
When you eventually stop using your
appliance please bring it to the nearest
recycling centre or to your dealer who
will take it back for a small fee.
5
Page 6

g
Customer service
Our appliances comply with the highest quality standards. If nevertheless a
problem should arise for which you can
find no solution in the operating
instructions, please contact your dealer
or the Electrolux customer services
dept.
Australia:
VOLTA (Aust) Pty. Ltd 835
635 Waverley Road
Glen Waverley
Victoria 3150
England:
Electrolux Guarantee Dept.
Leicester House
17 Leicester Street
Bedworth
Nuneaton
Warwickshire CV 12 8JP
6
 Loading...