

Page 1
Mighty Mite
Household Type
Vacuum Cleaner
Owner’s Guide
IMPORTANT
For any advice and
to order dust bags,
filters and
accessories
on your cleaner ,
please telephone
Customer Care
08706 055055
INDEX
Important Safeguards .............................. 2
Service Information .................................. 4
Automatic Motor Shut-Off......................... 4
Use........................................................... 5
Accessories........................................... 6-7
Maintaining............................................... 8
Dust Bag ............................................... 8-9
HEPA Filter............................................... 9
Problem Solving ..................................... 10
Guarantee ...............................................11
www.electrolux.com
Page 2

IMPORTANT USER INFORMATION
IT IS MOST IMPORTANT THAT THIS INSTRUCTION BOOK SHOULD BE RETAINED WITH THE APPLIANCE
FOR FUTURE REFERENCE. SHOULD THE APPLIANCE BE SOLD OR TRANSFERRED TO ANOTHER
OWNER, OR SHOULD YOU MOVE HOUSE AND LEAVE THE APPLIANCE, ALWAYS ENSURE THAT
THE BOOK IS SUPPLIED WITH THE APPLIANCE IN ORDER THAT THE NEW OWNER CAN BE ACQUAINTED
WITH THE FUNCTIONING OF THE APPLIANCE AND THE RELEVANT WARNINGS.
THESE WARNINGS ARE PROVIDED IN THE INTEREST OF SAFETY. YOU MUST READ THEM
CAREFULLY BEFORE INSTALLING OR USING THE APPLIANCE.
• This appliance is designed to be operated by adults. Children should not be allowed to tamper with the
controls or play with the product.
• It is dangerous to alter the specifications or modify the product in any way.
• Always store your vacuum cleaner in a dry place away from damp atmosphere and do not use it to pick
up water or other liquids.
• Do not use the appliance in the presence of flammable gasses.
• Never allow anyone to have access to the rotating brush of the appliance (if fitted) unless the appliance
is disconnected from the mains supply.
• Never leave the appliance running unattended.
• Remove the plug from the wall socket before attempting any form of user maintenance specified in the user
instruction booklet.
• Do not carry or drag your vacuum cleaner by the mains supply cable.
• Do not tug at the mains supply cable to remove the plug from the wall socket.
• Ensure the mains supply cable is kept well away from the rotating brushes (where fitted) of your appliance
whilst in operation.
• Keep the mains supply cable away from heat, oil, sharp edges and rough surfaces. Always ensure that the
cable is not damaged in any way.
• Never pick up hot cinders or lighted cigarette ends.
• Extreme care is required when cleaning stair carpets with your appliance. Ensure that your cleaner is in
a stable position at the bottom of the stairs, and take care not to stretch the hose beyond its actual length.
Always ensure when using your cleaner on the stair treads that you keep one hand firmly on the appliance.
• Dust bags and filters should be changed at regular intervals as stated in your instruction booklet.
• Always use genuine Electrolux dust bags.
• Do not place the air freshener loose inside the dust bag compartment.
• Do not use the appliance without a dust bag or with the dust cover removed.
• When fitting and changing the accessories always follow the instructions in the instruction booklet.
• Under no circumstances should you attempt to repair the appliance yourself. Repairs undertaken by
unauthorised or inexperienced persons may cause injury and/or serious malfunctioning.
• This appliance should be serviced by authorised Electrolux personnel and only genuine Electrolux spare
parts should be used.
• The supply cable fitted to your machine is of two core construction. Where a moulded-on plug is not fitted
the leads at the end of the cable are not prepared for a specific type of plug.
As a general guide to fitting any plug
• Ensure the lengths of wire inside the plug are prepared correctly.
• Connections should be firmly made after all conductor strands are entered into the terminal posts.
• When preparing the cable ends take care not to damage the outer sheath, or the insulation surrounding
the inner conductors.
• Tighten all screws.
• Replace the top cover of the plug and secure.
Extension Cable
• If using an extension cable at any time always ensure that the insulation sheath is in good condition and
is not damaged in any way.
• Make sure that the socket is fitted to the extension cable correctly, if in doubt have it checked by a Qualified
electrician.
Double Insulation
• Your vacuum cleaner is double insulated. This means that all external parts are electrically insulated
from the mains. This is done by placing insulation barriers between the electrical and mechanical
2
components, making it unnecessary for the cleaner to be earthed.
Page 3
BEFORE YOU START
CHECK THE VOLTAGE
First check the voltage shown on the data plate (see rear view) to make sure that the cleaner is of the correct
voltage for your electricity supply. If it is not, do not use the cleaner but refer back to your dealer.
CONNECTING TO YOUR ELECTRICITY SUPPLY
Permanently connected to the cleaner is a mains supply (2-core) cable fitted with a non-rewirable plug incorporating
a 13A fuse.
In the event of the fuse requiring replacement the fuse cover should be removed using a small screwdriver. The old
fuse MUST be replaced by a 13A ASTA approved BS1362 fuse or a BSI approved fuse. The cover must be replaced
before the plug is used again. In the event of loss of the fuse cover, replacements can be obtained from your Electrolux
dealer or Electrical Retailers and must be of the same colour as indicated by the coloured insert on the base of the plug.
If difficulty is experienced in obtaining a replacement, contact Electrolux on 08706 055055.
In no circumstances must the plug be used without a correct fuse cover fitted.
If the plug that is fitted to your appliance is not suitable for your socket outlet, it must be cut off and the appropriate
plug fitted.
Remove the fuse from the cut off plug.
The cut off plug should then be disposed of to prevent the hazard of shocks in case it should be plugged into a 13
amp socket in another part of your home.
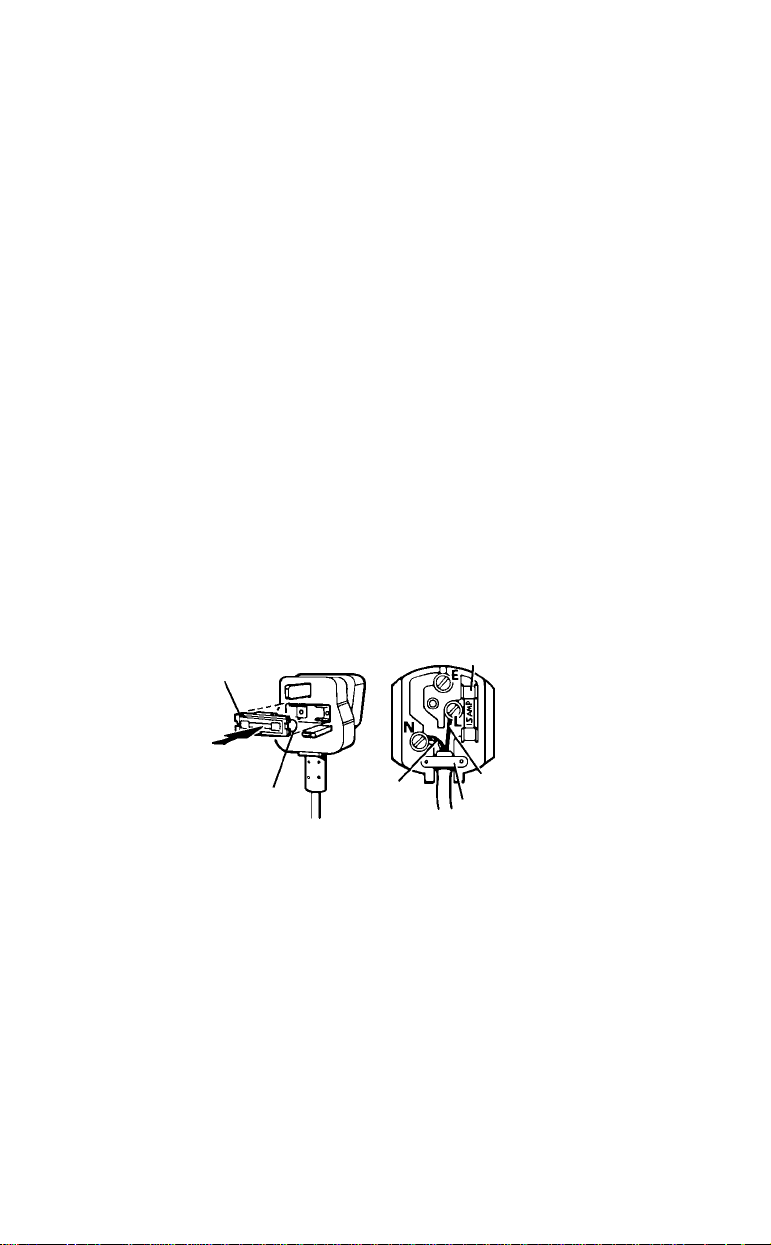
The wires in the mains cable of this appliance are coloured in accordance with the following code: Blue: Neutral.
Brown: Live.
As the colours of the wires in the mains cable of this appliance may not correspond with the coloured markings
identifying the terminals in your plug, proceed as follows:
The wire which is coloured blue must be connected to the terminal which is marked with the letter N or coloured black.
The wire which is coloured brown must be connected to the terminal which is marked with the letter L or coloured
red.
If using a three-pin plug, do not make any connection to the terminal marked with the letter E or by the earth symbol
or coloured green or green-and-yellow. This cleaner is double insulated and no earth connection is necessary.
It is in your interest to ensure that the plug is correctly attached to the mains cable. In case of doubt, have it done
by a qualified electrician, as Electrolux cannot regard the repair of faults on the plug connection as a service that
can be given free of charge under the terms of the guarantee.
Fuse Cover
13 Amp Fuse
Fuse
Blue
WARNING
If the cleaning head has accidentally passed over the mains supply cable the following action should be taken:
1. Switch off and remove the plug from the socket outlet.
2. Examine the mains supply cable for damage (only after removing the plug from the socket outlet).
3. If there is any sign of damage to the supply cable it MUST be renewed. The repair MUST be carried out by Electrolux
Service Staff or a similar qualified person.
4. NEVER use the machine with a damaged mains supply cable.
Proprietary carpet conditioning and air freshening materials
After using proprietary carpet conditioning powders, it is recommended that the dust bag be changed. Some of
these preparations contain substances which if left in the vacuum cleaner for extended periods could damage the
plastic mouldings which form the structure of the cleaner.
Many air fresheners, household deodorants, sprays and polishes contain a highly flammable gas propellant.
Because of this, it is particularly important that these products are used strictly in accordance with the relevant
manufacturer’s instructions.
It is essential that none of the above products are sprayed directly into the vacuum cleaner or any of its filters, hose
assembly, or dustbag chamber.
Brown
Cord Clamp
3
Page 4

SERVICE
Should you require service on your Electrolux cleaner, please telephone 08706 055055.
Before requesting service, please check whether your problem is covered under Service
Checklist (see below).
SERVICE CHECKLIST
• If your cleaner will not operate, check the plug connection, plug fuse and mains fuse.
• Never allow the dust cup to become so full that it impedes the air-flow, thus reducing
the cleaning efficiency of the machine. The character of household dust and its effect
on the air-flow through the machine may vary considerably. Fluffy dust allows air to
pass through readily whereas fine powdery dust or proprietary cleaning powders,
pack tightly in the dust cup, offering greater resistance to air-flow and will reduce
cleaning efficiency if it becomes overloaded.
• Always store your cleaner in a dry place.
• Check dust bag and filters every week. Replace frequently to ensure maximum
cleaning performance.
• Sucking up such items as stockings, clippings of cloth, sizeable pieces of paper,
wrappings from cigarette packets or sweets etc., may block the hose. Electrolux
regrets that the clearing of blocked hoses cannot be regarded as service that
can be given free of charge, under the guarantee. Should a blockage occur, first
disconnect the cleaner from the electricity supply , refer to section headed “Blockages.”
If these operations are not successful, contact 08706 055055.
• Never pick up hot cinders or lighted cigarette ends.
• Make certain that your cleaner does not come into contact with water or any
other liquid. It is not designed as a wet pick up cleaner, and must never be
used on damp carpets or wet floors.
Important - in the event of the mains supply cable of this vacuum cleaner requiring
replacement, we recommend that this be carried out by a Electrolux Service Agent.
Spares
New filters and dust bags can be obtained from Authorised Electrolux Dealers and
electrical retailers. If difficulty is experienced in obtaining spares please call us on 08706
055055.
Rating Plate
The model, type, and serial numbers are indicated on
the rating plate located on the back side of the cleaner.
For prompt and complete service information, always refer
to these numbers when inquiring about service.
Model & T ype______________________ Serial No. _________________________
MODEL TYPE SERIAL NO.
VOLTS W ATTS HERTZ
ELECTROLUX
Automatic Motor Shut-Off
To protect from overheating, this vacuum cleaner is equipped with a thermostat which
automatically shuts off the motor if it overheats. Should this happen:
1. Turn off the switch and unplug the cleaner because the thermostat will allow the
cleaner to automatically start running again when the motor cools (approximately 30
minutes).
2. Check the hose, bag and filter regularly, as a clogged hose, full bag or dirty filter
could cause the motor to overheat.
3. Call an Electrolux Service Station at 08706 055055 if the cleaner will not
operate after cooling for approximately 30 minutes.
4
Page 5

HOW TO USE
A carpet should be cleaned regularly over heavy traffic areas, and once a week over
the entire carpeted area. Vacuum slowly, making several passes (forward and
backward) over the carpet, covering small areas at a time. The time required to clean
the carpet will depend on several factors–including type of carpet and amount of dirt.
Rotate Swivel Hook to
1
Connect Hose
Important
Always store cleaner
in a vertical position
when using plug and
cord storage to
prevent damage to
delicate surfaces.
2
release cord
3
Plug in
Swivel Hook
Store Tools
4
Crevice Tool
Combination
Tool
HEP A
Filter
(on some
models)
Push ON/OFF switch
5
(A thermostat automatically shuts the
motor off if it overheats, see Automatic
Motor Shut-Off on page 4.)
On/Off Switch
5
Page 6

Cleaning Accessories
Attach wands and cleaning tools
Open the Slip
Ring to reduce
suction.
Slip the circular end of an accessory tool
onto the end of the hose handle and twist
slightly to secure. If additional reach is
needed, place a wand on the hose handle
first.
Crevice Tool *Upholstery Nozzle
(optional)
Fig. 1
6
Combination Tool
Combination
Floor Tool
*Dusting Brush
(optional)
*Bare Floor Brush (optional)
Crevice Tool: For crevices, corners, baseboards,
between cushions.
Upholstery Nozzle: For curtains, draperies, cushions,
fabrics.
Dusting Brush: For furniture, blinds, books, lamp
shades, shelves.
Combination Tool: One tool with bristles for dusting,
and nozzle for floors and upholstery.
Bare Floor Brush: For any type of hard surface floor.
*May be purchased separately.
Cyclonic Bag Saver (on some models)
This accessory reduces the need for frequent bag changes. It
does not eliminate the use of a paper bag. To remove the
1
Cyclonic Bag Saver, follow the steps in reverse and reattach
the large upper wand.
UNP ACKING AND ASSEMBLING
2
3
Fig. 1a
Unpack and check that all the parts are included.
The Cyclonic Bag Saver consists of three main
parts, see Fig.1:
1. Cyclonic Housing
2. Cyclone Dust Cup
3. Retaining Clip
Attach retaining clip onto the rear of the cyclonic
cup as shown in Fig. 1a.
Page 7

Cyclonic Bag Saver (on some models) continued
MAX
MAX
Fig. 2a
Fig. 2b
Tab &
Slot
Fig. 3
Handle
Attaching the Cyclonic Bag
Saver onto the vacuum cleaner
Your vacuum cleaner is equipped with two
wands.
Fig. 2a Push the hose nozzle into the top of
the cyclonic housing until it is firmly
in place.
Fig. 2b Attach the cyclonic dust cup onto the
cyclonic housing. Place the slot in the
cyclonic dust cup over the tab on the
cyclonic housing. Then grasp the
handle on the cyclonic dust cup, and
pivot the cyclonic dust cup up and
over the ledge on the cyclonic
housing.
Fig. 3 Push the nozzle at the bottom of the
cyclone unit into the top of one of the
straight wands. Adjust the position of
the cyclone unit. Install the last
straight wand and then push the
assembled wands into the floor tool.
Important Safety Information
- Do not vacuum surfaces which have been
subjected to inflammable solvents.
- Do not pick up any liquid.
- Do not pick up hot ashes which could cause
a fire.
Emptying
Empty the dust compartment of the cassette
after each use or when the dust cup is filled
up to the MAX level, Fig. 3. Detach the dust
cup by following the instructions in Fig. 2b in
reverse.
Empty the contents into a waste container.
To reattach the dust cup again follow the
described steps in Fig. 2b.
Maintenance
The Cyclonic Bag Saver can be washed in
cold or warm water and a mild detergent.
Thoroughly dry the dust compartment with
a soft towel before using it again. If the
cyclone unit clogs, use the vacuum cleaner
to unclog it.
7
Page 8

HOW TO MAINTAIN
The instructions given in this booklet serve as a guide to routine maintenance. To
avoid unnecessary service calls, check the hose, bag and filter often. Clear a
clogged hose with the blower, change the bag if it is full, and clean the motor filter
when it is dirty.
Disposable Dust Bags and Filters
The dust bag and motor filter play a very important roll in the efficiency of the vacuum
cleaner. The purpose of the dust bag is to trap dirt, but at the same time, the paper
bag must be porous enough to allow air to pass through. If the bag or the motor filter
become clogged, no air can pass through the cleaner and no cleaning can take place
regardless of how powerful the unit is. To keep the cleaner operating at maximum
efficiency, change the dust bag frequently and clean the filter as needed. Some fine
particles can restrict airflow very quickly and will decrease performance even before
the bag appears to be full. For that reason, when vacuuming carpet fresheners or
cleaners, powder, plaster dust, or similar fine substances, the bag and filter may need
to be changed more often.
Use GENUINE ELECTROLUX spares and accessories. Look for the Genuine
Electrolux product symbol. Call Electrolux on 08706 055055 for assistance.
How to Remove Disposable Dust Bags
NOTE: Turn off vacuum and unplug the electrical cord before changing dust
bag or cleaning motor filter. Never operate the vacuum cleaner without
the dust bag or filter.
Turn off and unplug cleaner.
1
2
Open lid by
pushing down
hood latch.
Latch
8
3
Fold BAG CLOSURE
FLAP down and push
behind rubber seal.
4
Insert finger into upper
left notch then pull out
and remove bag.
Page 9

How to Install Disposable Dust Bags
NOTE: Turn off vacuum and unplug the electrical cord before changing dust
1. Turn off and unplug cleaner.
2. Open bag cover by pushing latch.
3. Clean motor filter by rinsing under warm
Motor Filter
bag or cleaning motor filter. Never operate the vacuum cleaner without
the dust bag or filter.
Latch
➔
water and let air dry if heavily soiled.
4. Open bag folds slightly.
5. Place bag in cleaner.
6. Tuck bag corners under collar.
7. Swing bag cover closed and push to
latch.
How to Install HEPA Filter (on some models)
Check the HEPA filter with each disposable dust bag change. Replace twice a year or
after every six bag changes.
Upper Filter Tabs
Bottom Clips
How to Remove HEPA Filter
Grasp the bottom clips on the filter and
pull out and down to release the upper
filter tabs from the rear housing tabs on
the cleaner.
Rear Housing Tabs
Bottom Clips
Insert upper filter corner tabs firmly under
rear housing tabs and pivot filter down until
bottom clips on filter click securely into
place on the cleaner.
9
Page 10

PROBLEM SOLVING
NOTE: T urn OFF the power switch and unplug the electrical cord before servicing.
PROBLEM CAUSE SOLUTION
3
Motor won’t start
No suction at end of
hose
Reduced suction
Motor shuts off
General questions
Electric plug
3
Power switch not
turned “ON”
3
Full paper bag
3
Hose
3
Front cover not
latched
3
Full paper bag
3
Slip ring open
3
Hose
3
Cyclonic Bag
Saver
3
Automatic Motor
Shut-Off
3
Assembly or
related
attachments
Push plug securely into
outlet.
Try another outlet.
Check circuit breaker/fuse.
Make sure power switch is
“ON.”
Replace paper bag.
Remove any clogs from
hose that restrict airflow,
then try again.
Push front cover until it
latches firmly.
Replace paper bag.
Rotate slip ring on wand
until hole is covered.
Remove any clogs from
hose that restrict airflow,
then try again.
Check upper housing for
blockage.
See directions on page 4.
Call 08706 055055.
10
Page 11

Guarantee
This guarantee is in addition to your statutory and other legal rights.
This product is for household use only.
Electrolux products are carefully designed, manufactured, tested and inspected
and, in consequence, we undertake to replace or repair any part found to be defective
in material or workmanship, within one year of delivery to the original purchaser,
free of charge. You may be required to take the product to your nearest service
provider if the product requires attention during the first year.
There are certain conditions which may invalidate this guarantee:
a. It is dependent upon the appliance being correctly installed and used in
accordance with the Company’s instructions under normal domestic conditions
within the United Kingdom or the Republic of Ireland.
b. Service at all times must be carried out by an Electrolux Service Representative
or authorised agent.
c. The guarantee may be invalidated by unauthorised repair or modification of the
appliance.
d. Y ou may be charged by Electrolux if you call for an engineer to resolve a problem
that we believe is covered in the instruction booklet.
The Company does not accept liability for defects arising from neglect, misuse or
accident.
Proof of the date of purchase will be required before service under guarantee is
provided. For further assistance call our customer care line on 08706 055055.
Important:
For future reference we suggest you record the following details here, and keep the
receipt with the handbook as proof of purchase.
Purchased from___________________________________________________
Date purchased_________________ Model no _________________________
LUTON, BEDFORDSHIRE, LU4 9RJ
Features of the Electrolux vacuum cleaner and accessories supplied with it are protected in Great Britain
and abroad by Patents or Registered Designs.
This appliance conforms with the requirements of the amended E.E.C. directive No. 89/336/EEC relating to
electromagnetic compatibility (EMC) CE.
Electrolux, may introduce modifications to their product from time to time, and consequently the details
given in this booklet are subject to alteration without notice.
Page 12

Part No. 70183 (8/00) Printed in U.S.A.
 Loading...