

Page 1
DE
BEDIENUNG
FR
UTILISATION
IT
USO
EN
USE
3
13
23
33
Page 2

Page 3
DUNSTABZUGSHAUBE
ALLGEMEINES
Das von Ihnen gewählte Modell ist eine Dunstabzugshaube für Abluftbetrieb, das auch für
Umluftbetrieb verwendbar ist.
Eine Haube im ABLUFTBETRIEB saugt den Kochdunst am Entstehungsort an und leitet ihn
ins Freie. Für diese Art von Luftreinigung sind keine Kohlefilter notwendig.
Eine Haube im UMLUFTBETRIEB saugt den Kochdunst am Entstehungsort an, reinigt ihn
durch Kohlefilter und läßt die gereinigte und vom Geruch befreite Luft wieder in denselben
Raum zurückströmen. In dieser Betriebsart ist die Verwendung von Kohlefiltern unerläßlich.
Die Kohlefilter sind als Zubehör erhältlich (siehe ZUBEHÖR).
VOR DER MONTAGE
Vor der Montage ist folgendes zu beachten:
Achten Sie auf den Mindestabstand zwischen Oberkante der Kochstelle und Unterkante der
Dunstabzugshaube wie in der Abbildungen M 1 gezeigt. Wir empfehlen einen Abstand
zwischen 700 – 800 mm.
ACHTUNG! Falls der Dunstabzug in geringerem Abstand montiert wird, lehnt der
Hersteller jegliche Haftung für eventuelle Beschädigungen der Dunstabzugshaube ab,
die durch die starke Hitzeentwicklung entstehen könnten. Der Hersteller ist in diesem
Fall nicht haftbar für Sach- und Personenschäden, die direkt oder indirekt durch
unsachgemäßen Betrieb, Bruch oder möglichen Brand verursacht worden sind.
Eine Schutzkontaktsteckdose in einem angemessenen Abstand anbringen; oder ein
Anschluss vorbereiten, alle den gesetzlich gültigen Normen entsprechend;
Wenn das Gerät im Abluftbetrieb eingesetzt wird, muss die Abluft über eine Abluftleitung ins
Freie geführt werden.
ACHTUNG! Die Abluft muss in einem separaten Rohr insFreie geführt werden und darf
nicht in einen Schornstein geleitet werden. Die unsachgemässe Montage von einer
Dunstabzugshaube, kann zu einem Brand führen. Ferner sind die kantonalen
feuerpolizeilichen Vorschriften zu beachten.
Wenn das Gerät im Abluftbetrieb eingesetzt werden soll, muss für genügend Ersatzluft
gesorgt werden.
Bei der Verwendung einer Dunstabzugshaube in modernen dichten, gedämmten Gebäuden
mit/ohne Komfortlüftung sollte in einer frühen Planungsphase ein Lüftungskonzept erstellt
werden.
Der gemeinsame, gefahrlose Betrieb von kamingebundenen Geräten (z.B. Cheminee,
Gasherd) und Dunstabzugshauben ist nur gewährleistet, wenn Raum und/oder Wohnung
durch eine geeignete Zuluftöffnung von ca. 500-600 cm
bei laufender Dunstabzugshaube Unterdruck vermieden wird. Der Unterdruck im Raum darf
nicht grösser als4 PA sein.
Für den Umluftbetrieb sind Kohlefilter notwendig. Diese können als Zubehör bezogen werden.
2
von aussen belüftet sind und dadurch
3
Page 4
MONTAGEANLEITUNGEN
Für die Montage beachten Sie bitte die Montageanleitung.
ACHTUNG! Die im Lieferumfang beigelegten Befestigungselemente (Dübel Fisher 8x40
mit Schrauben) ausschliesslich für Massiv-Betondecken geeignet. Der Monteur muss
sicherstellen, dass die mitgelieferten Befestigungselemente für die vorhandene Decke
oder Wand geeignet sind. Die Herstellungsfirma lehnt jegliche Haftung ab, welche durch
unsachgemässe Montage verursacht worden sind.
ENTFERNUNG UND WIEDEREINBAU DER METALL-FETTFILTER
Die Leuchtmittel müssen ausgeschaltet und abgekühlt sein.
Folgen Sie den Anweisungen gemäss den Abbildungen.
Um die Fettfilter zu entfernen, drücken Sie den Verschluss am Filter und ziehen Sie diesen
nach unten.
Um die Filter wieder einzusetzten diesen schräg in die Öffnungen einführen, vorne heben und
Verschluss einrasten.
MONTAGE UND ENTFERNUNG DER KOHLEFILTERN
Wenn die Dunstabzugshaube im Umluftbetrieb verwendet wird, ist die Montage von
Aktivkohlefiltern unbedingt erforderlich.
Aktivkohlefilter sind als Zubehör/Ersatzteil erhältlich.
Es gibt 2 Sorten von Aktivkohlefilern:
• Regenerierbarer Long Life Aktivkohlefilter: Handhabung gemäss Gebrauchsanweisung
beim Aktivkohlefilter.
• Standard Akiivkohlefilter, kann nicht regeneriert werden. Die Handhabung entnehmen Sie
bitte der Abbildung C.
ALLGEMEINE HINWEISE
Das Material des Rohrs muß Korrosions und Wärme und Feuerfest sein. Die Herstellerfirma
rät dringestens davon ab, Stutzen oder Rohre mit kleinerem Durchmesser als die der
Anschlussstelle zu verwenden. Auch Aluflexschläuche werden nicht empfohlen, weil diese die
Leistungen des Gerätes massiv vermindern
Das Ende des Rohres an der Aussenwand muss so montiert sein dass kein Regen, kein
Wind, und keine Fremdkörper ins Innere gelangen können.
Im Zweifelsfall, wenden Sie sich an Fachleute aus der Spengler oder Lüftungsbranche.
4
Page 5
ELEKTRO-INSTALLATION
ALLGEMEINE HINWEISE
Die Elektro-Installation darf nur von qualifizierten Fachleuten durchgeführt werden und mit
Materialien, die den gültigen Normen entsprechen.
Der Hersteller lehnt jegliche Haftung für Installationen ab, die von nicht kompetenten
Personen durchgeführt worden sind oder für solche, bei denen die gesetzlich gültigen Normen
der elektrischen Sicherheit nicht beachtet wurden (sowohl was die Ausführung als auch was
die Materialien betrifft).
ELEKTRISCHE DATEN
Die Angaben über den elektrischen Anschluss entnehmen Sie bitte dem Typenschild. Dieses
befindet sich hinter den Metallfettfiltern.
ANSCHLUSS AN DAS STROMNETZ
Das Anschlusskabel ist bereits mit einem Stecker ausgerüstet.
Es können zwei verschiedene Elektro-Installationen durchgeführt werden:
• Festanschluß;
• Anschluß mit Stecker und Steckdose.
VOR DER ELEKTRO-INSTALLATION
Bevor die elektrischen Anschlüsse installiert werden, muß man:
• Nachprüfen, daß die angegebenen elektrischen Daten den Spannungswerten und
Netzfrequenzwerten des Aufstellungsortes entsprechen;
• Nachprüfen, daß der Aufstellungsort über eine vorschriftsmäßige Elektroschutz gegen
Kurzschluß und elektrischen Schock verfügt;
• Eine Steckdose (oder einen Anschlußpunkt) mit einem genormten zweipoligen Schalter
mit einer Kontaktöffnung von mindestens 3 mm installieren;
• Wenn man die Dunstabzugshaube mit einem Stecker installieren will, muß man einen
genormten kaufen, der zugänglich ist;
• Vor den Anschlußarbeiten den Strom durch den zweipoligen Schalter ausschalten und
erst nach erfolgter Arbeit wieder einschalten.
ACHTUNG! Im stand by Modus ist die Lichtstärke reduziert. Das ist keine Störung.
BEI REPARATUREN ZU BEACHTENDE SICHERHEITSMASSNAHMEN
Reparaturen sind ausschliesslich durch eine unserer Kundendienststellen durchzuführen.
Zudem sind immer Original-Ersatzteile zu verwenden.
Unsachgemäß durchgeführte Reparaturen können Brandgefahr und Stromschläge
verursachen.
5
Page 6
WICHTIGE HINWEISE FÜR DEN SICHEREN GEBRAUCH DES GERÄTES
angeschlossen werden. Was dazu alles erforderlich ist, entnehmen Sie der
Installationsanweisung.
Dieses Gerät ist nicht dafür bestimmt, durch Personen (einschliesslich Kinder) mit
eingeschränkten physischen, sensorischen oder geistigen Fähigkeiten oder mangels
Erfahrung und/oder mangels Wissen benutzt zu werden, es sei denn, sie werden durch eine
für Ihre Sicherheit zuständige Person beaufsichtigt oder erhielten von ihr Anweisungen, wie
das Gerät zu benutzen ist.
• Unter der Dunstabzugshaube darf nicht flambiert werden.
• Grosse Flammen sind unter dem Dunstabzug zu vermeiden.
• Frittiergeräte müssen während des Gebrauchs stets beaufsichtigt werden: Überhitztes Öl
kann sich entzünden.
• Bei Reinigungsarbeiten oder Störungen das Gerät ausschalten. Netzstecker aus der
Steckdose ziehen oder Sicherungen ausschalten/ausdrehen.
• Der gemeinsame, gefahrlose Betrieb von kamingebundenen Geräten (z.B. Cheminee,
Gasherd) und Dunstabzugshauben ist nur gewährleistet, wenn Raum und/oder Wohnung
durch eine geeignete Zuluftöffnung von ca. 500-600cm
dadurch bei laufender Dunstabzugshaube.
Unterdruck vermieden wird. Der Unterdruck im Raum darf nicht grösser als 4 PA sein. Die
Abluft muss in einem separaten Rohr ins Freie geführt werden und darf nicht in einen
Schornstein geleitet werden.
• Die Dunstabzugshaube nie ohne Metall-Fettfilter benutzen.
• Die Fettfilter immer sauber halten und die empfohlenen Reinigunszyklen einhalten.
• Die Kohlefilter innerhalb der angegebenen Zeiten regenrieren bzw. auswechseln (wenn
die Dunstabzugshaube im Umluftbetrieb verwendet wird).
• Die Dunstabzugshaube vor Kochbeginn einschalten.
Die Dunstabzugshaube ist ausschließlich zum Einsatz im privaten Haushalt und zur
Beseitigung von Küchengerüchen vorgesehen.
Die Dunstabzugshaube muss ordnungsgemäss eingebaut und
2
von aussen belüftet sind und
6
Page 7
BEDIENUNG UND GEBRAUCH
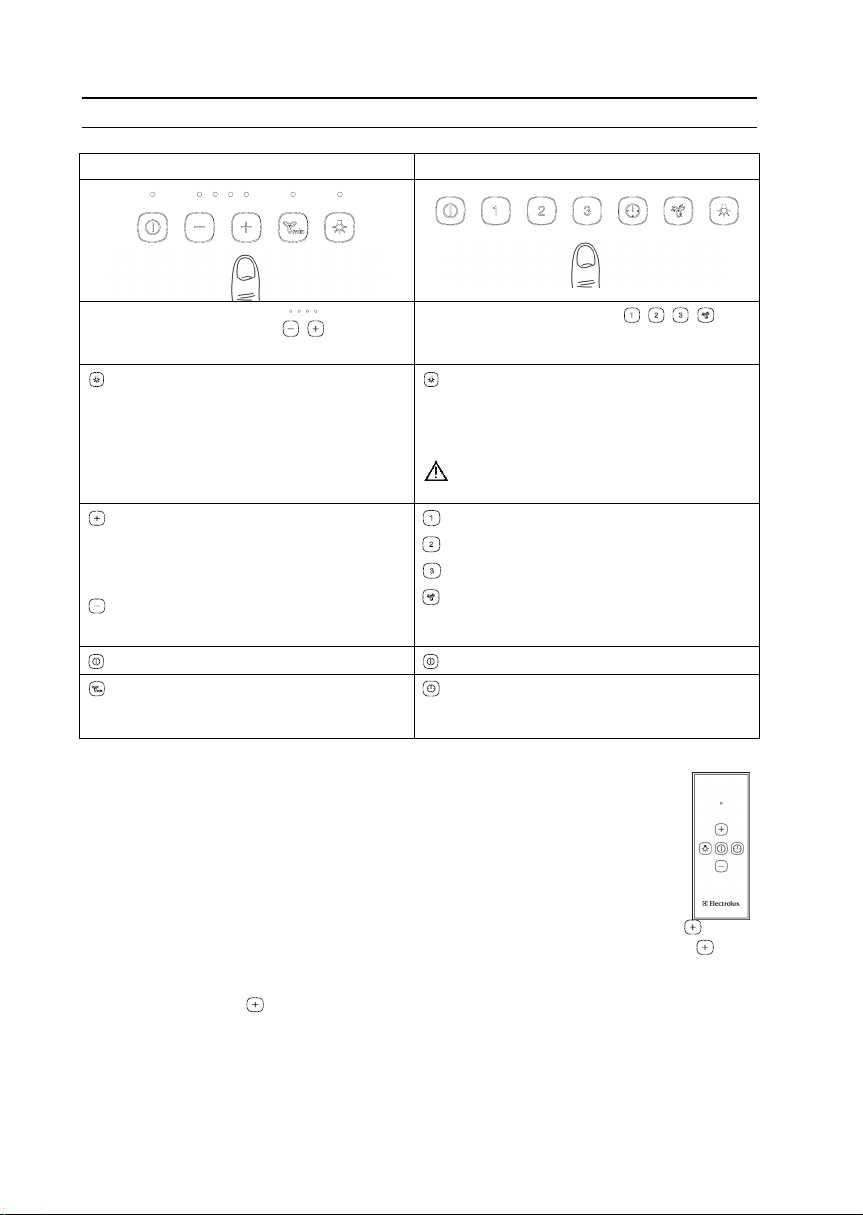
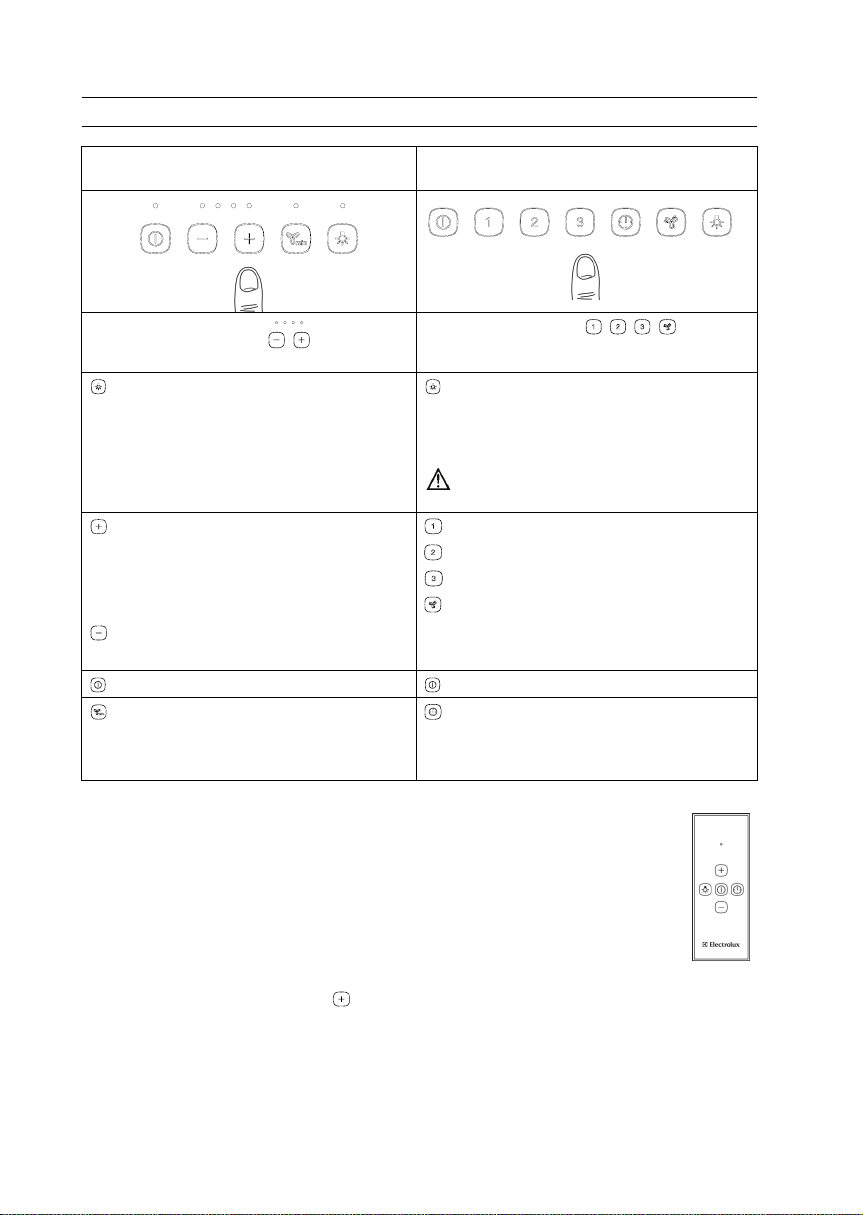
SL SERIE: LED ÜBER DEN TASTEN GL SERIE: HINTE
RLEUCHTETE TASTEN
Die Led’s über den Tasten zeigen die
4 verschiedenen Laufstufen des Motors.
Ein und Ausschalten der Beleuchtung. Kurzes Drücken: Ein und Ausschalten der
Erhöht die Luftleistung des Motors.
Auf der höchsten Laufstufe blinkt die LED,
nach 10 Minuten schaltet der Motor
automatisch auf Stufe 2 zurück.
Verringert die Luftleistung des Motors.
Ausschalten des Motors. Ausschalten des Motors.
TIMER: Auf der 1, 2, 3, Laufstufe schaltet
der Motor automatisch nach 10 Minuten ab,
die LED über der Taste blinkt.
FERNBEDIENUNG
Die Funktionen können auch mit der Fernbedienung aktiviert werden.
Bei der SL Serie wird standardmässig eine auf das Gerät abgestimmte
Fernbedienung mitgeliefert. Für die Hauben der GL Serie kann die Fernbedienung
(RM 15000) als Zubehör bestellt werden. Für die Inbetriebnahme beachten Sie
nachstehenden Abschnitt.
Inbetriebnahme der Fernbedienung:
Gerät vom Stromnetz nehmen, Fernbedienung auf den Dunstabzug richten, und die
der Fernbedienung drücken, wieder den Dunstabzug am Stromnetz anschliessen, die
Taste gedrückt halten bis ein akustisches Signal die Einstellung bestätigt. Falls innerhalb von
30 Sekunden kein Signal ertönt, Gerät vom Stromnetz nehmen, wieder am Stromnetz
anschliessen und den
INTERVALSCHALTUNG
Diese Haube verfügt über eine Intervallschaltung.
Die Intervalschaltung aktiviert den Lüfter für 10 Minuten pro Stunde, in der angezeigten
Lüfterstufe.
drücken.
Die hinterleuchteten Tasten
zeigen die 4 verschiedenen Laufstufen des
Motors.
Beleuchtung.
Langes Drücken: die Stärke der Beleuchtung
ist geändert.
Auf der mittleren Beleuchtungsstärke ist
ein leises Brummen zu hören (normal).
Laufstufe 1.
Laufstufe 2.
Laufstufe 3.
Höchste Laufstufe: die Taste blinkt, nach
10 Minuten schaltet der Motor automatisch auf
Stufe 2 zurück.
TIMER: Auf der 1, 2, 3, Laufstufe schaltet
der Motor automatisch nach 10 Minuten ab.
Die Taste blinkt.
Taste
7
Page 8
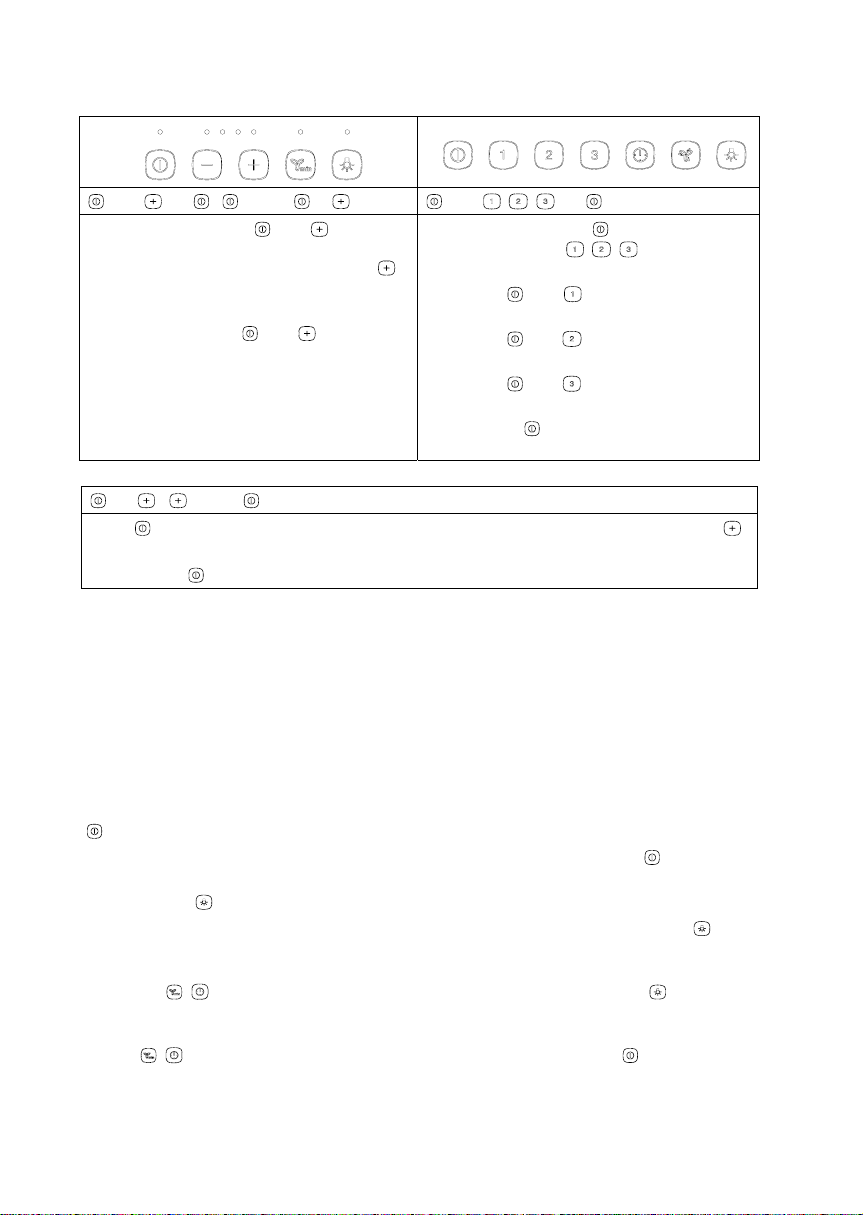
Intervalschaltung durch Bedienung (nicht möglich für das Modell WOSL90X):
und → , , … → e und / / →
Gleichzeitig die Tasten und drücken:
der Ledpunkt der ersten Laufstufe wird
eingeschaltet; beim Wieder Drücken der
Tasten, werden die folgenden Lüfterstufen
→3→1→2→3 … angezeigt;
2
gleichzeitig die Taste
die Laufstufe der Intervallschaltung zu
bestätigen.
Intervalschaltung durch Fernbedienung:
→ , , … →
Taste drücken: auf der Anzeige erscheint Laufstufe 1. Durch das Wieder Drücken der
Taste werden die folgenden Lüfterstufen 2
Mit der Taste
Die Intervallschaltung kann durch das Drücken einer Taste (ausser Lichttaste) deaktiviert
werden. Die Fernbedienung ist mit einer Batterie (Typ 23A) ausgestattet.
Für den Batteriewechsel lösen Sie die beiden Schrauben auf der Rückseite der
Fernbedienung. Nach dem Austausch der Batterie den Deckel und die Schrauben wieder
montieren. Für die Batterientsorgung beachten Sie die nationalen Normen und Vorschriften.
WARTUNG KOHLE FILTER UND FETTFILTER
Die Haubebedienung ist bei der Auslieferung für den Abluftbetrieb (Sättigungsanzeige
Fettfilter) eingestellt. Für den Umluftbetrieb mit zusätzlicher Sättigungsanzeige der
Aktivkohlefilter nächsten Abschnitt beachen.
Fettfilter-Sättigungsanzeige: akustisches Signal ertönt bei laufenden Motor, die LED der Taste
blinkt.
Reset Fettfilter-sättigungsanzeige: Motor ausschalten und kurz 2mal die Taste
Aktivkohlefilter Sättigungsanzeige: akustisches Signal ertönt bei ausgeschaltetem Motor, die
LED der Taste
Reset Aktivkohlefilter-Sättigungsanzeige: Motor ausschalten und kurz 2mal die Taste
drücken.
Einstellung für Umluftbetrieb: Motor und Beleuchtung ausschalten. 5 Sekunden gemeinsam
die Tasten
Sekunden.
Einstellung für Abluftbetrieb: Motor und Beleuchtung ausschalten. 5 Sekunden gemeinsam die
Tasten
Sekunden.
/ drücken. Als Bestätigung leuchtet danach die LED der Taste während 5
/ drücken. Als Bestätigung leuchtet danach die LED der Taste während 5
und drücken um
innerhalb vor 5 Sekunden die gewünschte Stufe bestätigen.
blinkt.
Gleichzeitig die Tasten
Geschwindigkeiten
die Intervalschaltung gewünscht ist.
Dass heißt
als Intervalschaltung.
Dass heißt
Laufstufe als Intervalschaltung.
Dass heißt
als Intervalschaltung.
Mit der Taste
die gewünschte Stufe bestätigen.
und für die erste Laufstufe
und für die zweite
und für die dritte Laufstufe
innerhalb vor 5 Sekunden
→3→1→2→3 … angezeigt;
und einer der
/ / drücken für die
drücken.
8
Page 9
WARTUNG
REINIGUNG DER METALL-FETTFILTER
Die Metall-Fettfilter befinden sich an der unteren Seite der Dunstabzugshaube und dienen
dazu, die sich beim Kochen bildenden Fette aufzusaugen, und sollen verhindern, daß der
Motor Schaden erleidet. Sie können handgewaschen werden oder im Geschirrspüler
gewaschen werden.
Beim Handwaschen braucht man nur Warmwasser und Seife, man muß sie mehrmals fest
abbürsten und dann mit fliessendem Wasser abspülen.
Nach der Reinigung müssen die Filter gut getrocknet und wieder korrekt eingesetzt werden.
Es kann möglich sein, daß die Filter nach der Reinigung eine kleine Änderung in der Farbe
haben. Wir geben hierunter Hinweise die ratsam zu folgen sind.
ACHTUNG! Wir empfehlen die Fettfilter nach 50-100 Betriebsstunden zu
waschen.
Wenn die Fettfilter sehr schmutzig sind, kann der Motor nur eine geringe Luftmenge
absaugen, daher wird die Funktion des Gerätes vermindert.
Bei zunehmender Sättigung mit fetthaltigen Rückständen erhöht sich außerdem die
ENTFLAMMBARKEIT.
Die Herstellungsfirma lehnt jegliche Haftung für Brände ab, die durch schlechte
Wartung bzw. unterlassene Reinigung der Metall-Fettfilter verursacht worden sind.
AKTIVKOHLEFILTER
Der Aktivkohlefilter wird im Umluftbetrieb verwendet. Die Kohle befreit die durchströmende
Luft von Geruchsstoffen. Der Aktivkohlefilter ist hinter den Fettfiltern patziert und unbedingt
erforderlich.
Im Abluftbetrieb ist kein Aktivkohlefilter notwendig.
Es stehen zwei Arten von Aktivkohlefiltern zur Verfügung. Den regenerierbaren Long Life Filter
und den Standard Filter.
REGENERIERBARER LONG LIFE AKTIVKOHLEFILTER
FÜR KOHLE FILTER DIE REGENERIERBAR SIND GIBT ES AUCH EINEN HINWEIS MIT
DEM FILTER. Der regenerierbare Longlife Filter ist mit einem Vermerk 230° auf dem
Filterrahmen gekennzeichnet.
GEBRAUCHSANWEISUNG. Vor dem ersten Gebrauch muss die Aktivkohle regeneriert
werden, da jede Aktivkohle Feuchtigkeit. Diese Feuchigkeit muss entzogen werden.
Die Filterkassette flach auf den Gitterrost in der Mitte Ihres Backhofens legen und bei 230°
eine Stunde lang aufheizen. Lassen Sie den Filter anschliessend zwei Stunden vollständig
abkühlen. Bei zu frühem einlegen kann die Dunstabzugshaube durch die Restwärme der
Kohle beschädigt werden. Der Regenerievorgang kann eine Verfärbung des Filters bewirken.
Der Filter kann danach wieder in der Dunstabzugshaube eingesetzt werden.
REGENERIERUNG
Feuchtigkeit und Fettpartikel verringern das Aufnahmevermögen und daher muss nach
spätestens 2 Monaten die Aktivkohle regeneriert werden.
Die Filterkassette flach auf den Gitterost in der Mitte Ihres Backhofens legen und bei 230° eine
Stunde lang aufheizen. Lassen Sie den Filter anschliessend zwei Stunden vollständig
abkühlen.
9
Page 10
Der Filter kann danach wieder in die Dunstabzugshaube eingesetzt werden. Nun ist Ihr Gerät
für weitere 4 Monate funktionstüchtig. Wenn der Dunstabzugshaube intensiv gebraucht wird,
muss der Filter in kürzeren Zeitabstände regeneriert werden. Der Filter verliert nach ca. 4
Jahre seine Wirksamkeit und sollte komplett ersetzt werden (Spezialkohle kann nicht
nachgefüllt werden).
STANDARD AKTIVKOHLEFILTER (NICHT REGENERIERBAR)
ACHTUNG! Für eine optimale Filterwirkung wird der Austausch nach 200-300
Betriebsstunden empfohlen. Standard Aktivkohlefilter können weder gewaschen noch
regeneriert werden.
Die Herstellungsfirma lehnt jegliche Haftung für Brände ab, die durch fehlende
Filterpflege (Austausch) verursacht werden.
AUSWECHSELN DER HALOGEN LAMPEN
ACHTUNG! Immer darauf achten, daß eine Lampe desselben Typs verwendet wird.
Kontrollieren Sie, daß die Lampen KALT sind und der Strom ausgeschaltet ist, bevor
Sie die Lampen auswechseln.
Folgen Sie den Schritten in L Abbildungen um die Lampen auszutauschen.
Strom wieder anschließen.
ACHTUNG! Sollte die Beleuchtung nicht funktionnieren, kontrollieren Sie ob die Lampen
richtig eingesteckt sind.
LED-LAMPEN
Der Austausch von defekten LED-Leuchtmitteln muss durch den Electrolux Kundendienst
ausgeführt werden.
10
Page 11

REINIGUNG
Damit die gute Funktionstüchtigkeit der Dunstabzugshaube erhalten bleibt, sollte man die
Haube ab und zu reinigen. Folgende Hinweise sind zu folgen:
ACHTUNG! Kontrollieren Sie, daß der Strom ausgeschaltet ist.
Die äußeren Teile mit milder Spüllauge reinigen. Es ist sehr wichtig, daß die flüssige Seife
keine Körner enthält, die die Oberfläche zerkratzen könnten.
Ein weiches Tuch mit Pflegelotion befeuchten und mit leichtem Druck auf das Gerät
auftragen.
Es ist ganz wichtig mit dem Tuch der Schleifrichtung zu folgen.
DAS REINIGUNGSMITTEL SOLLTE NICHT DIREKT AUF DIE HAUBE AUFGETRAGEN
WERDEN.
Keine Reinigungstücher mit Knöpfen oder Reissverschlüssen verwenden oder andere Teile
die die Oberfläche zerkratzen können.
Bitte keine Reinigungsmittel mit Scheuermittel, alkoholhaltige Produkte oder Benzin
verwenden. Die Oberfläche wird damit verkratzt und beschädigt.
Die Herstellungsfirma lehnt jegliche Haftung für unsachgemäße Reinigung ab.
ZUBEHÖR
Folgendes Zubehör ist erhältlich:
• STANDARD AKTIVKOHLEFILTER
• REGENERIERBARER LONG LIFE AKTIVKOHLEFILTER
• STARTER SET
• ELEKTRISCHE RÜCKSTAUKLAPPE
• FERNBEDIENUNG
STOERUNGEN
Falls die Tastatur nicht reagiert die Haube während 1 Minute ausschalten, Netzstecker ziehen
bzw. Sicherung herausdrehen. Danach wieder anschliessen und Haube einschalten.
Bei Störungen lesen Sie bitte die Hinweise unter RESET in der Gebrauchsanweisung.
Im stand by Modus ist die Lichtstärke reduziert. Dies ist keine Störung.
11
Page 12

GERAET EUROPAISCH GEKENNZEICHNET
Dieses Gerät ist entsprechend der europäischen Richtlinie 2002/96/EG über
Elektro und Elektronikaltgeräte (waste electrical and electronic equipment
WEEE) gekennzeichnet.
Das Symbol an der Seite auf dem Produkt oder seiner Verpackung weist
darauf hin, dass dieses Produkt nicht als normaler Haushaltsabfall zu
behandeln ist, sondern an einem Sammelpunkt für das Recycling von
elektrischen und elektronischen Geräten abgegeben werden muss. Durch
Ihren Beitrag zum korrekten Entsorgen dieses Produkts schützen Sie die
Umwelt und die Gesundheit Ihrer Mitmenschen. Umwelt und Gesundheit
werden durch falsches Entsorgen gefährdet. Weitere Informationen über das Recycling
dieses Produkts erhalten Sie von Ihrem Rathaus, Ihrer Müllabfuhr oder dem Geschäft,
dem Sie das Produkt gek
Für die Schweiz:
Wohin mit den Altgeräten? Überall dort, wo neue Geräte verkauft werden, oder Abgabe bei
den offiziellen S.EN.S-Sammelstellen oder offiziellen S.EN.
S-Recyclern. Die Liste der offiziellen S.EN.S-Sammelstellen finden sich unter
auft haben.
in
www.sens.ch
12
Page 13
HOTTE ASPIRANTE
Généralités
Le modèle que vous avez choisi est une hotte ASPIRANTE qui peut aussi avoir la fonction de
hotte FILTRANTE.
UNE HOTTE ASPIRANTE prélève l'air, les fumées et les vapeurs de cuisson du milieu
intérieur et les répand à l'extérieur. L'utilisation des filtres à charbon pour l'épuration n'est pas
nécessaire.
Une HOTTE FILTRANTE prélève l'air, les fumées et les vapeurs de cuisson du milieu
intérieur, les épure par des filtres à charbon et renverse l'air épuré dans le même milieu. Dans
ce cas l'utilisation des filtres à charbon est indispensable .
Les filtres à charbon sont disponibles séparément, et ils peuvent être achetés comme des
accessoires optionnels (VOIR ACCESSOIRES OPTIONNELS).
AVANT LE MONTAGE
Avant le montage il faut:
Faire attention aux distances d’ installation entre la partie inférieure de la hotte et la partie
supérieure du plan de cuisson comme montré dans les figures M 1. L’on conseille une
distance entre 700 et 800 mm.
ATTENTION! Dans le cas où l'usager decide d'installer la hotte à des distances
inférieures , la maison décline toute responsabilité à propos des eventuels
endommagements subis par la hotte à cause de la forte chaleur ou des dégâts à choses
et personnes provoqués directement ou indirectement par n'importe quel type de
fonctionnement défaillant, de rupture ou de possible incendie.
Prévoir un point fiche ou un point d'assemblage aux termes de la loi au rèseau électrique;
Si on utilise la hotte comme hotte aspirante, il faudra pratiquer un trou vers l'extérieur (c'est à
dire en plein air) pour l'évacuation des fumées.
ATTENTION! L échappement d'air de la hotte doit porter à l’exterieur par un tuyau
separé et il ne peut pas être conduit dans des cheminées de chaudière ou d’autre
evacuation. Le montage incorrecte d’une hotte aspirante peut donner lieu à des
incendies. Il faut aussi respecter les dispositions cantonales des pompiers.
Si la hotte est utilisée comme aspirante, il faudra garantir un rechange d’air suffisant.
Si la hotte est utilisée dans des bâtiments modernes, isolés et étanches avec ou sans air de
confort, il faut faire à l’avance un plan pour la conception du passage de l’air.
L’emploi simultané sans danger des appareils liés à la cheminée (par examples cheminée ou
four à gaz) est permis seulement si la pièce ou l’appartement disposent d’une ouverture pour
l’air qui arrive de l’exterieur de ca 500/600 cm
dépression.
La dépression dans la superficie du plan de cuisson doit être inférieure à 4 Pa (0.04 mbar).
Si la hotte est utilisée comme filtrante il faudra acheter les filtres à charbon qui sont
disponibles comme accessoires.
2
et si avec l’usage de la hotte l’on evite une
13
Page 14
INSTRUCTIONS DE MONTAGE
Monter le produit comme montré dans la notice de montage.
ATTENTION! Les elements de fixage (bouchons Fisher diamètre 8x40 avec vis ) qui
sont livrés avec la hotte sont appropriés aux plafonds et parois en bèton solide. Le
monteur doit verifier que les elements de fixage livrées avec la hotte sont appropriés
aux parois et aux plafonds trouvés. La maison constructrice decline toute responsabilité
pour des endommegements causés par un montage qui n’a pas eté fait de manière
correcte.
DEMONTAGE ET REMONTAGE DES FILTRES ANTIGRAS
Les ampoules doivent être éteintes et avoir eu le temps de refroidir.
Suivre les phases montrées dans les figures.
Pour démonter les filtres antigras enfoncer les poignées de filtres à graisse et puis basculer
les filtres vers le bas.
Pour remonter les filtres antigras, les introduire de façon oblique dans l’ ouverture, les
hausser sur la partie anterieure et les fixer dans la partie posterieure.
MONTAGE ET DEMONTAGE D’ EVENTUELS FILTRES A CHARBON
Si vous voulez utiliser la hotte comme hotte filtrante, il est nécessaire de monter les filtres à
charbon actif.
Les filtres à charbon sont optionnels et on peut les acheter séparément.
On a deux sortes de filtres à charbon actif.
Filtre charbon régénerable LONG LIFE dont les instructions de montage et emploi sont
données avec le filtre.
Filtre charbon standard qui n’est pas régénerable dont le montage est montré dans les
figures de la série C.
ATTENTION EN GENERAL!
Le tuyau doit être résistant à la chaleur, à la flamme et à la corrosion. On déconseille l'usage
des tuyaux de diamètre plus petit de celui de sortie de la hotte et des tuyaux en aluminum
flexible parce que les performances diminuent. La partie terminale du tuyau, doit avoir une
forme appropriée pour éviter que de la pluie, des corps étrangers, ou des souffles de vent
entrent dans le tuyau. En cas de doute vous adresser au personnel compétent pour la mise
en place d'installations à gaz et à aérage.
14
Page 15

INSTALLATION ELECTRIQUE
INSTRUCTIONS
L’installation électrique ne peut être faite que par le personnel expérimenté, qualifié et titulaire
d'un certificat d'aptitude professionnelle aux termes de la loi, qui utilise des matériels aux
normes et aux modalités d'installation. La maison décline toute responsabilité pour les
installations réalisées par des personnes incompétents et pour les installations qui ne
respectent pas les règles en vigueur en matière de sécurité électrique (soit les modalités, soit
les matériels).
DONNÉES TECHNIQUES ELECTRIQUES
Les données techniques électriques se trouvent dans la plaquette métallique de la hotte. Elle
se trouve à l'intérieur de la hotte et elle est visible après avoir enlevé les filtres antigras.
BRANCHEMENT AU RESEAU ELECTRIQUE
Le cable flexible d’alimentation fourni est dèjà branché intérieurement et il sort de la hotte à
proximité du conduit d’échappement de l’air. On peut exécuter deux types d’installation
électrique:
• installation fixe;
• installation par fiche sur une prise.
AVANT L’INSTALLATION ELECTRIQUE
Avant de brancher la hotte il faut:
• Vérifier que les données électriques indiquées soient correspondantes aux valeurs de tension et
de fréquence de réseau de l' endroit où la hotte sera installée;
• Vérifier que la pièce ait des systèmes de protection électrique contre les court-circuits et les
décharges électriques sur la base des règles en vigueur;
• Installer une prise de courant (où point d'assemblage) avec un interrupteur bipolaire aux termes de
la loi, avec une ouverture des contacts d'au moins 3 mm;
• Si on veut installer la hotte par moyen d'une fiche, la fiche doit être accessible;
• Exclure toujours la tension de réseau par l'interrupteur bipolaire avant les opérations de
branchement et rétablir l'alimentation pour l'usage normal seulement à branchement
terminé,éprouvé et sûr.
ATTENTION! En stand by l’intensité del la lumière est reduite. C’est pas du
malfonctionnement.
INSTRUCTIONS A SUIVRE EN CAS DE REPARATION
Les réparations doivent toujours être effectuées seulement par nos centres. Il faut toujour
utiliser des pièces originales.
Les réparations effectuées par d'autres personnes peuvent être dangereuses et peuvent
causer des électrocutions et des risques d'incendie.
15
Page 16

MODE D'EMPLOI ET INSTRUCTIONS IMPORTANTES
faire cela Vous le trouvez dans la notice de montage.
• La hotte n’est pas apte pour l’usage de la part des personnes (enfants inclus) avec
capacités physiques, sensorielles, ou mentales reduites, ou pour personnes qui n’on pas
l’experience ou la connaissance pour l’utiliser, à moins que elles n’ont pas eté instruites
par la personne responsable pour leur securité, ou que elles n’on pas appris la
connaissance de la notice d’emploi.
• ne pas cuisiner de plats flambés sous la hotte;
• éviter d'avoir des flammes libres sous la hotte;
• éviter que de fortes flammes sortent latéralement des marmites; pendant que l'on frie ne
pas faire sortir ni surchauffer l'huile de la marmite parce qu'elle pourrait s'enflammer;
• avant n'importe quelle opération de nettoyage ou d'entretien il faut débrancher la hotte de
l'alimentation de réseau par l'interrupteur général correspondant de l'appartement ou par
l'interrupteur bipolaire, ou détacher la fiche;
• Un emploi sans danger des appareils liés à la cheminée (comme cheminés et appareils à
gaz) est possible seulement si la pièce ou l’appartement ont une ouverture pour l’air qui
vient de l’exterieur de ca 500/600 cm
Pour un aérage sûr, la dépression la plus haute de la pièce ne doit pas dépasser 4 Pa
(0.04 mbar). Il faut avoir l’échappement de l’air à l’exterieur avec un tuyau separé et il ne
faut pas aller dans une cheminée ou tuyau.
• jamais utiliser la hotte sans les filtres antigras;
• maintenir propres les filtres antigras en respectant les intervalles de nettoyage conseillés
(voir par. ENTRETIEN);
• remplacer ou régénerer les filtres à charbon (si la hotte est utilisée comme filtrante) tout
en respectant les temps indiqués;
• démarrer le moteur de la hotte avant de commencer à cuisiner;
• la hotte doit être utilisée dans des maisons privée pour un usage domestique et pour
aspirer gas, fumées, vapeurs de cuisine.
La hotte doit être bien montée et branchée. Tout ce qui est nécessaire pour
2
et avec la hotte allumée l’on evite une dépression.
16
Page 17
FONCTIONNEMENT ET EMPLOI
SERIE SL: LEDS SUR LES TOUCHES SERIE GL: TOUCHES AVEC LUMIERE
DERRIERE
Les leds sur les touches indiquent les
4 differentes vitesses du moteur.
Allume et eteint les lampes. Appuyer legerement: cela allume et eteint
Augmente la vitesse du moteur.
La vitesse maximum vient indiquée avec le
point du led qui clignote et après 10 minute
l’on revient de façon automatique à la
deuxième vitesse.
Diminuit la vitesse du moteur.
Arrête le moteur. Arrête le moteur.
TIMER: dans la première, deuxième,
troisième vitesse on a le moteur qui s’eteint
de façon automatique après 10 minutes et le
point du LED sur la touche clignote.
TELECOMMANDE
Les fonctions des contrôles peuvent être activées mème par la télécomannde.
Pour les hottes de la sèrie GL il est possible de commander la télécommande
comme accessoire. (RM 15000).
La programmation de la télécommande est faite par le producteur. Si la
télécommande ne contrôle pas le moteur et les lumières près de la hottes, prière
de faire ce qui suit.
Programmation de la télécommande:
Continuer à appuyer sur la touche
confirmer que la télècommande a eté reconnue, un biep prolongé est emis. Si le signal sonore
n’esta pas entendu dans les 30 secondes répétez à nouveau la procédure.
de la télécommande et ensuite brancher la hotte. Pour
Les leds des Touches
indiquent les 4 differentes vitesses du moteur.
la lumière.
Appuyer de façon longue: cela change
l’intensité de la lumière.
Avec intensité moyenne de la lumière il
est normal d’avoir un petit bruit.
Première Vitesse 1.
Deuxième Vitesse 2.
Troisième vitesse 3.
Vitesse intensive:le point du led clignote et
apres 10 minutes l’ on revient
automatiquement à la deuxième vitesse.
TIMER: dans la première, deuxième,
troisième vitesse on a le moteur qui s’eteint
de façon automatique après 10 minutes et le
point du LED clignote.
17
Page 18

FONCTION D’INTERVALLE
Specifique dans cet appareil nous avons la fonction d’interval qui consiste dans l’activation
automatique du moteur 10 minutes chaque heure à la vitesse qui clignote.
Activation de la fonction d’intervalle par les boutons (pas possible pour le modèle
WOSL90X):
e → , , … → e e / / →
Appuyer en mème temps sur les touches
: le point du led de la première vitesse
et
s’affiche; en appuyant à nouveau sur la
touche
montrer la séquence suivante pour les
vitesses du moteur 2→3→1→2→3 …;
Appuyer en mème temps dans 5 secondes
sur les touches
vitesse à laquelle le moteur doint marcher
dans la fonction d’intervalle.
Activation de la fonction d’ intervalle par la télécommande:
Appuyer sur la touche : l’indicateur avec lumière va s’afficher sur la première vitesse; en
appuyant à nouveau sur la touche
suivante pour les vitesses du moteur 2→3→1→2→3 …;
Appuyer dans les premiers 5 secondes sur la touche
la fonction d’intervalle doit fonctionner.
En appuyant toute touche, sauf la lumière, la fonction d’intervalle est exclue.
La télécommande a une batterie (type 23 A). Quand la batterie est epuisée il faut: enlever les
deux vis dan la partie posterieure et demonter le couvercle.
Suivre les normes nationales pour la mise à côté des batteries èpuisée.
INDICATEUR POUR L’ENTRETIEN DE FILTRES A GRAISSE ET CHARBON
La hotte est livrée de l’usine en fonction aspirante (indicateur de saturation des filtres à
graisse): si l’on desire utiliser la hotte en fonction filtrante avec aussi un indicateur de
saturation pour le filtre charbon lire apres.
Indicateur de saturation des filtres à graisse: signale acoustique avec moteur en marche et le
point du led de la touche
Remise à zero de l’indicateur de saturation des filtres à graisse: avec moteur arrêtée, appuyer
deux fois sur la touche
Indicateur de saturation des filtres charbon: signale acoustique avec moteur en marche et le
point du led de la touché
, l’indicateur avec lumière va
et pour confirmer la
→ , , … →
, l’indicateur avec lumière va montrer la séquence
clignote.
.
clignote.
Appuyer en mème temps sur la touche
sur la touche d’une des vitesses
laquelle l’on veut que la fonction d’intervalle
fonctionne.
C’est à dire
vitesse.
C’est à dire
vitesse comme fonction d’intervalle.
C’est à dire
comme fonction d’interval.
Appuyer dans les premiers 5 secondes sur la
touche
la fonction d’intervalle doit fonctionner.
et pour la première
et pour la deuxième
et pour la troisième vitesse
pour confirmer la vitesse a laquelle
pour confirmer la vitesse a laquelle
et
/ / à
18
Page 19

Remise à zero de l’indicateur de saturation des filtres à charbon: appuyer deux fois sur la
touché
Programmation de la fonction filtrante: si la fonction aspirante (livraison standard) est active,
avec moteur arrêté et lumières eteintes il faut continuer à appuyer pour 5 secondes sur les
touches
Programmation de la fonction aspirante: si la fonction filtrante est programmée, avec moteur
arrêté et lumières eteintes il faut continuer à appuyer pour 5 secondes sur les touches
le point du led de la touche
.
/ ; le point du led de la touche s’allume pour 5 secondes.
/ ;
s’allume pour 5 secondes.
ENTRETIEN
NETTOYAGE DES FILTRES ANTIGRAS
Les filtres antigras qui se trouvent sur le fond de la hotte servent pour retenir les gras qui sont
généralement présents dans les fumées de cuisson et pour éviter que le moteur se détériore:
il peuvent être lavés à la main ou en lave-vaisselle.
Pour le lavage à main, il suffit d’utiliser de l’eau chaude et du savon, de brosser avec force
plusieurs fois et de le rincer avec de l’eau courante.
A la fin du lavage le filtres antigras doivent être essuyés et rassemblés correctement.
Il est possible que après le lavage le filtre puisse avoir un leger changement de la couleur.
Dans ce paragraphe il y a des instructions conseillé de se conformer.
ATTENTION! On conseille de laver les filtres antigras apres ca 50-100 heures
d’usage du plan de cuisson.
Si le filtres antigras sont très sales le moteur arrive à aspirer seulement peu d’air, avec
diminution de performance.
Les gras qui s’accumulent sur les filtres antigras, si non lavés periodiquement sont
facilement inflammables et PEUVENT CAUSER DES INCENDIES.
La maison constructrice décline toute responsabilité pour les incendies causés par le
mauvais entretien des filtres antigras.
LES FILTRES A CHARBON
Les filtres à charbon sont utilisés dans la hotte qui travaille en fonction filtrante. Le charbon
rend l’air libre des odeurs des fumées de la cuisine. Les filtres à charbon se trouvent derrière
les filtres antigras et sont absolutament obligatoires si l’on utilise la hotte comme filtrante.
Nous avons deux genres de filtres charbons: Filtres charbon régénerables LONG LIFE et
Filtres charbon standard.
FILTRES CHARBON REGENERABLES LONG LIFE
Pour les filtres charbon régénerables on a des instructions à part livrées avec le filtre.
Le filtre charbon régénerable Longlife sont marqué 230°C sur le cadre du filtre.
NOTICE D’EMPLOI. Le charbon actif doit être régénerée avant le premier emploi car le
charbon, même si special peut retenir l’humidité. Il faut enlever cette humidité.
Posez la cassette du filtre à plat sur la grille de Votre four et chauffez la pendant une heure à
230°C. Laissez ensuite refroidir pendant deux heures. Il est important que le filtre soit
totalement refroidi avant l’emplacement dans la hotte. Ce procès peut causer un changement
leger de couleur de la cassette du filtre. Après ce temps le filtre est prêt à l’emploi et peut être
remonté dans la hotte.
19
Page 20

REGENERATION
L’Humidité et le particules de graisse diminuent la capacité d’absorption du fltre à charbon
actif. C’est pour cela que le charbon actif doit être régéneré au plus tard dans le délai dans la
notice d’emploi.
Posez la cassette du filtre à plat sur la grille de Votre four et chauffez la pendant une heure à
230°C. Laissez ensuite refroidir pendant deux heures. Le filtre est maintenant prêt à l’emploi
et peut être remonté dans la hotte et Votre appareil peut fonctionner à nouveau pour d’autre
quatre mois. Si la hotte est utilisée de façon intensive, le filtre doit être changé dans un
intervalle plus bref de temps.
Le filtre à charbon actif a une durée de vie d’ environ 4 ans et après il perd son efficacité
pourtant doit être remplacé complètement (on ne peut pas mettre de l’autre charbon special
dans la cassette).
FILTRES CHARBONS STANDARD (QUI NE SONT PAS REGENERABLES)
ATTENTION! On conseille de remplacer les filtres à charbon après ca 200-300
heures d’usage du plan de cuisson. Les filtres à charbon standard ne peuvent être
lavés ni régenerés.
Le fabricant décline toute responsabilité pour les incendies causés par le mauvais
entretien (remplecement/régénération) des filtres a charbon.
REMPLACEMENT DES LAMPES
ATTENTION! Remplacez toujours les lampes avec des nouvelles lampes qui ont les
mêmes caractéristiques électriques. Avant de remplacer les lampes, vous assurer
qu’elles soient froides, et que l'alimentation électrique soit completement exclue.
Pour remplacer une lampe suivres les instructions montrées dans les figure de la série L.
Remettre la hotte sous tension.
ATTENTION! Si l’èclairage ne fonctionne pas, contrôlez si les ampoules sont
correctement enfoncées.
LAMPES A LEDS
Le remplacement des leds défectuex doit être effectué seulement par le centre
ELECTROLUX.
20
Page 21

NETTOYAGE
Pour garder la hotte en bon état, la nettoyer periodiquement en suivant ce qui suit:
ATTENTION! Assurez-vous que l'alimentation électrique soit excluse.
La substance détergente qu'on vous recommande est une solution d'eau et de SAVON
LIQUIDE NEUTRE. Il est très important que le savon liquide soit sans grains qui peuvent
érafler la surface.
La solution doit être appliquée sur un chiffon moelleux et ensuite on frotte le manteau avec
le chiffon. Il est important de suivre le sens du satinage avec le chiffon.
IL EST ABSOLUMENT INTERDIT DE VERSER DES LIQUIDES DIRECTEMENT SUR LA
HOTTE.
Le chiffon doit être sans boutons, fermetures éclair,boutons-pression ou d'autres choses qui
peuvent érafler la surface. Il est absolument interdit d'utiliser des solvants chimiques, des
produits aggressifs, granuleux ou abrasifs, des essences, des alcools ou des similaires qui
pourraient compromettre l'aspect extérieur du manteau.
La maison constructrice ne répond pas de dégâts fonctionnels et esthétiques causés par le
nettoyage fait avec des produits inappropriés ou d'une façon inadéquate.
ACCESSOIRES OPTIONNELS
Les accessoires optionnels suivants sont disponibles, vendus séparément:
• FILTRES A CHARBON STANDARD
• FILTRES A CHARBON REGENERABLES LONG LIFE
• SET FILTRANT
• CLAPET DE RETENUE ELECTRIQUE
• TELECOMMANDE
DERANGEMENT
Si la hotte aspirante ne repond pa aux commandes, débrancher la hotte pour ca 1 minute en enlevant la fiche d’alimentation on l’interrupter de securité et ensuite rebrancher la hotte.
Si le comportement de la hotte semble étrange, veuillez regarder les instructions pour le
RESET - remise à zero - des filtres concernant les controles de Votre hotte (Voir
FONCTIONNEMENT ET ENTRETIEN).
En stand by l’intensité del la lumière est reduite. C’est pas du malfonctionnement.
21
Page 22

MARQUE POUR DIRECTIVE EUROPEENNE
Cet appareil est marqué selon la directive européenne 2002/96/CE relative
aux appareils électriques et électroniques usagés (waste electrical and
electronic equipment WEEE). La directive définit le cadre pour une reprise et
une récupération des appareils usagés applicables dans les pays de la CEE.
Le symbole à coté sur le produit ou son emballage indique que ce produit ne
peut être traité come déchet ménager. Il doit plutôt être remis au point de
ramassage concerné, se chargeant du recyclage du matériel électrique et
électronique.
En vous assurant que ce produit est éliminé correctement, vous favorisez la prévention des
conséquences négatives pour l’environnement et la santé humaine qui, sinon,seraient le
résultat d’un traitement inapproprié des déchets de ce produit. Pour obtenir plus de détails sur
le recyclage de ce produit, veuillez prendre contact avec le bureau municipal de votre région,
votre service d’élimination des déchets ménagers ou le magasin où Vous avez acheté le
produit.
Pour la Suisse:
Ou donner les vieux appareils? Ou Vous achetez les nouveaux, ou livraison aux points de
récolte officiells S.EN.S ou aux recycleurs officiels S.EN.S.
La liste des recycleurs officiels S.EN.S peut être trouvée sous
www.sens.ch
22
Page 23

CAPPA ASPIRANTE
GENERALITÀ
Il modello da voi scelto è una cappa ASPIRANTE che può anche funzionare da cappa
FILTRANTE.
Una CAPPA ASPIRANTE preleva l'aria, i fumi ed i vapori di cottura dall'ambiente interno e li
riversa all'esterno. Non è necessario l'uso di filtri al carbone per la depurazione.
Una CAPPA FILTRANTE preleva l'aria, i fumi ed i vapori di cottura dall'ambiente interno, li
depura per mezzo dei filtri al carbone e riversa l'aria depurata nello stesso ambiente. In questo
caso l'uso dei filtri carbone è indispensabile.
I filtri carbone sono disponibili separatamente, e possono essere acquistati come accessori
opzionali (vedi ACCESSORI OPZIONALI).
PRIMA DEL MONTAGGIO
Prima del montaggio occorre:
Osservare le distanze minime di installazione tra parte inferiore della cappa e parte superiore
del piano cottura indicate in FIG. M 1. (Si consiglia una distanza tra 700 e 800 mm).
ATTENZIONE! Qualora la cappa sia montata a distanze minori di quelle indicate, la
ditta declina ogni responsabilità circa possibili danneggiamenti subiti dalla cappa per il
forte calore o danni a cose e persone provocati direttamente o indirettamente da
qualsiasi tipo di malfunzionamento, rottura o possibile incendio.
Predisporre un punto presa o un collegamento alla rete elettrica a norma.
Se si usa la cappa come cappa aspirante, occorre praticare un foro verso l’esterno (cioè in
aria libera) per l’evacuazione dei fumi.
ATTENZIONE! Lo scarico deve portare all’ esterno tramite un camino separato e non
puo’ essere condotto in un camino di caldaia o canna fumaria.
Il montaggio non corretto di una cappa aspirante puo’ dar luogo a incendi. Occorre
inoltre osservare le disposizioni cantonali dei pompieri.
Se la cappa viene usata come aspirante occorre garantire un sufficiente ricambio d’aria.
In caso di utilizzo di una cappa in edifici moderni, isolati a stagno con o senza areazione di
confort occorre fare in anticipo una pianificazione del concetto di passaggio dell’aria.
L’ utilizzo contemporaneo senza pericolo di apparecchi collegati al camino (esempio
caminetto, forno a gas) e la cappa è garantito solo se la stanza o l’appartamento dispongono
di un’apertura per aria di circa 500/600 cm
cappa si evita una depressione. La depressione nella stanza non deve essere piu’ grande di 4
mbar.
Se la cappa viene usata come filtrante, occorre acquistare i filtri carbone. Questi sono
disponibili come accessori.
2
che arriva dall’esterno e se con l’utilizzo della
23
Page 24

ISTRUZIONI PER IL MONTAGGIO
Montare il prodotto come indicato nel manuale di montaggio.
ATTENZIONE! Gli elementi di fissaggio (tappi Fischer diam 8x40 con vite) che vengono
consegnati con la cappa sono adatti solo per soffitti di calcestruzzo massiccio.
Chi esegue l’installazione deve assicurarsi che gli elementi di fissaggio consegnati con
la cappa siano idonei per il soffitto o parete trovati. La ditta costruttrice declina ogni
responsabilità per danni causati da montaggi non eseguiti correttamente.
SMONTAGGIO E RIMONTAGGIO DEI FILTRI ANTIGRASSO
Spegnere le lampade ed attendere che siano raffreddate.
Seguire le fasi indicate nelle figure.
Per smontare i filtri antigrasso premere le maniglie, e tirarli verso il basso.
Per rimontare i filtri antigrasso inserirli sbiechi nell’apertura, alzarli davanti ed agganciarli
dietro.
MONTAGGIO E SMONTAGGIO DI EVENTUALI FILTRI CARBONE
Se volete usare la cappa come cappa filtrante è necessario montare i filtri carbone attivo.
I filtri carbone sono OPZIONALI ed acquistabili separatamente.
Esistono due tipi di filtri carbone:
• Filtri carbone attivi rigenerabili LONG LIFE, le istruzioni di utilizzo sono fornite con il
foglio di istruzione con i filtri.
• Filtri carbone attivi standard che non sono rigenerabili, le istruzioni di utilizzo sono indicate
nella figure C.
AVVERTENZE GENERALI
Il materiale del tubo deve essere resistente al calore alla fiamma ed alla corrosione. La ditta
produttrice sconsiglia l’uso di riduttori e di tubi con diametro piu’ piccolo di quello di uscita della
cappa. Anche tubi di alluminio flessibili non sono consigliati in quanto diminuiscono fortemente
le prestazioni dell’ apparecchio.
La parte terminale del tubo, quella all’esterno del foro parete, deve avere forma appropriata
per evitare che piogga, vento o corpi estranei entrino all’interno.
In caso di dubbio rivolgersi al personale competente per impianti gas e areazione.
24
Page 25

INSTALLAZIONE ELETTRICA
AVVERTENZE
L'installazione elettrica può essere fatta solo da personale professionale esperto, qualificato e
abilitato dalle leggi vigenti a svolgere tale mansione usando materiali a norma e modalità di
installazione a regola d’arte. L'azienda declina ogni responsabilità per installazioni effettuate
da personale non competente e per installazioni che non rispettino le norme vigenti in materia
di sicurezza elettrica (sia per modalità che per materiali).
DATI TECNICI ELETTRICI
I dati tecnici elettrici sono reperibili nella targhetta metallica della cappa. Questa si trova
all’interno della cappa, visibile dopo aver asportato i filtri antigrasso.
ALLACCIAMENTO ALLA RETE ELETTRICA
Il cavo flessibile di alimentazione fornito è già collegato internamente e fuoriesce dalla cappa
in prossimità del condotto di uscita dell’aria.
E’ possibile eseguire due tipi di installazione elettrica:
• installazione fissa;
• installazione con spina su una presa.
PRIMA DELL’INSTALLAZIONE ELETTRICA
Prima di collegare l’apparecchio occorre:
• Verificare che i dati elettrici indicati siano corrispondenti ai valori di tensione e frequenza di
rete dell’appartamento dove si installa la cappa.
• Verificare che il locale sia dotato di sistemi di protezione elettrica contro cortocircuiti e
scosse elettriche secondo le norme vigenti.
• Far installare una presa di corrente (o punto di collegamento) con a monte un interruttore
bipolare a norma, con apertura dei contatti di almeno 3 mm.
•
Se si intende installare la cappa mediante la spina occorre che la spina sia accessibile.
• Escludere sempre la tensione di rete con l’interruttore bipolare prima delle operazioni di
collegamento e ripristinare l’alimentazione per il normale uso solo a collegamento
completato, provato e sicuro.
ATTENZIONE! In modalità stand by l’intensità della luce può essere ridotta. Questo non
è un disturbo.
ATTENZIONI DA SEGUIRE IN CASO DI RIPARAZIONE
Le riparazioni devono essere eseguite esclusivamente dai ns. centri. Occorre sempre usare
ricambi originali.
Riparazioni fatte da altri possono essere pericolose e dar luogo a folgorazioni e rischi
d’incendio.
25
Page 26

MODALITÀ D'USO e AVVERTENZE IMPORTANTI
necessario per far cio’ lo trovate nel libretto di installazione.
• La cappa non è idonea per l’uso da parte di persone (compresi bambini) con ridotte
capacità fisiche, sensoriali o mentali, a meno che non siano stati specificatamente istruiti
dalla persona responsabile per la loro sicurezza, o per persone che non abbiano
esperienza o conoscenza per usarla a meno che non l’abbiano appreso dalle istruzioni.
• Non cucinare piatti “flambé” ossia alla fiamma sotto alla cappa.
• Evitare di avere fiamme libere sotto la cappa.
• Evitare che le fiamme fuoriescano lateralmente dalle pentole; durante le fritture non far
uscire né surriscaldare l’olio della padella perché potrebbe infiammarsi.
• Prima di qualsiasi operazione di pulizia o manutenzione, scollegate la cappa
dall’alimentazione di rete tramite l’apposito interruttore generale dell’appartamento o
mediante l’interruttore bipolare o togliendo la spina.
• Un utilizzo senza pericolo di apparecchi collegati al camino (come caminetti e forni a gas)
con la cappa è garantico solo se la stanza o l’appartamento hanno un’adeguata apertura
per aria che viene dall’esterno di circa 500/600 cm
una depressione. La depressione massima del locale non deve superare i 4 Pa (0.04
mbar). Lo scarico deve essere condotto all’esterno con un camino separato e non puo’
andare in una canna fumaria o camino.
• Non utilizzare mai la cappa senza i filtri antigrasso in alluminio.
• Mantenere puliti i filtri antigrasso rispettando gli intervalli di pulizia consigliati.
• Sostituire o rigenerare i filtri carbone (se la cappa è usata come filtrante) rispettando i
tempi indicati.
• Accendere il motore della cappa prima di iniziare a cucinare.
La cappa aspirante deve essere usata esclusivamente nelle case private ad uso domestico e
per aspirare il fumo di cucina.
La cappa deve essere montata e collegata a regola d’ arte. Tutto cio’ che è
2
e con la cappa accesa viene evitata
26
Page 27

FUNZIONAMENTO ED UTILIZZO
SERIE SL: LED SOPRA I TASTI SERIE GL: TASTI RETROILLUMINATI
I led sopra i tasti indicano le 4 diverse
velocità del ventilatore.
Accende/spegne le lampade. Breve pressione: accende/spegne le
Aumenta la velocità del motore.
La velocità massima viene indicata con il led
lampeggiante e dopo 10 minuti si impostata
automaticamente la velocità 2.
Diminuisce la velocità del motore.
Arresta il motore Arresta il motore
TIMER: in velocità 1, 2, o 3 programma lo
spegnimento automatico del motore dopo 10
minuti ed il LED sopra il tasto lampeggia.
TELECOMANDO
Le funzioni del comando possono essere attivate anche dal telecomando.
Per le cappe serie GL è possibile ordinare separatamente il telecomando. (RM
15000).
La programmazione del telecomando viene eseguita dal costruttore. Se il
telecomando non dovesse comandare motore e luci in prossimità della cappa,
eseguire la seguente procedura.
Programmazione telecomando:
Premere e mantenere premuto il tasto
cappa; a conferma dell’avvenuto riconoscimento viene emesso un segnale acustico
prolungato. Se non si sente il segnale acustico entro 30 secondi ripetere la procedura.
FUNZIONE INTERVALLO
Una particolarità di questo apparecchio è rappresentato dalla funzione intervallo che consiste
nell’attivazione automatica della ventilazione 10 minuti ogni ora alla velocità lampeggiante
visualizzata.
I led dei tasti
diverse velocità del ventilatore.
lampade.
Lunga pressione: varia l’intensità della luce.
Con intensità di luce intermedia è
normale un piccolo ronzio.
Velocità 1.
Velocità 2.
Velocità 3.
Velocità massima: il led del tasto
lampeggia e trascorsi 10 minuti viene
impostata automaticamente la velocità 2.
TIMER: in velocità 1, 2, o 3 programma lo
spegnimento automatico del motore dopo 10
minuti ed il LED del tasto lampeggia.
del telecomando e successivamente alimentare la
indicano le 4
27
Page 28

Attivazione funzione intervallo tramite comando (non possibile per il modello
WOSL90X):
e → , , … → e e / / →
premere contemporaneamente i tasti e
: il led della velocità 1 si accende;
premendo ripetutamente il tasto
l’indicatore luminoso visualizzerà in sequenza
le velocità del ventilatore 2→3→1→2→3 …;
premere contemporaneamente entro 5 sec. i
e per confermare la velocità alla
tasti
quale deve funzionare il ventilatore nella
funzione intervallo.
Attivazione funzione intervallo tramite telecomando:
→ , , … →
premere il tasto : l’indicatore luminoso visualizzerà la velocità 1; premendo ripetutamente il
tasto
2→3→1→2→3 …;
premere entro 5 sec. il tasto
ventilatore nella funzione intervallo.
Premendo qualsiasi tasto, tranne quello luce, la funzione intervallo viene disattivata.
Il telecomando è alimentato con una batteria (tipo 23 A). Quando la batteria è esaurita
bisogna: svitare le due viti poste nella parte posteriore ed asportare il coperchio; estrarre la
batteria e sostituirla con una nuova avente le stesse caratteristiche.
Seguire le norme nazionali per lo smaltimento della batteria.
INDICAZIONE MANUTENZIONE FILTRI ANTIGRASSO E CARBONE
La cappa di serie viene fornita come aspirante; se si desidera utilizzarla come filtrante
con anche l’ indicazione dell’ allarme filtri carbone leggere di seguito.
Allarme filtri antigrasso: segnale acustico con motore in moto e led del tasto
Azzeramento allarme filtri antigrasso: a motore spento premere due volte .
Allarme filtri carbone: segnale acustico con motore in moto e led del tasto
Azzeramento allarme filtri carbone: premere due volte
Impostazione uso filtrante: se impostata funzione aspirante (fornitura standard), a motore e
luci spente premere continuativamente per 5 secondi il tasto
accende per 5 secondi.
Impostazione uso aspirante: se impostata funzione filtrante, a motore e luci spente premere
continuativamente per 5 secondi il tasto
, l’indicatore luminoso visualizzerà in sequenza le velocità del ventilatore
,
per confermare la velocità alla quale deve funzionare il
premere contemporaneamente il tasto
quello di una delle velocità
quale si vuole attivare la funzione intervallo;
Cioè Tasto
Cioè Tasto
Cioè Tasto
premere entro 5 sec. il tasto
confermare la velocità alla quale deve
funzionare il ventilatore nella funzione
intervallo.
/ ; il led del tasto si accende per 5 secondi.
e per la prima velocità;
e per la seconda velocità;
e per la terza velocità;
.
/ ; il led del tasto si
/ / alla
per
lampeggiante.
lampeggiante.
e
28
Page 29

MANUTENZIONE
FILTRI ANTIGRASSO
I filtri metallici antigrasso servono per trattenere i grassi che nell’uso normale sono in
sospensione nei fumi di cottura, impedendo che si deteriori il motore; possono essere lavati a
mano od in lavastoviglie.
Per il lavaggio a mano è sufficiente adoperare acqua calda e sapone, spazzolando molte volte
e poi risciacquando sotto acqua corrente.
Alla fine del lavaggio i filtri antigrasso devono essere asciugati e rimontati correttamente.
E’ possibile che dopo il lavaggio il filtro subisca una lieve alterazione del colore
ATTENZIONE! Si consiglia di lavare i filtri antigrasso dopo circa 50-100 ore di
utilizzo del piano cottura.
Se i filtri antigrasso sono molto sporchi il motore riesce ad aspirare poca quantità d’aria, con
diminuzione delle prestazioni.
I grassi che si accumulano sui filtri antigrasso, se non rimossi con un lavaggio periodico, sono
facilmente infiammabili e possono causare incendi.
La ditta costruttrice declina ogni responsabilità per incendi causati da cattiva
manutenzione dei filtri antigrasso.
FILTRI CARBONE
I filtri carbone sono utilizzati in funzione filtrante. Il carbone depura l’aria dagli odori dei fumi di
cucina. I filtri carbone si trovano dietro i filtri antigrasso e sono assolutamente necessari se la
cappa è filtrante. In versione aspirante non è necessario avere filtri carbone.
Esistono due tipi di filtri carbone: filtri carbone rigenerabili LONG LIFE e filtri carbone
standard.
FILTRI CARBONE ATTIVI LONG LIFE
Per i filtri carbone rigenerabili vengono fornite istruzioni a parte con il filtro.
I filtri carbone a lunga vita sono marcati con 230°C sulla cornice.
ISTRUZIONI. Il carbone deve essere rigenerato prima del primo utilizzo per eliminare l’umidità
presente nello speciale carbone attivo.
Mettere la cassetta del filtro sulla griglia nel mezzo del forno e lasciare riscaldare a 230° C per
un’ora. Successivamente lasciare raffreddare completamente per due ore. Se il filtro viene
montato prima di due ore la cappa puo’ essere danneggiata da residui caldi del carbone. Il
processo di rigenerazione puo’ causare un piccolo scolorimento del filtro. Dopo questo tempo
il filtro puo’ essere rimontato nella cappa.
RIGENERAZIONE
L’umidità e le particelle di grasso riducono le prestazioni e per questo il filtro deve essere
rigenerato secondo il tempo indicato nel libretto istruzioni.
Mettere la cassetta del filtro sulla griglia nel mezzo del forno e lasciare riscaldare a 230°C per
un’ora. Successivamente lasciare raffreddare completamente per due ore. Solo allora si puo’
rimontare il filtro ed il Vs. apparecchio rifunzionerà per altri 4 mesi.
Se la cappa viene utilizzata in modo intensivo il filtro deve essere rigenerato in un intervallo
minore di tempo.
Dopo 4 anni il filtro perde la sua efficacia e deve essere cambiato completamente (non si puo’
aggiungere carbone speciale).
29
Page 30

FILTRI CARBONE STANDARD (CHE NON SONO RIGENERABILI)
ATTENZIONE! Si consiglia di sostituire i filtri carbone dopo circa 200-300 ore di utilizzo del
piano cottura. I filtri carbone standard non possono essere lavati né rigenerati.
La ditta costruttrice declina ogni responsabilità per incendi causati da non corretta
manutenzione (sostituzione) dei filtri carbone.
SOSTITUZIONE DELLE LAMPADE ALOGENE
ATTENZIONE! Sostituite sempre le lampade con altre aventi le stesse caratteristiche
elettriche. Prima di sostituire le lampade assicuratevi che siano FREDDE e sia
esclusa completamente l’alimentazione elettrica.
Seguire le fasi indicate nelle figure serie L per cambiare le lampade.
Ripristinare l’alimentazione elettrica.
ATTENZIONE! Se l’illuminazione non funzionasse, controllare che le lampade siano
inserite correttamente.
LAMPADE LED
La sostituzione di lampade Led difettose deve essere fatta solo dal centro Electrolux.
30
Page 31

PULIZIA
Per conservare in buono stato la cappa, pulirla periodicamente seguendo le avvertenze
riportate di seguito.
ATTENZIONE! Assicuratevi che sia esclusa l’alimentazione elettrica.
La sostanza detergente raccomandata è una soluzione di ACQUA e SAPONE LIQUIDO
NEUTRO. E’ molto importante che il sapone liquido sia privo di granuli che possono graffiare la
superficie.
La soluzione deve essere prima applicata su un panno morbido e poi a mano si strofina il panno
sul mantello seguendo necessariamente col panno il senso della satinatura.
E’ fatto assoluto divieto di versare liquidi direttamente sulla cappa.
Il panno deve essere privo di bottoni, chiusure lampo, automatici o altro che possa graffiare la
superficie.
Si vieta l’uso di prodotti aggressivi, granulosi o abrasivi o similari che potrebbero compromettere
l’aspetto superficiale del materiale.
La ditta costruttrice non risponde di danni sia funzionali che estetici causati da una pulizia non
adeguata ai materiali utilizzati od eseguita in modo non corretto.
ACCESSORI OPZIONALI
Sono disponibili, venduti separatamente, questi accessori opzionali:
• FILTRI CARBONE STANDARD
• FILTRI CARBONE RIGENERABILI LONG LIFE
• SET FILTRANTE
• VALVOLA DI RITENUTA ELETTRICA
• TELECOMANDO
GUASTI
Se la cappa aspirante non risponde al comando togliere tensione alla cappa per circa 1
minuto estraendo la spina di alimentazione o disinserendo l’interruttore di sicurezza e
successivamente ripristinare il collegamento.
Se il comportamento della cappa sembra anomalo, consultare la procedura di azzeramento
filtri relativa al comando che equipaggia il prodotto (vedi capitolo FUNZIONAMENTO ED
UTILIZZO).
In modalità stand by l’intensità della luce può essere ridotta: questo non è un disturbo.
31
Page 32

CONTRASSEGNO PER DIRETTIVA CEE
Questo apparecchio dispone di contrassegno ai sensi della direttiva europea
2002/96/CE in materia di apparecchi elettrici ed elettronici (waste electrical
and electronic equipment WEEE).
Questa direttiva definisce le norme per la raccolta ed il riciclaggio degli
apparecchi dismessi valide su tutto il territorio dell’ Unione Europea.
Il simbolo a lato sul prodotto o sulla confezione indica che il prodotto non
deve essere considerato come un normale rifiuto domestico, ma deve essere
portato nel punto di raccolta appropriato per il riciclaggio di apparecchiature
elettriche ed elettroniche. Provvedendo a smaltire questo prodotto in questo modo
appropriato, si contribuisce a evitare potenziali conseguenze negative per l’ ambiente e per la
salute, che potrebbero derivare da uno smaltimento inadeguato del prodotto. Per informazioni
piu’ dettagliate sul riciclaggio di questo prodotto, contattare l’ ufficio comunale, il servizio locale
di smaltimento rifiuti, o il negozio in cui è stato acquistato il prodotto.
Per la Svizzera:
Dove dismettere i vecchi apparecchi? O dove sono acquistati i nuovi o consegnarli ai punti di
raccolta S.EN.S. o ai riciclatori ufficiali S.EN.S.
La lista dei punti di raccolta ufficiali S.EN.S si puo’ trovare sotto:
www.sens.ch
32
Page 33

COOKER HOOD
GENERAL
The model you have selected is a decorative suction cooker hood which can also work as
filtering hood.
A SUCTION HOOD extracts air, fumes and vapours from the inside environment and then
expels them outside. It is not necessary to use carbon filters for purifying.
A FILTERING HOOD extracts air, fumes and vapours from the inside environment, purifies
them by means of carbon filters and then emits the purified air into the same environment. In
this case, the use of carbon filters is absolutely necessary .
Carbon filters are available separately and can be purchased as optional accessories (see
OPTIONAL ACCESSORIES).
BEFORE MOUNTING
Before mounting you should:
Check that the minimum distances between the lower part of the cooker hood and the upper
part of the cooker as given in FIGURES M 1. We advice a distance between 700 and 800 mm.
WARNING! If the user decides to install the hood at lower distances, the manufacturer
declines any responsibility for eventual damages caused by the hood due to strong heat
or damages to property or persons etc. caused directly or indirectly by any type of
malfunctioning breakdown or possible fire.
Arrange for a socket outlet or standard connection to the electric mains.
If the hood is used as a suction hood, it is necessary to make a hole towards the outside (i.e.
in the open air) for the scavenging of the fumes.
WARNING! The air discharge of the hood must go outside by means of a separate
chimney and cannot be connected to a boiler chimney, gas, fume or vapour
scavenging pipes or any other duct. The incorrect mounting of a cooker hoods can
create fires. It is necessary to observe the cantonal dispositions of the fire-brigade.
If the hood is used as a suction hood, it is necessary to guarantee enough air- exchange .
In case a cooker hood is used in modern air tight buildings with or without confort air, it is
necessary to make in advance a planning for the air flow.
The contemporary use without danger of appliances connected to chimneys (for instance
fireplaces or furnaces, gas or other fuel stoves) and cooker hood is allowed only if the room or
the flat dispose of an opening for the air from the outside of ca 500/600 cm
of the hood a depression is avoided.
The depression in the room must not be above 4 Pa (0.04 mbar).
If the hood is to be used as a filtering hood, it is necessary to purchase carbon filters . They
are available as ACCESSORIES.
2
and if with the use
33
Page 34

MOUNTING INSTRUCTIONS
Mount the hood as shown in the mounting instruction booklet.
WARNING! The fixing material (screws/plugs) that are delivered with the hood are
suitable only for solid concrete ceilings and walls. The person who is mounting the
hood should make sure that the fixing elements delivered with the hoods are right and
suitable for the walls and ceiling he finds. The manufacturer declines any
responsibility for damages caused by incorrect mounting.
DISMANTLING AND RE-POSITIONING OF THE GREASE FILTERS
Switch the lights off and wait till they have completely cooled down.
Follow the steps as shown in Figures.
To dismantle the grease filter press the handle and, pull it downwards.
To re-position the grease filter insert them oblique in the opening, lift them in the front side and
then fix them in the back side.
FITTING AND REMOVAL OF EVENTUAL CARBON FILTERS
If you wish to use the hood as a filtering hood, it is necessary to fit the carbon filters.
The carbon filters ARE OPTIONAL, and can be bought separately.
2 kinds of carbon filters are available:
• LONG LIFE Carbon filters that can be regenerated. The instructions are given with the
filters.
• Standard Carbon filters that cannot be regenerated. The instructions you find in Figures
C.
GENERAL WARNING
The pipe must be heat, flame and corrosionproof. The producer strongly advises against the
use of reducers or pipes with smaller diameter to the hood outlet pipe. Also flexible aluminium
pipes are not recommended because performance is strongly diminished.
The end part of the pipe, on the outside of the hole on the wall, must be of such a shape to
avoid rain, gusts of wind or other foreign bodies getting into the pipe.
Should there be any doubt, contact anyone specialising in the installation of gas or ventilation
system.
34
Page 35

ELECTRICAL CONNECTION
WARNING
The electrical connection can only be carried out by qualified professional personnel, using
standard material and state of the art installation methods. The manufacturer declines any
responsibility for installations carried out by unskilled persons and for installations which are
not in conformity with the standard norms concerning electrical safety (both concerning
methods and materials).
ELECTRICAL TECHNICAL DATA
The electrical technical data are available in the metallic rating plate of the hood. This you can
find inside the hood after you have removed the grease filters.
CONNECTION TO THE POWER SUPPLY
The flexible feed cable supplied is already connected internally and emerges from the hood
near the air outlet duct.
It is possible to effect two types of electric installation:
• fixed installation;
• installation by means of plug on a socket.
BEFORE ELECTRICAL INSTALLATION
Before connection you must:
• Check that the electrical data indicated are in conformity with the main voltage and
frequency values of the building where the hood is to be installed;
• Check that the building is fitted with electric safety systems to protect against short circuits
and electric shock systems, according to the laws in force;
• Install an electric socket (or connection point) with a bipolar switch, which has contacts
with an opening of at least 3 mms;
• If it is intended to install the hood with a plug, it is necessary that you have access to the
plug.
• always turn off the main voltage supply by means of the bipolar switch before connecting
and switch on again only when connections have been completed, tested and are safe.
WARNING! I When the hood is in stand by the intensity of the light is reduced. This is
no failure.
PRECAUTIONS TO BE TAKEN IF REPAIRS ARE TO BE CARRIED OUT
Repairs must be carried out only by our SERVICE CENTERS. It is necessary to use only
original spare parts.
Any repairs carried out by others could prove to be dangerous and could be a fire risk.
35
Page 36

INSTRUCTIONS FOR USE and PRECAUTIONS
is necessary to do that you find in the instruction manual.
• The hood is not proper for the use of people (children included) with reduced mental,
physical and sensorial capacities or for people that have no experience or knowledge to
use it, unless they have been trained on purpose by the person responsible for their
security or they acquire experience or knowledge from the instruction booklet.
• Do not to cook “flambé” dishes, avoid flames directly underneath the hood;
• Avoid free flames underneath the hood;
• Avoid any strong flames being issued from under saucepans at the sides; when frying, do
not allow oil to splash or overheat in the pan, as this is a fire risk;
• before any cleaning or maintenance operation, disconnect the hood from the main supply,
by means of the main switch or the bipolar switch or by removing the plug;
• A contemporary use without danger of appliances connected to pipes (like fireplaces or
gas equipment) with the hood is allowed only if the room or flat have a proper opening for
air arriving from the outside of circa 500/600 cm
depression is avoided. For safe ventilation, maximum depression in the room should not
exceed 4 Pa (0,04 mbar). The air discharge must be brought outside by a separate pipe
and cannot be connected to a scavenging pipe or chimney.
• never use the hood without the grease filters;
• keep the grease filters clean, taking into account the recommended cleaning suggestions;
• replace or regenerate the carbon filters (if the hood is used as a filtering hood), at the
intervals indicated;
• turn on the hood motor before you start cooking;
The cooker hood must be used only in private houses for domestic use and to aspirate
vapours and fumes in the kitchen.
The hood must be mounted and connected in a proper way. Everything that
2
and if with the hood working a
36
Page 37

FUNCTIONS AND USE
SL SERIE: LED ABOVE PUSH BUTTONS GL: BUTTONS WITH LIGHT ON THE BACK
The led points above the push buttons
are showing the 4 different speeds of the
motor.
It turns on and off the lights. Short pressing: it switches the lights on
It increases the speeds of the motor.
The highest speed is shown with the led
flashing and after 10 minutes the motor goes
automatically to speed 2.
It decreases the speed of the motor.
It stops the motor it stops the motor
TIMER: with the first, second or third
speed after 10 minutes it sets the automatic
switch off of the motor and the Led point
above the push button is flashing..
REMOTE CONTROL
The functions of the controls can be activated also by a remote control.
For the hoods of the GL serie it is possible to order the remote control as
accessory
The remote control is set up by the manufacturer. If the remote control is not
controlling motor or light nearby the cooker hood, please do the following.
Set up of the remote control:
Keep pressing the
confirm that the remote control has been recognized a long beep is issued. If you do not hear
the acoustic signal within 30 seconds, please repeat the steps as described.
INTERVAL FUNCTION
A specific function of this appliance is the Interval Function which consists in activating the
motor in automatic way 10 minutes each hour at the flashing shown speed.
push button of the remote control and the connect the cooker hood. To
The led points of the push buttons
are showing the 4 different speeds of the
motor.
and off.
Long pressing: it changes the intensity of
the light.
it is normal to have a little whistle with
middle intensity of the light.
first speed
second speed
third speed
Highest speed: the point of the led is
flashing and after 10 minutes the motor goes
automatically to the second speed.
TIMER: on the first, second or third speed
it sets after 10 minutes the switching off of the
motor and the point of the led is flashing.
37
Page 38

Interval function by controls (not possible for model WOSL90X):
e → , , … → e e / / →
Keep pressing at the same time the push
button
speed will switch on, press again the push
button
following for the speeds of the motor
2→3→1→2→3 …;
Keep pressing within 5 seconds the push
button
the motor you wish for the interval function.
Setting of the interval function by the remote control:
Press the push button : the light indicator will show first speed, press again the push
button the light indicator will show the following for the speeds of the motor 2→3→1→2→3
…;
Press within 5 seconds the
the interval function.
By pressing any push button, light excluded, the interval function is excluded.
The remote control has a battery (type 23 A). When the battery is exhausted you need to:
loosen the 2 screws on the rear part and remove the cover; take the battery out and replace it
with one with the same characteristics.
Close the cover again and tighten the screws.
Follow National norms for waste disposal of exhausted batteries.
SATURATION INDICATORS OF GREASE FILTERS AND CARBON FILTERS
The hood is delivered standard in suction use: if you wish to use the hood in filtering
version it is necessary to set this function.
When the grease filters need to be cleaned, you have a saturation indicator for the grease
filters and, if the hood is set for filtering use, when the carbon filters need to be
replaced/regenerated you have a saturation indicator for the carbon filters.
Saturation indicator alarm for the grease filter: acoustic signal with working motor and the point
of the led of the push button
Clearing the saturation indicator alarm for the grease filter: with the motor off press twice the
Saturation indicator alarm for the carbon filters: acoustic signal with working motor and led of
the
Clearing of the saturation indicator alarm of the carbon filter: press twice the
Setting of the filtering use: if the suction function is set up (standard delivery), with motor and
lights off keep pressing for 5 seconds the push buttons
38
and : the led point of the first
, the light indicator will show the
and to confirm the speed for
→ , , … →
push button to confirm the speed for the motor you wish for
is flashing.
push button.
push button is flashing.
will switch on for 5 seconds.
Keep pressing at the same time the push
button
at which you wish to set the interval function.
That is
Press
Press
Press
Press within 5 seconds the
confirm the speed for the motor you wish for
the interval function.
and one of the speeds / /
and for the first speeed
and for the second speeed
and for the third speeed
push button to
push button.
/ ; the led point of the push button
Page 39

Setting of the suction use: if the hood is set for filtering use, with motor and lights off keep
pressing for 5 seconds the push buttons
on for 5 seconds.
/ ; the led point of the push button will switch
MAINTENANCE
CLEANING OF GREASE FILTERS
The metallic grease filters are used to trap the grease that in normal use is contained in the
kitchen vapours/fumes, thereby avoiding the deterioration of the motor.They can be
handwashed or washed in the dishwasher.
For washing by hand, use hot water and soap; this can be done by hand brushing vigorously
several times and then rinsing under the tap.
After washing, the grease filters should be dried and re-fitted correctly.
It is possible that after washing the filter colour changes slightly.
WARNING! We recommend washing grease filters after 50-100 hours of use of
the hob.
If grease filters are dirty, motor can take in just a small quantity of air and performance is
reduced.
The grease which accumulates on dirty filters is easily inflammable and can cause fires, if
not eliminated by periodic washes.
The manufacturer declines any responsibility for fires caused by poor maintenance of
the grease filters.
CARBON FILTERS
The carbon filters are used when the hood is in filtering version. The carbon sets the air free
from kitchen odours. The carbon filters are to be found behind the grease filters and are
necessary if the hood is used in filtering version.
It is not necessary to use carbon filters, if the hood is used for suction use.
We have kinds of carbon filters: LONG LIFE Carbon filters that can be regenerated and
Standard Carbon Filters that cannot be regenerated.
LONG LIFE CARBON FILTERS
For carbon filter that can be regenerated you find an instruction with the filter.
The carbon filter that can be regenerated is marked with 230 °C on the frame.
INSTRUCTIONS: the carbon must be regenerated before the first use as the carbon, even if
special active carbon, takes on humidity. The humidity must be taken away.
Put the filter cassette on the grill of your oven and let is warm up for 1 hour at 230°C. Then
wait for 2 hours to let it become completely cold. If the filter is remounted before 2 hours the
hood can be damaged by remains of hot carbon. The process of regeneration can cause a
light change in the colour of the filter cassette. After this time the filter can be remounted in the
hood.
REGENERATION
Humidity and grease particules reduce the performances of air delivery and for this reason the
filter must be regenerated according to the time given in the instruction booklet.
Put the filter- cassette on the grill of your oven and let it warm up for 1 hour at 230°C. Then
wait for 2 hours to let it become completely cold. Only after this time the filter can be
remounted and your hood can work for other 4 months. If you use the hood in an intensive
39
Page 40

way, the filter must be regenerated in shorter time. After 4 years the filter looses its
effectiveness and must be completely replaced (it is not possible to add special carbon).
STANDARD CARBON FILTERS (THAT CANNOT BE REGENERATED)
WARNING! WE RECOMMEND REPLACING CARBON FILTERS AFTER APPROX.
200-300 HOURS OF USE OF THE HOB. STANDARD CARBON FILTERS CANNOT
BE WASHED OR RE-CYCLED.
The manufacturer denies any responsibility for fires caused by failure in the
maintenance of carbon filters (replacing or regeneration of the carbon filters).
REPLACEMENT OF HALOGEN LAMPS
WARNING! Always replace the lamps with lamps which have the same electrical
characteristics. Before replacing the lamps, make sure that they are cold and that power has
been completely turned off.
Follow the instructions phases as shown in Figures of the L SERIES.
Connect back to electricity.
WARNING! If the lights are not working kindly check tha the lamps have been inserted in a
correct way.
LED LAMPS
To replace faulty Led Lamps always use an ELECTROLUX SERVICE CENTRE.
40
Page 41

CLEANING
To preserve the hood in good condition, clean this periodically following the advice given as
follows.
WARNING! Make sure that power has been completely turned off.
The detergent solution recommended is a combination of WATER and NEUTRAL LIQUID
SOAP. It is of vital importance that the liquid soap should not contain any grains which could
scratch the surface.
The solution should be applied first onto a soft cloth which is then rubbed over the shell. It is
important to follow the pattern of the satin finish with the cloth.
IT IS ABSOLUTELY FORBIDDEN TO POUR LIQUIDS DIRECTLY ONTO THE HOOD.
The cloth used should not have any buttons, zips, fasteners or anything else which could
scratch the surface.
The use of harsh abrasive or granular products, petrol, spirits or similar products which could
damage the surface of the materiall, is severely forbidden.
The manufacturer will not be responsible for any damages either functional or to the
appearance of the hood, caused by cleaning operations carried out using unsuitable products
or unsuitable methods.
ACCESSORIES
The following optional accesories are available and are sold separately:
• STANDARD CARBON FILTERS
• LONG LIFE CARBON FILTERS THAT CAN BE REGENERATED
• FILTERING SET
• ELECTRIC CHECK VALVE
TROUBLESHOOTING
If the cooker hood is not responding to the controls, disconnect electricity for about 1 minute,
taking the plug out or disconnecting the main electricity supply, then reconnect.
If the behaviour of the hood seems strange, check the reset procedure for the grease filter for
the type of controls you have (see Function and Use chapter).
When the hood is in stand by the lights have a reduced intensity – This is no sign of failure.
41
Page 42

EUROPEAN DIRECTIVE MARK
This appliance is marked according to the European directive 2002/96/EC on Waste Electrical and Electronic Equipment (WEEE). This norm is the frame of a European-wide validity of return and recycling of Waste Electrical and Electronic Equipment.
The symbol on the product or on its packaging indicates that this product may
not be treated as household waste. Instead it shall be handed over to the
applicable collection point for the recycling of electrical and electronic
equipment. By ensuring this product is disposed of correctly, you will help
prevent potential negative consequences for the environment and human health, which could
otherwise be caused by inappropriate waste handling of this product, please contact your
local city office, your household waste disposal service or the shop where you purchased the
product.
For Switzerland:
Where to give old appliances? Either where you buy the new ones, or delivery them to the
official S.EN.S collection points or S.EN.S recyclers.
List of the official S.EN.S collection points you find under
www.sens.ch
42
Page 43

Page 44

www.electrolux.com
06067719 1211
 Loading...