

AEG-Electrolux VAMPYRTC345.2, VAMPYRTC345.3, VAMPYRTC315.0F, VAMPYRTC355, VAMPYRTC375.0 User Manual
...Page 1

VAMPYR® TC . . . electronic
Cylinder vacuum cleaner
Aspirateur-traîneau
Stofzuiger, sledemodel
Aspirapolvere da pavimento
Aspiradora arrastrable
Aspirador de pó
Golvdammsugare
Støvsuger
Pölynimuri
Vysavaè prachu
Porszívó
Odkurzacz podlogowy
H𪸽¼¯¸± ÷¸³õ¦
ПЫЛЕСОС
Operating instructions
Mode demploi
Gebruiksaanwijzing
Istruzioni per luso
Instrucciones para el uso
Instruções de manejo
Bruksanvisning
Brugsanvisning
Käyttöohje
Návod k pou
Használati útmutató
Instrukcja obs¢ugi
Oå®ã¥ªÿ ¿¼±÷ªþÿ
ИНСТРУКЦИЯ ПО ЭКСПЛУАТАЦИИ
it
í
¤
Page 2
Depending on the model, the equipment marked with * may be different or not available.
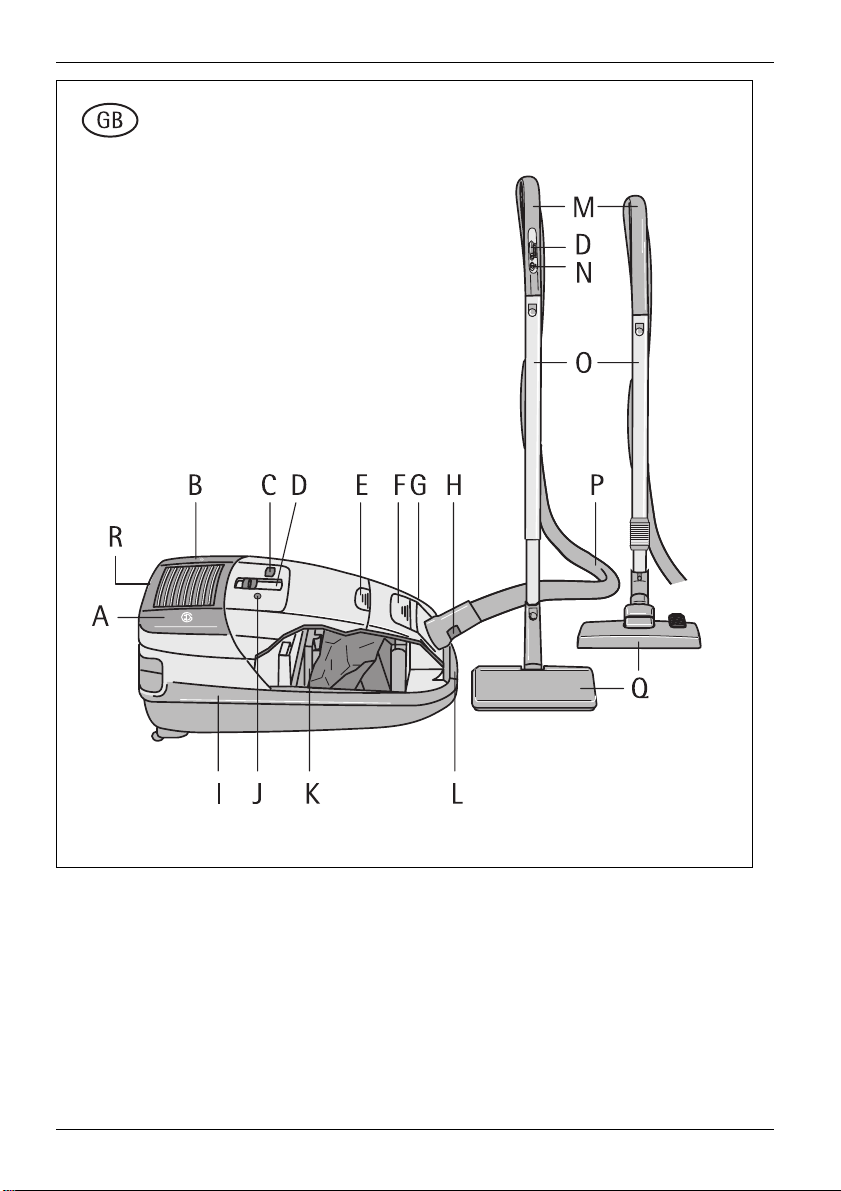
= Cable Retraction Button
A
= On/Off Button
B
= Filter Replacement Indicator*
C
= Power Regulation*
D
= Button to Open the Accessory Compart-
E
ment
= Button to Open the Paper Filter Compart-
F
ment
= Socket for Electrical Vacuum Brush*
G
= Button for Hose Release*
H
2
= Tool Rail
I
= Power Indicator Light*
J
= Hygiene Filter
K
=Carrying Handle
L
=Handle
M
= ROTOSOFT Remote Control*
N
= Telescopic Tube*
O
= Suction Hose
P
=Nozzle*
Q
= Button for Filter Box Lid
R
Page 3

Contents
Appliance Description
Safety Instructions
Making the Vacuum Cleaner Ready
. . . . . . . . . . . . . . . . . . . . . . . . . . . . . . . . . .4
for Use
Switching On
Adjusting the Suction Power
Using the Nozzles
Additional Accessories
Filter Replacement
Maintenance and Cleaning
What to do if
AEG Customer Service in Europe
. . . . . . . . . . . . . . . . . . . . . . . . . . . .4
. . . . . . . . . . . . . . . . . . . . .2
. . . . . . . . . . . . . . . . . . . . . . .3
. . . . . . . . . . . . . .4
. . . . . . . . . . . . . . . . . . . . . . . .6
. . . . . . . . . . . . . . . . . . . .7
. . . . . . . . . . . . . . . . . . . . . . .8
. . . . . . . . . . . . . . .11
. . . . . . . . . . . . . . . . . . . . . . . . . . .11
. . . . . . . . 175
Dear customer,
Please read these operating instructions through
carefully. Above all please observe the safety
instructions on the initial pages of these operating instructions! Please keep these operating
instructions for future reference. Pass them onto
any subsequent owner of the appliance.
Safety Instructions
Only connect the appliance to 220/230 V
AC.
The circuit for the socket used must be pro-
tected with a fuse with a rating of at least
16 A, or 10 A slow blow.
Never remove the mains plug from the socket
by pulling on the cable.
Do not use the appliance if:
the mains lead is damaged,
the electrical hose, electrical telescopic
tube or electrical vacuum brush show visible signs of damage,
the housing shows visible signs of damage.
Important!
telescopic tube contain electrical connections. These should be checked regularly and
must not be used if damaged. Do
the electrical hose, electrical telescopic tube
or electrical vacuum brush in water. Never
vacuum liquids using the vacuum cleaner.
The electrical hose and electrical
immerse
not
Avoid running over the mains lead with the
appliance, the vacuum brush or the electrical
vacuum brush. The insulation could be damaged.
If a paper filter is not inserted, it is not
possible to close the cover. Please do not
use force!
Ensure that a paper filter, a fresh air activated
charcoal filter/microfilter
are always fitted.
Toner dust from laser printers and copiers
must not be vacuumed using normal household vacuum cleaners.
It is only permitted to use this vacuum
cleaner for dry vacuuming. People and animals must not be vacuumed using the appliance.
Keep children away from electrical appliances.
The manufacturer does not accept any liabil-
ity for any damage caused by incorrect use or
incorrect operation of the appliance.
Leave wet shampooed carpets to dry com-
pletely. Otherwise the vacuum cleaner will be
damaged. Furthermore, protection against
electric shock may be impaired.
Do not vacuum matches, glowing ashes or
cigarette ends using the appliance. Avoid
picking up hard, pointed objects as these may
damage the appliance or the paper filter.
Do not subject the appliance to the effects of
the weather, moisture or sources of heat.
If the mains lead is defective, the complete
cable roller must be replaced by AEG customer service, or an authorised repair centre.
Repairs to electrical appliances are only to be
performed by qualified service engineers.
Improper repairs can give rise to significant
hazards for the user.
Therefore if your appliance needs repairing,
please contact your retailer or AEG customer
service.
This appliance complies with the following
;
EC directives: - 73/23/EWG dated 19.02.1973
Low Voltage Directive 89/336/EWG dated
03.05.1989 (including Directive Amendment
92/31/EWG) EMC Directive.
*
and a hygiene filter
*) depending on model
3
Page 4
Making the Vacuum Cleaner Ready
for Use
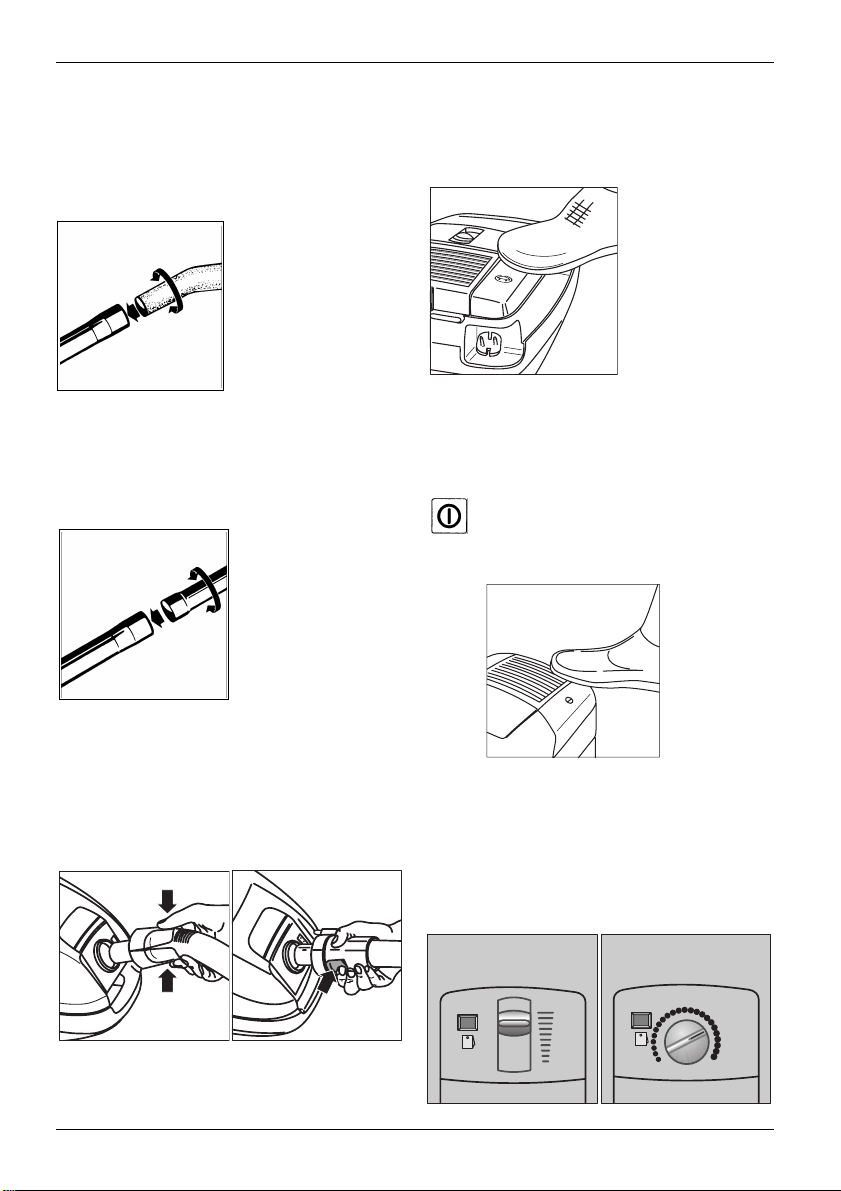
Connect suction hose and suction tube
together until the catch engages
Firmly connect the suction hose handle to the
suction tube.
Mains Connection/Cable Rewind
The mains cable is in the cable compartment.
Pull out the cable and plug into a mains socket.
After use, unplug from the mains. Press the foot
button, the cable is rolled up automatically.
Adjust Telescopic Tube
(depending on model)
The tube can be adjusted to the required working height by sliding the sleeve.
Connect Suction Hose
(depending on model)
Insert the connector on the suction hose in the
suction inlet. The connector locks in place and
can be rotated freely (depending on model).
To remove the hose, press the release button and
pull out the connector.
Switching On
Switch On and Off
You can switch the appliance on and off
by pressing the On/Off button. When
switched on, the mains power indicator
is illuminated (depending on model).
Adjusting the Suction Power
(depending on model)
The suction power can be adjusted to suit the
specific situation using the electronic power
regulation. By reducing the suction power, you
can significantly reduce the amount of force
needed to push the nozzle.
On the Appliance
4
Page 5

On the Handle
The electronic power regulation can be easily
adjusted using the remote control on the handle.
InfraMote
(depending on model)
Pulse LED for remote control.
A
Stand-by position: During pauses in your
B
work or short interruptions, switch to the
stand-by position. Vacuuming is interrupted.
Continuous regulation up to maximum
C
power.
Continuous regulation down to minimum
D
power.
Remote control battery compartment. The
E
batteries should be changed at least once a
year. Only use alkaline batteries of type
LR 03 AAA 1.5 Volt.
Power Regulation Remote Control
ROTOSOFT (depending on model)
First switch on the appliance. The ROTOSOFT
electrical vacuum brush is switched on and off
using the switch
Electronic power regulation is easy using the
remote control on the handle (
ing on the model).
Stand-by Position
During pauses or short interruptions to
your work, slide the adjuster to the
stand-by position, vacuuming is interrupted. If you stop work for a longer
period, please switch off the appliance
using the On/Off button.
(Figure A)
.
Figure B
/depend-
Sliding Regulator
Unfavourable room conditions (e.g. ob-
Note:
stacles, partition walls, dark doors and furniture,
very large window areas, very high room ceilings
or very dark wall colours) can cause the remote
control to malfunction. To rectify this problem,
please point the suction tube handle in the direction of the vacuum cleaner.
Sources of infrared (the sun, low energy lamps)
can, in certain circumstances, impair the function of the remote control. In this case, move
the vacuum cleaner out of the light causing the
interference.
Rotary Regulator
5
Page 6

Using the Nozzles
Use of the Electrical Vacuum Brush
ROTOSOFT
(depending on model)
The electrical vacuum brush is suitable for carpets and smooth floors.
Engage electrical vacuum brush with connector.
The brush is switched on by placing the vacuum
cleaner in operation and operating the On button (Figure 1/N) on the handle. Pick up larger
items such as material remnants, paper, etc.
from the floor to avoid jamming the rollers.
Press on the nozzles:
Connect the floor nozzle to the suction tube.
The connection must engage noticeably.
Press the release button to remove the floor
nozzle from the suction tube.
Using the VARIO Floor Nozzle
(depending on model)
For the daily care of carpets and hard floors. The
floor nozzle can be switched over manually:
with the brushes protruding for smooth floors,
and with the brushes withdrawn for carpets.
A furniture brush, crevice nozzle and upholstery
nozzle are stored in the accessories compartment.
To met your specific requirements for room
care, three different items are included with
the vacuum cleaner in an integrated accessories compartment. Open the compartment by
gently pressing the button as shown in the
Figure.
The nozzles can, depending on your needs, be
fitted to either the suction tube or the suction
hose handle.
Crevice Nozzle
For vacuuming crevices, gaps and corners.
6
Page 7

Upholstery Nozzle
For vacuum cleaning all upholstered furniture,
mattresses, etc.
The thread lifting strips on the nozzle even pick
up thread and lint.
Furniture Brush
For vacuuming delicate materials and objects.
Electrical Vacuum Brush ROTOSOFT
(depending on model)
For all AEG vacuum cleaners with sockets.
For cleaning robust, worn carpets. The rotating
brushes remove stubborn or trodden-in dirt, and
revive the carpet pile.
Special Purpose Nozzle
(Available from your retailer)
E No. 900 087 806
See additional accessories for special floor nozzles.
Additional Accessories
Turbo Brush ROTOSOFT 1200
(Available from your retailer)
E No. 900 087 810
The ROTOSOFT 1200 eases the care of carpets
and smooth floors. With their rotary motion, the
brushes revive short-pile carpets flattened by
heavy use.
For special care of parquet, tiles and hard floors.
Radiator Brush
ET No. 668 451 930
(Available from AEG customer service)
For removing dust from radiator ribs, narrow
shelf compartments, or crevices. The radiator
brush is fitted to the crevice nozzle.
7
Page 8

Filter Replacement
Replacing the Hygiene Paper Bag
It is necessary to replace the hygiene paper bag
if, with the appliance switched on at maximum
suction power and the nozzle lifted off the
floor, the viewing window of the filter replacement indicator is completely red.
Even if the hygiene paper bag does not
appear to be full, it should be replaced.
some cases, fine dust can block the pores on the
surface of the filter in such a way that the suction power of the appliance is significantly
reduced and the filter replacement indicator
activated, even though the hygiene paper bag is
not completely full. The same also applies in the
case of the blockage of the microfine dust filter
or the hygiene filter. The lid can be opened by
pressing the button and then folded back until
it engages.
In
not fitted, the lid cannot be closed. Please do
not use force!
Changing the Microfilter
The filter box lid can be opened by pressing the
button. Remove the used microfilter by the
clean hygiene tabs
the household rubbish. Insert the new microfilter and close the filter box lid.
Replacing the Fresh Air Activated Charcoal
Filter
Open the filter box lid. Remove the microfilter
and bottom grille. Remove used fresh air activated charcoal filter by the clean tabs. The filter
can be disposed of in the household rubbish
without problems. Insert the new fresh air activated charcoal filter, along with the grille and
microfilter. Close filter box lid.
(Figure) and dispose of it in
Hygienic Filter Replacement:
To remove the full hygiene paper bag, pull up
the closing tab. Here you must overcome slight
resistance. The opening on the hygiene bag
closes automatically. Hygiene paper bags full of
normal household dust can be disposed of with
household rubbish. Slide the new hygiene paper
bag into the guide rails to the stop, only then
can the lid be closed. If a hygiene paper bag is
8
Page 9

Replacing the Fresh Air O2-Filtersystem
washable HEPA
Open the filter box lid. Remove O
clean if necessary). Remove the fresh air activat-
-Filter (and
2
ed charcoal filter by the tabs. Insert new filter
and O
-Filter. Close filter box lid.
2
Changing the Hygiene Filter
Hygiene filter, 2 layer with white fleeced
fabric
Open the dust compartment lid and remove the
hygiene filter frame. Remove the used hygiene
filter. The filter can be disposed of in the household rubbish without problems. Insert the new
hygiene filter with the white surface towards
the grille, slide the filter frame into the retaining bracket.
Cleaning the O
Open the filter box lid and remove the O
Wash out the soiled filter insert only under
-Filter
2
-Filter.
2
warm, running water. Do not user any cleaner,
and, as far as possible, do not touch the delicate
filter surface. Tap the filter frame gently to
remove any remaining water. Insert O
and close the filter box lid.
-Filter
2
Upgrading to Fresh Air Activated Charcoal/
Ultra/O
-Filter and Fresh Air Micro-Filter
2
(depending on model)
If you want to upgrade your appliance to one of
these filter systems, please proceed as follows:
Open the filter flap and remove the microfilter.
Remove the lower grill and the insulation material underneath it.
Also remove the upper grill with the aid of a
screwdriver. Insert the new filter system and the
fresh air microfilter, close the filter lid.
9
Page 10

When Does the Filter Have to be
Replaced?
Filter Systems
Depending on the model, your appliance may be
equipped with various outlet filters:
1
Hygiene Filter System:
microfilter. The two-layer hygiene filter and
the electrostatically charged microfilter provide for almost 100% clean outlet air.
2
Fresh Air Microfilter System:
microfilter and activated charcoal filter. The
hygiene filter system, combined with a special
odour retention filter, effectively and reliably
retains odours and dust.
3
O
-Filtersystem washable HEPA:
2
filter, washable and reusable O
activated charcoal filter. The washable special
filter, of filter class S, is useful for people
who suffer from allergies and, in combination
with the odour retaining activated charcoal
filter, achieves the highest efficiency.
4
Ultra Filter System:
filter.
Recommended Replacement Intervals
Replace the
on every fifth paper filter change, however at
the latest when the suction performance of the
appliance starts to drop, or the replacement
indicator illuminates.
The
be replaced after approximately one year. If
noticeable odours are produced, the filter must
be replaced earlier.
Clean the
cleaning after the third replacement of the
hygiene paper bag.
The
year.
microfilter
fresh air activated charcoal filter
-Filter
O
2
ultra filter
should be replaced after one
Hygiene filter and
Hygiene filter,
Hygiene
-Filter and
2
Hygiene filter and ultra
and the
regularly. We recommend
hygiene filter
should
Upgrade Set
Hygiene Paper Bag
VAMPYR TC...
E No. 909 280 424
ET No. 668 901 264
Paper filter size 24
(3-layer)
Upgrade Filters
Fresh Air Activated Charcoal Filter
E No. 900 087 003
ET No. 109 990 124/9
Ultra Filter
E No. 900 087 004
ET No. 109 990 121/5
-Filtersystem washable HEPA
O
2
E No. 900 087 012
ET No. 900 087 012/2
Microfilter
ET No. 109 606 000/7
Fresh Air Activated Charcoal Filter for
-Filtersystem washable HEPA
O
2
ET No. 109 990 300/5
10
Page 11

Carrying and Storage
To make the appliance easier to store and to
carry, slide the floor nozzle, turbo nozzle and
electrical vacuum brush onto the tool rail.
Parking System
For storing the suction pipe and nozzle during
short pauses in vacuuming. The bracket on the
nozzle is slid into the parking rail on appliance.
Depending on the model, the appliance switches
off automatically.
Maintenance and Cleaning
When performing maintenance or cleaning the
appliance, ensure that it is switched off and
unplugged from the mains. As required, wipe
the housing and the paper filter compartment
with a damp cloth. Do not use any abrasive
cleaners or solvents. Occasionally vacuum the
floor nozzle and the brushes with the crevice
nozzle.
What to do if ...
the nozzle is hard to push:
Lower the power setting on the appliance.
Cleaning efficiency is not degraded in this
case.
the motor thermal cut-out has tripped:
If the motor is overloaded, e.g. due to a full
filter bag or blocked accessory, the motor
thermal cut-out shuts down the motor.
In this case, switch off the appliance.
Unplug from the mains and leave the
motor to cool down. Check the hygiene
paper bag, suction tube and suction hose,
remove any blockage. The appliance can be
turned on again after approximately 30
minutes.
the fuse has blown:
If you have plugged other high power elec-
trical appliances into the same circuit and
use them at the same time as the vacuum
cleaner, the fuse may blow.
This can be avoided by turning down the
electronic power regulation to the minimum setting prior to switching on the
appliance, and only selecting a higher setting after switching on the vacuum cleaner.
Your vacuum cleaner is equipped with an
electronic soft start controller that
reduces the start up current of the
motor, this avoids the mains fuse blowing under normal circumstances. As a
result, at the lowest power setting the
appliance may have a start delay of
approx. 4 seconds.
the paper filter becomes damaged and the
hygiene filter is soiled:
Remove filer frame, replace hygiene filter
and reinsert the filter frame,
Fit new hygiene paper bag.
11
Page 12

the lid jumps out of the hinge:
If the housing lid comes out of the hinge
due to the lid being opened too far, that is
past the stop, place the lid on the housing
and press it closed until it engages.
Protecting the Environment
Do not simply throw away packaging material
and old appliances.
Equipment Packaging:
The cardboard packaging can be placed in the
waste paper collection.
Deposit the plastic bag made of polyethylene
(PE) at a PE collection point for recycling.
Recycling the Appliance at the End of its Life:
The plastic components all carry a material
identification marking so that, like the other
materials, they can be recycled at the end of
the life of the appliance.
Please inquire with your local authority about
your local recycling centre.
Batteries:
Do not throw used batteries in household
rubbish. Dispose of these in the special containers provided by the local authority.
Customer Service
The highest quality requirements are applied to
our products. Should you nevertheless have
questions in respect of the usage of this appliance, please write to us. It is only with your support that we are in the position to develop
appliances to suit your needs.
12
 Loading...