

Page 1

SANTO 60270-18 KG
Dubbeldeurs-koelautomaat
Fridge freezer
Gebruiksaanwijzing
Operating Instructions
Page 2
2
Geachte klant,
Lees eerst aandachtig de gebruiksaanwijzing door voordat u uw nieuwe
koelapparaat in gebruik neemt. Hierin staat belangrijke informatie over een
veilig gebruik, over het opstellen en over het onderhoud van het apparaat.
De gebruiksaanwijzing s.v.p. bewaren om lager nog eens iets na te kunnen
lezen.. Aan eventuele volgende bezitters van het apparaat doorgeven.
Deze gebruiksaanwijzing is voor meerdere, technisch vergelijkbare modellen
in diverse uitvoeringen bestemd. S.v.p. alleen op de aanwijzingen letten die
op uw apparaat betrekking hebben.
Met de waarschuwingsdriehoek en/of door signaalwoorden (Waar-
schuwing!, Voorzichtig!, Let op!) wordt de aandacht gevestigd op aanwijzingen die belangrijk zijn voor uw veiligheid of voor het juist functioneren
van het apparaat. Hier absoluut op letten.
Na dit symbool wordt uitleg gegeven over de bediening en het praktisch
gebruik van het apparaat.
Met het klaverblad worden tips en aanwijzingen voor een economischen
milieuvriendelijk gebruik van het apparaat aangegeven.
Voor eventueel optredende storingen staan in de handleiding aanwijzingen
om deze zelf op te lossen, zie Hoofdstuk "Wat te doen als...". Als deze aanwijzingen niet voldoende informatie bieden staat onze service-afdeling u te
allen tijde ter beschikking.
Page 3

3
Inhoud
Veiligheid . . . . . . . . . . . . . . . . . . . . . . . . . . . . . . . . . . . . . . . . . . . . . . .4
Weggooien . . . . . . . . . . . . . . . . . . . . . . . . . . . . . . . . . . . . . . . . . . . . . .5
Informatie over de verpakking van het apparaat . . . . . . . . . . . . . . . . . .5
Weggooien van oude apparaten . . . . . . . . . . . . . . . . . . . . . . . . . . . . . . . .6
Transportbescherming verwijderen . . . . . . . . . . . . . . . . . . . . . . . . . . .6
Opstellen . . . . . . . . . . . . . . . . . . . . . . . . . . . . . . . . . . . . . . . . . . . . . . .7
Opstelplaats . . . . . . . . . . . . . . . . . . . . . . . . . . . . . . . . . . . . . . . . . . . . . . . . .7
Uw koelapparaat heeft lucht nodig . . . . . . . . . . . . . . . . . . . . . . . . . . . . .8
Muur-afstandshouders . . . . . . . . . . . . . . . . . . . . . . . . . . . . . . . . . . . . . . . .8
Overzetten van het deurscharnier . . . . . . . . . . . . . . . . . . . . . . . . . . . . . . .8
Elektrische aansluiting . . . . . . . . . . . . . . . . . . . . . . . . . . . . . . . . . . .10
Voor ingebruikname . . . . . . . . . . . . . . . . . . . . . . . . . . . . . . . . . . . . .10
Bedienings- en controle-inrichting . . . . . . . . . . . . . . . . . . . . . . . . .11
In gebruik nemen en temperatuurregeling . . . . . . . . . . . . . . . . . . .11
Interieur . . . . . . . . . . . . . . . . . . . . . . . . . . . . . . . . . . . . . . . . . . . . . . 12
Legvlakken . . . . . . . . . . . . . . . . . . . . . . . . . . . . . . . . . . . . . . . . . . . . . . . . .12
Variabele binnendeur . . . . . . . . . . . . . . . . . . . . . . . . . . . . . . . . . . . . . . .12
Variabele box . . . . . . . . . . . . . . . . . . . . . . . . . . . . . . . . . . . . . . . . . . . . . .13
Koelen van levensmiddelen . . . . . . . . . . . . . . . . . . . . . . . . . . . . . . . .13
Invriezen en diepgevroren bewaren . . . . . . . . . . . . . . . . . . . . . . . . .14
Diepvrieskalender . . . . . . . . . . . . . . . . . . . . . . . . . . . . . . . . . . . . . . .15
Koude-accu’s . . . . . . . . . . . . . . . . . . . . . . . . . . . . . . . . . . . . . . . . . .15
Maken van ijsblokjes . . . . . . . . . . . . . . . . . . . . . . . . . . . . . . . . . . . .15
Ontdooien van het apparaat . . . . . . . . . . . . . . . . . . . . . . . . . . . . . . .16
Apparaat uitzetten . . . . . . . . . . . . . . . . . . . . . . . . . . . . . . . . . . . . . .17
Reiniging en onderhoud . . . . . . . . . . . . . . . . . . . . . . . . . . . . . . . . . .17
Tips om energie te besparen . . . . . . . . . . . . . . . . . . . . . . . . . . . . . .18
Wat te doen als . . . . . . . . . . . . . . . . . . . . . . . . . . . . . . . . . . . . . . . . .19
Hulp bij storingen . . . . . . . . . . . . . . . . . . . . . . . . . . . . . . . . . . . . . . . . . . .19
Lamp vervangen . . . . . . . . . . . . . . . . . . . . . . . . . . . . . . . . . . . . . . . .20
Doel, normen, richtlijnen . . . . . . . . . . . . . . . . . . . . . . . . . . . . . . . . . .21
Page 4
4
Veiligheid
De veiligheid van onze koelapparaten voldoet aan de Europese en Nederlandse normen. Desondanks zien wij ons genoodzaakt u met de volgende
veiligheidsaanwijzingen vertrouwd te maken:
Reglementaire toepassing
• Het koelapparaat is voor huishoudelijk gebruik bestemd. Het is geschikt
voor het koelen, invriezen en diepgevroren bewaren van levensmiddelen
en voor het maken van ijs. Als het apparaat voor andere doeleinden
gebruikt wordt kan de fabrikant geen verantwoording nemen voor eventuele schaden.
• Het ombouwen van of veranderingen aan het koelapparaat aanbrengen
is uit veiligheidsoverwegingen niet toegestaan.
• Als het koelapparaat commercieel of voor andere doeleinden dan voor het
koelen, diepgevroren bewaren en invriezen van levensmiddelen gebruikt
wordt, s.v.p. letten op de hiervoor van kracht zijnde wettelijke bepalingen.
Voordat het apparaat voor de eerste keer in gebruik
genomen wordt
• Controleer het koelapparaat op transportschaden. Een beschadigd apparaat in geen geval aansluiten! Wend u in geval van schade tot de leverancier.
Koelmiddelen
Het apparaat bevat in het koelvloeistofcircuit de koelvloeistof Isobutan
(R600a), een natuurlijk, zeer milieuvriendelijk gas, dat echter wel brandbaar is.
• Bij het transport en het opstellen van het apparaat erop letten dat geen
onderdelen van het koelvloeistofcircuit beschadigd worden.
• Bij beschadiging van het koelvloeistofcircuit:
– open vuur en brandhaarden absoluut vermijden;
– het vertrek waar het apparaat staat goed ventileren.
Veiligheid van kinderen
• Verpakkingsdelen (bijv. folies, piepschuim) kunnen voor kinderen gevaarlijk zijn. Verstikkingsgevaar! Verpakkingsmateriaal van kinderen weghouden!
• Oude apparaten voor het weggooien onbruikbaar maken. Stekker uit het
stopcontact trekken, stroomkabel doorknippen, eventueel aanwezige
snap– of grendelsloten verwijderen of kapotmaken. Daardoor wordt
voorkomen dat spelende kinderen in het apparaat opgesloten raken (verstikkingsgevaar!) of in andere levensgevaarlijke situaties terecht komen.
Page 5

5
• Dit apparaat is niet bedoeld voor gebruik door kinderen, personen met
verminderde lichamelijke, zintuigelijke of geestelijke capaciteiten of een
gebrek aan kennis en ervaring, tenzij er toezicht is ingesteld door de persoon die verantwoordelijk is voor hun veiligheid of tenzij zij van deze persoon instructies hebben gekregen over het gebruik. Laat kinderen niet
zonder toezicht in de buurt van het apparaat. .
Bij dagelijks gebruik
• Containers met brandbare gassen of vloeistoffen kunnen lek raken door
de inwerking van koude. Explosiegevaar! Leg geen containers met brandbare stoffen zoals bijv. spraybussen, aanstekers, navullingen van aanstekers etc. in het koelapparaat.
• Flessen en blikken mogen niet in het vriesvak. Ze kunnen springen als de
inhoud bevriest – bij koolzuurhoudende inhoud zelfs exploderen! Leg
nooit limonades, sappen, bier, wijn, champagne etc. in het vriesvak. Uitzondering: sterke drank met een zeer hoog alcoholpercentage kan in het
vriesvak gelegd worden.
• Consumptie-ijs en ijsblokjes niet direct vanuit de vriesruimte in de mond
steken. Zeer koud ijs kan aan de lippen of de tong vastvriezen en verwondingen veroorzaken.
• Niet met natte handen aan diepvriesartikelen komen. De handen kunnen
daaraan vastvriezen.
• Geen elektrische apparaten (bijv. elektrische ijsmachines, mixers etc.) in het
koelapparaat gebruiken.
• Voor het schoonmaken het apparaat altijd uitzetten en de stekker uit het
stopcontact trekken of de zekering in de uitschakelen huisinstallatie.
• De stekker altijd aan de stekker zelf uit het stopcontact trekken, nooit aan
het snoer.
Bij storing
• Als er een storing aan het apparaat optreedt eerst in de gebruiksaanwijzing kijken onder “Wat te doen als ...”. Als de daar gegeven aanwijzingen
niet verder helpen zelf niet verder aan het apparaat werken.
• Koelapparaten mogen alleen dooor geschoold personeel gerepareerd worden. Door ondeskundige reparaties kunnen grote gevaren ontstaan. Wend
u zich bij reparaties tot uw vakhandel of tot onze service-afdeling.
Weggooien
Informatie over de verpakking van het apparaat
Alle gebruikte grondstoffen zijn milieuvriendelijk! Ze kunnen zonder gevaar
weggegooid of in de vuilverbrandingsoven verbrand worden!
De grondstoffen: de kunststoffen kunnen ook opnieuw gebruikt worden en
worden als volgt gekarakteriseerd:
Page 6
6
Transportbescherming verwijderen
Het apparaat alsmede de onderdelen van het interieur zijn voor het transport beschermd.
• Alle plakband alsmede bekledingsdelen uit het interieur verwijderen.
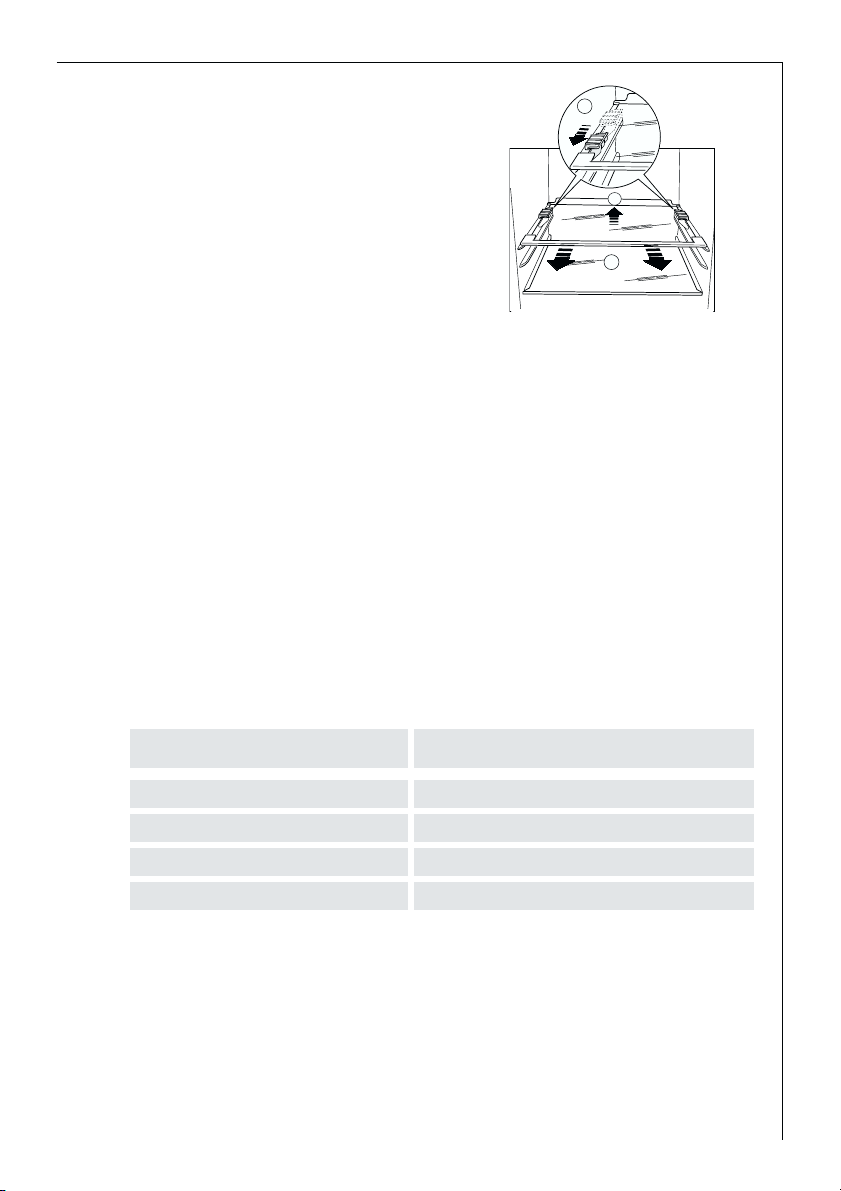
Uw apparatuur is voorzien van blokkeringen, waardoor de platen tijdens het
transport op hun plaats blijven.
Handel als volgt om deze te verwijderen:
>PE< voor polyethyleen, bijv. bij de buitenste verpakking en de zakken binnenin.
>PS< voor schuimpolystyrol, bijv. bij de bekledingsdelen, in principe CFK-vrij.
De kartonnen delen zijn van oud papier gemaakt en kunnen ook weer bij
het oudpapier gedaan worden.
Weggooien van oude apparaten
Wegens milieuredenen dienen koelapparaten vakkundig ontmanteld te
worden. Dit geldt voor uw huidige apparaat en - als het ook aan vervanging
toe is - ook voor uw nieuwe apparaat.
Waarschuwing! Apparaten die hun tijd gehad hebben onbruikbaar maken
voordat ze weggegooid worden. Stekker er afhalen, netsnoer doorknippen,
eventuele snap- of grendelsloten verwijderen of kapotmaken. Hierdoor
wordt voorkomen dat spelende kinderen in het apparaat opgesloten worden
(verstikkingsgevaar!) of in andere levensgevaarlijke situaties terechtkomen.
Aanwijzingen voor het weggooien:
• Het apparaat mag niet bij het huis- of grofvuil gezet worden.
• Het koelvloeistofcircuit, in het bijzonder de warmtewisselaar aan de achterkant, mag niet beschadigd worden.
• Het symbool op het product of op de verpakking wijst erop dat dit
product niet als huishoudafval mag worden behandeld. Het moet echter
naar een plaats worden gebracht waar elektrische en elektronische apparatuur wordt gerecycled. Als u ervoor zorgt dat dit product op de correcte manier wordt verwijderd, voorkomt u mogelijk voor mens en milieu
negatieve gevolgen die zich zouden kunnen voordoen in geval van
verkeerde afvalbehandeling. Voor meer details in verband met het recyclen van dit product, neemt u het best contact op met de gemeentelijke
instanties, het bedrijf of de dienst belast met de verwijdering van huishoudafval of de winkel waar u het product hebt gekocht.
Page 7
7
Klimaatklasse voor een omgevingstemperatuur van
SN +10 tot +32 °C
N +16 tot +32 °C
ST +18 tot +38 °C
T +18 tot +43 °C
Opstellen
Opstelplaats
Het apparaat in een goed geventileerde en droge ruimte neerzetten.
De omgevingstemperatuur heeft invloed op het stroomverbruik.
Het apparaat daarom
– niet aan directe straling van de zon blootstellen;
– niet bij radiatoren, naast een kachel of andere warmtebronnen plaatsen;
– alleen op een plaats neerzetten waarvan de omgevingstemperatuur over-
eenkomt met de klimaatklasse waarvoor het apparaat is ontworpen.
De klimaatklassees staan op het typeplaatje dat zich links aan de binnenkant
van het apparaat bevindt.
De volgende tabel geeft aan welke omgevingstemperatuur bij welke klimaatklasse behoort:
Als het onvermijdelijk is het apparaat naast een warmtebron te plaat-sen,
aan weerszijden minimaal de volgende afstanden aanhouden:
– tot elektrische fornuizen 3 cm;
– tot olie- en kolenfornuizen 30 cm.
Als men zich niet aan deze afstanden kan houden, is een warmte-isoleren-
deplaat tussen fornuis en koelapparaat aan te bevelen.
Als het koelapparaat naast een ander koel- of diepvriesapparaat staat, is een
afstand van 5 cm aan weerszijden aan te bevelen, zodat zich geen condens
vormt aan de buitenkant van de apparaten.
A
C
B
Beweeg de blokkeringen in de richting van de pijl, til de glasplaat aan
de achterkant op en duw deze in de
richting van de pijl tot deze los raakt
en verwijder de blokkeringen.
Page 8
8
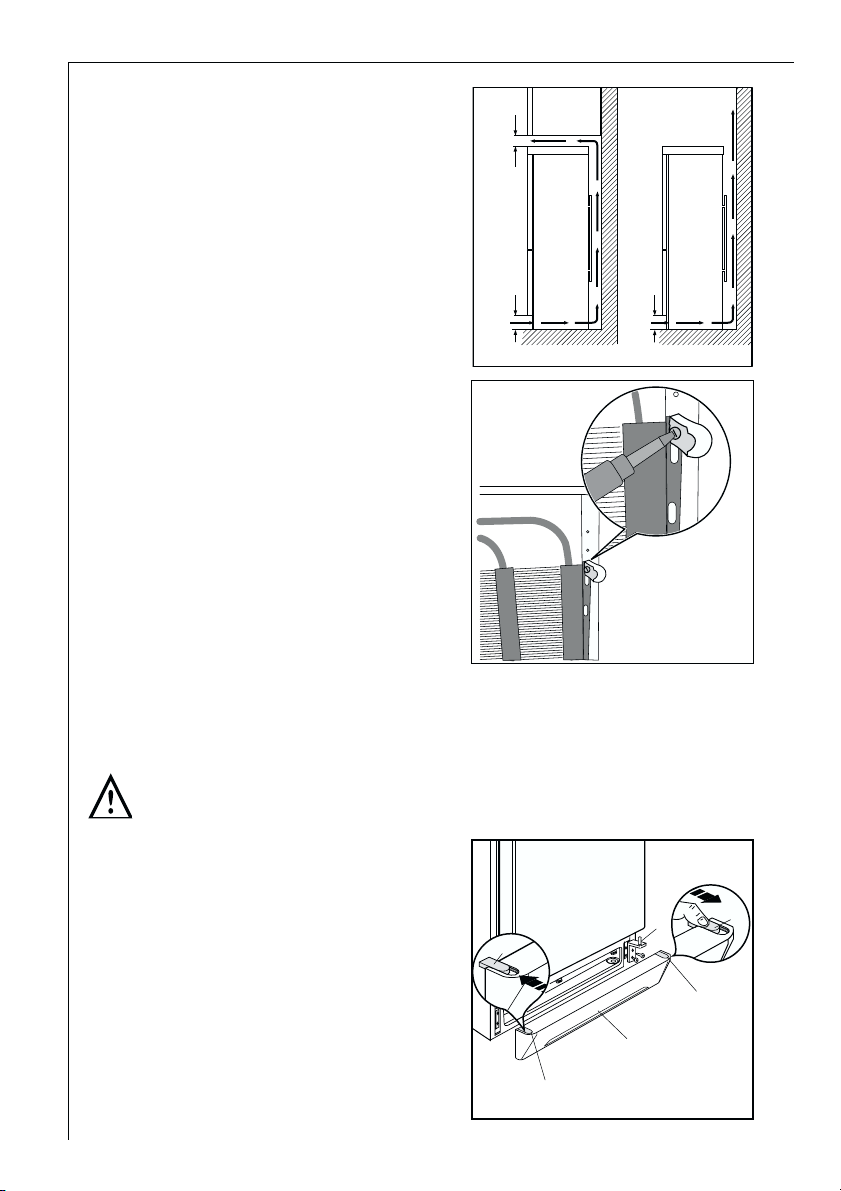
Uw koelapparaat heeft lucht
nodig
Om veiligheidsredenen moet de ventilatie zodanig zijn als aangegeven de
afbeelding.
Attentie: zorg ervoor dat de ventilatie openingen tijdens gebruik niet
worden afgedekt.
Muur-afstandhouders
In het apparaat bevinden zich twee
afstandhouders die in de bovenste
hoeken aan de achterzijde geplaatst
dienen te worden.
Draai de schroeven los steek de
afstandhouder onder de schroefkop
en draai de schroeven weer vast.
Overzetten van het deurscharnier
Het deurscharnier kan van rechts (stand waarin het wordt afgeleverd) naar
links overgezet worden als dat voor de opstelplaats nodig is.
Waarschuwing! Bij het overzetten van de deurscharnieren mag het apparaat niet op het lichtnet aangesloten zijn. Van te voren de stekker uit het
stopcontact halen.
Ga nu verder als volgt te werk:
1. Trek het ventilatierooster (D), dat
door palwerk vastgezet is, uit.
2. Verwijder het onderscharnier (E) door
de twee schroeven, die het bevestigen; verwijder de deur van de vriesruimte door hem naar beneden te
schuiven.
3. Draai de schroeven weer vast.
100 mm10 mm
10 mm
NP00
E
F
D
F
F
F
Page 9
9
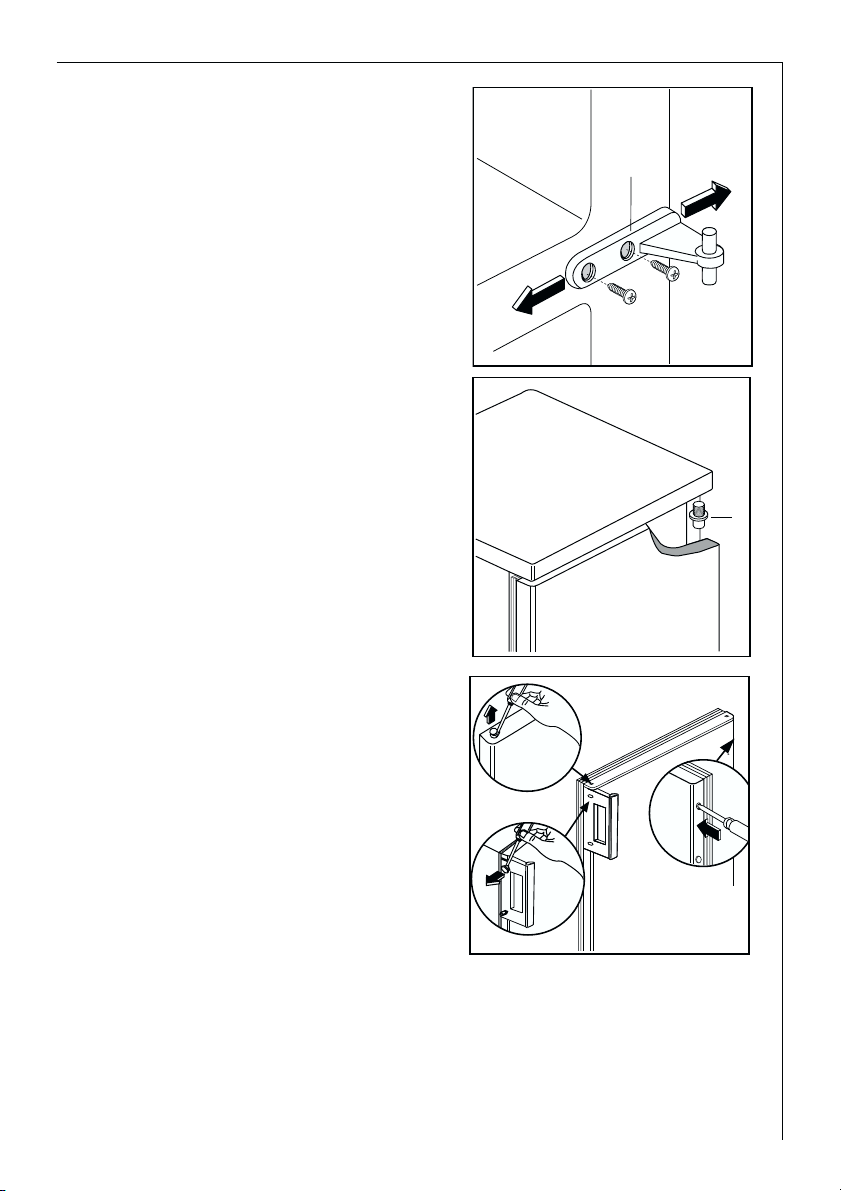
4. Verwijder de beschermdopjes van de
schroeven linksonder en plaats ze op
de schroeven rechts.
5. Draai de twee schroeven links-onder
los.
6. Schroef het middenscharnier los;
verwijder de deur van de koelruimte
door hem naar beneden te schuiven
7. Draai met een schroevendraaier de
twee beschermdopjes op de gaatjes
links los en monteer ze aan de rechterkant.
8. Draai de stift van het bovenscharnier
los en monteer haar aan de
linkerkant.
9. Plaats de deur van de koelruimte op
de bovenstift.
10. Plaats het middenscharnier in het
onderste deel van de deur van de
koelruimte; vergeet de sluitringetjes
niet.
11. Schroef het middenscharnier stevig
vast.
12. Plaats de deur van de vriesruimte op
het middenscharnier.
13. Hermonteer het onderscharnier (E)
aan de andere kant door middel van
de twee schroeven die u eerder
verwijderd hebt.
14. Verwijder het stopstuk (F) uit het
ventilatierooster (D) door het naar de
pijlrichting te duwen en breng het
aan de andere kant weer aan.
15. Hermonteer het ventilatierooster (D),
voer het door palwerk in.
G
H
Page 10

10
Voor ingebruikname
• Het interieur van het apparaat en alle accessoires schoonmaken voor het
eerste gebruik (zie Hoofdstuk “Reiniging en onderhoud”).
Elektrische aansluiting
Voor de elektrische aansluiting is een volgens de voorschriften geïnstalleerde
contactdoos met randaarde vereist. De contactdoos moet zodanig worden
geïnstalleerd, dat de stekker altijd uit de contactdoos kan worden getrokken.
De elektrische zekering dient minstens 10 Ampère te zijn.
Indien het stopcontact bij een ingebouwd apparaat niet meer toegankelijk
is, dient een maatregel in de elektrische installatie er voor te zorgen dat het
apparaat van de stroom kan worden afgesloten (bijv. zekering, beveiligingsschakelaar, aardlekschakelaar of dergelijke met een contactopeningsbreedte van minimaal 3 mm).
• Voor ingebruikneming op het typeplaatje van het apparaat controleren of
de netspanning en stroomsoort overeenkomen met de waarden van het
lichtnet op de plaats waar het apparaat komt te staan.
Bijv.: AC 220 ... 240 V 50 Hz of
220 ... 240 V~ 50 Hz
(d.w.z. 220 tot 240 Volt wisselstroom, 50 Hertz)
Het typeplaatje bevindt zich links aan de binnenkant van het apparaat.
16. De handgreep losschroeven. Aan de andere kant van de deur bevestigen
nadat u de dopjes met een priem doorgeprikt heeft. De vrijgekomen
gaatjes afsluiten met de bijgeleverde dopjes; deze vindt u in het zakje
van de documentatie.
Belangrijk
Na het omkeren van de deurdraairichting moet u controleren of het deurrubber rondom goed op de sponning sluit. In een koud vertrek (in de winter) kan het gebeuren dat dat niet het geval is. Na enkele dagen zal het rubber zich echter aangepast hebben. Wilt u dat bespoedigen, dan kunt u het
rubber warm maken met een föhn.
Page 11
11
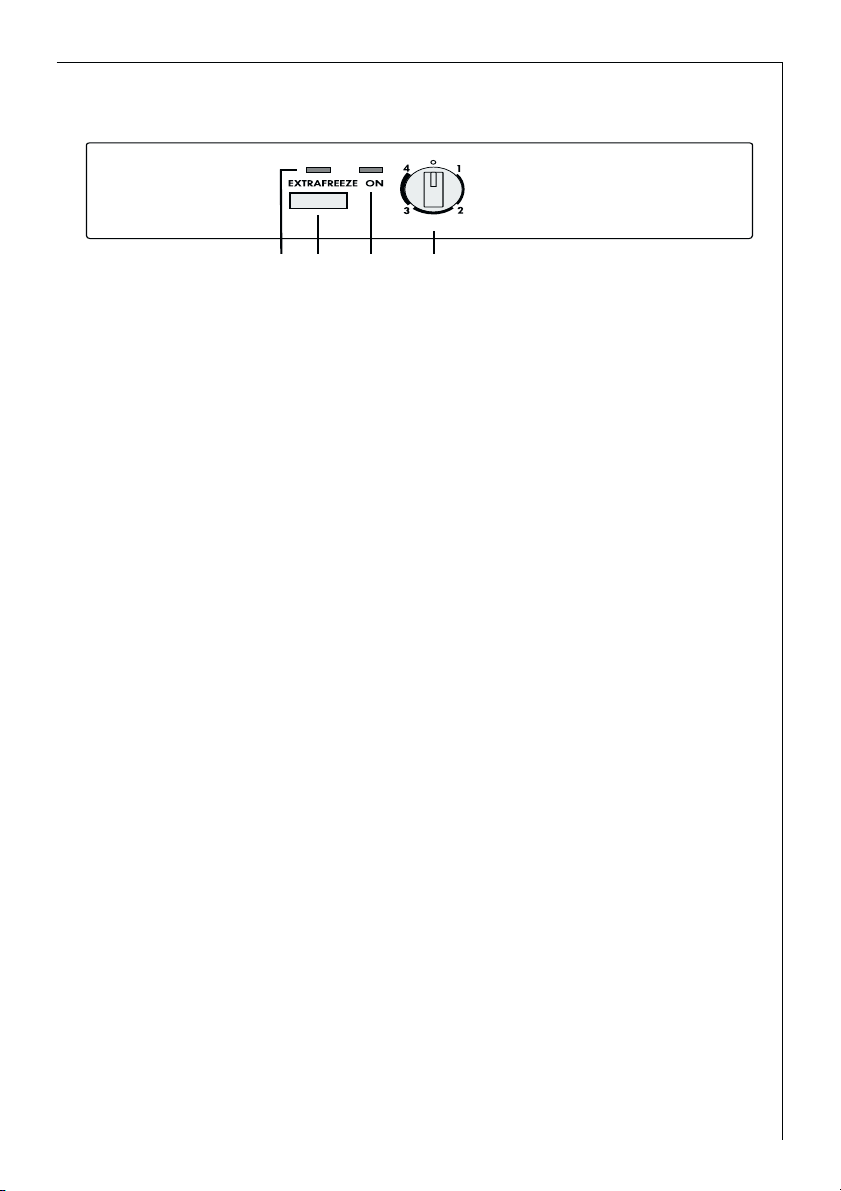
Bedienings- en controle-inrichting
B DA C
A. Lichtcontrolelampje (geel)
B. Klimaatschakelaar (EXTRAFREEZE)
C. Lichtnetcontrolelampje (groen- ON)
D. Temperatuurregelaar
De bedienings- en kontrole-inrichting omvat:
Temperatuurregelaar (D) die tevens dient om het toestel in- en uit te
schakelen.
Het groene kontrolelampje (C) brandt als het toestel aan netspanning aangesloten en ingeschakeld is. In deze schakelstand is het koelakkgregaat
automatisch in bedrijf.
Temperatuurregeling bij een omgevingstemperatuur beneden +16°C.
Indien de temperatuur in het vertrek waarin zich het apparaat bevindt
onder +16°C daalt, dient u de klimaatschakelaar in te drukken. Het gele
controlelampje boven de schakelaar licht op. Op deze wijze werkt de compressor gedurende langere tijden, zodat ook bij een lage omgevingstemperatuur de bewaartemperatuur -18°C in de vriesruimte behouden kan worden.
Attentie! Als de omgevingstemperatuur onder +10°C daalt, kunnen wij
de werking van het apparaat niet garanderen. Zorg er daarom voor dat
de omgevingstemperatuur minimaal +10°C is.
Belangrijk!
Indien de omgevingstemperatuur weer boven +16°C stijgt, dient u de klimaatschkelaar uit te schakelen; dit voorkomt onnodig energieverbruik. Het
gele controlelampje dooft.
In gebruik nemen en temperatuurregeling
• U steekt de steker van de koelkast in een contactdoos met randaarde.
Als u de koelkastdeur opent, wordt de binnenverlichting ingeschakeld.
Stand „0“ betekent: uit.
Stand „1“ betekent: hoogste binnentemperatuur, warmste instelling.
Page 12
12
Interieur
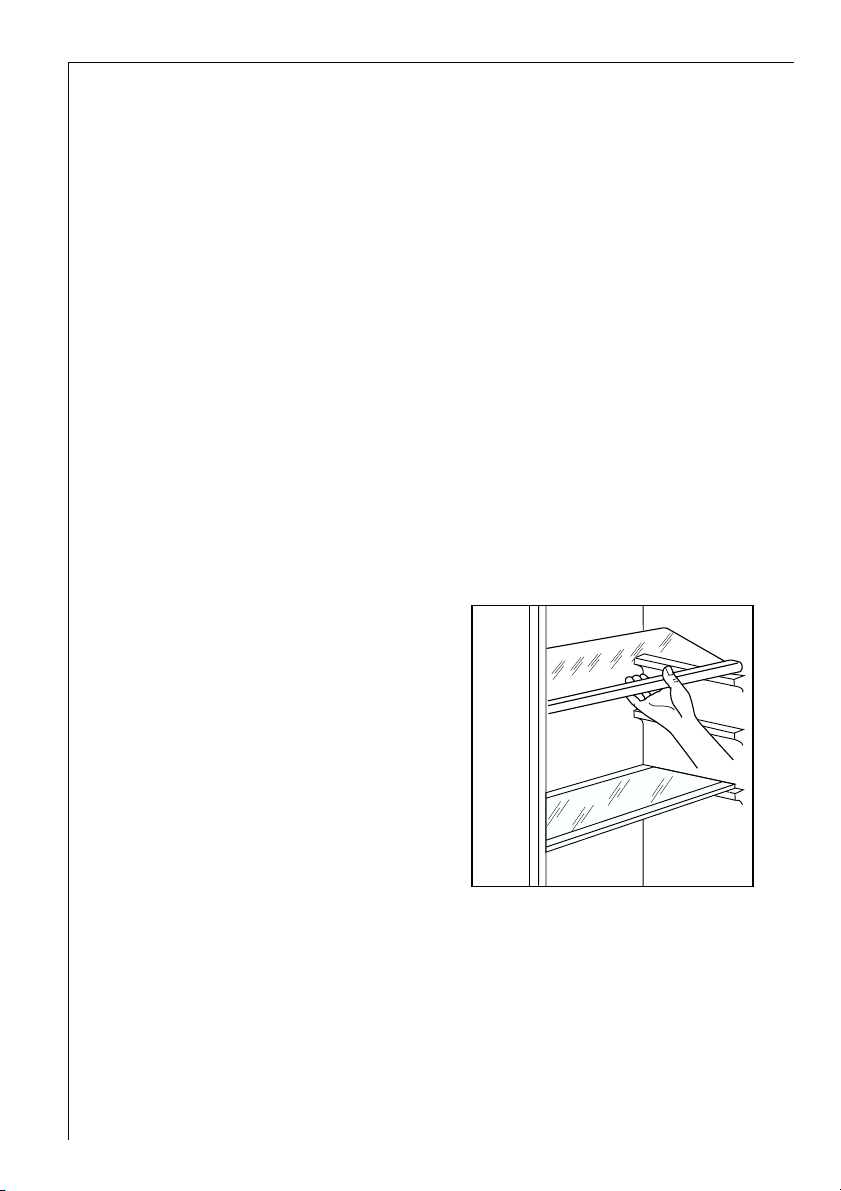
Legvlakken
Naargelang het model is het apparaat voorzien van glazen legvlakken.
Het legvlak van glas boven de groente- en fruitbakken moet altijd op die
plaats blijven liggen, opdat groente
en fruit langer vers blijven.
De overige legvlakken zijn in hoogte verstelbaar:
Daartoe het legvlak zover naar voren trekken tot het naar boven of onde-
ren bewogen kan worden en eruit gehaald kan worden.
Om de legvlakken op een andere hoogte te zetten in omgekeerde volgorde
te werk gaan.
Variabele binnendeur
Naargelang de behoefte kunnen de deurvakken er naar boven uitgenomen
worden en op andere plaatsen gezet worden.
Stand „4“ betekent: laagste binnentemperatuur, koudste instelling.
Bij het instellen van de juiste stand dient u er rekening mee te houden dat
de temperatuur in het apparaat afhankelijk is van:
- de kamertemperatuur;
- de frequentie waarmee de deuren geopend worden;
- de hoeveelheid levensmiddelen in de kast;
- de plaats van het apparaat.
De temperaturen in koelruimte en vriesvak kunnen niet gescheiden geregeld
worden.
Als verse levensmiddelen snel moeten worden ingevroren, kunt u stand „4“
kiezen. Let u erop, dat de temperatuur in de koelruimte niet beneden 0°C
komt en zet de temperatuurregelaar tijdig op stand „2“ of „3“ terug.
Belangrijk!
Hoge omgevingstemperatuur (bijv. op hete zomerdagen) en koude instelling
van de temperatuurregelaar (stand “3” tot “4”) kunnen er voor zorgen dat
de compressor continu werkt.
Zet in dat geval de temperatuurregelaar op een warmere stand (stand “2”
tot “3”). Bij deze instelling wordt de compressor geregeld en begint het ontdooien weer automatisch.
D338
Page 13
13
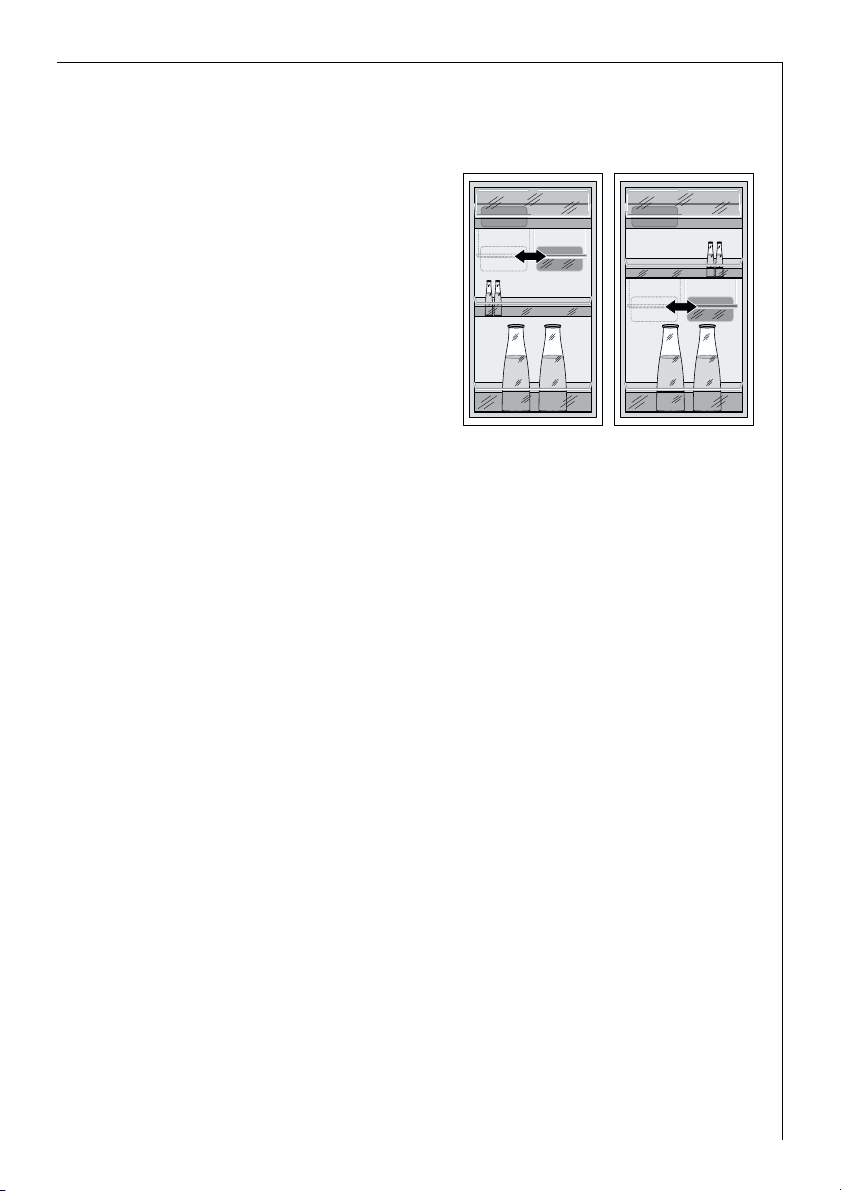
Variabele box
Sommige modellen hebben een variabele box die naar de zijkant verschoven kan worden en onder een deurvak is aangebracht.
De box kan onder ieder deurvak worden aangebracht.
Voor het omzetten het deurvak met
de variabele box naar boven uit de
houders in de deur tillen en de beugel uit de geleider onder het deurvak
uitnemen.
Inzetten op een andere hoogte
geschiedt in omgekeerde volgorde.
Koelen van levensmiddelen
Voor een optimaal gebruik van de koelruimte adviseren wij u de volgende
eenvoudige regels in acht te nemen:
• Plaats geen warme of dampende spijzen of dranken in de koelruimte;
• dek vooral sterk geurend voedsel af of verpak het;
• plaats de levensmiddelen zo, dat de lucht vrij eromheen kan circuleren.
Enkele belangrijke tips:
Vlees (alle soorten): wordt in plastic zakjes op de glazen plaat boven de
groentelade geplaatst.
Bewaar vlees niet langer dan één of twee dagen.
Gekookt voedsel, koude schotels enz.: kunnen, goed afgedekt, op elk legv-
lak geplaatst worden.
Fruit en groente: worden schoongemaakt in de groentelade(n) gelegd.
Boter en kaas: worden, om blootstelling aan de lucht te voorkomen, in spe-
ciale koeldozen bewaard of in plastic- of aluminiumfolie verpakt.
Flessen melk: worden, goed gesloten, in het flessenrek geplaatst.
Bewaar niet-luchtdicht verpakte bananen, aardappelen, uien of knoflook
niet in de koelkast.
Page 14

14
Invriezen en diepgevroren bewaren
In uw koelapparaat kunt u diepvriesproducten bewaren en verse levensmiddelen zelf invriezen.
Attentie!
• Voor het invriezen van levensmiddelen dient de temperatuur in de vries-
ruimte –18 °C of lager te zijn.
• Let op het op het typeplaatje aangegeven vriesvermogen. Het vriesver-
mogen is de maximale hoeveelheid verse waren die binnen 24 uur ingevroren kunnen worden. Als er gedurende meerdere dagen achter elkaar
ingevroren wordt, neem dan slechts 2/3 tot 3/4 van de hoeveelheid aangegeven op het typeplaatje. De kwaliteit is beter, als de levensmiddelen
snel tot in de kern bevriezen.
• Warme levensmiddelen voor het invriezen laten afkoelen. De warmte leidt
tot verhoogde ijsvorming en verhoogt het energieverbruik.
• Bij het bewaren van kant-en-klare diepvriesproducten dient u zich
beslist aan de door de fabrikant opgegeven bewaartijd te houden.
• Eenmaal ontdooide levensmiddelen zonder verdere verwerking (berei-
den tot panklare gerechten) in geen geval een tweede keer invriezen.
• Containers met brandbare gassen of vloeistoffen kunnen lek raken door
de inwerking van koude. Explosiegevaar! Leg geen containers met brandbare stoffen zoals bijv. spraybussen, aanstekers, navullingen van aanstekers etc. in het vriesapparaat.
• Flessen en blikken mogen niet in de vriesruimte. Ze kunnen springen als
de inhoud bevriest – bij koolzuurhoudende inhoud zelfs exploderen! Leg
nooit limonades, sappen, bier, wijn, champagne etc. in de vriesruimte. Uitzondering: sterke drank met een zeer hoog alcoholpercentage kan in de
vriesruimte gelegd worden.
• Alle levensmiddelen voor het invriezen luchtdicht verpakken, zodat ze
niet uitdrogen, de smaak niet verloren gaat en de smaak niet op andere
diepvriesproducten overgebracht wordt.
Voorzichtig! Diepvriesartikelen niet met natte handen aanraken. De handen
Page 15

15
kunnen daaraan vast vriezen.
Om veiligheidsredenen moet u de laden niet verwijderen.
1. De verpakte levensmiddelen in de laden leggen. De in te vriezen levensmiddelen in de bovenste lade van het apparaat plaatsen. Niet-bevroren artikelen mogen niet in aanraking komen met reeds bevroren waren omdat
anders de bevroren artikelen kunnen ontdooien.
2. Indien u voedsel sneller wilt invriezen of indien u de max. hoeveelheid wilt
invriezen, dan dient u 24 uur van te voren de klimaatschakelaar in te
drukken. op de koude instelling.
3. Diepvriesartikelen het liefst naar soort apart in de laden leggen.
Koude-accu’s
In één van de laden van de vriesruimte bevinden zich twee koude-accu’s.
Als de stroom uitvalt of bij een storing aan het apparaat verlengen de koude-
accu’s de tijd tot de diepvriesartikelen te warm worden met meerdere uren.
De koude-accu’s kunen dit echter alleen optimaal doen als ze in de boven-
ste lade vooraan boven op de diepvriesartikelen gelegd worden. De koudeaccu’s kunnen tijdelijk ook als koelelement voor koeltassen gebruikt worden.
Diepvrieskalender
• De symbolen geven de diverse soorten diepvriesproducten aan.
• De getallen geven voor iedere soort diepvriesproduct de bewaartijd in
maanden aan. Of de hoogste of de laagste waarde van de aangegeven
bewaartijd geldt, hangt af van de kwaliteit van de levensmiddelen en de
behandeling voorafgaand aan het invriezen. Voor levensmiddelen met een
hoog vetgehalte geldt altijd de laagste waarde.
Maken van ijsblokjes
1. IJsbakje voor 3/4 met koud water vullen, in de vriesruimte plaatsen en laten
bevriezen.
2. Om de ijsblokjes los te maken het ijsbakje omdraaien of kort onder stromend
water houden.
Attentie! Een eventueel vastgevroren ijsbakje in geen geval met spitse
of scherpe voorwerpen losmaken.
Page 16

16
Ontdooien van het apparaat
Het ontdooien van de koelruimte
Als de compressor loopt vormt zich op de achterwand van de koelruimte
een rijplaag. Deze laag wordt automatisch verwijderd, wanneer de compressor stilstaat. Het dooiwater wordt in een gootje in de achterwand van
de koelruimte opgevangen en via een afvoeropening naar een verzamelbak
boven de compressor gevoerd, alwaar het verdampt.
Het ontdooien van de vriesruimte
In het vriesvak slaat het vocht dat ontstaat tijdens de werking van het
apparaat en tijdens het openen van de deur neer. Daardoor vormt zich in
de vriesruimte een rijplaag. Deze dient regelmatig verwijderd te worden
met behulp van de speciale kunststof schraper. Een dikke rijplaag in de
vriesruimte betekent een hoger energieverbruik. Ontdooi daarom minstens
éénmaal per jaar, resp. als zich een rijplaag van ca. 4 mm gevormd heeft, devriesruimte. Dit kunt u het beste doen, wanneer de vriesruimte leeg of slechts voor een klein deel gevuld is.
Ga als volgt te werk:
1. Verwijder de diepvriesproducten en
bewaar ze op een koele plaats.
2. Schakel het apparaat uit en haal de
stekker uit het stopcontact of
schakel de zekering in de huisinstallatie uit.
3. Laat de deur van de vriesruimte
openstaan.
4. Steek de kunststof schraper in de opening onder de vriesruimte en plaats
daar een schaaltje of teiltje onder.
5. Draai de thermostaatknop in de gewenste stand of steek de stekker weer in
het stopcontact. Na twee of drie uur kunt u de diepvriesproducten weer
terugplaatsen.
Belangrijk
Gebruik geen metalen voorwerpen om de rijplaag te verwijderen.
Gebruik geen elektrische verwarmingsapparaten o.i.d. om het ontdooipro-
ces te versnellen. Houd u aan de aanwijzingen in dit boekje.
Temperatuurstijging van diepvriesproducten kan hun houdbaarheidsduur
verkorten.
D068
Page 17

17
Reiniging en onderhoud
Om hygiënische redenen dient het apparaat aan de binnenkant met toebehoren geregeld gereinigd te worden.
Waarschuwing!
• Het apparaat mag tijden het schoonmaken niet op het elektriciteitsnet aan-
gesloten zijn. Gevaar voor schokken! Zet voor het schoonmaken het apparaat uit en trek de stekker uit het stopcontact of schakel de zekering uit.
• Het apparaat nooit met stoomreinigingsapparaten schoonmaken. Er kan
vocht in de elektrische onderdelen komen. Gevaar voor schokken! Hete
damp kan kunstof onderdelen beschadigen.
• Het apparaat dient droog te zijn voordat het weer in gebruik genomen
wordt.
Let op!
• Etherische oliën en organische oplosmiddelen kunnen kunststof onderde-
len aantasten, bijv.
– Sap van citroen– of sinaasappelschillen;
– boterzuur;
– schoonmaakmiddelen die azijnzuren bevatten.
Dergelijke substanties niet in contact brengen met apparaatonderdelen.
• Geen schurende schoonmaakmiddelen gebruiken.
1. Koel– en diepvriesartikelen er uit halen. Diepvriesartikelen in meerdere
lagen kranten verpakken. Alles afgedekt op een koele plaats leggen.
2. Vriesvak voor het schoonmaken ontdooien (zie hoofdstuk “Ontdooien”).
3. Apparaat uitzetten en de stekker uit het stopcontact halen of de zekering
Apparaat uitzetten
Voor het uitzetten de temperatuurregelaar op stand “0” draaien.
Als het apparaat gedurende langere tijd niet gebruikt wordt:
1. Levensmiddelen uit koelruimte en vriesvak nemen.
2. Apparaat uitzetten, daartoe de temperatuurregelaar op stand “0” draaien.
3. Stekker uit het stopcontact halen of zekering in de huisinstallatie uitschakelen.
4. Diepvriesruimte ontdooien en grondig reinigen (zie hoofdstuk “Reiniging en
onderhoud”).
5. Deuren daarna open laten om geurvorming te voorkomen.
Page 18

18
in de huisinstallatie uitschakelen.
4. Apparaat en interieur met een doek en lauwwarm water schoonmaken.
Eventueel een beetje normaal afwasmiddel gebruiken.
5. Daarna met schoon water afnemen en droogmaken.
Stof op de condensor verhoogt het
energieverbruik. Daarom eenmaal
per jaar de condensor aan de achterkant van het apparaat met een
zachte borstel of met de stofzuiger
voorzichtig schoonmaken.
6. Het dooiwaterafvoergat aan de achterwand van de koelruimte controleren. Een verstopt dooiwaterafvoergat
met behulp van het groene stopje
dat met het toestel is meegeleverd
schoonmaken.
7. Als alles droog is, de levensmiddelen
er weer in doen en het apparaat weer
in bedrijf nemen.
Tips om energie te besparen
• Het apparaat niet in de buurt van kachels, verwarmingselementen of
andere warmtebronnen plaatsen. Bij een hoge omgevingstemperatuur
werkt de compressor vaker en langer.
• Zorgen voor voldoende be- en ontluchting aan de onderkant van het
apparaat. Ventilatieopeningen nooit afdekken.
• Geen warme spijzen in het apparaat zetten. Warme spijzen eerst laten
afkoelen.
• Deur slechts zo lang open laten als nodig is.
• De temperatuur niet lager dan nodig instellen.
• Diepvriesartikelen voor het ontdooien in de koelruimte leggen. De koude
in de diepvriesartikelen wordt zo voor koeling van de koelruimte gebruikt.
• Houd de warmte afgevende verdamper, het metalen rooster aan de ach-
terzijde van het apparaat, schoon.
D037
Page 19

19
Sterke rijpvorming in het
apparaat, eventueel ook aan
de deurafdichting.
Deurafdichting is lek (eventueel na het overzetten van
het deurscharnier).
Op de ondichte plaatsen de
deurafdichting voorzichtig met
een föhn verwarmen (niet heter
dan ca. 50 °C). Tegelijkertijd de
verwarmde deurafdichting met
de hand zo in vorm trekken dat
hij weer helemaal sluit.
De levensmiddelen zijn te
warm.
Binnenverlichting werkt niet.
Het apparaat staat naast een
warmtebron.
Temperatuur is niet juist ingesteld.
Zie hoofdstuk “Ingebruikname”.
Lamp is kapot.
Zie hoofdstuk “Lamp vervangen”.
Temperatuurregelaar op een
koudere stand zetten.
Deur heeft te lang opengestaan.
Zie hoofdstuk “Opstelplaats”.
In de laatste 24 uur zijn grotere hoeveelheden warme
levensmiddelen opgeslagen.
Deur slechts zo lang open
laten als nodig is.
Apparaat koelt te sterk.
Temperatuur is te laag ingesteld.
Temperatuurregelaar tijdelijk
op een hogere stand zetten.
Wat te doen als ...
Hulp bij storingen
Het kan bij een storing om kleine defecten gaan die u zelf aan de hand van
de volgende aanwijzingen kunt oplossen. Voer zelf geen verdere werkzaamheden uit als de volgende informatie in concrete gevallen niet verder
helpt.
Waarschuwing! Reparaties aan het koelapparaat mogen alleen door
geschoold personeel uitgevoerd worden. Door ondeskundige reparaties kunnen grote gevaren ontstaan voor de gebruiker. Wend u bij reparatie tot onze
service-afdeling.
Storing Mogelijke oorzaken Oplossing
Apparaat werkt niet.
Apparaat is niet aangezet. Apparaat aanzetten.
Stekker zit niet in het stopcontact of zit los.
Stekker in stopcontact steken.
Zekering is los of kapot.
Zekering controleren,eventueel
vernieuwen
Stopcontact is kapot.
Storingen in het lichtnet door
uw elektrovakman laten
verhelpen.
Page 20

20
Ongewone geluiden.
Apparaat komt tegen de muur
of tegen andere voorwerpen
aan.
Apparaat staat niet recht.
Een onderdeel, bijv. een leiding,
aan de achterkant van het
apparaat komt tegen een
ander onderdeel van het apparaat aan of tegen de muur.
De compressor start na enige
tijd automatisch.
Zie hoofdstuk “Reiniging en
onderhoud”.
Dit is normaal, het betreft
geen storing.
Na het wijzigen van de temperatuurinstelling start de compressor niet direct.
Water op de bodem van de
koelruimte of op de legvlakken.
Dooiwaterafvoer is verstopt.
Dit onderdeel voorzichtig wegbuigen.
Apparaat iets wegtrekken.
Stelvoetjes bijstellen.
Storing Mogelijke oorzaken Oplossing
Lamp vervangen
Waarschuwing! Gevaar voor elektrische schok! Voor het vervangen van de
lamp het apparaat uitzetten en de stekker uit het stopcontact trekken of de
zekering in de huisinstallatie uitschakelen.
Lampgegevens: 220-240 V
1. Om het apparaat uit te zetten de
temperatuurregelaar op stand „0"
draaien.
2. Stekker uit het stopcontact
trekken.
3. Voor het vervangen van de lamp,
dient men op de achterste
vasthechting te drukken en tegelijkertijd het dekseltje in de richting van de pijltjes weg te nemen.
4. Vervang de lamp met een exemplaar van gelijke sterkte (het
maximum vermogen staat op de
lichtverspreider aangegeven).
5. De afdekking weer monteren.
6. De koelkast aanzetten.
Page 21

21
Doel, normen, richtlijnen
Het koelapparaat is voor huishoudelijk gebruik bestemd en is met inachtneming van de voor deze apparaten geldende normen gemaakt. Bij de
fabricage zijn speciaal die maatregelen genomen die vereist zijn volgens de
Duitse wet op de veiligheid van apparaten (GSG), volgens de Duitse voorschriften ter voorkoming van ongevallen bij koudeinstallaties (VBG 20) en
volgens de bepalingen van de vereniging van Duitse elektotechnici (VDE). De
koudecirculatie is op dichtheid getest.
Dit apparaat voldoet aan de volgende EU-richtlijnen:
– 73/23/EG van 19.2.1973 - Laagspanningsrichtlijn
– 89/336/EG van 3.5.1989
(met inbegrip van Wijzigingsrichtlijn 92/31/EG) - EMC-richtlijn
Page 22

22
Dear customer,
Before placing your new refrigerator/freezer into operation please read these operating instructions carefully. They contain important information for
safe use, for installation and for care of the appliance.
Please keep these operating instructions for future reference. Pass them on
to possible new owners of the appliance.
Notes which are important for your safety or for the proper functioning of
the appliance are stressed with a warning triangle and/or with signal words
(Warning!, Caution!, Attention!). Please observe the following carefully.
Supplementary information regarding operation and practical applications
of the appliance appear after this symbol.
Tips and notes concerning economical and environmentally sound use of
the appliance are marked with the flower.
The operating instructions contain instructions for the correction of possible malfunctions by the user in the section "What to do if ...". If these
instructions should not be sufficient, our customer service department is
always available to you.
Page 23

23
Contents
Safety . . . . . . . . . . . . . . . . . . . . . . . . . . . . . . . . . . . . . . . . . . . . . . . . .24
Disposal . . . . . . . . . . . . . . . . . . . . . . . . . . . . . . . . . . . . . . . . . . . . . . .25
Appliance Packaging Information . . . . . . . . . . . . . . . . . . . . . . . . . . . . .25
Disposal of old Appliances . . . . . . . . . . . . . . . . . . . . . . . . . . . . . . . . . . . .26
Remove transport safeguard . . . . . . . . . . . . . . . . . . . . . . . . . . . . . . .26
Installation . . . . . . . . . . . . . . . . . . . . . . . . . . . . . . . . . . . . . . . . . . . . .27
Installation Location . . . . . . . . . . . . . . . . . . . . . . . . . . . . . . . . . . . . . . . . .27
Your appliance needs air . . . . . . . . . . . . . . . . . . . . . . . . . . . . . . . . . . . . .28
Rear spacer . . . . . . . . . . . . . . . . . . . . . . . . . . . . . . . . . . . . . . . . . . . . . . . . .28
Rehingeing the door . . . . . . . . . . . . . . . . . . . . . . . . . . . . . . . . . . . . . . . . .28
Electrical connection . . . . . . . . . . . . . . . . . . . . . . . . . . . . . . . . . . . . .30
Prior to Inital Start-up . . . . . . . . . . . . . . . . . . . . . . . . . . . . . . . . . . .30
Control panel . . . . . . . . . . . . . . . . . . . . . . . . . . . . . . . . . . . . . . . . . . .30
Starting up and temperature regulation . . . . . . . . . . . . . . . . . . . . .31
Interior Accessories . . . . . . . . . . . . . . . . . . . . . . . . . . . . . . . . . . . . . .32
Storage shelves . . . . . . . . . . . . . . . . . . . . . . . . . . . . . . . . . . . . . . . . . . . . .32
Door rack . . . . . . . . . . . . . . . . . . . . . . . . . . . . . . . . . . . . . . . . . . . . . . . . . .32
Variable Storge box . . . . . . . . . . . . . . . . . . . . . . . . . . . . . . . . . . . . . . . . . .32
Fresh food refrigeration . . . . . . . . . . . . . . . . . . . . . . . . . . . . . . . . . .33
Freezing and storing frozen food . . . . . . . . . . . . . . . . . . . . . . . . . . .34
Preparation of Ice Cubes . . . . . . . . . . . . . . . . . . . . . . . . . . . . . . . . .35
Freezing calender . . . . . . . . . . . . . . . . . . . . . . . . . . . . . . . . . . . . . . . .35
Ice pack . . . . . . . . . . . . . . . . . . . . . . . . . . . . . . . . . . . . . . . . . . . . . . .35
Defrosting . . . . . . . . . . . . . . . . . . . . . . . . . . . . . . . . . . . . . . . . . . . . .36
Switching off the appliance . . . . . . . . . . . . . . . . . . . . . . . . . . . . . . .37
Cleaning and Care . . . . . . . . . . . . . . . . . . . . . . . . . . . . . . . . . . . . . . .37
Energy Saving Tips . . . . . . . . . . . . . . . . . . . . . . . . . . . . . . . . . . . . . . .38
What to do if . . . . . . . . . . . . . . . . . . . . . . . . . . . . . . . . . . . . . . . . . .39
Correcting Malfunctions . . . . . . . . . . . . . . . . . . . . . . . . . . . . . . . . . . . . .39
Changing the light bulb . . . . . . . . . . . . . . . . . . . . . . . . . . . . . . . . . . . . . .40
Customer Service . . . . . . . . . . . . . . . . . . . . . . . . . . . . . . . . . . . . . . .41
Regulations, Standards, Guidelines . . . . . . . . . . . . . . . . . . . . . . . . .41
Page 24

24
Safety
The safety aspects of our refrigerators/freezers comply with accepted technical standards and the German Appliance Safety Law. Nevertheless, we
consider it our obligation to make you aware of the following safety information:
Intended use
• The refrigerator is intended for use in the home. It is suitable for the coo-
ling, freezing and storing of frozen food, as well as for making ice. If the
appliance is used for purposes other than those intended or used incorrectly, no liability can be accepted by the manufacturer for any damage
that may be caused.
• Alterations or changes to the freezer are not permitted for reasons of
safety.
• If you use the refrigerator in a commercial application or forpurposes
other than the cooling, freezing or frozen storage of foods,please observe all valid legal regulations for your application.
Prior to initial start–up
• Check the refrigerator for transport damage. Under no circumstance
should a damaged appliance be plugged in! In the event of damage, please
contact the vendor.
Refrigerant
The refrigerant isobutane (R600a) is contained within the refrigerant circuit
of the appliance, a natural gas with a high level of environmental compatibility, which is nevertheless flammable.
• During transportation and installation of the appliance, be certain that
none of the components of the refrigerant circuit become damaged.
• If the refrigerant circuit should become damaged:
– avoid open flames and sources of ignition;
– thoroughly ventilate the room in which the appliance is situated.
Safety of children
• Packaging (e.g. wraps, polystyrene) can be dangerous for children. There is
a risk of suffocation! Keep packaging material away from children!
• Please make old appliances unusable prior to disposal. Pull out the mains
plug, cut off the mains cable, break or remove spring or boltcatches, if fitted. By doing this you ensure that children cannot lock themselves in the
fridge when playing (there is risk of suffocation!)or get themselves into
other dangerous situations.
Page 25

25
• This appliance is not intended for use by persons (including children) with
reduced physical, sensory or mental capabilities, or lack of experience and
knowledge, unless they have been given supervision or instruction concerning use of the appliance by a person responsible for their safety.
Children should be supervised to ensure that they do not play with the
appliance. !
Daily Operation
• Containers with flammable gases or liquids can leak at low temperatures.
There is a risk of an explosion! Do not store any containers with flammable materials such as, for example, spray cans, fire extinguisher refill cartridges etc in the refrigerator/freezer.
• Bottles and cans must not be placed in the freezer compartment. They can
burst when the contents freeze, high carbonate content drinks can even
explode! Never store lemonade, juices, beer, wine, sparkling wine etc. in
the freezer compartment. Exception: high alcohol content spirits can be
stored in the freezer compartment.
• Do not put ice creams or ice cubes in the mouth immediately after remo-
val from the freezer compartment. Very cold ice can freeze to the lips or
tongue and cause injury.
• Do not touch frozen food with wet hands. Your hands could freeze to the
food.
• Do not operate any electrical appliances in the refrigerator/freezer (e.g.
electric ice cream makers, mixers etc.).
• Before cleaning the appliance, always switch off the appliance and unplug
it, or pull the house fuse or switch off the circuit breaker.
• When unplugging always pull the plug from the mains socket, do not pull
on the cable.
In case of malfunction
• If the a malfunction occurs on the appliance, please look first in the "What
to do if ..." section of these instructions. If the information given there
does not help, please do not perform any further repairs yourself.
• Refrigerators/freezers may only be repaired by qualified service engineers.
Improper repairs can give rise to significant hazards. If your appliance needs
repairing, please contact your specialist dealer or our Customer Service.
Disposal
Appliance Packaging Information
All materials are environmentally sound! They can be dumped or burned at
an incinerating plant without danger!
About the materials: The plastics can be recycled and are identified as follows:
Page 26

26
Remove transport safeguard
The appliance and the interior fittings are protected for transport.
• Remove all adhesive tape and packing pieces from the interior of the
appliance.
Your appliance is equipped with shelf
retainers that make it possible to
secure the shelves during transportation.
>PE< for polyethylene, e.g. the outer covering and the bags in the interior.
>PS< for polystyrene foam, e.g. the pads, which are all free of chlorofluo-
rocarbon.
The carton parts are made from recycled paper and should be disposed of
at a waste-paper recycling collection location.
Disposal of old Appliances
For environmental reasons, refrigeration appliances must be disposed of
properly. This applies to your old appliance, and - at the end of its service
life - for your new appliance as well.
Warning! Before disposing of old appliances make them inoperable. Remove plug from mains, sever the power cable, remove or destroy any snap or
latch closures. This eliminates the danger that playing children lock themselves into the appliance (danger of suffocation!) or place themselves into
other life-endangering situations.
Disposal:
• The appliance may not be disposed of with domestic waste or bulky refuse.
• The refrigerant circuit, especially the heat exchanger at the back of the
appliance, may not be damaged.
• The symbol on the product or on its packaging indicates that
this product may not be treated as household waste. Instead it shall
be handed over to the applicable collection point for the recycling
of electrical and electronic equipment. By ensuring this product is
disposed of correctly, you will help prevent potential negative consequences for the environment and human health, which could
otherwise be caused by inappropriate waste handling of this product. For more detailed information about recycling of this product,
please contact your local city office, your household waste disposal
service or the shop where you purchased the product.
Page 27

27
Climate classification for an ambient temperature of
SN +10 bis +32 °C
N +16 bis +32 °C
ST +18 bis +38 °C
T +18 bis +43 °C
If installation next to a source of heat is unavoidable, the following minimum clearances must be maintained at the sides of the appliance:
– for electric cookers 3 cm;
– for oil and coal fired ranges 30 cm.
If these clearances cannot be maintained a heat insulating pad is required
between the cooker and the refrigeration appliance.
If the refrigeration appliance is installed next to another refrigerator or free-
zer a clearance of 5 cm at the sides is required, in order to prevent the formation of condensation on the outside of the appliance.
Installation
Installation Location
The appliance should be set up in a well ventilated, dry room.
Energy use is affected by the ambient temperature. The appliance should
therefore
– not be exposed to direct sunlight;
– not be installed next to radiators, cookers or other sources of heat;
– only be installed at a location whose ambient temperature corresponds to
the climate classification, for which the appliance is designed.
The climate classification can be found on the serial plate, which is located
at the left on the inside of the appliance.
The following table shows which ambient temperature is correct for each
climate classification: each climate classification:
A
C
B
To remove them proceed as follows:
Move the shelf retainers in the direc-
tion of the arrow, raise the shelf from
the rear and push it forward until it
is freed and remove the retainers.
Page 28

28
Rehingeing the door
The side at which the door opens can be changed from the right side (factory adjustment) to the left side, if the installation site requires.
Warning! When changing the side at which the door opens, the appliance
may not be connected to the mains. Remove plug from the mains before
hand.
Procced as follow:
1. Remove the ventilationgrill (D) and
the plastic cover (G).
2. Remove plug (F) and refit it on the
opposite side of the ventilationgrill.
3. Unscrew the bottom hinge and
remove the freezer compartment
door by pulling it downwards.
E
F
D
F
F
F
Your appliance needs air
For safety reasons, minimum ventilationmust be as shown Fig.
Attention: keep ventilation openings clear of obstruction;
Rear spacers
Fit the rear spacers contained in
the applaince to ensure even dissipation of heat genereted during
operation.
Proceed in the sequence illustrated by the figures.
100 mm10 mm
10 mm
NP00
Page 29

29
G
4. Re-tighten the screws.
5. Remove the screw masking plugs
from the bottom left-hand side and
refit them on the right-hand side.
6. Unscrew the two screws on the bottom left-hand side.
7. Unscrew the middle hinge and remove the refrigerator compartment
door by pulling it downwards.
8. With a screwdriver, unscrew the two
masking plugs covering the holes on
the left-hand side and refit them on
the right-hand side.
9. Unscrew the pin from the top hinge
and refit it on the left-hand side.
Remember to fit the washers.
10. Slide the refrigerator compartment
door onto the top pin.
11. Insert the middle hinge into the bottom of the refrigerator compartment
door. Remember to fit the washers.
12. Fully screw up the middle hinge.
13. Fit the freezer compartment door
onto the middle hinge.
14. Unscrew the bottom hinge pin and
refit it on the opposite side of the
bottom hinge.
15. Insert the bottom hinge into the bottom of the freezer compartment
door.
16. Fully screw down the bottom hinge.
17. Re-assemble the ventilationgrill (D)
and the plastic cover (G).
18. Unscrew the handles. Refit them on the opposite side after having piercing
the plugs with a punch. Cover the holes left open with the plugs contained
in the documentation pack.
H
Page 30

30
Control panel
The green pilot lamp (C), which comes on when the panel is switched on and
the mains voltage is available. In this switch position, the refrigerating unit
automatically operates by system control.
Prior to Initial Start–Up
• Please clean the appliance interior and all accessories prior to initial start-
up (see section: “Cleaning and Care”).
Electrical connection
Before initial start-up, refer to the appliance rating plate to ascertain if supply voltage and current values correspond with those of the mains at the
installation location.
e.g.: AC 220 ... 240 V 50 Hz or
220 ... 240 V~ 50 Hz
(i.e. 220 to 240 volts alternating current, 50 Hertz)
The rating plate is inside the appliance on the left.
A correctly installed, earthed socket is required for the electrical supply. The
supply must have a fuse rating of at least 10 Amps.
If the socket is not accessible once the appliance is built in, the electrical
installation must include suitable means of isolating the appliance from the
mains (e.g. fuse, cut-out, current trip or similar with a minimum contact
separation of 3 mm).
Attention: The mains connection cable may only be replaced by a skilled
electrician. Please contact your dealer or our customer service department
for repairs.
B DA C
Page 31

31
Starting up and temperature regulation
• Insert the plug of the connection lead into the plug socket with protecti-
ve earth contact.
Setting „0“ means: Off.
Setting „1“ means: Hightest temperature, (warmest setting).
Setting „4“ (end-stop) means: Lowest temperature, (coldest setting).
However, the exact setting should be chosen keeping in the mind that the
temperature inside the refrigerator depends on:
-the quantity of food stored
-how often the door is opened
The temperatures in the refrigerator compartment and freezer co partment
cannot be independently regulated.
If you want the freeze fresh food rapidly, select setting „4“, ensuring that
the temperature in the refrigerator compartment does not drop blow 0°C.
You should also promptly reset the temperature regulator to setting „2“ or
„3“.
Important!
High ambient temperatures (e.g. on hot summer days) and a cold setting on
the temperature regulator (position "4") can cause the compressor to run
continuously.
If this happens, turn the temperature regulator back to a warmer setting
(position "3" to "4"). At this setting the compressor will be switched on and
off as usual and automatic defrosting recommenced.
Temperature adjustment with ambient temperature below +16°C
When the ambient temperature in the room in which the appliance is situated is less than 16° C, the ambient switch (B) must be depressed. The yellow
pilot light (A ) comes on. In this way, when the ambient temperature is low,
the compressor operates for longer periods to ensure that the storage temperature of -18° C is maintained inside the freezer compartment.
Important!
If the ambient temperature rises to above +16°C, de-activate the ambient
switch in order to avoid unnecessary energy consumption. The yellow pilot
light goes out.
Page 32

32
Interior Accessories
Storage shelves
• You should always slide one of the full size glass storage shelf into the
lowest set of guides, above the fruit and the vegetable containers, and
keep it in this position.
• The height of the storage shelves
can be adjusted:
• To do this pull the storage shelf
forward until it can be swivelledupwards or downwards and
removed.
• Please do the same in reverse to
insert the shelf at a different height.
Adjusting the upper door rack
• Depending on the food stored, the upper door racks can be changed to
other holders or removed. Take out the refrigerators food, press the door
racks digonally upwards at their edges, reposition them, and press them
back into place.
Variable Storage Box
Some models are equipped with a variable storage box which is fitted under
a door shelf compartment and can be slid sideways.
The box can be inserted under any
door shelf compartment.
1. To change the position of the storage box; lift the shelf compartment
with the box upwards and out of the
holders in the door and remove the
retaining bracket out of the guide
under the shelf compartment.
2. Reverse the above operation to insert
the shelf at a different height.
D338
Page 33

33
Fresh food refrigeration
To obtain the best performance:
• do not store warm food or evaporating liquide in the refrigeator
• do cover or wrap the food, particularly if it has a strong flavour.
• Position food so that air can circuiate freely round it.
Useful hints:
Meat (all types): wrap in polythene bags and place on the glass shelf above
the vegetable drawer(s)For safety, store in this way only one or two days
at the most.
Cooked foods, cold dishes, etc: these should be covered and may be placed
on any shelf.
Fruit and vegetables: these should be thoroughly cleaned and placed in the
special drawer(s) provided.
Butter and cheese: these should be placed in special airtight containers or
wapped in aluminium foil or polythene bags to exclude as much air as possible.
Milk bootles: these should have a cap and should be stored in the bottle
rack on the door.
Bananas, potatoes, onions and garlic, if not packed, must not be kept in
the refrigerator.
Page 34

34
Freezing and storing frozen food
You can use your freezer for freezing fresh food yourself.
Important!
• The temperature in the freezer compartment must be –18 °C or colder
before freezing food.
• Please observe the freezing capacity given on the rating plate. The free-
zing capacity is the maximum quantity of fresh food that can be frozen
within a period of 24 hours. If you wish to freeze food several days in a
row, please observe a maximum capacity of only 2/3 to 3/4 of that on the
rating plate. The quality of the food is best preserved when it is frozen
right through to the core as quickly as possible.
• Allow warm food to cool down before freezing. The warmth will cause
increased ice formation and increase the power consumption.
• Please note the maximum storage times specified by the manufacturer.
• Thawed foods which have not been processed further (cooked into meals)
may not under any circumstances be frozen a second time.
• Containers with flammable gases or liquids can leak at low temperatures.
There is a risk of an explosion! Do not store any containers with flammable materials such as, for example, spray cans, fire extinguisher refill cartridges etc in the refrigerator/freezer.
• Bottles and cans must not be placed in the freezer. They can burst when
the contents freeze, high carbonate content drinks can even explode!
Never store lemonade, juices, beer, wine, sparkling wine etc. in the freezer. Exception: high alcohol content spirits can be stored in the freezer.
• All foods must be packed air tight prior to freezing, so that they do not
dry out or lose their flavour, and so that no flavour contamination of
other frozen goods occurs.
Caution! Do not touch frozen food with wet hands. Your hands could freeze to the food.
1. To achieve faster freezing of food or to freeze the maximum allowed quantity, depress the ambient switch 12 hours before loading the food without
modifying the thermostat setting.
2. Place the food to be frozen in the top drawer.
3. Not open the door frequently or leave it open longer than absolutely necessary.
Page 35

35
Preparation of Ice Cubes
1. Fill the ice cube tray 3/4 full with cold water, place it in the freezer compartment and leave to freeze.
2. To loosen the frozen cubes, either bend the ice cube tray or hold it under
running water for a few seconds.
Important! Never try to free an ice tray that is frozen to the freezer compartment using pointed or sharp edged objects. Use the ice scraper supplied.
Freezing Calendar
• The symbols on the drawers show different types of frozen goods.
• The numbers indicate storage times in months for the appropriate types
of frozen goods. Whether the upper or lower value of the indicated storage time is valid depends on the quality of the foods and pre-treating
before freezing. The lower value applies to foods with high fat content.
Ice pack
There are two ice packs in one drawer of the freezer.
In the event of a power failure or malfunction, the ice packs will lengthen
the amount of time it takes for the frozen food to become too warm by
several hours. The ice packs can only fulfil this task optimally if it is placed
in the uppermost drawer, at the front, above the frozen food. You can use
the ice packs for cooling cold bags.
Page 36

36
Defrosting
Refrigerator
Frost is automatically eliminated from the evaporator of the refrigerator
compartment every time the motor compressor stops, during normal use.
The defrost water drains out through a trough into a special container at
the back of the appliance, over the motor compressor, where it evaporates.
Freezer
The freezer compartment, however, will become progrssively covered with
frost. This should be removed with the special plastic scraper provided, whenever the tickness of the frost exceeds 4 mm. During this operation it is not
necessary to switch off the power supply or to remove the foodstuffs.
However when the ice becomes very thick on the inner liner, complete
defrosting should be carried out as follows:
1. Remove the frozen food from the
freezer, wrap it in several layers of
newspaper and put it in a very
cool place.
2. Switch off the appliance and pull
out the plug, or remove or
unscrew the safety fuses.
3. Leave the freezer compartment
door open.
4. Insert the plastic scraper into the
recess provided under the defrost
water channel and place a collecting basin under it.
5. Once defrosting is completed keep the scraper for future use;
6. Turn the thermostat knob to the required setting or replace the plug in the
power socket.
Warning!
Never use metal tools to scrape off the frost
Do not use a mechanical device or any artificial means to speed up the
thawing process other than those recommended by the manufacturer.
A temperature rise of the frozen food packs, during defrosting , may shor-
ten their safe storage life.
D068
Page 37

37
Switching off the appliance
If the appliance is not going to be used for an extended period:
1. Remove all refrigerated and deep-frozen packages as well as ice trays.
2. Switch off the appliance by turning the temperature regulator to position
"0".
3. Remove the mains plug or switch off or turn out the circuit breaker or fuse.
4. Defrost freezer compartment and clean thoroughly (see section: “Cleaning
and Care”).
5. Leave the door open to avoid the build up of odours.
Cleaning and Care
For hygienic reasons the appliance interior, including interior accessories,
should be cleaned regularly.
Warning!
• The appliance may not be connected to the mains during cleaning. Danger of electrical shock! Before cleaning switch the appliance offand rem
ve the plug from the mains, or switch off or turn out the circuit breaker
or fuse.
• Never clean the appliance with a steam cleaner. Moisture could accumulate in electrical components, danger of electrical shock! Hot vapours can
lead to the damage of plastic parts.
• The appliance must be dry before it is placed back into service.
Attention!
• Ethereal oils and organic solvents can attack plastic parts, e.g.
– lemon juice or the juice from orange peals;
– butyric acid;
– cleansers which contain acetic acid.
Do not allow such substances to come into contact with appliance parts.
• Do not use any abrasive cleansers.
1. Remove frozen food and the food from the refrigerator. Wrap frozen
food in several layers of newspaper. Store it in a cool place, well covered.
2. Defrost the freezer compartment prior to cleaning (see "Defrosting" section).
3. Switch the appliance off and remove the plug from the mains, or switch off
or turn out the circuit breaker or fuse.
Page 38

38
4. Clean the appliance and the interior accessories with a cloth and lukewarm
water. Commercially available dish washing detergents may also be used.
5. After cleaning wipe with fresh water and rub dry.
Accumulation of dust at the condenser increases energy consumption. For
this reason carefully clean the condenser at the back of the appliance once
a year with a soft brush or a vacuum cleaner.
6. Check the water drain hole on
the rear wall of the fridge. Clear a
blocked drain hole with the aid of
the green peg in the pack of
accessories included with the
appliance.
7. After everything is dry place
appliance back into service.
Energy Saving Tips
• Do not install the appliance near cookers, radiators or other sources of
warmth. High ambient temperatures cause longer, more frequent operation of the compressor.
• Ensure sufficient air circulation and exhaust at the appliance base
and at the back wall of the appliance. Never cover air vent openings.
• Do not place warm foods into the appliance. Allow warm foods to cool
first.
• Only leave door open as long as necessary.
• Do not set temperature any colder than necessary.
• Put frozen food in the fridge to defrost. The cold in the frozen food will
then be used to cool the fridge.
• Keep the heat emitting condenser, the metall grille on the rear wall of
your appliance, always clean.
D037
Page 39

39
The food is too warm.
Interior lighting does not
work.
The appliance is near a heat
source.
Temperature is not properly
adjusted.
Please look in the "Initial Start
Up" section.
Light bulb is defective.
Please look in the "Changing
the Light Bulb" section.
Turn the temperature regulator to a colder setting temporarily.
Door was open for an extended period.
Please look in the "Installation
location" section.
A large quantity of warm food
was placed in the appliance
within the last 24 hours.
Open the door only as long as
necessary.
Malfunction Possible Cause Remedy
Appliance does not work.
Appliance is not switched on Switch on the appliance.
Mains plug is not plugged in
or is loose.
Insert mains plug.
Fuse has blown or is defective.
Check fuse, replace if necessary.
Socket is defective.
Mains malfunctions are to be
corrected by an electrician.
Appliance cools too much. Temperature is set too cold.
Turn the temperature regulator to a warmer setting temporarily.
What to do if ...
Correcting Malfunctions
A malfunction may be caused by only a minor fault that you can rectify
yourself using the following instructions. Do not perform any other work on
the appliance if the following information does not provide assistance in
your specific case.
Warning! Repairs to refrigerators/freezers may only be performed by
qualified service engineers. Improper repairs can give rise to significant
hazards for the user. If your appliance needs repairing, please contact your
specialist dealer or our Customer Service.
Heavy build up of frost, possibly also on the door seal.
Door seal is not air tight (possibly after changing over the
hinges).
Carefully warm the leaking
sections of the door seal with
a hair dryer (not hotter than
approx. 50 °C). At the same
time shape the warmed door
seal by hand such that it sits
correctly.
Page 40

40
Unusual noises.
The appliance is touching the
wall or other objects.
Appliance is not level.
A component, e.g. a pipe, on
the rear of the appliance is
touching another part of the
appliance or the wall.
The compressor starts after a
period of time.
See the "Cleaning and Care"
section.
This is normal, no error has
occurred.
The compressor does not start
immediately after changing
the temperature setting.
Water on the floor or on storage shelves.
Water drain hole is blocked.
If necessary, carefully bend
the component out of the
way.
Move the appliance slightly.
Readjust the feet.
Changing the light bulb
Warning! There is a risk of electric shocks! Before changing the light bulb,
switch off the appliance and unplug it, or pull the fuse or the circuit breaker.
Light bulb data: 220-240 V
1. To switch off the appliance, turn the
temperature regulator to position "0".
2. Unplug the mains plug.
3. To change the light bulb press on the
rear hook and at the same time slide
the cover in the direction indicated
by the arrow.
4. Change the defective light bulb with
one of the some power (the maximum power is shown on the light
diffuser).
5. Refit the light bulb cover.
6. Put the refrigerator back into operation.
Malfunction Possible Cause Remedy
Page 41

41
Regulations, Standards, Guidelines
This appliance was designed for household use and was manufactured in
accordance with the appropriate standards. The necessary measures in
accordance with appliance safety legislation regulations (GSG), accident
prevention regulations for refrigeration appliances (VBG 20) and the regulations of the German Society of Electrical Engineers (VDE) were observed in
the manufacture of this appliance.
The refrigerant circuit has been checked for leaks.
This appliance is in accordance with the following EU guidelines:
– 73/23/EWG dated 19 February 1973 - low voltage guidelines.
– 89/336/EWG dated 3 May 1989
(including guideline change notice 92/31/EWG) - EMV guideline
Customer Service
If you cannot find the remedy for a malfunction in these operating instructions, please contact your dealer or our customer service department.
Addresses and telephone numbers are listed in the accompanying booklet
"Guarantee Conditions/Customer Service Locations".
Selective ordering of replacement parts can save unnecessary travel and
costs. For this reason always provide the following appliance information:
This information can be found on the serial plate in the interior at the left
of the appliance.
• Model Name
• Model Number (PNC)
• Serial Number (S-No.)
We recommend that you enter this information here, so that it is handy if
needed.
Note: The customer bears the costs of unjustified customer service calls
even during the guarantee period.
Page 42

Page 43

Page 44

AEG Hausgeräte GmbH
Postfach 1036
D-90327 Nürnberg
http://www.aeg.hausgeraete.de
© Copyright by AEG Wijzigingen voorbehouden
2223 034-52 08/07 Subject to change without notice
 Loading...