

Page 1

USR 200
Universalschneider
Universal Slicer
Trancheuse universelle
Universele snijmachine
Affettatrice universale
Rebanadora universal
Cortador universal
Yleisleikkuri
Univerzální krájeè
Univerzális vágógép
УхукехЮ кпрЮт генйкЮт чсЮузт
Gebrauchsanweisung
Operating instructions
Mode d’emploi
Gebruiksaanwijzing
Istruzioni per l’uso
Instrucciones para el uso
Instruções de utilização
Käyttöohje
Návod k použití
Használati útmutató
ПдзгЯет чсЮузт
Page 2
1
K
J
A
B
D
H
G
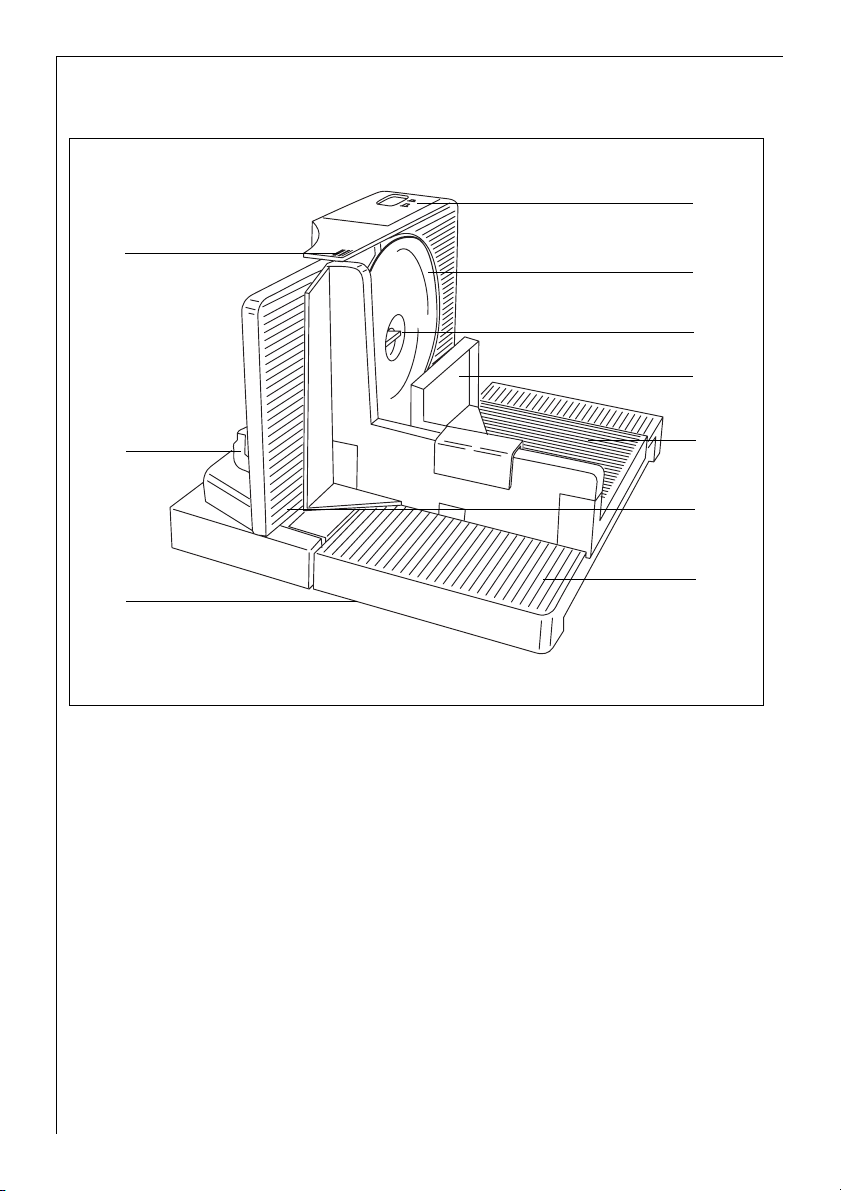
Gerätebeschreibung
A Scheibenmesser gezahnt (Rundmesser)
B Messerverschluß mit Linksdrehung
C Schneidgutschlitten mit Fingerschutz
D Restguthalter
E Anschlagplatte
F Schneidetisch mit Schlittenführungsrille
G Typenschild (Geräteunterseite)
H Schnittstärke-Einstellrad
J Schnittstärke-Einstellskala
K Ein-/Ausschalter
C
E
F
Appliance Description
A Toothed Cutting Disc (Circular Blade)
B Blade Lock with Left-Hand Thread
C Slide with Finger Protection
D Holder
E Stop Plate
F Slicing Table with Guide Slot for the Slide
G Rating Plate (on the underside of the
appliance)
H Slice Thickness Adjustment Knob
J Slice Thickness Adjustment Scale
K On/Off Switch
2
Page 3

2
3
4
6
5
7
3
Page 4

10
8
9
4
Page 5

g
Dear Customer,
g
Please read these operating instructions carefully. Above all please
observe the safety instructions on the
first few pages of these operating
instructions! Please keep these operating instructions for later reference. Pass
them on to any subsequent owner of
the appliance.
1 Safety Instructions
• Prior to using for the first time, please
note that the appliance may only be
used with the voltage and type of current that is stated on the rating plate.
• Only connect the appliance to a socket
that has been installed in accordance
with regulations.
• Do not hold any hard objects against
the rotating blade, and do not reach
into the blade. There is a risk of injury!
• Plastic parts must not be placed on or
close to radiators.
• The Universal Slicer is a household
appliance and therefore not suitable
for commercial use.
• The Universal Slicer may only be used
once it has been positioned in accor
dance with instructions.
• Under no circumstances should the
Universal Slicer be used to slice frozen
food.
(There is a risk of damage to the appliance.)
• It is essential that the slide be used
(Fig. 1/C) when slicing. The slide and
holder (Fig. 1/D) may only be removed
in the case that the size and shape of
the item to be sliced is such as to pre
vent their use (e.g. bread).
• Switch off the appliance after a maximum of 5 minutes continuous use, the
Universal Slicer is designed for a maxi
mum period of operation of 5 minutes.
• After each use, return the stop plate
(Fig. 1/E) to the „0” position to avoid
anybody injuring themselves on the
circular blade (Fig. 1/A).
• Prior to cleaning and before changing
the blade, put the stop plate in the „0”
position and unplug the appliance
from the mains.
• Never submerge the appliance in water
or otherwise bring it into contact with
water. Observe the cleaning instructions!
Important:
• After switching off the appliance,
the circular blade continues to
rotate for a short time.
• Children do not recognise the haz-
ards that can be present when using
electrical appliances or slicers. For
this reason do not leave children to
„play” or use the appliance unsuper
vised. Do not leave the appliance
running unsupervised.
• In order to avoid danger, if the con-
nection lead of this appliance is
damaged, it must be replaced by the
manufacturer, its customer service
department or a similarly qualified
person.
• Repairs to this appliance may only
be carried out by qualified service
-
;
-
-
engineers. Considerable danger may
result from improper repairs. If
repairs become necessary, please
contact the Customer Care Depart
ment or your authorised dealer.
• If the appliance is used for a purpose
other than that intended, or is ope
rated incorrectly, no liability can be
accepted.
This appliance complies with the following EC directives:
• 73/23/EWG dated 19.2.1973
„Low Voltage Directive", including
Directive Amendment 93/68/EWG.
• 89/336/EWG dated 3.5.1989
„EMC Directive”, including Directive
Amendment 92/31/EWG.
-
-
-
9
Page 6

g
Positioning the Appliance
The Universal Slicer, with its non-slip
feet, will stand securely without slipping on level, clean, dry work surfaces.
Prior to using for the first time, it is
advisable to wipe all parts with a damp
cloth and dry them.
Prior to Using
• Check that the appliance is stable and
connect to the mains using the mains
plug.
• Set the required slice thickness. To do
this, turn the slice thickness adjust
ment knob (Fig. 2) anticlockwise. Slice
thicknesses from thin to approx.
14 mm can be selected continuously.
The slice thickness adjustment scale
(Fig. 1/J) is not graduated in millimetres, it is an arbitrary scale for your reference. The „0” position is designed to
cover the blade for safety reasons.
• Assemble the slide (Fig. 3). Lift up the
rear wall of the slide until it is at 90º
and then press downwards to the stop.
• Fold down the slicing table.
• Fitting the slide and the holder.
Tilt the slide (Fig. 4) and place in the
guide slot on the side of the slicing
table, swivel into the working position.
Place the holder on the slide from the
right.
-
Switching On the Universal Slicer
The Universal Slicer is switched on by
applying thumb pressure to the switch
(Fig. 1/K). At the same time the safety
interlock must be disengaged with
another finger (Fig. 5). The circular
blade continues to rotate as long as
the switch remains pressed. When the
switch is released, the appliance
switches off.
Please Note: The circular blade continues to rotate for a short time after the
appliance is switched off.
After each use, please return the stop
plate to its initial position („0“ position) by turning the slice thickness
adjustment knob (Fig. 2).
Instructions for Use
To use the Universal Slicer safely and
ensure even slicing, place the item to
be sliced on the slide and press it, if
necessary using the holder, lightly
against the stop plate (Fig. 6). With the
circular blade rotating, the slide is then
moved, together with the item to be
sliced, towards the circular blade, apply
light pressure. After use, return the
stop plate to the „0” position using the
slice thickness adjuster.
Collecting the Slices
Place, for example, a plate in the cutout in the housing (Fig. 7).
Removing the Circular Blade
Prior to removing the circular blade, it
is imperative that the stop plate be
placed in the „0” position and that the
appliance is unplugged from the mains.
When carrying out the following steps,
please do not forget: The circular
blade is very sharp!
Unscrew the blade lock (Fig. 8) by turning it clockwise (left hand thread).
The circular blade can now be removed
from the housing cover.
Fitting the Circular Blade
Place the circular blade in the housing
cover, rotating it slightly if necessary.
The blade must be positioned in the
recess in the housing cover over its
entire periphery. Fit the blade lock by
turning it in an anticlockwise direction
(turn to the left). Tighten the blade
lock.
10
Page 7

g
Dismantling the Appliance
(Fig.
9/10)
Remove the circular blade as described
above. To remove the slicing table, fold
it up and pull it out of the housing at
the lower end at the rear (Fig. 9). To
replace the slicing table, position it
vertically and insert the two pins at the
front, followed by those at the rear. To
remove the motor unit, the circular
blade must be removed first. Unlock
the motor unit and then pull it out of
the housing to the front by the handle
(Fig. 10). To replace the unit, slide it in
until it audibly engages in the housing.
Cleaning
With the exception of the motor unit
with the mains cable, your appliance is
dishwasher safe. Cleaning is only to be
performed when the circular blade is
stationary. Prior to cleaning, it is
imperative that the stop plate be
placed in the „0” position and that the
appliance is unplugged from the mains.
Clean the motor unit with a damp
cloth. The remaining parts can be
washed normally in water by hand or
placed in the dishwasher at max. 50 °C.
Never stand or submerge the Universal Slicer in water.
Putting the Appliance Away
Remove the holder and the slide; fold
the slide together. Fold up the slicing
table. Your appliance will now fit in a
drawer with a minimum height of
125 mm (internal dimension).
Disposal
Packaging material
2
The packaging materials are environmentally friendly and can be recycled.
The plastic components are identified
by markings, e.g. >PE<, >PS<, etc.
Please dispose of the packaging materials in the appropriate container at
the community waste disposal facilities.
Old appliance
2
The symbol W on the product or on
its packaging indicates that this product may not be treated as household
waste. Instead it shall be handed over
to the applicable collection point for
the recycling of electrical and electronic equipment. By ensuring this product is disposed of correctly, you will
help prevent potential negative consequences for the environment and
human health, which could otherwise
be caused by inappropriate waste
handling of this product. For more
detailed information about recycling
of this product, please contact your
local city office, your household waste
disposal service or the shop where you
purchased the product.
11
Page 8

AEG Hausgeräte GmbH
Muggenhofer Str. 135
D-90429 Nürnberg
http://www.aeg-hausgeraete.de
© Copyright by AEG
822 949 017 – 02 - 0405
 Loading...