

Page 1

Operating Instructions
Tumble dryer
Electrolux TW SL3 M100
Dear Electrolux customer!
Welcome to the family of Electrolux customers.
We hope that you will have many years of use from your new
machine.
The machine has many features. To make the most of its
functions, we recommend that you read the operating
instructions before using the machine. The operating
instructions include information on how you can help protect
the environment.
Page 2

Contents
Before using your machine for
the first time
Language selection
Safety
Transport/Winter storage
Packing material
Recycling
General
Child safety catch
Activating/deactivating Child-safe
start
Advice and tips before you
tumble-dry
Materials that can be tumble-dried
Materials that must not be
tumble-dried
15Care and cleaning
3
3
4Safety instructions
4
4
4
5
6Child safety
6
6
6
7Description of the tumble dryer
8
8
8
Cleaning the lint filter
Emptying the condensed water
container
Cleaning the steamer filter
Cleaning the outside of the
machine
The machine will not start
Overheating cut-out
Drying takes too long
Error messages
Technical data
Standard tests
Before contacting the service
division
15
15
16
16
18Troubleshooting
18
18
18
18
19Technical information
19
19
20Service
20
21Installation
Static electricity
Sort your fabrics
Select the programme
Press the Start button
Drying programme finished
You can carry out the following
settings
How to choose the settings:
Audible Volume
Language
Child-safe
10
12
13
14Settings
14
14
14
14
14
8
9Tumble drying
9
Positioning the tumble dryer
Adjusting the feet
Condensed water
Electrical installation
Follow these instructions:
21
22
23
23
24Door hanging
25
28Quick guide
2
Page 3

Before using your machine for the first time
Language selection
You will be prompted to select the display
language whenyou have connected your machine
and start it for the first time. Do as follows:
Turn the programme selector to choose from: US
English, English,Svenska, Dansk, Norsk, Suomi,
Français, Deutsch, Italiano, Espanol, Русский,
Nederlands.
Press Stop to save the setting.
Laundry labels
Certain materials are not suitable for
tumble-drying. Always check and follow the
instructions on each item’s laundry label. You can
find more information in the "Advice and tips
before you tumble-dry" chapter.
NOTE!
When starting the tumble dryer for the first time
or after a long period without use, you may notice
a slight thumping noise. This noise is completely
normal and will disappear after a few loads.
3
Page 4
Safety instructions
Read the operating instructions and
keep them in a safe place!
• Electrical installation, if required, should be
carried out by a qualified electrician.
• The machine should only be used for
tumble-drying as described in these
instructions.
• Repairs and maintenance relating to safety or
performance must be carried out by a qualified
professional.
• Damaged mains cables must only be replaced
by a qualified electrician.
• Sufficient ventilation is required to prevent
smoke from open fires or fumes from
equipment burning other fuels being sucked
into the room when the tumble dryer is running.
• Do not dry dirty laundry in the tumble dryer.
• Items that are stained with e.g. cooking oil,
acetone, alcohol, petrol, kerosene, stain
remover, turpentine, wax and wax remover
should be washed in hot water with extra
detergent before they go in the tumbler dryer.
• Items such as foam rubber, latex, plastic,
waterproof textiles, rubber-coated items and
clothes and foam-rubber filled cushions must
not be dried in the tumbler dryer.
• Fabric softener or similar products should be
used as per the recommendations of the
detergent manufacturer.
• The machine is not designed to be used by
persons (even children) that are physically or
mentally handicapped or lack experience and
knowledge. Such persons must receive
instruction in how to use the machine from the
person responsible for their safety.
• Children must be watched to ensure they do
not play with the machine.
• Do not let lint accumulate near the dryer
• Do not install the dryer behind doors with lock,
sliding doors or next to the doors with hinges
so that opening of the dryer door will never be
hindered.
Safety
• The machine must not be used for drying items
that have been dry-cleaned at home or fabrics
that may contain residues of flammable liquids.
• The tumble dryer is protected by an
overheating cut-out. This shuts off the machine
if the temperature gets too high.
• A float shuts off the machine in the event of a
blockage in the condensed water hose or if
there is a risk of the condensed water container
overflowing.
WARNING!
When the tumble dryer is operating, the back of
the tumble dryer will get very hot. Leave the
machine to cool completely before touching the
back.
Installation
See the "Installation" chapter.
WARNING!
Do not start the machine until it has been in
position for 24 hours. If for some reason the
tumble dryer needs to be laid down for transport
or service, it must be laid on its left side viewed
from the front.
Transport/Winter storage
If you need to move your machine or store it over
the winter in unheated premises, make sure that
you drain the condensed water container
beforehand.
Packing material
Please sort waste materials in accordance with
local guidelines.
4
Page 5

Safety instructions
Recycling
This machine is manufactured and labelled for
recycling. In order to prevent personal injury, the
machine must be made inoperable after deciding
to take it out of service. Contact your local
authority for information about where and how
your machine should be correctly recycled.
5
Page 6

Child safety
General
WARNING!
Do not allow children to play with the
tumble dryer.
• If the door is opened when a programme is
running the garments may be very hot, with a
risk of burn injuries.
• The tumble dryer does not start automatically
when the door is closed (if a child pulls the
door shut from the inside, for example).
Child safety catch
By activating the child-safe start function you can
prevent children from starting the tumble dryer or
changing the current programme.
Activating/deactivating Child-safe start
Do as follows to open the settings menu:
1. Turn off the machine using the main power
switch.
2. Press the Stop button and switch on the
machine with the main power switch. Then
press the Stop button 5 times within 10
seconds.
3. Select the setting you want to change by
turning the programme selector.
4. Press the Stop button once.
5. Change and save the setting as described
below.
6. Press the Start button to return to the
programme menu.
You can activate the Child-safe start option to
prevent children from starting the machine.
1. Turn the programme selector and choose
"Child-safe On" or "Child-safe Off".
2. Press the Stop button once to save the setting.
You can temporarily deactivate Child-safe start
by pressing the Start and Stop buttons at the
same time. Child-safe start will be deactivated for
3 minutes.
6
Page 7
1 3
4 5 62
7
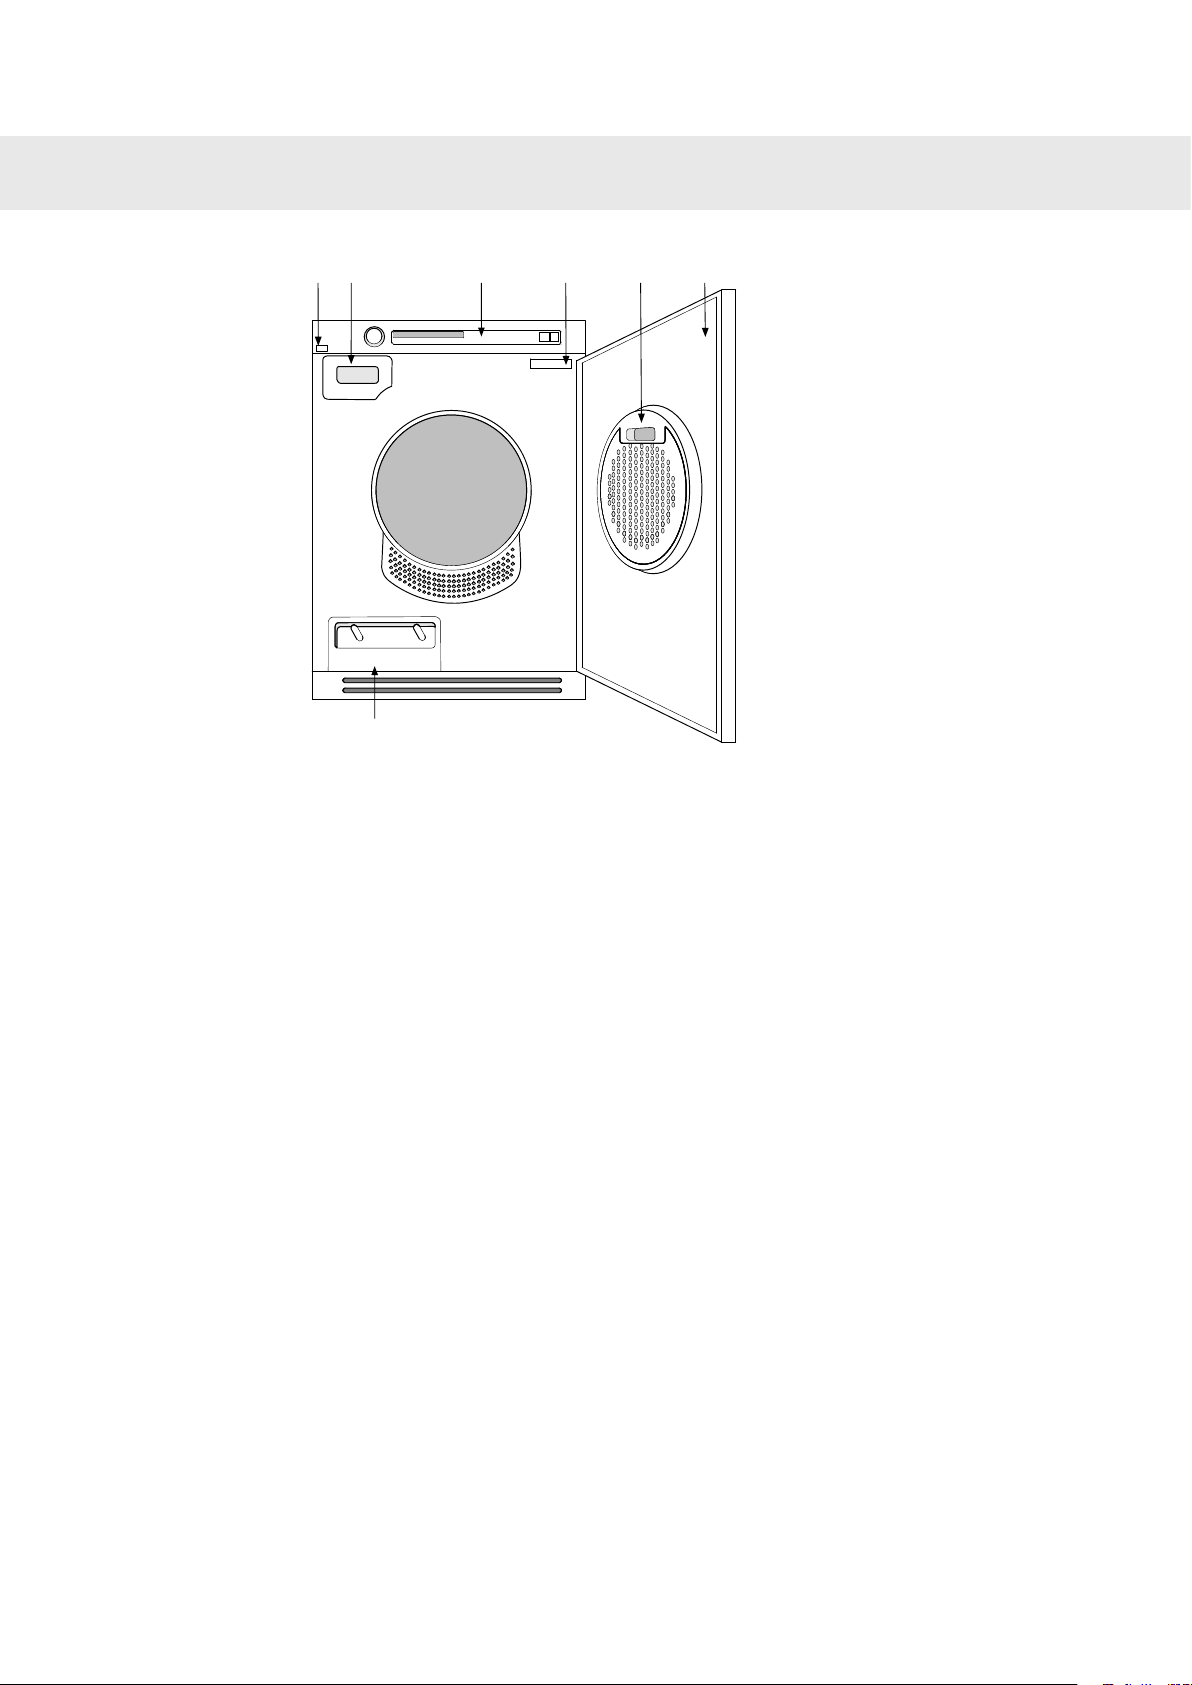
Description of the tumble dryer
Type plate4.
Lint filter5.Main power switch1.
Outer door6.Condensed water container2.
Steamer and filter7.Panel3.
7
Page 8

Advice and tips before you tumble-dry
Here are some tips that may help you before you
begin tumble-drying.
Have the clothes been spun?
Items to be tumble-dried should be spun at 1000
rpm or faster. Higher spin speeds save energy
and reduce drying time.
Materials that can be tumble-dried
This symbol means that the material is suitable
for tumble-drying. Fabrics best suited to
tumble-drying are cotton fabrics, terry cloth and
synthetic fibres. Garments will be softer and lighter
when tumbled than when hung out to dry.
NOTE!
The tumble dryer does not cause any significant
wear on fabrics. The lint that collects in the lint
filter consists of dust and fibre residues formed
when the items are used.
Static electricity
To reduce the risk of static electricity in the laundry
after tumble drying you can:
• Use fabric softener when washing.
• Wait five minutes after the drying program ends
before opening the door and removing the
laundry from the dryer.
NOTE!
You can stop the tumble dryer by pressing the
Stop button for three seconds or by opening the
door. In both cases the programme is stopped
and starts from the beginning if restarted.
If you do not want to restart the programme then
immediately remove all laundry and spread it out
to allow the heat to dissipate.
Materials that must not be tumble-dried
This symbol means that the material is not
suitable for tumble-drying. Certain materials may
melt or become a fire hazard if exposed to heat,
and others can lose their shape or shrink.
And do not tumble-dry
• materials labelled "Do not dry near heat".
• garments that have been dry-cleaned at home.
• plastic foam.
• fibreglass material.
• wool must not be tumble-dried because of the
risk of felting.
8
Page 9

Tumble drying
Below are step-by-step instructions to help you
achieve the best possible tumble-drying results.
Sort your fabrics
You will achieve the most uniform drying
1
results if the items are made of the same
type of material. Do up zips and buttons, fasten
belts, sort the items and adjust the load and
temperature.
Press the main power switch
until the display lights.
2
Open the door, load the items
and then close the door
3
9
Page 10

Main power switch
Programme selector
Display window
Start
Stop
Tumble drying
Select the programme
4
Guidelines as to what specific programmes can be used for:
The Auto extra dry, Auto dry and Auto normal dry
programmes have two temperature settings.
Normal temperature but also low temperature for
more delicate items.
Auto extra dry
Temperature normal. This programme is for items
that are particularly difficult to dry, such as jeans
with very thick seams.
Auto dry
Temperature normal. These programmes shut off
the heat once the load is dry but before it is "bone
dry". The Auto dry programme shuts off the heat
slightly later than Auto normal dry. Use trial and
error to find out what works best. Use these
programmes when you want items to be
completely dry.
Auto normal dry
Temperature normal. These programmes shut off
the heat once the load is dry but before it is "bone
dry". The Auto dry programme shuts off the heat
slightly later than Auto normal dry. Use trial and
error to find out what works best. Use these
programmes when you want items to be
completely dry.
Auto extra dry (low temperature)
Energy Save. This programme is for items that
are particularly difficult to dry, such as jeans with
very thick seams.
Auto dry (low temperature)
Energy Save. These programmes shut off the
heat once the load is dry but before it is "bone
dry". The Auto dry programme shuts off the heat
slightly later than Auto normal dry. Use trial and
error to find out what works best. Use these
programmes when you want items to be
completely dry.
Auto normal dry (low temperature)
Energy Save. These programmes shut off the
heat once the load is dry but before it is "bone
dry". The Auto dry programme shuts off the heat
slightly later than Auto normal dry. Use trial and
error to find out what works best. Use these
programmes when you want items to be
completely dry.
Auto Iron dry
This programme shuts off the heat once the load
is just damp enough for ironing or pressing.
10
Page 11

Tumble drying
Programme chart
Here we present the energy and time consumption of a few different programmes. The table shows the
effect of using different spin speeds when washing the load. Consumption can vary depending on room
temperature, humidity, load, variations in the power supply and selected options.
For the consumption values given below, the requirements are as follows:
23 °CTemperature of intake air:
55 %Moisture content of intake air:
NormalDrying temperature:
dry
dry
ter/cotton
ter/cotton
Spin speed (rpm)LoadMaterialProgram
(kWh)
1)
1/2Crease-resistant, polyes-
1)
1)
Programme time, approx. (min)Energy consumption, approx.
3:152,4800 rpm1/1Cotton, linenAuto extra
2:502,01000 rpm
2:401,91400 rpm
2:351,81600 rpm
2:502,0800 rpm1/1Cotton, linenAuto dry
2:301,81000 rpm
2:151,61400 rpm
2:051,51600 rpm
1:251,01000 rpm1/2Crease-resistant, polyes-
2:301,8800 rpm1/1Cotton, linenAuto normal
2:201,681000 rpm
2:001,41400 rpm
1:401,21600 rpm
0:550,651000 rpm
2:101,6800 rpm1/1Cotton, linenAuto Iron dry
1:551,391000 rpm
1:301,11400 rpm
1:100,81600 rpm
1) Test programme in accordance with EN61121:2005. During testing, the tumble dryer must be set to 10A and Time saver must be activated. After washing, the load must
be spun at 1000 rpm.
11
Page 12

Tumble drying
Press the Start button
Remaining drying time
5
An estimate of the remaining drying time
will be shown on the display a few minutes after
the drying programme starts. For example, "1:35"
means that it will take approximately 1 hour and
35 minutes for the load to dry.
The actual remaining time may be longer than the
estimated time shown on the display. The
remaining time is then shown as "0:15" until the
load is sufficiently dry.
You can stop the tumble dryer by pressing the
Stop button or by opening the door. In both cases
the programme is stopped and starts from the
beginning if restarted.
NOTE!
The programme will not be affected if you
change the programme selector after the
programme has started.
12
Page 13

Tumble drying
Drying programme finished
The compressor's cooling fan continues to
6
run after the programme finishes, but stops
automatically or when any button/knob is
activated.
The text "Done" appears on the display when the
programme is finished.
Backlighting
Two minutes after the drying programme finishes
the backlighting on the display and option buttons
enters energy saving mode.
Condensed water
The condensed water container must be emptied
after each load. Remove the condensed water
container, empty out the water and replace the
container. If the condensed water container
becomes full to overflowing, the programme is
interrupted and "Over Flow" appears on the
display. Empty the container and press the Start
button to start a new programme.
The condensed water is decalcified and can be
used in steam irons. Pour it through a coffee
filter.
Automatic emptying
For connection to a separate drain, see the
installation instructions in the set of documents.
NOTE!
• Clean the lint filter after each load.
• Drain the tank after each load.
WARNING!
If the lint filter becomes clogged, the machine’s
automatic overheating cut-out may be triggered.
In order to be able to restart the machine, you
must clean the filter and allow the machine to
cool down for around 30 minutes.
Once drying has finished
TIP!
Turn off the main power switch. Remove the
clothes and close the door to prevent small
children from climbing into the machine.
13
Page 14

Settings
You can carry out the following settings
• Language
• Child-safe
• Audible Volume
How to choose the settings:
Do as follows to open the settings menu:
1. Turn off the machine using the main power switch.
2. Press the Stop button and switch on the machine with the main power switch. Then press the Stop
button 5 times within 10 seconds.
3. Select the setting you want to change by turning the programme selector.
4. Press the Stop button once.
5. Change and save the setting as described below.
6. Press the Start button to return to the programme menu.
Audible Volume
1. Turn the programme selector and choose Buzzer On or Buzzer Off to set whether the tumble dryer
should audibly indicate that the programme is finished or that an error has occurred.
2. Press the Stop button once to save the setting.
Language
1. Turn the programme selector to choose from: US English, English, svenska, dansk, norsk, Suomea,
Français, Deutsch, Italiano, Espanol, Русский, Nederlands.
2. Press the Stop button once to save the setting.
Child-safe
You can activate the Child-safe start option to prevent children from starting the machine.
1. Turn the programme selector and choose "Child-safe On" or "Child-safe Off".
2. Press the Stop button once to save the setting.
You can temporarily deactivate Child-safe start by pressing the Start and Stop buttons at the same time.
Child-safe start will be deactivated for 3 minutes.
14
Page 15

Care and cleaning
Cleaning the lint filter
The lint filter must be cleaned after each load.
1. Grasp the filter handle and pull it towards you.
2. Open the filter and remove the lint from all
sides of it by hand. Use a soft dry cloth and, if
necessary, a sponge with a small amount of
washing-up liquid to remove any deposits. Dry
the filter carefully with a towel.
Emptying the condensed water container
3. Close the filter before closing the door.
If you have not connected the machine to a
separate drain the condensed water container
must be emptied after each load. Remove the
condensed water container, empty out the water
and replace the container.
If the condensed water container becomes full to
overflowing, the programme is interrupted and
"Over Flow" appears on the display. Empty the
container and press the Start button to restart the
programme.
For connection to a separate drain, see the
installation instructions in the set of documents.
15
Page 16

Care and cleaning
Cleaning the steamer filter
Lint should be cleaned from the net filter and the
foam filter inside the steamer door at the intervals
shown on the machine's display or more often.
1. Remove the plinth
2. Open the steamer door.
6. Wash the foam filter in a washing machine
using a rinse or quick wash programme. No
detergent or hot wash is necessary. The lint is
washed away and the filter is not damaged.
7. Clean the steamer by spraying water on the
ribs with a plant spray bottle. The lint runs off
together with the water, which is then
evacuated by the condensed water pump.
3. Pull out the filter by grasping the "handle" in
the middle.
4. Brush the lint from the filter with your hand. Use
a soft, dry cloth to remove any deposits.
5. Remove the foam filter found behind the net
filter.
16
8. Replace both filters and close the steamer
door.
NOTE!
Avoidtouching the ribs on the steamer. They are
very thin and easily damaged. If the ribs are bent
or damaged, the efficiency of the condenser is
greatly impaired, as is the drying result.
Cleaning the outside of the machine
Clean the outside of the machine and the
programme panel with a mild cleaner. Do not use
solvents, as these can damage the machine. Do
not hose down or spray the machine with water.
NOTE!
Do not allow dust to accumulate around the
machine. Keep the area around the tumble dryer
Page 17

Care and cleaning
clean and cool; dust, heat and moisture prolong
drying times.
17
Page 18

Troubleshooting
The machine will not start
Check
• that the door is properly closed.
• that the main power switch is on.
• that the Delayed Start option has not been
selected. To cancel Delayed Start, press the
Stop button for three seconds.
• that the plug is connected.
• that the main fuses have not blown.
• that the overheating cut-out has not been
triggered.
Overheating cut-out
The overheating cut-out shuts off the tumble dryer
if the temperature is too high, e.g. because dust
is clogging the lint filter.
• Clean the lint filter.
• The overheating cut-out will reset automatically
once the machine has cooled down.
Drying takes too long
• Check that the lint filter is not blocked. See the
"Care and cleaning" chapter.
• Empty the condensed water container and
check that the steamer filter and steamer are
not blocked. See the "Care and cleaning"
chapter.
Error messages
• If Over Flow appears on the display, the
condensed water container is full or the
steamer filter is blocked. Empty the container,
clean the filter and restart the machine. See
the "Care and cleaning" chapter.
• Read "Drying takes too long" in this chapter if
"Max program time " appears on the display.
• If "" appears on the display, clean the lint filter.
• If "Clean condenser" appears on the display,
clean the steamer. See the "Care and cleaning"
chapter.
• If "Clean auto filter" appears on the display,
clean the water filter. See the "Care and
cleaning" chapter.
• Press the Stop button to close any error
messages.
18
Page 19

Technical information
Technical data
850 mmHeight:
595 mmWidth:
585 mmDepth:
55 kgWeight:
112 lCylinder volume:
7 kgMax. drying capacity:
50-55 rpmSpeed:
See type plate.Rated power:
Stainless steelDrum material:
Outer casing material:
Powder-coated and hot-galvanized sheet steel or
stainless steel.
Stacking or freestandingSetup
Standard tests
For the standard test the machine's condensed water hose must be connected to a drain.
Europe:
Drying performance:
Energy declaration:
EN 611 21 (95/13/EEC).
Auto normal dry, 7 kg cotton
EN 611 21 (95/13/EEC).
Auto normal dry, 7 kg cotton
IEC 60 704-2-6.Test method for noise measurement:
19
Page 20

1
TYPE TD70.C
2
3
Service
Before contacting the service division
Before contacting the service division, you should
check whether you can resolve the problem
yourself. See the "Troubleshooting" and "Care
and cleaning" chapters.
If, despite this, you still need to contact the service
division, make sure you know the model
designation, type designation and serial number.
The model designation (1) can be found on the
first page of the operating instructions and on the
machine panel. The type designation (2) and
serial number (3) can be found on the type plate,
which is found on the front of the tumble dryer
inside the outer door.
20
Page 21

Installation
WARNING!
Do not start the machine until it has been in
position for 24 hours. If for some reason the
tumble dryer needs to be laid down for transport
or service, it must be laid on its left side viewed
from the front.
Positioning the tumble dryer
The tumble dryer can be free-standing or in a
stack. Remember that the tumble dryer produces
heat and should therefore not be located in a room
that is too small. If the room is very small, drying
will take longer due to the limited quantity of air.
WARNING!
• Any electrical installation must be carried out
by qualified professionals.
• The machine must not be installed behind a
lockable door, a sliding door or a door with
hinges on the opposite side to those of the
tumble dryer.
• The tumble dryer's plinth ventilation must not
be blocked by a rug or the like.
NOTE!
2. Undo the two screws indicated on the back of
the washing machine.
3. Secure the anti-tilt device using the screws as
shown in the picture.
To improve ventilation, leave the door to the
room where the tumble dryer is located open.
Freestanding
The tumble dryer can be positioned beside the
washing machine. An air gap of at least 5 mm
must be left between the washing machine and
the tumble dryer.
Stacking
The tumble dryer can be placed on top of a
Electrolux washing machine. Use the two foot
cups found in the document bag included with the
machine and the two tip guards attached to the
bottom left corner of the back of the machine.
How to assemble the stack:
1. Undo the anti-tilt device.
21
Page 22

A
B
A
B
Installation
4. Attach the plastic cups for fixing the tumble
dryer’s front feet to the washing machine’s top
cover. This is essential, as only when the
tumble dryer’s feet are resting in the plastic
cups can you be sure that the tumble dryer is
correctly positioned on the washing machine.
Break off tag A on the cup fitted on the
right-hand side and tag B on the cup fitted on
the left-hand side. Then remove the paper from
the self-adhesive surface under the plastic
cups.
5. Fit the plastic cups so that the “tags” marked
with arrows are against the front edge or side
edge of the cover and press them firmly onto
the cover. Then break off the remaining tags.
8. Lower the tumble dryer’s front feet into the
plastic cups and adjust the tumble dryer to
ensure it is level.
Adjusting the feet
Screw the feet in or out so that the tumble dryer
is both stable and level.
6. Push out the knock-out hole on the back of the
tumble dryer (you must not remove it, just open
it) using a hammer and screwdriver.
7. Push the tumble dryer in under the metal
brackets. While doing this, keep the front edge
raised by 10 mm to 20 mm.
22
Page 23

2
1
2a
Max 1000 mm
Installation
Condensed water
The machine is supplied as shown in Option 1
(inset). This means that the condensed water is
pumped into the condensed water container,
which must be removed and emptied by hand.
Option 2 allows you to remove the small short
hose from the nipple. Attach the rubber hose
supplied to the same nipple. The water can then
be pumped out into a sink or a floor drain (2a).
Electrical installation
If the machine is delivered from the factory with
a plug attached it can be connected to an earthed
wall socket. Otherwise, a permanent connection
using a multipolar circuit breaker must be made
by a qualified professional.
Connection on delivery
• 230V, 1-Phase, 10A
• 50Hz
• Use a type A residual-current device.
Coin operation
The machine is prepared for coin operation. Such
installation must be carried out by a qualified
professional.
The installation requires a connection cable to
power the coin meter. This connection cable can
be ordered using the factory art. no. 92 090 95.
The coin meter shall be able to short circuit two
signal lines for periods of up to 10 minutes. This
is to give the user time to load the machine,
choose a programme and start the programme
after putting the coins in.
"Insert coin" appears on the display when the
machine is started with the main power switch.
23
Page 24

1
3
4
5
6
2
Door hanging
3.
and lower edges)
Locking hook4.Hinge pins (top and bottom)1.
Hinges (left + right side)5.Cover washer2.
Plinth6.Plastic plugs (on the upper
24
Page 25

Door hanging
You can choose whether the door is hung on the
right or the left.
Follow these instructions:
1. Remove the plinth.
2. Remove the hinge, two screws.
3. Lift the door up and remove it. Support the door
at the same time.
4. Remove both door pins (top and bottom). Fit
them on the other side of the machine. Refit
the hinge.
7. Switch the catch (magnetic lock) and the cover
plate. First loosen the screw holding the catch
(magnetic lock) in place. Then use a flat-bladed
screwdriver to remove the cover plate. Refit
the catch (magnetic lock) and the cover plate
on the other side.
8. Reattach the inner part of the door with the
screws (13 in total).
9. Move the plastic plugs on the upper and lower
edges of the door. Use a flat-bladed
screwdriver to remove the plugs.
10. Loosen the two screws holding the handle in
place on the door. Push out the two plastic
plugs inside the screw holes on the other side
of the door. Use the two screws to attach the
handle to the other side of the door and press
the plastic plugs into the holes where the
handle was previously fitted.
11. Refit the door by loosening the hinge screws
slightly, affixing the door and closing it.
Retighten the hinges. Replace the plinth.
5. Loosen the screws (13 in total) on the inside
of the door.
6. Loosen the inner part of the door (pull down
and lift out).
25
Page 26

Your notes
26
Page 27

Your notes
27
Page 28

Quick guide
Fabrics
• Dry fabrics of the same type together to
1
ensure that they dry as evenly as
possible.
Turn on the main power switch
2
Load the garments
• Close the door.
3
Select a programme and any
options
4
• Turn the programme selector to the
required programme.
Press the Start button
5
Drying programme finished
• "Done" appears on the display when the
6
7
programme is finished.
• Clean the lint filter after each load.
Once drying has finished
• Turn off the mains power switch and
close the door.
Art. No.: 8092723. Rev. 01. We reserve the right to make changes.
28
 Loading...