

Page 1

AT 206., 406.
Automatic-Toaster
Automatic Toaster
Grille tous pains automatique
Automatisch broodrooster
Tostapane automatico
Tostador automático
Torradeira automática
Automaattinen leivänpaahdin
Automatický opékaè topinek
Automata kenyérpirító
Бхфьмбфз фпуфйЭсб
Gebrauchsanweisung
Operating instructions
Mode d’emploi
Gebruiksaanwijzing
Istruzioni per l’uso
Instrucciones para el uso
Instruções de utilização
Käyttöohje
Návod k použití
Használati útmutató
ПдзгЯет чсЮузт
Page 2
1
L
A
B
H
C
D
K
E
J
G
F
2
2
3
Page 3
5a
4
5b
6
8
7
9
3
Page 4

g
Dear Customer,
g
Please read these operating instructions through carefully.
Above all please observe the safety
instructions on the first few pages of
these operating instructions! Please
keep these operating instructions for
later reference. Pass them on to any
subsequent owner of the appliance.
Using the warning triangle and/or the
1
key words (Danger!, Caution!, Important!), information that is important
for your safety or the correct functioning of the appliance is highlighted. It is
essential that this information is
observed.
0 This symbol guides you step by step
through the operation of the appliance.
Next to this symbol you will find addi-
3
tional information and practical tips on
using the appliance.
Tips and information about the eco-
2
nomical and ecological use of the
appliance are marked with a cloverleaf.
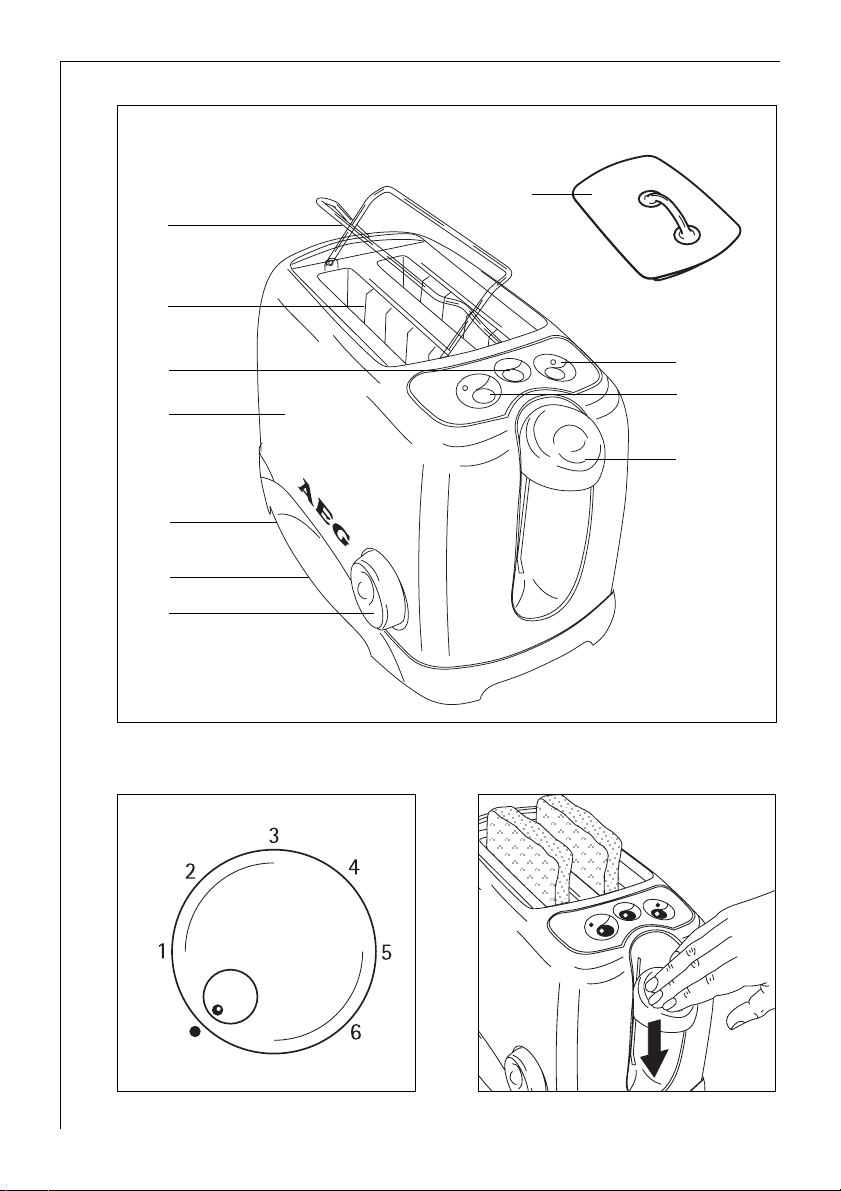
Appliance Description
(Figure 1)
A Roll rack for crisping up bread rolls
B Toasting slot
C Thermally insulated outer housing
D Crumb drawer
E Browning control with safety switch
F Start lever and bread lift*
G Defrost button with indicator lamp*
H Stop button*
J Warm up button with indicator lamp*
K Rating plate (on the underside of the
appliance)
L Toasting slot lid for protection from
dirt*
* depending on model
1 Safety Instructions
The safety standards of AEG electric
appliances are in keeping with the
recognised rules of technology and the
law governing the safety of appliances.
Nevertheless, as a manufacturer we
consider it our obligation to make you
aware of the following safety information.
General Safety
• The operating voltage of the appliance
and the mains voltage as well as the
type of current must match (see the
rating plate on the underside of the
appliance).
• Only plug into a correctly installed
earthed mains socket.
• Never pull the plug from the socket by
means of the mains lead!
• Prior to cleaning or in the event of a
malfunction, unplug the appliance
first! Loosen jammed pieces of toast
with a blunt wooden implement (e.g.
the handle of a cooking spoon). Ensure
that you do not touch the heater elements during this process.
• Do not reach into the toasting slot
with your fingers or metal implements
– there is a risk of injury and damage
to the appliance.
• Depending on the model, the toaster is
equipped with a lid for the toasting
slot.
The lid must not be fitted when the
appliance is in use, there is a risk of
fire.
Only put the lid on the appliance when
it has cooled to room temperature.
• The outer housing of the toaster is
thermally insulated. However the metal
parts in the toasting slot and on the
base of the appliance will become hot
– there is a risk of burns!
• Do not use the appliance if the mains
cable is damaged or the housing is visibly damaged.
8
Page 5

g
• The mains cable is of a special type
and is only to be replaced by an AEG
customer service centre since special
tools are required for its replacement.
• Repairs to electrical equipment may
only be performed by qualified service engineers. Improper repairs may
lead to serious hazards for the user.
• In the case of a malfunction, please
therefore contact your dealer or AEG
customer service direct.
• If the appliance is used for purposes
other than those intended or used
incorrectly, no liability can be accepted
for any damage that may be caused.
Child Safety
• Do not leave the toaster switched on
unsupervised.
• Keep children away from electrical
appliances.
You should take note of the following when using your toaster
• Do not place the appliance on hot surfaces.
• Do not use near naked flames.
• Do not use the toaster underneath or
near inflammable objects (e.g. curtains).
• Toast can catch fire if toasted repeatedly, therefore only use the keep warm
setting after toasting.
• Do not cover the toasting slot when
toasting.
• Do not immerse the appliance in
water!
• Do not kink the mains lead or bring it
into contact with hot parts of the
appliance.
• To move the appliance when warm
after use, only pick it up by the thermally insulated outer housing.
2 Disposal
Disposing of the Packaging Material!
Do not simply throw away the packaging material. Please observe the following instructions:
Packaging made from cardboard can
be put in the waste paper collection.
Deposit polyethylene plastic bags (PE)
at a PE collection point for recycling.
Padding materials made from foam
polystyrene (PS) are CFC-free and can
be deposited at the appropriate collection point (recycling depot). Please
inquire with your local authority about
your local recycling centre.
Disposing of your old appliance!
When you eventually stop using your
appliance please take it to the nearest
recycling centre or to your dealer who
will take it back for a small fee.
Operating Instructions
Prior to Using for the First Time
3
To avoid the build up of unpleasant
odours, the appliance should be placed
near an open window and operated a
few times at the maximum browning
setting without any bread. Leave the
toaster to cool to room temperature
between the heating phases.
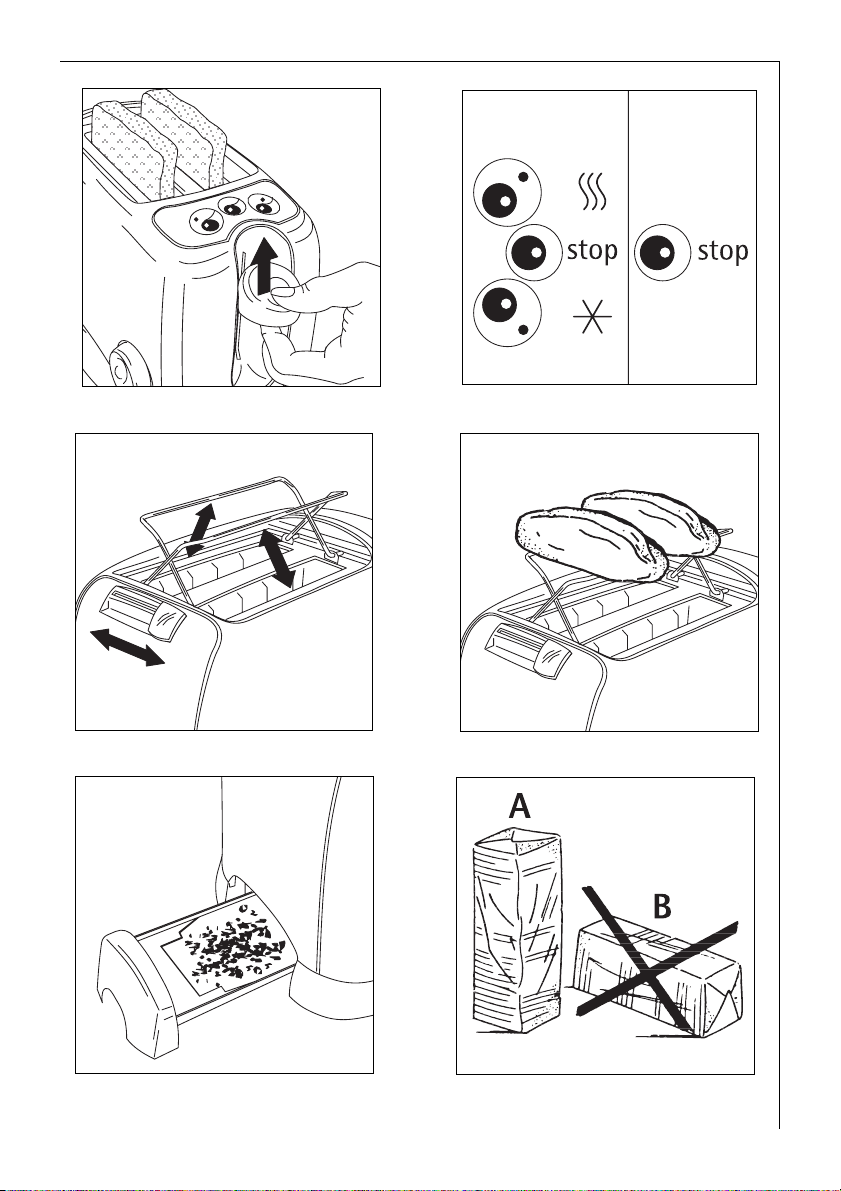
Switching On
0 Plug the mains plug into the mains
socket.
0 Insert bread for toasting.
Select the browning setting and press
down the start lever (Figure 3).
When the required degree of browning
3
has been reached, the toaster switches
off automatically; the slices of toast
are lifted up ready for removal. By lifting the start lever (bread lift func-
tion) the toasted bread can be lifted
sufficiently such that it is easy to
remove (Figure 4).
9
Page 6

g
The Safety Switch and Adjusting
the Browning Setting (Figure 2)
Using the rotary knob you can continuously adjust the browning setting
from 1-6 as required. Setting 1 for
lightest browning. Setting 6 for darkest
browning.
Use a setting between 1 and 3 when
you first start toasting. If the toast is
not browned to your liking, set the
adjuster lower or higher, higher for
example when toasting rye or dark
bread. When toasting only 1 slice and
also when toasting bread that is no
longer fresh, use a slightly lower
browning setting.
The electronic toasting time regulator
3
ensures that once a browning setting
has been chosen, the results are always
the same for the same type of bread.
Once you have finished toasting we
3
recommend always turning the rotary
knob for the browning setting to •.
This prevents the appliance being
switched on accidentally.
Stop Button
(Figure 5a/5b, depending on
model)
If you want to interrupt toasting, press
the stop button or lift the start lever.
The appliance switches off.
Once chosen, the browning setting
remains unchanged.
Defrost Button
(Figure 5a, depending on model)
Also press the defrost button when
toasting frozen bread. This lengthens
the toasting time.
Warm Up Button
(Figure 5a, depending on model)
To warm up toasted bread also press
the warm up button to keep the toast
warm and crisp.
Roll Rack (Figure 6 and 7)
Due to the nature of the function of
the appliance, the roll rack will become
hot during toasting, therefore never
touch the metal parts.
0 Pull the lever to the rear to open the
roll rack.
0 Place rolls or other bread for crisping
on the rack, turn the browning control
to the required browning setting.
0 Switch on the toaster using the start
lever.
0 When the toaster has switched off,
turn the bread. Repeat the process.
Never place rolls or bread directly on
3
the toasting slot. Do not use the roll
rack (Figure 7) as a carrying handle.
Cleaning and Care
0 Before cleaning, always unplug and
leave the toaster to cool down.
Crumbs dropping from the bread dur-
3
ing toasting collect in the crumb
drawer (Figure 8).
0 Pull out to the side and remove the
crumbs.
Do not use caustic or abrasive cleaners
3
to clean the thermally insulated outer
housing. Only clean the housing with a
dry or slightly moist cloth.
Liquid must not be applied to the
3
toaster, the toaster must also never be
immersed in liquid.
Thermally Insulated Outer
Housing
The appliance is enclosed in a thermally insulating outer housing that
makes it possible to move the appliance even when it is still warm after
use.
10
Page 7

Storage of Bread for Toasting
(Figure 9)
In order to always obtain evenly
3
browned toast, opened packets of
bread should be resealed and stored
with the end that has been started
downwards.
A = right
B = wrong
This appliance complies with the fol-
;
lowing EC directives:
• 73/23/EWG dated 19.2.1973
– Low Voltage Directive
• 89/336/EWG dated 3.5.1989
(including Directive Amendment
92/31/EWG) – EMC Directive.
Customer Service
The highest quality requirements are
placed on our appliances. Should, nevertheless, a malfunction occur on
which you can find no information in
the operating instructions, please contact your dealer or AEG Customer Service.
g
11
Page 8

AEG Kundendienst in Europa
Deutschland Europa
Sollte dieses AEG Kleingerät wider Erwarten nicht
funktionieren, senden Sie es bitte an folgende Adresse:
Beginnt die Postleitzahl Ihres Wohnortes
mit 2 - 3 - 4 - 5
AEG Kleingeräte-Zentralwerkstatt
Firma Elektro Stefan Irsen
Sachtlebenstraße 1, 41541 Dormagen
Beginnt die Postleitzahl Ihres Wohnortes
mit 0 - 1 - 6 - 7 - 8 - 9
AEG Kleingeräte-Zentralwerkstatt
Firma Trepesch GmbH
Steinstraße 500, 90419 Nürnberg
In Deutschland stehen wir Ihnen für Fragen, Anregungen
oder bei Problemen rund um unsere Kleingeräte und
Raumpflegegeräte montags bis freitags von 8 bis 18 Uhr
zur Verfügung.
AEG Serviceline unter 01805-30 60 80*
Fax: 0911/ 3 23-49 19 30
E-Mail: service.kleingeraete@aeg-hausgeraete.de
Österreich, 4010 Linz, 0732 / 770101 - 30
Belgique/België, 1502 Lembeek, 02/363.04.44
Danmark, 7000 Fredericia, 70 11 74 00
España, Madrid, 1-885-2700
France, 60307 Senlis, 03-44 62 24 24
Great Britain, Service Force 08705 929 929
Hellas, 18346 MOÓXATO, 01/4822646
Island, Reykjavik (Bræóurnir Ormsson hf), 91-3 88 20
Italia, 20394 Agrate Brianza (Milano), 39 / 68 99-8 39
Luxembourg, 1273 Luxembourg-Hamm, 4 24 31-433
Nederland, 2400 AC Alphen aan den Rijn, 0172-468 300
Norge, 0516 Oslo, 22 72 58 00
Portugal, 2635-445 Rio de Mouro, (01) 926 75 75
Schweiz/Svizzera, 5506 Mägenwil, 0848 848 348
Suomi, Porissa, puh. (02) 622 3300
Sverige, 10545 Stockholm, 08-738 60 00
*(Deutsche Telekom 24 Pf/Min.)
Garantiebedingungen
Für dieses Gerät leisten wir - zusätzlich zu
der gesetzlichen Gewährleistung des
Händlers aus Kaufvertrag - dem Endabneh-
mer gegenüber zu den nachstehenden Bedingungen Garantie:
1. Die Garantiezeit beträgt 12 Monate und
beginnt mit dem Zeitpunkt der Übergabe
des Geräts, der durch Rechnung oder
andere Unterlagen zu belegen ist. Die
Garantiezeit ist auf 6 Monate beschränkt,
wenn das Gerät gewerblich genutzt wird.
2. Die Garantie umfaßt die Behebung aller
innerhalb der Garantiezeit auftretenden
Schäden oder Mängel des Geräts, die
nachweislich auf Material- oder Fertigungsfehlern beruhen. Nicht unter die
Garantie fallen Schäden oder Mängel aus
nicht vorschriftsmäßiger Handhabung
sowie Nichtbeachtung der Gebrauchsanweisungen.
3. Im Garantiefall senden Sie das Gerät an
die für Ihren Wohnort zuständige AEG
Kleingeräte-Zentralwerkstatt oder übergeben es Ihrem Fachhändler.
Bei Einsendung achten Sie bitte auf gute
Verpackung, Ihre vollständige AbsenderAnschrift und eine kurze Fehlerbeschreibung. Fügen Sie zum Nachweis Ihres
Garantieanspruchs den Kaufbeleg bei.
4. Die Garantieleistungen werden ohne jede
Berechnung durchgeführt; sie bewirken
weder eine Verlängerung noch einen
Neubeginn der Garantiezeit. Ausgewechselte Teile gehen in unser Eigentum über.
Guarantee
This appliance is covered by the following
guarantee and is in addition to your statutory and other legal rights. All components
which fail due to defective manufacture will
be repaired or replaced free of charge for a
period of 12 months from the date of
purchase. We will not accept claims if unauthorised modification is made or if nonstandard components are used. The appliance must be used in accordance with the
operating instructions and the guarantee
does not cover any damage caused during
transit or through misuse. In order to establish the date of purchase, advice note or similar document must be produced whenever
the guarantee is claimed.
Garantie
Pour toute mise en œvre de garantie ou de
service après vente, vous devez yous adresser
à votre vendeur.
AEG assure au vendeur le remplacement gratuit des pièces détachées nécessaires à la réparation pendant 1 an, à partir de la date de
votre facture, sauf en cas de non respect des
prescriptions d’utilisation ou lorsqu’une cause étrangère à l’appareil est responsable de la
défaillance.
Les dispositions stipulées ci-dessus ne sont
pas exclusives du bénéfice au profit de
l’acheteur de la garantie légale pour défaut
et vice cachés qui s’applique, en tout état de
cause, dans les conditions des articles 1641 et
suivants, du code civil.
Garantie
AEG Huishoudelijke Apparaten neemt voor
reparaties binnen de garantietermijn - voor
zover de defecten zijn terug te voeren op
materiaal - en/of constructiefouten - de kosten op zich voor materiaal en arbeidsloon.
De garantie bedraagt 12 maanden en gaat in
op de dag van aankoop. Wanneer garantie
wordt verlangd, dient de faktuur can aankoop te worden overlegd. De garantietermijn
wordt door reparaties niet verlengd. Buiten
elke garantieverplichting vallen losse onderdelen van glas en/of kunststof. Alle overige
kosten, zoals voorrijdkosten, kosten van opzending en administratie, zijn voor rekening
van de eigenaar.
Garanzia
Duranti i primi 12 mesi d’esercizio, vengono
fornite gratuitamente dall’AEG le parti di ricam bio r iconosc iute difet tose . La g aranz ia ha
inizio con il giorno dell’acquisto che deve venir comprovato a mezzo della fattura o boletta di consegna. Per il resto valgono le
condizioni generali di fornitura della rispettiva rappresentanza nazionale.
Garantia
Durante los primeros 12 meses, la AEG se
hace cargo de cuantos costes de material y
horas de trabajos invertidas se produzcan en
la subsanación de defectos. La garantia empieza a regir a partir de la fecha de la entrega, la que deberá justificarse mediante
presentación de la factura o de la nota de depacho. Por lo demás serán de aplicación las
condiciones generales de venta se gun rigen
en el respectivo pais de nuestra representación.
Garantie
In Belgien ist nur die durch belge AEG ausgegebene Garantiekarte gültig.
En Belgique, seule la carte de garantie émise
par la belge AEG est valable.
In België is slechts de door de belge AEG uitgegeven waarborgkaart geldig.
AEG Hausgeräte GmbH, Muggenhofer Straße 135, D-90429 Nürnberg
 Loading...