

Page 1
SSI 7020 INOX
Instruction book .........................4
g
Mode d’emploi ...........................9
f
Brugsanvisning.........................15
k
Bruksanvisning ......................... 20
s
PAG E
Bruksanvisning ........................... 25
n
Käyttöohje .................................. 30
q
Инструкцию по эксплуатации .. 35
u
Page 2
1
D
F
E
G H
J
C
K
L
B
M
A
O
N
P
A
C
B
D
2
3
2
Page 3
A
B
C
6/A
4
5
6/B
7
8
3
Page 4

g
Ironing table - Recommendations for use
Fabric
Synthetics
Polyacrilic
Polyamide Enkalon, Grilon, Nylon, Perlon, Rilsan
Polyester
Cellulose
Natural fibres
Silk
Woollens
Temperature
Selector
Steam
Switch
Steam off
“0”
Steam off
“0”
Steam off
“0”
Steam off
“0”
Comments
g
Acrylan, Dralon, Lycra, Orlon, Vonnel
Dacron, Diolen, Kodel, Trevira, Vestan
Cellulose fibres, acetate, cupro,
viscose such as: Cuprama, Colvera,
Phyron, Rayon, Tricell
Silk, wool and synthetic fibres can be
dry-ironed by covering with a damp
cloth and ironing over the cloth
Cotton
Linen
Setting when
not in use
For mixed fibres we recommend ironing at the lower temperature (that of the more sensitive fibre), eg.,
polyester-cotton on polyester position.
Varied ironing speeds and fabric dampness can mean that the optimal setting can differ from that recommended in the table!
= Cold
Steam on
“1”
Steam on
“1”
Steam off
“0”
Constant steam possible from •••
position
Super steam jet from ••• position for
stubborn creases
Remove plug
4
Page 5

g
Dear Customer,
g
Please read these operating instructions carefully. Above all please observe the safety instructions on the
initial pages of these operating instructions! Please keep these operating instructions for future reference. Pass
them on to any subsequent owner of
the appliance.
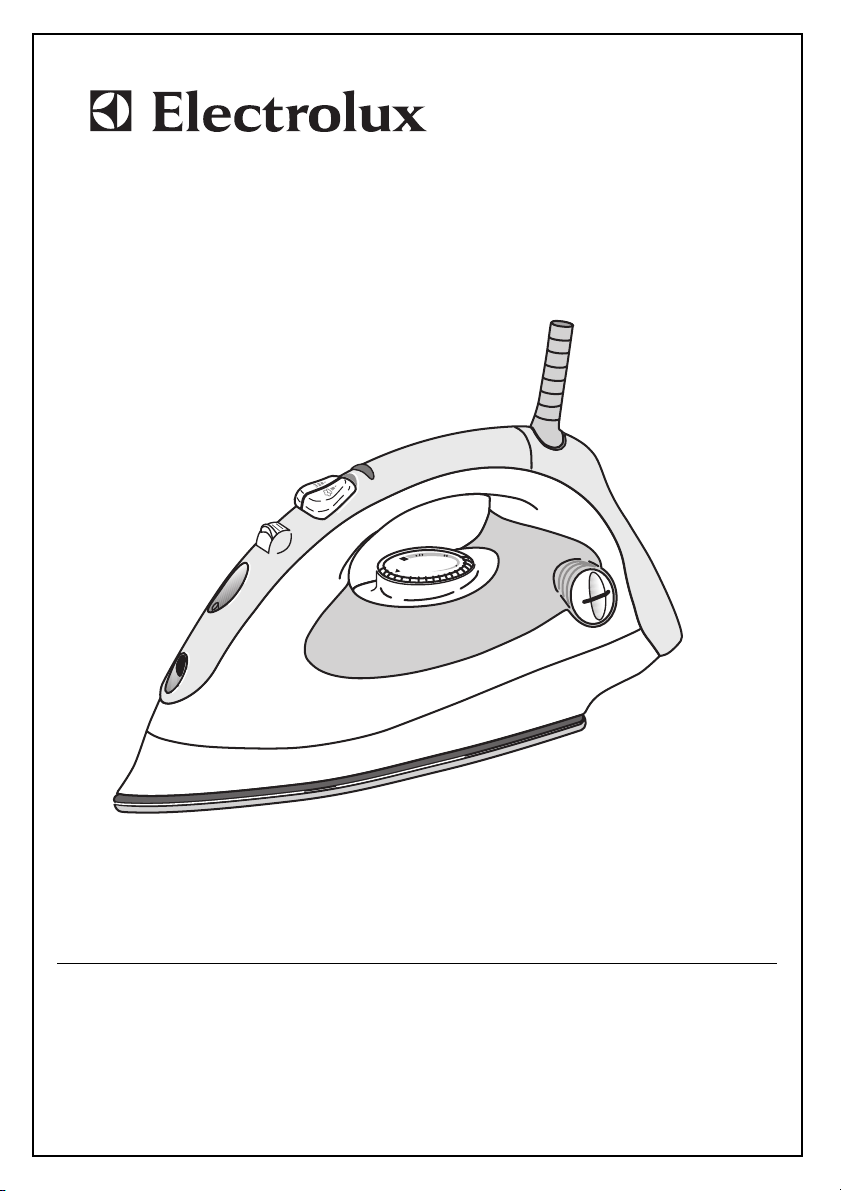
Features (Figure 1)
A Rating plate
B Stainless steel soleplate
C Steam exit holes
D Spray nozzle
E Water filling hole
F Steam “ON/OFF” switch and self-clean-
ing function “Self Clean”
G Spray function button
H Steam jet button
J Power indicator
K Mains cord
L Heel with care information
M Cord storage
M Temperature selector
O Transparent water reservoir
P Measuring beaker
Temperature selector (Figure 2)
A “Cold” setting
B Synthetics
C Silk/wool
DCotton/linen
1 Safety instructions
• The appliance may only be operated
using the voltage and current rating
indicated on the rating plate
(Figure 1/A).
• The appliance should only be plugged
into a socket installed according to
regulations.
• Caution! During use the soleplate and
cover of the iron reach high operating
temperatures!
• Do not leave the appliance alone when
switched on.
Even when leaving the room for only a
short period remove the plug. Keep
children away from the appliance.
When steam ironing steam is emitted
1
from the openings in the soleplate –
risk of burns!
• Always remove the mains plug before
cleaning the steam iron, filling with
water or emptying.
• Never immerse the steam iron in water!
• Always place the steam iron in an
upright position on the heel.
• Do not twist or bend the mains cord or
wrap it round the iron while it is still
hot. Only store the appliance once it is
cool and after emptying any remaining
water.
• Please check the mains cord from time
to time for damage! Special tools are
required to repair a damaged mains
cord. To repair this or any other fault
please contact your specialist dealer or
your local customer service centre.
Electrical appliances may only be
repaired by qualified specialists.
Improperly effected repairs may
result in significant risk to the user.
Technical data
Power consumption 2000W
Mains voltage 230 V
5
Page 6

g
This appliance complies with the fol-
;
lowing EC directives:
– 73/23/EWG dated 19.02.1973 “Low
Voltage Directive”, (including
Amending Directive 93/68/EWG.
– 89/336/EWG dated 03.05.1989 “EMC
Directive”, including Amending
Directive 92/31/EWG.
Using for the first time
Setting the temperature
(Figure 2)
Please note the internationally applicable care symbols on garment labels.
On good quality garments they indicate the correct ironing temperatures.
The ironing table indicates which temperature is most appropriate for which
type of fabric. We recommend sorting
the washing first. Start with materials
that require low temperature ironing
(eg. PERLON). Follow on by ironing
materials that require progressively
higher temperatures. In this way you
avoid damaging sensitive fabrics by
using too high a temperature. The
power indicator lights up when the
appliance is switched on (Figure 1/J); It
goes off when the set temperature is
reached. However, if the temperature
selector (Figure 1/N) is turned back,
please note that it takes a while for the
soleplate to cool down. Only when the
power indicator light comes on again
has the soleplate reached the cooler
temperature.
Dry ironing
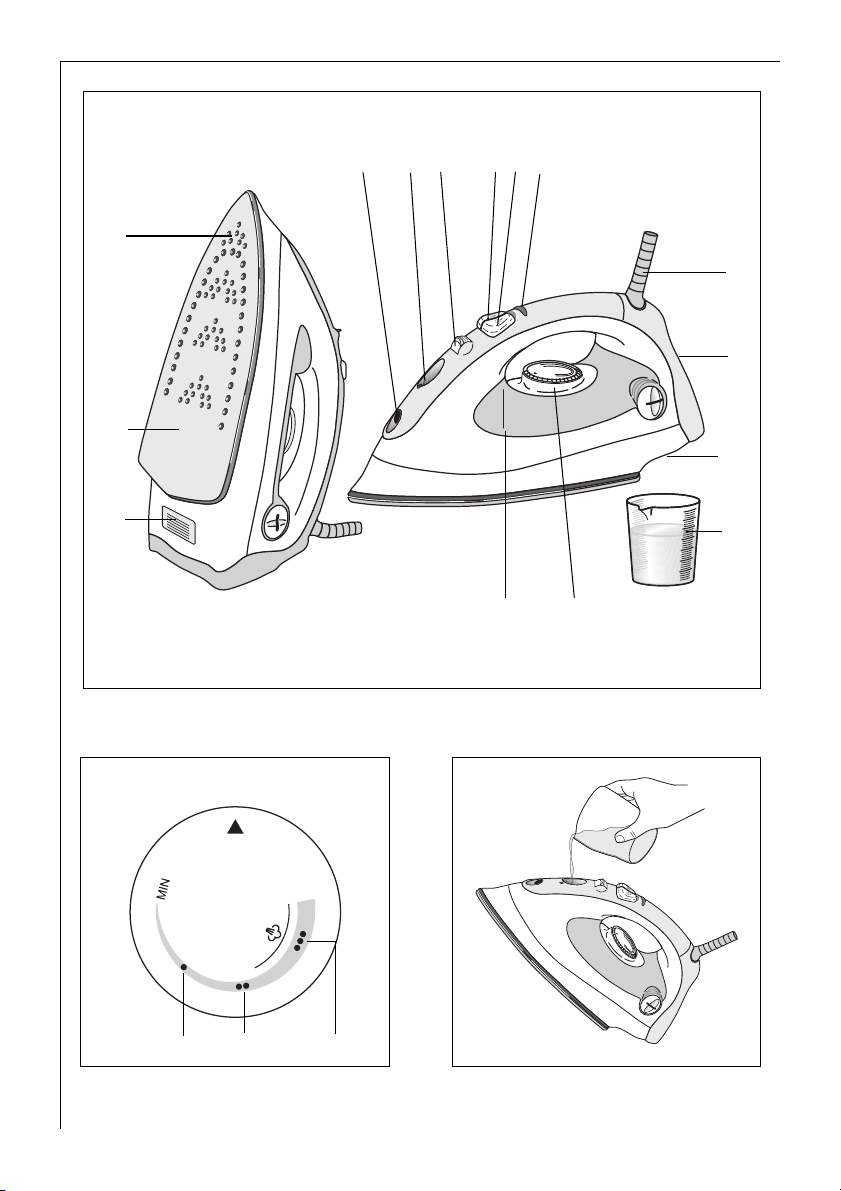
0 Set the steam switch (Figure 1/F) to
position “0” (Figure 4/A).
0 Turn the temperature selector to the
desired temperature.
Steam ironing
Filling the steam iron (Figure 3)
The water reservoir should only be
filled when the plug has been removed
from the socket.
0 Set the steam switch to position “0”
= dry iron (Figure 4/A) and hold the
appliance upright.
0 Fill the water reservoir at most to the
“MAX” mark. You can use the measuring beaker (Figure 1/P) that comes with
your appliance to do this.
Water quality
You can use tap water up to a water
hardness level of 3 PPM, 17° dH (German degrees of hardness). Your local
Water Authority can advise you on the
hardness of the water in your area. If
the water from your tap is harder than
the above, please use distilled water
available from a chemist or a mixture
of tap water and distilled water. Never
use battery water under any circumstances!
When using for the first time,
please note:
0 Fill the reservoir with water; set the
steam switch (Figure 1/F) to position
“1” (Figure 4/B).
0 Heat the appliance and place it with
the soleplate facing downwards on an
iron rest or plate (Figure 5) to allow the
water to steam through and activate
the steam chamber.
You will obtain optimal steaming
3
results and the noise produced by the
steaming will be steadier after the
water reservoir has been filled and
drained three times.
Ironing with steam
To steam iron, set the temperature
selector (Figure 1/N) to the required
fabric type and wait until the power
indicator (Figure 1/J) goes out – only
then set the steam switch (Figue 1/F)
to position “1” (Figure 4/B). You will
6
Page 7

g
find which temperature setting (fabric
type) matches which steam setting in
the ironing table. As soon as the iron is
held horizontally steam begins to form.
When the iron is set upright again the
steam supply stops automatically.
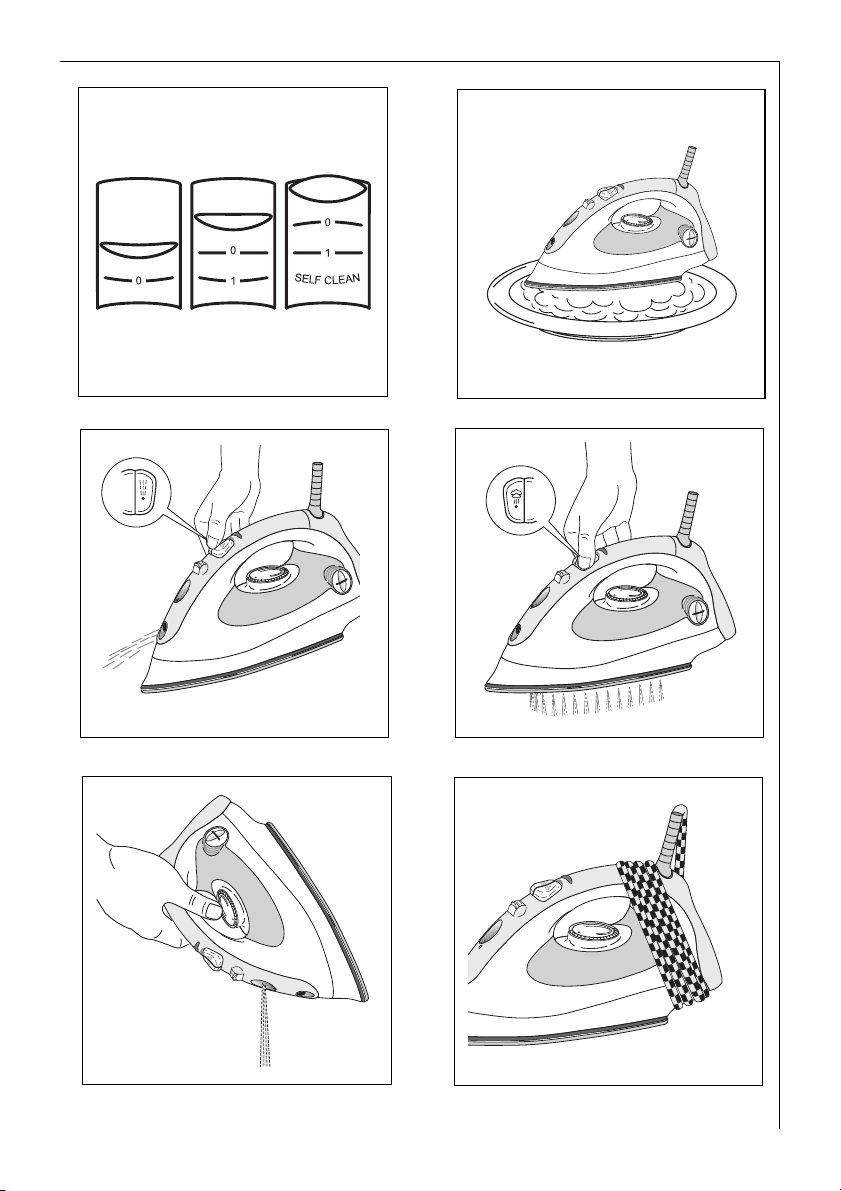
Spray function (Figure 6/A)
The first time you use the appliance, or
if you have not used it for a long time,
you will need to press the spray button
(Figure 1/G) several times before water
comes out of the spray nozzle
(Figure 1/D). You can also use the
spray function when dry ironing.
Super steam jet function
(Figure 6/B)
The super steam jet is of valuable
assistance when ironing, for example,
creases, embroidery etc. You can trigger the additional steam jet both when
steam ironing and when dry ironing.
0 Set the temperature selector (Figure
1/N) to the “MAX” position and wait
until the correct temperature has been
reached, i.e., until the power indicator
(Figure 1/J) goes out.
0 Raise the steam iron a little away from
the material and press the steam jet
button (Figure 1/H).
Always wait another 5 seconds before
pressing the steam jet button again.
Steaming hanging articles
0 Turn the temperature selector (Figure
1/N) to the “MAX” position and wait
until the power indicator (Figure 1/J)
goes out.
0 Hang the article concerned on a
hanger and hold the steam iron at a
distance of 10 - 20 cm from the material.
0 Now press the steam jet button (Figure
1/H). Wait at least 5 seconds before
pressing the button again.
Important: Do not attempt to freshen
1
up clothing whilst it is still being worn.
Risk of burns!
Storage
Remove the plug from the socket!
Set the temperature selector (Figure
1/N) to the “Cold” position (Figure 2/A)
and the steam switch (Figure 1/F) to
position “0” (Figure 4/A).
Empty out remaining water (Figure 7).
Store the appliance standing upright.
To store properly wrap the mains cord
around the cord storage (Figures 1/K
and 8).
Care and maintenance
Self-cleaning function
We recommend carrying out selfcleaning every two weeks. However,
the period between self-cleaning
should be shorter for harder water
types.
Carry out the self-cleaning function as
follows:
0 Unplug from the mains.
0 Set the steam switch (Figure 1/F) to
position “0” (Figure 4/A).
0 Fill the water reservoir (Figure 1/O) to
the “MAX”mark.
0 Set the temperature selector (Figure
1/N) to “MAX”.
0 Insert the plug into the socket.
0 Wait until the power indicator (Figure
1/J) goes out.
0 Pull out the mains plug.
0 Hold the iron horizontally over a sink.
0 Set the steam switch (Figure 1/F) to the
“Self Clean” position (Figure 4/C) and
hold it firmly in place.
0 Steam and hot water will now run out
of the steam exit holes (Figure 1/C).
Move the iron gently to and fro above
the sink until the water reservoir is
empty.
0 Allow the iron to cool and wipe the
soleplate dry with a soft cloth.
7
Page 8

g
Descaling
When using tap water for steaming,
lime is deposited in the steam chamber; heavy deposits reduce the quantity of steam produced. To descale use
lukewarm water and vinegar essence –
mixing ratio 1:1. Pour the mixture into
the cold appliance, ensuring first that
it is not connected to the mains.
Proprietory brands of descaler are
too aggressive and may not be used!
0 Place the appliance horizontally on an
iron rest or plate (Figure 5). Set the
steam switch (Figure 1/F) to position
“1” (Figure 4/B) and allow all the mixture to flow through.
0 Afterwards repeat the procedure using
clear water and then heat the iron
briefly to allow the steam chambers to
dry. Your steam iron is now ready for
use again.
As a precaution we recommend descaling every three months.
What to do, if ...
• no “Steam” appears when using on a
steam setting?
– In warm, dry air (during the winter)
a smaller jet of steam is normal
because it is taken up by the dry air
before condensing.
– Emptying the filled water reservoir
can wash out fluff. Remove the
mains cord and tip the filled appliance forwards at an angle (Figure 7)
so that the water can run out of the
filling hole.
• drops of water come out of the steam
exit holes?
– Do not set the steam switch to posi-
tion “1” until the temperature for
steam ironing has been reached. If
the temperature has been set too
low for steam ironing increase the
setting.
• stains appear on the washing while
ironing?
– Clean the steam iron. Rub the sole-
plate while still warm with a water
and vinegar mixture or with a nonabrasive cleaning fluid.
– When dry ironing fluff can enter the
steam chambers and carbonize. This
can lead to stains as the water
passes through. Therefore also clean
the inside of the water reservoir. Fill
it with water and gently shake the
steam iron. Then pour the water out.
• the soleplate is rough or furred?
The iron temperature was set too high.
– Select the correct ironing tempera-
ture for the fabric (see ironing
table).
2 Protecting the environment
Do not simply throw packaging material away.
• The cardboard packaging can be recycled in the waste paper collection.
• Deposit the plastic bag made of polyethylene (PE) at a PE collection point
for recycling.
• Padding materials are made of foamed
polystyrene (PS). They are CFC free.
Please inquire with your local authority
about your local recycling centre.
Customer Service
Our products are of the highest quality.
Should you nevertheless have questions concerning the use of this appliance, please write to us. Only with your
support can we be sure to develop
appliances to suit your needs.
8
 Loading...