

Page 1

SANTO K 9 10 00-6i
Benutzerinformation Kühlschrank
User manual Refrigerator
Notice d'utilisation Réfrigérateur
Gebruiksaanwijzing Koelkast
Návod k použití Chladnička
Instrukcja obsługi Chłodziarka
Page 2
Inhalt
2
Danke, dass Sie sich für eines unserer hochqualitativen Produkte entschieden haben.
Lesen Sie für eine optimale und gleichmäßige Leistung Ihres Gerätes diese
Benutzerinformation bitte sorgfältig durch. Sie wird Ihnen helfen, alle Vorgänge
perfekt und äußerst effizient zu steuern. Damit Sie diese Benutzerinformation bei
Bedarf stets zur Hand haben, empfehlen wir Ihnen, sie an einem sicheren Ort
aufzubewahren. Und geben Sie diese Benutzerinformation bitte an einen
eventuellen neuen Besitzer dieses Gerätes weiter.
Wir wünschen Ihnen viel Freude mit Ihrem neuen Gerät.
Inhalt
Sicherheitshinweise 2
Sicherheitshinweis 3
Allgemeine Sicherheitshinweise 3
Täglicher Gebrauch 4
Reinigen und Pflegen 4
Inbetriebnahme 4
Kundendienst 5
Bedienblende 5
Einschalten des Geräts 5
Ausschalten des Geräts 6
Temperaturanzeige 6
Temperaturregelung 6
COOLMATIC -Funktion 6
Urlaubsschaltung 7
Erste Inbetriebnahme 7
Reinigung des Innenraums 7
Täglicher Gebrauch 7
Verstellbare Ablagen/Einsätze 7
Positionierung der variablen Ablagebox
Feuchtigkeitsregulierung 8
Praktische Tipps und Hinweise 8
Energiespartipps 8
Hinweise für die Kühlung frischer
Lebensmittel 8
Hinweise für die Kühlung 9
Reinigung und Pflege 9
Regelmäßige Reinigung 9
Abtauen des Kühlschranks 10
Stillstandzeiten 10
Was tun, wenn … 11
Austauschen der Lampe für die
Innenbeleuchtung 13
Schließen Sie die Tür 13
Technische Daten 13
Gerät aufstellen 13
Aufstellung 13
Entfernen der Ablagenhalter 14
Elektrischer Anschluss 14
8
Anforderungen an die Belüftung 15
Hinweise zum Umweltschutz 15
Änderungen vorbehalten
Sicherheitshinweise
Lesen Sie zu Ihrer Sicherheit und für die optimale Geräteanwendung vor der Installation
und dem Gebrauch des Gerätes die vorliegende Benutzerinformation aufmerksam durch,
einschließlich der Ratschläge und Warnungen. Es ist wichtig, dass zur Vermeidung von
Fehlern und Unfällen alle Personen, die das Gerät benutzen, mit der Bedienung und den
Sicherheitsvorschriften vertraut sind. Heben Sie die Benutzerinformation gut auf und
übergeben Sie sie bei einem Weiterverkauf des Gerätes dem neuen Besitzer, so dass jeder
während der gesamten Lebensdauer des Gerätes über Gebrauch und Sicherheit informiert
ist.
Page 3
Sicherheitshinweise
Halten Sie sich zu Ihrer Sicherheit und zum Schutz Ihres Eigentums strikt an die Vorsichtsmaßnahmen der vorliegenden Benutzerinformation, da der Hersteller bei Missachtung
derselben von jeder Haftung freigestellt ist.
Sicherheitshinweis
• Das Gerät darf von Personen (einschließlich Kindern), deren physische, sensorische Fähigkeiten und deren Mangel an Erfahrung und Kenntnissen einen sicheren Gebrauch des
Gerätes ausschließen nur unter Aufsicht oder nach ausreichender Einweisung durch eine
verantwortungsbewusste Person benutzt werden, die sicherstellt, dass sie sich der Gefahren des Gebrauchs bewusst sind.
Kinder müssen beaufsichtigt werden, damit sie nicht am Gerät herumspielen können.
• Halten Sie das Verpackungsmaterial unbedingt von Kindern fern. Erstickungsgefahr!
• Ziehen Sie vor der Entsorgung des Gerätes den Netzstecker, schneiden Sie das Netzkabel
(so nah wie möglich am Gerät) ab und entfernen Sie die Tür, so dass spielende Kinder
vor elektrischem Schlag geschützt sind und sich nicht in dem Gerät einschließen können.
• Wenn dieses Gerät mit magnetischer Türdichtung ein älteres Modell mit Schnappverschluss (Türlasche) an der Tür oder auf dem Deckel ersetzt, machen Sie den Schnappverschluss vor dem Entsorgen des Altgerätes unbrauchbar. So verhindern Sie, dass das
Gerät nicht zu einer Todesfalle für Kinder wird.
Allgemeine Sicherheitshinweise
VORSICHT!
Die Belüftungsöffnungen müssen immer frei von Hindernissen sein.
3
• Das Gerät ist für die Aufbewahrung von Lebensmitteln und/oder Getränken in einem
normalen Haushalt bestimmt, wie in den vorliegenden Bedienungsanweisungen beschrieben wird.
• Benutzen Sie keine mechanischen oder sonstigen Hilfsmittel, um den Abtauprozess zu
beschleunigen.
• Verwenden Sie keine anderen Elektrogeräte (wie Speiseeisbereiter) in Kühlgeräten, wenn
solche Geräte nicht ausdrücklich vom Hersteller für diesen Zweck zugelassen sind.
• Achten Sie darauf, den Kühlkreislauf nicht zu beschädigen.
• Das Kältemittel Isobutan (R600a) im Kältekreislauf des Gerätes ist ein natürliches und
sehr umweltfreundliches Gas, das jedoch leicht entflammbar ist.
Achten Sie beim Transport und bei der Aufstellung des Gerätes darauf, nicht die Komponenten des Kältekreislaufs zu beschädigen.
Bei einer eventuellen Beschädigung des Kältekreislaufs:
– offene Flammen und Zündfunken vermeiden
– den Raum, in dem das Gerät installiert ist, gut lüften
Page 4

Sicherheitshinweise
4
• Änderungen der Spezifikationen und am Gerät sind gefährlich. Ein defektes Netzkabel
kann Kurzschlüsse und Feuer verursachen und/oder zu Stromschlägen führen.
WARNUNG!
Elektrische Bauteile (Netzkabel, Stecker, Kompressor) dürfen nur vom Kundendienst oder
einer kompetenten Fachkraft ausgewechselt werden.
1. Das Netzkabel darf nicht verlängert werden.
2. Vergewissern Sie sich, dass der Netzstecker nicht von der Geräterückseite gequetscht
oder beschädigt wird. Ein gequetschter oder beschädigter Netzstecker überhitzt und
kann einen Brand verursachen.
3. Vergewissern Sie sich, dass der Netzstecker des Gerätes frei zugänglich ist.
4. Ziehen Sie nicht am Netzkabel.
5. Stecken Sie den Netzstecker nie in eine lockere Steckdose. Es besteht Brand- und
Stromschlaggefahr.
6.
Betreiben Sie das Gerät nicht ohne Lampenabdeckung,
sehen ist.
• Dieses Gerät ist schwer. Vorsicht beim Transport.
• Entnehmen oder berühren Sie nie mit nassen/feuchten Händen Tiefkühlgut, da dies zu
Hautverletzungen oder Kälteverbrennungen führen kann.
• Das Gerät nicht direkter Sonneneinstrahlung aussetzen.
1)
Innenbeleuchtung vorge-
Täglicher Gebrauch
• Stellen Sie keine heißen Töpfe auf die Kunststoffteile des Gerätes.
• Lagern Sie keine feuergefährlichen Gase oder Flüssigkeiten in dem Gerät. Explosionsgefahr.
• Die Lagerempfehlungen des Geräteherstellers sollten strikt eingehalten werden. Halten
Sie sich an die betreffenden Anweisungen.
Reinigen und Pflegen
• Schalten Sie vor Wartungsarbeiten immer das Gerät ab und ziehen Sie den Netzstecker
aus der Steckdose. Falls Sie nicht an die Steckdose kommen, unterbrechen Sie die Stromversorgung.
• Reinigen Sie das Gerät nicht mit Metallgegenständen.
• Kontrollieren Sie den Tauwasserabfluss im Kühlraum in regelmäßigen Abständen. Reinigen Sie den Ablauf, falls nötig. Bei verstopftem Wasserabfluss sammelt sich das Wasser
auf dem Boden des Gerätes an.
Inbetriebnahme
Halten Sie sich für den elektrischen Anschluss strikt an die Anweisungen der betreffenden
Abschnitte.
• Kontrollieren Sie nach dem Auspacken das Gerät auf eventuelle Beschädigungen. Nehmen Sie das Gerät nicht in Betrieb, wenn es beschädigt ist. Melden Sie die Schäden
umgehend dem Händler, bei dem Sie es erworben haben. Bewahren Sie in diesem Fall
die Verpackung auf.
• Lassen Sie das Gerät mindestens vier Stunden stehen, bevor Sie es elektrisch anschließen,
damit das Öl in den Kompressor zurückfließen kann.
1) wenn eine Abdeckung der
Page 5
Bedienblende
• Ausreichenden Freiraum zur Luftzirkulation um das Gerät lassen; anderenfalls besteht
Überhitzungsgefahr. Halten Sie sich für die Belüftung an die Installationsanweisungen.
• Das Gerät sollte zur Vermeidung von Verbrennungen durch Berührung von heißen Bauteilen (Kompressor, Kondensator) möglichst mit der Rückseite gegen eine Wand aufgestellt werden.
• Das Gerät darf nicht in der Nähe von Heizkörpern oder Kochern installiert werden.
• Vergewissern Sie sich, dass der Netzstecker des Gerätes nach der Installation frei zugänglich ist.
•
Verbinden Sie das Gerät ausschließlich mit einer Trinkwasserzuleitung.
Kundendienst
• Sollte die Wartung des Gerätes elektrische Arbeiten verlangen, so dürfen diese nur von
einem qualifizierten Elektriker oder einem Elektro-Fachmann durchgeführt werden.
• Wenden Sie sich für Reparaturen und Wartung nur an Fachkräfte der autorisierten Kundendienststellen und verlangen Sie stets Original-Ersatzteile.
Umweltschutz
Das Gerät enthält im Kältekreis oder in dem Isoliermaterial keine ozonschädigenden Gase.
Das Gerät darf nicht wie normaler Hausmüll entsorgt werden. Die Isolierung enthält entzündliche Gase: das Gerät muss gemäß den geltenden Vorschriften entsorgt werden; sie
erhalten diese bei Ihrer Gemeindeverwaltung. Nicht das Kälteaggregat beschädigen, insbesondere nicht in der Nähe des Wärmetauschers. Die Materialien, die bei der Herstellung
dieses Geräts verwendet wurden und mit dem Symbol
werden.
markiert sind, können recycelt
5
2)
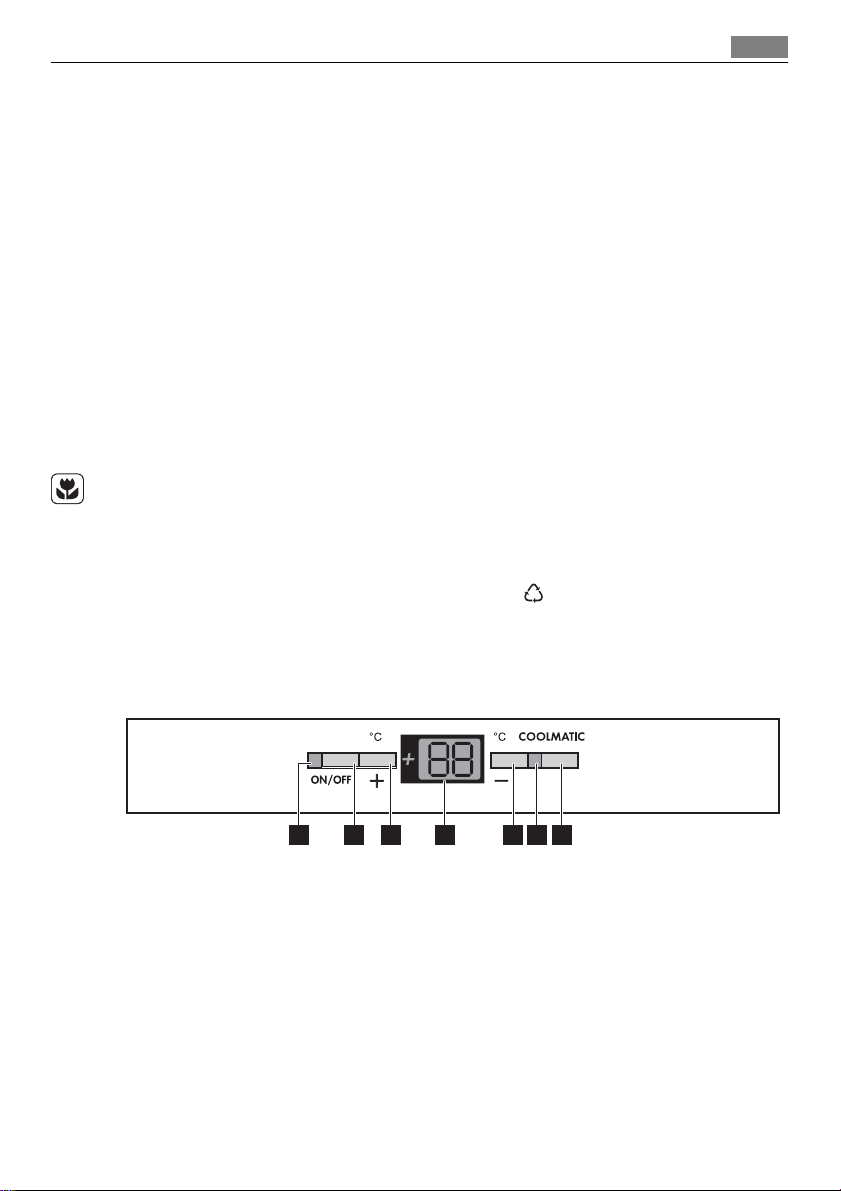
Bedienblende
1 2 3 4 5 6 7
1. Kontrolllampe
2. ON/OFF -Taste
3. Taste Temperatureinstellung (für wärmere Temperaturen)
4. Temperaturanzeige
5. Taste Temperatureinstellung (für kältere Temperaturen)
6. COOLMATIC-Anzeige
7. COOLMATIC -Taste
Einschalten des Geräts
1. Stecken Sie den Netzstecker in eine Netzsteckdose.
2. Drücken Sie die ON/OFF-Taste.
3. Die Kontrolllampe leuchtet auf.
2) Falls ein Wasseranschluss erforderlich ist
Page 6
Bedienblende
6
Ausschalten des Geräts
1. Halten Sie die ON/OFF-Taste mehr als 5 Sekunden lang gedrückt.
2. Danach wird ein Countdown der Temperatur (-3 -2 -1) angezeigt. Wenn "1" angezeigt
wird, schaltet sich das Gerät aus. Auch die Temperaturanzeige schaltet sich aus, ebenso
wie die Kontrolllampe.
Temperaturanzeige
Die Temperaturanzeige hat unterschiedliche Bedeutungen:
• Im Normalbetrieb wird die zurzeit im Kühlschrank herrschende Temperatur (IST-Temperatur) angezeigt. Die IST-Temperatur wird durch stetig leuchtende Ziffern dargestellt.
• Beim Verstellen der Temperatur wird die zurzeit für den Kühlschrank eingestellte Temperatur (SOLL-Temperatur) angezeigt. Die SOLL-Temperatur wird durch blinkende Ziffern
dargestellt.
Temperaturregelung
Bedienen Sie das Gerät wie folgt:
1. Stellen Sie die gewünschte Temperatur ein, indem Sie auf die entsprechende Taste
Temperatureinstellung drücken. In der Temperaturanzeige erscheint sofort die geänderte Einstellung (SOLL-Temperatur), und zwar in blinkenden Ziffern.
2. Jedes Mal, wenn Sie auf eine Taste Temperatureinstellung drücken, ändert sich die
angezeigte SOLL-Temperatur um 1 °C. Das Gerät muss die SOLL-Temperatur innerhalb
von 24 Stunden erreichen.
3. Wenn die gewünschte Temperatur erreicht ist, wechselt die Temperaturanzeige nach
kurzer Zeit (ca. 5 Sek.) zur Anzeige der zurzeit im Gerät herrschenden IST-Temperatur.
Außerdem hören die Ziffern in der Temperaturanzeige auf zu blinken und leuchten
stattdessen stetig.
Für eine ordnungsgemäße Lagerung von Lebensmitteln sollten Sie folgende Temperatur
einstellen:
• +5 °C für den Kühlschrank
Wird die Einstellung geändert, so läuft der Kompressor nicht sofort an, wenn gerade au-
tomatisch abgetaut wird. Da die Lagertemperatur im Kühlschrank schnell erreicht wird,
können Sie das Gerät gleich nach dem Einschalten mit Lebensmitteln füllen.
COOLMATIC -Funktion
Die COOLMATIC -Funktion dient zum schnellen Herunterkühlen von großen Lebensmittelmengen im Kühlschrank.
So schalten Sie die Funktion ein:
1. Drücken Sie die COOLMATIC -Taste.
2. Die COOLMATIC -Anzeige leuchtet auf.
3. Eine SOLL-Temperatur von +2 °C wird automatisch gewählt.
So schalten Sie die Funktion aus:
1. Drücken Sie die COOLMATIC -Taste.
2. Die COOLMATIC -Anzeige erlischt.
Die COOLMATIC -Funktion schaltet sich automatisch nach etwa 6 Stunden aus.
Page 7
Erste Inbetriebnahme
Wenn die COOLMATIC-Funktion eingeschaltet ist, lässt sich die Temperatureinstellung nicht
ändern.
Urlaubsschaltung
Mit dieser Funktion können Sie den Kühlschrank über längere Zeit (z. B. den Sommerurlaub)
mit geschlossener Tür leer stehen lassen, ohne dass sich ein unangenehmer Geruch entwickelt.
Der Kühlschrank muss leer sein, wenn Sie die Urlaubsschaltung nutzen wollen.
So schalten Sie die Funktion ein:
1. Halten Sie die Taste Temperatureinstellung (für wärmere Temperaturen) gedrückt, bis
der Buchstabe "H" (für "Holiday" - Urlaub) in der Temperaturanzeige erscheint. Bei der
Urlaubsschaltung wird die Temperatur auf +15 °C eingestellt. Der Kühlschrank arbeitet
dabei im Energiesparbetrieb.
So schalten Sie die Funktion aus:
1. Stellen Sie die gewünschte Temperatur über die Tasten Temperatureinstellung ein.
Erste Inbetriebnahme
Reinigung des Innenraums
Bevor Sie das Gerät in Betrieb nehmen, beseitigen Sie den typischen "Neugeruch" am besten
durch Auswaschen der Innenteile mit lauwarmem Wasser und einem neutralen Reinigungsmittel.Sorgfältig nachtrocknen.
Benutzen Sie keinesfalls Putzmittel oder Scheuerpulver, da diese die Oberfläche beschädigen können.
7
Täglicher Gebrauch
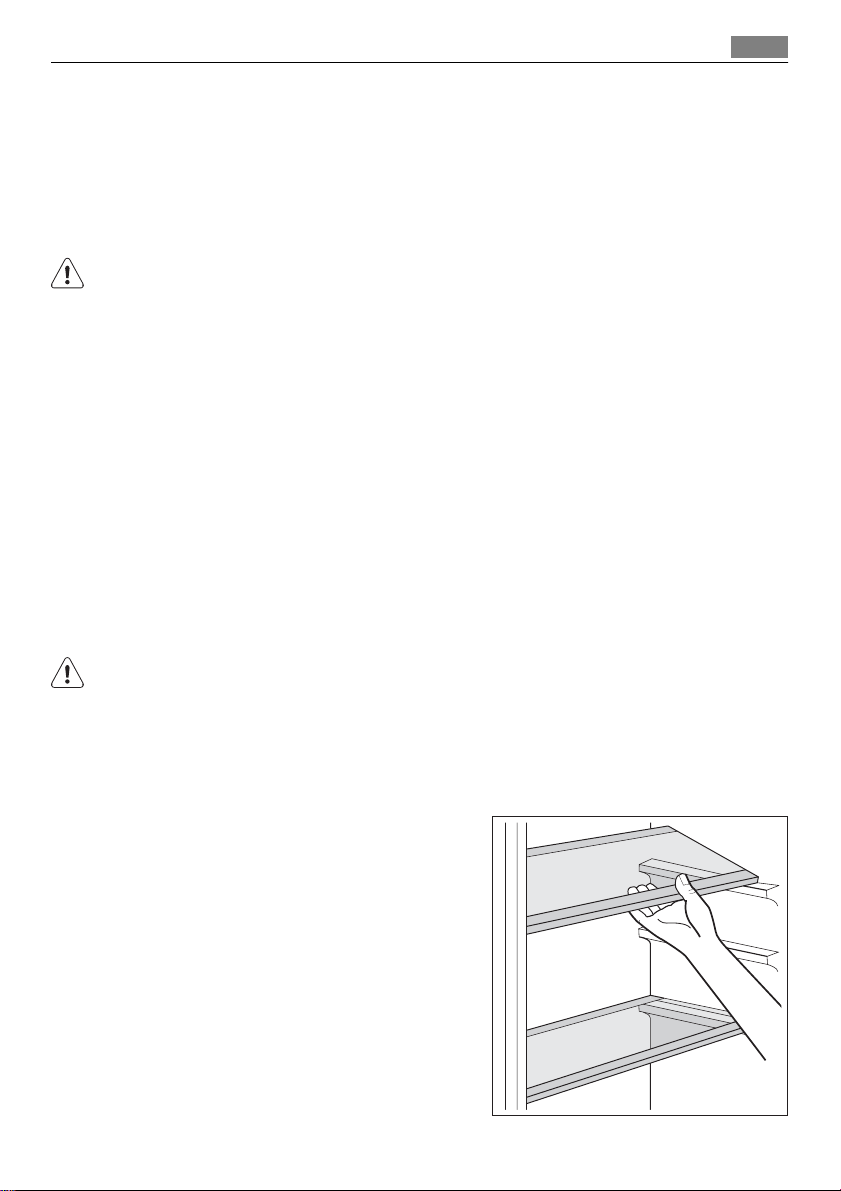
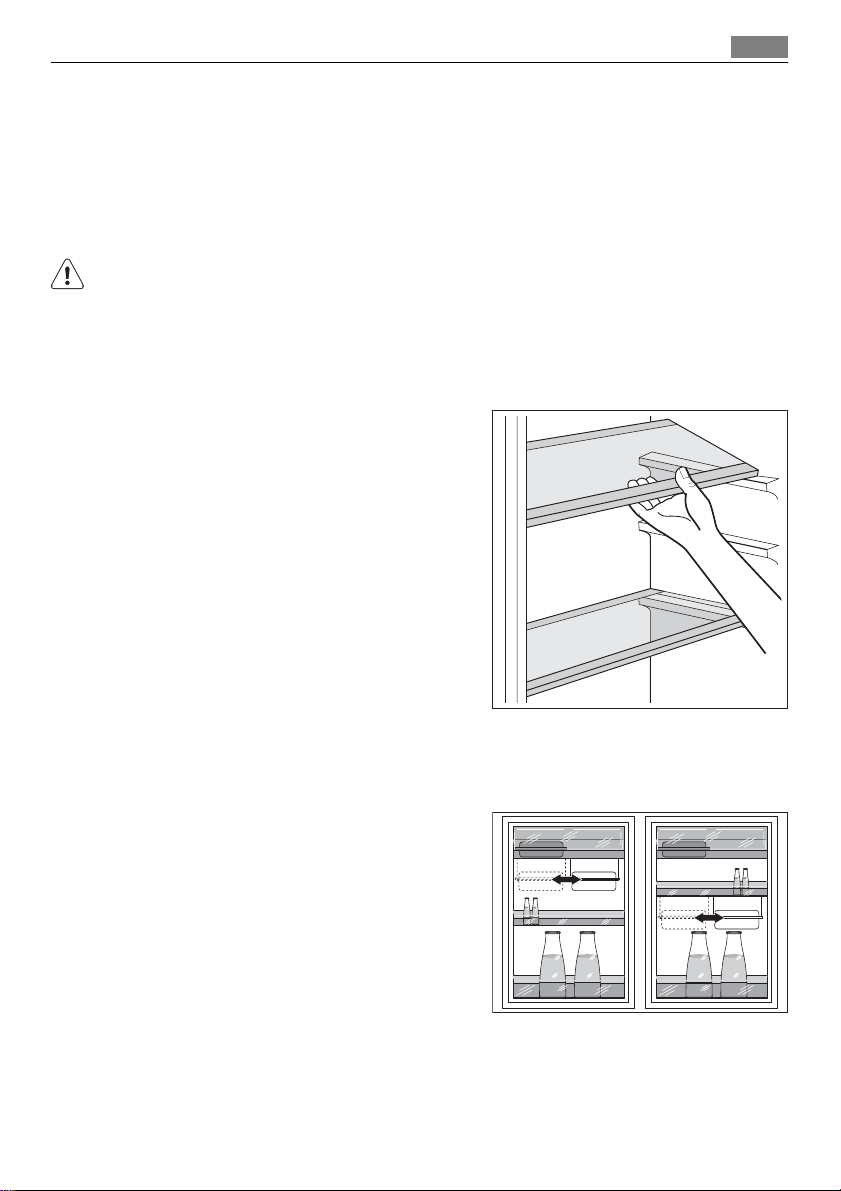
Verstellbare Ablagen/Einsätze
Die Wände des Kühlschranks sind mit einer Anzahl
von Führungsschienen ausgestattet, die verschiedene Möglichkeiten für das Einsetzen der Ablagen
bieten.
Zur besseren Raumnutzung können die vorderen
Halbteile der Ablagen auf die rückwärtigen hinaufgelegt werden.
Page 8
Praktische Tipps und Hinweise
8
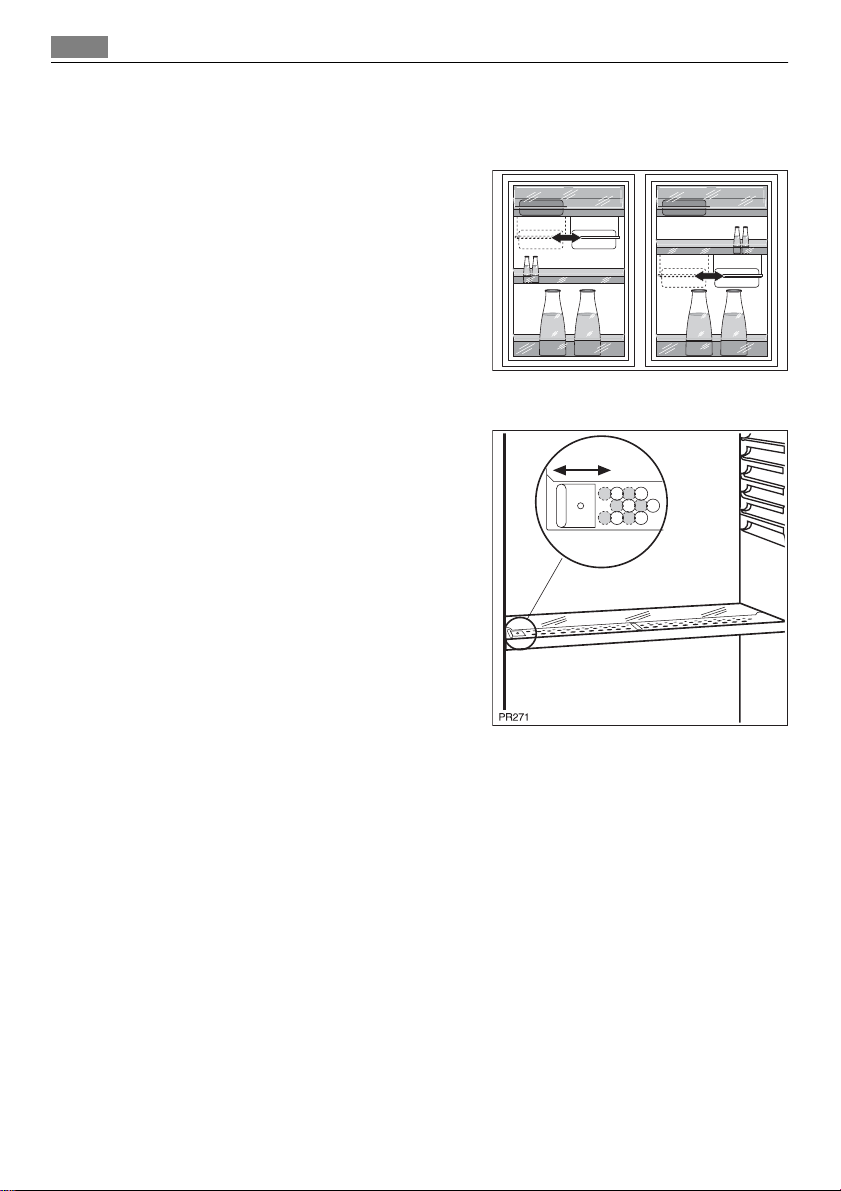
Positionierung der variablen Ablagebox
Die Ablagebox kann in verschiedenen Höhen positioniert werden.
So nehmen Sie die Montage auf der gewünschten Höhe vor:
1. Zum Umsetzen das Abstellfach mit der
Ablagebox nach oben aus den Aufnahmen
in der Tür herausheben.
2. Haltebügel aus der Führung unter der Ab-
lage herausnehmen.
3. Das Einsetzen in eine andere Höhe bitte in
umgekehrter Reihenfolge vornehmen.
Feuchtigkeitsregulierung
In die Glasablage ist eine Vorrichtung mit (über
einen Schieber verstellbaren) Schlitzen integriert,
die die Temperaturregelung in den Gemüsefächern ermöglicht.
Bei geschlossenen Lüftungsschlitzen:
bleibt der natürliche Feuchtegehalt der Lebensmittel in den Obst- und Gemüsefächern für längere Zeit erhalten.
Bei geöffneten Lüftungsschlitzen:
führt die höhere Luftzirkulation zu einem niedrigeren Feuchtegehalt der Luft in den Obst- und
Gemüsefächer.
Praktische Tipps und Hinweise
Energiespartipps
• Öffnen Sie die Tür nicht zu häufig, und lassen Sie diese nicht länger offen als unbedingt
notwendig.
• Ist die Umgebungstemperatur hoch, der Temperaturregler auf eine höhere Einstellung
gedreht und das Gerät voll beladen, kann es bei andauerndem Betrieb des Kompressors
zu Frost- oder Eisbildung am Verdampfer kommen. In diesem Fall muss mit dem Temperaturregler eine niedrigere Temperatur gewählt werden, die ein automatisches Abtauen ermöglicht und damit auch einen niedrigeren Energieverbrauch.
Hinweise für die Kühlung frischer Lebensmittel
So erzielen Sie beste Ergebnisse:
• legen Sie bitte keine warmen Lebensmittel oder dampfende Flüssigkeiten in den Kühl-
schrank
Page 9
Reinigung und Pflege
• decken Sie die Lebensmittel ab oder verpacken Sie diese entsprechend, besonders wenn
diese stark riechen
• legen Sie die Lebensmittel so hinein, dass um sie Luft frei zirkulieren kann
Hinweise für die Kühlung
Tipps:
Fleisch (alle Sorten): wickeln Sie Fleisch in lebensmittelechte Tüten und legen Sie diese auf
die Glasablage über der Gemüseschublade.
Bitte lagern Sie Fleisch aus Sicherheitsgründen nur einen oder maximal zwei Tage auf diese
Weise.
Gekochte Lebensmittel, kalte Gerichte usw.: diese können abgedeckt auf eine Ablage gelegt
werden.
Obst und Gemüse: bitte waschen Sie Obst und Gemüse gründlich und legen Sie es in die
speziell dafür vorgesehene(n) Schublade(n).
Butter und Käse: diese sollten stets in speziellen luftdichten Behältern verpackt sein oder
in Aluminiumfolie bzw. in lebensmittelechte Tüten eingepackt werden, um so wenig Luft
wie möglich in der Verpackung zu haben.
Milchflaschen: bitte bewahren Sie Milchflaschen stets mit Deckel im Flaschenregal in der
Tür auf.
Bananen, Kartoffeln, Zwiebeln und Knoblauch sollten nicht im Kühlschrank aufbewahrt
werden, außer diese sind dafür speziell verpackt.
Reinigung und Pflege
9
VORSICHT!
Ziehen Sie bitte vor jeder Reinigungsarbeit immer den Netzstecker aus der Steckdose.
Der Kältekreis des Gerätes enthält Kohlenwasserstoffe; Wartungsarbeiten und Nachfüllen
von Kältemittel dürfen daher nur durch vom Hersteller autorisiertes Fachpersonal ausgeführt werden.
Regelmäßige Reinigung
Der gesamte Kühlschrank muss regelmäßig gereinigt werden:
• Reinigen Sie die Innenseiten und die Zubehörteile mit lauwarmem Wasser und etwas
Neutralseife.
• Prüfen und säubern Sie die Türdichtungen in regelmäßigen Abständen und kontrollieren
Sie, dass diese sauber und frei von Verunreinigungen sind.
• Spülen und trocknen Sie diese sorgfältig ab.
Ziehen Sie nicht an Leitungen und/oder Kabeln im Innern des Kühlschranks und achten Sie
darauf, diese nicht zu verschieben oder zu beschädigen.
Benutzen Sie zur Reinigung des Innenraums keinesfalls Putzmittel, Scheuerpulver, stark
parfümierte Reinigungsmittel oder Wachspolituren, da diese die Oberfläche des Innenraums beschädigen und einen starken Eigengeruch hinterlassen können.
Reinigen Sie den Kondensator (schwarzes Gitter) und den Motorkompressor auf der Geräterückseite mit einer Bürste oder einem Staubsauger. Dadurch verbessert sich die Leistung
des Geräts und es verbraucht weniger Strom.
Page 10
Reinigung und Pflege
10
Bitte achten Sie darauf, das Kühlsystem nicht zu beschädigen.
Viele Haushaltsreiniger für Küchen enthalten Chemikalien, die den im Gerät verwendeten
Kunststoff angreifen können. Aus diesem Grund ist es empfehlenswert, das Gerät außen
nur mit warmem Wasser und etwas flüssigem Tellerspülmittel zu reinigen.
Schließen Sie das Gerät nach der Reinigung wieder an die Netzversorgung an.
Abtauen des Kühlschranks
Bei normalem Betrieb wird Frost bei jedem Anhalten des Motorkompressors automatisch
aus dem Verdampfer des Kühlschranks entfernt. Das Tauwasser läuft durch eine Rinne in
einen speziellen Behälter an der Rückseite des Geräts über dem Motorkompressor, wo es
verdampft.
Reinigen Sie deshalb regelmäßig die Abflussöffnung des Tauwassers in der Mitte des Kühlschrankkanals, damit das Wasser nicht überfließt
und auf die gelagerten Lebensmittel tropft. Benutzen Sie dazu bitte das mitgelieferte Reinigungswerkzeug, das sich bereits in der Ablauföffnung befindet.
Stillstandzeiten
Bei längerem Stillstand des Gerätes müssen Sie folgendermaßen vorgehen:
•
trennen Sie das Gerät von der Netzversorgung
• entnehmen Sie alle Lebensmittel
•
tauen Sie das Gerät ab,
• lassen Sie die Türen offen/angelehnt, um das Entstehen unangenehmer Gerüche zu ver-
meiden.
Möchten Sie bei einer längeren Abwesenheit den Gefrierschrank weiter laufen lassen, bitten
Sie jemanden, gelegentlich die Temperatur zu prüfen, damit das Gefriergut bei einem möglichen Stromausfall nicht im Innern des Gerätes verdirbt.
3) falls dies vorgesehen ist.
3)
Reinigen Sie das Gerät und alle Zubehörteile
Page 11
Was tun, wenn …
Was tun, wenn …
WARNUNG!
Ziehen Sie vor der Fehlersuche immer den Netzstecker aus der Steckdose.
Maßnahmen im Rahmen der Fehlersuche, die in der vorliegenden Gebrauchsanweisung
nicht beschrieben sind, dürfen nur von einem qualifizierten Elektriker bzw. einer anderen
kompetenten Person durchgeführt werden.
Während das Gerät in Betrieb ist, sind Geräusche zu hören (von Kompressor und Kühlkreislauf). Das ist normal.
Problem Mögliche Ursache Abhilfe
Das Gerät ist zu laut
Das Gerät funktioniert
nicht. Die Lampe der Innenbeleuchtung funktioniert nicht.
Der Netzstecker steckt nicht
Das Gerät bekommt keinen
Die Lampe der Innenbeleuchtung funktioniert
nicht.
Der Kompressor arbeitet
ständig.
Die Tür ist nicht richtig geschlos-
Die Tür wurde zu häufig geöff-
Die Temperatur der zu kühlen-
Die Raumtemperatur ist zu
Das Gerät steht nicht stabil. Kontrollieren Sie, ob eventuelle
Das Gerät ist abgeschaltet. Schalten Sie das Gerät ein.
richtig in der Steckdose.
Strom. Es liegt keine Spannung
an der Netzsteckdose an.
Die Lampe ist defekt. Siehe hierzu "Austauschen der
Die Temperatur ist nicht richtig
eingestellt.
sen.
net.
den Lebensmittel ist zu hoch.
hoch.
Unebenheiten der Standfläche
korrekt ausgeglichen wurden, so
dass alle vier Füße fest auf dem
Boden stehen.
Stecken Sie den Netzstecker richtig in die Steckdose.
Testen Sie bitte, ob ein anderes
Gerät an dieser Steckdose funktioniert.
Kontaktieren Sie gegebenenfalls
einen qualifizierten Elektriker.
Lampe für die Innenbeleuchtung".
Stellen Sie eine höhere Temperatur ein.
Siehe hierzu "Schließen der Tür".
Lassen Sie die Tür nicht länger als
unbedingt erforderlich offen.
Lassen Sie Lebensmittel auf
Raumtemperatur abkühlen, bevor
Sie sie in den Kühlschrank stellen.
Senken Sie die Raumtemperatur.
11
Page 12
Was tun, wenn …
12
Problem Mögliche Ursache Abhilfe
Der Kompressor schaltet
sich nicht sofort ein,
nachdem Sie die COOLMATIC -Taste gedrückt
oder die Soll-Temperatur
auf einen anderen Wert
eingestellt haben.
Wasser fließt an der
Rückwand des Kühlschranks hinunter.
Wasser fließt in den Innenraum des Kühlschranks.
Die eingelagerten Lebensmittel
Die Temperatur lässt sich
nicht einstellen.
Die Temperatur im Gerät
ist zu niedrig/zu hoch.
Die Tür ist nicht richtig geschlos-
Die Temperatur der zu kühlen-
Es wurden zu viele Lebensmittel
Die Temperatur im Kühlschrank ist zu hoch.
Das ist keine Störung, sondern
normal.
Beim automatischen Abtauen
fließt das abgetaute Wasser an
der Rückwand des Kühlschranks
hinunter.
Der Wasserabflusskanal ist verstopft.
verhindern, dass das Wasser zum
Kollektor fließt.
Die COOLMATIC -Funktion ist
eingeschaltet.
Die Temperatureinstellung ist
nicht korrekt.
sen.
den Lebensmittel ist zu hoch.
auf einmal in den Kühlschrank
gelegt.
Die Kaltluft kann nicht im Gerät
zirkulieren.
Der Kompressor schaltet sich
nach einer Weile ein.
Das ist normal.
Reinigen Sie den Wasserabflusskanal.
Stellen Sie sicher, dass die Lebensmittel nicht die Rückwand berühren.
Schalten Sie die COOLMATIC Funktion von Hand aus oder warten Sie mit dem Einstellen der
Temperatur, bis sich die Funktion
automatisch ausschaltet. Siehe
hierzu "COOLMATIC -Funktion".
Stellen Sie eine höhere/niedrigere
Temperatur ein.
Siehe hierzu "Schließen der Tür".
Lassen Sie Lebensmittel auf
Raumtemperatur abkühlen, bevor
Sie sie in den Kühlschrank stellen.
Legen Sie weniger Lebensmittel
auf einmal in den Kühlschrank.
Stellen Sie sicher, dass die Kaltluft
im Gerät zirkulieren kann.
Page 13
Technische Daten
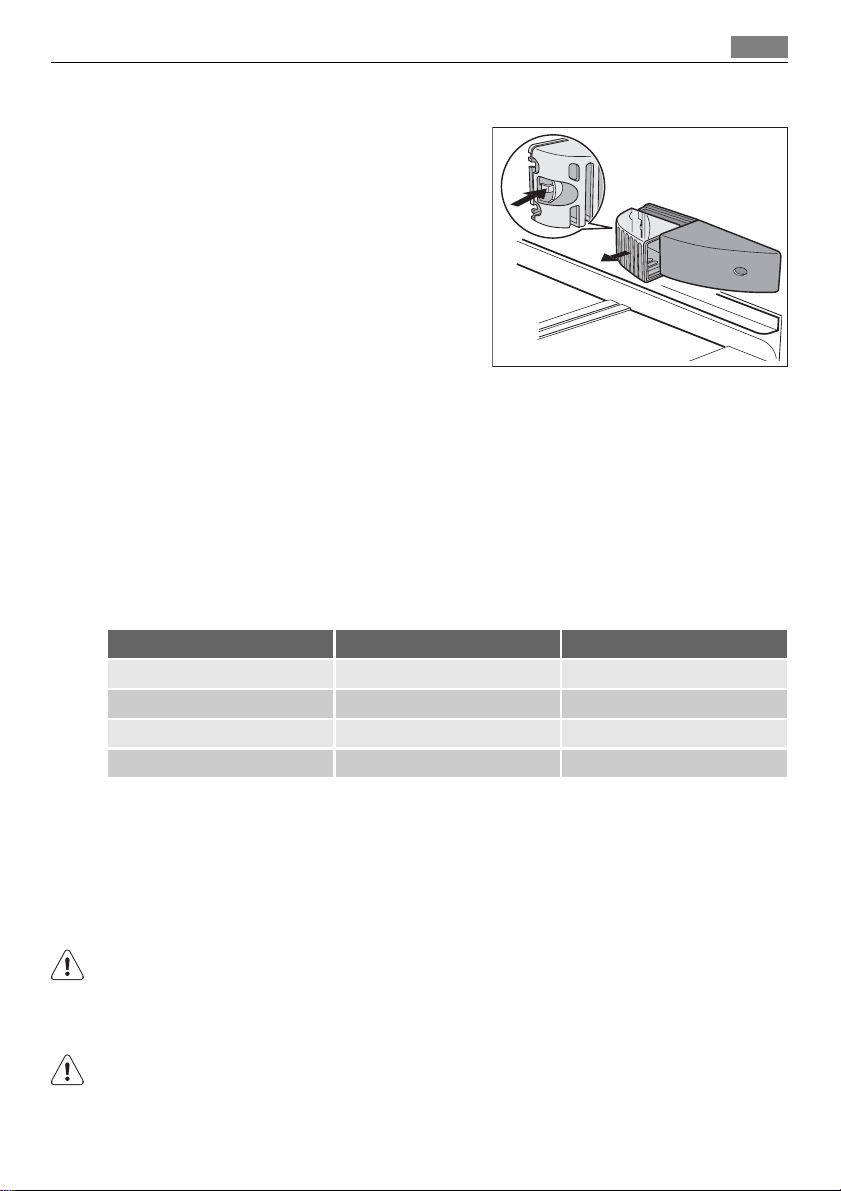
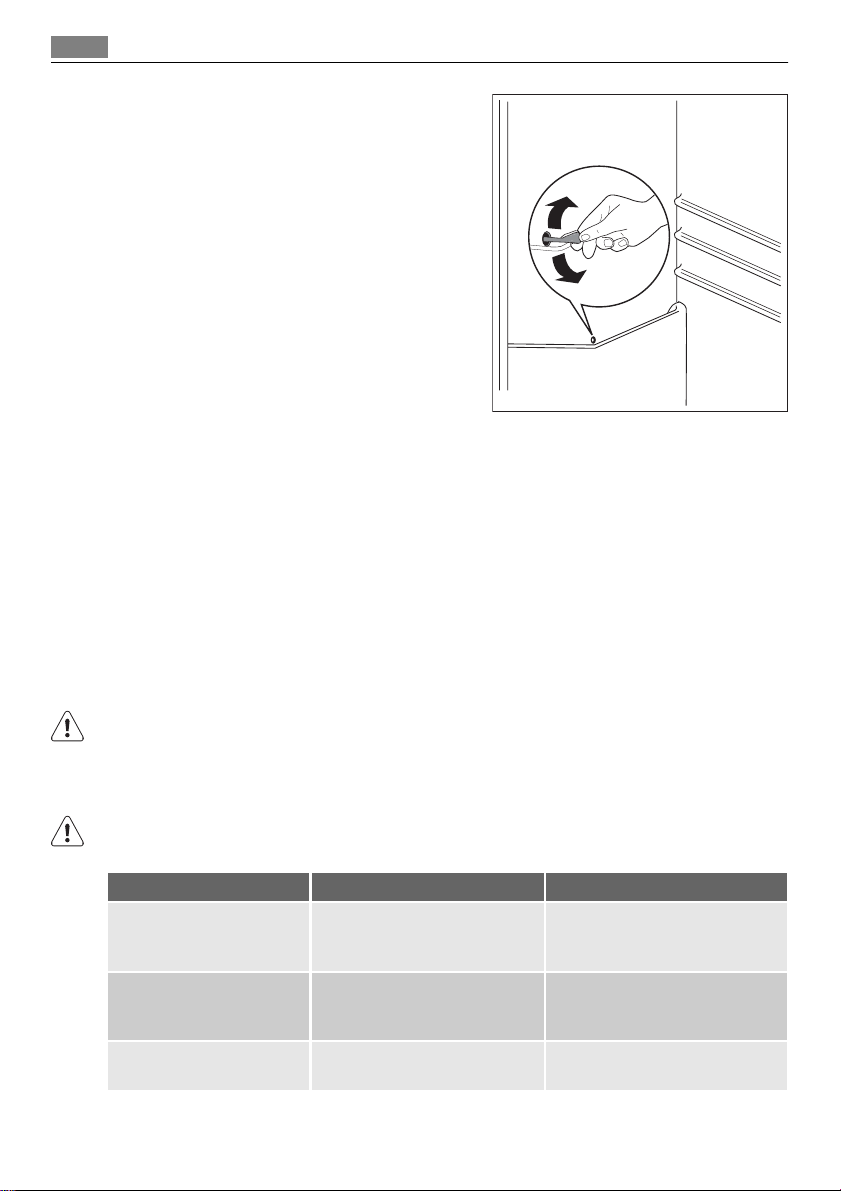
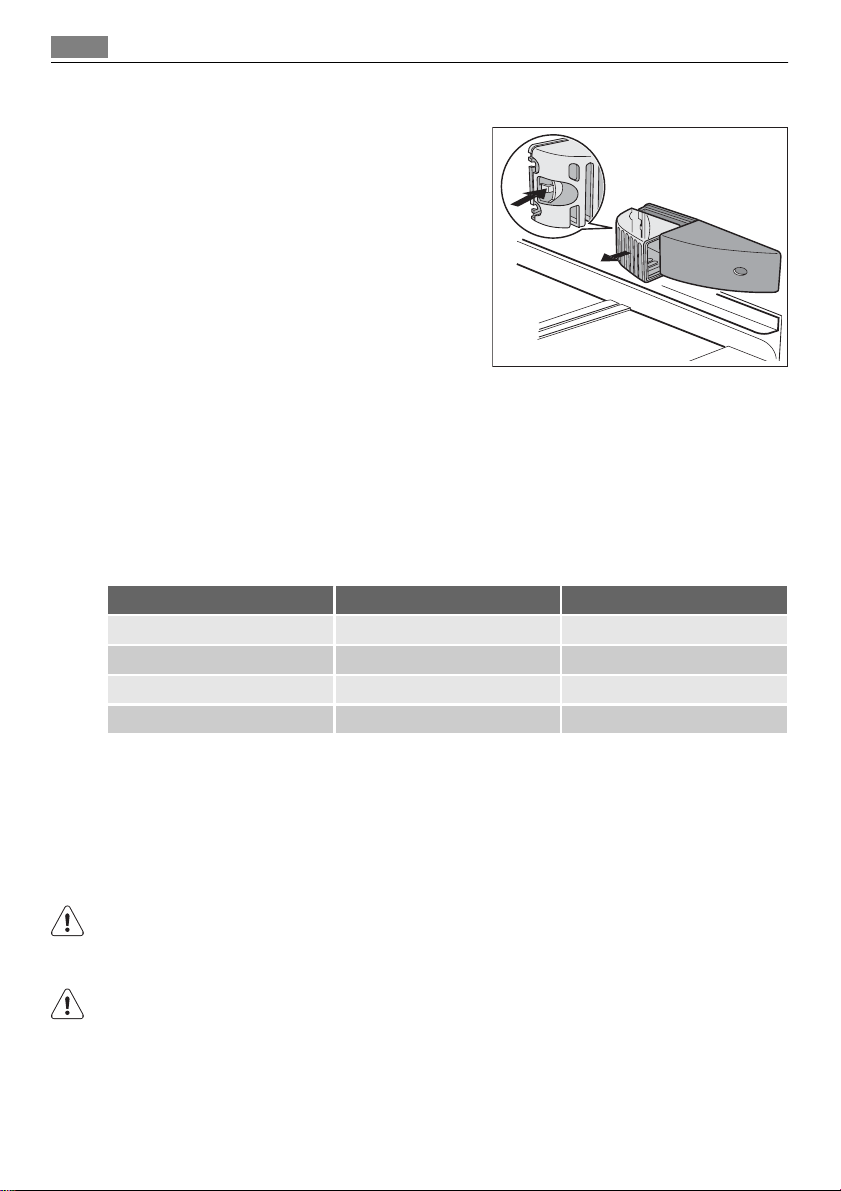
Austauschen der Lampe für die Innenbeleuchtung
1. Schalten Sie das Gerät aus.
2. Drücken Sie auf den Haken hinten und
schieben Sie die Abdeckung der Lampe
gleichzeitig in Pfeilrichtung.
3. Ersetzen Sie die Lampe durch eine Lampe
der gleichen Leistung (die maximal erlaubte Leistung steht auf der Abdeckung
der Lampe).
4. Bringen Sie die Abdeckung der Lampe
wieder an, indem Sie sie an die ursprüngliche Position zurückschieben.
5. Schalten Sie das Gerät ein.
6. Öffnen Sie die Tür. Vergewissern Sie sich, dass die Lampe leuchtet.
Schließen Sie die Tür
1. Reinigen Sie die Türdichtungen.
2. Stellen Sie die Tür nach Bedarf ein. Siehe hierzu "Gerät aufstellen".
3. Ersetzen Sie die defekten Türdichtungen, falls erforderlich. Kontaktieren Sie den Kun-
dendienst.
Technische Daten
13
Abmessung der Aussparung
Höhe 1030 mm
Breite 560 mm
Tiefe 550 mm
Die technischen Informationen befinden sich auf dem Typschild innen links im Gerät sowie
auf der Energieplakette.
Gerät aufstellen
Aufstellung
WARNUNG!
Wenn Sie ein altes Gerät entsorgen möchten, das ein Schloss oder einen Riegel an der Tür
besitzt, müssen Sie das Schloss bzw. den Riegel zunächst unbrauchbar machen, um zu
verhindern, dass sich spielende Kinder darin einschließen können.
Die Steckdose für den Anschluss des Geräts muss nach der Installation zugänglich sein.
Page 14
Gerät aufstellen
14
Installieren Sie dieses Gerät an einem Ort, an dem die Umgebungstemperatur mit der Klimaklasse übereinstimmt, die auf dem Typschild des Geräts angegeben ist:
Klimaklasse Umgebungstemperatur
SN +10°C bis + 32°C
N +16°C bis + 32°C
ST +16°C bis + 38°C
T +16°C bis + 43°C
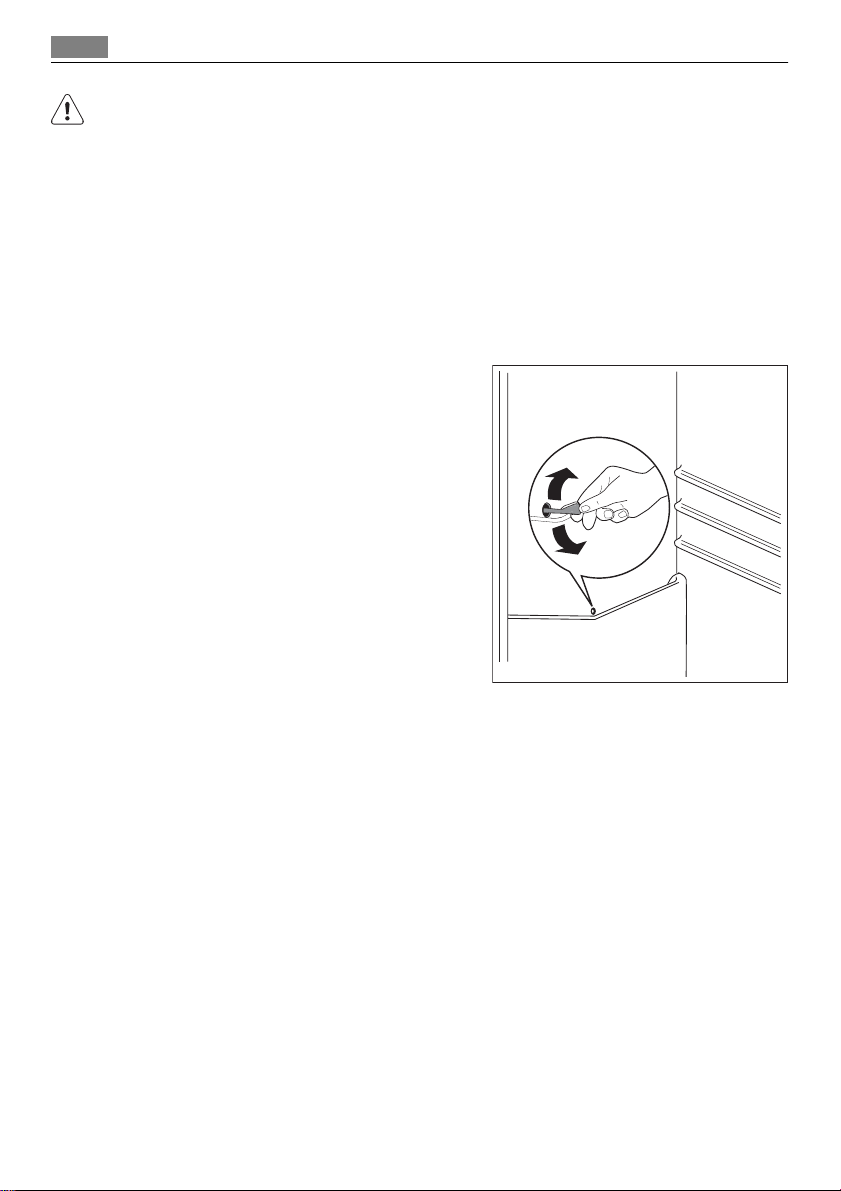
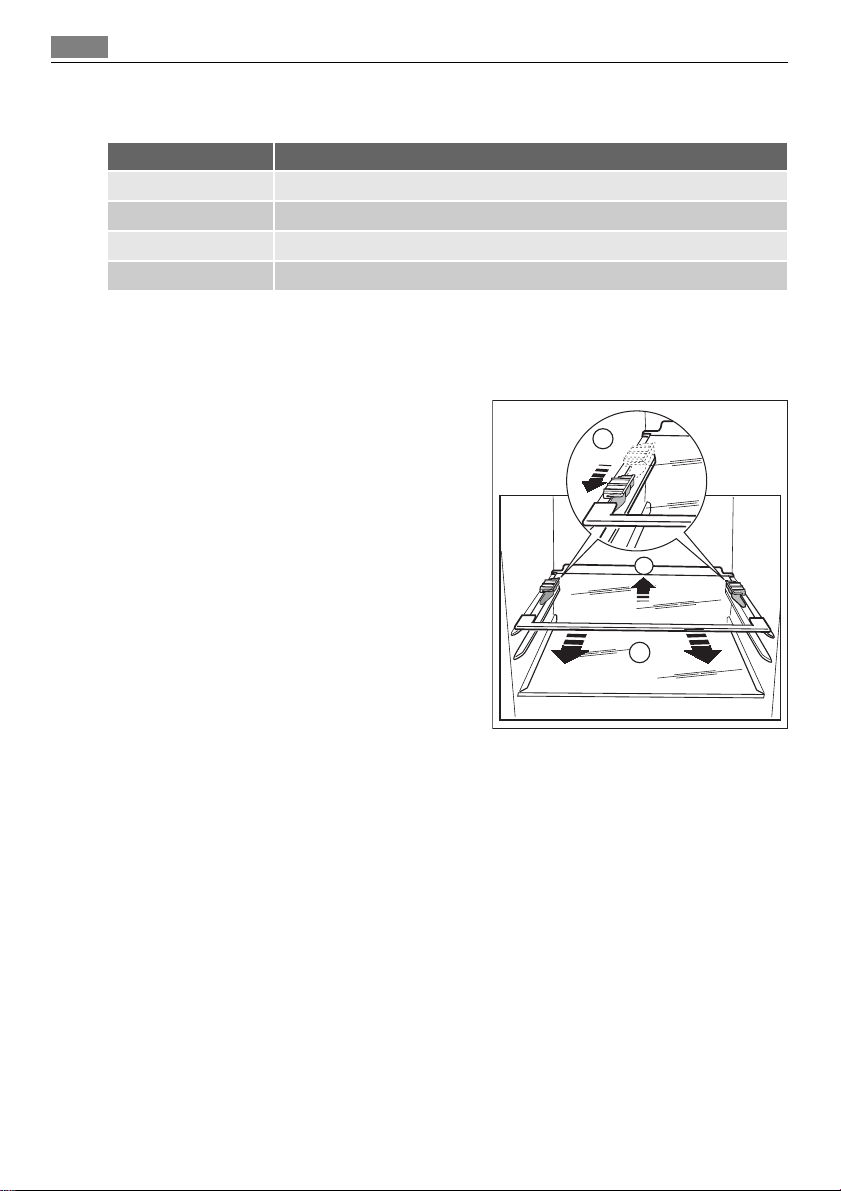
Entfernen der Ablagenhalter
Ihr Gerät ist mit Ablagenhaltern ausgestattet; sie dienen der Sicherung der Ablagen während des Transports.
Entfernen Sie diese Halter wie folgt:
1. Schieben Sie die Ablagenhalter in Pfeilrichtung (A).
2. Heben Sie die Ablage hinten an und drücken Sie sie nach vorn, bis sie sich herausnehmen lässt (B).
3. Entfernen Sie die Halter (C).
A
B
C
Elektrischer Anschluss
Kontrollieren Sie vor der ersten Benutzung des Gerätes, dass die Netzspannung und -frequenz Ihres Hausanschlusses mit den auf dem Typschild angegebenen Anschlusswerten
übereinstimmen.
Das Gerät muss geerdet sein. Zu diesem Zweck ist die Netzkabelsteckdose mit einem
Schutzkontakt ausgestattet. Falls die Steckdose Ihres Hausanschlusses nicht geerdet sein
sollte, lassen Sie das Gerät bitte gemäß den geltenden Vorschriften erden und fragen Sie
dafür einen qualifizierten Elektriker.
Der Hersteller übernimmt keinerlei Haftung für Schäden oder Verletzungen, die durch
Missachtung der vorstehenden Sicherheitshinweise entstehen.
Das Gerät entspricht den EU- Richtlinien.
Page 15
Hinweise zum Umweltschutz
Anforderungen an die Belüftung
Die Luftzirkulation hinter dem Gerät muss ausreichend groß sein.
50 mm
min.
200 cm
2
Hinweise zum Umweltschutz
Das Symbol auf dem Produkt oder seiner Verpackung weist darauf hin, dass dieses
Produkt nicht als normaler Haushaltsabfall zu behandeln ist, sondern an einem
Sammelpunkt für das Recycling von elektrischen und elektronischen Geräten abgegeben
werden muss. Durch Ihren Beitrag zum korrekten Entsorgen dieses Produkts schützen Sie
die Umwelt und die Gesundheit Ihrer Mitmenschen. Umwelt und Gesundheit werden durch
falsches Entsorgen gefährdet. Weitere Informationen über das Recycling dieses Produkts
erhalten Sie von Ihrem Rathaus, Ihrer Müllabfuhr oder dem Geschäft, in dem Sie das Produkt
gekauft haben.
min.
200 cm
15
2
Page 16

Contents
16
Thank you for choosing one of our high-quality products.
To ensure optimal and regular performance of your appliance please read this
instruction manual carefully. It will enable you to navigate all processes perfectly
and most efficiently. To refer to this manual any time you need to, we recommend
you t o k ee p it in a sa fe pla ce . A nd p lea se pass it to any future owner of the appliance.
We wish you much joy with your new appliance.
Contents
Safety information 16
Children and vulnerable people safety
17
General safety 17
Daily use 18
Care and cleaning 18
Installation 18
Service 18
Control panel 19
Switching on 19
Switching off 19
Temperature indicator 19
Temperature regulation 20
COOLMATIC function 20
Holiday function 20
First use 21
Cleaning the interior 21
Daily use 21
Movable shelves 21
Positioning the door half shelf 21
Humidity control 22
Helpful hints and tips 22
Hints for energy saving 22
Hints for fresh food refrigeration 22
Hints for refrigeration 22
Care and Cleaning 23
Periodic cleaning 23
Defrosting of the refrigerator 23
Periods of non-operation 24
What to do if… 24
Replacing the lamp 26
Closing the door 26
Technical data 26
Installation 26
Positioning 26
Removing the shelf holders 27
Electrical connection 27
Ventilation requirements 28
Environmental concerns 28
Subject to change without notice
Safety information
In the interest of your safety and to ensure the correct use, before installing and first using
the appliance, read this user manual carefully, including its hints and warnings. To avoid
unnecessary mistakes and accidents, it is important to ensure that all people using the
appliance are thoroughly familiar with its operation and safety features. Save these instructions and make sure that they remain with the appliance if it is moved or sold, so that
everyone using it through its life will be properly informed on appliance use and safety.
For the safety of life and property keep the precautions of these user's instructions as the
manufacturer is not responsible for damages caused by omission.
Page 17
Safety information
Children and vulnerable people safety
• This appliance is not intended for use by persons (including children) with reduced
physical, sensory or mental capabilities, or lack of experience and knowledge, unless they
have been given supervision or instruction concerning use of the appliance by a person
responsible for their safety.
Children should be supervised to ensure that they do not play with the appliance.
• Keep all packaging well away from children. There is risk of suffocation.
• If you are discarding the appliance pull the plug out of the socket, cut the connection
cable (as close to the appliance as you can) and remove the door to prevent playing
children to suffer electric shock or to close themselves into it.
• If this appliance featuring magnetic door seals is to replace an older appliance having a
spring lock (latch) on the door or lid, be sure to make that spring lock unusable before
you discard the old appliance. This will prevent it from becoming a death trap for a child.
General safety
CAUTION!
Keep ventilation openings clear of obstruction.
• The appliance is intended for keeping foodstuff and/or beverages in a normal household
as explained in this instruction booklet.
• Do not use a mechanical device or any artificial means to speed up the thawing process.
• Do not use other electrical appliances (such as ice cream makers) inside of refrigerating
appliances, unless they are approved for this purpose by the manufacturer.
• Do not damage the refrigerant circuit.
• The refrigerant isobutane (R600a) is contained within the refrigerant circuit of the ap-
pliance, a natural gas with a high level of environmental compatibility, which is nevertheless flammable.
During transportation and installation of the appliance, be certain that none of the
components of the refrigerant circuit become damaged.
If the refrigerant circuit should become damaged:
– avoid open flames and sources of ignition
– thoroughly ventilate the room in which the appliance is situated
• It is dangerous to alter the specifications or modify this product in any way. Any damage
to the cord may cause a short-circuit, fire and/or electric shock.
WARNING!
Any electrical component (power cord, plug, compressor) must be replaced by a certified
service agent or qualified service personnel.
17
1. Power cord must not be lengthened.
2. Make sure that the power plug is not squashed or damaged by the back of the
appliance. A squashed or damaged power plug may overheat and cause a fire.
3. Make sure that you can come to the mains plug of the appliance.
4. Do not pull the mains cable.
5. If the power plug socket is loose, do not insert the power plug. There is a risk of
electric shock or fire.
6.
You must not operate the appliance without the lamp cover
4)
of interior lighting.
Page 18
Safety information
18
• This appliance is heavy. Care should be taken when moving it.
• Do not remove nor touch items from the freezer compartment if your hands are damp/
wet, as this could cause skin abrasions or frost/freezer burns.
• Avoid prolonged exposure of the appliance to direct sunlight.
Daily use
• Do not put hot pot on the plastic parts in the appliance.
• Do not store flammable gas and liquid in the appliance, because they may explode.
• Appliance's manufacturers storage recommendations should be strictly adhered to. Refer
to relevant instructions.
Care and cleaning
• Before maintenance, switch off the appliance and disconnect the mains plug from the
mains socket. If you cannot come to the mains socket, interrupt the power supply.
• Do not clean the appliance with metal objects.
• Regularly examine the drain in the refrigerator for defrosted water. If necessary, clean
the drain. If the drain is blocked, water will collect in the bottom of the appliance.
Installation
For electrical connection carefully follow the instructions given in specific paragraphs.
• Unpack the appliance and check if there are damages on it. Do not connect the appliance
if it is damaged. Report possible damages immediately to the place you bought it. In that
case retain packing.
• It is advisable to wait at least four hours before connecting the appliance to allow the
oil to flow back in the compressor.
• Adequate air circulation should be around the appliance, lacking this leads to overheating. To achieve sufficient ventilation follow the instructions relevant to installation.
• Wherever possible the back of the product should be against a wall to avoid touching
or catching warm parts (compressor, condenser) to prevent possible burn.
• The appliance must not be located close to radiators or cookers.
• Make sure that the mains plug is accessible after the installation of the appliance.
•
Connect to potable water supply only.
5)
Service
• Any electrical work required to do the servicing of the appliance should be carried out
by a qualified electrician or competent person.
• This product must be serviced by an authorized Service Centre, and only genuine spare
parts must be used.
4) If the lamp cover is foreseen
5) If a water connection is foreseen
Page 19
Control panel
Environment Protection
This appliance does not contain gasses which could damage the ozone layer, in either its
refrigerant circuit or insulation materials. The appliance shall not be discarded together
with the urban refuse and rubbish. The insulation foam contains flammable gases: the
appliance shall be disposed according to the applicable regulations to obtain from your
local authorities. Avoid damaging the cooling unit, especially at the rear near the heat
exchanger. The materials used on this appliance marked by the symbol
Control panel
1 2 3 4 5 6 7
1. Pilot light
2. ON/OFF switch
3. Temperature regulator (warmest)
4. Temperature indicator
5. Temperature regulator (coldest)
6. COOLMATIC indicator
7. COOLMATIC switch
19
are recyclable.
Switching on
1. Plug the mains plug into the mains socket.
2. Press ON/OFF switch.
3. The pilot light will light up.
Switching off
1. Keep ON/OFF switch pressed for more than 5 seconds.
2. After that, a countdown of the temperature from -3 -2 -1 will be shown. When “1”
appears the appliance is turned off. The temperature indicator switches off. The Pilot
light switches off.
Temperature indicator
The temperature indicator shows several information:
• During normal operation, the temperature indicator shows the current temperature inside the fridge (ACTUAL temperature). The ACTUAL temperature is indicated with illuminated numbers.
• During temperature adjusting operation, the temperature indicator shows the fridge
temperature currently set (DESIRED temperature). The DESIRED temperature is indicated
by flashing numbers.
Page 20

Control panel
20
Temperature regulation
To operate the appliance, proceed as follows:
1. Set the required temperature by pressing the corresponding temperature regulator. The
temperature indicator will immediately show the changed setting (DESIRED temperature) and the temperature indicator flashes.
2. Each time the temperature regulator is pressed the DESIRED temperature is adjusted
by 1 °C. The DESIRED temperature must be reached within 24 hours.
3. Once the required temperature has been set, after a short period (approx. 5 sec.) the
temperature indicator will show again the current ACTUAL temperature inside the corresponding compartment. The temperature indicator will change from flashing to continuous illumination.
For a correct storage of the food the following temperature should be set:
• +5 °C in the fridge
When the setting is changed, the compressor does not start immediately if automatic
defrosting is currently taking place. As the storage temperature within the fridge is reached
quickly you can store food immediately after switching on.
COOLMATIC function
The COOLMATIC function is suitable for quick cooling of large quantities of goods in the
refrigerator.
To activate the function, do these steps:
1. Press the COOLMATIC switch.
2. The COOLMATIC indicator will light up.
3. A DESIRED temperature setting of +2°C is automatically selected.
To deactivate the function, do these steps:
1. Press the COOLMATIC switch.
2. The COOLMATIC indicator goes out.
The COOLMATIC function stops automatically after about 6 hours.
If the COOLMATIC function is switched on the temperature setting may not be changed.
Holiday function
This function allows you to keep the refrigerator shut and empty during a long holiday
period (e.g. the summer holidays) without the formation of a bad smell.
The fridge compartment must be empty when the holiday function is on.
To activate the function, do this step:
1. press continuously the temperature regulator (warmest) until the letter "H" (Holiday)
appears on the temperature indicator. The Holiday function sets the temperature at
+15°C. The refrigerator is in the energy-saving mode.
To deactivate the function, do this step:
1. set the required temperature by pressing the fridge temperature regulator.
Page 21
First use
First use
Cleaning the interior
Before using the appliance for the first time, wash the interior and all internal accessories
with lukewarm water and some neutral soap so as to remove the typical smell of a brandnew product, then dry thoroughly.
Do not use detergents or abrasive powders, as these will damage the finish.
Daily use
Movable shelves
The walls of the refrigerator are equipped with a
series of runners so that the shelves can be positioned as desired.
For better use of space, the front half-shelves can
lie over the rear ones.
21
Positioning the door half shelf
The door half shelf can be placed at different heights.
To make these adjustments proceed as follow:
1. lift the shelf with the door half shelf up-
wards and out of the holders in the door
2. remove the retaining bracket out of the
guide under the shelf
3. Reverse the above operation to insert the
half shelf at a different height.
Page 22

Helpful hints and tips
22
Humidity control
The glass shelf incorporates a device with slits
(adjustable by means of a sliding lever), which
makes it possible to regulate the temperature in
the vegetable drawer(s).
When the ventilation slots are closed:
the natural moisture content of the food in the
fruit and vegetable compartments is preserved for
longer.
When the ventilation slots are opened:
more air circulation results in a lower air moisture
content in the fruit and vegetable compartments.
Helpful hints and tips
Hints for energy saving
• Do not open the door frequently or leave it open longer than absolutely necessary.
• If the ambient temperature is high, the Temperature Regulator is on the higher setting
and the appliance is fully loaded, the compressor may run continuously, causing frost
or ice on the evaporator. If this happens, turn the Temperature Regulator toward lower
settings to allow automatic defrosting and so a saving in electricity consumption.
Hints for fresh food refrigeration
To obtain the best performance:
• do not store warm food or evaporating liquids in the refrigerator
• do cover or wrap the food, particularly if it has a strong flavour
• position food so that air can circulate freely around it
Hints for refrigeration
Useful hints:
Meat (all types) : wrap in polythene bags and place on the glass shelf above the vegetable
drawer.
For safety, store in this way only one or two days at the most.
Cooked foods, cold dishes, etc..: these should be covered and may be placed on any shelf.
Fruit and vegetables: these should be thoroughly cleaned and placed in the special drawer(s)
provided.
Butter and cheese: these should be placed in special airtight containers or wrapped in
aluminium foil or polythene bags to exclude as much air as possible.
Milk bottles: these should have a cap and should be stored in the bottle rack on the door.
Bananas, potatoes, onions and garlic, if not packed, must not be kept in the refrigerator.
Page 23
Care and Cleaning
Care and Cleaning
CAUTION!
Unplug the appliance before carrying out any maintenance operation.
This appliance contains hydrocarbons in its cooling unit; maintenance and recharging must
therefore only be carried out by authorized technicians.
Periodic cleaning
The equipment has to be cleaned regularly:
• clean the inside and accessories with lukewarm water and some neutral soap.
• regularly check the door seals and wipe clean to ensure they are clean and free from
debris.
• rinse and dry thoroughly.
Do not pull, move or damage any pipes and/or cables inside the cabinet.
Never use detergents, abrasive powders, highly perfumed cleaning products or wax polishes
to clean the interior as this will damage the surface and leave a strong odour.
Clean the condenser (black grill) and the compressor at the back of the appliance with a
brush or a vacuum cleaner. This operation will improve the performance of the appliance
and save electricity consumption.
Take care of not to damage the cooling system.
23
Many proprietary kitchen surface cleaners contain chemicals that can attack/damage the
plastics used in this appliance. For this reason it is recommended that the outer casing of
this appliance is only cleaned with warm water with a little washing-up liquid added.
After cleaning, reconnect the equipment to the mains supply.
Defrosting of the refrigerator
Frost is automatically eliminated from the evaporator of the refrigerator compartment
every time the motor compressor stops, during normal use. The defrost water drains out
through a trough into a special container at the back of the appliance, over the motor
compressor, where it evaporates.
Page 24
What to do if…
24
It is important to periodically clean the defrost
water drain hole in the middle of the refrigerator
compartment channel to prevent the water overflowing and dripping onto the food inside. Use the
special cleaner provided, which you will find already inserted into the drain hole.
Periods of non-operation
When the appliance is not in use for long periods, take the following precautions:
•
disconnect the appliance from electricity supply
• remove all food
•
• leave the door/doors ajar to prevent unpleasant smells.
If the cabinet will be kept on, ask somebody to check it once in a while to prevent the food
inside from spoiling in case of a power failure.
defrost
6)
and clean the appliance and all accessories
What to do if…
WARNING!
Before troubleshooting, disconnect the mains plug from the mains socket.
Only a qualified electrician or competent person must do the troubleshooting that is not
in this manual.
There are some sounds during normal use (compressor, refrigerant circulation).
Problem Possible cause Solution
The appliance is noisy
The appliance does not
operate. The lamp does
not operate.
The mains plug is not connected
6) If foreseen.
The appliance is not supported
properly
The appliance is switched off. Switch on the appliance.
to the mains socket correctly.
Check if the appliance stands stable (all the four feet should be on
the floor)
Connect the mains plug to the
mains socket correctly.
Page 25
What to do if…
Problem Possible cause Solution
The appliance has no power.
The lamp does not work.
The compressor operates
continually.
The door is not closed correctly. Refer to "Closing the door".
The door has been opened too
The product temperature is too
The room temperature is too
The compressor does not
start immediately after
pressing the COOLMATIC
switch, or after changing
the temperature.
Water flows on the rear
plate of the refrigerator.
Water flows into the refrigerator.
Products prevent that water
Temperature cannot be
set .
The temperature in the
appliance is too low/high.
The door is not closed correctly. Refer to "Closing the door".
The product temperature is too
Many products are stored at the
The temperature in the
refrigerator is too high.
There is no voltage in the mains
socket.
The lamp is defective. Refer to "Replacing the lamp".
The temperature is not set cor-
rectly.
frequently.
high.
high.
This is normal, no error has oc-
curred.
During the automatic defrosting
process, frost defrosts on the
rear plate.
The water outlet is clogged. Clean the water outlet.
flows into the water collector.
COOLMATIC function switched
on.
The temperature regulator is not
set correctly.
high.
same time.
There is no cold air circulation in
the appliance.
Connect a different electrical appliance to the mains socket.
Contact a qualified electrician.
Set a higher temperature.
Do not keep the door open longer
than necessary.
Let the product temperature decrease to room temperature before storage.
Decrease the room temperature.
The compressor starts after a period of time.
This is correct.
Make sure that products do not
touch the rear plate.
Switch off COOLMATIC manually,
or wait to set the temperature
until the function has reset automatically. Refer to "COOLMATIC
function"..
Set a higher/lower temperature.
Let the product temperature decrease to room temperature before storage.
Store less products at the same
time.
Make sure that there is cold air
circulation in the appliance.
25
Page 26
Technical data
26
Replacing the lamp
1. Switch off the appliance.
2. Press on the rear hook and at the same
time slide the cover in the direction of the
arrow.
3. Replace the lamp with one of the same
power (the maximum power is shown on
the lamp cover).
4. Install the lamp cover by sliding it into its
original position.
5. Switch on the appliance.
6. Open the door. Make sure that the light
comes on.
Closing the door
1. Clean the door gaskets.
2. If necessary, adjust the door. Refer to "Installation".
3. If necessary, replace the defective door gaskets. Contact the Service Force Center.
Technical data
Dimension of the recess
Height 1030 mm
Width 560 mm
Depth 550 mm
The technical information are situated in the rating plate on the internal left side of the
appliance and in the energy label.
Installation
Positioning
WARNING!
If you are discarding an old appliance that has a lock or catch on the door, you must ensure
that it is made unusable to prevent young children being trapped inside.
The appliance shall have the plug accessible after installation.
Install this appliance at a location where the ambient temperature corresponds to the
climate class indicated on the rating plate of the appliance:
Page 27

Installation
Climate class Ambient temperature
SN +10°C to + 32°C
N +16°C to + 32°C
ST +16°C to + 38°C
T +16°C to + 43°C
Removing the shelf holders
Your appliance is equipped with shelf retainers that make it possible to secure the shelves
during transportation.
To remove them proceed as follows:
1. Move the shelf holders in the direction of
the arrow (A).
2. Raise the shelf from the rear and push it
forward until it is freed (B).
3. Remove the retainers (C).
A
B
C
27
Electrical connection
Before plugging in, ensure that the voltage and frequency shown on the rating plate correspond to your domestic power supply.
The appliance must be earthed. The power supply cable plug is provided with a contact for
this purpose. If the domestic power supply socket is not earthed, connect the appliance to
a separate earth in compliance with current regulations, consulting a qualified electrician.
The manufacturer declines all responsibility if the above safety precautions are not observed.
This appliance complies with the E.E.C. Directives.
Page 28

Environmental concerns
28
Ventilation requirements
The airflow behind the appliance must be sufficient.
50 mm
min.
200 cm
2
Environmental concerns
The symbol on the product or on its packaging indicates that this product may not be
treated as household waste. Instead it should be taken to the appropriate collection point
for the recycling of electrical and electronic equipment. By ensuring this product is disposed
of correctly, you will help prevent potential negative consequences for the environment
and human health, which could otherwise be caused by inappropriate waste handling of
this product. For more detailed information about recycling of this product, please contact
your local council, your household waste disposal service or the shop where you purchased
the product.
min.
200 cm
2
Page 29

Sommaire
Nous vous remercions d’avoir choisi l’un de nos produits de qualité.
Afin de garantir une performance optimale et constante de votre appareil, veuillez
lire attentivement cette notice d'utilisation. Il vous permettra d’utiliser
correctement et efficacement toutes les fonctions de l’appareil. Nous vous
recommandons de conserver cette notice à proximité pour une utilisation rapide et
optimale. Si l'appareil devez être vendu ou cédé à une autre personne, assurez-vous
que la notice d'utilisation l'accompagne.
Nous vous souhaitons beaucoup de plaisir avec votre nouvel appareil.
Sommaire
29
Consignes de sécurité 29
Sécurité des enfants et des personnes
vulnérables 30
Sécurité générale 30
Utilisation quotidienne 31
Entretien et nettoyage 31
Installation 31
Maintenance 32
Bandeau de commande 32
Mise en marche 32
Mise à l'arrêt 33
Afficheur 33
Réglage de la température 33
Fonction COOLMATIC 33
Fonction Vacances 34
Première utilisation 34
Nettoyage intérieur 34
Utilisation quotidienne 34
Clayettes amovibles 34
Emplacement du demi-balconnet 35
Contrôle de l'humidité 35
Conseils utiles 35
Consignes de sécurité
Conseils pour l'économie d'énergie 35
Conseils pour la réfrigération de denrées
fraîches 35
Conseils pour la réfrigération 36
Entretien et nettoyage 36
Nettoyage périodique 36
Dégivrage du réfrigérateur 37
En cas d'absence prolongée ou de nonutilisation 37
Que faire si… 37
Remplacement de l'ampoule 39
Fermeture de la porte 39
Caractéristiques techniques 40
Installation 40
Emplacement 40
Retrait des supports de clayette 40
Branchement électrique 41
Ventilation 41
En matière de sauvegarde de l'environnement
42
Sous réserve de modifications
222352201-00-122008
Pour votre sécurité et garantir une utilisation correcte de l'appareil, lisez attentivement
cette notice, y compris les conseils et avertissements, avant d'installer et d'utiliser l'appareil
pour la première fois. Pour éviter toute erreur ou accident, veillez à ce que toute personne
qui utilise l'appareil connaisse bien son fonctionnement et ses fonctions de sécurité. Conservez cette notice avec l'appareil. Si l'appareil doit être vendu ou cédé à une autre personne,
Page 30

Consignes de sécurité
30
veillez à remettre cette notice au nouveau propriétaire, afin qu'il puisse se familiariser avec
son fonctionnement et sa sécurité.
Pour la sécurité des personnes et des biens, conservez et respectez les consignes de sécurité
figurant dans cette notice. Le fabricant décline toute responsabilité en cas de dommages
dus au non-respect de ces instructions.
Sécurité des enfants et des personnes vulnérables
• Cet appareil n'est pas destiné à être utilisé par des enfants ou des personnes dont les
capacités physiques, sensorielles ou mentales, ou le manque d'expérience et de connaissance les empêchent d'utiliser l'appareil sans risque lorsqu'ils sont sans surveillance
ou en l'absence d'instruction d'une personne responsable qui puisse leur assurer une
utilisation de l'appareil sans danger.
Empêchez les enfants de jouer avec l'appareil.
• Ne laissez pas les différents emballages à portée des enfants. Ils pourraient s'asphyxier.
• Si l'appareil doit être mis au rebut, veillez à couper le câble d'alimentation électrique au
ras de l'appareil pour éviter les risques d'électrocution. Démontez la porte pour éviter
que des enfants ne restent enfermés à l'intérieur.
• Cet appareil est muni de fermetures magnétiques. S'il remplace un appareil équipé d'une
fermeture à ressort, nous vous conseillons de rendre celle-ci inutilisable avant de vous
en débarrasser. Ceci afin d'éviter aux enfants de s'enfermer dans l'appareil et de mettre
ainsi leur vie en danger.
Sécurité générale
ATTENTION
Veillez à ce que les orifices de ventilation ne soient pas obstrués.
• Cet appareil est destiné uniquement à la conservation des aliments et à un usage do-
mestique normal. Ne l'utilisez pas à des fins commerciales ou industrielles ou pour d'autres buts que celui pour lequel il a été conçu.
• N'utilisez pas d'appareils électriques, d'agents chimiques, de dispositifs mécaniques ou
autres moyens artificiels pour dégivrer ou accélérer le dégivrage de votre appareil.
• Ne faites pas fonctionner d'appareils électriques (par exemple : sorbetières électriques,
mélangeurs ou sèche cheveux) à l'intérieur de votre appareil.
• N'endommagez pas le circuit de refroidissement.
• Conformément au règlement UTE-C-73-997 de juillet 2006, seules les personnes ayant
reçues une formation spécifique aux fluides inflammables peuvent intervenir sur cet
appareil qui contient des hydrocarbures. Ce gaz est néanmoins inflammable.
Pendant le transport et l'installation de votre appareil, assurez-vous qu'aucune partie
du circuit n'est endommagée.
Si un composant du circuit réfrigérant est endommagé :
– évitez les flammes nues (briquet) et toute autre source d'allumage (étincelles)
– aérez la pièce dans laquelle se trouve l'appareil
Page 31

Consignes de sécurité
• Ne modifiez pas ou n'essayez pas de modifier les caractéristiques de cet appareil. Un
cordon d'alimentation endommagé peut être la cause de courts-circuits, d'incendies et/
ou d'électrocutions.
AVERTISSEMENT
Les composants électriques (cordon d'alimentation, prise, compresseur) doivent être remplacés par un électricien qualifié.
1. N'utilisez pas de rallonge au niveau du câble d'alimentation.
2. Assurez-vous que la prise n'est pas écrasée ou endommagée par l'arrière de l'appareil.
Une prise de courant endommagée peut s'échauffer et causer un incendie.
3. Assurez-vous de pouvoir accéder à la prise secteur de l'appareil.
4. Ne tirez pas sur le câble d'alimentation.
5. Si la fiche du cordon d'alimentation est desserrée, ne la branchez pas dans la prise
murale. Risque d'électrocution ou d'incendie.
6.
N'utilisez pas l'appareil si le diffuseur de l'ampoule d'éclairage n'est pas présent
pour l'éclairage intérieur.
• Cet appareil est lourd. Faites attention lors de son déplacement.
• Ne touchez pas avec les mains humides les surfaces givrées ou les produits congelés ; la
température très basse à laquelle ils se trouvent peut provoquer des brûlures ou un
arrachement de la peau.
• Évitez les expositions prolongées de l'appareil aux rayons solaires.
Utilisation quotidienne
• Ne posez pas d'éléments chauds sur les parties en plastique de l'appareil.
• Ne stockez pas de gaz ou de liquides inflammables dans l'appareil (risque d'explosion).
• Respectez scrupuleusement les recommandations de conservation. Consultez les chapitres correspondants dans cette notice d'utilisation.
31
7)
Entretien et nettoyage
• Avant tout entretien, mettez l'appareil à l'arrêt et débranchez-le. Si vous n'avez pas accès
à la prise, coupez le courant.
• N'utilisez pas d'objets métalliques pour nettoyer l'appareil.
• Contrôlez régulièrement l'orifice d'évacuation de l'eau de dégivrage dans le compartiment réfrigérateur. Nettoyez-le, le cas échéant. Si l'orifice est bouché, l'eau s'écoulera
au fond du compartiment réfrigérateur.
Installation
Avant de procéder au branchement électrique, respectez scrupuleusement les instructions
fournies dans cette notice.
• Déballez l'appareil et vérifiez qu'il n'est pas endommagé. Ne branchez pas l'appareil s'il
est endommagé. Signalez immédiatement au revendeur de l'appareil les dommages
constatés. Dans ce cas, gardez l'emballage.
• Il est conseillé d'attendre au moins quatre heures avant de brancher l'appareil pour que
le circuit frigorifique soit stabilisé.
7) si l'appareil en est équipé
Page 32

Bandeau de commande
32
• Veillez à ce que l'air circule librement autour de l'appareil pour éviter qu'il ne surchauffe.
Pour assurer une ventilation suffisante, respectez les instructions de la notice (chapitre
Installation).
• Placez l'appareil dos au mur pour éviter tout contact avec le compresseur et le condenseur (risque de brûlure).
• Placez de préférence votre appareil loin d'une source de chaleur (chauffage, cuisson ou
rayons solaires trop intenses).
• Assurez-vous que la prise murale reste accessible après l'installation de l'appareil.
•
Branchez à l'alimentation en eau potable uniquement.
8)
Maintenance
• Les branchements électriques nécessaires à l'entretien de l'appareil doivent être réalisés
par un électricien qualifié ou une personne compétente.
• Cet appareil ne doit être entretenu et réparé que par un Service après-vente autorisé,
exclusivement avec des pièces d'origine.
Protection de l'environnement
Le système frigorifique et l'isolation de votre appareil ne contiennent pas de C.F.C. contribuant ainsi à préserver l'environnement. L'appareil ne doit pas être mis au rebut avec les
ordures ménagères et les déchets urbains. La mousse d'isolation contient des gaz inflammables : l'appareil sera mis au rebut conformément aux règlements applicables disponibles
auprès des autorités locales. Veillez à ne pas détériorer les circuits frigorifiques, notamment
au niveau du condenseur. Les matériaux utilisés dans cet appareil identifiés par le symbole
sont recyclables.
Bandeau de commande
1 2 3 4 5 6 7
1. Voyant
2. Touche ON/OFF
3. Thermostat (plus CHAUD)
4. Afficheur
5. Thermostat (plus FROID)
6. Voyant COOLMATIC
7. Touche COOLMATIC
Mise en marche
1. Branchez l'appareil.
2. Appuyez sur la touche ON/OFF.
3. Le voyant s'allume.
8) Si un branchement sur le réseau d'eau est prévu
Page 33

Bandeau de commande
Mise à l'arrêt
1. Maintenez la touche ON/OFF appuyée pendant plus de 5 secondes.
2. L'afficheur effectue un décompte de 3 à 1. Dès que "1" apparaît, l'appareil se met à
l'arrêt. L'afficheur s'éteint. Le voyant correspondant s'éteint.
Afficheur
L'afficheur fournit plusieurs informations :
• En fonctionnement normal, il indique la température régnant momentanément dans
l'appareil (température REELLE). La température REELLE est indiquée par un affichage
fixe.
• Pendant le réglage de la température, il affiche la température momentanément réglée
dans le compartiment réfrigérateur (température de CONSIGNE). La température DE
CONSIGNE est indiquée par un affichage clignotant.
Réglage de la température
Pour faire fonctionner l'appareil, procédez comme suit :
1. Sélectionnez la température souhaitée en appuyant sur le dispositif de réglage de tem-
pérature correspondant. L'afficheur indique immédiatement le réglage modifié (température DE CONSIGNE) et celui-ci clignote.
2. A chaque action sur le dispositif de réglage de température, la température DE CON-
SIGNE est modifiée de 1 °C. La température DE CONSIGNE sera atteinte au bout de 24
heures.
3. Si les touches ne sont plus actionnées après avoir modifié le réglage de la température,
l'afficheur indique à nouveau après un bref délai (5 secondes environ) la température
régnant momentanément dans le compartiment correspondant (température REELLE).
L'afficheur passe d'un affichage clignotant à un affichage fixe.
Pour une conservation correcte des aliments, sélectionnez la température suivante :
• +5 °C dans le réfrigérateur
En cas de modification du réglage, le compresseur ne démarre pas immédiatement si le
dégivrage automatique est en cours. La température de stockage dans le compartiment
réfrigérateur est rapidement atteinte, les aliments peuvent être introduits immédiatement
après la mise en service.
33
Fonction COOLMATIC
La fonction COOLMATIC permet de réfrigérer une grande quantité d'aliments plus rapidement.
Pour activer la fonction, procédez comme suit :
1. Appuyez sur la touche COOLMATIC .
2. Le voyant correspondant COOLMATIC s'allume.
3. Lorsque la réfrigération rapide est mise en fonction, la température est réglée à +2 °C.
Pour désactiver la fonction, procédez comme suit :
1. Appuyez sur la touche COOLMATIC .
2. Le voyant correspondant COOLMATIC s'éteint.
La fonction COOLMATIC est enclenchée pour une période d'environ 6 heures, avec retour
progressif à l'issue de ce laps de temps à la température réglée précédemment.
Page 34

Première utilisation
34
Si la fonction COOLMATIC est activée, la température ne peut pas être modifiée.
Fonction Vacances
Cette fonction vous permet de garder le compartiment réfrigérateur vide et fermé pendant
une longue période (p.ex. les vacances d'été), sans formation de mauvaises odeurs.
Le compartiment réfrigérateur doit être vide quand la fonction Vacances est activée. Vous
ne devez pas conserver de marchandises dans ce compartiment.
Pour activer la fonction, procédez comme suit :
1. maintenez appuyé le dispositif de réglage de température (plus CHAUD) jusqu'à ce que
la lettre "H" (pour vacances) apparaisse sur l'afficheur. La fonction Vacances règle la
température à +15 °C dans le compartiment réfrigérateur. Le compartiment réfrigérateur est à présent en fonction "Vacances" et en mode économie d'énergie.
Pour désactiver la fonction, procédez comme suit :
1. réglez la température souhaitée en utilisant le dispositif de réglage de température
correspondant.
Première utilisation
Nettoyage intérieur
Avant d'utiliser l'appareil pour la première fois, nettoyez l'intérieur et tous les accessoires
internes avec de l'eau tiède savonneuse pour supprimer l'odeur caractéristique du "neuf"
puis séchez soigneusement.
N'utilisez pas de produits abrasifs, poudre à récurer, éponge métallique pour ne pas abîmer
la finition.
Utilisation quotidienne
Clayettes amovibles
Les parois du réfrigérateur sont équipées d'une
série de glissières pour que les clayettes puissent
être placées en fonction des besoins.
Pour exploiter au mieux l'espace, vous pouvez placer les demi-clayettes avant au dessus des clayettes arrière.
Page 35

Emplacement du demi-balconnet
Le demi-balconnet peut être positionné à différentes hauteurs.
Pour l'ajuster, procédez comme suit :
1. soulevez l'ensemble balconnet et demi-
balconnet pour l'extraire des supports de
la porte
2. retirez la patte de fixation de la glissière
située sous le balconnet
3. Pour glisser le demi-balconnet à une hau-
teur différente, suivez cette même procédure mais dans l'ordre inverse.
Contrôle de l'humidité
La clayette inférieure en verre est équipée d'un
dispositif muni de fentes dont les ouvertures sont
réglables à l'aide d'un levier coulissant. Le rôle de
ce filtre est de retarder la déshydratation des fruits
et légumes dans le bac à légumes, ce qui permet
d'augmenter considérablement leur conservation.
Lorsque les fentes sont fermées :
le taux d'humidité est plus élevé.
Lorsque les fentes sont ouvertes :
le taux d'humidité est plus bas.
Conseils utiles
35
Conseils utiles
Conseils pour l'économie d'énergie
• N'ouvrez pas la porte trop souvent ou plus longtemps que nécessaire.
• Si la température ambiante est élevée, le thermostat est réglé sur Max et l'appareil est
plein. Il est possible que le compresseur fonctionne en régime continu, d'où un risque de
formation excessive de givre sur l'évaporateur. Pour éviter cet inconvénient, placez le
thermostat sur une position moins élevée de façon à permettre un dégivrage automatique et, par conséquent, des économies de courant.
Conseils pour la réfrigération de denrées fraîches
Pour obtenir les meilleures performances possibles :
• n'introduisez pas d'aliments encore chauds ou de liquides en évaporation dans le réfrigérateur
• couvrez ou enveloppez soigneusement les aliments, surtout s'ils sont aromatiques
• placez les aliments pour que l'air puisse circuler librement autour
Page 36

Entretien et nettoyage
36
Conseils pour la réfrigération
Conseils utiles :
Viande (tous les types) : enveloppez-la dans des sachets en plastique et placez-la sur la
tablette en verre au-dessus du bac à légumes.
La période de conservation est de 1 à 2 jours au maximum.
Aliments cuits, plats froids, etc. : placez-les bien couverts sur une clayette.
Fruits et légumes : placez-les une fois nettoyés dans le(s) bac(s) à légumes fourni(s).
Beurre et fromage : placez-les dans des récipients étanches spéciaux ou enveloppez-les
soigneusement dans des feuilles d'aluminium ou de polyéthylène, pour emmagasiner le
moins d'air possible.
Lait en bouteille : bouchez-le et placez-le dans le balconnet de la contreporte réservé aux
bouteilles.
Bananes, pommes de terre, oignons et ail ne se conservent pas au réfrigérateur, s'ils ne sont
pas correctement emballés.
Entretien et nettoyage
ATTENTION
débrancher l'appareil avant toute opération d'entretien.
Cet appareil contient des hydrocarbures dans son circuit réfrigérant : l'entretien et la recharge ne doivent donc être effectués que par du personnel autorisé.
Nettoyage périodique
Cet appareil doit être nettoyé régulièrement :
• nettoyez l'intérieur et tous les accessoires avec de l'eau tiède savonneuse.
• vérifiez régulièrement les joints de porte et nettoyez-les en les essuyant pour éviter toute
accumulation de déchets.
• rincez et séchez soigneusement.
Ne pas tirer, déplacer ou endommager les tuyaux et/ou câbles qui se trouvent à l'intérieur
de l'appareil.
Ne JAMAIS utiliser de produits abrasifs ou caustiques ni d'éponges avec grattoir pour nettoyer l'intérieur de façon à ne pas l'abîmer et laisser de fortes odeurs.
Nettoyer le condenseur (grille noire) et le compresseur situés à l'arrière de l'appareil avec
une brosse ou un aspirateur. Cette opération améliore les performances de l'appareil et
permet des économies d'énergie.
Attention à ne pas endommager le système de réfrigération.
De nombreux détergents pour la cuisine recommandés par les fabricants contiennent des
produits chimiques qui peuvent attaquer/endommager les pièces en plastique utilisées dans
cet appareil. Il est par conséquent recommandé d'utiliser seulement de l'eau chaude additionnée d'un peu de savon liquide pour nettoyer la carrosserie de l'appareil.
Après le nettoyage, rebranchez l'appareil.
Page 37

Que faire si…
Dégivrage du réfrigérateur
Le givre est automatiquement éliminé de l'évaporateur du compartiment réfrigérateur à
chaque arrêt du compresseur, en cours d'utilisation normale. L'eau de dégivrage est collectée dans un récipient spécial situé à l'arrière de l'appareil, au-dessus du compresseur,
d'où elle s'évapore.
Il est important de nettoyer régulièrement l'orifice
d'écoulement de la gouttière d'évacuation de l'eau
de dégivrage située au milieu du compartiment
réfrigérateur pour empêcher l'eau de déborder et
de couler sur les aliments qui se trouvent à l'intérieur. Nettoyez l'orifice d'écoulement de l'eau de
dégivrage avec le bâtonnet spécial se trouvant
déjà dans l'orifice.
En cas d'absence prolongée ou de non-utilisation
Prenez les précautions suivantes :
•
débranchez l'appareil
• retirez tous les aliments
•
dégivrez
• laissez la porte/les portes entrouverte(s) pour prévenir la formation d'odeurs désagréables.
Si, toutefois, vous n'avez pas la possibilité de débrancher et vider l'appareiI, faites vérifier
régulièrement son bon fonctionnement pour éviter la détérioration des aliments en cas de
panne de courant.
9)
et nettoyez l'appareil et tous les accessoires
37
Que faire si…
AVERTISSEMENT
Avant d'essayer de résoudre un quelconque problème, débranchez l'appareil.
Tout problème non mentionné dans le présent manuel, doit être exclusivement confié à un
électricien qualifié ou une personne compétente.
Certains bruits pendant le fonctionnement (compresseur, circuit de réfrigérant) sont normaux.
9) si cela est prévu.
Page 38

Que faire si…
38
Anomalie Cause possible Remède
L'appareil est bruyant
L'appareil ne fonctionne
pas. L'ampoule ne fonctionne pas.
La fiche n'est pas correctement
Le courant n'arrive pas à l'appa-
L'ampoule ne fonctionne
pas.
Le compresseur fonctionne en permanence.
La porte n'est pas bien fermée. Consultez le paragraphe "Ferme-
La porte a été ouverte trop sou-
La température du produit est
La température ambiante est
Le compresseur ne démarre pas immédiatement après avoir activé la
fonction COOLMATIC ou
après avoir réglé la température.
De l'eau s'écoule sur la
plaque arrière du réfrigérateur.
De l'eau s'écoule dans le
réfrigérateur.
Des produits empêchent que
L'appareil n'est pas stable Vérifiez la stabilité (les quatre
L'appareil est éteint. Mettez l'appareil en marche.
branchée sur la prise.
reil. La prise de courant n'est pas
alimentée.
L'ampoule est défectueuse. Consultez le paragraphe "Rem-
La température n'est pas bien
réglée.
vent.
trop élevée.
trop élevée.
Ce phénomène est normal, il ne
s'agit pas d'une anomalie.
Pendant le dégivrage automatique, le givre fond sur la plaque
arrière.
L'orifice d'écoulement de l'eau
est obstrué.
l'eau s'écoule dans le réservoir
d'eau.
pieds doivent être en contact avec
le sol)
Branchez correctement la fiche
sur la prise.
Branchez un autre appareil électrique à la prise de courant.
Faites appel à un électricien qualifié.
placement de l'ampoule".
Sélectionnez une température
plus élevée.
ture de la porte".
Ne laissez pas la porte ouverte
plus longtemps que nécessaire.
Laissez le produit revenir à tem-
pérature ambiante avant de le
ranger dans le congélateur.
Réduisez la température ambiante.
Le compresseur ne démarre pas
immédiatement.
Ce phénomène est normal.
Nettoyez l'orifice.
Assurez-vous que les produits ne
touchent pas la plaque arrière.
Page 39

Anomalie Cause possible Remède
Il n'est pas possible de régler la température .
La température à l'intérieur de l'appareil est
trop basse/élevée.
La porte n'est pas bien fermée. Consultez le paragraphe "Ferme-
La température du produit est
Trop de produits ont été intro-
La température du réfrigérateur est trop élevée.
La fonction COOLMATIC est activée.
Le bouton du thermostat n'est
pas bien réglé.
trop élevée.
duits simultanément.
L'air froid ne circule pas dans
l'appareil.
Remplacement de l'ampoule
1. Mettez l'appareil à l'arrêt.
2. Tout en appuyant sur le crochet arrière,
faites glisser le diffuseur dans le sens de
la flèche.
3. Remplacez l'ampoule par un modèle sem-
blable de même puissance (la puissance
maximale est indiquée sur le diffuseur).
4. Installez le diffuseur de l'ampoule en le
faisant glisser dans sa position d'origine.
5. Mettez l'appareil en marche.
6. Ouvrez la porte. Vérifiez que l'ampoule
s'allume.
Que faire si…
Déactivez-la COOLMATIC manuellement, ou attendez avant de
régler la température que la fonction se réinitialise automatiquement. Consultez le paragraphe
"Fonction COOLMATIC "..
Sélectionnez une température
plus basse/élevée.
ture de la porte".
Laissez le produit revenir à tem-
pérature ambiante avant de le
ranger dans le congélateur.
Introduisez moins de produits en
même temps.
Assurez-vous que l'air froid circule dans l'appareil.
39
Fermeture de la porte
1. Nettoyez les joints de la porte.
2. Si nécessaire, ajustez la porte. Consultez le paragraphe "Installation".
3. Si nécessaire, remplacez les joints défectueux. Contactez le Service Après-vente.
Page 40

Caractéristiques techniques
40
Caractéristiques techniques
Dimensions de la niche d'encastrement
Hauteur 1030 mm
Largeur 560 mm
Profondeur 550 mm
Les données techniques figurent sur la plaque signalétique située sur le côté gauche à
l'intérieur de l'appareil et sur l'étiquette d'énergie.
Installation
Emplacement
AVERTISSEMENT
Si l'appareil qui doit être mis au rebut est équipé d'un dispositif de fermeture, rendez celuici inutilisable de manière à ce que les enfants ne puissent pas rester enfermés à l'intérieur
de l'appareil.
La prise de l'appareil doit être facilement accessible après son installation.
Installez cet appareil à un endroit où la température ambiante correspond à la classe climatique indiquée sur la plaque signalétique de l'appareil :
Classe climatique Température ambiante
SN +10°C à + 32°C
N +16°C à + 32°C
ST +16°C à +38°C
T +16°C à +43°C
Retrait des supports de clayette
Votre appareil est équipé de dispositifs de retenue qui permettent d'immobiliser les clayettes
au cours du transport.
Pour les enlever, procédez comme suit :
Page 41

Installation
1. Déplacez les supports de clayette dans le
sens de la flèche (A).
A
2. Soulevez la clayette de l'arrière et pous-
sez-la vers l'avant pour la dégager (B).
3. Enlevez les dispositifs de retenue (C).
B
C
Branchement électrique
Contrôlez, avant de brancher l'appareil, si la tension et la fréquence indiquées sur la plaque
signalétique correspondent à celles de votre réseau.
L'appareil doit être relié à la terre. La fiche du câble d'alimentation comporte un logement
pour mise à la terre. Si la prise de courant murale n'est pas mise à la terre, branchez l'appareil
sur une prise de terre conformément aux normes en vigueur, en demandant conseil à un
électricien qualifié.
Le fabricant décline toute responsabilité en cas d'incident suite au non-respect des consignes de sécurité sus-mentionnées.
Cet appareil est conforme aux directives communautaires.
41
Ventilation
La circulation d'air derrière l'appareil doit être suffisante.
50 mm
min.
200 cm
2
min.
2
200 cm
Page 42

En matière de sauvegarde de l'environnement
42
En matière de sauvegarde de l'environnement
Le symbole sur le produit ou son emballage indique que ce produit ne peut être traité
comme déchet ménager. Il doit être remis au point de collecte dédié à cet effet (collecte et
recyclage du matériel électrique et électronique).
En procédant à la mise au rebut de l'appareil dans les règles de l’art, nous préservons
l'environnement et notre sécurité, s’assurant ainsi que les déchets seront traités dans des
conditions optimum.
Pour obtenir plus de détails sur le recyclage de ce produit, veuillez prendre contact avec les
services de votre commune ou le magasin où vous avez effectué l'achat.
Page 43

Wij danken u voor uw keuze voor een van onze producten van hoogwaardige
kwaliteit.
Lees deze gebruiksaanwijzing alstublieft zorgvuldig door, zo kunt u zeker zijn van
optimale en professionele prestaties van uw apparaat. De handleiding zal u in staat
stellen om alle processen perfect en op de meest efficiënte wijze te laten verlopen.
Wij adviseren u deze handleiding op een veilige plaats te bewaren, dan kunt u hem
te allen tijde raadplegen. Geef deze handleiding ook aan een eventuele toekomstige
eigenaar van het apparaat.
Wij wensen u veel plezier met uw nieuwe apparaat.
Inhoud
Inhoud
43
Veiligheidsinformatie 43
Veiligheid van kinderen en kwetsbare
mensen 44
Algemene veiligheid 44
Dagelijks gebruik 45
Onderhoud en reiniging 45
Installatie 45
Onderhoud 46
Bedieningspaneel 46
Inschakelen 46
Uitschakelen 47
Temperatuurdisplay 47
Temperatuurregeling 47
COOLMATIC functie 47
Vakantiefunctie 48
Het eerste gebruik 48
De binnenkant schoonmaken 48
Dagelijks gebruik 48
Verplaatsbare schappen 48
Het plaatsen van de deurhelftplateaus
48
Vochtigheidsregeling 49
Veiligheidsinformatie
Nuttige aanwijzingen en tips 49
Tips voor energiebesparing 49
Tips voor het koelen van vers voedsel 49
Nuttige tips voor het koelen 49
Reiniging en onderhoud 50
Periodieke reiniging 50
Het ontdooien van de koelkast 51
Periodes dat het apparaat niet gebruikt
wordt 51
Problemen oplossen 51
Het lampje vervangen 53
De deur sluiten 53
Technische gegevens 53
Montage 54
Opstelling 54
Het verwijderen van de geleiders van de
schappen 54
Elektrische aansluiting 54
Ventilatievereisten 55
Het milieu 55
Wijzigingen voorbehouden
222352201-00-122008
In het belang van uw veiligheid en om een correct gebruik te kunnen waarborgen is het
van belang dat u, alvorens het apparaat te installeren en in gebruik te nemen, deze gebruiksaanwijzing, inclusief de tips en waarschuwingen, grondig doorleest. Om onnodige
vergissingen en ongevallen te voorkomen is het belangrijk ervoor te zorgen dat alle mensen
die het apparaat gebruiken, volledig bekend zijn met de werking ervan en de veiligheidsvoorzieningen. Bewaar deze instructies en zorg ervoor dat zij bij het apparaat blijven als
Page 44

Veiligheidsinformatie
44
het wordt verplaatst of verkocht, zodat iedereen die het apparaat gedurende zijn hele
levensduur gebruikt, naar behoren is geïnformeerd over het gebruik en de veiligheid van
het apparaat.
Voor de veiligheid van mensen en eigendommen dient u zich aan de voorzorgsmaatregelen
uit dit instructieboekje te houden, de fabrikant is niet verantwoordelijk voor schade die
door het niet opvolgen van de aanwijzingen veroorzaakt is.
Veiligheid van kinderen en kwetsbare mensen
• Dit apparaat is niet bedoeld voor gebruik door personen (waaronder begrepen kinderen)
met verminderde fysieke, zintuiglijke vermogens of een gebrek aan ervaring en kennis,
tenzij dit onder toezicht gebeurt van een voor hun veiligheid verantwoordelijke persoon
of tenzij zij van een dergelijke persoon instructie hebben ontvangen over het gebruik
van het apparaat.
Houd kinderen uit de buurt om te voorkomen dat ze met het apparaat gaan spelen.
• Houd alle verpakkingsmateriaal buiten het bereik van kinderen. Gevaar voor verstikking.
• Als u het apparaat afdankt trek dan de stekker uit het stopcontact, snij de voedingskabel
door (zo dicht mogelijk bij het apparaat) en verwijder de deur om te voorkomen dat
kinderen een elektrische schok krijgen of zichzelf in het apparaat opsluiten.
• Als dit apparaat, dat voorzien is van een magnetische deursluiting, een ouder apparaat
vervangt, dat voorzien is van een veerslot (slot) op de deur of het deksel, zorg er dan
voor dat u het slot onbruikbaar maakt voordat u het oude apparaat weggooit. Dit voorkomt dat kinderen er in opgesloten kunnen raken.
Algemene veiligheid
LET OP!
Houd de ventilatie-openingen altijd vrij van obstructies.
• Dit apparaat is bedoeld voor het bewaren van levensmiddelen en/of dranken in een
gewoon huishouden, zoals uitgelegd in dit instructieboekje.
• Gebruik geen mechanische hulpmiddelen of kunstgrepen om het ontdooiproces te versnellen.
• Gebruik geen andere elektrische apparaten (bijvoorbeeld ijsmachines) in koelkasten, tenzij ze voor dit doel goedgekeurd zijn door de fabrikant.
• Let op dat u het koelcircuit niet beschadigt.
• Het koelmiddel isobutaan (R600a) bevindt zich in het koelcircuit van het apparaat, dit is
een natuurlijk gas dat weliswaar milieuvriendelijk is, maar ook uiterst ontvlambaar.
Controleer of de onderdelen van het koelcircuit tijdens transport en installatie van het
apparaat niet beschadigd zijn geraakt.
Indien het koelcircuit beschadigd is:
– open vuur en ontstekingsbronnen vermijden
– de ruimte waar het apparaat zich bevindt grondig ventileren
Page 45

Veiligheidsinformatie
• Het is gevaarlijk om wijzigingen aan te brengen in de specificaties of dit product op
enigerlei wijze te modificeren. Een beschadigd netsnoer kan kortsluiting, brand en/of een
elektrische schok veroorzaken.
WAARSCHUWING!
Alle elektrische onderdelen (netsnoer, stekker, compressor) mogen uitsluitend vervangen
worden door een erkende onderhoudsdienst of gekwalificeerd onderhoudspersoneel.
1. Het netsnoer mag niet verlengd worden.
2. Verzeker u ervan dat de stekker niet platgedrukt of beschadigd wordt door de ach-
terkant van het apparaat. Een platgedrukte of beschadigde stekker kan oververhit
raken en brand veroorzaken.
3. Verzeker u ervan dat u de stekker van het apparaat kunt bereiken.
4. Trek niet aan het snoer.
5. Als de stekker los zit, steek hem dan niet in het stopcontact. Dit kan gevaar opleveren
van een elektrische schok of brand.
6.
U mag het apparaat niet gebruiken zonder de afdekking van het lampje
binnenverlichting.
• Dit apparaat is zwaar. Wees voorzichtig als u het apparaat verplaatst.
• Haal geen artikelen uit het vriesvak en raak ze niet aan als uw handen vochtig/nat zijn,
dit kan uw huid beschadigen of vrieswonden veroorzaken.
• Stel het apparaat niet langdurig bloot aan direct zonlicht.
Dagelijks gebruik
• Zet geen hete potten op de kunststof onderdelen in het apparaat.
• Bewaar geen brandbare gassen of vloeistoffen in het apparaat, deze kunnen ontploffen.
• U dient zich strikt te houden aan de aanbevelingen van de fabrikant van het apparaat
met betrekking tot het bewaren van voedsel. Raadpleeg de betreffende aanwijzingen.
10)
voor de
45
Onderhoud en reiniging
• Schakel het apparaat uit en trek de stekker uit het stopcontact voordat u onderhoudshandelingen verricht. Als u het stopcontact niet kunt bereiken, onderbreek dan de
stroomtoevoer.
• Maak het apparaat niet schoon met metalen voorwerpen.
• Controleer de afvoer in de koelkast regelmatig op dooiwater. Maak de afvoer, indien
nodig, schoon. Als de afvoer verstopt is, zal er water op de bodem van het apparaat
liggen.
Installatie
Voor de aansluiting van elektriciteit dienen de instructies in de desbetreffende paragrafen
nauwgezet te worden opgevolgd.
• Pak het apparaat uit en controleer of er beschadigingen zijn. Sluit het apparaat niet aan
als het beschadigd is. Meld mogelijke beschadigingen onmiddellijk bij de winkel waar u
het apparaat gekocht heeft. Gooi in dat geval de verpakking niet weg.
• Wij adviseren u om 4 uur te wachten voordat u het apparaat aansluit, dan kan de olie
terugvloeien in de compressor.
10) Als er een afdekking voor het lampje is voorzien
Page 46

Bedieningspaneel
46
• Rond het apparaat dient adequate luchtcirculatie te zijn, anders kan dit tot oververhitting
leiden. Om voldoende ventilatie te verkrijgen de instructies met betrekking tot de installatie opvolgen.
• De achterkant dient zo mogelijk tegen een muur geplaatst te worden, teneinde te voorkomen dat hete onderdelen (compressor, condensator) aangeraakt kunnen worden en
brandwonden veroorzaken.
• Het apparaat mag niet vlakbij radiatoren of kooktoestellen geplaatst worden.
• Verzeker u ervan dat de stekker bereikbaar is nadat het apparaat geïnstalleerd is.
•
Sluit het apparaat alleen aan op een drinkwaterleiding.
11)
Onderhoud
• Alle elektrotechnische werkzaamheden die noodzakelijk zijn voor het uitvoeren van onderhoud aan het apparaat, dienen uitgevoerd te worden door een gekwalificeerd elektricien of competent persoon.
• Dit product mag alleen worden onderhouden door een erkend onderhoudscentrum en
er dient alleen gebruik te worden gemaakt van originele reserveonderdelen.
Bescherming van het milieu
Dit apparaat bevat geen gassen die de ozonlaag kunnen beschadigen, niet in het koelcircuit
en evenmin in de isolatiematerialen. Het apparaat mag niet worden weggegooid bij het
normale huishoudelijke afval. Het isolatieschuim bevat ontvlambare gassen: het apparaat
moet weggegooid worden conform de van toepassing zijnde regels die u bij de lokale overheidsinstanties kunt verkrijgen. Voorkom beschadiging aan de koeleenheid, vooral aan de
achterkant bij de warmtewisselaar. De materialen die gebruikt zijn voor dit apparaat en die
voorzien zijn van het symbool
zijn recyclebaar.
Bedieningspaneel
1. Controlelampje
2. ON/OFF schakelaar
3. Temperatuurregelaar (warmst)
4. Temperatuurdisplay
5. Temperatuurregelaar (koudst)
6. COOLMATIC indicator
7. COOLMATIC schakelaar
Inschakelen
1. Steek de stekker in het stopcontact.
2. Druk op de ON/OFF schakelaar.
11) Indien er een wateraansluiting voorzien is
1 2 3 4 5 6 7
Page 47

Bedieningspaneel
3. Het controlelampje gaat branden.
Uitschakelen
1. Houd de ON/OFF schakelaar langer dan 5 seconden ingedrukt.
2. Daarna wordt het aftellen van de temperatuur van -3 -2 -1 weergegeven. Als "1" ver-
schijnt wordt het apparaat uitgeschakeld. Het temperatuurdisplay gaat uit. Het controlelampje gaat uit.
Temperatuurdisplay
Het temperatuurdisplay geeft verschillende informatie weer:
• Tijdens de normale werking wordt de huidige temperatuur in de koelkast (ACTUELE temperatuur) weergegeven. De ACTUELE temperatuur wordt aangegeven met verlichte getallen.
• Tijdens het aanpassen van de temperatuur wordt de ingestelde koelkasttemperatuur
weergegeven (GEWENSTE temperatuur). De GEWENSTE temperatuur wordt aangeduid
met knipperende getallen.
Temperatuurregeling
Ga als volgt te werk om het apparaat in werking te stellen:
1. Stel de gewenste temperatuur in door op de temperatuurregelaar te drukken. Het tem-
peratuurdisplay geeft onmiddellijk de gewijzigde instelling weer (GEWENSTE temperatuur) en het temperatuurdisplay knippert.
2. Telkens wanneer u op de temperatuurregelaar drukt wordt de GEWENSTE temperatuur
met 1 °C aangepast. De GEWENSTE temperatuur moet binnen 24 uur bereikt worden.
3. Als de vereiste temperatuur is ingesteld, zal na een korte periode (ong. 5 sec.) het
temperatuurdisplay weer de huidige ACTUELE temperatuur binnen de koelkast weer-
geven. Het temperatuurdisplay verandert van knipperende naar continue verlichting.
Voor een juiste conservering van het voedsel moet de volgende temperatuur worden ingesteld:
• +5 °C in de koelkast
Als de instelling is gewijzigd, start de compressor niet meteen als op dat moment auto-
matisch ontdooien plaatsvindt. Aangezien de conserveringstemperatuur binnen in de koelkast snel wordt bereikt, kunt u meteen na het inschakelen voedsel in de koelkast leggen.
47
COOLMATIC functie
De COOLMATIC functie is geschikt voor het snel koelen van grote hoeveelheden voedingsmiddelen in de koelkast.
Voer de volgende stappen uit om de functie in te schakelen:
1. Druk op de COOLMATIC schakelaar.
2. De COOLMATIC indicator gaat branden.
3. Er wordt automatisch een GEWENSTE temperatuurinstelling van +2°C geselecteerd.
Voer de volgende stappen uit om de functie uit te schakelen:
1. Druk op de COOLMATIC schakelaar.
2. De COOLMATIC indicator gaat uit.
De COOLMATIC functie stopt automatisch na ongeveer 6 uur.
Page 48

Het eerste gebruik
48
Als de COOLMATIC functie is ingeschakeld kan de temperatuurinstelling niet veranderd
worden.
Vakantiefunctie
Met deze functie kunt u de koelkast gesloten en leeg houden tijdens een lange vakantieperiode (bijv. de zomervakantie) zonder dat u vieze luchtjes krijgt.
De koelruimte moet leeg zijn als de vakantiefunctie is ingeschakeld.
Ga als volgt te werk om de functie in te schakelen:
1. druk meerdere malen op de temperatuurregelaar (warmst) tot de letter "H" (Holiday)
op het temperatuurdisplay verschijnt. De vakantiefunctie stelt de temperatuur in op
+15°C. De koelkast staat in de energiebesparende stand.
Ga als volgt te werk om de functie uit te schakelen:
1. stel de gewenste temperatuur in door op de temperatuurregelaar te drukken.
Het eerste gebruik
De binnenkant schoonmaken
Voordat u het apparaat voor de eerste keer gebruikt, wast u de binnenkant en de interne
accessoires met lauwwarm water en een beetje neutrale zeep om de typische geur van een
nieuw product weg te nemen. Droog daarna grondig af.
Gebruik geen oplosmiddelen of schuurpoeders. Deze beschadigen de lak.
Dagelijks gebruik
Verplaatsbare schappen
De wanden van de koelkast zijn voorzien van een
aantal geleiders zodat de schappen op de gewenste plaats gezet kunnen worden.
Voor een beter gebruik van de ruimte kunnen de
voorste halve schappen over de achterste worden
geplaatst.
Het plaatsen van de deurhelftplateaus
Het deurhelftplateau kan op verschillende hoogtes worden geplaatst.
Page 49

Om deze aanpassingen uit te voeren, gaat u als volgt te werk:
1. til het schap met het deurhelftplateau
naar boven en haal het uit de houders in
de deur
2. verwijder de sluitbeugel uit de geleiding
onder het plateau
3. Om het plateau op een andere hoogte te-
rug te plaatsen, doet u hetzelfde in om-
gekeerde volgorde.
Vochtigheidsregeling
De glasplaat bevat een apparaat met inkepingen
(afstelbaar door middel van een hendel), waarmee
het mogelijk wordt de temperatuur in de groentelade(s) te regelen.
Wanneer de ventilatieopeningen gesloten zijn:
wordt het natuurlijke vochtgehalte van het voedsel in de fruit- en groentelades langer bewaard.
Wanneer de ventilatieopeningen geopend zijn:
zorgt de luchtcirculatie voor een lager luchtvochtigheidsgehalte in de fruit- en groentelades.
Nuttige aanwijzingen en tips
49
Nuttige aanwijzingen en tips
Tips voor energiebesparing
• De deur niet vaker openen of open laten staan dan strikt noodzakelijk.
• Als de omgevingstemperatuur hoog is, de thermostaatknop op de hoogste instelling staat
en het apparaat volledig gevuld is, kan de compressor continu aan staan waardoor er ijs
op de verdamper ontstaat. Als dit gebeurt, draait u de thermostaatknop naar een lagere
instelling om de koelkast automatisch te laten ontdooien en zo elektriciteitsverbruik te
besparen.
Tips voor het koelen van vers voedsel
Om de beste prestatie te verkrijgen:
• Zet geen warm voedsel of verdampende vloeistoffen in de koelkast
• dek het voedsel af of verpak het, in het bijzonder als het een sterke geur heeft
• plaats het voedsel zodanig dat de lucht er vrijelijk omheen kan circuleren
Nuttige tips voor het koelen
Nuttige tips:
Page 50

Reiniging en onderhoud
50
Vlees (alle soorten) in plastic zakken verpakken en op het glazen schap leggen, boven de
groentelade.
Bewaar het, voor de veiligheid, slechts een of maximaal twee dagen op deze manier.
Gekookt voedsel, koude schotels, enz.: deze moeten afgedekt worden en mogen op willekeurig welk schap gezet worden.
Fruit en groente: deze moeten zorgvuldig schoongemaakt worden en in de speciaal daarvoor bedoelde lade(n) geplaatst worden.
Boter en kaas: dit moet in speciale luchtdichte bakjes gelegd of in aluminiumfolie of plastic
zakjes gewikkeld worden om zoveel mogelijk lucht buiten te sluiten.
Melkflessen: deze moeten een afdekdop hebben en opgeslagen worden in het flessenrek in
de deur.
Bananen, aardappelen, uien en knoflook, indien niet verpakt, mogen niet in de koelkast
bewaard worden.
Reiniging en onderhoud
LET OP!
Voordat u welke onderhoudshandeling dan ook verricht, de stekker uit het stopcontact
trekken.
Het koelcircuit van dit apparaat bevat koolwaterstoffen; onderhoud en herladen mag alleen
uitgevoerd worden door bevoegde technici.
Periodieke reiniging
Het apparaat moet regelmatig worden schoongemaakt:
• maak de binnenkant en de accessoires schoon met lauw water en wat neutrale zeep.
• controleer de afdichtingen regelmatig en wrijf ze schoon om u ervan te verzekeren dat
ze schoon zijn en vrij van restjes zijn.
• spoel ze af en maak ze grondig droog.
Trek niet aan leidingen en/of kabels aan de binnenkant van de kast en verplaats of beschadig
ze niet.
Gebruik nooit schoonmaakmiddelen, schuurpoeders, erg geparfumeerde reinigingsproducten en waspolijstmiddelen om de binnenkant schoon te maken, aangezien deze het oppervlak beschadigen en een sterke geur achterlaten.
Maak de condensor (zwart rooster) en de compressor op de achterkant van het apparaat
schoon met een borstel of stofzuiger. Deze handeling zal de prestatie van het apparaat
verbeteren en het elektriciteitsverbruik besparen.
Zorg ervoor dat u het koelsysteem niet beschadigt.
Veel normaal verkrijgbare keukenreinigers bevatten chemicaliën die de kunststoffen die in
dit apparaat gebruikt zijn kunnen aantasten/beschadigen. Daarom wordt het aanbevolen
de buitenkant van dit apparaat alleen schoon te maken met warm water met een beetje
afwasmiddel.
Steek, na het schoonmaken van het apparaat, de stekker weer in het stopcontact.
Page 51

Problemen oplossen
Het ontdooien van de koelkast
Rijp wordt elke keer als de compressormotor tijdens normale werking stopt, automatisch
van de verdamper van het koelvak verwijderd. Het dooiwater loopt via een gootje in een
speciale opvangbak aan de achterkant van het apparaat, boven de compressormotor, waar
het verdampt.
Het is belangrijk om het afvoergaatje van het
dooiwater in het midden van het koelvak regelmatig schoon te maken, om te voorkomen dat het
water overloopt en op het voedsel in de koelkast
gaat druppelen. Gebruik daarvoor de speciale reiniger, die al in het afvoergaatje zit.
Periodes dat het apparaat niet gebruikt wordt
Als het apparaat gedurende lange tijd niet gebruikt wordt, neem dan de volgende voorzorgsmaatregelen:
•
trek de stekker uit het stopcontact,
• verwijder al het voedsel,
•
ontdooi de koelkast,
• laat de deur/deuren op een kier staan om de vorming van onaangename luchtjes te
voorkomen.
Als uw apparaat aan blijft staan, vraag dan iemand om het zo nu en dan te controleren,
om te voorkomen dat het bewaarde voedsel bederft, als de stroom uitvalt.
12)
en maak het apparaat en alle accessoires schoon,
51
Problemen oplossen
WAARSCHUWING!
Voordat u storingen opspoort, de stekker uit het stopcontact trekken.
Het opsporen van storingen die niet in deze handleiding vermeld zijn, dient te worden
verricht door een gekwalificeerd technicus of deskundig persoon.
Er zijn tijdens de normale werking geluiden te horen (compressor, koelcircuit).
12) indien nodig,
Page 52

Problemen oplossen
52
Probleem Mogelijke oorzaak Oplossing
Het apparaat maakt lawaai
Het apparaat werkt niet.
Het lampje brandt niet.
De stekker zit niet goed in het
Het apparaat krijgt geen stroom.
Het lampje brandt niet.
De compressor werkt
continu.
De deur is niet goed gesloten. Raadpleeg "De deur sluiten".
De deur is te vaak open gedaan. Laat de deur niet langer open
De temperatuur van het product
De kamertemperatuur is te
De compressor start niet
onmiddellijk na het drukken op de COOLMATIC
schakelaar, of na het veranderen van de temperatuur.
Er loopt water over de
achterkant van de koelkast.
Er loopt water in de koelkast.
Producten verhinderen het wa-
De temperatuur kan niet
worden ingesteld.
Het apparaat wordt niet goed
ondersteund
Het apparaat is uitgeschakeld. Schakel het apparaat in.
stopcontact.
Er staat geen spanning op het
stopcontact.
Het lampje is stuk. Raadpleeg "Het lampje vervan-
De temperatuur is niet goed ingesteld.
is te hoog.
hoog.
Dit is normaal, er is geen storing. De compressor start na enige tijd.
Tijdens het automatische ontdooiproces, ontdooit de rijp tegen de achterwand.
De waterafvoer is verstopt. Maak de waterafvoer schoon.
ter om in de wateropvangbak te
lopen.
COOLMATIC functie is ingeschakeld.
Controleer of het apparaat stabiel
staat (alle vier de voetjes moeten
op de vloer staan)
Steek de stekker goed in het stopcontact.
Sluit een ander elektrisch apparaat aan op het stopcontact.
Neem contact op met een gekwalificeerde elektricien.
gen".
Stel een hogere temperatuur in.
staan dan noodzakelijk.
Laat het product afkoelen tot ka-
mertemperatuur voordat u het
opbergt.
Verlaag de kamertemperatuur.
Dit is normaal.
Zorg ervoor dat de producten de
achterwand niet raken.
Schakel de COOLMATIC functie
handmatig uit, of wacht met het
instellen van de temperatuur tot
de functie automatisch wordt uitgeschakeld. Raadpleeg " COOLMATIC functie".
Page 53

Probleem Mogelijke oorzaak Oplossing
De temperatuur in het
apparaat is te laag/hoog.
De deur is niet goed gesloten. Raadpleeg "De deur sluiten".
De temperatuur van het product
Er zijn veel producten tegelijk
De temperatuur in de
koelkast is te hoog.
De temperatuur is niet goed ingesteld.
is te hoog.
geconserveerd.
Er is geen koude luchtcirculatie
in het apparaat.
Het lampje vervangen
1. Schakel het apparaat uit.
2. Druk op de achterste haak en schuif het
kapje tegelijkertijd in de richting van de
pijl.
3. Vervang het lampje met één van hetzelfde
vermogen (het maximale vermogen wordt
weergegeven op de lamp zelf).
4. Installeer het lampenkapje door het terug
te schuiven in zijn oorspronkelijke positie.
5. Schakel het apparaat in.
6. Open de deur. Controleer of het lampje
gaat branden.
Technische gegevens
Stel een hogere/lagere temperatuur in.
Laat het product afkoelen tot kamertemperatuur voordat u het
conserveert.
Conserveer minder producten tegelijk.
Zorg ervoor dat er koude luchtcirculatie in het apparaat is.
53
De deur sluiten
1. Maak de afdichtingen van de deur schoon.
2. Stel de deur, indien nodig, af. Raadpleeg "Montage".
3. Vervang, indien nodig, de defecte deurafdichtingen. Neem contact met de service-
afdeling.
Technische gegevens
Afmetingen van de uitsparing
Hoogte 1030 mm
Breedte 560 mm
Diepte 550 mm
De technische gegevens staan op het typeplaatje aan de linker binnenkant in het apparaat
en op het energielabel.
Page 54

Montage
54
Montage
Opstelling
WAARSCHUWING!
Als u een oud apparaat weggooit dat voorzien is van een deurslot of vergrendeling, zorg
er dan voor dat dit onbruikbaar gemaakt wordt, zodat kinderen er niet in opgesloten kunnen
raken.
De stekker van het apparaat moet na installatie toegankelijk zijn.
Installeer dit apparaat op een plaats waar de omgevingstemperatuur overeenkomt met de
klimaatklasse die vermeld is op het typeplaatje van het apparaat:
Klimaatklasse Omgevingstemperatuur
SN +10°C tot + 32°C
N +16°C tot + 32°C
ST +16°C tot + 38°C
T +16°C tot + 43°C
Het verwijderen van de geleiders van de schappen
Uw apparaat is voorzien van borgklemmen voor de schappen die het mogelijk maken de
schappen vast te zetten tijdens transport.
Om deze te verwijderen gaat u als volgt te werk:
1. Trek de schaphouders in de richting van
de pijl (A).
2. Til het schap aan de achterkant op en duw
het naar voren tot het vrij komt (B).
3. Verwijder de borgklemmen (C).
A
B
C
Elektrische aansluiting
Zorg er vóór het aansluiten voor dat het voltage en de frequentie op het typeplaatje overeenkomen met de stroomtoevoer in uw huis.
Het apparaat moet geaard zijn. De netsnoerstekker is voorzien van een contact voor dit
doel. Als het stopcontact niet geaard is, sluit het apparaat dan aan op een afzonderlijk
Page 55

Het milieu
aardepunt, in overeenstemming met de geldende regels, raadpleeg hiervoor een gekwalificeerd elektricien.
De fabrikant neemt geen verantwoordelijkheid op zich als de bovenstaande veiligheidsmaatregelen niet worden nageleefd.
Dit apparaat voldoet aan de EU. richtlijnen.
Ventilatievereisten
De luchtstroom achter het apparaat moet voldoende zijn.
50 mm
min.
200 cm
2
Het milieu
Het symbool op het product of op de verpakking wijst erop dat dit product niet als
huishoudafval mag worden behandeld, maar moet worden afgegeven bij een verzamelpunt
waar elektrische en elektronische apparatuur wordt gerecycled. Als u ervoor zorgt dat dit
product op de juiste manier wordt verwijderd, voorkomt u mogelijke negatieve gevolgen
voor mens en milieu die zich zouden kunnen voordoen in geval van verkeerde
afvalverwerking. Voor gedetailleerdere informatie over het recyclen van dit product, kunt
u contact opnemen met de gemeente, de gemeentereiniging of de winkel waar u het
product hebt gekocht.
min.
200 cm
55
2
Page 56

56
Obsah
Děkujeme, že jste si vybrali jeden z našich vysoce kvalitních výrobků.
Přečtěte si prosím pozorně tento návod k použití, abyste zajistili
optimální a správný chod svého spotřebiče. Najdete v něm rady k
dokonalému a co nejúčinnějšímu používání spotřebiče. Doporučujeme
vám, abyste návod uložili na bezpečném místě, a mohli ho kdykoliv
znovu použít. Předejte ho prosím i případnému dalšímu majiteli
spotřebiče.
Přejeme vám s novým spotřebičem hodně radosti.
Obsah
Bezpečnostní informace 56
Bezpečnost dětí a hendikepovaných
osob 57
Všeobecné bezpečnostní informace
57
Denní používání 58
Čištění a údržba 58
Instalace 58
Servis 59
Ovládací panel 59
Zapnutí 59
Vypnutí 60
Displej teploty 60
Nastavení teploty 60
Funkce COOLMATIC 60
Funkce Dovolená 60
Při prvním použití 61
Čistění vnitřku spotřebiče 61
Denní používání 61
Přemístitelné police 61
Umístění dveřních poliček 61
Regulace vlhkosti 62
Užitečné rady a tipy 62
Tipy pro úsporu energie 62
Tipy pro chlazení čerstvých potravin
Tipy pro chlazení 62
Čištění a údržba 63
Pravidelné čištění 63
Odmrazování chladničky 64
Vyřazení spotřebiče z provozu 64
Co dělat, když... 64
Výměna žárovky 66
Zavření dveří 66
Technické údaje 66
Instalace 67
Umístění 67
Odstranění držáků polic 67
Připojení k elektrické síti 67
Požadavky na větrání 68
Poznámky k životnímu prostředí 68
Zmĕny vyhrazeny
Bezpečnostní informace
V zájmu své bezpečnosti a správného chodu spotřebiče si před jeho instalací
a prvním použitím pozorně Přečtěte návod k použití včetně rad a upozornění.
K ochraně před nežádoucími omyly a nehodami je důležité, aby se všechny
osoby, které budou používat tento spotřebič, seznámily s jeho provozem a
bezpečnostními funkcemi. Tyto pokyny uschovejte a zajistěte, aby zůstaly u
spotřebiče i v případě jeho přestěhování na jiné místo nebo prodeje dalším
osobám, aby se tak všichni uživatelé po celou dobu životnosti spotřebiče mohli
řádně informovat o jeho používání a bezpečnosti.
62
Page 57

Bezpečnostní informace
Dodržujte pokyny uvedené v tomto návodu k použití, abyste neohrozili své
zdraví a majetek, a uvědomte si, že výrobce neručí za úrazy a poškození způ‐
sobené jejich nedodržením.
Bezpečnost dětí a hendikepovaných osob
•
Tento spotřebič nesmějí používat osoby (včetně dětí) se sníženými fyzický‐
mi, smyslovými nebo duševními schopnostmi, nebo bez patřičných zkuše‐
ností a znalostí, pokud je nesledují osoby odpovědné za jejich bezpečnost,
nebo jim nedávají příslušné pokyny k použití spotřebiče.
Na děti je třeba dohlédnout, aby si se spotřebičem nehrály.
•
Všechny obaly uschovejte z dosahu dětí. Hrozí nebezpečí udušení.
•
Jestliže likvidujete starý spotřebič, vytáhněte zástrčku ze zásuvky, odřízněte
napájecí kabel (co nejblíže u spotřebiče) a odstraňte dveře, aby nedošlo k
úrazu dětí elektrickým proudem, nebo se děti nemohly zavřít uvnitř.
•
Jestliže je tento spotřebič vybaven magnetickým těsněním dveří a nahrazuje
starší spotřebič s pružinovým zámkem (západkou) na dveřích nebo víku,
nezapomeňte před likvidací pružinový zámek znehodnotit. Děti se pak ne‐
mohou ve spotřebiči zavřít jako ve smrtelně nebezpečné pasti.
Všeobecné bezpečnostní informace
POZOR
Udržujte větrací otvory volně průchodné.
•
Tento spotřebič je určen k uchování potravin a nápojů v běžné domácnosti,
jak je uvedeno v návodu k použití.
•
K urychlení odmrazování nepoužívejte mechanické ani jiné pomocné
prostředky.
•
V prostoru chladicích spotřebičů nepoužívejte jiné elektrické přístroje (např.
zmrzlinové strojky), než typy schválené k tomuto účelu výrobcem.
•
Nepoškozujte okruh chladicí kapaliny.
•
Chladivo isobutan (R600a) je obsaženo v chladicím okruhu spotřebiče; je to
zemní plyn s vysokým stupněm slučitelnosti s životním prostředím, ale je
hořlavý.
Během přepravy a instalace spotřebiče dbejte na to, aby nedošlo k poško‐
zení žádné části chladicího okruhu.
Pokud dojde k poškození chladicího okruhu:
– odstraňte z blízkosti spotřebiče otevřený plamen a všechny zdroje ohně
– důkladně vyvětrejte místnost, ve které je spotřebič umístěný.
57
Page 58

58
Bezpečnostní informace
• Změna technických parametrů nebo jakákoli jiná úprava spotřebiče je ne‐
bezpečná. Jakékoli poškození kabelu může mít za následek zkrat, požár a/
nebo úraz elektrickým proudem.
UPOZORNĚNÍ
Jakýkoli elektrický díl (napájecí kabel, zástrčka, kompresor) smí vyměnit pouze
autorizovaný zástupce servisu nebo kvalifikovaný pracovník servisu.
1. Napájecí kabel nelze nastavovat.
2. Zkontrolujte, zda není zástrčka stlačená nebo poškozená zadní stranou
spotřebiče. Stlačená nebo poškozená zástrčka se může přehřát a způ‐
sobit požár.
3. Ověřte si, že je zástrčka spotřebiče dobře přístupná.
4. Netahejte za napájecí kabel.
5. Pokud je zásuvka uvolněná, nezasunujte do ní zástrčku. Hrozí nebez‐
pečí úrazu elektrickým proudem nebo požár.
6.
Nespouštějte spotřebič bez krytu žárovky
• Tento spotřebič je těžký. Při přemisťování spotřebiče buďte proto opatrní.
• Nevytahujte věci z mrazničky, ani se jich nedotýkejte, máte-li vlhké nebo
mokré ruce, protože byste si mohli odřít pokožku nebo způsobit omrzliny.
• Spotřebič nesmí být dlouhodobě vystaven přímému slunečnímu záření.
13)
vnitřního osvětlení.
Denní používání
• Ve spotřebiči nestavte horké nádoby na plastové části spotřebiče.
• Neskladujte v něm hořlavý plyn nebo tekutiny, protože by mohly vybuchnout.
• Pokyny výrobce spotřebiče týkající se uchování potravin je nutné přísně do‐
držovat. Řiďte se příslušnými pokyny.
Čištění a údržba
• Před čištěním nebo údržbou vždy spotřebič vypněte a vytáhněte síťovou
zástrčku ze sítě. Jestliže nemůže vytáhnout zástrčku, přerušte přívod pro‐
udu.
• Nečistěte spotřebič kovovými předměty.
• Pravidelně kontrolujte a čistěte odtokový otvor na rozmrazenou vodu. Je-li
zanesený, uvolněte ho. Jestliže je otvor ucpaný, rozlije se voda na dno
chladničky.
Instalace
U elektrického připojení se pečlivě řiďte pokyny uvedenými v příslušných od‐
stavcích.
•
Vybalte spotřebič a zkontrolujte, zda není poškozený. Je-li spotřebič poško‐
zený, nezapojujte ho do sítě. Případné poškození okamžitě nahlaste pro‐
dejci, u kterého jste spotřebič koupili. V tomto případě si uschovejte obal.
•
Doporučujeme vám, abyste se zapojením spotřebiče počkali nejméně čtyři
hodiny, aby olej mohl natéct zpět do kompresoru.
•
Okolo spotřebiče musí být dostatečná cirkulace vzduchu, jinak by se
přehříval. K dosažení dostatečného větrání se řiďte pokyny k instalaci.
13) Pokud je spotřebič vybaven krytem žárovky.
Page 59

Ovládací panel
•
Pokud je to možné, měl by spotřebič stát zadní stranou ke stěně, aby byly
jeho horké části nepřístupné (kompresor, kondenzátor), a nemohli jste o ně
zachytit nebo se spálit.
•
Spotřebič nesmí být umístěn v blízkosti radiátorů nebo sporáků.
•
Zkontrolujte, zda je zástrčka po instalaci spotřebiče přístupná.
•
Spotřebič připojte výhradně k přívodu pitné vody.
14)
Servis
• Jakékoliv elektrikářské práce, nutné pro zapojení tohoto spotřebiče, smí
provádět pouze kvalifikovaný elektrikář nebo osoba s příslušným oprávně‐
ním.
• Pokud je spotřebič nutné opravit, obraťte se na autorizované servisní středi‐
sko, které smí použít výhradně originální náhradní díly.
Ochrana životního prostředí
Tento přístroj neobsahuje plyny, které mohou poškodit ozónovou vrstvu, ani v
chladicím okruhu, ani v izolačních materiálech. Spotřebič nelikvidujte společně
s domácím odpadem a smetím. Izolační pěna obsahuje hořlavé plyny:
spotřebič je nutné zlikvidovat podle příslušných předpisů, které získáte na
obecním úřadě. Zabraňte poškození chladicí jednotky, hlavně vzadu v blízkosti
výměníku tepla. Materiály použité u tohoto spotřebiče označené symbolem
jsou recyklovatelné.
59
Ovládací panel
1 2 3 4 5 6 7
1.
Provozní kontrolka
2.
Vypínač ON/OFF
3.
Ovladač teploty (nejteplejší)
4.
Displej teploty
5.
Ovladač teploty (nejchladnější)
6.
Ukazatel COOLMATIC
7.
Vypínač COOLMATIC
Zapnutí
1.
Síťovou zástrčku zasuňte do zásuvky.
2.
Stiskněte spínač ON/OFF.
3.
Provozní kontrolka se rozsvítí.
14) Pokud je spotřebič vybaven vodovodní přípojkou
Page 60

60
Ovládací panel
Vypnutí
1. Ovladač ON/OFF podržte stisknutý déle než 5 vteřin.
2. Poté se zobrazí odpočítávání teploty od -3-2-1. Když se zobrazí "1" , je
spotřebič vypnutý. Displej teploty zhasne. Provozní kontrolka zhasne.
Displej teploty
Displeje teploty zobrazují různé informace:
•
Během běžného provozu se zobrazuje současná teplota uvnitř mrazničky
(SKUTEČNÁ teplota). SKUTEČNÁ teplota je signalizována svítícími čísly.
•
Během seřizování teploty se na displeji teploty zobrazuje právě nastavená
teplota chladničky (POŽADOVANÁ teplota). POŽADOVANÁ teplota je sig‐
nalizována blikajícími čísly.
Nastavení teploty
Chcete-li spotřebič nastavit, postupujte takto:
1. Nastavte požadovanou teplotu stisknutím příslušného ovladače teploty.
Displej teploty bude okamžitě ukáže změněné nastavení (POŽADOVA‐
NOU teplotu) a bude blikat.
2. Při každém stisknutí ovladače teploty se POŽADOVANÁ teplota změní o
1 °C. POŽADOVANÉ teploty musí být dosaženo do 24 hodin.
3. Po nastavení požadované teploty se za krátkou dobu (asi 5 s) displej teploty
změní a opět zobrazuje současnou SKUTEČNOU teplotu uvnitř příslušné‐
ho oddílu. Displej teploty přestane blikat a bude stále svítit.
Pro správné uložení potravin nastavte následující teplotu:
• +5 °C v chladničce
Jestliže změníte nastavení, kompresor se nespustí hned, pokud právě probíhá
automatické odmrazování. Protože chladnička rychle dosáhne skladovací te‐
ploty, můžete do ní vložit potraviny ihned po zapnutí.
Funkce COOLMATIC
Funkce COOLMATIC je vhodná pro rychlé zchlazení velkého množství potra‐
vin v chladničce.
Chcete-li tuto funkci zapnout, postupujte takto:
1. Stiskněte vypínač COOLMATIC .
2. Kontrolka COOLMATIC se rozsvítí.
3. Automaticky se zvolí nastavení POŽADOVANÉ teploty +2 °C.
Chcete-li tuto funkci vypnout, postupujte takto:
1. Stiskněte vypínač COOLMATIC .
2. Ukazatel COOLMATIC .
Funkce COOLMATIC se automaticky vypne za 6 hodin.
Pokud je funkce COOLMATIC zapnutá, nastavení teploty se nesmí změnit.
Funkce Dovolená
Tato funkce umožňuje ponechat prázdnou chladničku zavřenou v období dlou‐
hé dovolené (např. v létě), aniž vzniknou nepříjemné pachy.
Page 61

Při prvním použití
Chladicí oddíl musí být při zapnutí funkce Dovolená prázdný.
Chcete-li tuto funkci zapnout, postupujte takto:
1. tiskněte ovladač teploty (nejteplejší), až se na displeji teploty objeví pís‐
meno "H" (Holiday - dovolená). Při funkci Dovolená se nastaví teplota na
+15 °C. Nyní je chladnička v režimu šetřícím energii.
Chcete-li tuto funkci vypnout, postupujte takto:
1. nastavte požadovanou teplotu stisknutím ovladače teploty chladničky.
Při prvním použití
Čistění vnitřku spotřebiče
Před prvním použitím spotřebiče vymyjte vnitřek a všechno vnitřní příslušen‐
ství vlažnou vodou s trochou neutrálního mycího prostředku, abyste odstranili
typický pach nového výrobku, a pak vše důkladně utřete do sucha.
Nepoužívejte čisticí prostředky nebo abrazivní prášky, které mohou poškodit
povrch spotřebiče.
Denní používání
Přemístitelné police
Na stěnách chladničky jsou kolejničky, do
kterých se podle přání zasunují police.
K lepšímu využití prostoru mohou přední
poloviční police ležet na zadních policích.
61
Umístění dveřních poliček
Dveřní poloviční polici můžete umístit do různé výšky.
Postupujte následovně:
Page 62

62
Užitečné rady a tipy
1. Zvedněte polici s poloviční dveřní
policí nahoru a vytáhněte ji z
dveřních držáků.
2. Odstraňte podpěru z vodicí lišty pod
policí.
3. Stejným postupem v obráceném
pořadí zasuňte polici do jiné výšky.
Regulace vlhkosti
Ve skleněné polici jsou štěrbiny (nastavi‐
telné posuvnou páčkou), které umožňují
regulaci teploty v zásuvce nebo zásuvkách
na zeleninu.
Se zavřenými větracími otvory:
se přirozená vlhkost potravin v zásuvkách
na ovoce a zeleninu uchová po delší dobu.
S otevřenými větracími otvory:
dochází k větší cirkulaci vzduchu a tedy
snížení vlhkosti vzduchu v potravinách v
zásuvkách na ovoce a zeleninu.
Užitečné rady a tipy
Tipy pro úsporu energie
•
Neotvírejte často dveře, ani je nenechávejte otevřené déle, než je nezbytně
nutné.
•
Jestliže je okolní teplota vysoká, regulátor teploty je na vyšším nastavení a
spotřebič je zcela zaplněný, může kompresor běžet nepřetržitě a na výpar‐
níku se pak tvoří námraza nebo led. V tomto případě je nutné nastavit re‐
gulátor teploty na nižší nastavení, aby se spotřebič automaticky odmrazil, a
tím snížil spotřebu energie.
Tipy pro chlazení čerstvých potravin
K dosažení nejlepšího výkonu:
•
do chladničky nevkládejte teplé potraviny nebo tekutiny, které se odpařují;
•
potraviny zakrývejte nebo je zabalujte, zejména mají-li silnou vůni;
•
potraviny položte tak, aby okolo nich mohl proudit volně vzduch.
Tipy pro chlazení
Užitečné rady:
Page 63

Čištění a údržba
Maso (všechny druhy): zabalte do polyetylénového sáčku a položte na skle‐
něnou polici nad zásuvku se zeleninou.
Z hlediska bezpečné konzumace takto skladujte maso pouze jeden nebo dva
dny.
Vařená jídla, studená jídla apod.: můžete zakrýt a položit na jakoukoli polici.
Ovoce a zelenina: musí být důkladně očištěné, vložte je do speciální zásuvky
(nebo zásuvek), které jsou součástí vybavení.
Máslo a sýr: musí být ve speciální vzduchotěsné nádobě nebo zabalené do
hliníkové fólie či do polyetylénového sáčku, aby k nim měl vzduch co nejméně
přístup.
Láhve s mlékem: musí být uzavřeny víčkem a uloženy v držáku na láhve ve
dveřích.
Banány, brambory, cibule a česnek smí být v chladničce pouze tehdy, jsou-li
zabalené.
Čištění a údržba
POZOR
Před každou údržbou vytáhněte zástrčku spotřebiče ze zdroje elektrického
napájení.
Tento spotřebič obsahuje uhlovodíky v chladicí jednotce; údržbu a doplňování
smí proto provádět pouze autorizovaný pracovník.
63
Pravidelné čištění
Spotřebič je nutné pravidelně čistit:
•
vnitřek a všechno vnitřní příslušenství omyjte vlažnou vodou s trochou ne‐
utrálního mycího prostředku;
•
pravidelně kontrolujte těsnění dvířek a otírejte je, aby bylo čisté, bez usa‐
zených nečistot;
•
důkladně vše opláchněte a osušte.
Nehýbejte s žádnými trubkami nebo kabely uvnitř spotřebiče, netahejte za ně
a nepoškozujte je.
Nikdy nepoužívejte k čištění vnitřku spotřebiče abrazivní prášky, vysoce pa‐
rfémované čisticí prostředky nebo vosková leštidla, protože mohou poškodit
povrch a zanechat silný pach.
Kondenzátor (černá mřížka) a kompresor na zadní straně spotřebiče čistěte
kartáčem nebo vysavačem. Tím se zlepší výkon spotřebiče a sníží spotřeba
energie.
Dbejte na to, abyste nepoškodili chladicí systém.
Řada prostředků na čistění povrchů v kuchyni obsahuje chemikálie, které mo‐
hou poškodit umělou hmotu použitou v tomto spotřebiči. Doporučujeme proto
čistit povrch spotřebiče pouze teplou vodou s trochou tekutého mycího
prostředku na nádobí.
Page 64

64
Co dělat, když...
Po čištění znovu připojte spotřebič k elektrické síti.
Odmrazování chladničky
Během normálního používání se námraza automaticky odstraňuje z výparníku
chladicího oddílu při každém zastavení motoru kompresoru. Rozmrazená vo‐
da vytéká žlábkem do speciální nádoby na zadní straně spotřebiče nad mo‐
torem kompresoru, kde se odpařuje.
Odtokový otvor pro rozmrazenou vodu,
který se nachází uprostřed žlábku v chla‐
dicím oddíle, se musí pravidelně čistit, aby
voda nemohla přetéct na uložené potravi‐
ny. Používejte speciální čisticí nástroj, kte‐
rý najdete již zasunutý do odtokového ot‐
voru.
Vyřazení spotřebiče z provozu
Jestliže spotřebič nebudete po dlouhou dobu používat, proveďte následná
opatření:
•
odpojte spotřebič od sítě
•
vyjměte všechny potraviny
•
odmrazte
•
nechte dveře pootevřené, abyste zabránili vzniku nepříjemných pachů.
Pokud necháte spotřebič zapnutý, požádejte někoho, aby ho občas zkontro‐
loval, zda se potraviny nekazí, např. z důvodu výpadku proudu.
15)
a vyčistěte spotřebič a všechno příslušenství
Co dělat, když...
UPOZORNĚNÍ
Při hledání a odstraňování závady vytáhněte zástrčku z nástěnné zásuvky.
Odstraňování závady, které není uvedeno v tomto návodu, smí provádět po‐
uze kvalifikovaný elektrikář nebo osoba s příslušným oprávněním.
Během normálního používání vydává spotřebič různé zvuky (kompresor, chla‐
dicí okruh).
15) Pokud je to možné.
Page 65

Co dělat, když...
Problém Možná příčina Řešení
Spotřebič je hlučný Spotřebič není správně in‐
Spotřebič nefunguje.
Osvětlení nefunguje.
Zástrčka není zasunutá
Spotřebič je bez proudu.
Osvětlení nefunguje. Vadná žárovka. Viz "Výměna žárovky".
Kompresor funguje
nepřetržitě.
Dveře nejsou správně
Otvírali jste příliš často
Teplota spotřebiče je příliš
Teplota místnosti je příliš
Po stisknutí spínače
COOLMATIC nebo po
změně teploty se kom‐
presor nespustí okam‐
žitě.
Po vnitřní zadní stěně
chladničky stéká voda.
V chladničce teče voda. Odtokový otvor je ucpaný. Vyčistěte odtokový otvor.
Vložení potraviny brání od‐
Teplotu nelze nastavit. COOLMATIC funkce je za‐
stalovaný
Spotřebič je vypnutý. Zapněte spotřebič.
správně do zásuvky.
Zásuvka není pod pro‐
udem.
Není správně nastavená te‐
plota.
zavřené.
dveře.
vysoká.
vysoká.
To je normální jev a nezna‐
mená poruchu.
Během automatického od‐
mrazování se na zadní stě‐
ně rozmrazuje námraza.
toku vody do odtokového
otvoru.
pnutá.
Zkontrolujte, zda je ve stabil‐
ní poloze (všechny čtyři no‐
žičky musejí být na podlaze)
Zástrčku zasuňte správně do
zásuvky.
Zasuňte do zásuvky zástrčku
jiného elektrického spotřebi‐
če.
Obraťte se na kvalifikované‐
ho elektrikáře.
Nastavte vyšší teplotu.
Viz "Zavření dveří".
Nenechávejte dveře
otevřené déle, než je nezbyt‐
ně nutné.
Nechte jídlo vychladnout na
teplotu místnosti, a teprve
pak ho vložte do spotřebiče.
Snižte teplotu místnosti.
Kompresor se spouští až po
určité době.
Nejde o závadu.
Přemístěte potraviny tak,
aby se nedotýkaly zadní stě‐
ny.
Vypněte COOLMATIC ruč‐
ně, nebo počkejte s nastave‐
ním teploty, až se funkce re‐
setuje automaticky. Viz funk‐
ci " COOLMATIC ".
65
Page 66

66
Technické údaje
Problém Možná příčina Řešení
Teplota ve spotřebiči je
příliš nízká/vysoká.
Dveře nejsou správně
Teplota spotřebiče je příliš
Vložili jste příliš velké množ‐
Teplota v chladničce je
příliš vysoká.
Výměna žárovky
1.
Vypněte spotřebič.
2.
Stiskněte zadní háček a současně
posuňte kryt ve směru označeném
šipkou.
3.
Použitou žárovku vyměňte za novou
se stejným příkonem (maximální
příkon je uveden na krytu světla).
4.
Nasaďte kryt žárovky zasunutím
zpět do původní polohy.
5.
Zapněte spotřebič.
6.
Otevřete dveře. Přesvědčte se, že
se osvětlení rozsvítí.
Není správně nastavená te‐
plota.
zavřené.
vysoká.
ství potravin najednou.
Ve spotřebiči neobíhá
chladný vzduch.
Nastavte vyšší/nižší teplotu.
Viz "Zavření dveří".
Nechte jídlo vychladnout na
teplotu místnosti, a teprve
pak ho vložte do spotřebiče.
Dávejte do spotřebiče raději
méně potravin.
Vždy zkontrolujte, zda ve
spotřebiči může dobře obíhat
chladný vzduch.
Zavření dveří
1.
Vyčistěte těsnění dveří.
2.
Pokud je to nutné, dveře seřiďte. Řiďte se pokyny v části "Instalace".
3.
V případě potřeby vadné těsnění dveří vyměňte. Obraťte se na servisní
středisko.
Technické údaje
Rozměry výklenku
Výška 1030 mm
Šířka 560 mm
Hloubka 550 mm
Technické údaje jsou uvedeny na typovém štítku umístěném na vnitřní levé
straně spotřebiče a na energetickém štítku.
Page 67

Instalace
Instalace
Umístění
UPOZORNĚNÍ
Jestliže likvidujete starý spotřebič se zámkem nebo západkou na dveřích, mu‐
síte ho znehodnotit tak, aby se malé děti nemohly uvnitř zavřít.
Síťová zástrčka musí být po instalaci volně přístupná.
Spotřebič instalujte na místě, jehož okolní teplota odpovídá klimatické třídě
uvedené na typovém štítku spotřebiče:
Klimatická třída Okolní teplota
SN +10°C až + 32°C
N +16°C až + 32°C
ST +16°C až + 38°C
T +16°C až + 43°C
Odstranění držáků polic
Spotřebič je vybaven držáky polic, kterými je možné police bezpečně zajistit
během přepravy.
Chcete-li je odstranit, postupujte takto:
1.
Posuňte držáky polic ve směru šip‐
ky (A).
2.
Nadzdvihněte polici zezadu a pak ji
zatlačte dopředu, až se uvolní (B).
3.
Odstraňte zarážky (C).
A
67
B
C
Připojení k elektrické síti
Spotřebič smí být připojen k síti až po ověření, že napětí a frekvence uvedené
na typovém štítku odpovídají napětí v domácí síti.
Spotřebič musí být podle zákona uzemněn. Zástrčka napájecího kabelu je k
tomuto účelu vybavena příslušným kontaktem. Pokud není domácí zásuvka
uzemněná, poraďte se s odborníkem a připojte spotřebič k samostatnému
uzemnění v souladu s platnými předpisy .
Page 68

68
Poznámky k životnímu prostředí
Výrobce odmítá veškerou odpovědnost v případě nedodržení výše uvedených
pokynů.
Tento spotřebič je v souladu se směrnicemi EHS.
Požadavky na větrání
Prostor za spotřebičem musí umožňovat
dostatečné proudění vzduchu.
50 mm
min.
200 cm
2
Poznámky k životnímu prostředí
Symbol na výrobku nebo jeho balení udává, že tento výrobek nepatří do
domácího odpadu. Je nutné odvézt ho do sběrného místa pro recyklaci
elektrického a elektronického zařízení. Zajištěním správné likvidace tohoto
výrobku pomůžete zabránit negativním důsledkům pro životní prostředí a
lidské zdraví, které by jinak byly způsobeny nevhodnou likvidací tohoto
výrobku. Podrobnější informace o recyklaci tohoto výrobku zjistíte u
příslušného místního úřadu, služby pro likvidaci domovního odpadu nebo v
obchodě, kde jste výrobek zakoupili.
min.
200 cm
2
Page 69

Spis treści
Dziękujemy za wybranie jednego z naszych produktów o wysokiej
jakości.
Aby zapewnić optymalne i prawidłowe działanie Państwa urządzenia
prosimy o dokładne przeczytanie niniejszej instrukcji obsługi. Pozwoli to
Państwu na doskonałe i najbardziej wydajne kierowanie wszystkimi
procesami. Zalecamy przechowywanie instrukcji obsługi w
bezpiecznym miejscu, co pozwoli na korzystanie z niej również w
przyszłości. Ponadto prosimy o przekazanie jej przyszłemu
właścicielowi urządzenia.
Życzymy Państwu wiele radości z używania nowego urządzenia.
Spis treści
69
Informacje dotyczące bezpieczeństwa
69
Bezpieczeństwo dzieci i osób
upośledzonych 70
Ogólne zasady bezpieczeństwa
70
Codzienna eksploatacja 71
Konserwacja i czyszczenie 71
Instalacja 72
Serwis 72
Panel sterowania 73
Włączanie 73
Wyłączanie 73
Wskaźnik temperatury 73
Regulacja temperatury 73
COOLMATIC Funkcja 74
Funkcja Wakacje 74
Pierwsze użycie 75
Czyszczenie wnętrza 75
Codzienna eksploatacja 75
Zmiana położenia półek 75
Rozmieszczanie wąskich półek na
drzwiach 75
Kontrola wilgotności 76
Przydatne rady i wskazówki 76
Wskazówki dotyczące oszczędzania
energii 76
Wskazówki dotyczące
przechowywania świeżej żywności
76
Wskazówki dotyczące
przechowywania żywności 76
Konserwacja i czyszczenie 77
Okresowe czyszczenie 77
Rozmrażanie chłodziarki 77
Okresy przerw w eksploatacji
urządzenia 78
Co zrobić, gdy… 78
Wymiana żarówki 80
Zamykanie drzwi 80
Dane techniczne 81
Instalacja 81
Miejsce instalacji 81
Wyjmowanie elementów blokady
półek 81
Przyłącze elektryczne 82
Wymagania dotyczące wentylacji
82
Ochrona środowiska 83
Może ulec zmianie bez powiadomienia
Informacje dotyczące bezpieczeństwa
W celu zapewnienia bezpieczeństwa użytkownika i bezawaryjnej pracy urzą‐
222352201-00-122008
dzenia przed instalacją i pierwszym użyciem należy uważnie przeczytać in‐
Page 70

70
Informacje dotyczące bezpieczeństwa
strukcję obsługi, zwracając szczególną uwagę na wskazówki oraz ostrzeżenia.
Wszyscy użytkownicy urządzenia powinni poznać zasady jego bezpiecznej
obsługi. Pozwoli to uniknąć niepotrzebnych pomyłek i wypadków. Prosimy o
zachowanie instrukcji obsługi przez cały czas używania urządzenia oraz prze‐
kazanie jej kolejnemu użytkownikowi w razie odstąpienia lub sprzedaży urzą‐
dzenia.
W celu uniknięcia szkód na zdrowiu i życiu osób oraz szkód materialnych na‐
leży przestrzegać środków ostrożności podanych w niniejszej instrukcji obsłu‐
gi, gdyż producent nie jest odpowiedzialny za szkody spowodowane wskutek
ich nieprzestrzegania.
Bezpieczeństwo dzieci i osób upośledzonych
•
Niniejsze urządzenie nie jest przeznaczone do użytku przez osoby (w tym
dzieci) o ograniczonych zdolnościach fizycznych, sensorycznych czy umy‐
słowych, a także nieposiadające wiedzy lub doświadczenia w użytkowaniu
tego typu urządzeń, chyba, że będą one nadzorowane lub zostaną poin‐
struowane na temat korzystania z tego urządzenia przez osobę odpowie‐
dzialną za ich bezpieczeństwo.
Dzieci należy pilnować, aby mieć pewność, że nie bawią się urządzeniem.
•
Opakowanie należy przechowywać w miejscu niedostępnym dla dzieci. Ist‐
nieje ryzyko uduszenia.
•
W przypadku utylizacji urządzenia należy wyjąć wtyczkę z gniazdka, odciąć
przewód zasilający (jak najbliżej urządzenia) i odkręcić drzwi, aby uchronić
bawiące się dzieci przed porażeniem prądem lub przed zamknięciem się w
środku urządzenia.
•
Jeśli to urządzenie zawierające magnetyczne uszczelnienie drzwi ma za‐
stąpić urządzenie z blokadą sprężynową (ryglem) w drzwiach lub w pokry‐
wie, przed oddaniem starego urządzenia do utylizacji należy usunąć bloka‐
dę. Zapobiegnie to przypadkowemu uwięzieniu dziecka.
Ogólne zasady bezpieczeństwa
UWAGA!
Nie zasłaniać otworów wentylacyjnych.
•
Urządzenie jest przeznaczone do przechowywania żywności i/lub napojów
w zwykłych warunkach domowych zgodnie z opisem zawartym w niniejszej
instrukcji obsługi.
•
Do przyśpieszenia procesu rozmrażania nie wolno używać urządzeń me‐
chanicznych ani żadnych innych sztucznych metod.
•
Nie wolno stosować innych urządzeń elektrycznych (np. maszynek do lo‐
dów) wewnątrz urządzeń chłodniczych, jeśli nie zostały one zaakceptowane
do tego celu do tego celu przez producenta.
•
Należy uważać, aby nie uszkodzić układu chłodniczego.
Page 71

Informacje dotyczące bezpieczeństwa
•
W układzie chłodniczym urządzenia znajduje się czynnik chłodniczy izobu‐
71
tan (R600a), ekologiczny gaz naturalny, lecz łatwopalny.
Należy upewnić się, że podczas transportu i instalacji urządzenia nie zostały
uszkodzone żadne elementy układu chłodniczego.
Jeśli układ chłodniczy został uszkodzony, należy:
– unikać otwartego płomienia oraz innych źródeł zapłonu,
– dokładnie przewietrzyć pomieszczenie, w którym znajduje się urządzenie.
• Zmiany parametrów lub jakiekolwiek modyfikacje urządzenia stanowią po‐
tencjalne zagrożenie. Uszkodzenia przewodu zasilającego mogą spowodo‐
wać zwarcie, pożar i/lub porażenie prądem.
OSTRZEŻENIE!
Wszelkie elementy elektryczne (przewód zasilający, wtyczka, sprężarka) mo‐
gą zostać wymienione wyłącznie przez technika autoryzowanego serwisu lub
w przez wykwalifikowany personel techniczny.
1. Nie wolno przedłużać przewodu zasilającego.
2. Należy upewnić się, że wtyczka przewodu zasilającego nie jest zmiaż‐
dżona ani uszkodzona przez tylną ściankę urządzenia. Zmiażdżona lub
uszkodzona wtyczka może się przegrzewać i spowodować pożar.
3. Należy zapewnić dostęp do wtyczki przewodu zasilającego.
4. Nie wolno ciągnąć za przewód zasilający.
5. Jeżeli gniazdo jest poluzowane, nie wolno podłączać do niego wtyczki
przewodu zasilającego. Występuje niebezpieczeństwo porażenia prą‐
dem lub pożaru.
6.
Nie wolno używać urządzenia bez nałożonej osłony oświetlenia
16)
wew‐
nętrznego.
• Urządzenie jest ciężkie. Przy jego przemieszczaniu należy zachować os‐
trożność.
• Nie wolno usuwać ani dotykać przedmiotów znajdujących się w komorze
zamrażarki wilgotnymi lub mokrymi rękoma, gdyż może to spowodować
uszkodzenie skóry lub odmrożenie.
• Nie należy wystawiać urządzenia na bezpośrednie działanie promieni sło‐
necznych.
Codzienna eksploatacja
• Nie wolno stawiać gorących naczyń na plastikowych elementach urządze‐
nia.
• Nie wolno przechowywać łatwopalnych gazów ani płynów w urządzeniu,
ponieważ mogą spowodować wybuch.
• Należy ściśle stosować się do wskazówek dotyczących przechowywania
podanych przez producenta urządzenia. Patrz odpowiednie instrukcje.
Konserwacja i czyszczenie
• Przed przeprowadzeniem konserwacji należy wyłączyć urządzenie i wyjąć
wtyczkę przewodu zasilającego z gniazdka zasilania. Jeśli nie ma dostępu
do gniazdka zasilania, należy wyłączyć prąd.
16) Jeśli urządzenie posiada osłonę oświetlenia
Page 72

72
Informacje dotyczące bezpieczeństwa
• Nie wolno czyścić urządzenia metalowymi przedmiotami.
• Należy regularnie sprawdzać otwór odpływowy skroplin w chłodziarce. W
razie konieczności należy go wyczyścić. Jeżeli otwór odpływowy jest zablo‐
kowany, woda zacznie się zbierać na dnie chłodziarki.
Instalacja
Podłączenie elektryczne urządzenia należy wykonać zgodnie z wskazówkami
podanymi w odpowiednich rozdziałach.
•
Rozpakować urządzenie i sprawdzić, czy nie jest w żaden sposób uszko‐
dzone. Nie wolno podłączać urządzenia, jeśli jest uszkodzone. Ewentualne
uszkodzenia należy natychmiast zgłosić sprzedawcy. W tym przypadku na‐
leży zachować opakowanie.
•
Zaleca się odczekanie co najmniej czterech godzin przed podłączeniem
urządzenia, aby olej mógł spłynąć z powrotem do sprężarki.
•
Należy zapewnić odpowiednią wentylację ze wszystkich stron urządzenia.
Nieodpowiednia wentylacja prowadzi do jego przegrzewania. Aby uzyskać
wystarczającą wentylację, należy postępować zgodnie z wskazówkami do‐
tyczącymi instalacji.
•
W razie możliwości tylną ściankę urządzenia należy ustawić od ściany, aby
uniknąć dotykania lub chwytania za ciepłe elementy (sprężarka, skraplacz)
i zapobiec ewentualnym oparzeniom.
•
Urządzenia nie wolno umieszczać w pobliżu kaloryferów lub kuchenek.
•
Należy zadbać o to, aby po instalacji urządzenia możliwy był dostęp do
wtyczki sieciowej.
•
Urządzenie można podłączyć wyłącznie do instalacji doprowadzającej wodę
17)
pitną.
Serwis
• Wszelkie prace elektryczne związane z serwisowaniem urządzenia powinny
być przeprowadzone przez wykwalifikowanego elektryka lub inną kompe‐
tentną osobę.
• Naprawy tego produktu muszą być wykonywane w autoryzowanym punkcie
serwisowym. Należy stosować wyłącznie oryginalne części zamienne.
Ochrona środowiska
W obiegu czynnika chłodniczego ani w materiałach izolacyjnych urządzenia
nie ma gazów szkodliwych dla warstwy ozonowej. Urządzenia nie należy wy‐
rzucać wraz z odpadami komunalnymi i śmieciami. Pianka izolacyjna zawiera
łatwopalne gazy: urządzenie należy utylizować zgodnie z obowiązującymi
przepisami, które można uzyskać od władz lokalnych. Należy unikać uszko‐
dzenia układu chłodniczego, szczególnie z tyłu przy wymienniku ciepła. Ma‐
teriały zastosowane w urządzeniu, które są oznaczone symbolem
się do ponownego przetworzenia.
17) Jeśli przewidziane jest podłączenie do sieci wodociągowej
, nadają
Page 73

Panel sterowania
Panel sterowania
1 2 3 4 5 6 7
1.
Lampka kontrolna
2.
Przełącznik ON/OFF
3.
Regulator temperatury (najcieplej)
4.
Wskaźnik temperatury
5.
Regulator temperatury (najzimniej)
6.
Wskaźnik COOLMATIC
7.
Przełącznik COOLMATIC
Włączanie
1.
Podłączyć wtyczkę do gniazdka sieciowego.
2.
Nacisnąć przełącznik ON/OFF.
3.
Lampka kontrolna miga.
Wyłączanie
1. Przytrzymać przełącznik ON/OFF naciśnięty przez ponad 5 sekund.
2. Następnie wyświetli się wskazanie odliczania temperatury w kolejności -3
-2 -1. Po wyświetleniu "1" urządzenie zostaje wyłączone. Wskaźnik tem‐
peratury gaśnie. Lampka kontrolna zgaśnie.
73
Wskaźnik temperatury
Wskaźnik temperatury wyświetla różne informacje:
•
Podczas normalnej pracy wyświetla się bieżąca wartość temperatury w
chłodziarce (temperatura BIEŻĄCA). BIEŻĄCA temperatura jest oznaczona
podświetlonymi liczbami.
•
W trakcie regulacji temperatury wskaźnik temperatury wyświetla obecnie
ustawianą temperaturę (temperaturę ŻĄDANĄ). Temperatura ŻĄDANA jest
oznaczona migającymi liczbami.
Regulacja temperatury
W celu ustawienia temperatury należy postępować w następujący sposób:
1. Ustawić wymaganą temperaturę odpowiednim regulatorem temperatury.
Na wyświetlaczu temperatury natychmiast pojawi się zmieniona wartość
(ŻĄDANA temperatura) i wskaźnik temperatury miga.
2. Po każdym naciśnięciu regulatora temperatury ŻĄDANA temperatura jest
zmieniana o 1°C. ŻĄDANA temperatura zostanie osiągnięta w ciągu 24
godzin.
3. Po ustawieniu wymaganej temperatury i po upływie krótkiej chwili (ok. 5
sekund) wskaźnik temperatury ponownie będzie wyświetlać BIEŻĄCĄ tem ‐
Page 74

74
Panel sterowania
peraturę w odpowiedniej komorze. Wskaźnik temperatury przestanie mi‐
gać i świeci światłem stałym.
Aby zapewnić odpowiednie przechowywanie żywności, należy ustawić nastę‐
pującą temperaturę:
• +5°C w komorze chłodziarki
Sprężarka nie rozpocznie pracy natychmiast po wprowadzeniu opisanej zmia‐
ny, jeśli w danym momencie trwa automatyczne odszranianie. Ponieważ chło‐
dziarka szybko osiąga ustawioną temperaturę przechowywania, artykuły spo‐
żywcze można wkładać natychmiast po jej włączeniu.
COOLMATIC Funkcja
Funkcja COOLMATIC służy do szybkiego schłodzenia większej ilości artyku‐
łów spożywczych w chłodziarce.
Aby włączyć tę funkcję, należy:
1. Nacisnąć przełącznik COOLMATIC .
2. Włączy się wskaźnik COOLMATIC .
3. Automatycznie zostanie wybrane ustawienie ŻĄDANEJ temperatury na
poziomie +2°C.
Aby włączyć tę funkcję, należy:
1. Nacisnąć przełącznik COOLMATIC .
2. Wskaźnik COOLMATIC wyłączy się.
Funkcja COOLMATIC wyłącza się automatycznie po 6 godzinach.
Jeśli włączona jest funkcja COOLMATIC, nie można zmienić ustawienia tem‐
peratury.
Funkcja Wakacje
Funkcja ta pozwala na pracę zamkniętej i pustej chłodziarki przez dłuższy ok‐
res, na przykład podczas wakacji letnich, nie dopuszczając do powstawania
nieprzyjemnego zapachu.
Gdy funkcja Wakacje (Holiday) jest włączona, komora chłodziarki musi być
opróżniona.
Aby włączyć tę funkcję, należy:
1. naciskać ciągle regulator temperatury (najcieplej), aż na wskaźniku tem‐
peratury zostanie wyświetlona litera H (Holiday). Funkcja Wakacje (Holi‐
day) umożliwia ustawienie temperatury na +15°C. Chłodziarka działa w
trybie oszczędzania energii.
Aby wyłączyć tę funkcję, należy:
1. ustawić żądaną temperaturę naciskając regulator temperatury chłodziarki.
Page 75

Pierwsze użycie
Pierwsze użycie
Czyszczenie wnętrza
W celu usunięcia zapachu nowego produktu przed pierwszym uruchomieniem
urządzenia należy wymyć jego wnętrze i znajdujące się w nim elementy letnią
wodą z łagodnym mydłem, a następnie dokładnie je wysuszyć.
Nie należy stosować detergentów ani proszków do szorowania, ponieważ mo‐
gą one uszkodzić powierzchni urządzenia.
Codzienna eksploatacja
Zmiana położenia półek
Ściany komory chłodziarki wyposażono w
kilka prowadnic umożliwiających umie‐
szczenie półek zgodnie z aktualnymi po‐
trzebami.
W celu lepszego wykorzystania miejsca
przednie wąskie półki mogą zostać umie‐
szczone nad tylnymi.
75
Rozmieszczanie wąskich półek na drzwiach
Wąskie półki drzwiowe można umieszczać na różnych wysokościach.
Aby dokonać odpowiedniego ustawienia, należy:
1. podnieść półkę z wąską półką
drzwiową do góry i wyjąć z obsady
w drzwiach
2. wyjąć wspornik mocujący z prowad‐
nicy pod półką
3. Aby włożyć półkę na innej wysokoś‐
ci, należy wykonać te same czyn‐
ności w odwrotnej kolejności.
Page 76

76
Przydatne rady i wskazówki
Kontrola wilgotności
Szklana półka posiada mechanizm ze
szczelinami (regulowanymi dźwigienką),
dzięki któremu można regulować tempera‐
turę w szufladzie na warzywa.
Gdy szczeliny wentylacyjne są zamknięte:
artykuły w szufladzie na warzywa i owoce
dłużej zachowują naturalną wilgotność.
Gdy szczeliny wentylacyjne są otwarte:
większa cyrkulacja powietrza powoduje
obniżenie wilgotności powietrza w komo‐
rze na warzywa i owoce.
Przydatne rady i wskazówki
Wskazówki dotyczące oszczędzania energii
•
Nie otwierać zbyt często drzwi zamrażarki i nie zostawiać ich otwartych dłu‐
żej niż jest to absolutnie konieczne.
•
Jeśli temperatura otoczenia jest wysoka, pokrętło regulacji temperatury jest
ustawione w najwyższej pozycji, urządzenie jest w pełni załadowane sprę‐
żarka będzie pracowała bezustannie, powodując zbieranie się szronu lub
lodu na parowniku. W takim przypadku należy obrócić pokrętło regulacji
temperatury w kierunku niższego ustawienia, aby umożliwić automatyczne
usuwanie szronu i jednocześnie zmniejszyć zużycie energii.
Wskazówki dotyczące przechowywania świeżej żywności
Aby uzyskać najlepsze wyniki:
•
Nie przechowywać w chłodziarce przechowywać ciepłej żywności ani paru‐
jących płynów.
•
Artykuły spożywcze należy przykryć lub owinąć, szczególnie te, które mają
silny zapach.
•
Zapewnić swobodny przepływ powietrza wokół artykułów spożywczych.
Wskazówki dotyczące przechowywania żywności
Przydatne wskazówki:
Mięso (każdy rodzaj): zapakować do polietylenowych worków i umieścić na
szklanej półce nad szufladą na warzywa.
Ze względów bezpieczeństwa można je przechowywać w ten sposób najwyżej
przez jeden lub dwa dni.
Żywność gotowana, potrawy na zimno itp.: należy je przykryć i umieścić na
dowolnej półce.
Owoce i warzywa: należy je dokładnie oczyścić i umieścić w przeznaczonych
dla nich szufladach.
Page 77

Konserwacja i czyszczenie
Masło i ser: należy je umieszczać w specjalnych hermetycznych pojemnikach
lub zapakować w folię aluminiową lub woreczki polietylenowe, aby maksymal‐
nie ograniczyć dostęp powietrza.
Butelki z mlekiem: należy założyć na nie nakrętki i przechowywać na półce na
butelki na drzwiach.
Bananów, ziemniaków, cebuli i czosnku, jeśli nie są zapakowane, nie należy
przechowywać w chłodziarce.
Konserwacja i czyszczenie
UWAGA!
Przed przeprowadzeniem jakichkolwiek prac konserwacyjnych, należy odłą‐
czyć urządzenie od zasilania.
Układ chłodniczy urządzenia zawiera węglowodory. Prace konserwacyjne i
uzupełnianie mogą wykonywać wyłącznie technicy autoryzowanego serwisu.
Okresowe czyszczenie
Urządzenie należy czyścić regularnie:
•
Wnętrze i akcesoria należy czyścić za pomocą ciepłej wody z dodatkiem
łagodnego mydła.
•
Należy regularnie sprawdzać i czyścić uszczelki drzwi.
•
Dokładnie opłukać i wysuszyć.
Nie ciągnąć, nie przesuwać ani nie niszczyć rurek i/lub przewodów umie‐
szczonych w urządzeniu.
Do czyszczenia wnętrza urządzenia nie stosować środków czyszczących,
proszków do szorowania, pachnących środków czyszczących lub wosku do
polerowania, gdyż mogą one uszkodzić powierzchnię i pozostawić silny za‐
pach.
77
Skraplacz (czarna kratka) i sprężarkę z tyłu urządzenia należy wyczyścić za
pomocą szczotki lub odkurzacza. Zwiększy to wydajność urządzenia i zmniej‐
szy zużycie energii elektrycznej.
Należy uważać, aby nie uszkodzić układu chłodniczego.
Niektóre kuchenne środki czyszczące zawierają substancje chemiczne, które
mogą uszkodzić tworzywo zastosowane w urządzeniu. Z tego względu zaleca
się mycie zewnętrznych części urządzenia ciepłą wodą z niewielką ilością pły‐
nu do mycia naczyń.
Po czyszczeniu ponownie podłączyć urządzenie do zasilania.
Rozmrażanie chłodziarki
Za każdym razem przy wyłączeniu silnika sprężarki w czasie normalnego
użytkowania szron jest usuwany automatycznie z parownika komory chło‐
dziarki. Roztopiony szron spływa rynienką do specjalnego pojemnika z tyłu
urządzenia nad sprężarką, gdzie odparowuje.
Page 78

78
Co zrobić, gdy…
Należy pamiętać o okresowym czyszcze‐
niu otworu odpływowego na środku kanału
komory chłodziarki w celu zapobieżenia
przelewaniu się wody i kapaniu na żyw‐
ność. Należy używać specjalnej przetyczki
dostarczanej z urządzeniem, a umieszczo‐
nej w otworze odpływowym.
Okresy przerw w eksploatacji urządzenia
Jeśli urządzenie nie jest używane przez długi czas, należy wykonać następu‐
jące czynności:
•
odłączyć urządzenie od zasilania
•
wyjąć wszystkie artykuły spożywcze
•
rozmrozić
•
pozostawić uchylone drzwi, aby uniknąć powstawania nieprzyjemnych za‐
pachów.
Jeśli urządzenie pozostanie włączone, należy poprosić kogoś o regularne
sprawdzanie, aby uniknąć zepsucia się żywności w przypadku przerwy w za‐
silaniu.
18)
i wyczyścić urządzenie oraz wszystkie elementy
Co zrobić, gdy…
OSTRZEŻENIE!
Przed przystąpieniem do usunięcia problemu należy wyjąć wtyczkę z gniazd‐
ka.
Usuwanie problemów nieuwzględnionych w niniejszej instrukcji można po‐
wierzyć wyłącznie wykwalifikowanemu elektrykowi lub innej kompetentnej
osobie.
Podczas normalnej pracy urządzenia słychać odgłosy pracy urządzenia (sprę‐
żarka, obieg czynnika chłodniczego).
Problem Możliwa przyczyna Rozwiązanie
Urządzenie głośno pra‐
cuje
18) Jeśli przewidziano.
Urządzenie nie jest prawid‐
łowo ustawione
Należy sprawdzić, czy urzą‐
dzenie stoi stabilnie (wszyst‐
kie cztery nóżki powinny stać
na podłodze)
Page 79

Co zrobić, gdy…
Problem Możliwa przyczyna Rozwiązanie
Urządzenie nie działa.
Nie działa oświetlenie.
Wtyczka przewodu zasila‐
Brak zasilania urządzenia.
Nie działa oświetlenie. Żarówka jest uszkodzona. Patrz "Wymiana żarówki".
Sprężarka pracuje bez‐
ustannie.
Drzwi nie są prawidłowo za‐
Drzwi są otwierane zbyt
Temperatura produktów
Temperatura w pomie‐
Sprężarka nie urucha‐
mia się natychmiast po
naciśnięciu przełączni‐
ka COOLMATIC lub
zmianie temperatury.
Po tylnej ściance chło‐
dziarki spływa woda.
Woda spływa do komo‐
ry chłodziarki.
Produkty uniemożliwiają
Nie można ustawić tem‐
peratury.
Urządzenie jest wyłączone. Włączyć urządzenie.
jącego nie jest prawidłowo
umieszczona w gniazdku.
Brak napięcia w gniazdku.
Temperatura nie jest pra‐
widłowo ustawiona.
mknięte.
często.
jest zbyt wysoka.
szczeniu jest zbyt wysoka.
Jest to normalne, nie wystą‐
piła usterka.
Podczas procesu automa‐
tycznego rozmrażania
szron rozmraża się na tylnej
ściance.
Odpływ skroplin jest zatka‐
ny.
spływanie skroplin do ry‐
nienki na tylnej ścianie.
Funkcja COOLMATIC jest
włączona.
Włożyć wtyczkę prawidłowo
do gniazdka.
Podłączyć inne urządzenie
elektryczne do tego gniazd‐
ka.
Skontaktować się z wykwali‐
fikowanym elektrykiem.
Ustawić wyższą temperatu‐
rę.
Patrz "Zamykanie drzwi".
Nie należy pozostawiać
drzwi otwartych dłużej niż to
konieczne.
Pozostawić produkty, aby
ostygły do temperatury poko‐
jowej i dopiero wtedy włożyć
je do urządzenia.
Obniżyć temperaturę w po‐
mieszczeniu.
Sprężarka rozpoczyna pracę
dopiero po pewnym czasie.
Jest to prawidłowe.
Należy wyczyścić odpływ
skroplin.
Upewnić się, że produkty nie
stykają się z tylną ścianką.
Wyłączyć funkcję COOLMA‐
TIC ręcznie lub poczekać z
ustawieniem temperatury do
samoczynnego wyłączenia
funkcji. Patrz "Funkcja
COOLMATIC ".
79
Page 80

80
Co zrobić, gdy…
Problem Możliwa przyczyna Rozwiązanie
Temperatura w urzą‐
dzeniu jest zbyt niska/
wysoka.
Drzwi nie są prawidłowo za‐
Temperatura produktów
Zbyt wiele produktów wło‐
Temperatura w chło‐
dziarce jest zbyt wyso‐
ka.
Wymiana żarówki
1.
Wyłączyć urządzenie.
2.
Nacisnąć tylny zaczep i jednocześ‐
nie przesunąć osłonę oświetlenia w
kierunku wskazanym za pomocą
strzałki.
3.
Wymienić starą żarówkę na nową o
takiej samej mocy (maksymalną
moc podano na kloszu).
4.
Założyć klosz, wsuwając go na
właściwe miejsce.
5.
Włączyć urządzenie.
6.
Otworzyć drzwi. Upewnić się, że oś‐
wietlenie się włącza.
Regulator temperatury nie
jest prawidłowo ustawiony.
mknięte.
jest zbyt wysoka.
żono na raz do przechowa‐
nia.
Brak cyrkulacji zimnego po‐
wietrza w urządzeniu.
Ustawić wyższą/niższą tem‐
peraturę.
Patrz "Zamykanie drzwi".
Pozostawić produkty, aby
ostygły do temperatury poko‐
jowej i dopiero wtedy włożyć
je do urządzenia.
Ograniczyć ilość produktów
wkładanych jednocześnie do
przechowania.
Należy zapewnić cyrkulację
zimnego powietrza w urzą‐
dzeniu.
Zamykanie drzwi
1.
Wyczyścić uszczelki drzwi.
2.
W razie konieczności wyregulować drzwi. Patrz punkt "Instalacja".
3.
W razie konieczności wymienić uszkodzone uszczelki drzwi. W tym celu
skontaktować się z autoryzowanym punktem serwisowym.
Page 81

Dane techniczne
Dane techniczne
Wymiary wnęki
Wysokość 1030 mm
Szerokość 560 mm
Głębokość 550 mm
Dane techniczne podane są na tabliczce znamionowej znajdującej się z lewej
strony wewnątrz urządzenia oraz na etykiecie efektywności energetycznej.
Instalacja
Miejsce instalacji
OSTRZEŻENIE!
W przypadku utylizacji starego urządzenia posiadającego zamek lub rygiel na
drzwiach, należy najpierw go unieszkodliwić, aby dzieci nie mogły zatrzasnąć
się wewnątrz.
Należy pozostawić dostęp do wtyczki przewodu zasilającego po zainstalowa‐
niu urządzenia.
81
Urządzenie należy instalować w miejscu, w którym temperatura otoczenia bę‐
dzie odpowiadać klasie klimatycznej wskazanej na tabliczce znamionowej
urządzenia:
Klasa klimatyczna Temperatura otoczenia
SN +10°C do +32°C
N +16°C do +32°C
ST +16°C do +38°C
T +16°C do +43°C
Wyjmowanie elementów blokady półek
Urządzenie jest wyposażone w blokadę półek, która umożliwia zabezpieczenie
półek podczas transportu.
Aby je zdjąć, należy:
Page 82

82
Instalacja
1.
Przesunąć elementy blokady półek
w kierunku oznaczonym strzałką
A
(A).
2.
Podnieść półkę z tyłu i wypychać ją
do przodu, dopóki nie zostanie
uwolniona (B).
3.
Wyjąć blokady (C).
B
C
Przyłącze elektryczne
Przed podłączeniem urządzenia do sieci elektrycznej należy sprawdzić, czy
napięcie oraz częstotliwość podane na tabliczce znamionowej odpowiadają
parametrom domowej instalacji zasilającej.
Urządzenie musi być uziemione. Wtyczka przewodu zasilającego dołączone‐
go do urządzenia posiada styk uziemiający. Jeśli gniazdko zasilania nie jest
uziemione, urządzenie należy odrębnie uziemić zgodnie z aktualnymi przepi‐
sami, uzgadniając to z wykwalifikowanym elektrykiem.
Producent nie ponosi żadnej odpowiedzialności w przypadku nieprzestrzega‐
nia powyższych wskazówek dotyczących bezpieczeństwa.
Niniejsze urządzenie spełnia wymogi dyrektyw Unii Europejskiej.
Wymagania dotyczące wentylacji
Przepływ powietrza za urządzeniem musi
być wystarczający.
50 mm
min.
200 cm
2
min.
2
200 cm
Page 83

Ochrona środowiska
Ochrona środowiska
Symbol na produkcie lub na opakowaniu oznacza, że tego produktu nie
wolno traktować tak, jak innych odpadów domowych. Należy oddać go do
właściwego punktu skupu surowców wtórnych zajmującego się złomowanym
sprzętem elektrycznym i elektronicznym. Właściwa utylizacja i złomowanie
pomaga w eliminacji niekorzystnego wpływu złomowanych produktów na
środowisko naturalne oraz zdrowie. Aby uzyskać szczegółowe dane
dotyczące możliwości recyklingu niniejszego urządzenia, należy
skontaktować się z lokalnym urzędem miasta, służbami oczyszczania miasta
lub sklepem, w którym produkt został zakupiony.
83
Page 84

www.electrolux.com
U kan toebehoren, verbruiksprodukten en onderdelen bestellen via onze webwinkel op:
www.aeg-electrolux.be
Vous pouvez commander des accessoires, consommables et pièces détachées via notre magasin
online sur:
www.aeg-electrolux.be
www.aeg-electrolux.lu
Voor het on-line bestellen van accessoires, consumables en onderdelen gaat u naar de ’webwinkel’
op:
www.aeg.nl
www.aeg-electrolux.cz
222352201-00-122008
 Loading...