

Page 1

Kühlschränk
Refrigerator
Benutzerinformation
User Manual
SANTO
Page 2

2
Verehrter Kunde!
Vielen Dank, dass Sie sich für eines unserer Qualitätsprodukte entschieden
haben.
Dieses Gerät bietet Ihnen eine perfekte Synthese aus funktionellem Design
und wegweisender Spitzentechnologie.
Überzeugen Sie sich selbst von dem Entwicklungsvorsprung unserer Produkte,
die bei Leistungsfähigkeit und Bedienung eine absolute Spitzenposition einnehmen.
Besonderer Wert wurde zudem auf so wichtige Aspekte wie
Umweltfreundlichkeit und Energieersparnis gelegt, die integraler Bestandteil
aller unserer Produkte sind.
Lesen Sie dieses Bedienhandbuch aufmerksam durch, um Ihr Gerät optimal
und über lange Zeit zuverlässig nutzen und alle Bedienvorgänge korrekt und
Zeit sparend ausführen zu können.
Bewahren Sie das Handbuch zur späteren Bezugnahme an einem sicheren Ort
auf und händigen Sie es im Verkaufsfall dem zukünftigen Besitzer aus.
Wir wünschen Ihnen viel Freude mit Ihrem neuen Gerät.
Folgende Symbolen werden im Text verwendet:
wichtige Hinweise für Ihre Sicherheit oder für die Funktionsfähigkeit des Gerätes
Hinweise und praktische Tipps
Umweltinformationen
Page 3

3
Inhaltsverzeichnis
Sicherheit . . . . . . . . . . . . . . . . . . . . . . . . . . . . . . . . . . . . . . . . . . . . . . . . . . . . 4
Entsorgung . . . . . . . . . . . . . . . . . . . . . . . . . . . . . . . . . . . . . . . . . . . . . . . . . . . 6
Information zur Geräteverpackung / Entsorgung von Altgeräten . . . . . . . . 6
Transportschutz entfernen. . . . . . . . . . . . . . . . . . . . . . . . . . . . . . . . . . . . . . . 7
Aufstellen . . . . . . . . . . . . . . . . . . . . . . . . . . . . . . . . . . . . . . . . . . . . . . . . . . . . 7
Aufstellort . . . . . . . . . . . . . . . . . . . . . . . . . . . . . . . . . . . . . . . . . . . . . . . . . . . . . . 7
Das Kühlgerät braucht Luft / Einbau . . . . . . . . . . . . . . . . . . . . . . . . . . . . . . . . 8
Elektrischer Anschluss. . . . . . . . . . . . . . . . . . . . . . . . . . . . . . . . . . . . . . . . . . . . . 9
Gerätebeschreibung. . . . . . . . . . . . . . . . . . . . . . . . . . . . . . . . . . . . . . . . . . . 10
Geräteansicht. . . . . . . . . . . . . . . . . . . . . . . . . . . . . . . . . . . . . . . . . . . . . . . . . . . 10
Vor Inbetriebnahme . . . . . . . . . . . . . . . . . . . . . . . . . . . . . . . . . . . . . . . . . . . 11
Inbetriebnahme - Temperatur einstellen . . . . . . . . . . . . . . . . . . . . . . . . . . 11
Gerät abschalten . . . . . . . . . . . . . . . . . . . . . . . . . . . . . . . . . . . . . . . . . . . . . 13
Innenaustattung . . . . . . . . . . . . . . . . . . . . . . . . . . . . . . . . . . . . . . . . . . . . . 13
Abstellflächen/Abstellroste . . . . . . . . . . . . . . . . . . . . . . . . . . . . . . . . . . . . . . . 13
Variable Innentür / Flaschenhalter / Feuchteregulierung. . . . . . . . . . . . . . . 14
Variable Ablagebox . . . . . . . . . . . . . . . . . . . . . . . . . . . . . . . . . . . . . . . . . . . . . . 15
Richtig lagern. . . . . . . . . . . . . . . . . . . . . . . . . . . . . . . . . . . . . . . . . . . . . . . . 16
Abtauen . . . . . . . . . . . . . . . . . . . . . . . . . . . . . . . . . . . . . . . . . . . . . . . . . . . . 16
Der Kühlraum taut automatisch ab . . . . . . . . . . . . . . . . . . . . . . . . . . . . . . . . 16
Reinigung und Pflege . . . . . . . . . . . . . . . . . . . . . . . . . . . . . . . . . . . . . . . . . 17
Tipps für Energie-Einsparung . . . . . . . . . . . . . . . . . . . . . . . . . . . . . . . . . . . 18
Was tun, wenn . . .. . . . . . . . . . . . . . . . . . . . . . . . . . . . . . . . . . . . . . . . . . . . 18
Abhilfe bei Störungen . . . . . . . . . . . . . . . . . . . . . . . . . . . . . . . . . . . . . . . . . . . 18
Lampe auswechseln . . . . . . . . . . . . . . . . . . . . . . . . . . . . . . . . . . . . . . . . . . . . . 19
Betriebsgeräusche . . . . . . . . . . . . . . . . . . . . . . . . . . . . . . . . . . . . . . . . . . . . 20
Bestimmungen, Normen, Richtlinien . . . . . . . . . . . . . . . . . . . . . . . . . . . . . 20
Fachbegriffe . . . . . . . . . . . . . . . . . . . . . . . . . . . . . . . . . . . . . . . . . . . . . . . . . 21
Page 4

4
Sicherheit
Die Sicherheit unserer Kältegeräte entspricht den anerkannten Regeln
der Technik und dem Gerätesicherheitsgesetz. Dennoch sehen wir uns
veranlasst, Sie mit folgenden Sicherheitshinweisen vertraut zu machen:
Bestimmungsgemäße Verwendung
• Das Kältegerät ist für die Verwendung im Haushalt bestimmt. Es eignet sich zum Kühlen von Lebensmitteln. Wird das Gerät zweckentfremdet oder falsch bedient, kann vom Hersteller keine Haftung für
eventuelle Schäden übernommen werden.
• Umbauten oder Veränderungen am Kältegerät sind aus Sicherheitsgründen nicht zulässig.
• Sollten Sie das Kältegerät gewerblich oder für andere Zwecke als
zum Tiefkühllagern von Lebensmitteln benutzen, beachten Sie bitte
die für Ihren Bereich gültigen gesetzlichen Bestimmungen.
Vor der ersten Inbetriebnahme
• Überprüfen Sie das Kältegerät auf Transportschäden. Ein beschädigtes Gerät auf keinen Fall anschließen! Wenden Sie sich im Schadensfall bitte an den Lieferanten.
• Prüfen, dass das Gerät nach der Installation nicht auf dem Netzkabel
steht. Wichtig: Beschädigte Versorgungskabel müssen durch ein
Spezialkabel bzw. einen Spezialsatz ersetzt werden, die beim
Hersteller oder den Kundendienststellen erhältlich sind.
Kältemittel
Das Gerät enthält im Kältemittelkreislauf das Kältemittel Isobutan
(R600a), ein Naturgas mit hoher Umweltverträglichkeit, das jedoch
brennbar ist.
• Warnung - Achten Sie beim Transportieren und Aufstellen des
Gerätes darauf, dass keine Teile des Kältemittelkreislaufs beschädigt
werden.
• Bei Beschädigung des Kältemittelkreislaufs:
– offenes Feuer und Zündquellen unbedingt vermeiden;
– den Raum, in dem das Gerät steht, gut durchlüften.
Sicherheit von Kindern
• Verpackungsteile (z. B. Folien, Styropor) können für Kinder gefährlich
sein. Erstickungsgefahr! Verpackungsmaterial von Kindern fernhalten!
Page 5

Sicherheit
5
• Ausgediente Altgeräte bitte vor der Entsorgung unbrauchbar
machen. Netzstecker ziehen, Netzkabel durchtrennen, eventuell vorhandene Schnapp- oder Riegelschlösser entfernen oder zerstören.
Dadurch verhindern Sie, dass sich spielende Kinder im Gerät einsperren (Erstickungsgefahr!) oder in andere lebensgefährliche Situationen
geraten.
• Kinder können Gefahren, die im Umgang mit Haushaltsgeräten liegen, oft nicht erkennen. Sorgen Sie deshalb für die notwendige Aufsicht und lassen Sie Kinder nicht mit dem Gerät spielen!
Im Alltagsbetrieb
• Behälter mit brennbaren Gasen oder Flüssigkeiten können durch Kälteeinwirkung undicht werden. Explosionsgefahr! Lagern Sie keine
Behälter mit brennbaren Stoffen, wie z.B. Spraydosen, FeuerzeugNachfüllkartuschen etc. im Kältegerät.
• Warnung - Keine Elektrogeräte (z. B. elektrische Eismaschinen,
Rührgeräte etc.) im Kältegerät betreiben.
• Warnung - Um die Funktion des Gerätes nicht zu beeinträchtigen,
dürfen die Lüftungsöffnungen der Geräteverkleidungen oder des
Aufbaus von Einbaumöbeln nicht abgedeckt oder zugestellt werden.
• Vor Reinigungsarbeiten das Gerät grundsätzlich abschalten und den
Netzstecker ziehen oder Sicherung in der Wohnung abschalten bzw.
herausdrehen.
• Netzstecker immer am Stecker aus der Steckdose ziehen, nie am
Kabel.
Im Störungsfall
• Sollte einmal eine Störung am Gerät auftreten, sehen Sie bitte zuerst
in dieser Gebrauchsanweisung unter "Was tun, wenn ..." nach. Falls
die dort aufgeführten Hinweise nicht weiterhelfen, führen Sie bitte
keine weiteren Arbeiten selbst aus.
• Kältegeräte dürfen nur von Fachkräften repariert werden. Durch
unsachgemäße Reparaturen können erhebliche Gefahren entstehen.
Wenden Sie sich im Reparaturfall bitte an Ihren Fachhändler oder an
unseren Kundendienst.
Page 6

6
Entsorgung
Information zur Geräteverpackung
Entsorgen Sie das Verpackungsmaterial Ihres Gerätes sachgerecht. Alle
verwendeten Verpackungsmaterialien sind umweltverträglich und wiederverwertbar.
Zu den Werkstoffen: Die Kunststoffe können auch wiederverwertet
werden und sind folgendermaßen gekennzeichnet:
>PE< für Polyäthylen, z. B. bei der äußeren Hülle und den Beuteln im
Innern.
>PS< für geschäumtes Polystyrol, z. B. bei den Polsterteilen, grundsätzlich FCKW-frei.
Die Kartonteile werden aus Altpapier hergestellt und sollten auch wieder zur Altpapiersammlung gegeben werden.
Entsorgung von Altgeräten
Aus Umweltschutzgründen müssen Kältegeräte fachgerecht entsorgt
werden. Dies gilt für Ihr bisheriges Gerät und - nachdem es eines Tages
ausgedient hat - auch für Ihr neues Gerät.
Warnung! Ausgediente Altgeräte bitte vor der Entsorgung unbrauch-
bar machen. Netzstecker ziehen, Netzkabel durchtrennen, eventuell
vorhandene Schnapp- oder Riegelschlösser entfernen oder zerstören.
Dadurch verhindern Sie, dass sich spielende Kinder im Gerät einsperren
(Erstickungsgefahr!) oder in andere lebensgefährliche Situationen geraten.
Entsorgungshinweise:
• Das Gerät darf nicht mit dem Haus- oder Sperrmüll entsorgt werden.
• Der Kältemittelkreislauf, insbesondere der Wärmetauscher an der
Geräterückseite, darf nicht beschädigt werden.
• Das Symbol auf dem Produkt oder seiner Verpackung weist darauf hin, dass dieses Produkt nicht als normaler Haushaltsabfall zu
behandeln ist, sondern an einem Sammelpunkt für das Recycling von
elektrischen und elektronischen Geräten abgegeben werden muss.
Durch Ihren Beitrag zum korrekten Entsorgen dieses Produkts schützen Sie die Umwelt und die Gesundheit Ihrer Mitmenschen. Umwelt
und Gesundheit werden durch falsches Entsorgen gefährdet. Weitere
Informationen über das Recycling dieses Produkts erhalten Sie von
Ihrem Rathaus, Ihrer Müllabfuhr oder dem Geschäft, in dem Sie das
Produkt gekauft haben.
Page 7

7
Aufstellen
Aufstellort
Das Gerät soll in einem gut belüfteten und trockenen Raum stehen.
Die Umgebungstemperatur wirkt sich auf den Stromverbrauch und die
einwandfreie Funktion des Gerätes aus.
Daher sollte das Gerät
– nicht direkter Sonneneinstrahlung ausgesetzt sein;
– nicht an Heizkörpern, neben einem Herd oder sonstigen
Wärmequellen stehen;
– nur an einem Ort stehen, dessen Umgebungstemperatur der Klima-
klasse entspricht, für die das Gerät ausgelegt ist.
Die Klimaklasse finden Sie auf dem Typschild, das sich links im Innenraum des Gerätes befindet.
Nachstehende Tabelle zeigt, welche Umgebungstemperatur welcher
Klimaklasse zugeordnet ist:
Direkter Einbau unter einem Kochfeld ist nicht zulässig. Die teilweise
hohen Abstrahlungstemperaturen des Kochfeldes können das Gerät
beschädigen.
Wird in der Nähe ein Kochfeld eingebaut, sind die zugehörigen Einbauund Schutzvorschriften zu beachten. Durch die Vielzahl der möglichen
Einbausituationen können hier keine detailierten Angaben erfolgen.
Klimaklasse für Umgebungstemperatur von
SN +10 bis +32 °C
N +16 bis +32 °C
ST +18 bis +38 °C
T +18 bis +43 °C
Transportschutz entfernen
Das Gerät sowie Teile der Innenausstattung sind für den Transport
geschützt.
☞
1. Klebebänder links und rechts an den Türaußenseiten abziehen.
2. Alle Klebebänder sowie Polsterteile aus dem Geräteinnenraum entfer-
nen.
Page 8
Aufstellen
8
Das Kältegerät braucht Luft
Integrierbare Modelle (i-Geräte)
Die integrierte Tür des Möbelschrankes
dichtet die Einbaunische weitgehend ab.
Deshalb muss bei i-Geräten die Belüftung
durch die Öffnung im Möbelsockel erfolgen. Die erwärmte Luft muss durch den
Luftschacht an der Rückwand des Möbels
nach oben abziehen können. Die
Lüftungsquerschnitte sollen mindestens
200 cm
2
.
Warnung! Um die Funktion des Gerätes nicht zu beeinträchtigen, dürfen diese Lüftungsöffnungen nicht abgedeckt oder zugestellt werden.
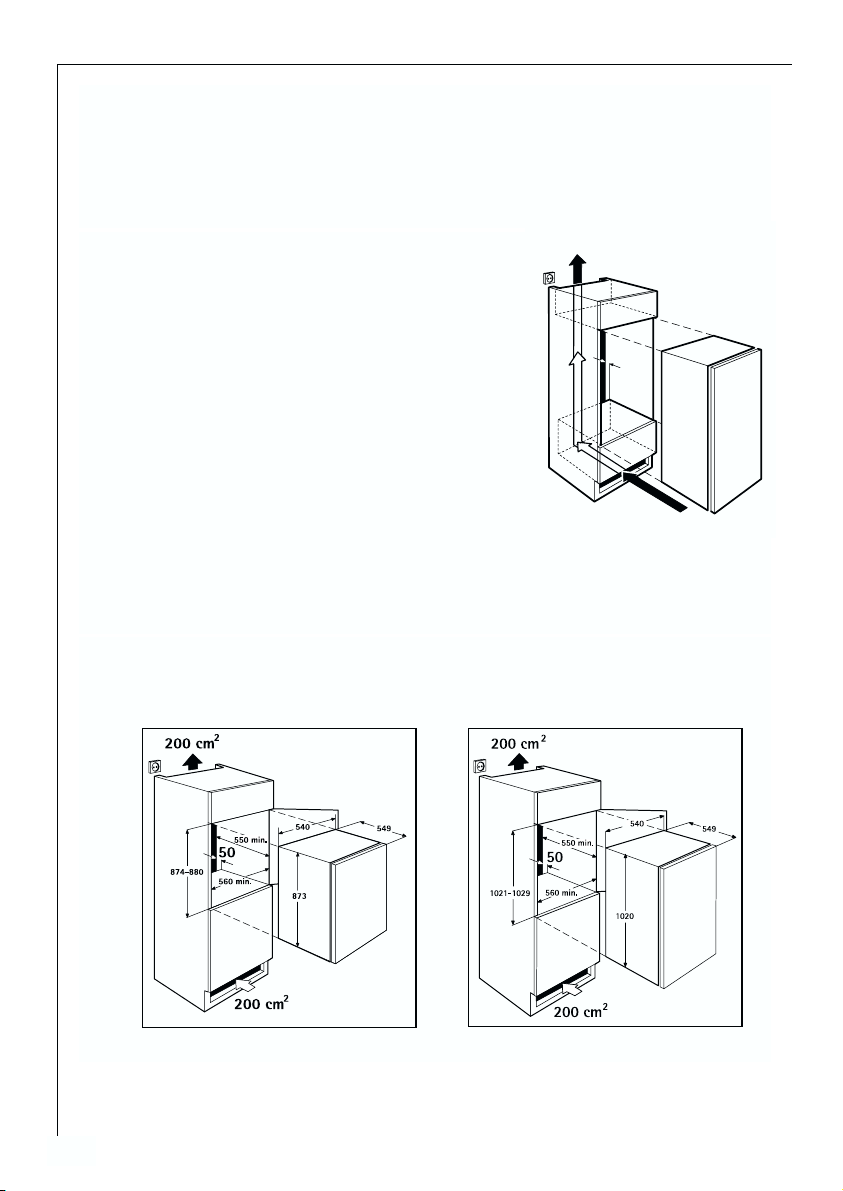
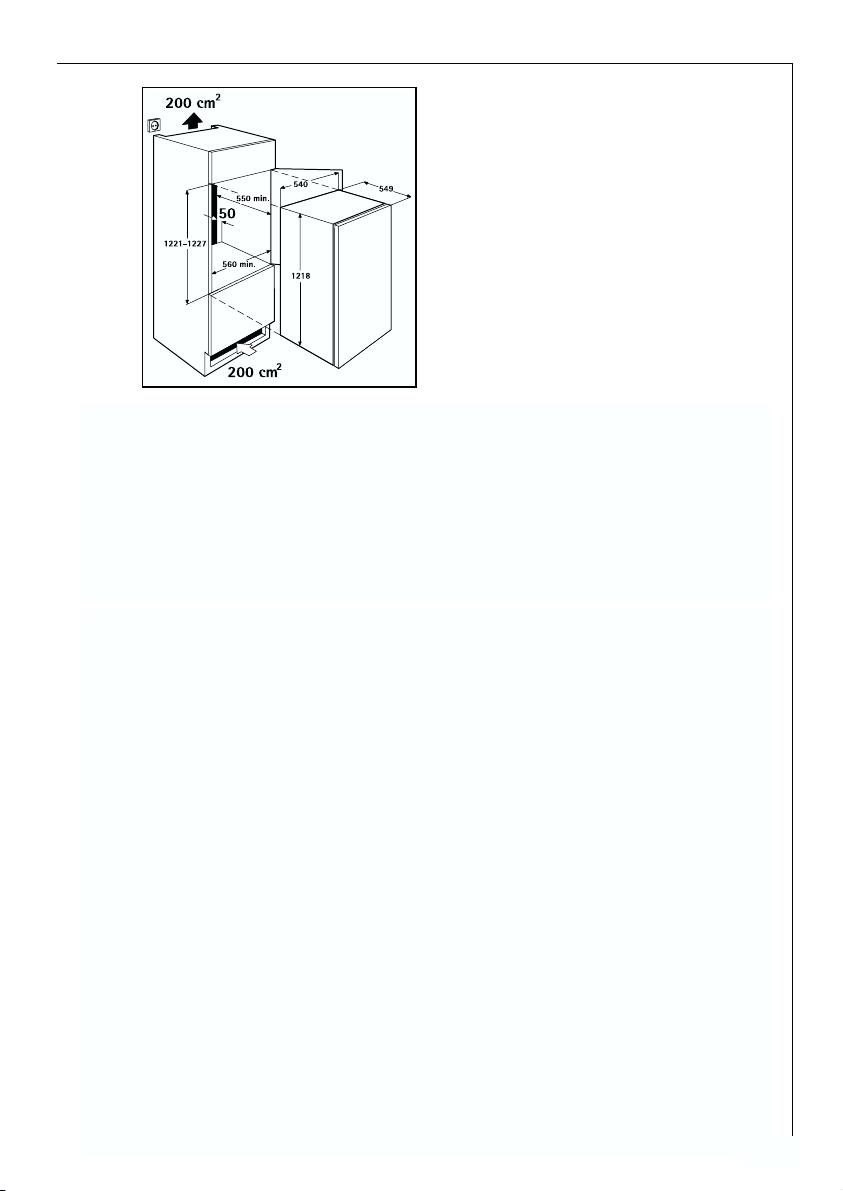
Einbau
Maßzeichnung
Eine Erwärmung des Kältegerätes ist durch ausreichenden Abstand und
Einbringung einer geeigneten Wärmeschutzplatte zu verhindern. Die
ordnungsgemäße Be- und Entlüftung des Kältegerätes muss gewährleistet sein.
min. 200 cm
2
50
min. 200 cm
2
Page 9
Aufstellen
9
Elektrischer Anschluss
Für den elektrischen Anschluss ist eine vorschriftsmäßig installierte
Schutzkontakt-Steckdose erforderlich. Sie sollte so gesetzt sein, dass
ein Ziehen des Netzsteckers möglich ist.
Die zum Anschluss des Gerätes nötige Schutzkontakt-Steckdose sollte
sich links oder rechts neben der Einbaunische befinden.
Die elektrische Absicherung muss mindestens 10/16 Ampere betragen.
Ist die Steckdose bei eingebautem Gerät nicht mehr zugänglich, muss
eine geeignete Maßnahme in der Elektroinstallation sicherstellen, dass
das Gerät vom Netz getrennt werden kann (z. B. Sicherung, LSSchalter, Fehlerstrom-Schutzschalter oder dergleichen mit einer
Kontaktöffnungsweite von min. 3 mm).
☞ Vor Inbetriebnahme am Typschild des Gerätes überprüfen, ob
Anschlussspannung und Stromart mit den Werten des Stromnetzes am
Aufstellort übereinstimmen.
Z. B.: AC 220 ... 240 V 50 Hz oder
220 ... 240 V~ 50 Hz
(d. h. 220 bis 240 Volt Wechselstrom, 50 Hertz)
Das Typschild befindet sich links im Innenraum des Gerätes.
Siehe beiliegende Montageanweisung.
Prüfen Sie bitte nach dem Einbau des Geräts, insbesondere nach
Türanschlagwechsel, ob die Türdichtung ringsum richtig abdichtet. Eine
undichte Türdichtung kann zu verstärkter Reifbildung und dadurch zu
höherem Energieverbrauch führen (siehe auch Abschnitt „Abhilfe bei
Störungen“).
Page 10
10
Gerätebeschreibung
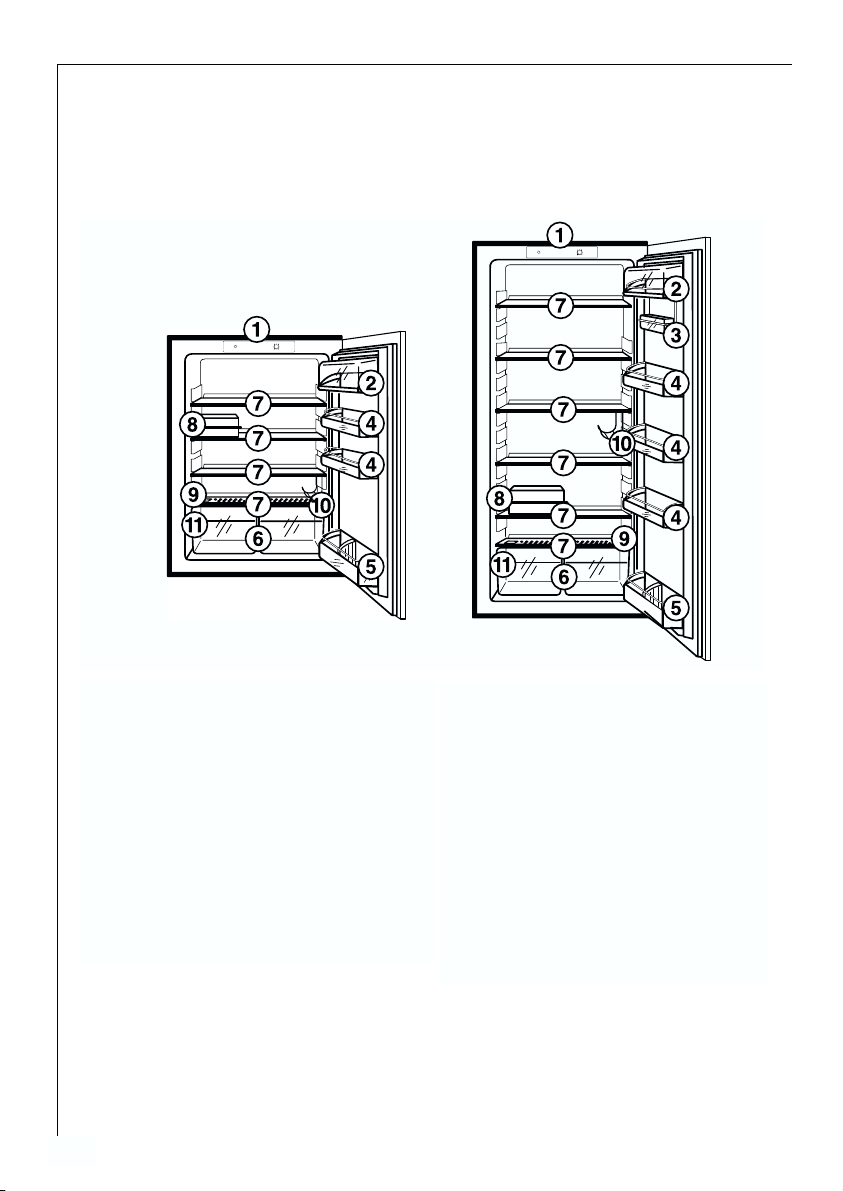
Geräteansicht
(verschiedene Modelle)
1 = Bedienblende
2 = Butter-/Käsefach mit Klappe
3 = Variable Ablagebox (nicht
bei allen Modellen,
Ausführung je nach Modell
unterschiedlich)
4 = Türabstellfächer
5 = Flaschenfach
Flaschenhalter (nicht bei
allen Modellen)
6 = Obst-/Gemüseschalen
7 = Abstellflächen
8 = Allzweckbox (nicht bei allen
Modellen)
9 = Feuchteregulierung (nicht
bei allen Modellen)
10 = Flaschen-/Dosenhalter
(nicht bei allen Modellen)
11 = Typschild
Page 11
11
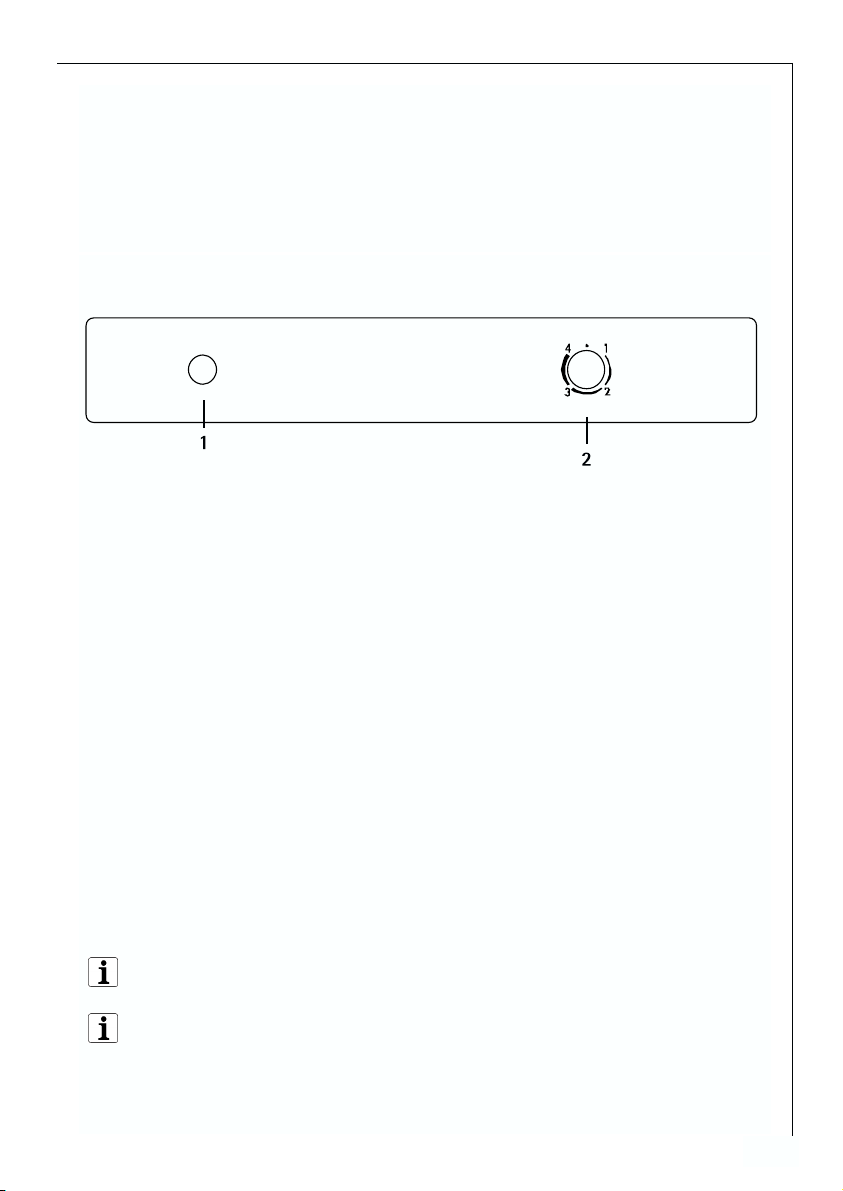
Inbetriebnahme - Temperatur einstellen
1 Lichtschalter
2 Temperaturregler und EIN/AUS-Schalter
Der Temperaturregler befindet sich oben am Gerät auf der
Bedienblende. Er ist zugleich der EIN/AUS-Schalter.
Zum Drehen des Temperaturreglers ist eine Münze erforderlich.
Dadurch wird versehentliches Verstellen der Temperatureinstellung
erschwert (Kindersicherung).
Stellung „0“ = Kühlung aus
Stellung „1“ = wärmste Innentemperatur
Stellung „4“ = kälteste Innentemperatur
☞
1. Netzstecker in die Steckdose stecken.
2. Gewünschte Temperatur durch Drehen des Temperaturreglers einstel-
len. Die Innenbeleuchtung geht an. Der Kompressor startet und läuft
dann automatisch.
Hinweis: Bei Änderung der Einstellung läuft der Kompressor nicht
sofort an, wenn gerade automatisch abgetaut wird.
Da die Lagertemperatur im Kühlraum schnell erreicht wird, können Sie
gleich nach dem Einschalten Kühlgut einlagern.
Aus ernährungswissenschaftlicher Sicht ist +5 °C für den Kühlraum als
ausreichend kalte Lagertemperatur anzusehen.
Folgende Einflüsse sind ausschlaggebend für die Innentemperatur:
– Umgebungstemperatur;
– Menge und Temperatur der eingelagerten Lebensmittel;
Vor Inbetriebnahme
☞
Das Geräteinnere und alle Ausstattungsteile bitte vor
Erstinbetriebnahme reinigen (siehe Abschnitt "Reinigung und Pflege").
Page 12

Inbetriebnahme - Temperatur einstellen
12
– Häufiges oder langes Öffnen der Tür;
– ein Fehler am Gerät.
Deshalb muss die Temperaturregler-Einstellung eventuell den gegebenen Einflüssen angepaßt werden.
Einstellungsempfehlungen:
Beispiele:
Hinweis: Bei Einstellung gemäß Tabelle „Einstellungsempfehlungen“
stellt sich eine mittlere Kühlraumtemperatur von ca. +5°C ein.
Dies gilt für Umgebungstemperaturen von +10°C bis +38°C
3. Falls Sie höhere oder tiefere Temperatur wünschen, drehen Sie den
Temperaturregler auf wärmere bzw. kältere Einstellung.
Wichtig!
Hohe Umgebungstemperatur (z. B. an heißen Sommertagen) und kalte
Einstellung des Temperaturreglers (Stellung „3“ bis „4“) kann zu Dauerbetrieb des Kompressors führen.
Grund: Der Kompressor muss ununterbrochen laufen, um bei hoher
Umgebungstemperatur die tiefe Temperatur im Gerät zu halten. Der
Kühlraum taut dann nicht mehr ab - denn automatisches Abtauen des
Kühlraums ist nur bei stillstehendem Kompressor möglich (siehe auch
Abschnitt „Abtauen“). Starke Reifbildung an der Kühlraumrückwand ist
die Folge.
In diesem Fall den Temperaturregler auf eine wärmere Einstellung
zurückdrehen (Stellung „2“ bis „3“). Bei dieser Einstellung wird der
Kompressor geregelt und der Abtauvorgang wieder automatisch eingeleitet.
Umgebungstemperatur Temperaturregler-Stellung
ca. 10°C Bereich bis 1
ca. 16°C Bereich um 2
ca. 25°C Bereich um 2
ca. 32°C 2 bis 3
ca. 38°C Bereich um 2
Page 13
13
Gerät abschalten
☞
Zum Abschalten der Kühlung Temperaturregler auf Stellung „0“ drehen.
Soll das Gerät für längere Zeit außer Betrieb genommen werden:
☞
1. Kühlgut herausnehmen.
2. Gerät abschalten, dazu Temperaturregler auf Stellung „0“ drehen.
3. Netzstecker ziehen oder Sicherung abschalten bzw. herausdrehen.
4. Gerät gründlich reinigen (siehe Abschnitt "Reinigung und Pflege").
5. Tür anschließend geöffnet lassen, um Geruchsbildung zu vermeiden.
Innenausstattung
Abstellflächen
Je nach Modell ist Ihr Gerät entweder mit Abstellflächen aus Glas oder
mit Abstellrosten ausgestattet.
Die Abstellfläche aus Glas über den Obst- und Gemüseschalen muss
immer in dieser Stellung verbleiben, damit Obst und Gemüse länger
frisch bleiben.
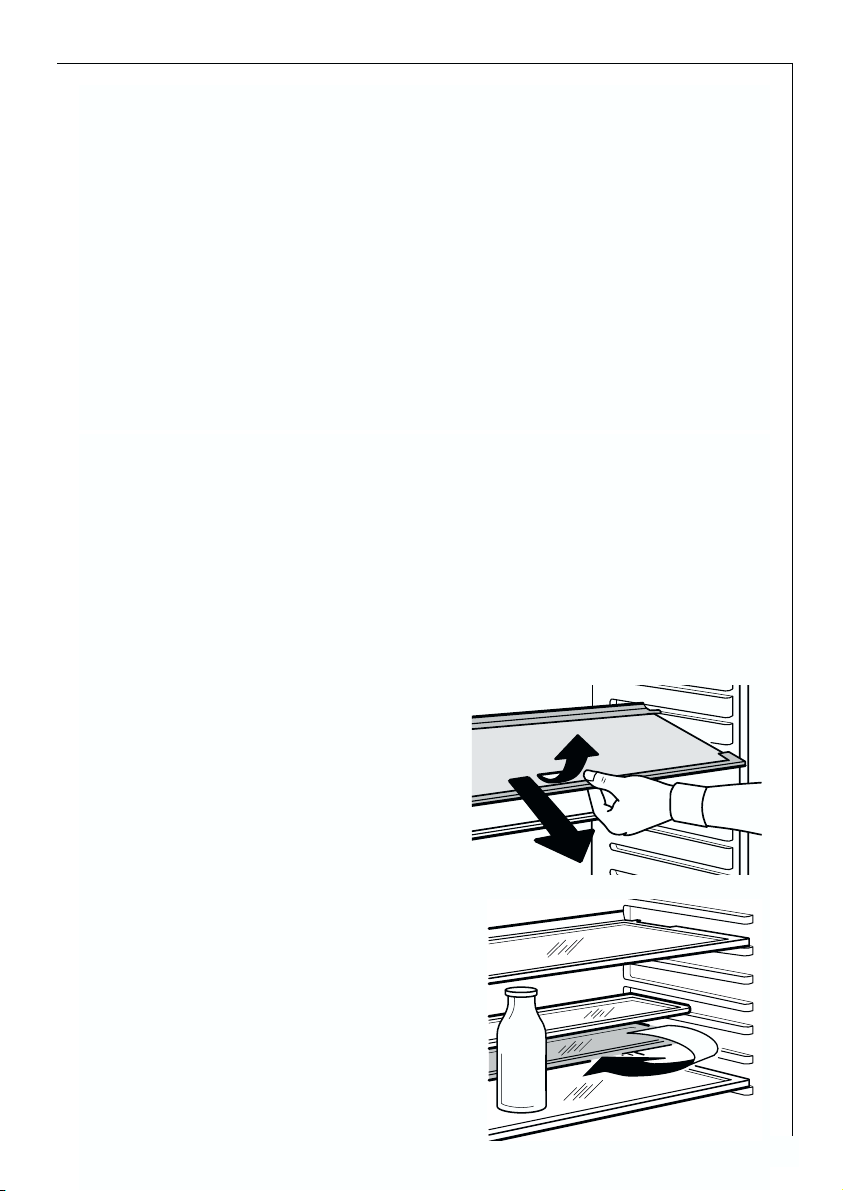
Die übrigen Abstellflächen sind höhenverstellbar:
☞
1. Dazu die Abstellfläche soweit nach
vorne ziehen, bis sie sich nach oben
oder unten abschwenken und herausnehmen lässt.
2. Das Einsetzen in eine andere Höhe
bitte in umgekehrter Reihenfolge
vornehmen.
Hohes Kühlgut einstellen (nicht bei
allen Modellen):
Die vordere Hälfte der zweiteiligen
Glasabstellfläche herausnehmen und in
eine andere Ebene einschieben.
Dadurch gewinnen Sie Raum, um auf
der darunterliegenden Abstellfläche
hohes Kühlgut abzustellen.
☞
Page 14
Innenausstattung
14
Variable Innentür
Je nach Erfordernis können die Türabstellfächer nach oben herausgenommen und in andere Aufnahmen umgesetzt werden.
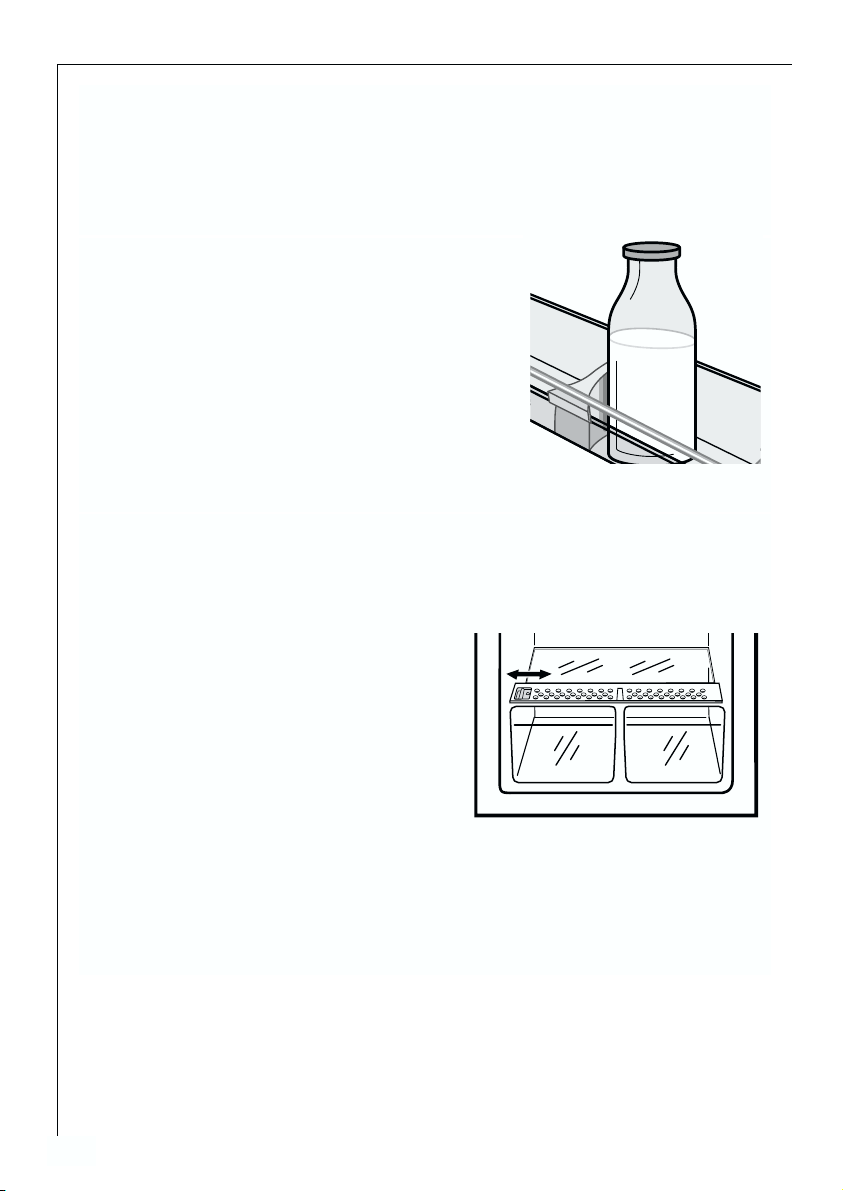
Flaschenhalter (nicht bei allen Modellen)
Bei einigen Modellen ist im Flaschenfach
ein Flaschenhalter eingesetzt. Er dient als
Kippschutz für einzelne Flaschen und ist
seitlich verschiebbar.
Feuchteregulierung (nicht bei allen Modellen)
Vor der Abstellfläche über den Obst- und Gemüseschalen befindet sich
bei einigen Modellen ein verstellbares Lüftungsgitter.
Die Öffnung der Lüftungsschlitze
kann mit einem Schieber stufenlos
reguliert werden.
Schieber rechts: Lüftungsschlitze
geöffnet.
Schieber links: Lüftungsschlitze
geschlossen.
Bei geöffneten Lüftungsschlitzen
stellt sich infolge stärkerer
Luftzirkulation ein niedrigerer Feuchtegehalt der Luft in den Obst- und
Gemüseschalen ein.
Bei geschlossenen Lüftungsschlitzen bleibt der natürliche Feuchtegehalt der Lebensmittel in den Obst- und Gemüseschalen länger erhalten.
Page 15

Innenausstattung
15
Variable Ablagebox
(nicht bei allen Modellen, Ausführung je nach Modell unterschiedlich)
Einige Modelle sind mit einer variablen Ablagebox ausgestattet, die
seitlich verschiebbar unter einem Türabstellfach angebracht ist.
Die Box kann unter jedem Türabstellfach eingesetzt werden.
☞
1. Zum Umsetzen das Abstellfach mit
der Box nach oben aus den
Aufnahmen in der Tür herausheben
und den Haltebügel aus der
Führung unter dem Abstellfach
herausnehmen.
2. Das Einsetzen in eine andere Höhe
bitte in umgekehrter Reihenfolge
vornehmen.
Die variable Box kann auch im
Kühlraum an einer Abstellfläche seitlich eingehängt werden:
☞
1. Dazu die Abstellfläche soweit nach
vorne ziehen, bis sie sich nach oben
oder unten abschwenken und herausnehmen läßt.
2. Den Haltebügel an der Verjüngung der
Abstellfläche einhängen und die
Abstellfläche wieder in die Führungen
einschieben.
Page 16

Abtauen
Der Kühlraum taut automatisch ab
Das Abtauen des Verdampfers in der Rückwand des Kühlraums erfolgt
automatisch.
Das Tauwasser wird in der Ablaufrinne an der Rückwand des Kühlraumes aufgefangen, durch das Ablaufloch in die Auffangschale am Kompressor geleitet und dort verdunstet.
Das Tauwasser-Ablaufloch muss regelmäßig gereinigt werden (siehe
Kapitel „Reinigung und Pflege“).
Richtig lagern
Im Kühlraum ergeben sich, physikalisch
bedingt, unterschiedliche
Temperaturbereiche.
Der kälteste Bereich befindet sich auf
der untersten Abstellfläche über den
Obst- und Gemüseschalen. Wärmere
Bereiche sind die oberen Abstellflächen
und die Abstellfächer an der Tür. An
welcher Stelle im Kühlraum geeignete
Temperaturen für verschiedene Arten
von Lebensmitteln vorliegen, zeigt
nebenstehendes Einordnungsbeispiel.
Tipp: Lebensmittel sollen immer abgedeckt oder verpackt in den Kühlraum,
um Austrocknen und Geruchs- oder
Geschmacksübertragung auf anderes
Kühlgut zu vermeiden.
Zum Verpacken eignen sich:
– Frischhaltebeutel und -folien aus Polyäthylen;
– Kunststoffbehälter mit Deckel;
– Spezielle Hauben aus Kunststoff mit Gummizug;
– Aluminiumfolie.
16
Page 17

17
Reinigung und Pflege
Aus hygienischen Gründen sollte das Geräteinnere, einschließlich
Innenausstattung, regelmäßig gereinigt werden.
Warnung!
• Das Gerät darf während der Reinigung nicht am Stromnetz ange-
schlossen sein. Stromschlaggefahr! Vor Reinigungsarbeiten Gerät
abschalten und Netzstecker ziehen oder Sicherung abschalten bzw.
herausdrehen.
• Das Gerät nie mit Dampfreinigungsgeräten reinigen. Feuchtigkeit
könnte in elektrische Bauteile gelangen, Stromschlaggefahr! Heißer
Dampf kann zu Schäden an Kunststoffteilen führen.
• Das Gerät muss trocken sein, bevor Sie es wieder in Betrieb nehmen.
Achtung!
• Ätherische Öle und organische Lösungsmittel können Kunststoffteile
angreifen, z. B.
– Saft von Zitronen- oder Apfelsinenschalen;
– Buttersäure;
– Reinigungsmittel, die Essigsäure enthalten.
Solche Substanzen nicht mit den Geräteteilen in Kontakt bringen.
• Keine scheuernden Reinigungsmittel verwenden.
☞
1. Kühlgut herausnehmen und abgedeckt an einem kühlen Ort lagern.
2. Gerät abschalten und den Netzstecker ziehen oder Sicherung abschal-
ten bzw. herausdrehen.
3. Entfernen Sie Reif mit einem weichen Kunststoffschaber, z. B. Teigkratzer. Keinesfalls harte oder spitze Gegenstände dazu benutzen.
4. Gerät einschließlich Innenausstattung mit einem Lappen und lauwarmem Wasser reinigen. Eventuell etwas handelsübliches
Geschirrspülmittel beigeben.
5. Anschließend mit klarem Wasser
nachwischen und trockenreiben.
6. Die Ablauföffnung der Tropfrinne an
der Rückwand des Kühlraumes kontrollieren. Bei Verstopfung diese mit
Hilfe des grünen Stöpsels aus dem
Geräte-Beipack frei machen.
7. Nachdem alles trocken ist,
Lebensmittel wieder einlagern und
Gerät wieder in Betrieb nehmen.
Page 18

18
Geräte kühlt zu stark.
Temperatur ist zu kalt eingestellt.
Temperaturtasten vorübergehend auf wärmere
Einstellung drehen.
Was tun, wenn ...
Abhilfe bei Störungen
Möglicherweise handelt es sich bei einer Störung nur um einen kleinen
Fehler, den Sie anhand nachfolgender Hinweise selbst beheben können.
Führen Sie keine weiteren Arbeiten selbst aus, wenn nachstehende
Informationen im konkreten Fall nicht weiterhelfen.
Warnung! Reparaturen am Kältegerät dürfen nur von Fachkräften
durchgeführt werden. Durch unsachgemäße Reparaturen können
erhebliche Gefahren für den Benutzer entstehen. Wenden Sie sich im
Reparaturfall an Ihren Fachhändler oder an unseren Kundendienst.
Störung Mögliche Ursache Abhilfe
Gerät arbeitet nicht.
Gerät ist nicht eingeschaltet.
Netzstecker ist nicht eingesteckt oder lose.
Sicherung hat ausgelöst
oder ist defekt.
Steckdose ist defekt.
Störungen am Stromnetz
behebt Ihr
Elektrofachmann.
Gerät einschalten.
Netzstecker einstecken.
Sicherung überprüfen,
gegebenenfalls erneuern.
Tipps zur Energie-Einsparung
• Das Gerät nicht in der Nähe von Herden, Heizkörpern oder anderen
Wärmequellen aufstellen. Bei hoher Umgebungstemperatur läuft der
Kompressor häufiger und länger.
• Ausreichende Be- und Entlüftung des Gerätes gewährleisten. Lüf-
tungsöffnungen niemals abdecken.
• Keine warmen Speisen in das Gerät stellen. Warme Speisen erst
abkühlen lassen.
• Tür nur so lange wie nötig geöffnet lassen.
• Die Temperatur nicht kälter als nötig einstellen.
Page 19

Was tun, wenn...
19
Die Kühlraum- bzw.
Gefrierfachtemperatur ist
nicht ausreichend.
Temperatur ist nicht richtig eingestellt.
Bitte im Abschnitt “Inbe-
triebnahme” nachsehen.
Tür war längere Zeit geöffnet.
Tür nur so lange wie nötig
geöffnet lassen.
Innerhalb der letzen 24
Std. wurden größere
Mengen warmer
Lebensmittel eingelagert.
Kältere
Temperaturreglerstellung
wählen.
Das Gerät steht neben
einer Wärmequelle.
Bitte im Abschnitt
“Aufstellort” nachsehen.
Lampe ist defekt.
Bitte im Abschnitt “Lampe
auswechseln” nachsehen.
Innenbeleuchtung funktioniert nicht.
Störung Mögliche Ursache Abhilfe
An den undichten Stellen
Türdichtung vorsichtig mit
einem Haartrockner erwär-
men (nicht wärmer als ca.
50°C). Gleichzeitig die
erwärmte Türdichtung von
Hand so in Form ziehen,
dass sie wieder einwandfrei
anliegt.
Türdichtung ist undicht
(evtl. nach Türanschlagwechsel).
Starke Reifbildung im
Gerät, evtl. auch an der
Türdichtung.
Nach Änderung der
Temperatureinstellung
läuft der Kompressor nicht
sofort an.
Dies ist normal, es liegt
keine Störung vor.
Der Kompressor läuft nach
einiger Zeit selbsttätig an.
Tauwasser-Ablaufloch ist
verstopft.
Siehe Abschnitt “Reinigung
und Pflege”.
Wasser am Kühlraumboden
oder auf Abstellflächen.
Lampe auswechseln
Warnung! Stromschlaggefahr! Vor dem Lampenwechsel Gerät abschalten und den Netzstecker ziehen oder Sicherung abschalten bzw. herausdrehen.
Lampendaten: 220-240 V, max. 25 W, Fassung: E 14
☞
1. Zum Abschalten des Gerätes Temperaturregler auf Stellung “O” drehen.
2. Netzstecker ziehen.
Page 20

20
3. Zum Auswechseln der Lampe
Verschluss drücken und gleichzeitig die
Lampenabdeckung in Pfeilrichtung herausnehmen.
4. Defekte Lampe auswechseln.
5. Lampenabdeckung wieder einsetzen.
6. Gerät wieder in Betrieb nehmen.
Betriebsgeräusche
Folgende Geräusche sind charakterstisch für Kältegeräte:
• Klicken
Immer wenn der Kompressor ein- oder ausschaltet, ist ein Klicken zu
hören.
• Summen
Sobald der Kompressor arbeitet, können Sie ihn summen hören.
• Blubbern/Plätschern
Wenn Kältemittel in dünne Rohre einströmt, können Sie ein blubberndes oder plätscherndes Geräusch hören. Auch nach dem
Abschalten des Kompressors ist dieses Geräusch noch kurze Zeit hörbar.
Bestimmungen, Normen, Richtlinien
Das Kältegerät ist für den Haushalt bestimmt und wurde unter
Beachtung der für diese Geräte geltenden Normen hergestellt.
Bei der Fertigung wurden insbesondere die nach dem Gerätesicherheitsgesetz (GSG), der Unfallverhütungsvorschrift für Kälteanlagen
(VBG 20) und den Bestimmungen des Verbandes Deutscher
Elektrotechniker (VDE) notwendigen Maßnahmen getroffen.
Der Kältekreislauf wurde auf Dichtheit geprüft.
Dieses Gerät entspricht den folgenden EG-Richtlinien:
– 73/23/EWG vom 19.2.1973 - Niederspannungsrichtlinie
– 89/336/EWG vom 3.5.1989
(einschließlich Änderungsrichtlinie 92/31/EWG) - EMV-Richtlinie
– 94/2/EG vom 21. 01. 1994 - Richtlinie zur Energieettikettierung
– 96/57 EG vom 3. 9. 1996 - Anforderung im Hinblick auf die Energie-
effizienz von elektrischen Haushaltskühl- und Gefriergeräten und
entsprechenden Kombinationen.
Page 21

21
Fachbegriffe
• Kältemittel
Flüssigkeiten, die zur Kälteerzeugung verwendet werden können,
nennt man Kältemittel. Sie haben einen verhältnismäßig niedrigen
Siedepunkt, so niedrig, dass die Wärme der im Kältegerät lagernden
Lebensmittel das Kältemittel zum Sieden bzw. Verdampfen bringen
kann.
• Kältemittelkreislauf
Geschlossenes Kreislaufsystem, in dem sich das Kältemittel befindet.
Der Kältemittelkreislauf besteht im wesentlichen aus Verdampfer,
Kompressor, Verflüssiger sowie aus Rohrleitungen.
• Verdampfer
Im Verdampfer verdampft das Kältemittel. Wie alle Flüssigkeiten
benötigt Kältemittel zum Verdampfen Wärme. Diese Wärme wird
dem Geräteinnenraum entzogen, der dadurch abkühlt. Deshalb ist
der Verdampfer im Geräteinnenraum angeordnet oder unmittelbar
hinter der Innenwand eingeschäumt und dadurch nicht sichtbar.
• Kompressor
Der Kompressor sieht aus wie eine kleine Tonne. Er wird von einem
eingebauten Elektromotor angetrieben und ist hinten im
Sockelbereich des Gerätes untergebracht. Aufgabe des Kompressors
ist es, dampfförmiges Kältemittel aus dem Verdampfer abzuziehen,
zu verdichten und zum Verflüssiger weiterzuleiten.
• Verflüssiger
Der Verflüssiger hat meist die Form eines Gitters. Im Verflüssiger wird
das vom Kompressor verdichtete Kältemittel verflüssigt. Dabei wird
Wärme frei, die über die Oberfläche des Verflüssigers an die
Umgebungsluft abgegeben wird. Der Verflüssiger ist deshalb außen,
meist an der Geräterückseite angebracht.
Für Deutschland: Sie können Ersatzteile, Zubehör und Pflegemittel online bestellen unter http://www.aeg-hausgeraete.de
Für Österreich: Sie können Ersatzteile, Zubehör und Pflegemittel für Ihr
AEG Gerät über das Internet bestellen.
Ersatzteile Online finden Sie auf unsere Homepage:
http://www.aeg-hausgeraete.at unter der Rubrik “Service”.
Page 22

22
Dear Customer
Thank you for choosing one of our high-quality products.
With this appliance you will experience the perfect combination of functio-
nal design and cutting edge technology.
Convince yourself that our appliances are engineered to deliver the best
performance and control - indeed we are setting the highest standards of
excellence.
In addition to this you find environmental and energy saving aspects as an
integral part of our products.
To ensure optimal and regular performance of your appliance please read this
instruction manual carefully. It will enable you to navigate all processes perfectly and most efficiently.
To refer to this manual any time you need to, we recommend you to keep it
in a safe place. And please pass it to any future owner of the appliance.
We wish you much joy with your new appliance.
The following symbols are used in this manual
Important information concerning your personal safety and information on
how to avoid damaging the appliance
General information and tips
Environmental information
Page 23

23
Contents
Safety . . . . . . . . . . . . . . . . . . . . . . . . . . . . . . . . . . . . . . . . . . . . . . . . . . . . . .24
Disposal . . . . . . . . . . . . . . . . . . . . . . . . . . . . . . . . . . . . . . . . . . . . . . . . . . . .26
Appliance Packaging Information . . . . . . . . . . . . . . . . . . . . . . . . . . . . . . . . .26
Disposal of old Appliances . . . . . . . . . . . . . . . . . . . . . . . . . . . . . . . . . . . . . . .26
Remove transport packaging . . . . . . . . . . . . . . . . . . . . . . . . . . . . . . . . . . .27
Installation . . . . . . . . . . . . . . . . . . . . . . . . . . . . . . . . . . . . . . . . . . . . . . . . .27
Installation Location . . . . . . . . . . . . . . . . . . . . . . . . . . . . . . . . . . . . . . . . . . . .27
Your refrigerator needs ventilation . . . . . . . . . . . . . . . . . . . . . . . . . . . . . . . .28
Installation . . . . . . . . . . . . . . . . . . . . . . . . . . . . . . . . . . . . . . . . . . . . . . . . . . . .28
Electrical connection . . . . . . . . . . . . . . . . . . . . . . . . . . . . . . . . . . . . . . . . . . . .29
Description of the appliance . . . . . . . . . . . . . . . . . . . . . . . . . . . . . . . . . . .30
View of the appliance . . . . . . . . . . . . . . . . . . . . . . . . . . . . . . . . . . . . . . . . . . . .30
Prior to Initial Start–Up . . . . . . . . . . . . . . . . . . . . . . . . . . . . . . . . . . . . . . .31
Starting up and temperature regulation . . . . . . . . . . . . . . . . . . . . . . . . . .31
Switching off the appliance . . . . . . . . . . . . . . . . . . . . . . . . . . . . . . . . . . . .33
Interior Accessories . . . . . . . . . . . . . . . . . . . . . . . . . . . . . . . . . . . . . . . . . .33
Storage shelves . . . . . . . . . . . . . . . . . . . . . . . . . . . . . . . . . . . . . . . . . . . . . . . . .33
Variable Inner Door . . . . . . . . . . . . . . . . . . . . . . . . . . . . . . . . . . . . . . . . . . . . . .34
Bottle Holder . . . . . . . . . . . . . . . . . . . . . . . . . . . . . . . . . . . . . . . . . . . . . . . . . . .34
Humidity Control . . . . . . . . . . . . . . . . . . . . . . . . . . . . . . . . . . . . . . . . . . . . . . . .34
Variable Storage Box . . . . . . . . . . . . . . . . . . . . . . . . . . . . . . . . . . . . . . . . . . . . .35
Correct Storage . . . . . . . . . . . . . . . . . . . . . . . . . . . . . . . . . . . . . . . . . . . . . .36
Defrosting . . . . . . . . . . . . . . . . . . . . . . . . . . . . . . . . . . . . . . . . . . . . . . . . . .36
The fridge defrosts automatically . . . . . . . . . . . . . . . . . . . . . . . . . . . . . . . . . .36
Cleaning and Care . . . . . . . . . . . . . . . . . . . . . . . . . . . . . . . . . . . . . . . . . . . . 37
Energy Saving Tips . . . . . . . . . . . . . . . . . . . . . . . . . . . . . . . . . . . . . . . . . . .38
What to do if ... . . . . . . . . . . . . . . . . . . . . . . . . . . . . . . . . . . . . . . . . . . . . .38
Correcting Malfunctions . . . . . . . . . . . . . . . . . . . . . . . . . . . . . . . . . . . . . . . . .38
Changing the light bulb . . . . . . . . . . . . . . . . . . . . . . . . . . . . . . . . . . . . . . . . .39
Customer Service . . . . . . . . . . . . . . . . . . . . . . . . . . . . . . . . . . . . . . . . . . . .40
Noises during Operation . . . . . . . . . . . . . . . . . . . . . . . . . . . . . . . . . . . . . .41
Regulations, Standards, Guidelines . . . . . . . . . . . . . . . . . . . . . . . . . . . . . .41
Technical terminology . . . . . . . . . . . . . . . . . . . . . . . . . . . . . . . . . . . . . . . .42
Page 24

24
Safety
The safety of our refrigerators/freezers is in accordance with recognised technological standards and appliance safety legislation. We
nevertheless feel that it is important to acquaint you with the following safety guidelines:
Intended use
• The refrigerator is intended for use in the home. It is suitable for the
cooling food. If the appliance is used for purposes other than those
intended or used incorrectly, no liability can be accepted by the
manufacturer for any damage that may be caused.
• Alterations or changes to the refrigerator are not permitted for rea-
sons of safety.
• If you use the refrigerator in a commercial application or for purpo-
ses other than the cooling of foods, the manufacturer accepts no liability for any damages which may occur.
Prior to initial start–up
• Check the appliance for transport damage. Under no circumstance
should a damaged appliance be plugged in. In the event of damage,
please contact your supplier.
• Ensure that the appliance does not stand on the electrical supply
cable. Important: if the supply cable is damaged, it must be replaced
by a special cord or assembly available from the manufacturer or its
Customer Service.
Refrigerant
The refrigerant isobutane (R600a) is contained within the refrigerant
circuit of the appliance, a natural gas with a high level of environmental compatibility, which is nevertheless flammable.
• Warning - During transportation and installation of the appliance,
be certain that none of the components of the refrigerant circuit
become damaged.
• If the refrigerant circuit should become damaged:
– avoid open flames and sources of ignition;
– thoroughly ventilate the room in which the appliance is situated.
Safety of children
• Packaging (e.g. wraps, polystyrene) can be dangerous for children.
There is a risk of suffocation! Keep packaging material away from
children!
Page 25

Safety
25
• Please make old appliances unusable prior to disposal. Pull out the
mains plug, cut off the mains cable, break or remove spring or bolt
catches, if fitted. By doing this you ensure that children cannot lock
themselves in the appliance when playing (there is risk of suffocation!) or get themselves into other dangerous situations.
• Often children cannot recognise the hazards present in household
appliances. It is therefore important that you ensure adequate supervision and never let children play with the appliance!
Daily Operation
• Containers with flammable gases or liquids can leak at low tempera-
tures. There is a risk of an explosion! Do not store any containers
with flammable materials such as spray cans, fire extinguisher refill
cartridges etc in the refrigerator/freezer.
• Warning - Do not operate any electrical appliances in the refrigera-
tor/freezer (e.g. electric ice cream makers, mixers etc.).
• Warning - In order not to impair the function of the appliance,
never cover or obstruct the ventilation openings.
• Warning - Do not damage the cooling circuit.
• Before cleaning the appliance, always switch off the appliance and
unplug it, or disconnect from the electricity supply.
• When unplugging always pull the plug from the mains socket, do not
pull on the cable.
In case of malfunction
• If a malfunction occurs on the appliance, please look first in the
"What to do if ..." section of these instructions. If the information
given there does not help, please do not perform any further repairs
yourself.
• Refrigerators/freezers may only be repaired by qualified service engi-
neers. Improper repairs can give rise to significant hazards. If your
appliance needs repairing, please contact your specialist dealer or
our Customer Service.
Page 26

26
Disposal
Appliance Packaging Information
All materials are environmentally sound! They can be disposed of or
burned at an incinerating plant without danger.
About the materials: The plastics can be recycled and are identified as
follows:
>PE< for polyethylene, e.g. the outer covering and the bags in the
interior.
>PS< for polystyrene foam, e.g. the pads, which are all free of chlorofluorocarbon.
The carton parts are made from recycled paper and should be disposed
of at a waste-paper recycling collection location.
Disposal of old Appliances
For environmental reasons, refrigeration appliances must be disposed
of properly. This applies to your old appliance, and - at the end of its
service life - for your new appliance as well.
Warning! Before disposing of old appliances make them inoperable.
Remove plug from mains, sever the power cable, remove or destroy any
snap or latch closures. This ensures that playing children do not lock
themselves inside the appliance (danger of suffocation!) or place
themselves into other life-endangering situations.
Disposal:
• The appliance may not be disposed of with domestic waste or bulky
refuse.
• The refrigerant circuit, especially the heat exchanger at the back of
the appliance, must not be damaged.
• The symbol on the product or on its packaging indicates that
this product may not be treated as household waste. Instead it shall
be handed over to the applicable collection point for the recycling of
electrical and electronic equipment. By ensuring this product is disposed of correctly, you will help prevent potential negative consequences for the environment and human health, which could otherwise be caused by inappropriate waste handling of this product. For
more detailed information about recycling of this product, please
contact your local city office, your household waste disposal service
or the shop where you purchased the product.
Page 27

27
Remove transport packaging
The appliance and the interior fittings are protected for transport.
☞
1. Pull off the adhesive tape on the left and right side of the door.
2. Remove all adhesive tape and packing pieces from the interior of the
appliance.
Installation
Installation Location
The appliance should be set up in a well ventilated, dry room.
Energy use and efficient performance of the appliance is affected by
the ambient temperature.
The appliance should therefore
– not be exposed to direct sunlight;
– not be installed next to radiators, cookers or other sources of heat;
– only be installed at a location whose ambient temperature
corresponds to the climate classification, for which the appliance is
designed.
The climate classification can be found on the rating plate, which is
located at the left on the inside of the appliance.
The following table shows which ambient temperature is correct for
each climate classification:
Installation directly under a hob is not allowed. The temperatures of
the hob, which in part are quite high, may damage the appliance.
If a hob is installed near the appliance, the corresponding installation
and safety instructions must be adhered to. Considering the numerous
installation conditions which are possible, there is no way of providing
detailed information here.
Climate classification for an ambient temperature of
SN +10 to +32 °C
N +16 to +32 °C
ST +18 to +38 °C
T +18 to +43 °C
Page 28

Installation
28
It is necessary to avoid overheating of the appliance by maintaining
adequate distances from heat sources and by the use of a suitable
thermal insulation plate. Proper ventilation of the appliance must also
be ensured.
Your refrigerator needs ventilation
Integratable models (i-appliances)
The integrated door of the furniture cabinet largely seals the installation recess. iappliances must therefore be provided with
ventilation by having an opening in the
furniture plinth. The warmed air must be
able to be exhausted upwards through the
air shaft on the furniture back.
The ventilation cross-sections should be at
least 200 cm
2
.
Warning - To ensure the appliance func-
tions correctly, never cover or obstruct the
ventilation openings.
Installation
Dimensioned drawings
min. 200 cm
2
50
min. 200 cm
2
Page 29

Installation
29
See installation instructions supplied.
Please check whether, after installing your appliance and especially
after reversing the door, the door seal seals right round. A badly fitting
door seal may lead to heavy frosting and thereby to a higher power
consumption (see also „What to do if...“).
Electrical connection
A correctly installed, earthed socket is required for the electrical supply. The supply must have a fuse rating of at least 10 Amps. If the
socket is not accessible once the appliance is built in, the electrical
installation must include suitable means of isolating the appliance
from the mains (e.g. a fused spur).
Before initial start-up, refer to the appliance rating plate to ascertain
if supply voltage and current values correspond with those of the
mains at the installation location.
e.g.: AC 220 ... 240 V 50 Hz or
220 ... 240 V ~50 Hz
(i.e. 220 to 240 volts alternating current, 50 Hertz)
The rating plate is inside the appliance on the left.
☞
Page 30

30
Description of the appliance
View of the appliance
(various models)
1 = Control panel
2 = Butter/cheese compartment with flap
3 = Variable storage box (not included with all models, design differs
depending on the model)
4 = Door storage compartments
5 = Bottle compartment
Bottle holder (not on all models)
6 = Fruit and vegetable drawers
7 = Storage shelves
8 = General purpose box (not included with all models)
9 = Moisture regulation (not on all models)
10 = Bottle / Can holder (not on all models)
11 = Rating plate
Page 31

31
Prior to Initial Start–Up
Please clean the appliance interior and all accessories prior to initial
start-up (see section: “Cleaning and Care”).
☞
Starting up - Temperature regulation
1 Light switch
2 Temperature regulator and ON/OFF switch
The temperature regulator is located at the top of the appliance on the
control panel. It is also the ON/OFF-switch.
A coin is required to turn the temperature regulator. This makes it is
more difficult to change the temperature setting accidentally (child
protection).
Position „0“ = Refrigeration off
Position „1“ = Warmest interior temperature
Position „4“ = Coldest interior temperature
☞
1. Plug the mains plug into the mains socket.
2. Set the required temperature by turning the temperature regulator.
The inside light goes on. The compressor starts and then runs automatically.
Note: When the setting is changed, the compressor does not start
immediately if automatic defrosting is currently taking place.
Goods to be refrigerated can be loaded immediately after switching
on, because the storage temperature in the refrigerator is quickly
reached.
Note: From a food science point of view, +5 °C should be considered
cold enough as a storage temperature.
Page 32

Starting up - Temperature regulation
32
The following effects are of significance in respect of the interior temperature:
– Ambient temperature;
– Quantity and temperature of the food stored;
– Frequency with which the door is opened and how long it is left
open.
– A defect in the appliance.
The temperature regulator setting may therefore need to be adjusted
to suit the specific conditions.
Recommended settings:
Examples:
Note: At the setting given under the table “Recommended settings”
the fridge has an average temperature of approx. +5°C. These figures
apply at ambient temperatures from +16°C to +38°C.
3. If you want a higher or lower temperature, turn the temperature regulator to a warmer or cooler setting respectively.
Important!
High ambient temperatures (e.g. on hot summer days) and a cold setting on the temperature regulator (position"3" to "4") can cause the
compressor to run continuously.
Reason: when the ambient temperature is high, the compressor must
run continuously to maintain the low temperature in the appliance.
The fridge will not be able to defrost since automatic defrosting of the
fridge is only possible when the compressor is not running (see also
"Defrosting" section). The result is the build up of a thick layer of frost
on the fridge rear wall.
If this happens, turn the temperature regulator back to a warmer setting (position “2” to “3”). At this setting the compressor will be
switched on and off as usual and automatic defrosting recommenced.
Ambient temperature Temperature controller position
Approx. 10°C Range up to 1
Approx. 16°C Range about 2
Approx. 25°C Range about 2
Approx. 32°C 2 to 3
Approx. 38°C Range about 2
Page 33

33
Interior Accessories
Storage Shelves
Various glass or plastic storage shelves and wire trays are included with
your appliance - different models have different combinations.
You should always slide one of the full size glass storage shelves into
the lowest set of guides, above the vegetable drawers, and keep it in
this position.
The height of the storage shelves can
be adjusted:
☞
1. To do this pull the storage shelf forward until it can be swivelled
upwards or downwards and removed.
2. Please do the same in reverse to
insert the shelf at a different height.
(not for all models)
Your appliance is equipped with two
half-size glass storage shelves.
Storing tall items:
Slide the front half of the Vario storage
shelf in another level to the rear.
By this means you will gain space to
place tall items on the storage shelf
below.
☞
☞
Switching off the appliance
☞
1. To switch off the appliance, turn the temperature regulator to position
"0". The inside light goes out.
If the appliance is not going to be used for an extended period:
☞
1. Remove all refrigerated packages.
2. Switch off the appliance by turning the temperature regulator to posi-
tion "0". The inside light goes out.
3. Remove the mains plug or switch off or disconnect from the electricity
supply.
4. Clean thoroughly (see section: “Cleaning and Care”).
5. Leave the door open to avoid the build up of odours.
Page 34

Interior accessories
34
Variable Inner Door
The door compartments can be pulled up and removed, and inserted at
other positions as needed.
Bottle Holder (not on all models)
Some models are equipped with a bottle
holder in the bottle compartment. This is
used to prevent individual bottles from
falling over and can be slid sideways.
Humidity Control (not on all models)
On some models, there is an adjustable air grille in front of the shelf
above the fruit and vegetable compartments.
The opening in the ventilation slots
can be steplessly adjusted with a slider.
Slider in right position: Ventilation
slots opened.
Slider in left position: Ventilation slots closed.
With the ventilation slots open, the stronger air circulation results in a
lower air moisture content in the fruit and vegetable compartments.
When the ventilation slots are closed, the natural moisture content of
the food in the fruit and vegetable compartments is preserved for longer.
Page 35

Interior accessories
35
Variable Storage Box
(not on all models, design differs depending on the model)
Some models are equipped with a variable storage box which is fitted
under a door shelf compartment and can be slid sideways.
The box can be inserted under every door shelf compartment.
☞
1. To change, lift the shelf compartment with the box upwards and
out of the holders in the door and
remove the retaining bracket out
of the guide under the shelf compartment.
2. Please do the same in reverse to
insert the shelf at a different
height.
The variable box can be hung from a storage shelf in the refrigerator
compartment:
☞
1. Pull the storage shelf forward until it can
be tipped up or down and removed.
2. Hang the retaining bracket on the taper
on the storage shelf and slide the storage
shelf back into the guides.
Page 36

Defrosting
The fridge defrosts automatically
The rear wall of the fridge covers with frost when the compressor is
running, and defrosts when the compressor is off.
The water from the thawing frost is collected in the drain channel on
the rear of the fridge, feed through the drain hole into the collector
on the compressor, and then evaporated.
The water drainage hole must be cleaned regularly (see the section
"Cleaning and Maintenance").
36
Correct Storage
For physical reasons, there are different
temperature regions in the fridge. The
coldest region is on the lowest storage
shelf. Warmer regions are the top storage shelf, the vegetable drawer and the
storage compartments on the door.
The arrangement example shows at
which places in the refrigerator suitable
temperatures for various types of foods
exist.
Tip: Food in the fridge should always be
covered or packaged, to prevent drying
and tainting of other food.
The following are suited for packaging:
– Polyethylene airtight bags and wraps;
– Plastic containers with lids;
– Special plastic covers with elastic;
– Aluminium foil.
Page 37

37
Cleaning and Care
For hygienic reasons the appliance interior, including interior accessories, should be cleaned regularly.
Warning!
• The appliance must not be connected to the mains during cleaning.
Danger of electrical shock. Before cleaning switch the appliance off
and remove the plug from the mains, or switch off or disconnect
from the electricity supply.
• Never clean the appliance with a steam cleaner. Moisture could
accumulate in electrical components and there is a danger of an
electrical shock. Hot vapours can lead to the damage of plastic parts.
• The appliance must be dry before it is placed back into service.
Important!
• Ethereal oils and organic solvents can attack plastic parts, e.g.
– lemon juice or the juice from orange peals;
– butyric acid;
– cleansers which contain acetic acid.
Do not allow such substances to come into contact with appliance
parts.
• Do not use any abrasive cleansers.
☞
1. Remove the food from the refrigerator. Store it in a cool place, well
covered.
2. Remove the mains plug or switch off or disconnect from the electricity
supply.
3. Remove frost from time to time with a soft plastic scraper, e.g. a pastry
scraper. Under no circumstances use hard or pointed objects to remove
frost.
4. Clean the appliance and the interior accessories with a cloth and lukewarm water.
5. After cleaning wipe with fresh water
and rub dry.
6. Check the water drain hole on the
rear wall of the fridge.
Clear a blocked drain hole with the
aid of the green peg in the pack of
accessories included with the appliance.
7. After everything is dry reconnect the
appliance to the electricity supply.
Page 38

38
Temperature is set too
cold.
Turn the temperature
regulator to a warmer setting temporarily.
Appliance cools too much.
Energy Saving Tips
• Do not install the appliance near cookers, radiators or other sources
of warmth. High ambient temperatures cause longer, more frequent
operation of the compressor.
• Ensure sufficient air circulation and exhaust at the appliance base
and at the back wall of the appliance. Never cover air vent openings.
• Do not place warm foods into the appliance. Allow warm foods to
cool first.
• Only leave door open as long as necessary.
• Do not set temperature any colder than necessary.
What to do if ...
Correcting Malfunctions
A malfunction may be caused by only a minor fault that you can rectify yourself using the following instructions. Do not perform any other
work on the appliance if the following information does not provide
assistance in your specific case.
Important! Repairs to refrigerators/freezers may only be performed by
competent service engineers. Improper repairs can give rise to significant hazards for the user. If your appliance needs repairing, please
contact your specialist dealer or our local Customer service.
Symptom Possible Cause Remedy
Appliance does not work.
Appliance is not switched
on.
Mains plug is not plugged
in or is loose.
Fuse has blown or is defective
Socket is defective.
Mains malfunctions are to
be corrected by an electrician.
Switch on the appliance.
Insert mains plug.
Check fuse, replace if necessary.
Page 39

What to do if...
39
Symptom Possible Cause Remedy
The food is too warm.
Temperature is not properly adjusted.
Please look in the “Initial
Start Up” section.
Door was open for an
extended period.
A large quantity of warm
food was placed in the
appliance within the last
24 hours.
The appliance is near a
heat source.
Do not leave the door open
any longer than necessary.
Turn the thermostat knob
to a colder setting tem-
porarily.
Please look in the
“Installation location” section.
Light bulb is defective.
Interior lighting does not
work.
Please look in the “Changing
the light bulb” section.
Heavy build up of frost,
possibly also on the door
seal.
Door seal is not airtight
(possibly after reversing
the door).
Carefully warm the leaking
sections of the door seal
with a hair dryer (on a
cool setting). At the same
time shape the warmed
door seal by hand such
that it sits correctly.
The compressor does not
start immediately after
changing the temperature
setting.
This is normal, no error has
occurred.
Water in the bottom of
the cabinet.
Water drain hole is
blocked.
See the “Cleaning and
Care” section.
The compressor starts after
a period of time.
Changing the light bulb
Warning! There is a risk of electric shocks! Before changing the light
bulb, switch off the appliance and unplug it, or disconnect from the
mains supply.
Light bulb data: 220-240 V, max. 25 W
☞
1. To switch off the appliance, turn the thermostat knob to position "0".
2. Unplug the mains plug.
Page 40

40
3. To change the light bulb, press on the
rear hook and at the same time slide
the light bulb cover in the direction
indicated by the arrow.
4. Change the faulty light bulb.
5. Refit the light bulb cover.
6. Put the refrigerator back into opera-
tion.
Customer Service
If you cannot find the remedy for a malfunction in these operating
instructions, please contact your dealer or our customer service
department. Addresses and telephone numbers are listed in the accompanying booklet "Guarantee Conditions/Customer Service Locations".
Selective ordering of replacement parts can save unnecessary travel
and costs. For this reason always provide the following appliance
information:
• Model Name
• Model Number (PNC)
• Serial Number (S-No.)
This information can be found on the serial plate in the interior at the
left of the appliance. We recommend that you enter this information
here, so that it is handy if needed.
Note: The customer bears the costs of unjustified customer service
calls even during the guarantee period.
Page 41

41
Noises during Operation
The following noises are characteristic of refrigeration appliances:
• Clicks
Whenever the compressor switches on or off, a click can be heard.
• Humming
As soon as the compressor is in operation, you can hear it humming.
• Bubbling/Splashing
When refrigerant flows into thin tubes, you can hear bubbling or
splashing noises. Even after the compressor has been switched off,
this noise can be heard for a short time.
Regulations, Standards, Guidelines
This appliance was designed for household use and was manufactured
in accordance with the appropriate standards. The necessary measures
in accordance with appliance safety legislation regulations (GSG), accident prevention regulations for refrigeration appliances (VBG 20) and
the regulations of the German Society of Electrical Engineers (VDE)
were observed in the manufacture of this appliance.
The refrigerant circuit has been checked for leaks.
This appliance is in accordance with the following EU guidelines:
– 73/23/EWG dated 19 February 1973 - low voltage guidelines.
– 89/336/EWG dated 3 May 1989
(including guideline change notice 92/31/EWG) - EMV guideline
– 94/2/EG dated 21.01.1994 - Directive on Energy Labelling
– 96/57 EG dated 3.9.1996 - Energy Efficiency Requirements of
Household Electric Refrigerators, Freezers and Combinations Thereof.
Page 42

42
Technical terminology
• Refrigerant
Liquids that can be used to a generate a cooling effect are known as
refrigerants. They have a relatively low boiling-point, indeed so low,
that the warmth from the food stored in the fridge or freezer can
cause the refrigerant to boil and vaporise.
• Refrigerant Circuit
Closed circulation system that contains the refrigerant. The refriger-
ant circuit comprises primarily of an evaporator, a compressor, a con-
denser and pipe work.
• Evaporator
The refrigerant is evaporated in the evaporator. Similar to all other
liquids, refrigerant requires heat to evaporate. This heat is removed
from the interior of the appliance, as a result the interior is cooled.
The evaporator is therefore located inside the appliance or placed in
foam immediately behind the inner wall and thus not visible.
• Compressor
The compressor looks like a small drum. It is driven by a built-in
electric motor and is mounted on the base of the appliance at the
rear. The task of the compressor is to draw in vaporised refrigerant
from the evaporator, to compress it, and to pass it on to the con-
denser.
• Condenser
The condenser normally has the form of a grid. The refrigerant com-
pressed in the compressor is liquefied in the condenser. During this
process, heat is released to the surrounding air at the surface of the
condenser. The condenser is mounted on the base of the appliance.
Page 43

Page 44

www.electrolux.com
www.aeg-electrolux.de
2222 626-73-00-06102006 Änderungen vorbehalten
Subject to change without notice
 Loading...