

Page 1
Kühl - Gefrierschrank / refrigerateur - congelateur
fridge - freezer / frigorifero - congelatore
GEBRAUCHSANWEISUNGEN
MODE D’EMPLOI
LIBRETTO ISTRUZIONI
INSTRUCTION BOOK
2223 439-02
SK 25511
I
F
D
GB
Page 2

WARNUNGEN UND WICHTIGE HINWEISE
Es ist sehr wichtig, daß diese Bedienungsanleitung mit dem betreffenden Gerät aufbewahrt wird. Sollte
dieses Gerät verkauft bzw. einer anderen Person gegeben werden, so ist es nötig, die Anleitung
beizufügen, damit der neue Besitzer über den Betrieb des Gerätes bzw. die entsprechenden Warnungen.
Sollte dieses Gerät mit Magnet-Türverschluß als Ersatz für ein altes Gerät dienen, das noch mit einem
Schnappschloß ausgerüstet ist, so machen Sie bitte dieses Schloß unbrauchbar, bevor Sie das Gerät
beiseite stellen oder zum Müll geben. Sie verhindern damit, daß spielende Kinder sich selbst einsperren
und damit in Lebensgefahr kommen.
Diese Warnungen wurden zu Ihrem bzw. dem Schutz anderer erarbeitet.Wir bitten Sie daher, diese
aufmerksam zu lesen, bevor das Gerät in Betrieb genommen wird.
Sicherheit
• Das Gerät darf von Kindern und Personen, deren
physische, sensorische oder geistige Fähigkeiten
sowie Mangel an Erfahrung und Kenntnissen
einen sicheren Gebrauch des Gerätes
ausschließen, nur unter Aufsicht oder nach
entsprechender Einweisung durch eine Person
benutzt werden, die sicherstellt, dass sie sich
den Gefahren des Gebrauchs bewusst sind.
Kinder sind zu beaufsichtigen, sodass sie nicht
am Gerät spielen können.
• Es ist gefährlich, die Eigenschaften dieses
Gerätes zu ändern.
• Vor der inneren bzw. äußeren Reinigung des
Gerätes sowie beim Auswechseln der Glühlampe
(bei damit ausgestatteten Geräten) das Gerät
spannungslos machen.
• Eis aus dem Gefrier- bzw. Frosterfach nicht
sofort essen, es könnte Kälte-Brandwunden
verursachen.
• Dieses Gerät ist schwer. Beim Versetzen bitte
darauf achten!
• Beachten Sie, dan während der Bewegung
des Gerätes der Kältemittelkreislauf nicht
beschädigt wird.
• Das Gerät darf nicht in unmittelbarer Nähe
von Heizkörpern oder Gasherden aufgestellt
werden.
• Ein Standort mit direkter Sonneneinstrahlung
sollte vermieden werden.
• Eine ausreichende Luftzirkulation an der
Geräterückseite muß gewährleistet sein.
Jegliche Beschädigung des Kühlkreislaufes
ist zu vermeiden.
• NUR FÜR GEFRIERSCHRÄNKE
(Einbaugeräte ausgenommen): ein optimaler
Aufstellungsort ist der Keller.
• Keine Elektrogeräte (z.B. Eismaschinen) in
das Gerät stellen.
Störungen - Kundendienst
• Sollte die Installation des Gerätes eine Änderung
der elektrischen Hausinstallation verlangen, so
darf diese nur von Elektro-Fachkräften
durchgeführt werden.
• Eventuelle Reparaturen dürfen nur von einem
Kundendienst oder sonstigen autorisierten
Stellen durchgeführt werden.
• Es ist wichtig, daß nur Original-Ersatzteile
verwendet werden.
• Dieses Gerät enthält im Kältekreislauf
Kohlenwasserstoff. Aus diesem Grund darf die
Wartung und das Nachfiillen ausschließlich von
autorisiertem Fachpersonal durchgeführt werden.
• Benutzen Sie nie Metallgegenstände um das
Gerät zu reinigen, da es beschädigt werden
könnte.
• Tritt eine Störung oder ein Defekt ein, versuchen
Sie nicht, das Gerät selbst zu reparieren.
Elektrogeräte dürfen nur von Elektro-Fachkräften
repariert werden, da durch unsachgemäße
Reparaturen erhebliche Folgeschäden entstehen
können. Wenden Sie sich bitte an die nächste
Kundendienststelle.
Aufstellung
• Sich vergewissern, daß das Gerät nach der
Installation nicht auf dem Netzkabel steht.
Wichtig:Beschädigte Versorgungskabel müssen
durch ein Spezialkabel bzw. einen Spezialsatz
ersetzt werden, die beim Hersteller oder den
Kundendienst erhältlich sind.
• Während das Gerät in Betrieb ist, werden der
Verflüssiger und der Kompressor, die sich auf der
Rückseite des Gerätes befinden, heiß. Es ist
darauf zuachten, dass die Luft um das Gerät frei
zirkulieren kann, damit die Wärme abgeführt
werden kann. Eine ungenügende Luftzirkulation
kann einen unregelmässigen Betrieb bzw.
Schäden am Gerät verursachen. Achten Sie auf
die Installationsanweisungen.
• Teile, die heiß werden (z.B. Kompressorgehäuse,
Verflüssiger und zugehörige Rohre), sollen nicht
frei zugänglich sein. Wo es auch immer möglich
ist, soll das Gerät mit der Rückseite gegen eine
Wand gestellt werden.
Während des Transports kann es vorkommen, daß
das im Motorkompressor enthaltene Öl in den
Kältekreislauf abläuft. Man sollte mindestens 2
Std. warten, bevor das Gerät in Betrieb
genommen wird, damit das Öl in den Kompressor
zurückströmen kann.
2
Page 3
3
Gebrauch
• Die Haushaltskühl- und Gefriergeräte sind nur
zur Einlagerung bzw. zum Einfrieren von
Nahrungsmitteln bestimmt.
• Die beste Leistung erzielt man bei
Raumtemperaturen von +18°C bis +43°C (Klasse
T); +18°C bis +38°C (Klasse ST); +16°C bis
+32°C (Klasse N); +10°C bis +32°C (Klasse SN);
die Geräteklasse ist auf dem Typschild
angegeben.
Zu beachten: Wird dieses Gerätes bei anderen
Umgebungstemperaturen betrieben als den in
der entsprechenden Klimaklasse angegebenen
Werten, sind folgende Hinweise zu beachten:
sinkt die Umgebungstemperatur unter den
angegebenen Mindestwert ab, könnte die
Lagertemperatur im Gefrierabteil nicht mehr
garantiert sein; es wird daher empfohlen, die
eingelagerten Lebensmittel so rasch als möglich
zu verbrauchen.
• Einaufgetautes Produkt darf nicht wieder
eingefroren werden.
• Für das Aufbewahren bzw. das Einfrieren der
Lebensmittel sind die Anweisungen des
Herstellers zu befolgen.
• In allen Kühl- und Gefriergeräten bedecken sich
im Laufe der Zeit alle kälteführenden Teile mit
einer Reif bzw. Eissicht. Diese Schicht wird je
nach Modell automatisch oder mit der Hand
abgetaut.
• Die Reifsicht niemals mit Metallgegenständen
abkratzen, das Gerät könnte beschädigt werden.
Dazu nur einen Plastikschaber verwenden.
• Zum Lösen der festgefrorenen Eisschalen keine
scharfkantigen oder spitzn Gegenstände
benutzen.
• Es sollten keine kohlensäurehaltigen Getränke in
das Gefrier- bzw. Frosterfach eingestellt werden,
sie könnten platzen.
Umweltnormen
Dieses Gerät enthält im Kühlkreislauf und in der
Isolierung kein ozonschädigendes Gas. Das
Gerät darf nicht mit dem Hausmüll entsorgt
werden. Eine Beschädigung des
Kältemittelkreislaufs, insbesondere des
Wärmetauschers auf der Rückseite des Gerätes,
muß verhindert werden. Auskunft über
Abholtermine oder Sammelplätze gibt die
örtliche Gemeindeverwaltung an. Die in diesem
Gerät verwendeten und mit dem Symbol
gekennzeichneten Materialien,sind
recyclingfähig.
Entsorgung von Altgeräten
Das Symbol auf dem Produkt oder seiner
Verpackung weist darauf hin, dass dieses Produkt
nicht als normaler Haushaltsabfall zu behandeln ist,
sondern an einem Sammelpunkt für das Recycling
von elektrischen und elektronischen Geräten
abgegeben werden muss. Durch Ihren Beitrag zum
korrekten Entsorgen dieses Produkts schützen Sie
die Umwelt und die Gesundheit Ihrer Mitmenschen.
Umwelt und Gesundheit werden durch falsches
Entsorgen gefährdet. Weitere Informationen über
das Recycling dieses Produkts erhalten Sie von
Ihrem Rathaus, Ihrer Müllabfuhr oder dem Geschäft,
in dem Sie das Produkt gekauft haben.
HINWEISE ZUR VERPACKUNGSENTSORGUNG
Verpackungen und Packhilfsmittel unserer ElektroGroßgeräte sind mit Ausnahme von Holzwerkstoffen
recyclingfähig und sollen grundsätzlich der
Wiederverwertung zugeführt werden.
Wir empfehlen Ihnen:
• Papier-, Pappe- und Wellpappeverpackungen
sollten in die entsprechenden Sammelbehälter
gegeben werden.
• Kunststoffverpackungsteile sollten ebenfalls in
die dafür vorgesehenen Sammelbehälter
gegeben werden. Solange solche in Ihrem
Wohngebiet noch nicht vorhanden sind, können
Sie diese Materialien zum Hausmüll geben.
Als Packhilfsmittel sind bei uns nur recyclingfähige
Kunststoffe zugelassen, z.B.:
In den Beispielen steht
PE für Polyäthylen** 02 = ^ PE-HD; 04 = ^ PE-LD
PP für Polypropylen
PS für Polystyrol
BESTANDTEILE AUS PLASTIK
Zur einfacheren Entsorgung und/oder Recycling ist
ein Großteil der Materialien dieses Gerätes
gekennzeichnet, um ihre Identifizierung zu
ermöglichen.
02**
PE
05
PP
06
PS
PS
SAN
ABS
Page 4

4
INHALT
Warnungen und wichtige Hinweise . . . . . . . . . . . . . . . . . . . . . . . . . . . . . . . . . . . . . . . . . . . . . . . . . . . . . . . .02
Hinweise zur Verpackungsentsorgung . . . . . . . . . . . . . . . . . . . . . . . . . . . . . . . . . . . . . . . . . . . . . . . . . . . . .03
Gebrauch / Reinigung der Innenteile - Inbetriebnahme - Temperaturregelung - Hinweise zum richtigen . . . .
Kühlen von Lebensmitteln und Getränken - Einfrieren von frischen Lebensmitteln - Aufbewahrung der . . . . .
Tiefkühlkost - Auftauen - Eiswürfelbereitung . . . . . . . . . . . . . . . . . . . . . . . . . . . . . . . . . . . . . . . . . . . . . . . . . . .05
Gebrauch / Höhenverstellbare Abstellregale - Höhenverstellung der Innentürablagen . . . . . . . . . . . . . . . . . . . .06
Tips - Tips für das Kühlen - Tips für das Einfrieren - Tips für Tiefkühlkost . . . . . . . . . . . . . . . . . . . . . . . . . . . .07
Wartung / Regelmäßige Reinigung - Stillstandszeiten - Innenbeleuchtung . . . . . . . . . . . . . . . . . . . . . . . . . . .08
Wartung / Abtauen - Störungen . . . . . . . . . . . . . . . . . . . . . . . . . . . . . . . . . . . . . . . . . . . . . . . . . . . . . . . . . . . .09
Installation / Aufstellung . . . . . . . . . . . . . . . . . . . . . . . . . . . . . . . . . . . . . . . . . . . . . . . . . . . . . . . . . . . . . . . . .10
Installation / Elektrischer Anschluß - Hintere Abstandsstücke . . . . . . . . . . . . . . . . . . . . . . . . . . . . . . . . . . . . .11
Installation / Türanschlag wechseln . . . . . . . . . . . . . . . . . . . . . . . . . . . . . . . . . . . . . . . . . . . . . . . . . . . . . . . . .12
Installation / Abschlangwechsel Verdampferfachtür . . . . . . . . . . . . . . . . . . . . . . . . . . . . . . . . . . . . . . . . . . . . .13
Page 5

5
Reinigung der Innenteile
Bevor Sie das Gerät in Betrieb nehmen, beseitigen
Sie den typischen «Neugeruch» am besten durch
Auswaschen der Innenteile mit lauwarmem Wasser
und einem neutralen Reinigungsmittel Sorgfältig
nachtrocknen.
Bitte keine Reinigungs- bzw. Scheuermittel
verwenden, die das Gerät beschädigen könnten.
Temperaturregelung
Die Temperatur wird automatisch geregelt und kann
erhöht werden (wärmer) durch Drehen des Thermostatknopfes auf niedrigere Einstellungen oder verringert (kälter) durch das Drehen auf höhere Zahlen.
Die richtige Einstellung erhält man, unter
Berücksichtigung folgender, die Innentemperatur
beeinflussender Faktoren:
• Raumtemperatur,
• Häufigkeit des Türöffnens,
• Menge der eingelagerten Lebensmittel,
• Aufstellung des Gerätes.
Die mittlere Einstellung ist meistens die
geeignetste.
Wichtig
Höchste Kälteeinstellung bei hoher Raumtemperatur und erheblicher Lebensmittelmenge kann
fortdauernden Kühlschrank-Betrieb verursachen, dabei kann sich eine Reif- oder Eisschicht an
der hinteren Innenwand bilden. In diesem Falle
den Thermostatknopf auf wärmere Temperaturen
stellen, damit das automatische Abtauen, mit
folglich geringerem Stromverbrauch,
gewährleistet werden kann.
GEBRAUCH
Inbetriebnahme
Netzstecker in die Steckdose einstecken.
Kühlschranktür öffnen und Thermostatknopf von der
Stellung “0” (STOP) aus im Uhrzeigesinn drehen.
Den Stillstand erhält man durch Drehen des
Thermostatknopfes auf Stellung «O».
Hinweise zum richtigen Kühlen
von Lebensmitteln und Getränken
Um die besten Leistungen des Kühlschrankes zu
erreichen, beachten Sie bitte folgendes:
• Keine warmen Speisen oder dampfenden
Flüssigkeiten in den Kühlschrank einstellen.
Einfrieren von frischen Lebensmitteln
Für das Einfrieren von Lebensmitteln ist es nicht
nötig, die Thermostateinstellung zu ändern. Wünscht
man aber ein rasches Einfrieren, so muß der
Thermostatknopf auf die höchste Stellung gedreht
werden. Sollte jedoch bei dieser Einstellung die
Temperatur im Kühlraum unter 0°C sinken, so muß
eine niedrigere Reglerstellung gewählt werden.
Aufbewahrung der Tiefkühlkost
Nach einem längeren Stillstand oder bei der ersten
Inbetriebnahme des Gerätes muß vor der
Einlagerung der Tiefkühlkost die höchste Stellung
des Thermostatknopfes gewählt werden. Nach ca. 2
Stunden kann dieser auf eine mittlere Stellung
zurückgedreht werden.
Wichtig
Unbeabsichtigt aufgetaute Lebensmittel,
beispielsweise wegen Stromausfall, müssen,
wenn der Betrieb für länger als die in der Tabelle
technische Daten unter der Position „Lagerzeit
bei Störung“ angegebene Dauer unterbrochen
ist, kurzfristig verbraucht oder sofort gekocht
und erneut eingefroren werden (nach
Abkühlung).
• Geruchverbreitende Lebensmittel müssen
abgedeckt oder eingewickelt werden.
• Die Lebensmittel müssen so eingelagert werden,
daß die Kälte um sie frei zirkulieren kann.
Auftauen
Die eingefrorenen oder tiefgekühlten Lebensmittel
sollten vor dem Gebrauch aufgetaut werden, indem
man sie am besten im Kühlabteil oder je nach der
zur Verfügung stehenden Zeit bei Raumtemperatur
auftaut. Kleine Stücke können eingefroren gekocht
werden. Selbstverständlich verlängert sich dabei die
Kochzeit.
Eiswürfelbereitung
Das Gerät hat eine oder mehrere Eiswürfelschalen,
welche mit Wasser aufgefüllt in das Gefrierfach
gestellt werden.
Bitte zur Entnahme der Eiswürfelschalen keine
Metallgegenstände benutzen!
Page 6

6
Höhenverstellbare Abstellregale
Der Abstand zwischen den verschiedenen
Abstellregalen kann je nach Wunsch geändert
werden. Dazu die Regale herausnehmen und auf
das gewünschte Niveau einsetzen.
Höhenverstellung der
Innentürablagen
Zur Einlagerung von Lebensmittel-Packungen
verschiedener Größe, sind die Abstellregale der
Innentür höhenverstellbar.
Hierzu wie folgt vorgehen:
das Abstellregal stufenweise in Pfeilrichtung drücken
bis es frei wird; dann in der gewünschten Höhe
wieder anbringen.
D338
Page 7

7
Tips für das Einfrieren
Für ein einwandfreies Einfrieren der Lebensmittel
geben wir folgende Ratschläge:
• Das Gefriervermögen des Gefrierabteils (in 24
Std.) kann auf dem Typenschild abgelesen
werden.
• Der Gefriervorgang dauert ca. 24 Stunden. In
dieser Zeit sollte keine zusätzliche Ware in das
Gefrierabteil eingelegt werden.
• Nur erstklassige, frische und gut gesäuberte
Produkte einfrieren.
• Die Nahrungsmittel vor dem Einfrieren in kleine
Portionen einteilen, damit der Gefriervorgang
beschleunigt wird; dies ermöglicht das spätere
Auftauen von kleineren Portionen.
• Die Lebensmittel in Alu- oder Polyäthylenfolien
luftdicht verpacken.
• Es soll vermieden werden, daß die
einzufrierenden Lebensmittel mit den bereits
eingefrorenen in Berührung kommen, um eine
Wärmeübertragung an diese zu verhindern.
• Es ist zu beachten, daß mageres Fleisch besser
und länger haltbar ist. Fetthaltiges Fleisch hat
eine geringere Lagerzeit. Ferner reduziert Salz
die Haltbarkeitsdauer.
TIPS
Tips für das Kühlen
Nachstehend einige praktische Ratschläge:
Fleisch (alle Sorten) in Plastikfolie einpacken und
auf die Glasplatte, die sich über der Gemüseschale
(über den Gemüseschalen) befindet, legen.
In dieser Lage kann das Fleisch längstens 1-2
Tage aufbewahrt werden.
Gekochte Nahrungsmittel, kalte Platten, usw.
zugedeckt aufbewahren. Sie können auf jeden
beliebigen Rost gelegt werden.
Obst und Gemüse: nach vorherigem Säubern und
Waschen in der Gemüseschale (in den
Gemüseschalen) aufbewahren.
Butter und Käse: in speziellen Behältern aufbewahren oder in Alu- bzw. Plastikfolie einpacken, um
den Kontakt mit der Luft zu vermeiden.
Milch in Flaschen: gut verschlossen auf die Konsol
der Innentür stellen.
Wenn Bananen, Kartoffeln, Zwiebeln und
Knoblauch nicht verpackt sind, sollen sie nicht
in den Kühlschrank gegeben werden.
• Speiseeis, direkt aus dem Gefrierfach
genommen, kann Kälte-Brandwunden
verursachen.
• Es ist empfehlenswert, auf der Verpackung das
Einfrierdatum zu notieren, damit die
Aufbewahrungszeit eingehalten werden kann.
• Es sollten keine kohlensäurehaltigen
Getränke in das Gefrierfach eingestellt
werden, da sie explodieren können.
Tips für Tiefkühlkost
Um optimale Leistungen des Gerätes zu erhalten,
sich vergewissern,
• daß die Tiefkühlkost beim Verkäufer gut
aufbewahrt wurde
• daß der Transport vom Verkäufer zum
Verbraucher in kurzer Zeit erfolgt.
• Tür so wenig wie möglich öffnen und nicht offen
lassen.
• Einmal aufgetaute Lebensmittel verderben
schnell und können kein ein zweites Mal
eingefroren werden.
• Das Haltbarkeitsdatum auf der
Tiefkühlkostverpackung sollte nicht überschritten
werden.
Page 8
8
WARTUNG
Vor jeder Reinigungsarbeit immer den
Netzstecker aus der Steckdose ziehen.
Achtung
Dieses Gerät enthält im Kältekreislauf Kohlenwasserstoff. Aus diesem Grund darf die Wartung
und das Nachfüllen aussschließlich von
autorisiertem Fachpersonal durchgeführt werden.
Regelmäßige Reinigung
Benutzen Sie nie Metallgegenstände um das Gerät
zu reinigen, da es beschädigt werden könnte.
Den Innenraum mit lauwarmem Wasser und Natron
und die lackierten Teile mit einem Poliermittel
reinigen.
Gut nachwaschen und sorgfältig trocknen.
Den Kondensator und den Motorkompressor mit
einer Bürste oder einem Staubsauger reinigen. Dies
begünstigt den guten Betrieb mit folglicher
Stromersparnis.
Viele spezifisch für die Reinigung von
Küchenoberflächen erhältliche Mittel enthalten
chemische Substanzen, die die Kunststoffteile
dieses Geräts angreifen bzw. beschädigen
können. Aus diesem Grund ist es
empfehlenswert, das Gerät außen nur mit
warmem Wasser und etwas flüssigem
Tellerspülmittel zu reinigen.
Stillstandszeiten
Bei längerem Stillstand des Gerätes, müssen Sie
folgendermaßen vorgehen:
den Stecker aus der Steckdose ziehen;
alle Lebensmittel herausnehmen;
Gerät abtauen, Innenraum und Zubehörteile
reinigen; die Türen offen lassen, um im Innern eine
gute Luftzirkulation zu gewährleisten und somit
Geruchsbildung zu vermeiden.
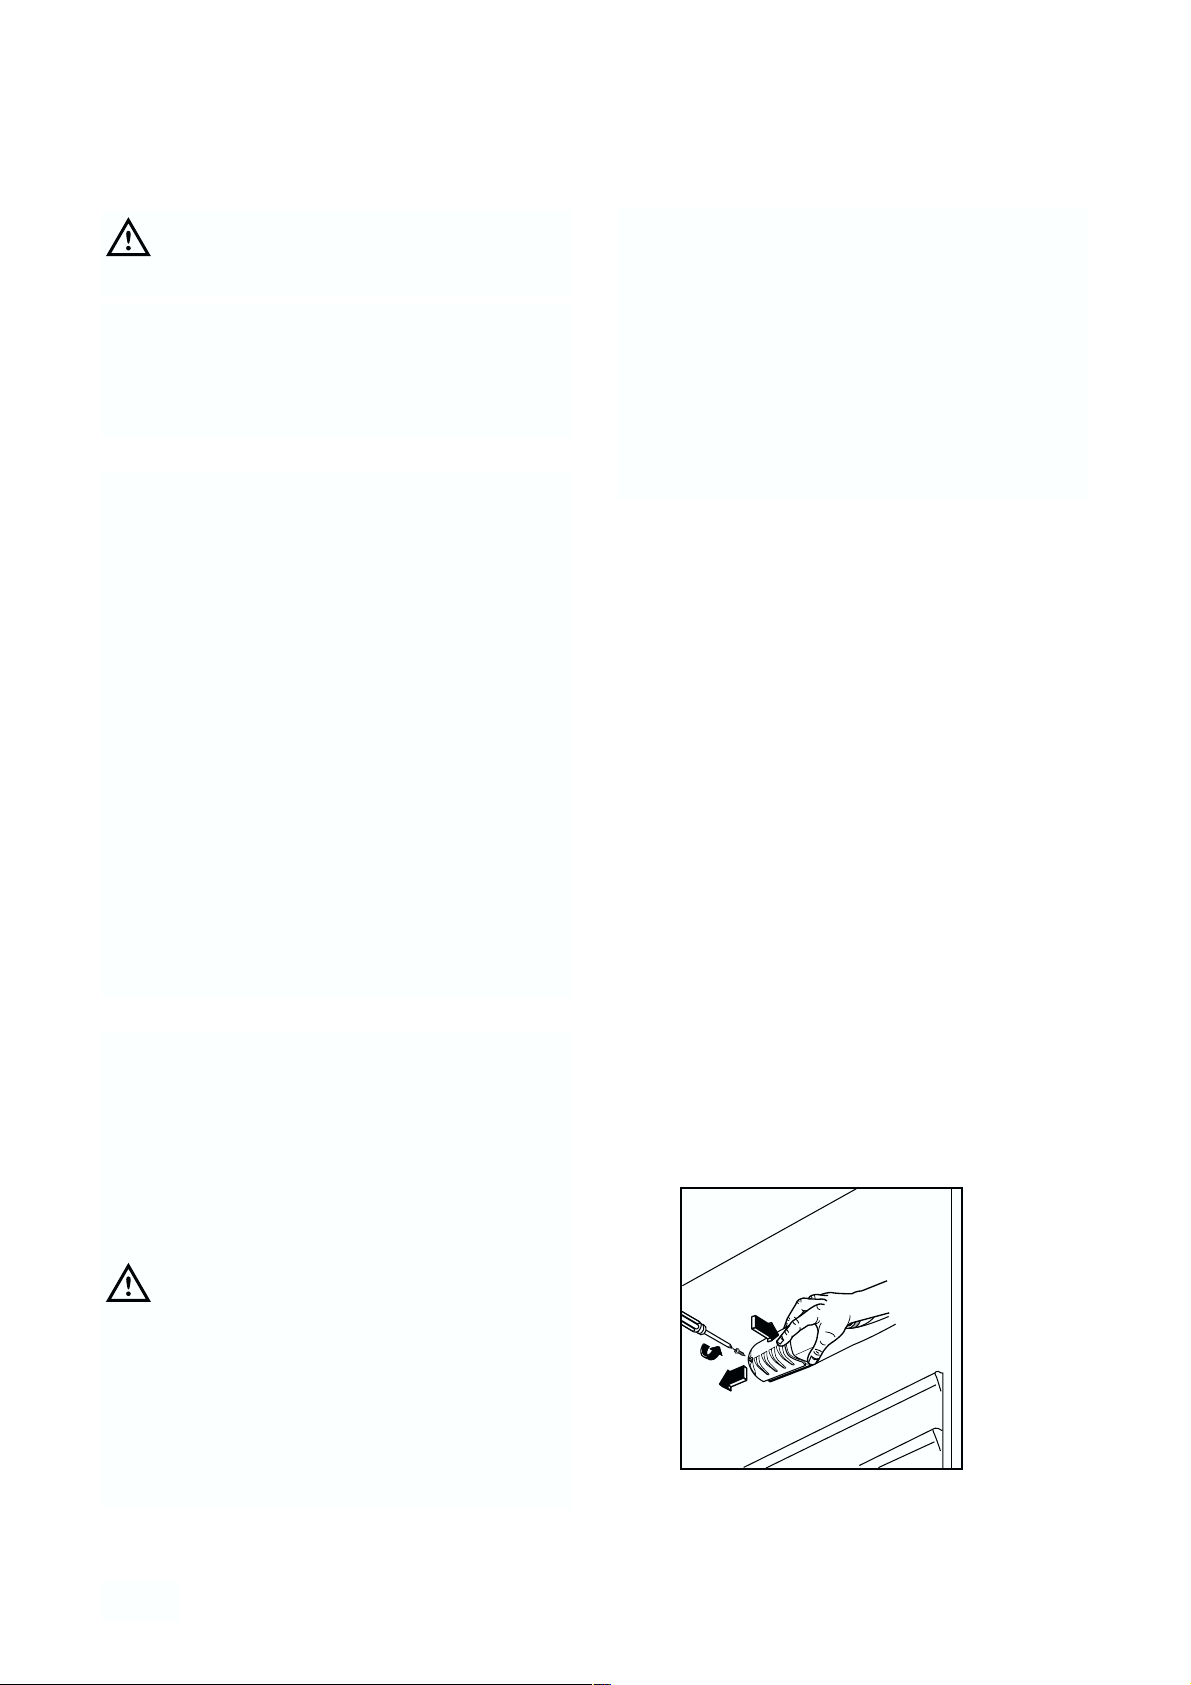
Innenbeleuchtung
Die Innenbeleuchtungslampe im Kühlabteil ist durch
folgende Arbeitsschritte zugänglich:
• Lösen Sie die Befestigungsschraube der
Lampenabdeckung.
• Heben Sie den beweglichen Teil ab, indem Sie
wie in der Abbildung gezeigt darauf drücken.
Sollte sich die Beleuchtung beim Öffnen
der Türe nicht einschalten, ist zu
überprüfen, ob die Glühbirne fest
eingeschraubt ist; wenn die Störung
dennoch bestehen bleibt, die defekte
Glühbirne durch eine neue Birne gleicher
Leistung ersetzen.
Die maximale Leistung ist am
Leuchtkörper angegeben.
D411
Page 9

9
STÖRUNGEN
Falls das Gerät Störungen aufweisen sollte,
überprüfen Sie zuerst folgendes:
• Steckt der Netzstecker in der Steckdose?
• Befindet sich der Hauptschalter der elektrischen
Anlage in der richtigen Stellung?
• Ist die Stromzufuhr unterbrochen?
• Befindet sich der Thermostatknopf in richtiger
Stellung?
• Wasserpfütze auf dem Boden des Kühlfaches:
• Abtauwasserloch verstopft? (siehe Abschnitt
“Abtauen”)
Sollten Sie nach o.e. Prüfungen zu keinem Resultat
kommen, so wenden Sie sich bitte an unseren
nächsten Kundendienst.
Um ein rasches Beheben des Schadens zu
ermöglichen, ist es beim Anruf an den
Kundendienst notwendig, die Modell- und
Seriennummer anzugeben, die Sie dem
Garantieschein oder dem Typenschild (– linke
Seite – unten) entnehmen können.
Abtauen
Die sich auf dem Verdampfer des Kühlschrankes
bildende Reifschicht taut jedesmal in den Stillstandzeiten des Motorkompressors von selbst ab. Das
Tauwasser läuft durch eine Rinne in eine Plastikschale auf der Rückseite des Gerätes (über dem
Kompressor) und verdunstet dort.
Wir empfehlen, das in der Mitte der
Abtauwasserrinne des Kühlraumes befindliche
Ablaufloch für das Abtauwasser regelmäßig zu
reinigen, um zu vermeiden, daß das
Abtauwasser auf die eingelagerten Lebensmittel
tropft.Verwenden Sie den dafür vorgesehenen
Reiniger,der sich schon im Ablaufloch befindet.
Die sich im Gefrierfach bildende Reifschicht soll,
sobald diese eine Stärke von 4 mm erreicht hat, mit
einem Plastikschaber abgekratzt werden. Während
dieses Vorganges ist es nicht nötig, das Gerät
auszuschalten und die Nahrungsmittel
herauszunehmen.
Wenn sich jedoch eine dicke Eisschicht bildet, muß
man vollkommen abtauen. Um ein vollständiges
Abtauen durchzuführen, geht man wie folgt vor:
1. Den Thermostatknopf auf «O» einstellen oder
den Stecker aus der Steckdose herausziehen.
2. Die eventuell im Frosterfach liegenden
Lebensmittel herausnehmen, sie in
Zeitungspapier einwickeln und sehr kühl
aufbewahren.
3. Tür offen lassen. Ein Gefäß auf den ersten Rost
direkt unter das Ablaufloch stellen. Den Stöpsel
wie in der Abbildung gezeigt entfernen.
4. Nach beendetem Abtauprozeß das Gefrierteil gut
nachtrocknen und den Stöpsel wieder
hineingeben.
5. Den Thermostatknopf wieder in die gewünschte
Stellung drehen bzw. den Stecker wieder
einstecken.
6. Nachdem das Gerät für 2-3 Std. in Betrieb
genommen wurde, können tiefgefrorene
Lebensmittel darin zurückgelegt
Achtung:
Benutzen Sie niemals Metallgegenstände, um die
Reifschicht abzukratzen, damit eine
Beschädigungen des Gerätes vermieden werden
kann.
Benutzen Sie kein mechanisches oder anderes
Mittel für einen schnelleren Abtauprozeß mit
Ausnahme der vom Hersteller empfohlenen.
Ein Temperaturanstieg der Tiefkühlkost während
des Abtauens könnte die Aufbewahrungsdauer
verkürzen.
D037
PR151
Page 10

INSTALLATION
Aufstellung
Das Gerät sollte nicht in der Nähe von
Wärmequellen wie Heizkörpern oder Öfen
aufgestellt und vor direkter Sonneneinstrahlung
geschützt werden. Aus Gründen der Sicherheit muß
eine Mindestbelüftung gesichert sein, wie aus der
Abb. hervorgeht.
Anordnung des Gerätes unter den Oberschränken
der Küche (siehe Abb. A).
Anordnung des Gerätes ohne Oberschränke der
Küche (siehe Abb. B).
Achtung: Die Ventilations - Öffnungen müssen
immer saubergehalten werden.
Die Nivellierung erfolgt durch Drehen der am
Unterteil des Gerätes angebrachten
Nivellierfüßchen.
10
Wichtig
Es m
uß möglich sein, das Gerät vom Netz zu
trennenn; Nach der Installation muß die Steckdose
daher zugänglich bleiben.
100 mm10 mm
A
NP006
B
10 mm
Page 11

11
Elektrischer Anschluß
Bevor Sie den Stecker in die Steckdose einstecken,
überprüfen Sie bitte, daß die auf dem Typenschild
des Gerätes angegebene Spannung sowie
Frequenz mit dem Anschlußwert des Hauses
übereinstimmen. Eine Abweichung von ±6% von der
Nominalspannung ist zulässig. Für die Anpassung
des Gerätes an andere Spannungen muß ein
Spartransformator angemessener Leistung
vorgeschaltet werden.
Das Gerät muß unbedingt vorschriftsmäßig geerdet
werden. Zu diesem Zweck ist der Stecker des
Speisekabels mit dem dafür vorgesehenen Kontakt
versehen. Sollte die Netzleitung im Haus nicht mit
einer Erdleitung versehen sein, so muß das Gerät
an eine getrennte Erdleitung vorschriftsmäßig und
unter Hinzuziehung eines Fachmanns
angeschlossen werden.
Die Erzeugerfirma lehnt jede Verantwortung ab,
falls diese Unfallverhütungsvorschrift nicht
beachtet wird.
Dieses Gerät entspricht der folgende
EWG Richtlinie:
- 87/308 EWG vom 2.6.87 (DeutschlandAusführung) bzw. der ÖVE-Richtlinie Nr. F 61/84
(Österreich-Ausführung) bezüglich
Funkentstörung.
- 73/23 EWG vom 19/02/73 (Niederspannung) und
folgende Änderungen;
- 89/336 EWG vom 03/05/89 (Elektromagnetische
Verträglichkeit) und folgende Änderungen.
Hintere Abstandsstücke
Im Gerät sind 2 Distanzstücke enthalten, die wie in
der Abbildung gezeigt angebracht werden müssen.
Lösen Sie dazu etwas die Schrauben der
Gehäuseabdeckung. Schieben Sie das Distanzstück
unter den Schraubenkopf und ziehen Sie die
Schraube wieder fest.
Page 12
12
Türanschlag wechseln
Der Türanschlag kann von rechts (Lieferzustand)
nach links gewechselt werden, falls der Aufstellort
dies erfordert.
Warnung!
Während des Türanschlagwechsels darf das Gerät
nicht am Stromnetz angeschlossen sein. Vorher
Netzstecker ziehen.
Die folgenden Handlungsschritte sollten unter
Mithilfe einer zweiten Person zum Anhalten der Türe
durchgeführt werden.
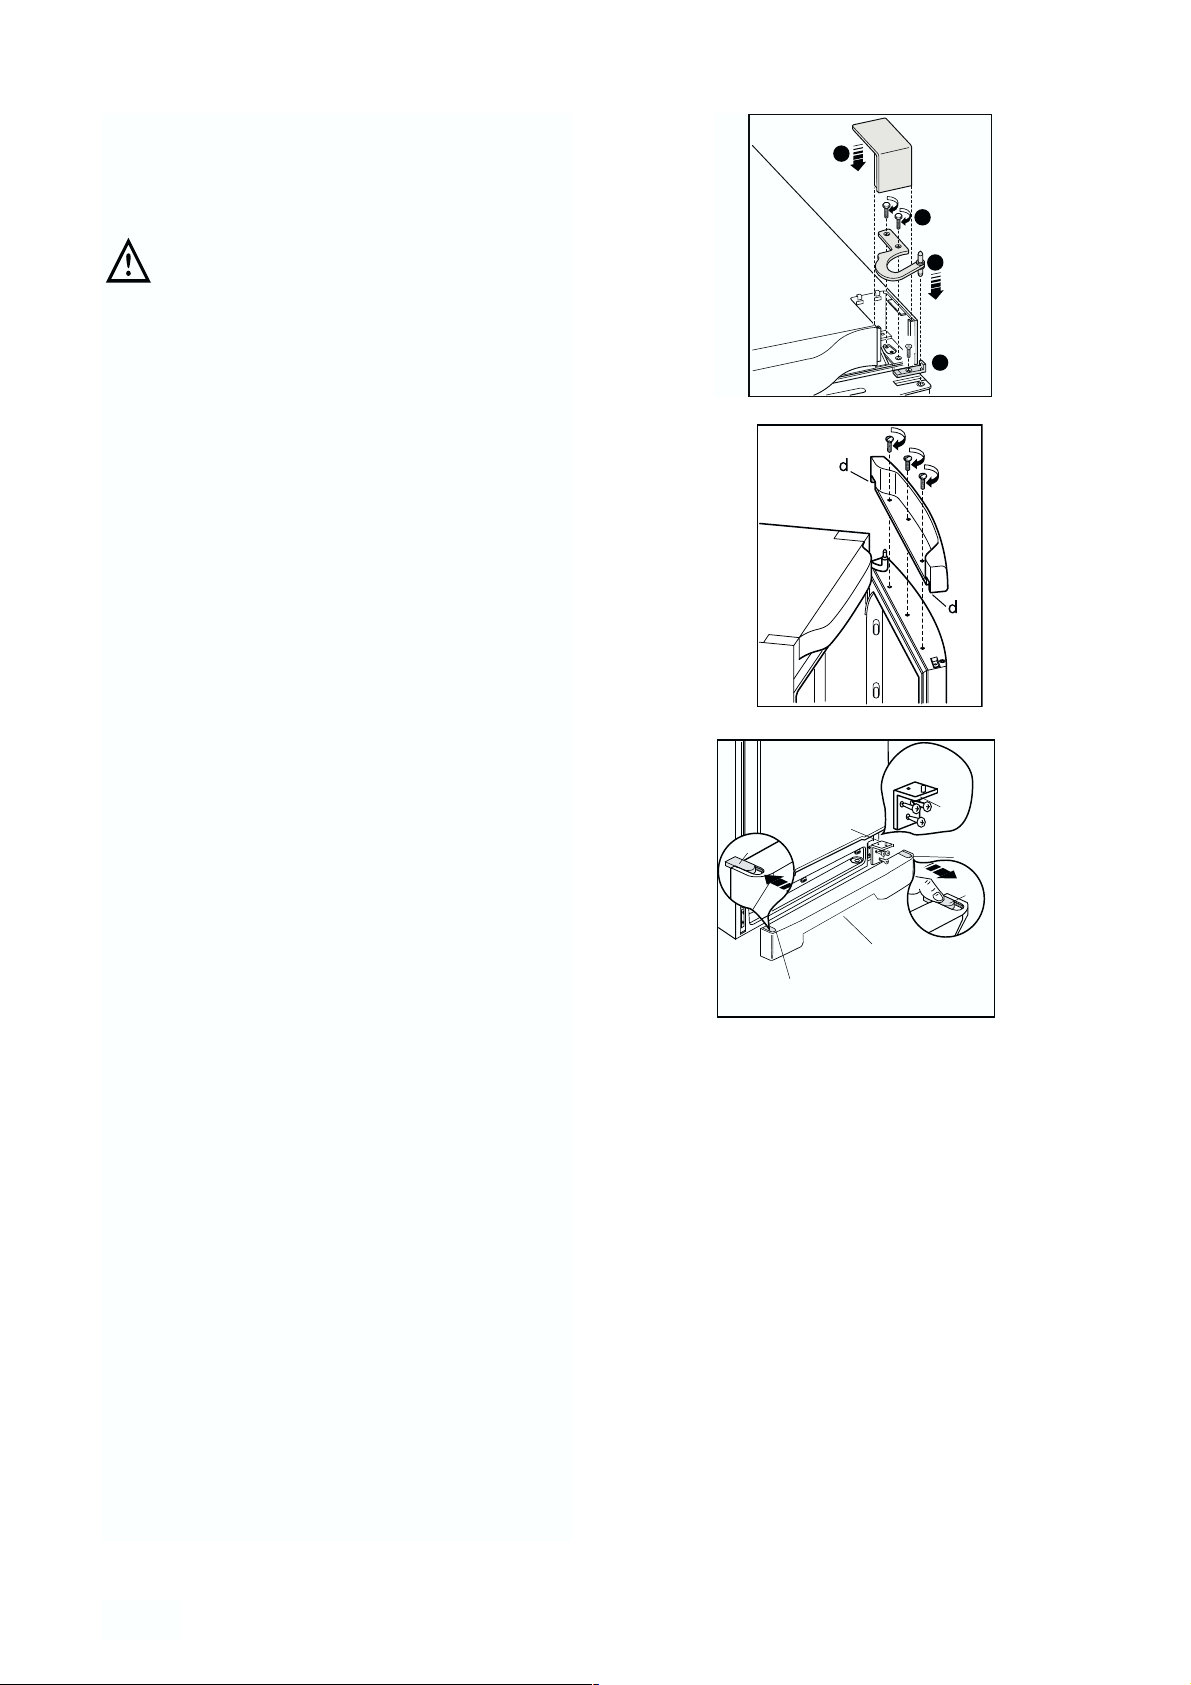
• Öffnen Sie die Türe am aufrecht stehenden
Gerät.
• Lösen Sie die 2 Schrauben und entfernen Sie die
Kunststoffabdeckung.
• Lösen Sie die Bauteile (d) und befestigen Sie
diese auf der gegenüberliegender Seite.
• Legen Sie das Gerät auf die Geräterückseite.
• Entfernen Sie die Kunststoff -abdeckung des
Scharniers. dx und sx (3).
• Lösen Sie das obere Scharnier und enfernen Sie
es.(1-2).
• Lösen Sie die Schraube und entfernen Sie den
Türstopper. (4)
• Entfernen Sie die Türe.
• Entlüftungsgitter (D) abnehmen.
• Mit Hilfe eines 10 mm Schlüssel den unteren
Scharnierstift abschrauben und auf gegenüberliegenden Scharnierseite wieder
anschrauben.
• Unteres Scharnier (E) auf gegenüberliegende
Türseite montieren und mittels der vorher
entnommenen Schrauben befestigen.
• Abdeckung (F) vom Entlüftungs-gitter (D)
herausschieben und auf gegenüberliegende
Seite montieren.
• Entlüftungsgitter wieder einsetzen.
• Setzen Sie die Gerätetüre
• Achten Sie darauf, dass die Türe parallel zur
Topabdeckung verläuft.
• Befestigen Sie den Türstopper auf der gegenüber
liegenden Seite. (4)
• Positionieren und befestigen Sie das obere
Scharnier auf der gegenüber liegenden Seite. (1-
2)
• Setzen Sie die 2 Kunststoffabdeckungen des
Scharniers (3) wieder ein.
3
2
1
4
E
F
E
F
F
D
F
Page 13

13
• Stellen sie das Gerät wieder in die aufrechte
Position.
• Öffnen Sie die Türe und befestigen Sie die
Kunststoffabdeckung der oberen Türe mit den
Schrauben.
• Befestigen Sie die Türgriffe auf der gegenüber
liegenden Seite. Setzen Sie die
Kunststoffabdeckungen, die Sie in der Verpakung
der Gebrauchsanweisung finden, in die Löcher
der ürsprünglichen Griffbefestigung.
Gerät in Position bringen, ausrichten, warten
mindestens 2 Std. bevor das Gerät in Betrieb
genommen wird. Ans Stromnetz anschließen.
Falls Sie den Türanschlagwechsel nicht selbst
durchführen möchten, verständigen Sie bitte den
Kundendienst. Der Kundendienst führt dann den
Türanschlagwechsel auf Ihre Kosten aus.
Achtung
Vergewissern Sie sich nach Ausführung des
Türanschlagwechsel, daß alle Schrauben fest
angezogzen sind und die türdichtung
einwandfrei am Gehäuse anliegt.
Gegenfalls die Türdichtung vorsichtig mit einem
Fön zu erwärmen (max. 50°C) und von Hand in
Form ziehen.
Anschlagwechsel Verdampferfachtür
180°
Page 14

14
AVERTISSEMENTS ET CONSEILS IMPORTANTS
Il est très important que cette notice d’utilisation soit gardée avec l’appareil pour toute future
consultation. Si cet appareil devait être vendu ou transféré à une autre personne, assurez-vous que la
notice d’utilisation suive l’appareil, de façon à ce que le nouvel utilisateur puisse être informé du
fonctionnement de celui-ci et des avertissements relatifs.
Si cet appareil, muni de fermeture magnétique, doit être employé pour en remplacer un autre avec une
fermeture à ressort, nous vous conseillons de rendre celle-ci inutilisable avant de mettre l’ancien
appareil de côté. Cela dans le but d’éviter que des enfants puissent s’y renfermer et se mettre ainsi en
danger de mort. Ces avertissements sont donnés pour votre sûreté et pour celle d’autrui. Nous vous
prions donc de bien vouloir les lire attentivement avant d’installer et d’utiliser l’appareil.
Sûreté
• Cet appareil n'est pas destiné à être utilisé par
des enfants ou des personnes dont les capacités
physiques, sensorielles ou mentales, ou le
manque d'expérience et de connaissance les
empêchent d'utiliser l'appareil sans risque
lorsqu'ils sont sans surveillance ou en l'absence
d'instruction d'une personne responsable qui
puisse leur assurer une utilisation de l'appareil
sans danger.
• Débranchez toujours la prise de courant avant de
procéder au nettoyage intérieur et extérieur de
l’appareil et au remplacement de la lampe
d’éclairage (pour les appareils qui en sont
équipés).
• Ne consommez pas certains produits tels que les
bâtonnets glacés dès leur sortie de l’appareil; la
température très basse à laquelle ils se trouvent
peut provoquer des brûlures.
• Cet appareil est lourd. Faites attention lors du
déplacement.
• Faites très attention lorsque vous déplacez
l’appareil afin de ne pas endommager des
parties du circuit de réfrigérant et ainsi
d’éviter le risque de fuites de liquide.
• L’appareil ne doit pas être situé à proximité de
radiateurs ou cuisinières à gaz.
• Evitez une exposition prolongée de l’appareil
aux rayons solaires.
• II doit y avoir une circulation d’air suffisante à
la partie arrière de l’appareil et il faut éviter
tout endommagement du circuit réfrigérant.
• Seulement pour congélateurs (sauf modèles
encastrés): un emplacement optimal est la
cave.
• Ne pas mettre d’instruments électriques à
l’intérieur de l’appareil.
Service/Réparation
• Une éventuelle modification à l’installation
électrique de votre maison qui devait être nécessaire pour l’installation de l’appareil ne devra être
effectuée que par du personnel qualifié.
• Il est dangereux de modifier ou d’essayer de
modifier les caractéristiques de cet appareil.
• Cet appareil contient des hydrocarbures dans
son circuit de réfrigérant; I’entretien et la
recharge ne doivent done être effectués que par
du personnel autorisé.
• En cas de panne, n’essayez pas de réparer
l’appareil vous-même. Les réparations effectuées
par du personnel non qualifié peuvent provoquer
des dommages. Contactez le Service AprèsVente le plus proche et n’exigez que des pièces
détachées originales.
Installation
• Assurez-vous, après avoir installé l’appareil, que
celuici ne repose pas sur le câble d’alimentation.
Important: en cas de dommage au câble
d’alimentation, il faudra le remplacer avec un
câble spécial ou un ensemble disponibles chez le
fabricant ou le service technique aprés-vente.
• L’appareil se réchauffe sensibilment au niveau du
condenseur et du compresseur.Veillez à ce que
l’air circule librement tout autour de l’appareil.
Une ventilation insuffisante entraìnerait un
mauvais fonctionnement et des dommages sur
l’appareil. Suivez les instructions données pour
l’installation.
• A cause du système de transport, l’huile
contenue dans le compresseur pourrait s’écouler
dans le circuit réfrigérant. Attendez 2 heures au
moins avant de brancher l’appareil pour
permettre à l’huile de refluer dans le
compresseur.
Utilisation
• Les réfrigérateurs et/ou congélateurs ménagers
sont destinés uniquement à la conservation et/ou
congélation des aliments et des boissons.
• Pour le bon fonctionnement de votre appareil, la
température ambiante du local doit être comprise
entre +18°C et +43°C (Classe T); +18°C et
+38°C (Classe ST); +16°C et +32°C (Classe N);
+10°C et +32°C (Classe SN); La classe
d’appartenance est indiquée sur la plaque
signalétique.
Page 15
15
ATTENTION: En dehors des températures
ambiantes indiquées par la classe climatique
d’appartenance de ce produit, il est obligatoire de
respecter les indications suivantes: lorsque la
température ambiante descend sous la valeur
minimum, la température de conservation du
compartiment congélateur peut ne pas être
garantie; il est donc conseillé de consommer les
produits que ce dernier contient au plus vite.
• Un produit décongelé ne doit jamais être
recongelé.
• Suivez les indications du fabricant pour la
conservation et/ou congélation des aliments.
• Dans tous les appareils de réfrigération et
congélation il y a des surfaces qui se couvrent de
givre. Suivant le modèle, ce givre peut être
éliminé automatiquement (dégivrage
automatique) ou bien manuellement.
• N’essayez jamais d’enlever le givre avec un objet
métallique, vous risqueriez d’endommager
irréparablement l’évaporateur. N’employez pour
cela que une spatule en plastique.
• De même, ne décollez jamais les bacs à glace
avec un couteau ou tout autre objet tranchant.
• Ne placez ni bouteilles ni boîtes de boissons
gazeuses dans le congélateur/compartiment à
basse température, elles pourraient exploser.
Protection de l’environnement
Cet appareil ne contient pas, dans son circuit de
réfrigérant et ses matières isolantes, de gaz
réfrigérant nocifs à la couche d’ozone. L’appareil
ne doit pas être mis au rebut avec les ordures
urbaines et la ferraille. Il faut éviter d’endommager le circuit de réfrigérant, surtout à l’arrière
de l’appareil, près de l’énchangeur thermique.
Vous pouvez vous renseigner sur les centres de
ramassage auprès de votre bureau municipal.
Les matériaux utilisés dans cet appareil
identifiés par le symbole sont recyclables.
Elimination des vieux appareils
Le symbole sur le produit ou son emballage
indique que ce produit ne peut être traité comme
déchet ménager. Il doit plutôt être remis au point de
ramassage concerné, se chargeant du recyclage du
matériel électrique et électronique. En vous assurant
que ce produit est éliminé correctement, vous
favorisez la prévention des conséquences négatives
pour l’environnement et la santé humaine qui, sinon,
seraient le résultat d’un traitement inapproprié des
déchets de ce produit. Pour obtenir plus de détails
sur le recyclage de ce produit, veuillez prendre
contact avec le bureau municipal de votre région,
votre service d’élimination des déchets ménagers ou
le magasin où vous avez acheté le produit.
Page 16

16
SOMMAIRE
Avertissements et conseils importants.................................................................................................14
Renseignements pour l’élimination des matériaux d’emballage........................................................16
Utilisation/ Nettoyage - Mise en service - Réglage de la température - Congélation - Conservation des ..
produits surgelés - Décongélation -Glaçons..............................................................................................17
Utilisation/ Réfrigération - Tablettes amovibles - Positionnement des balconnets de la contre-porte.......18
Conseils / Conseils pour la réfrigeration - Conseils pour la congélation - Conseils pour la surgélation ..19
Entretien / Nettoyage - Arrêt prolongé - Changement de l’ampoule........................................................20
Entretien /Dégivrage - Anomalie de fonctionnement ............................................................................21
Installation / Emplacement ......................................................................................................................22
Installation / Branchement électrique - Entretoises postérieures.............................................................23
Installation / Réversibilités des portes.....................................................................................................24
Installation / Réversibilité de la porte ......................................................................................................25
RENSEIGNEMENTS POUR L’ÉLIMINATION
DES MATÉRIAUX D’EMBALLAGE
Tous les matériaux et les accessoires utilisés pour
emballer nos grands électroménagers, sauf ceux qui
sont en bois recyclables et peuvent donc se
récupérer.
Voici ce que nous vous conseillons:
• Déposez les emballages en papier, en carton et
en carton ondulé aux endroits prévus pour le
ramassage de ce genre de matériau.
• Mettez les piéces en plastique dans les
conteneurs prévus à cet effet. Si ce genre de
conteneurs n’existent pas encore à l’endroit où
vous habitez, vous pouvez éliminer les matériaux
en question en les mettant dans les ordures
ménagères.
Pour les emballages de matières plastiques
recyclables, par example:
Les exemples reportent les symboles suivants:
PE pour polyéthylène** 02 = ^ PE-HD; 04 = ^ PE-LD
PP pour le polypropylène
PS pour le polystyrène
PIÉCES EN MATIÉRE PLASTIQUE
Pour faciliter l’élimination et :ou le recyclage des
matériaux, la plupart des pièces de l’appareil ont
une contremarque qui en facilite l’indentification.
02**
PE
05
PP
06
PS
PS
SAN
ABS
Page 17

17
Décongélation
Avant d’être utilisés, les aliments congelés ou
surgelés doivent être décongelés dans le
réfrigérateur ou à température ambiante, selon le
temps dont on dispose pour cette opération.
S’il s’agit de produits minces ou divisés, placez-les
directement à cuire: dans ce cas le temps de
cuisson sera plus long.
Glaçons
L'appareil est équipé d'un ou de plusieurs bacs à
glace pour faire des glaçons. Il faut remplir ces bacs
d'eau potable et les placer dans le congélateur.
N’employez pas d’objet métallique pour décoller
les bacs à glace.
Conservation des produits
surgelés
A la première mise en fonctionnement ou après un
arrêt prolongé faites fonctionner l’appareil pendant
duex heures au moins avec le bouton du thermostat
sur la position de froid maximum. Ramenez ensuite
le thermostat sur une position moyenne.
Attention
En cas de décongélation accidentelle, par
exemple en cas de coupure de courant, si la
période d’interruption est supérieure à la valeur
du “autonomie, en cas de panne” indiquée dans
le tableau des données techniques, il sera
nécessaire de consommer rapidement les
aliments ou de les cuisiner aussitôt et de les
recongeler (après qu’ils ont refroidi).
Congélation
Le compartiment à 4 étoiles sert à congeler des
aliments frais et à conserver des denrées congelées
et surgelées pendant un certain temps.
Pour congeler les aliments frais il n’est pas
nécessaire de régler le thermostat sur une position
différente de celle employée en état de
fonctionnement habituel.Toutefois, si vous désirez
congeler plus rapidement vous pouvez régler le
thermostat sur une position plus froide tout en
veillant à ce que la témperature ne descende pas en
dessous de 0°C dans le compartiment réfrigérateur.
Dans ce cas il faudra ramener le thermostat sur une
position moins froide
Nettoyage
L’appareil étant convenablement installé, nous vous
conseillons de le nettoyer soigneusement avec de
l’eau tiède savonneuse, pour enlever l’odeur
caractéristique de «neuf».
N’utilisez pas de produits abrasifs, de
poudre à récurer ni d’éponge métallique.
Réglage de la température
La température est réglée automatiquement et peut
être augmentée (moins froid) en tournant le bouton
vers les numéros les plus bas ou bien diminuée
(plus froid) en le tournant vers les numéros les plus
élevés.
En tout cas, l’exacte position doit être repérée en
considérant que la température interne dépend des
facteurs suivants:
• température ambiante;
• fréquence d’ouverture des portes;
• quantité d’aliments conservés;
• emplacement de l’appareil.
Une position moyenne est la plus indiquée.
Important
Si le thermostat est réglé sur la position de froid
maximum, lorsque la température ambiante est
élevée et que l'appareil est plein, il est possible
que le compresseur fonctionne en régime
continu. Dans ce cas, il y a un risque de
formation excessive de givre sur la paroi
postérieure à l’intérieur de l’appareil. Pour éviter
cet inconvénient, placez le thermostat sur une
position moins élevée, de façon à permettre un
dégivrage automatique et, par conséquent, des
économies de courant.
UTILISATION
Mise en service
Enfoncez la fiche dans la prise de courant
Tournez le bouton du thermostat vers la droite sur
une position moyenne.
Pour arrêter l’appareil tournez le bouton du
thermostat sur la position «O».
Page 18

18
Positionnement des balconnets de
la contre-porte
Il est possible de changer de place les balconnets.
A cet effet procédez comme suit:
Dégagez les balconnets en agissant dans le sens
indiqué par les flèches. Remontez les balconnets à
la hauteur désirée.
Tablettes amovibles
Les glissières se trouvant sur les parois de la cuve
vous permettent de positionner les tablettes à
différentes hauteurs, selon vos besoins.
Réfrigération
Pour obtenir le meilleur rendement du compartiment
réfrigérateur:
• n’introduisez pas d’aliments encore chauds ou de
liquides en évaporation dans la cuve;
• couvrez les aliments, surtout s’ils sont
aromatiques;
• placez les denrées de façon à ce que l'air puisse
circuler tout autour.
D338
Page 19

19
Conseils pour la surgélation
Comment utiliser ce compartiment au mieux:
• vérifiez que les aliments aient bien été conservés
en magasin;
• assurez-vous que le transport, du moment de
l'achat jusqu'à celui de la mise en place dans le
compartiment, dure le moins longtemps possible;
• évitez d’ouvrir trop souvent la porte et ne la
laissez ouverte que le temps nécessaire.
• Il convient de faire très attention, car les aliments
dégelés, ne peuvent être recongelés.
• Ne dépassez jamais la date limite d’utilisation
généralement marquée sur les paquets.
• ne placez ni bouteilles ni boîtes de boissons
gazeuses dans le congélateur, car elles
pourraient éclater.
CONSEILS
Conseils pour la réfrigeration
Où placer les denrées?
Viandes (de toutes sortes): enveloppez-la dans des
sachets en plastique et placez-la sur la tablette en
verre au-dessus du(des) bac(s) à légumes.
La période de conservation est de 1 à 2 jours au
maximum.
Aliments cuits, plats froids, etc.: placez-les, bien
couverts, sur une clayette.
Fruits et légumes: bac(s) à légumes (une fois
nettoyés).
Beurre et fromage: enveloppez-les soigneusement
dans des feuilles d’aluminium ou de polyéthylène et
mettez-les dans les casiers appropriés.
Lait en bouteille: à placer dans l’un des balconnets
de la contreporte.
Bananes, pommes de terre, oignon et ail ne
doivent pas être placés dans le réfrigérateur,
s’ils ne sont pas conditionnés.
Conseils pour la congélation
Règles à respecter pour la congélation:
• le pouvoir max. de congélation par 24 heures
figure sur la plaque signalétique;
• le processus de congélation prend 24 heures. Il
vaut mieux ne pas ajouter d'autres aliments à
congeler pendant ce laps de temps;
• les produits destinés à la congélation doivent être
frais, bien nettoyés et d’excellente qualité;
• préparez de petites portions, de façon à faciliter
la congélation et à permettre de ne décongeler
que la quantité nécessaire;
• enveloppez les denrées dans du papier
d'aluminium ou de polythène, en éliminant les
bulles d'air et en fermant bien les paquets;
• évitez de placer des produits à congeler en
contact avec des denrées déjà entreposées, pour
éviter d'en élever la température;
• les aliments maigres se conservent mieux et plus
longtemps que les gras; le sel réduit la durée de
conservation;
• ne consommez pas les bâtonnets glacés toute
de suite après les avoir sortis du congélateur. La
température très basse à laquelle ils se trouvent
peut provoquer des brûlures:
• indiquez sur chaque paquet la date de
congélation, afin de pouvoir contrôler le temps
d’entreposage;
Page 20

20
ENTRETIEN
Débranchez l’appareil avant toute
opération.
Attention
Cet appareil contient des hydrocarbures dans son
circuit de réfrigération; l’entretien et la recharge ne
doivent donc être effectués que par du personnel
autorisé.
Nettoyage
N'utilisez jamais des objets métalliques pour
nettoyer l'appareil; vous risquez de l'endommager.
A l'occasion d'un dégivrage complet, lavez I'intérieur
avec de l'eau tiède et du bicarbonate, rincez et
séchez soigneusement.
Lavez la carrosserie avec de l'eau tiède
savonneuse. Passez de temps en temps un produit
à polir.
Dépoussiérez le condenseur situé à l'arrière de
l'appareil à l'aide d'une brosse ou d'un aspirateur.
Une accumulation de poussière risquerait de
diminuer le rendement de l'appareil.
De nombreux détergents spécifiques pour les
surfaces de cuisine contiennent des agents
chimiques pouvant corroder/endommager les
parties en plastique de cet appareil. Il est donc
recommandé de ne laver le revêtement extérieur
de cet appareil qu’avec de l’eau chaude et un
petit peu de détergent liquide pour assiettes.
Arrêt prolongé
Lorsque l'appareil doit rester à l'arrêt pendant un
certain temps, prenez les précautions suivantes:
débranchez la prise de courant;
videz l'appareil;
dégivrez-le et nettoyez-le à fond;
laissez les portes entrouvertes pour faire circuler de
l'air, de façon à éviter les mauvaises odeurs.
Changement de l’ampoule
L’ampoule d’éclairage dans le compartiment
réfrigérateur est accessible si on effectue les
opérations suivantes:
• dévissez la vis de fixation du plafonnier;
• décrochez la partie mobile en exerçant une
pression sur celle-ci comme indiqué dans la
figure.
Lorsque la porte est ouverte, si l’ampoule
ne s’allume pas, il faut contrôler qu’elle
soit bien vissée; si cela n’élimine pas le
problème, mettre une autre ampoule qui ait
la même puissance.
La puissance maximale est indiquée sur le
diffuseur.
D411
Page 21

21
Dégivrage
Le dégivrage du compartiment réfrigérateur
s’effectue automatiquement, à chaque arrêt du
compresseur. L’eau de dégivrage est évacuée dans
un bac situé à l’arrière de l’appareil où elle
s’évapore.
Nous recommandons de nettoyer
périodiquement l’orifice d’écoulement de l’eau
de dégivrage se trouvant dans la partie centrale
de la gouttière du compartiment réfrigérateur
afin d’éviter que l’eau, en débordant, ne coule
sur les denrées stockées dans la cuve. Utilisez à
cet effet le bâtonnet se trouvant dans l’orifice.
Dans le congélateur, par contre, il faut éliminer le
givre à chaque fois qu'il y a une couche épaisse qui
s'est formée (de 4 mm environ), en se servant de
une spatule en plastique. Pendant que l'on effectue
cette opération, il n'est pas nécessaire de couper le
courant ou d'enlever les denrées qui se trouvent
dans le compartiment. Pour effectuer un dégivrage
complet procédez de la manière suivante:
1. tournez le bouton du thermostat sur la position
«O» ou débranchez l’appareil;
2. enveloppez les denrées dans plusieurs feuilles
de papier journal et conservez-les dans un
endroit frais;
3. maintenez la porte ouverte, placez un récipient
sur la première clayette du réfrigérateur, à
l’endroit qui correspond à l’ouverture de vidange,
et retirez le bouchon, comme l’illustre la figure;
4. une fois que le dégivrage est terminé, épongez
bien le congélateur et remettez le bouchon à sa
place;
5. ramenez le bouton du thermostat sur la position
désirée ou rebranchez l’appareil.
6. Après 2-3 heures de fonctionnement l’appareil
est à nouveau prêt à la con-servation des
produits surgelés.
Important:
Pour cette opération n’utilisez jamais d’objet
métallique qui risquerait de détériorer l’appareil.
N’utilisez jamais de dispositifs mécaniques ou
autres moyens artificiels pour accélérer le
dégivrage, à part ceux préconisés.
L’élévation de température des denrées
congelées peut diminuer leur durée de
conservation.
ANOMALIE DE FONCTIONNEMENT
Si l'appareil marche mal, il faut contrôler
• si la fiche est bien branchée à la prise de courant
et si l'interrupteur est éteint;
• s'il n'y a pas de panne de courant;
• si les commandes sont bien dans la bonne
position;
• s'il y a des traces d'eau au fond du compartiment
et si l'orifice d'écoulement de l'eau de dégivrage
est bouché (voir chapitre “Dégivrage”).
Une fois que tous ces contrôles ont été effectués, si
l'anomalie de fonctionnement continue, adressezvous au Service Après-Vente le plus proche.
Pour que l'intervention soit plus rapide, au
moment de l'appel, il vaut mieux indiquer le code
du modèle et le numéro d'immatriculation, qui se
trouvent sur le certificat de garantie ou sur la
plaque d'immatriculation placée à l'intérieur de
l'appareil, à gauche et en bas.
D037
PR151
Page 22

22
INSTALLATION
Emplacement
Placez de préférence votre appareil loin d’une
source de chaleur (chauffage, cuisson ou rayons
solaires trop intenses).
Pour des raisons de sécurité, la ventilation doit être
prévue comme indiqué dans la Fig.
Appreil positionné sous armoires murales de cuisine
en surplomb (voir Fig. A).
Appreil positionné sans armoires murales de cuisine
en surplomb (voir Fig. B).
Attention: veillez à ne pas obstruer les
ouvertures de ventilation.
Mettez l’appareil d’aplomb en agissant sur les pieds
réglables.
Important:
L’appareil doit
pouvoir être débranché du secteur; il
est donc nécessaire que la fiche reste accessible
une fois que l’installation est terminée.
100 mm10 mm
A
NP006
B
10 mm
Page 23

23
Branchement électrique
Contrôlez, avant de brancher l’appareil, que le
voltage et la fréquence indiqués sur la plaque
signalétique correspondent à ceux de votre réseau.
Tolérance admise: ±6%.
Pour l’adaptation de l’appareil à des voltages
différents, l’adjonction d’un autotransformateur d’une
puissance adéquate est indispensable.
Il faut absolument brancher l'appareil à une prise
de terre qui marche.
C'est pour cela que la prise du câble d'alimentation
est munie d'un contact prévu exprès. Si la prise de
courant du réseau domestique n'est pas branchée à
la terre, branchez l'appareil à une prise de terre à
part, conformément aux normes en vigueur, en vous
adressant à un technicien spécialisé.
Le fabricant décline toute responsabilité, si cette
norme de prévention des accidents n'est pas
respectée.
-Cet appareil est conforme aux Directives
Communautaires suivantes:
- 87/308 CEE du 2.6.87 concernant la
suppression des interférences radio-électriques
- 73/23 CEE 19/02/73 (Basse Tension) et
modifications successives;
- 89/336 CEE 03/05/89 (Compatibilité Electromagnétique) et modifications successives.
Entretoises postérieures
A l’intérieur de l’appareil, il y a deux entretoises
qui doivent être montées comme indiqué sur la
figure.
Desserrez les vis et introduisez les entretoises sous
la tête de vis, puis resserrer.
Page 24

24
Réversibilité des portes
Avant d'effectuer la réversibilité des portes,
débranchez l'appareil.
Comment procéder :
• Pour effectuer les opérations décrites ci-dessous,
nous vous conseillons de vous faire aider par une
autre personne pour éviter d'endommager les
portes de l'appareil.
• L'appareil en position verticale, ouvrez la porte
supérieure. Retirez les vis fixant le cache
plastique de la porte supérieure et retirez-le.
• Enlevez la petite couverture en plastique (d) de le
cache plastique de la porte et remontez-la de
l’autre côté.
• Inclinez l'appareil sur l'arrière en intercalant un
support (petit tabouret par exemple).
• Retirez les cache charnières en plastique (3).
• Dévissez la charnière supérieure (1 - 2) et
retirez-la.
• Dévissez et retirez l'arrêt de porte (4).
• Retirez la porte.
• Otez la grille d’aération (D) qui est fixée par un
ressort.
• Dévissez le pivot de la charnière (E) avec une clé
de 10 et montez-le sur l’autre côté de l’appareil.
• Vissez la charnière inférieure (E) sur le côté
opposé en utilisant les vis enlevées
précédemment.
• Détachez le cache (F) de la grille de ventilation
(D) et remontez-le de l’autre côté.
• Remontez la grille d’aeration (D).
• Retirez la porte.
• Vérifiez que les portes sont parallèles.
• Fixez l'arrêt de porte (4).
• Installez et fixez la charnière supérieure (1 - 2)
sur le côté opposé.
• Replacez les cache charnières en plastique (3).
• Replacez votre appareil en position verticale.
• Replacez le cache plastique de la porte
supérieure en le fixant à l'aide des vis.
• Dévissez les poignées. Remontez-les de l’autre
côté après avoir percé les caches avec un
poinçon. Couvrez les trous libres avec les caches
contenus dans le sachet de la documentation.
3
2
1
4
E
F
D
F
E
F
F
Page 25

25
Replacez, nivelez l’appareil et attendez au
moins deux heures avant de le relier.
Si ne voulez pas faire les operations vous pouvez
contacter le Service Après-Vente en payant.
Attention
La réversibilité des portes une fois effectuée,
contrôlez que les joints magnétiques adhèrent à
la carrosserie. Si la température à l’intérieur de
la pièce est trop basse (en hiver, par exemple), il
se peut que les joints n’adhèrent pas
parfaitement. Dans ce cas, si on ne veut pas
attendre que les joints reprennent leurs
dimensions naturelles après un certain temps,
on pourra accélérer ce processus en chauffant la
partie intéressée à l’aide d’un sèche-cheveux.
Réversibilité de la porte
180°
Page 26

26
WARNINGS
It is most important that this instruction book should be retained with the appliance for future
reference. Should the appliance be sold or transferred to another owner, or should you move house
and leave the appliance, always ensure that the book is supplied with the appliance in order that the
new owner can be acquainted with the functioning of the appliance and the relevant warnings.
If this appliance featuring magnetic door seals is to replace an older appliance having a spring lock
(latch) on the door or lid, be sure to make that spring lock unusable before you discard the old
appliance. This will prevent it from becoming a death-trap for a child.
These warnings are provided in the interest of safety.You must read them carefully before installing or
using the appliance.
General Safety
• This appliance is not intended for use by persons
(including children) with reduced physical,
sensory or mental capabilities, or lack of
experience and knowledge, unless they have
been given supervision or instruction concerning
use of the appliance by a person responsible for
their safety.
Children should be supervised to ensure that
they do not play with the appliance.
• It is dangerous to alter the specifications or
modify this product in any way.
• Before any cleaning or maintenance work is carried
out, be sure to switch off and unplug the appliance.
• This appliance is heavy. Care should be taken
when moving it
• Ice lollies can cause frost burns if consumed
straight from the appliance.
• Take utmost care when handling your
appliance so as not to cause any damages to
the cooling unit with consequent possible
fluid leakages.
• The appliance must not be located close to
radiators or gas cookers.
• Avoid prolonged exposure of the appliance to
direct sunlight.
• There must be adequate ventilation round the
back of the appliance and any damage to the
refrigerant circuit must be avoided.
• For freezers only (except built-in models): an
ideal location is the cellar or basement.
• Do not use other electrical appliances (such
as ice cream makers) inside of refrigerating
appliances.
Service/Repair
• Any electrical work required to install this
appliance should be carried out by a qualified
electrician or competent person
• This product should be serviced by an authorized
Service Centre, and only genuine spare parts
should be used.
• Under no circumstances should you attempt to
repair the appliance yourself. Repairs carried out
by inexperienced persons may cause injury or
more serious malfunctioning. Refer to your local
Service Centre, and always insist on genuine
spare parts.
• This appliance contains hydrocarbons in its
cooling unit; maintenance and recharging must
therefore only be carried out by authorized
technicians.
Use
• The domestic refrigerators and freezers are
designed to be used specifically for the storage
of edible foodstuffs only.
• Best performance is obtained with ambient
temperature between +18°C and +43°C (class T);
+18°C and +38°C (class ST); +16°C and +32°C
(class N); +10°C and +32°C (class SN).The
class of your appliance is shown on its rating
plate.
Warning: when the ambient temperature is not
included within the range indicated for the class
of this appliance, the following instructions must
be observed: when the ambient temperature
drops below the minimum level, the storage
temperature in the freezer compartment cannot
be guaranteed; therefore it is advisable to use the
food stored as soon as possible.
• Frozen food must not be re-frozen once it has
been thawed out.
• Manufacturers’ storage recommendations should
be strictly adhered to. Refer to relevant
instructions.
• The inner lining of the appliance consists of
channels through which the refrigerant passes. If
these should be punctured this would damage the
appliance beyond repair and cause food loss. DO
NOT USE SHARP INSTRUMENTS to scrape off
frost or ice. Frost may be removed by using a
plastic scraper. Under no circumstances should
solid ice be forced off the liner. Solid ice should be
allowed to thaw when defrosting the appliance.
Page 27

27
CONTENTS
Warning . . . . . . . . . . . . . . . . . . . . . . . . . . . . . . . . . . . . . . . . . . . . . . . . . . . . . . . . . . . . . . . . . . . . . . . . . .26
Use / Cleaning the interior - Operation - Temperature regulation - Fresh food refrigeration - Freezing . .
fresh food - Storage of frozen food - Thawing - Ice-cube production . . . . . . . . . . . . . . . . . . . . . . . . . . . .28
Use / Movable shelves -Positioning the door shelves . . . . . . . . . . . . . . . . . . . . . . . . . . . . . . . . . . . . . . . .29
Hints / Hints for refrigeration - Hints for freezing - Hints for storage of frozen food . . . . . . . . . . . . . . . . .30
Maintenance / Periodic cleaning - Periods of non-operation - Interior light - Defrosting . . . . . . . . . . . . .31
Customer service and spare parts . . . . . . . . . . . . . . . . . . . . . . . . . . . . . . . . . . . . . . . . . . . . . . . . . . . .32
Installation - Location . . . . . . . . . . . . . . . . . . . . . . . . . . . . . . . . . . . . . . . . . . . . . . . . . . . . . . . . . . . . . .33
Installation/ Electrical connection - Rear spacers . . . . . . . . . . . . . . . . . . . . . . . . . . . . . . . . . . . . . . . . . .34
Installation/ Door Reversibility . . . . . . . . . . . . . . . . . . . . . . . . . . . . . . . . . . . . . . . . . . . . . . . . . . . . . . . . .35
Installation/ Inner door reversal . . . . . . . . . . . . . . . . . . . . . . . . . . . . . . . . . . . . . . . . . . . . . . . . . . . . . . . .36
• Do not place carbonated or fizzy drinks in the
freezer as it creates pressure on the container,
which may cause it to explode, resulting in
damage to the appliance. Do not use a
mechanical device or any artificial means to
speed up the thawing process other than those
recommended by the manufacturer. Never use
metal objects for cleaning your appliance as it
may get damaged.
Installation
• During normal operation, the condenser and
compressor at the back of the appliance heat up
considerably. For safety reasons, minimum
ventilation must be as shown in the instructions.
Attention: keep ventilation openings clear of
obstruction.
• Care must be taken to ensure that the appliance
does not stand on the electrical supply cable.
Important: if the supply cord is damaged, it must
be replaced by a special cord or assembly available from the manufacturer or its service agent.
• If the appliance is transported horizontally, it is
possible that the oil contained in the compressor
flows in the refrigerant circuit. It is advisable to
wait at least two hours before connecting the
appliance to allow the oil to flow back in the
compressor.
• There are working parts in this product which
heat up. Always ensure that there is adequate
ventilation as a failure to do this will result in
component failure and possible food loss. See
installation instructions.
• Parts which heat up should not be exposed.
Wherever possible the back of the product should
be against a wall.
Environment Protection
This appliance does not contain gasses which
could damage the ozone layer, in either its
refrigerant circuit or insulation materials.The
appliance shall not be discarded together with
the urban refuse and rubbish. Avoid damaging
the cooling unit, especially at the rear near the
heat exchanger. Information on your local
disposal sites may be obtained from municipal
authorities.The materials used on this appliance
marked by the symbol are recyclable.
Disposal of old Appliances
The symbol on the product or on its packaging
indicates that this product may not be treated as
household waste. Instead it shall be handed over to
the applicable collection point for the recycling of
electrical and electronic equipment. By ensuring this
product is disposed of correctly, you will help prevent
potential negative consequences for the
environment and human health, which could
otherwise be caused by inappropriate waste
handling of this product. For more detailed
information about recycling of this product, please
contact your local city office, your household waste
disposal service or the shop where you purchased
the product.
Page 28

28
Fresh food refrigeration
To obtain the best performance:
• do not store warm food or evaporating liquids in
the refrigerator;
• do cover or wrap the food, particularly if it has a
strong flavour.
• Position food so that air can circulate freely round
it.
Cleaning the interior
Before using the appliance for the first time, wash
the interior and all internal accessories with lukewarm water and some neutral soap so as to remove
the typical smell of a brand-new product, then dry
thoroughly.
Do not use detergents or abrasive
powders, as these will damage the finish.
Temperature regulation
The temperature is automatically regulated and can
be increased to achieve a higher temperature
(warmer) by rotating the thermostat knob toward
lower settings or reduced (colder) rotating the knob
towards higher settings.
However, the exact setting should be chosen
keeping in mind that the temperature inside the
refrigerator depends on:
• room temperature;
• how often the door is opened;
• the quantity of food stored;
• location of appliance.
A medium setting is generally the most suitable.
Important
If the ambient temperature is high or the
appliance is fully loaded, and the appliance is
set to the lowest temperatures, it may run
continuously causing frost to form on the rear
wall. In this case the dial must be set to a higher
temperature to allow automatic defrosting and
therefore reduced energy consumption.
USE
Operation
Insert the plug into the wall socket.
Turn the thermostat knob ,clockwise, beyond the “O”
(STOP) position.
To stop operation, simply turn the thermostat knob to
position “O”.
Freezing fresh food
The 4-star compartment is suitable for
long term storage of commercially frozen food, and
for freezing fresh food.
To freeze fresh foods It is not necessary to change
the setting of the thermostatknob. However, for a
quicker freezing operation, turn the thermostat knob
to the coldest setting; but remeber that, in this
condition, the refrigerator compartment temperature
might drop below 0°C. If this occurs reset thermostat
knob to a warmer setting.
Ice-cube production
This appliance is equipped with one or more trays
for the production of ice-cubes. Fill these trays with
water, then put them in the freezer compartment.
Do not use metallic instruments to remove the
trays from the freezer.
Thawing
Deep-frozen or frozen food, prior to being used, can
be thawed in the refrigerator compartment or at
room temperature, depending on the time available
for this operation.
Small pieces may even be cooked still frozen,
directly from the freezer: in this case, cooking will
take longer.
Storage of frozen food
When first starting-up or after a period out of use,
before putting the products in the compartment let
the appliance run at least two hours on the coldest
setting, then turn the thermostat knob to the normal
operating position.
Important
In the event of accidental defrosting, for example
due to a power failure, if the power has been off
for longer that the value shown in the technical
characteristics chart under “rising time”, the
defrosted food must be consumed quickly or
cooked immediately and then refrozen (after
cooling).
Page 29

29
Positioning the door shelves
To permit storage of food packages of various sizes,
the door shelves can be placed at different heights.
To make these adjustments proceed as follows:
Gradually pull the shelf in the direction of the arrows
until it comes free, then reposition as required.
Movable shelves
The walls of the refrigerator are equipped with a
series of runners so that the shelves can be
positioned as desired.
D338
Page 30

30
HINTS
Hints for refrigeration
Useful hints:
Meat (all types): wrap in polythene bags and place
on the glass shelf above the vegetable drawer.
For safety, store in this way only one or two days
at the most.
Cooked foods, cold dishes, etc..: these should be
covered and may be placed on any shelf.
Fruit and vegetables: these should be thoroughly
cleaned and placed in the special drawer(s)
provided.
Butter and cheese: these should be placed in
special airtight containers or wrapped in aluminium
foil or polythene bags to exclude as much air as
possible.
Milk bottles: these should have a cap and should
be stored in the bottle rack on the door.
Bananas, potatoes, onions and garlic, if not
packed, must not be kept in the refrigerator.
Hints for freezing
To help you make the most of the freezing process,
here are some important hints:
• the maximum quantity of food which can be
frozen in 24 hrs. is shown on the rating plate;
• the freezing process takes 24 hours. No further
food to be frozen should be added during this
period;
• only freeze top quality, fresh and thoroughly
cleaned, foodstuffs;
• prepare food in small portions to enable it to be
rapidly and completely frozen and to make it
possible subsequently to thaw only the quantity
required;
• wrap up the food in aluminium foil or polythene
and make sure that the packages are airtight;
• do not allow fresh, unfrozen food to touch food
which is already frozen, thus avoiding a rise in
temperature of the latter;
• lean foods store better and longer than fatty
ones; salt reduces the storage life of food;
• water ices, if consumed immediately after
removal from the freezer compartment, can
possibly cause the skin to be freeze burnt;
• it is advisable to show the freezing-in date on
each individual pack to enable you to keep tab of
the storage time;
• do not put carbonated liquids (fizzy drinks,
etc.) in the freezer compartment as they may
burst.
Hints for storage of frozen food
To obtain the best performance from this appliance,
you should:
• make sure that the commercially frozen
foodstuffs were adequately stored by the retailer;
• be sure that frozen foodstuffs are transferred
from the foodstore to the freezer in the shortest
possible time;
• not open the door frequently or leave it open
longer than absolutely necessary.
• Once defrosted, food deteriorates rapidly and
cannot be refrozen.
• Do not exceed the storage period indicated by
the food manufacturer.
Page 31

31
Defrosting
Frost is automatically eliminated from the evaporator
of the refrigerator compartment every time the motor
compressor stops, during normal use. The defrost
water drains out through a trough into a special
container at the back of the appliance, over the
motor compressor, where it evaporates.
It is important to periodically clean the defrost
water drain hole in the middle of the refrigerator
compartment channel to prevent the water
overflowing and dripping onto the food inside.
Use the special cleaner provided, which you will
find already inserted into the drain hole.
The freezer compartment, however, will become
progressively covered with frost. This should be
removed with a plastic scraper, whenever the
thickness of the frost exceeds 4 mm. During this
operation it is not necessary to switch off the power
supply or to remove the foodstuffs.
Never use sharp metal tools to scrape off frost
from the evaporator as you could damage it.
MAINTENANCE
Unplug the appliance before carrying out
any maintenance operation.
Warning
This appliance contains hydrocarbons in its cooling
unit; maintenance and recharging must therefore
only be carried out by authorized technicians.
Periodic cleaning
Clean the inside with warm water and bicarbonate of
soda.
Rinse and dry thoroughly.
Clean the condenser (black grill) and the
compressor at the back of the appliance with a
brush or a vacuum cleaner.This operation will
improve the performance of the appliance and save
electricity consumption.
Many proprietary kitchen surface cleaners
contain chemicals that can attack/damage the
plastics used in this appliance. For this reason it
is recommended that the outer casing of this
appliance is only cleaned with warm water with a
little washing-up liquid added.
Periods of non-operation
When the appliance is not in use for long periods,
take the following precautions:
remove the plug from the wall socket;
remove all food;
defrost and clean the interior and all accessories;
leave the door ajar to allow air to circulate to prevent
unpleasant smells.
Interior light
The light bulb inside the refrigerator compartment
can be reached as follows:
• unscrew the light cover securing screw.
• unhook the moving part as shown in the figure.
If the light does not come on when the door
is open, check that it is screwed into place
properly. If it still does not light up, change
the bulb.The rating is shown on the light
bulb cover.
D411
D037
Page 32

32
CUSTOMER SERVICE AND SPARE PARTS
If the appliance is not functioning properly, check
that:
• the plug is firmly in the wall socket and the mains
power switch is on;
• there is an electricity supply (find out by plugging
in another appliance);
• the thermostat knob is in the correct position.
• If there are water drops on the bottom of the
cabinet, check that the defrost water drain
opening is not obstructed (see “Defrosting”
section).
• If your appliance is still not working properly after
making the above checks, contact the nearest
service centre.
To obtain fast service, it is essential that when you
apply for it you specify the model and serial number
of your appliance which can be found on the
guarantee certificate or on the rating plate located
inside the appliance, on the bottom left-hand side.
However, when the ice becomes very thick on the
inner liner, complete defrosting should be carried out
as follows:
1. pull out the plug from the wall socket or turn the
thermostat knob to the «O» setting;
2. remove any stored food, wrap it in several layers
of newspaper and put it in a cool place;
3. leave the door open, place a basin on the top
shelf of the refrigerator compartment, under the
drain hole, remove the plug as shown in the
figure;
4. when defrosting is completed, dry the interior
thoroughly and refit the plug;
5. turn the thermostat knob back to the required
setting or replace the plug in the power socket.
6. After two or three hours, reload the previously
removed food into the compartment.
Important:
Never use sharp metal tools to scrape off frost
from the evaporator as you could damage it.
Do not use a maechanical device or any artificial
means to speed up the thawing process other
than those recommended by the manufacturer.
A temperature rise of the frozen food packs,
during defrosting, may shorten their safe storage
life.
PR151
Page 33

33
INSTALLATION
Location
The appliance should be installed well away from
sources of heat such as radiators, boilers, direct
sunlight etc.
For safety reasons, minimum ventilation must be as
shown in Fig.
Appliance positioned under overhanging kitchen wall
units (see Fig. A).
Appliance positioned without overhanging kitchen
wall units (see Fig. B).
Attention: keep ventilation openings clear of
obstruction.
Two adjustable feet at the cabinet base allow
accurate levelling of the appliance.
Attention
It must be possible to disconnect the appliance from
the mains power supply; the plug must therefore be
easily accessible after installation.
100 mm10 mm
A
NP006
B
10 mm
Page 34

34
Electrical connection
Before plugging in, ensure that the voltage and
frequency shown on the serial number plate
correspond to your domestic power supply. Voltage
can vary by ±6% of the rated voltage.
For operation with different voltages, a suitably sized
auto-transformer must be used.
The appliance must be earthed.
The power supply cable plug is provided with a
contact for this purpose.
If the domestic power supply socket is not earthed,
connect the appliance to a separate earth in
compliance with current regulations, consulting a
specialist technician.
The Manufacturer declines all responsibility if
the above safety precautions are not observed.
This appliance complies with the following
E.E.C. Directives:
- 87/308 EEC of 2/6/87 relative to radio interference
suppression.
- 73/23 EEC of 19.2.73 (Low Voltage Directive) and
subsequent modifications;
- 89/336 EEC of 3.5.89 (Electromagnetic
Compatibility Directive) and subsequent
modifications.
Rear spacers
In the appliance, there are two spacers which
must be fitted as shown in the figure .
Slacken the screws and insert the spacer under the
screw head, then re-tighten the screws.
Page 35

35
Door reversibility
Before carrying out any operations, remove the
plug from the power socket.
To change the opening direction of the door,
proceed as follows:
• To carry out the following operations, we suggest
that this be made with another person that will
keep a firm hold on the doors of the appliance
during the operations.
• Open the door with the appliance in the upright
position. Unscrew the screws and remove the
door plastic trim.
• Remove the little plastic cover from the door
plastic trim and refit on the opposite side (d).
• Lay down the appliance back side down.
• Remove the plastic hinge covers dx and sx (3).
• Unscrew the upper hinge and remove it (1-2)
• Unscrew the screw and remove the door stopper
(4).
• Remove the door
• Remove the ventilation grill (D).
• Using a 10 mm spanner, unscrew the hinge pin
(E) and reassemble it on the opposite side of the
hinge;
• Screw down the bottom hinge (E) on the opposite
side by using the screws previously removed.
• Remove the plug (F) from the ventilation grill (D)
and replace it on the opposite side.
• Re-assemble the ventilation grill (D).
• Reinsert the door .
• Pay attention that the front board of the doors are
parallel to the front board of the top.
• Fix the door stopper on the opposite side (4).
• Position and fix the upper hinge on the opposite
side (1-2)
• Reinsert the 2 plastic hinge covers (3).
• Lift up the appliance to vertical position.
• Open the door and reposition the upper door
plastic trim with screws.
• Fix the handles on the opposite side, insert the
plastic plugs into the holes left open that can be
found in the instruction for use bag.
3
2
1
4
E
F
D
F
E
F
F
Page 36

36
Reposition, level the appliance, wait for at least
two hours and then connect it to the power socket.
In any case you do not want to carry out the above
mentioned operations, contact the nearest After
Sales Service Force. The After Sales Service
specialist will carry out the reversibility of the doors
at your cost.
Warning
After having reversed the opening direction of
the doors check that all the screws are properly
tightened and that the magnetic seal adheres to
the cabinet.
If the ambient temperature is cold (i.e. in Winter),
the gasket may not fit perfectly to the cabinet. In
that case, wait for the natural fitting of the gasket
or accelerate this process by heating up the part
involved with a normal hairdrier.
Inner door reversal
180°
Page 37

AVVERTENZE E CONSIGLI IMPORTANTI
È molto importante che questo libretto istruzioni sia conservato assieme all’apparecchiatura per
qualsiasi futura consultazione. Se l’apparecchiatura dovesse essere venduta o trasferita ad un’altra
persona, assicurarsi che il libretto venga fornito assieme, in modo che il nuovo utente possa essere
messo al corrente del funzionamento della macchina e delle avvertenze relative.
Queste avvertenze sono state redatte per la Vostra sicurezza e per quella degli altri. Vi preghiamo,
dunque, di volerle leggere attentamente prima d’installare e di utilizzare l’apparecchiatura.
Sicurezza generale
•
Qualora questa apparecchiatura, munita di
chiusura magnetica, venisse usata in
sostituzione di una con chiusura a scatto,
consigliamo di rendere quest’ultima inservibile.
Cio’ eviterà che i bambini, giocando, vi
rimangano intrappolati, con grave pericolo per la
loro vita.
•
Togliere la spina dalla presa di corrente prima di
procedere a qualsiasi operazione di pulizia e
manutenzione (come nel caso di sostituzione
della lampadina, sulle apparecchiature che ne
sono provviste).
•
Questo apparecchio non deve essere utilizzato
da persone (e bambini) con ridotte capacità
fisiche, sensoriali o mentali o prive
dell'esperienza e delle nozioni necessarie, salvo i
casi in cui agiscano sotto sorveglianza o siano
stati opportunamente istruiti sull'uso di tale
apparecchio da persone responsabili per la loro
sicurezza.
Evitare che i bambini utilizzino l'apparecchio in
modo improprio.
•
È pericoloso modificare o tentare di modificare
le caratteristiche di quest’ apparecchiatura.
•
Questa apparecchiatura contiene idrocarburi nel
circuito refrigerante; pertanto la manutenzione e
la ricarica deve essere effettuata esclusivamente
da personale autorizzato dall’azienda.
•
Prestare la massima cura nella
movimentazione per non dannegiare parti del
circuito refrigerante onde evitare possibili
fuoriuscite di fluido.
•
L’apparecchiatura non deve essere collocata
nelle vicinanze di termosifoni o cucine a gas.
•
Evitate ogni esposizione prolungata
dell’apparecchiatura ai raggi solari.
•
La parte posteriore dell’apparecchiatura deve
ricevere una sufficiente circolazione d’aria e
deve essere evitato qualsiasi danno al
circuito refrigerante.
•
Solo per i congelatori (esclusi incassati): una
collocazione ottimale è la cantina.
•
Non introdurre apparecchi elettrici all’interno
dell’apparecchiatura (ad es. gelatiera)
Assistenza / Riparazioni
•
Ogni eventuale modifica che si rendesse
necessaria all’impianto elettrico domestico, per
poter installare l’apparecchiatura, dovrà essere
eseguita solo da personale abilitato.
•
Mai riparare l’apparecchiatura da soli. Le
riparazioni effettuate da persone non competenti
possono provocare dei danni. Contattare il
Centro di Assistenza più vicino ed esigere solo
ricambi originali
.
Uso
•
I frigoriferi e/o congelatori domestici sono
destinati unicamente alla conservazione e/o
congelazione degli alimenti.
•
Le migliori prestazioni si hanno con temperature
dell’ambiente comprese tra +18°C e +43°C
(Classe T); + 18°C e +38°C (Classe ST); +16°C
e +32°C (Classe N); +10°C e +32°C (Classe
SN); la classe di appartenenza é riportata sulla
targa matricola ubicata nella cella a fianco del
vano verdura.
Attenzione: al di fuori delle temperature
ambiente indicate dalla classe climatica di
appartenenza di questo prodotto, si devono
osservare le seguenti indicazioni: quando la
temperatura ambiente scende al di sotto del
valore minimo può non essere garantita la
temperatura di conservazione nel vano
congelatore; pertanto si consiglia di consumare
al più presto gli alimenti in esso contenuti .
•
In tutte le apparecchiature ci sono delle superfici
che si coprono di brina. A seconda del modello,
tale brina può essere eliminata automaticamente
(sbrinamento automatico) oppure manualmente.
Non tentare mai di togliere la brina con un
oggetto appuntito, si rischierebbe di danneggiare
irrimediabilmente l’evaporatore. Utilizzare a tale
scopo una paletta in plastica.
•
Non mettere mai nello scompartimento a bassa
temperatura (congelatore o conservatore) bibite
gassate: possono esplodere.
•
Non introdurre mai liquidi o alimenti caldi e non
riempire fino all’orlo i recipienti muniti di
coperchio.
•
Non usare alcun dispositivo meccanico o altro
mezzo artificiale per accelerare il processo di
sbrinamento tranne quelli qui raccomandati.
37
Page 38

38
Protezione dell’ambiente
Questa apparecchiatura non contiene, nel
circuito refrigerante e nell’isolamento, gas
refrigeranti nocivi per l’ozono. L’apparecchiatura
non deve essere smaltita con rifiuti urbani e
rottami. Deve essere evitato il danneggiamento
del circuito refrigerante, soprattutto nella parte
posteriore vicino allo scambiatore. Informazioni
sui centri di raccolta vengono forniti dall’autorità
comunale. I materiali usati in questa
apparecchiatura contrassegnati dal simbolo
sono riciclabili.
Smaltimento di apparecchi vecchi
Il simbolo sul prodotto o sulla confezione
indica che il prodotto non deve essere considerato
come un normale rifiuto domestico, ma deve essere
portato nel punto di raccolta appropriato per il
riciclaggio di apparecchiature elettriche ed
elettroniche.
Provvedendo a smaltire questo prodotto in modo
appropriato, si contribuisce a evitare potenziali
conseguenze negative per l'ambiente e per la salute,
che potrebbero derivare da uno smaltimento
inadeguato del prodotto. Per informazioni più
dettagliate sul riciclaggio di questo prodotto,
contattare l'ufficio comunale, il servizio locale di
smaltimento rifiuti o il negozio in cui è stato
acquistato il prodotto.
•
Non usare mai oggetti metallici per pulire
l’apparecchiatura; essa potrebbe venir
danneggiata.
Installazione
•
Durante il normale funzionamento il
condensatore ed il compressore, che sono posti
sul retro dell’apparecchiatura, si riscaldano
sensibilmente. Assicurarsi quindi che
l’installazione venga eseguita come da istruzioni
riportate sul libretto. Un’aerazione insufficiente
comporterà sicuramente un cattivo
funzionamento e dei danni all’apparecchiatura.
•
Assicurarsi, dopo aver installato
l’apparecchiatura, che essa non appoggi sul cavo
di alimentazione.
Importante: se il cavo di alimentazione si
danneggiasse, dovrà essere sostituito da uno
speciale cavo o assieme disponibili presso il
costruttore o il servizio di assistenza tecnica.
•
Se l’apparecchiatura viene trasportata in
posizione orizzontale è possibile che l’olio
contenuto nel compressore defluisca nel circuito
refrigerante. Lasciare l’apparecchiatura in
posizione verticale almeno 2 ore prima di
metterla in funzione per dar modo all’olio di
refluire nel compressore.
•
L’apparecchiatura non deve essere collocata
nelle vicinanze di termosifoni o cucine a gas.
•
Evitate ogni esposizione prolungata
dell’apparecchiatura ai raggi solari.
•
La parte posteriore dell’apparecchiatura deve
ricevere una sufficiente circolazione d’aria e deve
essere evitato qualsiasi danno al circuito
refrigerante.
INDICE
Avvertenze e consigli importanti . . . . . . . . . . . . . . . . . . . . . . . . . . . . . . . . . . . . . . . . . . . . . . . . . . . . .37
Uso / Pulizia delle parti interne - Funzionamento - Regolazione della temperatura - Refrigerazione . . .
dei cibi e delle bevande - Congelazione dei cibi freschi - Conservazione dei cibi surgelati . . . . . . . . . . .
Scongelazione - Cubetti di ghiaccio . . . . . . . . . . . . . . . . . . . . . . . . . . . . . . . . . . . . . . . . . . . . . . . . . . . . .39
Uso / Ripiani mobili - Posizionamento delle mensole . . . . . . . . . . . . . . . . . . . . . . . . . . . . . . . . . . . . . . . .40
Consigli / Consigli per la refrigerazione - Consigli per la congelazione - Consigli per la conservazione
dei surgelati / Manutenzione / Periodi di inattività . . . . . . . . . . . . . . . . . . . . . . . . . . . . . . . . . . . . . . . . . .41
Manutenzione /Pulizia periodica - Lampada di illuminazione - Sbrinamento . . . . . . . . . . . . . . . . . . . . .42
Se qualcosa non va - Installazione - Posizionamento . . . . . . . . . . . . . . . . . . . . . . . . . . . . . . . . . . . . .43
Installazione / Collegamento elettrico - Distanziali posteriori . . . . . . . . . . . . . . . . . . . . . . . . . . . . . . . . .44
Installazione / Reversibilità della porta . . . . . . . . . . . . . . . . . . . . . . . . . . . . . . . . . . . . . . . . . . . . . . . . . .45
Installazione / Reversibilità della portina . . . . . . . . . . . . . . . . . . . . . . . . . . . . . . . . . . . . . . . . . . . . . . . . .46
Page 39

39
Pulizia delle parti interne
Prima dell’uso e del collegamento elettrico pulire
tutte le parti interne con acqua tiepida e sapone
neutro allo scopo di togliere il caratteristico odore di
nuovo indi asciugare accuratamente.
Non usare detersivi nè polveri abrasive
che sono dannose alle finiture.
Funzionamento
Inserire la spina nella presa di corrente. Aprire la
porta del frigorifero e ruotare in senso orario la
manopola del termostato oltre la posizione «0»
(arresto).
Lo spegnimento si ottiene ruotando la manopola del
termostato sulla posizione «0».
Regolazione della temperatura
La temperatura è regolata automaticamente e può
essere aumentata (meno freddo) ruotando la
manopola verso i numeri più bassi oppure diminuita
(più freddo) ruotandola verso i numeri più alti. La
posizione corretta, comunque, va individuata
tenendo conto che la temperatura interna dipende
da questi fattori:
• la temperatura ambiente;
• la frequenza di apertura delle porte;
• la quantità di alimenti conservati;
• la collocazione dell’apparecchio.
La posizione intermedia è la più indicata.
Importante
Sulle posizioni di massimo freddo, con temperatura ambiente elevata, ed una notevole quantità
di alimenti, il funzionamento può essere
continuo, con formazione di brina o ghiaccio
sulla parete posteriore della cella. In tal caso è
necessario ruotare la manopola su una posizione di minor freddo, in modo da consentire lo
sbrinamento automatico e, di conseguenza, un
minor consumo di energia elettrica.
Refrigerazione dei cibi e delle bevande
Per utilizzare nel modo migliore lo scomparto
refrigerante è necessario:
non introdurre nella cella vivande calde o liquidi in
evaporazione; coprire o avvolgere gli alimenti,
specie se contengono aromi;
disporre gli alimenti in modo che l’aria possa
circolare liberamente attorno ad essi.
USO
Conservazione dei cibi surgelati
Al momento della messa in funzione o dopo un
periodo di inattività, introdurre gli alimenti
nell’apparecchio dopo averlo fatto funzionare per
almeno due ore con la manopola del termostato
sulla posizione di massimo freddo, quindi ruotare la
manopola sulla posizione di funzionamento normale.
Importante
In caso di scongelamento per cause accidentali,
ad esempio per mancanza di corrente, se il
periodo dell’interruzione é superiore al valore
riportato nella tabella dei dati tecnici sotto la
voce “tempo di risalita” sarà necessario
consumare i cibi entro breve o cucinarli subito e
ricongelarli (una volta raffreddati).
Congelazione dei cibi freschi
Lo scomparto congelante è adatto alla
congelazione di cibi freschi e alla conservazione a
lungo termine di cibi congelati e surgelati.
Per la congelazione non é necessario variare la
posizione della manopola termostato da quella di
normale funzionamento. Tuttavia, volendo ottenere
una congelazione più rapida, ruotare la manopola
del termostato verso la posizione di massimo
freddo; con manopola in quest’ultima posizione, la
temperatura nello scomparto refrigerante potrebbe
scendere al di sotto di 0°C. Se ciò si verificasse
riportare la manopola del termostato in
corrispondenza di una posizione che consenta una
temperatura meno fredda.
Scongelazione
Gli alimenti surgelati o congelati, prima di essere
usati, possono essere scongelati nel frigorifero o a
temperatura ambiente, a seconda del tempo
disponibile per l’operazione. I pezzi piccoli possono
essere cucinati direttamente appena tolti dal
congelatore; in questo caso, però, il tempo di cottura
sarà più lungo.
Cubetti di ghiaccio
II frigorifero è equipaggiato con una o più vaschette
per la formazione dei cubetti di ghiaccio. Dette
vaschette vanno riempite di acqua potabile e riposte
nello scomparto congelatore. Si raccomanda di non
usare utensili metallici per staccare le vaschette.
Non ingerire mai i ghiaccioli o i cubetti di ghiaccio
appena tolti dall’apparecchiatura perché potrebbero
provocare ustioni.
Page 40

40
Posizionamento delle mensole
Per permettere lo stoccaggio d’alimenti di diverse
dimensioni, si possono posizionare le mensole ad
altezze differenti. Operare come segue:
Spingere la mensola nel senso della freccia fino a
quando non si libera e posizionarla all’altezza
desiderata.
Ripiani mobili
Sulle pareti della cella sono ricavate delle guide che
consentono il posizionamento dei ripiani a diverse
altezze, secondo la necessità.
D338
Page 41

41
Consigli per la conservazione dei
surgelati
Per utilizzare nel modo migliore lo scomparto è
necessario:
• assicurarsi che i surgelati siano stati ben
conservati dal rivenditore;
• che il trasporto, dall’acquisto alla sistemazione
nello scomparto, sia breve;
• non aprire troppo frequentemente la porta dello
scomparto e non lasciarla aperta più del
necessario.
• Una volta scongelati, gli alimenti si deteriorano in
breve tempo e non possono venir ricongelati.
• Non superare il periodo di conservazione indicato
sulle confezioni dal produttore dei cibi.
MANUTENZIONE
Periodi di inattività
Durante i periodi in cui l’apparecchiatura non è in
funzione osservare le seguenti precauzioni:
staccare la spina dalla presa di corrente;
togliere tutti gli alimenti;
sbrinare e pulire l’interno e tutti gli accessori;
lasciare le porte socchiuse per facilitare la
circolazione di aria all’interno in modo da evitare la
formazione di odori sgradevoli.
scongelamento solo della quantità necessaria;
• avvolgere gli alimenti in fogli di alluminio o
politene.Gli stessi devono essere bene aderenti
ai cibi e ben chiusi;
• evitare di mettere i prodotti da congelare a
contatto di quelli già congelati; ciò eviterà
l’innalzamento della temperatura di questi ultimi;
• tenere presente che gli alimenti magri si
conservano meglio e più a lungo di quelli grassi e
che il sale riduce il tempo di conservazione;
• non consumare immediatamente i ghiaccioli
prelevati dallo scomparto congelatore possono
provocare scottature da freddo;
• è consigliabile indicare sulla confezione la data di
inizio della congelazione al fine di poter
controllare il tempo di conservazione;
• non mettere nello scomparto congelatore
bevande gassate: possono esplodere
Consigli per la congelazione
Per ottenere i massimi vantaggi dal processo di
congelazione diamo alcuni consigli importanti:
• la quantità massima di alimenti che possono
essere congelati in 24 h è riportata sulla
«targhetta matricola»;
• il processo di congelamento dura 24 ore.In
questo lasso di tempo non si dovrebbe
aggiungere altro cibo da congelare;
• congelare solo alimenti di ottima qualità, freschi e
ben puliti;
• dividere tutto in piccole parti, in modo da favorire
la rapidità della congelazione e consentire lo
CONSIGLI
Consigli per la refrigerazione
Carne (di tutti i tipi): va avvolta in sacchetti di
plastica e posta sul vetro sopra il cassetto verdura.
In questa posizione si potrà conservare per uno
o due giorni al massimo.
Cibi cotti piatti freddi, ecc. devono essere ben
coperti e possono essere disposti su qualsiasi
griglia.
Frutta e verdura: saranno messe, previa pulitura,
nel/ nei cassetto/i previsto/i a tale scopo.
Burro e formaggio devono essere conservati negli
appositi contenitori o avvolti in fogli di plastica o
alluminio per evitare il contatto con l’aria.
Latte in bottiglia: ben chiuse poste nel
portabottiglie.
Banane, patate, cipolla ed aglio, se non sono
confezionati, non vanno messi in frigorifero.
Staccare la spina dalla presa di corrente
prima di eseguire qualsiasi operazione.
Questa apparecchiatura contiene idrocarburi nel
circuito refrigerante; pertanto la manutenzione e la
ricarica devono essere effettuate esclusivamente da
personale autorizzato dall’azienda.
Page 42

42
Sbrinamento
Sull’evaporatore dello scomparto refrigerante la
brina viene eliminata automaticamente ad ogni
arresto del compressore. L’acqua derivante dallo
sbrinamento, tramite un apposito convogliatore,
viene raccolta in una bacinella posta nella parte
posteriore sopra il compressore
dell’apparecchiatura, da dove evapora.
Si raccomanda di pulire periodicamente il foro di
scarico dell’acqua di sbrinamento, posto nella
parte centrale dell’apposito convogliatore dello
scomparto frigorifero, utilizzando l’apposito
«pulitore» che si trova nel foro, per evitare che
l’acqua di sbrinamento cada sui cibi.
Nello scomparto congelante la brina deve essere
eliminata ogniqualvolta si è formato uno spessore di
4 mm circa, utilizzando una paletta in plastica.
Qualora si formasse uno spesso strato di ghiaccio,
sarà necessario effettuare un completo sbrinamento,
procedendo come segue:
1. staccare la spina dalla presa di corrente o porre
la manopola del termostato in posizione «O»;
2. avvolgere gli alimenti in parecchi fogli di giornale
e riporli in un luogo molto fresco;
3. lasciare la porta aperta, porre una bacinella sulla
prima griglia dello scomparto frigorifero in
corrispondenza del foro di scarico acqua di
sbrinamento e sollevare il tappo di chiusura come
indicato in figura;
4. a sbrinamento avvenuto asciugare le pareti
accuratamente;
5. reinserire la spina nella presa di corrente;
6. posizionare la manopola del termostato sul
numero più alto. Dopo due o tre di funzionamento
riportare la manopola sulla posizione intermedia.
Attenzione:
Si raccomanda di non impiegare utensili
Pulizia periodica
Non usare mai oggetti metallici per pulire l’apparecchiatura; essa potrebbe venir danneggiata.
Molti detergenti specifici per le superfici di
cucina contengono agenti chimici che possono
intaccare/danneggiare le parti in plastica
presenti in questo apparecchio. Si consiglia,
quindi, di pulire il rivestimento esterno di questo
apparecchio solo con acqua calda contenente
una piccola quantità di detersivo liquido per
piatti.
Pulire l’interno con acqua tiepida e bicarbonato di
soda. Risciacquare e asciugare accuratamente.
Pulire il condensatore e il motocompressore con una
spazzola o un aspirapolvere. Questa operazione
migliorerà il funzionamento con conseguente
risparmio di energia.
metallici per asportare la brina onde evitare gravi
danni all’apparecchio.
Non usare alcun dispositivo meccanico o altro
mezzo artificiale per accelerare il processo di
sbrinamento tranne quelli qui raccomandati.
Un innalzamento della temperatura dei surgelati
potrebbe ridurne il tempo di conservazione.
Lampada di illuminazione
La lampada di illuminazione dello scomparto
refrigerante é accessibile tramite le seguenti
operazioni.
• Svitare la vite di fissaggio della plafoniera.
• Sganciare la parte mobile esercitando una
pressione (vedi figura).
Qualora, a porta aperta, la lampada non si
accendesse, controllare che sia avvitata
bene; se il difetto rimane sostituire la
lampada con una di pari potenza ( la
potenza massima é riportata sul diffusore
luce).
D411
D037
PR151
Page 43

43
INSTALLAZIONE
Posizionamento
Collocare l’apparecchiatura lontana da fonti di
calore, quali: termosifoni, stufe da riscaldamento,
esposizione diretta ai raggi solari ecc.
Per motivi di sicurezza la ventilazione deve essere
come indicato in figura
Posizionamento dell’apparecchio sotto il pensile
della cucina (vedi Fig. - A). Posizionamento
dell’apparecchio senza pensile della cucina (vedi
Fig. - B).
Attenzione: mantenere le aperture per la
ventilazione libere da ogni ostruzione.
Uno o più piedini regolabili, posti alla base del
mobile, consentono un accurato livellamento.
SE QUALCOSA NON VA
Qualora l’apparecchiatura presentasse qualche
disfunzione, è bene controllare:
• che la spina sia ben inserita nella presa di
corrente;
• che non manchi l’energia elettrica
• che la manopola del termostato si trovi in
posizione intermedia.
Inoltre:
• se l’apparecchiatura è eccessivamente rumorosa
verificare che i fianchi non siano a contatto con
mobili o schienali che possono causare rumore o
vibrazioni;
• se vi sono tracce di acqua sul fondo dello
scomparto, verificare che il foro di deflusso
dell’acqua derivante dallo sbrinamento non sia
ostruito.
Dopo le verifiche di cui sopra, se la disfunzione
dovesse permanere, è bene chiamare il Centro di
Assistenza Tecnica più vicino.
Attenzione
L’apparecchio deve poter essere scollegato dalla
rete; é quindi necessario che la spina rimanga
accessibile ad installazione avvenuta.
100 mm10 mm
A
NP006
B
10 mm
Page 44

44
Collegamento elettrico
Assicurarsi, prima di inserire la spina nella presa
di corrente, che la tensione e la frequenza
riportate sulla targhetta matricola corrispondano
a quelle dell’impianto domestico.
È ammessa una oscillazione di ±6% sulla tensione
nominale.
Per il funzionamento a tensioni diverse si dovrà
utilizzare un autotrasformatore di potenza adeguata.
E’ indispensabile collegare l’apparecchio ad una
efficiente presa di terra.
A tale scopo la spina del cavo di alimentazione é
dotata dell’apposito contatto. Qualora la presa di
corrente dell’impianto domestico non sia collegata a
terra, allacciare l’apparecchiatura ad un impianto di
terra a parte conformemente alle norme in vigore
consultando in proposito un tecnico specializzato.
La Casa Costruttrice declina ogni responsabilità
qualora questa norma antinfortunistica non
fosse rrispettata.
Questa apparecchiatura è conforme alle seguenti
Direttive Comunitarie
-87/308/CEE del 2/6/87 relativa alla
soppressione dei disturbi radio.
- 73/23/CEE del 19/02/73 (Bassa Tensione) e
successive modificazioni;
- 89/336/CEE del 03/05/89 (Compatibilità
Elettromagnetica) e successive modificazione.
Distanziali posteriori
Nell’apparecchiatura sono inseriti due distanziali da
applicare come indicato in figura.
Allentare le viti, inserire i distanziali sotto la testa
della vite e riavvitare.
Page 45

45
Reversibilità della porta
Prima di ogni operazione staccare la spina dalla
presa di corrente.
Nel caso il luogo d'installazione o l'utilizzo lo
richieda, la direzione di apertura della porta può
essere modificata da destra a sinistra. Le
apparecchiature disponibili sul mercato hanno
l'apertura a destra. Eseguire le operazioni seguenti
in base alle figure e alle spiegazioni.
• Per eseguire le operazioni seguenti, proponiamo
di chiedere l'aiuto di un'altra persona che
mantiene saldamente la porta della
apparecchiatura durante l'operazione.
• Aprire la porta con apparecchiatura non coricata.
• Svitare le viti e togliere la testata della porta
superiore.
• Rimuovere il tappo (d) dalla testata della porta
superiore e posizionarlo sul lato opposto.
• Coricare l’apparecchiatura sullo schienale
• Togliere i tappi copricerniera ds. e sn. (3)
• Svitare la cerniera superiore e toglierla (1-2).
• Svitare la vite e togliere il fermoporta (4)
• Togliere la porta.
• Rimuovere con un utensile il coperchietto (F),
smontare la cerniera inferiore (E) svitando le viti
che la fissano.
• Reinserire il coperchietto sul lato opposto (F).
• Rimontare la porta.
• Prestare attenzione affinché il bordo della porta
sia parallelo al bordo del top.
• Fissare il fermoporta sul lato opposto (4).
• Posizionare e fissare la cerniera superiore sul
lato opposto (1-2).
• Reinserire i due tappi copricerniera.(3)
• Sollevare l’apparecchiatura in posizione verticale.
• Aprire la porta e riposizionare la testata porta
sulla porta conle viti.
• Montare la maniglia sul lato opposto, mettere nei
fori rimasti liberi le coperture in plastica che si
trovano nel sacchetto delle istruzioni d'uso.
3
2
1
4
E
F
D
F
E
F
F
Page 46

46
Rimettere l'apparecchiatura al suo posto,
livellarla e aspettare al meno due ore prima di
collegarla.
In caso non si voglia eseguire le operazioni sopra
elencate, contattare il servizio assistenza più vicino.
I tecnici esperti eseguiranno il montaggio con un
addebito.
Attenzione
Ultimata la reversibilità, controllare che la
guarnizione magnetica sia aderente al mobile. Se
la temperatura ambiente è fredda (ad es.in
inverno), può succedere che la guarnizione non
aderisca perfettamente al mobile. In tal caso
attendere il naturale rinvenimento della
guarnizione stessa oppure accelerare tale
processo riscaldando la parte interessata con un
normale asciugacapelli.
Reversibilità della portina
180°
Page 47

47
KUNDENDIENST
Servicestellen Points de service Servizio dopo vendita
5506 Mägenwil/Zürich
Industriestr. 10
9000 St. Gallen
Zürcherstrasse 204 e
4127 Birsfelden
Hauptstrasse 52
6032 Emmen
Buholzstrasse 1
7000 Chur
Comercialstrasse 19
3018 Bern
Morgenstrasse 131
Ersatzteilverkauf Point de vente de
5506 Mägenwil
Industriestrasse 10
Tel. 0848 848 023
Fachberatung / Verkauf Demonstration / Vente Consulente (cucina) /
8048 Zürich
Badenerstrasse 587
Tel. 044 405 81 11
Garantie Garantie Garanzia
Für jedes Produkt gewähren wir ab
Verkauf bzw. Lieferdatum an den
Endverbraucher eine Garantie von 2
Jahren. (Ausweis durch Garantieschein, Faktura oder Verkaufsbeleg).
Die Garantieleistung umfasst die
Kosten für Material, Arbeits- und
Reisezeit.
Die Garantieleistung entfällt bei
Nichtbeachtung der Gebrauchsanweisung und Betriebsvorschriften,
unsachgerechter Installation, sowie
bei Beschädigung durch äussere
Einflüsse, höhere Gewalt, Eingriffe
Dritter und Verwendung von NichtOriginal Teilen.
1028 Préverenges
Le Trési 6
rechange
5506 Mägenwil
Industriestrasse 10
Tel. 0848 848 023
8048 Zürich
Badenerstrasse 587
Tel. 044 405 81 11
Nous octroyons sur chaque produit
2 ans de garantie à partir de la date
de livraison ou de la mise en service
au consommateur (documenté au
moyen d’une facture, d’un bon de
garantie ou d’un justificatif d’achat).
Notre garantie couvre les frais de
mains d’œuvres et de déplacement,
ainsi que les pièces de rechange.
Les conditions de garantie ne sont
pas valables en cas d’intervention
d’un tiers non autorisé, de l’emploi
de pièces de rechange non
originales, d’erreurs de maniement
ou d’installation dues à l’inobservation du mode d’emploi, et pour
des dommages causés par des
influences extérieures ou de force
majeure.
6916 Grancia
Zona Industriale E
Vendita pezzi di ricambio
5506 Mägenwil
Industriestrasse 10
Tel. 0848 848 023
Vendita
8048 Zürich
Badenerstrasse 587
Tel. 044 405 81 11
Per ogni prodotto concediamo una
garanzia di 2 anni a partire dalla
data di consegna o dalla sua messa
in funzione. (fa stato la data della
fattura, del certificato di garanzia o
dello scontrino d’acquisto )
Nella garanzia sono comprese le
spese di manodopera, di viaggio e
del materiale.
Dalla copertura sono esclusi il
logoramento ed i danni causati da
agenti esterni, intervento di terzi,
utilizzo di ricambi non originali o
dalla inosservanza delle prescrizioni
d’istallazione ed istruzioni per l’uso.
Page 48

www.electrolux.com
www.electrolux.ch
 Loading...