

Page 1

KühlGefrierkombination
SANTO 2232 KG
Fridge-Freezer
Réfrigérateur-Congélateur
Frigorífico-Congelador
Frigorifero-Congelatore
Koel-Diepvrieskast
Gebrauchsanweisung
Instruction Booklet
Mode d’emploi
Libro de instrucciones
Libretto istruzioni
Gebruiksaanwijzing
AUS
ERFAHRUNG
GUT
Page 2

Contents
Warnings
Installation
Positioning page 18
Levelling page 18
Electrical connections page 18
Cleaning the inside page 19
Aligning the fridge-freezer top with the other kitchen units page 19
Fitting the appliance under the kitchen worktop page 20
Use
Starting up page 21
Setting the temperature page 21
Refrigerator compartment page 22
Freshness control page 22
Freezer compartment page 23
Some useful hints for freezing page 23
Storing ready-frozen food page 24
Thawing page 24
Making ice cubes page 24
Defrosting page 25
Maintenance
Internal cleaning page 26
Cleaning of the condenser/fan page 26
External cleaning page 26
Periodical cleaning page 26
Periods of non-use page 26
Replacing the bulb page 26
What to do if the appliance does not work
page 16
page 18
page 21
page 26
page 27
Page 3

■
■
■
■
■
■
■
Warnings
■
■
■
■
■
■
■
■
■
■
■
■
It is most important that this instruction
book should be retained with the appliance
for future reference. Should the appliance be
sold or transferred to another owner, or
should you move house and leave the appliance, always ensure that the book is
supplied with the appliance in order that the
new owner can be acquainted with the functioning of the appliance and the relevant
warnings.
These warnings are provided in the interest of
safety. You must read them carefully before
installing or using the appliance.
This appliance is designed to be operated by
adults. Children should not be allowed to
tamper with the controls or play with the
product.
Any electrical work required to install this
appliance should be carried out by a qualified
electrician or competent person.
This product should be serviced by an
authorized Service Centre, and only genuine
spare parts should be used.
It is dangerous to alter the specifications or
modify this product in any way.
Care must be taken to ensure that the appliance does not stand on the electrical supply
cable.
The domestic refrigerators and freezers are
designed to be used specifically for the storage of edible foodstuffs only.
Frozen food must not be re-frozen once it has
been thawed out.
Manufacturers’ storage recommendations
should be strictly adhered to. Refer to relevant instructions.
During normal operation, the condenser and
compressor at the back of the appliance heat
up considerably. For safety reasons, minimum ventilation must be as shown in the relevant Figure.
Attention: keep ventilation openings
clear of obstruction.
Before any cleaning or maintenance work is
carried out, be sure to switch off and unplug
the appliance.
If the appliance has been transported horizontally, it is possible that the oil contained in
the compressor flows in the refrigerant circuit.
It is advisable to wait at least two hours
before connecting the appliance to allow the
oil to flow back in the compressor.
The inner lining of the appliance consists of
channels through which the refrigerant
passes. If these should be punctured this
would damage the appliance beyond repair
and cause food loss. DO NOT USE SHARP
INSTRUMENTS to scrape off frost or ice.
Frost may be removed by using the scraper
provided. Under no circumstances should
solid ice be forced off the liner. Solid ice
should be allowed to thaw when defrosting
the appliance. See defrost instructions.
Do not use a mechanical device or any artificial means to speed up the thawing process
other than those recommended by the manufacturer.
Do not place carbonated or fizzy drinks in the
freezer as it creates pressure on the container, which may cause it to explode, resulting in damage to the appliance.
This appliance is heavy. Care should be taken
when moving it.
Ice lollies can cause frost burns if consumed
straight from the appliance.
This appliance contains hydrocarbons in its
cooling unit; maintenance and recharging
must therefore only be carried out by authorized technicians.
Never use metal objects for cleaning your
appliance as it may get damaged.
Under no circumstances should you attempt
to repair the appliance yourself.
Repairs carried out by inexperienced persons
may cause injury or more serious malfunctioning. Refer to your local Service Centre,
and always insist on genuine spare parts.
Page 4

■
■
■
■
■
■
This appliance does not contain gasses
which could damage the ozone layer, in
either its refrigerant circuit or insulation
materials. The appliance shall not be discarded together with the urban refuse
and rubbish. Avoid damaging the cooling
unit, especially at the rear near the heat
exchanger. Information on your local disposal sites may be obtained from your
municipal authorities.
Take utmost care when handling your
appliance so as not to cause any damages to the cooling unit with consequent
possible fluid leakages.
The appliance must not be located close
to radiators or gas cookers.
Avoid prolonged exposure of the appliance to direct sunlight.
There must be adequate ventilation
round the back of the appliance and any
damage to the refrigerant circuit must be
avoided.
For freezers only (except built-in models): an ideal location is the cellar or
basement.
Page 5
Installation
If this new appliance, provided with a magnetic
door seal, is replacing one which has a sprung
door closing device, you are advised to ensure
that this device is made inoperable before discarding the appliance so that the door can no longer
be retained in a closed position.
This is to avoid the possibility of children accidentally shutting themselves in the appliance and
thus endangering their lives.
Warning!
If this appliance has been transported horizontally,
wait at least half a day before starting it in order to
allow the oil to flow back into the compressor.
Positioning
Position the appliance well away from sources of
heat (radiators, stoves, cooking appliances, direct
sunlight etc.).
The best performance is obtained with a room
temperature of between +10 ° C and +32 ° C.
For safety reasons, minimum ventilation must be
as shown in the Figure.
Appliance positioned under overhanging kitchen
wall units (see Fig.-A).
Appliance positioned under the kitchen worktop
(see Fig.-B).
Attention: keep ventilation openings clear of
obstruction.
min.
2
50 cm
A
min.
50 cm
D527
2
B
min.
50 cm
2
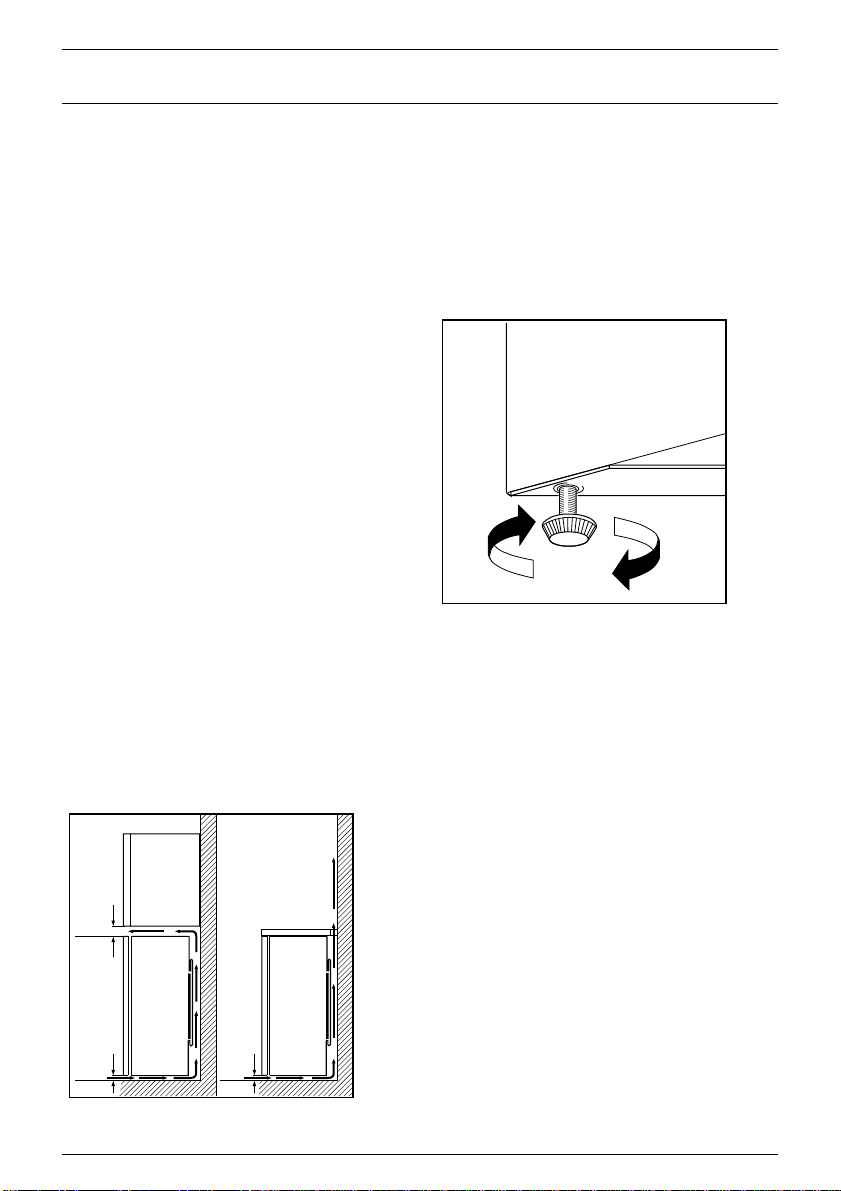
Levelling
The appliance is provided with two levelling feet
located at the front, and two rear castors for easy
movement.
The refrigerator should be levelled accurately, adjusting the feet as shown in the figure so that it is
tilted slightly backwards to facilitate closure of the
doors.
D090
Electrical connections
Before plugging in the appliance to the mains
socket, check that the voltage and frequency
indicated on the appliance’s rating plate are the
same as those provided by your home power
supply. A 6% fluctuation above or below rated
voltage is acceptable. For operation using different voltages, you should use an autotransformer
of suitable capacity.
The appliance MUST be connected to an
efficient earth or ground tap.
The supply-lead plug in fact incorporates a special
earth or ground contact for this purpose.
If by any chance the sockets of your domestic
wiring system are not earthed (grounded), the
appliance must be connected to a separate earth
or ground wire by a qualified electrician, in accordance with existing safety regulations.
The manufacturer declines to accept any
liability if this accident-prevention procedure
is not followed.
This appliance complies with EEC directive
number 87/308 of 2.6.87 relative to radio interference suppression.
Page 6

This appliance complies with the
following E.E.C. Directives:
- 73/23 EEC of 19.2.73 (Low Voltage Directive)
and subsequent modifications;
- 89/336 EEC of 3.5.89 (Electromagnetic
Compatibility Directive) and subsequent modifications.
Cleaning the inside
Wash the inside of the appliance with lukewarm
water and a little bicarbonate of soda (1
teaspoonful to 1.2 litre/2 pints of water). Do not
use soap or detergent as the smell might linger.
Dry thoroughly.
Aligning the fridge-freezer top with
the other kitchen units
The appliance comes with the top aligned with
the door. To change the alignment, follow the
instructions below:
remove the screws (A) fixing the rear brackets to
the top; move the top and, having selected the
new position, refit the screws.
A
D080
D089
D091
Page 7

Fitting the appliance under the
kitchen worktop
This appliance can also be fitted under your
existing kitchen unit tops following the instructions below:
remove the screws (A) fixing the rear brackets (C)
to the top, detach the top from the catches (B) and
remove.
Fit the appliance into the recess.
B
900
A
C
B
D087
570÷600
820
Important
For the appliance to function properly, an opening
of at least 137 cm
2
must be cut in the kitchen
worktop.
min 137cm
D219
2
A minimum clearance must also be provided
between the condenser and the wall, as shown in
the figure.
60 mm
D575
min.
50 cm
2
Page 8

Use
1.
2.
3.
4.
5.
6.
7.
8.
9.
4
1
5
6
2
7
8
3
9
10
11
Fast freezing compartment.
Food calender.
Frozen and deep-frozen products.
Thermostat, ambient temperature switch, light.
Butter.
Cooked foods, cold meats, foods used every
day.
For best use of the space, the front shelves can
be folded back onto the rear shelves.
Starting up
After cleaning the appliance, connect up to the
mains and set the temperature as follows:
Setting the temperature
The temperature inside the refrigerator and
freezer is regulated by a single thermostat with 6
operating positions and one «stop» (
Position 1 = minimum cold
Position 6 = maximum cold
Turn the thermostat dial to the required position;
the intermediate position is usually the most
suitable.
O
) position.
Meat, fish.
Tubes of sauce.
Fruit and vegetables.
10. Bottles.
11. Air regulator.
The thermostat setting can vary as the temperature inside the refrigeration compartment
depends on the following factors:
– room temperature
– how often the door is opened
– how much food is stored
– position of the appliance.
Important
If the fridge is not defrosting correctly, it is
possible that because a very low temperature has
been selected, the motor is working continuously,
which prevents the defrost cycle from operating.
To ensure correct defrosting, a lower number
should be selected on the thermostat and you
should notice that the motor cuts out from time to
Page 9

A
B
time, which is correct.
If you wish to return to a lower temperature, turn
the thermostat to a higher number, however you
should turn the setting lower occasionally to allow
automatic defrosting.
Important
To ensure that the appliance is working efficiently
when the room temperature drops below 14
degrees centigrade, a switch is located beside the
thermostat knob.
The operating position is when the switch is
depressed (the built-in light illuminates).
You should ensure that this switch is used
correctly, and it is most likely that it will need to be
depressed throughout the winter to allow for low
overnight temperatures.
No damage can be caused by leaving the switch
in this position for a period of time.
A
B
D325
– Thermostat dial
– Ambient switch.
– space out the food so that the air can circulate
freely around it
– don’t block the gap between the front part of
the shelves and the back.
Freshness control
The fruit and vegetable compartment can accumulate moisture, depending on the type of food stored.
To regulate the build-up of damp air in this compartment there is a grille which can be adjusted.
For salads and leafy vegetables, a high moisture
content will ensure that they retain their freshness
but root vegetables such as turnips require a less
moist atmosphere. The adjuster allows you to select
the best conditions for your food, the atmosphere
will be dryer the more the grille is opened.
Refrigerator compartment
The coldest area of the refrigerator is the lower
part, above the fruit and vegetable drawer.
For the best performance from your refrigerator,
always follow these rules:
– make sure the appliance is installed correctly
– never put hot drinks or food into the refrigerator,
leave them to cool to room temperature first
– cover food, especially if strong smelling
A
D084
Page 10

Freezer compartment
Some useful hints for freezing
Starting up
When starting up the appliance for the first time or
after a period of non use, position the thermostat
to a medium setting and leave for at least 4 hours
before placing the food to be frozen inside.
If you wish to fast-freeze a quantity of fresh food,
you must depress the ambient switch. Leave it on
this position for 24 hours before placing in the
food and release it after further 24 hours.
If the switch is already depressed (see
«Important» on page 22) no further adjustment is
required.
The products for freezing should be placed in the
upper drawer and then transferred to the lower
drawers so that the compartment is left free for
the next freezing operation.
You should never freeze all at once a greater
quantity of fresh foods than the maximum
indicated on the appliance’s rating plate.
– Fresh foods to be frozen must be fresh and of
the best quality.
– The size of each pack should be small enough
to ensure that it is used in one go. Small packs
freeze more quickly and uniformly, and give better results.
– Frozen food, once thawed, must not be refro-
zen. Lean food keeps better and longer than
fatty food, salt reduces the storage time.
– Wrap the food in polythene or aluminium freez-
ing bags or foil, so that they adhere to the food
and provide an airtight seal.
– The inner door of the freezer compartment
shows pictures of different types of food followed by a figure. These figures indicate the
maximum storage time, in months, for each
type of food.
Details of food being stored, can also be written
in pencil on a card located in a special holder in
the inner door.
– Never place hot food, bottles or cans of fizzy
drink in the freezer as they may explode. Containers with a lid must not be filled to the brim.
– Do not open the door or place extra fresh food
in the freezer next to food which is already frozen as this could cause the temperature of the
frozen food to rise and its quality and storage
life to reduce.
– In the first compartment, products must only be
stacked up to the mark on the drawers so as to
ensure that air circulation is not obstructed.
Page 11

Storing ready-frozen food
Thawing
Storing ready-frozen food is quite straightforward.
The packs can be placed beside each other or on
top of each other.
You are strongly advised to place ready-frozen
food in the compartment as quickly as possible
after purchase and we therefore recommend that
you buy them last. Also ensure that the external
packaging is intact.
Packaging which is swollen or has traces of
refrozen water droplets on the pack could indicate that the product has not been kept at a
suitable temperature and that it may have lost its
original quality.
Partially thawed food must not be refrozen, it
must be consumed within 24 hours. Never
exceed the storage times indicated.
Do not open the freezer door too often and do
not leave it open longer than necessary.
Important
Do not consume ice-lollies which have just come
out of the freezer. Their extremely low temperature
can cause frost burns.
Caution
In the event of a power cut, the food in the freezer
will not be affected if the power cut is short and if
the freezer is full. Do not open the door. Should the
food begin to thaw, it must be consumed quickly
and must not be re-frozen.
Food can be thawed in a number of ways,
depending on the type of food and the size of the
packs.
Meat, fish and fruit should be thawed in the refrigeration compartment and small pieces of meat
or poultry can even be cooked while still frozen,
but you must ensure that it is thoroughly cooked
through.
Vegetables should be directly immersed in boiling
water; ready-cooked dishes can be placed
directly in the oven in their aluminium wrapping.
A microwave oven is particularly suitable for
thawing any type of frozen or deep-frozen food:
follow the oven instructions, particularly regarding
the placement of aluminium wrapping in the oven.
D081
Making ice cubes
The appliance is provided with a plastic ice cube
tray.
Fill the tray 3/4 full to allow the ice to expand and
place in one of the freezer drawers.
To turn out the ice cubes, simply give the tray a
slight twist to release the cubes.
Page 12

Defrosting
Refrigeration compartment
The refrigerator automatically defrosts every time
the compressor stops. The water is discharged,
via the pipe, into a tray located at the back of the
appliance above the compressor, where it evaporates.
D079
Important:
To avoid defrost water overflowing into the fridge,
periodically clean the water discharge hole in the
centre of the V-shaped drip collector at the back of
the refrigerator compartment behind the fruit and
vegetable drawer. Use the special cleaner
provided, which you will find already inserted into
the discharge hole.
Freezer compartment
When the frost has reached a thickness of up to
4 mm, it can be removed using the ice scraper
provided with the appliance. During this operation
it is not necessary to disconnect the appliance
from the mains and remove the food.
Do not use a mechanical device or any artificial
means to speed up the thawing process other
than those recommended by the manufacturer.
For complete defrosting (once or twice a year)
proceed as follows:
– turn the thermostat dial to the «stop» position
(O) or disconnect the appliance from the mains.
– Remove any food from inside the freezer and
fridge, wrap it in several sheets of newspaper
and store in a cool place.
– Leave the door open and insert the ice scraper
under the channel in the centre of the lower
part of the appliance, place a low-sided con-
tainer beneath the scraper to collect the water.
– Clean and dry thoroughly.
– Replace the scraper in one of the drawers.
– Reconnect the appliance to the mains or reset
the thermostat to an operating position.
D083
D082
Page 13

Maintenance
Unplug the appliance before carrying out
any maintenance operation.
Warning
This appliance contains hydrocarbons in its cooling
unit; maintenance and recharging must therefore
only be carried out by authorized technicians.
Internal cleaning
Never use metal objects for cleaning your
appliance as it may get damaged.
Clean the inside and accessories with warm water
and sodium bicarbonate (one tablespoonful in 4
litres of water). Rinse and dry thoroughly.
The freezer drawers can be easily removed for
more thorough cleaning. Pull out fully and lift,
unhooking them from the catches.
For repositioning lift the drawers, insert under the
catches and slide in.
Cleaning of the condenser/fan
It will be necessary periodically to clean the
cooling fan and condenser. If a build-up of dust
and fluff is allowed around these items it could
reduce the operating efficiency of your appliance.
To gain access to these items please follow the
instructions.
– Disconnect the appliance from the mains.
– Pull the appliance out so as to expose the rear.
– The condenser (black pipework on right hand
base) and fan should be cleaned with a soft
brush or vacuum cleaner.
Periodical cleaning
Clean the condenser and compressor with a
brush or vacuum cleaner. This improves operating
efficiency and so saves energy.
D275
Periods of non-use
When the appliance is not in use, disconnect from
the mains, empty, defrost and clean, leaving the
doors ajar to prevent unpleasant smells.
Replacing the bulb
Unplug the appliance before replacing the bulb.
The light inside the refrigerator compartment is
easy to get at through the opening in the light
holder.
If the light does not go on when the door is open,
check that it is screwed into place properly.
If it still does not light up, change the bulb.
The rating is shown on the light bulb cover.
External cleaning
Wash the unit with warm soapy water. Do not use
abrasive products.
D085
Page 14

What to do if the appliance does not work
Before calling the Service Centre, check the following points:
The appliance does not work
Check that there is power at the socket. Ensure
that there is not a power cut by checking the lights
in the house. Check that the thermostat dial is in
the correct position.
Vibration or abnormal noises
The liquid refrigerant sometimes causes a faint
bubbling sound. This is quite normal in an
appliance of this type.
Traces of water on the bottom of the refrigeration compartment
Check that the defrosting water discharge hole is
not blocked.
The light does not come on
Check if the bulb is fitted correctly. Replace if it has
blown.
The fridge does not defrost
Check that the thermostat setting is not too high.
If, after the above checks there is still a fault, call
your nearest Service Centre.
Please make sure you give the model and serial
number of the appliance. This information can be
found on the rating plate inside the refrigerator
compartment on the left side behind the vegetable
drawer, or on the guarantee certificate.
Page 15

AEG Hausgeräte AG
Postfach 1036
D-90327 Nürnberg
AUS
ERFAHRUNG
GUT
Copyright by AEG
H271277100 – 0195/151 –
2222712-55 ET 1 2 3 4 5 6 7 8 9 10 11 12 / 97
 Loading...