

Page 1
Deutsch Seite 1
English Page 7
Svenska Sida 31
Dansk Side 37
Norsk Side 43
Français Page 13
Italiano Pagina 19
Español Pagina 25
Nederlands Pag. 49
Suomi Sivu 55
RM 4203
Typ C60 / 70
821 2652-01
T.B. Rev 09/2005
MANUAL
World Fridge
Page 2

E
W
u
e
B
d
s
D
l
b
D
W
D
E
T
N
d
T
z
v
L
K
d
n
t
D
a
D
d
t
s
I
G
E
G
EBRAUCHS- UND EINBAUANWEISUNG
F
ÜR DOMETIC KÜHLSCHRÄNKE
INFÜHRUNG
ir freuen uns, daß Sie diesen Kühlschrank gewählt haben
nd hoffen, daß Sie damit viel Freude haben werden. Zurst aber einige wohlgemeinte Ratschläge:
evor Sie den Kühlschrank in Betrieb nehmen, sollten Sie
iese Gebrauchs- und Einbauanweisung sorgfältig durchleen.
amit der Kühlschrank gute Leistung bringt und wirtschaft-
ich arbeitet, muß er wie nachstehend beschrieben, einge-
aut und verwendet werden.
er Kühlschrank ist für den Einbau in Freizeitfahrzeuge, wie
ohnwagen oder Wohnmobile vorgesehen.
as Gerät ist für diese Anwendung in Konformität mit der
U-Gasgeräterichtlinie 90/396/EWG baumustergeprüft.
RANSPORTSCHÄDEN
ach dem Entfernen der Verpackung kontrollieren Sie, ob
er Kühlschrank während des Transports beschädigt wurde.
ransportschäden sind unmittelbar dem, für den Transport
uständigen Unternehmen zu melden, spätestens innerhalb
on sieben Tagen nach Zustellung der Ware.
EISTUNGSSCHILD
ontrollieren Sie am Leistungsschild (siehe unten), daß Sie
as richtige Modell bekommen haben, und daß Netzspanung und Gasanschlussdruck den vorgeschriebenen Wer-
en entsprechen (in BRD, 230 Volt, 30 bzw. 50 mbar).
as Leistungsschild ist im Inneren des Kühlschrankes
ngebracht und enthält u. a. folgende Angaben:
Modellbezeichnung ......................
Produktnummer .........................
Seriennummer ..........................
iese Daten werden bei evtl. Kontakten mit dem Kundenienst benötigt. Wir schlagen Ihnen vor, sie hier einzu-
ragen. Weitere technische Angaben befinden sich im Ab-
chnitt TECHNISCHE DATEN dieser Gebrauchsanweisung.
NHALTSVERZEICHNIS
EBRAUCHSANWEISUNG........................2
BEDIENUNGSBLENDE. . . . . . . . . . ...............2
INBETRIEBNAHME.............................2
WINTERBETRIEB...............................2
TEMPERATURREGELUNG.....................2
TÜRVERRIEGELUNG...........................3
EINLAGERUNG VON LEBENSMITTELN.......3
EISWÜRFELBEREITUNG.. . . ...................3
ABTAUEN. . . . . ..................................3
PFLEGEANLEITUNG ............. . . . . . .........3
AUSSERBETRIEBNAHME......................3
VERHALTEN BEI STÖRUNGEN................3
WARTUNG......................................4
EINIGE RATSCHLÄGE .............. . . .........4
GARANTIE......................................4
KUNDENDIENST UND ERSATZTEILE .........4
TECHNISCHE DATEN ..........................4
INBAUANWEISUNG. . . ...........................4
SCHARNIERE VERSETZEN....................4
TÜRDEKORPLATTE............................5
AUFSTELLUNG/EINBAU . . . . . . . . . . . . . . .........5
GASINSTALLATION............................5
ELEKTRISCHE INSTALLATION................6
1
Page 3

G
B
D
F
d
D
z
D
d
D
b
d
D
G
s
e
W
s
L
g
F
I
D
G
D
F
m
V
r
B
F
h
K
e
B
1
2
D
3
4
5
6
7
D
(
2
B
b
C
S
1
D
d
d
W
K
A
z
s
w
s
d
s
E
r
m
T
D
E
e
k
p
U
t
M
S
b
B
u
K
S
T
h
B
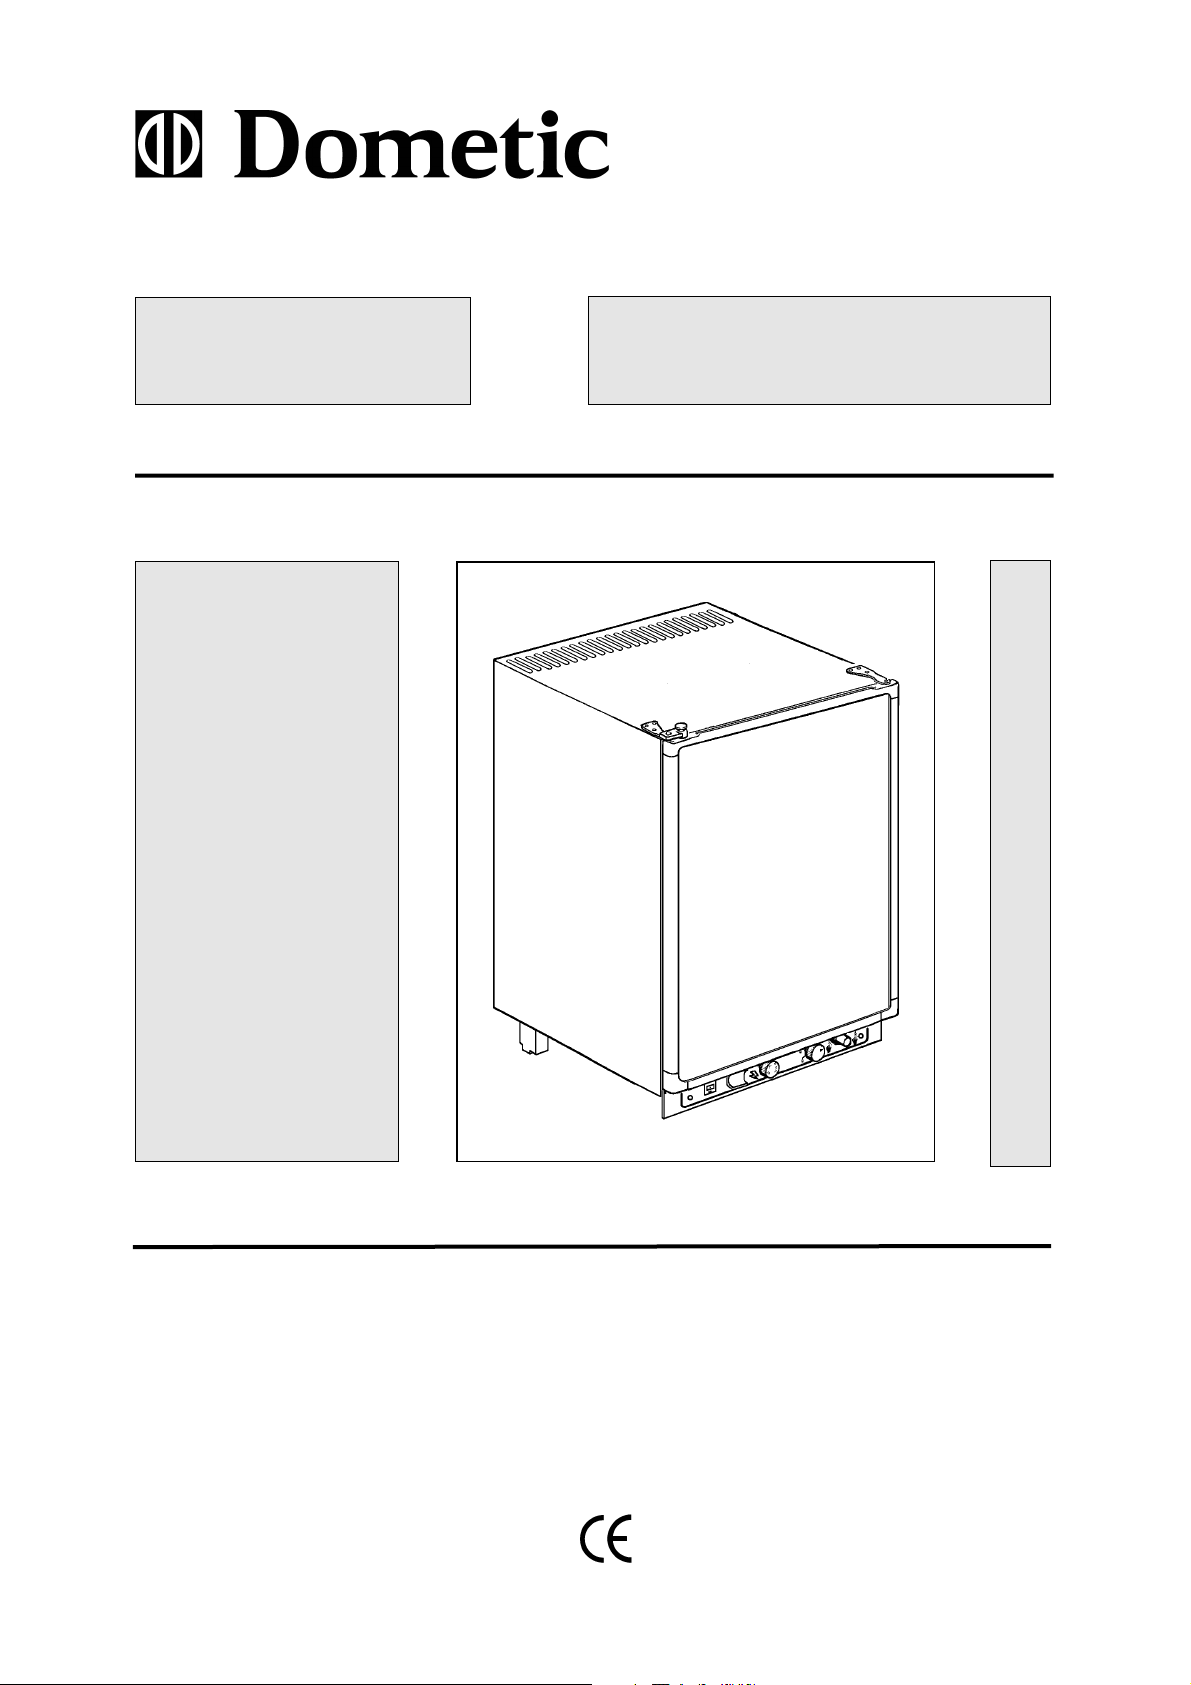
EBRAUCHSANWEISUNG
EDIENUNGSBLENDE
er Kühlschrank kann entweder mit 230 V, 12 V oder
lüssig-gas betrieben werden. Die Betriebsart wird mit Hilfe
er Bedienungselemente an der Blende (Fig. 3), eingestellt.
er elektrische Wahlschalter (A) hat drei Stellungen und
war 230 V, 12 V oder 0 (aus).
ie Temperatur im Hauptkühlfach wird bei Netzbetrieb mit
em Drehknopf (B) des Thermostaten geregelt.
ie Gaszufuhr wird durch Drehen am Knopf (C) gesperrt,
zw. geöffnet. Drei verschiedene Gasleistungen können
abei eingestellt werden.
er Kühlschrank hat eine Zündsicherung, die selbsttätig die
aszufuhr schließt, wenn die Flamme ausgeht. Beim Einchal-ten des Gasbetriebes muß man die Sicherung manull öffnen, indem man den Knopf (C) eindrückt.
enn der Knopf (D) des Piezozünders eingedrückt wird,
pringt ein Zündfunke am Brenner über.
inks unten im Kühlschrankinneren befindet sich ein Schau-
las, durch welches ein blaues Licht ersichtlich ist, wenn die
lamme brennt.
NBETRIEBNAHME DES GERÄTES
ie Positionsnummern im Text beziehen sich auf Fig. 3.
Warnung:
Schalten Sie bitte jedesmal nur eine Energiequelle ein !
asbetrieb
er Kühlschrank ist ausschließlich für einen Betrieb mit
lüssiggas (Propan/Butan) vorgesehen. Der Betriebsdruck
uß unbedingt der Angabe am Typenschild entsprechen.
ergleichen Sie sie bitte mit den Angaben des Druckminde-
ers an der Flüssiggasflasche.
ei der ersten Inbetriebnahme sowie nach Kundendienst
laschenwechsel o. ä., können die Gasleitungen Luft entalten. Sie sollten durch kurze Inbetriebnahme des
ühlschrankes und evtl. anderer Gasgeräte (Herd etc.)
ntlüftet werden, damit das Gas ohne Verzögerung zündet.
evor Sie den Gasbetrieb einschalten:
. Gegebenenfalls das Gasabsperrventil an der Gasflasche
sowie das bordseitige Geräteventil öffnen (Kontrolle,daß
Gas in der Flasche vorhanden ist).
. Kontrollieren Sie, daß der Netz- und der 12V- Betrieb
ausgeschaltet sind.
ann gehen Sie wie folgt vor:
. Gasregelventil (C) auf Stellung " max " bringen.
. Bei eingedrücktem Knopf (C) der Zündsicherung, Druck-
knopf (D) des Piezozünders alle 2-3 Sekunden betätigen,
bis die Flamme zündet.
. Daß die Flamme brennt, kann im Schauglas beobachtet
werden.
. Halten Sie den Knopf (C) noch 10-15 Sekunden einge-
drückt.
. Danach loslassen und kontrollieren, daß die Flamme
weiterbrennt.
er Gasbetrieb wird ausgeschaltet, indem man den Knopf
C) auf ``●'' stellt.
30 V Betrieb
evor Sie den Kühlschrank in Betrieb nehmen, prüfen Sie
itte, daß die Spannung des Hausanschlusses oder des
ampingplatzes mit der auf dem Typenschild angegebenen
pannung übereinstimmt. Dann gehen Sie wie folgt vor:
● Gasbetrieb gegebenenfalls abstellen.
● Spannungswahlschalter (A) in Stellung 230 V bringen.
● Drehknopf des Thermostaten (B) auf die höchste
(kälteste) Stufe bringen.
2 V Betrieb
er 12 V-Betrieb sollte nur während der Fahrt (bei laufenem Motor des Fahrzeuges) verwendet werden, da sonst
ie Batterie schnell entladen wird.
● Den Gasbetrieb gegebenenfalls ausschalten.
● Spannungswahlschalter (A) in Stellung 12 V bringen.
INTERBETRIEB
ontrollieren Sie bitte, daß die Lüftungsgitter und die
bgasführung nicht von Schneetrieb, Blättern o. dgl.
ugesetzt werden.
DOMETIC Lüftungsgitter A 1620 (Fig. 11), können mit
peziellen Winterabdeckungen, Modell WA 120, versehen
erden, die das Kühlaggregat gegen allzu kalte Luft
chützen. Die Abdeckungen sollten montiert werden, wenn
ie Aussentemperatur unter etwa 10°C sinkt. Unter 0°C
ollten sie montiert sein.
s wird empfohlen, die Winterabdeckungen auch zu montie-
en, wenn das Fahrzeug längere Zeit außer Betrieb genom-
en wird.
EMPERATURREGELUNG
ie Positionsnummern beziehen sich auf Fig. 3.
in Absorptionskühlgerät arbeitet völlig geräuschlos. Etwa
ine Stunde nach dem Einschalten sollte das Tiefkühlfach
alt werden. Bis der Kühlschrank die normale Betriebstemeratur erreicht hat, dauert es 6-10 Std. (abhängig von der
mgebungstemperatur). Wenn der Schrank mit Lebensmit-
eln beladen ist, dauert die Abkühlzeit länger (8-18 Std.).
an sollte also, wenn möglich, schon vor einer Reise den
chrank einschalten und gegebenenfalls vorgekühlte Leensmittel einlagern.
ei 230 V Betrieb ist der elektrische Thermostat wirksam
nd erlaubt die kontinuierliche Regelung der Temperatur im
ühlschrank. Normalerweise wird der Drehknopf (B) in
tellung 3-5 gesetzt. Wenn Sie eine niedrigere (kältere)
emperatur wünschen, drehen Sie bitte den Knopf auf eine
öhere Stufe.
ei 12 V Betrieb arbeitet das Kühlaggregat ununterbrochen.
2
Page 4

D
g
U
w
d
u
u
H
T
D
e
z
Z
E
B
B
d
r
W
k
d
D
d
s
m
D
b
u
d
E
Z
a
E
V
A
M
k
b
m
D
l
d
a
F
D
d
s
v
F
N
t
h
b
P
D
z
a
m
g
a
D
L
a
s
B
S
d
s
A
W
a
V
B
o
1
2
3
4
5
6
W
d
1
2
3
er Gasbetrieb sollte immer mit dem Knopf (C) des Gasre-
elventils in Stellung ``max'' eingeschaltet werden. Hat die
mgebungstemperatur 25°C oder mehr erreicht und/ oder
ird der Kühlschrank häufig geöffnet, sollte der Knopf in
ieser Stellung bleiben. Wenn die Umgebungstemperatur
nter 25° C absinkt, sollte man auf Stellung ``mid'' gehen
nd unter 10° C auf ``min'', um evt. Überfrieren im
auptkühlfach zu vermeiden.
ÜRVERRIEGELUNG
ie arretierbare Türverriegelung hat zwei Positionen. Die
rste (geschlossen) wird während der Fahrt benutzt und die
weite (leicht geöffnet), wenn der Kühlschrank für längere
eit außer Betrieb genommen wird.
INLAGERUNG VON LEBENSMITTELN
ewahren Sie die Lebensmittel immer in geschlossenen
ehältern, Alufolie o. dgl., auf. Nie warme Lebensmittel in
en Kühlschrank einlagern sondern erst auf Zimmertempe-
atur abkühlen lassen.
aren, die leichtflüchtige, brennbare Gase abgeben
önnen, dürfen nicht im Kühlschrank aufbewahrt weren.
as (✱✱) Frosterfach ist für die Eiswürfelbereitung und für
ie Aufbewahrung gefrorener Lebensmittel, wie z. B. Speieeis, vorgesehen. Es ist nicht zum Einfrieren von Lebens-
itteln geeignet.
ie meisten gefrorenen Lebensmittel können im Frosterfach
is zu einem Monat aufbewahrt werden. Aber die Zeit kann
nterschiedlich sein, und es sollten die Anweisungen auf
er Verpackung befolgt werden.
ISWÜRFELBEREITUNG
ur Eisbereitung wird die Eisschale mit Wasser gefüllt und
uf die Kühlplatte im Tiefkühlfach gestellt. Für schnellere
isbereitung den Regler dabei auf höchste Stufe stellen.
ergessen Sie aber nicht, ihn nachher zurückzustellen.
BTAUEN
it der Zeit bildet sich Reif auf den Kühlrippen im Hauptühlfach. Spätestens wenn die Reifschicht etwa 3 mm
eträgt, muß man abtauen, um Leistungsverluste zu ver-
eiden.
er Kühlschrank wird abgestellt, Lebensmittel und Eisscha-
e herausgenommen und die Tür(en) aufgestellt. Sie sollten
em Kühlschrank aber keine Fremdwärme zuführen und
uch nicht versuchen, mit scharfen Gegenständen den
rost abzukratzen.
as Tauwasser läuft in eine Tropfschale oder -rinne, von
ort durch einen Schlauch durch die Rückwand des Kühlchrankes zu einem Auffangbehälter am Kühlaggregat. Dort
erdunstet das Wasser von selbst. Das Tauwasser im
rosterfach sollte mit einem Tuch aufgenommen werden.
ach dem Abtauen wird der Schrank mit einem Lappen
rocken-gewischt, wieder angeschaltet und die Lebensmittel
inein-gelegt. Mit der Eiswürfelbereitung sollten Sie jedoch
is zum nächsten Tag warten.
FLEGEANLEITUNG
en Kühlschrank zuerst ausschalten und abtauen, wie
uvor beschrieben. Lose Teile (Etageren, Tragroste usw.)
usbauen, spülen und trocknen. Einen Lappen mit lauwar-
em Wasser, (evtl. mit Zusatz von einem milden Reiniungsmittel) anfeuchten und damit den Schrank von innen
uswischen. Danach mit einem weichen Tuch abtrocknen.
ie PVC-Dichtungen der Türen auch mit einem feuchten
appen abwischen und von Zeit zu Zeit mit Talkumpuder
breiben. Nie Scheuermittel, aggressive Reinigungsmittel,
tark parfümierte Produkte, Wachs o. ä. verwenden.
ei Gelegenheit das Kühlaggregat hinten am Schrank von
taub befreien, besonders die Rohrschlangen und zwischen
en Rippen. Dabei sollte der Kühlschrank abgeschaltet
ein.
USSERBETRIEBNAHME
ird der Kühlschrank für längere Zeit nicht benutzt, sollte er
ußer Betrieb genommen werden.
● Das Gas an evtl. vorhandenem Absperrventil abschalten.
● Elektroschalter auf 0 stellen.
● Gasabsperrventil auf ● stellen.
● Den Kühlschrank entleeren, abtauen und reinigen wie
vorher beschrieben. Die Tür des Kühlschrankes und des
Frosterfaches leicht geöffnet lassen und ggf. mit der
Türverriegelung in dieser Position arretieren.
ERHALTEN BEI STÖRUNGEN
evor Sie den Kundendienst anrufen, kontrollieren Sie,
b:
. die Anweisungen im Abschnitt EINSCHALTEN DES
KÜHLSCHRANKES befolgt wurden.
. der Kühlschrank waagerecht steht.
. es möglich ist, den Kühlschrank mit wenigstens einer der
vorhandenen Energiequellen zu betreiben.
. Wenn der Kühlschrank mit Flaschengas nicht funktioniert,
kontrollieren Sie:
● ob die Gasflasche leer ist.
● ob alle zwischengeschalteten Ventile geöffnet sind.
. Wenn der Kühlschrank nicht auf 12 V funktioniert, kon-
trollieren Sie:
● ob 12 V angeschlossen ist.
● ob die bordseitige 12 V-Sicherung intakt ist.
● ob die Batterie nicht entladen ist.
. Wenn der Kühlschrank nicht auf 230 V funktioniert, kon-
trollieren Sie:
● ob 230 V an den Kühlschrank angeschlossen sind.
● ob die Sicherung intakt ist.
enn der Kühlschrank nicht ausreichend kühlt, kann
ie Ursache sein:
. Lüftung des Kühlaggregates unzureichend, weil Zuluft-
und/oder Abluftöffnung ganz oder teilweise zugedeckt
sind.
. Der Verdampfer ist vereist.
. Die Thermostatstellung bzw. die Stellung des Regel-
ventils ist falsch.
3
Page 5

4
5
6
7
8
W
r
D
W
A
e
e
s
N
G
e
d
E
B
G
D
a
N
V
s
I
S
d
D
m
K
K
e
b
T
A
M
I
G
E
G
*
K
E
D
n
S
D
S
. Der Gasdruck ist falsch - kontrollieren Sie bitte den
Druckregler an der Gasflasche.
. Die Umgebungstemperatur ist zu hoch, z. B. weil die
Lüftungsöffnungen dem Wärmestau in einem Vorzelt
ausgesetzt sind.
. Zu viele (warme) Lebensmittel wurden kurzfristig eingela-
gert.
. Die Türdichtung liegt nicht umlaufend an, oder die Tür ist
nicht richtig geschlossen.
. Mehr als eine Energiequelle sind versehentlich einge-
schaltet.
enn der Kühlschrank dennoch nicht richtig funktioniert,
ufen sie den Kundendienst an, siehe unter Abschnitt KUN-
ENDIENST UND ERSATZTEILE.
Das Kühlaggregat darf nicht geöffnet werden -
es steht unter hohem Druck.
ARTUNG
rbeiten am Gas- und Elektroeinrichtungen dürfen nur von
inem zugelassenen Fachmann ausgeführt werden, und es
mpfiehlt sich, diese von einer autorisierten Kundendiensttelle ausführen zu lassen.
ach den geltenden Vorschriften G 607 des DVGW ist die
asanlage und die angeschlossenen Abgasführungen von
inem Sachkundigen alle zwei Jahre zu überprüfen (von
em Betreiber zu veranlassen).
INIGE RATSCHLÄGE
itte beachten Sie, daß:
● der 12 V Betrieb bei Stillstand des Fahrzeuges nicht
lange eingeschaltet bleibt.
● der Kühlschrank rechtzeitig abgetaut wird.
● der Kühlschrank bei Nichtbenutzung, wie beschrieben,
außer Betrieb genommen wird.
● Lebensmittel mit starkem Geruch sorgfältig verpackt
werden.
● die Lüftungsöffnungen frei sind.
● während der Fahrt die Tür mit der Türverriegelung arre-
tiert ist.
● der Kühlschrank jeweils von nur einer Energiequelle
gespeist wird.
ARANTIE
er Kühlschrank hat ein Jahr Garantie, von der Übergabe
n den Endverbraucher gerechnet (Rechnung oder andere
achweise bitte aufheben). Voraussetzung sind normale
erwendung und Folgeleistung dieser Gebrauchsanwei-
ung.
nnerhalb der gesetzlichen Garantiezeit (6 Monate) werden
chäden und Mängel am Gerät unentgeltlich behoben. Ab
em 7. Monat wird jedoch eine Anfahrpauschale erhoben.
er Kühlschrank hat zusätzlich eine Europagarantie ge-
äß der im Schrank eingelegten Drucksache.
UNDENDIENST UND ERSATZTEILE
undendienst und Ersatzteile können vom Händler oder
iner Kundendienststelle der Fa. Electrolux europaweit
ezogen werden.
ECHNISCHE DATEN RM 4203
ußenmaße des Kühlschranks
Höhe .........................606mm
Breite .........................486mm
Tiefe einschl. Kühlaggregat
ohne Tür.................440mm
einschl. Tür ..............480 mm
indesteinbaumaße der Nische
Höhe .........................610mm
Breite .........................490mm
Tiefe .........................460mm
nhalt
Brutto ........................... 60 lit.
Nutzinhalt.......................... 51lit.
davon Frosterfach ....................6lit.
ewicht(ohne Verpackung)............... 21kg
lektrische Daten
Anschlußleistung
230 V................... 105 watt
12V.................... 100watt
Energieverbrauch in 24 h..........2,3kWh
astechnische Daten
Nenn-Wärmebelastung *) ........ 186watt
Kleinstell-Wärmebelastung .. . ??? 120 watt
Gasverbrauch, in 24h
max.......................0,35 kg
mid.......................0,24 kg
min. ......................0,16 kg
) entspricht dem Anschlusswert ........14,5 g/h
ältemittel .......................Ammoniak
INBAUANWEISUNG
ie Gas- und Elektroinstallation muß von einem zugelasseen Fachmann ausgeführt werden.
CHARNIERE VERSETZEN
er Türanschlag kann in der folgenden Weise von einer
eite auf die andere versetzt werden:
● Den oberen Scharnierbolzen lösen und die Tür abmontieren (Vorsicht, daß Sie die Buchse und Scheibe nicht
verlieren).
● Den unteren Scharnierbolzen sowie die Türverriegelung
lösen und auf der entgegengesetzten Seite montieren
● Die Kunstoffstöpsel, die die alternativen Löcher der
Transportsperre in der Tür abdecken, vorsichtig herausnehmen und wechseln (Fig. 10).
● Die Tür auf den unteren Scharnierbolzen aufsetzen und
den oberen (mit Buchse und Scheibe) montieren.
● Kontrollieren, daß sich die Tür frei bewegen kann und die
Dichtung ringsum anliegt.
4
Page 6

T
ÜRDEKORPLATTE
E
s
A
A
R
A
D
a
F
E
s
v
F
i
K
D
d
b
W
u
K
g
E
D
(
D
Ö
L
s
e
w
I
b
v
z
e
b
S
g
B
g
S
L
B
K
l
e
D
m
o
F
g
D
u
m
a
I
d
d
t
a
W
(
a
v
w
G
D
F
e
E
v
s
s
inbau in einem Wohnwagen
ine Türdekorplatte kann einfach gewechselt bzw. einge-
etzt werden. Die Abmessungen der Platte müssen sein:
Höhe .........................532mm
Breite .........................453mm
Stärke .....................max3,8 mm
● Tür ausbauen wie unter SCHARNIERE VERSETZEN
beschrieben wurde
● unteren Teil des Türrahmens ausbauen, Platte nach
unten herausziehen
● neue Platte einpassen und nach oben schieben
● unteren Teil des Türrahmens wieder anbringen
UFSTELLUNG/EINBAU DES GERÄTES
ufstellen in nicht geschlossenen
äumen
● Der Kühlschrank muß so aufgestellt werden, daß er vor
direkter Sonnenbestrahlung, Regen und starkem Wind
geschützt ist
● Der Aufstellungsort soll möglichst kühl und gut belüftet
sein, damit sich die Abgase vom Brenner im Raum nicht
anreichern. Die Ventilationsöffnungen oben am Schrank
dürfen nicht zugedeckt werden.
● Den Schrank auf einer Stabilen Unterlage aufstellen,
damit er nicht kippt, wenn die beladene Tür geöffnet
wird.
● Die Unterlaage muß waagerecht sein. Mit Wasserwage
kontrollieren und den Schrank ggf. ausrichten.
ufstellen in geschlossenen Räumen
er Aufstellraum sollte ein Inhalt von wenigstens 20 m
ufweisen und ein zu öffnendes Fenster oder eine Tür ins
reie haben.
s ist wichtig, daß der Kühlschrank nicht einer Wärmeeintrahlung von heißen Gegenständen ausgesetzt wird (z.B.
on einem Herd ohne Strahlungsschutz).
ür gute Leistung, auch bei hoher Umgebungstemperatur,
st es wichtig, daß das Kühlaggregat (hinten am
ühlschrank) ausreichend belüftet wird.
er Kühlschrank ist für eine Freiaufstellung vorgesehen und
er Abstand zu evtl. Seitenwänden sollte wenigstens 50mm
etragen.
enn der Kühlschrank evtl. eingebaut wird, müssen Zu-
nd Abluftöffnungen mit ausreichender Fläche für das
ühlaggregat vorgesehen werden und zwar wie in Fig. 1
ezeigt wird. Die Bezeichnungen im Bild bedeuten:
F Zuluftöffnung
G Abluftöffnung nach oben
H Abluftöffnung nach vorne (Alternative)
3
er Kühlschrank muß in einer Nische eingebaut werden,
Bild 2), deren Abmessungen aus den TECHNISCHEN
ATEN entnommen werden können. In der Nische werden
ffnungen durch die Aussenwand angebracht, in welche
üftungsgitter angebracht werden (kleinster freier Querchnitt 250 cm2). Gitter, die für diese Anwendung speziell
ntwickelt wurden, können von DOMETIC bezogen
erden (Modell A 1620).
n den Seitenwänden des Kühlschrankes sind vier Kunstoff-
uchsen mit Schrauben zur Befestigung des Kühlschrankes
orgesehen (Fig. 4). Die Seitenwände der Nische und/ oder
ur Kühlschrankbefestigung angebrachte Leisten, müssen
ntsprechend ausgelegt sein, so daß die Schrauben auch
ei der erhöhten Beanspruchung während der Fahrt, festen
itz behalten. Wenn der Kühlschrank in seine richtige Lage
ebracht ist, werden die Schrauben durch das
lechgehäuse des Kühlschrankes in die Nischenwand
eschraubt. Zwischen Gehäuse und Wand darf auf jeder
eite ein Spiel von höchstens 3 mm vorhanden sein (evt.
eisten einsetzen).
emerkung: Dies ist die einzige zugelassene Art, den
ühlschrank in der Nische zu befestigen. An anderen Stel-
en in das Gehäuse eindringende Schrauben können
ingeschäumte Bauteile wie z. B. Leitungen beschädigen.
ie Abgase müssen ins Freie geleitet werden und zwar
ittels einer speziellen Abgasführung, die gesondert bestellt
der über den Kundendienst bezogen wird. Sie muß nach
ig. 5 montiert werden und ist Bestandteil der Genehmiung des Kühlschrankes.
er Abstand vom Wanddurchbruch zum Abgasrohr muß
mlaufend wenigstens 20 mm betragen. Der Durchbruch
uß mit nicht brennbarem Isoliermaterial, z. B. Glaswolle,
usgefüllt werden.
m oberen DOMETIC-Gitter ist eine Durchführung für
ie Abgase bereits integriert, Fig. 7. Damit kann man auf
en Einsatz von der herkömmlichen Abgasführung, verzich-
en und dadurch den Einbau vereinfachen. Dieser Einbau ist
ls Alternative zugelassen.
enn nicht gewährleistet ist, daß evtl. ausleckendes Gas
schwerer als Luft) durch ein Gitter in Bodenhöhe nach
ußen abgeleitet werden kann, empfiehlt es sich, ein Loch
on etwa 40 mm im Nischenboden vorzusehen, durch
elches das Gas ins Freie geleitet wird.
ASINSTALLATION
as Gerät ist ausschließlich für einen Betrieb mit
lüssiggas (Propan/Butan) vorgesehen, auf keinen Fall
twa Stadtgas oder Naturgas.
in fest eingestellter Druckregler (Druckminderer) muß
orhanden sein, der den Flaschendruck auf den am Typenchild angegbenen Betriebsdruck herabsetzt. Dieser entpricht dem Normdruck des Bestimmungslandes.
5
Page 7

D
ie Gasarmatur ist in Fig. 6 schematisch dargestellt. Die
B
.
F
d
D
w
A
D
D
s
u
v
b
D
A
z
I
D
s
F
V
s
E
s
s
I
D
(
z
e
L
B
a
N
u
F
D
G
o
V
M
D
V
l
E
2
D
g
e
1
D
K
D
V
(
m
S
D
s
i
S
d
S
D
ezeichnungen im Bild bedeuten:
s wird empfohlen den Kühlschrank mit Sicherheitschlauch und -stecker nach DIN 3383 Teil 3 anzuschliesen.
J Schlauchanschluss, R 1/4 Linksgewinde
K Stahlrohr, 8 mm Durchmesser
L Piezozünder
M Gasregelventil
N Zündsicherung
O Thermoelement
P Brenner
Q Zündelektrode
.. in nicht geschlossenen Räumen
ür diesen Verwendungszweck ist ein Schlauchanschluss
es Kühlschrankes an einer Gasflasche vorgeschrieben.
afür muß ein Schlauch nach DIN 4815 Teil 2 verwendet
erden.
n der handelsüblichen Camping-Gasflasche muss ein
ruckregler, wie oben beschrieben, angebracht werden.
abei kontrolliert man, daß die Gummidichtung im Flachenventil sowie die Gegenfläche am Regler sauber und
nbeschädigt sind. Dann Überwurfmutter des Reglers nur
on Hand anziehen, da sonst die Gummidichtung
eschädigt werden kann.
er Schlauchnschluss wird wie folgt hergestellt, Fig. 9:
● Schrank auf die Seite legen
● Den Schlauch am Nippel (J) von Hand bis zum Anschlag
anschrauben (Achtung: Linksgewinde)
● Schlauchmutter mit Schlüssel leicht nachziehen, dabei
mit zweitem Schlüssel den Nippelsechskant gegenhalten.
● Das andere Ende des Schlauches am Ausgang des
Druckreglers an der Flasche in entsprechender Weise
anschliessen
● Absperrventil der Flasche aufdrehen, so daß der
Schlauch unter Betriebsdruck steht
● Durch Bestreichen mit Flüssigseife, Spühlmittel o.dgl. die
beiden Schlauchverschraubungen auf Undichtigkeit
prüfen (Blasenbildung). Wenn undicht: Verschraubung
leicht nachziehen bis sich keine Blasen mehr bilden.
● In derselben Weise die Verschraubung zwischen Nippel
(J) und Rohr (K) auf Undichtigkeit prüfen und ggf. vorsichtig nachziehen.
● Ggf. auch die Verschraubung Flasche/Regler prüfen.
Wenn undicht: Gummidichtung und Gegenfläche reinigen
und auf Schaden untersuchen. Wenn fehlerhaft: auswechseln (Flasche zurückgeben) aber kein fremdes
Dichtmittel verwenden.
CHTUNG: Wenn die oben angeführte Maßnahmen nicht
u Dichtigkeit führen, Kundendienst einschalten.
nstalltion in geschlossenen Räumen
er Gasanschluss zum Kühlschrank muß nach den Technichen Regeln Flüssiggas (TRF) von einem zugelassenem
achmann ausgeführt werden. (TRF sind vom Deutschen
erein des Gas-und Wasserfaches, DVGW und vom Deutcher Verband Flüssiggase, DVFG herausgegeben)
nstallation in Fahrzeugen
er Gasanschluß zum Kühlschrank muß starr erfolgen
Schlauchanschluß ist unzulässig). Er darf nur von einem
ugelassenen Fachmann ausgeführt werden. Der Anschluß
rfolgt mittels einer Schneidring-(Ermeto-) Verschraubung
8, DIN 2353-St nach dem Arbeitsblatt G 607 des DVGW.
ordseitig ist ein Geräteabsperrventil leicht zugänglich
nzuordnen.
ach fachgerechter Installation ist eine Dichtheitsprüfung
nd eine Flammprobe gemäß TRF vom zugelassenen
achmann durchzuführen.
ie TRF-Sicherheitsvorschriften verbieten zwingend,
asgeräteanschlüsse und -Installationen jeder Art mit
ffener Flamme auf Undichtigkeiten abzuleuchten. Die
orschrift empfiehlt ein Bestreichen mit schaumbildenden
itteln (Handspühlmittel, Flüssigseife u.ä.) vorzunehmen.
ie Dichtigkeit aller gasführenden Teile, insbesondere
erschraubungen, sollte in der beschriebene Weise kontrol-
iert werden
LEKTRISCHE INSTALLATION
30 V Anschluss
ie 230 V Stromversorgung muß an eine vorschriftsmäßig
eerdete Steckdose oder an einen geerdeten Festanschluß
rfolgen.
Das Kabel (sowie das 12 V Kabel) muß so verlegt sein,
daß es nicht mit heißen Teilen des Aggregates/Bren-
ners oder mit scharfen Kanten in Berührung kommt.
2 V Anschluss
as bordseitige 12 V Anschlußkabel wird an eine 2-polige
lemmleiste am Kühlschrank (polrichtig!) angeschlossen.
ie Verkabelung sollte mit einer direkten, möglichst kurzen
erbindung an die Batterie bzw. Lichtmaschine erfolgen
Leitungsquerschnitt min. 2,5 mm2, empfohlen werden 4
m2). Bordseitig ist der 12 V Stromkreis mit einer 16 A
icherung abzusichern.
amit Sie beim Abstellen des Fahrzeugmotors nicht verges-
en, den 12 V-Betrieb auch auszuschalten (was die Batterie
n wenigen Stunden entladen würde), empfiehlt es sich, die
tromversorgung so auszuführen, daß sie beim Umdrehen
es Zündschlüssels unterbrochen wird.
chaltplan, siehe Fig. 8.
ie Bezeichnungen im Schaltplan bedeuten:
I. Schaltplan für Netzspannungsversorgung
II. Schaltplan für 12 V Gleichspannungsversorgung
S 12 V Heizpatrone
T Schalter für 12 V Betrieb/Netzbetrieb
U Elektro-Thermostat
V Heizpatrone für Netzbetrieb
6
Page 8

I
W
h
a
I
b
T
r
t
T
v
T
9
T
I
b
t
w
D
C
y
T
S
t
n
C
I
O
PERATING AND INSTALLATION
I
R
NSTRUCTIONS FOR DOMETIC
EFRIGERATORS.
NTRODUCTION
e are pleased that you have chosen this refrigerator and
ope you will derive much satisfaction from using it, but first
few well-meant words of advice:
t is important to read through these instructions carefully
efore beginning to use the refrigerator.
o ensure good refrigeration and economical operation, the
efrigerator must be installed and used as described in
hese instructions.
he refrigerator is designed for building-in to leisure
ehicles such as caravans or motorhomes.
he appliance is certified according to the EU-Gas-Directive
0/396/EEC.
RANSIT DAMAGE
nspect the refrigerator for damage. Transit damage must
e reported without delay to whoever is responsible for
ransport but not later than seven days after the refrigerator
as delivered.
ATA PLATE
heck the data plate, inside the refrigerator, to ensure that
ou have received the right model.
The right gas pressure is......... 30 mbar.
The right voltage is ............. 230volts.
he data plate contains e. g. the following details:
Model designation .......................
Product number .........................
Serial number ...........................
ince these details will be needed if you have to get in
ouch with service personnel, it is a good idea to make a
ote of them here.
ONTENTS
OPERATING INSTRUCTIONS..................8
CONTROLS.....................................8
STARTING THE REFRIGERATOR .. . . .........8
WINTER OPERATION . . . . . . . . . . . . . .............8
REGULATING THE TEMPERATURE...........8
TRAVEL CATCH................................8
FOOD STORAGE .. . . . . . . . . . . . . .................8
ICE-MAKING....................................9
DEFROSTING...................................9
CLEANING THE REFRIGERATOR .............9
TURNING OFF THE REFRIGERATOR .........9
IF THE `FRIDGE FAILS TO WORK.............9
MAINTENANCE............. . . . . . . . . . . . .........9
SOME USEFUL HINTS ....................... 10
GUARANTEE ................................. 10
SERVICE AND SPARE PARTS............... 10
TECHNICAL DATA ........................... 10
NSTALLATION INSTRUCTIONS..... . . . . ....... 10
REPOSITIONING THE HINGES . . . ........... 10
DOOR PANEL................................. 10
INSTALLATION/BUILDING-IN................ 10
LP GAS CONNECTION . . . . . . . . . . . . . . . . ....... 11
ELECTRICAL CONNECTION. . . . . . . . . . ....... 12
7
Page 9

O
C
T
C
b
T
1
R
w
T
a
T
m
T
c
T
w
I
b
i
S
T
L
A
d
b
o
i
B
1
2
3
4
5
6
7
T
2
1
2
3
1
O
t
d
W
P
n
f
c
t
b
W
t
R
T
O
h
O
m
a
t
O
L
(
2
n
k
t
T
M
v
T
d
s
t
F
A
i
N
M
T
s
f
N
s
d
a
PERATING INSTRUCTIONS
ONTROLS
he refrigerator can be run on either 230 V, 12 V or LP gas.
hanging between these modes of operation is carried out
y means of the controls of the control paner shown in fig 3.
he voltage selector (A) can be set at either 230 V,
2Vor0.
efrigerator temperature is controlled by a thermostat (B)
hen the unit runs on 230 V.
he gas supply is turned on/off by means of the knob (C). It
lso serves to select one of three different gas inputs.
he refrigerator is fitted with a safety device which auto-
atically shuts off the supply of gas if the flame goes out.
he safety device can be opened manually by depressing
ontrol (C).
he piezoelectric igniter discharges a spark over the burner
hen the button (D) is depressed.
nside the refrigerator at bottom left is a sight glass for the
urner. A blue light can be seen through it when the flame
s alight.
TARTING THE REFRIGERATOR
he position numbers refer to fig. 3.
Caution!
Only use one source of energy at a time
P Gas operation
fter initial installation, after servicing, changing gas cyliners etc.,the gas lines may contain some air which should
e allowed to escape by briefly turning on the refrigerator or
ther appliances. This will ensure that the flame lights
mmediately.
efore you start gas operation:
. Open the shut-off valve of the gas bottle (check that there
is enough gas). Open any on-board shut-off valve.
. Check that the switches for mains and 12 V operation are
off.
. Turn the gas control (C) to position MAX.
. Depress the knob (C) of the flame failure device and hold
it down while depressing the piezoelectric igniter button
(D) several times in quick succession.
. Check the flame indicator/sight glass that the flame is
alight.
. Keep the knob (C) depressed for a further 10-15 sec.
. Release the knob and again check that the flame stays
alight.
o terminate gas operation, turn knob (C) to ●.
30 V Operation
. Turn off the gas by means of the shut-off valve.
. Set the voltage selector (A) to 230 V.
. Turn the electric thermostat (B) to the highest (coldest)
position.
2 V Operation
nly operate your refrigerator on 12 V when the engine of
he vehicle is running - otherwise your battery will soon be
ischarged.
● If applicable, turn off the gas operation
● Depress the voltage selector (A) to position 12 V.
INTER OPERATION
lease check that the ventilation grilles or the flue outlet are
ot blocked by snow, leaves, etc.
DOMETIC ventilation grilles A 1620 (fig. 11), can be
itted with winter covers, modell WA 120, to protect the
ooling unit against cold air. The covers may be fitted when
he outside temperature is below approx. 10° C and should
e fitted when the temperature is below freezing point.
e suggest that you fit the winter covers also in the case
hat the vehicle is laid up during the winter season.
EGULATING THE TEMPERATURE
he position number refers to fig. 3.
nce the refrigerator has been started it will take a few
ours to become cold.
n 230 V operation the refrigerator is controlled by a ther-
ostat and the thermostat knob (B) should be set at 3-5. If
lower (colder) temperature is desired, set the thermostat
o a higher figure.
n 12 V operation the refrigerator works continuously.
P gas operation should always be initiated with the knob
C) at the max position. If the ambient temperature is above
5° C and/ or the door of the refrigerator is frequently opeed the knob should be left at that position. Below 25° C the
nob should be set at mid and below 10° C at min to avoid
emperature below freezing in the main compartment.
RAVEL CATCH
ake sure that the travel catch is engaged when the cara-
an is on the move.
he travel catch at the top of the door can be set in two
ifferent positions. In one position the door is held tightly
hut. In the other position the door is secured ajar so that
he refrigerator can be aired when not in use.
OOD STORAGE
lways keep food in closed containers. Never put hot food
n the refrigerator; allow it to cool first.
EVER KEEP ITEMS IN THE REFRIGERATOR WHICH
IGHT GIVE OFF FLAMMABLE GASES.
he 2-star (✱✱) frozen food compartment is intended for the
torage of frozen food and for making ice. It is not suit-able
or freezing items of food.
ever put bottles or cans of fizzy drinks in the frozen food
torage compartment as they may burst when freezing. Also
on't give children ice lollies straight from the compartment
s they could cause frost burns.
8
Page 10

M
c
v
o
I
F
p
I
t
b
m
D
F
f
a
C
i
r
T
a
f
s
D
h
m
b
T
t
e
t
P
g
C
C
a
S
b
c
i
N
p
t
o
T
a
g
w
T
w
r
T
I
I
C
t
1
2
3
4
5
6
I
1
2
3
4
5
6
7
8
I
t
M
C
e
w
z
A
ost kinds of frozen food can be stored in the frozen food
ompartment for about a month. This period of time may
ary, however, and it is important to follow the instructions
n the individual packings.
CE-MAKING
ill the ice tray just below the brim with drinking water and
ut the tray on the freezer shelf.
t is possible to make ice faster by turning the control knob
emporarily to its highest value but do not forget to turn it
ack to its regular setting afterwards as the refrigerator
ight otherwise become too cold.
EFROSTING
rost will gradually accumulate on the refrigerating sur-
aces. It must not be allowed to grow too thick as it acts as
n insulator and adversely affects refrigerator performance.
heck the formation of frost regularly every week and when
t is about 3 mm thick it will be necessary to defrost the
efrigerator.
o defrost the refrigerator, turn it off and remove the ice tray
nd all food items. Normally the temperature of items of
ozen foods would rise unduly during defrosting and so they
hould be consumed within 24 h or discarded.
o not try to accelerate defrosting by using any kind of
eating appliance as the plastic surfaces of the refrigerator
ight then be damaged. Neither should any sharp objects
e used to scrape off the ice.
he defrost water runs from a collector channel down a
ube to a drip tray at the rear of the refrigerator where it
vaporates. When all the ice has melted, wipe the refrigera-
or dry and restart it.
lace the food items back inside but wait until the refri-
erator is cold before making ice cubes.
LEANING THE REFRIGERATOR
lean the inside of the refrigerator regularly to keep it fresh
nd hygienic.
oak a cloth in a solution consisting of a teaspoon of bicaronate of soda to half a litre of warm water. Wring out the
loth and use it to clean the interior of the refrigerator and
ts fittings.
ever use detergents, scouring powder, strongly scented
roducts or wax polish to clean the interior of the refrigera-
or as they may damage the surfaces and leave a strong
dour.
he exterior of the refrigerator should be wiped clean now
nd again, using a damp cloth and a small quantity of deterent. But not the door gasket, which should only be cleaned
ith soap and water and then thoroughly dried.
he cooling unit behind the refrigerator should be cleaned
ith a brush from time to time, but make sure that the
efrigerator is switched off when doing this.
URNING OFF THE REFRIGERATOR
f the refrigerator is not to be used for some time:
● Shut off any on-board valve in the gas line to the refrigerator.
● Set the voltage selector (A), fig. 3, to 0.
● Set the gas valve (C) to ●.
● Empty the refrigerator. Defrost and clean it as described
earlier. Leave the doors of the refrigerator and the frozen
food compartment ajar. Use the travel catch to hold in
this position.
F THE `FRIDGE FAILS TO WORK
heck the following points before calling a service
echnician:
. That the STARTING THE REFRIGERATOR instructions
have been followed.
. The refrigerator is level.
. If it is possible to start the refrigerator on any of the con-
nected sources of energy.
. If the refrigerator fails to work on gas, check:
● That the gas bottle is not empty.
● That all LP-gas valves are open.
. If the refrigerator fails to work on 12 V, check:
● That the 12 V supply is connected to the refrigerator.
● That the fuse on the 12 V supply is intact.
● That the 12 V switch is on.
. If the refrigerator fails to work on 230 V, check:
● That the 230 V supply is connected to the refrigerator.
● That the fuse is intact.
f the refrigerator is not cold enough it may be because:
. The ventilation is inadequate owing to reduced area of the
ventilation passages (partial blockage of grilles from wire
mesh etc).
. The evaporator is frosted up.
. The temperature control setting is incorrect.
. The gas pressure is incorrect - check the pressure regula-
tor at the gas container.
. The ambient temperature is too high.
. To much food is loaded at the same time.
. The door is not properly closed or the magnetic sealig
strip is defective.
. More than one source of energy is used at the same time.
f the refrigerator still does not work properly, call a service
echnician.
The sealed cooling system must not be opened, since
is under high pressure.
AINTENANCE
oncerning gas- and electric installations, only authorized
xperts are allowed to carry out maintenance and repair
orks. Besides, it is recommendable to contact an authori-
ed service if it comes to repair works.
ccording to the valid regulations G607 of DVGW, the gas
9
Page 11

i
nstallation as well as the connect flue oulets are to be
c
a
S
M
G
T
t
t
I
i
S
S
d
T
O
B
C
E
L
C
I
R
T
f
D
T
d
I
I
(
I
T
o
o
I
r
hecked every two years by an expert (this has to be
rranged by the person responsible).
mid.......................0,24 kg
min.......................0.16 kg
ooling medium ..............Ammonia (R 717)
OME USEFUL HINTS
ake sure that:
● The refrigerator is not operating on 12 V when the vehicle is parked, otherwise you will drain the car battery in
a short time.
● Defrosting is carried out periodically.
● The refrigerator is clean and dry with the door left open
when it is not to be used for some time.
● Liquids or items with a strong odour are well packa-ged.
● The ventilation openings are unobstructed.
● The door is secured by means of the travel catch when
the caravan is on the move.
● Only one mode of operation at a time is used to run the
refrigerator.
UARANTEE
he refrigerator is guaranteed for one full year on condition
hat it is used in a correct manner and in accordance with
hese operating and installation in-structions.
t is also embraced by a European guarantee as described
n the brochure supplied with the refrigerator.
ERVICE AND SPARE PARTS
ervice and spare parts are obtainable from your dealer or
DOMETIC - consult the yellow pages of the telephone
irectory.
ECHNICAL DATA RM 4203
verall dimensions
Height (incl. controls) .............606 mm
Width .........................486 mm
Depth (incl. cooling unit)
without door..............440mm
with door.................480 mm
uild-in dimensions
Height .........................610mm
Width .........................490 mm
Depth .........................460mm
apacity
gross ............................60 lit
net ............................51lit
frozen food compt..................... 6lit
Weight (whithout packaging)......... 21 kg
lectrical data
Input 230 V ..................... 105 watt
12V ........................ 100watt
Energy consumption/24 hours .....2.3 kWh
p gas data
Input (max) ..................... 186 watt
ditto, low flame ................... 86 watt
Energy consumption/24 hours
max ......................0.35 kg
NSTALLATION INSTRUCTIONS
EPOSITIONING THE HINGES
he door hinges can be moved to the opposite side in the
ollowing way:
● Unscrew the upper hinge pin, taking care not to lose the
set of washers and bushes.
● Lift the door from the lower hinge pin.
● Unscrew the pin and mount it on the opposite side hinge.
● Unscrew the travel catch and mount it on the opposite
side.
● Carefully prise out and exchange the plastic inserts in the
holes for the tarvel catch in the upper door frame. (fig.
10)
● Fit the door on the pin and reassemble the pin with
washers and bushes in its new position.
● Check that the door closes properly and seals all round.
OOR PANEL
he door panel can easily be mounted or changed. The
imensions of the panel must be:
Height .........................532mm
Width .........................453 mm
Thickness....................max3,8 mm
● Remove the door, see REPOSITIONING THE HINGES.
● Remove the lower trim moulding and then withdraw the
panel by sliding it downwards.
● Fit the new panel in place and slide it up as far as
possible.
● Fit the trim moulding back in place.
NSTALLATION/BUILDING-IN
nstallation in open air applications.
Under an awning, on a veranda, etc.)
● Place the refrigerator protected from rain, direct sun
exposure and strong draught.
● The location should be cool and with good air circulation
to avoid concentration of the flue gases. The ventilation
opening at the top of the refrigerator must not be covered.
● Place the refrigerator on a sturdy base so that it does not
tipp over when its door is opened.
● The base must be level. Check with a water level and
adjust if necessary.
nstallation indoors
he room should have a capacity (lenght x width x height)
f at least 20 m3and have a window (wich can be opened)
r a door to the outside.
t is important that the refrigerator is not subject to heat
adiation from a stove etc.
10
Page 12

F
t
t
T
a
5
I
a
c
t
I
T
t
T
w
g
G
n
F
w
r
T
i
t
m
W
b
e
b
s
N
r
p
r
e
F
o
s
T
m
s
w
s
f
T
o
n
I
e
r
m
e
L
T
l
C
T
n
T
t
t
l
g
w
(
h
.
F
u
a
A
t
v
s
o
d
T
C
.
T
a
or best performance also at high ambient temperatures
here must be a free air circulation over the cooling unit at
he rear of the refrigerator.
he refrigerator is designed for a free-standing installation
nd the clearance to side walls etc., should be at least
cm (2'').
f the refrigerator is to be built-in, openings with sufficient
rea must be foreseen for the access and exit of air for the
ooling unit, as shown in fig. 2. The letters in the figure refer
o:
F Access for cooling air
G Exit for air (upwards)
H Exit forwards (alternative)
nstallation in a caravan or motorhome
he refrigerator must be installed in a recess (fig. 2) with
he dimensions given in TECHNICAL DATA.
he refrigerating unit is ventilated via two openings in the
all of the caravan. The opening must be fitted with suitable
rilles, to give a free cross-section of at least 250 cm2.
rilles specially developed for this application can be obtai-
ed from DOMETIC (model A 1620).
our fasteners are fitted in the plastic bushings in the side
alls of the fridge, fig. 4. They are used for securing the
efrigerator in the enclosure.
he side walls of the enclosure and/ or any wooden braces
nstalled to fix the refrigerator must be dimensioned to seat
he screws securely, also considering the forces due to the
ovement of the vehicle.
ith the refrigerator in place, drive the screws through the
ushings in the lining of the refrigerator into the walls of the
nclosure. There must not be more than 3mm of clearance
etween refrigerator and enclosure on each side. If necesary, wooden strips or similar should be fitted.
ote: This is the only approved means of securing the
efrigerator to the enclosure and to the vehicle. Fasteners
enetrating other parts of the insulation (PU) foam of the
efrigerator might damage components like electric wiring
tc.
lue gas must be exhausted through a flue extension, to be
rdered separately or purchased through our service organiation,
he distance between the flue tube and combustible
aterial must not be less than 20 mm at any point. The
pace around the tube where it passes through the caravan
all should be packed with glass wool protected with
uitable metal plates. Install the flue extension as shown in
ig. 5.
he upper DOMETIC grille has an integrated flue
utlet, fig. 7. In this case the traditional flue outlet, is not
eeded which simplifies the installation.
f there is no outer grille at floor level where leaking gas can
scape, a 40 mm hole should be made in the floor of the
ecess to drain the gas. The hole should be fitted with wire
esh and an angled plate to protect it from stones, mud
tc.
P GAS CONNECTION
he refrigerator is designed for operation on liquified petro-
eum gas (LPG), the pressure of which must be:
● for Butane type LPG 28 mbar
● for Propane type LPG 37 mbar
heck that this is stated on the data plate.
he refrigerator is not designed for operation on town gas or
atural gas.
CAUTION !
CHECK THAT THE GAS SUPPLIED TO THE
REFRIGERATOR IS AT THE CORRECT PRESSURE.
CHECK THE REDUCING VALVE ON THE LP GAS
he gas equipment is shown in fig. 6. In the burner (P) is a
hermocouple (O), which generates an electric current
hrought the flame failure device (N), keeping it open as
ong as the flame burns. The valve (M) opens/closes the
as mechanically. It also has a ``MIN'' position for cold
eather. The piezo igniter (L) is connected to the spark plug
Q). The gas connecting tube (K) has a nipple (J) with left
and thread R 1/4.
.. in open air applications
or this application a hose connection to the LPG-bottle is
sed. Only use rubber hose with crimped on connectors
pproved for LPG.
pressure regulator (as described above) is assembled to
he LPG-bottle. Check that the rubber gasket in the shut off
alve of the bottle is clean and undamaged, as also the
ealing surface in the pressure regulator. The nut should
nly be thightened by hand - otherwise the gasket might be
amaged.
he connection is made as follows (figs. 6/9):
● Put the refrigerator on its side
● Connect hose to nipple (J) and thigten by hand. (Note:
left hand thread!).
● Thigten carefully with a wrench, thereby holding the
nipple (J) with second wrench.
● In the same way, connect other end of hose to pressure
regulator on LPG bottle.
● Open shut off valve of bottle, putting the hose under
pressure.
● Check for leaks at the connections, using water with
detergent, watching for bubbles. If leaking: carefully
thigten with two wrenches as explained above until
formation of bubbles stops.
● In similar way check also thigtness between nipple (J)
and tube (K) and thighten if necessary.
● Also check connection between pressure regulator and
LPG bottle. If leaking, clean sealing surfaces and inspect
for damage. If found defective: exchange (return LPG
bottle), but do not use any foreign sealing compound.
AUTION: If there are still leaks, call in a service
technician.
.. indoors
he gas installation should only be carried out by an
uthorisid gas fitter.
11
Page 13

A
i
e
s
w
d
.
T
p
m
I
a
t
t
b
b
b
E
T
a
l
i
t
A
M
C
O
F
h
a
I
a
G
B
B
A
c
t
T
c
t
o
T
t
T
t
r
W
I
m
a
3
u
2
C
a
1
C
b
a
a
l
m
T
f
T
s
t
i
W
T
flexible tube/hose, of max 1,5 m length approved for LPG
s connected to the threaded nipple (J) of fig. 6. Its other
nd is connected to the reducing valve of the gas bottle as
hown in 8 ig. 9 or to an easily accessible gas shut off valve
hich forms a part of the fixed gas installation of the buil-
ing.
.. in vehicles
he gas supply pipe should be connected to the gas inlet
ipe on the right hand side of the gas control valve by
eans of a suitable threaded coupling.
n making the connection to the refrigerator, a gas cock of
n approved type for use on LPG must be incorporated in
he supply line in a position which is readily accessible to
he user. For eventual servicing purposes, the union should
e on the outlet side of the cock and the pipework should
e positioned so as not to prevent the refrigerator from
eing readily withdrawn.
LECTRICAL CONNECTION
he electrical installation must be carried out in a proper
nd durable manner, taking into account all relevant reguations and codes of practice. For mains voltage operation,
t is important that the circuit to and in the caravan is effecively earthed.
LL MAINS VOLTAGE WIRING IN THE CARAVAN
UST BE INSTALLED IN ACCORDANCE WITH
URRENT I.E.E. REGULATIONS INCLUDING THE USE
F AN OUTLET AND COUPLER TO BS4343/- CEE17.
or connection to a 230 V electricity supply, the refrige-rator
as a 3-core mains lead which is intended for connec-tion to
properly earthed plug and socket outlet.
MPORTANT: The wires in the mains lead of this appliance
re coloured in accordance with the following code:
REEN-AND-YELLOW = EARTH
LUE = NEUTRAL
ROWN = LIVE
s the colours of the wires may not correspond with the
oloured markings identifying the terminals in your plug, in
he United Kingdom, proceed as follows:
he wire which is coloured GREEN-AND-YELLOW must be
onnected to the terminal in the plug which is marked with
he letter E or by the earth symbol or coloured green
r green-and-yellow.
he wire which is coloured BLUE must be connected to the
erminal which is marked with the letter N or coloured black.
he wire which is coloured BROWN must be connected to
he terminal which is marked with the letter L or coloured
ed.
ARNING - THIS APPLIANCE MUST BE EARTHED.
n the United Kingdom, the plug or circuit to the refrigerator
ust be fitted with a fuse not greater than 5 amps. If a 13
mp.(B.S.1363) fused plug is used, it should be fitted with a
amp. fuse. In other countries, the fuse rating will depend
pon the voltage and local practice.
30 V Supplies.
heck that the voltage stated on the data plate is the same
s the mains voltage in use (230 V).
Electrical leads
must be routed and secured so that they cannot come
into contact with hot or sharp parts of the refrigerator.
2 V Supplies
onnect the refrigerator to the vehicle battery or alterna-tor
y a direct cable. To avoid a voltage drop, the cross-section
rea of the connecting cable between battery/alter-nator
nd refrigerator must be at least 2.5 mm2if the distance is
ess than 9 meters, and at least 4 mm2if the distance is
ore than 9 meters
o ensure satisfactory operation, the positive lead must be
itted with a fuse rated at max. 16 A.
o prevent the refrigerator from draining the battery, make
ure that the current supplied to the caravan is cut off when
he vehicle engine is not running, for example by fit-ting an
gnition control relay.
iring diagram, see fig. 8.
he notations in the wiring diagramme are:
I. Diagramme for the mains installation.
II. Diagramme for the 12 V installation.
S. 12 V heating element
T. Switch for 230 V/12 V operation
U. Electric thermostat
V. Heating element, 230 V
12
Page 14

Page 15

Page 16

 Loading...