

Page 1
LAVAMAT REGINA 2551F
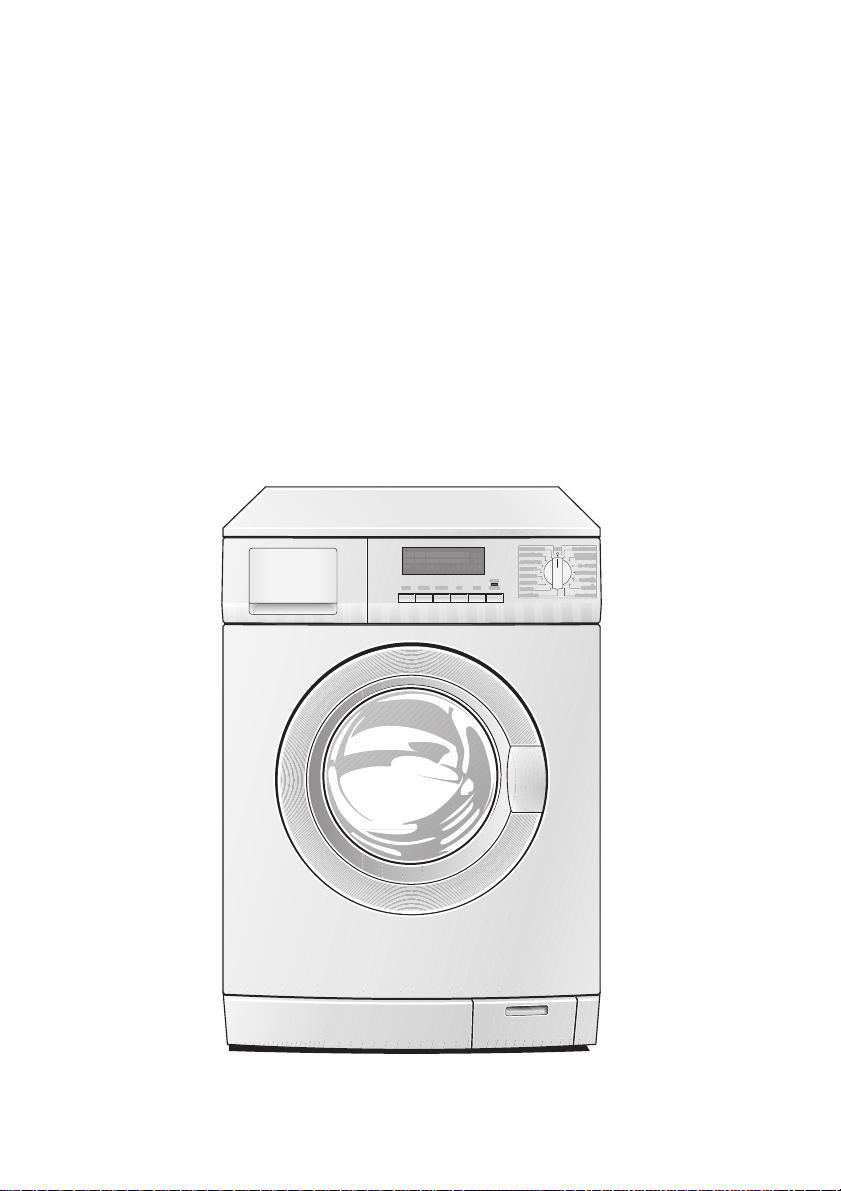
Washing machine
User information
Page 2

Dear customer,
Please read this User Information carefully and keep it to refer to at a
later date.
Pass this User Information on to any subsequent owner of the appliance.
The following symbols are used in the text:
1 Safety instructions
Warning: Notes that concern your personal safety.
Attention: Notes that show how to avoid damage to the appliance.
3 Useful tips and hints
2 Environmental information
2
Page 3

Contents
Operating Instructions. . . . . . . . . . . . . . . . . . . . . . . . . . . . . . . . . . . . . 5
Safety . . . . . . . . . . . . . . . . . . . . . . . . . . . . . . . . . . . . . . . . . . . . . . . . . . . . . . . . . 5
Description of the appliance . . . . . . . . . . . . . . . . . . . . . . . . . . . . . . . . . . . . 7
Control panel . . . . . . . . . . . . . . . . . . . . . . . . . . . . . . . . . . . . . . . . . . . . . . . . . . . 7
What is shown in the display . . . . . . . . . . . . . . . . . . . . . . . . . . . . . . . . . . . . . 7
Program overview . . . . . . . . . . . . . . . . . . . . . . . . . . . . . . . . . . . . . . . . . . . . . . 8
Prior to using for the first time . . . . . . . . . . . . . . . . . . . . . . . . . . . . . . . . . . 11
Switching on the appliance for the first time - setting the language. . . . . 11
Setting the time. . . . . . . . . . . . . . . . . . . . . . . . . . . . . . . . . . . . . . . . . . . . . . . . . 12
Carrying out a wash program prior to first use . . . . . . . . . . . . . . . . . . . . . . . 12
Preparing and sorting washing . . . . . . . . . . . . . . . . . . . . . . . . . . . . . . . . . . . 12
Running a washing cycle . . . . . . . . . . . . . . . . . . . . . . . . . . . . . . . . . . . . . . . . 13
Opening the door/loading washing . . . . . . . . . . . . . . . . . . . . . . . . . . . . . . . . . 13
Adding detergent/ additives . . . . . . . . . . . . . . . . . . . . . . . . . . . . . . . . . . . . . . . 13
Switching on the appliance/selecting a program. . . . . . . . . . . . . . . . . . . . . . 15
Changing the temperature . . . . . . . . . . . . . . . . . . . . . . . . . . . . . . . . . . . . . . . . 15
Changing spin speed/selecting rinse hold. . . . . . . . . . . . . . . . . . . . . . . . . . . . 15
Setting options. . . . . . . . . . . . . . . . . . . . . . . . . . . . . . . . . . . . . . . . . . . . . . . . . . 16
Prewash, Sensitive, Stain, Night Cycle . . . . . . . . . . . . . . . . . . . . . . . . . . . . 17
Setting times . . . . . . . . . . . . . . . . . . . . . . . . . . . . . . . . . . . . . . . . . . . . . . . . . . . 18
Time Saving: SHORT or VERY SHORT . . . . . . . . . . . . . . . . . . . . . . . . . . . . . 18
Delay Start . . . . . . . . . . . . . . . . . . . . . . . . . . . . . . . . . . . . . . . . . . . . . . . . . . 19
Starting a program . . . . . . . . . . . . . . . . . . . . . . . . . . . . . . . . . . . . . . . . . . . . . . 19
Program progress . . . . . . . . . . . . . . . . . . . . . . . . . . . . . . . . . . . . . . . . . . . . . . . . 20
Interrupting a program/adding washing . . . . . . . . . . . . . . . . . . . . . . . . . . . . . 20
Washing cycle complete/Removing the washing. . . . . . . . . . . . . . . . . . . . . . 21
Setup . . . . . . . . . . . . . . . . . . . . . . . . . . . . . . . . . . . . . . . . . . . . . . . . . . . . . . . . . 21
Memory 1, 2, 3 . . . . . . . . . . . . . . . . . . . . . . . . . . . . . . . . . . . . . . . . . . . . . . . . . . 21
Volume . . . . . . . . . . . . . . . . . . . . . . . . . . . . . . . . . . . . . . . . . . . . . . . . . . . . . . . . 23
Extra Rinse . . . . . . . . . . . . . . . . . . . . . . . . . . . . . . . . . . . . . . . . . . . . . . . . . . . . . 23
Language . . . . . . . . . . . . . . . . . . . . . . . . . . . . . . . . . . . . . . . . . . . . . . . . . . . . . . 24
Clock . . . . . . . . . . . . . . . . . . . . . . . . . . . . . . . . . . . . . . . . . . . . . . . . . . . . . . . . . . 24
Contrast and brightness . . . . . . . . . . . . . . . . . . . . . . . . . . . . . . . . . . . . . . . . . . 25
3
Page 4

Child safety device. . . . . . . . . . . . . . . . . . . . . . . . . . . . . . . . . . . . . . . . . . . . . . 26
Cleaning and maintenance . . . . . . . . . . . . . . . . . . . . . . . . . . . . . . . . . . . . . . 27
What to do if.... . . . . . . . . . . . . . . . . . . . . . . . . . . . . . . . . . . . . . . . . . . . . . . . . 28
Remedying small malfunctions yourself . . . . . . . . . . . . . . . . . . . . . . . . . . . . . 28
If the wash results are not satisfactory. . . . . . . . . . . . . . . . . . . . . . . . . . . . . . 30
Carrying out an emergency drain . . . . . . . . . . . . . . . . . . . . . . . . . . . . . . . . . . 31
Drain pump. . . . . . . . . . . . . . . . . . . . . . . . . . . . . . . . . . . . . . . . . . . . . . . . . . . . . 32
Disposal . . . . . . . . . . . . . . . . . . . . . . . . . . . . . . . . . . . . . . . . . . . . . . . . . . . . . . . 33
Technical data. . . . . . . . . . . . . . . . . . . . . . . . . . . . . . . . . . . . . . . . . . . . . . . . . . 34
Consumption values. . . . . . . . . . . . . . . . . . . . . . . . . . . . . . . . . . . . . . . . . . . . . 34
Installation and connection instructions. . . . . . . . . . . . . . . . . 35
Safety information for the installation. . . . . . . . . . . . . . . . . . . . . . . . . . . . 35
Installing the appliance . . . . . . . . . . . . . . . . . . . . . . . . . . . . . . . . . . . . . . . . . 36
Transporting the appliance. . . . . . . . . . . . . . . . . . . . . . . . . . . . . . . . . . . . . . . . 36
Removing the transit packaging . . . . . . . . . . . . . . . . . . . . . . . . . . . . . . . . . . . 36
Where to install . . . . . . . . . . . . . . . . . . . . . . . . . . . . . . . . . . . . . . . . . . . . . . . . . 38
Making the appliance level. . . . . . . . . . . . . . . . . . . . . . . . . . . . . . . . . . . . . . . . 38
Electrical connection. . . . . . . . . . . . . . . . . . . . . . . . . . . . . . . . . . . . . . . . . . . . 39
Connecting to the water supply . . . . . . . . . . . . . . . . . . . . . . . . . . . . . . . . . . 39
Water inflow. . . . . . . . . . . . . . . . . . . . . . . . . . . . . . . . . . . . . . . . . . . . . . . . . . . . 40
Water drainage. . . . . . . . . . . . . . . . . . . . . . . . . . . . . . . . . . . . . . . . . . . . . . . . . . 41
Customer Services. . . . . . . . . . . . . . . . . . . . . . . . . . . . . . . . . . . . . . . . . . 42
Service . . . . . . . . . . . . . . . . . . . . . . . . . . . . . . . . . . . . . . . . . . . . . . . . . . . . . . 43
4
Page 5

Operating Instructions
1 Safety
Prior to using for the first time
• Follow the ”Instructions for installation and connection”.
• If the appliance is delivered in the winter months when there are mi-
nus temperatures: Store the washing machine at room temperature
for 24 hours before using for the first time.
Correct use
• The washing machine is only designed for the washing of normal domestic laundry at home.
• Additions or modifications to the washing machine are not permitted.
• Use only detergents and additives that are suitable for use in domestic washing machines.
• The washing must not contain any inflammable solutions. Danger of
explosion!
• Do not use the washing machine for dry cleaning.
• Dyes/colour removers may only be used in the washing machine, if
the manufacturer of these products expressly permits this. We cannot
be held responsible for any damage arising.
Child safety
• Keep packaging away from children. There is a risk of suffocation.
• Children often do not recognise the hazards associated with electrical
appliances. Don’t allow children to use the washing machine unsupervised.
• Make sure that children and pets don’t climb into the drum of the
washing machine. Could endanger life!
5
Page 6

General safety
• Repairs to the washing machine must only be carried out by qualified
service engineers.
• Never use the washing machine if the mains cable is damaged; or if
the control panel, work top or plinth area is damaged such that the
inside of the appliance is freely accessible.
• Switch off the washing machine before cleaning, maintenance and
servicing. In addition, pull the mains plug out of the socket or – in
the case of a permanent connection – switch off the cut-out in the
fuse box or remove the screw fuse completely.
• If operation is stopped, disconnect the appliance from the mains supply and shut off the water tap.
• Never unplug the appliance by pulling on the cable. Always pull the
plug.
• Multi-way plugs, connectors and extension cables must not be used.
This could constitute a fire hazard through overheating.
• Never wash the washing machine down with a water jet. Danger of
electric shock!
• In washing programmes with high temperatures the glass in the door
gets hot. Do not touch it.
• Before emergency emptying of the appliance, before cleaning the
drain pump or opening the door in an emergency, let the water cool
down.
• Small animals can nibble at the cables and water hoses. Danger of
electric shock and danger of water damage! Keep small animals away
from the washing machine.
6
Page 7
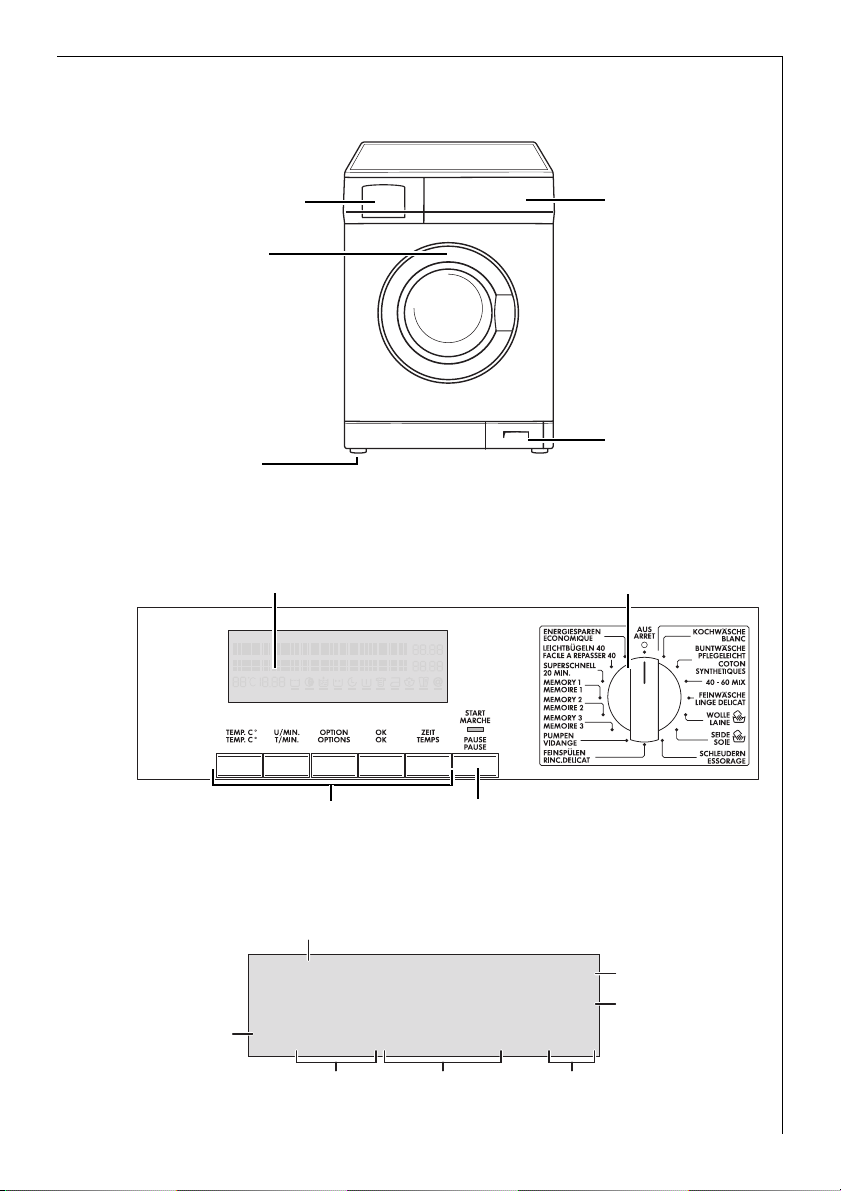
Description of the appliance
Detergent dispenser
drawer
Rating plate
(behind door)
Three screw feet
(height adjustable);
rear left:
Automatic foot
Control panel
Display
Control panel
Plinth flap/
Drain pump
Programme knob and
On/Off dial
Function keys START/PAUSE key
What is shown in the display
Information field, shows the current settings
COTTON
Cycle end at
Temperature
95C1000 NэээээVэSэFэLэBэaэaэKэT
Spin speed/
Rinse hold
Options
12.45
15.05
Times
Current time
End of cycle
7
Page 8

Program overview
Program
Options Times Spin speed
PREWASH
SENSITIVE
STAIN
max. load1)(dry washing)
ENERGY SAVING
2)
5kg • • • • • • • • • •
COTTONS 5kg • • • • •
LINEN/EASY-CARES
60°, 50°, 40°, 30°, Cold cycle
5kg
or
2,5kg
• • •
4)
SHORT
NIGHT CYCLE
VERY SHORT
DELAY START
1500/1400
1200/1000
800/600/400
3)
•3)• • • • • •
0
• •3)•3)• • • • • •
40 - 60 MIX 5kg • • • • • • • • • •
DELICATES
40°, 30°, Cold cycle
WOOL/ (HANDWASH)
40°, 30°, Cold cycle
2,5kg • •4)• • • • • • •
2kg • • • • •
SILK/ (HANDWASH) 1kg • • • • •
SPIN 5kg • • •
RINSE HOLD
RINSE 2,5kg • • • • •
DRAIN
REFRESH 2,5kg • • • • •
EASY IRON 40 1kg • • • • • • • • • •
1) A 10 litre bucket holds around 2.5 kg of dry washing (cotton)
2) Program settings for testing in accordance with or in support of EN 60 456 and IEC 60 456 are
described in the Chapter “Consumption Values”.
3) Recommended load for short progammes is 2,5 kg; full loading is possible however with somewhat reduced
cleaning results.
4) STAIN can only be selected with wash temperatures of 40°C and above, as stain treatment products are only
effective at higher temperatures.
8
Page 9
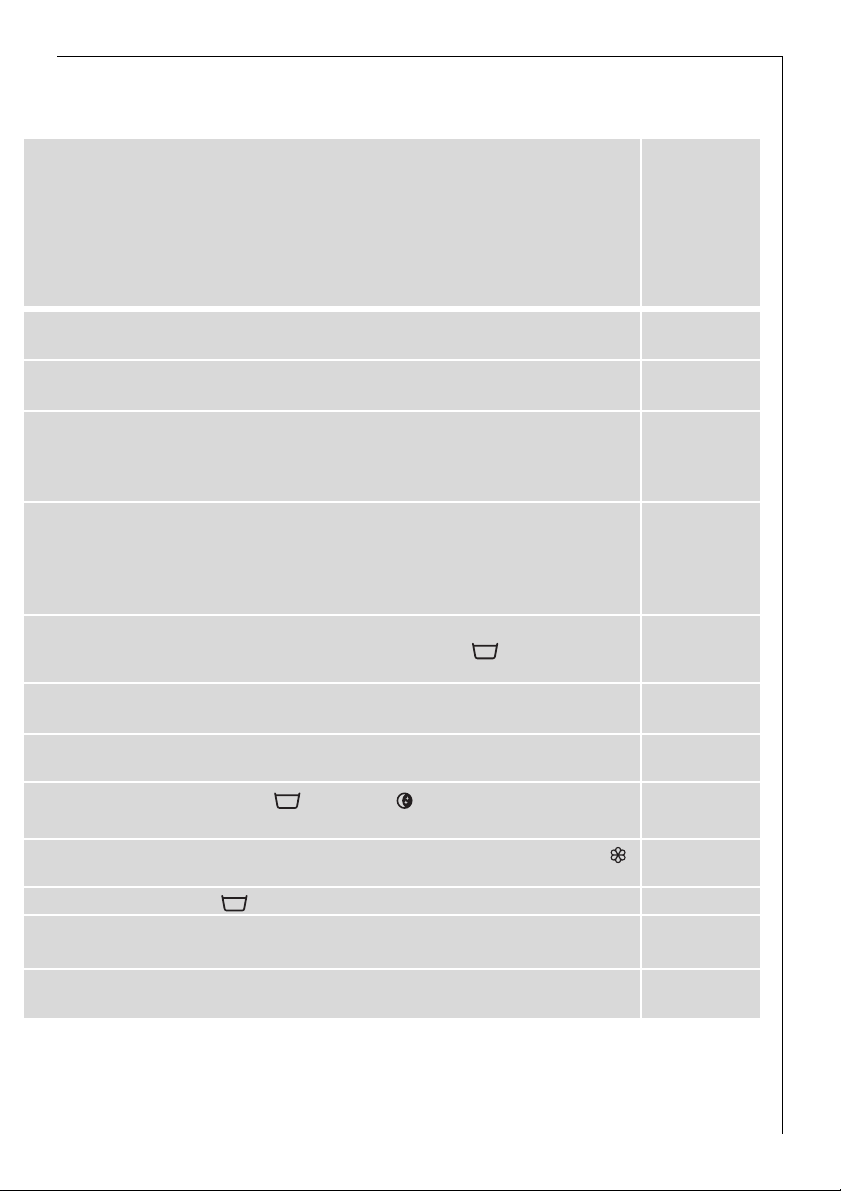
Use/Features
Care
symbols
1)
Energy-saving program at 60 °C for lightly to normally soiled whites/coloureds made
of cotton/linen.
Energy-saving program at 95 °C for normally to heavily soiled whites/coloureds
made of cotton/linen.
General program for whites/coloureds made of cotton/linen as well as for easy-care
mixed fibres and synthetics. The program is automatically adjusted to the different
fabric types and load sizes. If loading only with easy-care washing, do not load more
than 2,5 kg.
Program for whites/coloureds which are labelled for different wash temperatures.
Items, which according to the care symbols are normally to be washed separately at
40 °C or at 60 °C, can be washed together in this program. This makes better use of
the drum capacity and thus saves energy. Achieves the washing results of a normal
60° programme.
Gentle program for delicate fabrics such as bonded fabrics, microfibres, synthetics,
net curtains (max. net curtain load 15 to 20 m
suitable for items with a climatic membrane, e.g. outdoor clothing.
Particularly delicate program for machine washable and hand washable wool or wool
mixtures.
Particularly delicate program at 30 °C, for machine washable and hand washable silk.
Wash very delicate items individually.
Draining and spinning, e.g. after a RINSE HOLD/ NIGHT CYCLE, or separate spin
for hand-washed cottons/linens and easy-cares.
Separate gentle rinse (3 rinses, liquid conditioner is washed in from compartment ,
gentle spin).
Pumps water away after a RINSE HOLD.
Special cycle at 30 °C, about 20 minutes long, for quickly washing through e. g. once
worn, slightly dirty sports clothing or new clothes.
Special cycle at 40 °C for easy-care fabrics, which afterwards are to be ironed only
lightly or not at all.
1) The numbers in the care symbols show the maximum temperatures.
2
). If used with RINSE HOLD also
M O
O
J M
I K N
J M
I K
Q L H
Q L H
J M O
I K N
J M O
J M O
I K N
K N
9
Page 10

Overview of terms
The English terms used in this User Information booklet correspond to
the German/French names below that are to be found at your appliance’s control panel.
Programme selector
OFF AUS/ARRET
COTTONS
LINEN/EASYCARES
40 - 60 MIX 40 - 60 MIX
DELICATES
WOOL WOLLE/LAINE
SILK SEIDE/SOIE
SPIN
RINSE
DRAIN PUMPEN/VIDANGE
MEMORY
REFRESH
EASY IRON
ENERGY SAVING
KOCHWÄSCHE/
BLANC
BUNTWÄSCHE/
PFLEGELEICHT
COTON/
SYNTHETIQUES
FEINWÄSCHE/
LINGE DELICAT
SCHLEUDERN/
ESSORAGE
FEINSPÜLEN/
RINC.DELICAT
MEMORY/
MEMOIRE
SUPERSCHNELL/
20 MIN.
LEICHTBÜGELN/
FACILE A REPASSER
ENERGIESPAREN/
ECONOMIQUE
Buttons
TEMP. TEMP.C°
RPM
OPTION
OK OK
TIME ZEIT/TEMPS
START/PAUSE
U/MIN.
T/MIN.
OPTION
OPTIONS
START/PAUSE
MARCHE/PAUSE
10
Page 11
Prior to using for the first time
Switching on the appliance for the first time - setting
the language
The display is set to German as standard in the factory.
3 Important: If the display does not show the menu for setting the lan-
guage when the appliance is switched on, the appliance has been
switched on before. If this happens, please see the section “Setup/Language”.
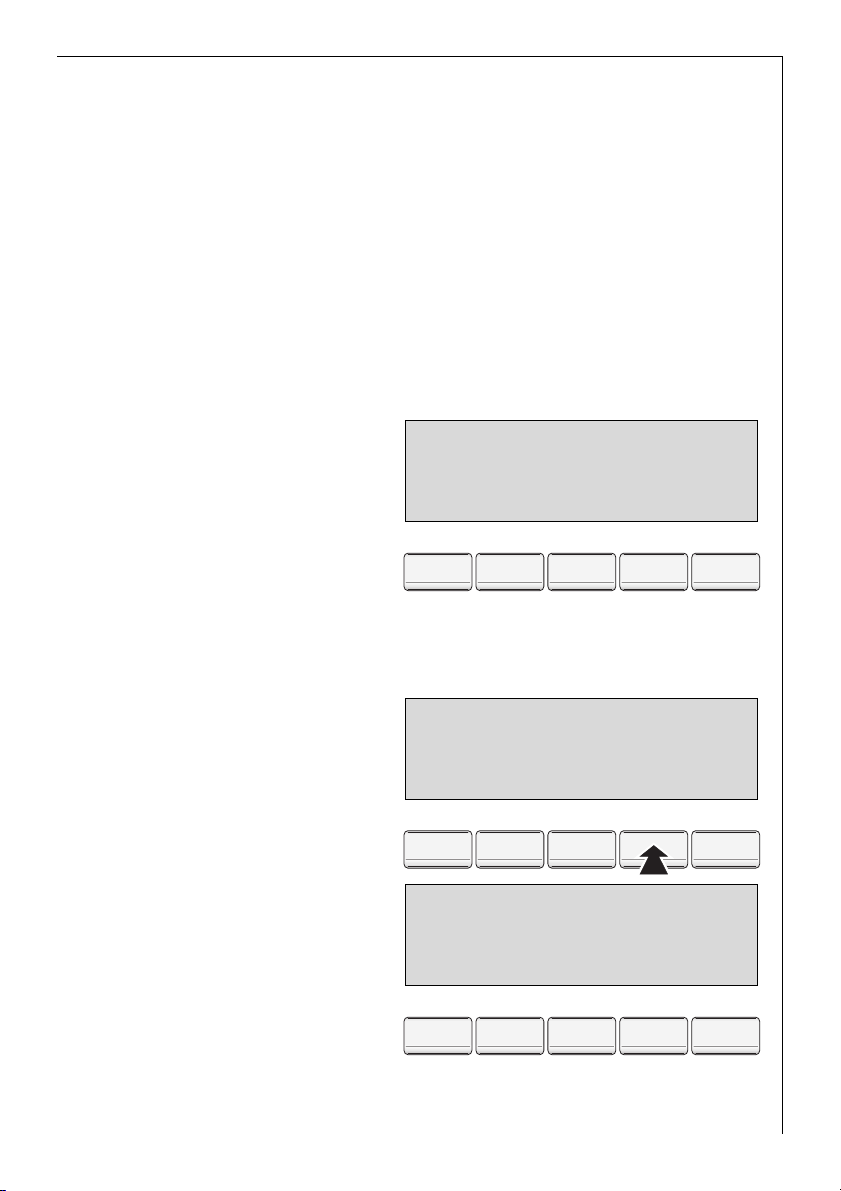
To switch on the appliance, turn the program knob to any program,
e. g. COTTONS.
The display lights up and
should look like the illustration opposite.
In addition the display
shows:
– “Bestätigen durch Taste
OK”
– “Ändern durch Taste OPTI-
ON”
If you want to keep the language:
Press the OK key.
If you want to change the
language:
1. Press the OPTION key repeat-
edly, until the desired language appears in the display,
e. g. ENGLISH.
2. Press the OK key.
In the display ENGLISH flash-
es several times and the display should then look like
e.g. the illustration opposite.
3. To switch the appliance off,
turn the programme knob
to OFF.
Sprache:
DEUTSCH
aэээээaэaэaэaэBэaэaэaэa
TEMP. C°
TEMP. C°
U/MIN.
T/MIN.
OPTION
OPTIONS
OK
OK
ZEIT
TEMPS
Language
ENGLISH
aэээээaэaэaэaэBэaэaэaэa
TEMP. C°
TEMP. C°
U/MIN.
T/MIN.
COTTON
Cycle end at
95C1500 aaэээээaaaaaaaaa
TEMP. C°
TEMP. C°
U/MIN.
T/MIN.
OPTION
OPTIONS
OPTION
OPTIONS
OK
OK
ZEIT
TEMPS
12.45
15.06
OK
OK
ZEIT
TEMPS
11
Page 12

Setting the time
So that the time and the end of the program are correctly displayed,
please check the display and set the current time if necessary. To do
this, please see the section “Setup/Clock”.
Carrying out a wash program prior to first use
In order to remove any residues from the drum and water container
which may have been left during manufacturing, perform the first
wash cycle without any washing in the machine. Program: LINEN/EASYCARES 60 °C, option TIME SAVING: VERY SHORT, use approx. 1/4 measuring cup of detergent.
Preparing and sorting washing
Preparing washing
• Empty pockets. Remove foreign bodies (e. g. coins, paper clips, nails,
etc.).
• Do up zips, button up covers to prevent damage to washing.
• Remove the runners from net curtains or cover them with a net or a
bag.
• Wash sensitive and small items in a net or a pillow case, e.g. net cur-
tains, tights, socks, handkerchiefs, bras.
Important! Bras and other items containing wires should only be
washed in a net bag. The wires can work loose and damage the appliance.
12
Sorting washing
• By colour: Wash white and coloured washing separately. Washing can
run.
• By temperature, type of washing and care symbol.
Important! Do not wash fabrics with care symbol G (= do not wash!)
in the washing machine.
Page 13
Running a washing cycle
Opening the door/loading washing
1. To open the door: pull the door by the handle.
2. Unfold washing and load it loosely
into the machine. Mix large and
small items.
Important: Do not get any washing
caught between the door and the
rubber seal.
3. Push the door shut firmly. Door
catch must audibly click shut.
Adding detergent/additives
Important: Use only detergents and additives that are suitable for use
in domestic washing machines.
Dose detergent and additives according to the instructions of the de-
tergent and additive manufacturers. Follow the instructions on the
packaging.
Dosing depends upon:
– the washing’s degree of soiling,
– the size of the load
– the degree of hardness of the water supply.
• If the manufacturer does not give instructions for small loads: for a
half load, use a third less, for a very small load, use only half of the
detergent that is recommended for a full load.
• From water hardness 2 (= medium) upwards, water softener should
be used. Detergent can then always be dosed for water hardness 1
(= soft). Your local water company will be able to give you information about the water hardness in your area.
13
Page 14

1. Pull the detergent dispenser drawer out as far as the stop.
2. Add the detergent/additives.
3. Push the drawer in fully.
Washing powder/tablets
for the main wash
Softeners/
wash-care products
to preserve the shape
of garments/
starch
In-wash stain treatment/
tablets
Washing powder/tablets
for the pre-wash
or for water softener
Washing powder/tablets for the main wash
If you are using water softener and need the right-hand compartment
for the pre-wash detergent, add the water softener to the main wash
detergent in the left-hand compartment.
Softeners, wash-care products to preserve the shape of garments,
starch
Do not fill the compartment beyond the MAX mark. Dilute thick liquid
concentrates according to the manufacturer’s instructions before
putting them into the drawer. Dissolve powder starches.
If you use liquid detergents:
Add liquid detergent using the dosage container provided by the detergent manufacturer.
14
Page 15

Switching on the appliance/selecting a program
Select the program using the
program knob, e.g., LINEN/
EASY-CARES.
3 By selecting a program, you
switch the appliance on at
the same time.
– The display lights up and
shows the program set, the
current time and the estimated end of the cycle.
– Depending on the program, the washing machine suggests a temper-
ature and a spin speed. You can change these suggestions.
– The lighting for the display switches itself off at the end of the cycle
or, if the appliance is not started after the program is set, after
10 minutes. To switch the light on again, press any key or turn the
program knob.
Changing the temperature
Press the TEMP. key repeatedly until the desired temperature
is displayed.
LINEN/EASY CARE
Cycle end at
50C1500 aэээээaэaэaэaэaэaэaэaэa
TEMP. C°
TEMP. C°
U/MIN.
T/MIN.
OPTION
OPTIONS
12.45
14.37
OK
OK
ZEIT
TEMPS
Changing spin speed/selecting rinse hold
Press the RPM key repeatedly, until the desired spin
speed or RINSE HOLD is
displayed.
3 With spin speed “0” the last
rinse water is drained off at
the end of the cycle, but the
washing is not spun.
• With RINSE HOLD the washing is left to soak in the last rinse wa-
ter. There is no final spin after the intermediate spin(s). Intermediate
spins are programme-dependent and cannot be altered.
LINEN/EASY CARE
Cycle end at
50C 800 aэээээaэaэaэaэaэaэaэaэa
TEMP. C°
TEMP. C°
U/MIN.
T/MIN.
OPTION
OPTIONS
12.45
14.37
OK
OK
ZEIT
TEMPS
15
Page 16

Setting options
Options can be added to a wash cycle that has already been selected.
Press the OPTION key. The display shows the symbols for the options.
PREWASH
Pre-washes at about 30 °C before the main wash cycle, which
follows automatically.
SENSITIVE
Enhanced rinse action through an additional rinse cycle together with decreased drum movement (improved fabric care). This
is ideal when frequent washes are necessary, for example, in
cases of highly sensitive skin. An additional rinse cycle can also
be permanently set (see section “Setup”).
STAIN
For heavily soiled and stained washing. In-wash stain treatment
products are washed in at the optimum time as the program
progresses.
NIGHT CYCLE
The washing is left to soak in the final rinse water. There is no final spin and no intermediate spin. Because of this the program
runs very quietly. NIGHT CYCLE is therefore particularly suitable
if you want to wash at night.
SETUP
The special functions that can be set under Setup remain permanently stored in the appliance, e. g., time, language, etc. (see
section “Setup”) until they are changed or deactivated.
3 Only the options that can be combined with the cycle that has already
been set are shown in the display.
16
Page 17

Prewash, Sensitive, Stain, Night Cycle
1. Press the OPTION key repeat-
edly until the desired symbol flashes, e. g.,
PREWASH (With each
press of the key, the next
symbol flashes, from left to
LINEN/EASY CARE
Prewashing
aэээээVэSэFэLэBэaэaэaэa
TEMP. C°
TEMP. C°
U/MIN.
T/MIN.
OPTION
OPTIONS
12.45
14.37
OK
OK
ZEIT
TEMPS
right.)
2. Press the OK key. The symbol
stops flashing. A black bar
appears under the symbol.
The option is set. The display
changes to the next option.
LINEN/EASY CARE
Sensitive
aэээээV_эSэFэLэBэaэaэaэa
TEMP. C°
TEMP. C°
U/MIN.
T/MIN.
OPTION
OPTIONS
12.45
14.56
OK
OK
ZEIT
TEMPS
To switch off the option,
press the OPTION key repeatedly until the symbol for the
option flashes and then press the OK key. The black bar under the symbol disappears.
3 If other options are to be selected: Press the OPTION key repeatedly un-
til the desired symbol flashes and confirm each one with the OK key.
3. Press the OPTION key repeatedly, until the exit icon appears. The display shows the
symbol for the selected option.
LINEN/EASY CARE
Cycle end at
50C 800 aэээээVэaэaэaэaэaэaэaэa
TEMP. C°
TEMP. C°
U/MIN.
T/MIN.
OPTION
OPTIONS
12.45
14.56
OK
OK
ZEIT
TEMPS
17
Page 18

Setting times
Shortened cycles and the delay of the start time can be set for a wash
cycle that has already been selected.
Press the TIME key. The display shows the symbols for TIME SAVING and
DELAY START.
TIME SAVING: SHORT or VERY SHORT
Shortened wash cycle for lightly soiled washing.
– SHORT: only possible with the programs COTTONS, LINEN/
EASY-CARES and EASY IRON
– VERY SHORT: only possible with the programs COTTONS, LIN-
EN/EASY-CARES and EASY IRON 40° and DELICATES.
DELAY START
To delay the start of a program by between 30 minutes and a
max. of 20 hours.
Time Saving: SHORT or VERY SHORT
1. Press the TIME key repeated-
ly, until the TIME SAVING
symbol flashes.
2. Press the OK key.
3. Press the TIME key. A black
bar appears under
the TIME SAVING symbol,
SHORT or VERY SHORT appears in the display.
4. To change from SHORT to
VERY SHORT, press the TIME
key again.
3 You can change between
NORMAL, SHORT, and VERY
SHORT using the TIME key.
5. Press the OK key to confirm
the selection. The display
changes to the symbol for DELAY START, i.e. DELAY START can now
be set.
6. Press the TIME key, if no Delay Start is to be set. The display shows the
TIME SAVING symbol as well as the time for the end of the cycle.
Time saving
NORMAL
aэээээaэaэaэaэaэaэaэKэT
TEMP. C°
TEMP. C°
U/MIN.
T/MIN.
Time saving
VERY SHORT
aэээээaэaэaэaэaэaэaэK_эT
TEMP. C°
TEMP. C°
U/MIN.
T/MIN.
OPTION
OPTIONS
OPTION
OPTIONS
OK
OK
OK
OK
12.45
14.37
ZEIT
TEMPS
12.45
14.12
ZEIT
TEMPS
18
Page 19

Delay Start
1. Press the TIME key repeatedly, until the DELAY START symbol flashes.
2. Press the OK key. In the display, “Start in 0 min” is displayed.
3. Press the TIME key repeated-
ly, until the display shows
the desired period by which
you want to delay the start,
e. g. “Start in 4h” (=4 hours).
A black bar appears under
Delay Start
Start in 4h
aэээээaэaэaэaэaэaэaэKэT_
TEMP. C°
TEMP. C°
U/MIN.
T/MIN.
OPTION
OPTIONS
OK
OK
the DELAY START symbol.
3 If 20 h is displayed and you
press the key again, the delayed start is cancelled.
4. Press the OK key. The display shows the DELAY START and the time
until the end of the program (including period by which the start has
been delayed).
5. To activate the Delay Start,
press the START/PAUSE key.
The display now shows e. g.,
“Start in 4.00” (=4 hours).
The display for the time remaining until the start of the
program is reduced in 30
minute intervals (e.g., 4.00,
3.30, 3.00, ... 0.30, 0).
LINEN/EASY CARE
Start in
50C 800 aэээээaэaэaэaэaэaэaэaэT
TEMP. C°
TEMP. C°
U/MIN.
T/MIN.
OPTION
OPTIONS
OK
OK
12.45
18.37
ZEIT
TEMPS
12.45
4.00
ZEIT
TEMPS
Starting a program
1. Check that the water tap is open.
2. Press the START/PAUSE key.
The program is started or it starts after the time delay set has elapsed.
3 If after pressing the START/PAUSE key the display shows “Door not
Closed”, the door has not been shut properly. Push the door firmly
closed and press the START/PAUSE key again.
19
Page 20

Program progress
The display indicates the
stage of the program that is
currently being performed as
well as the time of the end
of the program.
LINEN/EASY CARE
Washing
50C 800 aэээээaэaэaэaэaэaэaэaэa
TEMP. C°
TEMP. C°
U/MIN.
T/MIN.
OPTION
OPTIONS
3 During the washing cycle the
time of the end of the program may change as the
program adjusts itself to different conditions (e. g., type and quantity
of laundry, out of balance spin detection, special rinses, etc.).
Interrupting a program/adding washing
Interrupting a program
• The wash program can be interrupted at any time by pressing
the START/PAUSE key. It is then re-started by pressing the key again.
• To stop the washing machine before the program has ended, turn the
program knob to OFF.
Important: Be careful if there is water in the appliance!
Adding washing
1. Press the START/PAUSE key.
• If “Door locked” and “Pause” are alternately shown in the display, it is
no longer possible to add washing, e. g. when the water level is too
high.
• If “Door openable” and “Pause” are alternately shown in the display, it
is still possible to add washing:
2. Open the door.
3. Add washing and close the door again.
4. Press the START/PAUSE key again. The program continues.
12.45
14.37
OK
OK
ZEIT
TEMPS
20
Page 21

Washing cycle complete/Removing the washing
At the end of the cycle a long acoustic signal sounds 3 times (when the
SOUND setting is NORMAL or LOW) and the messages “Cycle ended”
and “Door openable” appear alternately in the display.
1. Open the door and remove the washing.
2. Turn the programme knob to OFF.
3. After the wash, pull out the detergent dispenser drawer slightly to al-
low it to dry. Leave the door slightly open to air the inside of the washing machine.
If RINSE HOLD or NIGHT CYCLE was selected:
After a RINSE HOLD or when a program with NIGHT CYCLE has ended,
the START/PAUSE indicator flashes. “Cycle ended” and “Door locked”
appear alternately in the display.
The water must first be drained:
– Turn the programme knob to OFF, then to DRAIN and press
the START/PAUSE key (the water is drained without spinning),
or
– or turn the programme knob to OFF and then to SPIN. Change the
spin speed if necessary and press the START/PAUSE key (the water is
drained and the washing spun).
Setup
The special functions that can be set under Setup remain permanently
stored independent of each washing cycle – even after the appliance
has been switched off or the mains plug has been removed from the
socket.
Memory 1, 2, 3
Program combinations can be stored at program knob positions MEMORY 1, 2, 3 and can then be selected directly using the program knob.
To do this the desired program combination is first put together and
then stored.
21
Page 22

Setting the Memory
Example: Program position
MEMORY 1 is to be given the
following program combination: LINEN/EASYCARES 40 °C, 800 rpm, with
PREWASH.
LINEN/EASY CARE
Cycle end at
40C 800 aэээээVэaэaэaэaэaэaэaэa
TEMP. C°
TEMP. C°
U/MIN.
T/MIN.
OPTION
OPTIONS
OK
OK
1. Turn the program knob to LINEN/EASY-CARES.
2. Press the TEMP. key repeatedly, until 40 °C appears in the display.
3. Press the RPM key repeatedly, until 800 appears in the display.
4. Using the OPTION key set PREWASH and press the OK key. A black
bar appears under the PREWASH symbol .
5. Press the OPTION key repeatedly, until the SETUP symbol flashes.
6. Press the OK key. The display
changes to the Special Functions level. Program memory
position MEMORY 1 is offered first.
Memory 1
Store program
aэээээaэaэaэaэBэaэaэaэa
TEMP. C°
TEMP. C°
U/MIN.
T/MIN.
OPTION
OPTIONS
OK
OK
3 To change to another memo-
ry position, press the OPTION
key.
7. Press the OK key.
The program combination is now stored to program knob position MEMORY 1 and in the future can be selected directly using the program
knob.
12.45
14.37
ZEIT
TEMPS
ZEIT
TEMPS
3 The Memory can be overwritten at any time with a new program com-
bination (see “Changing the Memory”) but cannot be deleted.
Changing the Memory
1. Put together the new program combination as required (for an exam-
ple, see “Setting the Memory”, steps 1 to 4).
2. Press the OPTION key repeatedly, until the SETUP symbol flashes.
3. Press the OK key.
4. Using the OPTION key select the memory position to be changed, e. g.
MEMORY 1.
5. Store the new program combination using the OK key.
22
Page 23

Volume
The volume of the acoustic signal can be selected.
1. Turn the program knob to any program and press the OPTION key repeatedly until the SETUP symbol flashes.
2. Press the OK key.
3. Press the OPTION key repeatedly, until VOLUME is shown in the display.
4. Press the OK key.
5. Press the OPTION key repeat-
edly until the desired volume
(NORMAL, LOW, NO SOUND)
is shown in the display.
6. Press the OK key to confirm
Sound
NORMAL
TEMP. C°
TEMP. C°
aэээээaэaэaэaэBэaэaэaэa
U/MIN.
T/MIN.
OPTION
OPTIONS
OK
OK
the setting. The icon changes
to the next special function.
7. Press the OPTION key repeatedly until the exit icon is displayed.
Extra Rinse
1. Turn the program knob to any program and press the OPTION key
repeatedly until the SETUP symbol flashes.
2. Press the OK key.
3. Press the OPTION key repeat-
edly until RINSE+ is
shown in the display.
4. Press the OK key. The RINSE+
symbol appears. The
display changes to the next
special function.
5. Press the OPTION key repeatedly, until the exit icon appears.
Rinse+
NO
TEMP. C°
TEMP. C°
aэээээaэaэaэaэBэaэaэaэa
U/MIN.
T/MIN.
OPTION
OPTIONS
OK
OK
ZEIT
TEMPS
ZEIT
TEMPS
23
Page 24

Language
1. Turn the program knob to any program and press the OPTION key
repeatedly until the SETUP symbol flashes.
2. Press the OK key.
3. Press the OPTION key repeatedly, until the display shows LANGUAGE.
4. Press the OK key.
5. Press the OPTION key repeat-
edly, until the desired language appears in the display,
e. g. ENGLISH.
6. Press the OK key. The display
Language
ENGLISH
aэээээaэaэaэaэBэaэaэaэa
TEMP. C°
TEMP. C°
U/MIN.
T/MIN.
OPTION
OPTIONS
OK
OK
changes to the next special
function.
7. Press the OPTION key repeatedly, until the exit icon appears.
Clock
1. Turn the program knob to any program and press the OPTION key re-
peatedly until the SETUP symbol flashes.
2. Press the OK key.
3. Press the OPTION key repeatedly until CLOCK is shown in the display.
4. Press the OK key.
5. Using the OPTION key set the
desired time. With each press
of the key, the display moves
on by one minute. Keeping
the key depressed changes
the display in 10 minute
steps.
6. Press the OK key. The display
changes to the next special function.
7. Press the OPTION key repeatedly, until the exit icon appears.
Clock
Set time
aэээээaэaэaэaэBэaэaэaэa
TEMP. C°
TEMP. C°
U/MIN.
T/MIN.
OPTION
OPTIONS
OK
OK
ZEIT
TEMPS
11.17
ZEIT
TEMPS
24
Page 25

Contrast and brightness
1. Turn the program knob to any program and press the OPTION key re-
peatedly until the SETUP symbol flashes.
2. Press the OK key.
3. Press the OPTION key repeatedly, until the display shows CONTRAST or
or BRIGHTNESS.
4. Press the OK key.
5. Using the OPTION key set the
desired setting. With each
press of the key or if the key
is kept pressed down, the
black triangle in the diagram
moves further to the right
for more contrast or brightness. If the triangle reaches the right hand edge, it starts again from
the left.
6. Press the OK key. The display changes to the next special function or
back to the exit icon.
7. Press the OPTION key repeatedly, until the exit icon appears.
Contrast
ƒ………………™………………‡
aэээээaэaэaэaэBэaэaэaэa
TEMP. C°
TEMP. C°
U/MIN.
T/MIN.
OPTION
OPTIONS
OK
OK
ZEIT
TEMPS
25
Page 26

Child safety device
When the child safety device is set, the door can no longer be closed.
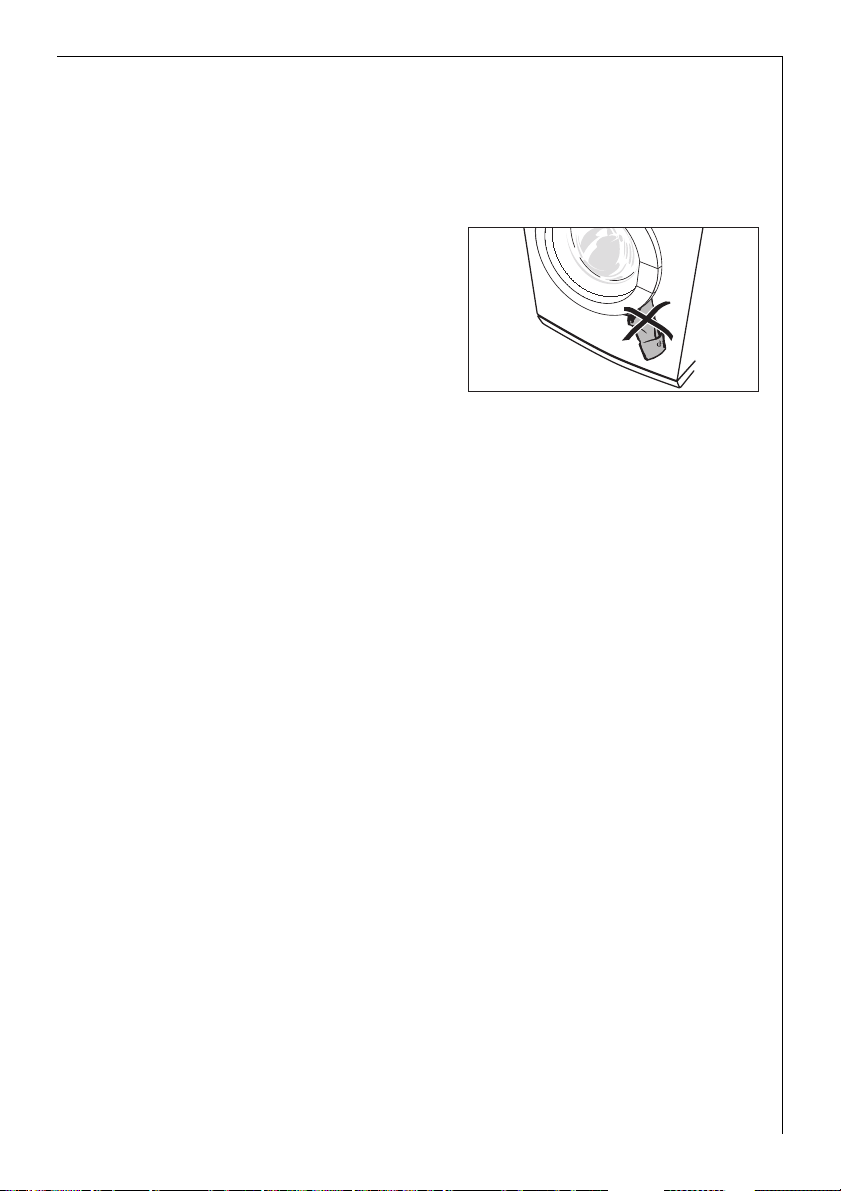
Setting the child safety device:
Use a coin to turn the knob (on the
inside of the door) in a clockwise direction as far as it will go.
1 Warning! The knob must not be
sunk-in after being set, otherwise
the child safety device is not active.
The knob must stand proud as
shown in the illustration.
Releasing the child safety device:
Turn the knob anti-clockwise as far
as it will go.
26
Page 27

Cleaning and maintenance
Important! Do not use furniture care products or aggressive cleaners to
clean the appliance.
Wipe control panel and body with a damp cloth.
Cleaning procedure
If you plan to wash mainly at low temperature, you should run a hot
programme from time to time. This will reduce any deposits and clean
the appliance from the inside.
Detergent dispenser drawer
The detergent dispenser drawer should be cleaned regularly.
1. Remove the detergent dispenser drawer by pulling it firmly.
2. Remove the conditioner insert from
the middle compartment.
3. Clean all parts with water.
4. Put the conditioner insert in as far as
it will go, so that it is firmly in place.
5. Clean all parts of the washing machine, especially the nozzles in the
top of the washing-in chamber, with
a brush.
6. Insert the detergent dispenser drawer in the guide rails and push it in.
Washing drum
Rust deposits in the drum may occur due to rusting foreign bodies in
the washing or tap water containing iron.
Important! Do not clean the drum with acidic descaling agents, scouring agents containing chlorine or iron or steel wool.
1. Remove any rust deposits on the drum with a cleaning agent for stainless steel.
2. Run a washing cycle without any washing to clean off any cleaning
agent residues. Program: LINEN/EASY-CARES 60°, option TIME SAVING: VERY SHORT, add approx. 1/4 of a measuring cup of washing
powder.
27
Page 28

Door and rubber collar
Regularly check whether deposits or foreign bodies are present in the
folds of the rubber collar or on the inside of the glass door.
Clean the glass in the door and the rubber collar regularly.
What to do if...
Remedying small malfunctions yourself
If while the appliance is operating a short acoustic signal sounds 3
times and one of the following messages appears in the display:
– „No incoming water/Check tap & Hose“,
– „No drain - check/drain hose/filter” or “Pump Blocked”,
– “Door not Closed”,
please have a look at the following table.
When the fault is remedied, press the START/PAUSE key.
If “Warning : E and number or letter” is displayed: Switch the appliance
off and on again. Re-set the program. Press the START/PAUSE key.
If the warning is displayed again, please contact the Customer Care
Department and inform them of the warning.
Problem Possible cause Remedy
28
Washing machine does not
work.
Door cannot be closed.
Display shows: ”Selection
error”.
Display shows: “Door not
Closed/Please check”
Mains plug not plugged
in or fuse not working.
Door not closed properly.
START/PAUSE key was
not pressed for long
enough.
Child safety device engaged.
The selected function
cannot be combined
with other program settings.
Door not closed properly.
Plug in mains plug. Check
fuse.
Close door - there should be
an audible click.
Press START/PAUSEkey for
longer.
Release child safety device.
Make another selection.
Close door - there should be
an audible click.
Start program again.
Page 29

Problem Possible cause Remedy
Display shows: “No incoming water/Check tap &
Hose”
Washing machine vibrates
when operating or is noisy.
Washing has not been
spun.
Water is running out from
under the washing
machine.
Display shows:
“Warning : EF3”.
The drain pump runs constantly - even when the
appliance is switched off.
Display shows: “Excess Detergent”
Display shows:
– “No drain - check drain
hose/filter” or
– “Pump Blocked”
Tap turned off. Turn the tap on.
Filter in the screw connection of the inlet hose
is blocked.
Water tap is blocked
with limescale or faulty.
Transit packaging has
not been removed.
Screw feet not correctly
adjusted.
Only a few large items of
washing in the drum.
Screw connection on the
inlet hose is leaking.
Drain hose is leaking. Replace drain hose.
Drain pump cover is not
closed properly.
Washing was caught in
the door.
Emergency drain hose is
leaking.
The Aqua Control antiflood system has responded.
Probably too much detergent has been used.
Kink in drain hose. Remove kink.
Maximum pumping
height of 1m exceeded.
Drain pump is blocked.
With connection to sink
outlet: Sink outlet is
blocked.
Turn off the water tap. Unscrew hose, take out filter
and clean it.
Check the water tap and have
it repaired if necessary.
Remove transit packaging.
Adjust feet according to the
Installation and Connection
instructions.
Always load the drum as full
as possible. Mix large and
small items.
Screw the inlet hose in firmly.
Close cover properly.
Load washing carefully for
the next wash.
Close off emergency drain
hose properly.
Close the tap, remove the
mains plug from the socket
and inform Customer Service.
Dose detergent exactly as instructed by manufacturer.
Please contact Customer Care
Department.
Switch off appliance. Pull out
mains plug.
Clean drain pump. Remove
foreign bodies from pump
housing.
Clean out sink outlet.
29
Page 30

Problem Possible cause Remedy
Fabric softener not rinsed
in, compartment for additives is filled with water.
Door cannot be opened
when appliance is switched
on.
Washing is heavily creased.
Conditioner insert in the
compartment for additives is not correctly attached or is blocked.
Door locked.
Power cut. (All displays
are off.)
For safety reasons, the
door remains locked for
approx. 4 to 10 minutes.
Possibly too much washing was loaded.
If the wash results are not satisfactory
Washing is grey and scale is being deposited in the drum
• Too little detergent is being used.
• The right detergent was not used.
• Special soiling was not pre-treated.
• Programme or temperature was not correctly set.
Clean detergent dispenser
drawer, insert conditioner insert firmly.
Wait until the display shows
“Door openable” and “Cycle
ended” alternately.
Program continues, when
power cut is over.
To remove washing:
If water can be seen in the
appliance, before opening the
door, first perform an emergency drain.
Observe maximum loads.
30
There are grey stains on the washing.
• Washing soiled with ointment, grease or oil was washed with too lit-
tle detergent.
• It was washed at too low a temperature.
• A common cause is that fabric conditioner – especially a concentrate
– has got onto the washing. Such stains should be washed out as
quickly as possible and make sure that you are careful when using
fabric conditioner.
After the last rinse foam can still be seen.
• Modern detergents may create foam even in the last rinse cycle. The
washing is however sufficiently rinsed.
Page 31
There are white residues on the washing.
• This is due to the insoluble ingredients in modern detergents.
They are not caused by insufficient rinsing.
Shake or brush the washing. If possible turn the washing inside out
before washing. Check your choice of detergent. Especially with dark
colours it is advisable to use liquid detergents.
Carrying out an emergency drain
1 Warning! Before emergency draining, switch off the washing machine
and remove the mains plug from the socket.
Warning! The water that comes out of the emergency drain hose may
be hot. There is a risk of scalding. Let the water cool before performing
an emergency drain.
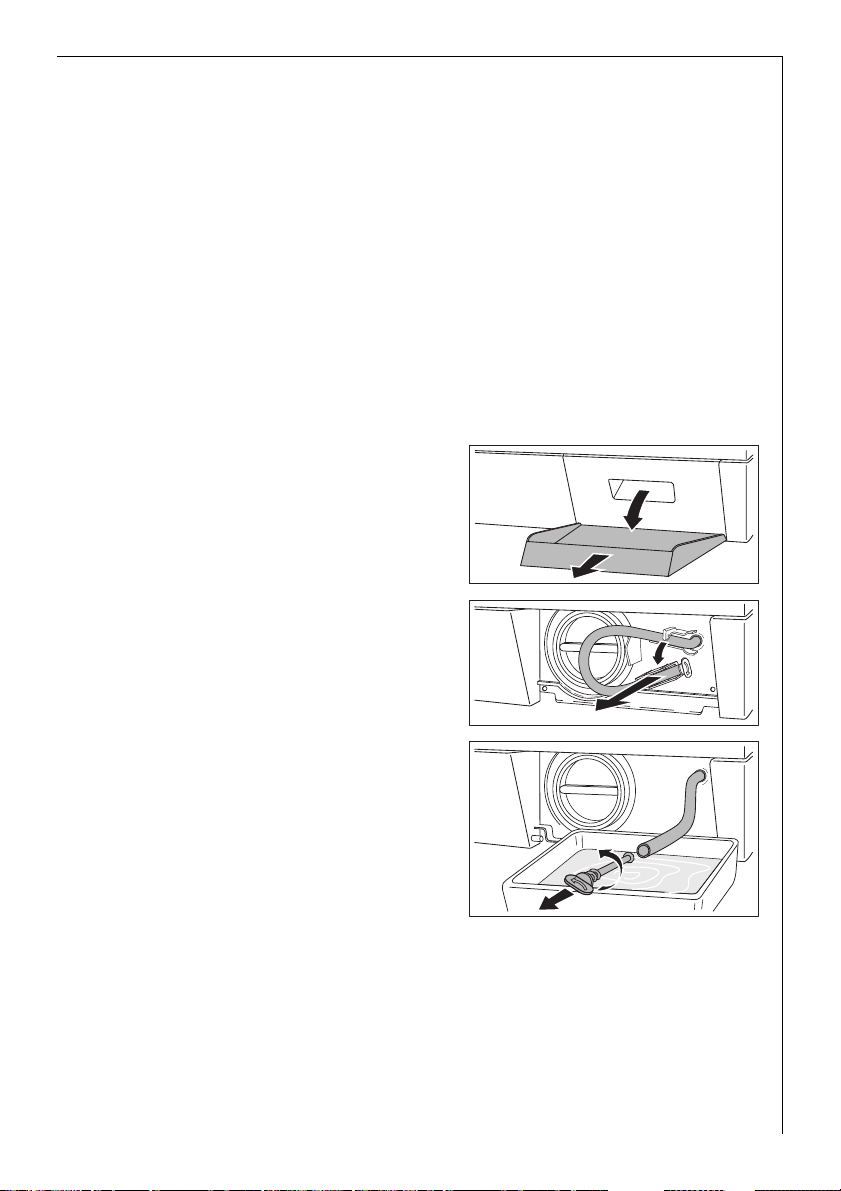
1. Open the plinth flap and remove it.
2. Take out the emergency drain hose.
3. Place a shallow container under-
neath it. Then loosen the drain plug
by turning it in an anti-clockwise
direction and pull it out.
4. The water runs out. If it is necessary
to empty the container more than
once, seal up the emergency drain
hose with the drain plug while you
are doing so.
When the water has all drained away:
5. Push the drain plug firmly into the emergency drain hose and screw it
tight in a clockwise direction.
6. Place the emergency drain hose back in the support.
7. Insert the plinth flap and close it.
31
Page 32

Drain pump
The drain pump is maintenance-free. It is only necessary to open the
pump cover if there is a malfunction and water is no longer being
pumped out, e. g. if the pump wheel is blocked.
Please make sure before loading the washing that there are no foreign
bodies in the pockets or caught between the washing. Paperclips, nails,
etc. that may have got into the washing machine with the washing remain in the pump housing (foreign body trap that protects the pump
wheel).
1 Warning! Before opening the pump cover, switch off the washing ma-
chine and remove the mains plug from the socket.
1. First carry out an emergency drain.
2. Place a cloth on the floor in front of the drain pump cover.
Residual water runs out.
3. Unscrew the pump cover in an anticlockwise direction and remove it.
4. Remove foreign bodies and fluff
from the pump housing and from
the pump wheel.
5. Check whether the pump wheel
right at the back of the pump housing can turn. (It is normal for the
pumping wheel to turn jerkily.) If
the pumping wheel cannot be
turned, please contact the Customer
Care Department.
6. Insert the pump cover. Insert the
guides at the sides of the cover into
the guide slots and tighten the cover by turning in a clockwise
direction.
7. Close off the emergency drain hose
and place it in the support.
8. Close plinth flap.
32
Page 33

Disposal
Packaging material
2
The packaging materials are environmentally friendly and can be recycled. The plastic components are identified by markings, e.g. >PE<,
>PS<, etc. Please dispose of the packaging materials in the appropriate
container at the community waste disposal facilities.
2 Old appliance
The symbol
product may not be treated as household waste. Instead it shall be
handed over to the applicable collection point for the recycling of electrical and electronic equipment. By ensuring this product is disposed of
correctly, you will help prevent potential negative consequences for the
environment and human health, which could otherwise be caused by
inappropriate waste handling of this product. For more detailed information about recycling of this product, please contact your local city
office, your household waste disposal service or the shop where you
purchased the product.
W on the product or on its packaging indicates that this
1 Warning! When an appliance is finished with, remove the plug from
the mains socket. Cut off the cable and plug and dispose of them.
Destroy the door lock. This prevents children from trapping themselves
inside and endangering their lives.
33
Page 34

Technical data
This appliance conforms with the following EU Directives:
5
– 73/23/EEC dated 19.02.1973 Low Voltage Directive
– 89/336/EEC dated 03.05.1989 EMC Directive inclusive of Amending
Directive 92/31/EEC
– 93/68/EEC dated 22.07.1993 CE Marking Directive
Height x Width x Depth 850 x 598 x 603 mm
Depth when door is open 980 mm
Height adjustment approx. +10/-5mm
Load (depending on programme) Max. 5kg
Area of use Domestic
Drum spin speed see Rating Plate
Water pressure 1-10bar (=10–100N/cm2=0.1–1.0MPa)
Consumption values
The consumption values were obtained under standardised conditions.
They may vary when operating in domestic conditions.
34
Program knob/
Temperature
ENERGY SAVING
COTTONS 95 Cotton 5 52 1,80
LINEN/EASY-CARES 40
LINEN/EASY-CARES 40
TIME SAVING: SHORT
DELICATES 30 Synthetics 2,5 54 0,35
WOOL (HANDWASH) 30 Wool 2 48 0,30
1) The load is determined in accordance with EN 60456 Standard Loads.
2) Note: Program setting for testing in accordance with or in support of EN 60 456 and
IEC 60 456.
Actual consumption will vary from the indicated values depending on water pressure,
water hardness, water temperature at filling, room temperature, type and quantity of
washing, detergent used, variations in mains voltage and any additional program
functions selected.
2)
2)
2)
Type of
fabric
Cotton 5 37 0,85
Cotton 5 48 0,66
Synthetics 2,5 48 0,50
Load
in kg
1)
Water
in litres
Energy
in kWh
Page 35

Installation and connection instructions
1 Safety information for the installation
• This washing machine cannot be built-in.
• Before using for the first time, check the appliance for damage sus-
tained while it was being transported. Do not under any circumstances connect an appliance that is damaged. In the case of damage,
please contact your supplier.
• Before using for the first time, all parts of the transit packaging must
be removed. Otherwise when spinning damage may be caused to the
appliance or to neighbouring units or furniture.
• Before using the appliance for the first time, splash protection must
be completed. (See “Removing the transit packaging”.)
• Always plug the mains plug into a correctly installed shockproof
socket.
• Permanent connection: a permanent connection must only be in-
stalled by a trained electrician.
• Prior to using the appliance for the first time, ensure that the rated
voltage and type of supply on the rating plate match that of the supply where the appliance is to be installed. The fuse rating is also to be
found on the rating plate.
• If work on the plumbing is required for the proper connection of the
washing machine to the water supply, this must be undertaken by a
registered plumber.
• If work on the electricity supply system is required for the proper
connection of the washing machine to the electricity supply, this
must be undertaken by a registered electrician.
• The washing machine’s cable must only be replaced by the Customer
Care Department or a registered electrician.
35
Page 36

Installing the appliance
Transporting the appliance
1 Warning! The washing machine is very heavy. Risk of injury. Be careful
when lifting.
• Do not lay the appliance on its front nor on its right side (as seen
from the front). Electrical components may get wet.
• Never transport the appliance without its transit packaging. Only re-
move the transit packaging when the appliance is in its place of installation. Transporting the appliance without its transit packaging
can lead to damage to the appliance.
• Never lift the appliance by the door when it is open nor by the plinth.
When moving using a sack trolley:
• Only use the sack trolley on the side of the appliance. The sack trol-
ley’s base plate must not be longer than 24 cm, otherwise parts of the
anti-flood system may be damaged.
Removing the transit packaging
Important! Before using the appli-
ance for the first time, all parts of
the transit packaging must be removed! Keep the transit packaging
in a safe place, in case it is needed at
a later date when the appliance is to
be moved (e.g. moving house).
1. At the back of the appliance, open
both hose clips and remove both
hoses and mains cable.
2. Remove both hose clips from the appliance by jerking them hard.
36
Page 37

3. Remove both plastic caps sideways.
3 Special spanner A and sealing caps B
(2 off) and C (1 off) are supplied
with the appliance.
4. Remove screw D with its compression spring using special spanner A.
5. Turn sealing cap C upside down as
shown in the illustration.
6. Seal hole using sealing cap C.
7. Unscrew and remove two screws E
using special spanner A.
8. Unscrew and remove four screws F
using special spanner A.
9. Remove transit bar G.
10. Screw in the four screws F again.
11. Seal the two big holes using sealing
caps B.
Important! Press all sealing caps B
(2 off) and C (1 off) in firmly, so that
they snap into place. (Splash protection).
37
Page 38

Where to install
Important! The appliance must not be used in a room where there is a
danger of frost. Frost damage or impaired operation! Frost damage is
not covered by the warranty.
• The surface on which the appliance is to be installed must be firm
and level. Do not install the appliance on carpets or on soft floor coverings.
• The surface on which the appliance is to be installed must be clean
and dry and free from coverings that move, so that the appliance
does not slide.
• If the location in which the appliance is to be installed is fitted with
small-format tiles, put a rubber mat (available in the shops) under
the appliance.
If the appliance is to stand on a
plinth:
In order for the appliance to be secure on the plinth, fixing plates*)
must be mounted, into which the
appliance is inserted.
If the appliance is to stand on floors that vibrate, e. g. floors of
wooden joists with deal boards:
If possible, install the appliance in one corner of the room.
1. Screw a water-resistant wooden board (at least 15 mm thick) onto at
least 2 of the floor joists.
2. Affix fixing plates *) onto the wooden board, into which the appliance
is inserted.
*) The fixing plates can be obtained from the Customer Care Department.
Making the appliance level
3 Automatic foot: The rear foot on the left-hand side of your washing
machine is built as a shock absorbing foot, which is why the appliance
gives in the back left-hand corner if put under load. The automatic foot
guarantees that the appliance does not move even at high spin speeds.
Basically the automatic foot does not need to be set.
38
Page 39

The four feet of the appliance are
pre-adjusted.
Large degrees of unevenness can be
compensated for by individually adjusting the height adjustable screw
feet.
Use the special spanner supplied to
do this.
Important! Do not use pieces of
wood, cardboard or such like to level out unevenness in the floor, but
adjust the height adjustable screw
feet instead.
Electrical connection
Details about the voltage, type of supply and the fuses required are to
be found on the rating plate. The rating plate is next to the doorway.
Connecting to the water supply
Important!
• This appliance must not be connected to the hot water system.
• When connecting it, use only new hose kits.
• Only connect the appliance to the drinking water supply. Rain water
or water for industrial use may only be used if it fulfils the requirements of DIN1986 and DIN1988.
• Do not kink or crush the water inlet hose or drain hose.
Permitted water pressure
The water pressure must be at least 1 bar (= 10N/cm2=0.1MPa) and may
be a maximum of 10bar (=100N/cm
– If more than 10 bar: Connect a pressure reduction valve.
– If less than 1bar: Disconnect the appliance end of the inlet hose from
the solenoid inlet valve and remove the flow meter. (In addition remove the filter using pointed pliers and take out the rubber gasket
behind it.) Re-insert the filter.
2
=1MPa).
39
Page 40

Water inflow
A 1.50 m long pressure hose is supplied with the appliance.
If a longer water inlet hose is required, only original hoses are to be
used. The Customer Care Department stocks hose kits of different
lengths.
3 Sealing rings are either inserted in the plastic nuts of the threaded hose
fitting or are included as spare parts . Do not use any other seals.
Important! All threaded hose fit-
tings must only be tightened by
hand.
1. Connect the hose with the right-angle connector to the machine.
Important! Do not position the inlet
hose vertically downwards. Position
it to the right or the left as shown in
the illustration.
2. Connect the hose with the straight
connector to a water tap with an R
¾ (inch) screw thread.
3. Open the water tap slowly and check
all connections for water tightness.
40
Page 41

Water drainage
The maximum permitted difference between the height of the surface
on which the appliance is installed and the water outlet is 1 metre.
Only original hoses may be used to extend hoses. (A maximum of 3 m
laid on the floor and then 80 cm vertically). The Customer Care Department stocks outlet hoses of different lengths.
Draining water into a sink outlet
Secure the outlet/sink outlet joint
with a hose band clip (available from
your dealer).
Draining water into a wash basin/bath
1 Important!
– Small basins are not suitable. Wa-
ter may overflow.
– The end of the drain hose must
not be in the water that has been
pumped out. Otherwise water
could be sucked back into the appliance.
– When draining into a wash basin
or a bath, secure the drain hose
with the supplied elbow to stop it
slipping. Otherwise the water running out can force the hose out of
the basin.
– When pumping the water out,
check that the water is running
away fast enough.
Pumping heights over 1 m
The washing machine’s drain pump is able to pump water to a height of
1meter, calculated from the surface on which the appliance is installed.
Warning! If pumping height is over 1 metre, malfunctions and damage
to the appliance may arise.
For pumping heights over 1metre a conversion kit can be obtained.
Please contact the Customer Care Department.
41
Page 42

Customer Services
Servicestellen
5506 Mägenwil/Zürich
Industriestrasse 10
9000 St. Gallen
Vonwilstrasse 15
4127 Birsfelden
Hauptstrasse 52
8604 Volketswil
Hölzliwisenstrasse 12
6032 Emmen
Buholzstrasse
7000 Chur
Comercialstrasse 19
3063 Ittigen/Bern
Ey 5
Ersatzteilverkauf
5506 Mägenwil
Industriestrasse 10
0848 848 028
Fachberatung/Verkauf
8048 Zürich
Badenerstrasse 587
044 405 85 00
Garantie
Für jedes Produkt gewähren
wir ab Verkauf bzw. Lieferdatum an den Endverbraucher eine Garantie von
2 Jahren. (Ausweis durch
Garantieschein, Faktura
oder Verkaufsbeleg).
Die Garantieleistung umfasst die Kosten für Material, Arbeits- und Reisezeit.
Die Garantieleistung entfällt
bei Nichtbeachtung der Gebrauchsanweisung und Betriebsvorschriften,
unsachgerechter Installation, sowie bei Beschädigung durch äussere
Einflüsse, höhere Gewalt,
Eingriffe Dritter und Verwendung von Nicht-Original-Teilen.
1
Points de Service
1028 Préverenges
Le Trési 6
Points de vente de rechange
5506 Mägenwil
Industriestrasse 10
0848 848 028
Demonstration/Vente
8048 Zürich
Badenerstrasse 587
044 405 85 00
Garantie
Nous octroyons sur chaque produit 2 ans de garantie à partir de
la date de livraison ou de la mise
en service au consommateur
(documenté au moyen d’une facture, d’un bon de garantie ou
d’un justificatif d’achat).
Notre garantie couvre les frais de
mains d’œuvres et de déplacement, ainsi que les pièces de rechange.
Les conditions de garantie ne
sont pas valables en cas d’intervention d’un tiers non autorisé,
de l’emploi de pièces de rechange
non originales, d’erreurs de
maniement ou d’installation dues
à l’inobservation du mode d’emploi, et pour des dommages
causés par des influences extérieures ou de force majeure.
Servizio dopo vendita
6916 Grancia
Zona Industriale E
Vendita pezzi di ricambio
5506 Mägenwil
Industriestrasse 10
0848 848 028
Consulente (cucina)/Vendita
8048 Zürich
Badenerstrasse 587
044 405 85 00
Garanzia
Per ogni prodotto concediamo
una garanzia di 2 anni a
partire dalla data di consegna
o dalla sua messa in funzione
(fa stato la data della fattura,
del certificato di garanzia o
dello scontrino d’acquisto).
Nella garanzia sono comprese
le spese di manodopera, di
viaggio e del materiale.
Dalla copertura sono esclusi il
logoramento ed i danni
causati da agenti esterni, intervento di terzi, utilizzo di
ricambi non originali o dalla
inosservanza delle prescrizioni
d’istallazione ed istruzioni per
l’uso.
42
Page 43

Service
In the event of technical faults, please first check whether you can
remedy the problem yourself with the help of the operating instructions (section “What to do if…”).
If you were not able to remedy the problem yourself, please contact the
Customer Care Department or one of our service partners.
In order to be able to assist you
quickly, we require the following
information:
– Model description
– Product number (PNC)
– Serial number (S No.)
(for numbers see rating plate)
– Type of fault
– Any error messages displayed by
the appliance
So that you have the necessary reference numbers from your appliance
at hand, we recommend that you write them in here:
Model description: .....................................
PNC: .....................................
S No: .....................................
43
Page 44

From the Electrolux Group. The world´s No.1 choice.
The Electrolux Group is the world´s largest producer of powered appliances for kitchen, cleaning and outdoor
use. More than 55 million Electrolux Group products (such as refrigerators, cookers, washing machines,
vacuum cleaners, chain saws and lawn mowers) are sold each year to a value of approx. USD 14 billion in more
than 150 countries around the world.
AEG Hausgeräte GmbH
Postfach 1036
D-90327 Nürnberg
http://www.aeg-electrolux.de
© Copyright by AEG
105 176 367-02-020805-04
Subject to change without notice
 Loading...