

Page 1
207.5141.02
Pow erFridge
RC3000
Operating Instructions
R
USA
CAN
Page 2
Thank you for choosing our appliance. We are sure it will provide you with trouble-free use.
In the following, we would like to familiarise you with some symbols, which we bring to your attention to ensure
the safe and efficient operation of the appliance:
source of danger, in event of improper operation
suggested useful tips to read
information concerning environmental protection
This refrigerator is to be operated by HD-5 Propane Gas and electricity (12 V dc and 120 V ac).
2
Attention!
Your portable refrigerator - in gas operation - must only be used in a well-ventilated
place, where it is protected from rain or water splashes. In electrical operation, the
appliance can be used in an enclosed area. However the appliance must still be
protected from moisture.
For your safety!
If you smell gas:
1. Evacuated enclosure 2. Call for professional help.
For your safety!
Do not store or use gasoline or other flammable vapors and loquids in the vicinity of this
or any other appliance.
Warning!
This refrigerator consumes air (oxygen). Provide ample ventilation especially when
sleeping. Do not use this refrigerator in unventilated structures to avoid endangering
your life. Provide additional ventilation for any additional fuel burning appliances and
additional occupants.
Please read these operating instructions carefully before putting the
refrigeration unit into operation. If you later sell or dispose of it, please ensure
that the new owner receives these operating instructions.
Page 3

3
CONTENT
CONTENTSS
1. Unpacking
2. View of the appliance
3. Cleaning
4. Installation
5. Using the appliance
5.1. Operating from electrical mains
5.2. Operating from vehicle battery
5.3. Liquid gas operation
6. Mounting the wheels
7. Useful suggestions
8. Defrosting, cleaning and maintenance
9. Customer service
10. Putting into operation, technical data
10.1. Connecting to electrical mains
10.2. Connecting to vehicle power source
10.3. Connecting to gas cylinder
10.4. Connection of gas supply
11. Environmental protection information
12. Recycling
Page 4
4
1. Unpacking
After removal from the cardboard packaging, make
sure the appliance is not damaged. If you find damage
to the appliance resulting from transport, report it
immediately to the transportation firm.
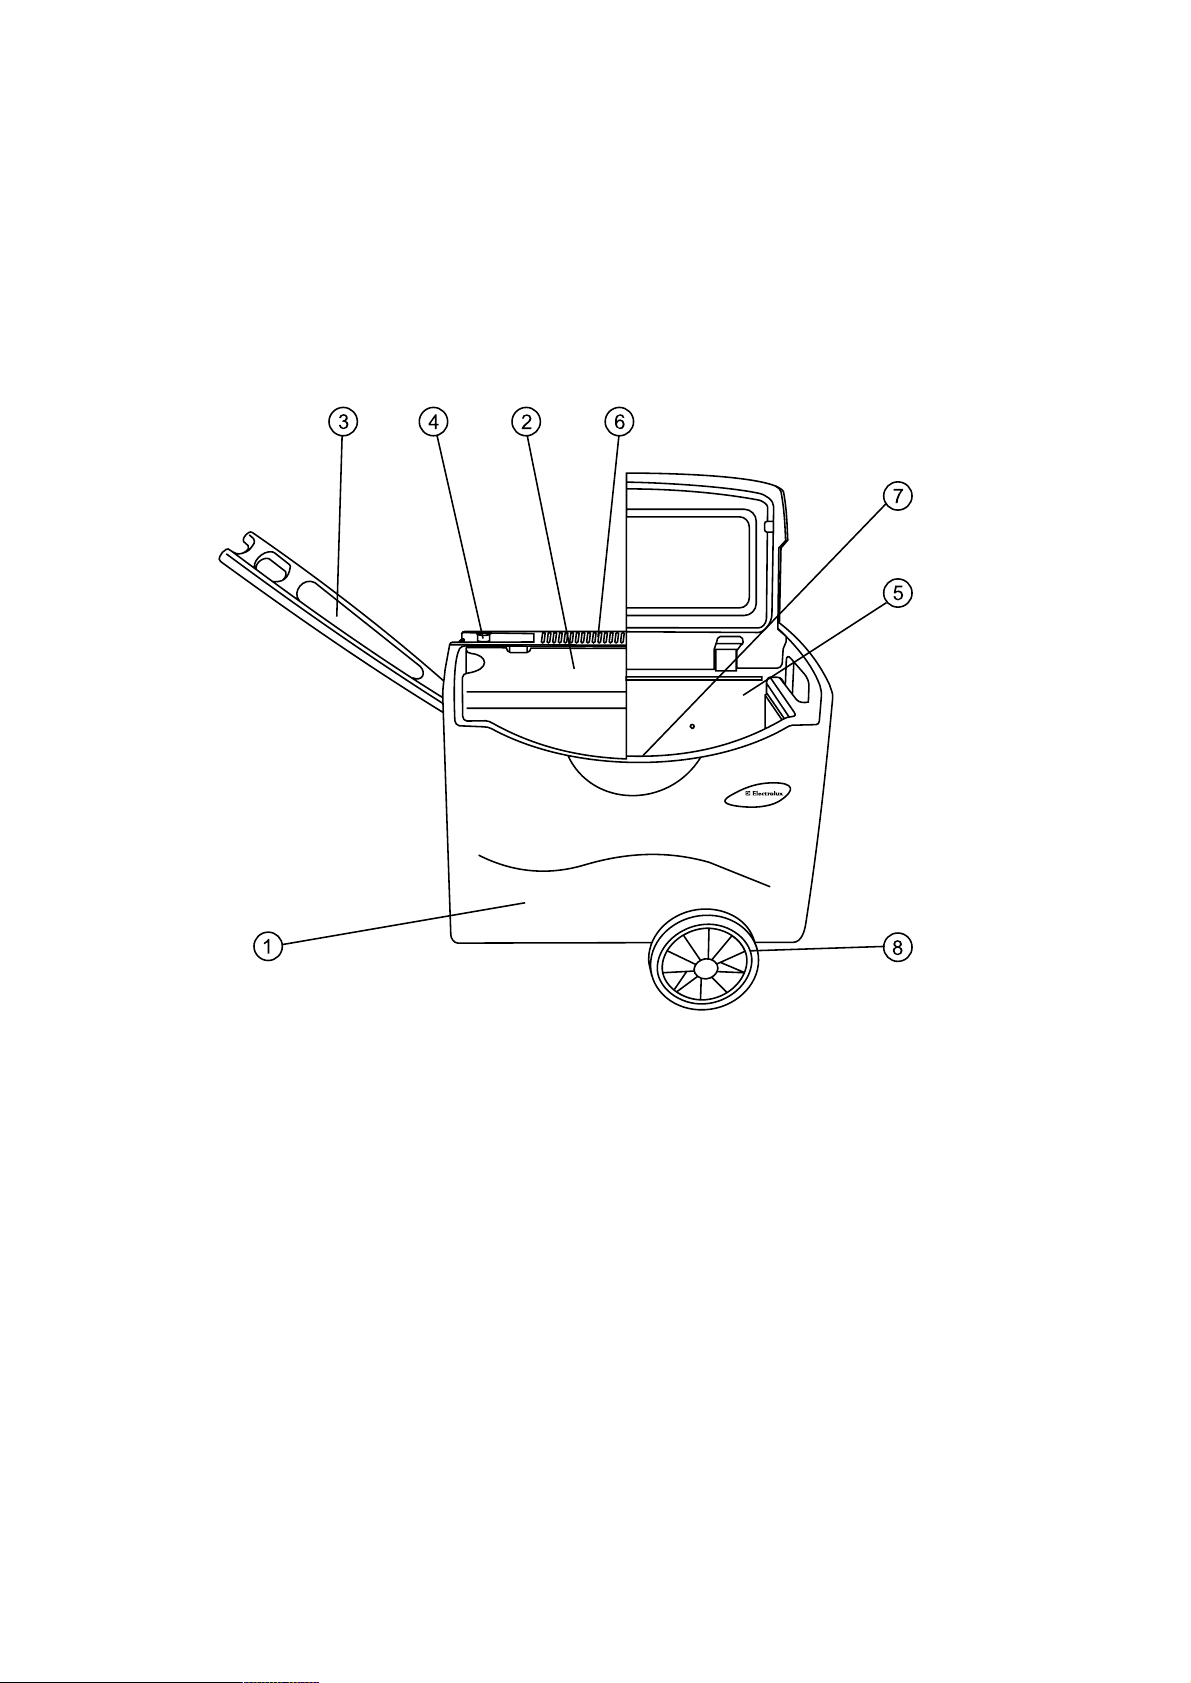
2. View of the appliance
1. insulated casing
2. insulated lid
3. handle
4. control panel
5. evaporator panel
6. rear cover
7. Pressure regulator
8. wheels
Figure 1.
Page 5

5
3. Cleaning
Clean both the inside and outside of the
appliance before putting it into use.
To do so, use a soft towel, lukewarm water and a
non-abrasive detergent. Ensure water does not
enter the rear cover grille or the control elements.
Afterwards, wipe the appliance with a clean towel
and clear water, and then wipe it dry.
To avoid damage, do not use soap, soda or
abrasive cleaners.
4. Installation:
The installation of the refrigerator must conform with
the following Americal National Standards as
applicable: ANS Z21.74b - 1992 Portable
Refrigerator; in Canada: CAN1-11.4-M79.
For installation, for maintaining proper clearances
from combustible material to the refrigerator, the
following minimum clearances must be observed:
clearance from rear edge to outer
casing of refrigerator: 4 inches
clearance above top
of refrigerator lid: 6 or 13 inches
clearance at sides of
refrigerator casing: 0 inches
Fig. 2. illustrates these minimum clearences.
See that the refrigerator is standing level in both
directions by means of a spirit level. This is
important for satisfactory operation of the cooling
unit.
The absorption cooling unit is cooled by convection
air and therefore it is of the outmost importance
that the air circulates free over the unit and that the
air vent openings of the refrigerator are always kept
open. The more ventilation you provide, the better
the performance you can expect from the
refrigerator.
NOTES: KEEP APPLIANCE AREA CLEAR
AND FREE FROM COMBUSTIBLE MATERIALS,
GASOLINE AND OTHER LIQUIDS WITH
FLAMMABLE VAPORS.
DO NOT OBSTRUCT THE FLOW OF
COMBUSTION AND VENTILATION AIR.
Figure 2.
Page 6

6
Figure 3.
Figure 4.
Figure 5.
5. Using the appliance
The cable for mains connection, the 12V connecting
cable and the connector for the gas hook-up are
located on the right-hand side of the rear cover of the
cooling box, behind the door (Figure 2).
5.1. Operating from electrical mains
Warning: Electrical grounding instructions:
This appliance is equipped with a three-prong
(grounding) plug for your protection against shock
hazards and should be plugged directly into a properly
grounded three-prong receptable. Do not cut or
remove the grounding prong from this plug.
The cord is approximately 5 feet long and a grounded
three-prong receptable should be installed in an
accessible position within reach of the plug. Do not
use any extension cords!
When connecting the appliance for the first time, set
the thermostat to maximum; then, after about five
hours, set it back to a medium position. This is
suitable for general refrigeration requirements.
NB: Plug is provided according to specific
regulations in each country and may be different to
that shown.
5.2. Operating from vehicle battery
Make sure the voltage shown on the data plate of the
appliance matches the voltage of the vehicle battery
(12V).
12V DC voltage appliances are equipped with
connectors that can be plugged into cigarette lighters
(Figure 3.). For some types of vehicle, you may need
to remove the red plastic ring located on the end of
the connector. To do so, turn the plastic ring in an anticlockwise direction and pull it off. The appliance can
then be connected to the cigarette lighter. In 12V
operation, the appliance runs uninterrupted without
temperature control.
For 12V operation, make sure, if the engine is not
running, that the appliance connector is removed from
the cigarette lighter. Otherwise, the appliance will
discharge the vehicle battery when in operation.
5.3. Liquid gas operation
Connection to the gas cylinder is described in
sections 11.3. and 11.4.
After opening the gas cylinder valve, push the safety gas
valve down (Figure 4) and set it to the large flame
symbol, holding it down for about 10 seconds. Keep the
button pressed down and press the piezo-igniting button
(marked with a star) several times one after the other. If
the flame does not ignite, repeat the process. (Air in the
appliance gas line prior to connection to the gas cylinder
must be evacuated. Only then can the gas be lit.)
Ignition of the flame can be verified through the flameview opening (Figure 5). After you have got the flame
keep the safety gas valve down another 20 seconds.
Figure 2.
Page 7

7
First mount the two wheels on the axle. To do so,
press in the spring located on the wheel (Figure 6);
then release the spring, pushing the wheel onto the
axle. It can be felt when the spring jumps into place
and it is not possible to pull the wheel from the axle.
After mounting the wheels, fasten the axle to the
bottom of the housing. To do so, turn the appliance
upside down (while empty) and fasten the axle with the
retaining screw (Figure 7).
To mount the pull handle, turn the appliance (while
empty) on its end. Position the pull handle below the
handle fastener, so that its smooth surface is on the
outside. Screw the handle fastener to the chassis
using both screws (Figure 8).
Snap the pull handle into the fastener groove, folding
it down beside the chassis. In this position, it acts as
a leg when the appliance is in operation.
If you wish to pull the appliance on wheels, make sure
no power source is connected. Then straighten up the
pull handle and pull the appliance to its new location.
When loading onto a vehicle, the wheels and handle
are removed in reverse order (if required for better use
of space). The appliance must be empty to carry out
these processes.
Figure 6.
Figure 7.
Figure 8.
6. Mounting the wheels
The wheel set, found inside the appliance, consists of
the following parts:
2 wheels
1 axle
1 axle-retaining screw
1 pull handle
1 handle fastener
2 screws for the pull handle
If, for any reason, the gas flame extinguishes, the
flame safety device is working automatically and shuts
off gas supply. While the button is pushed, this device
is temporary inoperative.
After finishing the gas operation the gas supply is to be
turned off.
Page 8

8
7. Useful suggestions
When setting out on a trip, run the appliance on
120 V for 24 hours. Place food in a pre-cooled
condition into the appliance.
Determine the requirements for making ice and
either set up the ice-tray holder or remove it before
plugging in the refrigeration unit. (Because of frost
formation, this may be more difficult to accomplish
later.)
Frost forms on the evaporator panel when in
operation. When opening the cover or putting in
food, some of this frost melts and collects in the
form of water on the bottom of the appliance. Wipe
the water off occasionally using a sponge.
Avoid putting foods with fragile packaging (such as
glass) into the refrigeration unit, if you wish to pull it
on its wheels. Movements and shaking of the unit
may cause these items to break.
On descent, make sure the refrigeration unit does
not roll onto your legs. On steep descents,
proceed behind the unit with the wheels in front.
Once the refrigeration unit is in its permanent
position, make sure foods do not come into contact
with the evaporator panel, as this can cause
freezer-burn to the foods.
8. Defrosting, cleaning and
maintenance
For defrosting, always unplug the appliance from an
electrical power source to avoid the risk of shock.
Make sure no other power source is connected (gas
or 12V). Remove food from the refrigeration unit and
leave the lid open. Depending on the temperature,
frost melts in a short time from the evaporator panel,
with water collecting at the bottom of the appliance.
Wipe it off using a towel. Afterwards, clean the
appliance by following the instructions in section 3.
Leave the lid ajar to prevent any odours from forming.
The appliance does not require any further
maintenance.
Page 9

9
9. Customer service
Before notifying customer service, please check the
following:
Are location and ventilation satisfactory?
Does the appliance stand evenly?
Is there a current in the wall socket and is the
connection suitable for the appliance?
Is the mains power cable damaged?
For mains operation, is the electric thermostat
swiched on?
For gas operation, was the safety valve knob
pressed down long enough?
Is the safety valve knob set towards the large
flame symbol?
Is the gas cylinder or the pressure regulator valve
open?
Is there any gas in the cylinder? (If by shaking, no
liquid movement can be detected, then the
cylinder is empty.)
Are by any chance two different power sources
connected (such as gas or electricity)?
Was warm food placed in the unit?
Was a large quantity of food put in at one time?
If after checking the above, the appliance still does
not operate properly, contact customer service. When
reporting the problem, state the type of problem, the
type of appliance, and the product number and serial
number from the data plate.
We assume the warranty in accordance with our
warranty assumptions for the appliance.
10. Putting into operation
You must, in all instances, operate the
appliance from a single energy source only.
Connecting several energy sources at the same time
will cause failure of the appliance.
Technical data:
10.1 Connecting to electrical mains
Make sure no other energy source is connected
(gas, 12V).
The appliance may only be operated from nominal
voltage mains as shown on the data plate. The
appliance mains plug may be connected to a mains
socket earthed in accordance with regulations. (In
foreign countries, because of other electric
receptacles, an adapter may be required.)
10.2 Connecting to vehicle power
source
Make sure no other energy source is connected
(gas, 120V).
12V appliances must be connected to a vehicle
cigarette lighter, which is protected with a 16A fuse.
10.3 Connecting to gas cylinder
Make sure no other energy source is connected
(120V, 12V).
This refrigerator is designed for self-contained fuel
cylinder of not more than 75 cubic inches (2 ½
pounds nominal water capacity). The cylinder(s)
must be constructed and marked in accordance
with the specifications for LP-gas cylinders of the
U.S. Department of Transportation (DOT), DOT
SPEC. 89 (49CFR 178.65), in Canada, with the
ministry of transport and communication.
The refrigerator may only be operated by a selfcontained 14 oz propane HD5 gas bottle, which is
to be connected to the refrigerator by means of the
supplied manual control valve and the pressure
regulator with hose. The gas burner is fitted with a
jet Nr. 22 which is suitable for use on Propane gas
at a supply pressure of 11 inches water gauge.
10.4 Connection of gas supply (Fig.11)
a. fit the manual control valve (Fig.11.1) with
pressure regulator (Fig.11.2) and hose finger
tight to the self contained 14 oz gas cylinder
(Fig. 11.3)
b. connect the gas hose to the inlet (Fig. 11.4) at
the back of the refrigerator with tools (see label
at the connection)
c. put the gas bottle assembly about 10 from the
refrigerator.
After connecting all gas connections must be
checked for leaks. For this put a soapy solution
on all gas connections, turn on the gas cylinder
manual valve and watch for bubbles.
For the detection of leaks never use an open flame.
If the gas bottle is empty withdraw it from the bottle
holder, unscrew the manual control valve /
pressure regulator-assemly from the bottle and refit
a new one.
Model RC 3000
Type JCB 4
Gross volume 35 litre
Mains operation 120V (AC)
Input 85W
Energy consumption 1.4 kWh/24h
Battery operation 12V (DC)
Input 80W
Energy consumption 160Ah/24h
Gas pressure (p) 11 WG
Gas classification Propane
Jet size 22
Climate class N
Refrigerant 370g NH
3
+ H2O
Page 10

10
For your safety:
Do not check for leaks with a naked flame! Do not smoke while checking for leaks!
Figure 11.
12. Environmental protection
information
The appliance does not contain any CFC's/HCFC's.
Ammonia (natural hydrogen and nitrogen compound)
is used as a refrigerating agent in the refrigeration unit.
The ozone-friendly cyclopentane is activated as a
motive agent for the PU foam insulation.
Sodium chromate is used for corrosion protection
(less than 2 weight % of the coolant).
13. Recycling
After unpacking the appliance, the packing materials
should be delivered to a local collection site. At the
end of its useful lifetime, the appliance should be
delivered to a specialised collection and reprocessing
firm, which reclaims the usable materials. The rest is
properly destroyed.
Page 11

11
USA CANADA
Service Office Dometic Distribution Inc.
The Dometic Corporation 866 Langs Drive
509 South Poplar Street Cambridge,Ontario
LaGrange, IN 46761 N3H 2N7 Canada
Phone: 219-463-4858 Phone: 519-653-4390
For Service Center Assistance
Call: 800-544-4881
Wiring Diagram
Page 12

Printed by Xerox Hungary Ltd. Rev.: 2003. 09. 03.
 Loading...