

Page 1

207.4460.02
EA0300C EA0600C EA0610C EA3100
EA0301C EA0601C EA0611C EA3200
EA0302C EA0602C EA0612C EA3210
ENGLISH ENGLISH
FRENCH FRANÇAIS
DUTCH NEDERLANDS
GERMAN DEUTSCH
SWEDISH SVENSK
NORWEGIAN NORSK
DANISH DANSKE
FINISH SUOMENKJELINEN VERSIO
SPANISH ESPAÑOL
PORTUGUESE
PORTOGUÈS
ITALY
ITALIANO
2...7
8...11
12...15
16...19
20...22
23...25
26...29
30...32
33...36
37...40
41...46
USER'S HANDBOOK
NOTICE D'UTILISATION
HANDLEIDING
GEBRAUCHSANWEISUNG
BRUKSANVISNING
BETJENINGSVEJLEDNING
HÄNDBOK
KÄYTTÖOHJE
MANUAL
MANUAL
MANUALE
Page 2

2
IMPORTANT: PLEASE READ THE INSTRUCTION BOOK BEFORE USING THIS APPLIANCE
IMPORTANT USER INFORMATION
It is most important that this instruction book should be retained with the appliance for future reference. Should the
appliance be sold or transferred to another owner or should you move house and leave the appliance, always ensure
that the book is supplied with the appliance in order that the new owner can be acquainted with the functioning of the
appliance and the relevant warnings.
These warnings are provided in the interest of safety. You must read them carefully before installing or using the appliance.
This product is designed to be operated by adults.
Children should not be allowed to tamper with the
controls or play with the product.
Any electrical work required to install this appliance
should be carried out by a qualified electrician.
This product should be serviced by an authorised
Electrolux Service Engineer, and only genuine
Electrolux spare parts should be used.
Care must be taken to ensure that the appliance
does not stand on the electrical supply cable.
Electrolux refrigerators are designed to be used
specifically for the storage of edible foodstuffs only.
There are working parts in this product which heat
up. Always ensure that there is adequate ventilation
as a failure to do this will result in component failure
and possible food loss. See installation instructions.
Parts which heat up should not be exposed.
Wherever possible the back of the product should
be close to a wall but leaving the required distance
for ventilation as stated in the installation
instructions.
Before defrosting, cleaning or maintenance work is
carried out, be sure to switch off the appliance and
unplug it.
The ice box in this appliance contains tubes through
which the refrigerant passes. If these are punctured
this would cause substantial damage and result in
food loss. DO NOT USE SHARP INSTRUMENTS to
scrape off frost or ice. Under no circumstances
should solid ice be forced off the ice box. Solid ice
should be allowed to thaw when defrosting the
appliance. See defrost instructions.
The appliance should be left for 2 hours after
installation before it is turned on in order to allow
refrigerant to settle, unless it is of the absorption
type in which case it can be turned on immediately.
This appliance is heavy. Care should be taken when
moving it.
Ice lollies can cause frost burns if consumed
straight from the freezer.
Frozen food must not be refrozen once it has
thawed out.
Manufacturer's food storage recommendations
should be strictly adhered to. Refer to relevant
instructions.
Do not place carbonated of fizzy drinks in the
freezer as is creates pressure on the container
which may cause it to explode resulting in damage
to the appliance.
Under no circumstances should you attempt to
repair the appliance yourself. Repairs carried out by
inexperienced persons may cause injury or more
serious malfunctioning. Refer to your local
Electrolux Service Centre and always insist on
genuine Electrolux spare parts.
INSTRUCTIONS FOR USE
It's important that you read this handbook before
installing and using your new refrigerator.
SAFETY NOTE: If this refrigerator is replacing a larger
one which is going to be scrapped, remove the door
before disposal to prevent children from becoming
trapped inside.
INSTALLATION INSTRUCTIONS
The refrigerator is equipped with an electrically heated
absorption cooling unit which is virtually silent in
operation. The fridge is designed for free-standing
installation, but can be built-in if the following conditions
are complied with to ensure satisfactory operation and
maximum cooling efficiency.
1) The fridge must be level in both directions.
2) There must be an air duct at the back of the housing
to provide sufficient air-flow over the cooling unit to
carry away heat generated during the cooling
process. The entire cooling unit should project into
the duct and the air passing through the dust must
not be pre-heated by radiators. T.V. sets or any
other sources of heat.
Two refrigerators should not be built-in, one on top
of the other, unless separate air ducts are provided
for each.
3) When built-in, for future servicing requirements, it
must be possible for the refrigerator to be easily
removed, without damaging the fitment in which it is
housed.
The illustrations on page 47 show 3 different ways of
building-in the refrigerator.
With the refrigerator standing on a shelf - Figure 1
The opening at the back for the passage of air must be
at least 105 mm deep. This can be achieved by using
105 mm opening immediately under the cooling unit.
Alternatively, the shelf can be supported on battens at
the sides, screwed to adjacent fitments, or on legs,
leaving a completely unobstructed opening underneath
the cooling unit for the full width of the refrigerator,
allowing maximum air-flow.
If a ventilation grill is fitted at the top, it must have a free
space of at least 200 cm2 for the ventilating air to
escape.
With the refrigerator built into a housing - Figures 2
and 3.
The ventilation duct at the back of the recess must be at
least 105 mm deep and extend the full width of the
refrigerator - 425 mm minimum.
If the inlet and/or outlet openings at the bottom and top
of the duct are fitted with decorative grilles, the free
space through each grille must not be less than 200
cm2 so that the air-flow is not restricted.
Page 3
3
Door hang and outer door panel
The chosen position for your fridge may make it
preferable to change over the door hinges to reverse
the door hang. To do this, refer to page 5.
If you wish, the outer door panel can be removed and
replaced by another (not supplied by Electrolux) to
match existing decor in your room instructions for doing
this are also given on page 5.
Connecting to the mains
The refrigerator must only be connected to the
electricity supply using an earthed socket outlet,
installed in accordance with local regulations. Before
connecting the refrigerator, check from the data label
inside the cabinet that the voltage agree with your mains
supply.
Plug connection (for United Kingdom only)
If a 3 pin 13 amp fused plug is used, it should be fitted
with a 3 amp fuse; with other plug types, the circuit
should contain a 5 am fuse.
This appliance conforms with the requirements of EEC
Directive No. 89/336 relating to radio interference.
Warning - This appliance must be earthed.
MOULDED - ON PLUG
The mains lead is fitted with a non-rewirable mouldedon 13 amp plug containing a 3 amp fuse. If the fuse
requires replacing at any time, the fuse cover/carrier
should be removed using a small screwdriver to lever
it out. The old fuse should be replaced by a 3 amp
ASTA approved BS1362 fuse and the fuse
cover/carrier must be refitted before the plug is used
again.
If the fuse cover-carrier is lost, a replacement can be
obtained from the Electrolux Service Shops. The fuse
cover/carrier must be of the same colour as that of the
coloured insert in the base of the plug. In no
circumstances must the plug be used without a correct
fuse cover/carrier fitted.
If the plug supplied on the mains lead is not suitable for
the socket in your home, it should be cut off and
disposed of safety, or destroyed, to avoid any possible
shock hazard resulting from the plug being inserted
into a 13 amp socket elsewhere in the house. A
suitable replacement plug should then be fitted as
given below.
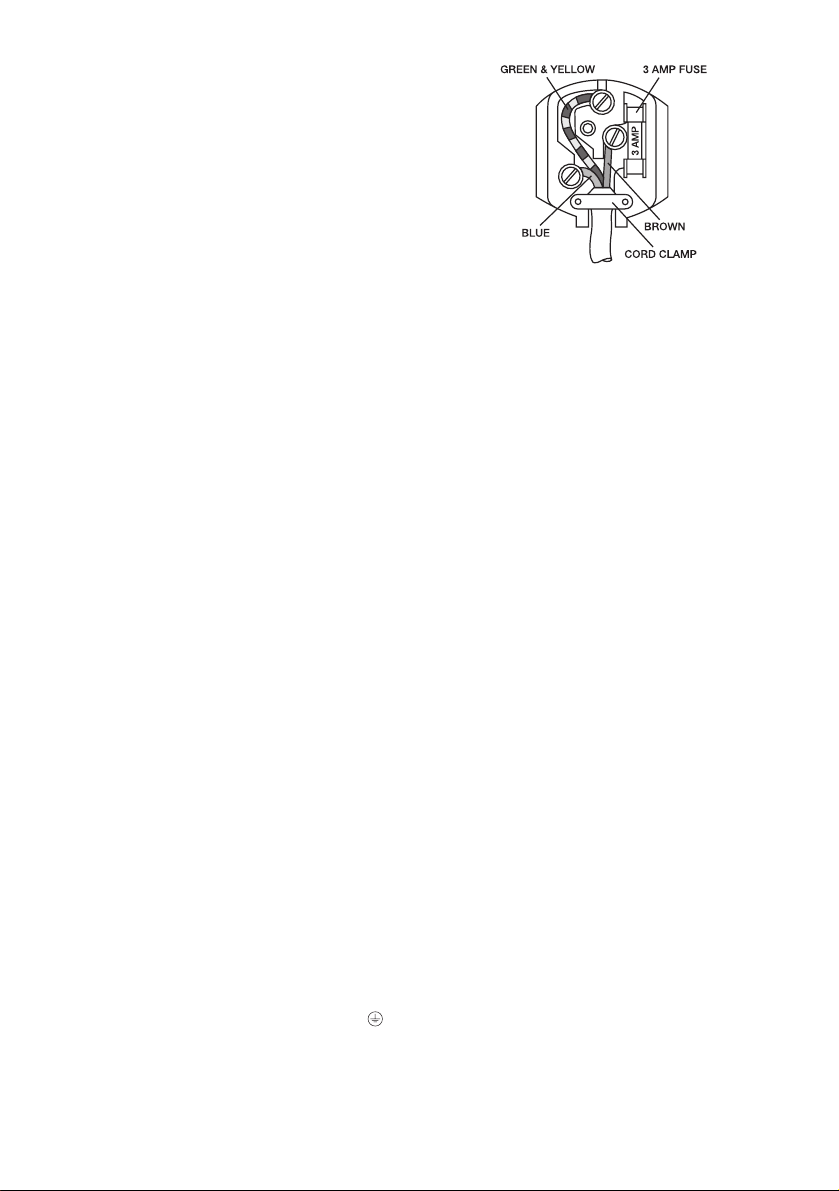
IMPORTANT
The wires in the mains lead of this appliance are
coloured in accordance with the following code:
GREEN-and-YELLOW : EARTH
BLUE : NEUTRAL
BROWN : LIVE
As the colours of the wires in the mains lead may not
correspond with the coloured markings identifying the
terminals in your plug, proceed as follows.
Connect the GREEN-and-YELLOW coloured wire to the
plug terminal marked letter E or earth symbol or
coloured green or green-and-yellow.
Connect the BROWN coloured wire to the plug terminal
marked letter L or coloured red.
Connect the BLUE coloured wire to the plug terminal
marked letter N or coloured black.
STARTING THE REFRIGERATOR
To start the fridge, plug into the socket outlet, switch on,
and turn the thermostat dial (inside the cabinet) to
setting number 3 or 4. There will be signs of cooling in
about an hour. Note that the fridge has an absorption
type of cooling unit, which is virtually silent in operation.
You will not therefore hear anything start up when the
fridge is switched on.
On the Auto-Defrost versions there also will be signs of
cooling after about one hour, unless by coincidence the
time switch is at a defrost cycle when first switched on
in which case 2 or 3 hours may elapse before cooling
starts to take place.
The refrigerator temperature will be affected by
location, room temperature, and frequency of door
opening and adjustment of the thermostat dial may be
needed to allow for this.
Temperature control
The temperature in the fridge is from 0° to 7°C and
inside the frozen food storage compartment on model
EA0600C/601C/602C/EA3200 is -12° or below,
when you set the thermostat dial to 3 or 4, in normal
ambient temperatures.
If colder temperatures are needed in the fridge turn the
thermostat dial clockwise to a higher number: if less
cooling is required, turn the dial anti-clockwise to a
lower number.
USING THE FRIDGE
The fridge compartment provides suitable storage for
most kinds of food, milk, drinks, etc and door shelves
are provided in the 60 litre models for bottles, jars, and
small packets.
Ideally, all foods should be in covered containers or
plastic bags, or wrapped in foil
or plastic film. Liquids should also be covered. This is to
prevent flavours passing from one item to another and
also to reduce frost build-up on the cooling surfaces
due to moisture coming from stored items.
Suggested storage times for fresh foods
Storage times will vary according to the type of food and
how fresh it is when put into the fridge but no food
should be stored for longer than the times stated below:
Suggested maximum storage times:
Type of food Storage time
Uncooked fresh meat
poultry, beef and lamb 3-5 days
pork 2-4 days
sausages 3 days
mince & offal 1-2 days
Page 4

4
Cooked meat
ham, sliced meat 2-3 days
pies 1 day
casseroles & paté 2 days
poultry 2-3 days
Bacon 1 week
Dairy produce
milk 2-3 days
cream 1 week
butter 3-4 weeks
hard cheese 3-4 weeks
soft cheese 1 week
Vegetables & Salads 1 week
Fruit 2 weeks
FROZEN FOOD STORAGE
COMPARTMENT WHERE FITTED
The frozen food storage compartment has a net volume
of 3.7 litres (0.13 cubic feet) and has a two-star
classification ** which means that, provided the
thermostat is set as described under 'Temperature
Regulation', it will maintain a temperature of -12°C
(10°F', or below). Under these conditions, most types
of frozen food can be stored in the compartment for up
to one month.
The length of storage time cannot be precisely stated as
this varies very much with the nature of the packaged
quick-frozen food stored, - vegetables, fish, meat, fruit
and dairy products. It is therefore important to take note
of the food manufacturer's estimate of the permissible
storage times for his products. This estimate, which
should be marked on each frozen food package, takes
into account inevitable variations during everyday
operation which may lead to changes in taste and
colour.
If frozen food is allowed to thaw, i.e. the packs become
wet and limp, no attempt should be made to store or refreeze - it should be consumed within 24 hours.
The frozen food storage compartment is for storing
quick-frozen foods, ice-cream and making ice. It is not
intended for the quick-freezing of foodstuffs.
Care should be taken when handling an consuming
water ices (e.g. iced lollies) taken directly from the
frozen food storage compartment because of the
possibility of cold burn (frost bite) when such ices are at
very low temperatures.
Never put bottles or cans of carbonated (gassy) drinks
in the frozen food storage compartment, as they may
burst if the gas is forced out by freezing.
NOTE: This does, not apply to Automatic Defrost
versions where Defrosting occurs every 24 hours
(depending on thermostat setting).
ICE-MAKING
Fill the ice tray with fresh drinking water to just below the
top (to allow for expansion), and place it on the icemaking shelf (This is at the top of the frozen food
compartment in the EA0600C/601C/602C/EA3200).
Ice will be made more quickly if the thermostat dial is
temporarily turned to MAX but remember to return the
dial to its usual setting when ice has formed; otherwise
the fridge may become too cold. To release the ice
cubes, simply twist the tray along its length to hold it,
inverted on a plate, under a running cold tap until the
cubes loosen.
LOOKING AFTER YOUR FRIDGE
Defrosting
Frost will gradually form on the cooling surfaces and it
must not be allowed to become too thick since it acts as
an insulator and interferes with the cooling process.
Defrosting (manual versions)
To defrost turn the thermostat dial to 0 remove the ice
tray and leave the cabinet and frozen food storage
compartment door open.
The frost will melt and run into the drip collector which
should be located underneath the frozen food storage
compartment.
When defrosting is complete, remove the drip collector
and turn the thermostat dial to its normal setting.
Rinse out the ice tray, refill it with fresh water and place
it on its shelf. Some drips of water may come from the
cooling fins during normal operation, therefore the drip
collector should be kept in position.
Automatic defrosting (where fitted)
Automatic defrosting is achieved by means of a times
switch, fitted at the back of the cabinet, which switches
off the cooling unit for approximately 2 hours every day.
No appreciable amount of frost should build-up on or
around the frozen food compartment during normal
use.
The defrost water runs through a drain tube from the
drip channel and into an evaporating vessel located at
the bottom rear of the refrigerator. The defrost water will
evaporate automatically into the circulating air and the
vessel will not need emptying manually.
Semi-automatic defrosting (where fitted)
Some models have a semi-automatic defrosting device
and these can be identified by the push-button in the
centre of the thermostat dial.
With these models you should, regularly each week,
examine the frost build-up and, if it is more than about 6
mm thick, the fridge should be defrosted. All models
with this device (including the
EA0600C/601C/602C/EA3200 when frozen food is
not being stored), are defrosted as follows:
Remove the ice tray and, on model
EA0600C/601C/602C/EA3200, see that the frozen
food compartment is empty. Push in the button in the
centre of the thermostat dial but do not turn the dial to
another position - leave it at its usual setting.
Close the door
The defrost button will stay in and the cooling unit will
remain switched off until the frost has melted. The
defrost button will then automatically spring out to its
normal position and the refrigerator will start working
again. The time taken to defrost will depend on the
amount of frost to be removed and the room
temperature.
NOTE: If frost builds up inside the frozen food
compartment in the EA0600C/601C/602C/EA3200,
it may not be cleared using push-button defrosting. In
this case, you may occasionally need to defrost using
the method described under 'Frozen foods and
defrosting'.
Page 5

5
Defrost water disposal
While defrosting is taking place, defrost water will run
through a tube into an evaporating vessel in the cooling
unit compartment at the back of the cabinet. The water
will then evaporate into the circulating air. You do not
have to empty the vessel.
Frozen foods and defrosting
Models EA0600C/601C/602C/EA3200
If possible, arrange to use up your frozen food before
defrosting becomes necessary, then you can defrost as
described above. If you do have a frozen food remaining
and you cannot temporarily store it in a freezer or
another frozen food compartment, wrap it in several
thicknesses of clean newspaper, or in a blanket or other
suitable insulating material and put it in a cool place.
Defrosting must than be carried out as quickly as
possible. Do this by disconnecting the plug from the
wall socket and placing a dish of hot (not boiling) water
on the ice-tray shelf in the frozen food compartment,
changing the water as necessary until all frost has
melted. (Don't pour put a container of very hot water on
the bottom of the frozen food compartment, and don't
use an electric heater, hair drier, or other form of heat
as this will damage plastic surfaces).
When defrosting has finished, wipe out and dry the
frozen food compartment, reconnect to the electricity
supply, and replace the frozen food. Don't attempt to
make ice-cubes until the fridge has cooled down again.
REMEMBER: If the temperature of frozen food is
allowed to rise unduly during defrosting, its storage life
may be shortened.
Cleaning
Clean the interior of your fridge regularly to keep it fresh
and hygienic.
Switch off and pull the plug from the wall socket then
thoroughly clean the interior and fittings with a cloth
wrung out in a solution of one teaspoonful of
bicarbonate of soda to each pint of warm water.
Never use detergents, abrasive powders, highly
perfumed cleaning materials of wax polishes to clean
the interior as these will damage the surfaces and leave
a strong smell.
The outside should occasionally be dusted or wiped
over with a damp cloth and a small amount of detergent.
But not the door seal which should be cleaned only with
soap and water and thoroughly dried.
If accessible, the cooling unit at the rear should be
cleaned of dust occasionally using a brush, but make
sure the fridge is unplugged when you do this.
Occasionally, strong-smelling food may leave the fridge
with a slight odour. Placing a small dish of bicarbonate
of soda powder inside should slowly absorb these
smells. The dish should be refilled periodically.
Going on holiday
Don't switch off at the mains if you intend leaving food in
the refrigerator (or frozen food compartment on
EA0600C/601C/602C/EA3200).
For 2 days or less, there is no need to remove any food.
For up to a week, remove all food from the refrigerator
compartment except eggs, butter, and bacon.
On models EA0600C/602C/EA3200, if you are going
away for more than a week, you can leave frozen food
in the frozen food compartment (with the refrigerator left
running) as long as its storage life won't have been
exceeded when you return, but take everything out of
the fridge compartment and close the door.
If you intend leaving both the fridge and frozen food
compartments empty, switch off at the wall socket,
defrost, clean, and dry, than leave both doors open to
prevent the accumulation of odours inside.
CHANGING OVER THE DOOR
HINGES
Remove the two fixing screws and pull out the blanking
piece from the alternative top hinge position.
Lay the (empty) refrigerator on its back and transfer the
upper and lower hinges to the opposite side. Stand the
refrigerator on its feet and check that the door closes
and seals properly. Refit the blanking piece in the
original top hinge position.
CHANGING THE OUTER DOOR
PANEL
If required, the outer door panel can be removed and
replaced by one of a different material or colour to
match other fitments. It can be of rust-proofed metal),
or a plastic laminate.
To do this lay the refrigerator on its back, and remove
the bottom section of the door surround held by 3
screws. The existing panel can then be slid out an a
new panel slid in and the bottom section refitted to
retain the new panel.
CHANGING THE INTERIOR LIGHT
BULB (EA3100/EA3200/EA3210)
If the interior light fails to work first switch off and pull
out the mains plug, then replace the bulb with a new
one, as follows:
Remove the lamp cover by sliding it towards the rear.
Unscrew the bulb and replace it with a new 10 watt
bulb, available from your local Service Shop. Refit the
lamp cover.
SOMETHING NOT WORKING
Before you call for your Electrolux Service Engineer,
carry out these simple checks:
Is there a power failure? Check your house lights.
Is the plug firmly connected to the wall socket and is the
socket switched on? Check the power supply by
plugging in another appliance or a table lamp.
Is the fuse in the plug intact? If you have fitted your own
plug are the wires correctly connected?
Is the thermostat dial at the correct setting? (Normally
No. 3 or 4).
If fitted has the defrost button been inadvertently pushed
in? If it has, turn the thermostat dial to position '0' and the
button should spring out. Then re-set the dial to its usual
position and the fridge should start cooling again.
Has the door been left open causing the temperature to
rise?
Is the fridge still level?
Has the air-flow over the back become obstructed?
If after checking all the above points your fridge still
won't work properly, call your nearest Electrolux
Service Centre.
Page 6

6
His address can be found on page 7.
This refrigerator is equipped with overheating
protection. An authorised service technician can check
whether this has been triggered or not.
For future reference, we suggest you record these
details here and keep the receipt with the handbook as
proof of the data of purchase.
Purchased from _______________________________
Date purchased _______________________________
Model Number ________________________________
(See data label inside cabinet)
IMPORTANT THINGS TO
REMEMBER
Do ...
make sure the fridge is level in both directions.
cover or wrap foods and liquids, particularly those with
strong odours.
cover melons and pineappels and only store for short
periods.
close the frozen food compartment door
(EA0600C/601C/602C/EA3200) after use, ensuring
that its catch engages properly. Remind other users
about this.
leave the door open (and the frozen food compartment
door on (EA600C/601C/602C.EA3200) when the
refrigerator is out of use
defrost regularly.
DON'T ...
obstruct air-flow over the cooling unit at the back.
put hot food in the fridge - allow it to cool first.
store bananas in the fridge or they will turn black.
use a sharp instrument to hasten defrosting or to
remove an ice tray as this could cause damage.
put bottles or cans of fizzy drinks in the frozen food
compartment as they may burst when freezing.
give children iced lollies straight from the frozen food
department; they could cause frost burns.
Sodium chromate is used for corrosion protection (less
than 2 weight % of the coolant).
This appliance complies with the following EEC
directives:
LVD-Directive 73/23/EEC with amendment
90/683/EEC
EMC-Directive 89/336/EEC
Guarantee
This Guarantee is offered to you as an extra benefit and does not affect your legal rights.
Electrolux products are carefully designed, manufactered tested and inspected and in consequence we
undertake to replace or repair any part found to be defective in material or workmanship, within one year
of delivery to the original purchaser, free of charge.
This guarantee is conditional upon the appliance being correctly installed and used in
accordance with the Company's instructions under normal conditions within the United Kingdom or the
Republic of Ireland. It may however be invalidated by unauthorised repair or modification of the appliance.
The Company does not accept liability for defects arising from neglect, misuse, or accident.
Proof of the data of purchase will be required before free service is provided. Addresses where service
can be listed overleaf.
Electrolux Limited
IMPORTANT For future reference, please enter
the date of purchase in this panel.
Purchased from ______________________________
Model Number ______________________________
(See data label inside cabinet)
(UK only)
Page 7

7
SERVICE ADDRESSES UK
United Kingdom
ABERDEEN
8 Cornhill Arcade, Conrhill Drive
Aberdeen AB2 5UT
Tel.: 0224 696569
Areas covered DD IV KW AB PH
NORTHERN REGION CENTRE
PO Box 40 Preston Road,
Aycliffe Industrial Estate, Newton Aycliffe
Co. Durham DL5 6XL
Tel.: 091-493-2025 or 0325-301400
Areas covered CA DL DH NE SR TS
Tel.: 0282-774621
Areas covered: SK M BL OL BB
Tel.: 051 254 1724
Areas covered: LA FY PR WN CW CH LL L WA
BELFAST
Unit C3, Edenderry Industrial Estate
326 Crumlin Road, Belfast BT14 7EE
Tel.: 0232 746591
Areas covered: BT
BIRMINGHAM
8 Lammermoor Ave, Great Barr
Birmingham B42 6ET
Tel.: 021 357076 or 021 358 5051
Areas covered: WR DY B WV TF ST SY WS
Tel.: 0993-704411
Areas covered: GL HP NN OX SL RG
CARDIFF
Guardian Industrial Estate
Clydesmuir Road, Tremorfa, Cardiff CF2 2QS
Tel.: 0222 460131
Areas covered: CF HR LD NP SA
GLASGOW
20 Cunningham Road, Clyde Estate,
Rutherglen, Glasgow G73 1PP
Tel.: 041 647 4381
Areas covered: DG KA ML G PA
Tel.: 031 557 8383
Areas covered: KY EH TD FK
LEEDS
64-66 Cross Gates Road, Leeds LS15 7 NN
Tel.: 0532 608511
Areas covered: S DN HU YO WF HX HD LS HG BD
LEICESTER
10-12 Buckminster Road, Leicester LE3 9AR
Tel.: 0533 515131
Area covered: LE DE CV NG LN PE IP NR
LONDON REGION CENTRE
2-4 Sandhurst, Kings Road
Canvey Island SS8 0QY
Tel.: 0268 694144
Areas covered: RM CM SS CO IG
Tel.: 081 443 3464
Areas covered: E EC WC N NW W EN
Tel.: 081 658 9069
Areas covered: KT SE SM CR BR SW
Tel.: 081 965 9699
Areas covered: AL CB LU MK SG WD HA UB TW
SOUTHERN REGION CENTRE
Limberline Road, Hilsea, Portsmouth PO3 5JJ
Tel.: 0705 667411
Areas covered: BH DT PO SO SP GU
Tel.: 0272 211876
Areas covered: BA BS SN TA
Tel.: 0626 65909
Areas covered: TQ EX TR PL
TONBRIDGE
61-63 High Street, Tonbridge TN9 1SD
Tel.: 0732 357722
Areas covered: CT DA ME TN
Tel.: 0273-694341
Areas covered: BN RH
Page 8

47
Page 9

Printed by Xerox Hungary Ltd. Rev.: 2002. 07. 22.
 Loading...