

Page 1
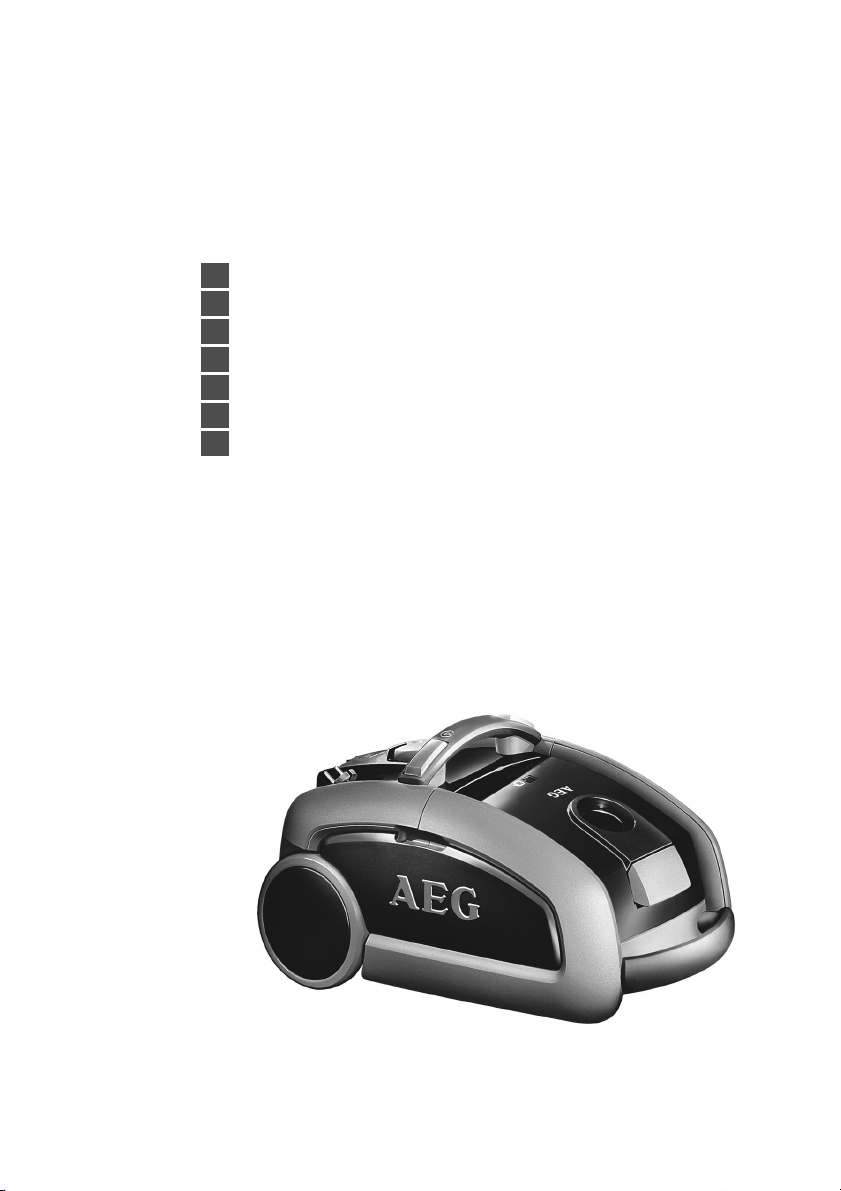
SYSTEM_PRO
D
Bodenstaubsauger Gebrauchsanweisung
GB
Vacuum Cleaner Operating Instructions
F
Aspirateur traîneau Mode d‘emploi
NL
Vloerstofzuiger Gebruiksaanwijzing
I
Aspirapolvere Istruzioni per l‘uso
E
Aspirador de polvo Instrucciones de uso
P
Aspirador de pó Instruções de utilização
Page 2

Sicherheitshinweise 3
D
Übersicht und Zusammensetzen 10
Staubsaugen 12
Düsen 14
Staubbeutel wechseln 16
Filter wechseln 18
Transportieren und Aufbewahren 20
Wartung und Reinigung 21
Was tun, wenn... 21
Der Umwelt zuliebe 21
Indicaciones de seguridad 8
E
Vista de conjunto y montaje 26
Trabajo con la aspiradora 28
Boquillas 30
Cambio de la bolsa de polvo 32
Cambio de filtro 34
Transporte y conservación 36
Mantenimiento y limpieza 37
¿Qué hacer si... 37
En favor del medio ambiente 37
Safety information 4
GB
Exploded view and assembly 10
Vacuuming 12
Nozzles 14
Changing dustbag 16
Changing the filters 18
Carrying and storage 20
Maintenance and cleaning 22
What to do, if... 22
Protecting the environment 22
Conseils de sécurité 5
F
Vue d'ensemble et assemblage 10
Aspiration 12
Suceurs 14
Changer le sac à poussière 16
Changer le filtre 18
Transport et rangement 20
Entretien et nettoyage 23
Que faire si... 23
Pour le respect de l'environnement 23
Aanwijzingen m.b.t. de veiligheid 6
NL
Overzicht en montage 10
Stofzuigen 12
Zuigmonden 14
Stofzak vervangen 16
Filters vervangen 18
Vervoeren en opbergen 20
Onderhoud en reiniging 24
Wat is er aan de hand als... 24
Ter wille van het milieu 24
Instruções de segurança 9
P
Visão geral e montagem 26
Aspirador 28
Bocais 30
Substituição do saco do pó 32
Substituição do filtro 34
Transportar e guardar 36
Manutenção e limpeza 38
O que fazer se... 38
Por respeito à natureza 38
Avvertenze di sicurezza 7
I
Panoramica e assemblaggio 10
Avvertenze di sicurezza 12
Bocchette 14
Sostituzione del sacchetto 16
Sostituzione del filtro 18
Trasporto e conservazione 20
Manutenzione e pulizia 25
Che cosa fare se 25
Per il rispetto dell’ambiente 25
2
Page 3
GB
Dear Customer,
Please read these operating instructions carefully. Above all, observe the safety instructions! Please
keep these operating instructions for future reference. Pass them on to any subsequent owner of the
appliance.
Safety information
• Connection: 220/230 volt alternating current only, 16 A or 10 A time-lag fuse.
• Do not use the appliance if:
– the cable is damaged,
– the appliance shows visible signs of damage.
• For domestic use and dry vacuuming only.
People and animals must not be vacuumed using the appliance.
Keep children away from electrical appliances.
• Do not vacuum the following:
– Fluids. Allow steam-cleaned carpets to dry out thoroughly.
– Matches, glowing ashes or cigarette ends.
– Hard, sharp items.
– Toner dust (from laser printers and copiers).
• Never remove the plug from the socket using the cable. Do not run the appliance or suction
brushes over the cable.
• Do not use water to clean the appliance.
• Do not expose the appliance to the impact of weather, moisture or heat.
• Dustbag and all filters must always be in place. Unless the dustbag has been inserted it is not
possible to close the lid to the dust chamber. Please do not use force!
• Please insert only an original S-bag dustbag.
• Repairs to electrical appliances may only be carried out by qualified specialists. Repairs carried
out by inexperienced persons may cause serious injury to the user.
• Should the cable be defective, the complete cable roller must be replaced by an AEG Service
Force Centre or by an authorised repair centre.
• The manufacturer accepts no responsibility for possible damages caused by non-regulation use
or incorrect operation of the appliance.
If your appliance needs repairing, please contact your retailer or AEG Service Force Centre.
This appliance complies with the following EU Directives:
• 73/23/EEC dated 19.02.1973 - Low Voltage Directive.
• 89/336/EEC dated 03.05.89 (including Directive Amendment 92/31/EEC) - EMC Directive.
4
Page 4
D
Übersicht und Zusammensetzen
GB
Exploded view and assembly
F
Vue d'ensemble et assemblage
NL
Overzicht en montage
I
Panoramica e assemblaggio
10
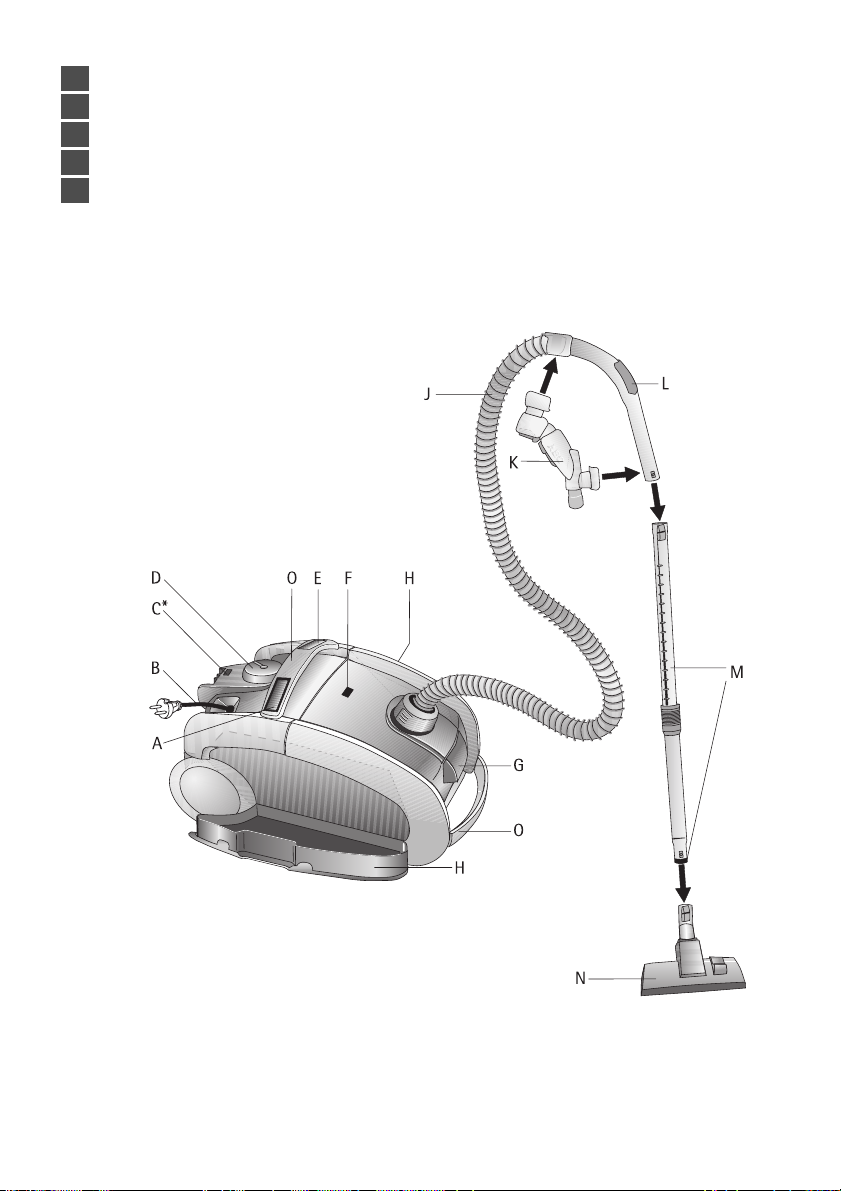
Page 5

A Taste Kabeleinzug J Saugschlauch
D
B Kabel K Zubehörhalter
C Anzeige „Abluftfilter wechseln“* L Leistungsregler am Handgriff
D Saugleistungsregler M Teleskoprohr mit Möbelschutzring
E Taste EIN/AUS N Bodendüse
F Anzeige „Staubbeutel wechseln“ O Gerätegriff
G Entriegelung des Staubraumdeckels
H rechts/links: Aufnahmedeckelfür
XXXSYSTEM_PRO Zubehör
* Je nach Modell
A Cable retraction button J Suction hose
GB
B Cable K Accessories retainer
C Display “Change exhaust air filter”* L Power regulator on handle
D Suction power regulator M Telescopic tube with furniture protection
E ON/OFF button ring
F Display: “Change dustbag” N Floor nozzle
G Dust chamber release catch O Appliance handle
H right/left: Retainer lid for
SYSTEM_PRO accessories
* Depending on model
A Touche d'enrouleur de câble J Flexible
F
B Cordon d'alimentation K Support pour accessoires
C Indicateur de colmatage du filtre de sortie d'air*L Régulateur de puissance sur la poignée
D Régulateur de puissance d'aspiration M Tuyau télescopique avec anneau de
E Bouton MARCHE/ARRET protection des meubles
F Indicateur de remplissage de sac N Combiné suceur
G Déverrouillage du couvercle de l'aspirateur O Poignée de transport
H à droite/à gauche : couvercle de rangement
pour les accessoires SYSTEM_PRO en option
* suivant le modèle
A toets snoerhaspel J zuigslang
NL
B snoer K houder voor hulpstukken
C indicatie „afvoerluchtfilter vervangen“* L vermogensregelaar in de handgreep
D vermogensregelaar M telescoopbuis met meubelbeschermring
E toets AAN/UIT N vloerzuigmond
F indicatie „stofzak vervangen “ O draaggreep
G ontgrendeling van het stofvakdeksel
H rechts/links: opbergdeksel voor
SYSTEM_PRO hulpstukken
* afhankelijk van model
A Tasto avvolgimento cavo J Tubo di aspirazione
I
B Cavo K Supporto portaaccessori
C Indicatore „microfiltro antiallergico“* L Regolatore di potenza all'impugnatura
D Regolatore della potenza di aspirazione M Tubo telescopico con anello di protezione
E Tasto ACCESO/SPENTO mobili
F Indicazione “sacco pieno” N Ugello per pavimento
G Tasto di apertura per scompartimento O Impugnatura dell'apparecchio
sacchetto
H destra/sinistra: Coperchio portaaccessori
SYSTEM_PRO
* a seconda del modello
11
Page 6

D
Staubsaugen
GB
Vacuuming
F
Aspiration
NL
Stofzuigen
I
Messa in funzione
12
Page 7

•Kabel B herausziehen, Netzstecker einstecken.
D
(Zum Kabeleinrollen Netzstecker ziehen, Stecker festhalten und Taste A drücken.)
• Ein-/Ausschalten mit Taste E (bei niedrigster Leistungsstufe ist wegen der elektronischen
Anlaufstrombegrenzung eine Anlaufverzögerung von bis zu 4 Sekunden möglich).
• Saugleistung am Saugleistungsregler D einstellen. Diese kann auch durch Öffnen des Leistungsreglers am Handgriff L reduziert werden, um den Kraftaufwand beim Staubsaugen zu
variieren.
•Pull out cable B and insert mains plug.
GB
(to retract cable, pull out mains plug, hold plug firmly, and press button A.)
• Switch on/off by pressing button E (there is the possibility of a delay in starting of up to 4
seconds at the lowest power level due to electronic starting current limitation).
• Set suction power using suction power regulator D. This can also be reduced by opening the
power regulator on handle L in order to vary the amount of strength required to push the
vacuum cleaner.
• Sortez le câble B, insérez la fiche dans la prise de courant.
F
(pour enrouler le câble, débranchez de la prise, puis appuyez sur la touche A tout en mainte-
nant la fiche).
• Mettez en marche ou arrêtez avec le bouton E. (Cet appareil est équipé d'un démarrage en
douceur ce qui peut occasionner un délai de 4 secondes environ entre le moment ou vous
appuyez sur le bouton et la mise en marche de l'aspirateur.)
• Réglez la puissance d'aspiration avec le régulateur de puissance d'aspiration D. Celle-ci peut
également être réduite en ouvrant le régulateur de puissance sur la poignée du flexible L,
afin de faire varier la force d'aspiration.
•Snoer B uittrekken, stekker in het stopcontact steken.
NL
• (Om het snoer op te rollen stekker uit het stopcontact trekken, vasthouden en toets A
indrukken.)
• In-/uitschakelen met toets E (bij de laagste vermogensinstelling is vanwege de elektronische
aanloopstroombegrenzing een aanloopvertraging van max. 4 seconden mogelijk).
• Zuigvermogen met de vermogensregelaar D instellen. Het vermogen kan door openen van
de vermogensregelaar in de handgreep L worden gereduceerd, om de lichamelijke inspanning bij het stofzuigen te variëren.
•Estrarre il cavo B, ed inserire la spina nella presa di corrente.
I
(per avvolgere il cavo, estrarre la spina dalla presa di corrente, tenere la spina e premere il
tasto A.)
• L'apparecchio viene acceso e spento con il tasto E (con il livello di potenza più basso é possibile
un ritardo di avviamento fino a a 4 secondi dovuto ad un sistema di protezione del motore).
• Regolare la potenza di aspirazione con il regolatore D. La potenza può essere ridotta anche
aprendo il regolatore di potenza dell'impugnatura L, al fine di variare la forza di scorrimento
durante a fase di aspirazione.
13
Page 8

D
Düsen
GB
Nozzles
F
Suceurs
NL
Zuigmonden
I
Bocchette
14
Page 9

N Bodendüse, umschaltbar für Teppiche und Hartböden
D
P Kombidüse: Möbelpinsel und Polsterdüse in einem
R Fugendüse (ausziehbar)
Q Handgriff mit abnehmbarem Saugschlauch
N Floor nozzle, setting may be changed for carpets and hard floors
GB
P Combination nozzle: furniture brush and upholstery nozzle in one
R Crevice nozzle (extendable)
Q Handle with removable suction hose
N Combiné suceur pour tapis et sols durs
F
P Combiné brosse meubles et petit suceur pour capitonnages
R Suceur pour fentes (extensible)
Q Poignée avec flexible d'aspiration amovible
N vloerzuigmond, omschakelbaar voor tapijt en gladde vloeren
NL
P combizuigmond: plumeau en meubelzuigmond in één
R kierenzuigmond (uittrekbaar)
Q handgreep met afneembare zuigslang
N Bocchetta per pavimenti, commutabile per tappeti e superfici rigide
I
P Bocchetta combinata: composta da pennello per mobili e bocchetta per poltrone in uno.
R Bocchetta per fughe (estraibile)
Q Maniglia con tubo aspirante smontabile
15
Page 10

D
Staubbeutel wechseln
GB
Changing dustbag
F
Changer le sac à poussières
NL
Stofzak vervangen
I
Cambio del sacchetto
16
Page 11

Staubbeutel S wechseln, wenn die Anzeige F farbig ausgefüllt ist (kontrollierbar bei Betrieb auf
D
höchster Saugstufe und vom Boden abgehobener Düse).
Auch wenn dabei der Beutel nicht gefüllt erscheint, kann ein Wechsel erforderlich sein.
Feinstaub kann die Poren verstopfen, was die Saugleistung des Gerätes verringert.
• Gerät ausschalten und mit Entriegelung G den Staubraumdeckel öffnen.
• Staubbeutel S durch Ziehen an der Verschlusslasche entnehmen.
• Neuen Staubbeutel in die Halterung einschieben, bis er einrastet. Achten Sie beim Schließen
des Staubraumdeckels darauf, dass sich der Staubbeutel vollständig innerhalb der Staubraumbegrenzung befindet. Wenn kein Staubbeutel eingesetzt ist, lässt sich der Staubraumdeckel nicht schließen. Bitte keine Gewalt anwenden!
Change dustbag S when display F is filled with colour (can be checked with the appliance oper-
GB
ating at maximum suction and with the nozzle raised from the floor).
A change may be necessary even if the bag does not appear to be full.
Fine dust can block the pores and reduce the suction power of the appliance.
• Switch off the appliance and open the dust chamber lid by pulling release catch G.
• Remove dustbag S by pulling on the sealing tab.
• Push new dustbag into the retainer until it clicks into place. Take care when closing the dust
chamber lid that the dustbag is completely inside the dustchamber border. The dust chamber
lid will not close unless a dustbag has been inserted. Please do not use force!
Changez le sac à poussière S lorsque l'indicateur F est entièrement coloré (pour le contrôle, fai-
F
tes fonctionner l'aspirateur à puissance d'aspiration maximale avec le suceur soulevé du sol).
Même si le sac ne paraît pas plein, un changement peut être nécessaire. La poussière fine peut
boucher les pores, ce qui diminue la puissance d'aspiration de l'appareil: Il est déconseillé d'aspirer des poussières très fines (plâtre, ciment...).
• Arrêtez l'appareil et ouvrez le couvercle du logement avec le déverrouillage G.
• Enlevez le sac à poussière S en tirant sur la languette de fermeture.
•
Insérez un sac à poussière neuf dans le support jusqu'à ce qu'il se verrouille. Lors de la fermeture
du couvercle du compartiment sac à poussière, veillez à ce que le sac à poussière se trouve entièrement à l'intérieur du compartiment sac à poussière. Si aucun sac à poussière n'est placé, le couvercle du compartiment sac à poussière ne peut pas se fermer. Ne jamais essayer de le fermer de force
Stofzak S vervangen, als de indicatie F helemaal gekleurd is (te controleren bij inschakelen op
NL
de hoogste zuigstand en zuigmond los van de vloer).
Ook als daarbij de zak niet vol lijkt, kan vervangen noodzakelijk zijn.
Fijn stof kan de poriën verstoppen, wat het zuigvermogen van het apparaat vermindert.
• Apparaat uitschakelen en met ontgrendeling G het stofvakdeksel openen.
• Stofzak S verwijderen door aan het sluitlipje te trekken.
• Nieuwe stofzak zo ver mogelijk in de geleider schuiven. Let er bij het sluiten van het stofvakdeksel op, dat de stofzak zich helemaal in het stof vak bevindt. Als er geen stofzak in de stofzuiger zit, kan het stofvakdeksel niet worden gesloten. Geen geweld gebruiken!
!
Sostituire il sacchetto S non appena l'indicatore F é completamente colorato (controllabile con
I
funzionamento a massima potenza di aspirazione e con bocchetta sollevata dal pavimento).
Può essere necessario sostituire il sacchetto anche se esso non é completamente pieno.
Delle fini particelle di polvere possono intasare i pori, cosa che riduce la potenza di aspirazione
dell'apparecchio.
• Spegnere l'apparecchio e aprire il coperchio del vano polvere con il tasto G.
• Estrarre il sacchetto S tirando l'apposita linguetta.
• Infilare un sacchetto nuovo nel supporto sino a che si innesta. Quando chiudete il coperchio
del vano polvere fate attenzione che il sacchetto vi sia interamente inserito. Se non è inserito alcun sacchetto, allora non sarà possibile chiudere il coperchio. Non chiudetelo facendo
uso della forza!
17
Page 12

D
Filter wechseln
GB
Changing the Filters
F
Changer le filtre
NL
Filters vervangen
I
Cambio del filtro
ET-Nr. 900 195 149/1
T
U
C*
18
V
ET-Nr. 900 195 150/9
Page 13

Motorschutzfilter T wechseln, wenn die Anzeige F nach dem Wechsel des Staubbeutels weiter-
D
hin farbig ausgefüllt ist bzw. wenn die Saugleistung bei wenig gefülltem Staubbeutel merklich
nachlässt:
• Gerät ausschalten und mit Entriegelung G den Staubraumdeckel öffnen.
• Motorschutzfilter T wechseln.
Microfilter V wechseln, wenn die Anzeige C* farbig ausgefüllt ist, bzw. nach jedem 5. Wechsel
des Staubbeutels oder wenn die Saugleistung merklich nachlässt:
• Gerät ausschalten. Filtergrilltaste U drücken und Filtergrill W öffnen.
• Microfilter V wechseln.
Je nach Modell
*
Change motor protection filter T if display F is still filled with colour after the dustbag has been
GB
changed or if the suction power is significantly reduced although the dustbag has little in it.
• Switch off the appliance and open the dust chamber lid by pulling release catch G.
• Change motor protection filter T.
Replace microfilter V if display C* is filled with colour or after every fifth dustbag change or if
the suction power is significantly reduced.
• Switch off the appliance. Press filter grille button U and open filter grille W.
• Replace microfilter V.
Depending on model
*
Remplacer le filtre de protection du moteur T lorsque l'indicateur F reste coloré après le rem-
F
placement du sac à poussière ou lorsque la puissance d'aspiration diminue sensiblement même
si le sac à poussière est peu rempli :
• Arrêtez l'appareil et ouvrez le couvercle du compartiment a sac à poussière avec le déverrouillage G.
• Remplacement du filtre de protection du moteur T.
Remplacez le microfiltre V lorsque l'indicateur C* est entièrement coloré ou tous les 5 changements de sac à poussière ou lorsque la puissance d'aspiration diminue sensiblement :
• Mettez l'appareil. Appuyez sur la touche de grille de filtre U et ouvrez la grille de filtre W.
• Remplacez le microfiltre V.
selon le modèle
*
Motorbeschermfilter T vervangen, als de indicatie F na het vervangen van de stofzak helemaal
NL
gekleurd blijft resp. als het zuigvermogen merkbaar minder wordt terwijl de stofzak niet vol is:
• Apparaat uitschakelen en met ontgrendeling G het stofvakdeksel openen.
• Motorbeschermfilter T vervangen.
Microfilter V vervangen, als de indicatie C* helemaal gekleurd is, resp. na elke 5e keer dat u de
stofzak vervangt of als het zuigvermogen merkbaar minder wordt:
• Apparaat uitschakelen. Filterroostertoets U indrukken en filterrooster W openen.
• Microfilter V vervangen.
afhankelijk van model
*
Il filtro di protezione del motore T va sostituito se dopo il cambio del sacchetto l'indicatore F
I
appare ancora completamente colorato oppure se la potenza di aspirazione si riduce sensibilmente anche se il sacchetto é pieno solo in parte:
• Spegnere l'apparecchio e aprire il coperchio del vano polvere con il tasto G.
• Sostituire il filtro di protezione del motore T.
Il microfiltro V va sostituito se l'indicatore C* appare completamente colorato oppure dopo
ogni 5 cambi di sacchetto, oppure se la potenza di aspirazione si riduce sensibilmente:
• Spegnete l'apparecchio. Premere il tasto della griglia filtrante U ed aprire la griglia W.
• Sostituire il microfiltro V.
a seconda del modello
*
19
Page 14

D
Transportieren und Aufbewahren
GB
Carrying and storage
F
Transport et rangement
NL
Vervoeren en opbergen
I
Trasporto e conservazione
20
Page 15

D
Wartung und Reinigung
Zur Wartung oder Reinigung Gerät ausschalten und Netzstecker ziehen.
Gehäuse und den Staubbeutelraum bei Bedarf mit einem feuchten Tuch abwischen und nachtrock-
nen. Keine Scheuermittel und keine Lösungsmittel verwenden. Bodendüse und die Bürstenstege
gelegentlich mit der Fugendüse absaugen.
Was tun, wenn...
...sich die Düse schwer schieben lässt:
Saugleistung (je nach Art des Teppichs) verringern. Die Reinigungswirkung wird dadurch nicht merklich beeinträchtigt.
...der Motor-Überhitzungsschutz das Gerät ausschaltet: z. B. in Folge von Überlastung des
Motors, durch vollen Staubbeutel oder verstopftes Zubehör.
Gerät ausschalten, Netzstecker ziehen, Motor abkühlen lassen. Staubbeutel, Saugrohr und Saugschlauch kontrollieren; eventuelle Verstopfung beseitigen. Nach ca. 30 Minuten kann das Gerät wieder eingeschaltet werden.
...die Sicherung ausgelöst wurde: Wenn andere elektrische Geräte mit hohem Anschlusswert am
gleichen Stromkreis gleichzeitig mit dem Staubsauger benutzt werden, kann die Sicherung ausgelöst
werden.
In diesem Fall vor dem Einschalten die Saugleistungsregulierung auf die niedrigste Stufe stellen und
erst nach dem Einschalten eine höhere Stufe wählen.
...das Kabel nicht vollständig eingezogen wird:
Das Kabel staut sich in der Kabeltrommel.
Ziehen Sie das Kabel wieder etwas heraus und drücken Sie die Taste A erneut.
...der Staubraumdeckel nicht schließt:
Kontrollieren Sie, ob der Staubbeutel eingesetzt ist.
Wenn ja, kontrollieren Sie, ob der Staubbeutel eingerastet ist.
Der Umwelt zuliebe
Geräteverpackung: Wir empfehlen, die Verpackung für die Dauer der Gewährleistung aufzubewah-
ren, um einen sicheren Transport zu ermöglichen.
Verwertung des Gerätes nach dem Ende seiner Lebenszeit: Die Kunststoffteile sind mit einer
Materialkennzeichnung versehen, so dass sie am Ende der Lebensdauer des Gerätes, wie die übrigen
Werkstoffe auch, einer Wiederverwertung zugeführt werden können.
21
Page 16

GB
Maintenance and cleaning
For maintenance or cleaning, switch off the appliance and unplug it from the mains.
As required, wipe the housing and the dustbag chamber with a damp cloth and then dry. Do not use
any scourers or any solvents. Occasionally vacuum the floor nozzle and the brush-heads with the
crevice nozzle.
What to do, if...
... it is difficult to push the nozzle:
Reduce suction power (depending on the type of carpet). This will not conspicuously reduce the
cleaning efficiency.
…the motor thermal cut-out has tripped: e. g. as the result of overloading the motor if the dustbag is full or if an accessory is blocked.
Switch off the appliance, unplug from the mains, and leave the motor to cool down. Check dustbag,
suction tube and suction hose; remove any blockage. The appliance can be switched on again after
approximately 30 minutes.
... the fuse has blown: The fuse can be blown if other electric appliances with a high power con-
sumption are used at the same time and on the same circuit as the vacuum cleaner.
If this is the case, set the suction power regulator to the lowest setting before switching on and only
select a higher suction level after switching on.
… the cable does not retract fully:
The cable is caught up on the cable drum.
Pull the cable out again a little and press button A again.
.…the dust chamber lid will not close:
Check that the dustbag has been inserted.
If it has, check that the dustbag has clicked into position.
Protecting the environment
Appliance packaging: We recommend keeping the packaging for the duration of the guarantee so
that the appliance can be transported safely.
Recycling the appliance at the end of its life: The plastic components all carry a material identi-
fication marking so that, like the other materials, they can be recycled at the end of the life of the
appliance.
22
 Loading...