

Page 1

ÖKO SANTO SUPER
2573-6 KA
Kühlautomat
Refrigerator
Gebrauchsanweisung
Operating Instructions
AEG Hausgeräte GmbH
Postfach 1036
D-90327 Nürnberg
http://www.aeg.hausgeraete.de
2222 016-44
Page 2
2
Sehr geehrte Kundin, sehr geehrter Kunde,
bevor Sie Ihr neues Kältegerät in Betrieb nehmen, lesen Sie bitte diese Gebrauchsanweisung aufmerksam durch. Sie enthält wichtige
Informationen zum sicheren Gebrauch, zum Aufstellen und zur Pflege des Gerätes.
Bewahren Sie bitte die Gebrauchsanweisung zum späteren Nachschlagen auf. Geben Sie sie an eventuelle Nachbesitzer des Gerätes
weiter.
Mit dem Warndreieck und/oder durch Signalwörter (Warnung!, Vor-
sicht!, Achtung!) sind Hinweise hervorgehoben, die für Ihre
Sicherheit oder für die Funktionsfähigkeit des Gerätes wichtig sind.
Bitte unbedingt beachten.
Nach diesem Zeichen erhalten Sie ergänzende Informationen zur
Bedienung und praktischen Anwendung des Gerätes.
Mit der Blume sind Tips und Hinweise zum wirtschaftlichen und
umweltschonenden Einsatz des Gerätes gekennzeichnet.
Für evtl. auftretende Störungen enthält die Gebrauchsanweisung
Hinweise zur selbständigen Behebung, siehe Abschnitt "Was tun,
wenn ...". Sollten diese Hinweise nicht ausreichen, steht Ihnen unser
Kundendienst jederzeit zur Verfügung.
Gedruckt auf umweltschonend hergestelltem Papier
– wer ökologisch denkt, handelt auch so ...
Page 3
Inhalt
Sicherheit . . . . . . . . . . . . . . . . . . . . . . . . . . . . . . . . . . ....... 4
Entsorgung . . . . . . . . . . . . . . . . . . . . . . . . . . . . . . . . . . . . . . . 5
Information zur Geräteverpackung . . . . . . . . . . . . . . . . . . . . . . . 5
Entsorgung von Altgeräten . . . . . . . . . . . . . . . . . . . . . . . . . . . .. 6
Transportschutz entfernen . . . . . . . ..................... 6
Aufstellen . . . . . . . . . . . . . . . . . . . . . . . . . . . . . . . . . . . . . . . . . 6
Aufstellort . . . . . . . . . . . . . . . . . . . . . . . . . . . . . . . . . . . . . . . . . 6
Ihr Kühlgerät braucht Luft . . . . . . . . . . . . . . . . . . . . . . . . . . . . . 7
Hintere Abstandstücke ................................. 8
Türanschlag wechseln . . . . . . . . . . . . . . . . . . . . . . . . . . . . . . . . 8
Vor Inbetriebnahme...................................9
Elektrischer Anschluß . . . . . . . . . . . . . . . . . . . . . . . . . . . . .... 9
Bedienblende ................................... .... 10
Inbetriebnahme und Temperaturregelung . . . . . . . . . . . . . . . 10
Innenausstattung .................................... 11
Abstellflächen . . . . . . . . . . . . . . . . . . . . . . . . ...............11
T
ürabsteller
. . . . . . . .................................. 11
Richtig lagern. . . . . . . . . . . . ...........................11
Abtauen . . . . . . . . . . . . . . . . . . . . . . . . . . . . . . . . . . ........ 12
Gerät abschalten . . . . . . . . . . . ... . . . . . . . . . . . . . . . . . . . . . . 13
Reinigung und Pflege . . . . . . . . . . . . . . . . . . . . . . ..........13
Tips zur Energie-Einsparung . . . . . . . . . . . . . . . . . . . . ......14
Was tun, wenn . . . . . . . . . . . . . . . . . . . . . . . . . . . . . . . . .....14
Abhilfe bei Störungen . . . . . . . . . . . . . . . . . . . . . . . . . . . . . . . . .14
Lampe auswechseln . . . . . . . . . . . . . . . . . . . . . . . . . . . . . . . . . 16
Kundendienst . . . . . . . . . . . . . . . . . . . . . . . . . . . . . . . . . .....17
Bestimmungen, Normen, Richtlinien . . . . . . . . . . . . . . . . . . . 17
3
2222 016-44
34
Regulations, Standards, Guidelines
This appliance was designed for household use and was manufactured in accordance with the appropriate standards. The necessary
measures in accordance with appliance safety legislation regulations
(GSG), accident prevention regulations for refrigeration appliances
(VBG 20) and the regulations of the German Society of Electrical
Engineers (VDE) were observed in the manufacture of this appliance.
The refrigerant circuit has been checked for leaks.
This appliance is in accordance with the following EU guidelines:
– 73/23/EWG dated 19 February 1973 - low voltage guidelines.
– 89/336/EWG dated 3 May 1989
(including guideline change notice 92/31/EWG) - EMV guideline
Customer Service
If you cannot find the remedy for a malfunction in these operating
instructions, please contact your dealer or our customer service
department. Addresses and telephone numbers are listed in the
accompanying booklet "Guarantee Conditions/Customer Service
Locations".
Selective ordering of replacement parts can save unnecessary travel
and costs. For this reason always provide the following appliance
information:
This information can be found on the serial plate in the interior at the
left of the appliance.
• Model Name
• Model Number (PNC)
• Serial Number (S-No.)
We recommend that you enter this information here, so that it is handy
if needed.
Note: The customer bears the costs of unjustified customer service
calls even during the guarantee period.
Page 4
4
Sicherheit
Die Sicherheit unserer Kältegeräte entspricht den anerkannten
Regeln der Technik und dem Gerätesicherheitsgesetz. Dennoch
sehen wir uns veranlaßt, Sie mit folgenden Sicherheitshinweisen vertraut zu machen:
Bestimmungsgemäße Verwendung
• Das Kältegerät ist für die Verwendung im Haushalt bestimmt. Es
eignet sich zum Kühlen von Lebensmitteln. Wird das Gerät
zweckentfremdet oder falsch bedient, kann vom Hersteller keine
Haftung für eventuelle Schäden übernommen werden.
• Umbauten oder Veränderungen am Kältegerät sind aus Sicherheitsgründen nicht zulässig.
• Sollten Sie das Kältegerät gewerblich oder für andere Zwecke als
zum Kühlen von Lebensmitteln benutzen, beachten Sie bitte die für
Ihren Bereich gültigen gesetzlichen Bestimmungen.
Vor der ersten Inbetriebnahme
• Überprüfen Sie das Kältegerät auf Transportschäden. Ein beschädigtes Gerät auf keinen Fall anschließen! Wenden Sie sich im Schadensfall bitte an den Lieferanten.
Kältemittel
Das Gerät enthält im Kältemittelkreislauf das Kältemittel Isobutan
(R600a), ein Naturgas mit hoher Umweltverträglichkeit, das jedoch
brennbar ist.
• Achten Sie beim Transportieren und Aufstellen des Gerätes darauf,
daß keine Teile des Kältemittelkreislaufs beschädigt werden.
• Bei Beschädigung des Kältemittelkreislaufs:
– offenes Feuer und Zündquellen unbedingt vermeiden;
– den Raum, in dem das Gerät steht, gut durchlüften.
Sicherheit von Kindern
• Verpackungsteile (z. B. Folien, Styropor) können für Kinder gefährlich
sein. Erstickungsgefahr! Verpackungsmaterial von Kindern fernhalten!
• Ausgediente Altgeräte bitte vor der Entsorgung unbrauchbar
machen. Netzstecker ziehen, Netzkabel durchtrennen, eventuell
vorhandene Schnapp- oder Riegelschlösser entfernen oder zerstören. Dadurch verhindern Sie, daß sich spielende Kinder im Gerät
33
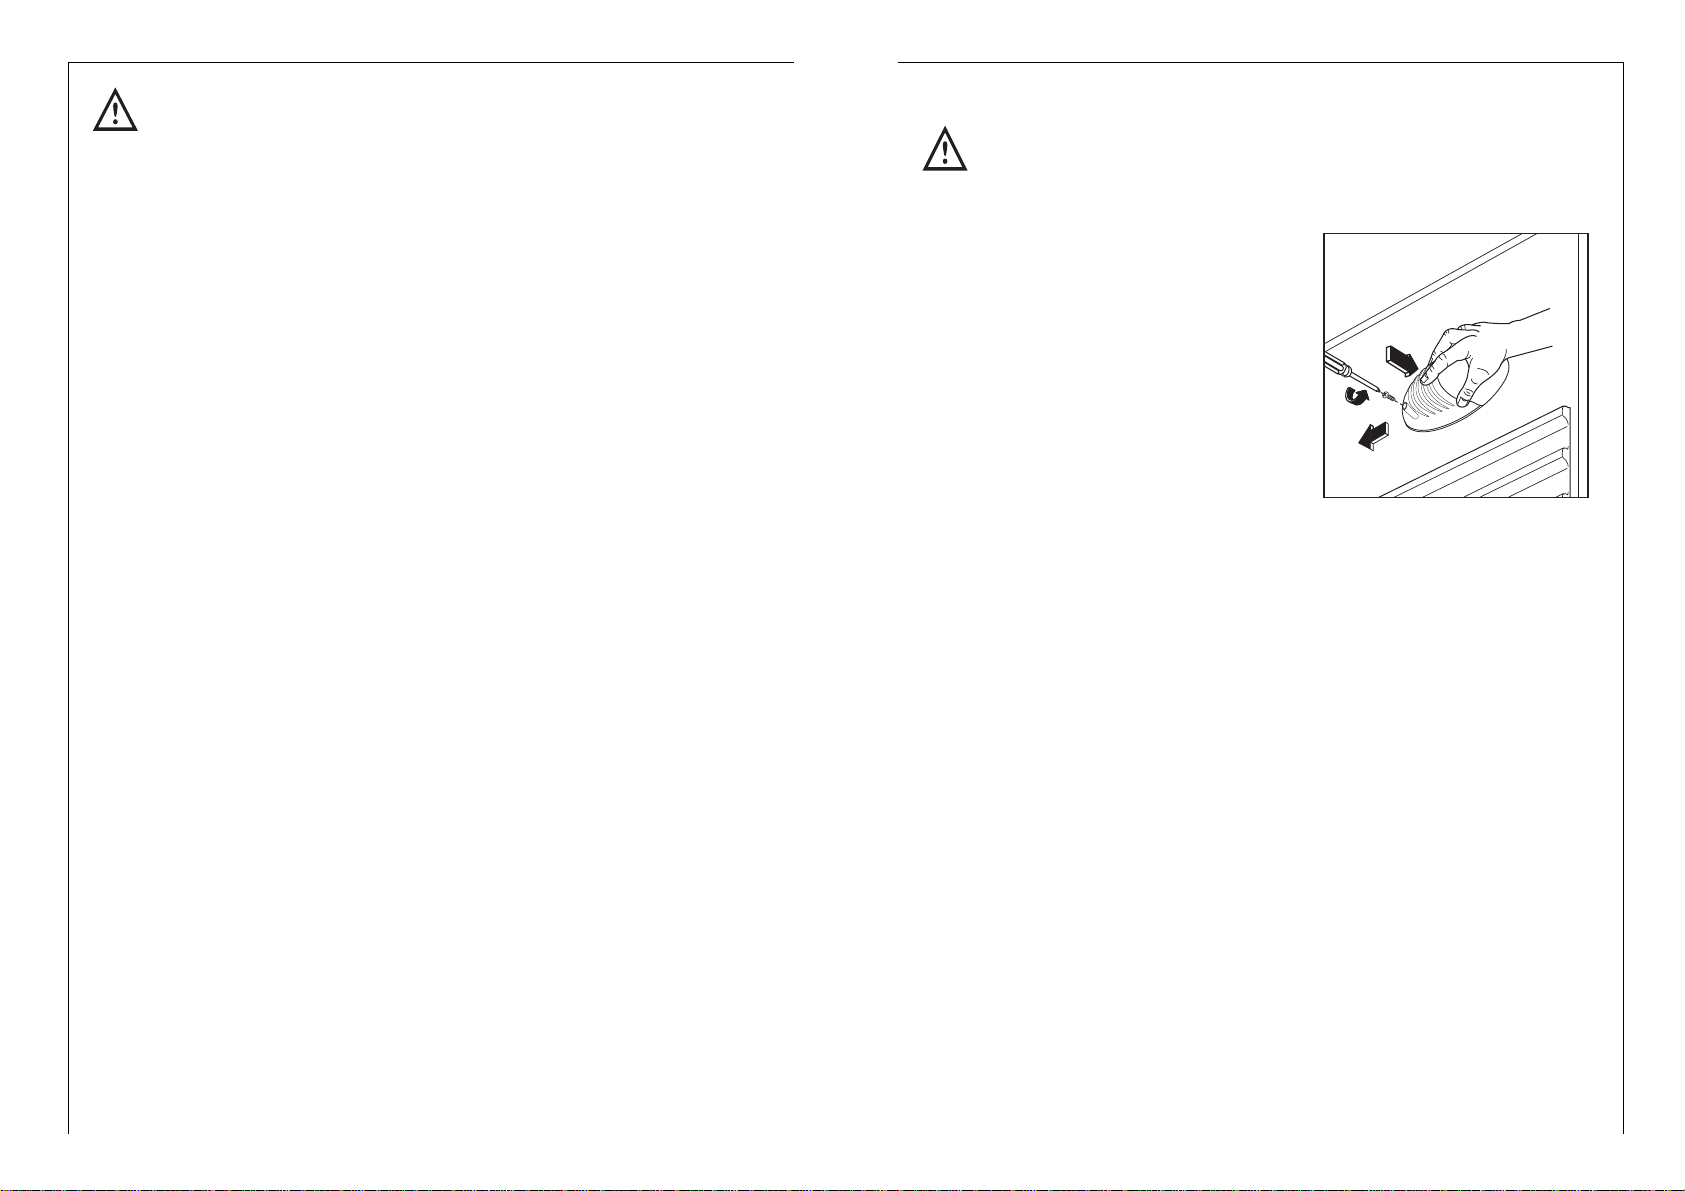
Changing the light bulb
Warning! There is a risk of electric shocks! Before changing the light
bulb, switch off the appliance and unplug it, or pull the fuse or the circuit breaker. Light bulb data: 220-240 V, max. 15 W
1. To switch off the appliance, turn the
temperature regulator to position "0".
2. Unplug the mains plug.
3. To change the light bulb, undo the
screw.
4. Press the light bulb cover as shown
and slide it backwards.
5. Change the defective light bulb.
6. Refit the light bulb cover and the
screw.
7. Put the refrigerator back into operation.
D613
Page 5
5
einsperren (Erstickungsgefahr!) oder in andere lebensgefährliche
Situationen geraten.
• Kinder können Gefahren, die im Umgang mit Haushaltsgeräten lie-
gen, oft nicht erkennen. Sorgen Sie deshalb für die notwendige Aufsicht und lassen Sie Kinder nicht mit dem Gerät spielen!
Im Alltagsbetrieb
• Behälter mit brennbaren Gasen oder Flüssigkeiten können durch
Kälteeinwirkung undicht werden. Explosionsgefahr! Lagern Sie keine Behälter mit brennbaren Stoffen, wie z.B. Spraydosen, Feuerzeug-Nachfüllkartuschen etc. im Kältegerät.
• Keine Elektrogeräte (z. B. elektrische Eismaschinen, Rührgeräte
etc.) im Kältegerät betreiben.
• Vor Reinigungsarbeiten das Gerät grundsätzlich abschalten und den
Netzstecker ziehen oder Sicherung in der Wohnung abschalten
bzw. herausdrehen.
• Netzstecker immer am Stecker aus der Steckdose ziehen, nie am
Kabel.
Im Störungsfall
• Sollte einmal eine Störung am Gerät auftreten, sehen Sie bitte
zuerst in dieser Gebrauchsanweisung unter "Was tun, wenn ..."
nach. Falls die dort aufgeführten Hinweise nicht weiterhelfen, führen Sie bitte keine weiteren Arbeiten selbst aus.
• Kältegeräte dürfen nur von Fachkräften repariert werden. Durch
unsachgemäße Reparaturen können erhebliche Gefahren entstehen. Wenden Sie sich im Reparaturfall bitte an Ihren Fachhändler oder an unseren Kundendienst.
Entsorgung
Information zur Geräteverpackung
Alle verwendeten Werkstoffe sind umweltverträglich! Sie können gefahrlos deponiert oder in der Müllverbrennungsanlage verbrannt werden!
Zu den Werkstoffen: Die Kunststoffe können auch wiederverwertet
werden und sind folgendermaßen gekennzeichnet:
>PE< für Polyäthylen, z. B. bei der äußeren Hülle und den Beuteln im
Innern.
>PS< für geschäumtes Polystyrol, z. B. bei den Polsterteilen, grundsätzlich FCKW-frei.
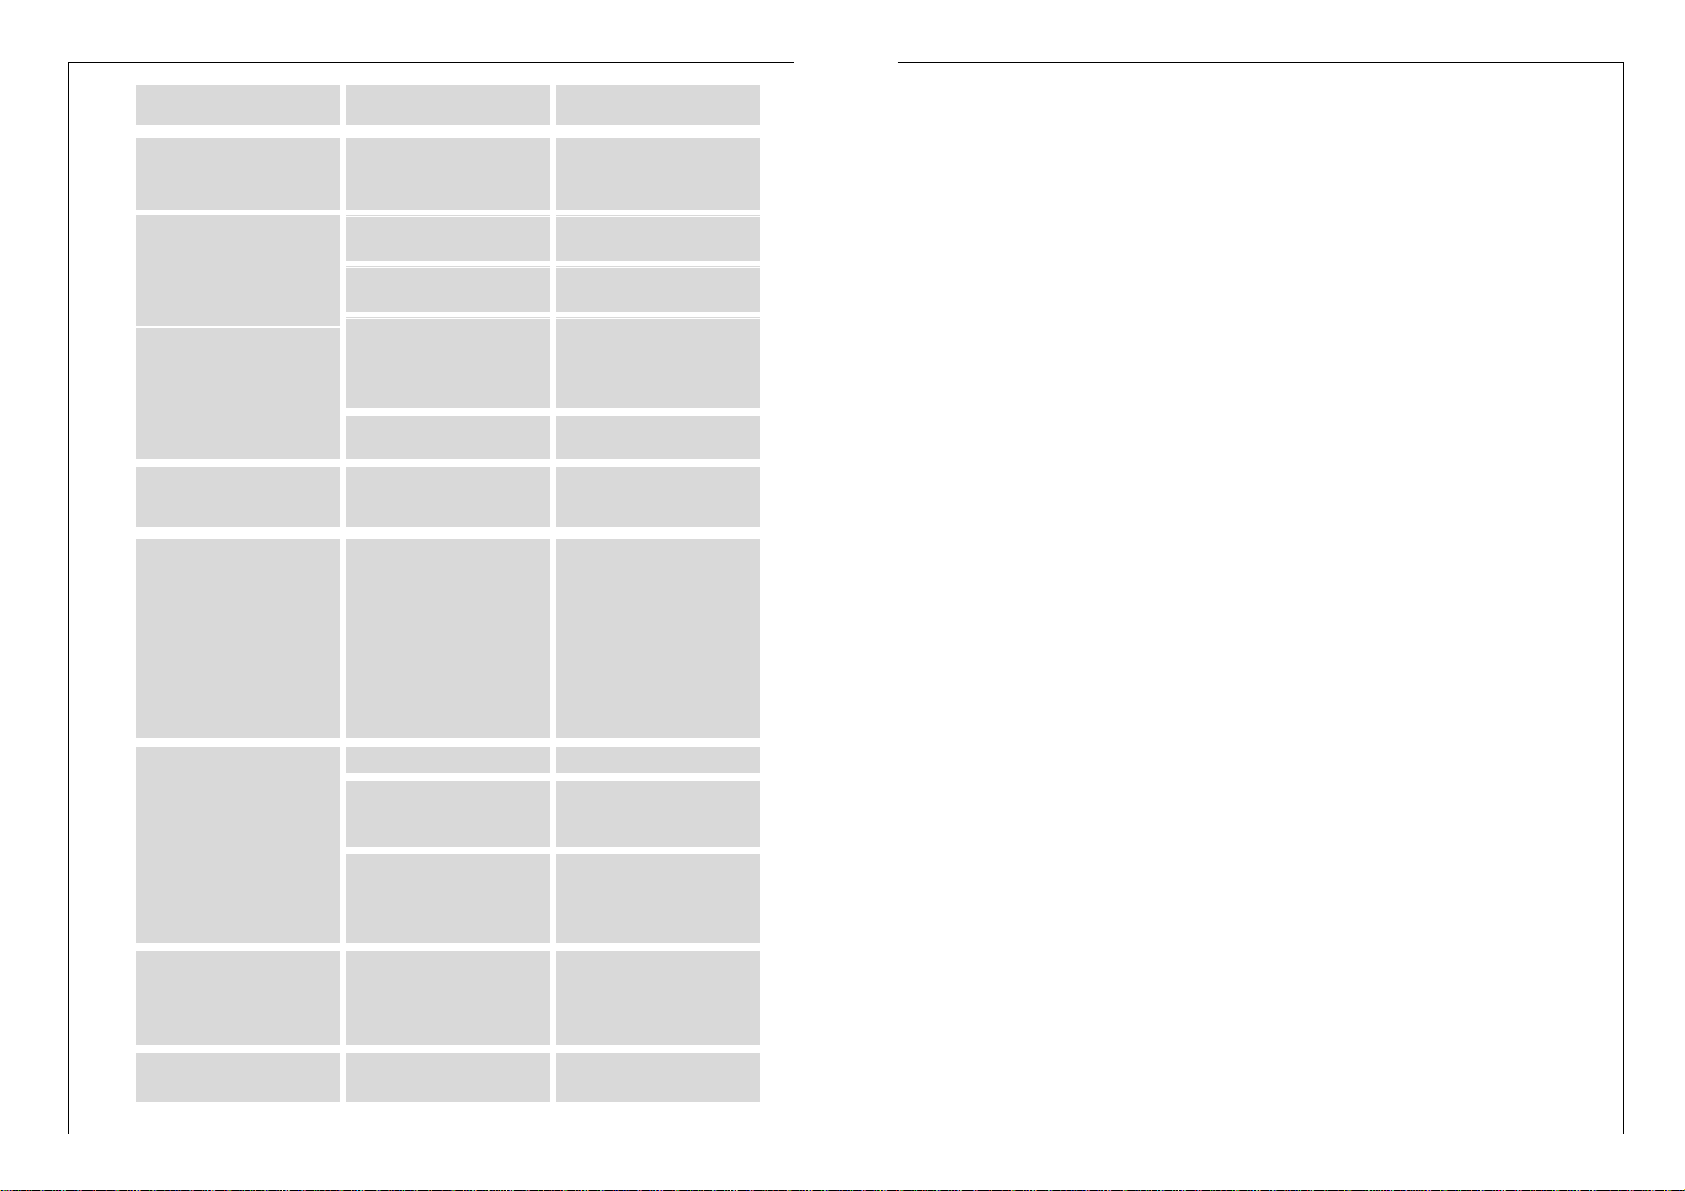
32
Heavy build up of frost, possibly also on the door seal.
Door seal is not air tight
(possibly after changing
over the hinges).
Carefully warm the leaking
sections of the door seal
with a hair dryer (not hotter
than approx. 50 °C). At the
same time shape the warmed door seal by hand such
that it sits correctly.
Unusual noises.
The appliance is touching
the wall or other objects.
Appliance is not level.
A component, e.g. a pipe,
on the rear of the appliance
is touching another part of
the appliance or the wall.
The compressor starts after
a period of time.
See the "Cleaning and
Care" section.
This is normal, no error has
occurred.
The compressor does not
start immediately after changing the temperature setting.
Water on the floor or on storage shelves.
Water drain hole is blocked.
If necessary, carefully bend
the component out of the
way.
Move the appliance slightly.
Readjust the feet.
The food is too warm.
Interior lighting does not
work.
The appliance is near a heat
source.
Temperature is not properly
adjusted.
Please look in the "Initial
Start Up" section.
Light bulb is defective. Please look in the "Chan-
ging the Light Bulb" section.
Turn the temperature regulator to a colder setting temporarily.
Door was open for an extended period.
Please look in the "Installation location" section.
A large quantity of warm
food was placed in the
appliance within the last 24
hours.
Open the door only as long
as necessary.
Appliance cools too much. Temperature is set too cold. Turn the temperature regu-
lator to a warmer setting
temporarily..
Malfunction
Possible Cause
Remedy
Page 6
6
Transportschutz entfernen
Das Gerät sowie Teile der Innenausstattung sind für den Transport
geschützt.
• Alle Klebebänder sowie Polsterteile aus dem Geräteinnenraum entfernen.
Eventuelle Kleberückstände können Sie mit Reinigungs- oder Waschbenzin entfernen.
Aufstellen
Aufstellort
Das Gerät soll in einem gut belüfteten und trockenen Raum stehen.
Die Umgebungstemperatur wirkt sich auf den Stromverbrauch aus.
Daher sollte das Gerät
– nicht direkter Sonneneinstrahlung ausgesetzt sein;
Die Kartonteile werden aus Altpapier hergestellt und sollten auch wieder zur Altpapiersammlung gegeben werden.
Entsorgung von Altgeräten
Aus Umweltschutzgründen müssen Kältegeräte fachgerecht entsorgt
werden. Dies gilt für Ihr bisheriges Gerät und - nachdem es eines
Tages ausgedient hat - auch für Ihr neues Gerät.
Warnung! Ausgediente Altgeräte bitte vor der Entsorgung unbrauchbar machen. Netzstecker ziehen, Netzkabel durchtrennen, eventuell
vorhandene Schnapp- oder Riegelschlösser entfernen oder zerstören. Dadurch verhindern Sie, daß sich spielende Kinder im Gerät einsperren (Erstickungsgefahr!) oder in andere lebensgefährliche Situationen geraten.
Entsorgungshinweise:
• Das Gerät darf nicht mit dem Haus- oder Sperrmüll entsorgt werden.
• Der Kältemittelkreislauf, insbesondere der Wärmetauscher an der
Geräterückseite, darf nicht beschädigt werden.
• Auskunft über Abholtermine oder Sammelplätze erhalten Sie bei der
örtlichen Stadtreinigung oder der Gemeindeverwaltung.
31
Energy Saving Tips
• Do not install the appliance near cookers, radiators or other sources
of warmth. High ambient temperatures cause longer, more frequent
operation of the compressor.
• Ensure sufficient air circulation and exhaust at the appliance base and
at the back wall of the appliance. Never cover air vent openings.
• Do not place warm foods into the appliance. Allow warm foods to
cool first.
• Only leave door open as long as necessary.
• Do not set temperature any colder than necessary.
• Put frozen food in the fridge to defrost. The cold in the frozen food
will then be used to cool the fridge.
• Keep the heat emitting condenser, the metall grille on the rear wall
of your appliance, always clean.
What to do if ...
Correcting Malfunctions
A malfunction may be caused by only a minor fault that you can rectify yourself using the following instructions. Do not perform any other
work on the appliance if the following information does not provide
assistance in your specific case.
Warning! Repairs to refrigerators/freezers may only be performed by
qualified service engineers. Improper repairs can give rise to significant hazards for the user. If your appliance needs repairing, please
contact your specialist dealer or our Customer Service.
Malfunction
Possible Cause
Remedy
Appliance does not work.
Appliance is not switched on Switch on the appliance.
Mains plug is not plugged in
or is loose.
Insert mains plug.
Fuse has blown or is defective.
Check fuse, replace if
necessary.
Socket is defective. Mains malfunctions are to
be corrected by an electrician.
Page 7

7
Klimaklasse für Umgebungstemperatur von
SN +10 bis +32 °C
N +16 bis +32 °C
ST +18 bis +38 °C
T +18 bis +43 °C
Ist die Aufstellung neben einer Wärmequelle unvermeidbar, sind folgende seitliche Mindestabstände einzuhalten:
– zu Elektroherden 3 cm;
– zu Öl- und Kohleherden 30 cm.
Können diese Abstände nicht eingehalten werden, ist eine Wärme-
schutzplatte zwischen Herd und Kältegerät erforderlich.
Steht das Kältegerät neben einem anderen Kühl- oder Gefriergerät,
ist ein seitlicher Abstand von 5 cm erforderlich, damit sich an den
Geräte-Außenseiten kein Schwitzwasser bildet.
– nicht an Heizkörpern, neben einem Herd oder sonstigen Wärme-
quellen stehen;
– nur an einem Ort stehen, dessen Umgebungstemperatur der Klima-
klasse entspricht, für die das Gerät ausgelegt ist.
Die Klimaklasse finden Sie auf dem Typschild, das sich links im
Innenraum des Gerätes befindet.
Nachstehende Tabelle zeigt, welche Umgebungstemperatur welcher
Klimaklasse zugeordnet ist:
100 mm10 mm
10 mm
NP007
Ihr Kühlgerät braucht Luft
Aus Gründen der Betriebssicherheit muß eine Mindestbelüftung gewährleistet sein, wie aus der
Abb. hervorgeht:
Achtung:
Die Lüftungs-Öffnungen müssen
immer saubergehalten werden.
Damit die Luft zirkulieren kann,
die Lüftungsöffnungen niemals
abdecken oder verstellen.
3030
Cleaning and Care
For hygienic reasons the appliance interior, including interior accessories, should be cleaned regularly.
Warning!
• The appliance may not be connected to the mains during cleaning.
Danger of electrical shock! Before cleaning switch the appliance
offand rem ve the plug from the mains, or switch off or turn out the circuit breaker or fuse.
• Never clean the appliance with a steam cleaner. Moisture could
accumulate in electrical components, danger of electrical shock!
Hot vapours can lead to the damage of plastic parts.
• The appliance must be dry before it is placed back into service.
Attention!
• Ethereal oils and organic solvents can attack plastic parts, e.g.
– lemon juice or the juice from orange peals;
– butyric acid;
– cleansers which contain acetic acid.
Do not allow such substances to come into contact with appliance
parts.
• Do not use any abrasive cleansers.
1. Remove the food from the refrigerator.
2. Switch the appliance off and remove the plug from the mains, or switch off or turn out the circuit breaker or fuse.
2. Clean the appliance and the interior accessories with a cloth and
lukewarm water. Commercially available dish washing detergents
may also be used.
4. After cleaning wipe with fresh water and rub dry.
Accumulation of dust at the condenser increases energy consump-
tion. For this reason carefully clean the condenser at the back of the
appliance once a year with a soft brush or a vacuum cleaner.
5. Check the water drain hole on the rear wall of the fridge. Clear a
blocked drain hole with the aid of the green peg .
6. After everything is dry place appliance back into service.
Page 8

8
Türanschlag wechseln
Der Türanschlag kann von rechts (Lieferzustand) nach links gewechselt werden, falls der Aufstellort dies erfordert.
Warnung! Während des Türanschlagwechsels darf das Gerät nicht
am Stromnetz angeschlossen sein. Vorher Netzstecker ziehen.
Vorgehensweise
1. Sockelblende (D) nach vorn
abziehen.
2. Türlagerabdeckung (F) von
links nach rechts umsetzen.
3. Unteres Türlager (E) abschrauben.
4. Kühlraumtür nach unten
abnehmen.
5. Oberen Türlagerzapfen (D)
abschrauben und auf gegenüberliegenden Seite montieren.
6. Abdeckstöpsel für die Bohrlöcher von links nach rechts
umsetzen.
7. Kühlraumtür auf oberes Türlager aufsetzen und schließen.
8. Unteres Türlager (E) unten
links in die Kühlraumtür einsetzen und am Gehäuse
festschrauben.
Hintere Abstandsstücke
Im Beipack sind 2 Distanzstücke enthalten, die wie in
der Abbildung gezeigt montiert werden müssen.
Lösen sie dazu etwas die
Schrauben gemäß Abbildung.
Schieben Sie das Distanzstück
unter den Schraubenkopf und
ziehen Sie die Schraube wieder
fest.
D594
D
D590
E
F
D
F
F
F
29
Defrosting
Refrigerator
Frost is automatically eliminated from the evaporator of the
refrigerator compartment
every time the motor compressor stops, during normal use.
The defrost water drains out
through a trough into a special
container at the back of the
appliance, over the motor
compressor, where it evaporates.
We particulary recommend that you peridically clean the
defrost-water drainage outlet, located in the center of the
drainage groove in the refrigerator compartment, to prevent the
defrost water form overflowing on to foods stored in the compartment. Use a special cleaner provided, which you will find
already inserted into the discharge hole.
D037
Switching off the appliance
To switch off the appliance, turn the temperature regulator to position
"0".
If the appliance is not going to be used for an extended period:
1. Remove all refrigerated packages as well as ice trays.
2. Switch off the appliance by turning the temperature regulator to position "0".
3. Remove the mains plug or switch off or turn out the circuit breaker or
fuse.
4. Clean thoroughly (see section: “Cleaning and Care”).
5. Leave the door open to avoid the build up of odours.
Page 9

9
9. Sockelblende (D) aufsetzen.
10. Türgriff abnehmen und auf
gegenüberliegender Seite
befestigen. Mit einem Senkstift
die Plastikstöpsel auf der
gegenüberliegenden Seite des
Türgriffs durchlöchern. Mit den
im Beipack enthaltenen Plastikstöpseln, die freigebliebenen Löcher abdecken.
Achtung:
Vergewissern Sie sich nach Ausführung des Türanschlagwechsels,
daß alle Schrauben fest angezogzen sind und die Türdichtung einwandfrei am Gehäuse anliegt.
Gegenfalls die Türdichtung vorsichtig mit einem Fön erwärmen
(max.50°C) und von Hand in Form ziehen.
PR228
Vor Inbetriebnahme
• Das Geräteinnere und alle Ausstattungsteile bitte vor Erstinbetrieb-
nahme reinigen (siehe Abschnitt "Reinigung und Pflege").
Elektrischer Anschluß
Für den elektrischen Anschluß ist eine vorschriftsmäßig installierte
Schutzkontakt-Steckdose erforderlich. Sie sollte so gesetzt sein, daß
ein Ziehen des Netzsteckers möglich ist.
Die elektrische Absicherung muß mindestens 10/16 Ampere betragen.
Ist die Steckdose bei eingebautem Gerät nicht mehr zugänglich, muß
eine geeignete Maßnahme in der Elektroinstallation sicherstellen, daß
das Gerät vom Netz getrennt werden kann (z. B. Sicherung, LSSchalter, Fehlerstrom-Schutzschalter oder dergleichen mit einer Kontaktöffnungsweite von mindestens 3 mm).
• Vor Inbetriebnahme am Typschild des Gerätes überprüfen, ob
Anschlußspannung und Stromart mit den Werten des Stromnetzes
am Aufstellort übereinstimmen.
Z. B.: AC 220 ... 240 V 50 Hz oder
220 ... 240 V~ 50 Hz
(d. h. 220 bis 240 Volt Wechselstrom, 50 Hertz)
Das Typschild befindet sich links im Innenraum des Gerätes.
Adjusting the upper door rack
• Depending on the food stored, the upper door racks
can be changed to other holders or removed. Take out
the refrigerators food, press
the door racks digonally
upwards at their edges,
reposition them, and press
them back into place.
28
PR270/1
Fresh food refrigeration
To obtain the best performance:
• do not store warm food or evaporating liquide in the refrigeator
• do cover or wrap the food, particularly if it has a strong flavour.
• Position food so that air can circuiate freely round it.
Useful hints:
Meat (all types): wrap in polythene bags and place on the glass shelf
above the vegetable drawer(s)For safety , store in this way only one
or two days at the most.
Cooked foods, cold dishes, etc: these should be covered and may
be placed on any shelf.
Fruit and vegetables: these should be thoroughly cleaned and
placed in the special drawer(s) provided.
Butter and cheese: these should be placed in special airtight con-
tainers or wapped in aluminium foil or polythene bags to exclude as
much air as possible.
Milk bootles: these should have a cap and should be stored in the
bottle rack on the door.
Bananas, potatoes, onions and garlic, if not packed, must not be
kept in the refrigerator.
Page 10

10
Inbetriebnahme und Temperaturregelung
• Netzstecker in die Steckdose stecken. Den Temperaturegler (B) im
Uhrzeigersinn aus der Stellung «O» (STOP) drehen. Die Kontrollampe (A) leuchtet auf.
Stellung „0“ bedeutet: aus.
Stellung „1“ bedeutet: Höchste Innentemperatur (wärmste Einstel-
lung).
Stellung „4“ (Endanschlag) bedeutet: Tiefste Innentemperatur (käl-
teste Einstellung).
Folgende Einflüsse sind ausschlaggebend für die Innentemperatur:
– Umgebungstemperatur;
– Menge und Temperatur der eingelagerten Lebensmittel;
– Häufiges oder langes Öffnen der Tür.
Wichtig!
Hohe Umgebungstemperatur (z. B. an heißen Sommertagen) und
kalte Einstellung des Temperaturreglers (Stellung „4“) kann zu Dauerbetrieb des Kompressors führen.
In diesem Fall den Temperaturregler auf eine wärmere Einstellung
zurückdrehen (Stellung „2“ bis „3“). Bei dieser Einstellung wird der
Kompressor geregelt und der Abtauvorgang wieder automatisch eingeleitet.
Bedienblende
AB
4
32
1
0
A - Netzkontrollampe
B - Temperaturregler
27
Setting „4“ (end-stop) means: Lowest temperature, (coldest setting).
However, the exact setting should be chosen keeping in the mind that the
temperature inside the refrigerator depends on:
-the quantity of food stored
-how often the door is opened
Important!
High ambient temperatures (e.g. on hot summer days) and a cold setting
on the temperature regulator (position"5" to "6") can cause the compressor to run continuously.
If this happens, turn the temperature regulator back to a warmer setting
(position "3" to "4"). At this setting the compressor will be switched on
and off as usual and automatic defrosting recommenced.
Interior Accessories
Storage shelves
• You should always slide one of the full size glass storage shelf into
the lowest set of guides, above the fruit and the vegetable containers, and keep it in this position.
• The height of the storage shelves can be adjusted:
• To do this pull the storage
shelf forward until it can be
swivelledupwards or
downwards and removed.
• Please do the same in reverse to insert the shelf at a different height.Slide the front
half of the V ario storage shelf
in another level to the rear.
By this means you will gain
space to place tall items on
the storage shelf below.
D338
Page 11

11
Innenausstattung
Verstellung der Abstellflächen
• Eine geschlossene Abstellflä-
che bitte in die untersten Führungen über die Obst- und
Gemüseschalen einschieben.
Sie muß immer in dieser Stellung verbleiben.
Die Abstellflächen sind
höhenverstellbar:
• Dazu die Abstellfläche soweit nach vorne ziehen, bis sie sich nach
oben oder unten abschwenken und heraus-nehmen läßt.
• Das Einsetzen in eine andere Höhe bitte in umgekehrter Reihenfol-
ge vornehmen.
• Die vordere Hälfte der VARIO-Glasabstellfläche auf einer anderen
Ebene nach hinten schieben. Dadurch gewinnen Sie Raum, um auf
der darunterliegenden Abstellfläche hohes Kühlgut abzustellen.
Verstellung der Türabsteller
• Je nach Lagergut können die
Türabsteller in andere Aufnahmen umgesetzt oder herausgenommen werden. Kühlgut
herausnehmen, Türabsteller
nach oben drücken, umsetzen
und wieder eindrücken.
D338
PR270/1
Richtig lagern
Um die besten Leistungen des Kühlschrankes zu erreichen, beachten Sie bitte folgendes:
• Keine warmen Speisen oder Flüssigkeiten in den Kühlschrank einstellen.
• Geruchverbreitende Lebensmittel sollten abgedeckt oder eingewickelt werden.
26
Starting up and temperature regulation
• Insert the plug of the connection lead into the plug socket with protective earth contact. Turn the thermostat knob (B), clockwise,
beyond the «O»(STOP) position. The pilot light (A) will light up, indicating that the appliance is in operation.
Setting „0“ means: Off.
Setting „1“ means: Hightest temperature, (warmest setting).
Control panel
AB
4
32
1
0
A- Mains control light
B- Thermostat button (Temperature selector)
Green and Yellow Earth
Blue Neutral
Brown Live
As the colours of the wires in the mains lead of this appliance may not
correspond with the coloured markings indentifying the terminals in
your plug, proceed as follows:
1. The wire coloured green and yellow must be connected to the terminal marked with the letter „E“ or by the earth symbol or coloured green
and yellow.
2. The wire coloured blue must be connected to the terminal „N“ or
coloured black.
3. The wire coloured brown must be connected to the terminal marked
„L“ or coloured red.
4. Upon completion there must be not cut, or stray strands of wire present and the cord clamp must be secure over the outer sheat.
Warning! A cut-off plug inserted into a 13 amp socket is a serious
safety (shock) hazard. Ensure that the cut-off plug is disposed of
safely.
Page 12

12
Abtauen
Kühlraum
Die sich auf dem Verdampfer
des Kühlschrankes bildende
Reifschicht taut jedesmal in
den Stillstandzeiten des Kompressors von selbst ab. Das
Tauwasser läuft durch eine
Rinne in eine Plastikschale auf
der Rückseite des Gerätes
und verdunstet dort.
Wir empfehlen, das in der Mitte der Abtauwasserrinne des Kühlraumes befindliche Ablaufloch für das Abtauwasser regelmäßig
zu reinigen, um zu vermeiden, daß das Abtauwasser auf Lebensmittel tropft.
Verwenden Sie den dafür vorgesehenen Reiniger, der sich schon
im Ablaufloch befindet.
D037
• Die Lebensmittel müssen so eingelagert werden, daß die Luft frei
zirkulieren kann.
Nachstehend einige praktische Ratschläge:
Fleisch (alle Sorten) in Plastikfolie einpacken und auf die Glasplat-
te, die sich über der Gemüseschale (über den Gemüseschalen)
befindet, legen.
In dieser Lage kann das Fleisch längstens 1-2 Tage aufbewahrt
werden.
Gekochte Nahrungsmittel, kalte Platten, usw. zugedeckt aufbe-
wahren. Sie können auf jede beliebige Ablage gelegt werden.
Obst und Gemüse: nach vorherigem Säubern und Waschen in der
Gemüseschale aufbewahren
Butter und Käse: in speziellen Behältern aufbewahren oder in Alu-
bzw. Plastikfolie einpacken, um den Kontakt mit der Luft zu vermeiden.
Milch in Flaschen: gut verschlossen in das Flaschenfach der
Innentür stellen
Bananen, Kartoffeln, Zwiebeln und Knoblauch sollten nicht
unverpackt im Kühlschrank aufbewahrt werden.
25
PR228
8. Refit ventilation grille (D), clipping it into place.
9. Unscrew the handle. Refit it on
opposite side after having pierced the plugs with a punch.
Cover the holes left open with
the plugs contained in the
documentation pack.
Attention:
After having reversed the ope-
ning direction of the doors
check that all the screws are
properly tightened and that the
magnetic seal adheres to the
cabinet.
If the ambient temperature is cold (i.e. in Winter), the gasket may not
fit perfectly to the cabinet. in that case, wait for the natural fitting of the
gasket or accelerate this process by heating up the part involved with a
normal hairdrier.
Prior to Initial Start–Up
• Please clean the appliance interior and all accessories prior to initial
start-up (see section: “Cleaning and Care”).
Electrical Connection
Any electrical work required to install this appliance should be carried
out by a qualified electrician or competent person.
WARNING – THIS APPLIANCE MUST BE EARTHED
The manufacturer declines any liability should these safety measures not be observed.
Before switching on, make sure the electricity supply voltage is the
same as that indicated on the appliance rating plate. The rating plate
is inside, on the left.
The appliance is supplied with a 13 amp plug fitted. In the event of
having to change the fuse in the plug supplied, a 13 amp ASTAapproved (BS 1362) fuse must be used.
Important!
The wires in the mains lead are coloured in accordance with the following code:
Page 13

13
Gerät abschalten
Soll das Gerät für längere Zeit außer Betrieb genommen werden:
1. Kühlgut herausnehmen.
2. Gerät abschalten, dazu Temperaturregler auf Stellung „0“ drehen.
3. Netzstecker ziehen oder Sicherung abschalten bzw. herausdrehen.
4. Gründlich reinigen (siehe Abschnitt "Reinigung und Pflege").
5. Tür offen lassen, um Geruchsbildung zu vermeiden.
Reinigung und Pflege
Aus hygienischen Gründen sollte das Geräteinnere, einschließlich
Innenausstattung, regelmäßig gereinigt werden.
Warnung!
• Das Gerät darf während der Reinigung nicht am Stromnetz ange-
schlossen sein. Stromschlaggefahr! Vor Reinigungsarbeiten Gerät
abschalten und Netzstecker ziehen oder Sicherung abschalten bzw.
herausdrehen.
• Das Gerät nie mit Dampfreinigungsgeräten reinigen. Feuchtigkeit
könnte in elektrische Bauteile gelangen, Stromschlaggefahr! Heißer
Dampf kann zu Schäden an Kunststoffteilen führen.
• Das Gerät muß trocken sein, bevor Sie es wieder in Betrieb nehmen.
Achtung!
• Ätherische Öle und organische Lösungsmittel können Kunststofftei-
le angreifen, z. B.
– Saft von Zitronen- oder Apfelsinenschalen;
– Buttersäure;
– Reinigungsmittel, die Essigsäure enthalten.
Solche Substanzen nicht mit den Geräteteilen in Kontakt bringen.
• Keine scheuernden Reinigungsmittel verwenden.
1. Kühlgut herausnehmen.
2. Gerät abschalten und den Netzstecker ziehen oder Sicherung
abschalten bzw. herausdrehen.
3. Gerät einschließlich Innenausstattung mit einem Lappen und lauwarmem Wasser reinigen. Eventuell etwas handelsübliches Geschirrspülmittel beigeben.
Rehingeing the door
The side at which the door opens can be changed from the right side
(factory adjustment) to the left side, if the installation site requires.
Warning! When changing the side at which the door opens, the
appliance may not be connected to the mains. Remove plug from the
mains beforehand.
Procced as follow:
1. Remove the clip-in ventilation
grille (D).
2. Remove the bottom hinge (E)
by unscrewing the two fixing
screws.
3. Unscrew pin (D) and refit it on
the opposite side.
5. Remove the two plugs, to
reveal the holes for the hinge
pivots, and remount them on
the other side.
6. Refit the door .
6. Refit bottom hinge (E) on the
opposite side, using the two
screws previously removed.
7. Remove blanking cover (F) from
ventilation grille (D) by pushing it
in the direction of the arrow and
refit it on the opposite side.
24
D
D590
E
F
D
F
F
F
Rear spacers
In the bag with the documentation, there are two spacers
which must be fitted.
slacken the screws and insert
the spacer under the screw
head, then re-tighten the
screws.
D594
Page 14

14
Was tun, wenn ...
Abhilfe bei Störungen
Möglicherweise handelt es sich bei einer Störung nur um einen kleinen Fehler, den Sie anhand nachfolgender Hinweise selbst beheben
können. Führen Sie keine weiteren Arbeiten selbst aus, wenn nachstehende Informationen im konkreten Fall nicht weiterhelfen.
Warnung! Reparaturen am Kältegerät dürfen nur von Fachkräften
durchgeführt werden. Durch unsachgemäße Reparaturen können
erhebliche Gefahren für den Benutzer entstehen. Wenden Sie sich im
Reparaturfall an Ihren Fachhändler oder an unseren Kundendienst.
Tips zur Energie-Einsparung
• Das Gerät nicht in der Nähe von Herden, Heizkörpern oder anderen
Wärmequellen aufstellen. Bei hoher Umgebungstemperatur läuft
der Kompressor häufiger und länger.
• Ausreichende Be- und Entlüftung des Gerätes gewährleisten. Lüf-
tungsöffnungen niemals abdecken.
• Keine warmen Speisen in das Gerät stellen. Warme Speisen erst
abkühlen lassen.
• Tür nur so lange wie nötig geöffnet lassen.
• Die Temperatur nicht kälter als nötig einstellen.
• Tiefkühlgut zum Auftauen in den Kühlraum legen. Die Kälte im Tief-
kühlgut wird so zur Kühlung im Kühlraum genutzt.
• Den Verflüssiger, das Metallgitter an der Geräterückseite, immer
sauber halten.
4. Anschließend mit klarem Wasser nachwischen und trockenreiben.
Staubablagerungen am Verflüssiger erhöhen den Energieverbrauch.
Deshalb einmal im Jahr den Verflüssiger an der Geräterückseite mit
einer weichen Bürste oder mit dem Staubsauger vorsichtig reinigen.
5. Die Ablauföffnung der Tropfrinne an der Rückwand des Kühlraumes
kontrollieren. Bei Verstopfung diese mit Hilfe des grünen Stöpsels frei
machen.
6. Nachdem alles trocken ist, Lebensmittel wieder einlagern und Gerät
wieder in Betrieb nehmen.
23
Climate classification ffor an ambient temperature of
SN +10 bis +32 °C
N +16 bis +32 °C
ST +18 bis +38 °C
T +18 bis +43 °C
If installation next to a source of heat is unavoidable, the following
minimum clearances must be maintained at the sides of the appliance:
– for electric cookers 3 cm;
– for oil and coal fired ranges 30 cm.
If these clearances cannot be maintained a heat insulating pad is
required between the cooker and the refrigeration appliance.
If the refrigeration appliance is installed next to another refrigerator or
freezer a clearance of 5 cm at the sides is required, in order to prevent the formation of condensation on the outside of the appliance.
The climate classification can be found on the serial plate, which is
located at the left on the inside of the appliance.
The following table shows which ambient temperature is correct for
each climate classification: each climate classification:
Your appliance needs air
For safety reasons, minimum
ventilationmust be as shown
Fig.
Attention: keep ventilation
openings clear of obstruction;
100 mm10 mm
10 mm
NP007
Page 15

15
Störung Mögliche Ursache Abhilfe
Gerät arbeitet nicht
Gerät ist nicht eingeschaltet Gerät einschalten.
Netzstecker ist nicht einge-
steckt oder lose.
Netzstecker einstecken.
Sicherung hat ausgelöst
oder ist defekt.
Sicherung überprüfen,
gegebenenfalls erneuern.
Steckdose ist defekt. Störungen am Stromnetz
behebt Ihr Elektrofachmann.
Die Lebensmittel sind zu
warm.
Innenbeleuchtung funktioniert nicht
Das Gerät steht neben einer
Wärmequelle.
Temperatur ist nicht richtig
eingestellt.
Bitte im Abschnitt "Inbetriebnahme" nachsehen.
Lampe ist defekt. Bitte im Abschnitt "Lampe
auswechseln" nachsehen.
Temperaturregler vorübergehend auf kältere Einstellung drehen.
Tür war längere Zeit geöffnet.
Bitte im Abschnitt "Aufstellort" nachsehen.
Innerhalb der letzten 24
Stunden wurden größere
Mengen warmer Lebensmittel eingelagert.
Tür nur so lange wie nötig
geöffnet lassen.
Starke Reifbildung im Gerät,
evtl. auch an der Türdichtung.
Türdichtung ist undicht
(evtl. nach Türanschlagwechsel).
An den undichten Stellen
Türdichtung vorsichtig mit
einem Foen® erwärmen
(nicht wärmer als ca. 50
°C). Gleichzeitig die
erwärmte Türdichtung von
Hand so in Form ziehen,
daß sie wieder einwandfrei
anliegt.
Gerät kühlt zu stark. Temperatur ist zu kalt ein-
gestellt.
Temperaturregler vorübergehend auf wärmere Einstellung drehen.
Ungewöhnliche Geräusche.
Gerät hat Kontakt mit der
Wand oder mit anderen
Gegenständen.
Gerät steht nicht gerade.
Ein Teil, z. B. ein Rohr, an
der Geräterückseite berührt
ein anderes Geräteteil oder
die Wand.
Gegebenenfalls dieses Teil
vorsichtig wegbiegen.
Gerät etwas wegrücken.
Verstellfüße nachjustieren.
22
Installation
Installation Location
The appliance should be set up in a well ventilated, dry room.
Energy use is affected by the ambient temperature. The appliance
should therefore
– not be exposed to direct sunlight;
– not be installed next to radiators, cookers or other sources of heat;
– only be installed at a location whose ambient temperature corre-
sponds to the climate classification, for which the appliance is designed.
Remove transport safeguard
The appliance and the interior fittings are protected for transport.
• Remove all adhesive tape and packing pieces from the interior of
the appliance.
You can remove any remnants of adhesive using white spirit.
Disposal of old Appliances
For environmental reasons, refrigeration appliances must be disposed of properly. This applies to your old appliance, and - at the end of
its service life - for your new appliance as well.
Warning! Before disposing of old appliances make them inoperable.
Remove plug from mains, sever the power cable, remove or destroy
any snap or latch closures. This eliminates the danger that playing
children lock themselves into the appliance (danger of suffocation!) or
place themselves into other life-endangering situations.
Disposal:
• The appliance may not be disposed of with domestic waste or bulky
refuse.
• The refrigerant circuit, especially the heat exchanger at the back of
the appliance, may not be damaged.
• Information concerning collection schedules or locations can be
obtained from the local disposal authorities or town hall.
Page 16

16
Lampe auswechseln
Warnung! Stromschlaggefahr! Vor dem Lampenwechsel Gerät
abschalten und den Netzstecker ziehen oder Sicherung abschalten
bzw. herausdrehen.
Lampendaten: 220-240 V, max. 15 W, Fassung: E 14
1. Zum Abschalten des Gerätes Temperaturregler auf Stellung „0“ drehen.
2. Netzstecker ziehen.
3. Zum Auswechseln der Lampe Befestigungsschraube herausdrehen.
4. Gemäß Abbildung auf die Lampenabdeckung drücken und diese nach
hinten abschieben.
5. Defekte Lampe auswechseln.
6. Lampenabdeckung wieder einsetzen
und Befestigungsschraube eindrehen.
7. Gerät wieder in Betrieb nehmen.
D613
Der Kompressor läuft nach
einiger Zeit selbsttätig an.
Siehe Abschnitt „Reinigung
und Pflege“
Dies ist normal, es liegt keine Störung vor.
Nach Änderung der Temperatureinstellung läuf der
Kompressor nicht sofort an.
Wasser am Kühlraumboden
oder auf Abstellflächen.
Tauwasser-Ablaufloch ist
verstopft.
Störung Mögliche Ursache Abhilfe
21
themselves in the fridge when playing (there is risk of suffocation!)or
get themselves into other dangerous situations.
• Often children cannot recognise the hazards present in household
appliances. It is therefore important that you ensure adequate
supervision and never let children play with the appliance!
Daily Operation
• Containers with flammable gases or liquids can leak at low temperatures. There is a risk of an explosion! Do not store any containers
with flammable materials such as, for example, spray cans, fire
extinguisher refill cartridges etc in the refrigerator/freezer.
• Do not operate any electrical appliances in the refrigerator/freezer
(e.g. electric ice cream makers, mixers etc.).
• Before cleaning the appliance, always switch off the appliance and
unplug it, or pull the house fuse or switch off the circuit breaker.
• When unplugging always pull the plug from the mains socket, do not
pull on the cable.
In case of malfunction
• If the a malfunction occurs on the appliance, please look first in the
"What to do if ..." section of these instructions. If the information given
there does not help, please do not perform any further repairs yourself.
• Refrigerators/freezers may only be repaired by qualified service
engineers. Improper repairs can give rise to significant hazards. If
your appliance needs repairing, please contact your specialist dealer or our Customer Service.
Disposal
Appliance Packaging Information
All materials are environmentally sound! They can be dumped or burned at an incinerating plant without danger!
About the materials: The plastics can be recycled and are identified
as follows:
>PE< for polyethylene, e.g. the outer covering and the bags in the
interior.
>PS< for polystyrene foam, e.g. the pads, which are all free of chlorofluorocarbon.
The carton parts are made from recycled paper and should be disposed of at a waste-paper recycling collection location.
Page 17

17
Kundendienst
Wenn Sie bei einer Störung keine Abhilfe in dieser Gebrauchsanweisung finden, wenden Sie sich bitte an Ihren Fachhändler oder an
unseren Kundendienst. Anschriften bzw. Telefonnummern sind im beiliegenden Heft „Garantiebedingungen/Kundendienststellen" aufgeführt.
Gezielte Ersatzteilvorbereitung kann unnötige Wege und Kosten
ersparen. Geben Sie deshalb bitte folgende Daten Ihres Gerätes an:
• Modellbezeichnung
• Erzeugnis-Nummer (PNC)
• Fertigungs-Nummer (S-No.)
Diese Angaben finden Sie auf dem Typschild links an der Innenseite
des Gerätes. Damit Sie die Daten schnell bei der Hand haben, empfehlen wir, sie hier einzutragen.
Hinweis: Ungerechtfertigter Kundendienstruf ist auch während der
Garantiezeit kostenpflichtig.
Bestimmungen, Normen, Richtlinien
Das Kältegerät ist für den Haushalt bestimmt und wurde unter Beachtung der für diese Geräte geltenden Normen hergestellt.
Bei der Fertigung wurden insbesondere die nach dem Gerätesicherheitsgesetz (GSG), der Unfallverhütungsvorschrift für Kälteanlagen
(VBG 20) und den Bestimmungen des Verbandes Deutscher Elektrotechniker (VDE) notwendigen Maßnahmen getroffen. Der Kältekreislauf wurde auf Dichtheit geprüft.
Dieses Gerät entspricht den folgenden EG-Richtlinien:
– 73/23/EWG vom 19.2.1973 - Niederspannungsrichtlinie
– 89/336/EWG vom 3.5.1989
(einschließlich Änderungsrichtlinie 92/31/EWG) - EMV-Richtlinie
20
Safety
The safety aspects of our refrigerators/freezers comply with accepted
technical standards and the German Appliance Safety Law. Nevertheless, we consider it our obligation to make you aware of the following
safety information:
Intended use
• The refrigerator is intended for use in the home. It is suitable for the
cooling. If the appliance is used for purposes other than those intended or used incorrectly, no liability can be accepted by the manufacturer for any damage that may be caused.
• Alterations or changes to the freezer are not permitted for reasons
of safety.
• If you use the refrigerator in a commercial application or forpurposes
other than the cooling please observe all valid legal regulations for
your application.
Prior to initial start–up
• Check the refrigerator for transport damage. Under no circumstance
should a damaged appliance be plugged in! In the event of damage,
please contact the vendor.
Refrigerant
The refrigerant isobutane (R600a) is contained within the refrigerant
circuit of the appliance, a natural gas with a high level of environmental compatibility, which is nevertheless flammable.
• During transportation and installation of the appliance, be certain that
none of the components of the refrigerant circuit become damaged.
• If the refrigerant circuit should become damaged:
– avoid open flames and sources of ignition;
– thoroughly ventilate the room in which the appliance is situated.
Safety of children
• Packaging (e.g. wraps, polystyrene) can be dangerous for children.
There is a risk of suffocation! Keep packaging material away from
children!
• Please make old appliances unusable prior to disposal. Pull out the
mains plug, cut off the mains cable, break or remove spring or boltcatches, if fitted. By doing this you ensure that children cannot lock
Page 18

18
Dear customer,
Before placing your new refrigerator/freezer into operation please
read these operating instructions carefully. They contain important
information for safe use, for installation and for care of the appliance.
Please keep these operating instructions for future reference. Pass
them on to possible new owners of the appliance.
Notes which are important for your safety or for the proper functioning
of the appliance are stressed with a warning triangle and/or with
signal words (Warning!, Caution!, Attention!). Please observe the following carefully.
Supplementary information regarding operation and practical applications of the appliance appear after this symbol.
Tips and notes concerning economical and environmentally sound
use of the appliance are marked with the cloverleaf.
The operating instructions contain instructions for the correction of
possible malfunctions by the user in the section "What to do if ...". If
these instructions should not be sufficient, our customer service
department is always available to you.
Printed on paper manufactured with environmentally sound processes.
who thinks ecologically acts accordingly ...
19
Contents
Safety . . . . . . . . . . . . . . . . . . . . . . . . . . . . . . . . . . . . . . . . . . . .20
Disposal . . . . . . . . . . . . . . . . . . . . . . . . . . . . . . . . . . . . . . . . . . 21
Appliance Packaging Information . . . . . . . . . . . . . . . . . . . . . . . . 21
Disposal of old Appliances . . . . . . . . . . . . . . . . . . . . . . . . . .. . . 22
Remove transport safeguard . . . . . . . . . . . . . . . . . . . . . . . . . .22
Installation . . . . . . . . . . . . . . . . . . . . . . . . . . . . . . . . . . . . . . . . 22
Installation Location . . . . . . . . . . . . . . . . . . . . . . . . . . . . . . ....22
Your refrigerator needs air . . . . . . . . . . . . . . . . . . . . . . . . . . . . . 23
Rear spacers .........................................24
Rehingeing the door . . . . . . . . . . . . . . . . . . . . . . . . . . . . . . . . . 24
Prior to Initial Start–Up . . . . . . . . . . . . . . . . . . . . . . . . . . . . . . 25
Electrical Connection . . . . . . . . . . . . . . . . . . . . . . . . . . . . . . . . . 25
Control panel ....................................... 26
Starting up and temperature regulation . . . . . . . . . . . . .....26
Interior Accessories . . . . . . . . . . . . . . . . . . . . . . . . . . . . . . . . 27
Storage shelves . . . . ..................................27
Door rack . . . . . . . . . . . . . . . . . . . . . . . . . . . . . . ............28
Fresh food refrigeration . . . . . . . . . . . . . . . . . . . . . . . . . . . . . 28
Defrosting . . . . . . . . . . . . . . . . . . . . . . . . . . . ..............29
Switching off the appliance . . . . . . ..................... 29
Cleaning and Care . . . . . . . . . . . . . . . . . . . . . . . . . . . . . . . . . . 30
Energy Saving Tips . . . . . . . . . . . . . . . . . . . . . . . . . . . . . . . . . 31
What to do if . . . . . . . . . . . . . . . . . . . . . . . . . . . . . . .........31
Correcting Malfunctions . . . . . . . . . . . . . . . . . . . . . . . . . . . . . . . 31
Changing the light bulb . . . . . . . . . . . . . . . . . . . . . . . . . . . . . . . 33
Customer Service . . . . . . . . . . . . . . . . . . . . . . . . . . . . . . . . . . 34
Regulations, Standards, Guidelines . . . . . . . . . . . . . . . . . . . . 34
 Loading...