

Page 1

TABLE OF CONTENTS
SECTION 1. NAMES OF PARTS
Names of Parts .............................................. 2
Standard Accessories ....................................4
INHALTSVERZEICHNIS
TEIL 1.TEILEBEZEICHNUNGEN
Bestandteil der Maschine ............................... 3
Standardzubehör und Aufbewahrung ............ 5
SECTION 2. GETTING READY TO SEW
Connecting Machine to Power Supply ...........4
Foot Switch .................................................... 4
Presser Foot Lifter.......................................... 6
Reverse Stitch Control ...................................6
Bobbin Winding ..............................................8
Inserting the bobbin .....................................12
Threading the Machine ................................ 14
Drawing up Bobbin Thread ..........................16
Changing Needle ......................................... 18
Selecting Needle and Thread.......................18
Adjusting the Needle Thread Tension .......... 20
Stitch Selector ..............................................22
SECTION 3. BASIC SEWING
Straight Stitch ...............................................24
Turning a Square Corner ............................. 26
Basic Zigzag................................................. 26
Overcasting with zigzag stitch ......................26
SECTION 4. CARE OF YOUR MACHINE
Cleaning the Bobbin Holder .........................28
Troubleshooting ........................................... 30
TABLE DES MATIÈRES
TEIL 2. VORBEREITUNGEN FÜR DAS NÄHEN
Anschluss der Maschine an den Netzstrom .. 5
Fußpedal ........................................................ 5
Nähfußhebel................................................... 7
Rückwärt-Taste .............................................. 7
Spulen ............................................................ 9
Entnahme der Spule .................................... 13
Einfädeln der Maschine................................ 15
Heraufholen des Unterfadens ...................... 17
Auswechseln der Nadel ................................ 19
Auswahl von Nadel und Faden..................... 19
Einstellen der Oberfadenspannung.............. 21
Stichwahlregler............................................. 23
TEIL 3. EINFACHES NÄHEN
Geradstich .................................................... 25
Ändern der Nährichtung um 90° .................. 27
Zickzack-Grundstich..................................... 27
Überwendlichnähen mit Zickzackstich ......... 27
TEIL 4. PFLEGE IHRER NÄHMASCHINE
Reinigen des Spulenhalters ......................... 29
PARTIE 1. IDENTIFICATION DES PIÉCES
Identification des pièces .................................3
Accessoires standard .....................................5
PARTIE 2. PRÉPAREZ-VOUS À COUDRE
Branchez la machine......................................5
Pédale de interrupteur ...................................5
Relève-pied presseur .....................................7
Bouton de marche arrière .............................. 7
Bobinage d’une canette de fil .........................9
Introduction de la canette ............................ 13
Enfilage de la machine .................................15
Comment faire monter le fil de la canette .... 17
Changer l’aiguille.......................................... 19
Choisir les aigilles et les fils ......................... 19
Réglage de la tension du fil de l’aiguille .......21
Sélecteur de point ........................................23
PARTIE 3. COUTURE DE BASE
Point droit .....................................................25
Pour coudre un angle droit ...........................27
Zig-zag simple .............................................. 27
Surfilage avec le zig-zag ..............................27
PARTIE 4. ENTRETIEN DE VOTRE MACHINE
Nettoyage du porte-canette.......................... 29
En cas de problème .....................................31
1
Page 2
w
q
SECTION 1. NAMES OF PARTS
e
r
t
y
o
!0
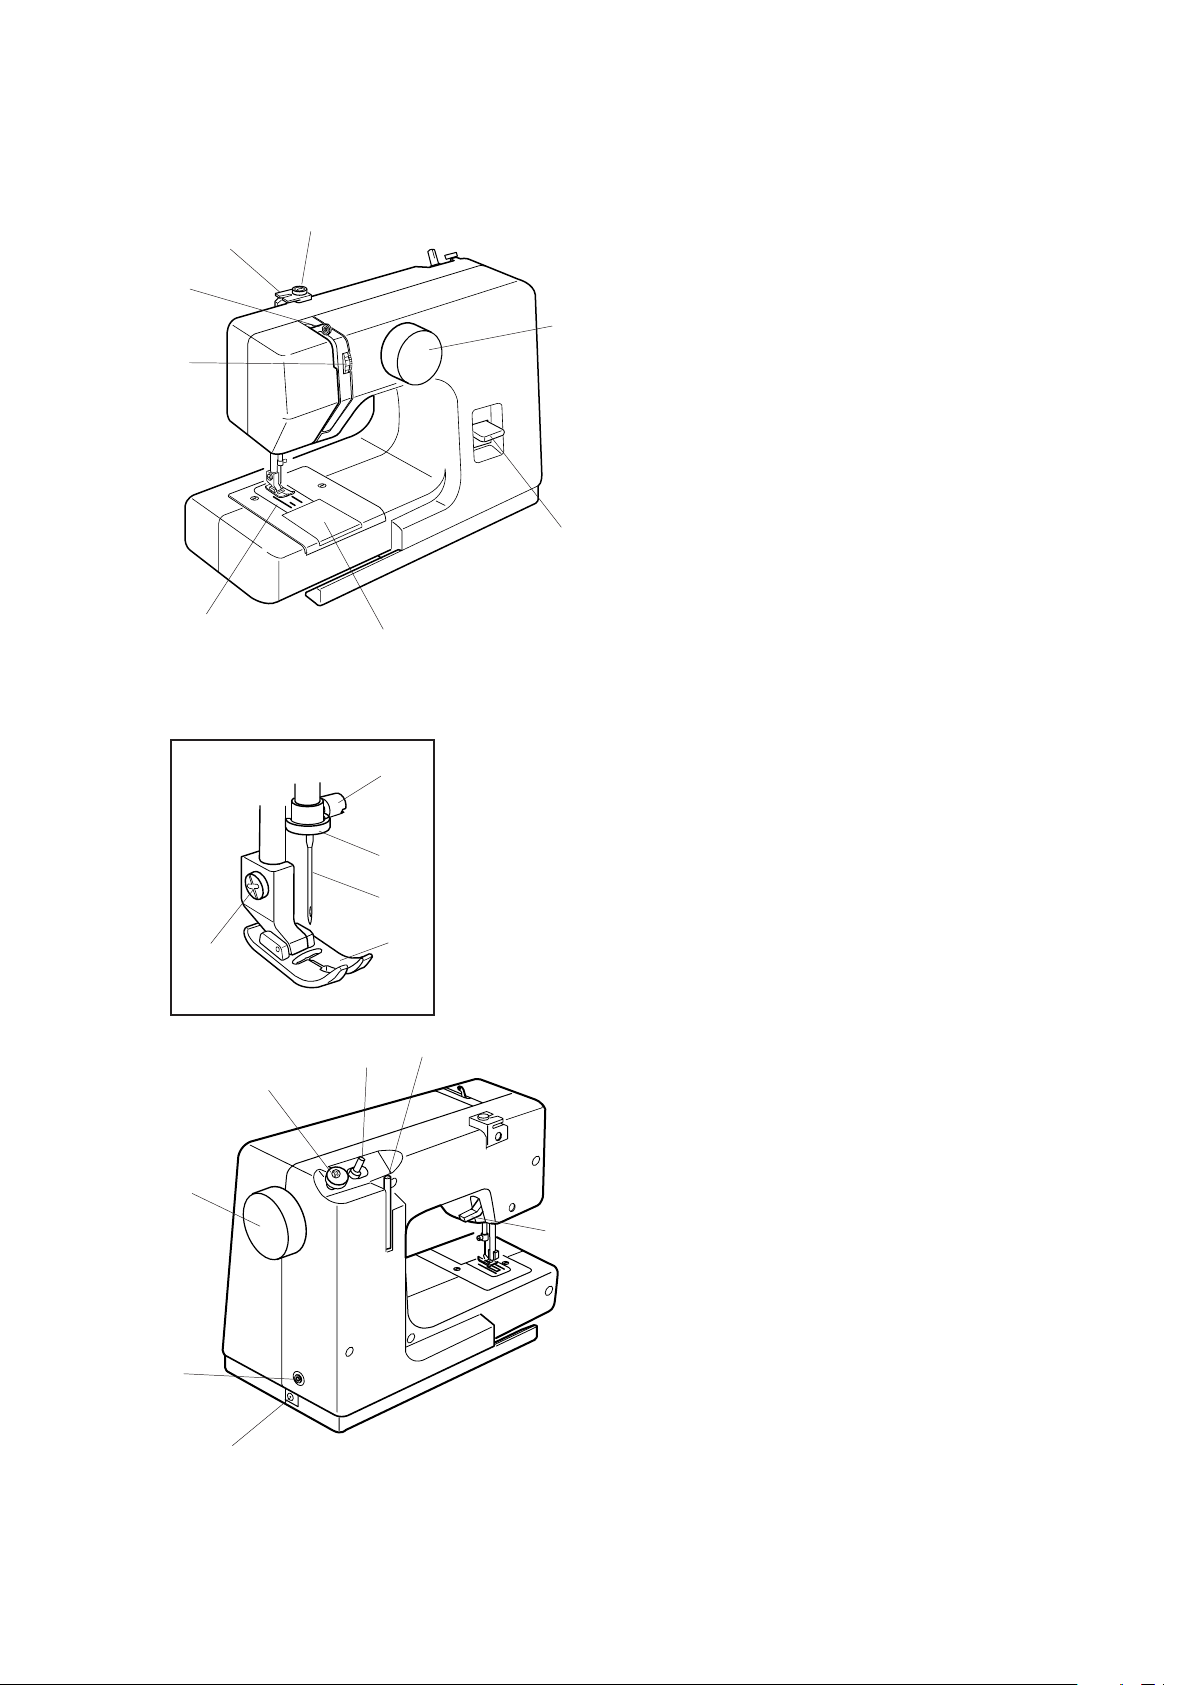
Names of Parts
i
q Bobbin winding tension disk
w Upper thread guide
e Thread take-up lever
r Thread tension dial
t Needle plate
y Hook cover plate
u
u Reverse stitch lever
i Stitch selector
o Needle Clamp screw
!0 Needle bar thread guide
!1 Needle
!2 Presser foot
!3 Setscrew
!4 Bobbin winder spindle
!5 Bobbin winder stopper
!6 Handwheel
!7
!6
!3
!8
!5
!4
!1
!2
!7 Foot switch jack
!8 AC adapter jack
!9 Presser foot lifter
@0 Spool pin
@0
!9
2
Page 3

PARTIE 1.
IDENTIFICATION DES PIÉCES
Identification des pièces
q Bobineuse a disque de tension
w Guide du fil supérieur
e Releveur tendeur du fil
r Molette de réglage de la tension du fil
t Plaque d'aiguille
y Couvercle à crochet
u Bouton de marche arrière
i Sélecteur de point
o Vis du pince l’aiguille
!0 Guide fil de la barre d’aiguille
!1 Aiguille
!2 Pied presseur
!3 Vis
!4 Enrouleur de la canette
TEIL 1.
TEILEBEZEICHNUNGEN
Bestandteile der Maschine
q
Spulerspannungsscheibe
w
Obere Fadenführung
e
Fadenhebel
r
Fadenspannungsregler
t
Stichplatte
y
Greiferplatte
u
Rückwärtsstich-Taste
i
Stichwahlregler
o
Nadelklemmschraube
!0
Nadelstangen-Fadenführung
!1
Nadel
!2
Nähfuß
!3
Stellschraube
!4
Aufspuler
!5 Butée d’enroulement de la canette
!6 Volant à main
!7 Fiche du pédale de interrupteur
!8 Fiche du Adapteur à C.A.
!9 Levier de relevage du pied presseur
@0 Porte-bobine
!5
Spuleranschlag
!6
Handrad
!7
Fußpedal-Anschlussbuchse
!8
Netzkabel
!9
Nähfußhebel
@0
Garnrollenstift
3
Page 4

Standard Accessories
r
q
w
t
t
e
y
q Bobbin
w Needle
e Threader
r AC adapter
t Foot switch
SECTION 2.
GETTING READY TO SEW
Connecting Machine to Power Supply
WARNING:
Do not use any AC adapter other than one
included in the standard accessory.
Before connecting the AC adapter, make
sure the voltage and frequency shown on the
AC adapter conform to your electrical power.
r
e
w
q
1. Insert the foot switch plug into the foot
switch jack.
2. Insert the AC adapter plug into the AC
adapter jack.
3. Insert the AC adapter into the power
outlet.
q Foot switch plug
w Foot switch jack
e AC adapter plug
r AC adapter Jack
t AC adapter
y Power outlet
Foot Switch
The foot switch turns on and off the power, it
does not control sewing speed.
Press on the foot switch to start the machine.
Release the foot switch to stop the machine.
4
Page 5
Accessoires standard
q Cannete
Standardzubehör und Aufbewahrung
q
Spule
w Aiguille
e Enfile-aiguille
r Adapteur à C.A.
t Pédale de interrupteur
PARTIE 2.
PRÉPAREZ-VOUS À COUDRE
Branchez la machine
AVERTISSEMENT:
N'utilisez aucun adapteur à C.A. autre qu'un inclus
dans l'accessoire standard.
Avant de brancher le cordon d’alimentation,
assurez-vous que la tension et la fréquence
indiquées sur la machine sont conformes à votre
installation électrique.
1. Ensuite, branchez la fiche de pédale de
interrupteur sur la prise de pédale de
interrupteur.
2. Branchez la fiche d’adapteur à C.A. sur la prise
d’adapteur à C.A.
3. Connectez l’adapteur à C.A. à la prise de courant.
q Fiche de pédale de interrupteur
w Prise de pédale de interrupteur
e Fiche d’adapteur à C.A.
r Prise d’dapteur à C.A.
t Adapteur à C.A.
y Prise de courant.
Pédale de interrupteur
Le pédale de interrupteur tourne en marche et en
arrêt le courant électrique, il ne commande pas la
vitesse de couture.
Serrez sur le pédale de interrupteur pour mettre en
marche la machine.
Libérez le pédale de interrupteur pour arrêter la
machine.
w
Nadel
e
Nadeleinfädler
r
Netzkabel
t
Fußpedal
TEIL 2.
VORBEREITUNGEN FÜR DAS NÄHEN
Anschluss der Maschine an den Netzstrom
WARNHINWEIS:
Benutzen Sie nur das Netzkabel, dasss als
Standardzubehör mit der Maschine geliefert wird.
Bitte achten Sie vor Anschließen des
Wechselstromadapters darauf, dass die auf dem
Wechselstromadapter angezeigte Spannung und
Frequenz mit denen Ihres Netzanschlusses
übereinstimmen.
1. Schließen Sie den Fußpedalstecker an die
Fußpedalbuchse an.
2. Setzen Sie den Stecker des Wechselstromadapters
in die Wechselstromadapterbuchse ein.
3. Stecken Sie den Wechselstromadapter in die
Steckdose.
Fußpedalstecker
q
Fußpedal-Anschlussbuchse
w
Netzkabelstecker
e
Netzkabelbuchse
r
Netzkabel
t
Steckdose
y
Fußpedal
Das Fußpedal dient zum Ein- und Ausschalten der
Stromversorgung, hat aber keinen Einfluss auf die
Nähgeschwindigkeit.
Treten Sie auf das Fußpedal, um die Maschine zu
starten.
Nehmen Sie den Fuß vom Pedal, um die Maschine
anzuhalten.
5
Page 6
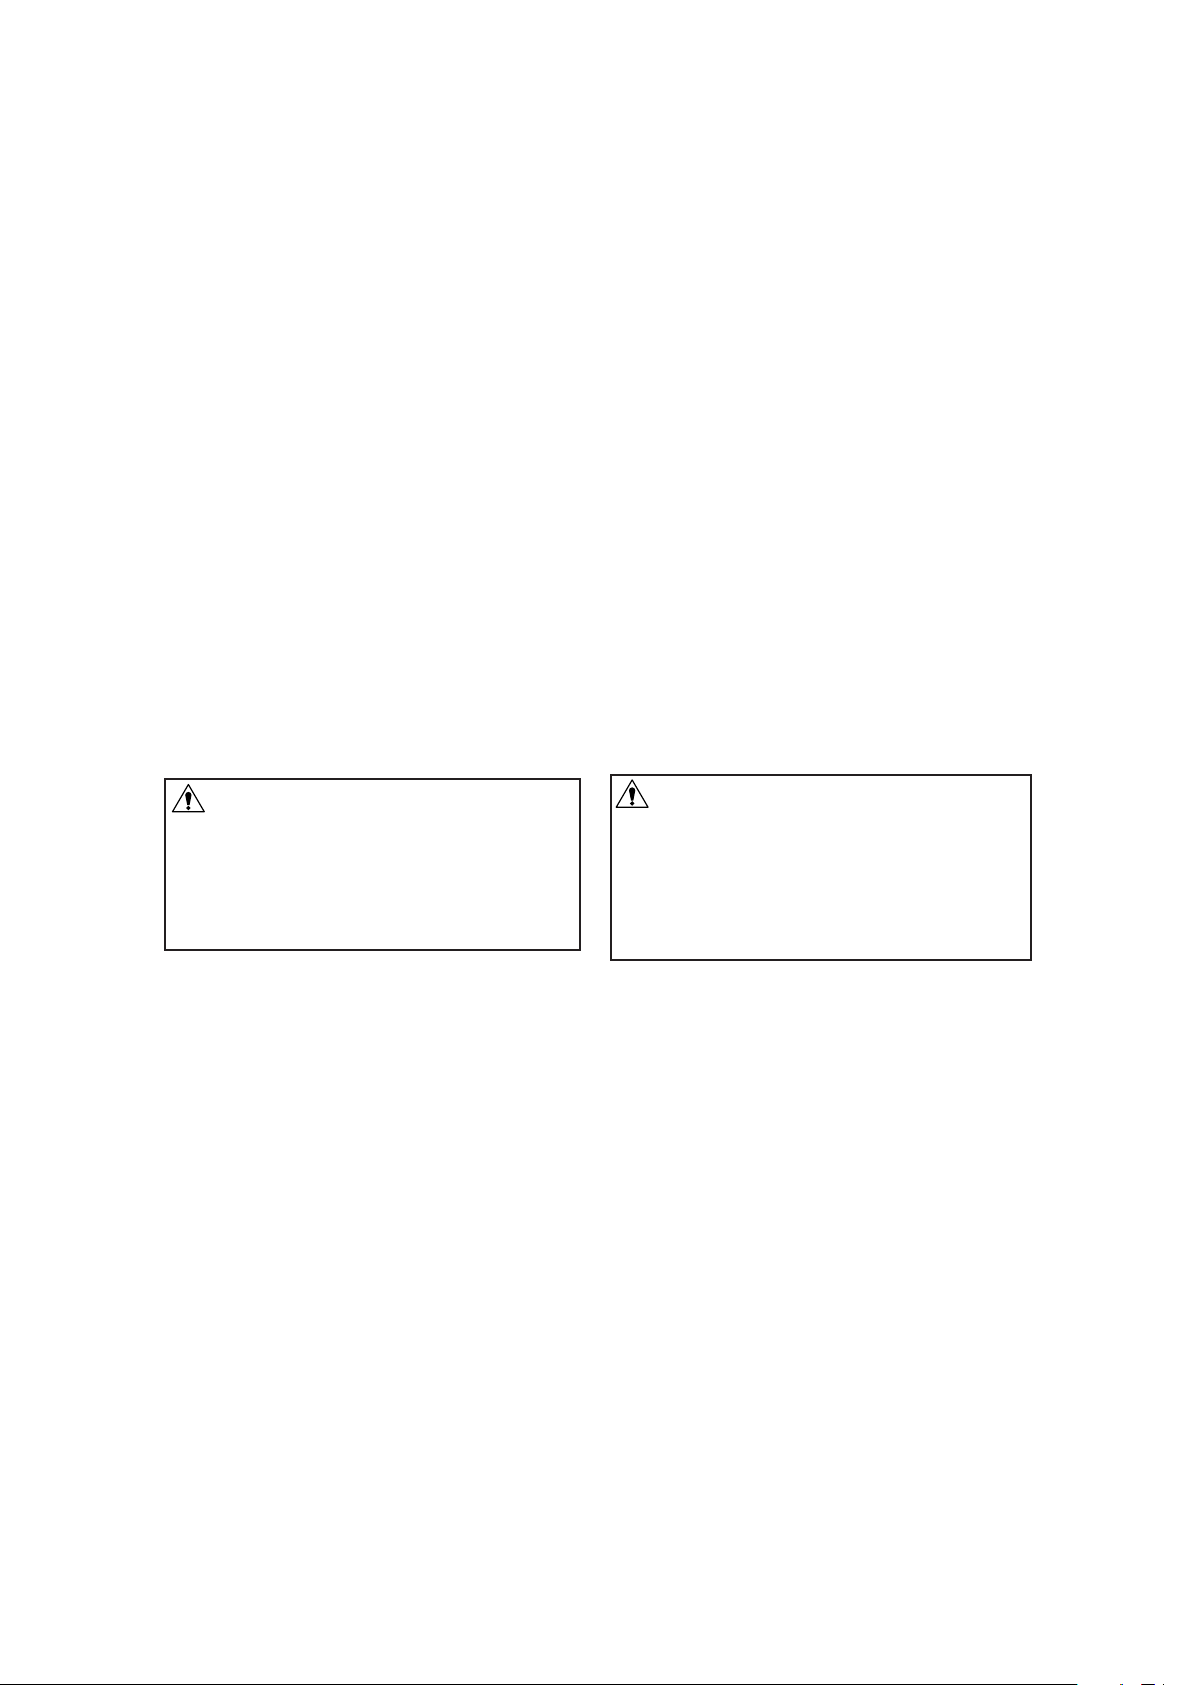
Presser Foot Lifter
q
e
w
The presser foot lifter raises and lowers the
presser foot.
You can raise it higher than the normal up
position to more easily place fabric under the
foot.
Remember to lower the presser foot onto the
fabric before starting to sew.
q Presser foot lifter
w Normal up position
e Highest position
Reverse Stitch Control
Press the reverse stitch control to sew in
reverse.
6
Page 7

Relève-pied presseur
Nähfußhebel
Le relève pied presseur remonte et abaisse le pied
presseur. Vous pouvez le remonter plus haut que la
position normale pour vous aider à passer un tissu
épais sous le pied.
Soyez sûr d'abaisser le pied sur le tissu avant de
commencer à coudre.
q Relève-pied presseur
w Position relevée normale
e Position relevée maximum
Der Nähfußhebel hebt und senkt den Nähfuß.
Sie können ihn über die normale Hochstellposition
hinaus anheben, um den Stoff leichter unter den
Nähfuß legen zu können.
Vergessen Sie nicht, den Nähfuß wieder auf den Stoff
zu senken, bevor Sie mit dem Nähen beginnen.
q
Nähfußhebel
w
Normale gehobene Stellung
e
Höchste Stellung
Bouton de marche arrière
La machine coud en marche arrière tant que l’on
appuie sur le bouton de marche arrière.
Rückwärt-Taste
Betätigen Sie die Rückwärt-Taste, um rückwärts zu
nähen.
7
Page 8
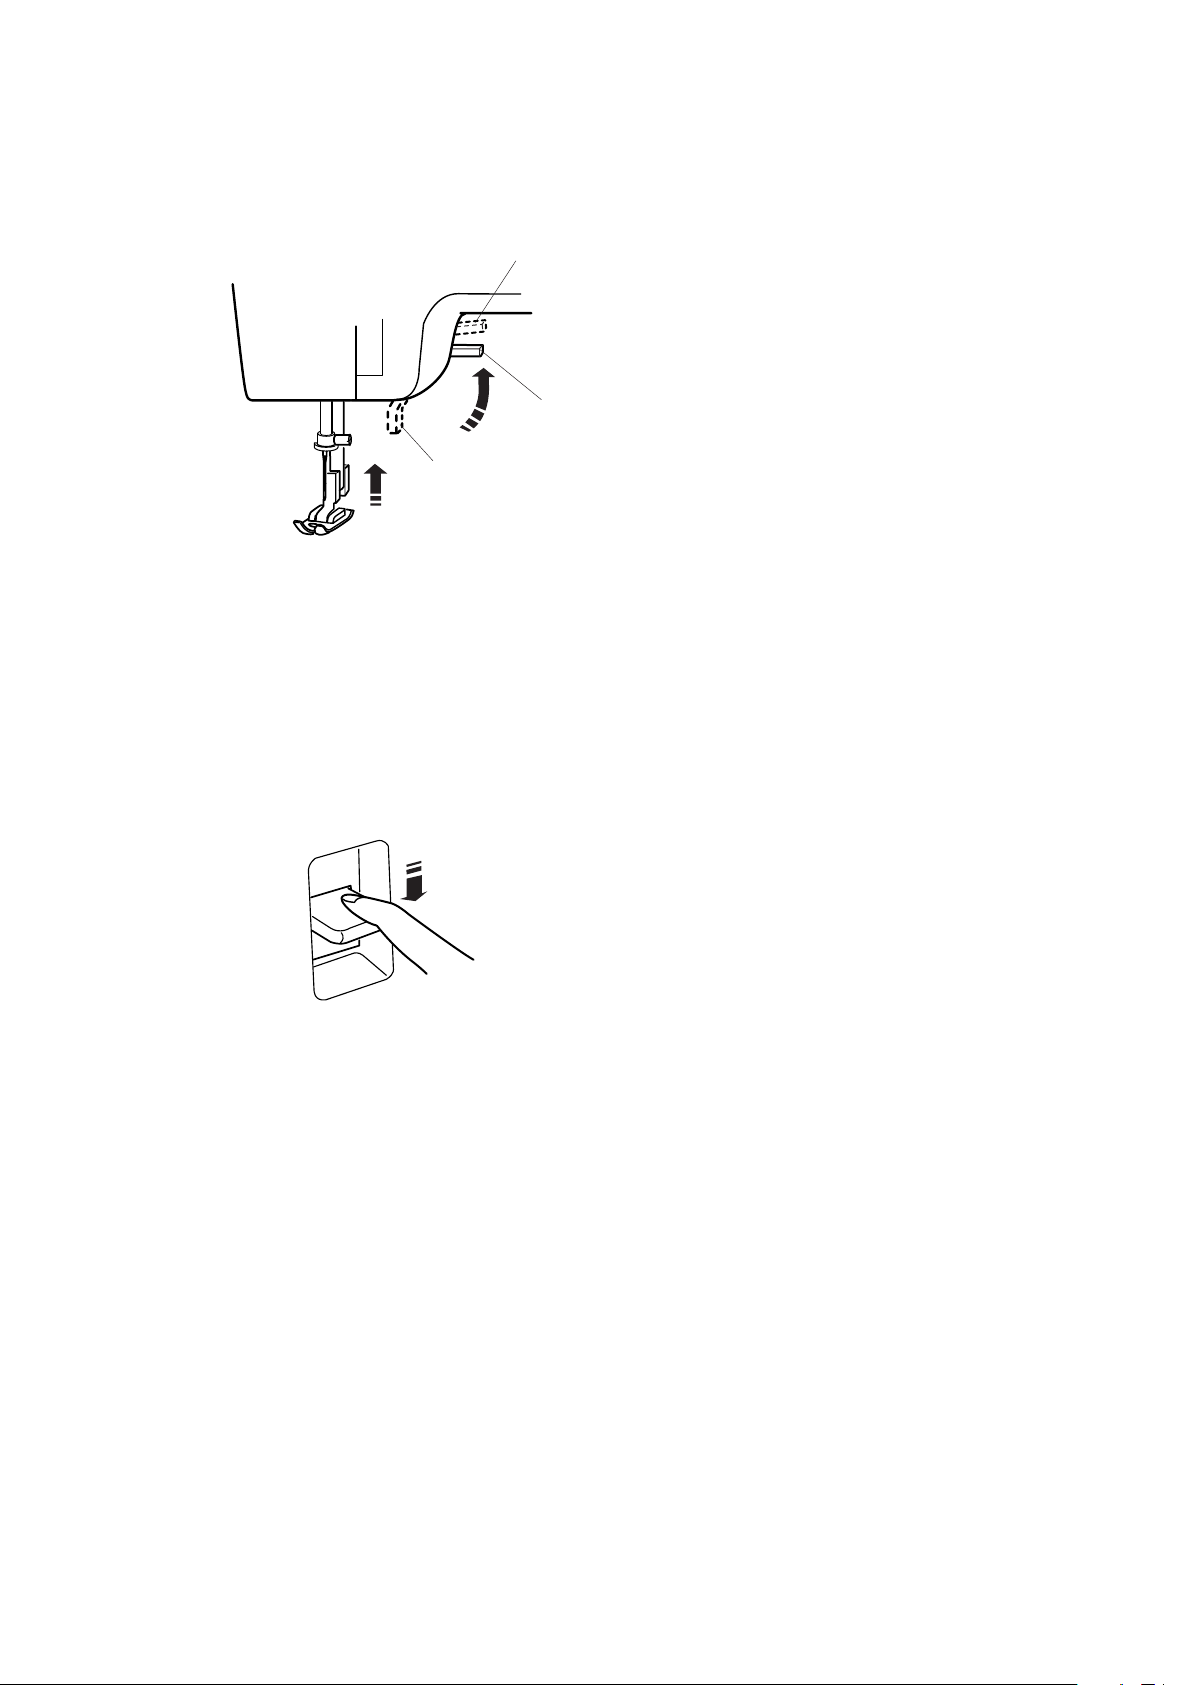
Bobbin Winding
q
q
w
e
The spool pin is stored in the back of the
sewing machine. Pull out the spool pin.
Place the spool of thread on it.
The end of the thread should be coming out
from the spool as shown.
q Spool pin
w End of the thread
e Spool of thread
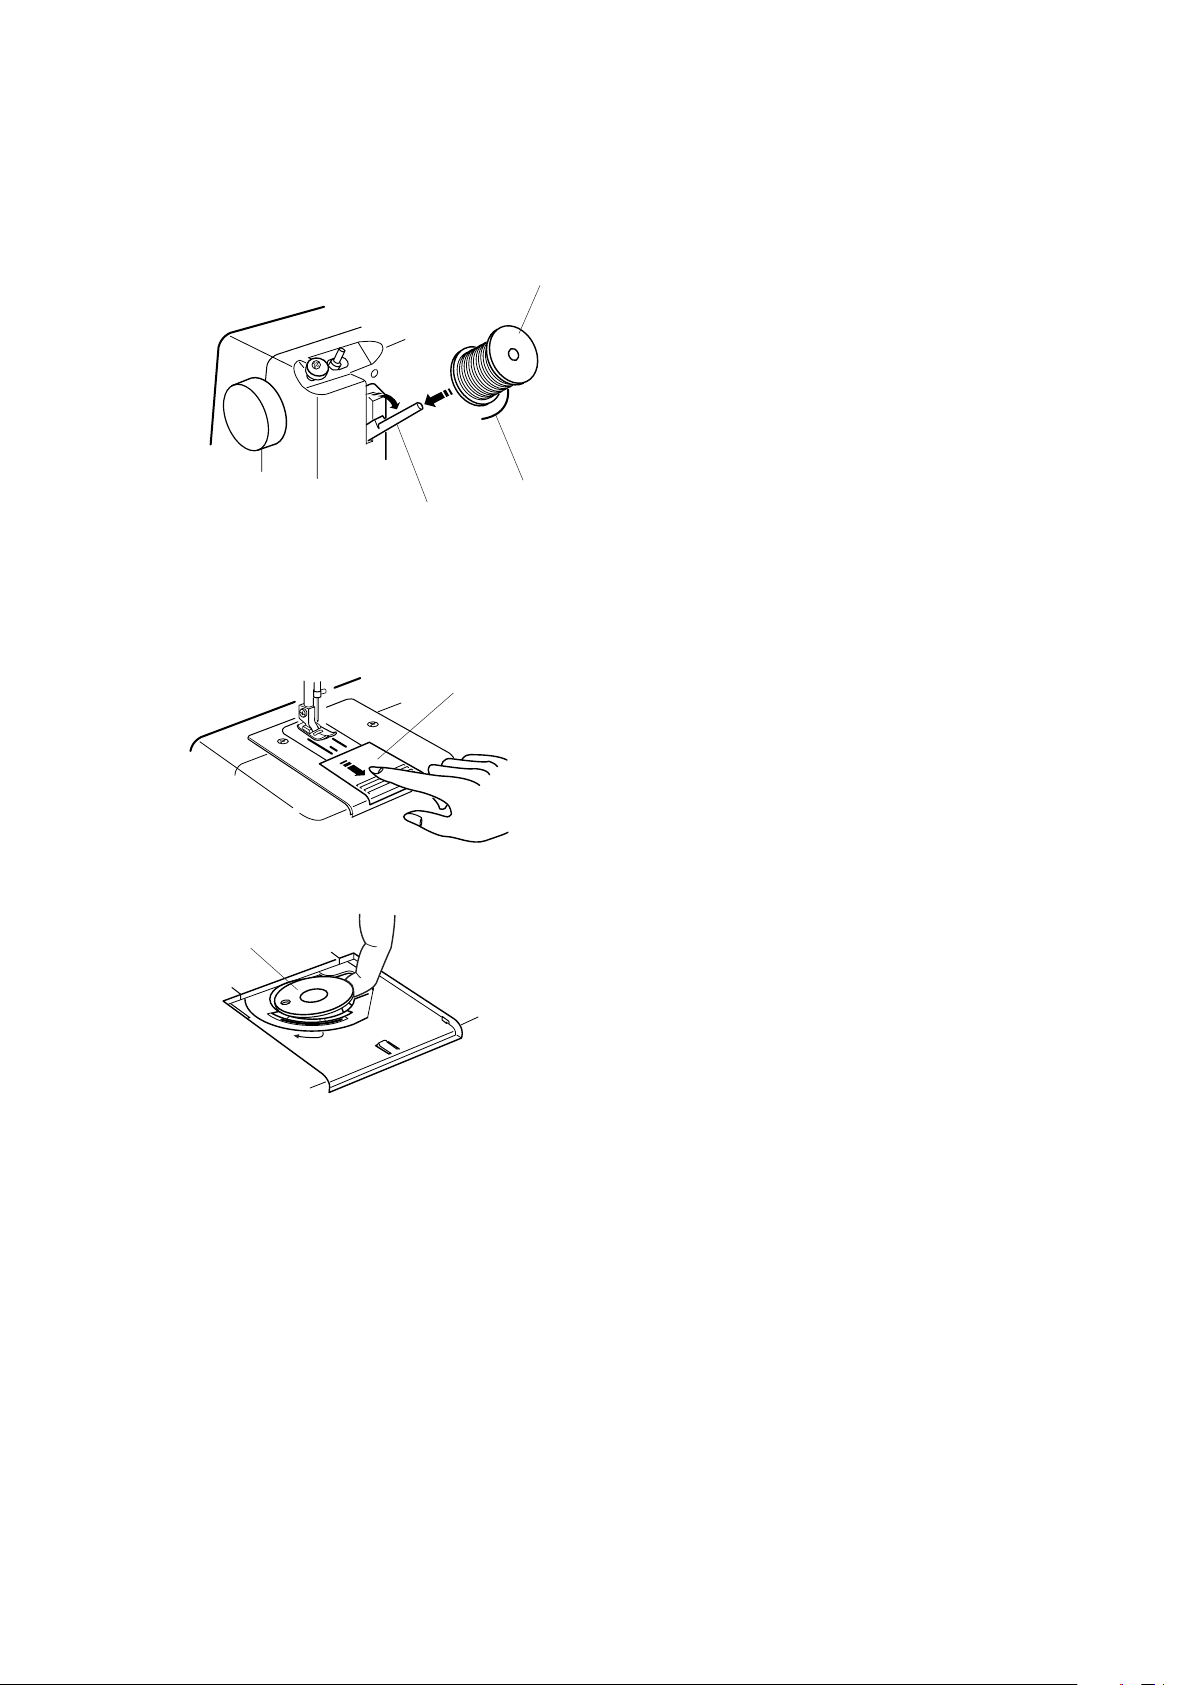
Removing the bobbin
Slide the hook cover plate toward you and
remove it.
q Hook cover plate
w
Lift out the bobbin from the bobbin holder.
w Bobbin
8
Page 9

Bobinage d’une canette de fil
Spulen
Le port-bobine est stockée dans le dos de la
machine. Soulevez le port-bobine. Placez la bobine
là-dessus. L'extrémité du fil vient dehors de la
bobine comme montrée.
q Port-bobine
w Extrémité du fil
e Bobine d’fil
Retrait de la canette
Faites glisser la plaque de recouvrement du
crochet vers vous, puis retirez celle-ci.
q Plaque de recouvrement du crochet
Der Garnrollenstift befindet sich an der Rückseite
der Maschine. Ziehen Sie die Spulspindel heraus.
Setzen Sie eine Garnrolle auf.
Das Fadenende sollte wie abgebildet von der
Spule laufen.
q
Garnrollenstift
w
Fadenende
e
Garnrolle
Entnahme der Spule
Schieben Sie die Greiferplatte auf sich zu und
entfernen Sie sie.
q
Greiferplatte
Soulevez la canette pour la sortir du porte-canette.
w Canette
Entnehmen Sie die Spule.
Spule
w
9
Page 10
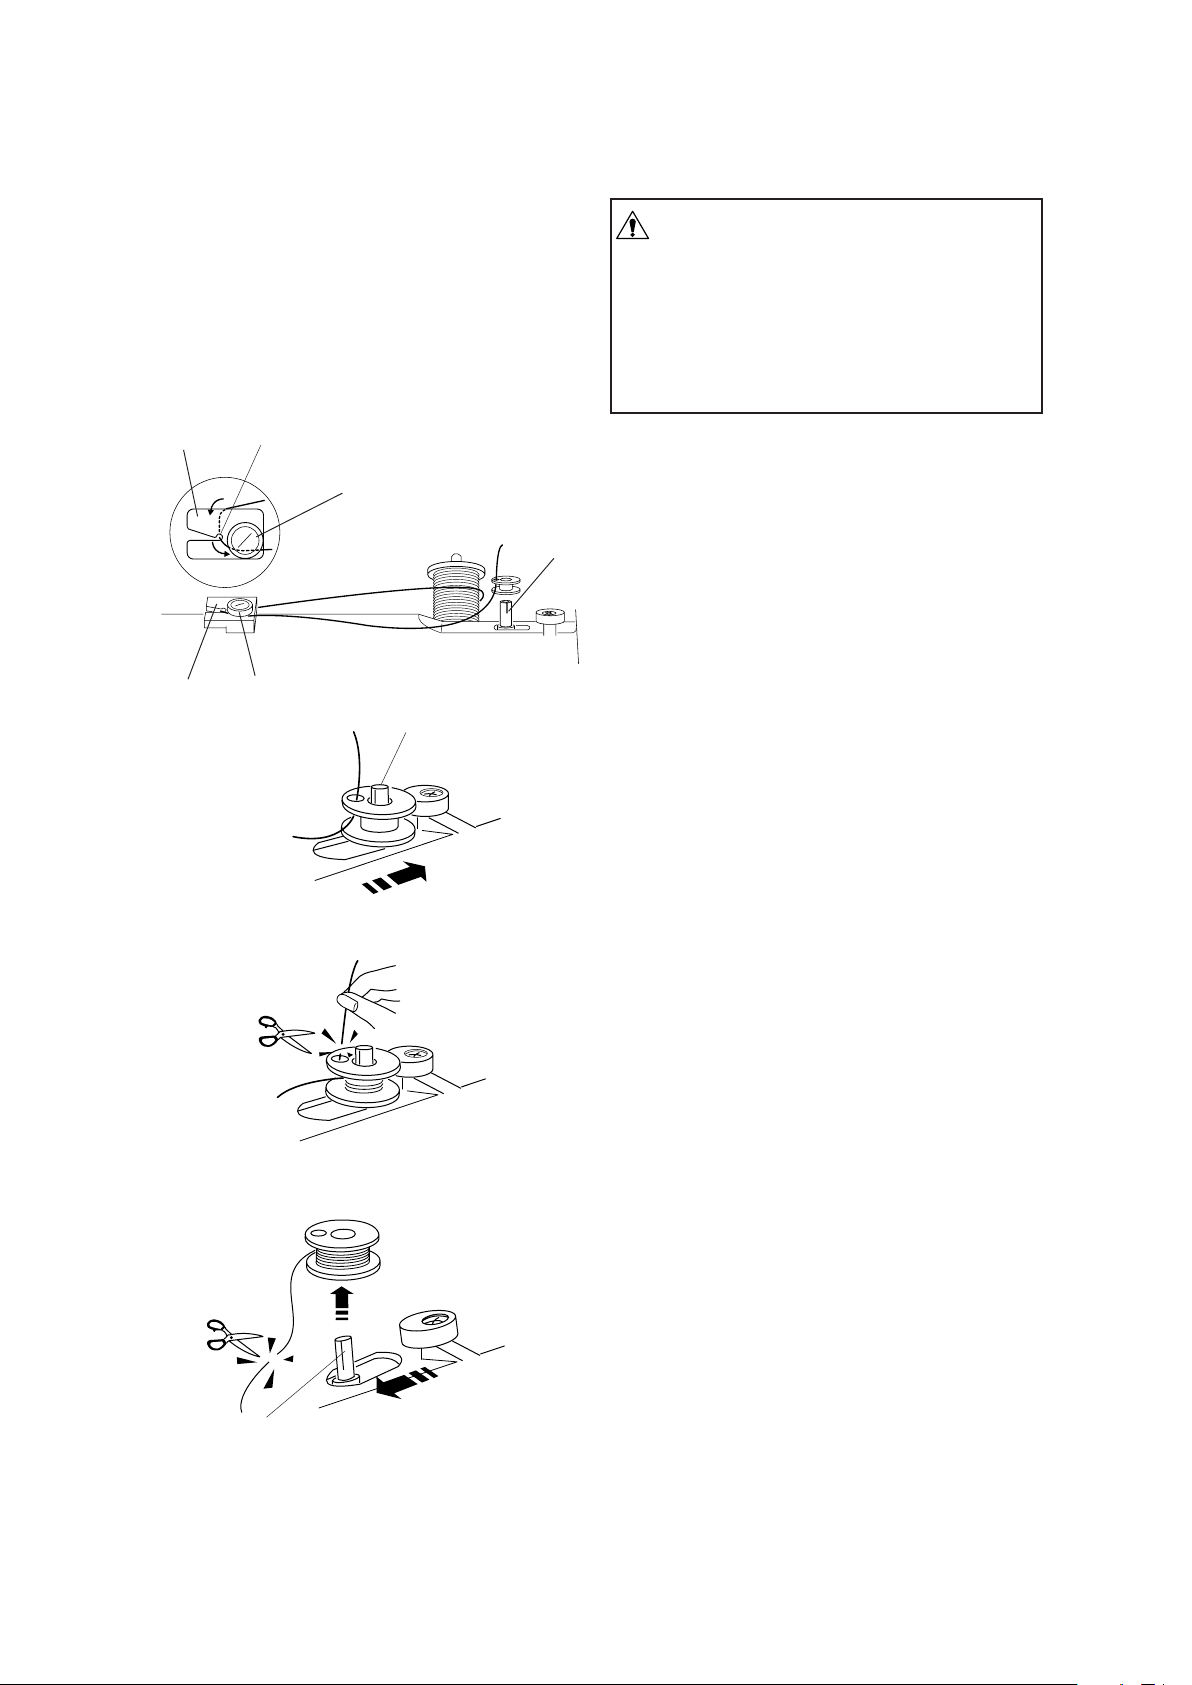
WARNING:
The needle and take-up lever moves up and
down while winding the bobbin.
Keep fingers away from all moving parts.
Special care is required around the sewing
machine needle.
To avoid possible injury, do not touch any
moving parts.
q
q
w
e
e
r
r
Draw thread from the spool.
Guide the thread around under the thread
guide. Draw out the thread from the notch and
pass it under the disk.
q Thread guide
w Notch
e Disk
Thread through the hole in the bobbin from the
inside to the outside.
Put the bobbin on the bobbin winder spindle.
r Bobbin winder spindle
Push the bobbin to the right.
With the free end of the thread held in your
hand, depress the foot switch.
After the bobbin has wound for about 10
seconds, stop the machine and cut the thread
close to the hole in the bobbin.
Depress the foot switch again.
When the bobbin is fully wound, it stops
automatically.
Return the bobbin winder to its original
position by moving the spindle to the left, and
cut the thread.
10
Page 11

AVERTISSEMENT:
L’aiguille et le levier releveur de fil se déplace en haut
et en bas tandis qu'enroulement de bobine.
Tenez les doigts à l’écart de toutes les pièces mobiles.
Il faut faire particulièrement attention dans la zone
proche de l’aiguille de la machine à coudre.
Pour éviter des dommages possibles, ne touchez
aucune pièce mobile.
WARNHINWEIS:
Während des Spulens bewegen sich Nadel und
Fadenhebel auf und ab.
Halten Sie Ihre Finger von allen beweglichen Teilen
fern.
Besondere Aufmerksamkeit ist im Bereich der
Nähnadel erforderlich.
Berühren Sie keine beweglichen Teile, um
Verletzungen zu vermeiden.
Tirez sur le fil de la bobine.
Passez le fil autour et sous du guide du fil. Tirez sur
le fil de l'entaille et passez le fil sous le disque.
q Guide du fil
w Entaille
e Disque
Passez le fil dans le trou de la canette, de l’intérieur.
Placez la canette sur l’axe de l’enrouleur de
canette.
r Axe de l’enrouleur de canette
Poussez la canette vers la droite.
En tenant l’extrémité libre du fil à la main, appuyez
sur la pédale de Interrupteur.
Arrêtez la machine après quelques tours pendant
environ 10 secondes, et coupez le fil au ras du trou
dans la canette.
Ziehen Sie Faden von der Garnrolle.
Führen Sie den Faden um und unter die
Fadenführung. Ziehen Sie den Faden von der Kerbe
und führen Sie ihn unter die Scheibe.
Fadenführung
q
Kerbe
w
Scheibe
e
Fädeln Sie den Faden von innen nach außen durch
das Loch an der Spule ein.
Stecken Sie die Spule auf den Aufspuler.
Aufspuler
r
Drücken Sie die Spule nach rechts.
Treten Sie auf das Fußpedal, während Sie das lose
Garnende mit der Hand festhalten.
Halten Sie den Spulvorgang nach 10 Sekunden an
und schneiden Sie den Faden nahe an der Spule ab.
Appuyez de nouveau sur la pédale de Interrupteur.
Lorsque la canette est pleine, elle s’arrête
automatiquement.
Remettez l’enrouleur de la canette à la position
d’origine, en poussant l’axe vers la gauche, et
coupez le fil.
Treten Sie erneut auf das Fußpedal.
Wenn die Spule voll ist, hält die Maschine
automatisch an.
Bringen Sie die Spulerspindel wieder in ihre
Ausgangsposition, indem Sie die Spindel nach links
bewegen. Schneiden Sie den Faden ab.
11
Page 12
q
e
w
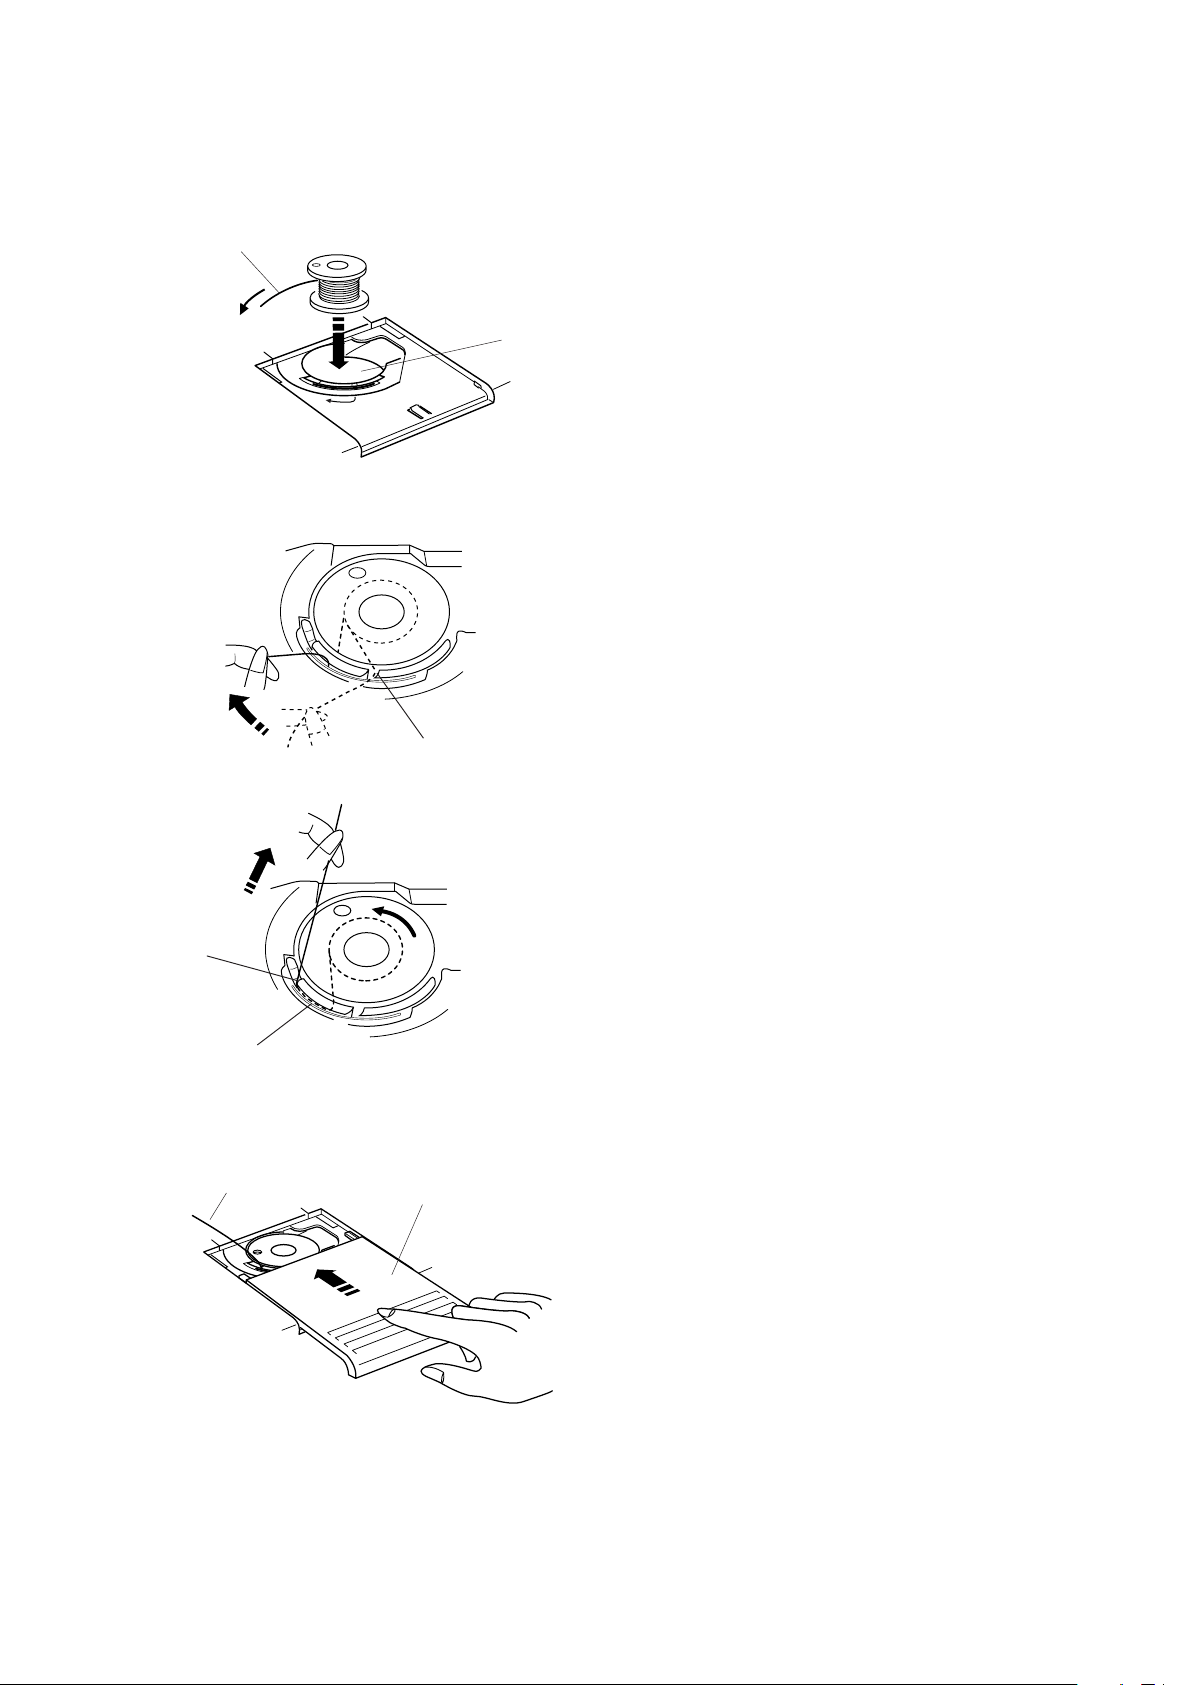
Inserting the bobbin
Place the bobbin in the bobbin holder with the
thread running off counterclockwise.
q Thread
w Bobbin holder
Guide the thread into the notch on the front of
the bobbin holder.
e Notch on the front
t
y
r
u
Draw the thread to the left, sliding it between
the tension spring blades.
r Spring blades
Continue to draw the thread lightly until the
thread slips into the notch on the side.
t Notch on the side
Pull out about 10 cm (4") of thread to the rear.
Reattach the hook cover plate.
y Thread
u Hook cover
12
Page 13

Introduction de la canette
Einsetzen der Spule
Placez la canette dans le porte-canette avec le fil
tournant dans le sens contraire des aiguilles d’une
montre.
q Fil
w Porte-canette
Guidez le fil dans l’encoche située sur le devant
du porte-canette.
e Encoche sur le devant
Tirez le fil vers la gauche, en le faisant glisser entre
les lames de tension.
r Lames de tension
Legen Sie die Spule in den Spulenhalter ein, wobei
das Garn gegen den Uhrzeigersinn abläuft.
Garn
q
Spulenhalter
w
Führen Sie den Faden durch die Kerbe an der
Vorderseite des Spulenhalters.
Kerbe an der Vorderseite
e
Ziehen Sie den Faden nach links und schieben Sie
ihn zwischen die Spannfederscheiben.
Spannfederscheiben
r
Continuez à tirer sur le fil avec précaution jusqu’à
ce qu’il s’engage dans l’encoche latérale.
t Encoche sur le côté
Tirez environ 10 cm de fil vers l’arrière.
Réinstallez la plaque de recouvrement du crochet.
y Fil
u Plaque de recouvrement du crochet
Ziehen Sie den Faden vorsichtig weiter, bis er in der
Seitenkerbe zu liegen kommt.
t
Kerbe an der Seite
Ziehen Sie ca. 10 cm des Fadens nach hinten heraus.
Bringen Sie die Greiferplatte wieder an.
Garn
y
u
Greiferabdeckung
13
Page 14

e
Threading the Machine
WARNING:
Disconnect the AC adapter from the machine
before threading.
* Place a spool on the spool pin, with thread
coming off as shown.
* Raise the thread take-up lever to its highest
position by turning the handwheel counterclockwise.
* Raise the presser foot.
q
Draw the end of thread around under the
thread guide.
q Thread guide
t
r
w
e
t
w
r
y
While holding the thread with your right hand
near the spool, use your left hand to draw
the end of the thread down along the right
channel and around the bottom of the guide
plate.
w Guide plate
Firmly draw the thread up along the left
channel.
Pass the thread through the eye of the take-up
lever from right to left.
e Take-up lever
Draw the thread down along the left channel
and pass it behind the needle bar thread
guide from the left.
r Needle bar thread guide
Insert the threader loop through the needle
eye from behind.
Pass the thread end through the threader loop.
t Needle eye
y Threader loop
Pull the threader loop out from the needle eye.
Remove the thread end from the threader
loop.
14
Page 15

Enfilage de la machine
Einfädeln der Maschine
AVERTISSEMENT:
Démontez l'adapteur à C.A. de la machine avant
l’enfiletage.
* Placez la bobine de fil sur le porte-bobine, avec
le fil sortant de la bobine comme illustré.
* Faites monter le levier releveur tendeur de fil le
plus haut possible en tournant le volant à main
en sens antihoraire.
* Relevez le relève presseur.
Tenez le fil de l’aiguille et passez-le sous le guide fil.
q Guide fil
WARNHINWEIS:
Trennen Sie das Netzkabel von der Maschine,
bevor Sie mit dem Einfädeln beginnen.
* Setzen Sie eine Garnrolle auf den
Garnrollenhalter und achten Sie darauf, dass der
Faden wie abgebildet abgewickelt wird.
* Bringen Sie den Fadenhebel durch Drehen des
Handrads gegen den Uhrzeigersinn in seine
höchste Stellung.
* Stellen Sie den Nähfuß hoch.
Führen Sie das Fadenende um und unter die
Fadenführung.
Fadenführung
q
En retenant le fil près de la bobine, tirez-le vers le
bas, et, de la droite vers la gauche, autour la plaque
du guide fil.
w Plaque du guide fil
Tirez fermement le fil vers le haut.
Passez le fil par l'oeil du levier releveur de fil.
e Levier releveur de fil
Par la droite, glissez le fil derrière le guide situé sur
la barre d’aiguille.
r Guide situé sur la barre d’aiguille
Passez la boucle d’enfile-aiguille dans l'oeil
d'aiguille par derrière.
Passez l'extrémité de fil par la boucle d’enfileaiguille.
t Oeil d'aiguille
y Boucle d’enfile-aiguille
Tirez la boucle d’enfile-aiguille dehors de l'oeil
d'aiguille. Enlevez l'extrémité de fil de la boucle
d’enfile-aiguille.
Halten Sie den Faden mit der rechten Hand nahe an
der Spule fest und ziehen Sie das Fadenende mit
der linken Hand im rechten Kanal entlang um die
Unterseite der Fadenführungsplatte.
Fadenführungsplatte
w
Ziehen Sie den Faden fest durch den linken Kanal
nach oben.
Führen Sie den Faden von rechts nach links durch
das Öhr des Fadenhebels.
e
Fadenhebel
Ziehen Sie den Faden nach unten durch den linken
Kanal und schieben Sie ihn von links hinter die
Nadelstangen-Fadenführung.
r
Nadelstangen-Fadenführung
Führen Sie die Schlinge des Einfädlers von hinten
durch das Nadelöhr.
Führen Sie das Fadenende durch die Schlinge des
Einfädlers.
Nadelöhr
t
Schlinge des Einfädlers
y
Ziehen Sie die Schlinge des Einfädlers durch das
Nadelöhr.
Ziehen Sie das Fadenende durch die Schlinge des
Einfädlers.
15
Page 16

q
Drawing up Bobbin Thread
Raise the presser foot. Hold the needle thread
lightly with your left hand and rotate the
handwheel counterclockwise, toward you, for
one complete turn.
q Needle thread
w
Bring the bobbin thread up by pulling the
needle thread.
w Bobbin thread
q
Pull both threads 4˝ to 6˝ (10 to 15 cm) under
and behind the presser foot.
16
Page 17

Comment faire monter le fil de la canette
Heraufholen des Unterfadens
Faites monter le pied presseur. Tenez le fil de
l’aiguille souplement de la main gauche, et tournez
le volant d’un tour complet en sens antihoraire.
q Fil de l’aiguille
Faites monter le fil de canette en tirant le fil de
l’aiguille vers le haut.
w Fil de canette
Stellen Sie den Nähfuß hoch. Halten Sie den
Oberfaden leicht in der linken Hand fest und drehen
Sie das Handrad einmal ganz gegen den
Uhrzeigersinn auf sich zu.
q
Oberfaden
Holen Sie den Unterfaden durch Hochziehen des
Oberfadens herauf.
w
Unterfaden
Tirez les deux fils vers l’arrière sous le pied
presseur, sur une longueur de 10 cm à 15 cm
(4” à 6”).
Ziehen Sie beide Fäden 10 bis 15 cm unter und hinter
den Nähfuß.
17
Page 18

w
r
q
e
Changing Needle
WARNING:
Disconnect the AC adapter from the machine
before changing the needle.
Raise the needle by turning the handwheel
and lower the presser foot.
Loosen the needle clamp screw by turning it
counterclockwise.
Remove the needle from the needle clamp.
Insert a new needle into the needle clamp with
the flat side to the rear. When inserting the
needle into the needle clamp, push it up as far
as it goes.
Tighten the needle clamp screw firmly by
turning it clockwise.
q Needle clamp screw
w Needle clamp
e Flat side
To check if a needle is bent, place the flat side
of the needle onto something flat (e.g needle
plate or glass). The gap between the needle
and the flat surface should be consistent.
r Gap
Never use a bent or blunt needle.
A damaged needle can cause permanent
snags or runs in knits, fine silks and silk-like
fabrics.
Selecting Needle and Thread
Fabric
Light
to
Medium
Weight
Organdy,
Georgette, Linen,
Cotton, Percale
NOTES:
This machine is equipped with the size #14
(90) needles only.
Extra thick or tight-woven fabrics cannot be
sewn with this machine.
Do not attempt to sew if the machine does not
feed the material or the needle does not
penetrate into the fabric.
18
Thread Needle
50 Silk
50 Cotton
50 to 90 Synthetic
11 (65)
or
14 (90)
Page 19

Changer l’aiguille
AVERTISSEMENT:
Démontez l'adapteur à C.A. de la machine avant
changer l’aiguille.
Auswechseln der Nadel
WARNHINWEIS:
Trennen Sie das Netzkabel von der Maschine, bevor
Sie mit dem Auswechseln der Nadel beginnen.
Faites monter l’aiguille et abaissez le pied presseur.
Desserrez la vis de blocage de l’aiguille en la
tournant en sens antihoraire. Retirez l’aiguille de
son support.
Insérez la nouvelle auguille dans le support, avec le
méplat vers l’arrière.
Lorsque vous mettez en place une nouvelle aiguille,
poussez-la à fond vers le haut dans le support.
Serrez fermement la vis de blocage en la tournant
en sens horaire.
q Vis de blocage de l’aiguille
w Support de l’aiguille
e Côté plat
Pour vérifier la qualité d’une aiguille, placez le
méplat de l’aiguille sur une surface plate (le
couvercle de la navette, un morceau de verre.).
L’espace entre l’aiguille et la surface doit être
constant.
r Espace
N’utilisez jamais une auguille tordue ou émoussée.
Drehen Sie das Handrad, um die Nadel anzuheben,
und senken Sie den Nähfuß.
Lösen Sie die Nadelklemmschraube, indem Sie sie
gegen den Uhrzeigersinn drehen.
Nehmen Sie die Nadel aus der Klemme.
Setzen Sie eine neue Nadel in die Nadelklemme 2
ein. Dabei muss die flache Seite nach hinten zeigen.
Achten Sie beim Einsetzen der Nadel in die
Nadelklemme darauf, dass sie bis zum Anschlag
hochgedrückt wird.
Ziehen Sie die Nadelklemmschraube fest an, indem
Sie sie im Uhrzeigersinn drehen.
q
Nadelklemmschraube
w
Nadelklemme
e
Flache Seite
Um festzustellen, ob eine Nadel verbogen ist, legen
Sie die flache Seite der Nadel auf einen flachen
Gegenstand (z.B. eine Stichplatte oder ein Stück
Glas). Der Abstand zwischen der Nadel und der
flachen Stelle sollte durchgehend gleich sein.
Lücke
r
Verwenden Sie niemals eine verbogene oder
stumpfe Nadel.
Eine schadhafte Nadel kann auf Maschenware,
feinen Seiden und seidenartigen Stoffen
permanente Laufmaschen verursachen.
Choisir les aigilles et les fils
Tissu
Léger
et
Moyen
REMARQUES:
Cette machine est équipée de la taille # 14(90) des
aiguilles seulement.
Les tissus très épais ou serré-tissés ne peuvent pas
être cousus avec cette machine.
N'essayez pas de coudre si la machine n'alimente pas
le matériel ou l'aiguille ne pénètre pas dans le tissu.
Organdi,
Georgette,
Lainage, Coton,
Percale
Fil
50 Soie
50 Coton
50 to 90 Synthétique
Aiguille
11 (65)
ou
14 (90)
Auswahl von Nadel und Faden
Stoff
Leicht
bis
Mittel
Gewicht
HINWEISE:
Diese Maschine ist nur mit Nadeln Nr. 14 (90)
ausgestattet.
Mit dieser Maschine können keine dicken oder dicht
gewebten Stoffe genäht werden.
Versuchen Sie nicht, mit der Maschine zu nähen,
wenn sich der Stoff nicht führen lässt oder die Nadel
nicht durch den Stoff sticht.
Organza,
Georgette,
Leinen,
Baumwolle,
Perkal
Garn
50 Seide
50 Baumwolle
50 bis 90
Synthetik
11 (65)
14 (90)
19
Nadel
oder
Page 20

Adjusting the Needle Thread Tension
q
w
e
t
r
q
w
y
e
Balanced tension
The ideal straight stitch has threads locked
between two layers of fabric, as illustrated.
Turn the dial to adjust the tension.
q To loosen
w To tighten
The tension requires adjustment depending on:
- stiffness and thickness of the fabric
- number of fabric layers
- type of stitch
e Needle thread (Top thread)
r Bobbin thread (Bottom thread)
t Right side (Top side) of fabric
y Wrong side (Bottom side) of fabric
Tension is too tight
If the bobbin thread shows through on the right
side (top side) of the fabric, turn the dial to a
lower number to loosen the needle thread
tension.
q Bobbin thread (Bottom thread)
w Right side (Top side) of fabric
e To loosen
q
w
q
Tension is too loose
If the needle thread shows through on the
wrong side (bottom side) of the fabric, turn the
dial to a higher number to tighten the needle
thread tension.
q Needle thread (Top thread)
w Wrong side (Bottom side) of fabric
e
e To tighten
For an ideal zigzag stitch, the bobbin thread
does not show
on the right side (Top side) of the fabric and
needle thread shows slightly on the wrong side
(Bottom side) of the fabric.
q Needle thread (Top thread)
20
Page 21

Réglage de la tension du fil de l’aiguille
Einstellen der Oberfadenspannung
Tension correcte
Le point droit parfait doit présenter des fils croisés
entre les deux épaisseurs de tissu, comme illustré à
gauche.
Lors du réglage de la tension du fil de l’aiguille,
plus le numéro est grand, plus le fil de I’aiguille sera
tendu.
q Pour réduire
w Pour augmenter
Le résultat dépend:
- de la raideur et de l’epaisseur du tissu
- du tissu du nombre d’épaisseurs de tissu
- du type de point employé
e Fil de l’aiguille (Fil supérieur)
r Fil de la canette (Fil inférieur)
t Endroit du tissu
y Envers du tissu
Si la tension est trop élevée
Le fil de la canette apparaît sur le côté endroit du
tissu et produit des bosses. Tournez la molette vers
le haut pour relâcher la tension du fil de l’aiguille.
q Fil de la canette (Fil inférieur)
w Endroit du tissu
e Pour rréduire
Ausgeglichene Fadenspannung
Beim idealen Geradstich werden die Fäden
zwischen zwei Stofflagen wie dargestellt
miteinander verschlungen.
Die Fadenspannung wird durch Drehen der
Stellscheibe eingestellt.
Lockern
q
Straffen
w
Faktoren, die sich auf die Einstellung der
Fadenspannung auswirken:
- Steifheit und Dicke des Stoffes
- Anzahl der Stofflagen
- Art des Stiches
Oberfaden
e
Unterfaden
r
Rechte (obere) Stoffseite
t
Linke (untere) Stoffseite
y
Spannung ist zu stark
Wenn der Unterfaden auf der rechten (oberen)
Stoffseite erscheint, muss die Oberfadenspannung
durch Verstellen der Stellscheibe auf eine kleinere
Zahl gelockert werden.
Unterfaden
q
Rechte (obere) Stoffseite
w
Lockern
e
Si la tension est trop faible
Le fil de l’aiguille apparaît àl’envers du tissu, et
produit des bosses. Tournez la molette vers le bas
pour augmenter la tension du fil de l’aiguille.
q Fil de l’aiguille (Fil du supérieur)
w Envers du tissu
e Pour augmenter
Lorsqu’un point zig-zag est effectué correctement,
le fil de la canette ne parait jamais sur le côté
endroit du tissu et le fil de l’aiguille apparaît à peine
sur le côté envers du tissu.
q Fil de l’aiguille (Fil du supérieur)
Spannung ist zu locker
Wenn der Oberfaden auf der linken (unteren)
Stoffseite erscheint, muss die Oberfadenspannung
durch Verstellen der Stellscheibe auf eine höhere
Zahl eingestellt werden.
Oberfaden
q
Linke (untere) Stoffseite
w
Straffen
e
Beim idealen Zickzackstich ist der Unterfaden auf
der rechten (oberen) Stoffseite überhaupt nicht und
der Oberfaden auf der linken (unteren) Stoffseite
nur leicht zu sehen.
Oberfaden
q
21
Page 22

q
Stitch Selector
w
Raise the needle above the fabric.
A
B
H
G
C
D
F
E
BCD
A
EFGH
CAUTION:
To avoid needle or fabric damage, make sure
the needle is up and out of the fabric while
selecting a stitch.
Turn the dial to select the desired pattern by
setting the symbol letter at the setting mark.
q Symbol letter
w Setting mark
NOTE:
You can fine-tune the stitch length of the
straight stitches (patterns A to D) by setting the
dial between the symbol letters.
22
Page 23

Sélecteur de point
Stichwahlregler
Levez l’aiguille au-dessaus du tissu.
ATTENTION:
Afin d’éviter d’endommager l’aiguille ou le
tissu,assurez-vous que l’aiguille est toujours
remontée à sa position la plus élevée et hors du
tissu, avant de régler le sélecteur de point.
Tournez le cadran pour choisir le motif désiré en
plaçant la lettre de symbole à la marque de réglage.
q Repère de réglage
w Sélecteur de point
REMARQUE:
Vous pouvez ajuster la longueur des points droits
(motifs A à D) en plaçant le cadran entre les lettres
de symbole.
BCD
A
EFGH
Stellen Sie die Nadel mit dem Handrad nach oben.
VORSICHT:
Vermeiden Sie eine Beschädigung von Nadel oder
Stoff, indem Sie sicherstellen, dass die Nadel bei
der Auswahl eines Stiches hochgestellt ist.
Drehen Sie das Wöhlrad, um das gewünschte
Stichmuster auszuwählen. Der Buchstabe für den
Stich muss dabei auf die Einstellmarke
ausgerichtet werden.
q
Buchstabe
w
Einstellmarke
HINWEIS:
Die Stichlänge der Geradstiche (Muster A bis D)
kann verändert werden, indem Sie die
Einstellmarke auf die Bereiche zwischen den
Buchstaben ausrichten.
BCD
A
EFGH
23
Page 24

SECTION 3. BASIC SEWING
Straight Stitch
Stitch selector: A – D, E
Needle thread tension: 2 to 6
NOTE:
The stitch length of pattern E is the same as
that of C.
Starting to sew
Raise the presser foot and position the fabric
on the needle plate.
Lower the needle to the point where you
want to start.
Lower the presser foot and pull the threads
toward the back.
Depress the foot switch. Gently guide the
fabric, letting the fabric feed naturally.
Securing a seam
To fasten the beginning of a seam, press the
reverse stitch control and sew several
reverse stitches first.
Then start sewing forward.
Finishing sewing
To fasten the ends of a seam, press the
reverse stitch control and sew several
reverse stitches.
Raise the presser foot.
Remove the fabric and cut the threads.
24
Page 25

PARTIE 3. COUTURE DE BASE
TEIL 3. EINFACHES NÄHEN
Point droit
Selecteur de point: A – D, E
Tension du fil de l’aiguille: 2 à 6
REMARQUE:
La longueur de point du modèle E est identique que
celle de C.
Début d’une couture
Levez le pied presseur et placez le tissu sur la
plaque d’aiguille.
Abaissez l’aiguille à l’endroit où vous souhaitez
commencer la couture.
Abaissez le pied presseur et tirez les fils vers
l’arrière.
Appuyez doucement sur la pédale de interrupteur.
Guidez le tissu le long de la ligne de repère en
laissant le tissu avancer naturellement.
Pour arrêter le couture
Pour arrêter le commencement d'une couture,
appuyez sur le bouton de marche arrière et piquez
plusieurs points en arrière.
Commencez alors à coudre en avant.
Geradstich
Stichwahlregler: A – D, E
Oberfadenspannung: 2 bis 6
HINWEIS:
Die Länge des Stiches E entspricht der Länge des
Stiches C.
So beginnen Sie zu nähen
Stellen Sie den Nähfußhebel hoch und legen Sie
den Stoff auf die Stichplatte.
Senken Sie die Nadel dort auf den Stoff, wo Sie
beginnen wollen.
Senken Sie den Nähfuß und ziehen Sie die Fäden
nach hinten.
Treten Sie auf das Fußpedal. Führen Sie den Stoff
vorsichtig und lassen Sie den Stoff dabei frei
laufen.
Vernähen einer Naht
Drücken Sie zum Vernähen des Nahtanfangs die
Rückwärtstaste und nähen Sie mehrere
Rückwärtsstiche.
Nähen Sie dann vorwärts.
Finitíon d’une couture
Pour arrêter l’extrémité des coutures, appuyez sur le
bouton de marche arrière et piquez plusieurs points
en arrière.
Relevez le pied presseur.
Retirez le tissu et coupez les fils.
Fertigstellen der Naht
Drücken Sie zum Vernähen des Nahtendes die
Rückwärtstaste und nähen Sie mehrere
Rückwärtsstiche.
Stellen Sie den Nähfuß hoch.
Nehmen Sie den Stoff von der Maschine und
schneiden Sie die Fäden ab.
25
Page 26

Turning a Square Corner
Stop stitching at the corner of the fabric.
Lower the needle by turning the handwheel
counterclockwise.
Raise the presser foot and turn the fabric
counterclockwise 90°.
Lower the presser foot and begin stitching in
the new direction.
Basic Zigzag
Stitch selector: F, G, H
Needle thread tension: 2 to 5
The zigzag stitch is one of the most common
and versatile stitches.
It can be a utility stitch for hemming, overcasting, mending and darning.
It can also be used for appliques or as a
decorative stitch.
Select a pattern, which is suited for your
sewing needs from the 3 patterns available.
Overcasting with zigzag stitch
Stitch selector: G, H
Needle thread tension: 2 to 5
Finish raw edge of the fabric to prevent it
from ravelling.
Start overcasting about 1/8”(0.3 cm) inside
the raw edge of the fabric.
The stitches on the right should just clear the
fabric edge.
26
Page 27

Pour coudre un angle droit
Ändern der Nährichtung um 90º
Arrêtez de coudre lorsque le bord du tissu arrive au
lignes du guide-virage.
Abaissez l’aiguille en tournant le volant dans le sens
inverse des aiguilles d’une montre.
Levez le pied presseur et tournez le tissu dans le
sens inverse des aiguilles d’une montre à 90°.
Abaissez le pied presseur et commencez la couture
dans la nouvelle direction.
Hören Sie an der Stoffecke zu nähen auf.
Stellen Sie die Nadel durch Drehen des Handrades
gegen den Uhrzeiger nach oben.
Stellen Sie den Nähfuß hoch und drehen Sie den
Stoff um 90° gegen den Uhrzeigersinn.
Senken Sie den Nähfuß und nähen Sie in der
neuen Richtung weiter.
Zig-zag simple
Sélecteur de point: F, G, H
Tension du fil de l’aiguille: 2 à 5
Le zig-zag est un point très commun et aux usages
multiples.
II est utile pour les ourlets, ainsi que pour surfiler et
repriser.
On peut également l’utiliser pour les appliques ou
comme point décoratif.
Choisissez un motif, qui convient à vos besoins de
couture des 3 motifs disponibles.
Surfilage avec le zig-zag
Sélecteur de point: G, H
Tension du fil de aiguille: 2 à 5
Finissez le bord cru du tissu pour l'empêcher
d'effilocher.
Commencez à obscurcir au sujet de 1/8” (0.3 cm) à
l'intérieur du bord cru du tissu.
Le point du côté droit devrait juste clair le bord de
tissu.
Zickzack-Grundstich
Stichwahlregler: F, G, H
Oberfadenspannung: 2 bis 5
Der Zickzackstich ist einer der nützlichsten und
vielseitigsten Stiche.
Er kann als Nutzstich zum Nähen von
Blindsäumen, Ausbessern und Stopfen benutzt
werden.
Es eignet sich auch für Applikationen oder als
Zierstich.
Wählen Sie für Ihre jeweilige Näharbeit eines der
drei verfügbaren Muster aus.
Versäubern mit Zickzackstich
Stichwahlregler: G, H
Oberfadenspannung: 2 bis 5
Umsäumen Sie die Schnittkante des Stoffes, damit
er nicht ausfranst.
Setzen Sie den Überwendlichstich etwa 0,3 cm von
der Innenseite der Schnittkante des Stoffes an.
Die Stiche auf der rechten Seite müssen knapp
neben der Stoffkante verlaufen.
27
Page 28

SECTION 4.
CARE OF YOUR MACHINE
Cleaning the Bobbin Holder
CAUTION:
Disconnect the AC adapter jack before
cleaning the machine.
Do not dismantle the machine other than as
explained in this section.
w
e
q
q
Remove the hook cover plate by sliding it
toward you.
q Hook cover plate
Take out the bobbin.
w Bobbin
Brush out dust and lint with a brush or a
vacuum cleaner.
e Brush
Insert the bobbin and attach the hook cover
plate.
NOTES:
Do not store the machine in a high-humidity
area, near a heat radiator, or in direct sunlight.
Clean the outside of the machine with a soft
cloth and mild soap.
28
Page 29

PARTIE 4.
ENTRETIEN DE VOTRE MACHINE
TEIL 4.
PFLEGE IHRER NÄHMASCHINE
Nettoyage du porte-canette
ATTENTION:
Débranchez la prise d'adapteur à C.A. avant de
nettoyer la machine.
Ne démontez rien d’autre que ce qui est décrit dans
ce chapitre.
Retirez le couvercle à crochet en le glissant vers
vous.
q Couvercle à crochet
Retirez la canette.
w Cannete
Reinigen des Spulenhalters
VORSICHT:
Trennen Sie das Netzkabel von der Maschine,
bevor Sie mit der Reinigung beginnen.
Bauen Sie die Maschine nur so weit auseinander,
wie es in diesem Abschnitt beschrieben wird.
Entfernen Sie die Greiferplatte, indem Sie sie auf
sich zu schieben.
q
Greiferplatte
Nehmen Sie die Spule heraus.
Spule
w
Enlerez la poussière et la charpie avec une
brosse ou un aspirateur.
e Brosse
Remettez la canette et la plaque.
REMARQUES:
N’entreposez pas la machine dans un endroit
humide, près d’un radiateur de chauffage central ou
exposée à la lumière directe du soleil.
Nettoyez l’extérieur avec un chiffon et du savon
doux.
Entfernen Sie Staub und Fusseln mit einer Bürste.
Bürste
e
Setzen Sie die Spule ein und bringen Sie die
Greiferplatte wieder an.
HINWEISE:
Lagern Sie die Maschine nicht in Bereichen mit
hoher Luftfeuchtigkeit, in der Nähe eines
Heizkörpers oder an Orten mit direkter
Sonneneinstrahlung.
Reinigen Sie das Gehäuse der Maschine mit
einem weichen Tuch.
29
Page 30

Troubleshooting
Condition Cause Reference
The needle
thread breaks.
The bobbin
thread breaks.
The needle
breaks.
Skipped stitches
1. The needle thread is not threaded properly.
2. The needle thread tension is too tight.
3. The needle is bent or blunt.
4. The needle is incorrectly inserted.
5. The needle thread and the bobbin thread are not set
properly under the presser foot at the beginning of sewing.
6. The threads are not drawn to the rear after finishing
sewing.
7. The thread is too heavy, or too fine for the needle.
1. The bobbin thread is not threaded properly in the bobbin
holder.
2. Lint has collected in the bobbin holder.
3. The bobbin is damaged and doesn't turn smoothly.
1. The needle is incorrectly inserted.
2. The needle is bent or blunt.
3. The needle clamp screw is loose.
4. The needle thread tension is too tight.
5. The threads are not drawn to the rear after the finishing
sewing.
6. The needle is too fine for the fabric being sewn.
1. The needle is incorrectly inserted.
2. The needle is bent or blunt.
3. The needle and/or threads are not suitable for the work
being sewn.
4. The needle thread is not threaded properly.
5. The wrong needle is used.
Page 14
Page 20
Page 18
Page 18
Page 24
Page 24
Page 18
Page 12
Page 28
Change the
bobbin
Page 18
Page 18
Page 18
Page 20
Page 24
Page 18
Page 18
Page 18
Page 18
Page 14
Change the
needle
Seam puckering
The fabric is not
fed.
The machine
does not run.
The machine is
noisy.
1. The needle thread tension is too tight.
2. The needle thread is not threaded properly.
3. The needle is too heavy for the fabric being sewn.
1. The fabric is too thick.
1. The AC adapter or foot switch jack is not connected
properly.
2. A thread is caught in the bobbin holder.
1. There is thread caught in the bobbin holder.
2. Lint has built up in the bobbin holder.
30
Page 20
Page 14
Page 18
Page 18
Page 4
Page 28
Page 28
Page 28
Page 31

En cas de problème
Problème
Le fil d’aiguille se
casse.
Le fil de canette se
casse.
L’aiguille se casse.
Points manqués.
Causes possibles
1. Le fil d’aiguille n’est pas passé correctement.
2. La tension du fil d’aiguille est trop forte.
3. L’aiguille est tordue ou émoussée.
4. L’aiguille est mal installée.
5. Le fil d’aiguille et celui de la canette ne sont pas passés
correctement sous le pied presseur au debut de la couture.
6. On ne tire pas le tissu vers l’arrière à la fin de la couture.
7. Le fil est trop épais ou trop fin pour l’aiguille.
1. Le fil de canette n’est pas passé correctement dans le
porte-canette.
2. Des fibres sont accumulées dans le porte-canette.
3. La canette est abîmée et fonctionne mal.
1. L’aiguille n’est pas installée correctement.
2. L’aiguille est tordue ou émoussée.
3. La vis de blocage de l’aiguille est desserrée.
4. La tension du fil de l’aiguille est trop elevée.
5. Le tissu n’est pas tiré vers l’arrière à la fin de la couture.
6. L’aiguille est trop fine pour le tissu employé.
1. L’aiguille n’est pas installee correctement.
2. L’aiguille est tordue ou émoussée.
3. L’aiguille et/ou le fil ne conviennent pas pour le tissu.
4. Le fil de l’aiguille n’est pas passé correctement.
6. Vous utilisez une mauvaise aiguille
Reference
Page 15
Page 21
Page 19
Page 19
Page 25
Page 25
Page 19
Page 13
Page 29
Changez la canette.
Page 19
Page 19
Page 19
Page 21
Page 25
Page 19
Page 19
Page 19
Page 19
Page 15
Changez l’aiguille
La couture fronce.
Le tissu n’avance
pas régulièrement.
La machine ne
marche pas.
Le fonctionnement
est bruyant.
1. La tension du fil de l’aiguille est trop élevée.
2. Le fil de l’aiguille ou celui de la canette n’est pas passé
correctement.
3. L’aiguille est trop grosse pour le tissu cousu.
1. Le tissu est trop épais.
1. La machine n’est pas branchée.
2. Un fil est coincé dans la piste du porte-canette.
1. Du fil est bloqué dans la piste du porte-canette.
2. De la charpie est accumulée dans le support de la canette ou
dans le porte-canette.
Page 21
Page 15
Page 19
Page 19
Page 5
Page 29
Page 29
Page 29
31
Page 32

Problemlösungen
Problem
Oberfaden reißt
Unterfaden reißt
Nadel bricht
Ausgelassene
Stiche
Ursache
1. Oberfaden nicht richtig eingefädelt.
2. Oberfadenspannung zu stark.
3. Nadel verbogen oder stumpf.
4. Nadel falsch eingesetzt. 5. Ober- und Unterfaden bei
Nähbeginn nicht unter Nähfuß gelegt.
6. Die Fäden wurden nach dem Nähen nicht nach hinten gezogen.
7. Faden zu dick oder dünn für die Nadel.
1. Unterfaden falsch in Spule gefädelt.
2. Fusseln im Spulenhalter.
3. Spule beschädigt und läuft nicht reibungslos.
1. Nadel falsch eingesetzt.
2. Nadel verbogen oder stumpf.
3. Nadelklemmschraube lose.
4. Oberfadenspannung zu stark.
5. Die Fäden wurden nach dem Nähen nicht nach hinten gezogen.
6. Nadel zu fein für den genähten Stoff.
1. Nadel falsch eingesetzt.
2. Nadel verbogen oder stumpf.
3. Nadel bzw. Fäden nicht für die genähte Arbeit geeignet.
4. Oberfaden nicht richtig eingefädelt.
5. Falsche Nadel verwendet.
Seite
Seite 15
Seite 21
Seite 19
Seite 19
Seite 25
Seite 25
Seite 19
Seite 13
Seite 29
Spule wechseln
Seite 19
Seite 19
Seite 19
Seite 21
Seite 25
Seite 19
Seite 19
Seite 19
Seite 19
Seite 15
Nadel auswechseln.
Naht kräuselt sich
Stoff wird nicht
einwandfrei
transportiert
Maschine läuft
nicht.
Maschine läuft
geräuschvoll
1. Oberfadenspannung zu stark.
2. Oberfaden nicht richtig eingefädelt.
3. Nadel zu stark für den genähten Stoff.
1. Stoff ist zu dick.
1. Wechselstromadapter oder Fußpedal nicht richtig
angeschlossen.
2. Faden hat sich im Spulenhalter verfangen.
1. Faden hat sich im Spulenhalter verfangen.
2. Fusseln im Spulenhalter.
Seite 21
Seite 15
Seite 19
Seite 19
Seite 5
Seite 29
Seite 29
Seite 29
32
Page 33

IMPORTANT SAFETY INSTRUCTIONS
This sewing machine is not a toy. Do not allow children to play with this machine.
The machine is not intended for use by infants or mentally disabled persons without proper
supervision.
When using an electrical appliance, basic safety precautions should always be followed, including
the followings:
Read all instructions before using this appliance.
DANGER— To reduce the risk of electric shock:
1. The sewing machine should never be left unattended when plugged in. Always unplug this
sewing machine from the electric outlet immediately after using and before cleaning.
WARNING— To reduce the risk of burns, fire, electric shock, or injury to persons:
1. Do not allow to be used as a toy. Close attention is necessary when this sewing machine is
used by or near children.
2. Use this sewing machine only for its intended use as described in this instruction book.
3. Never operate this sewing machine if it has a damaged cord or plug, if it is not working
properly, if it has been dropped or damaged, or dropped into water.
Return this sewing machine to the nearest authorized dealers or service center for
examination, repair, electrical or mechanical adjustment.
4. Never operate the sewing machine with any air opening blocked. Keep ventilation openings
of this sewing machine free from accumulation of lint, dust and loose cloth.
5. Never drop or insert any object into any opening.
6. Do not use outdoors.
7. Do not operate where aerosol (spray) products are being used or where oxygen is being
administered.
8. Do not unplug by pulling on cord. To unplug, grasp the plug, not the cord.
9. Keep fingers away from all moving parts. Special care is required around the sewing
machine needle.
10. Do not use bent needles.
11. Do not pull or push fabric while stitching. It may deflect the needle causing it to break.
12. Disconnect the AC adapter when making any adjustment in the needle area, such as
threading the needle, changing the needle, threading the bobbin, and the like.
13. Always unplug this sewing machine from the electrical outlet when making any adjustments
mentioned in this instruction book.
SAVE THESE INSTRUCTIONS
Please note that on disposal, this product must be safely recycled in accordance with relevant
National legislation relating to electrical/electronic products. If in doubt please contact your retailer
for guidance. (European Union only)
The design and specifications are subject to change without a prior notice.
Page 34

CONSIGNES DE SÉCURITÉ IMPORTANTES
Cette machine à coudre n'est pas un jouet. Ne permettez pas aux enfants de jouer avec cette
machine.
La machine n'est pas prévue à l'usage des enfants en bas âge ou des personnes mentalement
handicapées sans surveillance appropriée.
Pour utiliser un appareil électrique, il faut toujours respecter les consignes de sécurité
fondamentales, notamment les consignes suivantes : Avant d’utiliser cet appareil, lisez toutes ces
instructions.
DANGER : Pour réduire les risques d’électrocution.
1. Il ne faut jamais laisser un appareil sans surveillance lorsqu’il est branché. Il faut toujours
débrancher cette machine à coudre de la prise électrique murale, après son utilisation ou
avant de la nettoyer.
AVERTISSEMENT : Afin de réduire les risques de brûlures, incendie, électrocution
ou blessures corporelles:
1. Il ne faut pas se servir de la machine comme d’un jouet. Il faut faire très attention lorsque
cette machine à coudre est utilisée par des enfants ou à proximité de ceux-ci.
2. Utilisez cette machine uniquement pour les utilisations prévues, telles qu’elles sont décrites
dans le manuel de la machine à coudre.
3. Il ne faut jamais faire fonctionner la machine à coudre si le câble ou la prise est endommagé,
si elle ne fonctionne pas correctement, si on l’a laissé tomber, si elle est endommagée ou si
elle est tombée dans l’eau.
Retournez la machine à coudre au magasin ou au centre de réparation le plus proche, afin de
la faire examiner, réparer ou d’effectuer des réglages électriques ou mécaniques.
4. Il ne faut jamais faire fonctionner cette machine si les orifices d’aération sont colmatés. Tenir
les orifices d’aération de cette machine à coudre exempts de toute accumu lation de
peluches, poussières et de morceaux de chiffon.
5. Il ne faut jamais laisser tomber ou introduire d’objet dans les orifices.
6. Il ne faut pas l’utiliser en plein air.
7. Il ne faut pas la faire fonctionner si des produits en aérosol (vaporisateur) sont utilisés où s’il
y a une installation d’oxygène.
8. Ne débranchez pas la machine en tirant sur le câble. Pour la débrancher, saisissez la prise,
et non pas le câble électrique.
9. Tenez les doigts à l’écart de toutes les pièces mobiles. Il faut faire particulièrement attention
dans la zone proche de l’aiguille de la machine à coudre.
10. N’utilisez pas d’aiguilles courbées.
11. Ne tirez ni ne poussez pas le tissu pendant les piqûres. Cela risque de faire dévier l’aiguille et
provoquer sa cassure.
12. Avant de faire des réglages dans la zone de l’aiguille tels qu’enfiler l’aiguille, changer l’aiguille,
enfiler etc., Débranchez la prise d'adapteur à C.A.
13. Débranchez toujours la machine à coudre de la douille électrique avant de réglages mentionnés
dans le manuel de la machine à coudre.
CONSERVEZ CETTE NOTICE
La conception et les caractéristiques sont sujettes au changement sans une communication préalable préalable.
Selon la législation nationale ce produit doit être recycl en toute sécurit en accord avec les
règles prévues pour les appareils électriques ou électroniques.
En cas de doute contactez votre revendeur de machine coudre.
(union européenne seulement)
Page 35

WICHTIGE SICHERHEITSHINWEISE
Diese Nähmaschine ist kein Spielzeug. Erlauben Sie Kindern nicht, mit der Maschine zu spielen.
Die Maschine darf nicht ohne geeignete Aufsicht von Kindern oder geistig behinderten Personen
benutzt werden.
Bei der Benutzung eines elektrischen Geräts sind stets grundlegende Sicherheitsvorkehrungen
zu treffen, darunter:
Lesen Sie vor Inbetriebnahme dieses Geräts alle Anweisungen.
GEFAHR – Befolgen Sie die nachstehenden Anweisungen, um das Risiko eines
Stromschlags zu mindern:
1.Lassen Sie die Nähmaschine niemals unbeaufsichtigt, wenn sie an den Netzstrom
angeschlossen ist. Trennen Sie die Maschine nach der Benutzung und vor der Reinigung immer
vom Netzstrom.
WARNUNG – Mindern Sie wie folgt das Risiko von Verbrennungen, Bränden, Stromschlag
oder Personenverletzungen:
1. Lassen Sie es nicht zu, dass die Maschine als Spielzeug benutzt wird. Bei der Benutzung
dieser Nähmaschine durch Kinder oder in der Nähe von Kindern ist größte Aufmerksamkeit
erforderlich.
2. Benutzen Sie diese Maschine ausschließlich für den in diesen Gebrauchsanleitungen
beschriebenen Zweck.
3. Nehmen Sie diese Nähmaschine niemals in Betrieb, wenn Ihr Stromkabel oder Netzstecker
schadhaft ist, wenn sie nicht vorschriftsmäßig funktioniert, wenn sie fallen gelassen oder
beschädigt wurde oder in Wasser gefallen ist.
Bringen Sie diese Nähmaschine zwecks Überprüfung, Reparaturen und elektrischer und
mechanischer Einstellungen zu Ihrem nächsten Händler oder einem Kundendienstzentrum.
4. Nehmen Sie diese Nähmaschine niemals in Betrieb, wenn eine der Luftöffnungen blockiert ist.
Sorgen Sie dafür, dass sich in den Ventilationsöffnungen dieser Nähmaschine weder Fusseln
noch Staub oder Stoffreste ansammeln.
5. Lassen Sie keine Gegenstände in irgendwelche Öffnungen fallen und versuchen Sie nicht,
Gegenstände in Öffnungen zu stecken.
6. Benutzen Sie die Maschine nicht im Freien.
7. Benutzen Sie diese Maschine nicht in Bereichen, in denen Aerosol-Produkte (Sprühdosen)
benutzt oder Sauerstoff zugeführt werden.
8. Ziehen Sie den Netzstecker nicht ab, indem Sie am Kabel ziehen. Halten Sie zum Abziehen
des Netzsteckers den Stecker fest und nicht das Kabel.
9. Halten Sie Ihre Finger von allen beweglichen Teilen fern. Besondere Aufmerksamkeit ist im
Bereich der Nähnadel erforderlich.
10. Benutzen Sie keine verbogenen Nadeln.
11. Der Stoff darf während des Nähens nicht gezogen oder geschoben werden. Die Nadel könnte
sich sonst biegen und abbrechen.
12. Trennen Sie den Wechselstromadapter, wenn Justierungen im Nadelbereich – wie zum Beispiel
Einfädeln und Auswechseln der Nadel, Einfädeln der Spule, usw. – vorgenommen werden.
13. Ziehen Sie immer den Netzschalter dieser Nähmaschine ab, wenn irgendwelche in diesen
Gebrauchsanleitungen aufgeführten Justierungen vorgenommen werden.
BEWAHREN SIE DIESE ANLEITUNGEN AUF.
Technische Änderungen ohne vorherige Ankündigung vorbehalten.
Entsprechend der gesetzlichen Regelungen über das umweltgerechte Entsorgen von
Elektro- und Elektronikgeräten, ist dieses Produkt nach Verwendung dem
Wertstoffkreislauf zuzuführen. Im Zweifelsfalle wenden Sie sich bitte an den Verkäufer.
(Alleen voor de Europesche Gemeenschap)
Page 36

Instruction book
Livre d’Instructions
Bedienungsanleitung
NM 525
Page 37

525-800-158 (En/Fr/Ge)
Printed in Thailand
Imprimé en Thailand
Gedruckt in Thailand
 Loading...