

Page 1
Instruction Manual
Sewing Machine NM 1600/1800
Instruction Manual
Sewing Machine NM 1600/1800
Bedienungsanl.1800/1600 GB 30.08.2004 17:44 Uhr Seite 2
Page 2

Contents
Contents
Page
Page
Important introduction 2
Important instructions 3
Name of Parts 4
Accessory 5
Power supply 5
Change the electric light bulb 5
Change the needle 6
Selection of the right needle 7
Remove and attach presser foot 7
Adjust the threading tension 7
Adjust the lower threading tension 8
Reverse stitch 8
Stitch selection dial 8
Remove the bobbin case 9
Wind the bobbin 10
Thread the upper threading 11
Draw up lower threading 11
Straight sewing and zigzag sewing 12
Start sewing 12
Change sewing direction 12
Strengthen the stitches 12
Tricot stitch 13
Witchcraft or herringbone stitch 13
Zipper insertion 13
Make a buttonhole 14
Hem 15
Button sewing 15
Blind hem sewing 16
Free arm sewing 16
Clean the bobbin case 17
Clean feed dog 17
Oil the machine 18
1
Bedienungsanl.1800/1600 GB 30.08.2004 17:44 Uhr Seite 3
Page 3

Impor
Impor
tant intr
tant intr
oduction
oduction
Before using the machine please read the following instructions carefully.
Take enough time to read it.
By doing that, you’ll get a general idea of functioning and of the function
of the machine what will help you to work more easily and successfully.
The better you familiarize yourself with the work, the straighter you can
use the sewing machine.
This sewing machine has only been produced for use in the home.
2
Bedienungsanl.1800/1600 GB 30.08.2004 17:44 Uhr Seite 4
Page 4

Important instructions!
Important instructions!
Before using the sewing machine, the following instructions should always
be followed:
1. Operate the machine with the adequate caution - because of the needle
going up and down – and keep an eye at the sewing place while working!
2. Always unplug before changing the light bulb, the needle, the sewing foot,
the spool, the needle plate as well as during interruption of work without
supervision or during maintenance for reasons of safety.
Always unplug from the electrical outlet in these cases!
3. The light bulb’s maximal power is 15 watts. The sewing machine is
supplied with a commercial screw light bulb (thread name E14).
3
Bedienungsanl.1800/1600 GB 30.08.2004 17:44 Uhr Seite 5
Page 5
Name of parts
Name of parts
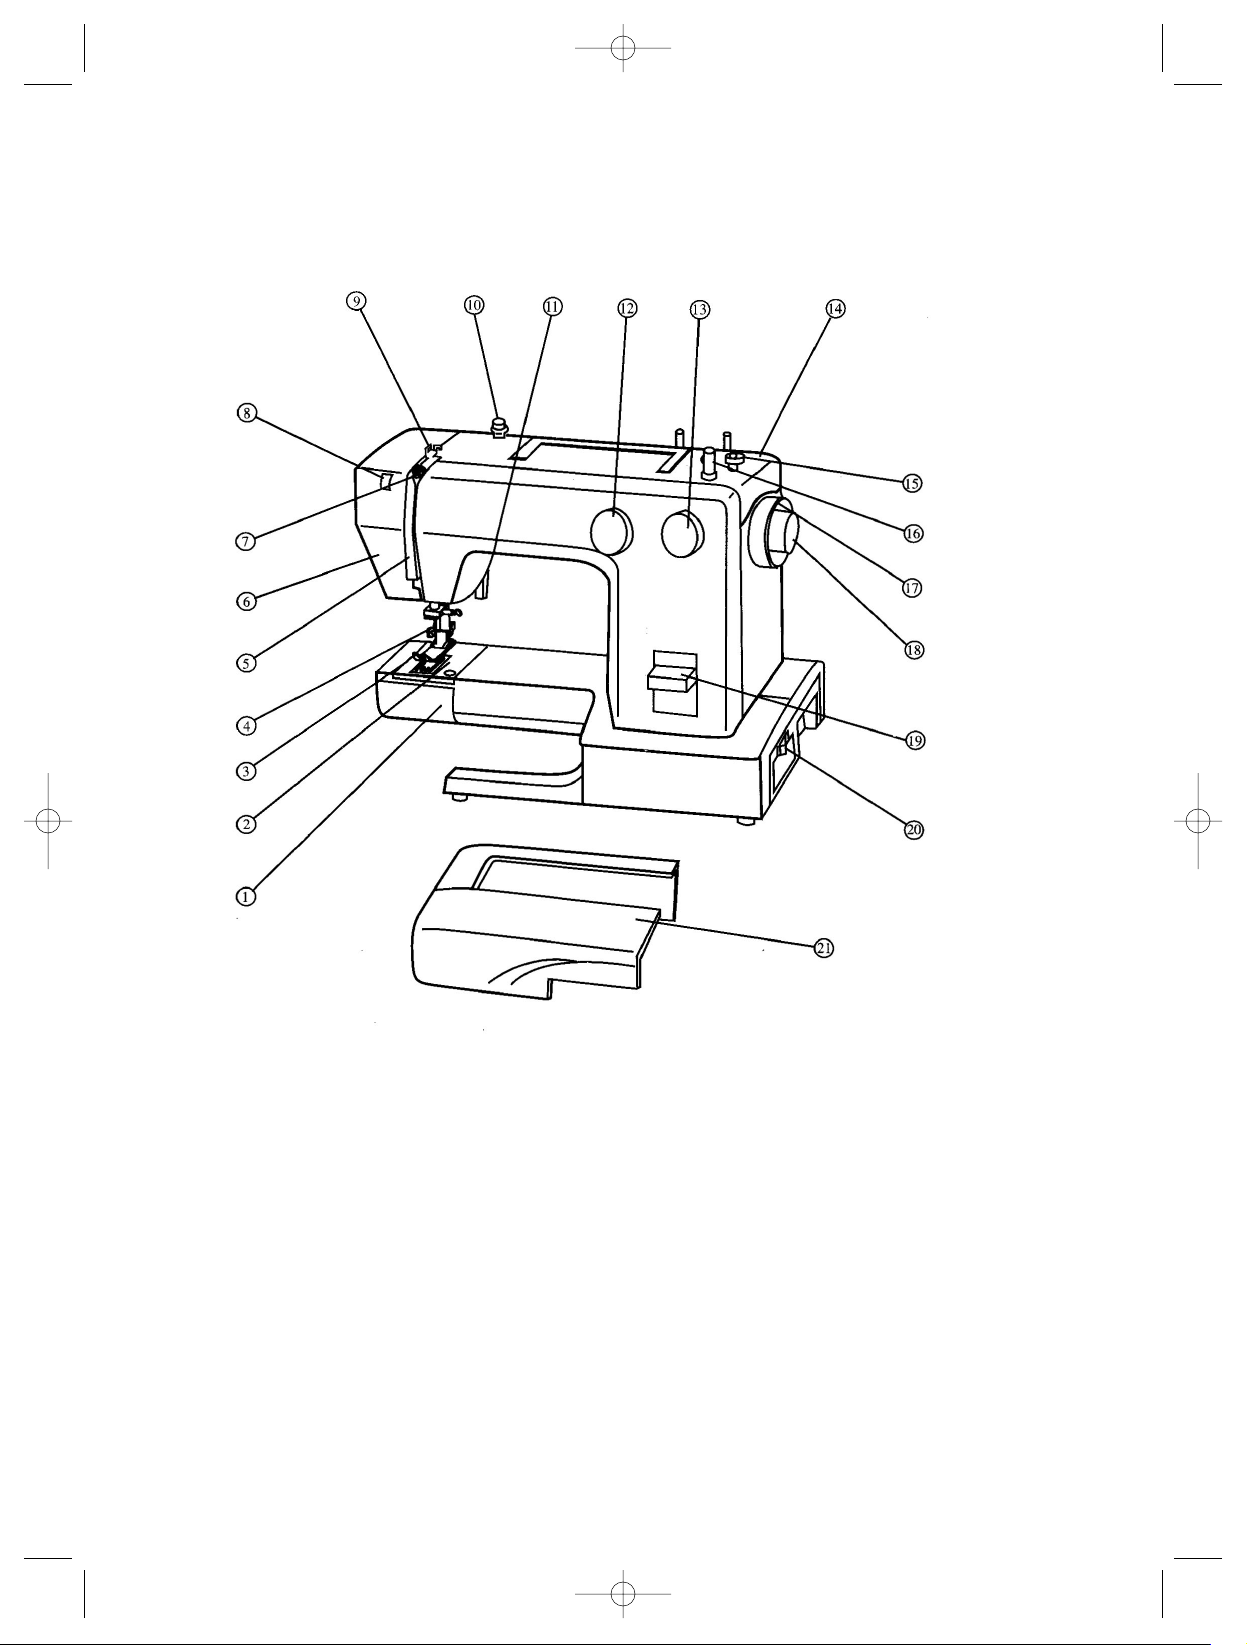
1 Bobbin case cover
2 Needle plate
3 Presser foot
4 Needle
5 Thread cover
6 Front cover, bulb cover
7 Thread take-up leaver
8 Upper threading tension
9 Thread guidance
10 Thread retainer guidance
11 Presser foot lever
4
12 Stitch selection button
13 Stitch length selection button
14 Cover
15 Thread retainer stopper
16 Sewing spool
17 Balance wheel
18 Coupling
19 Reverse button
20 Light switch
21 Cloth plate
Bedienungsanl.1800/1600 GB 30.08.2004 17:44 Uhr Seite 6
Page 6
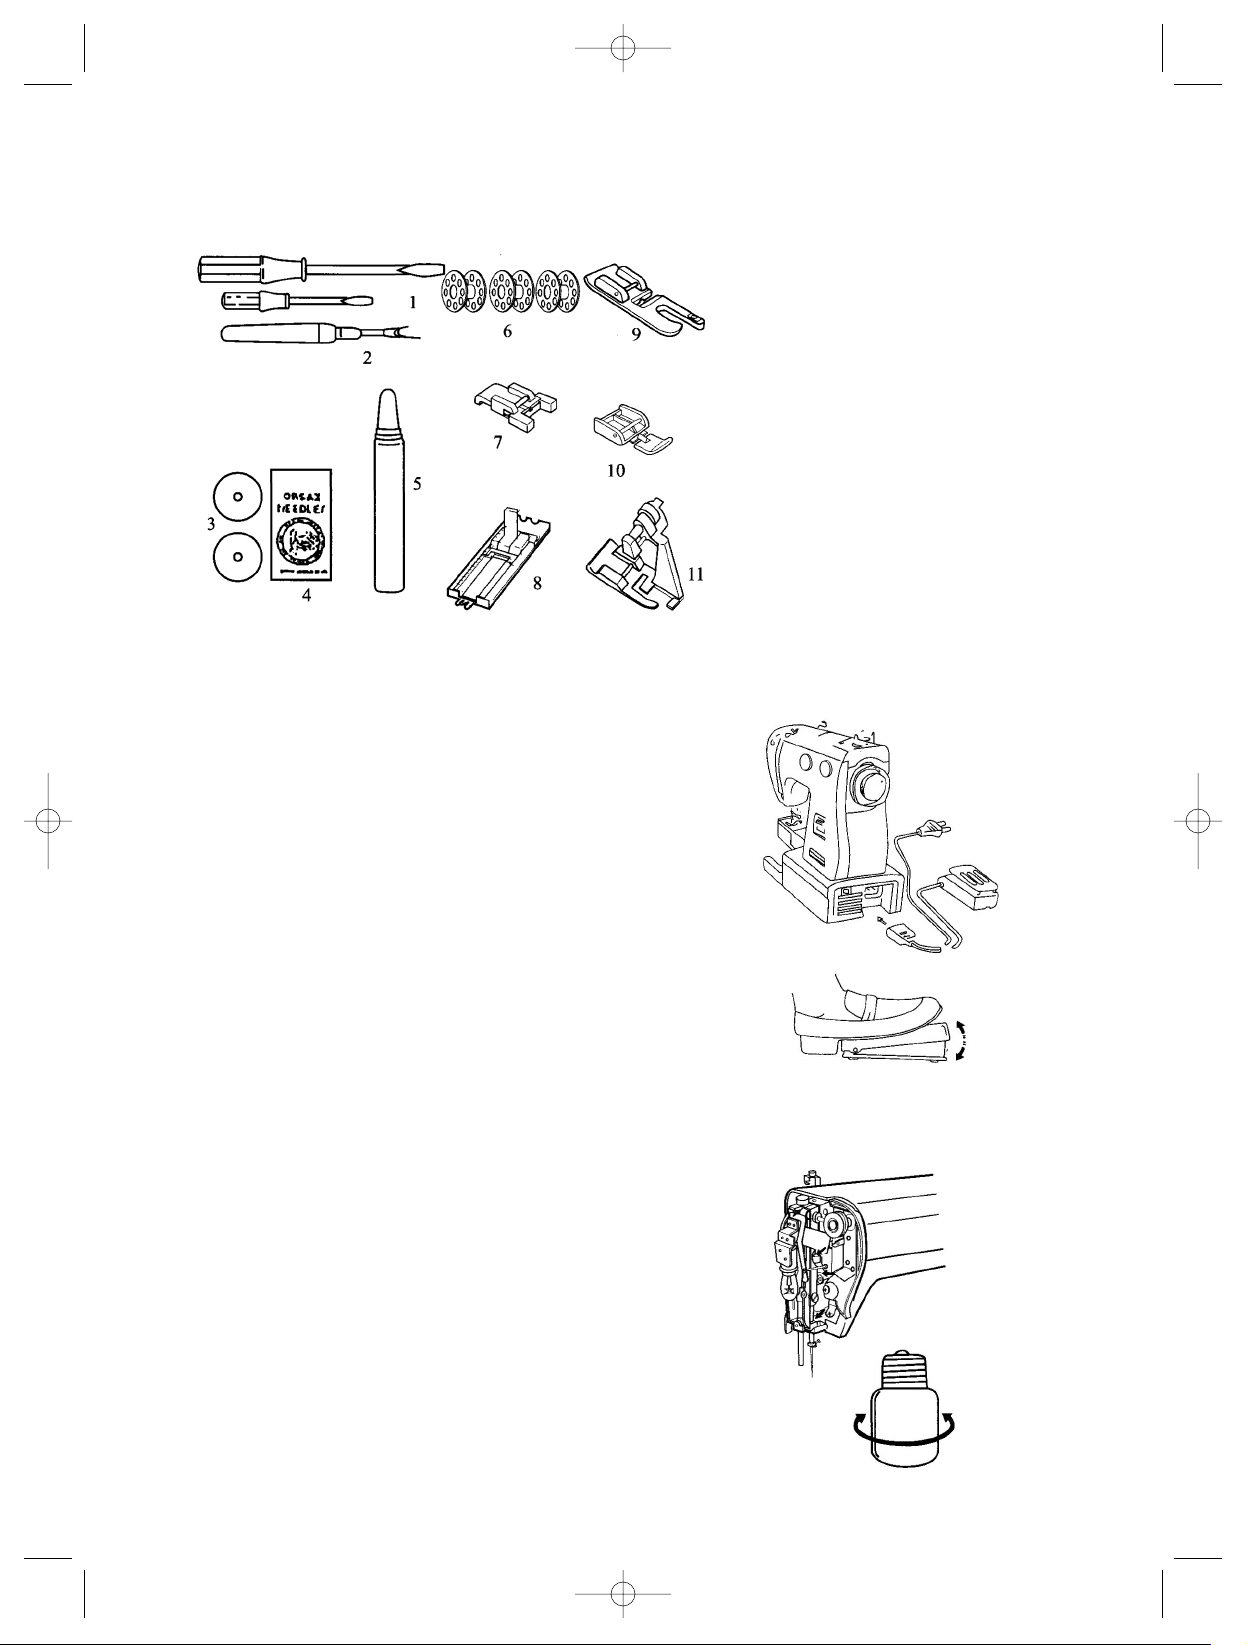
Accessory
Accessory
Power supply
Power supply
Put the coupling plug into the sewing
machine.
Put the plug into the wall socket.
(See figure)
Change the electric light bulb
Change the electric light bulb
The sewing lamp is behind the front cover.
Open the front cover with a screw driver
and unscrew the light bulb.
After that, put in the new light bulb.
WARNING! Pull the plug out of the
wall socket!
5
1. screw driver
2. ripper
3. felt plate
4. needles
5. oilcan
6. shuttles
7. sew on button foot
8. buttonhole foot
9. hem foot
10. zipper foot
11. blind stitch foot
Bedienungsanl.1800/1600 GB 30.08.2004 17:45 Uhr Seite 7
Page 7

6
Change the needle
Change the needle
Turn the balance wheel into your direction
until the needle is in the highest position.
Loosen the needle screw and remove the
needle from the fixture (see figure).
After that, put the new needle into the fixture
– with its flat side at the back. Press the needle as wide as possible up into the needle fixture. Tighten the needle fixture screw securely again.
Selection of the right needle
Selection of the right needle
The needle’s thickness is displayed
on the shaft.
In any case, do not use a bent or
blunt needle!
Bedienungsanl.1800/1600 GB 30.08.2004 17:45 Uhr Seite 8
Page 8

7
Remove and attach pr
Remove and attach pr
esser foot
esser foot
Remove:
Turn the hand wheel as wide as you can into
your direction until the needle reaches its highest position.
By lifting the presser foot lever you lift the
presser foot (1).
The presser foot falls down if you lift the lever
at the back of the foot switch (2).
Warning: Do not use force!
Attach:
Put the presser foot on the needle plate so
that the groove at the foot is directly situated
under the groove of the foot holder.
Adjust the threading tension
Adjust the threading tension
If you can pull the thread slightly with a small
resistance out of the bobbin, the threading
tension is correct.
As the lower threading tension is already set
by the factory concerning general sewing, it
needs not to be regulated very often.
In the case of very light or heavy materials,
the lower threading has to be regulated.
Adjust the lower threading
Adjust the lower threading
tension:
tension:
Turn the screw clockwise to increase the
tension.
Bedienungsanl.1800/1600 GB 30.08.2004 17:45 Uhr Seite 9
Page 9

Stitch length selection dial
Stitch length selection dial
To change the stitch length you can
turn the selection dial so that the
number of the desired stitch length
is at the mark.
The numbers stand for the approximate
stitch length in mm.
The lower the number is the shorter the
stitch is.
Reverse stitch
Reverse stitch
Press the button down to use
the reverse stitch.
Stitch selection dial
Stitch selection dial
You can set the desired stitch
using the stitch selection dial.
8
Stich length
selection
button
Bedienungsanl.1800/1600 GB 30.08.2004 17:45 Uhr Seite 10
Page 10

Remove the bobbin case
Remove the bobbin case
Set up the presser foot, turn the hand wheel
into your direction until the thread take-up
lever is on its position (figure 1).
Open the bobbin cover (figure 2).
After that, open the bobbin case and
take the case out of the machine
(figure 3). As long as you keep the
cover of the bobbin case open, the
bobbin cannot fall out.
As soon as you release the cover,
the bobbin falls out.
9
Bedienungsanl.1800/1600 GB 30.08.2004 17:45 Uhr Seite 11
Page 11

10
WWind the bobbin
ind the bobbin
Release the hand wheel release by turning the release plate into your direction.
Guide the thread from the thread reel
through the thread retainer (figure 2).
Now, put the end of the thread through
the hole in the bobbin (figure 3).
Put the bobbin onto the bobbin thorn so
that the end of the thread is on top of the
bobbin.
Press the bobbin thorn to the right until
you can hear a clicking. Hold the end of
the thread tight and start the machine.
As soon as the bobbin is winded up a little bit you can let the end of the thread
go (figure 4).
If the sewing spool stops, remove the
bobbin and cut the thread (figure 5).
Now, tighten the release plate again.
Bedienungsanl.1800/1600 GB 30.08.2004 17:45 Uhr Seite 12
Page 12

Thread the upper threading
Thread the upper threading
Put the thread reel on the reel holder so
that the thread comes backwards from
the reel.
Hold onto the reel with your right hand
and lead the thread downwards through
the two tension plates from top to bottom.
Lead the thread to the top through the
thread giver. Lead the thread giver with
a slight pull through the hole of the thread giver. Lead the thread to the needle
and thread the needle from front to
back.
Draw up lower threading
Draw up lower threading
Put the sewing foot on its highest position. Now, turn the hand wheel with your
right hand into your direction until the
needle moves down and then it moves
up again.
Stop the hand wheel as soon as the
needle is on its highest position.
Hold on the end of the upper stitch with
your left hand.
Pull the upper stitch slightly to the top
so that the lower stitch forms a loop
(figure 2).
Now, pull out around 5 cm of both threads under the sewing foot to the back
(figure 3).
11
Bedienungsanl.1800/1600 GB 30.08.2004 17:45 Uhr Seite 13
Page 13

12
Straight sewing and zigzag sewing
Straight sewing and zigzag sewing
Presser foot: zigzag foot (figure)
Stitch selection: 1 or
2 for straight sewing
3-10 for zigzag sewing
Stitch length selection dial: 0.3 – 4
Start sewing
Start sewing
Make sure that both threads are under the presser foot. While holding the threads with your left
hand, turn the hand wheel into your direction and
put the needle in the position on the material
where you want to start sewing. Lower the presser foot, step slightly on the foot controller and
start sewing. To bolt the stitch end you have to
sew a few reverse stitches first.
Change sewing direction
Change sewing direction
1. Stop the machine; turn the hand wheel into
your direction to put the needle into the
material. Lift the presser foot.
2. Turn the material in the desired direction.
3. Lower the presser foot and continue sewing.
Strengthen the stitches
Strengthen the stitches
1. Press the reverse button; sew a few reverse
stitches to bolt the stitches.
2. To remove the material you have to take up
the presser foot and to move the material
away into the other direction.
3. The thread cutter is at the backside of the
presser foot.
Bedienungsanl.1800/1600 GB 30.08.2004 17:45 Uhr Seite 14
Page 14

TTricot stitch
ricot stitch
This stitch is especially suitable for darning tears. It
is also used to strengthen stretching materials and
to sew on applications.
Presser foot: zigzag foot
Stitch selection: 8
Stitch length: 0.3 – 4
WWitchcraft and herringbone stitch
itchcraft and herringbone stitch
You can sew stretching materials using this very
elastic stitch. The witchcraft stitch is suitable for
lycra swimsuits, etc, as a margin stitch for belts or
as a decorative stitch.
Presser foot: zigzag foot
Stitch selection:
Stitch length: s.s. (stretch stitch)
Zipper insertion
Zipper insertion
Presser foot: zipper foot
Stitch selection: 1
Stitch length: 1 – 4
Sew in right side
If the foot is clicked into place at the foot holder with
the left foot fixture, the needle pricks through the left
foot pinhole. By doing that, the right side of the zipper
gets sewed on.
Sew on right side
Sew on right side
If you sewed on the right side of the zipper, you
have to change the foot into the right position and
sew on the left side.
13
Bedienungsanl.1800/1600 GB 30.08.2004 17:45 Uhr Seite 15
Page 15

Make a button hole
Make a button hole
Presser foot: button hole foot
Stitch selection: “A” “B’’ ‘’C’’
Stitch length: 0.3 – 1
1. Pull the button hole sole completely
forward and start with the symbol:
Now, you sew forward the left
button hole caterpillar according to
the desired length (see 1).
2. Switch on symbol:
while the needle is outside the material.
You sew the first row with 3-4 stitches (see 2).
3. Switch on symbol:
while the needle is outside the material.
Now, you sew the right caterpillar automatically
backwards (see 3).
4. Here, you stop the machine while the needle
is outside the material and switch on
symbol:
Sew the back row with 4-6 stitches. The button
hole is now sewed and can be opened with a
dividing knife (see 4).
14
WWarning:
arning:
Sometimes it is better to
Sometimes it is better to
repeat the sewing pro
repeat the sewing pro--
cess to get a better fixed
cess to get a better fixed
button hole. Before start
button hole. Before start--
ing sewing a button hole
ing sewing a button hole
you should do trial runs
you should do trial runs
and sew one or more
and sew one or more
button holes on the cor
button holes on the cor--
responding material.
responding material.
Bedienungsanl.1800/1600 GB 30.08.2004 17:45 Uhr Seite 16
Page 16

Hem
Hem
Presser foot: Hem foot
Stitch selection: “1”
Stitch length: 1-4
1. Replace the normal foot by a hem foot.
2. Turn up the selvage about 3 mm as shown
on the right side.
3. To protect the selvage you have to take in 5
mm from the selvage. For a short moment, stop
the machine with the needle in a horizontal
position.
4. Pull the selvage into the hem foot and start
the automatic hemming.
During hemming, fold the material slightly to the
left and let the selvage run through the foot as
wide as you can.
Button sewing
Button sewing
Presser foot: button foot
Stitch selection: “3” about “7”
Stitch length: 0
The button hole foot is for sewing buttons
up to an average size. Insert the foot.
Clamp the button by lifting and lowering the
presser foot (needle is in a horizontal position).
You have to set the needle stop so that the
button holes were directly hit by the needle.
The first stitches should be steered by the
hand wheel to avoid a damaging of the needle.
15
Bedienungsanl.1800/1600 GB 30.08.2004 17:45 Uhr Seite 17
Page 17

16
Blind hem sewing
Blind hem sewing
Presser foot: blind hem foot
Stitch selection: “9”
Stitch length: 1-3
1. Fold the material according to the desired
material width (figure 1).
2. On the right side, when you fold back the
hem, there has to remain a selvage with the
width of 4 mm (figure 2).
3. Lay the hem under the blind stitch foot so
that the guidance of the foot goes along the
folded hem (figure 3).
The guidance of the blind stitch foot can be
changed in that way, that the needle only hits
the selvage of the hem using the biggest zigzag over-lock so that you can only see a point
of the thread at the other side (figure 4). You
should complete the hem only slowly to have a
better control.
Free arm sewing
Free arm sewing
By removing the cloth plate you
get a free arm cloth plate.
The free arm makes it possible to
sew tubular components more easily.
Put the sleeves and the trouser
legs onto the free arm.
(See figure on the right)
Bedienungsanl.1800/1600 GB 30.08.2004 17:45 Uhr Seite 18
Page 18

Clean the bobbin case
Clean the bobbin case
1. Put the needle in the highest position,
otherwise, it is not possible to remove the
shutter. Remove the bobbin case.
2. Turn the snap lever out and remove the
retaining ring.
3. Remove the shuttle by holding the cone in
the middle of the shuttle. Remove all the
dirty parts from the retaining ring and oil all
the parts using a cloth.
4. Put a few drops of oil onto the shuttle.
5. Put the parts together again in
reversed order.
Warning:
Please only use special oil for
sewing machines!
Clean feed dog
Clean feed dog
To guarantee a perfect sewing it is always
necessary to keep the feed dog clean. You
should clean it every 2-3 months if you use
the machine very often.
1. Remove the presser foot and the needle.
2. Open the screws of the needle plate to
remove them from the machine (figure 1).
3. Now, remove the dust and remnants from
the feed dog by using a small brush
(figure 2).
4. Put on the needle plate again.
17
Bobbin
Shuttle
Greiferbahnring
Bobbin
case
Bedienungsanl.1800/1600 GB 30.08.2004 17:45 Uhr Seite 19
Page 19

18
Oil the machine
Oil the machine
Remove the upper arm cover and
open the bulb cover.
Warning:
Pay attention to the locked cover!
The parts that have to be oiled are
marked with arrows.
Before oiling, you should clean these
parts. You can put one or two drops of
good oil used for sewing machines
onto these parts.
Warning:
Only use oil for sewing machines.
You should oil every second or third
month.
Warning:
After oiling, do not forget to sew a
remnant first to absorb oil that came
out.
Bedienungsanl.1800/1600 GB 30.08.2004 17:45 Uhr Seite 20
Page 20

24 months guarantee
The receipt of purchase with date of purchase is the certificate for the guarantee
(Please always keep carefully)
If you have any questions or problems, please call our service hotline
under phone number
+49 7244 720435
Service (Repair Service)
SDC VERTRIEBS GMBH
AM HASENBIEL 6
D-76297 STUTENSEE
PRODUCT SPECIFICATIONS:
POWER 230 VOLTS 50 HERTZ
POWER INPUT 85 WATTS
INCLUDING ENGINE 70 WATTS
WORKPLACE LIGHTING 15 WATTS (LIGHT BULB SOCKET WITH THREAD E 14, MAX
15 WATTS)
STITCH RATE MAX 800 STITCHES PER MINUTE
Our devices are provided with the CE sign and are safety and GS tested.
We are always available for further information. Please contact:
VERITAS BETEILIGUNGSGESELLSCHAFT
P.O. Box 291347 • D- 47833 Krefeld • Germany
Trademark-License AEG
®
by Licentia Patent-Verwaltungs-GmbH
Bedienungsanl.1800/1600 GB 30.08.2004 17:44 Uhr Seite 1
 Loading...