

Page 1

LAVATHERM 86285IC
EN TUMBLE DRYER USER MANUAL 2
DE WÄSCHETROCKNER BENUTZERINFORMATION 30
Page 2

2
CONTENTS
4 SAFETY INFORMATION
6 ENVIRONMENT CONCERNS
7 PRODUCT DESCRIPTION
8 ACCESSORIES
10 CONTROL PANEL
11 BEFORE FIRST USE
11 PROGRAMMES
13 USING THE APPLIANCE
17 HINTS AND TIPS
19 CARE AND CLEANING
25 TROUBLESHOOTING
27 TECHNICAL INFORMATION
28 INSTALLATION
SERVICE
When contacting Service, ensure that
you have the following data available.
The information can be found on the
rating plate.
Model
PNC
Serial Number
The following symbols are used in this
user manual:
Warning - Important Safety information.
General information and tips
Environmental information
Subject to change without notice
Page 3

FOR PERFECT RESULTS
Thank you for choosing this AEG product. We have created it to give you
impeccable performance for many years, with innovative technologies that help
make life simpler – features you might not find on ordinary appliances. Please spend
a few minutes reading to get the very best from it.
ACCESSORIES AND CONSUMABLES
In the AEG webshop, you’ll find everything you need to keep all your AEG
appliances looking spotless and working perfectly. Along with a wide range of
accessories designed and built to the high quality standards you would expect, from
specialist cookware to cutlery baskets, from bottle holders to delicate laundry bags…
Visit the webshop at:
www.aeg.com/shop
ENGLISH 3
VISIT OUR WEBSITE FOR:
- Products
- Brochures
- User manuals
- Trouble shooter
- Service information
www.aeg.com
Page 4

4
SAFETY INFORMATION
In the interest of your safety and to
ensure the correct use, before installing and first using the appliance,
read this user manual carefully, including its hints and warnings. To
avoid unnecessary mistakes and accidents, it is important to ensure that
all people using the appliance are
thoroughly familiar with its operation
and safety features. Save these instructions and make sure that they
remain with the appliance if it is
moved or sold, so that everyone using it through its life will be properly
informed on appliance use and safety.
- Read the instruction manual be-
fore the appliance use.
GENERAL SAFETY
• It is dangerous to alter the specifications or attempt to modify this product in any way.
• This appliance is not intended for use
by persons (including children) with
reduced physical and sensory conditions or lack of experience and
knowledge, unless they have been
given supervision or instruction concerning use of the appliance by a
person responsible for their safety.
• Make sure that small children and
pets do not climb inside the drum.
To avoid this, please check into the
drum before using.
• Any objects such as coins, safety
pins, nails, screws, stones or any other hard, sharp material can cause extensive damage and must not be
placed into the machine.
• Items such as foam rubber (latex
foam), shower caps, waterproof textiles (if there is no special drying programme), rubber backed articles and
clothes or pillows fitted with foam
rubber pads must not be dried in the
tumble dryer.
• Make sure that there is access to the
mains plug after the installation.
• Always unplug the appliance after
use, cleaning and maintenance.
• Under no circumstances should you
attempt to repair the machine yourself. Repairs carried out by inexperienced persons may cause injury or
serious malfunctioning. Contact your
local Service Centre. Always insist on
genuine spare parts.
• Items that have been soiled with substances such as cooking oil acetone,
petrol, kerosene, spot removers, turpentine, waxes and wax removers
should be washed in hot water with
an extra amount of detergent before
being dried in the tumble dryer.
• Danger of explosion: Never tumble
dry items that have been in contact
with inflammable solvents (petrol,
methylated spirits, dry cleaning fluid
and the like). As these substances are
volatile, they could cause an explosion. Only tumble dry items washed
with water.
• Risk of fire: items that have been
spotted or soaked with vegetable or
cooking oil constitute a fire hazard
and should not be placed in the tumble dryer.
• If you have washed your laundry with
stain remover you must execute an
extra rinse cycle before loading your
tumble dryer.
• Please make sure that no gas lighters
or matches have accidentally been
left in pockets of garments incase
they are loaded into appliance
• The condensed water is not applicable to drink or to prepare food. It can
cause health problems to people and
pets.
• Do not seat or lean on the load door.
The appliance can tilt.
Page 5

WARNING!
• Risk of fire! To prevent from
the risk of self combustion
do not stop a tumble dryer
before the end of the drying cycle unless all items are
quickly removed and spread
out so that the heat is dissipated.
• Lint must not be allowed to
accumulate around the tumble dryer.
• Risk of electric shock! Do not spray
down the appliance with jets of water.
• The final part of a tumble dryer cycle
occurs without heat ( cool down cycle ) to ensure that the items are left
at a temperature that ensures that
items will not be damaged.
• The tumble dryer is not to be used if
industrial chemicals have been used
for cleaning.
• Ensure you have good ventilation in
the installation room to avoid the
back flow of gases into the room
from appliances burning other fuels,
including open fires.
INSTALLATION
• This appliance is heavy. Be careful
when you move the appliance.
• When unpacking the appliance,
check that it is not damaged. If in
doubt, do not use it and contact the
Service Centre.
• All packaging must be removed before use. Dangerous damage can occur to the product and to property if
this is not adhered to. See relevant
section in the user manual.
• Each electrical work necessary to install this appliance must be done by
a qualified electrician or competent
person.
• The rear surface of the appliance
must be put against the wall
• If the appliance is installed on the
carpet or equivalent, adjust the feet.
ENGLISH 5
Air must flow freely below the appliance.
• After the appliance installation, check
that it is not squeeze or stay on the
electrical supply cable.
• If the tumble dryer is put on top of a
washing machine, it is mandatory to
use the stacking kit (optional accessory - see chapter: "ACCESSORIES").
USE
• This appliance is for domestic use
only. It must not be used for other
functions .
• Only dry fabrics which are applicable
to dry in the tumble dryer. Follow the
instructions on each piece of clothing
label.
• Do not dry not washed items in the
tumble dryer.
• Do not put more load than recommended. Obey the maximum load
volume. See the related chapter in
the user manual.
• Clothes which are dripping wet must
not be put in the tumble dryer.
• Garments which have been in contact
with volatile petroleum products
should not be machine dried. If volatile cleaning fluids are used, care
should be taken to ensure that the
fluid is removed from the garment
before placing in the appliance.
• Do not use the tumble dryer if the
power supply cable, the control panel, the working surface or the base
are damaged so that the inside of
the tumble dryer is accessible.
• Fabric softener or equivalent products must be used as specified by the
fabric softener manufacturer.
• Risk of fire! Do not dry the damaged
items which contain padding or fillings (pillows, jackets, duvets, etc.).
The padding or fillings can get out
and cause the fire.
Page 6
6
CHILD SAFETY
• This machine is not intended for use
by young children or infirm persons
without supervision.
• Children often do not recognise the
hazards associated with electrical appliances. Children should be supervised to ensure that they do not play
with the appliance.
WARNING!
• Danger of suffocation! The
packaging components (e.g.
plastic film, polystyrene) can
be dangerous to children Keep them out of children’s
reach.
ENVIRONMENT CONCERNS
• Keep all detergents in a safe place
out of children’s reach.
• Make sure that children or pets do
not climb inside the drum.
DISCARD THE APPLIANCE
• Disconnect the mains plug from the
mains socket.
• Cut off the mains cable and discard
it.
• Discard the door catch. This prevents
children or pets to be closed in the
appliance. There is a risk of suffocation.
PACKAGING MATERIALS
Recycle the materials with the symbol
. Put the packaging in applicable
containers to recycle it.
The symbol
packaging indicates that this product
may not be treated as household
waste. Instead it should be taken to the
appropriate collection point for the
recycling of electrical and electronic
on the product or on its
equipment. By ensuring this product is
disposed of correctly, you will help
prevent potential negative
consequences for the environment and
human health, which could otherwise
be caused by inappropriate waste
handling of this product. For more
detailed information about recycling of
this product, please contact your local
council, your household waste disposal
service or the shop where you
purchased the product.
Page 7
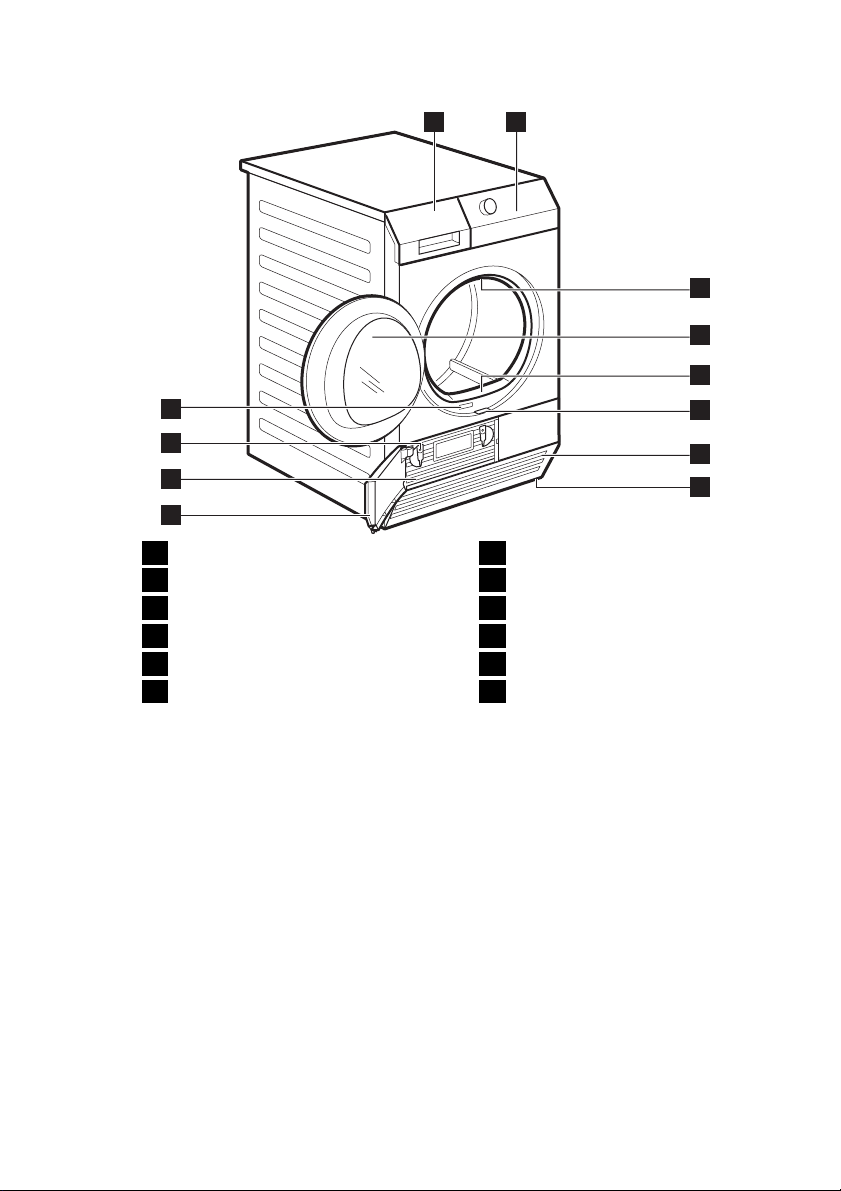
PRODUCT DESCRIPTION
ENGLISH 7
1 2
3
4
5
12
11
10
9
Water container
1
Control panel
2
Drum light
3
Load door (reversible)
4
Filter
5
Sliding button to open the con-
6
denser door
Airflow slots
7
Adjustable feet
8
Condenser door
9
Condenser cover
10
Lock knobs
11
Rating plate
12
6
7
8
Page 8
8
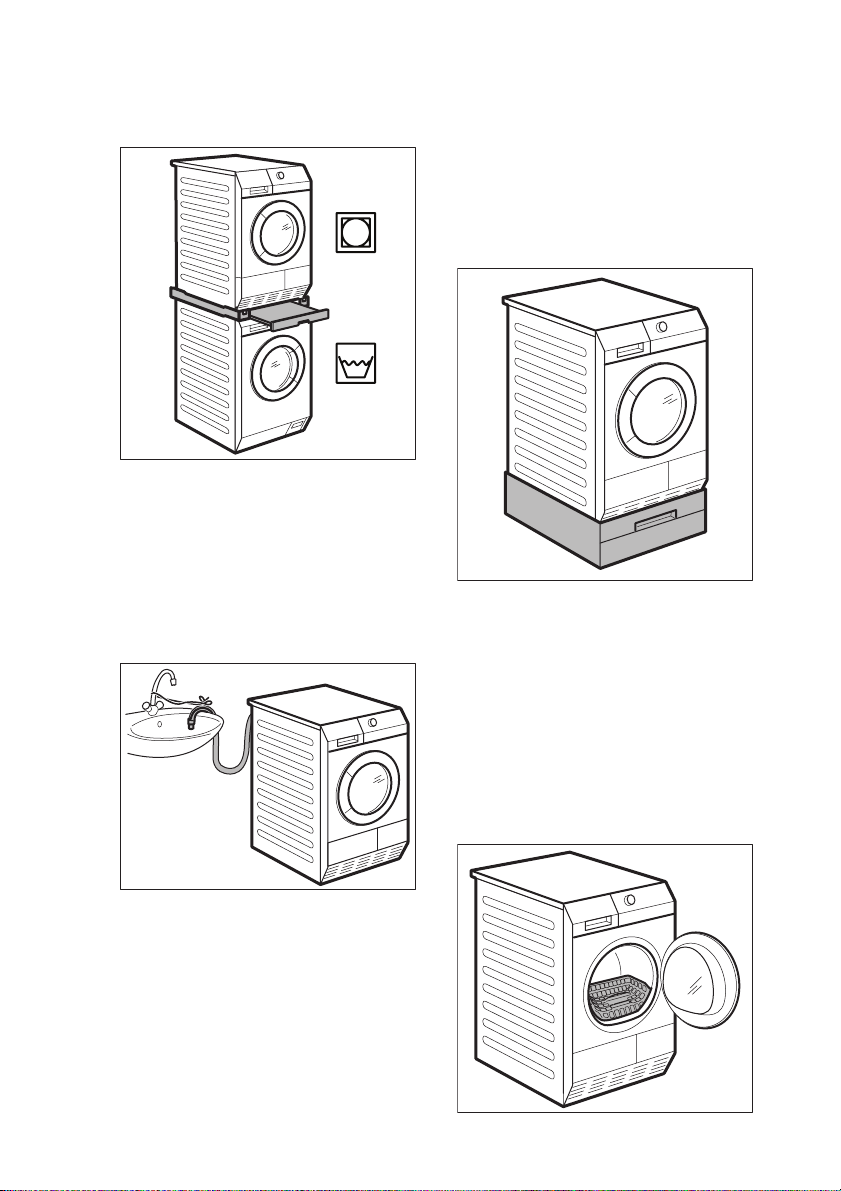
ACCESSORIES
STACKING KIT
Product name: SKP11
Available from your authorized dealer.
Stacking kit can be used only with the
washing machines specified in the leaflet. See leaflet attached.
Read carefully the instructions supplied
with the kit.
DRAINING KIT
1 m from floor level. The hose cannot
be in loop. If possible decrease the
length of the hose.
Read carefully the instructions supplied
with the kit.
PEDESTAL WITH THE DRAWER
Product name: PDSTP10.
Available from your authorized dealer.
To put the appliance higher at the level
which helps to easy load and remove
the laundry .
The drawer can be use for laundry storage e.g. : towels, cleaning products and
more.
Read carefully the instructions supplied
with the accessory.
Product name: DK11.
Available from your authorized dealer
(can be attached to some types of the
tumble dryers)
Installation kit for through draining of
the condensed water into a basin, siphon, gully, etc. After installation the
water container is drained automatically. The water container must stay in the
appliance.
Installed hose must be on the height
from minimum of 50 cm to maximum of
DRYING RACK
Product name: RA11.
Page 9

Available from your authorized dealer
(can be attached to some types of the
tumble dryers)
Drying rack accessory let to dry safely in
the tumble dryer:
• sport shoes
ENGLISH 9
•wool
• soft toys
• lingerie
Read carefully the instructions supplied
with the kit.
Page 10
10
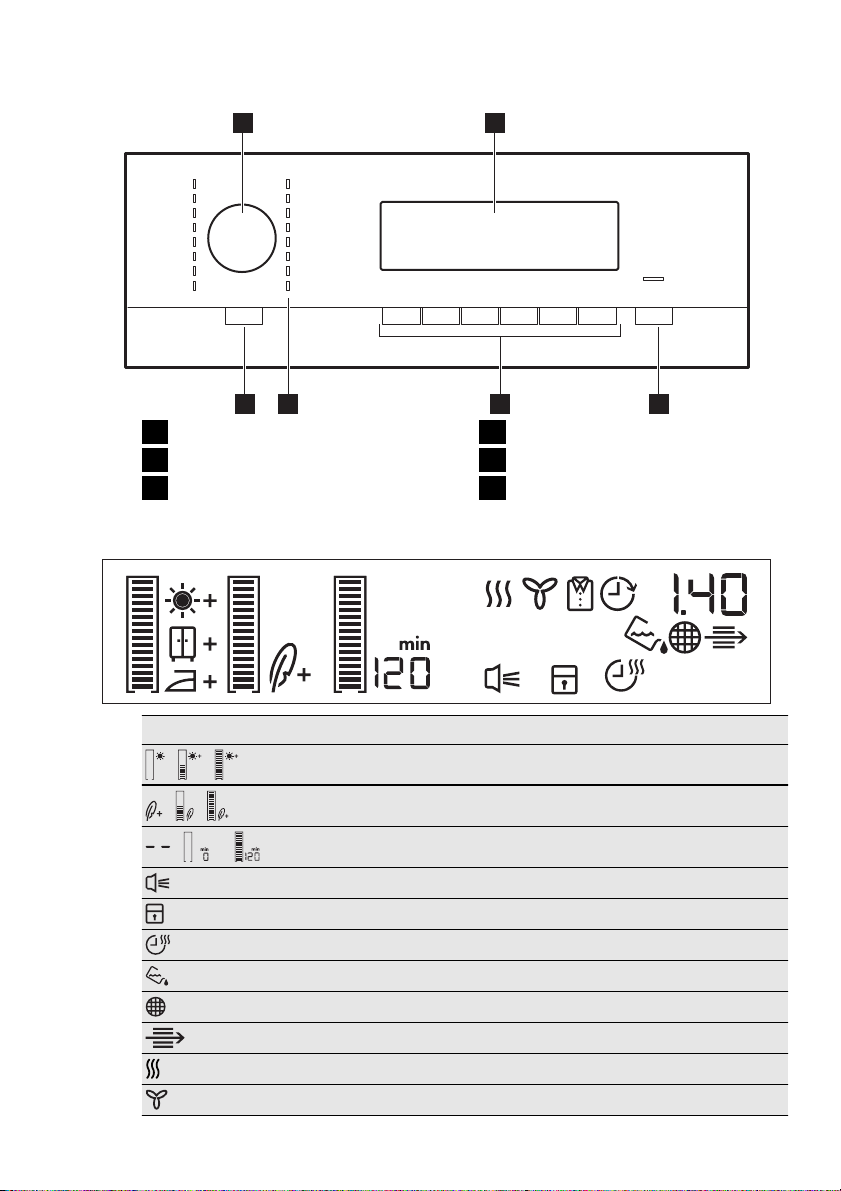
CONTROL PANEL
1 2
Programme dial
1
Display
2
Push button Start/Pause
3
DISPLAY
The function push buttons
4
Programme indicators
5
Push button Auto Off
6
356 4
Symbol Description
, ,
, ,
, —
extra dryness level: minimum, moderate, maximum
delicacy level: default, moderate, maximum
anti-crease time: default, interval (0 min. - 120 min.)
buzzer activated
child lock activated
time drying function activated
drain the water container indicator
clean the filter indicator
clean the condenser indicator
drying cycle phase indicator
cooling cycle phase indicator
Page 11
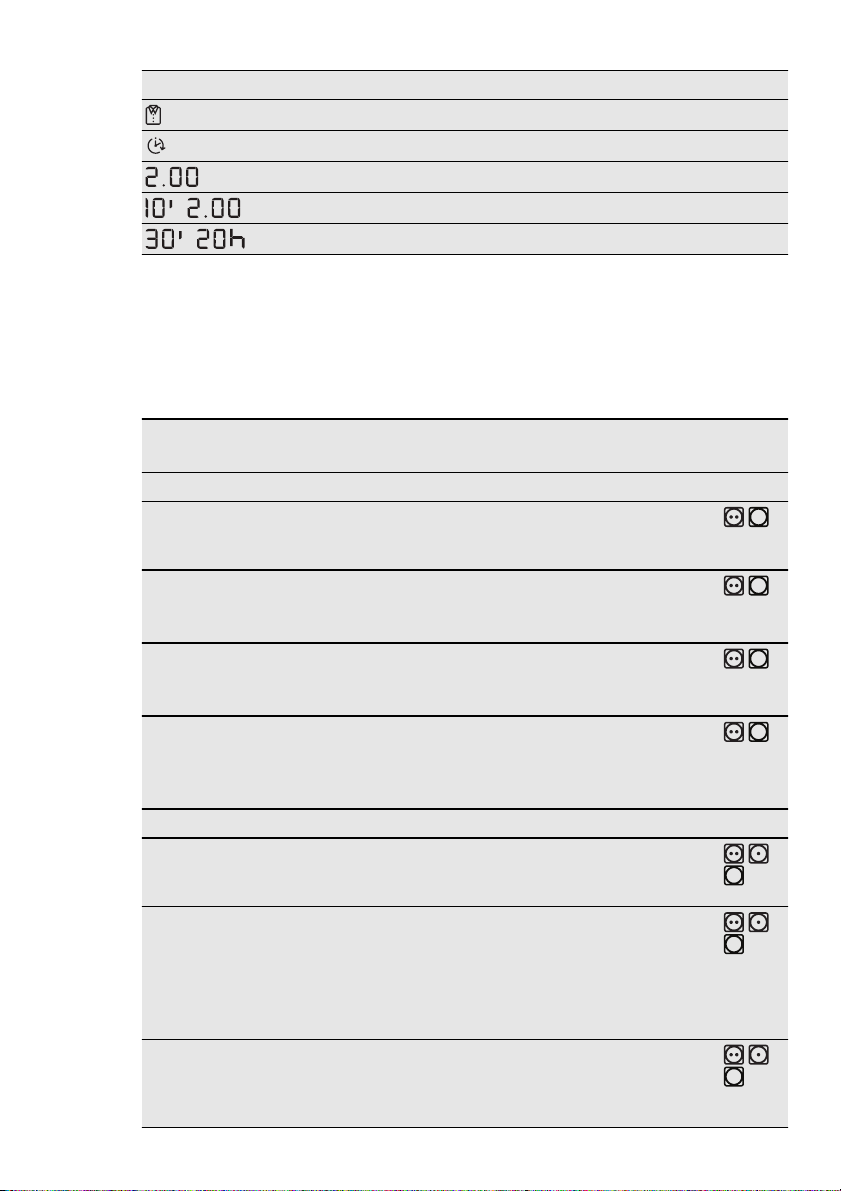
Symbol Description
-
-
BEFORE FIRST USE
ENGLISH 11
crease guard cycle phase indicator
delay start activated
cycle time
time programme interval (10 min. - 2h.)
delay start interval (30 min. - 20h.)
Clean the tumble dryer drum with a
moist cloth or set a short programme
PROGRAMMES
Programmes
Extra Dry
(Extra
Droog)
Cupboard
Dry (Kast-
2)
droog)
Iron Dry
(Strijkdroog)
2)
Extra Silent
(Extra Stil)
Bed Linen
(Beddengoed)
Duvets
(Dekbed)
Time (Tijd) 8 kg
Load
1)
8 kg
8 kg
8 kg
8 kg
3 kg
3 kg
(e.g. 30 minutes time programme) with
the load of moist cloths.
Properties
Cottons (Katoen)
To dry cotton pieces of clothing.
Drying level: extra dry.
To dry cotton pieces of clothing.
Drying level: cupboard dry.
To dry cotton pieces of clothing.
Drying level: applicable to iron.
To gently dry cotton pieces of
clothing with the noise decreased
to the minimum. The programme
can be used at night.
To dry bed linen such as: single
and double sheet, pillowcase,
bedspread.
To dry single or double duvet and
pillows (with feather, down or synthetic fillings).
To dry laundry with the time set by
the user.
Available
functions
all except
Time Drying
(Droogtijd)
all except
Time Drying
(Droogtijd)
all except
Time Drying
(Droogtijd)
all except
Time Drying
(Droogtijd)
3)
all except
Time Drying
(Droogtijd)
all except
Time Drying
(Droogtijd)
and Anti-
crease (Anti-
3)
kreuk)
all except
Dry Plus
(Drogen
Plus)
Fabric
mark
Page 12
12
Programmes
Extra Quick
Mixed (Mix
Extra Kort)
Extra Dry
(Extra
Droog)
Cupboard
Dry (Kast-
2)
droog)
Iron Dry
(Strijkdroog)
Extra Silent
(Extra Stil)
Easy Iron
(Strijkvrij)
Active Wear
(Sport Intensief)
Delicates
(Fijne Was)
Load
1)
3 kg
To dry cotton and synthetic fabrics, uses low temperature.
Properties
Synthetics (Synthetica)
To dry thick or multi-layered fab-
3,5 kg
rics, e. g. pullovers, bedding, table
linen.
To dry thin fabrics which are not ir-
3,5 kg
oned, e.g. easy care shirts, table
linen, baby clothes, socks, lingerie
with bones or wires.
3,5 kg
To dry thin fabrics which are also
to be ironed, e.g. knitwear, shirts.
To gently dry synthetic pieces of
3,5 kg
clothing with the noise decreased
to the minimum. The programme
can be used at night.
To dry easy care fabrics such shirts
and blouses; for minimum ironing
effort. The results can be different
1 kg
for to the different types of fabric
(or 5
shirts)
and its finish. Put fabrics in the
tumble dryer straight. After the cycle, immediately remove dried
fabrics and put on a cloths hanger.
To dry outdoor pieces of clothing,
technical, sports, pile fabrics, wa-
2 kg
terproof and breathable jackets,
shell jacket teamed with a removable fleece or inner insulation.
3 kg To dry delicate fabrics.
Available
functions
all except:
Delicate
(Behoed-
zaam) and
Time Drying
(Droogtijd)
all except
Time Drying
(Droogtijd)
all except
Time Drying
(Droogtijd)
all except
Time Drying
(Droogtijd)
all except
Time Drying
(Droogtijd)
3)
all except
Time Drying
(Droogtijd)
3)
all except
Time Drying
(Droogtijd)
and Anti-
crease (Anti-
3)
kreuk)
all except
Time Drying
(Droogtijd)
3)
Fabric
mark
Page 13
ENGLISH 13
Programmes
Load
1)
To dry the cloths made of wool .
Wool (Wol)
The cloths become soft and cosy.
1 kg
We recommend to remove the
cloths immediately after the programme end.
1)
maximal weight of dry clothes
2)
For test institutes only:
To make a performance test use the standard programmes which are specified in the EN
61121 document. If the remaining moisture level of the laundry, is out of tolerance, adjust the
programme with the Dry Plus (Drogen Plus) function .
3)
Delicate (Behoedzaam) activated by default
4)
Only with the drying rack RA11 — see chapter ACCESSORIES
USING THE APPLIANCE
PREPARING THE LAUNDRY
Dry only the laundry applicable
to dry in the tumble dryer. Make
sure if the laundry is applicable
to dry in the tumble dryer. Do
the check of the fabric mark on
the clothes.
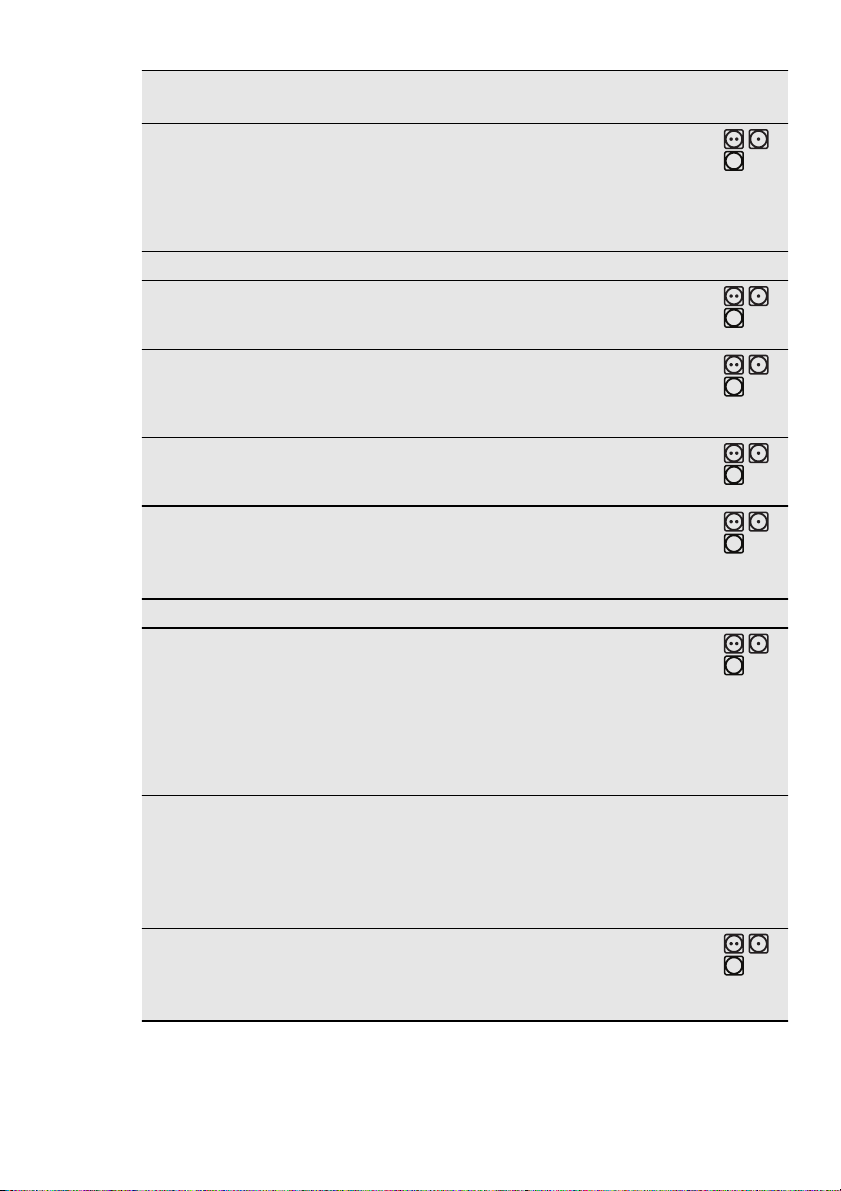
Fabric
mark
Correctly prepare the laundry:
• close zips, button up duvet covers
Property
Applicable to dry in the tumble dryer
Applicable to dry in the tumble dryer at standard temperature
Applicable to dry in the tumble dryer at decreased temperature
Not applicable to dry in the
tumble dryer
and attach loose ties or ribbons (e.g.
ribbons of aprons) - laundry can tangle
Properties
Available
functions
Dry Plus
(Drogen
Plus) , Buzzer (Zoem-
er) , Time
Drying
(Droogtijd)
4)
, Delay
Start (Star-
tuitstel)
• make sure the pockets are empty remove metal items (paper clips,
safety pins, etc.).
• turn items with 2 fabric layers inside
out (e.g. cotton lined anoraks, the
cotton fabric layer must be external).
Dry only:
• cotton and linen with Cottons (Katoen) programmes
• synthetic and mixtures with Synthetic
(Synthetica) programmes
• separately the strong coloured textiles and the light coloured textiles colours can bleed
• cotton jersey and knitwear only with
the applicable programmes - items
can shrink
Do not put more laundry than
the maximum load which is 8kg.
Fabric
mark
3)
Page 14
14
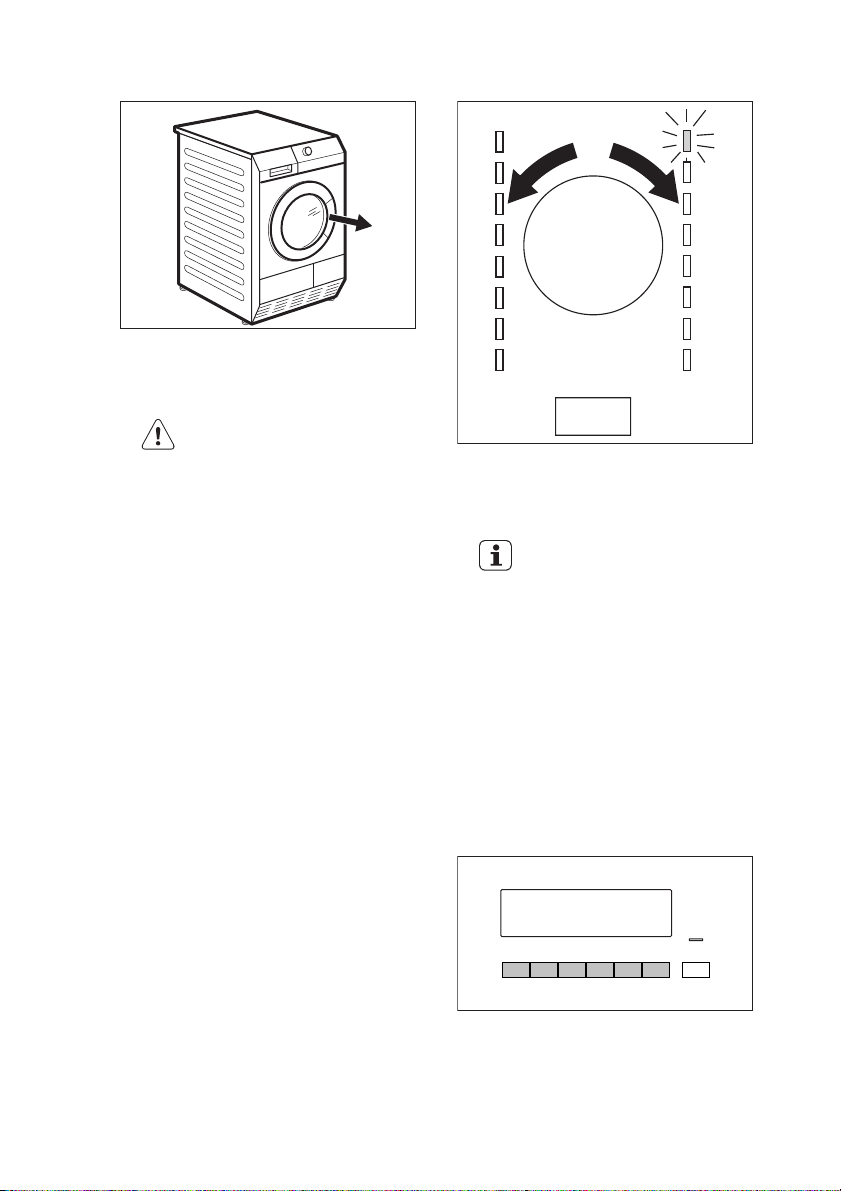
LOADING THE LAUNDRY
1. Pull the appliance door
2. Load loosely the laundry.
3. Close the appliance door.
CAUTION!
Do not lock the laundry in between the appliance door and
rubber seal.
SWITCHING ON THE
APPLIANCE
Push the Auto Off button to activate or
to deactivate the appliance. When the
appliance is on, some indications come
in to the view on the display.
AUTO OFF FUNCTION
To decrease the energy consumption,
the automatic standby function deactivates the appliance:
• if the Start/Pause (Start/Pauze) button was not pushed in the time of 5
minutes.
• after 5 minutes from the programme
end.
Push the Auto Off button to activate
the appliance.
SETTING A PROGRAMME
Use the programme dial to set the programme. The possible time to complete the programme come into view
on the display.
The drying time you see is related to the load of 5 kg for cotton and jeans programmes. For
the other programmes the drying time is related to the recommended loads. The drying time
of the cotton and jeans programmes with the load more
than 5 kg is longer.
SPECIAL FUNCTIONS
Together with the programme you can
set 1 or more special functions.
To activate or deactivate the function
push the applicable push button.
When the function is activated the applicable symbol comes into the view on
the display.
Page 15

ENGLISH 15
THE DRY PLUS (DROGEN
PLUS) FUNCTION
This function helps to get the laundry
more dried. There are 3 possible selections:
minimum - the default selection which
is related to the programme.
moderate — the selection to get the
laundry lightly dried.
maximum — the selection to get the
laundry more dried.
THE DELICATE
(BEHOEDZAAM) FUNCTION
To dry more lightly the sensitive and
temperature sensitive textiles (e.g.
acrylic, viscose). For fabrics with the
symbol
gramme operates with decreased heat.
on the fabric label. Pro-
THE ANTICREASE (ANTIKREUK) FUNCTION
Extends anticrease phase (30 minutes)
at the end of the drying cycle to 90 minutes. This function prevents laundry
from creases. Laundry can be removed
during the anticrease phase.
THE BUZZER (ZOEMER)
FUNCTION
When the buzzer function is activated
you can hear the buzzer at the:
•cycle end
• anti-crease phase start and end
• cycle interruption
The buzzer function is by default always
on. You can use this function to activate
or deactivate the sound.
THE TIME DRYING
(DROOGTIJD) FUNCTION
Operates only with the Time (Tijd) programme. Lets the user to set special
time of drying programme from minimum 10 min. to maximum of 2 hours (in
10 min. steps).
THE DELAY START
(STARTUITSTEL) FUNCTION
Let to delay the start of a drying
programme from minimum of
30 minutes to maximum of 20
hours.
1. Set the drying programme and
functions.
2. Push the Delay Start (Startuitstel)
button again and again until the
necessary time of the delay come
into the view on the display (e.g.
if the programme has to start af-
ter 12 hours.)
3. To activate the Delay Start (Startuitstel) function, push the Start/Pause
(Start/Pauze) button. The time to
start decreases on the display.
CHILD LOCK FUNCTION
The child lock can be set to prevent the
children to play with the appliance. The
child lock function locks all push buttons and the programme dial (this function does not lock Auto/Off button). To
activate the child lock function push the
Dry Plus (Drogen Plus) and Delicate
(Behoedzaam) buttons at the same time
until the symbol
the display. To deactivate push again
the above buttons until the symbol go
out of view.
You can activate the child lock function:
• before you push the Start/Pause
(Start/Pauze) button - the appliance
cannot start
• after you push the Start/Pause (Start/
Pauze) button - all the push buttons
and the programme dial are deactivated
come into view on
Page 16

16
STARTING A PROGRAMME
To activate the programme push the
button as on the illustration. The LED
above the button illuminates in red colour.
CHANGE A PROGRAMME
To change a programme, push the Auto/Off button to deactivate appliance.
Push the Auto/Off to activate the appliance and then set the programme
again.
AT THE END OF PROGRAMME
When the drying cycle is completed,
symbol flashes on the display. If
the
the Buzzer (Zoemer) function is on, an
acoustic signal sounds intermittently for
one minute.
To remove the laundry:
1. Push the Auto/Off button for 2 seconds to deactivate the appliance.
2. Open the appliance door.
3. Remove the laundry.
4. Close the appliance door.
After each drying cycle:
• clean the filter
• drain the water container
(See chapter CARE AND CLEANING.)
Page 17
HINTS AND TIPS
ENGLISH 17
ECOLOGICAL HINTS
• Do not use fabric softener to wash
and then dry. In the tumble dryer
laundry becomes soft automatically.
• Use the condensate as distilled water, e.g. for steam ironing. If necessary clean the condensate before (e.g.
with a coffee filter) to remove possible small pieces of fluff.
• Always keep the airflow slots on the
bottom of the appliance clear.
• Use the load volumes specified in the
programmes chapter.
• Make sure that is good airflow in the
appliance installation position.
• Clean the filter after each drying cycle.
• Spin good the laundry before drying.
AVERAGE LAUNDRY WEIGHTS
bathrobe 1200 g
quilt cover 700 g
man’s work shirt 600 g
man’s pyjamas 500 g
sheet 500 g
tablecloth 250 g
man’s shirt 200 g
night dress 200 g
pillow case 200 g
towelling towel 200 g
blouse 100 g
ladies’ briefs 100 g
men’s underpants 100 g
napkin 100 g
tea cloth 100 g
operation of the conductivity sensor in
the appliance. If you know the value of
the water conductivity you can adjust
the sensor to dry with the better results.
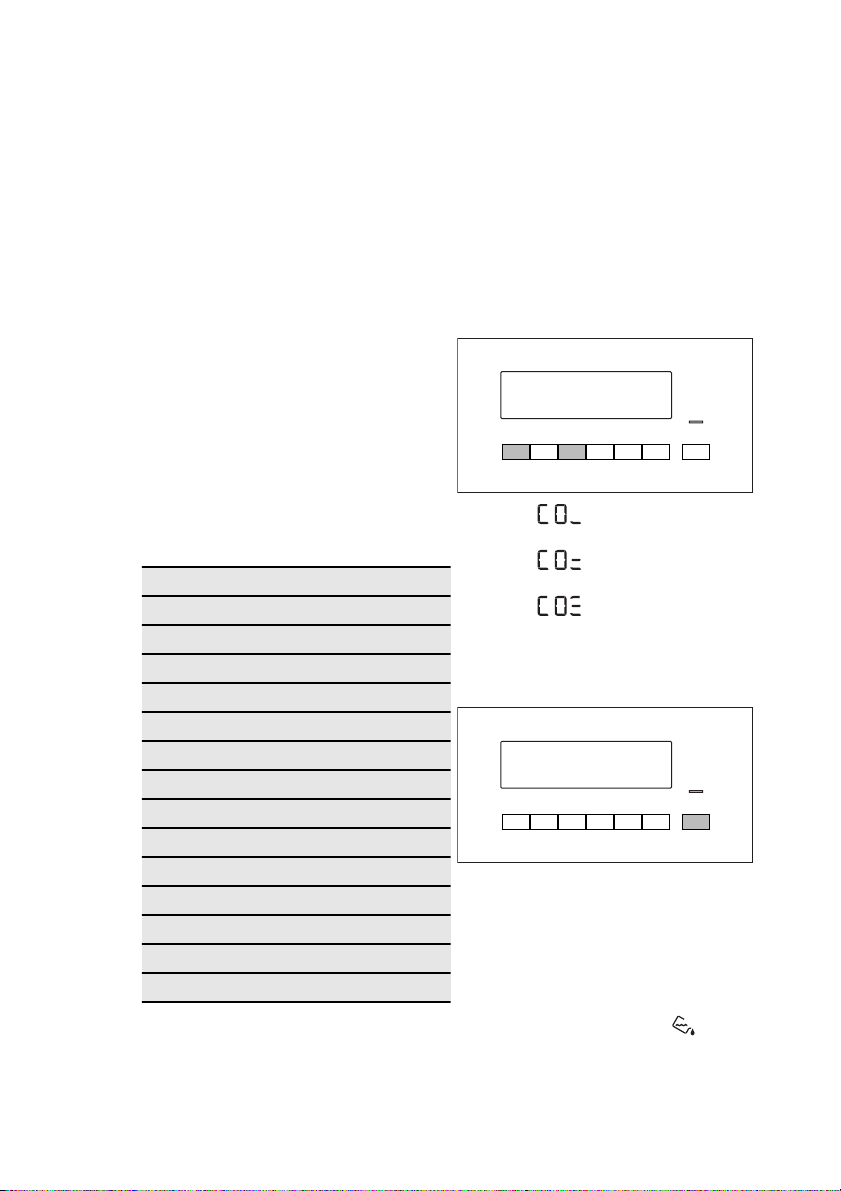
To change the sensor conductivity:
1. Turn the programme dial to available programme.
2. Push at the same time 2 buttons
(see the illustration). Hold down until one of the symbols come into
view on the display:
–
μS/cm
–
300-600 μS/cm
–
μS/cm
3. Push the button again and again
until you set necessary level (see
the illustration).
4. To memorise the setting push at
the same time 2 buttons as are
specified in the point 2.
low conductivity <300
moderate conductivity
high conductivity >600
WATER CONTAINER FULL —
INDICATION
WATER HARDNESS AND
CONDUCTIVITY
Water hardness can be different for different locations. Water hardness has an
effect on the water conductivity and the
By default the indication is always
on. It comes into the view at the end of
the cycle or when the water container is
full. When you use an external equipment to drain the container, the indication can be off.
Page 18

18
To activate or deactivate the indication:
1. Turn the programme dial to available programme.
2. Push at the same time 2 buttons
(see the illustration) and hold down
until you see the correct setting:
–
the indication
indicator
view — the indication
manently off
–
the indication
indicator
view — the indication
vated
is off and the
comes into the
is per-
is on and the
comes into the
is acti-
Page 19

CARE AND CLEANING
ENGLISH 19
CLEANING THE FILTER
At the end of each cycle the indicator
(clean the filter) is on to tell you that
the filter must be cleaned.
To clean the filter:
The filter collects the fluff. The
fluff occurs while the cloths are
dried in the tumble dryer.
1. Open the door.
2. Pull the filter.
3. Open the filter.
Page 20

20
4. Use a moist hand to clean the filter.
5. If necessary clean the filter with
warm water using a brush.
Close the filter.
6. Remove fluff from the filter socket.
CAUTION!
Do not operate the tumble dryer without the filter or with damaged or blocked filter.
Clean the filter after each drying
cycle. Clogged filter increases
the cycle time and causes higher
energy consumption.
DRAINING THE WATER
For this a vacuum cleaner can be
used.
7. Put the filter inside the filter socket.
If the water container is full, the pro-
gramme breaks off automatically and
the indicator
tainer is on. To continue the programme, drain the water container and
press the start button.
To drain the water container automatically you can install draining accessory (see chapter: AC-
CESSORIES)
drain the water con-
CONTAINER
Drain the water container after each
drying cycle.
Page 21

To drain the water container:
ENGLISH 21
1. Pull the water container.
2. Move the water container in hori-
zontal position.
3. Move the plastic connection out
and drain the water container into a
sink or equivalent receptacle.
4. Move plastic connection in and install water container.
WARNING!
CLEANING THE CONDENSER
Risk of poisoning. The condensed water is not applicable
to drink or to prepare food.
If the indicator clean the condens-
er is on, the condenser must be
cleaned.
The condensed water can be
used as distilled water, e.g. for
steam ironing. If necessary filter
the condensed water (e.g. with a
coffee filter) to remove possible
residue and small pieces of fluff.
Page 22

22
To clean the condenser:
1. Open the loading door.
2. Move the release button on the
bottom of the door opening and
open the condenser door.
3. Turn the 2 blockages to unlock the
condenser lid.
4. Lower the condenser lid.
Page 23

ENGLISH 23
5. Catch the handle and pull the con-
denser out from the bottom compartment. Move condenser horizontally to do not spill remaining
water.
6. Clean the condenser in vertical position over a basin or paddling.
Rinse through with a hand shower.
7. Clean the condenser filter. Rinse
through with a hand shower.
8. Put the condenser back inside the
bottom compartment.
9. Close the condenser lid.
10. Lock the 2 blockages until they
snap.
11. Close the condenser door.
Page 24

24
CAUTION!
Do not operate the tumble dryer when the condenser is
blocked with fluff. This could
cause the damage to the tumble dryer. This also increases energy consumption.
Do not use sharp objects to
clean the condenser. The damaged condenser could cause
leaks.
Do not operate the tumble dryer without the condenser.
CLEANING THE DRUM
WARNING!
Disconnect the appliance before you clean it.
Use a standard neutral soap detergent
to clean the inner surface of the drum
and drum ribs. Dry the cleaned surfaces
with a soft cloth.
CAUTION!
Do not use abrasive materials or
steel wool to clean the drum.
CLEANING THE CONTROL
PANEL AND HOUSING
Use a standard neutral soap detergent
to clean the control panel and housing.
Use a moist cloth to clean. Dry the
cleaned surfaces with a soft cloth.
CAUTION!
Do not use furniture cleaning
agents or cleaning agents which
can cause corrosion to clean the
appliance.
Page 25

TROUBLESHOOTING
TROUBLESHOOTING
ENGLISH 25
Problem
1)
The tumble
dryer does
not operate.
Unsatisfactory drying
results.
The door
does not
close.
Err (Error)
on the display.
No drum
light
Possible cause Remedy
The tumble dryer is not connected to mains supply.
Connect in at mains socket.
Check fuse in fuse box (domes-
tic installation).
The loading door is opened. Close the loading door.
The Auto/Off button was not
pushed.
The Start/Pause button was not
pushed.
The appliance is in the standby
mode.
Incorrect programme selection.
The filter is clogged.
The Dry Plus function was in
minimum mode.
The condenser is clogged.
Too high volume of the load.
The airflow grill is clogged.
Dirt on the inner surface of the
drum.
Too high water hardness.
The filter not locked in the posi-
tion.
The laundry is locked between
the door and the seal.
You try to change the pro-
gramme or the function after
the start of the cycle.
The function you try to activate
is not applicable with the selected programme.
Defective drum light.
Push the Auto/Off button.
Push the Start/Pause button.
Push the Auto/Off button.
Do the selection of the applica-
ble programme.
Clean the filter.
2)
3)
Change the Dry Plus function to
the moderate or maximum
mode.
Clean the condenser.
3)
Obey the maximum load vol-
ume.
Clean the airflow grill in the bot-
tom of the appliance.
Clean the inner surface of the
drum.
Set applicable water hardness4).
Put the filter in the correct posi-
tion.
Put the load correctly in the
drum.
Turn the tumble dryer off and
on. Make the new selection.
Turn the tumble dryer off and
on. Make the new selection.
Contact the service centre to re-
place the drum light.
Page 26

26
Problem
1)
Abnormally
elapsing
time on the
display.
Programme
inactive.
Drying cycle
too short.
The time to end is calculated on
the basis of the volume and
dampness of the laundry.
The water container is full.
Too small laundry volume.
The laundry is too dry.
Possible cause Remedy
The automatic procedure — this
is not the appliance malfunction.
Drain the water container3) ,
push the Start/Pause button.
Do the selection of time pro-
gramme.
Do the selection of time pro-
gramme or higher drying level
(e.g. Extra Dry )
The filter is clogged. Clean the filter.
Too high volume of the load.
Drying cycle
too long
The laundry not spun sufficient-
5)
ly.
Very high room temperature -
this is not the appliance malfunction.
1)
If there is an error message on the display (e.g. E51): Turn the tumble dryer off and on.
Make a selection of the new programme. Push the Start/Pause button. Does not operate? contact the service centre and give the error code.
2)
follow the programme description — see PROGRAMMES chapter
3)
see CARE AND CLEANING chapter
4)
see section WATER HARDNESS in HINTS AND TIPS chapter
5)
Note: After maximum 5 hours the drying cycle ends automatically (see Drying cycle
complete section).
DRUM LIGHT
This appliance has an internal lamp that
comes on when you open the door and
goes off when the door is closed.
WARNING!
Obey the maximum load vol-
ume.
Spin correctly the laundry.
If possible, lower the room tem-
perature.
To replace the internal lamp,
contact the service centre.
The LED of the lamp is CLASS 1 and
agrees with IEC 60825-1:1993 + A1:1997
+ A2:2001.
Visible LED radiation, do not
look directly into the beam.
Page 27

TECHNICAL INFORMATION
height x width x depth 850 x 600 x 600 mm (maximal 640 mm)
drum volume 118 l
maximum depth with the load door
opened
maximum width with the load door
opened
adjustable height 850 mm (+ 15 mm - feet regulation)
the appliance weight 43 kg
maximum load volume 8 kg
voltage 230 V
frequency 50 Hz
necessary fuse 16 A
total power 2800 W
energy efficiency class B
energy consumption kWh/cycle
annual energy consumption 268,8 kWh
type of use Domestic
permitted ambient temperature + 5°C to + 35°C
1)
8 kg of cotton, centrifuged at 1000 rpm with reference to EN 61121
ENGLISH 27
1090 mm
950 mm
1)
4,48 kWh
Page 28

28
INSTALLATION
APPLIANCE POSITIONING
• The tumble dryer must be installed in
a clean position, where dirt does not
collect.
• Air must flow freely around the appliance. Make sure that the front airflow
slots in the bottom of the appliance
are not blocked .
• To keep vibration and noise at the
minimum, when the tumble dryer operates, it must be put on a stable and
flat surface.
• When the appliance is put in its permanent position, check if is fully level
with the aid of a spirit level. If it is
not, adjust the feet until it is.
• Do not remove the feet. Do not decrease the floor clearance through
thick carpets, bar of wood or equivalent. This can increase the heat which
can cause interference with the operation of the appliance.
• The temperature of the hot
air which occurs in the tumble
dryer can increase to 60 °C.
The appliance must not be installed on the floor which is
not resistant to high temperatures.
• When the tumble dryer operates, the room temperature
must not be lower than +5 °C
and higher than +35 °C. This
can cause unwanted effect on
the performance of the appliance.
• If it is necessary to move the
appliance, it must be moved
vertically.
• The appliance must not be installed behind a lockable
door, a sliding door, a door
with a hinge on the opposite
side to that of the appliance
in such a way that a full opening of the tumble dryer is restricted.
UNPACKING
CAUTION!
Before use all parts of the transport
packaging must be removed.
To remove the polystyrene blockages:
1. Open the load door.
2. Pull 2 plastic hoses with the poly-
styrene blockages out from the
drum.
x2
It is possible to adjust the height of the
tumble dryer. To do that adjust the feet
(see picture).
15mm
Page 29

ENGLISH 29
INSTALLATION UNDER A
COUNTER
The appliance can be installed as freestanding or below the kitchen counter
with correct space (see picture).
600 mm
> 850 mm
600 mm
THE LOAD DOOR REVERSAL
The load door can be installed by the
user in the opposite side if there is a
limit to install the appliance. (see separate leaflet).
ELECTRICAL CONNECTION
• Connect the machine to an earthed
socket, in accordance with current
wiring regulations.
• Make sure that the electrical data on
the rating plate agrees with the power supply.
• Always use a correctly installed
shockproof socket.
• Do not use multiple plugs and extension cables. There is a risk of fire.
• Should the appliance power supply
cable need to be replaced, this must
be carried out by our Service Centre.
• Make sure not to squash or cause
damage to the mains plug and cable
behind the appliance.
• Do not pull the mains cable to disconnect the appliance. Always pull
the mains plug.
• The plug must be dry.
Page 30

30
INHALT
32 SICHERHEITSHINWEISE
34 UMWELTTIPPS
35 GERÄTEBESCHREIBUNG
36 ZUBEHÖR
38 BEDIENFELD
39 VOR DER ERSTEN INBETRIEBNAHME
39 PROGRAMME
41 GEBRAUCH DES GERÄTS
45 HINWEISE UND TIPPS
47 REINIGUNG UND PFLEGE
53 FEHLERSUCHE
55 TECHNISCHE DATEN
56 MONTAGE
KUNDENDIENST
Halten Sie folgende Angaben bereit,
wenn Sie sich an den Kundendienst
wenden. Die Informationen finden Sie
auf dem Typenschild.
Modell
Produkt-Nummer (PNC)
Seriennummer
In dieser Benutzerinformation werden
folgende Symbole verwendet:
Warnung - Wichtige
Sicherheitshinweise.
Allgemeine Hinweise und Ratschläge
Hinweise zum Umweltschutz
Änderungen vorbehalten
Page 31

FÜR PERFEKTE ERGEBNISSE
Danke, dass Sie sich für dieses AEG Produkt entschieden haben. Wir haben es
geschaffen, damit Sie viele Jahre von seiner ausgezeichneten Leistung und den
innovativen Technologien, die Ihnen das Leben erleichtern, profitieren können. Es ist
mit Funktionen ausgestattet, die in gewöhnlichen Geräten nicht vorhanden sind.
Nehmen Sie sich ein paar Minuten Zeit zum Lesen, um seine Vorzüge kennen zu
lernen.
ZUBEHÖR UND VERBRAUCHSMATERIALIEN
Im AEG Webshop finden Sie alles, was Sie für ein makelloses Aussehen und
perfektes Funktionieren Ihrer AEG Geräte benötigen. Wir bieten auch ein
umfangreiches Zubehörsortiment, das Ihre höchsten Qualitätsansprüche erfüllt, vom
Profi-Kochgeschirr bis zu Besteckkörben, von Flaschenhaltern bis hin zu
Wäschebeuteln für empfindliche Wäsche...
Besuchen Sie den Webshop unter
www.aeg.com/shop
DEUTSCH 31
Auf unserer Website finden Sie:
- Produkte
- Prospekte
- Gebrauchsanweisungen
- Problemlöser
- Service-Informationen
www.aeg.com
Page 32

32
SICHERHEITSHINWEISE
Lesen Sie zu Ihrer Sicherheit und für
eine optimale Nutzung des Geräts
vor der Montage und dem ersten Gebrauch die vorliegende Gebrauchsanweisung einschließlich der Ratschläge
und Warnungen aufmerksam durch.
Es ist wichtig, dass zur Vermeidung
von Fehlern und Unfällen alle Personen, die das Gerät benutzen, mit der
Bedienung und den Sicherheitsvorschriften vertraut sind. Heben Sie die
Benutzerinformation gut auf und
übergeben Sie sie bei einem Weiterverkauf des Geräts dem neuen Besitzer, sodass jeder während der gesamten Lebensdauer des Geräts über
Gebrauch und Sicherheit informiert
ist.
- Vor Gebrauch des Geräts Ge-
brauchsanweisung lesen.
ALLGEMEINE
SICHERHEITSHINWEISE
• Aus Sicherheitsgründen dürfen keine
Änderungen an den technischen
Merkmalen oder am Gerät selbst vorgenommen werden.
• Personen (einschließlich Kinder), die
aufgrund ihrer eingeschränkten physischen, sensorischen oder geistigen
Fähigkeiten oder ihrer Unerfahrenheit oder Unkenntnis nicht in der Lage sind, das Gerät sicher zu benutzen, dürfen dieses Gerät nicht ohne
Aufsicht oder Anweisung durch eine
für ihre Sicherheit verantwortliche
Person benutzen.
• Stellen Sie sicher, dass keine Kleinkinder oder Haustiere in die Trommel
klettern. Kontrollieren Sie daher vor
dem Gebrauch die Trommel.
• Alle harten und scharfen Gegenstände wie Münzen, Sicherheitsnadeln,
Nägel, Schrauben, Steine usw. können das Gerät schwer beschädigen
und gehören nicht in die Maschine.
• Artikel wie Schaumgummi (Latexschaumgummi), Duschhauben, im-
prägnierte Textilien (wenn es kein
gesondertes Trockenprogramm
gibt), gummibeschichte Wäschestücke, Kleider oder Kissen mit Schaumgummipolster dürfen in dem Gerät
nicht getrocknet werden.
• Stellen Sie sicher, dass der Netzstecker nach der Montage noch zugänglich ist.
• Ziehen Sie nach dem Trocknen und
zum Reinigen und Warten des Geräts
immer den Netzstecker.
• Versuchen Sie unter keinen Umständen, das Gerät selbst zu reparieren.
Reparaturen durch unerfahrene Personen können zu Verletzungen und
schweren Funktionsstörungen führen.
Wenden Sie sich an Ihren lokalen
Kundendienst. Bestehen Sie immer
auf Original-Ersatzteile.
• Wäschestücke, die mit Speiseöl verschmutzt sind oder die mit Aceton,
Benzin, Kerosin, Fleckentfernern, Terpentin, Wachsen und Wachsentfernern behandelt worden sind, müssen
vor dem Trocknen im Wäschetrockner in heißem Wasser und zusätzlichem Waschmittel gewaschen werden.
• Explosionsgefahr: Trocknen Sie niemals Wäschestücke, die mit entflammbaren Stoffen (Benzin, Spiritus,
Trockenreinigungsmittel oder Ähnlichem) in Berührung gekommen
sind. Da diese Stoffe flüchtig sind,
besteht Explosionsgefahr. Trocknen
Sie nur mit Wasser gewaschene Wäschestücke.
• Brandgefahr: Wäschestücke, die mit
Speise- oder Pflanzenöl befleckt oder
getränkt sind, stellen eine Brandgefahr dar und gehören nicht in den
Wäschetrockner.
• Für Wäsche, die mit Fleckenentferner
behandelt wurde, muss vor dem
Trocknen ein zusätzlicher Spülgang
durchgeführt werden
• Vergewissern Sie sich, dass keine
Feuerzeuge oder Streichhölzer in
den Taschen von Wäschestücken ge-
Page 33

blieben sind, bevor Sie die Wäsche in
die Trommel legen.
• Das Kondenswasser darf nicht getrunken oder für die Zubereitung von
Speisen verwendet werden. Dies
kann bei Mensch und Tier gesundheitliche Schäden hervorrufen.
• Setzen oder lehnen Sie sich nie auf
die Tür. Das Gerät könnte kippen.
WARNUNG!
• Brandgefahr! Damit Wäsche-
stücke sich nicht entzünden,
darf der Wäschetrockner
nicht vor Ende des Trockenganges ausgeschaltet werden, es sei denn, alle Wäschestücke werden schnell
herausgenommen und ausgebreitet, um die Wärme zu
verteilen.
• Flusenansammlungen um
den Wäschetrockner müssen
vermieden werden.
• Stromschlaggefahr! Spritzen Sie das
Gerät nicht mit einem Wasserstrahl
ab.
• Der letzte Teil eines Trockenzyklus
findet ohne Hitze statt (Abkühlzyklus),
um sicherzustellen, dass die Wäsche
eine Temperatur erreicht, bei der sie
nicht beschädigt wird.
• Wäsche, die chemisch gereinigt wurde, darf nicht im Trockner getrocknet
werden.
• Der Raum, in dem der Trockner aufgestellt wird, muss gut belüftet sein,
damit keine Gase in den Raum zurückströmen, die von offenem Feuer
oder von anderen Geräten, die mit
Brennstoffen arbeiten, stammen.
MONTAGE
• Dieses Gerät ist schwer. Vorsicht
beim Transport.
• Überzeugen Sie sich beim Auspacken, dass das Gerät nicht beschädigt ist. In Zweifelsfällen benutzen Sie
es nicht, sondern wenden Sie sich an
den Kundendienst.
DEUTSCH 33
• Entfernen Sie vor dem ersten Gebrauch das gesamte Verpackungsmaterial. Bei Missachtung dieser Anweisung können gefährliche Schäden
am Gerät und Sachschäden entstehen. Siehe den entsprechenden Abschnitt in der Gebrauchsanweisung.
• Alle Elektroarbeiten, die zur Installation dieses Geräts erforderlich sind,
dürfen nur von einer Elektrofachkraft
oder entsprechend qualifizierten Person ausgeführt werden.
• Die Geräterückseite muss gegen die
Wand zeigen.
• Stellen Sie die Füße entsprechend
ein, wenn das Gerät auf einem Teppich oder etwas Ähnlichem installiert
wird. Unter dem Gerät muss Luft hindurchströmen können.
• Überprüfen Sie nach der Installation,
dass das Gerät nicht auf dem Netzkabel steht oder das Netzkabel einklemmt.
• Wird der Trockner auf einer Waschmaschine installiert, muss der Auftisch-Bausatz (Zubehör) verwendet
werden. Siehe Kapitel: ZUBEHÖR.
GEBRAUCH
• Dieses Gerät ist ausschließlich zur
Verwendung im Haushalt bestimmt.
Es darf nicht für andere Zwecke verwendet werden.
• Nur Textilien trocknen, die für Wäschetrockner geeignet sind. Beachten Sie die Pflegekennzeichen auf
den Textilien.
• Trocknen Sie keine ungewaschenen
Wäschestücke im Trockner.
• Beladen Sie den Wäschetrockner
nicht über die empfohlene Menge hinaus. Beachten Sie das maximale
Fassungsvermögen. Siehe das entsprechende Kapitel in der Gebrauchsanweisung.
• Tropfnasse Kleidung darf nicht in den
Wäschetrockner geladen werden.
• Textilien, die mit flüchtigen Erdölerzeugnissen in Kontakt gekommen
sind, dürfen nicht in dem Gerät getrocknet werden. Wenn flüchtige Rei-
Page 34

34
nigungsflüssigkeiten verwendet wurden, müssen diese sorgfältig aus
dem Kleidungsstück entfernt werden,
bevor es in das Gerät gegeben wird.
• Benutzen Sie den Wäschetrockner
nicht, wenn das Stromkabel, das Bedienfeld, die Arbeitsplatte oder der
Sockel beschädigt ist, sodass das Geräteinnere zugänglich ist.
• Weichspüler und ähnliche Produkte
müssen den Herstellerangaben entsprechend benutzt werden.
• Brandgefahr! Beschädigte Wäschestücke mit Wattierungen oder Füllungen (Kopfkissen, Jacken, Bettdecken
etc.) dürfen nicht getrocknet werden.
Die Wattierung oder Füllung könnte
austreten und einen Brand verursachen.
SICHERHEIT FÜR KINDER
• Dieses Gerät darf ohne Aufsicht nicht
von kleinen Kindern oder Behinderten bedient werden.
• Kinder erkennen häufig nicht die Gefahren, die von elektrischen Geräten
ausgehen. Kinder müssen beaufsichtigt werden, damit sie nicht am Gerät
herumspielen können.
WARNUNG!
• Erstickungsgefahr! Verpackungen (z. B. Folien, Styropor) können eine Gefahr für
Kinder darstellen - halten Sie
solche Materialien von Kindern fern.
• Bewahren Sie alle Waschmittel außerhalb der Reichweite von Kindern
auf.
• Stellen Sie sicher, dass Kinder oder
Haustiere nicht in die Trommel klettern.
ENTSORGUNG DES GERÄTS
• Ziehen Sie den Netzstecker aus der
Netzsteckdose.
• Schneiden Sie das Netzkabel ab und
entsorgen Sie es.
• Entsorgen Sie die Türverriegelung,
damit Kinder oder Haustiere nicht in
dem Gerät eingeschlossen werden
können. Andernfalls besteht Erstickungsgefahr.
UMWELTTIPPS
VERPACKUNGSMATERIALIEN
Recyceln Sie Materialien mit dem Symbol
. Entsorgen Sie die Verpackung
in den entsprechenden Recyclingbehältern.
Das Symbol
seiner Verpackung weist darauf hin,
dass dieses Produkt nicht als normaler
Haushaltsabfall zu behandeln ist,
sondern an einem Sammelpunkt für das
Recycling von elektrischen und
auf dem Produkt oder
elektronischen Geräten abgegeben
werden muss. Durch Ihren Beitrag zum
korrekten Entsorgen dieses Produkts
schützen Sie die Umwelt und die
Gesundheit Ihrer Mitmenschen. Umwelt
und Gesundheit werden durch falsches
Entsorgen gefährdet. Weitere
Informationen über das Recycling
dieses Produkts erhalten Sie von Ihrem
Rathaus, Ihrer Müllabfuhr oder dem
Geschäft, in dem Sie das Produkt
gekauft haben.
Page 35

GERÄTEBESCHREIBUNG
DEUTSCH 35
1 2
3
4
5
12
11
10
9
Behälter
1
Bedienfeld
2
Trommelbeleuchtung
3
Einfülltür (Türanschlag wechselbar)
4
Filter
5
Schiebetaste zum Öffnen der Wär-
6
metauschertür
Luftschlitze
7
Schraubfüße
8
Wärmetauschertür
9
Wärmetauscherabdeckung
10
Verriegelungsgriffe
11
Typenschild
12
6
7
8
Page 36

36
ZUBEHÖR
BAUSATZ WASCH-TROCKENSÄULE
Produktbezeichnung: SKP11
Sie erhalten den Bausatz bei Ihrem Vertragshändler. Der Bausatz Wasch-Trocken-Säule kann nur mit den in der Broschüre aufgeführten Waschmaschinen
verwendet werden. Siehe beiliegende
Broschüre.
Lesen Sie aufmerksam die dem Bausatz
beiliegende Anleitung.
BAUSATZ ZUR ABLEITUNG
DES KONDENSWASSERS
tisch geleert. Der Wasserbehälter muss
im Gerät bleiben.
Der installierte Schlauch muss eine Höhe von mindestens 50 cm bis höchstens
1 m über dem Boden haben. Der
Schlauch darf keine Schleife bilden.
Wenn möglich, verringern Sie die Länge des Schlauchs.
Lesen Sie aufmerksam die dem Bausatz
beiliegende Anleitung.
SOCKEL MIT SCHUBLADE
Produktbezeichnung: PDSTP10.
Sie erhalten den Bausatz bei Ihrem Vertragshändler.
Damit wird das Gerät auf eine höhere
Ebene gebracht und das Be- und Entladen erleichtert.
Die Schublade kann zur Aufbewahrung
von Wäsche benutzt werden, z. B. für
Handtücher, Reinigungsprodukte und
anderes.
Lesen Sie aufmerksam die dem Zubehör beiliegende Anleitung.
Produktbezeichnung: DK11.
Erhältlich bei Ihrem lizenzierten Händler
(kann bei einigen Modellen des Wäschetrockners angebracht werden).
Installationsbausatz für die Ableitung
des Kondenswassers in ein Waschbecken, einen Siphon, Gully usw. Nach
der Montage wird der Behälter automa-
Page 37

TROCKENKORB
DEUTSCH 37
Produktbezeichnung: RA11.
Erhältlich bei Ihrem lizenzierten Händler
(kann bei einigen Modellen des Wäschetrockners angebracht werden)
Trockenkorb zum sicheren Trocknen im
Wäschetrockner von:
• Turnschuhen
• Wolle
• Stofftieren
• Dessous
Lesen Sie aufmerksam die dem Bausatz
beiliegende Anleitung.
Page 38

38
BEDIENFELD
Programmwahlschalter
1
Display
2
Taste Start/Pause
3
DISPLAY
1 2
Funktionstasten
4
Programmkontrolllampen
5
Taste Auto Off
6
356 4
Symbol Beschreibung
, ,
, ,
, —
Trockengrad: minimal, mittel, maximal
Empfindlichkeitsgrad: normal, mittel, maximal
Dauer des Knitterschutzprogramms: Standarddauer,
Einstellbereich (0 Min. - 120 Min.)
Signal eingeschaltet
Kindersicherung eingeschaltet
Zeitwahl-Funktion eingeschaltet
Anzeige Behälter leeren
Anzeige Filter reinigen
Anzeige Wärmetauscher reinigen
Anzeige Trockenphase
Anzeige Kühlphase
Page 39

Symbol Beschreibung
Anzeige Knitterschutzphase
Zeitvorwahl eingeschaltet
-
-
Programmdauer
Einstellbereich für das Zeitprogramm (10 Min. - 2 Std.)
Einstellbereich für die Zeitvorwahl (30 Min. - 20 Std.)
VOR DER ERSTEN INBETRIEBNAHME
DEUTSCH 39
Reinigen Sie die Trommel des Wäschetrockners mit einem feuchten Tuch
oder stellen Sie ein kurzes Programm
PROGRAMME
Programme
Extratrocken
(Extra
Droog)
Schranktrocken (Kastd-
2)
roog)
Bügeltro-
cken
(Strijkdroog)
2)
Extra Leise
(Extra Stil)
Bettwäsche
(Beddengoed)
Daunen
(Dekbed)
Bela-
dung
8 kg
8 kg
8 kg
8 kg
3 kg
3 kg
ein (z. B. 30 Minuten Zeitprogramm), für
das Sie das Gerät mit feuchten Tüchern
beladen.
1)
Zum Trocknen von Kleidungsstücken aus Baumwolle. Trockengrad:
Extratrocken.
Zum Trocknen von Kleidungsstücken aus Baumwolle. Trockengrad:
Schranktrocken.
Zum Trocknen von Kleidungsstücken aus Baumwolle. Trockengrad:
Bügelwäsche.
Zum sanften Trocknen von Kleidungsstücken aus Baumwolle bei
minimaler Geräuschentwicklung.
Das Programm kann nachts verwendet werden.
Zum Trocknen von Bettwäsche
wie: Einzel-/Doppelbettlaken, Kissenbezügen, Bettüberzügen.
Zum Trocknen von Bettdecken in
Normal- oder Übergröße und
Kopfkissen (mit Federn-, Daunenoder synthetischer Füllung).
Wäscheart
Baumwolle (Katoen)
Verfügbare
Funktionen
alle außer
Zeitwahl
(Droogtijd)
alle außer
Zeitwahl
(Droogtijd)
alle außer
Zeitwahl
(Droogtijd)
alle außer
Zeitwahl
(Droogtijd)
3)
alle außer
Zeitwahl
(Droogtijd)
alle außer
Zeitwahl
(Droogtijd)
und Knitterschutz (Anti-
kreuk)
3)
Pfle-
gesym-
bol
Page 40

40
Programme
Zeitprogramm (Tijd)
Mix Extra
Kurz (Mix
Extra Kort)
Extratrocken
(Extra
Droog)
Schranktrocken (Kastd-
2)
roog)
Bügeltrocken
(Strijkdroog)
Extra Leise
(Extra Stil)
Leichtbügeln (Strijkvrij)
Bela-
dung
8 kg
3 kg
3,5 kg
3,5 kg
3,5 kg
3,5 kg
1 kg
(oder
5
Hem-
den)
1)
Wäscheart
Zum Trocknen der Wäsche in einer
benutzerdefinierten Zeit.
Zum Trocknen von Textilien aus
Baumwolle und Synthetikgeweben
bei niedriger Temperatur.
Mischgewebe (Synthetica)
Zum Trocknen von dicken oder
mehrlagigen Textilien wie z. B.
Pullover, Bett-, Tischwäsche.
Zum Trocknen von dünnen Textilien, die nicht gebügelt werden
müssen, z. B. bügelfreie Hemden,
Tischwäsche, Babykleidung, Socken, Damenunterwäsche mit Korsettstangen oder Drahteinlagen.
Zum Trocknen von dünnen Textilien, die noch gebügelt werden
müssen, z. B. Strickwaren, Hemden.
Zum sanften Trocknen von Kleidungsstücken aus Mischgeweben
bei minimaler Geräuschentwicklung. Das Programm kann nachts
verwendet werden.
Zum Trocknen von pflegeleichten
Textilien (z. B. Hemden und Blusen); das Bügeln wird erheblich erleichtert. Die Ergebnisse können
je nach Gewebeart und -veredelungen unterschiedlich ausfallen.
Legen Sie die Kleidung direkt in
den Trockner. Nehmen Sie die
Textilien nach dem Trocknen sofort aus dem Trockner und hängen
Sie sie auf Kleiderbügel.
Verfügbare
Funktionen
alle außer
Trocken Plus
(Drogen
Plus)
alle außer:
Schonen
(Behoed-
zaam) und
Zeitwahl
(Droogtijd)
alle außer
Zeitwahl
(Droogtijd)
alle außer
Zeitwahl
(Droogtijd)
alle außer
Zeitwahl
(Droogtijd)
alle außer
Zeitwahl
(Droogtijd)
3)
alle außer
Zeitwahl
(Droogtijd)
3)
Pfle-
gesym-
bol
Page 41

DEUTSCH 41
Programme
Outdoor
(Sport Intensief)
Bela-
dung
2 kg
1)
Wäscheart
Zum Trocknen von Outdoorkleidung, Sport- und Florgewebe, imprägnierten und atmungsaktiven
Jacken, Jacken mit herausnehmbarem Fleeceteil oder Innenwattierung.
Verfügbare
Funktionen
alle außer
Zeitwahl
(Droogtijd)
und Knitterschutz (Anti-
kreuk)
alle außer
Feinwäsche
(Fijne Was)
3 kg Für Feinwäsche.
Zeitwahl
(Droogtijd)
3)
Trocken Plus
(Drogen
Plus) , Signal
(Zoemer) ,
Zeitwahl
(Droogtijd)
4)
, Zeitvor-
wahl (Start-
Wolle (Wol)
Zum Trocknen von Textilien aus
Wolle. Die Kleidungsstücke werden weich und anschmiegsam. Wir
1 kg
empfehlen, die Wäsche sofort
nach dem Programmende zu entnehmen.
uitstel)
1)
Höchstgewicht der trockenen Wäsche
2)
Nur für Prüfinstitute:
Verwenden Sie für die Leistungsprüfung die im Dokument EN 61121 angegebenen
Standardprogramme. Ist der Restfeuchtegrad der Wäsche nicht zufriedenstellend, wählen Sie
das Programm und die Funktion Trocken Plus (Drogen Plus) .
3)
Schonen (Behoedzaam) ist standardmäßig eingeschaltet
4)
Nur mit Trockenkorb RA11 — siehe ZUBEHÖR
Pfle-
gesym-
bol
3)
3)
GEBRAUCH DES GERÄTS
VORBEREITEN DER WÄSCHE
Nur Textilien trocknen, die für
Wäschetrockner geeignet sind.
Vergewissern Sie sich, dass die
Wäsche für Wäschetrockner geeignet ist. Achten Sie auf das
Pflegesymbol an den Kleidungsstücken.
Pflegesymbol
Eigenschaften
Kann im Wäschetrockner getrocknet werden
Pfle-
Eigenschaften
gesymbol
Kann im Trockner mit Stan-
dardtemperatur getrocknet
werden
Kann im Trockner mit redu-
zierter Temperatur getrock-
net werden
Kann nicht im Wäschetrock-
ner getrocknet werden
Bereiten Sie die Wäsche vor:
• Reißverschlüsse schließen, Bettbezüge zuknöpfen, lose Gürtel oder Bänder (z. B. von Schürzen) zusammen-
Page 42

42
binden, damit die Wäsche sich nicht
verheddert
• darauf achten, dass die Taschen leer
sind und Metallgegenstände (Heftklammern, Sicherheitsnadeln usw.)
entfernen
• Wäschestücke mit zwei Stoffschichten nach links wenden (z. B. sollte bei
mit Baumwolle gefütterten Anoraks
die Baumwollschicht außen liegen)
Trocknen Sie nur:
• Baumwolle und Leinen mit Baumwolle (Katoen) -Programmen
• Mischgewebe mit Mischgewebe
(Synthetica) -Programmen
• Textilien mit dunklen Farben getrennt von Textilien mit hellen Farben
- Textilien könnten sonst abfärben
• Trikotwäsche und Strickwaren nur mit
den entsprechenden Programmen die Wäschestücke könnten sonst einlaufen
Trocknen Sie nicht mehr Wäsche als das maximale Fassungsvermögen von 8kg.
EINSCHALTEN DES GERÄTS
Schalten Sie das Gerät mit der Auto
Off-Taste ein bzw. aus. Wenn das Gerät
eingeschaltet ist, erscheinen auf dem
Display einige Anzeigen.
AUTO OFF-FUNKTION
Die automatische Standbyfunktion
schaltet das Gerät automatisch in folgenden Fällen aus, um den Energieverbrauch zu senken:
• Wenn die Start/Pause (Start/Pauze) Taste nicht innerhalb von 5 Min. betätigt wird.
• 5 Min. nach Programmende.
Drücken Sie die Auto Off-Taste, um das
Gerät einzuschalten.
EINSTELLEN EINES
PROGRAMMS
EINFÜLLEN DER WÄSCHE
1. Ziehen Sie die Gerätetür auf.
2. Legen Sie die Wäsche locker ein.
3. Schließen Sie die Gerätetür.
VORSICHT!
Die Wäsche nicht zwischen Gerätetür und Gummidichtung einklemmen.
Wählen Sie das gewünschte Programm
mit dem Programmwahlschalter aus.
Die mögliche Programmdauer erscheint im Display.
Page 43

Die angegebene Trockenzeit
bezieht sich auf eine Beladung
mit 5 kg für Baumwoll- und
Jeansprogramme. Für andere
Programme bezieht sich die
Trockenzeit auf die empfohlene
Beladungsmenge. Die Trockenzeit für Baumwoll- und Jeansprogramme ist länger, wenn die
Beladung 5 kg übersteigt.
SONDERFUNKTIONEN
Zusammen mit dem Programm können
Sie eine oder mehrere Sonderfunktionen einstellen.
Drücken Sie die entsprechende Taste,
um die Funktion ein- oder auszuschalten.
Ist die Funktion eingeschaltet, erscheint
das entsprechende Symbol im Display.
FUNKTION TROCKEN PLUS
(DROGEN PLUS)
Mit dieser Funktion wird die Wäsche
stärker getrocknet. Es stehen 3 Optionen zur Verfügung:
minimal - Die zum Programm gehörende Standardauswahl.
mittel — Auswahl für eine etwas stärker
getrocknete Wäsche.
maximal — Auswahl für eine noch stärker getrocknete Wäsche.
FUNKTION SCHONEN
(BEHOEDZAAM)
Zum sanften Trocknen empfindlicher
und temperaturempfindlicher Textilien
(z. B. Acryl, Viskose). Für Textilien mit
dem Symbol
dieses Programm wird die Temperatur
reduziert.
auf dem Etikett. Für
DEUTSCH 43
FUNKTION KNITTERSCHUTZ
(ANTI-KREUK)
Verlängert die Knitterschutzphase (30
Minuten) am Ende des Trockenprogramms auf 90 Minuten. Diese Funktion
schützt die Textilien vor Knitterfalten.
Während der Knitterschutzphase kann
Wäsche entnommen werden.
FUNKTION SIGNAL (ZOEMER)
Wenn die Funktion Signal aktiviert ist,
ertönt das Signal:
• am Programmende
• zu Beginn und Ende der Knitterschutzphase
• bei einer Unterbrechung des Programms
Das Signal ist standardmäßig aktiviert.
Mit dieser Funktion können Sie den
Ton ein- oder ausschalten.
FUNKTION ZEITWAHL
(DROOGTIJD)
Nur zusammen mit dem Zeitprogramm
(Tijd) . Damit kann die Dauer des Trockenprogramms von min. 10 Min. bis
max. 2 Stunden (in Schritten von 10
Min.) eingestellt werden.
FUNKTION ZEITVORWAHL
(STARTUITSTEL)
Zur Verzögerung des Programmstarts um mindestens 30
Minuten bis höchstens 20 Stunden.
1. Wählen Sie ein Trockenprogramm
und Funktionen.
2. Drücken Sie die Taste Zeitvorwahl
(Startuitstel) wiederholt, bis die gewünschte Startzeitverzögerung im
Display angezeigt wird (z. B.
wenn das Programm nach einer
Verzögerung von 12 Stunden gestartet werden soll.)
3. Drücken Sie die Taste Start/Pause
(Start/Pauze) , um die Funktion
Zeitvorwahl (Startuitstel) zu aktivieren. Auf dem Display wird ange-
,
Page 44

44
zeigt, wie viel Zeit noch bis zum
Programmstart verbleibt.
FUNKTION
KINDERSICHERUNG
Die Kindersicherung kann eingeschaltet
werden, um zu verhindern, dass Kinder
mit dem Gerät spielen. Wenn die Kindersicherung eingeschaltet ist, sind alle
Tasten sowie der Programmwahlschalter gesperrt (diese Funktion sperrt nicht
die Auto/Off-Taste). Zum Einschalten
der Kindersicherung drücken Sie die
Tasten Trocken Plus (Drogen Plus) und
Schonen (Behoedzaam) gleichzeitig, bis
das Symbol
Zum Ausschalten drücken Sie die obigen Tasten erneut, bis das Symbol im
Display erlischt.
Die Kindersicherung kann eingeschaltet
werden:
• Bevor Sie die Taste Start/Pause
(Start/Pauze) drücken - das Gerät
kann nicht starten
• Nachdem Sie die Taste Start/Pause
(Start/Pauze) gedrückt haben - alle
Tasten und der Programmwahlschalter sind ausgeschaltet
im Display erscheint.
Zum Einschalten des Programms drücken Sie die entsprechende Taste (siehe Abbildung). Die LED über der Taste
leuchtet rot.
ÄNDERN EINES PROGRAMMS
Zum Ändern eines Programms drücken
Sie die Taste Auto/Off, um das Gerät
auszuschalten. Drücken Sie Auto/Off,
um das Gerät einzuschalten, und stellen
Sie dann das Programm ein.
AM PROGRAMMENDE
Nach Abschluss des Trockenprogramms blinkt das Symbol
play. Ist die Funktion Signal (Zoemer)
eingeschaltet, ertönt etwa eine Minute
lang eine akustische Signalfolge.
So entnehmen Sie die Wäsche:
1. Halten Sie die Auto/Off-Taste 2 Sekunden lang gedrückt, um das Gerät auszuschalten.
2. Öffnen Sie die Tür des Geräts.
3. Entnehmen Sie die Wäsche.
4. Schließen Sie die Gerätetür.
Nach jedem Trockenprogramm:
im Dis-
STARTEN EINES PROGRAMMS
• Filter reinigen
• Behälter leeren
(Siehe Kapitel REINIGUNG UND PFLE-
GE.)
Page 45

HINWEISE UND TIPPS
DEUTSCH 45
UMWELTTIPPS
• Benutzen Sie keinen Weichspüler für
Wäsche, die Sie anschließend in den
Trockner geben. Im Wäschetrockner
wird die Wäsche automatisch weich.
• Benutzen Sie das Kondensat als destilliertes Wasser, z. B. zum Dampfbügeln. Reinigen Sie das Kondensat
vorher (z. B. mit einem Kaffeefilter),
um eventuelle Rückstände oder Flusen zu entfernen.
• Halten Sie die Lüftungsschlitze unten
am Gerät stets frei.
• Halten Sie sich an die in der Programmtabelle aufgeführten Füllmengen.
• Achten Sie darauf, dass am Installationsort des Geräts eine gute Luftzirkulation herrscht.
• Reinigen Sie den Filter nach jedem
Trockenprogramm.
• Schleudern Sie die Wäsche vor dem
Trocknen gut.
DURCHSCHNITTSGEWICHT
VERSCHIEDENER
WÄSCHESTÜCKE
Geschirrtuch 100 g
WASSERHÄRTE UND
LEITFÄHIGKEIT
Die Wasserhärte kann sich von Ort zu
Ort unterscheiden. Die Wasserhärte
wirkt sich auf die Leitfähigkeit und die
Funktionsweise des Leitfähigkeitssensors aus. Wenn Sie den Wert der Leitfähigkeit des Wassers kennen, können
Sie den Sensor für bessere Trockenergebnisse einstellen.
So ändern Sie die Einstellung des Leitfähigkeitssensors:
1. Drehen Sie den Programmwahlschalter auf ein verfügbares Programm.
2. Drücken Sie die 2 Tasten gleichzeitig (siehe Abbildung). Halten Sie
die Tasten gedrückt, bis eines dieser Symbole im Display erscheint:
Bademantel 1200 g
Bettbezug 700 g
Arbeitshemd 600 g
Schlafanzug 500 g
Bettlaken 500 g
Tischtuch 250 g
Herrenhemd 200 g
Nachthemd 200 g
Kopfkissenbezug 200 g
Frottierhandtuch 200 g
Bluse 100 g
Damenslip 100 g
Herrenunterhose 100 g
Windel 100 g
–
300 μS/cm
–
300-600 μS/cm
–
μS/cm
3. Drücken Sie die Taste wiederholt,
bis der erforderliche Grad eingestellt ist (siehe Abbildung).
geringe Leitfähigkeit <
mittlere Leitfähigkeit
hohe Leitfähigkeit > 600
Page 46

46
4. Zum Speichern der Einstellung drü-
cken Sie die unter Punkt 2 angegebenen 2 Tasten gleichzeitig.
ANZEIGE „BEHÄLTER VOLL“
Die Anzeige ist standardmäßig eingeschaltet. Sie leuchtet am Ende des
Programms oder wenn der Wasserbehälter voll ist. Wenn Sie ein externes
Abpumpsystem für den Behälter benutzen, kann die Anzeige ausgeschaltet
werden.
Ein- oder Ausschalten der Anzeige:
1. Drehen Sie den Programmwahlschalter auf ein verfügbares Programm.
2. Drücken Sie die 2 Tasten gleichzeitig (siehe Abbildung), bis die gewünschte Einstellung erscheint:
–
die Anzeige
Anzeige
ist aus und die
erscheint — die
Kontrolllampe
ausgeschaltet
–
die Anzeige
ist eingeschaltet
und die Anzeige
scheint — die Anzeige
geschaltet
ist dauerhaft
er-
ist ein-
Page 47

REINIGUNG UND PFLEGE
DEUTSCH 47
REINIGEN DES FILTERS
Am Ende eines jeden Programms
leuchtet die Anzeige
gen), um darauf hinzuweisen, dass der
Filter gereinigt werden muss.
So reinigen Sie den Filter:
(Filter reini-
Der Filter hält Flusen zurück. Die
Flusen lösen sich während des
Trockengangs von der Wäsche.
1. Offnen Sie die Tür.
2. Ziehen Sie den Filter heraus.
3. Öffnen Sie den Filter.
Page 48

48
4. Reinigen Sie den Filter mit der
feuchten Hand.
5. Reinigen Sie den Filter bei Bedarf
mit einer Bürste und warmem Wasser.
Schließen Sie den Filter.
6. Entfernen Sie die Flusen vom Filtersockel. Hierfür können Sie einen
Staubsauger benutzen.
7. Setzten Sie den Filter in den Filtersockel.
VORSICHT!
Benutzen Sie den Trockner nie
ohne oder mit einem beschädigten oder verstopften Filter.
Reinigen Sie den Filter nach jedem Trockenprogramm. Ein verstopfter Filter verlängert den
Trockengang und erhöht den
Energieverbrauch.
Ist der Behälter voll, bricht das Programm automatisch ab und die Anzei-
ge Behälter leeren leuchtet. Zur
Fortsetzung des Programms leeren Sie
den Behälter und drücken Sie die Starttaste.
Sie können auch ein Zubehörteil
installieren, damit sich der Behälter automatisch leert (siehe
Kapitel: ZUBEHÖR).
LEEREN DES BEHÄLTERS
Der Behälter muss nach jedem Trockengang entleert werden.
Page 49

So leeren Sie den Behälter:
DEUTSCH 49
1. Ziehen Sie den Behälter heraus.
2. Tragen Sie den Behälter in waage-
rechter Lage.
3. Ziehen Sie die Kunststoffverbindung heraus und entleeren Sie den
Wasserbehälter in ein Waschbecken.
4. Schieben Sie die Kunststoffverbin-
WARNUNG!
Vergiftungsgefahr! Das Kondenswasser darf nicht getrunken
oder für die Zubereitung von
Speisen verwendet werden.
Das Kondenswasser kann als
destilliertes Wasser, z. B. zum
Bügeln mit einem Dampfbügeleisen, verwendet werden. Filtern
Sie jedoch zuvor das Kondenswasser (z. B. mit einem Kaffeefilter), um eventuelle Rückstände
oder Flusen zurückzuhalten.
dung ein und setzen Sie den Behälter ein.
REINIGEN DES
WÄRMETAUSCHERS
Sobald die Anzeige Wärmetauscher reinigen leuchtet, muss der Wär-
metauscher gereinigt werden.
Page 50

50
So reinigen Sie den Wärmetauscher:
1. Öffnen Sie die Einfülltür.
2. Schieben Sie den Entriegelungs-
knopf am unteren Rand der Einfüllöffnung zur Seite und öffnen Sie
die Wärmetauschertür.
3. Drehen Sie beide Verriegelungsgriffe, um die Wärmetauscherabdeckung zu entriegeln.
4. Klappen Sie die Wärmetauscherabdeckung nach unten.
Page 51

DEUTSCH 51
5. Ziehen Sie den Wärmetauscher am
Griff aus dem unteren Fach heraus.
Halten Sie den Wärmetauscher
waagerecht, um das verbliebene
Wasser nicht zu verschütten.
6. Reinigen Sie den Wärmetauscher in
senkrechter Lage über einem Becken. Spülen Sie ihn gründlich mit
einer Handbrause.
7. Reinigen Sie den Wärmetauscherfilter. Spülen Sie ihn gründlich mit einer Handbrause.
8. Setzen Sie den Wärmetauscher
wieder in das untere Fach ein.
9. Schließen Sie die Wärmetauscherabdeckung.
10. Drehen Sie beide Verriegelungs-
griffe, bis sie einrasten.
11. Schließen Sie die Wärmetauscher-
tür.
Page 52

52
VORSICHT!
Benutzen Sie den Wäschetrockner nie mit einem von Flusen zugesetzten Wärmetauscher. Dies
könnte zur Beschädigung des
Wäschetrockners führen. Außerdem erhöht sich auch der Energieverbrauch.
Verwenden Sie für die Reinigung des Wärmetauschers keine scharfen Gegenstände. Ein
beschädigter Wärmetauscher
kann zu Undichtigkeiten führen.
Benutzen Sie den Trockner nie
ohne den Wärmetauscher.
REINIGEN DER TROMMEL
WARNUNG!
Ziehen Sie vor der Reinigung
des Geräts den Netzstecker.
Verwenden Sie einen handelsüblichen
neutralen Reiniger zur Reinigung der
Trommelinnenflächen und Wäscheab-
weiser. Trocknen Sie die gereinigten
Flächen mit einem weichen Tuch.
VORSICHT!
Verwenden Sie keine Scheuermittel oder Metallschwämmchen zum Reinigen der Trommel.
BEDIENFELD UND GEHÄUSE
REINIGEN
Verwenden Sie einen handelsüblichen
neutralen Reiniger zur Reinigung des
Bedienfelds und Gehäuses.
Verwenden Sie zur Reinigung ein feuchtes Tuch. Trocknen Sie die gereinigten
Flächen mit einem weichen Tuch.
VORSICHT!
Verwenden Sie keine Möbelreiniger oder Reinigungsmittel, die
eine Korrosion des Geräts verursachen können.
Page 53

FEHLERSUCHE
FEHLERSUCHE
DEUTSCH 53
Problem
1)
Das Gerät
funktioniert
nicht.
Nicht zufriedenstellende Trockenergebnisse.
Die Einfülltür schließt
nicht.
Err (Fehler)
auf dem Display.
Keine Trommelbeleuchtung.
Mögliche Ursache Abhilfe
Der Wäschetrockner ist nicht an
die Stromversorgung angeschlossen.
Stecken Sie den Netzstecker in
die Steckdose. Kontrollieren Sie
die Sicherung der Hausinstallati-
on.
Die Einfülltür ist offen. Schließen Sie die Tür.
Die Auto/Off-Taste wurde nicht
gedrückt.
Die Start/Pause -Taste wurde
nicht gedrückt.
Das Gerät befindet sich im
Standby-Modus.
Es wurde ein falsches Programm
eingestellt.
Der Filter ist verstopft.
Die Funktion Trocken Plus war
auf minimal gestellt.
Der Wärmetauscher ist ver-
stopft.
Die Beladung des Geräts ist zu
hoch.
Das Lüftungsgitter ist verstopft.
Die Innenflächen der Trommel
sind verschmutzt.
Die Wasserhärte ist zu hoch.
Drücken Sie die Auto/Off-Taste.
Drücken Sie die Taste Start/Pau-
se .
Drücken Sie die Auto/Off-Taste.
Wählen Sie ein geeignetes Pro-
gramm.
Reinigen Sie den Filter.
2)
3)
Stellen Sie die Funktion Trocken
Plus auf mittel oder maximal.
Reinigen Sie den Wärmetau-
3)
scher.
Beachten Sie das maximale Fas-
sungsvermögen.
Reinigen Sie das Lüftungsgitter
am Boden des Geräts.
Reinigen Sie die Innenflächen
der Trommel.
Stellen Sie die entsprechende
4)
Wasserhärte ein.
.
Der Filter ist nicht eingerastet. Setzen Sie den Filter korrekt ein.
Zwischen der Tür und der Dich-
tung ist Wäsche eingeklemmt.
Sie haben nach dem Programm-
start versucht, das Programm
oder die Funktion zu ändern.
Die Funktion, die Sie einschalten möchten, lässt sich nicht mit
dem ausgewählten Programm
kombinieren.
Laden Sie die Wäsche richtig in
die Trommel.
Schalten Sie den Wäschetrockner aus und wieder ein. Wählen
Sie ein neues Programm.
Schalten Sie den Wäschetrockner aus und wieder ein. Wählen
Sie ein neues Programm.
Kontaktieren Sie den Kunden-
Defekte Trommelbeleuchtung.
dienst und lassen Sie die Trommelbeleuchtung austauschen.
Page 54

54
Problem
1)
Ungewöhnlicher Zeitablauf im Display.
Mögliche Ursache Abhilfe
Die voraussichtliche Programmdauer wird errechnet unter Berücksichtigung der Menge und
Feuchtigkeit der Wäsche.
Dieser Vorgang erfolgt automatisch, es handelt sich nicht um
eine Gerätestörung.
Das Programm ist
ausgeschal-
Der Wasserbehälter ist voll.
Leeren Sie den Behälter3), drücken Sie die Taste Start/Pause .
tet.
Der Trockengang ist
zu kurz.
Es befindet sich nicht genügend
Wäsche in der Trommel.
Die Wäsche ist zu trocken.
Wählen Sie ein Zeitprogramm.
Wählen Sie ein Zeitprogramm
oder eine höhere Trocknungs-
stufe (z. B. Extratrocken ).
Der Filter ist verstopft. Reinigen Sie den Filter.
Die Beladung des Geräts ist zu
Der Trockengang ist
zu lang.
hoch.
Die Wäsche wird nicht genug
geschleudert.
5)
Die Raumtemperatur ist zu
hoch, es handelt sich nicht um
eine Gerätestörung.
1)
Das Display zeigt eine Fehlermeldung an (z. B. E51): Schalten Sie den Wäschetrockner aus
und wieder ein. Wählen Sie ein neues Programm. Drücken Sie die Taste Start/Pause .
Funktioniert das Gerät nicht? - Wenden Sie sich an den Kundendienst unter Angabe des
Fehlercodes.
2)
Lesen Sie die Programmbeschreibung - siehe Kapitel PROGRAMME
3)
Siehe Kapitel REINIGUNG UND PFLEGE.
4)
Siehe Abschnitt WASSERHÄRTE im Kapitel TIPPS UND HINWEISE.
5)
Anmerkung: Nach spätestens 5 Stunden wird der Trockengang automatisch abgebrochen
(siehe Abschnitt Ende des Trockengangs).
BELEUCHTUNG
Die Innenbeleuchtung des Geräts wird
automatisch beim Öffnen der Tür eingeschaltet und beim Schließen der Tür
ausgeschaltet.
WARNUNG!
Beachten Sie das maximale Fas-
sungsvermögen.
Schleudern Sie die Wäsche rich-
tig.
Falls möglich, senken Sie die
Raumtemperatur.
Für den Austausch der Innenbeleuchtung wenden Sie sich bitte
an den Kundendienst.
Die LED-Leuchte ist der KLASSE 1 zuzuordnen und entspricht IEC 60825-1:
1993 + A1:1997 + A2:2001.
Sichtbare LED-Abstrahlung; vermeiden Sie es, direkt in den
Lichtstrahl zu schauen.
Page 55

TECHNISCHE DATEN
Höhe x Breite x Tiefe 850 x 600 x 600 mm (maximal 640 mm)
Trommelvolumen 118 Liter
maximale Tiefe bei geöffneter Einfülltür 1090 mm
maximale Breite bei geöffneter Einfüll-
tür
Höhenverstellbarkeit 850 mm (+ 15 mm - Fußeinstellung)
Gewicht des Geräts 43 kg
Max. Fassungsvermögen 8 kg
Elektrische Spannung 230 V
Frequenz 50 Hz
Erforderliche Sicherung 16 A
Gesamte Leistungsaufnahme 2800 W
Energie-Effizienzklasse B
Energieverbrauch kWh/Trockengang
Jährlicher Energieverbrauch 268,8 kWh
Verwendungsart Haushalt
Zulässige Umgebungstemperatur + 5 °C bis + 35 °C
1)
8 kg Baumwollwäsche, geschleudert mit 1000 U/min gemäß EN 61121
1)
DEUTSCH 55
950 mm
4,48 kWh
Page 56

56
MONTAGE
AUFSTELLEN DER MASCHINE
• Der Wäschetrockner muss an einem
sauberen, staubfreien Ort installiert
werden.
• Die Luft muss frei um das Gerät herum strömen können. Achten Sie darauf, dass die Lüftungsschlitze unten
am Gerät nicht blockiert werden.
• Damit Vibrationen und Geräusche
auf ein Minimum reduziert werden,
muss das Gerät auf einer stabilen
und ebenen Fläche stehen.
• Überprüfen Sie den waagrechten
Stand des Geräts mit einer Wasserwaage, wenn es an seinen Platz gestellt wird. Richten Sie es gegebenenfalls mit den Schraubfüßen waagerecht aus.
• Entfernen Sie die Füße nicht. Auf keinen Fall den Bodenabstand durch
Florteppiche, Holzleisten oder ähnliche Materialien verringern. Dadurch
kann sich die Temperatur erhöhen
und den Gerätebetrieb beeinträchtigen.
• Die Temperatur der Heißluft
im Wäschetrockner kann bis
auf 60 °C ansteigen. Das Gerät darf nicht auf dem Boden
installiert werden, der keinen
hohen Temperaturen standhält.
• Während des Betriebs des
Trockners muss die Raumtemperatur im Bereich zwischen
+5° C und +35° C liegen. Andere Temperaturen können
unerwünschte Auswirkungen
auf die Geräteleistung haben.
• Falls das Gerät bewegt werden muss, muss es in senkrechtem Zustand bewegt werden.
• Das Gerät darf nicht hinter einer verschließbaren Tür, einer
Schiebetür oder einer Tür, deren Scharnier sich an der gegenüberliegenden Seite des
Scharniers des Geräts befindet aufgestellt werden, wenn
dadurch die vollständige Öffnung des Trockners nicht
mehr möglich ist.
AUSPACKEN
VORSICHT!
Entfernen Sie vor dem Gebrauch das
gesamte Verpackungsmaterial.
Entfernen der Styroporteile:
1. Öffnen Sie die Einfülltür.
Page 57

2. Ziehen Sie die zwei Kunststoff-
schläuche mit den Styroporteilen
aus der Trommel heraus.
x2
Die Höhe des Wäschetrockners ist verstellbar. Justieren Sie dazu die Füße
(siehe Abbildung).
15mm
MONTAGE ALS
EINBAUGERÄT
Das Gerät kann freistehend oder unter
einer Küchenarbeitsplatte in einer Nische mit den entsprechenden Abmessungen montiert werden (siehe Abbildung).
600 mm
DEUTSCH 57
TÜRANSCHLAG DER
EINFÜLLTÜR WECHSELN
Die Einfülltür kann auch an der anderen
Seite montiert werden, wenn nicht genügend Platz zum Aufstellen ist. (Siehe
separates Blatt.)
ELEKTRISCHER ANSCHLUSS
• Der Anschluss darf nur über eine vorschriftsmäßig installierte und geerdete Steckdose erfolgen.
• Stellen Sie sicher, dass die elektrischen Daten auf dem Typenschild
den Daten Ihrer Stromversorgung
entsprechen.
• Schließen Sie das Gerät nur an eine
sachgemäß installierte Schutzkontaktsteckdose an.
• Verwenden Sie keine Mehrfachsteckdosen oder Verlängerungskabel. Es
besteht Brandgefahr.
• Falls das Netzkabel des Geräts ersetzt werden muss, lassen Sie dies
durch unseren Kundendienst durchführen.
• Achten Sie darauf, den Netzstecker
und das Netzkabel hinter dem Gerät
nicht zu quetschen oder zu beschädigen.
• Ziehen Sie nicht am Netzkabel, wenn
Sie das Gerät vom Stromnetz trennen
möchten. Ziehen Sie dazu immer direkt am Netzstecker.
• Der Stecker muss trocken sein.
> 850 mm
600 mm
Page 58

58
Page 59

DEUTSCH 59
Page 60

www.aeg.com/shop 136915850-A-072011
 Loading...