

AEG-Electrolux ARCTIS1153-4GS, ARCTIS1102-4GS, KOA1169-4GS, KO-ARCTIS1153-4GS, KOA1153-4GSCH User Manual
...Page 1

Tisch-Gefrierschränke
Table Top Freezers
Congélateurs-armoires table-top
Armarios congeladores de mesa
Congelatori tavolo
Tafelmodel diepvrieskasten
Pöytäpakastimet
Frysskåp av bordsmodell
Gebrauchsanweisung
Operating Instructions
Mode d’emploi
Instrucciones para el uso
Istruzioni per l’uso
Gebruiksaanwijzing
Käyttöohjeet
Bruksanvisning
AUS
ERFAHRUNG
GUT
Page 2

2
C/D
105
200 cm
2
AEG52
1
2
AEG53
850-860
900-910
E
570
550
93-103
A
AEG55
4
F
G
B
H
A
AEG56
5
AEG54
3
130
300
F
AEG79
6
Page 3
3
L
AEG80
7
AEG82
9
12 mm
2
AEG104
9a
AEG81
8
1
K
3
Page 4
4
AEG83
10
–10
–20
–30
0
456
2
7
14
1
2
3
3
2
3
1
AEG85
12
0
3
2
–10
14
1
–20
–30
2
3
2
AEG25
13
AEG84
11
Page 5

D
_____________________
D
Inhalt
Bildseiten (bitte ausklappen) 2-4
Allgemeine Hinweise, Platzwahl 7/8
Spannung und Stromart 8
Ihr Gefriergerät braucht Luft 8
Wechsel des Türanschlages 9
Bedienungs- und Kontrolleinrichtung 9
Inbetriebnahme und Temperaturregelung 10
Einfrieren und Tiefkühllagern 10
Tiefkühllagern und Umgang mit der Kälte 11
Abtauen und Reinigen 12
Störungen und Kundendienst 12/13
Tips zur Energie-Einsparung 13
_____________________
GB
Contents
lllustration pages (please unfold) 2-4
General tips, choice of location 14/15
Your refrigerator needs air 16
Changing the door round 16
Operation and controls 17
Starting up and setting temperature 17
Freezing and storing frozen food 17/18
Storing frozen food and using the cold 18
Defrosting and cleaning 19
Break-downs and after-sales service 20
Tips on saving energy 20
_____________________
F
Contenu
Pages avec figures
(que vous voudrez bien déplier) 2-4
Remarques générales,
choix de l'emplacement 21/22
Tension et nature du courant 22
Votre réfrigérateur a besoin d'air 22
Changement du côté d'ouverture de la porte 23
Elements de commande et de contrôle 24
Mise en service et réglage de la température 24
Congélation et stockage des
produits surgelés 24/25
Stockage des produits surgeles et
utilisation du froid 25
Dégivrage et entretien 26/27
Pannes et service après-vente 27/28
Conseils pour economiser de l'énergie 28
Seite
Page
Page
_____________________
E
Indice
llustraciones (por favor desplegarlas) 2-4
Indicaciones generales, emplazamiento 29/30
Tensión y tipo de corriente 30
Su mueble congelador necesita aire 30
Cambio del batiente de la puerta 31
Mandos y dispositivos de control 32
Puesta en servicio y regulación
de la temperatura 32/33
Congelación y almacenar ultracongelados 33
Almacenar ultracongelados y manejo
del frío 33/34
Descongelación y limpieza 34/35
Perturbaciones y Servicio Postventa 35/36
Consejos para economizar energía 36
_____________________
I
Indice
Pagine illustrate (vi preghiamo di aprire) 2-4
Indicazioni generali, luogo di installazione 37/38
Tensione e tipo di corrente 38
ll vostro congelatore ha bisogno di aria 38/39
Inversione della cernieratura della porta 39
Dispositivi di comando e di controllo 40
Avviamento in funzione e regolazione
della temperatura 40/41
Congelazione e conservazione in
stato congelato 41
Conservazione in stato congelato e
manipolazione del freddo 41/42
Sbrinamento e pulizia 42/43
Difetti e servizio tecnico assistenza clienti 43/44
Consigli per l'economizzazione di energia 44
_____________________
NL
Inhoud
Afbeeldingen (uitklapbare pagina's) 2-4
Algemene aanwijzingen, opstelling 45/46
Spanning en stroomsoort 46
Uw diepvriezer heeft lucht nodig 46
Overzetten van het deurscharnie 47
Bedienings- en kontrole-inrichting 47/48
In gebruik nemen en temperatuurregeling 48
Invriezen en bewaren 48
Bewaren van diepvriesprodukten en
met koude omgaan 49
Ontdooien en reinigen 49/50
Storingen en klantenservice 50/51
Tips voor het besparen van energie 51
Página
Pagina
pagina
5
Page 6

GB
Caution
If your new appliance has been bought as a
replacement for an older model, please make the
old appliance unusable at once: pull the plug out of
the socket, cut the connecting lead off, and dispose
of the plug together with the remaining lead in an
environmentally friendly manner.
Any catch or lock on your old appliance should also
be made unusable before you put the appliance
away or hand it over to be disposed of in an
environmentally friendly manner. In this way you can
prevent children locking themselves in when playing
and thus endangering their lives.
Please make sure that the pipelines of your refrigerator are not damaged before collection for environmentally appropriate disposal.
Information on the packaging of
the appliance
All materials used are environmentally compatible.
They can be safely thrown away on a rubbish dump
or burnt in a refuse incinerator.
Concerning the materials: the plastics can also be
re-used and are labelled as follows:
>PE< for polyethylene (polythene), e.g. for the outer
foil and for the bags inside
>PS< for polystyrol foam, e.g. for the padding,
manufactured entirely without chlorofluoro-
carbons (CFC).
The cardboard parts are manufactured from recycled paper and should be returned for collection as
scrap paper.
General tips
You have just purchased a freezer which has been
produced according to the standards applicable to
these appliances. During manufacture, the necessary measures have been taken as required by the
Appliance Safety Act, the Accident Prevention
Regulations for Refrigerating Installations (VBG 20),
and the Requirements of the Association of German
Electrical Engineers (VDE).
The refrigeration circuit has been checked for
leakage.
This appliance complies with the following EC
Directives:
- 73/23/EEC of 19.02.1973 - Low-Voltage Directive
- 89/336/EEC of 03.05.1989 (including Amendment
Directive 92/31/EEC) - EMC (Electromagnetic
Compatibily) Directive.
Before starting up, we recommend you to read the
following instructions for use, since only by doing so
can you benefit from all the advantages offered by
your freezer.
These instructions for use are intended for several
technically comparable models with different equipment. Please only take note of the instructions that
apply to your particular version. Please fold out the
pages with the illustrations, so that you can see
pictures and text both at once.
Removing the adhesive tapes
For transport purposes, the door is secured with
adhesive tapes on the housing. Remove any
possible adhesive tape residues with a cleaner or
petrol.
Commercial use
Should you use your home freezer commercially or for
purposes other than refrigeration, freezing, and deep
frozen storage of food and drinks, you must observe
the legal requirements applicable to your area.
Choice of location
If possible, your freezer should be installed in a dry,
well-ventilated room.
Its installation in a damp room or the occurrence of
weather-dependent high air humidity may temporarily lead to precipitation of moisture (dew formation) on the outside of the freezer compartment.
Ambient temperature has an effect on the power
consumption of the unit. The appliance should
therefore:
– not stand in the direct sunshine, or close to a radia-
tor or cooker
– stand in a position where the ambient temperature
corresponds with the climate category for which
the appliance is designed.
Y ou will find data on this on the rating plate, which is
in the interior of the appliance on the left hand side.
It will consist of one of the following:
Climate category Ambient temperature
from ... to ...
SN + 10 to + 32 °C
N + 16 to + 32 °C
ST + 18 to + 38 °C
T + 18 to + 43 °C
14
Page 7

If installation beside a heat source is unavoidable,
the following minimum distances at the sides are to
be complied with: To electric cookers 3 cm, to oil or
coal fired cookers 30 cm.
Install a heat protection panel between the two
appliances.
The appliance should be installed on a firm, horizontal surface. Correct any floor irregularities by
twisting the adjustable feet in or out.
Adjustable feet - working
height 85/86 cm
Fig. 1
Your appliance is fitted with 4 adjustable feet as
standard, with which you can compensate for any
floor irregularities by turning them inwards or
outwards. If the appliance is to be fitted underneath
a continuous worktop, the four adjustable feet must
be screwed into the low-lying position (A).
Special accessory adjustable feet for 90/91 cm
working height
Fig. 2
If the appliance is to be set up for a working height
of 90/91cm, 4 adjustable feet (B) should be orderd
and screwed in which are 6 cm long (E-No. 621
833 004) The standard feet can be kept in place,
screwed into the low-lying position (A).
Electrical connection
WARNING - THIS APPLIANCE MUST BE
EARTHED
Please ensure that the voltage and current indicated
on the rating plate agree with the voltage of your
electricity supply.
220/240 volts (i. e. 220/240 V AC).
If your appliance has been equipped with a mains
lead with a moulded-on type plug, you must comply
with the following regulations: The plug moulded on
to the cord incorporates a fuse. For replacement,
use a 13 amp BS 1362 fuse. Only ASTA approved
or certified fuses should be used. The fuse cover/
carrier must be replaced in the event of changing
the fuse. The plug must not be used if the fuse
cover/carrier is lost. A replacement cover/carrier
must be obtained from an electrical goods retailer. If
GB
the socket outlets in your home are not suitable for
the plug fitted to the appliance, then the plug must
be cut off and an appropriate one fitted. When
fitting the plug please note the following points:
Important
The wires in the mains lead are coloured in accordance with the following code:
Green and Yellow Earth
Blue Neutral
Brown Live
As the colours of the wires in the mains lead of this
appliance may not correspond with the coloured
markings identifying the terminals in your plug,
proceed as follows:
1. The wire which is coloured green and yellow
must be connected to the earth terminal in your
plug, which is marked with the letter E or by the
earth symbol or coloured green, or green
and yellow,
2. The wire which is coloured brown must be con-
nected to the live terminal which is marked with
the letter L or coloured red.
3. The wire which is coloured blue must be con-
nected to the neutral terminal which is marked
with the letter N or coloured black.
When wiring the plug, ensure that all strands of wire
are securely retained in each terminal. Do not forget
to tighten the mains lead clamp on the plug.
Warning! A cut-off plug inserted into a 13 amp
socket is a serious safety (shock) hazard. Ensure
that the cut-off plug is disposed of safely
Voltage 220/240 V AC
Fuse rating 13 amps
See rating plate for further information.
The rating plate is located on the inside of the appliance.
Plug socket
Fig. 3
The plug socket necessary for connection of the
freezer to the electricity supply should be positioned
so that it is possible to pull out the appliance
plug.
If the appliance is installed under a continuous
worktop, the plug socket should be provided as in
Fig. 3. A concealed protective plug socket requires
a 10 A/16 A fuse.
15
Page 8

GB
Your freezer needs air
Fig. 4
The cooling unit is designed for maintenance-free
operation.
What it should never lack is good ventilation. Air is
drawn in under the door , through the ventilation slits
in the plinth, through the gap between the appliance and the wall, and passes out through the air
outlet
grille on top. Never obstruct these openings.
If the freezer is installed under a continuous worksurface, an air outlet must be provided of at least
200 cm2 and a grille (C/D) provided to suit the
design of the worktop (Fig. 4).
The cut surface of the worktop (E) must be painted
in order to prevent moisture entering and distorting
it.
The minimum clearance between the appliance and
the wall should be at least 30 mm, and should be
checked before the air-outlet grille is fitted.
Special accessories:
C Air outlet grille, brown (E-No. 621 814 002)
D Air outlet grille, white (E-No. 621 825 004).
Removing the worktop
Fig. 5
After removal of the worktop of your table-top
freezer the appliance can be installed under a
continuous worktop.
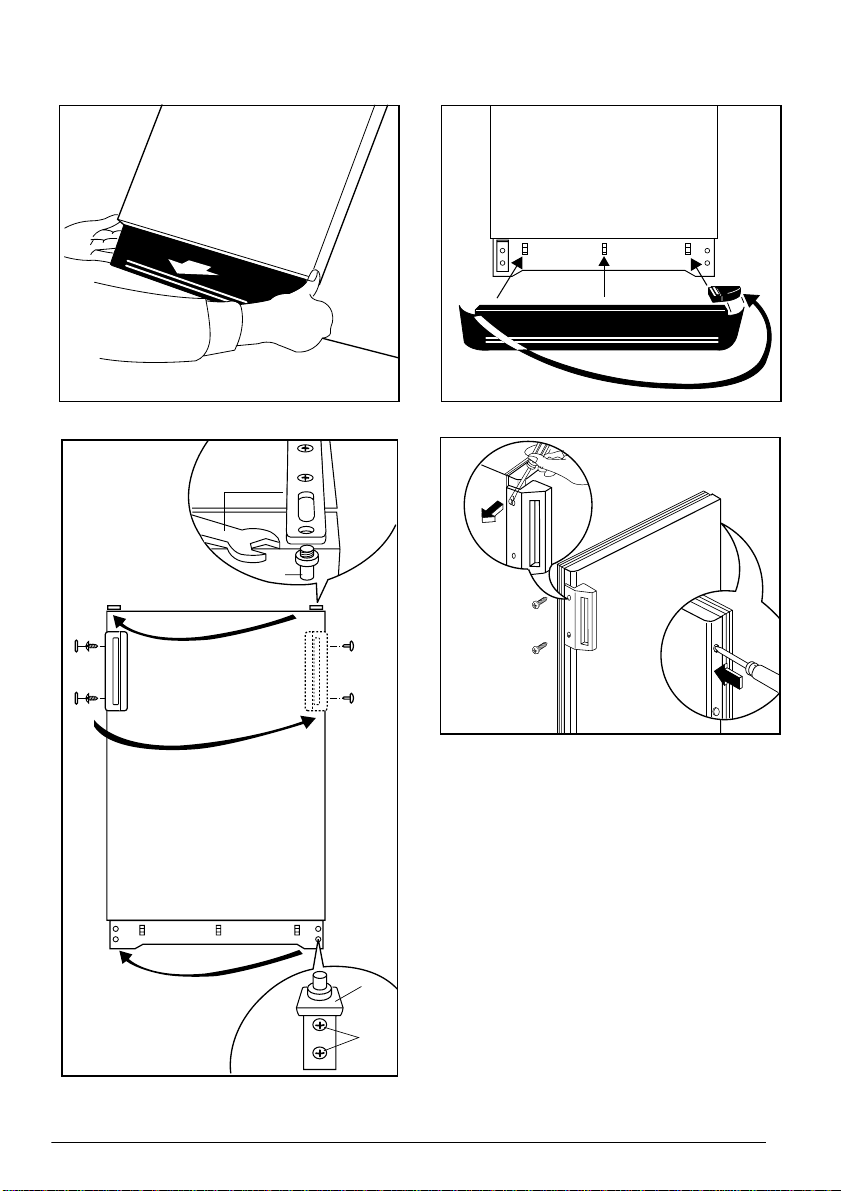
Proceed as described here: Unscrew the
cross-head screws (F) on the right and the left.
Lift the worktop slightly, move it about 5 mm
towards the rear, and lift it out upwards (G).
Unscrew the worktop holders (H) and keep them in
a safe place.
Changing over the door hinges
Figs. 7 to 9a
Before connecting your freezer to the power supply,
you should check whether the door must be
rehinged to open from the right (as delivered) to
opening from the left, if this is required by the installation position or for ease of operation.
1. Tilt the appliance backwards.
2. Pull the plinth panel off from in front.
3. Unscrew the door bearing (K) and take the door
bearing (1) off downwards out of the pivot hole.
4. Open the door slightly and take it off down-
wards. Place it aside and protect it against dam-
age.
5. Unscrew the upper swivel pin (2) and screw it
into place on the other side again.
6. Fit the door into the upper swivel pin (2) and
close it.
7. Fit the door mounting pin of the door mounting
(1) into the left-hand pivot hole and screw the
door mounting in with the screws (K).
8. Transfer the separate fitment (L),of the plinth
panel from left to right and press the plinth panel
back into the panel holders.
9. Unscrew the handle. Refit it on the opposite side
after having pierced the plugs with a punch.
Cover the holes left open with the plugs con-
tained in the documentation pack.
Mounting under a continuous
worktop
Fig. 6
If the appliance is to be installed under a continuous
worktop, it needs to be fastened in place on the
right and the left with a fastening screw (F) which
passes through the elongated hole of the door
mounting. The mounting screws of the removed
worktop can be used for this purpose.
16
Page 9

GB
Cleaning before starting up
In common with all new appliances, your freezer will
emit a specific odour when new.
It is therefore advisable to clean the interior of the
freezer and all accessories before use (see also
"Defrosting and cleaning").
Also, before starting up, take the cold-accumulator
(not on all models) out of the separate freezing
compartment at the top, and do not put it back in
its special position, at the front of the separate
freezer drawer, until the optimum storage temperature of -18 °C has been reached. If you have used
the cold accumulator for cooling or keeping food
fresh on the table or in an insulated bag, freeze it
again in the same way.
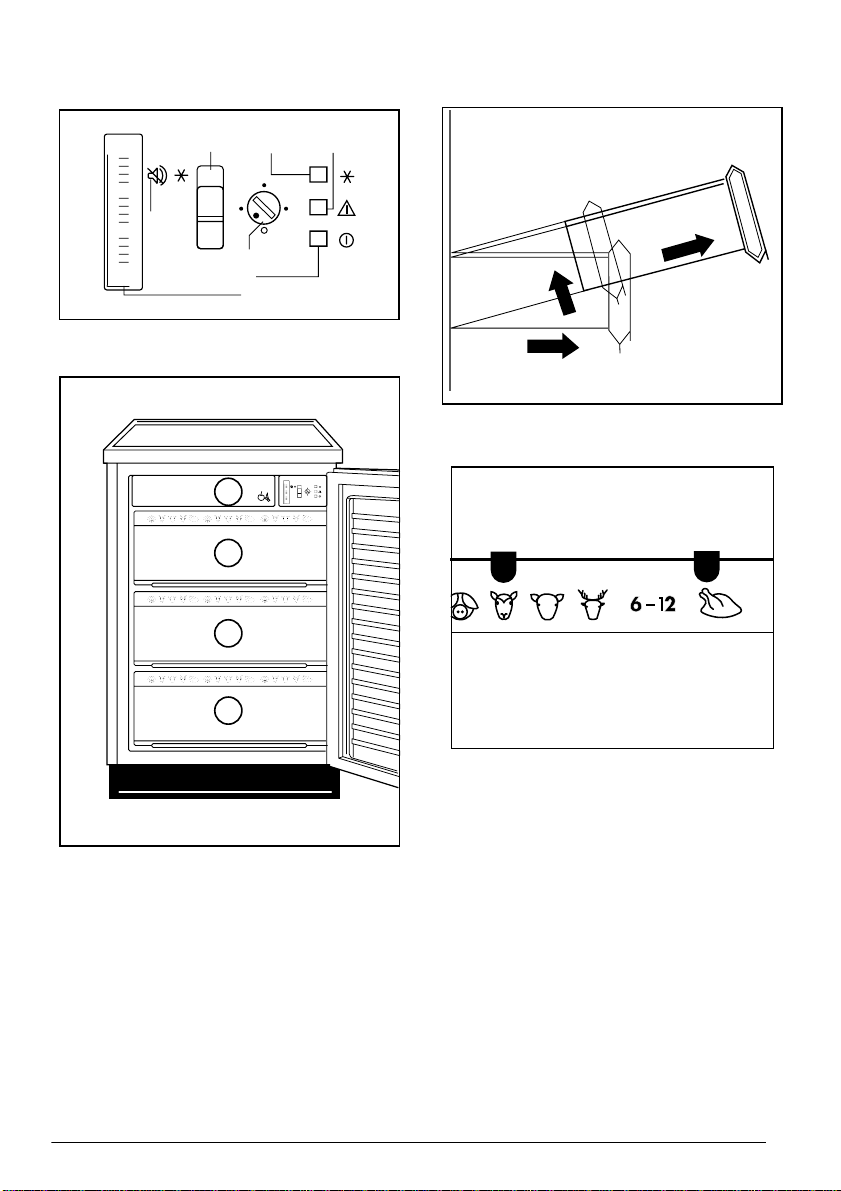
Operating and indicator panel
Fig 10
The temperature and control unit comprises:
The temperature regulator (1) , which serves at the
same time as the appliance's On-/Off switch.
The green pilot lamp (2) , which comes on when the
panel is switched on and the mains voltage is available. In this switch position, the refrigerating unit automatically operates by system control.
The temperature regulator (1 ), which can be used
for continuously variable setting of the most energy
saving storage temperature for your frozen food.
The optimum storage conditons occur at -18°C and
can be checked at the thermometer (3) .
The fast-freeze switch (4) with its amber pilot
lamp (5) .
The amber pilot light comes on when the switch (4)
has been operated. The refrigerating unit then operates continuously .
The red temperature pilot-lamp (6 ) comes or
when:
– the appliance has been started up but the stor-
age temperature has not yet been attained;
– the minimum storage temperature is no longer
being maintained (fault);
– excessive amounts of fresh food are placed in
side; or
– if the appliance door is open for too long.
Important note: if you operate the fast-freeze
switch or adjust the temperature regulator, it may
happen that your appliance's refrigeration motor
does not start immediately but only after some time.
This does not mean that your appliance has a fault.
Audible temperature alarm
Fig. 10
If your freezer is equipped with an audible temperature alarm (7), an acoustic warning sound simultaneously with illumination of the.red temperature pilot
lamp, alerting you to the fact that the storage
temperature in your freezer is too high or too warm.
The audible warning sounds until the red temperature pilot lamp goes out or until the audible alarm is
switched off by operation of the fast-freeze switch.
The fast-freeze switch can be switched off when the
red lamp has gone out.
Starting up and temperature
regulation
Fig. 10
Turn the temperature regulator (1) in the direction of
"1". The green lamp (2) and the red lamp (6) come
on, the audible warning sounds (if fitted), and the
refrigeration motor starts up.
Additionally operate the fast-freeze switch (4). The
amber pilot lamp (5) comes on, the audible warning
switches itself off, and the refrigerator motor runs
continuously. Only when the red lamp (6) has gone
out should you reset the fast-freeze switch (4) the
amber light (5) goes out and the audible warning is
activated again.
The temperature regulator (4) can be used to set
the required storage temperature, -18 °C or colder.
Setting "1" means:
highest, warmest internal temperature
Setting "4" means:
lowest, coldest internal temperature
Recommended regulator setting: 1.5 to 2.
Important: Regularly check on the red temperature
pilot lamp (6) and the thermometer (3) that the
required storage temperature is being maintained.
Freezing fresh food and
storing frozen food
Fig. 11
You can use your freezer for freezing fresh food
yourself. Before filling your freezer for the first time
with frozen food (deep-frozen food), an inside
temperature of -18 °C must have been attained.
Please observe the following instructions to be sure
of obtaining the best results.
17
Page 10

GB
Do not freeze too large a quantity at any one time.
The quality of the food is best preserved when it is
frozen right through to the core as quickly as
possible.
Do not exceed the quantity your appliance is
capable of freezing within 24 hours - this is indicated on the rating plate and in the product information.
If you want to carry out freezing on several consecutive days, only utilise 2/3 to 3/4 of the maximum
capacity. To utilise the maximum rated freezing
capacity, switch on the fast-freeze switch 24 hours
before freezing is due to start (the amber light will
now show). For smaller amounts, the fast-freeze
switch should be switched on 4-6 hours in
advance.
The smallest amounts (up to 3 kg) can be frozen
without pressing the fast-freeze switch.
Packed food to be frozen should be placed in
the freezer drawers (1 or 2).
Freezing is possible in these freezer drawers
because each level is equipped with its own refrigerating unit.
Take special care not to mix already frozen
foods with those not yet frozen.
Freezer drawer (3) should only be used for storage
of frozen food.
The lowest drawer has a solid floor and can be
used for catching some of the melt-water when the
freezer is being defrosted.
After about 24 hours (earlier for smaller quantities),
the fast-freeze switch can be switched off.
After freezing, you can leave the frozen food at the
level at which it was frozen.
However, if further food is to be frozen, you must
retain the fast-freeze setting and restack the frozen
food in the drawers and compartments according
to your own arrangement system to make free
freezing space available.
Hint for test centres
Filling plans for determination of freezing capacity
and warm-up time may be ordered direct from the
manufacturer.
Separate freezer drawer with
cold-accumulator
Fig. 11
At the top inside the freezer is a separate freezer
drawer (1 ) on some models with a cold-accumu-
lator and an ice-tray. The cold-accumulator is positioned at the front and in the event of a power
failure, a fault, or a removal, postpones the moment
when the interior warms up to an impermissible
level by several hours.
It can also be used temporarily for cooling an insulated picnic-bag. For refreezing it, see the instruction on "Before starting up".
Berries can be pre-frozen in this freezer drawer, and
then packed in portion-sized packs in the other
freezer compartments. The berries then keep their
shape.
The drawer can also be used for storing small
frozen items, e.g. herbs.
T aking out the freezer drawers
Figs.11 and 12
The freezer drawes (2) are stable and have an antitilt
feature, and are also retained at their endpositions
(Fig. 11) . This assures safe and convenient insertion and removal of frozen food.
To remove them, withdraw them as far as the catch,
tilt them upwards, and pull them out forwards
(Fig.12)
Symbols for stored food
Fig. 13
Food symbols are printed on the drawers. Sort the
food to be frozen according to type as much as
possible, and place it in separate compartments.
Place the markers (if supplied) on the appropriate
symbols.
In this way you can keep better track and will save
time when retrieving the food, as the door will be left
open for as short a time as possible, thus saving
electricity.
Freezer calendar
Fig. 13
The figures next to the symbols indicate the
maximum storage time in months, whereby several
types of food have been grouped under each set of
figures.
18
Page 11

GB
The do's and dont's of storing
frozen food
Once the freezing process is complete, deep-frozen
storage starts, in normal operation at a temperature
of -18 °C or colder.
For storage of already frozen food, it is imperative to
note the storage time specified by the manufacturer
on the packaging.
Make sure that only packaged food is stored in the
freezer, since unpackaged food will soon dry out
when exposed to the extreme cold. With the exception of spirits and drinks containing a higher
percentage of alcohol, beverages in glass bottles,
particularly soft drinks containing carbon dioxide,
juices, beer, wine, etc., should not be stored in the
freezer. When the contents freeze, the glass bottles
will crack or even burst.
For safety reasons (such as the risk of an explosion!) it is not allowed to store containers holding
inflammable liquids or gases, e.g. aerosol cans or
cigarette-lighter refill cartridges, in the appliance.
Never handle deep-frozen food with wet hands.
Your hands could easily become frozen to the food.
Never use the freezer as a means of cooling hot
meals, since this causes heavy frost formation
inside and an increase in electricity consumption.
If you want to utilise the effective capacity of your
freezer compartment fully and need to accommodate
an especially large amount of frozen food, you can
take out the upper freezer drawer (2) (Fig. 11) You can
then place frozen food directly on the refrigerating unit.
Even when food is loaded in this way, the functional
safety of your freezer compartment is assured.
Taking drawer (3) out is particularly useful if you are
freezing or storing items which are too large to fit into
one drawer. You can then stack the drawer (2) below
it correspondingly higher. In order to maintain the air
circulation, the frozen food should, however, not be
stacked higher than the front of the lower drawer.
Frost removal
During operation, and when the door is opened
moisture is deposited as frost in the internal space,
especially on the upper refrigerating unit.
Remove this frost from time to time with a plastic
scraper , e.g. a pastry scraper (not with a knife or the
like). The appliance needs not be switched off. You
will avoid heavy frost formation by not leaving the
door open unnecessarily long.
Defrosting and cleaning
Your freezer should be defrosted once or twice a
year or whenever a frost layer of around 4 mm has
formed. This should preferably occur when the
freezer is empty or contains little food.
Each temperature rise reduces the keeping qualities of
your frozen food. Around 12 hours before defrosting
your freezer, switch over to fast-freeze to build up a
low-temperature reserve in the frozen food.
All food packages remaining in the freezer compartment, hermetically packed if possible, should then
be wrapped in several layers of newspaper and
stored in a cool place (e.g. in a refrigerator).
During defrosting and cleaning, your freezer should
basically not be connected to the mains supply.
Therefore pull out the mains plug, remove the fuse
or trip the automatic safety device.
To defrost, remove all freezer drawers except for the
moment the lowest one from the freezer.
The lowest freezer drawer has a solid floor and can
be used for catching some of the melt-water when
the freezer is being defrosted. To do this, pull the
drawer slightly forwards and wipe the melt-water off
the condenser blades above it into the drawer.
You can accelerate the defrosting process by
placing a bowl of hot water in the freezer compartment and by removing detaching pieces of ice
before completely defrosting.
Never use electric heating or warming appliances or
suchlike, because of the risk of an accident or fire.
For safety reasons, this appliance must never be
cleaned with steam-cleaning equipment. Moisture
could find its way into the electronic components,
and steam could cause damage to the plastic parts.
After defrosting, clean the inside of your appliance
and accessories with lukewarm water to which a
mild cleaning agent containing no acetic acid can be
added. Finally , wash with clean water and wipe dry.
Restart the freezer compartment. The frozen food
can be placed back inside after around 30 minutes
(see "Before using for the first time").
Magnetic door seal
After opening and closing the door of your freezer whilst
it is in operation, you will not immediately be able to
open the door again because a vacuum will have developed inside, keeping the door closed until the pressures inside and outside the door have equalised. After
a few minutes you can easily reopen the door .
19
Page 12

GB
Switching the appliance off
If your freezer is to remain unused for any length of
time, it must be disconnected (unplugged) from the
electricity supply. The freezer should be defrosted,
cleaned thoroughly and the appliance door left
open to prevent any odours from forming.
If you should ever move house
Flg.11
If the freezer compartment is not fully loaded, pack
the frozen food all together on as few storage levels
as possible: drawers (1) and (2).
24 hours before the removal lorry is due to leave
switch over to fast-freezing in order to build up a
reserve of coldness in the frozen items.
Make sure the freezer door cannot come open
during transport.
Ensure that the freezer is the last item loaded onto
the removal lorry, so that it is the first to be taken off
and can be plugged in again at once.
Faults and servicing
T o maintain the safety of your appliance, r epairs, especially on live parts, should only be carried out by a
trained electrician. In the event of a fault, you should
therefore contact your electrical retailer or the service
centre direct.
Before approaching the service centre, check whether
the pilot lamps come on, the refrigerating unit operates, and the internal temperature is being maintained.
If, for example, the green light goes out whilst your
freezer is operational, switch on the fast-freeze
system.
If the amber light comes on, the green light is defective.
If the amber light does not come on when the
fast-freeze system is switched on, but the refrigerating
unit is operational, this means that the amber light
must be replaced.
If neither of the pilot light is on, check first whether
there has been a power failure (power point, fuse,
general failure of the mains supply , or similar). If necessary , inform your electrician at once.
If the red light comes on and the audible temperature
alarm (if fitted) sounds, or the temperature inside the
freezer has risen sharply without fresh food having
been inserted or the appliance door having been open
for any length of time, this means that there is a fault.
Switch on the fast-freeze system, keep your freezer
closed, and notify the nearest service centre immediately (see list of service centres). In this case, do not
carry out any repairs yourself, especially in the electrical parts of your freezer.
When notifying the service centre, please quote:
– the model designation
– E-number and
– F-number of your appliance.
These data are indicated on the rating plate inside
the freezer compartment.
Keep the freezer closed and inform the service
centre whether it is still freezing. If the freezing
mechanism has stopped working, the reserve in the
coldaccumulator (if fitted) and in the deep-frozen
food itself, if the freezer is full, will be sufficient for
about 27 hours, or about 18 hours if there is no
coldaccumulator.
N.B.! Unjustified after-sales service calls must be
paid for even during the guarantee period.
Important: regularly check on the red temperature
pilot lamp and thermometer that the storage
temperature is being maintained.
Minor repairs you can carry out
yourself
– Spare parts
Spare parts can be ordered from the service
centre. You can fit these yourself without any
special skill or training, e.g.:
– Freezer drawers
– Door handle.
Hints on energy saving
– Never place any hot food in the freezer - first
allow the food to cool to room temperature.
– Do not open the door unnecessarily, and close it
again as quickly as possible.
– Check the storage temperature in the freezer
compartment on the thermometer.
– Do not set the storage temperature for your fro-
zen food colder than -18°C
– Ensure good ventilation for your freezer.
20
Page 13

AEG Hausgeräte GmbH
Postfach 1036
D-90327 Nürnberg
AUS
ERFAHRUNG
GUT
Copyright by AEG
H 271 281 900 - 0297/151
2222 704-22 ET 123456789101112/97
 Loading...