

Page 1

HK955070FB
KOGESEKTION BRUGSANVISNING
DA
KOOKPLAAT GEBRUIKSAANWIJZING
NL
HOB USER MANUAL
EN
16
30
2
Page 2
2
FOR PERFEKTE RESULTATER
Tak fordi du valgte dette produkt fra AEG. Vi har skabt
det, så du kan nyde en ulastelig funktionsevne i mange år
med nyskabende teknologi, der gør livet lettere –
funktioner, som du ikke finder i almindelige apparater.
Brug et par minutter på at læse mere – så du kan få det
bedste ud af det.
TILBEHØR OG FORBRUGSVARER
I AEG's webbutik kan du finde alt, hvad du har brug for, til
at holde alle dine AEG-apparater flotte og perfekt
fungerende. Sammen med et stort udvalg af tilbehør, der
er designet og udviklet til de høje kvalitetsstandarder, du
ville forvente – fra specialkogegrej og bestikkurve til
flaskeholdere og fine vaskeposer ...
Besøg webbutikken på
www.aeg.com/shop
Page 3
INDHOLD
Indhold
4 Om sikkerhed
5 Installationsvejledning
7 Produktbeskrivelse
8 Betjeningsvejledning
12 Nyttige oplysninger og råd
13 Vedligeholdelse og rengøring
14 Hvis noget går galt
15 Miljøhensyn
3
Der er anvendt følgende symboler i denne
brugervejledning:
Vigtige oplysninger om din egen sikkerhed,
samt oplysninger om, hvordan du undgår
skader på apparatet.
Generelle oplysninger og tips
Miljøoplysninger
Ret til ændringer uden varsel forbeholdes
Page 4
4 Om sikkerhed
OM SIKKERHED
Læs brugsanvisningen grundigt igennem, før apparatet installeres for at forebygge ulykker
og sikre, at det bruges korrekt. Opbevar altid brugsanvisningen sammen med apparatet, også hvis du flytter eller sælger det. Alle, der bruger apparatet, skal være fuldstændig fortrolige med dets betjenings- og sikkerhedsfunktioner.
Sikkerhed for børn og andre udsatte personer
ADVARSEL
Lad ikke personer, herunder børn, med nedsat fysisk mobilitet, nedsatte mentale evner eller
manglende erfaring og viden betjene apparatet. De skal være under opsyn af en person, der
har ansvaret for deres sikkerhed, eller instrueres i at bruge apparatet.
• Opbevar al emballage utilgængeligt for børn. Der er fare for kvælning eller personskade.
• Hold børn på afstand af apparatet under og efter brug, indtil det er kølet af.
ADVARSEL
Slå børnesikringen til for at hindre, at små børn og dyr kan tænde for apparatet ved et
uheld.
Sikkerhed under brug
• Fjern al emballage, mærkater og folie fra apparatet, før det tages i brug.
• Sæt kogezonerne på "sluk", når de ikke er i brug.
• Risiko for forbrænding! Læg ikke bestik eller grydelåg på kogesektionen, da de kan blive
meget varme.
ADVARSEL
Brandrisiko!Alt for varmt fedt og olie kan antænde meget hurtigt.
Korrekt brug
• Hold altid øje med apparatet under brug.
• Dette apparat er kun til husholdningsbrug!
• Brug ikke apparatet som arbejds- eller frasætningsplads.
• Læg eller opbevar ikke meget brandfarlige væsker og materialer, eller genstande, der kan
smelte (af plastik eller aluminium) på eller ved apparatet.
• Vær forsigtig, når du tilslutter apparatet i en stikkontakt i nærheden. Lad ikke ledninger
røre apparatet eller varmt kogegrej. Ledningerne må ikke være viklet sammen.
Sådan undgås skader på apparatet
• Glaskeramikken kan tage skade, hvis der falder kogegrej eller andre ting ned på den.
• Kogegrej af støbejern, støbt aluminium eller med beskadiget bund kan forårsage ridser på
glaskeramikken. Træk dem ikke over overfladen.
• Lad ikke gryder og pander koge tørre. Det kan beskadige kogegrejet og glaskeramikken.
• Tænd aldrig for en kogezone, hvis den er tom, eller hvis der står en tom gryde eller pande
på den.
Page 5
Installationsvejledning
• Læg ikke aluminiumfolie på apparatet.
ADVARSEL
Hvis pladen får en revne, skal du tage stikket ud af kontakten for at forebygge elektrisk
stød.
INSTALLATIONSVEJLEDNING
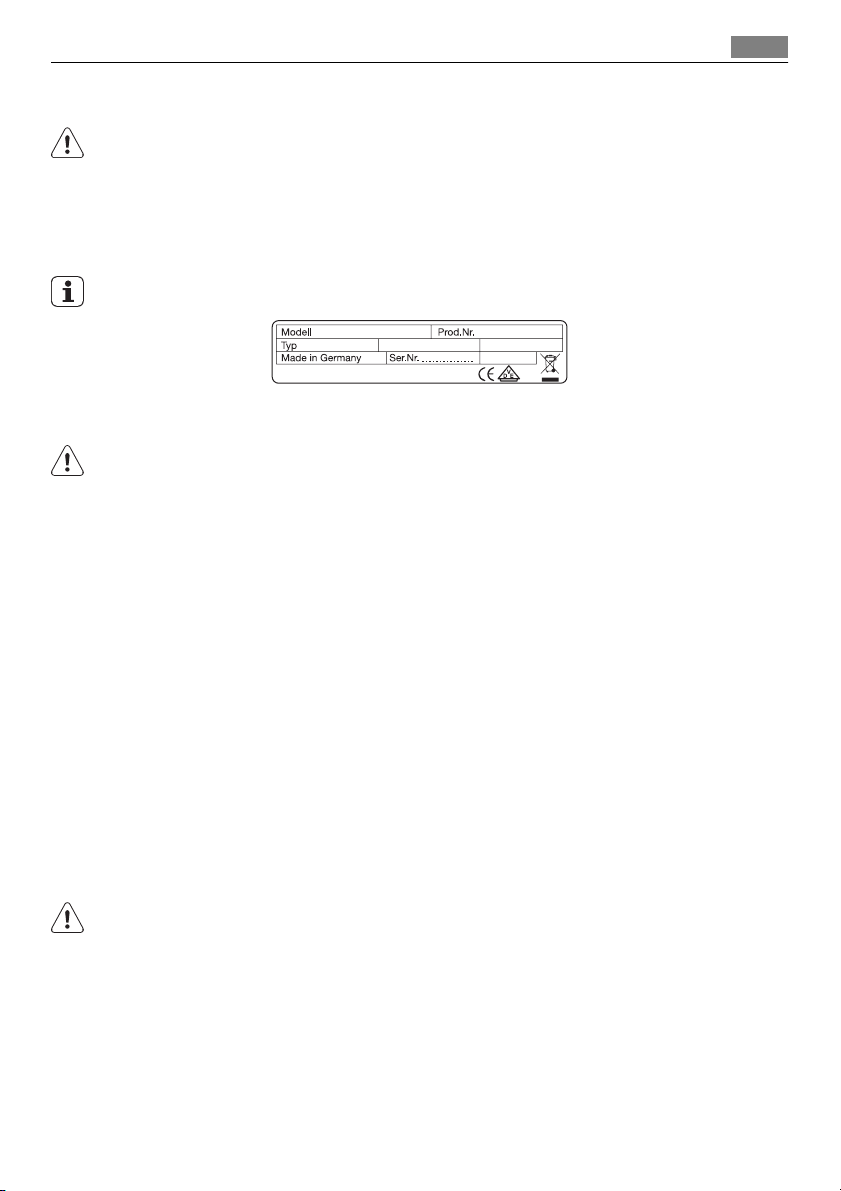
Før installationen bedes du notere serienummeret (Ser. Nr.), der er angivet på typeskil-
tet.Typeskiltet sidder på apparatets underste kabinet.
58 HCD AA AO
AEG
HK955070FB
220-240 V 50-60-Hz
Oplysninger om sikkerhed
ADVARSEL
Læs dette!
Kontrollér, at apparatet ikke har fået skader under transporten. Tilslut ikke et beskadiget apparat. Kontakt om nødvendigt forhandleren.
Apparatet må kun installeres, tilsluttes eller repareres af en autoriseret servicetekniker. Brug
kun originale reservedele.
Brug først indbygningsapparaterne, når de er monteret i passende indbygningsenheder og
bordplader, der opfylder kravene.
Produktet og dets specifikationer må ikke ændres. Risiko for skader på mennesker og apparat.
Overhold altid nøje de love, bestemmelser, retningslinjer og normer (regler om sikkerhed,
korrekt bortskaffelse, elsikkerhed osv.), der gælder i brugslandet!
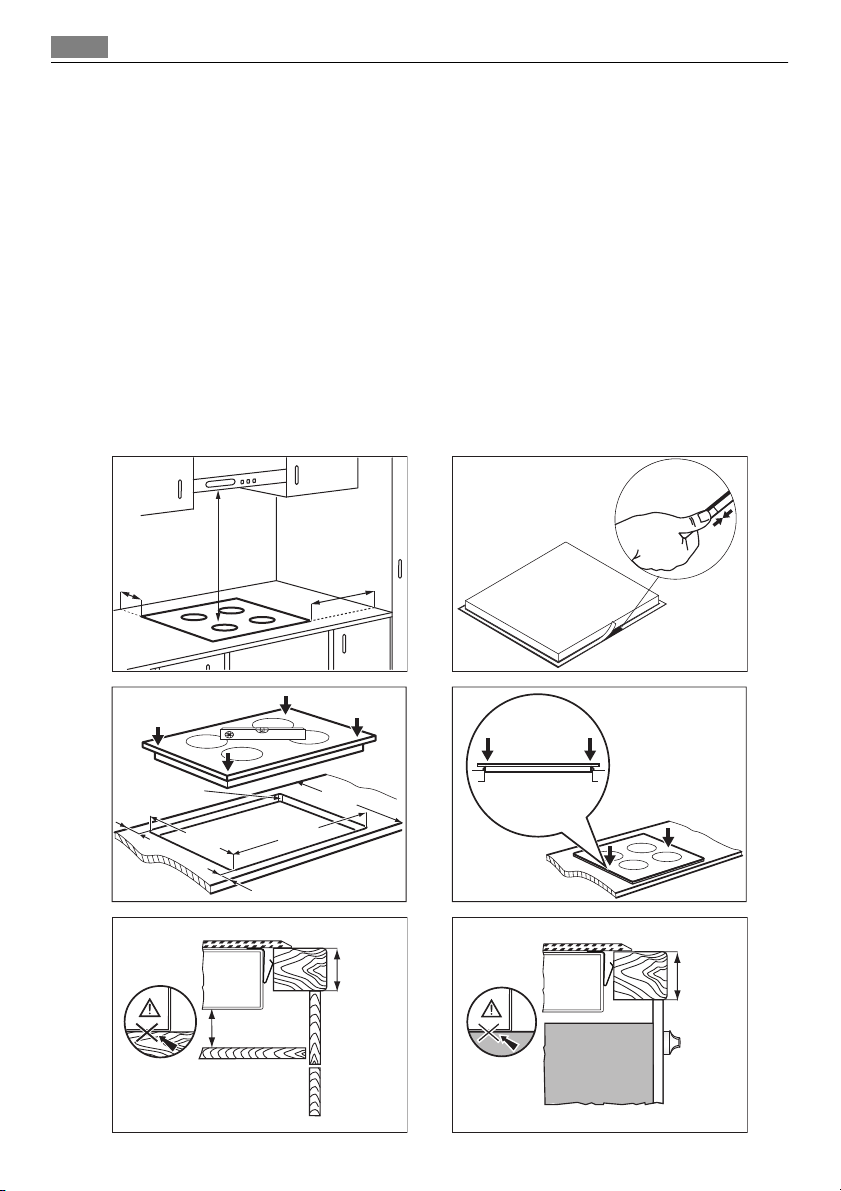
Mindsteafstandene til andre apparater skal overholdes!
Indbyg beskyttelse mod stød. F.eks. skal du montere en isolerende plade direkte under apparatet, hvis der er en skuffesektion nedenunder!
Beskyt snitfladerne i bordpladen mod fugt med en passende fugemasse!
Forsegl åbningen mellem apparat og bordplade helt med en egnet fugemasse!
Beskyt apparatets bund mod damp og fugt, f.eks. fra opvaskemaskine eller ovn!
Installér ikke apparatet ved siden af en dør eller under et vindue! Ellers kan varmt kogegrej
blive revet på gulvet, når døre eller vinduer åbnes.
949 595 124 00
7,9 kW
5
ADVARSEL
Risiko for skader ved elektrisk stød. Følg nøje vejledningen for tilslutning til lysnet
• Der er spænding på nettilslutningsklemmen
• Tilslutningsklemmen til lysnettet skal gøres spændingsfri.
• Stødbeskyttelse skal sikres ved at udføre indbygningen fagmæssigt korrekt.
• Løse og uprofessionelt udførte stikforbindelser kan medføre, at klemmen bliver overophedet.
• Klemmeforbindelser skal udføres fagmæssigt korrekt.
• Kablet skal forsynes med trækaflastning.
Page 6
6 Installationsvejledning
• Ved 1-faset eller 2-faset tilslutning skal anvendes det korrekte tilslutningskabel, type
H05BB-F Tmax 90°C (eller højere)
• Udskift et defekt netkabel med et specialkabel (type H05BB-F Tmax 90°C eller højere).
Kontakt altid Electrolux Service A/S.
Apparatets installation skal udføres med en afbryder med mindst 3 mm brydeafstand, så
forbindelsen til lysnettet kan afbrydes på alle poler.
Brug korrekte isoleringsanordninger: Gruppeafbrydere, sikringer (sikringer med skruegevind
skal tages ud af fatningen), fejlstrømsrelæer og kontaktorer.
Fastgøring af pakningen.
• Rengør bordpladen i det område, hvor den udskårne sektion er
• Klæb pakningslisten, der findes på apparatets nederste kant, langs glaskeramikkens udvendige kant. Stræk den ikke ud. Lad de afskårne ender være midt på den ene side. Når
du skærer dens længde til (tilføj nogle mm), skal du trykke de to ender sammen.
Indbygning
min.
min.
500mm
50mm
min.
50mm
R 5mm
=
490
+1
mm
=
880
600mm
+1
mm
min.
25 mm
min.
28 mm
min.
20 mm
Page 7
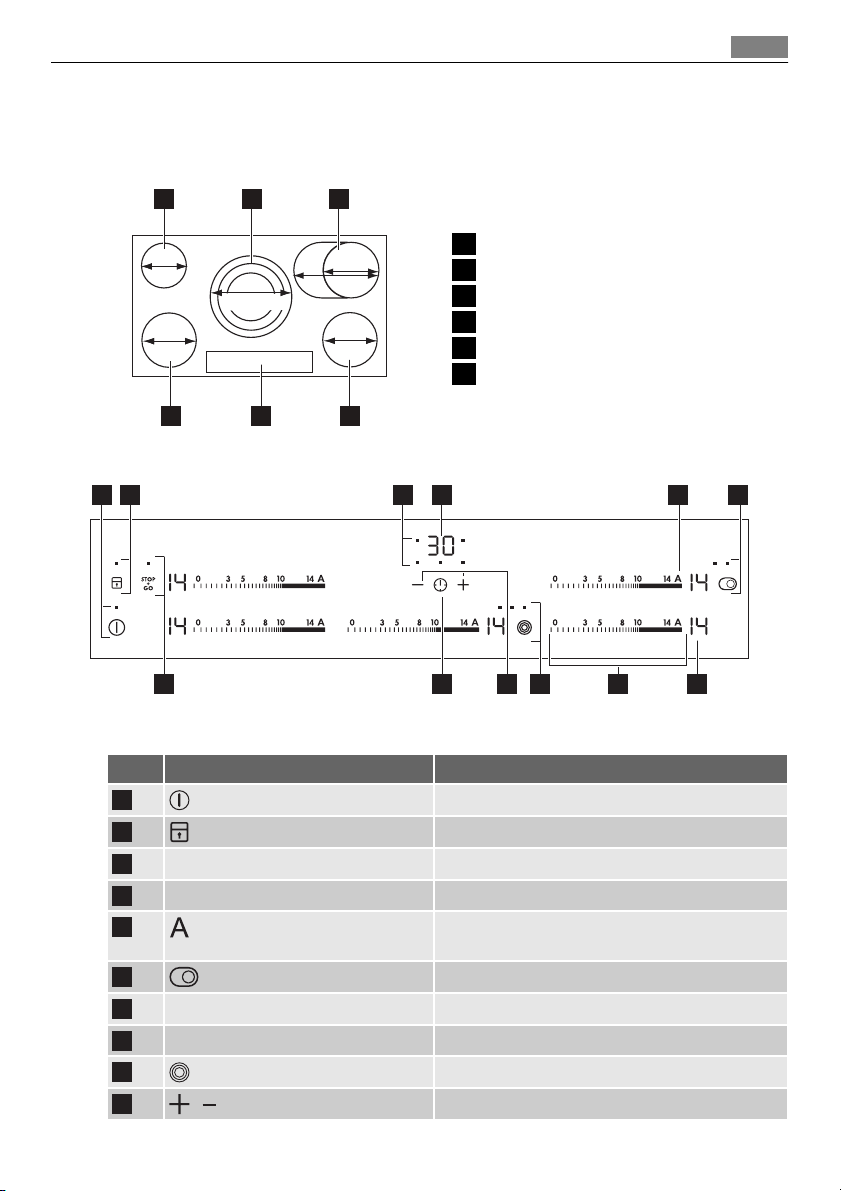
PRODUKTBESKRIVELSE
Kogesektionens layout
1 32
Produktbeskrivelse 7
145
mm
180
mm
145/
210/270
mm
265
mm
170
mm
180
mm
1 Enkelt kogezone, 1200 W
2 Trekreds-kogezone, 1050/1950/2700 W
3 Oval kogezone, 1400/2200 W
4 Enkelt kogezone, 1800 W
5 Betjeningspanel
6 Enkelt kogezone, 1800 W
456
Oversigt over betjeningspanelet
4 51 2 6
3
12 91011
Brug tasterne til at betjene apparatet. Display, kontrollamper og signaler viser de funktioner, der
er i brug.
Sensorfelt Funktion
1
2
Timer-lamper for kogezoner. Viser den kogezone, der er tidsindstillet.
3
Display for timer. Viser tiden i minutter.
4
5
Tænder/slukker for apparatet.
Låser/låser op for betjeningspanelet.
Den aktiverer den automatiske opvarmningsfunktion.
6
Indikator for varmetrin Viser varmetrinnet.
7
Skala på betjeningspanel Indstille varmetrin.
8
9
10
/
Tænder/slukker for yderste varmekreds.
Tænder/slukker for yderste varmekreds.
Øger eller mindsker tiden.
8 7
Page 8
8 Betjeningsvejledning
Sensorfelt Funktion
11
12
Indstiller kogezonen.
Tænder/slukker for STOP+GO-funktionen.
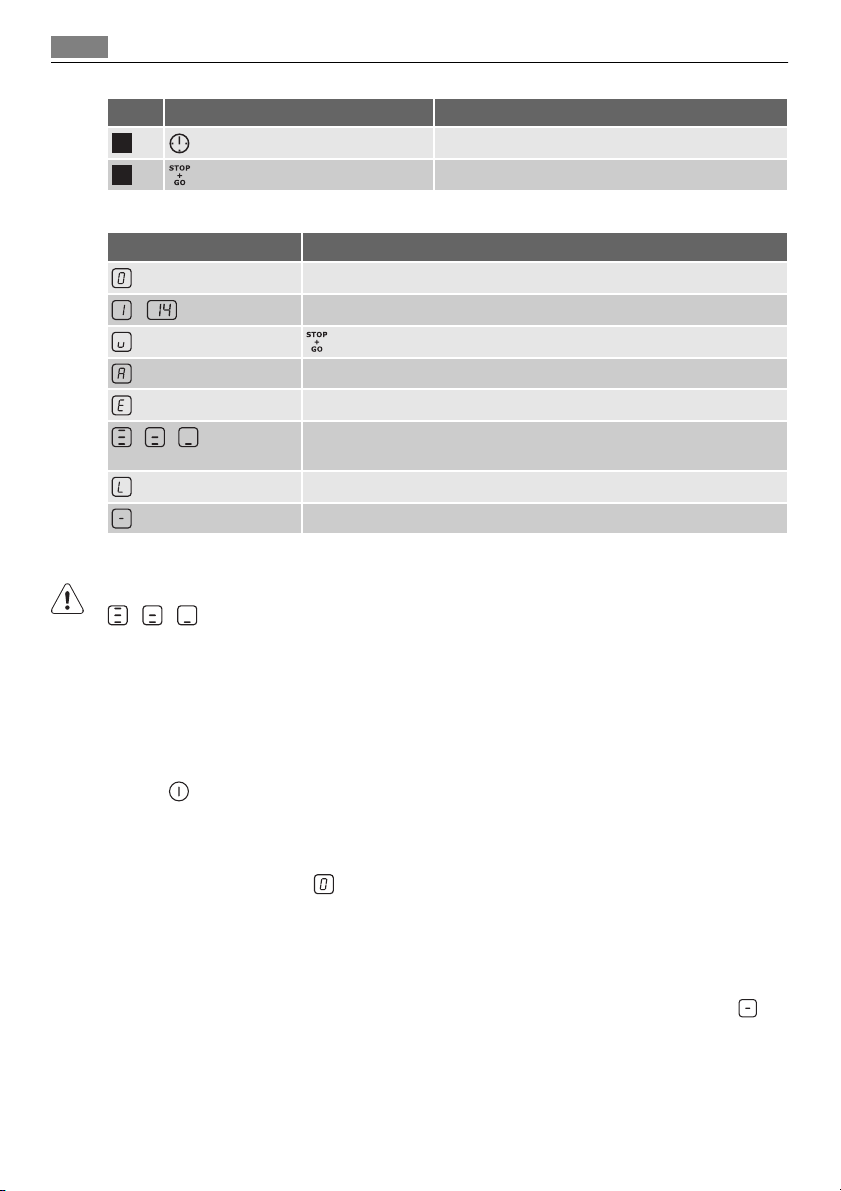
Display for varmetrin
Visning Forløb
Kogezonen er slukket.
-
+ tal
/ /
Kogezonen er tændt.
-funktionen er tændt.
Opkogningsautomatikken er tændt.
Der er en funktionsfejl.
OptiHeat Control (3-trins restvarmeindikator): Tilbereder stadig/holde
varm/restvarme.
Lås/Børnesikringen er slået til.
Den automatiske slukning er tændt.
OptiHeat Control (3-trins restvarmeindikator)
ADVARSEL
/ / Forbrændingsrisiko ved restvarme!
OptiHeat Controlviser niveauet af restvarme.
BETJENINGSVEJLEDNING
Aktivering og deaktivering
Rør ved i 1 sekund for at tænde eller slukke for apparatet.
Automatisk slukning
Funktionen slukker automatisk for apparatet hvis:
• alle kogezoner er slukket
• Du ikke indstiller et varmetrin, når du har tændt for kogesektionen.
• Hvis du spilder noget eller lægger noget på kontrolpanelet i mere end 10 sekunder (en
pande, en klud, m.m.). Signalet varer et stykke tid, og apparatet slukkes. Fjern genstanden,
eller tør betjeningspanelet af.
• du stopper ikke en kogezone eller ændrer på varmetrinnet. Efter nogen tid tændes
og kogesektionen slukkes. Se tabellen.
.
,
Page 9
Betjeningsvejledning 9
Tiderne for automatisk slukning
Varmetrin
Kogezonen sluk-
, - - - -
6 timer 5 timer 4 timer 1,5 timer
kes efter
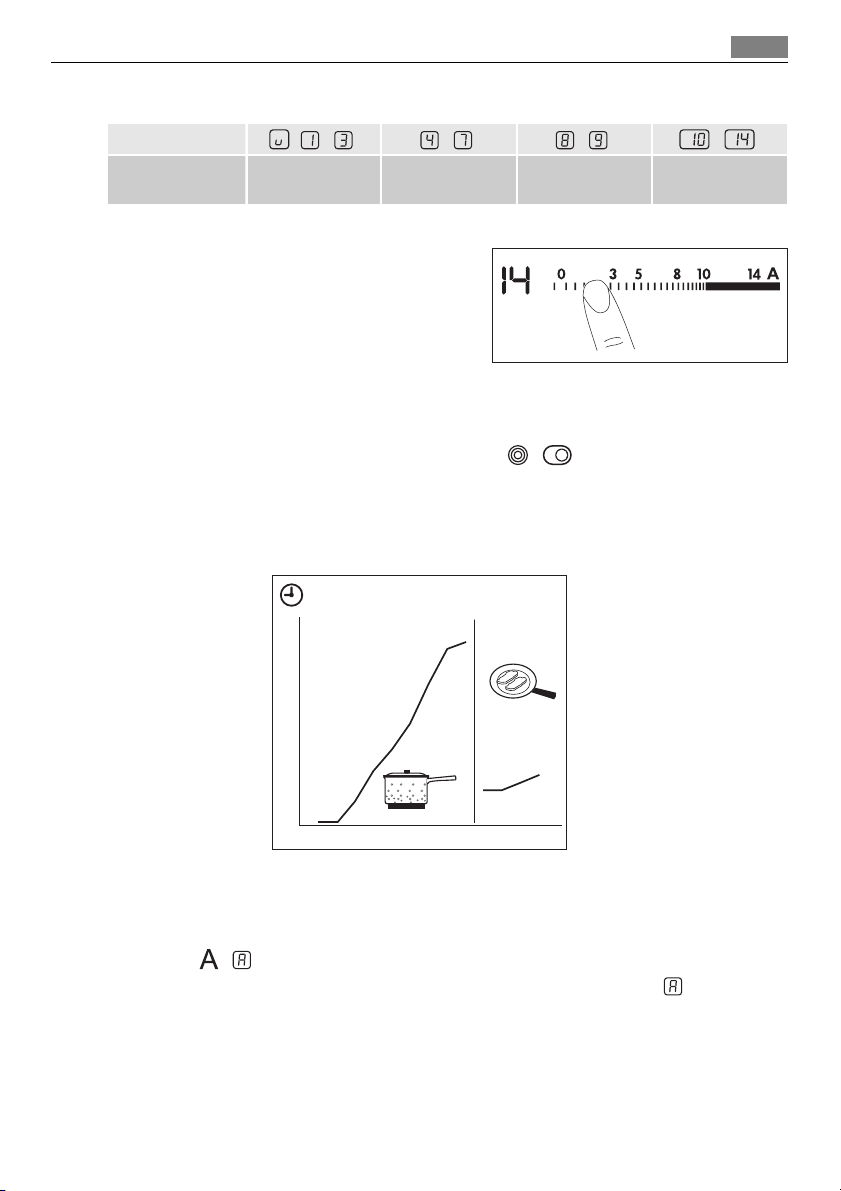
Varmetrin
Berør betjeningspanelet ved varmetrinnet. Flyt
evt. fingeren til venstre eller højre. Løft først fingeren, når den står på den ønskede indstilling.
Displayet viser varmetrinnet.
Tænde og slukke for apparatet
Du kan tilpasse det effektive varmeareal efter størrelsen på kogegrejets bund.
Slå yderste varmekreds til ved at røre ved sensorfeltet
/ . Kontrollampen giver sig til
at lyse Slå flere varmekredse til ved at røre samme sensorfelt igen. Kontrollampen giver sig
til at lyse
Brug samme fremgangsmåde for at slå yderste varmekreds fra. Kontrollampen slukkes
Opkogningsautomatik
12
11
10
9
8
7
6
5
4
3
2
1
0
1234567891011121314
Du kan opnå det påkrævede varmetrin hurtigere, hvis du slår opkogningsautomatikken til.
Denne funktion vælger det højeste varmetrin i et stykke tid (se grafikken) og skruer derefter
ned til det ønskede niveau.
Sådan aktiveres opkogningsautomatikken for en kogezone:
1. Rør ved
2. Berør øjeblikkeligt den ønskede varmeindstilling. Efter 3 sekunder vises
Funktionen slås fra ved at ændre varmetrin.
. tændes i displayet.
i displayet.
Timer
Nedtællingstimer
Brug Nedtællingstimeren til at indstille, hvor lang tid kogezonen skal være tændt under én
tilberedning.
Page 10
10 Betjeningsvejledning
Indstil nedtællingstimeren, når du har valgt kogezone.
Du kan indstille varmetrin før eller efter at du indstiller timeren.
• Sådan indstiller du kogezonen:Rør
kogezone tændes.
• Start af Nedtællingstimeren: rør timerens
Når lampen for kogezonen blinker langsommere, er nedtællingen begyndt.
• Sådan aflæses resttiden: vælg kogezone med
blinke hurtigt. Displayet viser resttiden.
• Sådan ændres Nedtællingstimeren:Vælg kogezone med
• Sådan slås timeren fra: Vælg kogezone med
ned til
samtidigt.
Når nedtællingen er slut, høres en lyd, og
• Sådan slukker du for lyden: Rør
CountUp Timer (Optællingstimer)
Brug CountUp Timer til at holde øje med, hvor længe kogezonen er tændt.
• Sådan indstiller du kogezonen Hvis du bruger mere end 1 kogezone):Rør
ge, indtil kontrollampen for den ønskede kogezone tændes.
• Sådan tænder du CountUp Timer:rør timerens
nen blinker langsommere, er tællingen begyndt. Displayet skifter mellem
tid (minutter).
• Hvordan du holder øje med, hvor længe kogezonen er tændt: Vælg kogezone med
Lampen for kogezonen begynder at blinke hurtigt. Displayet viser den tid, kogezonen er
tændt.
• Sådan slås CountUp Timer fra: Vælg kogezonen med
timeren. Lampen for kogezonen slukkes.
Minutur
Du kan bruge timeren som minutur, når der ikke er tændt for kogezonerne. Rør ved .
Rør ved
blinker.
• Sådan slukker du for lyden: Rør
. Lampen for kogezonen slukkes. Du kan også slukke ved at berøre og
00
eller timerens for at vælge tid. Når nedtællingen er slut, høres en lyd, og
flere gange, indtil kontrollampen for den ønskede
for at indstille tiden ( 00 - 99 minutter).
. Lampen for kogezonen begynder at
rør eller .
. Rør ved . Resttiden tæller baglæns
blinker. Kogezonen slukkes.
00
, tændes. Når lampen for kogezo-
og rør eller for at slukke
flere gan-
og den talte
.
00
STOP+GO
-funktionen indstiller alle kogezoner, der bruges på det laveste varmetrin ( ).
anvendes, kan du ikke ændre varmetrinnet.
Når
-funktionen standser ikke timer-funktionen.
• For at aktivere denne funktion skal du berøre
• For at deaktivere denne funktion skal du røre
res.
. Symbolet tændes.
. Det først indstillede varmetrin aktive-
Lås
Når kogezonen er i brug, kan du låse betjeningspanelet men ikke Det forhindrer en utilsigtet ændring af varmetrinnet.
Page 11
Indstil først varmetrinnet.
For at starte denne funktion skal du berøre
Timeren forbliver tændt.
For at stoppe denne funktion skal du berøre
Funktionen deaktiveres også, når du slukker for apparatet.
Børnesikring
Funktionen hindrer utilsigtet betjening af apparatet.
Sådan aktiveres børnesikringen
• Tænd for apparatet med
• Rør ved
• Sluk for apparatet med
Sådan deaktiveres børnesikringen
• Tænd for apparatet med
tændes.
• Sluk for apparatet med
Sådan deaktiveres børnesikringen til en enkelt madlavning
• Tænd for apparatet med
• Rør ved
onen.
• Når du slukker for apparatet med
i 4 sekunder. Symbolet tændes.
i 4 sekunder. Indstil varmetrin inden 10 sekunder Du kan betjene kogesekti-
. Indstil ikke varmetrin .
.
. Indstil ikke varmetrin . Rør ved i 4 sekunder. Symbolet
.
. Symbolet tændes.
, aktiveres børnesikringen igen.
Betjeningsvejledning
. Symbolet lyser i 4 sekunder.
. Det først indstillede varmetrin aktiveres.
11
OffSound Control (deaktivering og aktivering af lydene)
Deaktivering af lydene
Sluk for apparatet.
Rør ved
lyden er slået til. Rør ved
Når denne funktion anvendes, kan du kun høre lyde, når:
• Du rører ved
• Minuturet går ned
• Nedtællingstimeren tæller ned
• Du anbringer noget på betjeningspanelet.
Aktivering af lydene
Sluk for apparatet.
Rør ved
da lyden er slået fra. Rør ved
i 3 sekunder. Displayet tændes og slukkes. Rør ved i 3 sekunder. tændes,
, tændes, lyden er slået fra.
i 3 sekunder. Displayet tændes og slukkes. Rør ved i 3 sekunder. tændes,
, tændes. Lyden er slået til.
Page 12
12 Nyttige oplysninger og råd
NYTTIGE OPLYSNINGER OG RÅD
Kogegrej
• Bunden af kogegrejet skal være så tyk og plan som muligt.
• Kogegrej af emaljeret stål eller med alu- eller kobberbund kan give misfarvninger på
glaskeramikken.
Spar på energien
• Læg altid låg på gryderne, hvis det er muligt.
• Sæt kogegrejet på, inden der tændes for kogezonen.
• Sluk for kogezonen nogle minutter før tilberedningen er slut, så du udnytter restvarmen.
• Grydens bund og kogezonen bør være lige store
Öko Timer (øko-timer)
For at spare energi slukkes kogezonens varmelegeme før nedtællingstimeren lyder. Forskellen i betjeningstiden afhænger af det indstillede varmetrin og tilberedningstiden.
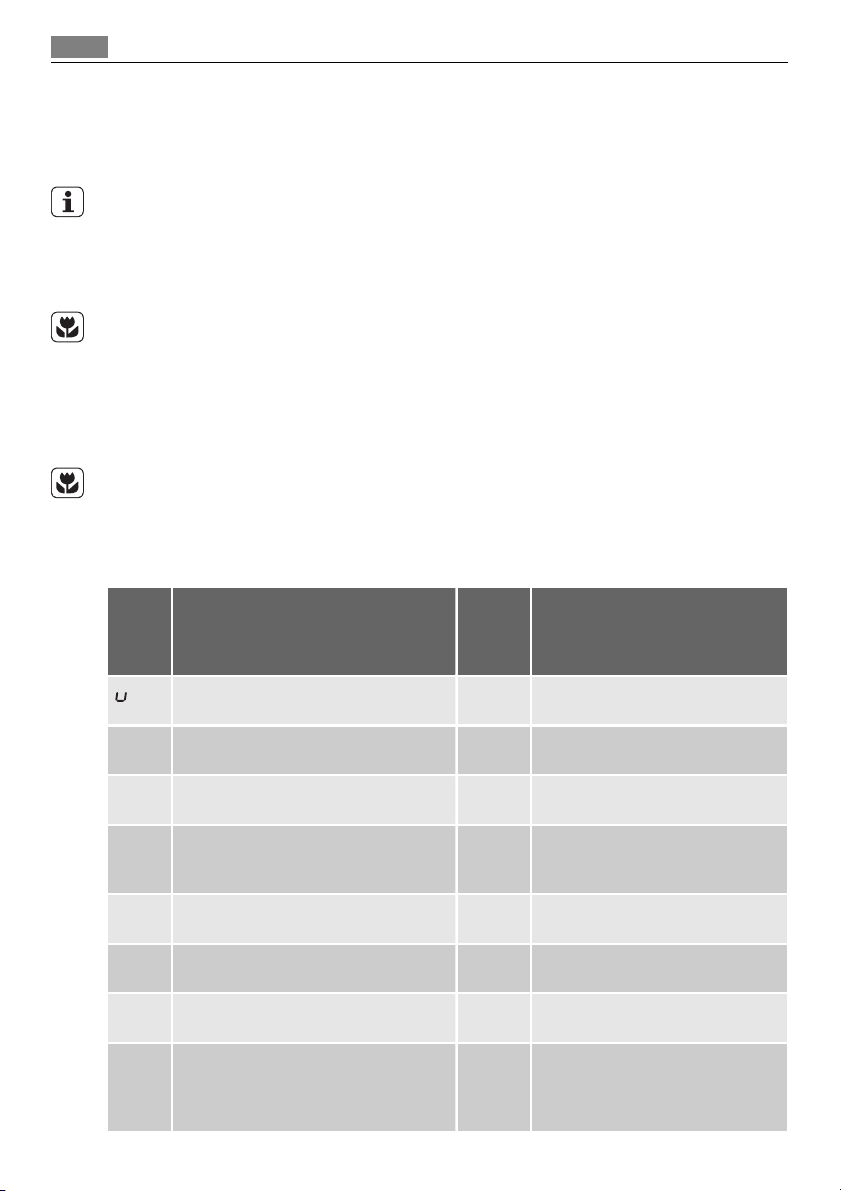
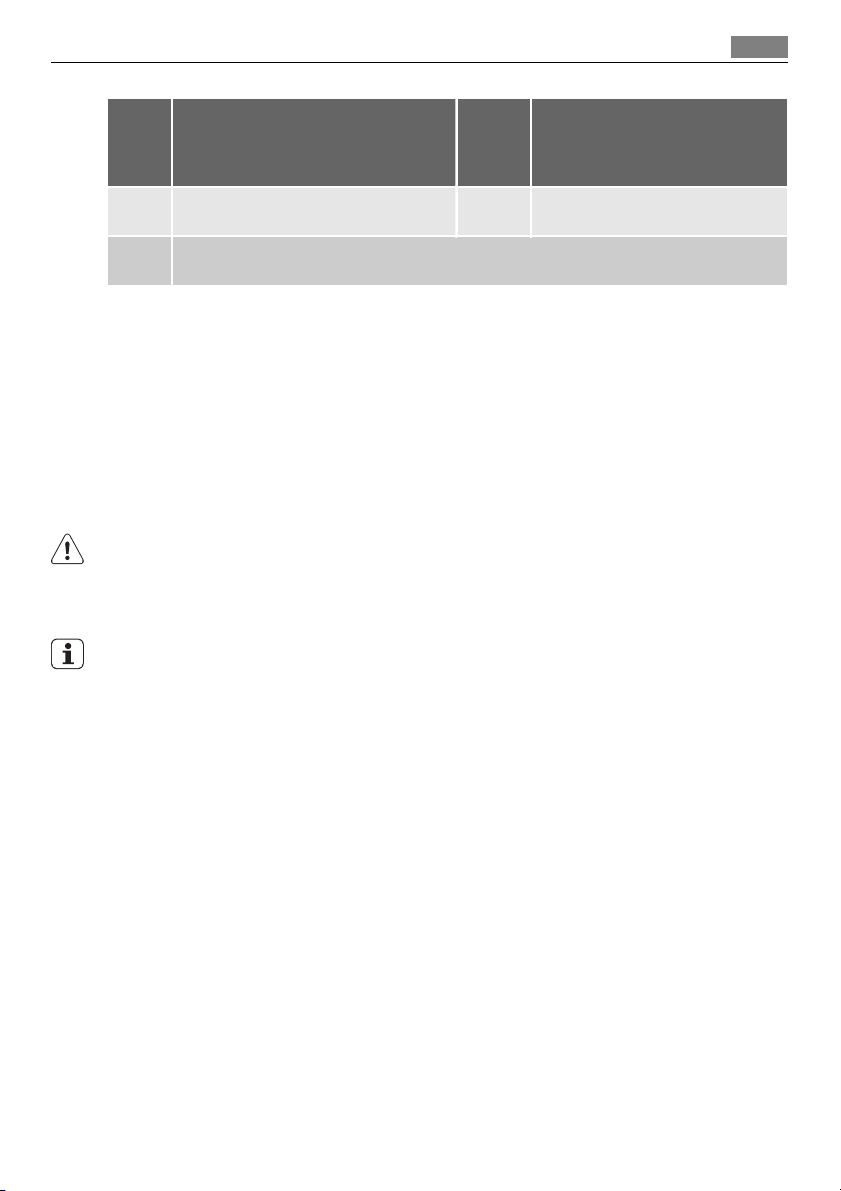
Eksempler på anvendelse
Oplysningerne i tabellen er kun vejledende.
Tem-
peratur-
indstil-
ling
At holde færdig mad varm efter be-
1
1-3 Hollandaise, smelte: Smør, chokolade,
1-3 Stivne/størkne: Luftige omeletter, bagteæg10-40
3-5 Mørkogning af ris og mælkeretter, op-
5-7 Dampning af grøntsager, fisk, kød 20-45
7-9 Dampning af kartofler 20-60
7-9 Kogning af større portioner, sammen-
9-12 Nænsom stegning: Schnitzler, cordon
gelatine
varmning af færdigretter
kogte retter og supper
bleu (kalvekød), koteletter, frikadeller,
pølser, lever, æg, pandekager, æbleskiver, samt opbagte saucer
Bruges til: Tid Gode råd
hov
5-25
min
min
25-50
min
min
min
60-150
min
efter behov
Læg et låg på kogegrejet.
Bland ind imellem.
Læg låg på under tilberedningen.
Tilsæt mindst dobbelt så meget væske som ris, rør rundt i mælkeretter
under tilberedningen.
Tilføj nogle spsk. væske.
Brug højst ¼ l vand til 750 g kartofler.
Op til 3 l væske plus ingredienser.
Vendes undervejs.
Page 13
Vedligeholdelse og rengøring
13
Tem-
peratur-
indstil-
ling
12-13 Kraftig stegning, hash browns (rösti),
tournedos, steaks
14 Kogning af større mængder vand, pasta, bruning af kød (gullasch, grydesteg), friturekog-
ning af pommes frites.
Bruges til: Tid Gode råd
5-15
min
Vendes undervejs.
Information om akrylmid
Vigtigt Ifølge nye videnskabelige undersøgelser kan der dannes sundhedsskadeligt
akrylamid, hvis du bruner maden (især hvis den indeholder stivelse). Derfor anbefaler vi, at
du tilbereder ved lavest mulig temperatur og ikke bruner maden for meget.
VEDLIGEHOLDELSE OG RENGØRING
Rengør altid apparatet efter brug.
Brug altid kogegrej med ren bund.
ADVARSEL
Skarpe genstande og slibende rengøringsmidler kan skade apparatet.
Af hensyn til din egen sikkerhed må du ikke rengøre apparatet med damp- eller højtryksrensere.
Skrammer eller mørke pletter i glaskeramikken betyder ikke noget for apparatets funktion.
Sådan fjernes snavs:
1. – Fjern straks:smeltet plastik, plastfolie og sukkerholdige madvarer. Ellers kan snavset
beskadige apparatet. Brug en speciel skraber til glasset. Sæt skraberen skråt ned på
glasoverfalden, og bevæg bladet hen over overfladen.
– Fjernes, når apparatet er kølet tilstrækkeligt ned:Rande af kalk eller vand, fedt-
stænk og metalskinnende misfarvning. Brug et rengøringsmiddel til glaskeramik eller
rustfrit stål.
2. Tør apparatet af med en fugtig klud og lidt opvaskemiddel.
3. Slut med at tørre efter med en ren klud.
Page 14
14 Hvis noget går galt
HVIS NOGET GÅR GALT
Fejl Mulig årsag og løsning
Apparatet kan ikke tændes eller
betjenes.
Der kommer et signal, apparatet slukker.
Der kommer et signal, når der
er slukket for apparatet.
Apparatet slukkes.
Restvarmeindikatoren tænder
ikke.
Opkogningsautomatikken starter ikke.
Du kan ikke aktivere den yderste varmekreds.
Sensorfelterne bliver varme. Kogegrejet er for stort, eller du placerer det for tæt på betje-
Der lyder intet signal, når der
trykkes på betjeningsknapperne
tændes
og et tal lyser.
Hvis du har prøvet de ovennævnte forslag, uden at problemet er løst: Kontakt forhandleren
eller kundeservice. Oplys specifikationerne på typeskiltet, den trecifrede kode for glaskeramik (der står i hjørnet af glaspladen) og den fejlmeddelelse, der lyser.
Overbevis dig om, at du har betjent apparatet rigtigt. Hvis fejlen skyldes forkert betjening, er
et teknikerbesøg fra servicecentret eller forhandleren ikke gratis, heller ikke i garantiperioden. Oplysninger om kundeservice og garantibetingelser står i garantihæftet.
• Tænd for apparatet igen, og indstil varmetrinnet inden 10 sekunder.
• Du har rørt ved 2 eller flere sensorfelter samtidigt. Berør kun
ét sensorfelt.
• Børnesikringen eller låsen eller Stop+Goer i gang. Se kapitlet
Driftsvejledning.
• Der er vand eller fedtstænk på betjeningspanelet. Tør betjeningspanelet af.
Du har dækket et eller flere sensorfelter. Flyt genstanden fra
sensorfelterne.
Du har lagt noget på Flyt genstanden fra sensorfelterne.
Kogezonen er ikke varm, fordi den kun har været tændt i kort tid.
Hvis kogezonen skulle være varm: Kontakt kundeservice
• Der er restvarme på kogezonen Lad kogezonen køle tilstrækkeligt af.
• Det højeste varmetrin er valgt. Højeste varmetrin har samme
effekt som den automatiske opkogningsfunktion.
Aktiver den indre kreds først.
ningspanelet. Sæt stort kogegrej på de bageste kogezoner, hvis
det er nødvendigt.
Signalerne er slået fra. Aktiver signalerne (se OffSound Control).
Automatisk slukning er tændt. Sluk for apparatet, og tænd igen.
Der er en fejl i apparatet.
Kobl apparatet fra lysnettet i et stykke tid. Sluk på gruppeafbry-
deren, eller tag sikringen ud på tavlen. Tilslut igen. Hvis
igen: Kontakt kundeservice.
lyser
Page 15

Miljøhensyn
MILJØHENSYN
Symbolet på produktet eller på pakken angiver, at dette produkt ikke må behandles som
husholdningsaffald. Det skal i stedet overgives til en affaldsstation for behandling af
elektrisk og elektronisk udstyr. Ved at sørge for at dette produkt bliver bortskaffet på den
rette måde, hjælper du med til at forebygge eventuelle negative påvirkninger af miljøet og
af personers helbred, der ellers kunne forårsages af forkert bortskaffelse af dette produkt.
Kontakt det lokale kommunekontor, affaldsselskab eller den forretning, hvor produktet er
købt, for yderligere oplysninger om genanvendelse af dette produkt.
Emballage
Emballagematerialet er miljøvenligt og kan genanvendes Plastdelene er mærket:
>PE<,>PS<, osv. Aflevér emballagens dele som husholdningsaffald på kommunens genbrugsstation.
15
Page 16

16
VOOR PERFECTE RESULTATEN
Bedankt dat u voor dit AEG product heeft gekozen. Dit
apparaat is ontworpen om vele jaren uitstekend te
presteren, met innovatieve technologieën die het leven
gemakkelijker helpen maken – functies die gewone
apparaten wellicht niet hebben. Neem een paar minuten
de tijd om het door te lezen zodat u er optimaal van kunt
profiteren.
ACCESSOIRES EN VERBRUIKSARTIKELEN
In de AEG webshop vindt u alles wat u nodig heeft om al
uw apparaten van AEG mooi te houden en perfect te
laten functioneren. Ook vindt u hier een groot aantal
accessoires die zijn ontworpen en gebouwd volgens de
hoge kwaliteitsnormen die u verwacht, van speciaal
kookgerei tot bestekmandjes en van flessenhouders tot
waszakken…
Bezoek onze webshop op
www.aeg.com/shop
Page 17

INHOUD
Inhoud
18 Veiligheidsinformatie
19 Montage-instructies
21 Beschrijving van het product
23 Bedieningsinstructies
26 Nuttige aanwijzingen en tips
28 Onderhoud en reiniging
28 Problemen oplossen
29 Milieubescherming
17
In deze gebruiksaanwijzing worden de
volgende symbolen gebruikt:
Belangrijke informatie over uw persoonlijke
veiligheid en informatie over het voorkomen
van schade aan het apparaat.
Algemene informatie en tips
Milieu-informatie
Wijzigingen voorbehouden
Page 18

18 Veiligheidsinformatie
VEILIGHEIDSINFORMATIE
Lees voor uw eigen veiligheid en correcte werking van het apparaat eerst deze handleiding
aandachtig door, alvorens het apparaat te installeren en te gebruiken. Bewaar deze instructies altijd bij het apparaat, ook wanneer u het verplaatst of verkoopt. Gebruikers moeten
volledig op de hoogte zijn van de bediening en veiligheidsfuncties van het apparaat.
Veiligheid van kinderen en kwetsbare mensen
WAARSCHUWING!
Mensen, met inbegrip van kinderen, met beperkte lichamelijke, zintuiglijke of verstandelijke
vermogens of gebrek aan ervaring en kennis, mogen dit apparaat niet gebruiken. Zij moeten
onder toezicht staan of instructies krijgen over het gebruik van dit apparaat van iemand die
verantwoordelijk is voor hun veiligheid.
• Houd alle verpakkingsmaterialen uit de buurt van kinderen. Gevaar voor verstikking of
lichamelijk letsel.
• Houd kinderen tijdens en na het gebruik uit de buurt van het apparaat, totdat het apparaat afgekoeld is.
WAARSCHUWING!
Om te voorkomen dat kleine kinderen of dieren per ongeluk het apparaat inschakelen, adviseren wij de kinderbeveiliging te activeren.
Veiligheid tijdens gebruik
• Verwijder al het verpakkingsmateriaal, stickers en folie van het apparaat voordat u het in
gebruik neemt.
• Zet de kookzones op "uit" na ieder gebruik.
• Gevaar voor brandwonden! Leg geen bestek of deksels op de kookplaat; deze kunnen zeer
heet worden.
WAARSCHUWING!
Brandgevaar! Te hete vetten en oliën kunnen snel in brand vliegen.
Gebruik conform de voorschriften
• Controleer het apparaat altijd tijdens gebruik.
• Dit apparaat is uitsluitend bestemd voor huishoudelijk gebruik!
• Het apparaat mag niet worden gebruikt als werkblad of aanrecht.
• Plaats geen brandbare vloeistoffen, licht ontvlambare materialen of voorwerpen die kunnen smelten (bijv. plastic of aluminium) op of in de buurt van het apparaat.
• Pas op als u het apparaat aansluit in de buurt van een stopcontact. Voorkom contact
tussen de elektrische verbindingen en het apparaat of heet kookgerei. Voorkom dat elektrische verbindingen verstrikt raken.
Voorkomen van schade aan het apparaat
• Als er voorwerpen of pannen op het glaskeramiek vallen, kan het oppervlak beschadigd
raken.
Page 19

Montage-instructies
• Pannen van gietijzer, aluminium of met beschadigde bodems kunnen krassen veroorzaken in het glaskeramiek. Verplaats ze niet over het oppervlak.
• Laat pannen niet droogkoken om beschadiging van de pan en het glaskeramiek te voorkomen.
• Gebruik de kookzones niet met lege pannen of zonder pannen erop.
• Leg geen aluminiumfolie op het apparaat.
WAARSCHUWING!
Als er een scheur in het oppervlak zit, haalt u de stekker uit het stopcontact om elektrische schokken te voorkomen.
MONTAGE-INSTRUCTIES
Noteer, voor de installatie, het serienummer (ser. nr.) op het typeplaatje.Het typeplaatje
van het apparaat bevindt zich aan de onderkant van de behuizing.
58 HCD AA AO
AEG
HK955070FB
220-240 V 50-60-Hz
De veiligheidsinstructies
WAARSCHUWING!
Lees deze zorgvuldig!
Controleer of het apparaat niet beschadigd is tijdens het transport. Sluit geen beschadigd
apparaat aan. Neem indien nodig contact op met de leverancier.
Alleen een geautoriseerde onderhoudstechnicus kan dit apparaat installeren, aansluiten of
repareren. Gebruik alleen originele reserveonderdelen.
Inbouwapparaten mogen alleen worden gebruikt nadat zij ingebouwd zijn in geschikte inbouwunits of werkbladen die aan de normen voldoen.
Wijzig de specificaties van het product of het product zelf niet. Gevaar voor letsel en schade
aan het apparaat.
De wetten, voorschriften, richtlijnen en normen die van kracht zijn in het land waar het apparaat wordt gebruikt dienen in acht genomen te worden (veiligheidsvoorschriften, correcte
recycling overeenkomstig de voorschriften, veiligheidsvoorschriften met betrekking tot
elektrische installaties, enz.)!
Houd de minimumafstanden naar andere apparaten en units in acht!
Tijdens de installatie moet een schokbescherming zijn aangebracht, bijv. lades mogen alleen
worden aangebracht als er onder het apparaat een beschermende vloer aanwezig is!
De uitgezaagde oppervlakken van het werkblad moeten beschermd worden tegen vocht
met een geschikte afdichting!
Het juiste afdichtmiddel moet worden gebruikt om de opening tussen het apparaat en het
werkblad af te dichten!
Bescherm de onderkant van het apparaat tegen stoom en vocht, bijv. van een afwasmachine of oven!
Installeer het apparaat niet naast deuren of onder ramen! Als u zich hier niet aan houdt,
kan het bij het openen van deuren of ramen gebeuren dat er hete pannen van het apparaat
worden geduwd.
949 595 124 00
7,9 kW
19
Page 20

20 Montage-instructies
WAARSCHUWING!
Risico van verwonding door elektrische stroom. Volg de instructies voor de elektrische aansluitingen nauwkeurig op.
• De netaansluiting staat onder stroom.
• Schakel de stroomtoevoer naar de netaansluiting uit.
• Garandeer de schokbescherming door een vakkundige inbouw.
• Loszittende en onvakkundig aangebrachte stekkerverbindingen kunnen oververhitting
van de aansluiting veroorzaken.
• Laat de aansluitingen in de klemmen correct installeren door een gekwalificeerde elektricien.
• Zorg ervoor dat het snoer niet wordt belast door trekken.
• In het geval van een eenfase- of tweefase-aansluiting, moet het geschikte netsnoer van
het type H05BB-F Tmax. 90°C (of hoger) worden gebruikt.
• Vervang een voedingskabel door een speciale kabel (type H05BB-F Tmax 90°C of hoger).
Neem contact op met een klantenservice bij u in de buurt.
Het apparaat moet met een poolschakelaar op een elektrisch circuit zijn aangesloten, met
een contactopening van minstens 3 mm, zodat het apparaat te allen tijde uitgeschakeld kan
worden.
U moet beschikken over de correcte isolatie-apparaten: stroomonderbrekers, zekeringen
(schroefzekeringen moeten uit de houder worden verwijderd), aardlekschakelaars en contactgevers.
Het bevestigen van de afdichtstrip.
• Het werkblad op de plaats van de uitsnijding reinigen.
• Trek de afdichtstrip rondom de onderrand van het apparaat langs de buitenrand van de
glazen keramische plaat. Rek het afdichtband daarbij niet uit. De plaats van het punt
waar de strip samenkomt dient in het midden van één van de zijden te liggen. Duw de
twee uiteinden tegen elkaar als u de strip op lengte knipt (houd een marge van een paar
mm aan).
Montage
min.
50mm
min.
500mm
min.
50mm
Page 21

Beschrijving van het product
21
R 5mm
=
490
+1
mm
=
880
600mm
+1
mm
min.
25 mm
min.
20 mm
BESCHRIJVING VAN HET PRODUCT
Indeling kookplaat
1 32
145
mm
180
mm
145/
210/270
mm
265
mm
170
mm
180
mm
456
min.
28 mm
1 Enkele kookzone 1200 W
2 Drievoudige kookzone 1050/1950/2700
W
3 Ovale kookzone 1400/2200 W
4 Enkele kookzone 1800 W
5 Bedieningspaneel
6 Enkele kookzone 1800 W
Page 22

22 Beschrijving van het product
Indeling bedieningspaneel
4 51 2 6
3
12 91011
8 7
Gebruik de tiptoetsen om het apparaat te bedienen. De displays, indicatielampjes en geluiden
tonen welke functies worden gebruikt.
tiptoets functie
1
2
Kookzoneweergave van de timer. Geeft aan voor welke zone u de tijd instelt
3
Het timerdisplay. geeft de tijd in minuten weer.
4
5
6
Een kookstanddisplay geeft de kookstand weer.
7
Een bedieningsstrip voor het instellen van de kookstand.
8
9
10
11
12
/
schakelt het apparaat in en uit.
vergrendelt en ontgrendelt het bedieningspaneel.
Functie Automatisch opwarmen inschakelen.
De buitenste ring in- en uitschakelen.
De buitenste ringen in- en uitschakelen.
verhoogt of verlaagt de tijdsinstelling.
Kookzone instellen.
schakelt de functie STOP+GO in en uit.
Kookstanddisplays
Display Beschrijving
De kookzone is uitgeschakeld.
-
+ cijfer
/ /
De kookzone wordt gebruikt.
De -functie werkt.
De functie Automatisch opwarmen werkt
Er is een storing.
OptiHeat Control (3 staps restwarmte-indicatie): door gaan met koken / warmhouden / restwarmte.
De functie vergrendeling/kinderbeveiliging werkt.
Page 23

Bedieningsinstructies 23
Display Beschrijving
De functie Automatische uitschakelen is in werking getreden.
OptiHeat Control (3 staps restwarmte-indicatie)
WAARSCHUWING!
/ / Verbrandingsgevaar door restwarmte!
OptiHeat Control geeft het niveau van de restwarmte aan.
BEDIENINGSINSTRUCTIES
In- en uitschakeling
Raak 1 seconde aan om het apparaat in– of uit te schakelen.
Automatisch uitschakelen
De functie schakelt het apparaat automatisch uit als:
• Alle kookzones uitgeschakeld zijn (
• U de kookstand niet instelt nadat u het apparaat hebt ingeschakeld.
• U iets knoeit of langer dan 10 seconden iets op het bedieningspaneel legt (een pan, een
doek, etc.). Het geluid klinkt enige tijd en het apparaat wordt uitgeschakeld. Verwijder
het voorwerp of reinig het bedieningspaneel.
• U een kookzone niet uitschakelt of de kookstand verandert. Na enige tijd gaat
den en wordt het apparaat uitgeschakeld. Zie de tabel.
De tijden voor Automatisch uitschakelen
Temperatuurin-
stelling
De kookzone
wordt uitgescha-
keld na
, - - -
6 uur 5 uur 4 uur 1,5 uur
).
bran-
-
De kookstand
Raak de bedieningsstrip daar aan waar de kookstand zich bevindt. Corrigeer naar links of rechts,
indien nodig. Laat niet los voordat de juiste kookstand is bereikt. Het display toont de kookstand.
In- en uitschakelen van de buitenste ringen
Het verwarmingsvlak kan worden aangepast aan de grootte van het kookgerei.
Raak sensorveld
branden Voor meer buitenste verwarmingskringen hetzelfde sensorveld opnieuw aanraken.
Het bijbehorende controlelampje gaat branden.
/ aan om de buitenste ring in te schakelen. Het controlelampje gaat
Page 24

00
24 Bedieningsinstructies
Voer de procedure opnieuw uit om de buitenste ring uit te schakelen. Het controlelampje
gaat uit.
Automatisch opwarmen
12
11
10
9
8
7
6
5
4
3
2
1
0
1234567891011121314
U kunt de gewenste kookstand sneller verkrijgen als u de functie Automatisch opwarmen
inschakelt. Deze functie schakelt even de hoogste kookstand in (zie de afbeelding) en verlaagt dan naar de gewenste kookstand.
De functie Automatisch opwarmen starten voor een kookzone:
aanraken ( verschijnt op de display).
1.
2. Raak meteen de benodigde warmteinstelling aan. Na 3 seconden verschijnt
display.
Wijzig de kookstand om de functie te stoppen.
op het
Timer
Timer met aftelfunctie
Gebruik de timer met aftelfunctie om in te stellen hoe lang de kookzone wordt gebruikt
voor slechts deze ene keer.
Stel de timer met aftelfunctie in nadat de kookzone is geselecteerd.
U kunt de kookstand vóór of na het instellen van de timer selecteren.
• Voor het afstellen van de kookzone:raak
gewenste kookzone brandt.
• De timer met aftelfunctie activeren: Raak
- 99 minuten). Als het lampje van de kookzone langzaam knippert, wordt de tijd
00
afgeteld.
• Resterende tijd zien: stel de kookzone in met
start te snel. Het display geeft de resterende tijd aan.
• De teller met aftelfunctie wijzigen: Stel de kookzone in met
• De timer uitschakelen: stel de kookzone in met
terug tot
schakelen kunt u ook
. Het indicatielampje van de kookzone gaat uit. Om de kookzone uit te
00
en gelijktijdig aanraken.
Als de afteltijd verstreken is, klinkt er een geluidssignaal en knippert
wordt uitgeschakeld.
meerdere malen aan tot het lampje van de
van de timer aan om de tijd in te stellen (
. Het indicatielampje van de kookzone
raak aan, of .
. Raak aan. De resterende tijd telt
. De kookzone
Page 25

00
Bedieningsinstructies
• Het geluid stoppen: aanraken
CountUp Timer (De timer met optelfunctie)
Gebruik CountUp Timer om in de gaten te houden hoelang de kookzone werkt.
• Voor het afstellen van de kookzone (als meer dan één kookzone werkt):raak
dere malen aan tot het lampje van de gewenste kookzone brandt.
• Voor het inschakelen van CountUp Timer:raak
lampje van de kookzone langzaam knippert, wordt de tijd opgeteld. De display schakelt
tussen
• Om in de gaten te houden hoelang de kookzone werkt: stel de kookzone in met
Het indicatielampje van de kookzone gaat snel knipperen. Het display geeft de tijd aan
die de kookzone werkt.
• Voor het uitschakelen van CountUp Timer: stel de kookzone in met
aan voor het inschakelen van de timer. Het indicatielampje van de kookzone gaat uit.
Kookwekker
U kunt de timer als Kookwekker gebruiken als de kookzones uitgeschakeld zijn. Raak
aan. Raak of van de timer aan om de tijd in te stellen. Als de tijd verstreken is, klinkt
er een geluidssignaal en knippert
• Het geluid stoppen: aanraken
en getelde tijd (minuten).
.
van de timer gaat branden. Als het
STOP+GO
De -functie stelt alle kookzones in op de laagste instelling ( ).
in werking is, kunt u de warmte-instelling niet wijzigen.
Als
stopt de timerfunctie niet.
• Voor het inschakelen van deze functie, raakt u
• Raak voor het uitschakelen van deze functie
ingesteld, wordt weergegeven.
aan. Het symbool gaat branden.
aan. De kookstand die u eerder hebt
25
meer-
.
en raak of
Slot
Wanneer de kookzones in gebruik zijn, kunt u het bedieningspaneel vergrendelen, maar niet
Stel eerst de kookstand in.
Raak om deze functie te starten
den.
De timer blijft aan.
Raak om deze functie te stoppen
weergegeven.
Als u het apparaat stopt, stopt deze functie ook.
De kinderbeveiliging
Deze functie voorkomt dat het apparaat onbedoeld wordt gebruikt.
De kinderbeveiliging inschakelen
•
• Raak
• Schakel het apparaat uit met
. Hiermee wordt voorkomen dat de kookstand per ongeluk wordt veranderd.
aan. Het symbool verschijnt gedurende vier secon-
aan. De kookstand die u eerder hebt ingesteld, wordt
Schakel het apparaat in met
4 seconden aan. Het symbool gaat branden.
. Stel geen kookstand in.
.
Page 26

26 Nuttige aanwijzingen en tips
De kinderbeveiliging uitschakelen
• Schakel het apparaat in met
symbool
• Schakel het apparaat uit met
De kinderbeveiliging gedurende een kooksessie onderdrukken
• Schakel het apparaat in met
• Raak
raat bedienen.
• Als u het apparaat uitschakelt met
gaat branden.
4 seconden aan. Stel de kookstand in binnen 10 seconden. U kunt het appa-
. Stel geen kookstand in. Raak 4 seconden aan. Het
.
. Het symbool gaat branden.
, treedt de kinderbeveiliging weer in werking.
OffSound Control (In- en uitschakelen van de geluiden)
Uitschakelen van de geluiden
Schakel het apparaat uit.
Raak
aan, het geluid is aan. Raak
Als deze functie is ingeschakeld, kunt u alleen de geluiden horen als:
•u
• de kookwekker af gaat
• de Timer met aftelfunctie gaat af
• als u iets op het bedieningspaneel plaatst.
Inschakelen van de geluiden
Schakel het apparaat uit.
Raak
aan, omdat het geluid uit staat. Raak
3 seconden aan. De displays gaan aan en uit. Raak 3 seconden aan. gaat
aan, gaat aan, het geluid is uit.
aanraakt
3 seconden aan. De displays gaan aan en uit. Raak 3 seconden aan. gaat
aan, gaat aan. Het geluid is aan.
NUTTIGE AANWIJZINGEN EN TIPS
Kookgerei
• De bodem van het kookgerei moet zo dik en vlak mogelijk zijn.
• Kookgerei gemaakt van geëmailleerd staal of met aluminium of kopperen bodems, kunnen tot verkleuringen leiden van de glazen keramische kookplaat.
Energie besparen
• Doe indien mogelijk altijd een deksel op de pan.
• Zet de pan op de kookzone voordat u deze inschakelt.
• Schakel voor het einde van de bereidingstijd de kookzones uit, om gebruik te maken van
de restwarmte.
• De bodems van de pannen en kookzones dienen dezelfde afmeting te hebben.
Page 27

Nuttige aanwijzingen en tips
Öko Timer (Eco-timer)
Om energie te besparen schakelt het verwarmingselement van de kookzone eerder uit dan
het signaal van de timer met aftelfunctie klinkt. Het verschil in werkingstijd hangt af van
het niveau van de kookstand en de tijd dat u kookt.
Voorbeelden van kooktoepassingen
De gegevens in de volgende tabel dienen slechts als richtlijn.
Tem-
peratuurinstelling
Bereide gerechten warmhouden zoals
1
1-3 Hollandaisesaus, smelten: boter, choco-
1-3 Stollen: luchtige omeletten, gebakken
3-5 Zachtjes aan de kook brengen van rijst
5-7 Stomen van groenten, vis en vlees 20-45
7-9 Aardappelen stomen 20-60
7-9 Bereiden van grotere hoeveelheden
9-12 Lichtjes braden: kalfsoester, cordon bleu
12-13 Door-en-door gebraden, opgebakken
14 Aan de kook brengen van grotere hoeveelheden water, pasta koken, aanbraden van vlees
lade, gelatine
eieren
en gerechten op melkbasis, reeds bereide gerechten opwarmen
voedsel, stoofschotels en soepen
van kalfsvlees, koteletten, rissoles, worstjes, lever, roux, eieren, pannenkoeken,
donuts
aardappelen, lendenbiefstukken, steaks
(goulash, stoofvlees), frituren van friet.
Gebruik om: Tijdsin-
stelling
nodig
5-25
min
10-40
min
25-50
min
min
min
60-150
min
zoals
nodig
5-15
min
Tips
Een deksel op de pan doen
Van tijd tot tijd mengen
Met deksel bereiden
Voeg minimaal twee keer zo veel
vocht toe als rijst, gerechten op
melkbasis regelmatig roeren.
Een paar eetlepels vocht toevoegen.
Gebruik max. ¼ l water voor 750 g
aardappelen.
Tot 3 l vloeistof plus ingrediënten.
Halverwege de bereidingstijd omdraaien.
Halverwege de bereidingstijd omdraaien.
27
Informatie over acrylamides
Belangrijk! Volgens recente wetenschappelijke informatie kan het intensief bruinen van
levensmiddelen (met name in producten die zetmeel bevatten), een gezondheidsrisico
vormen tengevolge van acrylamides. Om die reden adviseren wij levensmiddelen zoveel
mogelijk bij lage temperaturen gaar te laten worden en de gerechten niet te veel te
bruinen.
Page 28

28 Onderhoud en reiniging
ONDERHOUD EN REINIGING
Reinig het apparaat telkens na gebruik
Gebruik altijd kookgerei met een schone bodem.
WAARSCHUWING!
De scherpe voorwerpen en de schuurmiddelen kunnen het apparaat beschadigen.
Het reinigen van het apparaat met een stoom- of hogedrukreiniger is om veiligheidsredenen niettoegestaan.
Krassen of donkere vlekken in de glaskeramiek hebben geen invloed op de werking van het
apparaat.
Vuil verwijderen:
1. – Verwijder direct:gesmolten plastic, gesmolten folie en suikerhoudende gerechten.
Anders kan het vuil het apparaat beschadigen. Gebruik een speciale schraper voor de
glazen plaat. Plaats de schraper schuin op de glazen plaat en verwijder resten door
het blad over het oppervlak te schuiven.
– Verwijder nadat het apparaat voldoende is afgekoeld:kalkvlekken, waterkringen,
vetvlekken, glimmende metaalachtige verkleuringen. Gebruik een speciaal schoonmaakmiddel voor glaskeramiek of roestvrij staal.
2. Reinig het apparaat met een vochtige doek en een beetje afwasmiddel.
3. Wrijf het apparaat ten slotte droog met een schone doek.
PROBLEMEN OPLOSSEN
Probleem Mogelijke oorzaak en oplossing
U kunt het apparaat niet inschakelen of bedienen.
Er klinkt een geluid en het apparaat wordt uitgeschakeld.
Er klinkt een geluid als het apparaat wordt uitgeschakeld.
Het apparaat wordt uitgeschakeld.
De restwarmte-indicator gaat
niet aan.
• Schakel het apparaat opnieuw in en stel de kookstand binnen
10 seconden in.
• U hebt twee of meer sensorvelden tegelijk aangeraakt. Raak
slechts één sensorveld tegelijk aan.
• De kinderbeveiliging of toetsblokkering Stop+Go is actief. Zie
het hoofdstuk Gebruiksaanwijzing.
• Er bevindt zich water of vetspatten op het bedieningspaneel.
Reinig het bedieningspaneel.
U hebt een of meer sensorvelden afgedekt. Verwijder het voorwerp van de sensorvelden.
U hebt iets op de gezet. Verwijder het object van het sensorveld.
De kookzone is niet heet, omdat hij slechts kortstondig is bediend. Als de kookzone heet moet zijn, neem dan contact op met
de klantenservice.
Page 29

Milieubescherming
Probleem Mogelijke oorzaak en oplossing
De automatische opwarmfunctie start niet.
U kunt de buitenste ring niet
inschakelen.
De sensorvelden worden warm. De pan is te groot of staat te dicht bij de bediening. Plaats groter
Er klinkt geen signaal wanneer
u de sensorvelden van het bedieningspaneel aanraakt.
gaat branden.
en een getal gaan branden.
• De kookzone geeft nog steeds restwarmte af. Laat de kookzone
voldoende afkoelen.
• De hoogste kookstand is ingesteld. De hoogste kookstand heeft
hetzelfde vermogen als de automatische opwarmfunctie.
Schakel eerst de binnenste ring in.
kookgerei op de achterste kookzones indien nodig.
De signalen zijn uitgeschakeld. Activeer de signalen (zie In- en
uitschakelen van de geluiden).
De automatische uitschakeling is in werking getreden. Schakel
het apparaat uit en weer in.
Er heeft zich een fout in het apparaat voorgedaan.
Ontkoppel het apparaat enige tijd van de stroomtoevoer. Ontkoppel de zekering uit het elektrische systeem van het huis. Sluit het
apparaat opnieuw aan. Als
contact op met de klantenservice.
weer gaat branden, neem dan
29
Als u door het volgen van de bovenstaande suggesties het probleem niet kunt oplossen,
dient u contact op te nemen met uw vakhandelaar of de klantenservice. Geef de gegevens
door van het typeplaatje, een driecijferige code voor de glaskeramische plaat (bevindt zich
op de hoek van het glazen oppervlak) en de foutmelding die wordt weergegeven.
Controleer of u het apparaat op de juiste manier gebruikt hebt. Bij onjuist gebruik van het
apparaat wordt het bezoek van de technicus van de klantenservice of de vakhandelaar in
rekening gebracht, zelfs tijdens de garantieperiode. De instructies over de klantenservice en
de garantiebepalingen vindt u in het garantieboekje.
MILIEUBESCHERMING
Het symbool op het product of op de verpakking wijst erop dat dit product niet als
huishoudafval mag worden behandeld, maar moet worden afgegeven bij een verzamelpunt
waar elektrische en elektronische apparatuur wordt gerecycled. Als u ervoor zorgt dat dit
product op de juiste manier wordt verwijderd, voorkomt u mogelijke negatieve gevolgen
voor mens en milieu die zich zouden kunnen voordoen in geval van verkeerde
afvalverwerking. Voor gedetailleerdere informatie over het recyclen van dit product, kunt u
contact opnemen met de gemeente, de gemeentereiniging of de winkel waar u het product
hebt gekocht.
Verpakkingsmateriaal
De verpakkingsmaterialen zijn milieuvriendelijk en herbruikbaar De kunststof onderdelen
zijn gemarkeerd, bijv.: >PE<,>PS<, enz. Gooi het verpakkingsmateriaal weg in de juiste afvalcontainer bij uw plaatselijke afvalverwerkingsdienst.
Page 30

30
FOR PERFECT RESULTS
Thank you for choosing this AEG product. We have
created it to give you impeccable performance for many
years, with innovative technologies that help make life
simpler – features you might not find on ordinary
appliances. Please spend a few minutes reading to get the
very best from it.
ACCESSORIES AND CONSUMABLES
In the AEG webshop, you’ll find everything you need to
keep all your AEG appliances looking spotless and
working perfectly. Along with a wide range of accessories
designed and built to the high quality standards you
would expect, from specialist cookware to cutlery baskets,
from bottle holders to delicate laundry bags…
Visit the webshop at:
www.aeg.com/shop
Page 31

CONTENTS
32 Safety information
33 Installation instructions
35 Product description
36 Operating instructions
40 Helpful hints and tips
41 Care and cleaning
41 What to do if…
42 Environment concerns
43 Warranty
Contents
31
The following symbols are used in this user
manual:
Important information concerning your
personal safety and information on how to
avoid damaging the appliance.
General information and tips
Environmental information
Subject to change without notice
Page 32

32 Safety information
SAFETY INFORMATION
For your safety and correct operation of the appliance, read this manual carefully before
the installation and use. Always keep these instructions with the appliance also if you move
or sell it. The users must fully know the operation and safety functions of the appliance.
Children and vulnerable people safety
WARNING!
Do not let persons, children included, with reduced physical sensory, reduced mental functions or lack of experience and knowledge to use the appliance. They must have supervision
or instruction for the operation of the appliance by a person who is responsible for their
safety.
• Keep all packaging away from children. There is the risk of suffocation or injury.
• Keep the children away from the appliance during and after the operation, until the appliance is cold.
WARNING!
Activate the child safety device to prevent small children and pets from an accidental activation of the appliance.
Safety during operation
• Remove all packaging, stickers and layers from the appliance before the first use.
• Set the cooking zones to "off" after each use.
• The Risk of burns! Do not put cutlery or saucepan lids on the surface that you cook, as
they can become hot.
WARNING!
Fire risk! Too hot fats and oils can occur with ignition very quickly.
Correct operation
• Always monitor the appliance during operation.
• The appliance is only for domestic use!
• Do not use the appliance as a work or a storage surface.
• Do not put or keep very flammable liquids and materials, easy fusible objects (made of
plastic or aluminium) on or near the appliance.
• Be careful when you connect the appliance to the near sockets. Do not let the electricity
bonds touch the appliance or hot cookware. Do not let the electricity bonds to tangle.
How to prevent a damage to the appliance
• If the objects or cookware fall on the glass ceramic, the surface can be damaged.
• Cookware made of cast iron, cast aluminium or with damaged bottoms can cause
scratch of the glass ceramic. Do not move them on the surface.
• Do not let cookware boil dry to prevent the damage to cookware and glass.
• Do not use the cooking zones with empty cookware or without cookware.
Page 33

Installation instructions
• Do not put the aluminium foil on the appliance.
WARNING!
If there is a crack on the surface, disconnect power supply to prevent the electrical
shock.
INSTALLATION INSTRUCTIONS
Before the installation, note down the serial number (Ser. Nr.) from the rating plate.The
rating plate of the appliance is on its lower casing.
58 HCD AA AO
AEG
HK955070FB
220-240 V 50-60-Hz
The Safety Instructions
WARNING!
You must read these!
• Make sure that the appliance is not damaged because of transportation. Do not connect
a damaged appliance. If it is necessary, speak to the supplier.
• Only an authorized servicing technician can install, connect or repair this appliance. Use
only original spare parts.
• Only use the built-in appliances after you assemble the appliance into correct built-in
units and work surfaces that align to the standards.
• Do not change the specifications or change this product. Risk of injury and damage to
the appliance.
• Fully obey the laws, ordinances, directives and standards in force in the country where
you use the appliance (safety regulations, recycling regulations, electrical safety rules
etc.)!
• Keep the minimum distances to other appliances and units!
• Install shock protection, for example install the drawers only with a protective floor directly below the appliance!
• Keep safe the cut surfaces of the worktop from moisture with a correct sealant!
• Seal the appliance to the work top with no space between with a correct sealant!
• Keep safe the bottom of the appliance from steam and moisture, e.g. from a dishwasher
or oven!
• Do not install the appliance adjacent to doors and below windows! If not, when you
open the doors or windows they can push off hot cookware from the appliance.
WARNING!
Risk of injury from electrical current. Carefully obey the instructions for electrical connections.
949 595 124 00
7,9 kW
33
• The electrical mains terminal is live.
• Make electrical mains terminal free of voltage.
Page 34

34 Installation instructions
• Install correctly to give shock protection.
• Loose and incorrect plug and socket connections can make the terminal become too hot.
• A qualified electrician must install the connections in the clamps correctly.
• Use a strain relief clamp on cable.
• Use the correct mains cable of type H05BB-F Tmax 90°C (or higher) for a single phase or
two phase connection.
• Replace the damaged mains cable with a special cable (type H05BB-F Tmax 90°C; or
higher). Speak your local Service Centre.
The appliance must have the electrical installation which lets you disconnect the appliance
from the mains at all poles with a contact opening width of minimum 3 mm.
You must have correct devices to isolate: line protecting cut-outs, fuses (screw type fuses
removed from the holder), earth leakage trips and contactors.
To attach the seal.
• Clean the worktop in the area of the cut out section.
• Bond the seal stripe supplied on the lower edge of the appliance along the outer edge of
the glass ceramic. Do not extend it. Let stay the cut ends in the middle of one side.
When, you cut it to length (add some mm), push the two ends together.
Assembly
min.
50mm
=
R 5mm
490
min.
500mm
+1
mm
=
880
+1
min.
50mm
600mm
mm
Page 35

Product description 35
min.
20 mm
PRODUCT DESCRIPTION
Cooking surface layout
1 32
145
mm
180
mm
145/
210/270
265
mm
mm
min.
25 mm
170
mm
180
mm
456
min.
28 mm
1 Single cooking zone 1200 W
2 Triple cooking zone 1050/1950/2700 W
3 Oval cooking zone 1400/2200 W
4 Single cooking zone 1800 W
5 Control panel
6 Single cooking zone 1800 W
Control panel layout
4 51 2 6
3
12 91011
Use the sensor fields to operate the appliance. The displays, indicators and sounds tell which
functions operate.
sensor field function
1
2
Cooking zones' indicators of timer. It shows for which zone you set the time.
3
It activates and deactivates the appliance.
It locks/unlocks the control panel.
8 7
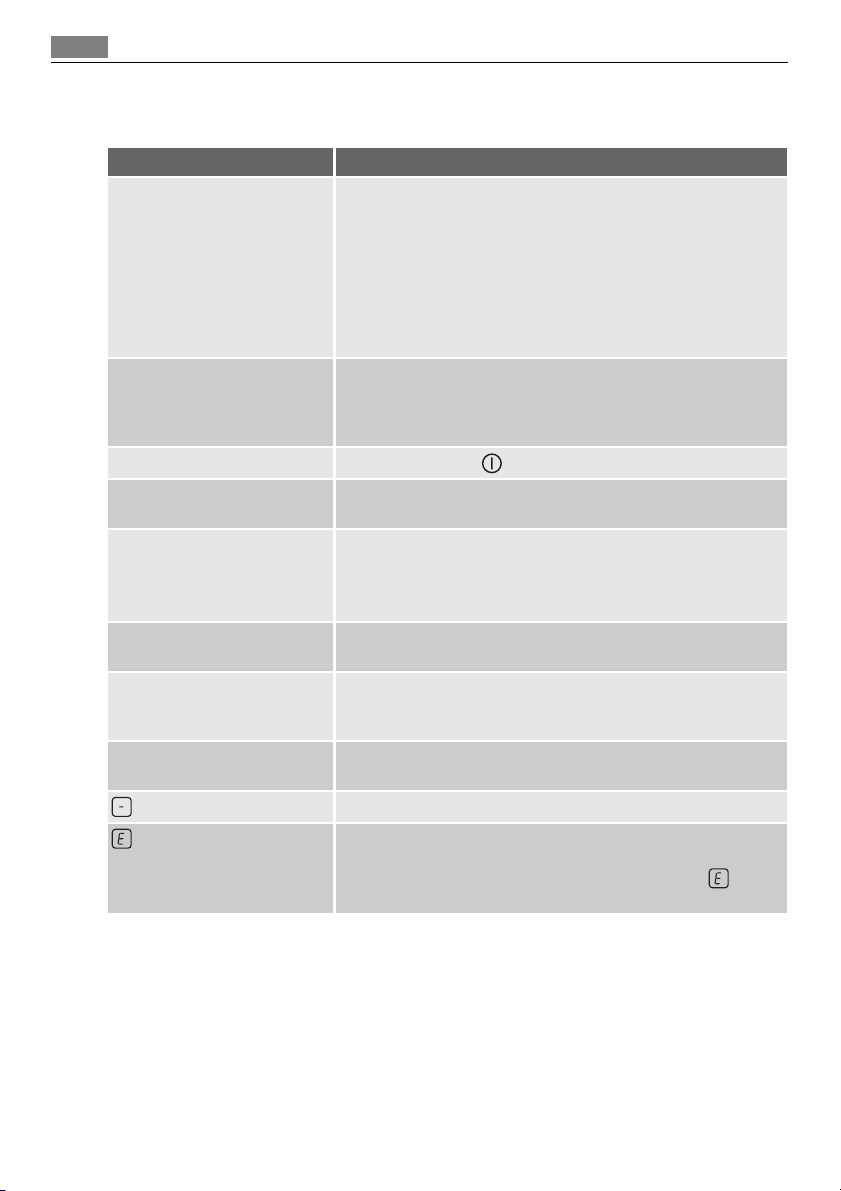
Page 36

36 Operating instructions
sensor field function
The timer display. It shows the time in minutes.
4
5
6
A heat setting display It shows the heat setting.
7
A control bar To set the heat setting.
8
9
10
11
12
/
Heat setting displays
Display Description
-
+ digit
/ /
It activates the Automatic Heat Up function.
It activates and deactivates the outer ring.
It activates and deactivates the outer rings.
It increases or decreases the time.
It sets the cooking zone.
It activates and deactivates theSTOP+GO function.
The cooking zone is deactivated.
The cooking zone operates.
The function operates.
The Automatic Heat Up function operates
There is a malfunction.
OptiHeat Control (3 step Residual heat indicator) : continue cook /
stay warm / residual heat.
Lock/The Child Safety function operates.
The Automatic Switch Of function operates.
OptiHeat Control (3 step Residual heat indicator)
WARNING!
/ / The risk of burns from residual heat!
OptiHeat Control shows the level of the residual heat.
OPERATING INSTRUCTIONS
Activation and deactivation
Touch for 1 second to activate or deactivate the appliance.
Automatic Switch Off
The function deactivates the appliance automatically if:
• All cooking zones are deactivated (
• You do not set the heat setting after you activate the appliance.
).
Page 37

Operating instructions 37
• You spill something or put something on the control panel for more than 10 seconds, (a
pan, a cloth, etc.). The sound operates some time and the appliance deactivates. Remove
the object or clean the control panel.
• You do not deactivate a cooking zone or change the heat setting. After some time,
comes on and the appliance deactivates. See the table.
The times of Automatic Switch Off
The heat setting
The cooking zone
, - - - -
6 hours 5 hours 4 hours 1.5 hours
deactivates after
The heat setting
Touch the control bar at the heat setting. Change
to the left or the right, if it is necessary. Do not
release before you have a correct heat setting. The
display shows the heat setting.
Activation and deactivation of the outer rings
You can adjust the surface you cook to the dimension of the cookware.
To activate the outer ring touch the sensor field
more outer rings touch the same sensor field again. The subsequent indicator comes on.
Do the procedure again to deactivate the outer ring. The indicator goes out.
/ . The indicator comes on. For
Automatic Heat Up
12
11
10
9
8
7
6
5
4
3
2
1
0
1234567891011121314
You can get a necessary heat setting in a shorter time if you activate the Automatic Heat
Up function. This function sets the highest heat setting for some time (see the illustration),
and then decreases to the necessary heat setting.
To start the Automatic Heat Up function for a cooking zone:
1. Touch
2. Immediately touch the necessary heat setting. After 3 seconds
play.
To stop the function change the heat setting.
( comes on in the display).
comes on in the dis-
Page 38

00
38 Operating instructions
Timer
Count Down Timer
Use the Count Down Timer to set how long the cooking zone operates for only this one
time.
Set the Count Down Timer after the selection of the cooking zone.
You can set the heat setting before or after you set the timer.
• To set the cooking zone:touch
cooking zone comes on.
• To activate the Count Down Timer: touch
minutes). When the indicator of the cooking zone start to flash slow, the time counts
down.
• To see the remaining time: set the cooking zone with
zone starts to quickly. The display shows the remaining time.
• To change the Count Down Timer:set the cooking zone with
• To deactivate the timer: set the cooking zone with
counts back to
also touch
When the countdown comes to an end, the sound operates and
zone deactivates.
• To stop the sound: touch
CountUp Timer ( The count up timer)
Use the CountUp Timer to monitor how long the cooking zone operates.
• To set the cooking zone (if more than 1 cooking zone operate):touch
again until the indicator of a necessary cooking zone comes on.
• To activate the CountUp Timer:touch
of the cooking zone starts to flash slow, the time counts up. The display switches between
• To see how long the cooking zone operates: set the cooking zone with
tor of the cooking zone starts to flash quickly. The display shows the time that the cooking zone operates.
• To deactivate the CountUp Timer: set the cooking zone with
deactivate the timer. The indicator of the cooking zone goes out.
Minute Minder
You can use the timer as a Minute Minder while the cooking zones do not operate. Touch
. Touch or of the timer to set the time. When the time comes to an end, the sound
operates and
• To stop the sound: touch
and counted time (minutes).
. The indicator of the cooking zone goes out. To deactivate you can
00
and at the same time.
flashes.
00
again and again until the indicator of a necessary
of the timer to set the time ( 00 -
. The indicator of the cooking
touch or .
. Touch . The remaining time
flashes. The cooking
of the timer comes on. When the indicator
and touch or to
99
again and
. The indica-
STOP+GO
The function sets all cooking zones that operate to the lowest heat setting ( ).
When
The
• To activate this function touch
operates, you cannot change the heat setting.
function does not stop the timer function.
. The symbol comes on.
Page 39

Operating instructions
• To deactivate this function touch . The heat setting that you set before comes on.
Lock
When the cooking zones operate, you can lock the control panel, but not . It prevents an
accidental change of the heat setting.
First set the heat setting.
To start this function touch
The Timer stays on.
To stop this function touch
When you stop the appliance, you also stop this function.
. The symbol comes on for 4 seconds.
. The heat setting that you set before comes on.
The child safety device
This function prevents an accidental operation of the appliance.
To activate the child safety device
• Activate the appliance with
• Touch
• Deactivate the appliance with
To deactivate the child safety device
• Activate the appliance with
The symbol
• Deactivate the appliance with
To override the child safety device for only one cooking time
• Activate the appliance with
• Touch
ance.
• When you deactivate the appliance with
for 4 seconds. The symbol comes on.
comes on.
for 4 seconds. Set the heat setting in 10 seconds. You can operate the appli-
. Do not set the heat settings.
.
. Do not set the heat settings. Touch for 4 seconds.
.
. The symbol comes on.
, the child safety device operates again.
39
OffSound Control (Deactivation and activation of the sounds)
Deactivation of the sounds
Deactivate the appliance.
Touch
comes on, the sound is on. Touch , comes on, the sound is off.
When this function operates, you can hear the sounds only when:
• you touch
• the Minute Minder comes down
• the Count Down Timer comes down
• you put something on the control panel.
Activation of the sounds
Deactivate the appliance.
Touch
comes on, because the sound is off. Touch , comes on. The sound is on.
for 3 seconds. The displays come on and go out. Touch for 3 seconds.
for 3 seconds. The displays come on and go out. Touch for 3 seconds.
Page 40

40 Helpful hints and tips
HELPFUL HINTS AND TIPS
Cookware
• The bottom of the cookware must be as thick and flat as possible.
• Cookware made of enamelled steel and with aluminium or copper bottoms can cause the
colour change on the glass-ceramic surface.
Energy saving
• If it is possible, always put the lids on the cookware.
• Put cookware on a cooking zone before you start it.
• Stop the cooking zones before the end of the cooking time to use residual heat.
• The bottom of pans and cooking zones must have the same dimension.
Öko Timer (Eco Timer)
To save the energy, the heater of the cooking zone deactivates before the count down timer
signal. The difference in the operation time is depends of the heat setting level and the time
you cook.
The examples of cooking applications
The data in the table is for guidance only.
Heat
setting
Keep cooked foods warm as nec-
1
1-3 Hollandaise sauce, melt: butter, choco-
1-3 Solidify: fluffy omelettes, baked eggs 10-40
3-5 Simmer rice and milkbased dishes, heat-
5-7 Steam vegetables, fish, meat 20-45
7-9 Steam potatoes 20-60
7-9 Cook larger quantities of food, stews
9-12 Gentle fry: escalope, veal cordon bleu,
late, gelatine
ing up ready-cooked meals
and soups
cutlets, rissoles, sausages, liver, roux,
eggs, pancakes, doughnuts
Use to: Time Hints
essary
5-25
min
min
25-50
min
min
min
60-150
min
as necessary
Put a lid on a cookware.
Mix from time to time.
Cook with a lid on.
Add the minimum two times as
much liquid as rice, mix milk dishes
at some point of the procedure
through.
Add some tablespoons of liquid.
Use max. ¼ l water for 750 g of potatoes.
Up to 3 l liquid plus ingredients.
Turn halfway through.
Page 41

Care and cleaning 41
Heat
setting
12-13 Heavy fry, hash browns, loin steaks,
steaks
14 Boil large quantities of water, cook pasta, sear meat (goulash, pot roast), deep fry chips.
Use to: Time Hints
5-15
min
Turn halfway through.
Information on acrylamides
Important! According to the newest scientific knowledge, if you brown food (specially the
one which contains starch), acrylamides can pose a health risk. Thus, we recommend that
you cook at the lowest temperatures and do not brown food too much.
CARE AND CLEANING
Clean the appliance after each use.
Always use cookware with clean bottom.
WARNING!
The sharp objects and abrasive cleaning agents can cause damage to the appliance.
For your safety, do not clean the appliance with steam cleaners or high-pressure cleaners.
Scratches or dark stains on the glass-ceramic cause no effect on how the appliance operates.
To remove the dirt:
1. – Remove immediately:melted plastic, plastic foil, and food with sugar. If not, the dirt
can cause damage to the appliance. Use a special scraper for the glass . Put the scraper on the glass surface at an acute angle and move the blade on the surface .
– Remove after the appliance is sufficiently cool:limescale rings , water rings, fat
stains, shiny metallic discolorations. Use a special cleaning agent for glass ceramic or
stainless steel.
2. Clean the appliance with a moist cloth and some detergent.
3. At the end rub the appliance dry with a clean cloth.
WHAT TO DO IF…
Problem Possible cause and remedy
You cannot activate the appliance or operate it.
• Activate the appliance again and set the heat setting in 10
seconds.
• You touched 2 or more sensor fields at the same time. Only
touch one sensor field.
• The Child Safety Device or the Lock or Stop+Go operates. See
the chapter Operating instructions.
• There is water or fat stains on the control panel. Clean the
control panel.
Page 42

42 Environment concerns
Problem Possible cause and remedy
A Sound operates and the appliance deactivates.
A sound operates when the appliance is deactivated.
The appliance deactivates.
The residual heat indicator does
not comes on.
The Automatic Heat Up function does not operate.
You cannot activate the outer
ring.
The sensor fields become hot. The cookware is too large or you out it too near to the controls.
There is no signal when you
touch the panel sensor fields.
comes on
and number comes on.
You put something on one or more sensor fields. Remove the object from the sensor fields.
You put something on the . Remove the object from the sensor field.
The cooking zone is not hot because it operated only for a short
time. If the cooking zone should be hot, speak to the service centre.
• There is still residual heat on the cooking zone. Let the cooking
zone become sufficiently cool.
• The highest heat setting is set. The highest heat setting has the
same power as the Automatic Heat Up function.
Activate the inner ring first.
Put large cookware on the rear cooking zones if it is necessary.
The signals are deactivated. Activate the signals (see OffSound
Control).
The Automatic Switch Off operates. Deactivate the appliance and
activate it again.
There is an error in the appliance.
Disconnect the appliance from the electrical supply for some
time. Disconnect the fuse from the electrical system of the house.
Connect again. If
comes on again, speak to the service centre.
If you tried the above solutions and cannot repair the problem, speak to your dealer or the
customer service. Give the data from the rating plate, three digit letter, code for the glass
ceramic (it is in the corner of the glass surface) and an error message that comes on.
Make sure, you operated the appliance correctly. If not the servicing by a customer service
technician or dealer will not be free of charge, also during the warranty period. The instructions about the customer service and conditions of guarantee are in the guarantee booklet.
ENVIRONMENT CONCERNS
The symbol on the product or on its packaging indicates that this product may not be
treated as household waste. Instead it should be taken to the appropriate collection point
for the recycling of electrical and electronic equipment. By ensuring this product is
disposed of correctly, you will help prevent potential negative consequences for the
environment and human health, which could otherwise be caused by inappropriate waste
handling of this product. For more detailed information about recycling of this product,
please contact your local council, your household waste disposal service or the shop where
you purchased the product.
Page 43

Warranty
Packaging material
The packaging materials are friendly to the environment and can be recycled. The plastic
components are identified by marking: >PE<,>PS<, etc. Discard the packaging materials as
household waste at the waste disposal facilities in your municipality.
WARRANTY
FOR SALES IN AUSTRALIA AND NEW ZEALAND
This document sets out the terms and conditions of product warranties for Electrolux
branded appliances. It is an important document. Please keep it with your proof of purchase documents in a safe place for future reference should you require service for
your Electrolux appliance. General Terms and Conditions
1. In this warranty
– Electrolux' means Electrolux Home Products Pty Ltd ABN 51 004 762 341 in respect
of Appliances purchased in Australia and Electrolux (NZ) Limited in respect of Appliances purchased in New Zealand;
– 'Appliance' means any Electrolux product purchased by you accompanied by this
document;
– 'Warranty Period' means
i) where you use the Appliance for personal, domestic or household purposes in
Australia the period of 24 months and in New Zealand the period of 24 months;
ii) where you use the Appliance for commercial purposes, in Australia the period of
0 months and in New Zealand the period of 0 months, (if the period stated is 0
months you are not covered by this product warranty) following the date of original
purchase of the Appliance;
– 'you' means the purchaser of the Appliance not having purchased the appliance for
re-sale, and 'your' has a corresponding meaning.
2. This warranty only applies to Appliances purchased and used in Australia or New Zealand and is in addition to (and does not exclude, restrict, or modify in any way) any
non-excludable statutory warranties in Australia or New Zealand.
3. Electrolux warrants that, when dispatched from an Electrolux warehouse, the Appliance is free from defects in materials and workmanship for the Warranty Period.
4. During the Warranty Period Electrolux or its Authorised Service Centre will, at no extra
charge if your appliance is readily accessible without special equipment, and subject to
these terms and conditions, repair or replace any parts which it considers to be defective. You agree that any replaced Appliances or parts become the property of Electrolux. This warranty does not apply to light globes, batteries, filters or similar perishable
parts.
5. Parts and Appliances not supplied by Electrolux are not covered by this warranty.
6. Where you are within an Electrolux service area, this warranty covers the cost of transport of the Appliance to and from Authorised Service Centres of Electrolux and travel-
43
Page 44

44 Warranty
ling costs for representatives of the Authorised Service Centre to and from your home
or business. If you are outside an Electrolux service area, you will bear these costs. For
information about whether you are within an Electrolux service area, please phone 13
13 49 in Australia, or 0800 10 66 10 in New Zealand.
7. Proof of purchase is required before you can make a claim under this warranty.
8. You may not make a claim under this warranty unless the defect claimed is due to
faulty or defective parts or workmanship. Electrolux is not liable in the following situations (which are not exhaustive):
– The Appliance is damaged by
i) accident
ii) misuse or abuse, including failure to properly maintain or service
iii) normal wear and tear
iv) power surges, electrical storm damage or incorrect power supply
v) incomplete or improper installation
vi) incorrect, improper or inappropriate operation
vii) insect or vermin infestation.
– The Appliance is modified without authority from Electrolux in writing.
– The Appliance's serial number or warranty seal has been removed or defaced.
– The Appliance was serviced or repaired by anyone other than Electrolux or its Au-
thorised Service Centres.
9. This warranty, the contract to which it relates and the relationship between you and
Electrolux are governed by the law applicable in the Australian State where the Appliance was purchased or the law applicable in New Zealand if the Appliance was purchased in New Zealand. Where the Appliance was purchased in New Zealand for business purposes the Consumer Guarantee Act does not apply.
Limitation of Liability
10. To the extent permitted by law:
– Electrolux excludes all warranties other than as contained in this document;
– Electrolux shall not be liable for any loss or damage whether direct or indirect or
consequential arising from your purchase, use or non-use of the Appliance.
11. Provisions of the Trade Practices Act and State consumer legislation in Australia, and
the Consumer Guarantees Act, the Sale of Goods Act and the Fair Trading Act in New
Zealand, imply warranties or conditions, or impose obligations, upon Electrolux which
cannot be excluded, restricted or modified. To the extent permitted by law, the liability
of Electrolux (if any) arising out of or in relation to the Appliance or any services supplied by Electrolux shall be limited (where it is fair and reasonable to do so),:
– in the case of Appliances, at its option, to the replacement or repair of the Applian-
ces or the supply of equivalent products or the payment of the cost of replacing the
Appliances or having the Appliances repaired or of acquiring equivalent Appliances.
Upon being replaced, parts and Appliances become the property of Electrolux; or
– in the case of services, at its option, to the supply of the services again or the pay-
ment of the cost of having the services re-supplied;
Page 45

454647
and in the case of Appliances or services supplied in New Zealand, loss or damage
whether direct or indirect or consequential that is reasonably foreseeable.
Privacy
You acknowledge that in the event that you make a warranty claim it will be necessary for
Electrolux and its Authorised Service Centres to exchange information in relation to you to
enable Electrolux to meet its obligations under this warranty.
Important Notice
Before Calling a Service Technician please check carefully the operating instructions, service
booklet and the warranty terms and conditions.
FOR SERVICE
OR TO FIND THE ADDRESS OF
YOUR NEAREST STATE SERVICE
CENTRE IN AUSTRALIA
Please call 13 13 4 9
For the cost of a local call (Australia
only)
FOR SERVICE
OR TO FIND THE ADDRESS OF
YOUR NEAREST AUTHORISED
SERVICE CENTRE IN NEW ZEALAND
Free call 0800 10 66 10
(New Zealand only)
SERVICE AUSTRALIA
ELECTROLUX HOME PRODUCTS
SERVICE NEW ZEALAND
ELECTROLUX HOME PRODUCTS
FOR SPARE PARTS
OR TO FIND THE ADDRESS OF
YOUR NEAREST STATE SPARE
PARTS CENTRE IN AUSTRALIA
Please call 13 13 50
For the cost of a local call (Australia
only)
FOR SPARE PARTS
OR TO FIND THE ADDRESS OF
YOUR NEAREST SPARE PARTS
CENTRE IN NEW ZEALAND
Free call 0800 10 66 20
(New Zealand only)
Page 46

Page 47

Page 48

www.aeg.com/shop 892934461-C-482010
 Loading...