

Page 1

HD 8760 - HD 8795
User manual
Notice d'utilisation
Cooker Hood
Hotte
Page 2

Contents
Safety warnings................................................................................ 3
Description of the Appliance........................................................... 5
Extraction mode ................................................................................. 5
Recirculation mode............................................................................. 5
Control Panel .................................................................................... 6
Filter checking device......................................................................... 7
Maintenance and care...................................................................... 8
Cleaning the hood .............................................................................. 8
Metal grease filter............................................................................... 8
Removing the front panels..................................................................8
Removing the metal grease filter........................................................ 9
Charcoal filter ................................................................................... 10
Changing the light bulb..................................................................... 11
Special accessories ....................................................................... 11
T echnical assist ance service......................................................... 12
T echnical S pecifications................................................................ 14
Mounting accessories included ........................................................ 14
Electrical connection ..................................................................... 15
Wall mounting................................................................................... 16
2
Page 3

Safety warnings
• When used as an extractor unit, the hood must be fitted with a
hose having preferably the same diameter as the outlet hole.
Should there already be a pipe of diameter 125 mm that ducts to
the outside through the walls or roof, it is possible to use the 150/
125 mm reduction flange provided. In this case the hood will be
slightly noisier.
Attention: The hose is not supplied and must be purchased
separately.
• The distance between the cookware support surface on top of the
cooking appliance and the lowest part of the cooker hood must be
at least 30 cm for electric cookers or, where a gas hob is fitted,
if the cooker hood is the 60 cm size (HD 8760 model):
installation above a 60 cm gas hob - minimum distance 30 cm
installation above a 70 cm gas hob - minimum distance 45 cm
installation above gas hobs larger than 70 cm is not possible
if the cooker hood is the 90 cm size (HD 8795 model):
installation above a 60 cm or 70 cm gas hob - minimum distance
30 cm
installation above gas hobs larger than 70 cm - minimum distance
45 cm
If the instructions for installation for the gas hob specify a greater
distance, this must be adhered to.
• Before any cleaning or maintenance operation, disconnect the
hood from the mains by removing the plug or disconnecting the
home mains switch.
• The appliance is not intended for use by children or persons with
impaired physical, sensorial or mental faculties, or if lacking in
experience or know-how, unless they are under supervision or
have been trained in the use of the appliance by a person
responsible for their safety.
• Children should be monitored to ensure that they do not play with
the appliance.
• Never use the hood without effectively mounted grating.!
• The hood must NEVER be used as a support surface unless
specifically indicated.
• The premises must be sufficiently ventilated, when the kitchen
hood is used together with other gas combustion devices or other
fuels.
• The suctioned air must not be conveyed into a conduit used for the
disposal of the fumes generated by appliances that combust gases
or other fuels.
3
Page 4
• The flaming of foods beneath the hood itself is severely prohibited.
• The use of exposed flames is detrimental to the filters and may
cause a fire risk, and must therefore be avoided in all
circumstances.
• Any frying must be done with care in order to make sure that the oil
does not overheat and burst into flames.
• Accessible parts may become hot when used with cooking
appliances.
• As regards the technical and safety measures to be adopted for
fume discharging it is important to closely follow the relations
provided by the competent authorities.
• The hood must be regularly cleaned on both the inside and outside
(AT LEAST ONCE A MONTH, it is in any event necessary to
proceed in accordance with the maintenance instructions provided
in this manual)..
• Failure to follow the instructions as concerns hood and filter
cleaning will lead to the risk of fires.
• Do not use or leave the hood without the lamp correctly mounted
because of the possible risk of electric shocks.
• We decline any responsibility for any problems, damage or fires
caused to the appliance as the result of the non-observance of the
instructions included in this manual.
This appliance is marked according to the European directive 2002/
96/EC on Waste Electrical and Electronic Equipment (WEEE).
By ensuring this product is disposed of correctly, you will help prevent
potential negative consequences for the environment and human
health, which could otherwise be caused by inappropriate waste
handling of this product.
The symbol on the product, or on the documents accompanying
the product, indicates that this appliance may not be treated as
household waste. Instead it should be taken to the appropriate
collection point for the recycling of electrical and electronic
equipment.
Disposal must be carried out in accordance with local environmental
regulations for waste disposal.
For more detailed information about treatment, recovery and recycling
of this product, please contact your local council, your household
waste disposal service or the shop where you purchased the product.
4
Page 5
Description of the Appliance
• The hood is supplied as an extractor unit and can also be used
with a recirculation mode by fitting a charcoal filter.
• You will need an original charcoal filter for this function (Available
from your local Service Force Centre).
• Only for HD 8760: The cooker hood is supplied ready for use as a
recirculation hood and may be used for extraction by removing the
charcoal filter which has been fitted inside the cooker hood.
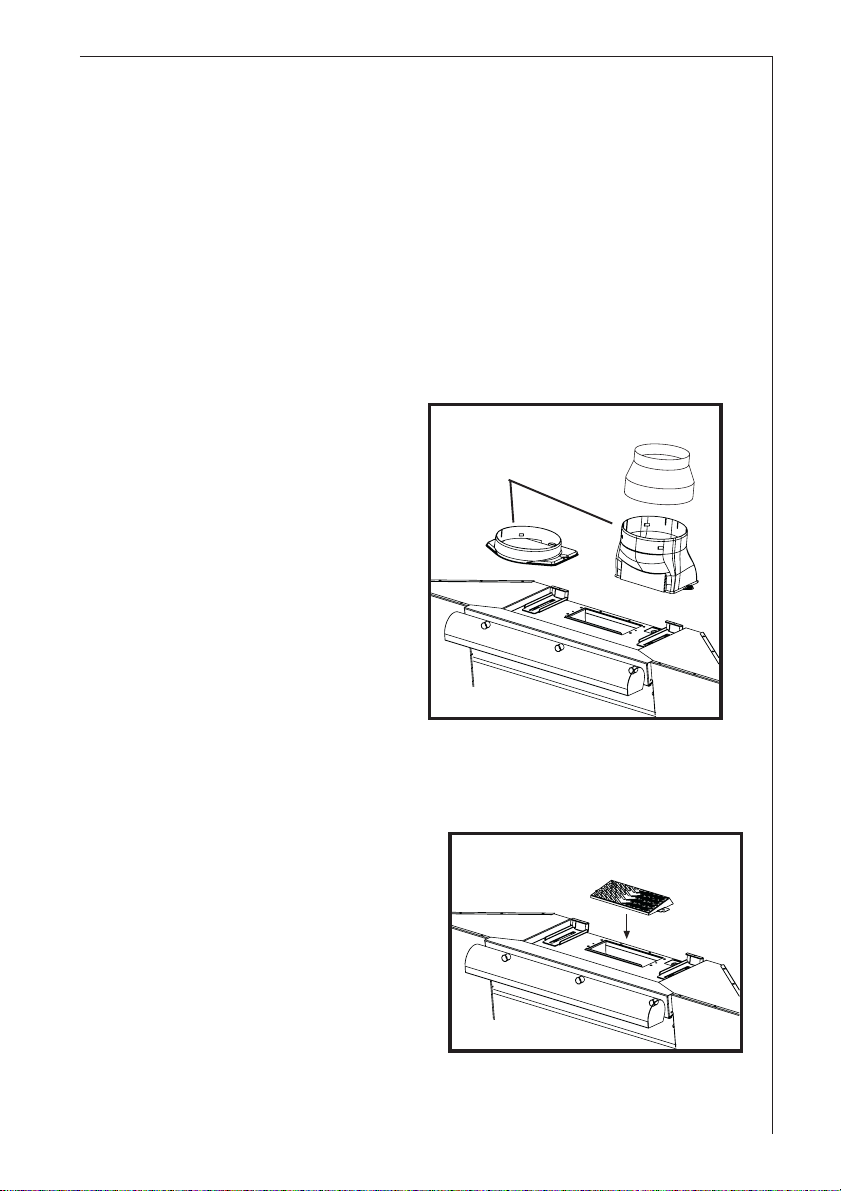
Extraction mode
• In this version fumes are
extracted to the outside via
a hose connected to the
coupling ring. Fig. 1.
• In order to obtain the best
performance the hose
should have a diameter
equal to the outlet hole.
• Should there already be a
pipe of diameter 125 mm
that ducts to the outside
through the walls, it is
possible to use the 150/125
mm reduction flange
provided. In this case the
hood will be slightly noisier.
coupling ring
Fig. 1
reduction
flange
Recirculation mode
• The air is filtered through a
charcoal filter and returned to
the kitchen.
• You will need an original
charcoal filter for the
recirculation mode. (See
Special Accessories).
• Fix the deflector using 2 screws
Ø 3.5x9.5 mm. Fig. 2.
Deflector
Fig. 2
5
Page 6

Control Panel
• Best results are obtained by using a low speed for normal
conditions and a high speed when odours are more concentrated.
Turn the hood on a few minutes before you start cooking, you will
then get an under pressure in the kitchen. The hood should be left
on after cooking for about 15 minutes or until all the odours have
disappeared.
• Cooker hood operation can also be controlled using the remote
control (the remote control is an accessory and may be ordered
separately).
The control panel consists of a knob and 2 LEDs; it is
located at the bottom right-hand side of the cooker
hood.
Fig. 3
• To switch the lights on and off:
Press and release the knob to switch the lights on; press and
release it again to switch them off.
Note: in some models it is possible to select one of 2 different
lighting intensity levels.
• T o select an available suction speed (power) level:
Turn the knob in a clockwise direction to increase the suction speed
(power); turn it in an anticlockwise direction to decrease the power
until the hob is switched off.
The cooker hood is fitted with an LED (L1) which indicates the
suction speed (power) selected by displaying different colours:
• Light off:
Suction motor switched off.
• Fixed green light:
Cooker hood operating at power level 1 (minimum).
• Fixed orange light:
Cooker hood operating at power level 2 (medium).
• Fixed red light:
Cooker hood operating at power level 3 (maximum).
• Flashing red light:
Cooker hood operating at an intensive power level (for a duration of
5 minutes, after which the appliance automatically selects power
level 3).
L2
L1
6
Page 7

Filter checking device
The cooker hood is fitted with a device which indicates when the filter
must be cleaned or replaced.
Usually the device, which signals when the carbon filter needs
maintenance work, is deactivated.
To activate it, proceed as follows:
Switch off the cooker hood.
Press and hold the knob for approximately 5 seconds.
The L2 LED begins to flash in green and after approximately 2
seconds the L2 LED will also begin to flash in orange, to indicate that
the device, which indicates when it is necessary to perform carbon
filter maintenance, has been activated.
L2 LED - grease filter indicator
The LED lights up in green when the grease filter needs to be cleaned;
this happens approximately every 40 hours of operation.
Every time the cooker hood is used, check whether the L2 LED is lit.
L2 LED - carbon filter indicator
The LED lights up in orange when the carbon filter needs to be
cleaned/replaced; this happens approximately every 160 hours of
operation.
Every time the cooker hood is used, check whether the L2 LED is lit.
Resetting the filter saturation warning
After cleaning or replacing the filters, switch on the cooker hood at any
suction speed (power), then press and hold the knob for more than 3
seconds, until you hear a beep indicating that the reset procedure has
been performed successfully . The L2 LED and the cooker hood both
switch off.
In some situations (for example, when the L2 LED is indicating that
the grease filters and the carbon filter are saturated), the procedure
described above must be repeated.
7
Page 8
Maintenance and care
• Before performing any maintenance operation, isolate the hood
from the electrical supply by switching off at the connector and
removing the connector fuse.
Or if the appliance has been connected through a plug and
socket, then the plug must be removed from the socket.
Cleaning the hood
• Clean the outside of the hood using a damp cloth and a solution of
mild washing up liquid and washing up liquid.
• Never use corrosive, abrasive or flammable cleaning products.
• Never insert pointed objects in the motor’s protective grid.
• Never use caustic detergents or abrasive brushes or powders.
• Only ever clean the switch panel and filter grille using a damp cloth
and delicate detergents.
• It is extremely important to clean the unit and change the filters at
the recommended intervals. Failure to do so will cause grease
deposits to build up that could constitute a fire hazard.
Metal grease filter
• The purpose of the grease filters is to absorb grease particles
which form during cooking and it must always be used, either in
the external extraction or
internal recycling function.
Attention: the metal grease
filters must be removed and
washed, either by hand or in
the dishwasher, every four
weeks.
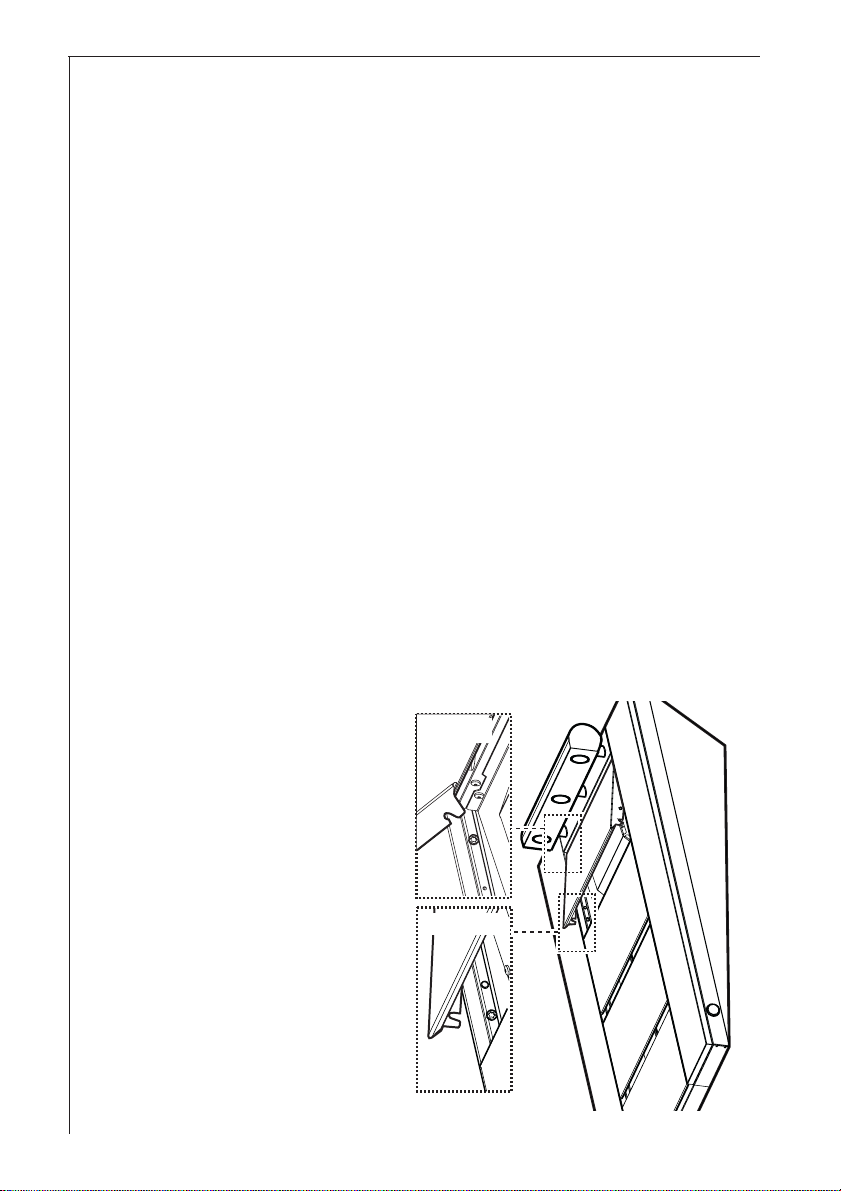
• To access the grease filter,
first remove the front panels
which conceal the grease
filter.
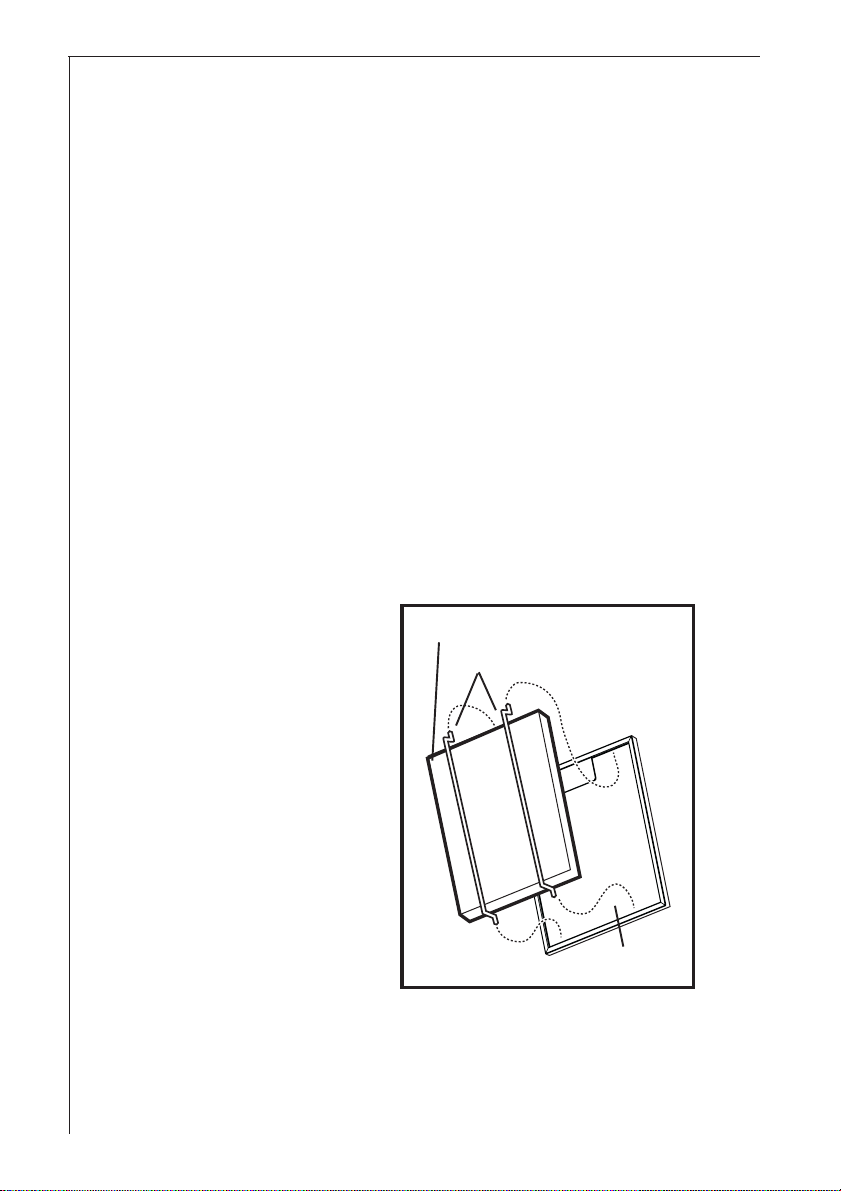
Extract
Unhook
Removing the front
panels:
Extract the small panel,
rotate upwards and unhook.
Repeat the operation for all
the small panels. Fig. 4.
8
Bild 3
Fig. 4
Page 9
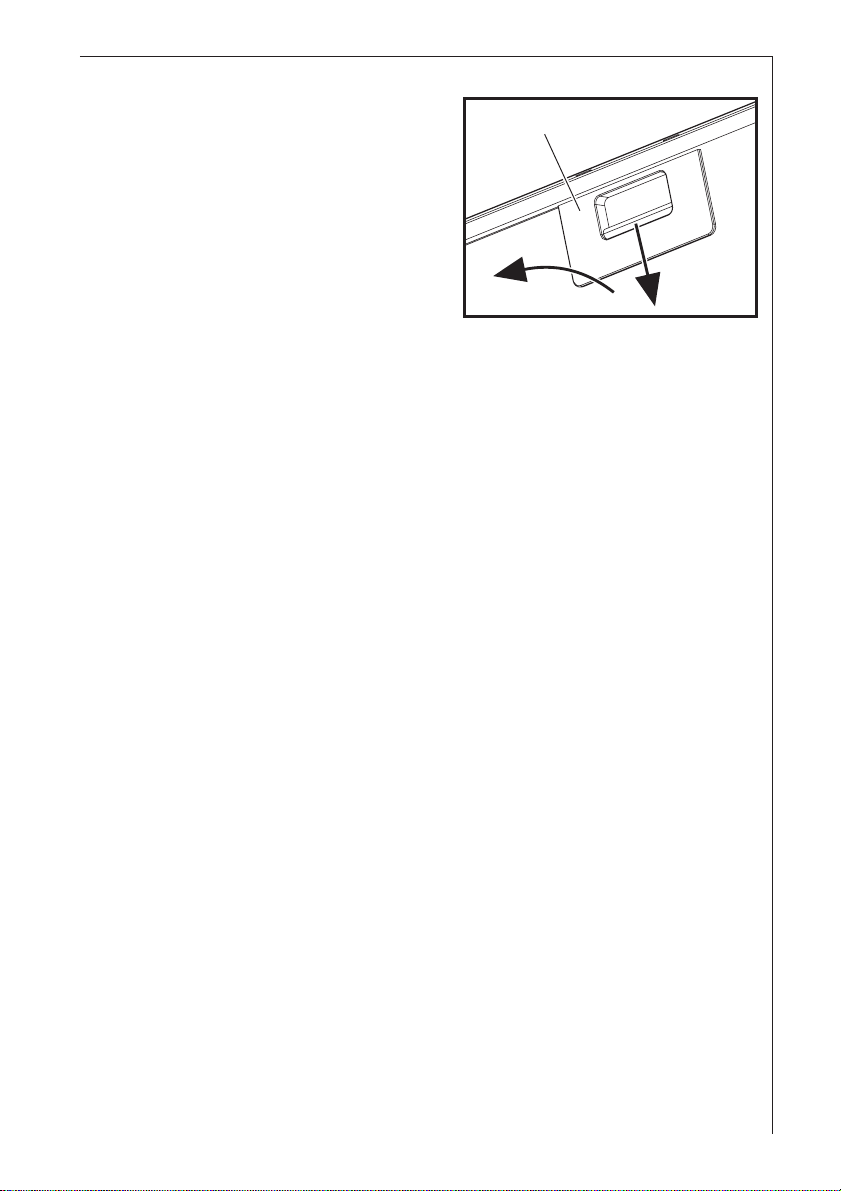
Removing the metal
Handle
grease filter
Pull the handle downards, then
extract the filter.Fig. 5.
Hand washing
Soak grease filter(s) for about
one hour in hot water with a
grease-loosening cleaner, then
rinse off thoroughly with hot
water. Repeat the process if necessary. Refit the grease filters
when they are dry.
Dishwasher
Place grease filters in the dishwasher. Select most powerful
washing programme and highest temperature, at least 65°C.
Repeat the process. Refit the grease filters when they are dry .
When washing the metal grease filter in the dishwasher a slight
discolouration of the filter can occur, this does not have any imp act
on its performance.
• Clean the inner housing using a hot detergent solution only (never
use caustic detergents, abrasive powders or brushes).
After having re-installed the grease filter , remount the front p anels
following the instructions for removal in reverse.
The narrower front panel is to be mounted at the highest position.
Fig. 5
9
Page 10
Charcoal filter
• The charcoal filter should only be used if you want to use the hood
in the recirculation mode.
• To do this you will need an original charcoal filter (available from
your local Service Force Centre).
• Cleaning/replacing the charcoal filter
Unlike other carbon filters, the LONGLIFE carbon filter can be
cleaned and reactivated. With normal use the filter should be
cleaned every second month (when using the hood 2,5 hours per
day , on avarage). The best way to clean the filter is in the
dishwasher. Use normal detergent and choose the highest temperature (65º C). Wash the filter separately so that no food part s gets
stuck on the filter and later causes bad odours. To reactivate the
filter, the filter should be dried in an oven for 10 minutes with a
maximum temperature of 100ºC.
After approximately three years of use, the charcoal filter should be
replaced with a new, as the odour reduction cap acity will be
reduced.
• Fitting
Fit the charcoal filter on the
rear side of the grease
filter, fix it with two metal
wires. Fig. 6.
Attention! The metal wires
are included in the carbon
filter packing and not on
the hood.
• To remove proceed in the
reverse order.
• Always specify the hood
model code number and
serial number when
ordering replacement
filters. This information is
shown on the registration
plate located on the inside
of the unit.
• The charcoal filter can be
ordered from your local Service Force Centre.
charcoal filter
metal wires
Fig. 6
grease filter
10
Page 11

Warning
• Failure to observe the instructions on cleaning the unit and
changing the filters will cause a fire hazard. You are therefore
strongly recommended to follow these instructions.
• The manufacturer declines all responsibility for any damage to the
motor or any fire damage linked to inappropriate maintenance or
failure to observe the above safety recommendations.
Changing the light bulb
• Disconnect the cooker hood from the
mains supply .
Prior to touching the light bulbs ensure
they are cooled down.
• Remove the lamp, use a screw driver as a
lever. Fig. 7.
• Replace the old bulb with a new one of the
same type.
• If the light does not come on, make sure the
bulb has been inserted correctly before
contacting your local Service Force Centre.
Fig. 7
Special accessories
Charcoal filter T ype 31
Remote control RM 7000*
Telescopic chimney K 8004 M (for extractor version only)*
Glass side panels BD 8004 W (only HD 8795)
* Not available in UK.
11
Page 12
Technical assistance service
You are welcome to telephone our technical assistance service (see list of technical
assistance centres) whenever you need information or in the unlikely event of a fault.
We reserve the right to change specifications and colours as a result of our policy of
continuing technological development.
Service and Spare Parts
In the event of your appliance requiring service, or if you wish to purchase spare
parts, contact your local Service Force Centre by telephoning: 08705 929 929
Your call will be automatically routed to the Service Centre covering your post code
area. For the address of your local Service Force Centre and further information
about Service Force, please visit the website at www.serviceforce.co.uk
Please ensure that you have read the section “What to do if...” as the engineer will
make a charge if the fault is not a mechanical or electrical breakdown even the
appliance is under warranty. Please note that proof of purchase is required for in-
guarantee service calls.
Help us to help you
Please determine your type of enquiry before writing or telephoning.
When you contact us we need to know:
• Your name • Clear and concise details of the fault
• Address and post code • Name and model of the appliance*
• Telephone number • E number*
• Serial number*
* This information can be found on the rating plate, which can be seen when the
grease filters are removed.
If you require Customer Service in the Republic of Ireland please contact us at
the address below:
AEG
Electrolux Group (Ire) Ltd
Long Mile Road
Dublin 12
Republic of Ireland
Tel: + 353 (0) 1 4090751
Email: service.eid@electrolux.ie
12
Page 13

If you require Customer Service in the Republic of Ireland please contact us at
the address below:
AEG
Electrolux Group (Ire) Ltd
Long Mile Road
Dublin 12
Republic of Ireland
Tel: + 353 (0) 1 4090751
Email: service.eid@electrolux.ie
CUSTOMER CARE DEPARTMENT
For general enquiries concerning your AEG appliance or for further
information on AEG products, please contact our Customer Care
Department by letter or telephone at the address below or visit our
website at www.aeg.co.uk
Customer Services Department
Major Appliances
AEG Electrolux
Addington Way
Luton
Bedfordshire
LU4 9QQ
08705 350 350 (*)
* calls to this number may be recorded for training purposes
13
Page 14

Technical Specifications
HD 8795 HD 8760
Dimensions (in cm):
Height x Width x Depth 80 x 89,8 x 33 80 x 59,8 x 33
Maximum absorbed power: 235 W 235 W
Motor absorption: 175 W 175 W
Lighting*: 3 x 20W
(30° Ø35 12V GU4) (30° Ø35 12V GU4)
Length of the cable: 150cm 150 cm
Electrical connection: 230 V 230 V
Fuse 5A 5A
* Attention! To guarantee the same quality of illumination we advise using the
same type of light: Halogen Lamp PHILIPS STANDARD LINE Code 425409, 20W 30°
Ø35 12V GU4
Mounting accessories included
1 allen spanner for torx screw
1 support bracket
1 deflector
2 Screw caps
1 Rubber strips (to be divided in 3 pieces)
1 template
2 spacers
4 wood-screws 5 x 45 mm
4 wall plugs Ø 8 mm
2 metal screws 3,5 x 9,5
2 metal screws 3,5 x 32
2 metal screws 5 x 18
1 reduction flange Ø 150-125 mm
2 flanges Ø 150 mm
Only HD 8795: 2 Stainless Steel side panels
14
Page 15

Electrical connection
Safety warnings for the electrician
The mains power supply must correspond to the rating indicated on
the plate situated inside the hood. If provided with a plug connect the
hood to a socket in compliance with current regulations and
positioned in an accessible area. If it not fitted with a plug (direct
mains connection) or if the plug is not located in an accessible area
apply a bi-polar switch in accordance with standards which assures
the complete disconnection of the mains under conditions relating to
over-current category III, in accordance with installation instructions.
IMPORTANT: Before re-connecting the hood circuit to the mains
supply and checking the efficient function, always check that the
mains cable is correctly assembled.
IMPORTANT! Power cable replacement must be undertaken by the
authorized service assistance centre or similar qualified person.
15
Page 16

Wall mounting - Fig. 8-9-10-11
• Warning! Do not connect the appliance to the mains until the
installation is fully complete.
• Place the three rubber strips on the back of the cooker hood.
Where necessary mount the two spacers provided on the drill holes
for definitive fixing.
The spacers are useful when the wall which is to house the cooker
hood is not perfectly vertical (for example: where it is partially
covered with wall tiles).
rubber strips
rubber strips
rubber strips
definitive fixing
Fig. 8
definitive fixing
spacers
16
Page 17

• Mark the wall with a centre line, this will aid mounting procedure (1),
position the template so that the mid line printed on the template
matches with the centre line previously marked, the lower side of
the template corresponds to the lower side of the hood once
mounted (2).
• Drill two holes Ø 8mm and fix the support bracket with two wall
plugs and screws (3).
• Remove the front panels (see paragraph “Removing the front
panels”).
• Hang the hood (4) adjust its position (5-6) and from the inside of the
hood sign two points for definitive fixing (7), remove the hood and
drill two holes Ø 8mm (8), fit two wall plugs, hang the hood again
and fix it securely with two screws (9). Cover the drill holes for
screws with the two screw caps provided.
4
(5x18)
5
9
6
Fig. 9
4
(5x18)
6
5
3
7
8
8
2
1
17
Page 18

10a
10b
11
• HD 8795 only: Fix the
sides of the cooker
hood by fastening the
pins (10a) to the sides
of the fastening screws
(10b).
Block the sides sliding
the two tabs outwards
(11).
• Make electrical
connection (12), but
leave the hood
disconnected from the
home mains circuit.
Fig. 10
• In the case that it is
decided to use the cooker
hood in the extraction mode, then fix one of the two flanges
provided in the exit hole (13 – extraction).
Attention! The tall flange should be used when a telescopic
chimney is required to be mounted (this item should be ordered –
see special accessories), the short flange is to be used in all other
cases.
• Remount the grease filter and the front panels noting the numbering
on the back of each screen (from 1 to 4, top to bottom).
• Connect the hood to the mains supply and check the functions are
working correctly .
13
Extractor version
18
14
12
1
2
3
4
Fig. 11
13
Filter version
Page 19

Chère cliente, cher client,
Veuillez lire attentivement cette notice d’utilisation et not amment le
chapitre « Sécurité » que vous trouverez dans les premières pages.
Conservez cette notice d’utilisation pour pouvoir la consulter
ultérieurement. Transmettez-la à l'éventuel prochain propriétaire de
l’appareil.
Mise au rebut
Mettre au rebut les matériaux d'emballage
• Tous les emballages sont recyclables, les films et les mousses sont
marqués en conséquence. Veuillez mettre au rebut les matériaux
d’emballage et éventuellement l’appareil usagé selon les règles en
vigueur.
• Respectez les prescriptions nationales et régionales et le marquage
des matériaux (tri des matériaux, ramassage des déchets,
déchetteries).
Consignes de mise au rebut
• L'appareil ne doit pas être jeté avec les ordures ménagères.
• Renseignez-vous auprès des services de votre commune des
endroits autorisés pour la mise au rebut de l’appareil.
• Attention! Rendez inutilisable l’appareil usagé avant de le mettre au
rebut. Coupez le câble d’alimentation au ras de l’appareil.
19
Page 20

Sommaire
Consignes de sécurité.................................................................... 21
Généralités...................................................................................... 23
Version évacuation extérieure............................................................ 23
V ersion rec yclage ............................................................................. 2 3
Utilisation de la hotte ..................................................................... 24
Dispositif de saturation des filtres...................................................... 25
Entretien .......................................................................................... 26
Filtre à graisse métallique ................................................................. 26
Enlever les cloisons frontales ............................................................ 26
Ouverture du filtre à graisse métallique .............................................. 26
Filtre à charbon ................................................................................. 28
Remplacement de l´ampoule d’éclairage ........................................... 29
Nettoyage ........................................................................................ 29
Accessoires (en option) .................................................................. 30
Service Après-vente ....................................................................... 30
Caractéristiques techniques .......................................................... 31
Accessoires/Matériel de montage ..................................................... 31
Branchement électrique ................................................................ 32
Montage............................................................................................ 33
20
Page 21

Cet appareil doit être installé par une personne qualifiée et selon les
normes en vigueur.
Consignes de sécurité
• Le tuyau d’évacuation doit présenter le même diamètre que celui de
l’ouverture d’évacuation.
Dans le cas où il existe déjà un tuyau d’évacuation de l’air d’un
diamètre de 125 mm dans le mur ou sur le toit, on pourra utiliser le
manchon de réduction 150/125 mm. Le bruit de fonctionnement sera
un peu plus élevé.
Attention ! Le tuyau d’évacuation et les colliers de fixation ne
sont pas fournis et doivent être achetés à part.
• La distance minimale entre la surface de support des récipients de
cuisson et la partie la plus basse de la hotte de cuisine doit être d'au
moins 30 cm si la table de cuisson est équipée de foyers
électriques. En présence de foyers au gaz…
si la hotte est un modèle de 60 cm (modèle HD 8760) :
installation sur les tables de cuisson au gaz de 60 cm - distance
minimale de 30 cm
installation sur les tables de cuisson au gaz de 70 cm - distance
minimale de 45 cm
installation impossible sur les tables de cuisson au gaz de plus de
70 cm
si la hotte est un modèle de 90 cm (modèle HD 8795)
installation sur les tables de cuisson au gaz de 60 et 70 cm distance minimale de 30 cm
installation sur les tables de cuisson au gaz de plus de 70 cm distance minimale de 45 cm
Si les instructions d’installation du dispositif de cuisson au gaz
spécifient une plus grande distance, il faut en tenir compte.
• Avant toute opération de nettoyage ou d’entretien, débrancher la
hotte du circuit électrique en retirant la prise ou en coupant
l’interrupteur général de l’habitation.
• L’app areil n’est pas destiné à une utilisation par des enfant s ou des
personnes à capacités physiques, sensorielles ou mentales réduites
et sans expérience et connaissance à moins qu’ils ne soient sous la
supervision ou formés sur l’utilisation de l’appareil par une personne
responsable de leur sécurité.
• Les enfants doivent être surveillés afin qu’ils ne jouent pas avec
l’appareil.
• Ne jamais utiliser la hotte sans que la grille ne soit montée
correctement!
• La hotte ne doit JAMAIS être utilisée comme plan pour déposer
quelque chose sauf si cela est expressément indiqué.
• Quand la hotte est utilisée en même temps que d’autres appareils à
combustion de gaz ou d’autres combustibles, le local doit disposer
d’une ventilation suffisante.
21
Page 22

• L’air aspiré ne doit jamais être envoyé dans un conduit utilisé pour
l’évacuation des fumées produites par des appareils à combustion de
gaz ou d’autres combustibles.
• Il est formellement interdit de faire flamber les aliments sous la hotte.
• L’utilisation de flammes libres peut entraîner des dégât s aux filtres et
peut donner lieu à des incendies, il faut donc les éviter à tout prix.
• La friture d’aliments doit être réalisée sous contrôle pour éviter que
l’huile surchauffée ne prenne feu.
• Les pièces accessibles peuvent se réchauffer de façon importante
quand elles sont utilisées avec des appareils pour la cuisson.
• En ce qui concerne les mesures techniques et de sécurité à adopter
pour l’évacuation des fumées, s’en tenir strictement à ce qui est
prévu dans les règlements des autorités locales compétentes.
• La hotte doit être régulièrement nettoyée, aussi bien à l’intérieur qu’à
l’extérieur (AU MOINS UNE FOIS P AR MOIS, respecter néanmoins
les instructions relatives à l’entretien fournies dans ce manuel).
• La non observation de ces normes de nettoyage de la hotte et du
changement et nettoyage des filtres comporte des risques
d’incendie.
• Ne pas utiliser ou laisser la hotte sans que les ampoules soient
correctement placées pour éviter tout risque de choc électrique.
• La société décline toute responsabilité pour d’éventuels
inconvénients, dégâts ou incendies provoqués par l’appareil et
dérivés de la non observation des instructions reprises dans ce
manuel.
Cet appareil porte le symbole du recyclage conformément à la Directive
Européenne 2002/96/CE concernant les Déchets d’Équipements
Électriques et Électroniques (DEEE ou WEEE).
En procédant correctement à la mise au rebut de cet appareil, vous
contribuerez à empêcher toute conséquence nuisible pour
l’environnement et la santé de l’homme.
Le symbole présent sur l’appareil ou sur la documentation qui
l’accompagne indique que ce produit ne peut en aucun cas être traité
comme déchet ménager. Il doit p ar conséquent être remis à un centre
de collecte des déchets chargé du recyclage des équipements
électriques et électroniques.
Pour la mise au rebut, respectez les normes relatives à l’élimination
des déchets en vigueur dans le pays d’installation.
Pour obtenir de plus amples détails au sujet du traitement, de la
récupération et du recyclage de cet appareil, veuillez vous adresser au
bureau compétent de votre commune, à la société de collecte des
déchets ou directement à votre revendeur .
22
Page 23

Généralités
• La hotte est livrée en version évacuation mais peut, grâce à l’emploi
d’un filtre à charbon actif (en option), être utilisée en version
recyclage.
• Pour cela, il faudra vous procurer le filtre à charbon actif d’origine
(voir Accessoires).
• Seulement HD 8760: La hotte est livrée en version recyclage (filtre à
charbon actif fourni) mais peut être utilisée, en enlevant le filtre à
charbon actif, en version évacuation extérieure.
Version évacuation extérieure
• L’air est rejeté à l’air libre p ar
un conduit raccordé sur le
tuyau d’évacuation. Fig. 1.
• Pour obtenir des performances
optimales lors de l’aspiration,
le tuyau d’évacuation doit avoir
un diamètre équivalent à celui
de l’ouverture d’évacuation.
Dans le cas où il existe déjà
un tuyau d’évacuation de l’air
d’un diamètre de 125 mm dans
le mur ou sur le toit, on pourra
utiliser le manchon de
réduction 150/125 mm. Le bruit
de fonctionnement sera un peu
plus élevé.
Fig. 1
manchon de réduction
bride
Version recyclage
• L’air est filtré par un filtre à
charbon (en option) et renvoyé
dans la pièce.
• En version recyclage utilisez le
filtre à charbon actif d’origine
(voir Accessoires) que vous
pourrez vous procurer en option
auprès de votre magasin
vendeur.
• Fixer le déflecteur d’air au
moyen des 2 vis Ø 3,5x9,5
mm.Fig. 2.
Déflecteur
Fig. 2
23
Page 24

Utilisation de la hotte
• La hotte aspirante est équipée de vitesses réglables. Il est conseillé
de mettre en fonctionnement la hotte quelques minutes avant le
début de la cuisson et de la laisser fonctionner env . une quinzaine de
minutes après la cuisson afin d’éliminer toutes les odeurs.
• Le fonctionnement de la hotte peut être contrôlé par télécommande
(la télécommande fait partie des accessoires et est à
commander en option).
(accessoire non disponible pour les appareils
commercialisés en France et installés sur le territoire
Français).
Le bandeau de commande, situé en bas, sur le côté
droit de la hotte comprend une manette et 2 voyants.
• Pour mettre en fonctionnement ou à l’arrêt
l’éclairage :
appuyez sur la manette puis relâchez-la pour mettre en
fonctionnement, appuyez et relâchez à nouveau pour mettre à l’arrêt.
Remarque : certains modèles offrent une possibilité de choix entre
2 intensités d’éclairage.
• Pour sélectionner les vitesses (puissances) d’aspiration
disponibles :
tournez la manette dans le sens des aiguilles d’une montre pour
augmenter la vitesse (puissance) d’aspiration, tournez dans le sens
inverse pour la réduire jusqu’à l’arrêt de la hotte.
La hotte est équipée d’un voyant (L1) qui s’allume de couleur
différente pour visualiser la vitesse (puissance) d’aspiration
sélectionnée :
• Eclairage à l’arrêt:
moteur d’aspiration à l’arrêt
• Voyant vert fixe :
hotte fonctionnant à la 1ère vitesse (minimum).
• Voyant orange fixe :
hotte fonctionnant à la 2ème vitesse (moyenne).
• Voyant rouge fixe :
hotte fonctionnant à la 3ème vitesse (maximum).
• Voyant rouge clignotant :
hotte fonctionnant à la vitesse intensive (la hotte fonctionne 5
minutes en vitesse intensive puis après ce laps de temps, bascule
automatiquement à la 3ème vitesse).
Fig. 3
L2
L1
24
Page 25

Dispositif de saturation des filtres
Cette hotte est équipée d’un dispositif qui signale lorsque le filtre à
graisse et/ou le filtre à charbon doit être nettoyé ou changé.
Le dispositif signalant la saturation du filtre à charbon actif est
désactivé.
Pour l’activer, procédez comme suit :
Mettez à l’arrêt la hotte.
Appuyez sur la manette plus de 5 secondes de suite.
Le voyant L2 se met à clignoter en vert. Au bout de 2 secondes environ,
le voyant L2 se met à clignoter en orange pour indiquer que le dispositif
de contrôle de saturation du filtre à charbon est à présent activé.
Voyant L2 – Voyant de saturation du filtre à
graisse
Ce voyant s’allume en vert quand le filtre à graisse a besoin d’être
nettoyé, ceci se produit après 40 heures environ d’utilisation.
A chaque utilisation de la hotte, contrôlez si le voyant L2 est allumé.
Voyant L2 – Voyant de saturation du filtre à
charbon actif
Le voyant s’allume en orange quand le filtre à charbon actif a besoin
d’être nettoyé/changé, ceci se produit après 160 heures environ
d’utilisation.
A chaque utilisation de la hotte, contrôlez si le voyant L2 est allumé.
Rétablissement de la signalisation de
saturation des filtres
Après avoir nettoyé ou changé les filtres, mettez en fonctionnement la
hotte à une vitesse (puissance) d’aspiration quelconque, appuyez
pendant 3 secondes sur la manette jusqu’à ce qu’un signal sonore
retentisse, ce qui indique que la remise à zéro a eu lieu, le voyant L2
s’éteint ainsi que la hotte.
Dans certains cas (quand par ex. le voyant L2 signale tant la saturation
des filtres à graisse que celle du filtre à charbon) il faut refaire
l’opération décrite plus haut.
25
Page 26

Entretien
Attention! Veillez a débrancher la hotte du réseau electrique avant
toute intervention sur celle- ci.
Filtre à graisse métallique
• Le filtre à graisse métallique a pour but de piéger les particules de
graisse produites durant la cuisson des aliments et sont utilisés
aussi bien durant le fonctionnement en version évacuation qu’en
version recyclage.
Le filtre à graisse métallique doit être extrait toutes les 4 semaines
et lavé soit à la main, soit dans un lave-vaisselle.
• Pour accéder au filtre à
graisse, enlevez d’abord les
petites cloisons frontales qui
le cachent.
Enlever les cloisons
frontales
Sortez la cloison, tournez
vers le haut et décrochez.
Répétez l’opération pour
toutes les cloisons. Fig. 4.
Décrocher
Enlever
Bild 3
Ouverture du filtre à
graisse métallique
• Poussez vers le bas le
dispositif d’arrêt du filtre à
graisse métallique puis retirezle. Fig. 5.
26
Fig. 4
dispositif d’arrêt
Fig. 5
Page 27

Nettoyage à la main
• Laissez tremper la cassette du filtre à graisse métallique durant env .
1 heure dans de l’eau chaude avec un détergent doux puis rincez à
l’eau chaude. Remettez en place la cassette soigneusement
séchée.
Lave-vaisselle
• Placez la cassette du filtre à graisse métallique dans le lavevaisselle.
Vérifiez que la rotation du bras de lavage du lave vaisselle ne puisse
pas être gêné par le filtre à graisse.
Lavez avec un programme pour vaisselles très sales et une
température d’au moins 65°C. Recommencez éventuellement
l’opération. Remettez en place la cassette après séchage.
• Il se peut qu’il y ait quelques modifications de la teinte de la cassette du filtre à graisse métallique lors du passage dans le lavevaisselle, modifications qui n’ont aucune influence sur le
fonctionnement de la cassette.
• Nettoyez l’intérieur du logement de la cassette avec de l’eau chaude
contenant du détergent (n’employez jamais de détergents corrosifs
ou de brosses à récurer!).
Après avoir réinstaller le filtre à graisse, remontez les cloisons frontales
dans le sens inverse au démontage.
La cloison frontale plus étroite doit être montée sur la position la plus
haute.
27
Page 28

Filtre à charbon
• Le filtre à charbon doit être mis en place lorsque la hotte est utilisée
en version recyclage.
• Pour cela, il faudra utiliser le filtre à charbon actif d’origine (voir
Accessoires).
• Nettoyage/remplacement du filtre à charbon
A la différence d’autres filtres de même type, le filtre à charbon
LONG LIFE peut être nettoyé et réutilisé. Le filtre doit être nettoyé
tous les deux mois en utilisation normale (en considerant une
utilisation moyenne de 2,5 heures par jour). Il est recommandé de
nettoyer le filtre dans un lave-vaisselle, à la température maximum.
Utiliser un détergent normal. Aucun ustensile ménager ne doit être
présent dans le lave-vaisselle lors du nettoyage du filtre, afin d’éviter
tout dépôt de particules d’aliments qui risqueraient de causer
ultérieurement de mauvaises odeurs. Pour réactiver le charbon, il
suffit de mettre le filtre à sécher au four . Régler le four sur chaleur
normale, à une température de 100°C, et y laisser le filtre pendant 10
minutes.
Le filtre doit être changé au bout de trois ans environ, car il a alors
perdu une bonne partie de
sa capacité de rétention
des odeurs.
• Montage
Installez le filtre à charbon
sur l’arrière du filtre à
graisse et fixez-le au
moyen de deux fils
métalliques. Fig. 6.
Attention ! Les fils
métalliques sont inclus
dans la confection du filtre
à charbon et non sur la
hotte
• Pour le démontage,
procédez dans l’ordre
inverse.
• Lors de la commande d’un
filtre de rechange, veuillez
préciser la désignation du modèle et la référence du produit. Ces
données sont indiquées sur la plaque signalétique à l’intérieur de
l’appareil.
• Vous pouvez commander le filtre à charbon auprès de votre magasin
vendeur.
28
filtre à charbon
fils métalliques
Fig. 6
filtre à graisse
Page 29

Attention
• Il y a risque d’incendie si vous ne respectez pas les instructions
concernant le nettoyage de l’appareil et le remplacement ou le
nettoyage du filtre.
• La responsabilité du constructeur ne peut en aucun cas être
engagée dans le cas d’un endommagement du moteur ou d’incendie
liés à un entretien négligé ou au non respect des consignes de
sécurité précédemment mentionnées.
Remplacement de l´ampoule
d’éclairage
• Mettez la hotte hors tension.
• Avant de toucher les ampoules, assurezvous qu’elles soient complètement refroidies.
• Débloquez l’ampoule avec un tournevis. Fig. 7.
• Remplacez l'ampoule défectueuse par une
ampoule du même type.
• Si l'ampoule ne s'allume pas, vérifiez qu'elle est
correctement installée avant d'appeler le Service
Après-Vente.
Fig. 7
Nettoyage
• Attention: Débranchez l’appareil avant le nettoyage.
N’introduisez pas d’objets pointus dans la grille de protection du
moteur.
• Nettoyez les parties extérieures avec un détergent doux.
N’utilisez jamais de produits abrasifs ou caustiques, de détergents
corrosifs, de brosses ou de sablons à récurer.
• Nettoyez le bandeau de commandes et la grille du filtre à graisse
avec un chiffon légèrement imbibé d’un détergent doux.
• Nettoyer toutes les parties en plastique avec un chiffon doux
humidifié avec de l’eau tiède et détergent doux.
• Il est très important de respecter les intervalles de remplacement
du(des) filtre(s) et de nettoyage. Le non respect peut entraîner un
risque d’incendie suite à l’accumulation de graisse dans le filtre.
29
Page 30

Accessoires (en option)
Filtre à charbon T ype 31
Télécommande RM 7000 (accessoire non disponible pour les appareils
commercialisés par la France et installés sur le territoire Français).
Cheminée telescopique K 8004 M (seulement pour le fonctionnement
en version évacuation extérieure)
Flancs en verre BD 8004 W (seulement HD 8795)
Service Après-vente
Dans le cas de demandes de renseignement ou de pannes, veuillez
appeler notre service après-vente (voir la liste de nos différents points
de service après-vente).
Lors de l’appel, préciser :
1. La désignation du modèle
2. La référence
3. Le numéro de l’appareil
Ces données sont indiquées sur la plaque signalétique située à
l’intérieur de l’appareil et visible après ouverture de la grille du
filtre à graisse.
Sous réserve de modifications de construction et de coloris dans le
cadre du développement technique.
Service Après-vente
Pour les appareils commercialisés en France
Si une intervention s’avère nécessaire, le vendeur de votre appareil est
le premier habilité à intervenir. A défaut (déménagement de votre part,
fermeture du magasin où vous avez effectué l’achat,…) veuillez
consulter le Centre Contact Consommateurs qui vous communiquera
alors l’adresse d’un service après vente.
Signalez au service après vente le numéro PNC et le S-No (numéro de
série), que vous trouverez sur la plaque signalétique située sur votre
appareil.
Afin de répondre rapidement, nous vous recommandons de l’inscrire à
cet endroit.
PNC :
S-No :
30
Page 31

Caractéristiques techniques
HD 8795 HD 8760
Dimensions (en cm):
Hauteur: 80 8 0
Largeur: 89,8 59,8
Profondeur: 33 3 3
Puissance nominale totale: 235 W 235 W
Moteur: 175 W 175 W
Eclairage (30° Ø35 12V GU4)*: 3 x 20W 3 x 20W
Longueur du câble: 150 cm 150 cm
Branchement électrique: 230 V 230 V
* Attention! Pour garantir la même qualité d’illumination, il est conseillé d’utiliser le
même type d’ampoule: Lampe Halogene PHILIPS STANDARD LINE code 425409
de 12V 20W 30° Ø35 GU4.
Accessoires/Matériel de montage
1 clé à chenillette pour vis torx
1 étrier de support
1 déflecteur
2 bouchons
1 bande en caoutchou (diviser en 3 parties)
1 gabarit
2 distanciers
4 vis à bois 5 x 45 mm
4 chevilles Ø 8 mm
2 vis à tôle 3,5 x 9,5
2 vis à tôle 3,5 x 32
2 vis à tôle 5 x 18
1 manchon de réduction Ø 150-125 mm
2 brides Ø 150 mm
Seulement HD 8795: 2 flancs en aciér
31
Page 32

Branchement électrique
Consignes de sécurité pour l’électricien
La tension électrique doit correspondre à la tension reportée sur la
plaque signalétique située à l’intérieur de la hotte. Si une prise est
présente, branchez la hotte dans une prise murale conforme aux
normes en vigueur et placée dans une zone accessible. Si aucune
prise n’est présente (raccordement direct au circuit électrique), ou si la
prise ne se trouve pas dans une zone accessible, appliquez un
disjoncteur normalisé pour assurer de débrancher complètement la
hotte du circuit électrique en conditions de catégorie surtension III,
conformément aux règlementations de montage.
Attention! Avant de rebrancher le circuit de la hotte à l’alimentation
électrique et d’en vérifier le fonctionnement correct, contrôlez toujours
que le câble d’alimentation soit monté correctement.
Attention! La substitution du câble d’alimentation doit être effectuée
par le service d’assistance technique autorisé de façon à prévenir tout
risque.
32
Page 33

Montage - Fig. 8-9-10-11
Avant d’effectuer l’installation, assurez-vous que l’appareil n’est
pas raccordé à l’installation électrique.
• Appliquer trois bandes caoutchoutées sur l’arrière de la hotte.
Si nécessaire, monter les deux distanciers fournis avec l’équipement
sur les trous de fixage définitif.
Les distanciers sont utiles lorsque la paroi où doit être fixée la hotte
n’est pas parfaitement verticale (par exemple, lorsque la paroi est
partiellement recouverte de briques).
Bandes
caoutchoutées
Bandes
caoutchoutées
Bandes
caoutchoutées
fixage définitif
Fig. 8
fixage définitif
distanciers
33
Page 34

• Marquer l’axe central sur la paroi, afin de faciliter la procédure de
montage (1), puis positionner le gabarit de façon à ce que sa ligne
centrale corresponde à l’axe précédemment marqué sur la paroi et
que le côté inférieur du gabarit corresponde au côté inférieur de la
hotte montée (2).
• Percer deux trous Ø 8 mm. et fixer l’étrier de support au moyen de
deux vis et de goujons pour parois (3).
• Enlever les cloisons frontales (voir paragraphe“Enlever les cloisons
frontale”).
• Suspendre la hotte (4) en réglant sa position (5-6), puis depuis
l’intérieur de la hotte marquer deux points pour la fixation définitive de
la hotte (7). Retirer la hotte et percer deux trous Ø 8 mm. (8), puis
insérer deux goujons pour parois, suspendre à nouveau la hotte et
fixer définitivement cette dernière au moyen de deux vis (9). Couvrir
les orifices de passage des vis avec deux bouchons fournis avec le
matériel.
4
Fig. 9
(5x18)
5
9
4
6
(5x18)
6
5
3
7
8
8
2
1
34
Page 35

• Seulement HD
10a
10b
11
8795 only: Fixer les
flancs à la hotte en
accrochant les
clavettes (10a) des
flancs aux vis
d’accrochage (10b).
Bloquez les flancs en
agissant sur les
languettes de blocage
(11).
• Préparer les
connexions
Fig. 10
électriques (12), sans
brancher la hotte à
l’installation électrique générale du logement.
• Dans le cas où l’on a choisit la hotte en version aspirante, appliquer
à l’ouverture d’évacuation une des deux brides fournies avec le
matériel (13 -Aspirante).
Attention! La bride haute doit être utilisée lorsque l’on veut appliquer
une cheminée téléscopique (à commander – voir accessoires
spéciaux), la bride basse doit être utilisée dans tous les autres cas.
• Remonter le filtre à graisse et
les cloisons frontales selon la
numérotation indiquée
également au derrière de
évacuation extérieure
13
chaque cloison (de 1 à 4, du
haut vers le bas).
• Brancher la hotte à
l’installation électrique
générale du logement
puis vérifier que la hotte
fonctionne correctement.
12
14
13
1
recyclage
2
3
4
Fig. 11
35
Page 36

LI2BUN Ed. 01/10
 Loading...