

Page 1

FHH6887-GK
................................................ .............................................
EN COOKER USER MANUAL 2
DE HERD BENUTZERINFORMATION 31
Page 2
www.electrolux.com
2
CONTENTS
1. SAFETY INFORMATION . . . . . . . . . . . . . . . . . . . . . . . . . . . . . . . . . . . . . . . . . . . . . . . . . . . 3
2. SAFETY INSTRUCTIONS . . . . . . . . . . . . . . . . . . . . . . . . . . . . . . . . . . . . . . . . . . . . . . . . . . 4
3. PRODUCT DESCRIPTION . . . . . . . . . . . . . . . . . . . . . . . . . . . . . . . . . . . . . . . . . . . . . . . . . 7
4. BEFORE FIRST USE . . . . . . . . . . . . . . . . . . . . . . . . . . . . . . . . . . . . . . . . . . . . . . . . . . . . . . 8
5. HOB - DAILY USE . . . . . . . . . . . . . . . . . . . . . . . . . . . . . . . . . . . . . . . . . . . . . . . . . . . . . . . . 8
6. HOB - HELPFUL HINTS AND TIPS . . . . . . . . . . . . . . . . . . . . . . . . . . . . . . . . . . . . . . . . . . . 9
7. HOB - CARE AND CLEANING . . . . . . . . . . . . . . . . . . . . . . . . . . . . . . . . . . . . . . . . . . . . . 10
8.
OVEN - DAILY USE . . . . . . . . . . . . . . . . . . . . . . . . . . . . . . . . . . . . . . . . . . . . . . . . . . . . . . 10
9. OVEN - CLOCK FUNCTIONS . . . . . . . . . . . . . . . . . . . . . . . . . . . . . . . . . . . . . . . . . . . . . . 12
10.
OVEN - HELPFUL HINTS AND TIPS . . . . . . . . . . . . . . . . . . . . . . . . . . . . . . . . . . . . . . . . . 13
11. OVEN - CARE AND CLEANING . . . . . . . . . . . . . . . . . . . . . . . . . . . . . . . . . . . . . . . . . . . . 24
12.
WHAT TO DO IF… . . . . . . . . . . . . . . . . . . . . . . . . . . . . . . . . . . . . . . . . . . . . . . . . . . . . . . 27
13. INSTALLATION . . . . . . . . . . . . . . . . . . . . . . . . . . . . . . . . . . . . . . . . . . . . . . . . . . . . . . . . . 28
WE’RE THINKING OF YOU
Thank you for purchasing an Electrolux appliance. You’ve chosen a product that brings with it
decades of professional experience and innovation. Ingenious and stylish, it has been designed
with you in mind. So whenever you use it, you can be safe in the knowledge that you’ll get great
results every time.
Welcome to Electrolux.
Visit our website for:
Get usage advice, brochures, trouble shooter, service information:
www.electrolux.com
Register your product for better service:
www.electrolux.com/productregistration
Buy Accessories, Consumables and Original spare parts for your appliance:
www.electrolux.com/shop
CUSTOMER CARE AND SERVICE
We recommend the use of original spare parts.
When contacting Service, ensure that you have the following data available.
The information can be found on the rating plate. Model, PNC, Serial Number.
Warning / Caution-Safety information
General information and tips
Environmental information
Subject to change without notice.
Page 3

1. SAFETY INFORMATION
Before the installation and use of the appliance, carefully
read the supplied instructions. The manufacturer is not
responsible if an incorrect installation and use causes injuries and damages. Always keep the instructions with
the appliance for future reference.
1.1 Children and vulnerable people safety
WARNING!
Risk of suffocation, injury or permanent disability.
• This appliance can be used by children aged from 8
years and above and persons with reduced physical,
sensory or mental capabilities or lack of experience and
knowledge if they are supervised by an adult or a person who is responsible for their safety.
• Do not let children play with the appliance.
• Keep all packaging away from children.
• Keep children and pets away from the appliance when
it operates or when it cools down. Accessible parts are
hot.
• If the appliance has a child safety device, we recommend that you activate it.
• Cleaning and user maintenance shall not be made by
children without supervision.
ENGLISH 3
1.2 General Safety
• The appliance and its accessible parts become hot
during use. Do not touch the heating elements.
• Do not operate the appliance by means of an external
timer or separate remote-control system.
• Unattended cooking on a hob with fat or oil can be
dangerous and may result in fire.
Page 4

www.electrolux.com
4
• Never try to extinguish a fire with water, but switch off
• Do not store items on the cooking surfaces.
• Do not use a steam cleaner to clean the appliance.
• Metallic objects such as knives, forks, spoons and lids
• Do not use harsh abrasive cleaners or sharp metal
• Be careful, when you touch the storage drawer. It can
• To remove the shelf supports first pull the front of the
• If the glass ceramic surface is cracked, switch off the
the appliance and then cover flame e.g. with a lid or a
fire blanket.
should not be placed on the hob surface since they
can get hot.
scrapers to clean the glass door since they can scratch
the surface, which may result in shattering of the glass.
get hot.
shelf support and then the rear end away from the side
walls. Install the shelf supports in the opposite sequence.
appliance to avoid the possibility of electric shock.
2.
SAFETY INSTRUCTIONS
2.1 Installation
WARNING!
Only a qualified person must install this appliance.
• Remove all the packaging.
• Do not install or use a damaged appli-
ance.
• Obey the installation instruction sup-
plied with the appliance.
• Always be careful when you move the
appliance because it is heavy. Always
wear safety gloves.
• Do not pull the appliance by the handle.
• Keep the minimum distance from the
other appliances and units.
• Make sure that the appliance is installed
below and adjacent safe structures.
• The sides of the appliance must stay
adjacent to appliances or to units with
the same height.
• Do not install the appliance on a platform.
• Do not install the appliance adjacent to
a door or under a window. This prevents hot cookware to fall from the appliance when the door or the window is
opened.
WARNING!
Make sure to install a stabilizing
means in order to prevent tipping
of the appliance. Refer to Installation chapter.
Page 5

Electrical connection
WARNING!
Risk of fire and electrical shock.
• All electrical connections should be
made by a qualified electrician.
• The appliance must be earthed.
• Make sure that the electrical information
on the rating plate agrees with the power supply. If not, contact an electrician.
• Always use a correctly installed shockproof socket.
• Do not use multi-plug adapters and extension cables.
• Make sure not to cause damage to the
mains plug and to the mains cable.
Contact the Service or an electrician to
change a damaged mains cable.
• Do not let mains cables to come in
touch with the appliance door, specially
when the door is hot.
• The shock protection of live and insulated parts must be fastened in such a
way that it cannot be removed without
tools.
• Connect the mains plug to the mains
socket only at the end of the installation. Make sure that there is access to
the mains plug after the installation.
• If the mains socket is loose, do not
connect the mains plug.
• Do not pull the mains cable to disconnect the appliance. Always pull the
mains plug.
• Use only correct isolation devices: line
protecting cut-outs, fuses (screw type
fuses removed from the holder), earth
leakage trips and contactors.
• The electrical installation must have an
isolation device which lets you disconnect the appliance from the mains at all
poles. The isolation device must have a
contact opening width of minimum 3
mm.
2.2 Use
WARNING!
Risk of injury, burns or electric
shock.
• Use this appliance in a household environment.
ENGLISH 5
• Do not change the specification of this
appliance.
• Make sure that the ventilation openings
are not blocked.
• Do not let the appliance stay unattended during operation.
• Deactivate the appliance after each
use.
• Internally the appliance becomes hot
when in operation. Do not touch the
heating elements that are in the appliance. Always use oven gloves to remove or put in accessories or ovenware.
• Be careful, when you open the appliance door while the appliance is in operation. Hot air can release.
• Do not operate the appliance with wet
hands or when it has contact with water.
• Do not apply pressure on the open
door.
• Do not use an external timer or a separate remote-control system to operate
the appliance.
• Always keep the appliance door closed
when the appliance is in operation.
• Do not put cutlery or saucepan lids on
the cooking zones. They become hot.
• Set the cooking zone to “off” after use.
• Do not use the appliance as a work
surface or as a storage surface.
• If the surface of the appliance is
cracked, disconnect immediately the
appliance from the power supply. This
to prevent an electrical shock.
WARNING!
Risk of fire or explosion.
• Fats and oil when heated can release
flammable vapours. Keep flames or
heated objects away from fats and oils
when you cook with them.
• The vapours that very hot oil releases
can cause spontaneous combustion.
• Used oil, that can contain food remnants, can cause fire at a lower temperature than oil used for the first time.
• Do not put flammable products or items
that are wet with flammable products
in, near or on the appliance.
Page 6
www.electrolux.com
6
• Do not let sparks or open flames to
• Open the appliance door carefully. The
• Do not try to extinguish a fire with wa-
• To prevent damage or discoloration to
• Discoloration of the enamel has no ef-
• Use a deep pan for moist cakes. Fruit
• Do not keep hot cookware on the con-
• Do not let cookware to boil dry.
• Be careful not to let objects or cook-
• Do not activate the cooking zones with
• Do not put aluminium foil on the appli-
• Cookware made of cast iron, aluminium
come in contact with the appliance
when you open the door.
use of ingredients with alcohol can
cause a mixture of alcohol and air.
ter. Disconnect the appliance and cover
the flame with a lid or a fire blanket.
WARNING!
Risk of damage to the appliance.
the enamel:
– Do not put ovenware or other objects
in the appliance directly on the bottom.
– Do not put aluminium foil directly on
the bottom of the appliance.
– do not put water directly into the hot
appliance.
– do not keep moist dishes and food in
the appliance after you finish the
cooking.
– be careful when you remove or install
the accessories.
fect on the performance of the appliance. It is not a defect in the sense of
the warranty law.
juices cause stains that can be permanent.
trol panel.
ware fall on the appliance. The surface
can be damaged.
empty cookware or without cookware.
ance.
or with a damaged bottom can cause
scratches on the glass ceramic. Always
lift these objects up when you have to
move them on the cooking surface.
2.3 Care and Cleaning
WARNING!
Risk of injury, fire or damage to
the appliance.
• Before maintenance, deactivate the appliance and disconnect the mains plug
from the mains socket.
• Make sure the appliance is cold. There
is the risk that the glass panels can
break.
• Replace immediately the door glass
panels when they are damaged. Contact the Service.
• Be careful when you remove the door
from the appliance. The door is heavy!
• Clean regularly the appliance to prevent
the deterioration of the surface material.
• Remaining fat or food in the appliance
can cause fire.
• Clean the appliance with a moist soft
cloth. Only use neutral detergents. Do
not use abrasive products, abrasive
cleaning pads, solvents or metal objects.
• If you use an oven spray, obey the safety instructions on the packaging.
• Do not clean the catalytic enamel (if applicable) with any kind of detergent.
2.4 Internal light
• The type of light bulb or halogen lamp
used for this appliance, is only for
household appliances. Do not use it for
house lighting.
WARNING!
Risk of electrical shock.
• Before replacing the lamp, disconnect
the appliance from the power supply.
• Only use lamps with the same specifications.
2.5 Disposal
WARNING!
Risk of injury or suffocation.
• Disconnect the appliance from the
mains supply.
• Cut off the mains cable and discard it.
Page 7
• Remove the door catch to prevent children and pets to get closed in the appliance.
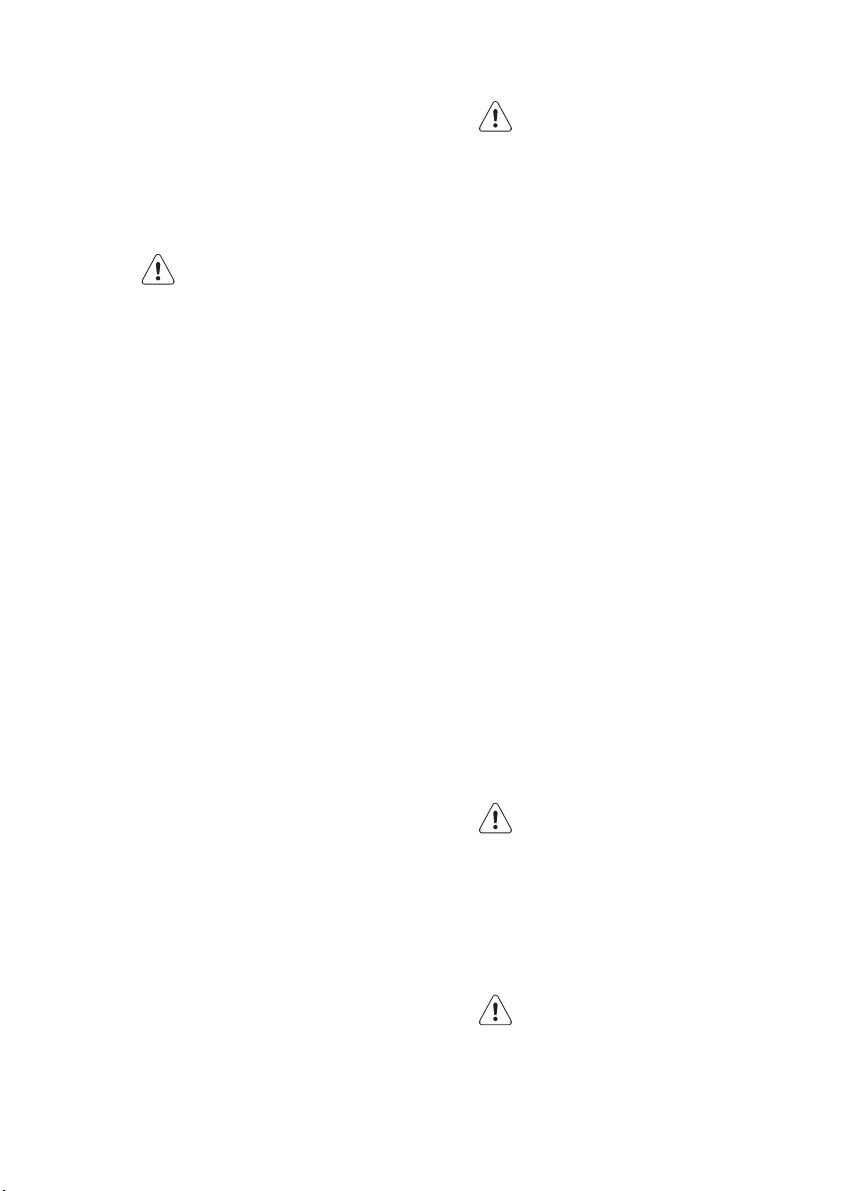
3. PRODUCT DESCRIPTION
3.1 General overview
1 3 4
2
5
4
3
9
2
1
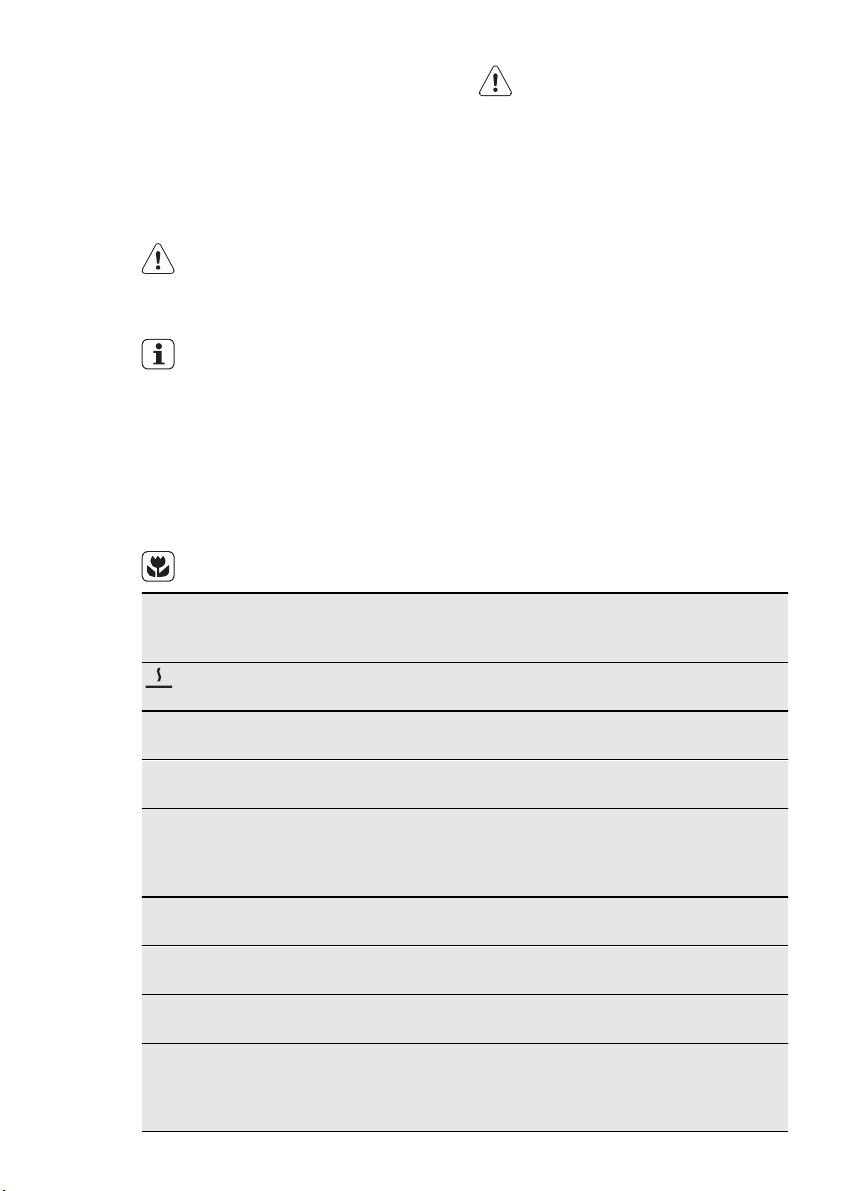
3.2 Cooking surface layout
ENGLISH 7
Knob for the oven functions
1
Electronic programmer
2
Knob for the temperature
3
5
6
7
8
Temperature indicator
4
Knobs for the hob
5
Heating element
6
Oven lamp
7
Fan and heating element
8
Shelf positions
9
1 3
145 mm
210 mm
2
5
180 mm
145 mm
46
3.3 Accessories
Oven shelf
•
For cookware, cake tins, roasts.
Flat baking tray
•
For cakes and biscuits.
Deep roasting pan
•
Cooking zone 1200 W
1
Steam outlet
2
Cooking zone 1800 W
3
Cooking zone 1200 W
4
Residual heat indicator
5
Cooking zone 2300 W
6
To bake and roast or as a pan to collect
fat.
• Storage drawer
Below the oven cavity is the storage
drawer.
Page 8
www.electrolux.com
8
4. BEFORE FIRST USE
WARNING!
Refer to the Safety chapters.
4.1 Initial Cleaning
• Remove all accessories and removable
shelf supports (if applicable).
• Clean the appliance before first use.
Refer to the chapter "Care and
cleaning".
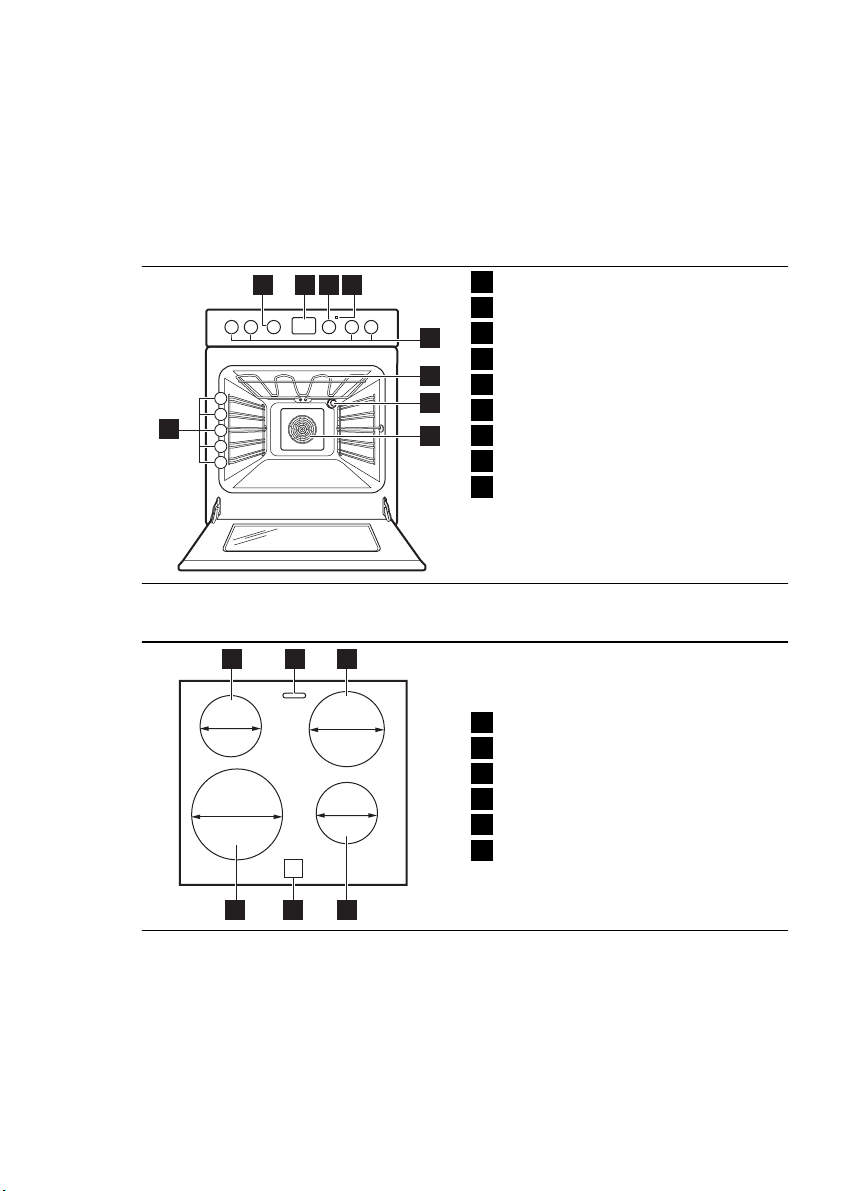
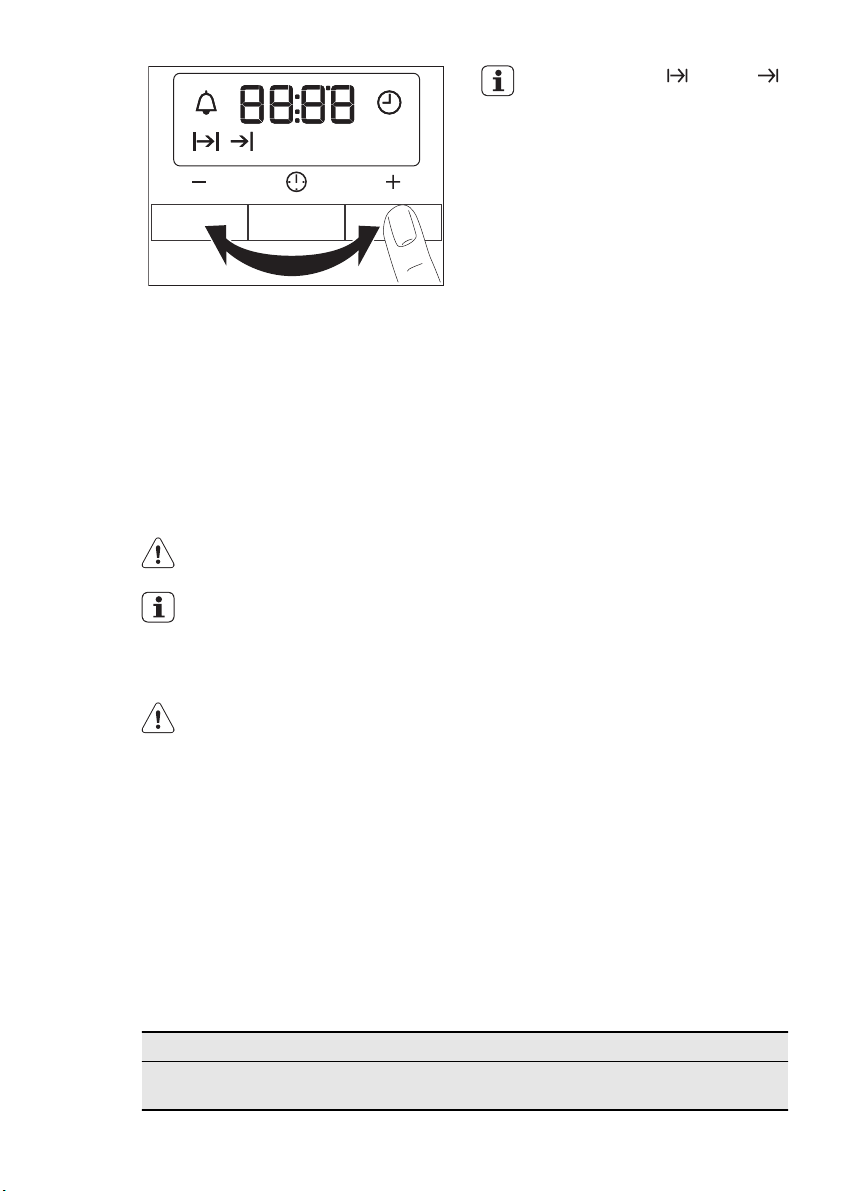
4.2 Setting the time
You must set the time before you
operate the oven.
When you connect the appliance to the
electrical supply or after a power cut, the
indicator for the Time of Day function
flashes.
Press the + or - button to set the correct
time.
After approximately five seconds, the
flashing stops and the display shows the
time of day you set.
To change the time, press
again and again until the indicator
for the Time of Day function flashes. You must not set the Duration
or End function at the same
time.
4.3 Preheating
Preheat the empty appliance to burn off
the remaining grease.
1.
Set the function and the maximum
temperature.
2.
Let the appliance operate for one
hour.
3.
Set the function and the maximum
temperature.
4.
Let the appliance operate for ten minutes.
5.
Set the function and the maximum
temperature.
6.
Let the appliance operate for ten mi-
nutes.
Accessories can become hotter than usually. The appliance can emit an odour and
smoke. This is normal. Make sure that the
airflow is sufficient.
5. HOB - DAILY USE
WARNING!
Refer to the Safety chapters.
5.1 Heat setting
Knob Function
Keep Warm
0 Off position
1-9 Heat settings
(1 - lowest heat setting, 9 highest heat setting)
1.
Turn the knob to a necessary heat
setting.
2.
To stop the cooking, turn the knob to
the 0 position.
Use the residual heat to decrease
energy consumption. Deactivate
the cooking zone approximately
5-10 minutes before the cooking
is completed.
Page 9
5.2 Residual heat indicator
The residual heat indicator comes on
when a cooking zone is hot.
6. HOB - HELPFUL HINTS AND TIPS
ENGLISH 9
WARNING!
There is a risk of burns from residual heat.
WARNING!
Refer to the Safety chapters.
6.1 Cookware
• The bottom of the cookware
must be as thick and flat as
possible.
• Cookware made of enamelled
steel and with aluminium or
copper bottoms can cause the
colour to change on the glassceramic surface.
6.3 The Examples of cooking
applications
The data in the table is for guidance only.
6.2 Energy saving
• If it is possible, always put the
lids on the cookware.
Heat
setting
1-2 Hollandaise sauce, melt: butter,
1-2 Solidify: fluffy omelettes, baked
2-3 Simmer rice and milkbased
3-4 Steam vegetables, fish, meat 20-45
4-5 Steam potatoes 20-60
4-5 Cook larger quantities of food,
6-7 Gentle fry: escalope, veal cordon
Use to: Time Hints
Keep warm the food you cooked as re-
1
quired
5-25
chocolate, gelatine
min
10-40
eggs
min
25-50
dishes, heating up ready-cooked
min
meals
min
min
60-150
stews and soups
min
as
bleu, cutlets, rissoles, sausages,
liver, roux, eggs, pancakes,
neces-
sary
doughnuts
• Put cookware on a cooking
zone before you start it.
• Deactivate the cooking zones
before the end of the cooking
time to use residual heat.
• The bottom of pans and cooking zones must have the same
dimension.
Put a lid on a cookware
Mix from time to time
Cook with a lid on
Add the minimum twice as
much liquid as rice, mix milk
dishes part procedure
through
Add some tablespoons of liquid
Use max. ¼ l water for 750 g
of potatoes
Up to 3 l liquid plus ingredients
Turn halfway through
Page 10
www.electrolux.com
10
Heat
Use to: Time Hints
setting
7-8 Heavy fry, hash browns, loin
steaks, steaks
9 Boil large quantities of water, cook pasta, sear meat (goulash, pot roast),
deep-fry chips
7. HOB - CARE AND CLEANING
WARNING!
Refer to the Safety chapters.
Clean the appliance after each use.
Always use cookware with clean bottom.
Scratches or dark stains on the
glass-ceramic cause no effect on
how the appliance operates.
To remove the dirt:
1.
– Remove immediately: melted
plastic, plastic foil and food with
sugar. If not, the dirt can cause
damage to the appliance. Use a
5-15
Turn halfway through
min
special scraper for the glass. Put
the scraper on the glass surface at
an acute angle and move the blade
across the surface.
Remove after the appliance is
–
sufficiently cool: limescale rings,
water rings, fat stains and shiny
metallic discolorations. Use a special cleaning agent for glass-ceramic or stainless steel.
2.
Clean the appliance with a moist cloth
and some detergent.
3.
At the end, rub the appliance dry
with a clean cloth.
8. OVEN - DAILY USE
WARNING!
Refer to the Safety chapters.
8.1 Cooling fan
When the appliance operates, the cooling
fan activates automatically to keep the
surfaces of the appliance cool. If you deactivate the appliance, the cooling fan
continues to operate until the temperature
in the appliance cools down.
8.2 Activating and deactivating
the appliance
1.
Turn the knob for the oven functions
to an oven function.
2.
Turn the knob for the temperature to
a temperature.
The temperature indicator comes on
while the temperature in the appliance
increases.
3.
To deactivate the appliance, turn the
knob for the oven functions and the
knob for the temperature to the Off
position.
Page 11
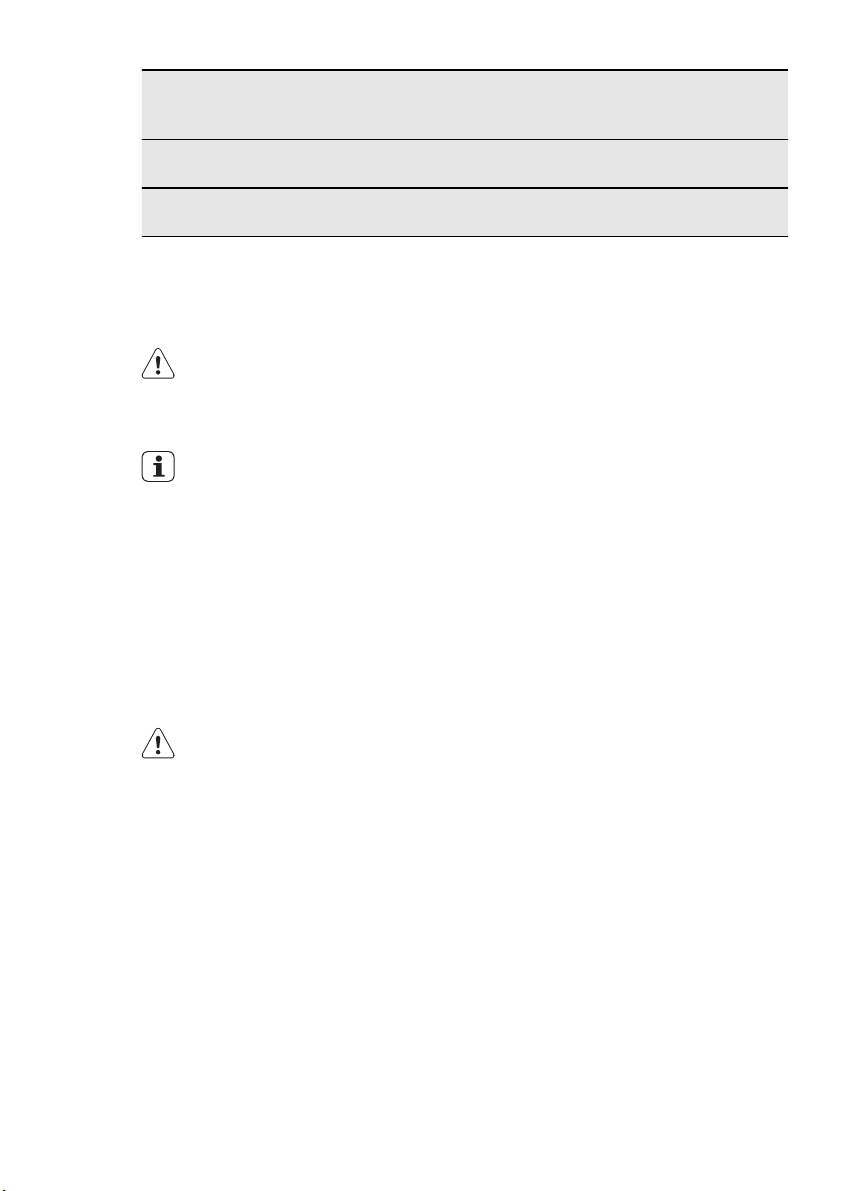
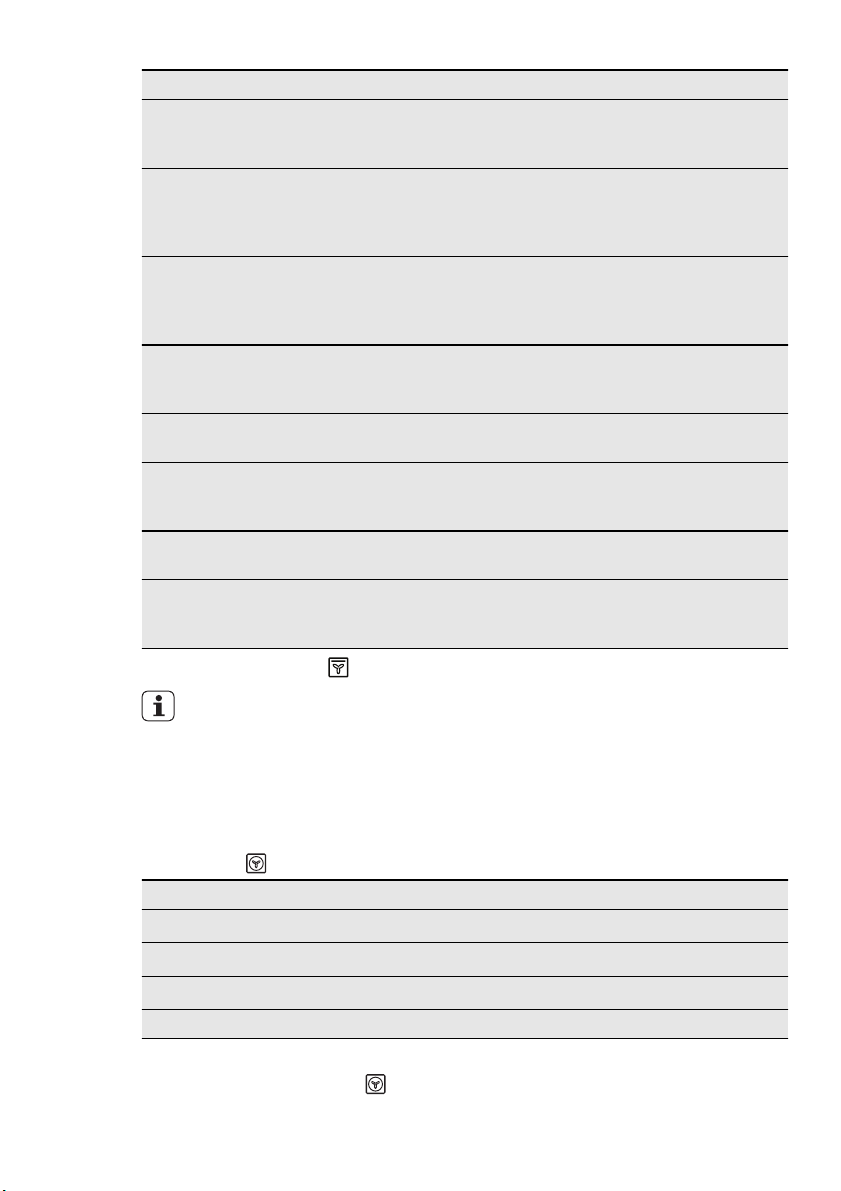
8.3 Oven Functions
Oven function Application
Off position The appliance is off.
ENGLISH 11
True Fan
Cooking
temperature, on more than one shelf, without flavour
transference. Set the oven temperature 20-40 °C lower
than for Conventional.
To roast or roast and bake food with the same cooking
Conventional
Cooking
Pizza Setting
To bake and roast on one oven level. The top and bottom heating elements operate at the same time.
To make pizza, quiche or pie. Set the oven temperature
20-40 °C lower than for Conventional.
To cook large pieces of meat. The grill element and the
Turbo Grilling
oven fan operate one after the other and circulate hot air
around the food.
Fast Grilling
Light Cooking
To grill flat food items in large quantities. To make toast.
The full grill element operates.
To bake in tins and dry on one shelf level at a low temperature.
Defrost To thaw frozen food.
Oven Lamp To activate the oven lamp without a cooking function.
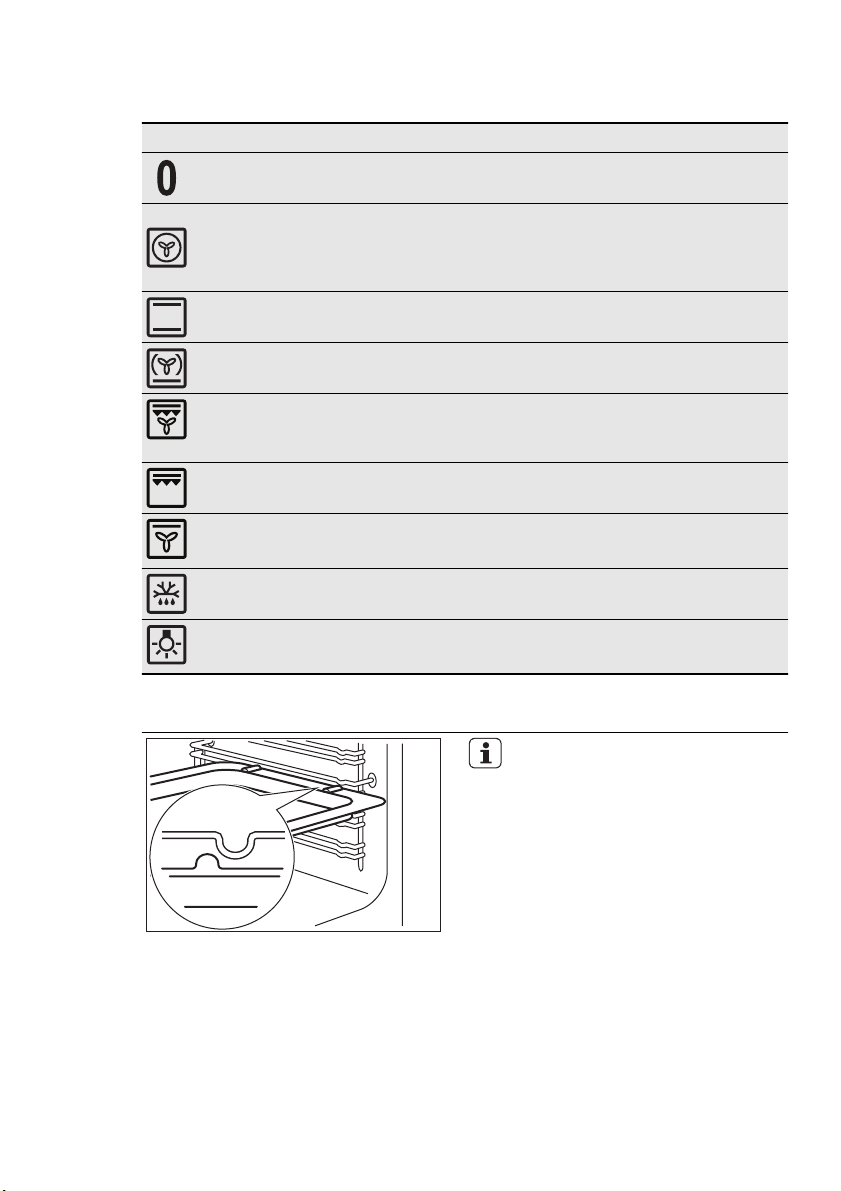
8.4 Installing the oven accessories
The deep pan and the oven shelf
have side edges. These edges
and the shape of the guide-bars
are a special device to prevent the
cookware from slipping.
Page 12
www.electrolux.com
12
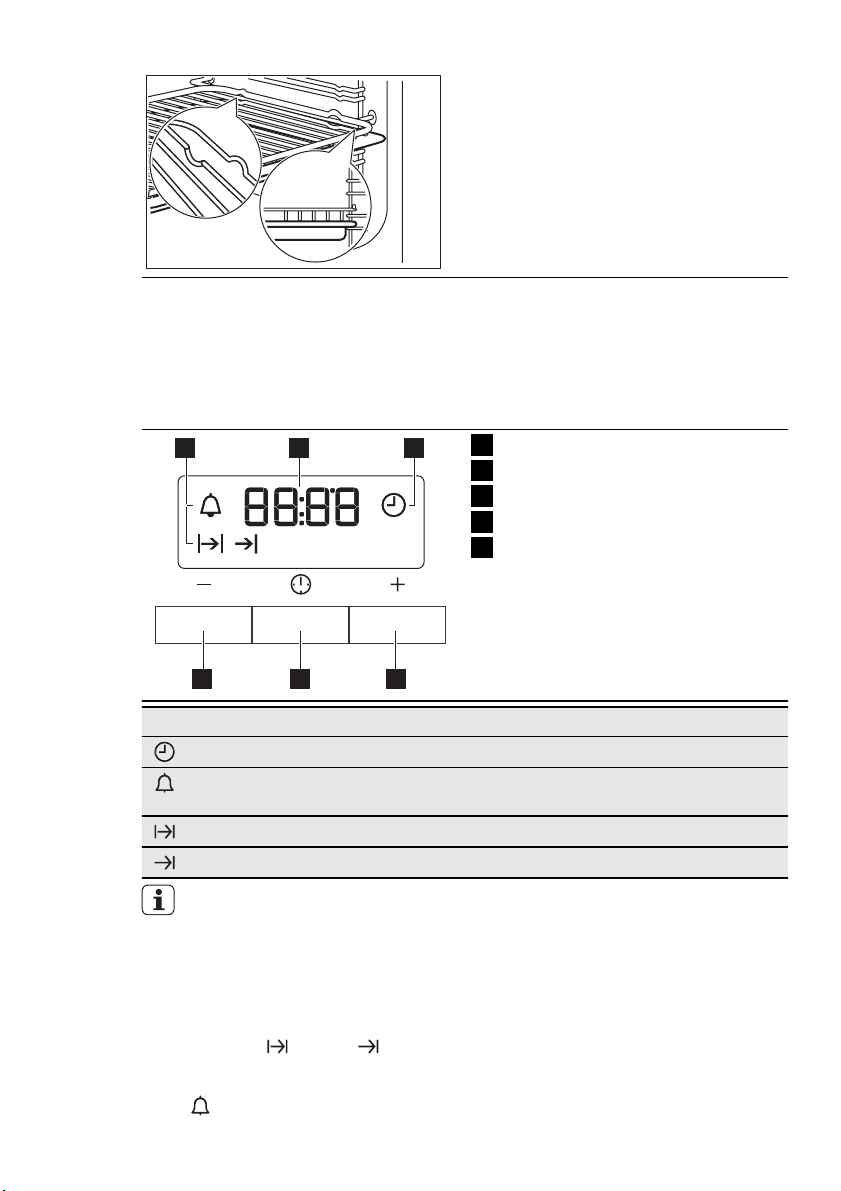
9. OVEN - CLOCK FUNCTIONS
9.1 Electronic programmer
1 2 1
hr min
Installing the oven shelf and the deep
pan together
Put the oven shelf on the deep pan. Push
the deep pan between the guide-bars of
one of the oven levels.
Function indicators
1
Time display
2
Button +
3
Selection button
4
Button -
5
345
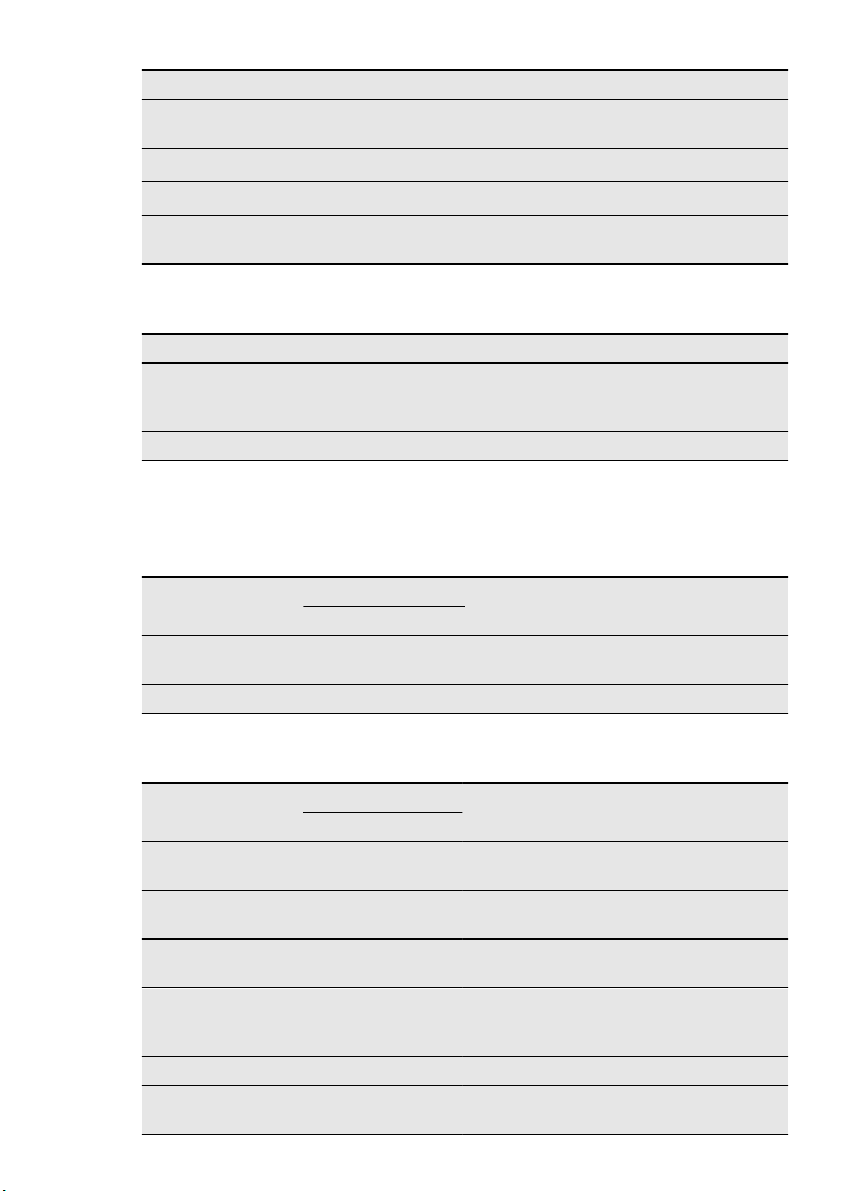
Clock function Application
Time of day To set, change or check the time of day.
Minute Minder To set a countdown time. This function has no effect on
the operation of the oven.
Duration To set how long the appliance must operate.
End To set when the appliance must be deactivated.
You can use Duration and End at
the same time to set the time
when the appliance must be activated and then deactivated. First
set Duration, then End.
2.
Press the Selection button again and
again until the indicator for the necessary clock function flashes.
9.2 Setting the clock functions
1.
For Duration and End , set an
oven function and temperature. This
is not necessary for the Minute Mind-
.
er
Page 13
4.
hr minhr min
Press a button to stop the signal.
5.
Turn the knob for the oven functions
and the knob for the temperature to
the off position.
9.3 Cancelling the clock
functions
1.
3.
Press + or - to set the necessary
clock function.
The display shows the indicator for
the clock function you set. When the
set time ends, the indicator flashes
and an acoustic signal sounds for two
minutes.
Press the Selection button again and
again until the necessary function indicator flashes.
2.
Press and hold the button -.
The clock function goes out after
some seconds.
10. OVEN - HELPFUL HINTS AND TIPS
ENGLISH 13
With the Duration and End
functions, the appliance deactivates automatically.
WARNING!
Refer to the Safety chapters.
The temperature and baking times
in the tables are guidelines only.
They depend on the recipes, quality and quantity of the ingredients
used.
CAUTION!
Use a deep baking tray for very
moist cakes. Fruit juices can
cause permanent stains on the
enamel.
10.1 Baking
General instructions
• Your new oven may bake or roast differently to the appliance you had before. Adapt your usual settings (temperature, cooking times) and shelf levels to
the values in the tables.
• With longer baking times, the oven can
be switched off about 10 minutes before the end of baking time, to use the
residual heat.
When you use frozen food, the trays
in the oven can twist during baking.
When the trays get cold again, the
distortion will be gone.
How to use the Baking Tables
• We recommend to use the lower temperature the first time.
• If you cannot find the settings for a special recipe, look for the one that is almost the same.
• Baking time can be extended by 10-15
minutes, if you bake cakes on more
than one level.
• Cakes and pastries at different heights
do not always brown equally at first. If
this occurs, do not change the temperature setting. The differences equalize
during the baking procedure.
10.2 Tips on baking
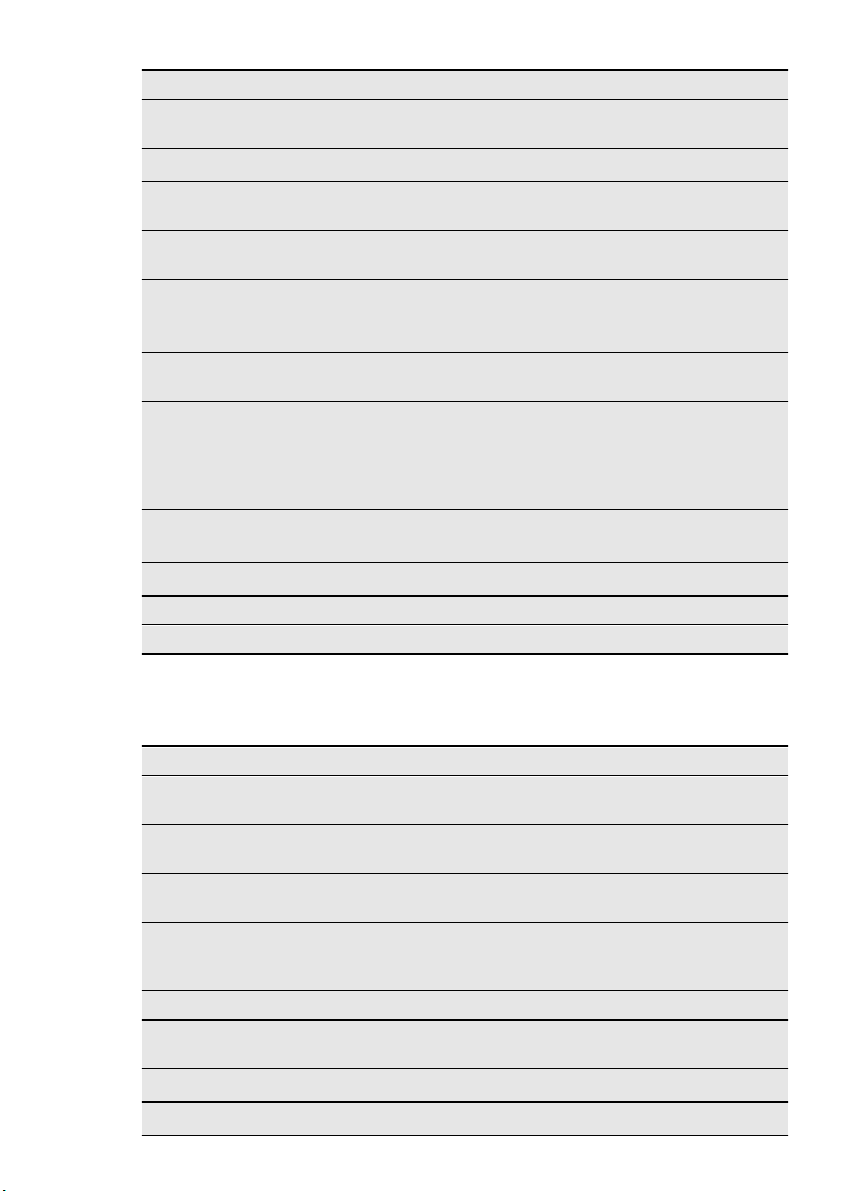
Baking results Possible cause Remedy
The cake is not browned
enough underneath.
Wrong shelf position. Place the cake lower.
Page 14
www.electrolux.com
14
The cake sinks (becomes
soggy, lumpy, streaky).
The cake sinks (becomes
soggy, lumpy, streaky).
The cake sinks (becomes
soggy, lumpy, streaky).
The cake is too dry.
The cake is too dry.
The cake browns unevenly.
The cake browns unevenly.
The cake is not ready in
the baking time given.
10.3 Light Cooking
Biscuits 180 – 190
Pastry: Choux 180 – 190
Pastry: Shortcrust 180 - 190
Meringues 80-100 120 - 150
1)
10.4 True Fan Cooking
Baking results Possible cause Remedy
The oven temperature is
too high.
The next time you bake
set a slightly lower oven
temperature.
Set a longer baking time.
The baking time is too
short.
Baking times cannot
be reduced by setting
higher temperatures.
Use less liquid. Pay atten-
There is too much liquid
in the mixture.
tion to mixing times, especially if you use a mix-
ing machine.
The oven temperature is
The baking time is too
The oven temperature is
too high and the baking
time is too short.
The mixture is unevenly
distributed.
The oven temperature is
Hints for the Light Cooking
function:
• Use the function to bake in tins
and dry on one shelf level at a
low temperature.
• Bake only one tin or tray at a
time.
• If you want to preheat the oven
.
use
too low.
long.
too low.
The next time you bake
set a higher oven temper-
ature.
The next time you bake
set a shorter baking time.
Set a lower oven temper-
ature and a longer baking
time.
Spread the mixture evenly
on the baking tray.
The next time you bake
set a slightly higher oven
temperature.
Type of baking Temperature °C Time in minutes
10 - 20
30 - 40
25 - 35
Preheat the oven.
1)
1)
1)
Page 15

ENGLISH 15
Baking on one oven level
Baking in tins
Type of baking Shelf position Temperature °C Time in min.
Ring cake or brioche
Madeira cake/fruit
cakes
Fatless sponge
cake
Flan base - short
pastry
Flan base sponge mixture
Apple pie (2tins
Ø20cm, diagonally
off set)
1)
Pre-heat the oven
Cakes/pastries/breads on baking trays
Type of baking Shelf position Temperature °C Time in min.
Cake with crumble
topping (dry)
Fruit flans (made
with yeast dough/
sponge mixture)
1)
Fruit flans made
with short pastry
1)
Use deep pan
2 150 - 160 50 - 70
1 - 2 140 - 160 50 - 90
3
2
150 - 160
170-180
1)
1)
25 - 40
10 - 25
2 150 - 170 20 - 25
2 - 3 160 60 - 90
3 150 - 160 20 - 40
3 150 35 - 55
3 160 - 170 40 - 80
Biscuits
Type of baking Shelf position Temperature °C Time in min.
Short pastry biscuits
Short bread / Pastry Stripes
Biscuits made with
sponge mixture
3 150 - 160 10 - 20
3 140 20 - 35
3 150 - 160 15 - 20
Pastries made with
egg white, merin-
3 80 - 100 120 - 150
gues
Macaroons 3 100 - 120 30 - 50
Page 16
www.electrolux.com
16
Biscuits made with
yeast dough
Puff pastries 3
Rolls 3
Small cakes
(20per tray)
1)
Bakes and gratins table
Baguettes topped
with melted
cheese
Stuffed vegetables 1 160 - 170 30- 60
1)
Multileveled Baking
Cakes/pastries/breads on baking trays
Cream puffs/
Eclairs
Dry streusel cake 2/4 150 - 160 30 - 45
1)
Type of baking Shelf position Temperature °C Time in min.
3 150 - 160 20 - 40
Pre-heat the oven
160
150
1)
1)
1)
170 - 180
3
20 - 30
10 - 35
20 - 35
Dish Shelf position Temperature °C Time in min.
1)
1)
15 - 30
25 - 45
Pre-heat the oven
Type of baking
Pre-heat the oven
1
Shelf position
2 levels
2/4
160 - 170
Temperature °C Time in min.
160 - 180
Biscuits/small cakes/pastries/rolls
Type of baking
Short pastry biscuits
Short bread/ Pastry Stripes
Biscuits made with
sponge mixture
Shelf position
2 levels
Temperature °C Time in min.
2/4 150 - 160 20 - 40
2/4 140 25 - 45
2/4 160 - 170 25 - 40
Biscuits made with
egg white, merin-
2/4 80 - 100 130 - 170
gues
Macaroons 2/4 100 - 120 40 - 80
Biscuits made with
yeast dough
2/4 160 - 170 30 - 60
Page 17

ENGLISH 17
Type of baking
Puff pastries 2/4
Rolls 2/4
Small cakes
(20per tray)
1)
Pre-heat the oven
Shelf position
2 levels
2/4
Temperature °C Time in min.
170 - 180
1)
180
1)
150
1)
30 - 50
25- 40
20 - 40
10.5 Conventional Baking on one level
Baking in tins
Type of baking Shelf position Temperature °C Time in min.
Ring cake or brioche
Madeira cake/fruit
cakes
Fatless sponge
cake
Flan base - short
pastry
Flan base sponge mixture
Apple pie (2tins
Ø20cm, diagonally
off set)
Savoury flan (e. g,
quiche lorraine)
Cheesecake 1 - 2 160 - 180 60 - 90
1)
Pre-heat the oven
2 160 - 180 50 - 70
1 - 2 150 - 170 50 - 90
3
2
1)
170
190 - 210
25 - 40
1)
10 - 25
2 170 - 190 20 - 25
1 - 2 180 60 - 90
1 180 - 220 35- 60
Cakes/pastries/breads on baking trays
Type of baking Shelf position Temperature °C Time in min.
Plaited bread/
bread crown
Christmas stollen 2
2 170 - 190 40 - 50
160 - 180
1)
50 - 70
Bread (rye
bread):
1.
First part of
baking process.
2.
Second part
1 - 2
1.
2.
1)
230
160 - 180
1.
2.
1)
20
30 - 60
of baking
process.
Page 18
www.electrolux.com
18
Cream puffs/
eclairs
Swiss roll 3
Cake with crumble
topping (dry)
Buttered almond
cake/sugar cakes
Fruit flans (made
with yeast dough/
sponge mixture)
Fruit flans made
with short pastry
Yeast cakes with
delicate toppings
(e.g.
quark,cream,custard)
Pizza (with a lot of
topping)
Pizza (thin crust) 1 - 2
Unleavened bread 1 230 - 250 10 - 15
Tarts (CH) 1 210 - 230 35 - 50
1)
2)
Type of baking Shelf position Temperature °C Time in min.
3
190 - 210
180 - 200
1)
1)
20 - 35
10 - 20
3 160 - 180 20 - 40
3
190 - 210
1)
20 - 30
3 170 35 - 55
2)
3 170 - 190 40 - 60
1)
1)
1)
40 - 80
30 - 50
15 - 25
2)
Pre-heat the oven
Use deep pan
3
1 - 2
160 - 180
190 - 210
220 - 250
Biscuits
Type of baking Shelf positions Temperature °C Time in min.
Short pastry biscuits
Short bread/ Pastry Stripes
Biscuits made with
sponge dough
3 170 - 190 10 - 20
3
160
1)
20 - 35
3 170 - 190 20 - 30
Pastries made with
egg white, merin-
3 80 - 100 120- 150
gues
Macaroons 3 120 - 130 30 - 60
Biscuits made with
yeast dough
Puff pastries 3
Rolls 3
3 170 - 190 20 - 40
190 - 210
190 - 210
1)
1)
20 - 30
10 - 55
Page 19

ENGLISH 19
Type of baking Shelf positions Temperature °C Time in min.
Small cakes
(20per tray)
1)
Pre-heat the oven
3 - 4
170
1)
20 - 30
Bakes and gratins table
Dish Shelf positions Temperature °C Time in min.
Pasta bake 1 180 - 200 45 - 60
Lasagne 1 180 - 200 35 - 50
Vegetables au gra-
tin
Baguettes topped
with melted
1
1
180 - 200
200 - 220
1)
1)
15 - 30
15 - 30
cheese
Sweet bakes 1 180 - 200 40 - 60
Fish bakes 1 180 - 200 40 - 60
Stuffed vegetables 1 180 - 200 40 - 60
1)
Pre-heat the oven
10.6 Pizza Setting
Type of baking Shelf position Temperature °C Time Min.
Pizza (thin crust)
Pizza (with a lot of
topping)
1)
1)
1 - 2
200 - 230
1 - 2 180 - 200 20 - 35
Tarts 1 - 2 170 - 200 35 - 55
Spinach flan 1 - 2 160 - 180 45 - 60
Quiche Lorraine
(Savoury flan)
1 - 2 170 - 190 45 - 55
Swiss Flan 1 - 2 170 - 200 35 - 55
Cheesecake 1 - 2 140 - 160 60 - 90
Apple cake, cov-
ered
1 - 2 150 - 170 50 - 60
Vegetable pie 1 - 2 160 - 180 50 - 60
Unleavened bread
Puff pastry flan
Flammekuchen
Piroggen (Russian
version of calzone)
1)
Use deep pan
2 - 3
2 - 3
2 - 3
2 - 3
230 - 250
160 - 180
230 - 250
180 - 200
2)
2)
2)
2)
2)
10 - 20
10 - 20
45 - 55
12 - 20
15 - 25
Page 20
www.electrolux.com
20
2)
10.7 Roasting
Roasting dishes
• Use heat-resistant ovenware to roast
• Large roasting joints can be roasted di-
10.8 Roasting with Conventional Cooking
Beef
Type of meat Quantity Shelf posi-
Pot roast 1-1.5 kg 1 200 - 230 105 - 150
Roast beef or
fillet: rare
Roast beef or
fillet: medium
Roast beef or
fillet: well done
1)
Pre-heat the oven
(please read the instructions of the
manufacturer).
rectly in the deep pan (if present) or on
the wire shelf above the deep pan.
per cm. of
thickness
per cm. of
thickness
per cm. of
thickness
Pre-heat the oven
• Roast lean meats in a roasting tin with a
lid. This will keep the meat more succulent.
• All types of meat, that can be browned
or have crackling, can be roasted in the
roasting tin without the lid.
Temperature°CTime in min.
tion
1
230 - 250
1)
6 - 8
1 220 - 230 8 - 10
1 200 - 220 10 - 12
Pork
Type of meat Quantity
Shelf posi-
tion
Temperature
°C
Time in min.
Shoulder,
neck, ham
1-1.5 kg 1 210 - 220 90 - 120
joint
Chop, spare
rib
1-1.5 kg 1 180 - 190 60 - 90
Meat loaf 750 g -1 kg 1 170 - 190 50 - 60
Porkknuckle
(precooked)
750 g -1 kg 1 200 - 220 90 - 120
Veal
Type of meat Quantity
Roast veal
1)
Knuckle of
veal
1)
use a closed roasting dish
1 kg 1 210 - 220 90 - 120
1.5-2 kg 1 200 - 220 150 - 180
Shelf posi-
tion
Temperature
°C
Time in min.
Page 21

ENGLISH 21
Lamb
Type of meat Quantity
Leg of lamb,
roast lamb
Saddle of
lamb
1- 1.5 kg 1 210 - 220 90 - 120
1- 1.5 kg 1 210 - 220 40 - 60
Shelf posi-
tion
Temperature
°C
Time in min.
Game
Type of meat Quantity
Shelf posi-
tion
Temperature
°C
Time in min.
Saddle of
hare, leg of
up to 1 kg 1
220 - 240
1)
30 - 40
hare
Saddle of ven-
ison
Haunch of
venison
1)
Pre-heat the oven
1.5-2 kg 1 210 - 220 35 - 40
1.5-2 kg 1 200 - 210 90 - 120
Poultry
Type of meat Quantity
Poultry portions
200-250g
each
Half chicken 400-500g
each
Chicken, poulard
1-1.5 kg 1 220 - 250 50 - 70
Shelf posi-
tion
1 220 - 250 20 - 40
1 220 - 250 35 - 50
Temperature
°C
Time in min.
Duck 1.5-2 kg 1 210 - 220 80 - 100
Goose 3.5-5 kg 1 200 - 210 150 - 180
Turkey 2.5-3.5 kg 1 200 - 210 120 - 180
Turkey 4-6 kg 1 180 - 200 180 - 240
Fish
Type of meat Quantity
Shelf posi-
tion
Temperature
°C
Time in min.
Whole fish 1-1.5 kg 1 210 - 220 40 - 70
Page 22

www.electrolux.com
22
10.9 Roasting with Turbo Grilling
Beef
Type of meat Quantity
Roast beef or
fillet: rare
Roast beef or
fillet: medium
Roast beef or
fillet: well done
1)
Pork
Type of meat Quantity
Shoulder,
neck, ham
joint
Chop, spare
rib
Meat loaf 750 g -1 kg 1 160 - 170 50 - 60
Porkknuckle
(precooked)
Pre-heat the oven
per cm. of
thickness
per cm. of
thickness
per cm. of
thickness
Shelf posi-
tion
1
1 180 - 190 6 - 8
1 170 - 180 8 - 10
Shelf posi-
tion
Temperature
°C
190 - 200
1)
Temperature
°C
Time min.
5 - 6
Time min.
1-1.5 kg 1 160 - 180 90 - 120
1-1.5 kg 1 170 - 180 60 - 90
750 g -1 kg 1 150 - 170 90 - 120
Veal
Type of meat Quantity Shelf posi-
Temperature°CTime min.
tion
Roast veal 1 kg 1 160 - 180 90 - 120
Knuckle of
1.5-2 kg 1 160 - 180 120 - 150
veal
Lamb
Type of meat Quantity Shelf posi-
Temperature°CTime min.
tion
Leg of lamb,
1-1.5 kg 1 150 - 170 100 - 120
roast lamb
Saddle of
1-1.5 kg 1 160 - 180 40 - 60
lamb
Page 23

ENGLISH 23
Poultry
Type of meat Quantity Shelf posi-
Temperature°CTime min.
tion
Poultry portions
Half chicken 400-500 g
200-250 g
each
1 200 - 220 30 - 50
1 190 - 210 35 - 50
each
Chicken, pou-
1-1.5 kg 1 190 - 210 50 - 70
lard
Duck 1.5-2 kg 1 180 - 200 80 - 100
Goose 3.5-5 kg 1 160 - 180 120 - 180
Turkey 2.5-3.5 kg 1 160 - 180 120 - 150
Turkey 4-6 kg 1 140 - 160 150 - 240
10.10 Grilling
Always use the grilling function with
maximum temperature setting
Always grill with the oven door
closed
Always pre-heat the empty oven
with the grill functions for 5 minutes.
• Always set the pan to collect the fat into
the first shelf level.
• Grill only flat pieces of meat or fish.
The grilling area is set in centre of the
shelf
• Set the shelf in the shelf level as recommended in the grilling table.
Grilling
Food types
for grilling
Shelf posi-
tion
Burgers 4
Temperature °C
1)
max
Grilling time in min.
1st side 2nd side
9 - 15 8 - 13
Pork fillet 4 max 10 - 12 6 - 10
Sausages 4 max 10 - 12 6 - 8
Fillet steaks,
veal steaks
Toast 4 - 5
Toast with
topping
1)
Pre-heat the oven
10.11 Defrosting
Remove the food packaging. Put the food
on a plate.
4 max 7 - 10 6 - 8
max
1)
1 - 4 1 - 4
4 max 6 - 8 -
Do not cover it with a bowl or a plate. This
can extend the defrost time.
Use the first oven shelf position. The one
on the bottom.
Page 24

www.electrolux.com
24
Dish
Defrosting
time in min.
Further defrost-
ing time in min.
Chicken, 1000 g 100 - 140 20 - 30
Meat, 1000 g 100 - 140 20 - 30 Turn halfway through
Meat, 500 g 90 - 120 20 - 30 Turn halfway through
Trout, 150 g 25 - 35 10 - 15 Strawberries, 300
g
30 - 40 10 - 20 -
Butter, 250 g 30 - 40 10 - 15 -
Cream, 2 x 200 g 80 - 100 10 - 15
Gateau, 1400 g 60 60 -
11. OVEN - CARE AND CLEANING
WARNING!
Refer to the Safety chapters.
• Clean the front of the appliance with a
soft cloth with warm water and cleaning
agent.
• To clean metal surfaces, use a usual
cleaning agent
• Clean the oven interior after each use.
Then you can remove dirt more easily
and it does not burn on.
• Clean stubborn dirt with a special oven
cleaner.
• Clean all oven accessories after each
use and let them dry. Use a soft cloth
with warm water and a cleaning agent.
• If you have nonstick accessories, do
not clean them using aggressive
Comment
Place the chicken on an
upturned saucer placed
on a large plate Turn
halfway through
Cream can also be
whipped when still
slightly frozen in places
agents, sharp-edged objects or a dishwasher. It can destroy the nonstick
coating.
Stainless steel or aluminium
appliances
Clean the oven door with a wet
sponge only. Dry it with a soft
cloth.
Do not use steel wool, acids or
abrasive materials as they can
damage the oven surface. Clean
the oven control panel with the
same precautions.
11.1 Shelf supports
You can remove the shelf supports to
clean the side walls.
Page 25

Removing the shelf supports
ENGLISH 25
1.
Pull the front of the shelf support
away from the side wall.
2.
Pull the rear end of the shelf support
away from the side wall and remove
it.
1
2
Installing the shelf supports
Install the shelf supports in the opposite
sequence.
Valid with telescopic runners:
The retaining pins on the telescopic shelf runners must point to
the front!
CAUTION!
Make sure that the longer fixing
wire is in the front. The ends of
the two wires must point to the
rear. Incorrect installation can
cause damage to the enamel.
11.2 Cleaning the oven door
To make the cleaning easier, remove the
door.
WARNING!
Make sure that the glass panels
are cool before you clean the
glass door. There is a risk that the
glass could break.
WARNING!
When the door glass panels are
damaged or have scratches, the
glass becomes weak and can
break. To prevent this, you must
replace them. For more instructions, contact your local Service
Centre.
Page 26

www.electrolux.com
26
Removing the door:
1.
Open the door fully.
2.
Move the slider until you hear a click.
3.
1
2
Close the door until the slider locks.
4.
Remove the door.
To remove the door, pull the door
outwards first from one side, and
then the other.
When the cleaning procedure is completed, insert the oven door in the opposite
sequence. Make sure that you hear a click
when you insert the door. Use force if
necessary.
11.3 Oven glass panels
Removing and cleaning the door glasses
1.
Hold the door trim (B) on the top
edge of the door at the two sides and
push inwards to release the clip seal.
B
2.
Pull the door trim to the front to remove it.
3.
Hold the door glass panels on their
top edge one by one and pull them
upwards from the guide.
4.
Clean the door glass panels.
The door glass on your product
can be different in type and shape
from the examples you see in the
diagrams. The number of glasses
can also be different.
To install panels, do the above steps in
the opposite sequence.
CAUTION!
The removable glass panels have
a marking on one side. Make sure
that the marking is in the top left
corner.
11.4 Oven lamp
WARNING!
Be careful when you change the
oven lamp. There is a risk of electrical shock.
Page 27

Before you change the oven lamp:
• Deactivate the oven.
• Remove the fuses in the fuse box or
deactivate the circuit breaker.
Put a cloth on the bottom of the
oven to prevent damage to the
oven light and glass cover.
Replacing the oven lamp
1.
You can find the lamp glass cover at
the back of the cavity.
Turn the lamp glass cover counterclockwise to remove it.
2.
Clean the glass cover.
3.
Replace the oven lamp with an applicable 300 °C heat-resistant oven
lamp.
Use the same oven lamp type.
4.
Install the glass cover.
11.5 Removing the drawer
The drawer below the oven can be removed for cleaning.
1.
Pull the drawer out until it stops.
ENGLISH 27
2.
Lift the drawer at a small angle and
remove it from the drawer support
rails.
Inserting the drawer
1.
Set the drawer on the support rails.
Make sure that the catches engage
correctly into the rails.
2.
Lower the drawer until it is horizontal
and push it in.
WARNING!
When the oven is in use, heat can
build up in the drawer. Do not
keep flammable things in there
(e.g. cleaning materials, plastic
bags, oven gloves, paper, cleaning sprays, etc.).
1
12. WHAT TO DO IF…
WARNING!
Refer to the Safety chapters.
Problem Possible cause Remedy
The hob does not operate
The oven does not heatupThe oven is not switchedonSwitch on the oven
2
The heat setting is not set Set the heat setting
Page 28

www.electrolux.com
28
The oven does not heatupThe clock is not set Set the clock
Problem Possible cause Remedy
The oven does not heatupThe necessary settings
Control the settings
are not set
The oven does not heatupThe fuse in the fuse box
is released
Control the fuse. If the
fuse is released more
than one time, refer to a
qualified electrician.
The oven lamp does not
operate
Steam and condensation
settle on the food and in
the oven cavity
The oven lamp is defective
You left the dish in the
oven for too long
Replace the oven lamp
Do not leave the dishes in
the oven for longer than
15-20 minutes after the
cooking process ends
The display shows
A power cut Reset the clock
“12.00”
The residual heat indica-
tor does not come on
If you cannot find a solution to the problem yourself, contact your dealer or the
service centre.
We recommend that you write the data here:
Model (MOD.) .........................................
Product number (PNC) .........................................
Serial number (S.N.) .........................................
The cooking zone is not
hot because it operated
only for a short time.
The necessary data for the service centre
is on the rating plate. The rating plate is
on the front frame of the oven cavity.
If the cooking zone must
be hot, speak to the
Service Centre.
13. INSTALLATION
WARNING!
Refer to the Safety chapters.
Dimensions
Height 847 - 867 mm
Width 596 mm
Depth 600 mm
Oven capacity 74 l
13.1 Location of the appliance
You can install your freestanding appliance with cabinets on one or two sides
and in the corner.
B
A
A
Page 29

Minimum distances
Dimen-
mm
sion
A 2
B 685
13.2 Levelling
Use small feet on the bottom of appliance
to set the appliance top surface level with
other surfaces.
13.3 Anti-tilt protection
CAUTION!
You must install the anti-tilt protection. If you do not install it, the
appliance can tilt.
Your appliance has the symbol
shown on the picture (if applicable) to remind you about the installation of the anti-tilt protection.
ENGLISH 29
Make sure you install the anti-tilt
protection at the correct height.
1.
Set the correct height and area for
the appliance before you attach the
anti-tilt protection.
2.
Install the anti-tilt protection 77 mm
down from the top surface of the appliance and 49 mm from the left side
of the appliance into the circular hole
on the bracket (see fig.). Screw it into
the solid material or use applicable reinforcement (wall).
3.
You can find the hole on the left side
at the back of the appliance (see fig.).
Lift the front of the appliance (1) and
put it in the middle of the space between the cupboards (2). If the space
between the bench cupboards is
larger than the width of the appliance,
you must adjust the side measurement to centre the appliance.
Make sure that the surface behind the
appliance is smooth.
49 mm
77 mm
2
1
13.4 Electrical installation
The manufacturer is not responsible if you do not follow the safety
precautions from the chapter
"Safety information".
This appliance is supplied without a main
plug or a main cable.
Applicable cable types: H07 RN-F, H05
RN-F, H05 RRF, H05 VV-F, H05 V2V2-F
(T90), H05 BB-F.
Page 30

www.electrolux.com
30
14. ENVIRONMENT CONCERNS
Recycle the materials with the symbol
. Put the packaging in applicable
containers to recycle it.
Help protect the environment and human
health and to recycle waste of electrical
and electronic appliances. Do not dispose
appliances marked with the symbol
with the household waste. Return the
product to your local recycling facility or
contact your municipal office.
Page 31

DEUTSCH 31
INHALT
1. SICHERHEITSINFORMATIONEN . . . . . . . . . . . . . . . . . . . . . . . . . . . . . . . . . . . . . . . . . . . 32
2. SICHERHEITSHINWEISE . . . . . . . . . . . . . . . . . . . . . . . . . . . . . . . . . . . . . . . . . . . . . . . . . 33
3. GERÄTEBESCHREIBUNG . . . . . . . . . . . . . . . . . . . . . . . . . . . . . . . . . . . . . . . . . . . . . . . . 37
4. VOR DER ERSTEN INBETRIEBNAHME . . . . . . . . . . . . . . . . . . . . . . . . . . . . . . . . . . . . . . 37
5. KOCHFELD - TÄGLICHER GEBRAUCH . . . . . . . . . . . . . . . . . . . . . . . . . . . . . . . . . . . . . . 38
6. KOCHFELD - PRAKTISCHE TIPPS UND HINWEISE . . . . . . . . . . . . . . . . . . . . . . . . . . . . . 39
7. KOCHFELD - REINIGUNG UND PFLEGE . . . . . . . . . . . . . . . . . . . . . . . . . . . . . . . . . . . . . 40
8.
BACKOFEN - TÄGLICHER GEBRAUCH . . . . . . . . . . . . . . . . . . . . . . . . . . . . . . . . . . . . . . 40
9. BACKOFEN - UHRFUNKTIONEN . . . . . . . . . . . . . . . . . . . . . . . . . . . . . . . . . . . . . . . . . . . 42
10.
BACKOFEN - PRAKTISCHE TIPPS UND HINWEISE . . . . . . . . . . . . . . . . . . . . . . . . . . . . . 43
11. BACKOFEN - REINIGUNG UND PFLEGE . . . . . . . . . . . . . . . . . . . . . . . . . . . . . . . . . . . . . 54
12.
WAS TUN, WENN … . . . . . . . . . . . . . . . . . . . . . . . . . . . . . . . . . . . . . . . . . . . . . . . . . . . . 57
13. MONTAGE . . . . . . . . . . . . . . . . . . . . . . . . . . . . . . . . . . . . . . . . . . . . . . . . . . . . . . . . . . . . 58
WIR DENKEN AN SIE
Vielen Dank, dass Sie sich für ein Electrolux Gerät entschieden haben. Sie haben ein Produkt
gewählt, hinter dem eine jahrzehntelange professionelle Erfahrung und Innovation steht. Bei der
Entwicklung dieses großartigen und eleganten Geräts haben wir an Sie gedacht. So haben Sie
bei jedem Gebrauch die Gewissheit, dass Sie stets großartige Ergebnisse erzielen werden.
Willkommen bei Electrolux.
Besuchen Sie uns auf unserer Website, um:
Anwendungshinweise, Prospekte, Fehlerbehebungs- und Service-Informationen zu
erhalten:
www.electrolux.com
Ihr erworbenes Produkt zu registrieren, um den besten Service dafür zu gewährleisten:
www.electrolux.com/productregistration
Zubehör, Verbrauchsmaterial und Original-Ersatzteile für Ihr Gerät zu erwerben:
www.electrolux.com/shop
KUNDENDIENST UND -BETREUUNG
Bitte verwenden Sie ausschließlich Original-Ersatzteile für Ihre Produkte.
Halten Sie folgende Angaben bereit, wenn Sie sich an den Kundendienst wenden
(diese Informationen finden Sie auf dem Typenschild): Modell, Produktnummer (PNC),
Seriennummer.
Warnungs-/ Sicherheitshinweise.
Allgemeine Hinweise und Ratschläge
Hinweise zum Umweltschutz
Änderungen vorbehalten.
Page 32

www.electrolux.com
32
1. SICHERHEITSINFORMATIONEN
Lesen Sie vor der Montage und Verwendung des Geräts
sorgfältig die mitgelieferte Anleitung. Der Hersteller haftet
nicht für Verletzungen oder Schäden, die durch eine fehlerhafte Montage entstehen. Bewahren Sie die Anleitung
zum Nachschlagen auf.
1.1 Sicherheit von Kindern und schutzbedürftigen
Personen
WARNUNG!
Es besteht Erstickungsgefahr, das Risiko von Verletzungen oder permanenten Behinderungen.
• Dieses Gerät kann dann von Kindern ab 8 Jahren, von
Personen mit eingeschränkten körperlichen, sensorischen oder geistigen Fähigkeiten sowie von Personen
ohne bisherige Erfahrung im Umgang mit solchen Geräten bedient werden, wenn sie dabei von einer Person, die für ihre Sicherheit verantwortlich ist, beaufsichtigt werden.
• Kinder dürfen nicht mit dem Gerät spielen.
• Halten Sie das Verpackungsmaterial von Kindern fern.
• Halten Sie Kinder und Haustiere vom Gerät fern, wenn
es in Betrieb oder in der Abkühlphase ist. Berührbare
Teile sind heiss.
• Falls Ihr Gerät mit einer Kindersicherung ausgestattet
ist, empfehlen wir, diese einzuschalten.
• Reinigung und Wartung des Geräts darf nicht von Kin-
dern ohne Aufsicht erfolgen.
1.2 Allgemeine Sicherheit
• Das Gerät und die zugänglichen Geräteteile werden
während des Betriebs heiß. Berühren Sie nicht die
Heizelemente.
• Schalten Sie das Gerät nicht über eine externe Zeit-
schaltuhr oder eine separate Fernsteuerung ein.
Page 33

DEUTSCH 33
• Kochen mit Fett oder Öl auf einem unbeaufsichtigten
Kochfeld ist gefährlich und kann zu einem Brand führen.
• Versuchen Sie nicht einen Brand mit Wasser zu lö-
schen, sondern schalten Sie das Gerät aus und bedecken Sie die Flamme mit einem Deckel oder einer Feuerlöschdecke.
• Legen Sie keine Gegenstände auf dem Kochfeld ab.
• Benutzen Sie zum Reinigen des Gerätes keinen
Dampfreiniger.
• Legen Sie keine Metallgegenstände wie Messer, Ga-
beln, Löffel oder Topfdeckel auf die Oberfläche des
Kochfelds, da diese heiß werden können.
• Benutzen Sie keine Scheuermittel oder Metall-
schwämmchen zum Reinigen der Ofenglastür; sie können die Glasfläche verkratzen und zum Zersplittern der
Scheibe führen.
• Seien Sie beim Anfassen der Aufbewahrungsschublade
vorsichtig. Sie kann heiß werden.
• Ziehen Sie die Einhängegitter erst vorne und dann hin-
ten von der Seitenwand weg und nehmen Sie sie heraus. Führen Sie zum Einsetzen der Einhängegitter die
obigen Schritte in umgekehrter Reihenfolge durch.
• Schalten Sie das Gerät sofort ab, wenn Sie Risse auf
der Glaskeramikfläche feststellen. Stromschlaggefahr!
2.
SICHERHEITSHINWEISE
2.1 Montage
WARNUNG!
Nur eine qualifizierte Fachkraft darf
den elektrischen Anschluss des
Geräts vornehmen.
• Entfernen Sie das gesamte Verpackungsmaterial.
• Stellen Sie ein beschädigtes Gerät nicht
auf und benutzen Sie es nicht.
• Halten Sie sich an die mitgelieferte
Montageanleitung.
• Seien Sie beim Umsetzen des Geräts
vorsichtig, denn es ist schwer. Tragen
Sie stets Sicherheitshandschuhe.
• Ziehen Sie das Gerät nicht am Türgriff.
Page 34

www.electrolux.com
34
• Die Mindestabstände zu anderen Gerä-
• Stellen Sie sicher, dass das Gerät un-
• Die Seiten des Geräts dürfen nur an
• Stellen Sie das Gerät nicht auf einem
• Installieren Sie das Gerät nicht direkt
Elektrischer Anschluss
• Alle elektrischen Anschlüsse sind von
• Das Gerät muss geerdet werden.
• Stellen Sie sicher, dass die elektrischen
• Das Gerät darf ausschließlich an eine
• Verwenden Sie keine Mehrfachsteckdo-
• Achten Sie darauf, Netzstecker und
• Achten Sie darauf, dass das Netzkabel
• Alle Teile, die gegen direktes Berühren
ten und Küchenmöbeln sind einzuhalten.
terhalb von bzw. zwischen sicheren
Konstruktionen montiert wird.
Geräte oder Einheiten in gleicher Höhe
angrenzen.
Sockel auf.
neben einer Tür oder unter einem Fenster. So kann heißes Kochgeschirr nicht
herunterfallen, wenn die Tür oder das
Fenster geöffnet wird.
WARNUNG!
Bringen Sie einen Kippschutz an,
um ein Umkippen des Geräts zu
verhindern. Siehe hierzu Kapitel
„Montage“.
WARNUNG!
Brand- und Stromschlaggefahr.
einem geprüften Elektriker vorzunehmen.
Daten auf dem Typenschild den Daten
Ihrer Stromversorgung entsprechen.
Wenden Sie sich andernfalls an eine
Elektrofachkraft.
ordnungsgemäß installierte Schutzkontaktsteckdose angeschlossen werden.
sen oder Verlängerungskabel.
Netzkabel nicht zu beschädigen. Wenden Sie sich zum Austausch des beschädigten Netzkabels an den Kundendienst oder einen Elektriker.
die Gerätetür nicht berührt, insbesondere wenn die Tür heiß ist.
schützen sowie die isolierten Teile müssen so befestigt werden, dass sie nicht
ohne Werkzeug entfernt werden können.
• Stecken Sie den Netzstecker erst nach
Abschluss der Montage in die Steckdose. Stellen Sie sicher, dass der Netzstecker nach der Montage noch zugänglich ist.
• Falls die Steckdose lose ist, schließen
Sie den Netzstecker nicht an.
• Ziehen Sie nicht am Netzkabel, um das
Gerät von der Spannungsversorgung
zu trennen. Ziehen Sie dazu immer direkt am Netzstecker.
• Verwenden Sie immer die richtigen
Trenneinrichtungen: Überlastschalter,
Sicherungen (Schraubsicherungen
müssen aus dem Halter entfernt werden können), Fehlerstromschutzschalter und Schütze.
• Die elektrische Installation muss eine
Trenneinrichtung aufweisen, mit der Sie
das Gerät allpolig von der Stromversorgung trennen können. Die Trenneinrichtung muss mit einer Kontaktöffnungsbreite von mindestens 3 mm ausgeführt
sein.
2.2 Gebrauch
WARNUNG!
Es besteht Verletzungs-, Verbrennungs- und Stromschlaggefahr.
• Das Gerät ist für die Verwendung im
Haushalt vorgesehen.
• Nehmen Sie keine technischen Änderungen am Gerät vor.
• Die Lüftungsöffnungen dürfen nicht abgedeckt werden.
• Lassen Sie das Gerät bei Betrieb nicht
unbeaufsichtigt.
• Das Gerät nach jedem Gebrauch ausschalten.
• Der Geräteinnenraum wird während
des Betriebs heiß. Berühren Sie nicht
die Heizelemente im Geräteinnern. Verwenden Sie zum Anfassen des Zubehörs und der Töpfe wärmeisolierende
Handschuhe.
• Gehen Sie beim Öffnen der Tür vorsichtig vor, wenn das Gerät in Betrieb ist.
Es kann heiße Luft austreten.
• Bedienen Sie das Gerät nicht mit feuchten oder nassen Händen oder wenn es
mit Wasser in Kontakt gekommen ist.
• Üben Sie keinen Druck auf die geöffnete Gerätetür aus.
Page 35

• Schalten Sie das Gerät nicht über eine
externe Zeitschaltuhr oder eine separate Fernsteuerung ein.
• Halten Sie die Tür immer geschlossen,
wenn das Gerät in Betrieb ist.
• Legen Sie kein Besteck und keine Topfdeckel auf die Kochzonen. Sie werden
heiß.
• Schalten Sie die Kochzonen nach jedem Gebrauch aus.
• Benutzen Sie das Gerät nicht als Arbeits- oder Abstellfläche.
• Hat die Geräteoberfläche einen Sprung,
trennen Sie das Gerät umgehend von
der Spannungsversorgung. Dies dient
zur Vermeidung eines Stromschlags.
WARNUNG!
Es besteht Explosions- und
Brandgefahr.
• Erhitzte Öle und Fette können brennbare Dämpfe freisetzen. Halten Sie Flammen und erhitzte Gegenstände beim
Kochen mit Fetten und Ölen von diesen
fern.
• Die von sehr heißem Öl freigesetzten
Dämpfe können eine Selbstzündung
verursachen.
• Bereits verwendetes Öl kann Lebensmittelreste enthalten und schon bei
niedrigeren Temperaturen eher einen
Brand verursachen als frisches Öl.
• Platzieren Sie keine entflammbaren
Produkte oder Gegenstände, die mit
entflammbaren Produkten benetzt sind,
im Gerät, auf dem Gerät oder in der
Nähe des Geräts.
• Achten Sie beim Öffnen der Tür darauf,
dass keine Funken oder offenen Flammen in das Geräts gelangen.
• Öffnen Sie die Gerätetür vorsichtig. Bei
der Verwendung von Zutaten, die Alkohol enthalten, kann ein Alkohol-Luftgemisch entstehen.
• Löschen Sie eine Flamme nicht mit
Wasser. Schalten Sie das Gerät aus
und bedecken Sie die Flamme mit einem Deckel oder einer Feuerlöschdecke.
WARNUNG!
Das Gerät könnte beschädigt werden.
DEUTSCH 35
• Um Beschädigungen oder Verfärbungen der Emailbeschichtung zu vermeiden:
– Stellen Sie Kochgeschirr oder andere
Gegenstände nicht direkt auf den
Boden des Geräts.
– Legen Sie keine Alufolie direkt auf
den Boden des Geräts.
– Stellen Sie kein Wasser in das heiße
Gerät.
– Lassen Sie nach dem Ausschalten
des Geräts kein feuchtes Geschirr
oder feuchte Speisen im Backofeninnenraum stehen.
– Gehen Sie beim Herausnehmen oder
Einsetzen der Innenausstattung sorgfältig vor.
• Verfärbungen der Emailbeschichtung
haben keine Auswirkung auf die Leistung des Geräts. Sie stellen keinen
Mangel im Sinne des Gewährleistungsrechtes dar.
• Verwenden Sie für feuchte Kuchen die
Brat- und Fettpfanne. Fruchtsäfte können bleibende Flecken verursachen.
• Stellen Sie kein heißes Kochgeschirr auf
das Bedienfeld.
• Lassen Sie das Kochgeschirr nicht leerkochen.
• Lassen Sie keine Gegenstände oder
Kochgeschirr auf das Gerät fallen. Die
Oberfläche könnte beschädigt werden.
• Schalten Sie die Kochzonen niemals
ein, wenn sich kein Kochgeschirr darauf
befindet, oder wenn das Kochgeschirr
leer ist.
• Legen Sie keine Alufolie auf das Gerät.
• Kochgeschirr aus Gusseisen oder Aluminiumguss oder mit beschädigten Böden kann die Glaskeramikoberfläche
verkratzen. Heben Sie das Kochgeschirr stets an, wenn Sie es auf dem
Kochfeld umsetzen möchten.
2.3 Reinigung und Pflege
WARNUNG!
Risiko von Verletzungen, Brand
oder Beschädigungen am Gerät.
• Schalten Sie vor Reinigungsarbeiten immer das Gerät aus und ziehen Sie den
Netzstecker aus der Steckdose.
Page 36

www.electrolux.com
36
• Vergewissern Sie sich, dass das Gerät
• Ersetzen Sie die Glasscheiben der Tür
• Gehen Sie beim Aushängen der Tür
• Reinigen Sie das Gerät regelmäßig, um
• Fett- oder Speisereste im Gerät können
• Reinigen Sie das Geräts mit einem wei-
• Falls Sie ein Backofenspray verwenden,
• Reinigen Sie die katalytische Emailbe-
abgekühlt ist. Zusätzlich besteht die
Gefahr, dass die Glasscheiben brechen.
umgehend, wenn sie beschädigt sind.
Wenden Sie sich hierzu an den Kundendienst.
sorgsam vor. Die Tür ist schwer!
eine Abnutzung des Oberflächenmaterials zu verhindern.
einen Brand verursachen.
chen, feuchten Tuch. Verwenden Sie
nur neutrale Reinigungsmittel. Benutzen
Sie keine Scheuermittel, scheuernde
Reinigungsschwämmchen, Lösungsmittel oder Metallgegenstände.
befolgen Sie bitte unbedingt die Anweisungen auf der Verpackung.
schichtung (falls vorhanden) nicht mit
Reinigungsmitteln.
nutzen Sie sie nicht für die Raumbeleuchtung.
WARNUNG!
Stromschlaggefahr.
• Trennen Sie das Gerät von der Stromversorgung, bevor Sie die Lampe austauschen.
• Verwenden Sie dazu eine Lampe mit
der gleichen Leistung.
2.5 Entsorgung
WARNUNG!
Verletzungs- und Erstickungsgefahr.
• Trennen Sie das Gerät von der Stromversorgung.
• Schneiden Sie das Netzkabel ab und
entsorgen Sie es.
• Entfernen Sie das Türschloss, um zu
verhindern, dass sich Kinder oder
Haustiere in dem Gerät einschließen.
2.4 Innenbeleuchtung
• Die Leuchtmittel in diesem Gerät sind
nur für Haushaltsgeräte geeignet. Be-
Page 37

3. GERÄTEBESCHREIBUNG
3.1 Allgemeine Übersicht
1 3 4
2
5
4
3
9
2
1
3.2 Kochfeldanordnung
DEUTSCH 37
Backofen-Einstellknopf
1
Elektronischer Programmspeicher
2
Temperaturwahlknopf
3
5
6
7
8
Temperatur-Kontrolllampe
4
Kochfeld-Einstellknöpfe
5
Heizelement
6
Backofenlampe
7
Ventilator und Heizelement
8
Einschubebenen
9
1 3
145 mm
210 mm
3.3 Zubehör
Rost
•
Für Kochgeschirr, Kuchenformen, Bra-
ten.
Backblech
•
2
5
180 mm
145 mm
46
Kochzone 1200 W
1
Dampfauslass
2
Kochzone 1800 W
3
Kochzone 1200 W
4
Restwärmeanzeige
5
Kochzone 2300 W
6
• Fettpfanne
Zum Backen und Braten oder zum Auffangen von austretendem Fett.
• Schublade
Die Schublade befindet sich unterhalb
des Garraums.
Für Kuchen und Plätzchen.
4. VOR DER ERSTEN INBETRIEBNAHME
WARNUNG!
Siehe Sicherheitshinweise.
Page 38

www.electrolux.com
38
4.1 Erste Reinigung
• Entfernen Sie alle Zubehörteile und die
• Reinigen Sie das Gerät vor der ersten
herausnehmbaren Auszüge (falls vorhanden).
Inbetriebnahme.
Siehe Kapitel „Reinigung und Pflege“.
Nach etwa 5 Sekunden hört die Anzeige
auf zu blinken und die eingestellte Uhrzeit
wird im Display angezeigt.
Um die Uhrzeit zu ändern, drücken Sie mehrmals die Taste
bis die Uhranzeige im Display
blinkt. Die Funktionen „Dauer“ (
) und „Ende“ ( ) können nicht
gleichzeitig eingestellt werden.
,
4.2 Einstellen der Uhrzeit
Die Uhrzeit muss vor der Inbetriebnahme des Backofens eingestellt werden.
Nach dem elektrischen Anschluss des
Geräts oder nach einem Stromausfall
blinkt die Uhranzeige.
Stellen Sie die Uhrzeit mit der Taste +
oder - ein.
4.3 Vorheizen
Heizen Sie das leere Gerät vor, um Fettreste zu verbrennen.
1.
Stellen Sie die Funktion und die
Höchsttemperatur ein.
2.
Lassen Sie das Gerät eine Stunde
lang eingeschaltet.
3.
Stellen Sie die Funktion und die
Höchsttemperatur ein.
4.
Lassen Sie das Gerät zehn Minuten
lang eingeschaltet.
5.
Stellen Sie die Funktion und die
Höchsttemperatur ein.
6.
Lassen Sie das Gerät zehn Minuten
lang eingeschaltet.
Das Zubehör kann heißer als sonst werden. Das Gerät kann Geruch und Rauch
verströmen. Das ist normal. Sorgen Sie
für eine ausreichende Belüftung.
5. KOCHFELD - TÄGLICHER GEBRAUCH
WARNUNG!
Siehe Sicherheitshinweise.
5.1 Kochstufe
Knopf Funktion
Warmhalten
0 Position Aus
1-9 Kochstufen
(1 - niedrigste Kochstufe, 9
- höchste Kochstufe)
1.
Drehen Sie den Knopf auf die gewünschte Kochstufe.
2.
Um den Garvorgang zu beenden,
drehen Sie den Knopf auf die Position
0.
Nutzen Sie die Restwärme, um
den Energieverbrauch zu senken.
Schalten Sie die Kochzone ca.
5-10 Minuten vor Ende des Garvorgangs aus.
5.2 Restwärmeanzeige
Die Restwärmeanzeige leuchtet auf, wenn
eine Kochzone heiß ist.
WARNUNG!
Es besteht Verbrennungsgefahr
durch Restwärme.
Page 39

DEUTSCH 39
6. KOCHFELD - PRAKTISCHE TIPPS UND HINWEISE
WARNUNG!
Siehe Sicherheitshinweise.
6.1 Kochgeschirr
• Der Boden des Kochgeschirrs
sollte so dick und flach wie
möglich sein.
• Kochgeschirr aus Stahlemaille
oder mit Aluminium- oder Kupferböden kann Verfärbungen
der Glaskeramikoberfläche verursachen.
6.2 Energiesparen
• Decken Sie Kochgeschirr, wenn
möglich, mit einem Deckel ab.
Koch
Verwendung: Zeit Tipps
• Stellen Sie das Kochgeschirr
auf die Kochzone und schalten
Sie diese erst dann ein.
• Schalten Sie die Kochzonen bereits vor dem Ende des Garvorgangs aus und nutzen Sie die
Restwärme.
• Der Boden des Kochgeschirrs
und die verwendete Kochzone
sollten gleich groß sein.
6.3 Anwendungsbeispiele zum
Kochen
Bei den Angaben in der folgenden Tabelle
handelt es sich um Richtwerte.
stufe
Zum Warmhalten von Speisen nach
1
Benutzen Sie einen Deckel
Bedarf
1-2 Sauce Hollandaise, schmelzen
von Butter, Schokolade, Gelatine
1-2 Stocken: Lockeres Omelett, ge-
backene Eier
2-3 Köcheln von Reis und Milchge-
richten, Erhitzen von Fertiggerichten
5 - 25
Min.
10 - 40
Min.
25 50 Min
.
Ab und zu umrühren
Mit Deckel garen
Mindestens doppelte Menge
Flüssigkeit zum Reis geben,
Milchgerichte zwischendurch
umrühren
3-4 Dünsten von Gemüse, Fisch,
Fleisch
20 45 Min
Einige Esslöffel Flüssigkeit
hinzugeben
.
4-5 Dampfgaren von Kartoffeln 20 - 60
Min.
4-5 Kochen größerer Speisemengen,
Eintopfgerichte und Suppen
60 150 Mi
Max. ¼ l Wasser für 750 g
Kartoffeln verwenden
Bis zu 3 l Flüssigkeit plus Zutaten
n.
6-7 Bei schwacher Hitze braten:
Schnitzel, Cordon bleu, Kote-
nach
Bedarf
Nach der Hälfte der Zeit wen-
den
letts, Frikadellen, Bratwürste, Leber, Mehlschwitze, Eier, Pfannkuchen, Donuts
7-8 Bei starker Hitze anbraten: Rösti,
Lendenstücke, Steaks
5-15
min
Nach der Hälfte der Zeit wen-
den
9 Aufkochen großer Mengen Wasser, Nudeln kochen, Anbraten von Fleisch
(Gulasch, Schmorbraten), Frittieren von Pommes frites
Page 40

www.electrolux.com
40
7. KOCHFELD - REINIGUNG UND PFLEGE
WARNUNG!
Siehe Sicherheitshinweise.
Reinigen Sie das Gerät nach jedem Gebrauch.
Achten Sie immer darauf, dass der Boden
des Kochgeschirrs sauber ist.
Kratzer oder dunkle Flecken in der
Glaskeramik beeinträchtigen die
Funktionsfähigkeit des Geräts
nicht.
So entfernen Sie Verschmutzungen:
1.
– Sofort entfernen: geschmolzener
Kunststoff, Frischhaltefolie und zuckerhaltige Lebensmittel. Andernfalls können die Verschmutzungen
das Gerät beschädigen. Verwenden Sie einen speziellen Reinigungsschaber für Glas. Den Reinigungsschaber schräg zur Glasfläche ansetzen und über die Oberfläche bewegen.
– Entfernen, wenn das Gerät ab-
gekühlt ist: Kalk- und Wasserränder, Fettflecken und glänzende Metallverfärbungen. Verwenden Sie
hierfür einen speziellen Reiniger für
Glaskeramik oder Edelstahl.
2.
Reinigen Sie das Gerät mit einem
feuchten Tuch und etwas Spülmittel.
3.
Reiben Sie das Gerät abschließend
mit einem sauberen Tuch trocken.
8. BACKOFEN - TÄGLICHER GEBRAUCH
WARNUNG!
Siehe Sicherheitshinweise.
8.1 Kühlgebläse
Wenn das Gerät in Betrieb ist, wird automatisch das Kühlgebläse eingeschaltet,
um die Geräteflächen zu kühlen. Nach
dem Abschalten des Geräts läuft das
Kühlgebläse weiter, bis das Gerät abgekühlt ist.
2.
Drehen Sie den Temperaturwahlknopf
auf eine Temperatur.
Die Temperatur-Kontrolllampe leuchtet, solange die Temperatur im Gerät
ansteigt.
3.
Drehen Sie zum Ausschalten des Geräts den Backofen-Einstellknopf und
den Temperaturwahlknopf in die Position Aus.
8.2 Ein- und Ausschalten des
Geräts
1.
Drehen Sie den Backofen-Einstellknopf auf die gewünschte Backofenfunktion.
8.3 Ofenfunktionen
Ofenfunktion Anwendung
Stellung „Aus“ Das Gerät ist ausgeschaltet.
Zum Braten und/oder Backen von Speisen bei gleicher
Heißluft mit
Ringheizkörper
Gartemperatur auf mehreren Ebenen gleichzeitig, ohne
dass es zu einer Aromaübertragung kommt. Stellen Sie
eine 20-40 °C niedrigere Backofentemperatur als bei
Ober-/Unterhitze ein.
Page 41

Ofenfunktion Anwendung
Ober-/Unter-
hitze
Zum Backen und Braten auf einer Ebene. Die Heizelemente für Ober- und Unterhitze sind gleichzeitig eingeschaltet.
Für Pizza, Quiche oder Pasteten. Stellen Sie eine 20-40
Pizzastufe
°C niedrigere Backofentemperatur als bei Ober-/Unterhitze ein.
Zum Garen größerer Fleischstücke. Das Grillelement und
Heißluftgrillen
der Ventilator schalten sich abwechselnd ein und aus,
sodass die Heißluft um die Speisen zirkulieren kann.
Grillstufe 2
Bio-Garen
Zum Grillen flacher Lebensmittel in größeren Mengen.
Zum Toasten. Das gesamte Grillelement ist eingeschaltet.
Zum Backen in Formen und zum Dörren auf einer Einschubebene bei niedrigen Temperaturen.
Auftauen Zum Auftauen gefrorener Lebensmittel.
DEUTSCH 41
Backofenbe-
leuchtung
Zum Einschalten der Backofenlampe, wenn keine Garfunktion eingeschaltet ist.
8.4 Einsetzen des Backofenzubehörs
Brat- und Fettpfanne und Rost zusammen einsetzen
Legen Sie den Rost auf die Brat- und
Fettpfanne. Schieben Sie die Brat- und
Fettpfanne zwischen die Führungsstäbe
einer der Einschubebenen.
Die Brat- und Fettpfanne und der
Rost haben Seitenränder. Durch
die Seitenränder und die Form der
Führungsstäbe wird das Kippen
der Einschubteile verhindert.
Page 42

www.electrolux.com
42
9. BACKOFEN - UHRFUNKTIONEN
9.1 Elektronischer Programmspeicher
1 2 1
hr min
345
Uhrfunktion Anwendung
Tageszeit Zum Einstellen, Ändern oder Abfragen der Tageszeit.
Kurzzeitwecker Zum Einstellen einer Kurzzeit. Diese Funktion hat keine
Dauer Einstellen der Einschaltdauer für das Gerät.
Ende Einstellen der Abschaltzeit für das Gerät.
Mit den Funktionen Dauer und Ende können Sie festlegen, wann
sich das Gerät ein- und ausschalten soll. Legen Sie zuerst die Dauer und dann das Ende fest.
Auswirkung auf den Backofenbetrieb.
Funktionsanzeigen
1
Zeitanzeige
2
Taste +
3
Auswahltaste
4
Taste -
5
hr minhr min
9.2 Einstellen der Uhrfunktionen
1.
Stellen Sie eine Backofenfunktion und
die gewünschte Temperatur für die
eingestellte „Dauer“
gestellte „Ende“
zeitwecker
nicht erforderlich.
2.
Drücken Sie mehrmals die Auswahltaste, bis die Anzeige für die erforderliche Uhrfunktion im Display blinkt.
ist diese Einstellung
und das ein-
ein. Für den Kurz-
3.
Drücken Sie + oder -, um die gewünschte Uhrfunktion einzustellen.
Die von Ihnen eingestellte Uhrfunktion
wird im Display angezeigt. Nach Ablauf der eingestellten Zeit blinkt die
Anzeige, und es ertönt zwei Minuten
lang ein Signalton.
Bei den Funktionen „Dauer“
und „Ende“ wird das Gerät au-
tomatisch ausgeschaltet.
4.
Drücken Sie eine beliebige Taste, um
den Signalton abzustellen.
Page 43

DEUTSCH 43
5.
Drehen Sie den Backofen-Einstellknopf und den Temperaturwahlknopf
in die Position „Aus“.
2.
Halten Sie die Taste - gedrückt.
Die Uhrfunktion schaltet sich nach ei-
nigen Sekunden aus.
9.3 Ausschalten der
Uhrfunktionen
1.
Drücken Sie die Auswahltaste so oft,
bis die gewünschte Funktionsleuchte
blinkt.
10. BACKOFEN - PRAKTISCHE TIPPS UND HINWEISE
WARNUNG!
Siehe Sicherheitshinweise.
Die Temperaturen und Backzeiten
in den Tabellen sind nur Richtwerte. Sie richten sich nach den Rezepten, der Qualität und der Menge der verwendeten Zutaten.
VORSICHT!
Verwenden Sie für sehr feuchte
Kuchen ein tiefes Backblech.
Obstsäfte können bleibende Flecken auf der Emailoberfläche verursachen.
10.1 Backen
Allgemeine Hinweise
• Ihr neuer Backofen backt oder brät unter Umständen anders als Ihr früheres
Gerät. Passen Sie Ihre normalen Einstellungen (Temperatur, Garzeiten) und
die Einsatzebenen an die Werte in den
Tabellen an.
• Bei längeren Backzeiten kann der
Backofen ca. 10 Minuten vor Ende der
Backzeit ausgeschaltet werden, um die
Restwärme auszunutzen.
Wenn Sie gefrorene Lebensmittel in
den Backofen geben, können sich die
Backbleche beim Backen verformen.
Nachdem die Backbleche abgekühlt
sind, hebt sich die Verformung wieder
auf.
Hinweise zu den Backtabellen
• Es empfiehlt sich, beim ersten Mal die
niedrigere Temperatur einzustellen.
• Finden Sie für ein spezielles Rezept keine konkreten Angaben, orientieren Sie
sich an einem ähnlichen Rezept.
• Die Backzeit kann sich um 10-15 Minuten verlängern, wenn Kuchen auf mehreren Ebenen gebacken werden.
• Höhenunterschiede bei Kuchen und
Gebäck können zu Beginn zu unterschiedlicher Bräunung führen. Verändern Sie in diesem Fall nicht die Temperatureinstellung. Die Bräunungsunterschiede gleichen sich während des
Backvorgangs aus.
10.2 Tipps zum Backen
Backergebnis Mögliche Ursache Abhilfe
Der Kuchen ist unten
nicht ausreichend gebräunt.
Der Kuchen fällt zusammen (wird feucht, klumpig, streifig).
Falsche Einschubebene.
Die Backofentemperatur
ist zu hoch.
Setzen Sie den Kuchen
Stellen Sie beim nächsten
Kuchen eine etwas niedrigere Backofentempera-
tiefer ein.
tur ein.
Page 44

www.electrolux.com
44
Der Kuchen fällt zusammen (wird feucht, klumpig, streifig).
Der Kuchen fällt zusammen (wird feucht, klumpig, streifig).
Der Kuchen ist zu trocken.
Der Kuchen ist zu trocken.
Der Kuchen ist unregelmäßig gebräunt.
Der Kuchen ist unregelmäßig gebräunt.
Der Kuchen ist nach der
eingestellten Zeit nicht
fertig gebacken.
10.3 Bio-Garen
Gebäck 180 – 190
Feingebäck: Brandteig 180 – 190
Feingebäck: Mürbeteig 180 - 190
Baiser 80-100 120 - 150
Backergebnis Mögliche Ursache Abhilfe
Stellen Sie eine längere
Backzeit ein. Die Back-
Die Backzeit ist zu kurz.
zeit lässt sich nicht
durch eine höhere
Temperatur verringern.
Weniger Flüssigkeit ver-
Der Teig enthält zu viel
Flüssigkeit.
wenden Beachten Sie die
Rührzeiten, vor allem
beim Einsatz von Kü-
chenmaschinen.
Die Backofentemperatur
ist zu niedrig.
Stellen Sie beim nächsten
Kuchen eine höhere
Backofentemperatur ein.
Stellen Sie beim nächsten
Die Backzeit ist zu lang.
Kuchen eine kürzere
Backzeit ein.
Die Backofentemperatur
ist zu hoch und die Back-
zeit zu kurz.
Die Mischung ist ungleich
verteilt.
Stellen Sie eine niedrigere
Backofentemperatur und
eine längere Backzeit ein.
Verteilen Sie die Mi-
schung gleichmäßig auf
dem Backblech.
Stellen Sie beim nächsten
Die Backofentemperatur
ist zu niedrig.
Kuchen eine etwas höhe-
re Backofentemperatur
ein.
Hinweise für die Funktion „BioGaren“:
• Verwenden Sie diese Funktion
zum Backen in Formen und
zum Dörren von Lebensmitteln
auf einer Einschubebene bei
niedrigen Temperaturen.
• Backen Sie nur in einer Form/einem Blech gleichzeitig.
• Wenn Sie den Backofen vorheizen möchten, verwenden Sie
.
Backware Temperatur in °C Dauer in Minuten
1)
10 - 20
1)
30 - 40
1)
25 - 35
Page 45

1)
Backofen vorheizen.
10.4 Heißluft mit Ringheizkörper
Backen auf einer Einschubebene
Backen in Formen
Backware Einschubebene Temperatur in °C Zeit in Min.
Gugelhupf oder
Rodonkuchen
Sandkuchen/
Früchtekuchen
Fatless sponge
cake
Tortenboden Mürbeteig
Tortenboden Rührteig
Apple pie (2 Formen, Ø 20 cm, diagonal versetzt)
1)
Backofen vorheizen
2 150 - 160 50 - 70
1 - 2 140 - 160 50 - 90
3
2
150 - 160
170-180
1)
1)
2 150 - 170 20 - 25
2 - 3 160 60 - 90
DEUTSCH 45
25 - 40
10 - 25
Kuchen/Gebäck/Brot auf Backblechen
Backware Einschubebene Temperatur in °C Zeit in Min.
Streuselkuchen
(trocken)
3 150 - 160 20 - 40
Obstkuchen (mit
Hefeteig/Rührteig)
1)
Obstkuchen mit
Mürbeteig
1)
Tiefes Blech benutzen
3 150 35 - 55
3 160 - 170 40 - 80
Plätzchen
Backware Einschubebene Temperatur in °C Zeit in Min.
Mürbeteigplätzchen
Short bread /
Pastry Stripes
3 150 - 160 10 - 20
3 140 20 - 35
Rührteigplätzchen 3 150 - 160 15 - 20
Eiweißgebäck,
Baiser
3 80 - 100 120 - 150
Page 46

www.electrolux.com
46
Makronen 3 100 - 120 30 - 50
Hefekleingebäck 3 150 - 160 20 - 40
Blätterteiggebäck 3
Brötchen 3
Small cakes (20
pro Blech)
1)
Tabelle für Aufläufe und Überbackenes
Überbackene Baguettes
Gefülltes Gemüse 1 160 - 170 30 - 60
1)
Backen auf mehreren Ebenen
Kuchen/Gebäck/Brot auf Backblechen
Windbeutel/Eclairs 2/4
Streuselkuchen,
trocken
1)
Backware Einschubebene Temperatur in °C Zeit in Min.
Backofen vorheizen
160
150
1)
1)
1)
170 - 180
3
20 - 30
10 - 35
20 - 35
Speise Einschubebene Temperatur in °C Zeit in Min.
1)
1)
15 - 30
25 - 45
Backofen vorheizen
Backware
1
Einschubebene
2 Ebenen
160 - 170
Temperatur in °C Zeit in Min.
160 - 180
2/4 150 - 160 30 - 45
Backofen vorheizen
Plätzchen/small cakes/Gebäck/Brötchen
Backware
Mürbeteigplätzchen
Mürbeteiggebäck/
Teigstreifen
Einschubebene
2 Ebenen
Temperatur in °C Zeit in Min.
2/4 150 - 160 20 - 40
2/4 140 25 - 45
Rührteigplätzchen 2/4 160 - 170 25 - 40
Eiweißgebäck,
Baiser
2/4 80 - 100 130 - 170
Makronen 2/4 100 - 120 40 - 80
Hefekleingebäck 2/4 160 - 170 30 - 60
180
1)
1)
30 - 50
25 - 40
Blätterteiggebäck 2/4
Brötchen 2/4
170 - 180
Page 47

DEUTSCH 47
Backware
Small cakes (20
pro Blech)
1)
Backofen vorheizen
Einschubebene
2 Ebenen
2/4
Temperatur in °C Zeit in Min.
150
1)
20 - 40
10.5 Backen mit Ober-/Unterhitze auf einer Ebene
Backen in Formen
Backware Einschubebene Temperatur in °C Zeit in Min.
Gugelhupf oder
Rodonkuchen
Sandkuchen/
Früchtekuchen
Fatless sponge
cake
Tortenboden Mürbeteig
Tortenboden Rührteig
Apple pie (2 Formen, Ø 20 cm, diagonal versetzt)
Pikante Torte (z.B.
Quiche Lorraine)
Käsekuchen 1 - 2 160 - 180 60 - 90
1)
Backofen vorheizen
2 160 - 180 50 - 70
1 - 2 150 - 170 50 - 90
3
2
1)
170
190 - 210
25 - 40
1)
10 - 25
2 170 - 190 20 - 25
1 - 2 180 60 - 90
1 180 - 220 35 - 60
Kuchen/Gebäck/Brot auf Backblechen
Backware Einschubebene Temperatur in °C Zeit in Min.
Hefezopf/Hefekranz
Christstollen 2
2 170 - 190 40 - 50
160 - 180
1)
Brot (Roggenbrot):
1.
Erster Teil des
Backvorgangs.
2.
Zweiter Teil
1 - 2
1.
2.
1)
230
160 - 180
1.
2.
1)
des Backvorgangs.
Windbeutel/Eclairs 3
Biskuitrolle 3
190 - 210
180 - 200
1)
1)
50 - 70
20
30 - 60
20 - 35
10 - 20
Page 48

www.electrolux.com
48
Streuselkuchen
(trocken)
Mandel-/Zuckerkuchen
Obstkuchen (mit
Hefeteig/Rührteig)
2)
Backware Einschubebene Temperatur in °C Zeit in Min.
3 160 - 180 20 - 40
3
190 - 210
1)
20 - 30
3 170 35 - 55
Obstkuchen mit
Mürbeteig
3 170 - 190 40 - 60
Hefekuchen mit
empfindlichen Belägen (z.B. Quark,
3
160 - 180
1)
40 - 80
Sahne, Pudding)
Pizza (mit viel Be-
2)
lag)
Pizza (dünner Bo-
den)
1 - 2
1 - 2
190 - 210
220 - 250
1)
1)
30 - 50
15 - 25
Ungesäuertes Brot 1 230 - 250 10 - 15
Wähen (CH) 1 210 - 230 35 - 50
1)
Backofen vorheizen
2)
Tiefes Blech benutzen
Plätzchen
Backware Einschubebenen Temperatur in °C Zeit in Min.
Mürbeteigplätzchen
Short bread/ Pastry Stripes
3 170 - 190 10 - 20
3
160
1)
20 - 35
Rührteigplätzchen 3 170 - 190 20 - 30
Eiweißgebäck,
Baiser
3 80 - 100 120 - 150
Makronen 3 120 - 130 30 - 60
Hefekleingebäck 3 170 - 190 20 - 40
170
1)
1)
1)
20 - 30
10 - 55
20 - 30
Blätterteiggebäck 3
Brötchen 3
Small cakes (20
pro Blech)
1)
Backofen vorheizen
3 - 4
190 - 210
190 - 210
Page 49

DEUTSCH 49
Tabelle für Aufläufe und Überbackenes
Speise Einschubebenen Temperatur in °C Zeit in Min.
Nudelauflauf 1 180 - 200 45 - 60
Lasagne 1 180 - 200 35 - 50
Gemüsegratin 1
Überbackene Baguettes
180 - 200
1
200 - 220
1)
1)
15 - 30
15 - 30
Süße Aufläufe 1 180 - 200 40 - 60
Fischaufläufe 1 180 - 200 40 - 60
Gefülltes Gemüse 1 180 - 200 40 - 60
1)
Backofen vorheizen
10.6 Pizzastufe
Backware Einschubebene Temperatur in °C Zeit (Min.)
Pizza (dünner Bo-
1)
den)
Pizza (mit viel Be-
1)
lag)
1 - 2
200 - 230
1 - 2 180 - 200 20 - 35
Obsttörtchen 1 - 2 170 - 200 35 - 55
Spinatquiche 1 - 2 160 - 180 45 - 60
Quiche Lorraine
(Herzhafte Torte)
1 - 2 170 - 190 45 - 55
Schweizer Flan 1 - 2 170 - 200 35 - 55
Käsekuchen 1 - 2 140 - 160 60 - 90
Apfelkuchen, ge-
deckt
1 - 2 150 - 170 50 - 60
Gemüsekuchen 1 - 2 160 - 180 50 - 60
Ungesäuertes Brot
Blätterteigquiche
Flammkuchen
2 - 3
2 - 3
2 - 3
230 - 250
160 - 180
230 - 250
Piroggen (Russische Version der
2 - 3
180 - 200
Calzone)
1)
Tiefes Blech benutzen
2)
Backofen vorheizen
2)
2)
2)
2)
2)
10 - 20
10 - 20
45 - 55
12 - 20
15 - 25
Page 50

www.electrolux.com
50
10.7 Braten
Bratgeschirr
• Benutzen Sie zum Braten hitzebestän-
• Große Bratenstücke können direkt im
10.8 Braten mit Ober-/Unterhitze
Rindfleisch
Schmorbraten 1-1,5 kg 1 200 - 230 105 - 150
Roastbeef
oder Filet:
Englisch
Roastbeef
oder Filet: Medium
Roastbeef
oder Filet:
durchgebraten
1)
• Braten Sie magere Fleischsorten in ei-
• Alle Fleischsorten, die sich zum Bräudiges Geschirr. (Beachten Sie die Angaben des Herstellers.)
tiefen Blech (falls vorhanden) oder auf
dem Kombirost über dem tiefen Blech
gebraten werden.
Fleischart Menge Einschub-
ebene
je cm Höhe 1
je cm Höhe 1 220 - 230 8 - 10
je cm Höhe 1 200 - 220 10 - 12
Backofen vorheizen
nem Bräter mit Deckel. So bleibt das
Fleisch saftiger.
nen eignen oder eine Kruste haben sollen, können im Bräter ohne Deckel gebraten werden.
Temperatur
Zeit in Min.
in °C
230 - 250
1)
6 - 8
Schweinefleisch
Fleischart Menge
Einschub-
ebene
Temperatur
in °C
Zeit in Min.
Schulter, Nacken, Schin-
1-1,5 kg 1 210 - 220 90 - 120
kenstück
Kotelett,
Schälrippchen
1-1,5 kg 1 180 - 190 60 - 90
Hackbraten 750 g - 1 kg 1 170 - 190 50 - 60
Schweinshaxe
(vorgegart)
750 g - 1 kg 1 200 - 220 90 - 120
Kalbfleisch
Fleischart Menge
Kalbsbraten
1)
Einschub-
ebene
1 kg 1 210 - 220 90 - 120
Temperatur
in °C
Zeit in Min.
Kalbshaxe 1,5-2 kg 1 200 - 220 150 - 180
1)
im geschlossenen Bräter
Page 51

DEUTSCH 51
Lammfleisch
Fleischart Menge
Lammkeule,
Lammbraten
1 - 1,5 kg 1 210 - 220 90 - 120
Einschub-
ebene
Temperatur
in °C
Zeit in Min.
Lammrücken 1 - 1,5 kg 1 210 - 220 40 - 60
Wild
Fleischart Menge
Hasenrücken,
Hasenkeule
Rehrücken,
Hirschrücken
Reh-/Hirschkeule
1)
Backofen vorheizen
bis zu 1 kg 1
1,5-2 kg 1 210 - 220 35 - 40
1,5-2 kg 1 200 - 210 90 - 120
Einschub-
ebene
Temperatur
in °C
220 - 240
1)
Zeit in Min.
30 - 40
Geflügel
Fleischart Menge
Einschub-
ebene
Temperatur
in °C
Zeit in Min.
Geflügelteile je 200 - 250 g 1 220 - 250 20 - 40
Hähnchenhälf-
te
Hähnchen,
Poularde
je 400 - 500 g 1 220 - 250 35 - 50
1-1,5 kg 1 220 - 250 50 - 70
Ente 1,5-2 kg 1 210 - 220 80 - 100
Gans 3,5-5 kg 1 200 - 210 150 - 180
Truthahn/Pute 2,5-3,5 kg 1 200 - 210 120 - 180
Truthahn/Pute 4-6 kg 1 180 - 200 180 - 240
Fisch
Fleischart Menge
Einschub-
ebene
Temperatur
in °C
Zeit in Min.
Ganzer Fisch 1-1,5 kg 1 210 - 220 40 - 70
Page 52

www.electrolux.com
52
10.9 Braten mit Heißluft Grillen
Rindfleisch
Roastbeef
oder Filet:
Englisch
Roastbeef
oder Filet: Medium
Roastbeef
oder Filet:
durchgebraten
1)
Schweinefleisch
Schulter, Nacken, Schinkenstück
Kotelett,
Schälrippchen
Hackbraten 750 g - 1 kg 1 160 - 170 50 - 60
Schweinshaxe
(vorgegart)
Fleischart Menge
je cm Höhe 1
je cm Höhe 1 180 - 190 6 - 8
je cm Höhe 1 170 - 180 8 - 10
Backofen vorheizen
Fleischart Menge
1-1,5 kg 1 160 - 180 90 - 120
1-1,5 kg 1 170 - 180 60 - 90
750 g - 1 kg 1 150 - 170 90 - 120
Einschub-
ebene
Einschub-
ebene
Temperatur
in °C
190 - 200
1)
Temperatur
in °C
Zeit (Min.)
5 - 6
Zeit (Min.)
Kalbfleisch
Fleischart Menge Einschub-
ebene
Temperatur
in °C
Zeit (Min.)
Kalbsbraten 1 kg 1 160 - 180 90 - 120
Kalbshaxe 1,5-2 kg 1 160 - 180 120 - 150
Lammfleisch
Fleischart Menge Einschub-
ebene
Lammkeule,
1-1,5 kg 1 150 - 170 100 - 120
Temperatur
in °C
Zeit (Min.)
Lammbraten
Lammrücken 1-1,5 kg 1 160 - 180 40 - 60
Page 53

DEUTSCH 53
Geflügel
Fleischart Menge Einschub-
ebene
Temperatur
in °C
Zeit (Min.)
Geflügelteile je 200 - 250 g 1 200 - 220 30 - 50
Hähnchenhälf-teje 400 - 500 g 1 190 - 210 35 - 50
Hähnchen,
1-1,5 kg 1 190 - 210 50 - 70
Poularde
Ente 1,5-2 kg 1 180 - 200 80 - 100
Gans 3,5-5 kg 1 160 - 180 120 - 180
Truthahn/Pute 2,5-3,5 kg 1 160 - 180 120 - 150
Truthahn/Pute 4-6 kg 1 140 - 160 150 - 240
10.10 Grillen
Benutzen Sie die Grill-Funktion immer
mit der höchsten Temperatureinstellung.
Grillen Sie immer bei geschlossener Backofentür.
Heizen Sie den leeren Backofen
mit den Grill-Funktionen immer 5
Minuten vor.
• Schieben Sie den Rost gemäß den
Empfehlungen in der Grilltabelle in die
entsprechende Einsatzebene.
• Schieben Sie zum Auffangen von Fett
die Fettpfanne immer in die erste Einschubebene.
• Nur flache Fleisch- oder Fischstücke
grillen.
Der Grillbereich befindet sich in der Mitte
des Rostes.
Grillen
Grillgut
Einschub-
ebene
Burgers 4
Temperatur in
°C
1)
max
Grillzeit in Minuten
Erste Seite Zweite Seite
9 - 15 8 - 13
Schweinefilet 4 max 10 - 12 6 - 10
Würstchen 4 max 10 - 12 6 - 8
Filetsteaks,
Kalbssteaks
Toast 4 - 5
Überbackener
Toast
1)
Backofen vorheizen
10.11 Auftauen
Entfernen Sie die Verpackung. Das Gericht auf einem Teller anrichten.
4 max 7 - 10 6 - 8
max
1)
1 - 4 1 - 4
4 max 6 - 8 -
Nicht mit einer Schüssel oder einem Teller
abdecken. Dadurch wird die Auftauzeit
verlängert.
Nutzen Sie die erste Einschubebene. von
unten.
Page 54

www.electrolux.com
54
Speise
Auftauzeit in
Min.
Zusätzliche Auf-
tauzeit in Min.
Hähnchen, 1000 g 100 - 140 20 - 30
Fleisch, 1000 g 100 - 140 20 - 30
Fleisch, 500 g 90 - 120 20 - 30
Forelle, 150 g 25 - 35 10 - 15 Erdbeeren, 300 g 30 - 40 10 - 20 Butter, 250 g 30 - 40 10 - 15 -
Sahne, 2 x 200 g 80 - 100 10 - 15
Kuchen, 1400 g 60 60 -
11. BACKOFEN - REINIGUNG UND PFLEGE
WARNUNG!
Siehe Sicherheitshinweise.
• Feuchten Sie ein weiches Tuch mit warmem Wasser und etwas Reinigungsmittel an und reinigen Sie damit die Vorderseite des Geräts.
• Verwenden Sie zum Reinigen der Metalloberflächen ein handelsübliches Reinigungsmittel.
• Reinigen Sie den Innenraum des Backofens nach jedem Gebrauch. So lassen
sich Verschmutzungen leichter entfernen und es kann nichts einbrennen.
• Entfernen Sie hartnäckige Verschmutzungen mit einem speziellen Backofenreiniger.
• Reinigen Sie alle Zubehörteile nach jedem Gebrauch und lassen Sie sie
trocknen. Feuchten Sie ein weiches
Tuch mit warmem Wasser und etwas
Spülmittel an.
• Zubehörteile mit Antihaftbeschichtung
dürfen nicht mit aggressiven Reinigungsmitteln, scharfkantigen Gegenständen oder im Geschirrspüler gereinigt werden. Die Antihaftbeschichtung
kann dadurch zerstört werden.
Geräte mit Edelstahl- oder Aluminiumfront:
Reinigen Sie die Backofentür nur
mit einem nassen Schwamm und
trocknen Sie sie mit einem weichen Tuch ab.
Verwenden Sie keine Stahlwolle,
Säuren oder Scheuermittel, da
diese die Oberflächen beschädigen können. Reinigen Sie das Bedienfeld auf dieselbe Weise.
11.1 Einhängegitter
Die Einhängegitter können zur Reinigung
der Seitenwände entfernt werden.
Bemerkung
Hähnchen auf eine umgedrehte Untertasse legen, die auf einem großen Teller aufliegt. Zwischendurch wenden.
Nach der Hälfte der Zeit
wenden
Nach der Hälfte der Zeit
wenden
Sahne lässt sich auch
mit noch leicht gefrorenen Stellen gut aufschlagen.
Page 55

Abnehmen der Einhängegitter
DEUTSCH 55
1.
Ziehen Sie das Einhängegitter vorne
von der Seitenwand weg.
2.
Ziehen Sie das Einhängegitter hinten
von der Seitenwand weg und nehmen Sie es heraus.
1
2
Einsetzen der Einhängegitter
Führen Sie zum Einsetzen der Einhängegitter die obigen Schritte in umgekehrter
Reihenfolge durch.
Gilt für Auszüge:
Die Haltestifte der Auszüge müssen nach vorne zeigen!
VORSICHT!
Achten Sie darauf, dass der längere Befestigungsdraht vorne ist.
Die Enden der beiden Drähte
müssen nach hinten zeigen. Eine
fehlerhafte Installation kann die
Emaille beschädigen.
11.2 Reinigen der Backofentür
Um die Reinigung zu erleichtern, können
Sie die Backofentür abnehmen.
WARNUNG!
Zur Reinigung der Glastür müssen
die Glasscheiben vorher abgekühlt
sein. Es besteht die Gefahr, dass
die Glasscheiben brechen.
WARNUNG!
Wenn die Türglasscheiben beschädigt sind oder Kratzer aufweisen, werden sie brüchig und können zerspringen. Um dies zu verhindern, müssen Sie sie ersetzen.
Weitere Informationen erhalten Sie
beim Kundendienst.
Page 56

www.electrolux.com
56
Aushängen der Tür:
1.
Öffnen Sie die Tür vollständig.
2.
Drücken Sie den Schieber, bis Sie ein
1
2
Klicken hören.
3.
Schließen Sie die Tür, bis der Schieber einrastet.
4.
Hängen Sie die Tür aus.
Um die Tür zu entfernen, ziehen
Sie sie erst aus der einen und
dann aus der anderen Seite heraus.
Nach der Reinigung muss die Backofentür in umgekehrter Reihenfolge wieder
eingebaut werden. Achten Sie darauf,
dass die Tür beim Einsetzen hörbar einrastet. Drücken Sie nötigenfalls kräftig gegen die Tür.
11.3 Backofenglasscheiben
Abnehmen und Reinigen der Türgläser
1.
B
2.
3.
4.
Das Türglas Ihres Geräts kann
sich in Art und Form von den Beispielen in diesen Abbildungen unterscheiden. Auch die Anzahl der
Scheiben kann variieren.
Fassen Sie die Türabdeckung (B) an
der Oberkante der Tür an beiden Seiten an. Drücken Sie sie nach innen,
um den Schnappverschluss zu lösen.
Ziehen Sie die Türabdeckung nach
vorn, um sie abzunehmen.
Fassen Sie die Türgläser nacheinander am oberen Rand an. Ziehen Sie
sie nach oben aus der Führung.
Reinigen Sie die Glasscheiben.
Um die Glasscheiben wieder einzusetzen,
führen Sie die Schritte oben in umgekehrter Reihenfolge durch.
VORSICHT!
Die herausnehmbaren Glasscheiben besitzen eine Markierung auf
einer Seite. Achten Sie darauf,
dass sich diese Markierung in der
oberen linken Ecke befindet.
Page 57

11.4 Backofenlampe
WARNUNG!
Vorsicht beim Austausch der
Backofenlampe. Es besteht die
Gefahr eines elektrischen Schlags.
DEUTSCH 57
1.
Ziehen Sie die Schublade bis zum Anschlag heraus.
Bevor Sie die Backofenlampe
austauschen:
• Schalten Sie den Backofen aus.
• Entfernen Sie die Sicherungen aus dem
Sicherungskasten, oder schalten Sie
den Schutzschalter aus.
Legen Sie ein Tuch auf den Backofenboden, um die Lampe und
das Glas zu schützen.
Austauschen der Backofenlampe
1.
Die Glasabdeckung der Backofenlampe befindet sich an der Rückwand
des Backofeninnenraums.
Drehen Sie die Glasabdeckung der
Lampe gegen den Uhrzeigersinn und
nehmen Sie sie ab.
2.
Reinigen Sie die Glasabdeckung.
3.
Tauschen Sie die Backofenlampe gegen eine geeignete hitzebeständige
300 °C-Backofenlampe aus.
Verwenden Sie dazu eine Backofenlampe mit der gleichen Leistung.
4.
Bringen Sie die Glasabdeckung wieder an.
11.5 Herausnehmen der
Schublade
Die Schublade unterhalb des Backofens
lässt sich zur leichteren Reinigung herausnehmen.
1
2.
Heben Sie die Schublade leicht an
und ziehen Sie sie aus den Führungen.
Einsetzen der Schublade
1.
Setzen Sie die Schublade auf die
Führungen. Achten Sie darauf, dass
die Arretierungen korrekt in den Führungen einrasten.
2.
Senken Sie die Schublade ab in die
Waagerechte und schieben Sie sie
ein.
WARNUNG!
In der Schublade kann bei Benutzung des Backofens ein Wärmestau entstehen. Bewahren Sie keine brennbaren Gegenstände, wie
Reinigungsmittel, Plastiktüten,
Topfhandschuhe, Papier, Reinigungssprays usw. in der Schublade auf.
2
12. WAS TUN, WENN …
WARNUNG!
Siehe Sicherheitshinweise.
Problem Mögliche Ursache Abhilfe
Das Kochfeld funktioniert
nicht
Es wurde keine Temperatureinstellung gewählt
Stellen Sie die Temperatur ein
Page 58

www.electrolux.com
58
Der Backofen heizt nicht
auf
Der Backofen heizt nicht
auf
Der Backofen heizt nicht
auf
Der Backofen heizt nicht
auf
Die Backofenlampe
leuchtet nicht
Dampf und Kondenswasser schlagen sich auf
Speisen und im Backofen
nieder.
Das Display zeigt „12.00“
an.
Die Restwärmeanzeige
leuchtet nicht auf.
Wenn Sie das Problem nicht selbst lösen
können, wenden Sie sich an Ihren Fachhändler oder Kundendienst.
Die vom Kundendienst benötigten Daten
finden Sie auf dem Typenschild. Das Ty-
Wir empfehlen, dass Sie folgende Daten hier notieren:
Modell (MOD.) .........................................
Produktnummer (PNC) .........................................
Seriennummer (S.N.) .........................................
Problem Mögliche Ursache Abhilfe
Der Ofen ist nicht eingeschaltet
Die Uhrzeit ist nicht ein-
Schalten Sie den Backofen ein.
Stellen Sie die Uhrzeit ein
gestellt
Die erforderlichen Einstel-
lungen wurden nicht vor-
Kontrollieren Sie die Einstellungen
genommen
Die Sicherung im Siche-
rungskasten hat ausgelöst
Überprüfen Sie die Sicherung Wenn die Sicherung
mehrmals ausgelöst hat,
wenden Sie sich an einen
qualifizierten Elektriker.
Die Backofenlampe ist
defekt
Die Speisen standen zu
lange im Backofen.
Tauschen Sie die Backofenlampe aus
Speisen nach Beendigung des Gar- oder
Backvorgangs nicht länger als 15-20 Minuten im
Backofen lassen.
Stromausfall Stellen Sie die Uhrzeit neu
ein.
Die Kochzone ist nicht
heiß, da sie nur kurze Zeit
in Betrieb war.
Sollte die Kochzone eigentlich heiß sein, wenden Sie sich bitte an den
Kundendienst.
penschild befindet sich am Frontrahmen
des Garraums.
13. MONTAGE
WARNUNG!
Siehe Sicherheitshinweise.
Höhe 847 - 867 mm
Breite 596 mm
Abmessungen
Abmessungen
Tiefe 600 mm
Backofenkapazi-
74 Liter
tät
Page 59

13.1 Standort des Geräts
Sie können Ihr freistehendes Gerät neben
oder zwischen Küchenmöbel sowie in einer Ecke aufstellen.
B
A
A
Mindestabstände
Abmes-
mm
sungen
A 2
B 685
13.2 Ausrichten
Richten Sie das Gerät mit den unten angebrachten Schraubfüßen so aus, dass
sich die Oberfläche des Kochfelds auf einer Ebene mit den angrenzenden Oberflächen befindet.
13.3 Kippschutz
VORSICHT!
Sie müssen den Kippschutz anbringen. Andernfalls könnte das
Gerät kippen.
Ihr Gerät ist mit dem Symbol, das
in der Abbildung ersichtlich ist, gekennzeichnet (sofern vorhanden).
Es soll Sie daran erinnern, dass
der Kippschutz montiert werden
muss.
DEUTSCH 59
Achten Sie darauf, den Kippschutz in der richtigen Höhe anzubringen.
1.
Stellen Sie die korrekte Höhe des Geräts ein, bevor Sie den Kippschutz
anbringen.
2.
Bringen Sie den Kippschutz in einem
Abstand von 77 mm zur Geräteoberfläche und 49 mm von der linken Geräteseite in der runden Öffnung an
dem Befestigungsteil an (siehe Abb.).
Verschrauben Sie ihn in festes Material oder benutzen Sie eine geeignete
Verstärkung (Wand).
3.
Die Öffnung befindet sich auf der linken Seite der Rückwand (siehe Abb.).
Heben Sie die Vorderseite des Geräts
(1) an und schieben Sie es in die Mitte
zwischen den angrenzenden Küchenmöbeln (2). Ist der Abstand zwischen
den angrenzenden Küchenmöbeln
breiter als das Gerät, müssen Sie die
seitlichen Abstände anpassen, damit
der Herd mittig steht.
Stellen Sie sicher, dass die Fläche
hinter dem Gerät glatt ist.
Page 60

www.electrolux.com
60
14. UMWELTTIPPS
Recyceln Sie Materialien mit dem Symbol
. Entsorgen Sie die Verpackung in den
entsprechenden Recyclingbehältern.
Recyceln Sie zum Umwelt- und
Gesundheitsschutz elektrische und
elektronische Geräte. Entsorgen Sie
Geräte mit diesem Symbol
dem Hausmüll. Bringen Sie das Gerät zu
Ihrer örtlichen Sammelstelle oder wenden
Sie sich an Ihr Gemeindeamt.
49 mm
1
77 mm
2
nicht mit
13.4 Elektroinstallation
Der Hersteller haftet nicht für
Schäden, die aufgrund der Nichtbeachtung der Sicherheitsvorkehrungen des Kapitels „Sicherheitshinweise“ entstehen.
Das Gerät wird ohne Netzstecker und
Netzkabel geliefert.
Einsetzbare Kabeltypen: H07 RN-F, H05
RN-F, H05 RRF, H05 VV-F, H05 V2V2-F
(T90), H05 BB-F.
Information: Wohin mit den
Altgeräten? Überall dort wo neue
Geräte verkauft werden oder Abgabe
bei den offiziellen SENSSammelstellen oder offiziellen SENSRecyclern. Die Liste der offiziellen
SENS-Sammelstellen findet sich unter
www.sens.ch.
Page 61

DEUTSCH 61
Page 62

www.electrolux.com
62
Page 63

DEUTSCH 63
Page 64

www.electrolux.com/shop
892957464-A-042013
 Loading...