

Page 1

FOEN® CURLER FC1000
FOEN® CURLER FC600
FOEN® CURLER FC300
W arm luftlockenbürste
H air curling brush
H orúcovzdušná k ulm a
H ork ovzdušná k ulm a
Lok ów k a z naw iew em ciepłego pow ietrza
H ajform ázó h ajszárító
Βούρτσα ζεστού αέ ρα
Gebrauch sanw eisung
Operating instructions
Návod na použ itie
Návod k použ ití
Instruk cja obsługi
H asználati útm utató
Οδη ϊες χρήσεως
Page 2
FO EN® CURLER FC1000
2
Page 3
FO EN® CURLER FC600
B
D
4
D
A
G
5
3
Page 4
FO EN® CURLER FC300
6
7
4
Page 5
Seh r geeh rte Kundin,
D
se h r geeh rter Kunde,
lesen Sie bitte die se Ge brauch sanw eisung
sorgfältig durch . Beach ten Sie vor allem die
Sich erh eitsh inw eise auf den erste n Seite n
die se r Ge brauch sanw eisung! Bew ah ren Sie
bitte die Ge brauch sanw eisung zum späte re n
Nach sch lagen auf. Gebe n Sie diese an
eve ntue lle Nach besitzer des Gerätes w eiter.
Geräte besch reibungen
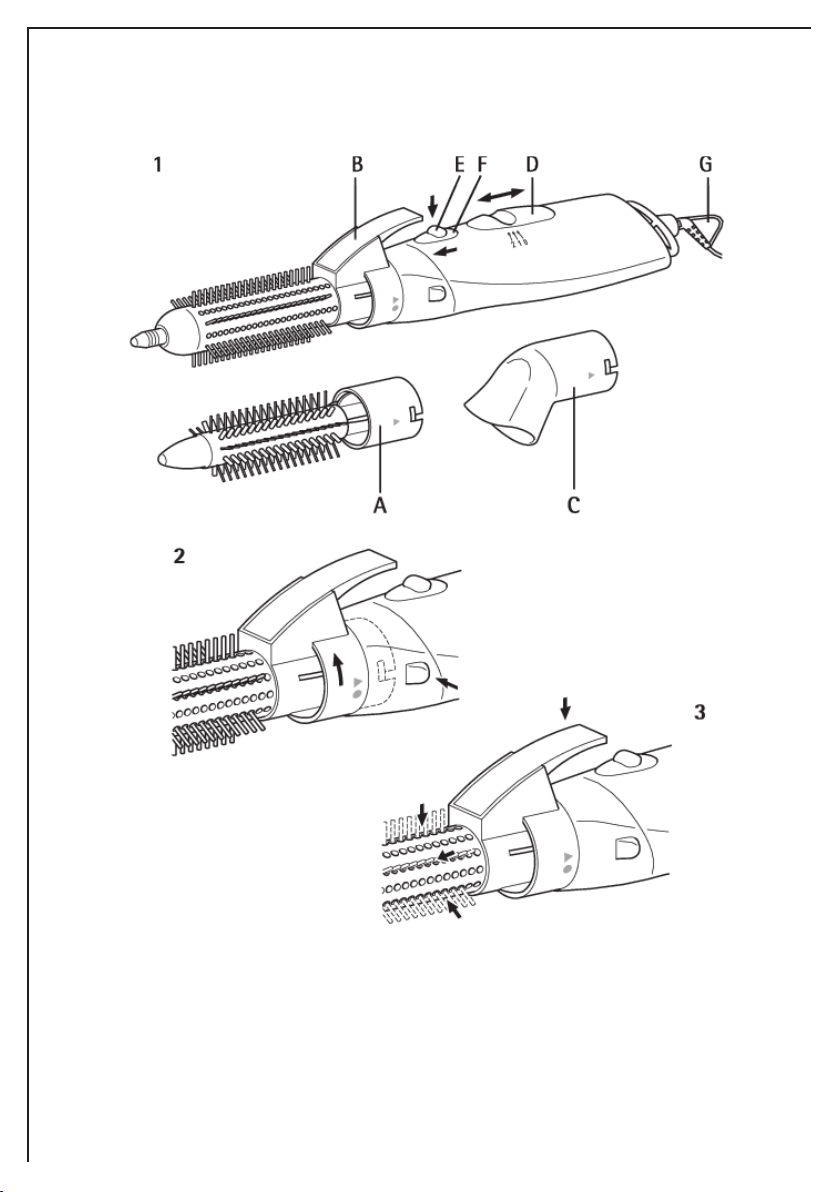
FO EN® CURLER FC1000
A Rundbü rste k lein
B Rundbü rste groß
C Ondulierdüse
D S ch iebe sch alte r zum Ein- /Aussch alten m it 2
Lüfterstufe n
E Cool- Taste
F Sch iebesch alte r «CARE- Program m »
G Aufh ängeöse
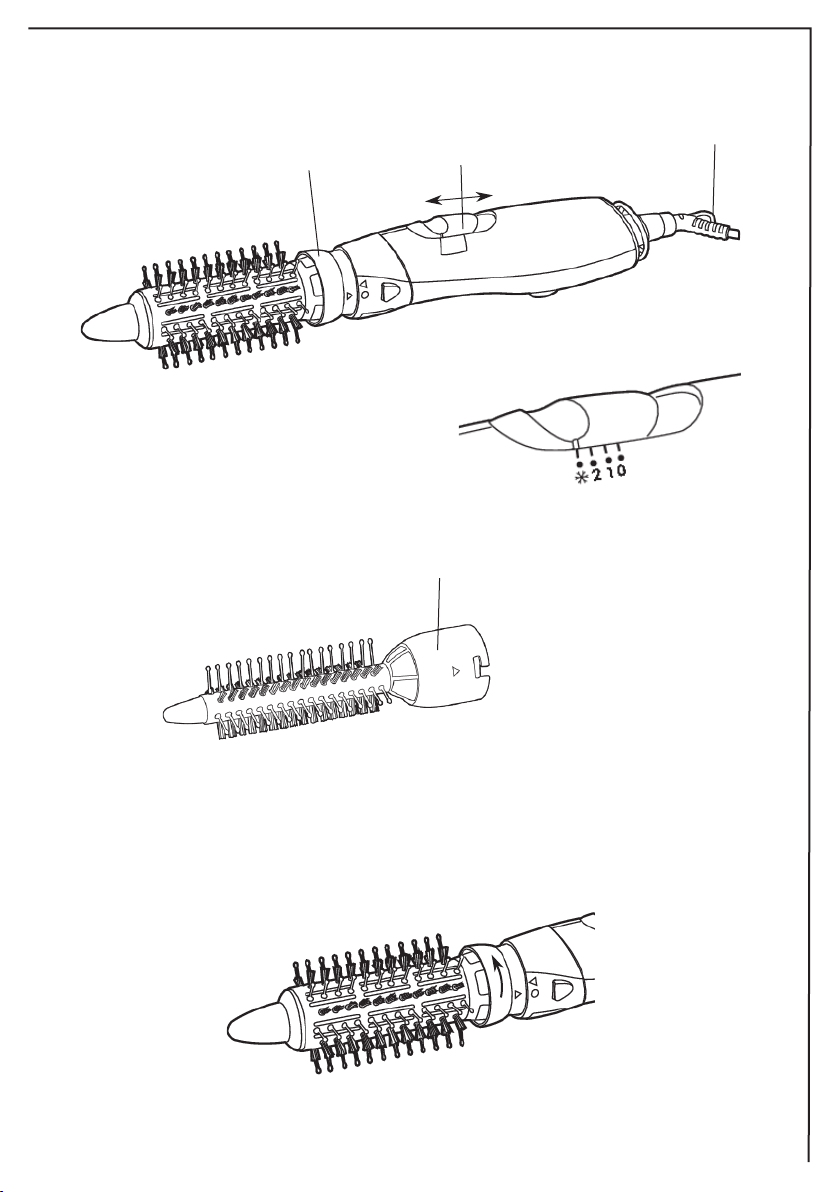
FO EN® CURLER FC600
A Rundbü rste (12 m m )
B Rundbü rste (30 m m )
D S ch iebe sch alte r zum Ein- /Aussch alten m it 2
Lüfterstufe n und Stellung "k alt"
G Aufh ängeöse
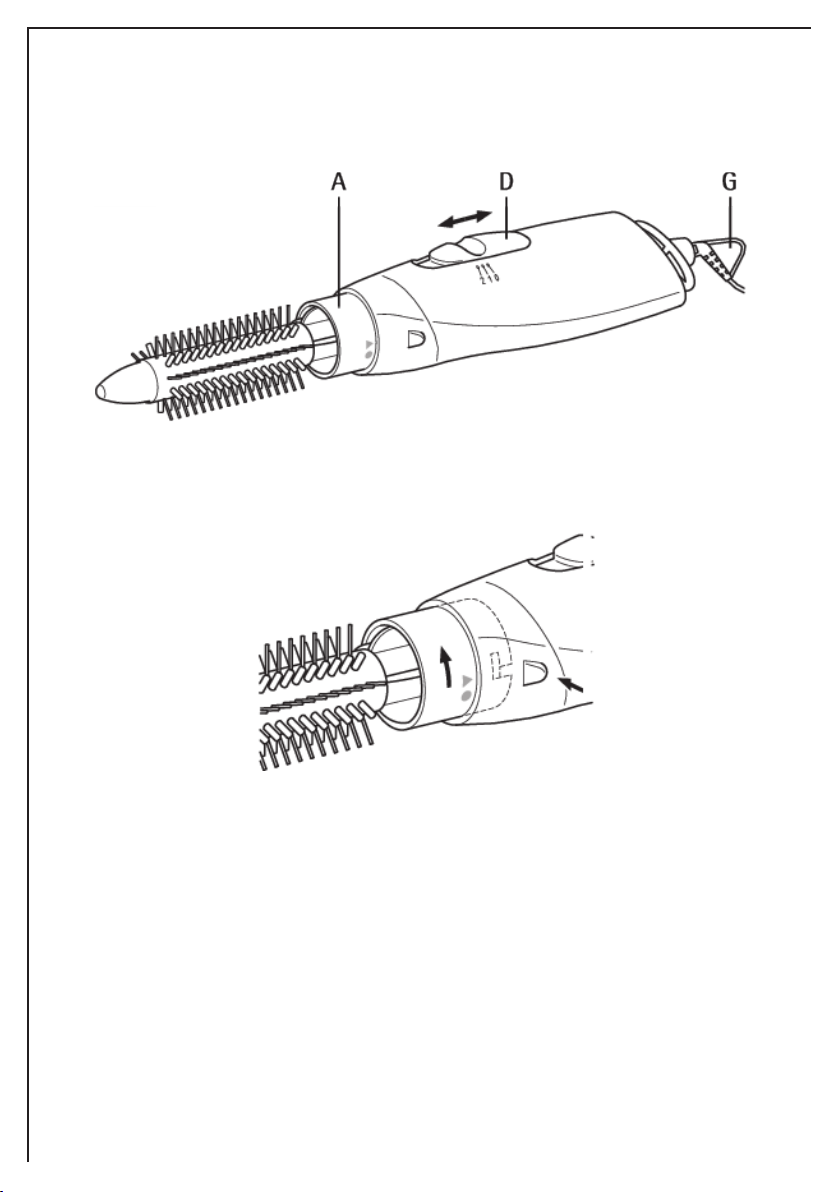
FO EN® CURLER FC300
A Rundbü rste k lein
D S ch iebe sch alte r zum Ein- /Aussch alten m it 2
Lüfterstufe n
G Aufh ängeöse
Sich erh eitsh inw eise
Die Sich erh eit die ses Geräts entsprich t den
anerk annten Re ge ln der Te ch nik und dem
Gerätesich erh e itsgesetz. De nnoch seh en w ir
uns als H e rste lle r veranlaßt, Sie m it de n
nach folgenden Sich erh eitsh inw eisen vertraut
zu m ach en.
Allgem eine Sich erh eit
• Das Gerät darf nur an ein Strom netz
angesch lossen w erden, dessen Spannung und
Freq ue nz m it de r Angabe auf dem Typsch ild
üb e reinstim m t!
• Ach tung! Diese Lockenbürste nich t in
de r Näh e von Badew annen,
W asch bek ken oder anderen Gefäßen,
w elch e W asser enth alten, be nutzen.
• W enn der Lock enstab im Bade zim m e r
ve rw ende t w ird, nach Gebrauch den
Netzste ck er zieh en, da die Näh e von W asser
auch bei ausgesch altetem Gerät eine Gefah r
darstellen k ann.
• Die Locke nb ürste darf nich t in Betrieb
genom m en w erden, w enn:
– Die Lock e nb ürste sich tbare Sch äde n
aufw eist.
– Die Lock e nb ürste h erunte r gefallen sein
sollte.
• Den Ne tzsteck e r nie an de r Z uleitung aus de r
Steckdose zieh en!
• Der Einbau e ine r
Feh lerstrom sch utzeinrich tung m it einem
Nennauslösestrom von w eniger als 30 m A in
de r H ausinstallation bie tet zusätzlich en
Sch utz. W enden Sie sich an Ih ren
Elek troinstallate ur.
• Die Z uleitung nich t um das Gerät w ickeln.
• Bitte prüfen Sie von Z eit zu Z eit die
Netzzuleitung auf Besch ädigungen!
• Um Sch äden de s H aares zu ve rm eiden, bitte
die Luftaustrittsöffnungen an den
Rundbü rste n je nach Lüfterstufe nie m als zu
dich t abde ck en.
5
Page 6
• Re paraturen an die sem Gerät dürfen nu r
von Fach k räfte n durch gefüh rt w erden.
Durch unsach gem äße Reparaturen k önne n
erh eblich e Gefah ren entsteh en. W ende n Sie
sich im Reparaturfall an de n Kunde ndie nst
oder an Ih ren autorisierten Fach h ändler.
Sich erh eit von Kindern
• Diese s Ge rät ist nich t dazu be stim m t, von Personen (einsch ließlich Kinde r), die aufgrund Ih rer Une rfah renh e it oder Unk enntnis nich t in
de r Lage sind es sich er zu be diene n oder von
Personen (einsch ließlich Kinde r) m it e inge sch ränkte n ph ysisch en, se nsorisch en ode r geistigen Fäh igk eite n, benutzt oder be triebe n zu
w erden, es sei de nn sie w urde n durch eine für
sie ve rantw ortlich e Person angew iese n w ie
das Gerät sich er zu be nutzen ist und anfänglich von ih r beaufsich tigt.
• Die H inw eise in die ser Gebrauch sanw eisung
sind unbedingt zu beach te n und Kindern entsprech end zu e rk lären.
• Kinder sollten H aartrock ne r nich t oh ne Aufsich t benutzen.
• Kinder m üssen beaufsich tigt w erden, um zu
gew äh rle isten, dass die se m it dem Gerät nich t
spielen.
Das sollte n Sie beim Betrieb der
Lock enbürste be ach te n
• Sollte das Gerät ins W asser fallen, sofort de n
Netzste ck er zieh en. Keine sfalls ins W asser
greifen! Das Gerät ansch lie ßend von e ine m
Fach m ann überprüfe n lassen!
• Das Gerät darf nich t naß w erden bzw . m it
nassen H ände n be nutzt w erde n.
• Nich t m it Sprays oder W asserzerstäuber in
das Gerät sprüh en.
• Sobald das Gerät aus der H and gele gt w ird, ist
es aus Gründe n der Sich erh eit im m er
auszusch alte n.
• Die Rundbürste w ird funk tionsbedingt
w äh rend de s Be trie b e s h e iß!
• Die Lufte intrittsöffnungen dürfen nie
abgede ck t w erden.
• Bei Ve rsch m utzung ist das Lufte inlaßgitter zu
reinigen (z.B. m it Staubsauger oder feine r
Bürste). H aare sollten nich t in den Bereich de s
Lufteinlaßgitters k om m e n.
• W ird beim Betrieb dieses Gerätes de r
Luftdurch laß be h indert (z. B. durch
Versch m utzung), so sch alte t der eingebaute
Übertem peratursch utz das Gerät autom atisch
ab und nach Abk üh lung (einige M inuten)
w ieder ein.
• Die Netzzu le itung darf bei Betrieb de s Ge räte s
nich t m it de r Luftaustrittsöffnung in
Berüh rung k om m en.
• W ird das Gerät zw eck entfrem det eingesetzt
oder falsch bedie nt, k ann vom H ersteller
k eine H aftung für eventu e lle Sch äden
übernom m en w erden (z.B. Be sch ädigungen
de r Zuleitu ng durch Au fw ick eln um das
Gerät).
Entsorgung
Verpack ungsm aterial
Die Verpack ungsm ate rialien sind
um w eltve rträglich und w iederve rw e rtbar. Die
Kunststoffteile sind gek ennzeich net, z. B.
> PE<, >PS< etc. Entsorgen Sie die
Verpack ungsm aterialien entsprech end ih rer
Kennzeich nung be i den k om m unalen
Entsorgungsste lle n in den dafür vorgese h ene n
Sam m elbe h älte rn.
Altgerät
Das Sym bol auf dem Produk t
ode r seine r Verpack ung w eist darauf h in, dass
die se s Produk t nich t als norm ale r
H aush altsabfall zu beh ande ln ist, sondern an
einem Sam m elpunk t für das Recycling von
elek trisch en und elek tronisch en Geräten
abgegeben w erden m uss. Durch Ih re n Be itrag
zum k orrek te n Entsorgen die ses Produk ts
sch ützen Sie die Um w elt und die Ge sundh eit
Ih rer Mitm ensch en. Um w elt und Gesundh eit
w erden durch falsch es Entsorgen gefäh rde t.
W eite re Inform atione n über das Re cycling
die se s Produk ts erh alte n Sie von Ih re m
Rath aus, Ih rer M üllabfuh r oder dem Gesch äft,
in de m Sie das Produk t gek auft h aben.
6
Page 7
Bedienungsh inw eise
FOEN® CURLER FC1000
Diese s M odell h at eine n Sch iebe sch alte r (Bild
1/D) m it folge nder Sch alte rste llu ng:
0 = AUS
1 = sch w ach er Luftstrom
2 = starke r Luftstrom
und eine n Sch iebe sch alte r (Bild 1/F)
«CAREProgram m » zur Ve rm inderung der
H e izleistung m it folgende r Sch alterstellung:
Sch alte r vorne = verm inderte H e izleistung
Sch alte r h inte n = norm ale H e izle istung
FOEN® CURLER FC600
Diese s M odell h at eine n Sch iebe sch alte r (Bild
4/D) m it folge nder Sch alte rste llu ng:
0 = AUS
1 = sch w ach er Luftstrom
2 = starke r Luftstrom
Stellung "k alt"
FOEN® CURLER FC300
Diese s M odell h at eine n Sch iebe sch alte r (Bild
6/D) m it folge nder Sch alte rste llu ng:
0 = AUS
1 = sch w ach er Luftstrom
2 = starke r Luftstrom
COOL- Taste (Bild 1/E)
FOEN® CURLER FC1000
Dam it die de n H aaren be im Trockne n
gegeb e ne Form be sse r und länge r h ält, sollte n
Sie das H aartrock ne n m it abge k üh lter Luft
absch ließen.
COO L- Taste drück e n.
CARE- Program m (Bild 1/F)
FOEN® CURLER FC1000
Durch Ve rste lle n des Sch alters (Bild 1/F) nach
vorne (drück en und sch ieben), w ird das CAREProgram m zum Stylen und Trock ne n be i
reduzierter, h aarsch onender Tem peratur
fixie rt. Die s gilt für beide Stufe n des
Sch iebesch alters (Bild 1/D).
Durch Rück stellung des Sch alte rs (Bild 1/F) in
die Au sgangsposition sch alten Sie das CAREProgram m ab und das Gerät arbeitet w iede r
m it der vollen H e izleistung.
Stellu ng "k alt" (Bild 4/D )
FOEN® CURLER FC600
Dam it die de n H aaren be im Trockne n
gegeb e ne Form be sse r und länge r h ält, sollte n
Sie das H aartrock ne n m it k alte r Luft
absch ließen.
Sch alte r au f Ste llu ng "k alt" stellen .
Zub e h örte ile w ech seln
(Bild 2, 5 und 7)
Taste auf der Seite de s H andteils drük k e n und
das H andteil zur Position • dreh en.
Z ubeh örte il abneh m en.
Z ubeh örte il m it leich te m Druck auf das
H andteil aufsetzen. H andte il zur
Position ► dreh en. Das Z ubeh örteil raste t
de utlich h örbar ein.
Rundb ü rste k lein
(Bild 1/A, 4/A, 4/B und 6/A)
Die H aarsträh ne vor dem Einrollen fe st über
die Bürste legen und diese von den
H aarw urzeln bis zu den H aarspitzen gut
durch bürsten. Dann die H aarsträh ne von de n
Spitzen h er zu eine r Lock e aufdreh e n.
Sch alte n Sie das Gerät ein (Stufe 1 ode r 2)
und lassen Sie die w arm e Luft auf die
H aarsträh ne einw irk e n, bis die se trock en ist.
Absch lie ßend zum Abk üh len die COOL- Taste
(FOEN® CURLER FC1000, Bild 1/E) drücke n,
ode r Sch alter auf Stellung "k alt" ste lle n
(FOEN® CURLER FC600, Bild 4/D ).
Rundb ü rste gross (Bild 1/B)
FOEN® CURLER FC1000
Die Borsten der grossen Rundbürste k önnen
auf W unsch abge se nk t w erden (Bild 3).
Dadurch lässt sich die Rundbürste se h r leich t
aus de r getrockne ten Locke zieh en.
Ondulierdüse (Bild 1/C)
FOEN® CURLER FC1000
Die Ondulie rdüse konzentriert de n Luftstrom
zum gezielte n Trock ne n bestim m ter
H aarpartien.
Aufh ängeöse (Bild 1/G und Bild 6/G)
An der integrierten Aufh änge öse k ann die
Lockenbürste platzsparend und jederzeit
griffbereit untergebrach t w erde n.
7
Page 8
Re inigen und Pflege
Eine regelm äßige Re inigung trägt w ese ntlich
zu e iner h öh eren Lebe nsdauer der
Lockenbürste bei.
Vor dem Reinigen ste ts den Ne tzsteck e r
zieh en. Das Gerät nur m it eine m leich t
feuch te n Tuch abw isch en und m it einem
w eich en Tuch nach trock nen. Das Gerät nie in
W asser tauch en. Das Gerät vor Staub,
Sch m utz und Fu sse ln sch ützen. Von Z e it zu
Z eit das Luftansauggitter m it einem w eich en
Pinsel reinigen.
Z ubeh örte ile k urze Z eit in Seife nw asser legen
und ansch lie ssend m it eine r k leine n
H aarbürste säubern. Danach abspülen und
trockne n. Dam it eve ntue ll verbleibe nde
W asserrück stände r besser ablaufen k önnen,
k urze Z e it m it der Öffnung nach unte n
aufstellen.
Tech nisch e Daten
FOEN® CURLER FC1000
Netzspannung: 230 V, 50 H z
Leistungsaufnah m e: 1000 W
FOEN® CURLER FC600
Netzspannung: 220- 240 V, 50/60 H z
Leistungsaufnah m e: 600 W
FOEN® CURLER FC300
Netzspannung: 230 V, 50 H z
Leistungsaufnah m e: 300 W
Diese s Ge rät e rfüllt folgende EC Norm en:
• Niedrig- Spannungs- Norm 2006/9 5/EC
• EM C Norm 89 /336/EEC und Ergänzung
9 2/31/EEC sow ie 9 3/68/EEC
Für De utsch land: 01805- 30 60 80*:
*aus dem Festne tz der Deutsch en Te lek om Euro
0,14/M in.
Für Österreich :
Für Reparaturservice: 0810- 9 55 400 *
Für Produ k tservice: 0810- 9 55 200*
*aus dem Festne tz der TELEKOM AUSTRIA Euro
0,10/M in
8
Page 9
GB
De ar Custom er,
Please read th is user m anual carefu lly be fore
using your curling brush , paying particular
attention to th e safe ty note s on th is and th e
follow ing page! Ke e p th e user m anual safe for
future reference and also to pass on to any
sub se q uent ow ner.
M odel descriptions
FO EN® CURLER FC1000
A Sm all round brush
B Large round brush
C W ave nozzle
D O N/O FF sw itch w ith tw o fan speeds
E Cool button
F «CARE program m e » slide sw itch
G H anger
FO EN® CURLER FC600
A Round brush (12m m )
B Round brush (30m m )
D O N/O FF sw itch w ith tw o fan speeds and cold
setting
G H anger
FO EN® CURLER FC300
A Sm all round brush
D O N/O FF sw itch w ith tw o fan speeds
G H anger
Safe ty notes
Th is appliance corresponds to acce pte d
tech nological standards w ith regards to
safety and to th e Germ an Appliance Safety
Law . As m anufacture rs, w e neve rth e le ss
regard it as our duty to fam iliarise custom ers
w ith th e follow ing safety conside rations.
General safety
• Th e curling brush m ay be connecte d only to a
pow er sock e t carrying a voltage and
freq uency m atch ing th e inform ation on th e
m odel rating plate!
• Caution! Do not use th is curling brush
near bath s, h and basins or oth e r
w atercontaining vessels!
• W h en th e Air curler is use d in a bath room ,
unplug it afte r use since th e proxim ity of
w ater presents a h azard even w h en th e curler
is sw itch ed off.
• Th e h ot air curle r m ust not be used, if:
– th ere is any visible sign of dam age to th e
curling brush .
– th e curling brush h as been dropped.
• Neve r try to rem ove th e plug from th e socket
by pulling on th e le ad!
• If th e supply cord is dam aged, it m ust be
replace d by th e m anufacturer, its service
agent or sim ilarly a qualified pe rson in order
to avoid h azard.
• Th e installation of a residual current circuit
bre ak er (RCD) w ith a rate d trigger cu rrent of
less th an 30 m A in th e dom estic pow e r supply
provides additional protection. Se e k advice
from a q ualifie d electrician.
• Do not w rap th e pow er lead around th e brush .
• Pe riodically ch eck th e m ains lead for dam age!
• To avoid dam aging your h air, neve r block th e
air outlets by w rapping h air too tigh tly
around th e round brush es in relation to th e
speed se tting.
9
Page 10
• Re pairs to th is appliance m ay only be
carried out by q u alifie d se rvice enginee rs.
Considerable danger m ay result from
im proper repairs. If repairs becom e
necessary, please contact th e Custom er Care
Departm ent or your auth orised dealer.
Ch ild safe ty
• Th is appliance is not intended for use by persons (including ch ildren) w ith reduced ph ysical, sensory or m ental capabilities, or lack of
experience and k now ledge unless th ey h ave
be en given supervision or instruction concerning use of th e appliance by a person responsible for th e ir safety.
• Keep pack aging m ate rials, e.g. Plastic bags,
out of th e reach of ch ildren.
• Ch ildren sh ould be supervised to ensure th at
th ey do not play w ith th e appliance.
Points to observe w h en operating th e
curling brush
• If th e curling brush falls into w ate r,
im m ediate ly rem ove th e plug from th e m ains
socket. Do not, under any circum stances,
reach into th e w ater! H ave th e appliance
ch eck e d by an ele ctrician!
• Th e curling brush m ust not be use d w et or
w ith w et h ands.
• Do not direct any spray can or w ate r m ister
into th e curling brush .
• For safe ty reasons, sw itch th e drier off
w h eneve r you put it dow n.
• Th e round brush be com es h ot during
operation. Th is is norm al, and results from th e
proper function of th e appliance!
• Th e air intak e s and outle ts m ust never be
cove re d.
• Cle an th e air intak e grille periodically (e.g.
w ith a vacuum cle aner or fine brush ) to
rem ove any block age s. Do not allow h air near
th e air intak e.
• If th e air flow is blocked w h ile th e curling
brush is operating (e.g. by dirt or fluff), th e
integral overh eat cut- out autom atically
sw itch es th e appliance off. Once it h as coole d
dow n (after a fe w m inute s) it autom atically
sw itch es back on.
• Th e pow er lead m ust not com e into contact
w ith th e air outle t during operation.
• Th e m anufacturer can accept no liability for
any loss or dam age arising from im proper
use of th e appliance (e.g. dam age to th e
pow er lead resulting from it being w ound
around th e curling brush ).
Disposal
Pack aging m aterial
Th e pack aging m ate rials are environm entally
friendly and can be recycled. Th e plastic
com ponents are identified by m ark ings, e.g.
> PE<, >PS<, etc. Ple ase dispose of th e
pack aging m aterials in th e appropriate
container at th e com m unity w aste disposal
facilitie s.
Old appliance
Th e sym bol on th e product or on
its pack aging indicates th at th is product m ay
not be treate d as h ouseh old w aste. Inste ad it
sh all be h ande d ove r to th e applicab le
colle ction point for th e recycling of e le ctrical
and electronic eq uipm ent. By ensuring th is
product is disposed of correctly, you w ill h elp
prevent pote ntial negative conseq uences for
th e environm ent and h um an h ealth , w h ich
could oth e rw ise be caused by inappropriate
w aste h andling of th is product. For m ore
de taile d inform ation about recycling of th is
product, please contact your local city office ,
your h ouse h old w aste disposal service or th e
sh op w h ere you purch ased th e product.
10
Page 11

Operating instructions
FOEN® CURLER FC1000
Th is m odel h as a slide sw itch (Figure 1/D ) w ith
th e follow ing sw itch positions:
0 = OFF
1 = low airflow
2 = h igh airflow
It also h as a «CARE program m e» slide sw itch
(Figure 1/F) to reduce th e h eat output. Th is
h as th e follow ing sw itch positions: Sw itch to
th e front = redu ced h eat output Sw itch to
th e rear = norm al h e at output
FOEN® CURLER FC600
Th is m odel h as a slide sw itch (Figure 4/D ) w ith
th e follow ing sw itch positions:
0 = OFF
1 = low airflow
2 = h igh airflow
COLD - setting
FOEN® CURLER FC300
Th is m odel h as a slide sw itch (Figure 6/D ) w ith
th e follow ing sw itch positions:
0 = OFF
1 = low airflow
2 = h igh airflow
COOL button (Figure 1/E)
FOEN® CURLER FC1000
To h elp you k eep your h air as you h ave styled
it, it is advisable to finish drying your h air
w ith cool air.
Press th e COO L button.
CARE program m e (Figure 1/F)
FOEN® CURLER FC1000
To select th e CARE program m e for styling and
drying at a reduced te m perature, w h ich is
k inder to your h air, pre ss dow n th e sw itch
(Figure 1/F) and push to th e front. Th e CARE
program m e can be use d w ith both settings of
th e airflow slide sw itch (Figure 1/D ).
To sw itch th e CARE program m e off, push th e
sw itch (Figure 1/F) back to th e original
position. Th e curling brush now operates w ith
th e full h eat outpu t.
COLD- se tting (Figure 4/D)
FOEN® CURLER FC600
To h elp you k eep your h air as you h ave styled
it, it is advisable to finish drying your h air
w ith cold air.
Sw itch it to th e Cold- setting position .
Ch anging accessories
(Figures 2, 5 and 7)
Push th e button on th e side of th e curling
brush body to th e position
m ark ed • . Rem ove th e accessory you w ish to
ch ange.
Applying ligh t pressure, push th e acce ssory
you req uire on to th e body. Rotate th e body
to th e position m ark e d ► . You w ill h ear th e
accessory click into place.
Sm all round brush
(Figures 1/A, 4/A, B and 6/A)
Before curling, lay strands of h air firm ly over
th e brush and brush th rough th orough ly from
th e roots to th e ends. Th en roll up th e h air
strands from th e ends to form a curl. Now
sw itch on th e curling brush (setting 1 or 2)
and allow th e h ot air to w ork on th e curled
h air until it is dry. Finally, press th e COO L
bu tton (FOEN® CURLER FC1000, Figure 1/E) or
sw itch th e sw itch to th e Cold- setting position
(FOEN® CURLER FC600, Figure 4/D ) to cool
th e h air.
Large round brush (Figure 1/B)
FOEN® CURLER FC1000
Th e bristle s of th e large round brush can be
retracted (Figure 3), allow ing easy rem oval of
th e brush once th e curl h as dried.
W ave nozzle (Figure 1/C)
FOEN® CURLER FC1000
Th e w ave nozzle concentrates th e flow of air
to dry sm all areas of th e h air.
H anger (Figures 1/G, 4/G, 6/G)
Th e integral h anger allow s space- saving
storage of th e curling brush , ready for use.
11
Page 12

Cleaning and care
Re gular cle aning w ill considerably exte nd th e
life of th e curling brush .
Alw ays rem ove th e plug from th e m ains
socket before cleaning. W ipe th e curling
brush w ith a dam pened (not w et) cloth and
dry w ith a soft dry cloth . Neve r im m erse th e
curling brush in w ater, and protect it from
dust, dirt and fluff. From tim e to tim e, clean
th e air intak e grille w ith a soft brush .
To clean th e acce ssorie s, im m erse for a sh ort
tim e in soapy w ater, and th en cle an w ith a
sm all h airbrush , rinse and dry. Stand brie fly
w ith th e opening dow nw ards, to allow any
w ater residues to drain off.
Tech nical data
FOEN® CURLER FC1000
M ains voltage: 230 V, 50 H z
Pow er consum ption: 1000 W
FOEN® CURLER FC600
M ains voltage: 220- 240 V, 50/60 H z
Pow er consum ption: 600 W
FOEN® CURLER FC300
M ains voltage: 230 V, 50 H z
Pow er consum ption: 300 W
Th is appliance conform s w ith th e follow ing EC
Directives:
• Low Voltage Directive 2006/9 5/EC
• EM C D ire ctive 89 /336/EEC w ith am e ndm ents
9 2/31/EEC and 9 3/68/EEC
12
Page 13

SK
Vážený zák azník ,
pred použitím h orúcovzdušnej k ulm y si
pozorne prečítajte tento návod na použitie a
ve nu jte osobitnú pozornosť bezpečnostným
upozorneniam na tejto a nasle dujúcej strane!
Návod na použ itie si odložte a odovzdajte h o
aj prípadném u ďalšiem u m ajite ľovi.
Popis m odelu
FO EN® CURLER FC1000
A M alá ok rúh la k efa
B Veľk á ok rúh la k e fa
C Ondulovací nástave c
D Vypínač s dvom a rých losť am i ve ntilátora
E Tlačidlo ch ladnéh o vzduch u
F Posuvný prepínač program u CARE
G Vešiak
FO EN® CURLER FC600
A Ok rúh la k efa (12 m m )
B Ok rúh la k efa (30 m m )
D Vypínač s dvom a rých losť am i ve ntilátora
a nastave ním ch ladnéh o vzduch u
G Vešiak
FO EN® CURLER FC300
A M alá ok rúh la k efa
D Vypínač s dvom a rých losťam i ventilátora
G Vešiak
Bezpečnostné upozornenia
Tento spotrebič zodpove dá ak ceptovaným
tech nologick ým štandardom vzh ľadom na
be zpe čnosť a nem eckém u zák onu o
be zpe čnosti spotrebičov. Napriek tom u ak o
výrobcovia považuje m e za svoju povinnosť
zoznám iť zákazník ov s nasledujúcim i
be zpe čnostným i otázk am i.
Vše obe cná be zpečnosť
• Kulm u m ožno zapojiť len do zásuvk y s
napätím a frek venciou zh odným i s
inform áciam i na typovom štítk u!
• Pozor! Nepouž ívajte túto k ulm u v
blízk osti vaní, um ývadie l ani iných
nádob obsah ujúcich vodu !
• Ak kulm u používate v k úpeľni, po použití ju
odpojte zo zásuvk y. Blízk osť vody predstavuje
rizik o, a to dok onca aj v prípade, že je kulm a
vypnutá.
• H orúcovzdušná k u lm a sa nesm ie použ ívať, ak :
– na k ulm e vidno ak ék oľve k viditeľné znám k y
pošk odenia.
– k ulm a spadla.
• Nik dy nevyť ah ujte zástrčk u zo zásuvk y
ťah aním za k ábe l!
• Ak sa napájací kábel pošk odí, m usí h o vym eniť
výrobca, jeh o servisný agent aleb o podobne
k valifik ovaná osoba, aby nevznik lo
nebezpeče nstvo úrazu.
• Inštalácia ističa na kom penzáciu zvyšk ovéh o
prúdu s nastaveným spúšťacím prúdom m enej
ak o 30 m A v dom ácom prívode elek triny
posk ytuje ďalšiu och ranu. Obráť te sa na
k valifik ovanéh o elek trik ára.
• Neom otávajte napájací k ábe l ok olo k e fy.
• Pravidelne k ontrolujte napájací k ábel, či nie je
pošk odený!
• Aby ste predišli pošk odzovaniu vlasov, nik dy
nezapch ávajte výstupy vzduch u príliš tesným
nam otaním vlasov ok olo okrúh lych k ief s
prih liadnutím na nastavenie rých losti.
• Opravy toh to spotre biča m ôžu vyk onávaťť
len k valifik ovaní servisní tech nici. Nevh odné
opravy m ôžu viesť k značném u
nebezpeče nstvu. V prípade potreby opráv sa
obráťte na oddelenie starostlivosti o
zák azník ov alebo na svojh o autorizovanéh o
predajcu.
13
Page 14
Bezpe čnosť de tí
• Te nto spotrebič nie je urče ný na použ itie
osobam i (vrátane detí) so zníženým i
fyzick ým i, senzorick ým i alebo m entálnym i
sch opnosťam i alebo nedostatk om skúse ností a
znalostí, pok iaľ nie sú pod doh ľadom ale b o
zauče né v súvislosti s použ ívaním spotre biča
osobou zodpove dnou za ich bezpečnosť.
• Uch ovávajte obalové m ate riály, napr. plastové
vreck á, m im o dosah u detí.
• Je potrebné zabezpečiť, aby sa deti s tým to
spotrebičom neh rali.
Na čo treb a dávať pozor pri používaní
k ulm y
• Ak kulm a spadne do vody, ok am žite vytiah nite
zásuvk u zo zástrčk y. Z a žiadnych ok olností
nesiah ajte do vody! Nech ajte spotrebič
sk ontrolovať elek trik árovi!
• Kulm a sa nesm ie používať m ok rá alebo
m ok rým i ruk am i.
• Nesm erujte na k ulm u ž iadny sprej ani vodný
rozprašovač.
• Z bezpečnostných dôvodov sušič vypnite ,
k edyk oľvek h o odlož íte .
• Ok rúh la k e fa je počas prevádzk y h orúca. Je to
norm álne a je to dôsle dk om správnej funk cie
spotrebiča.
• Nasávanie a výstupy vzduch u sa nik dy nesm ú
zak rývať .
• Pravidelne čistite m riež k u nasávania vzduch u
(napr. vysávačom alebo je m nou k efk ou), aby
ste odstránili ak ék oľvek upch anie.
Nene ch ávajte vlasy v blízk osti nasávania
vzduch u.
• Ak sa zablok uje prietok vzduch u počas
prevádzk y h orúcovzdušne j k ulm y (napr.
nečistotam i aleb o ch um áčm i), inte grovaná
poistk a proti preh riatiu spotrebič autom aticky
vypne. Po och ladení (po niek oľk ých m inútach )
sa znova autom atick y zapne.
• Napájací kábel nesm ie prísť počas prevádzk y
do styk u s výstupom vzduch u.
• Výrobca nem ôže prijať žiadnu zodpovednosť
za ak úkoľvek stratu alebo šk odu vyplývajúcu z
nesprávneh o použ itia spotrebiča (napr.
pošk odenia napájacieh o k ábla v dôsledk u
ovinutia ok olo k ulm y).
Lik vidácia
Obalový m ate riál
Obalové m ateriály sú prijate ľné pre životné
prostredie a m ožno ich recyk lovať. Plastové
súčasti sú označené značk am i, napr. > PE<,
> PS< atď. Obalové m ateriály odh oďte do
príslušných k ontajnerov zariadení na
lik vidáciu k om u nálneh o odpadu.
Sym bol na výrobk u alebo na je h o obale
znam ená, ž e s výrobk om sa nesm ie
zaobch ádzať ak o s dom ovým odpadom .
Nam iesto toh o h o tre ba odovzdať v zbe rnom
stredisk u na recyk láciu ele k trick ých alebo
elek tronick ých zariadení. Z abezpečte , že te nto
výrobok bude zlik vidovaný správnym
postupom , aby ste predišli ne gatívnym
vplyvom na životné prostredie a ľudsk é
zdravie , čo by bolo spôsobené nesprávnym
postupom pri jeh o lik vidácii. Podrobne jšie
inform ácie o recyk lácii toh to výrobk u získ ate,
ak zavoláte m iestny úrad vo Vašom bydlisk u,
zbe rné suroviny alebo obch od, v k torom ste
výrobok k úpili.
14
Page 15

Návod na použitie
FOEN® CURLER FC1000
Tento m odel m á posuvný prepínač (obrázok
1/D) s nasle dujúcim i poloh am i:
0 = vypnuté
1 = nízk y prietok vzduch u
2 = vysok ý prietok vzduch u
M á aj posuvný prepínač program u CARE
(obrázok 1/F) na zníženie te pe lnéh o výstupu.
Ten m á nasle dujúce poloh y:
Posun dopredu = znížený výstup tepla
Posun dozadu = norm álny výstup tepla
FOEN® CURLER FC600
Tento m odel m á posuvný prepínač (obrázok
4/D) s nasle dujúcim i poloh am i:
0 = vypnuté
1 = nízk y prietok vzduch u
2 = vysok ý prietok vzduch u
nastavenie ch ladnéh o vzduch u
FOEN® CURLER FC300
Tento m odel m á posuvný prepínač (obrázok
6/D) s nasle dujúcim i poloh am i:
0 = vypnuté
1 = nízk y prietok vzduch u
2 = vysok ý prietok vzduch u Tlačidlo COOL
(obrázok 1/E)
FOEN® CURLER FC1000
Aby sa váš úče s udržal v tvare, do k toréh o ste
si h o uče sali, odporúča sa uk ončiť suše nie
vlasov ch ladným vzduch om .
Stlačte tlačidlo COOL.
Program CARE (obrázok 1/F)
FOEN® CURLER FC1000
Ak ch cete navoliť program CARE na úpravu
účesu a sušenie pri zníže nej teplote, k torá je
šetrnejšia voči vašim vlasom , stlačte te nto
vypínač (obrázok 1/F) a potlačte h o dopredu.
Program CARE m ožno použ ívať pri oboch
nastaveniach posuvnéh o prepínača prietok u
vzduch u (obrázok 1/D).
Ak ch cete program CARE vypnúť , posuňte
prepínač (obrázok 1/F) späť do pôvodnej
poloh y. H orúcovzdušná k ulm a teraz pracuje s
plným tepe lným výk onom .
Nastavenie ch ladnéh o vzduch u
(obrázok 4/D )
FOEN® CURLER FC600
Aby sa váš úče s udržal v tvare, do k toréh o ste
si h o uče sali, odporúča sa uk ončiť suše nie
vlasov ch ladným vzduch om .
Prepnite do poloh y nastave nia ch ladnéh o
vzduch u .
Vým ena príslušenstva (obrázk y 2, 5 a 7)
Potlačte tlačidlo na bok u k ulm y do poloh y
označenej • . Odním te príslušenstvo, k toré
ch ce te vym eniť .
M ie rnym tlak om nasaďte želané príslušenstvo
na spotreb ič. Otočte te le so do poloh y
označenej ► . Bude te počuť , ako
prísluše nstvo zapadne na m iesto.
M alá ok rúh la k efa
(Obrázk y 1/A, 4/A, B a 6/A)
Pred ondu láciou um iestnite pram ene vlasov
pevne okolo k efy a preče sávajte ich dôk ladne
od k orienk ov k u k onče k om . Potom pram e ne
vlasov nam otajte od k onca, aby sa vytvorila
k učera. Te raz zapnite k ulm u (nastave nie 1
alebo 2) a nech ajte h orúci vzduch pôsobiť na
stoče né vlasy, k ým nebudú such é. Nak oniec
stlačte tlačidlo COO L (FO EN® CU RLER FC1000,
obrázok 1/E), alebo prepnite prepínač do
poloh y ch ladnéh o vzduch u (FO EN® CU RLER
FC600, obrázok 4/D ), aby ste vlasy
och ladili.
Veľk á okrúh la k efa (obrázok 1/B)
FOEN® CURLER FC1000
Štetiny veľk ej ok rúh le j k efy m ožno zaťah ovať
(obrázok 3), čo um ož ňuje ľah k é vytiah nutie
k efy po vysuše ní vlasov.
Ondulovací nástavec (obrázok 1/C)
FOEN® CURLER FC1000
Ondu lovací nástavec sústreďuje prúd vzduch u
na suše nie m alých plôch vlasov.
Vešiak (obrázk y 1/G, 4/G, 6/G)
Integrovaný vešiak um ožňuje odk ladanie tak ,
že sa ušetrí m iesto a k ulm a je vž dy pripravená
na použitie .
15
Page 16

Čistenie a starostlivosť
Pravidelné čistenie značne predĺž i životnosť
k ulm y.
Pred čiste ním vždy vytiah nite zástrčk u zo
zásuvk y. Utrite k ulm u navlh če nou (nie
m ok rou) textíliou a vysušte ju m äkk ou such ou
h andričk ou. Kulm u nik dy neponárajte do vody
a ch ráňte ju pred prach om , nečistotam i a
ch um áčm i. Z času na čas vyčistite m riež k u
nasávania vzduch u m äk kou k efk ou.
Prísluše nstvo čistite k rátk ym ponorením do
vody so saponátom a potom h o vyčistite
m alou k efou na vlasy, oplách nite a vysušte.
Postavte h o nak rátk o otvorom nadol, aby
odtie k li zvyšk y vody.
Tech nick é údaje
FOEN® CURLER FC1000
Napájacie napätie : 230 V, 50 H z
Spotreb a energie: 1000 W
FOEN® CURLER FC600
Napájacie napätie : 220 – 240 V, 50/60 H z
Spotreb a energie: 600 W
FOEN® CURLER FC300
Napájacie napätie : 230 V, 50 H z
Spotreb a energie: 300 W
Tento spotrebič zodpove dá nasledujúcim
sm erniciam ES:
• Sm ernica 2006/9 5/ES pre elek trick é zariadenia
určené na používanie v rám ci určitých lim itov
napätia,
• Sm ernica o elek trom agnetick ej k om patibilite
89 /336/EH S vrátane úprav 9 2/31/EH S a
9 3/68/EH S.
16
Page 17
CZ
Vážená zák aznice,
vážený zák azník u,
přečtěte si lask avě pečlivě tento návod k
použ ití. Dbe jte především bezpečnostních
pok ynů na prvních stránk ách toh oto návodu k
použ ití! Návod k použití lask avě usch ovejte
pro pozdější vyh ledání. Předejte jej dále
případným novým vlastník ům přístroje.
Popis přístroje
FO EN® CURLER FC1000
A Kulatý kartáč m alý
B Kulatý kartáč ve lk ý
C Ondulovací trysk a
D Posuvný vypínač pro zapnutí
a vypnutí s volbou dvou stupňů
proudění te pléh o vzduch u
E Tlačítk o pro vypínání oh řevu (COO L)
F Posuvný vypínač «Šetrnější program » (CARE)
G Závěsné očk o
FO EN® CURLER FC600
A Kulatý kartáč (12 m m )
B Kulatý kartáč (30 m m )
D Posuvný vypínač pro zapnutí a vypnutí s
volbou dvou stu pňů proudění tepléh o
vzduch u a vypnutím oh řevu
G Závěsné očk o
FO EN® CURLER FC300
A Kulatý kartáč m alý
D Posuvný vypínač pro zapnutí a vypnutí s
volbou dvou stu pňů proudění tepléh o vzduch u
G Závěsné očk o
Bezpečnostní pok yny
Bezpečnost toh oto spotřebiče odpovídá
platným tech nick ým předpisům a zák onu o
be zpe čnosti spotřebičů. Jak o výrobce m ám e
však nicm éně zapotřebí Vás seznám it s
následujícím i bezpečnostním i pok yny.
Obe cná bezpe čnost
• Přístroj se sm í připojit pouze k tak ové
elek trick é síti, je jíž napětí a k m itočet souh lasí
s údaji na typovém štítk u!
• Pozor! H ork ovzdušná k ulm a nesm í být
ulož ena ani použ ívána v blízk osti vany,
um ývadla ani jiných nádob s vodou.
• Pok ud je k ulm ofén použ íván v k oupe lně,
odpojte h o po použití ze zásuvk y, protože
blízk ost vody představuje ne b e zpečí i v
případě, že je k ulm ofén vypnutý.
• H ork ovzdušná k u lm a nesm í být použ ívána,
pok ud:
– je viditelně pošk ozena.
– spadla na zem .
• Nik dy nevytah ujte za připojovací kabe l
sít’ovou zástrčk u ze zásuvk y!
• Ve stavění proudovéh o ch rániče s jm enovitým
reziduálním proudem m enším než 30 m A v
dom ovní instalaci nabízí přídavnou och ranu.
Obrat’te se na svéh o elek troinstalatéra.
• Přívodní šňůru neovíje jte k olem přístroje.
• Pře zk oušejte lask avě občas sít’ový přívodní
k abe l, ne ní- li pošk oze ný.
• Výstupní otvory na k ulatých kartáčích nesm ějí
být při použ ívání jednotlivých stupňů
proudění te pléh o vzduch u zce la zak ryty, aby
nedošlo k pošk ození vlasů.
17
Page 18

• Opravy toh oto spotřebiče sm í provádět
pouze odborně vyšk ole ní pracovníci.
Nesprávně provedené opravy m oh ou
způsobit značné šk ody. Potřebujete- li
opravu, obrat’te se na naši zák aznick ou
službu nebo na svéh o autorizovanéh o
prodejce.
Zabezpečení před dětm i
• Te nto spotřebič není navržen pro použití osoba-
m i (včetně dětí) se sníž e ným i fizyckým i
sch opnostm i, se sníž e nou citlivostí ne b o s
m entálním postižením nebo osobam i bez potřebných zk ušeností a znalostí, pok ud nejsou
pod doh lede m instruováni při používání spotře-
biče osobou odpovědnou za jejich bezpečnost.
• Je be zpodm ínečnĕ nutné dbát pok ynů v tom -
to návodu k použití a tyto pok yny vh odnĕ dĕtem vysvĕtlit.
• Dĕti by nĕm ĕly použ ívat vysouše č vlasů be z do-
zoru.
• Dáve jte pozor, aby si s přístroje m neh rály děti.
Při používání h ork ovzdušné k ulm y se
řiïte následujícím i zásadam i
• Spadne- li přístroj do vody, vytáh něte
ok am žitě zástrčk u. Nik dy ne sah ejte do vody!
Přístroj pak nech te odborník em přezk ouše t!
• Nik dy ne pou žívejte přístroj, je- li m ok rý,
nebo m áte - li m ok ré ruce.
• Nerozprašujte spreji a vodním i rozprašovači
do přístroje.
• Jak m ile přístroj odlož íte, je nutno je j z
be zpe čnostních důvodů vypnout.
• Z funk čních důvodů m á k ulatý k artáč za
provozu vysok ou teplotu!
• M říž k a pro nasávání vzduch u nesm í být za
žádných ok olností zak ryta
• Při znečištění je tře ba m řížk u pro nasávání
vzduch u očistit (např. vysavače m ne bo
jem ným kartáče m ). Do oblasti m řížk y pro
nasávání vzduch u by nem ěly vnik nout vlasy.
• Z abrání- li se průch odu vzduch u při provozu
toh oto přístroje (např. znečištěním ), tak se
přístroj autom atick y vypne pom ocí
zabudované och rany proti nadm ěrné teplotě a
po och laze ní (něk olik m inut) se opět zapne.
• Přívodní sít’ový k abel se nesm í při provozu
přístroje dotýk at otvoru pro odvod vzduch u.
• Výrobce neručí za případné šk ody způsobené
nevh odným způsobem použití přístroje nebo
je h o ch ybnou obslu h ou (např. Pošk ození
připojovacíh o k abelu navíjením ok olo
přístroje).
Lik vidace
Obalový m ate riál
Použ ité obalové m ate riály jsou e k ologick é a
recyk lovatelné. Um ělé h m oty jsou označe ny
následujícím způsobem : >PE<, > PS<, atd.
Obalový m ateriál zlik vidu jte v souladu s jeh o
označením ve speciálních sběrných dvore ch ve
své obci.
Starý spotřebič
Sym bol na výrobk u nebo
jeh o balení udává, že tento výrobek nepatrí do
dom ácíh o odpadu. Je nutné odvézt h o do
sbernéh o m ísta pro recyk laci elek trick éh o a
elek tronick éh o zarízení. Zajištením správné
lik vidace toh oto výrobk u pom užete zabránit
negativním dusledk um pro životní prostredí a
lidsk é zdraví, k te ré by jinak byly zpusobe ny
nevh odnou lik vidací toh oto výrobk u.
Podrobnejší inform ace o recyk laci toh oto
výrobk u zjistíte u príslušnéh o m ístníh o úradu,
služ by pro lik vidaci dom ovníh o odpadu nebo v
obch ode , k de jste výrobek zak ou pili.
18
Page 19

Pok yny k obsluze
FOEN® CURLER FC1000
Tento m odel je vybaven posuvným vypínače m
(obr. 1/D ), k te rý lze nastavit do násle dujících
poloh :
0 = VYPNUTO
1 = slabý proud te pléh o vzduch u
2 = silný proud te pléh o vzduch u
a posuvným přepínačem (obr. 1/F) «Šetrnější
program » (CARE) pro šetrnější oh řev, k terý m á
následující poloh y:
spínač v přední poloze = snížený oh řev
spínač v zadní poloze = norm ální oh řev
FOEN® CURLER FC600
Tento m odel je vybaven posuvným vypínače m
(obr. 4/D ) s následujícím i poloh am i:
0 = vypnuto
1 = slabý proud te pléh o vzduch u
2 = silný proud te pléh o vzduch u
vypnutí oh řevu
FOEN® CURLER FC300
Tento m odel je vybaven posuvným vypínače m
(obr. 6/D ), k te rý lze nastavit do násle dujících
poloh :
0 = VYPNUTO
1 = slabý proud te pléh o vzduch u
2 = silný proud te pléh o vzduch u
Tlačítk o pro vypínání oh řevu
(COOL) (obr. 1/E)
FOEN® CURLER FC1000
Aby tvar daný vlasům při vysoušení lépe a
déle držel, je tře ba zak ončit vysoušení vlasů
och lazeným vzduch em .
Stisk něte tlačítk o pro vypínání oh řevu (COO L).
Še trnější program (CARE)
(obr. 1/F)
FOEN® CURLER FC1000
Posunutím přepínače (obr. 1/F) dopředu
(přepínač stisk něte a posuňte ) zvolíte še trnější
program (CARE) pro tvarování účesu a
vysouše ní při nižší te plotě, k te rá je šetrnější k
vlasům . Te nto program lze používat v obou
poloh ách posuvnéh o vypínače (obr. 1/D ).
Přesu nu tím přepínače do vých ozí poloh y (obr.
1/F) vypne te šetrnější program (CARE) a
přístroj znovu pracuje na plný výk on.
Vypnutí oh ře vu (obr. 4/D)
FOEN® CURLER FC600
Pok ud ch cete dosáh nout, aby tvar daný
vlasům při vysoušení drž e l lépe a déle, je třeba
nak onec vysouše né vlasy och ladit ch ladným
vzduch em .
Nastavte vypínač do poloh y pro vypnutí
oh řevu .
Vým ěna nástavců (obr. 2, 5 a 7)
Stisk něte tlačítk o na straně držadla a držadlo
otočte do poloh y • . Nástavec sejm ěte .
Nástave c nasaïte na držadlo, leh ce na něj
zatlačte a držadlo otočte do poloh y ► .
Jak m ile nástavec zask očí do provozní poloh y,
ozve se slyšitelný zvuk .
M alý k ulatý k artáč (obr. 1/A, 4/A, 4/B a
6/A)
Pram e n vlasů před navíjením pevně přiložte
na k artáč a řádně je proče se jte od k ořínk ů až
k e k onečk ům . Pram en navíje jte od k onečk ů
vlasů. Z apněte k ulm u (stupe ň 1 nebo 2) a
nech ejte působit te plý vzduch , dok ud vlasy
neusch nou. Nak onec stisk něte tlačítk o COOL
(FOEN® CURLER FC1000, obr. 1/E) nebo
nastavte spínač do poloh y pro vypnutí oh řevu
(FOEN® CURLER FC600, obr. 4/D ), ch ce te li si och ladit vlasy.
Velk ý k ulatý k artáč (obr. 1/B)
FOEN® CURLER FC1000
Štětiny velk éh o k ulatéh o k artáče lze sk lopit
(obr. 3), aby bylo m ožné k artáč snadněji
vytáh nout ze such é k adeře.
Ondulovací trysk a (obr. 1/C)
FOEN® CURLER FC1000
Při vysoušení nasm ěruje ondulovací trysk a
proud vzduch u na určitou část úče su .
Závěsné očk o (obr. 1/G, 4/G a 6/G)
Z ávěsné očk o um ožňu je uložit h ork ovzdušnou
k ulm u tak , aby zabírala m inim ální prostor a
současně byla ok am ž itě připravena k použití.
19
Page 20

čištění a údržba
Pravidelná údržba přispívá k prodlouž e ní
životnosti h ork ovzdušné k ulm y.
Před čištěním vždy odpojte k ulm u od sítě.
Přístroj očistěte vlh k ým h adřík em a otře te
dosuch a such ým h adřík em . Přístroj ne sm í být
ponořen do vody. Kulm u ch raňte před
prach e m , nečistotam i a te xtilním i vlák ny.
M říž k u pro nasávání vzduch u je třeba občas
očistit m ěk k ým štětcem .
Nástavce lze krátce ponořit do vody s m ýdlem
a očistit k artáčk em na vlasy. Nástavce
oplách něte vodou a osušte. Po oplách nutí je
na ch víli postavte otvorem dolů, aby z nich
vytek la voda.
Tech nick é údaje
FOEN® CURLER FC1000
Napětí sítě: 230 V, 50 H z
Přík on: 1000 W
FOEN® CURLER FC600
Napětí sítě: 220- 240 V, 50/60 H z
Přík on: 600 W
FOEN® CURLER FC300
Napětí sítě: 230 V, 50 H z
Přík on: 300 W
Tento spotřebič odpovídá následujícím
sm ěrnicím ES:
• Sm ěrnice pro nízk é napětí 2006/9 5/EC
• Sm ěrnice pro ele k trom agnetick ou slučite lnost
89 /336/EEC s dodatk y 9 2/31/EEC a 9 3/68/EEC
20
Page 21

PL
Szanow ni k lienci!
Prosim y o dok ładne przeczytanie tej instruk cji
obsługi.
Należy szczególnie zw rócić uw agę na zasady
be zpie czeństw a, k tóre podano na pierw szych
stronach ! Instruk cję obsługi należy
przech ow yw aćw ce lu k orzystania z nie j w
późniejszym term inie. Instruk cję tę należy
przek azaćew entualnem u następne m u
użytk ow nikow i tego sprzętu.
Opis sprzętu
FO EN® CURLER FC1000
A Szczotk a ok rągła m ała
B Szczotk a ok rągła duża
C Dysza do ondu lacji
D Prze suw ny w lacznik / w ylacznik z
2- stopniow a regulacja naw iew u
E Przycisk ch łodzenie (Cool)
F Przesuw ny prze łącznik
«Program pielęgnacja»
(«CARE Program »)
G Uch w yt do podw ieszania
FO EN® CURLER FC600
A Szczotk a ok rągła (12 m m )
B Szczotk a ok rągła (30 m m )
D Prze suw any w łącznik /w yłącznik z 2-
stopniow ą regulacją naw ie w u i trybe m
ch łodnego pow ietrza
G Uch w yt do podw ieszania
FO EN® CURLER FC300
A Szczotk a ok rągła m ała
D Prze suw ny w łącznik / w yłącznik z 2-
stopniow ą regulacją naw ie w u
G Uch w yt do podw ieszania
Zasady bezpieczeństw a
Bezpiecze ństw o tego urządzenia odpow iada
uznanym zasadom tech nik i oraz ustaw ie o
be zpie czeństw ie urządzeń. Jak o producent
sprzętu szczególnie zalecam y stosow anie się
do poniższych zasad be zpieczeństw a.
Ogólne zasady bezpieczeństw a
• Sprzęt te n m ożna podłączaćtylk o do źródła
zasilania, k tóre go napięcie jest zgodne z
podanym na tabliczce znam ionow ej!
• Uw aga: Lok ów k i nie należy używ aćw
pobliżu w anien, um yw alek lub
innych zbiornik ów na w odę.
• Gdy k orzystasz z lok ów k i w łazience, odłącz ją
od prądu, gdy nie jest już używ ana. Blisk ość
w ody m oże stanow ić zagrożenie naw e t
pom im o tego, że suszarka je st w yłączona.
• Lok ów k i nie należy w łączać, jeśli:
– Lok ów k a w yk azuje w idoczne oznak i
uszk odze nia.
– Lok ów k a została upuszczona na ziem ię.
• W tyk sieciow y prze w odu zasilającego nigdy
nie pow inien byćw yjm ow any z gniazdk a prze z
pociąganie za przew ód!
• Dodatk ow ą och ronę zapew nia w b udow anie w
instalacji dom ow ej zabe zpieczenia prze ciw
prądom błądzącym z poziom em w yzw olenia w
przypadk u w ystąpienia prądu o natężeniu
m niejszym niż 30 m A. W te j spraw ie należy
zw rócićsię do odpow iednie go elek tryk a
instalatora.
• Nie należy ok ręcaćprzew odu zasilającego
w ok ół urządzenia.
• Od czasu do czasu należy spraw dzać stan
k abla zasilające go!
• Aby unik nąćuszk odzenia w łosów , otw ory
w ypływ u pow ietrza znajdujące się w szczotce
ok rągłej, po w łączeniu w entylatora nigdy nie
pow inny być szczelnie zasłaniane.
21
Page 22

• Urządzenie m oże byćnapraw iane w yłącznie
przez specjalistów . Niefach ow e naprawy
m ogą prowadzićdo w ystąpienia dużych
zagrożeń dla bezpie czeństw a w użytk owaniu
urządzenia. W razie k onieczności
przeprow adzenia naprawy należy zw rócićsię
do se rw isu lub autoryzow anego sprzedaw cy.
Zagrożenie dla dzieci
• To urządzenie nie jest przeznaczone do użytk u
przez osoby (w tym dzieci) o ograniczonych
zdolnościach fizycznych , sensorycznych czy
um ysłow ych oraz nie posiadających odpow ied-
niej w iedzy i dośw iadczenia ch yba że pod nadzorem lub z instruk tażem dotyczącym
obch odzenia się z tym urządzenie m prow adzonym przez osobę odpow iedzialną za bezpieczeństw o obsługujące go.
• Z aw artych w te j instruk cji obsługi w sk azów ek
należy bezw arunk ow o przestrzegać i zapoznać
z nim i dzieci.
• Dzieci nie pow inny używ ać suszark i do w ło-
sów bez nadzoru.
• Nie w olno dopuścić do tego, aby urządzeniem
baw iły się dzieci.
Na co nale ży szczególnie zw rócić uw agę
podczas e k sploatacji lok ów k i
• Jeśli suszarka zostanie zanurzone w w odzie,
należy natych m iast w yciągnąć w tyczk ę z
gniazdk a. W żadnym w ypadk u nie w olno
ch w ytaćje j zanurzonej pod w odą! Urządzenie
dostarczyćdo specjalisty celem jego
spraw dzenia!
• Urządzenie nie m oże byćw ilgotne lub
ch w ytane m ok rym i ręk om a.
• Nie należy k ierow aćcieczy w postaci
aerozolu lub strum ienia w ody w kie runk u
urządzenia.
• Z e w zględów bezpiecze ństw a w m om encie
odłoże nia urządze nia należy zaw sze je
w yłączyć.
• Podczas pracy szczotk a okrągła, ze w zględu
na spełniane funk cje , jest gorąca!
• Otw ory napływ u pow ietrza nigdy nie pow inny
byćzasłaniane .
• W przypadk u zabrudzenia k ratk ę napływ u
pow ietrza należy oczyścić (np. za pom ocą
odk urzacza lub m ięk k iej szczotk i). W łosy nie
pow inny znajdow aćsię w ok olicy k ratk i
napływ u pow ietrza.
• Jeśli podczas pracy urządzenia przepływ
pow ietrza jest utrudniony (np. przez
zabrudzenie), nastąpi jego autom atyczne
w yłączenie za pom ocą w budow anego syste m u
k ontroli te m peratury, po czym po och łodzeniu
(po upływ ie paru m inut) nastąpi znow u jego
w łączenie .
• Podczas pracy urządzenia k abe l zasilający nie
pow inien dotyk aćdo otw oru w ypływ u
pow ietrza.
• Jeśli urządzenie jest używ ane niezgodnie z
przeznaczenie m lub nieprawidłow o
obsługiw ane, producent nie ponosi
odpow iedzialności za ew entualne pow stałe
szk ody (np. Napraw a uszk odzonego
przew odu zasilające go w sk utek okręcenia go
w ok ół urządzenia).
Re cyk ling
M ateriał opak ow ania
M ate riały opak ow ania m ogą bez ograniczeń
zostaćpow tórnie przetw orzone. Elem enty z
tw orzyw sztucznych są oznak ow ane, np.
> PE<, >PS<, itd. Usuw aćm ate riały opak ow ań
zgodnie z ich oznaczeniem w k om unalnych
zak ładach utylizacyjnych , do przew idzianych
w tym ce lu pojem nik ów zbiorczych .
W yek sploatow ane urządzenie
Sym bol na produk cie lub na
opak ow aniu oznacza, ze tego produk tu nie
w olno trak tow aćtak , jak innych odpadów
dom ow ych . Nalezy oddaćgo do w łasciw ego
punk tu sk upu surow ców w tórnych
zajm ującego się złom ow anym sprzętem
elek trycznym i elek tronicznym . W łasciw a
utylizacja i złom ow anie pom aga w elim inacji
niek orzystnego w pływ u złom ow anych
produk tów na srodow isk o naturalne oraz
zdroie. Aby uzysk aćszczegółow e dane
dotyczące m ozliw osci recyk lingu ninie jszego
urządzenia, nalezy sk ontak tow aćsię z
lok alnym urzędem m iasta, słuzbam i
oczyszczania m iasta lub sk lepem , w k tórym
produk t został zak upiony.
22
Page 23

W sk azów k i dotyczące obsługi
FOEN® CURLER FC1000
Ten m odel w yposażony jest w prze suw ny
przełącznik (rysune k 1/D ) z następującym i
pozycjam i prze łączania:
0 = W ył
1 = m ały strum ień pow ietrza
2 = duży strum ień pow ietrza oraz przesuw ny
przełącznik (rysune k 1/F)
«Program pielęgnacja» («CARE Program »),
służący do zm niejszania m ocy nagrze w ania, z
następującym i pozycjam i przełączania:
Prze łączanie do przodu = zm niejszona m oc
nagrze w ania
Prze łączanie do tyłu = norm alna m oc
nagrze w ania
FOEN® CURLER FC600
Ten m odel w yposażony jest w prze suw ny
przełącznik (rysune k 4/D ) z następującym i
pozycjam i prze łączania:
0 = W ył
1 = m ały strum ień pow ietrza
2 = duży strum ień pow ietrza
tryb ch łodne go pow ietrza
FOEN® CURLER FC300
Ten m odel w yposażony jest w prze suw ny
przełącznik (rysune k 6/D ) z następującym i
pozycjam i prze łączania:
0 = W ył
1 = m ały strum ień pow ietrza
2 = duży strum ień pow ietrza
Przycisk ch łodze nie (COOL)
(rysunek 1/E)
FOEN® CURLER FC1000
W celu lepszego ułoże nia w ysuszonych
w łosów należy je och łodzićzim nym
strum ienie m pow ietrza.
W cisnąćprzycisk ch łodzenie (COOL).
Program piele gnacja (CARE)
(rysunek 1/F)
FOEN® CURLER FC1000
Prze staw ienie do przodu prze łącznik a
(rysunek 1/F) (w cisnąći prze sunąć) pow oduje
w łączenie program u pielęgnacja (CARE)
służące go do utrw alania i w ysuszenia
ułożonych w łosów strum ienie m pow ietrza o
um iark ow anej tem peraturze. Służą do tego
oba położenia przesuw ne go przełącznik a
(rysunek 1/D ).
Prze staw ienie do tyłu przełącznik a (rysunek
1/F), w je go w yjściow e położe nie pow oduje
w yłączenie program u pielęgnacja (CARE) i
pracę urządze nia z pełną m ocą nagrzew ania.
Tryb ch łodnego pow ietrza (rysu nek 4/D)
FOEN® CURLER FC600
W celu lepszego ułoże nia w ysuszonych
w łosów należy je och łodzić zim nym
strum ienie m pow ietrza.
W tym celu należy przełączyć urządzenie w
tryb ch łodnego pow ietrza .
W ym iana ele m entów w yposażenia
(rysunk i 2, 5 i 7)
W cisnąćdźw ignię znajdującą się na części
ch w ytow ej, k tórą następnie należy obrócićw
położenie • . Z djąćelem ent w yposażenia.
Elem ent w yposażenia lek k o w cisk ając
nałożyćna częśćch w ytow ą. Część ch w ytow ą
obrócićw położenie ► . Elem ent w yposażenia
jest stabilnie zam ontow any w zatrzask u, gdy
dało się słyszećw yraźne k lik nięcie.
Szczotk a ok rągła m ała
(rysunk i 1/A, 4/A, 4/B i 6/A)
Pasm a w łosów um ieścićprzed nak ręcenie m
lok ów nad szczotk ą i szczotk ow aćje w
k ierunk u od nasady w łosów do ich k ońców .
Następnie pasm a w łosów nak ręcaćw lok i,
rozpoczynając od k ońców w łosów .
W łączyćurządzenie (stopie ń 1 lub 2) i
pozostaw ićpasm o w łosów do w ysuszenia pod
działaniem ciepłego strum ienia pow ietrza.
Na k oniec, w ce lu och łodzenia w cisnąć
przycisk ch łodzenia (COO L) (FOEN® CURLER
FC1000, rysune k 1/E) lub przestaw ić
przełącznik w położe nie ch łodzenia (FOEN®
CURLER FC600, rysunek 4/D ).
Szczotk a ok rągła duża (rysune k 1/B)
FOEN® CURLER FC1000
W łosie duże j, ok rągłe j szczotk i m ożna
ch ow ać(rysunek 3). Dzięki tem u szczotk ę
m ożna łatw o w ysunąćz w ysuszonych lok ów .
23
Page 24

Dysza do ondulacji (rysune k 1/C)
FOEN® CURLER FC1000
Dysza do ondulacji um ożliw ia k once ntrację
strum ienia pow ietrza w celu w ysuszenia
w ybranych partii w łosów .
Uch w yt do podw ieszania
(rysunk i 1/G, 4/G i 6/G)
Uch w yt do podw ieszania lok ów k i um ożliw ia
jej w ygodne przech ow yw anie zaw sze pod ręk ą.
Czyszczenie i k onserw acja
Re gularne czyszczenie przyczynia się do
przedłużenia czasu e k sploatacji lok ów ki.
Prze d k ażdym czyszczenie m należy zaw sze
w yjąćw tyk sieciow y. Urządzenie w ycieraćtylk o
m ięk k ą, w ilgotną ściereczk ą i w ysuszyćm ięk k ą
ściereczk ą. Nigdy nie zanurzaćurządze nia w
w odzie. Ch ronićurządzenie przed k urzem ,
brudem i zapylenie m . Od czasu do czasu
k ratk ę zasysania pow ie trza należy czyścić
m ięk k im pędzlem .
Elem enty w yposażenia należy przez k rótk i
czas pozostaw ićw w odzie z dodatk iem m ydła,
na k oniec w yczyścićm ałą szczotk ą do w łosów .
Następnie opłuk aći w ysuszyć. W celu lepszego
usu nięcia ew entualnych pozostałości w ody,
przez k rotk i czas pozostaw ićotw orem do dołu.
Dane tech niczne
FOEN® CURLER FC1000
Napięcie sieci: 230 V, 50H z
M oc znam ionow a: 1000 W
FOEN® CURLER FC600
Napięcie sieci: 220- 240 V, 50/60 H z
M oc znam ionow a: 600 W
FOEN® CURLER FC300
Napięcie sieci: 230 V, 50 H z
M oc znam ionow a: 1300 W
Urządzenie spełnia w ym agania Dyre k tyw Unii
Europejsk iej:
• Dyre k tyw a 2006/9 5/EC – nisk ie napięcie
• Dyre k tyw a 89 /336/EEC ze zm ianam i
9 2/31/EEC oraz 9 3/68/EEC – k om patybilność
elek trom agnetyczna
24
Page 25

H
Tisztelt vásárlónk !
Kérjük , olvassa végig figyelm esen ezt a
h asználati útm utatót. Minde nek előtt vegye
figye le m be az e lső oldalak on találh ató
biztonsági előírások at! Kérjük , őrizze m eg a
h asználati útm utatót, m ivel a k ésőbbie k be n
m ég szük sége leh et rá, és adja tovább a
k észülék esetle ge s k ésőbbi tu lajdonosának is.
A k észülék ek leírása
FO EN® CURLER FC1000
A Kis k örk efe
B Nagy k örk e fe
C H ullám osító fúvók a
D K i- és bek apcsoló, 2 sebe sségfok ozattal
E H ideg leve gő (COOL) gom bja
F A h ajk ím élő üzem m ód (CARE) tolók apcsolója
G Ak asztó
FO EN® CURLER FC600
A Kis k örk efe (12 m m )
B Kis k örk efe (30 m m )
D K i- és bek apcsoló, 2 sebe sségfok ozattal és
h ide g levegõ tolók apcsolóval
G Ak asztó
FO EN® CURLER FC300
A Kis k örk efe
D K i- és bek apcsoló, 2 sebe sségfok ozattal
G Ak asztó
Biztonsági előírások
Ezen k észülék ek biztonsága m egfe le l a
tech nik a jelenle gi állásának és a
k észülék biztonsági törvénynek . M i azonban
gyártók ént ennek ellenére úgy gondoltuk ,
h ogy érdem es fe lh ívni vásárlóink figyelm ét az
alábbi biztonsági előírások ra.
Általános biztonság
• A k észülék et csak olyan ele k trom os h álózatra
szab ad csatlak oztatni, am elynek feszültsége
és frek venciája m egegye zik a típustáblán
feltüntetett érték ek k el!
• Figyelem ! A h ajform ázót ne
h asználjuk fürdők ád, m osdók agyló
vagy m ás, vizet tartalm azó edény
k özelében.
• H a a k észülék et a fürdőszobában h asználja,
h asználat után szünte sse m eg az e szk öz
áram ellátását, m ert a víz köze lsége
áram ütésveszélyt jelent k ik apcsolt állapot
m elle tt is.
• A h ajform ázót ne m szabad h asználni, h a:
– a h ajform ázón láth ató sérülés van,
– a h ajform ázó ese tle g le e se tt.
• A h álózati csatlak ozót soh a ne a vezeték nél
fogva h úzzuk k i az aljzatból!
• További biztonságot nyújth at egy < 30 m A
névle ge s k ioldási áram erősségű h ibaáram védő
áram k ör beépítése az elek trom os h álózatba.
Forduljunk villanyszerelőh öz!
• A ve zeték et ne csavarjuk a k észülék k öré.
• Re ndszerese n e lle nőrizzük a vezeték ese tle ges
sérülése it!
• A h aj sérülését elk erülendő, a k örk e féken
találh ató levegő k ifúvó nyílások at –
fok ozattól függőe n – ne fe djük el túlságosan
szorosan.
• A k észülék en javítások at csak szak em be r
végezh et. A szak szerűtlen javítások je lentős
k árok at ok ozh atnak . Am ennyibe n javításra
van szük ség, fordu ljon a vevőszolgálath oz
vagy a h ivatalos m árk ak eresk edőh öz.
25
Page 26
A gye rm ek ek biztonsága érdek ébe n
• Korlátozott fizik ai, érzékszervi vagy szellem i k épességû, ill. a k észülék kezeléséh e z szük séges
tapasztalattal és ism erete k k el nem rende lk ezõ
szem élyek (beleértve a gyerm ek ek et) a k észülék et k izárólag csak az értük felelõs szem ély által végzett betanítás és k ezdeti fe lü gye le t
után üzem elte th etik és h asználh atják .
• A h asználati útm utató biztonsági előíásait ok -
ve tle nül be k ell tartani, és a gyerm ek ek nek
m egfelelő m ódon el k ell m agyarázni.
• Soh ase m űk ödtesse a k észülék et felügyelet nélk ül, és gyerm ek ek je lenlétébe n k ülönösen k örültek intően h asználja!
• Csom agolóanyagok (pl. fóliazacskók ) nem gyerm ek ek k ezébe valók .
• Győződjön m eg, h ogy gyerm ek ek nem tudják
a készülék et játék céljára h asználni!
A h ajform ázó h asználata során vegyük
figye lem be az alábbiak at
• H a a k észülék vízbe esik , h aladék talanul k i k ell
h úzni a h álózati csatlak ozót! Se m m ik éppen
sem szabad a k észülék után a vízbe nyúlni! Ezt
k övetőe n elle nőriztessük a k észülék et
szak em be rrel!
• A k észülék et nem érh eti nedvesség, és ne m
szabad nedves k ézze l h asználni.
• A k észü lék be ne fújjon be le sprayje l vagy
vízperm ettel.
• Am int lete sszük a k észülék et, biztonsági
ok okból azonnal ki k ell k apcsolni!
• A k örk efe a h asználat során, m űk ödéséből
eredőe n felforrósodik !
• A leve gőbe szívó nyílások at soh ase tak arjuk el!
• Szennye ződés e se tén a le vegőbeszívó rácsot
m eg k ell tisztítani (pl. porszívóval vagy finom
szőrű k efével). H ajszál ne k erüljön a
leve gőb e szívó nyílás rácsának k özelébe .
• Am ennyib e n az üzem eltetés során csök k en a
k észülék le vegőáte re sztő k épessége (pl.
szennyeződés m iatt), úgy a beépített
túlm elegedés- gátló autom atik usan k i- , m ajd
leh űlés (néh ány pe rc elte lte ) után újra
be k apcsolja a készülék et.
• A k észülék üzem eltetése során a vezeték nem
érintk ezh et a leve gő k ifúvó nyílással.
• A k észülék nem re nde ltetéssze rű vagy
h elyte le n h asználata ese tén a gyártó ne m
vállal felelőssége t az e setleges k árok ért (pl.,
h a a veze ték m egh ibásodik am iatt, h ogy a
k észülék k öré tek erték ).
Ártalm atlanítás
Csom agolóanyag
A csom agolásh oz felh asznált anyag
k örnyezetk ím élő és újra felh asználh ató. A
m űanyag részek k ülön m e g vannak jelölve, pl.
> PE<, >PS< stb. A csom agolóanyagot a rajta
lévő je lölésnek m e gfelelően az ártalm atlanító
h elye k en az arra k ijelölt gyűjtőtartályba
ártalm atlanítsa.
Elh asznált k észülék
A term ék en vagy a csom agoláson találh ató
szim bólum azt jelzi, h ogy a te rm ék nem
k ezelh e tő h áztartási h ulladék k ént. Eh elye tt a
term ék e t e l k ell szállítani az elek trom os és
elek tronik ai készülék ek újrah asznosítására
szak osodott m egfe le lő be gyűjtő h elyre. Azzal,
h ogy gondosk odik ezen term ék h elyes
h ulladék ba h elye zéséről, se rgit m egelőzni
azok at, a k örnye ze tre és az em be ri egészségre
gyak orolt potenciális k e dve zőtlen
k övetk ezm ények et, am elyek et e lle nk ező
esetben a term ék ne m m egfelelő
h ulladék kezelése ok ozh atna. H a részle te sebb
tájék oztatásra van szük sége a term ék
újrah asznosítására vonatk ozóan, k érjük , lépjen
k apcsolatba a h elyi önk orm ányzattal, a
h áztartási h ulladék ok k ezelését végző
szolgálattal vagy azzal a bolttal, ah ol a
term ék e t vásárolta.
26
Page 27

Ke ze lési útm utató
FOEN® CURLER FC1000
Ezen a m odellen találh ató egy tolók apcsoló
(1/D ábra) a követk ező állások k al:
0 = KI
1 = gyenge sebe sségfok ozat
2 = erős sebe sségfok ozat valam int a h ajk ím élő
üzem m ód (CARE) tolók apcsolója (1/F ábra) a
fűtőteljesítm ény csök ke ntése céljából, az lább i
állások kal:
elülső állás = csökk entett fűtőte lje sítm ény
h átsó állás = szok ásos fűtőteljesítm ény
FOEN® CURLER FC600
Ezen a m odellen találh ató egy tolók apcsoló
(4/D ábra) a követk ezõ állások k al:
0 = KI
1 = gyenge sebe sségfok ozat
2 = erõs se bességfok ozat
h ideg leve gõ tolók apcsója
FOEN® CURLER FC300
Ezen a m odellen találh ató egy tolók apcsoló
(6/D ábra) a követk ező állások k al:
0 = KI
1 = gyenge sebe sségfok ozat
2 = erős sebe sségfok ozat
H ideg le vegő (COO L) gom bja
(1/E ábra)
FOEN® CURLER FC1000
A szárítás k özbe n m egform ált frizura jobban
és tovább tart, h a h ide g levegőve l feje zzük be
a h ajszárítást.
Nyom juk m eg a h ideg leve gő (COOL) gom bját.
H ajk ím élő üze m m ód (CARE)
(1/F ábra)
FOEN® CURLER FC1000
A k apcsoló (1/F ábra) m egnyom ásával és
előretolásával állíth ató be a h ajk ím élő (CARE)
üzem m ód, am ely csök kente tt, h ajk ím élő
h őm érsék leten teszi le h e tővé a h aj form ázását
és szárítását. Az 1/D tolók apcsoló m indk ét
fok ozatában h asználh ató.
Az 1/F k apcsolót k iindulási h elyzetébe
visszatolva k ik apcsolh ató a h ajk ím élő (CARE)
üzem m ód, és a készülék újra te lje s
fűtőteljesítm énnyel m űk ödik .
H ideg le vegõ tolók apcsolója (4/D ábra)
FOEN® CURLER FC600
A szárítás k özbe n m egform ált frizura jobban
és tovább tart, h a h ide g levegõvel fe je zzü k be
a h ajszárítást.
Tolju k a tolók apcsolót a kívánt pozícióba .
A tartozék ok cseréje (2., 5. és 7. ábra)
Nyom juk m eg a nyél oldalán találh ató
gom bot, és forgassuk el a nye le t • állásba.
Vegyük le a tartozék ot.
A m ásik tartozék ot k önnye d nyom ással
h elye zzük a nyélre. Forgassuk a nye le t ►
állásba. A tartozék h allh atóan bek attan a
h elyére.
Kis k örk e fe (1/A, 4/A, 4/B es 6/A abra)
A h ajtincset felcsavarás előtt szorosan
h elye zzük a k efére és fésü ljük ki alaposan a
h aj tövétől a vége fe lé. Majd csavarjuk fel a
h ajtincset a h ajvégtől k ezdve egy fü rtbe.
Kapcsoljuk be a k észülék et (1- es vagy 2- es
fok ozatba), és addig enge djük a m ele g levegőt
a tincsre, am íg az m eg nem szárad. Végül
nyom juk m eg a h ideg leve gő (COOL) gom bját
(FOEN® CURLER FC1000, 1/E ábra) vagy tolja a
h ide g levegő tolók apcsolóját (FO EN® CU RLER
FC600, 4/D ábra ) a h aj leh űtéséh e z.
27
Page 28

Nagy k örk efe (1/B ábra)
FOEN® CURLER FC1000
A nagy k örk efe sörtéit igény szerint be le h e t
süllyeszte ni (3. ábra). Ezáltal a k örk e fét
k önnyen k i le h et h úzni a m e gszáradt
h ajfürtből.
H ullám osító fúvók a (1/C ábra)
FOEN® CURLER FC1000
A h ullám osító fúvók a koncentráltan irányítja
a le vegősugarat a h aj szárítani k ívánt részeire.
Ak asztó (1/G, 4/G es 6/G abra)
Az ak asztó se gítségével a h ajszárító
h elytak arék osan tárolh ató és k önnye n
h ozzáférh etően felak aszth ató.
Tisztítás és k arbantartás
A rendszeres tisztítás je le ntős m érték be n
növeli a h ajform ázó élettartam át. Tisztítás
előtt m indig h úzzuk k i a csatlak ozót a
k onnek torból. A k észü lék et csak enyh én
nedves ruh ával töröljük le , és száraz ruh ával
töröljük át. A h ajform ázót soh a ne m erítsük
vízbe!
Óvjuk a portól, a szennye ződéstől és a
szöszök től. A levegőbeszívó rácsot időnk ént
tisztítsuk m eg puh a ecsettel.
A tartozék okat áztassuk rövid időre szappanos
vízbe, m ajd tisztítsuk m e g e gy k is szőrk efével.
Ezután öblítsü k le és szárítsuk m eg. Az ese tle g
be nnm aradt vizet úgy távolíth atjuk el, h ogy a
tartozék ot rövid időre nyílásával lefelé állítjuk .
M űszak i adatok
FOEN® CURLER FC1000
H álózati fe szültség: 230 V , 50 H z
Felve tt teljesítm ény: 1000 W
FOEN® CURLER FC600
H álózati fe szültség: 230 V, 50 / 60 H z
Felve tt teljesítm ény: 600 W
FOEN® CURLER FC300
H álózati fe szültség: 230 V , 50 H z
Felve tt teljesítm ény: 300 W
Ez a k észülék m egfe le l az EK alábbi
irányelveinek :
• 2006/9 5 "A k isfeszültségrõl szóló irányelv”
• 89 /336/EGK , "Az elek trom ágneses
k om patibilitásról szóló irányelv", beleértve a
9 2/31/EGK és 9 3/68/EGK szám ú
m ódosítások at is.
28
Page 29
GR
Αγαπ η τή π ελάτισσα,
αγαπ η τέ π ελάτη ,
Παρακαλούµ ε να διαβάσετε π ροσεκτικά το
π αρόν εγχειρίδιο οδη γιών χρήση ς . ∆ώστε
ιδιαίτερη π ροσοχή στις υπ οδείξεις
ασφαλείας στις αρχικέ ς σελίδ ες του
π αρόντος εγχειριδίου οδη γιών χρήση ς!
Φυλάξτε το π αρόν εγχειρίδιο οδη γιών
χρήση ς για µελλοντική αναφορά.
Παραχω ρήστε το σε ενδεχόµ ενο µελλοντικό
χρήστη τη ς συσκευής.
Περιγραφή συσκευών
FOEN® CURLER FC1000
A Λεπ τή βούρτσα
B Χοντρή βούρτσα
C Συγκεντρωτή αέ ρα
D Συρόµενος διακόπ τη ς on/off µε 2 ταχύτη τες
ανεµιστήρα
E Πλήκτρο κρύου αέ ρα
F Συρόµενος διακόπ τη ς «CAREProgram m »
G ∆ακτύλιος ανάρτη ση ς
FOEN® CURLER FC600
A Βούρτσα (12m m )
Β Βούρτσα (30m m )
D Συρόµενος διακόπ τη ς ON/OFF µε 2
ταχύτη τες ανεµιστήρα και ρύθµιση κρύου
αέ ρα
G ∆ακτύλιος ανάρτη ση ς
FOEN® CURLER FC300
A Λεπ τή βούρτσα
D Συρόµενος διακόπ τη ς on/off µε δύο
ταχύτη τες ανεµιστήρα
G ∆ακτύλιος ανάρτη ση ς
Υπ οδείξεις ασφαλείας
Η ασφάλεια αυτής τη ς συσκευής
ανταπ οκρίνεται στους ισχύοντες
τεχνολογικούς κανόνες καθώς και στις
νοµοθετικέ ς δ ιατάξεις σχετικά µε τη ν
ασφάλεια τω ν συσκευών. Ως εκ τούτου, απ ό
τη ν π λευρά µας, ω ς κατασκευαστέ ς,
θεω ρούµε υποχρέ ω σή µ ας να σας
γνω στοπ οιήσουµ ε τις π αρακάτω υπ οδείξεις
ασφαλείας .
Γενική ασφάλεια
• Η συσκευή π ρέπ ει να συνδεθεί µε η λεκτρικό
δίκτυο, µε αντίστοιχη τάση και συχνότη τα
σύµφω να µε τα στοιχεία π ου υπ άρχουν
στη ν πινακίδα τεχνικών χαρακτη ριστικών!
• Προσοχή! Μη χρη σιµοπ οιείτε τη
βούρτσα ζεστού αέ ρα κοντά σε
µπ ανιέ ρες, νιπ τήρες ή άλλα δοχεία
π ου π εριέ χουν νερό.
• Όταν χρη σιµ οποιείτε το σίδερο για
µπ ούκλες µ ε αέ ρα στο µπ άνιο,
απ οσυνδέ στε το απ ό τη ν π ρίζα µετά τη ν
χρήση του καθώς υπ άρχει κίνδυνος
η λεκτροπ λη ξίας ακόµα και αν το σεσουάρ
είναι κλειστό.
• Μ η θέ τετε τη βούρτσα ζεστού αέ ρα σε
λειτουργία όταν:
– Η βούρτσα ζεστού αέ ρα π αρουσιάζει
εµφανείς βλάβες.
– Η βούρτσα ζεστού αέ ρα έ χει π έ σει κάτω .
• Μ η ν τραβάτε ποτέ το βύσµ α απ ό τη ν πρίζα
π ιάνοντάς το απ ό το καλώδιο τροφοδοσίας!
• Η εγκατάσταση µιας διάταξη ς π ροστασίας
ρεύµατος διαρροής µ ε ονοµαστική ισχύ
ρεύµατος ενεργοποίη ση ς κάτω τω ν 30 m A
π αρέ χει επιπ λέ ον προστασία. Απ ευθυνθείτε
στον η λεκτρολόγο σας.
• Μ η ν τυλίγετε το καλώδιο τροφοδοσίας γύρω
απ ό τη συσκευή.
• Ελέγχετε κατά π εριόδους το καλώδιο
η λεκτρικού ρεύµατος για τυχόν ζη µίες!
• Για να απ οφύγετε τη ν καταστροφή του
µαλλιού σας, µη ν καλύπ τετε ποτέ τελείω ς τις
οπ έ ς εξόδ ου αέ ρα στις βούρτσες.
29
Page 30
• Οι εργασίες επ ισκευής αυτής τη ς
συσκευής επ ιτρέπ εται να
π ραγµ ατοποιη θούν µ όνον απ ό
εξειδικευµ έ νο προσω π ικό! Οι µη
π ροβλεπ όµενες επ ισκευές µπ ορεί να
δη µιουργήσουν σοβαρούς κινδύνους.
Στη ν π ερίπ τω ση επ ισκευής απ ευθυνθείτε
στο τµ ήµα Εξυπ η ρέτη ση ς Πελατών ή
στον εξουσιοδ οτη µ ένο εµ π ορικό
αντιπ ρόσω π ο τη ς π εριοχής σας.
Ασφάλεια π αιδιών
• Η συσκευή αυτή δ εν π ρέπ ει να χρη σιµ οπ οιείται απ ό άτοµα (συµπ εριλαµ βανοµέ νω ν και
π αιδ ιών) µε µειω µέ νες φυσικέ ς, αισθη τικές
και διανοη τικέ ς ικανότη τες, ή έ λλειψ η εµπ ειρίας και γνώσεω ν, εκτός αν βρίσκονται υπ ό
τον έ λεγχο κάποιου ατόµου υπ εύθυνου για
τη ν ασφάλειά τους.
• Πρέ π ει οπ ω σδ ήπ οτε να τη ρείτε τις υπ οδείξεις π ου π εριέ χονται στις π αρούσες οδη γίες
χρήση ς και να τις εξη γήσετε στα π αιδιά.
• Μ η ν επ ιτρέ π ετε στα π αιδ ιά τη χρήση τη ς συσκευής χω ρίς επ ίβλεψ η .
• Πρέ π ει να επ ιβλέ π ετε τα µ ικρά π αιδ ιά, για
να βεβαιω θείτε ότι δ εν παίζουν µε τη συσκευή.
Κατά τη λειτουργία τη ς βούρτσας
ζεστού αέ ρα π ρέπ ει να λαµ βάνετε
υπ όψ η σας τα π αρακάτω
• Σε π ερίπ τω ση π ου η συσκευή π έ σει µέ σα
στο νερό, τραβήξτε αµέ σω ς το φις απ ό τη ν
π ρίζα. Σε καµία π ερίπ τω ση µη ν βάλετε τα
χέ ρια σας στο νερό! Κατόπ ιν αναθέ σετε τη ν
επ ισκευή τη ς συσκευής σε κάπ οιον ειδ ικό!
• Προστατεύετε τη συσκευή απ ό τη ν
υγρασία και µη ν τη χρη σιµοπ οιείτε µε
υγρά χέ ρια.
• Μ η ν ψ εκάζετε τη συσκευή µε σπ ρέ ι ή
νερό.
• Για τη ν ασφάλειά σας απ ενεργοπ οιείτε
π άντοτε τη συσκευή π ριν τη ν απ οθέ σετε.
• Η βούρτσα αναπ τύσσει υψ η λή θερµοκρασία
κατά τη λειτουργία!
• Ποτέ µη ν καλύπτετε τις οπ έ ς εισόδου αέ ρα.
• Καθαρίζετε τους ρύπ ους απ ό το π λέ γµ α
εισόδ ου αέ ρα (π .χ. µε η λεκτρική σκούπ α ή
λεπ τή βούρτσα). Φροντίζετε ώστε τα µ αλλιά
σας να µ η ν έ ρχονται σε επ αφή µε το π λέ γµ α
εισόδ ου αέ ρα.
• Σε π ερίπ τω ση εµ π λοκής τη ς ροής του αέ ρα
κατά τη λειτουργία τη ς συσκευής (π .χ. λόγω
ρύπ ω ν), η συσκευή απ ενεργοπ οιείται
αυτόµατα απ ό τη ν ενσω µ ατω µ έ νη
π ροστασία υπ ερθέ ρµανση ς και
επ ανενεργοπ οιείται µόλις κρυώσει (µετά
απ ό λίγα λεπ τά).
• Το καλώδιο τροφοδοσίας δεν π ρέ π ει να
έ ρχεται σε επ αφή µε τις οπ έ ς εξόδου αέ ρα
κατά τη λειτουργία.
• Η εταιρεία δε φέ ρει καµ ία ευθύνη για
τυχόν βλάβες στη συσ κευή π ου µπ ορούν
να π ροκλη θούν λόγω εσφαλµέ νη ς ή
διαφορετικής απ ό τη ν π ροβλεπ όµ ενη
χρήση τη ς συσκευής (π.χ. ζη µ ιέ ς στο
καλώδιο τροφοδοσίας λόγω τυλίγµ ατος
γύρω απ ό τη συσκευή).
Απ όρριψ η
Υλικό συσκευασίας
Τα υλικά συσκευασίας είναι ανακυκλώσιµα
και φιλικά προς το π εριβάλλον. Τα π λαστικά
µέ ρη φέ ρουν µία συγκεκριµέ νη σήµανση ,
π .χ. >PE<, >PS<, κλπ . Απ ορρίψ τε τα υλικά
συσκευασίας σύµφω να µε τη σήµανση , στα
δη µοτικά ση µ εία συλλογής απ ορριµµάτω ν,
στους ειδικούς π ου κάδους π ροβλέ πονται
για το σκοπό αυτό.
Παλιά συσκευή
Το σύµβολο στο π ροϊόν ή επ άνω
στη συσκευασία του υπ οδεικνύει ότι δ εν
π ρέπ ει να µ εταχειρίζεστε το π ροϊόν ω ς
οικιακό απ όρριµµ α. Αντιθέ τω ς θα π ρέπ ει να
π αραδ ίδεται στο κατάλλη λο ση µείο
συλλογής για τη ν ανακύκλω οη η λεκτρικού
και η λεκτρονικού εξοπ λισµ ού.
Εξασφαλίζοντας ότι το π ροϊόν αυτό
διατίθεται σω στά, συµ βάλλετε στη ν
απ οτροπ ή ενδεχόµενω ν αρνη τικών
συνεπ ειών για το π εριβάλλον και τη ν
ανθρώπινη υγεία, οι οπ οίες θα µ π ορούσαν
διαφορετικά να π ροκλη θούν απ ό
ακατάλλη λο χειρισµό απ όρριψ η ς του
π ροϊόντος αυτού. Για λεπ τοµερέ στερες
π λη ροφορίες σχετικά µε τη ν ανακύκλω οη
του π ροϊόντος αυτού, επ ικοινω νήστε µε το
δη µαρχείο τη ς π εριοχής σας, τη ν τοπ ική σας
υπ η ρεσία απ οκοµ ιδής οικιακών
απ ορριµ µ άτω ν ή µε το κατάστη µα όπ ου
αγοράσατε το π ροϊόν.
30
Page 31
Υπ οδείξεις χειρισµ ού
FOEN® CURLER FC1000
Το συγκεκριµ έ νο µοντέ λο διαθέ τει έ ναν
συρόµενο διακόπ τη (εικόνα 1/D) µε τις
ακόλουθες θέ σεις ρύθµιση ς:
0 = OFF
1 = χαµη λή βαθµ ίδα ροής αέ ρα
2 = υψ η λή βαθµίδα ροής αέ ρα
και έ ναν συρόµενο δ ιακόπ τη (εικόνα 1/F)
π ρογράµµ ατος φροντίδας «CAREProgram m ») για µείω ση τη ς θερµικής ισχύος
µε τις ακόλουθες θέ σεις ρύθµ ιση ς:
∆ιακόπ τη ς εµπ ρός = µ ειω µέ νη θερµική ισχύς
∆ιακόπ τη ς π ίσω = κανονική θερµική ισχύς
FOEN® CURLER FC600
Το συγκεκριµ έ νο µοντέ λο διαθέ τει έ να
συρόµενο διακόπ τη (εικόνα 4/D) µε τις
ακόλουθες θέ σεις ρύθµιση ς:
0 = OFF
1 = χαµη λή βαθµ ίδα ροής αέ ρα
2 = υψ η λή βαθµίδα ροής αέ ρα
ρύθµιση κρύου αέ ρα
FOEN® CURLER FC300
Το συγκεκριµ έ νο µοντέ λο διαθέ τει έ ναν
συρόµενο διακόπ τη (εικόνα 6/D) µε τις
ακόλουθες θέ σεις ρύθµιση ς:
0 = OFF
1 = χαµη λή βαθµ ίδα ροής αέ ρα
2 = υψ η λή βαθµίδα ροής αέ ρα
Πλήκτρο κρύου αέ ρα
(εικόνα 1/Ε)
FOEN® CURLER FC1000
Για να δ ώσετε µεγαλύτερο όγκο και κράτη µα
στα µαλλιά σας , π ρέπ ει, στο τέ λος, να
στεγνώνετε τα µ αλλιά σας µε κρύο αέ ρα.
Πιέ στε το π λήκτρο κρύου αέ ρα.
Πρόγραµµ α φροντίδ ας
(εικόνα 1/F)
FOEN® CURLER FC1000
Ρυθµίζοντας το διακόπ τη (εικόνα 1/F) στη
µπ ροστινή θέ ση (π ιέ ζοντας και
σπ ρώχνοντας), ενεργοπ οιείται το
π ρόγραµµα φροντίδας για φορµάρισµ α και
στέ γνω µα σε χαµ η λή θερµοκρασία, ώστε να
µη ν ταλαιπ ω ρούνται τα µ αλλιά σας. Αυτό
ισχύει και στις δύο θέ σεις του συρόµενου
διακόπ τη (εικόνα 1/D).
Επαναφέ ροντας το διακόπ τη στη ν αρχική
του θέ ση (εικόνα 1/F) απ ενεργοποιείται το
π ρόγραµµα φροντίδας και η συσκευή
λειτουργεί και π άλι µ ε τη ν κανονική θερµ ική
ισχύ.
Ρύθµιση κρύου αέ ρα (εικόνα 4/D)
FOEN® CURLER FC600
Για να δ ώσετε µεγαλύτερο όγκο και κράτη µα
στα µαλλιά σας , π ρέπ ει, στο τέ λος, να
στεγνώνετε τα µ αλλιά σας µε κρύο αέ ρα.
Μ ετακινήστε το διακόπ τη στη θέ ση ρύθµιση ς
κρύου αέ ρα .
Αντικατάσ ταση εξαρτη µ άτω ν
(εικόνα 2, 5, 7)
Πιέ στε το π λήκτρο στο π λάγιο µέ ρος τη ς
λαβής και στρέ ψ τε τη λαβή στη θέ ση
Αφαιρέ στε το εξάρτη µα.
Τοπ οθετήστε το εξάρτη µ α στη λαβή,
π ιέ ζοντας το ελαφρώς. Στρέ ψ τε τη λαβή στη
θέ ση ► . Το εξάρτη µα έ χει ασφαλίσει, όταν
ακουστεί ο χαρακτη ριστικός ήχος.
.
•
Λεπ τή βούρτσα
(εικόνα 1/A, 4/A, 4/B, 6/A)
Περάστε µία τούφα απ ό τα µαλλιά σας
π άνω απ ό τη βούρτσα και βουρτσίστε καλά
απ ό τις ρίζες ω ς τις άκρες. Στη συνέ χεια
στρέ ψ τε τη ν τούφα µ ε τη βούρτσα
ξεκινώντας απ ό τις άκρες, έ τσι ώστε να
σχη µατιστεί µ ία µπ ούκλα. Ενεργοπ οιήστε τη
συσκευή (βαθµ ίδα 1 ή 2) και αφήστε το ο
ζεστό αέ ρα να στεγνώσει τη ν τούφα
µαλλιών. Για να ολοκλη ρω θεί η δ ιαδ ικασία,
π ατήστε το π λήκτρο κρύου αέ ρα (FO EN®
CURLER FC1000, εικόνα 1/E) ή
µετακινήστε το διακόπ τη στη θέ ση ρύθµιση ς
κρύου αέ ρα (FOEN® CURLER FC600,
εικόνα 4/D ) για να σταθεροποιήσετε το
χτέ νισµ α.
31
Page 32

Χοντρή βούρτσα (εικόνα 1/B)
FOEN® CURLER FC1000
Μ π ορείτε, αν θέ λετε, να ρυθµίσετε το µ ήκος
τω ν τριχών τη ς χοντρής βούρτσας (εικόνα
3). Με αυτόν τον τρόπ ο µπ ορείτε να
τραβήξετε τη βούρτσα απ ό τη στεγνή
µπ ούκλα π ιο εύκολα.
Συγκεντρω τής αέ ρα (εικόνα 1/C)
FOEN® CURLER FC1000
Ο συγκεντρω τής αέ ρα επιτρέ π ει τη
συγκέ ντρω ση αέ ρα σε συγκεκριµέ να ση µεία
για στέ γνω µα µ εµονωµ έ νω ν τµη µάτω ν
∆ακτύλιος ανάρτη σ η ς
(εικόνα 1/G, 4/G, 6/G)
Ο ενσω µατω µ έ νος δ ακτύλιος ανάρτη ση ς
συµβάλλει στη ν εξοικονόµη ση χώρου και τη ν
εύκολη π ρόσβαση κατά τη ν απ οθήκευση τη ς
συσκευής.
Καθαρισµός και φροντίδ α
Ο τακτικός καθαρισµός συµ βάλλει στη
µεγαλύτερη διάρκεια ζω ής τη ς συσκευής .
Πριν απ ό τον καθαρισµό, βγάλτε το φις απ ό
τη ν π ρίζα. Για τον καθαρισµό τη ς συσκευής
χρη σιµ οποιείτε µόνο έ να ελαφρώς υγρό
π ανί και στεγνώστε τη ν έ π ειτα µε ένα
µαλακό π ανί. Μ η βυθίζετε τη συσκευή στο
νερό. Π ροστατεύετε τη συσκευή απ ό τη
σκόνη , τους ρύπ ους και τα χνούδ ια.
Καθαρίζετε κατά διαστήµ ατα το π λέ γµα
εισόδ ου αέ ρα µ ε έ να π ινέ λο.
Τοπ οθετήστε τα εξαρτήµατα για µικρό
χρονικό δ ιάστη µ α σε σαπ ουνόνερο και στη
συνέχεια καθαρίστε τα µ ε µ ια µικρή βούρτσα
µαλλιών. Κατόπ ιν ξεπλύνετε και σκουπ ίστε
τα. Για να στραγγίσουν τελείω ς, ακουµπ ήστε
τα για λίγη ώρα µε το άνοιγµα π ρος τα κάτω .
Τεχνικά χαρακτη ριστικά
FOEN® CURLER FC1000
Τάση δικτύου: 230 V, 50 H z
Κατανάλω ση ισχύος: 1000 W
FOEN® CURLER FC600
Τάση δικτύου: 220-240 V, 50/60 H z
Κατανάλω ση ισχύος: 600 W
FOEN® CURLER FC300
Τάση δικτύου: 230 V, 50 H z
Κατανάλω ση ισχύος: 300 W
Η συσκευή αυτή συµ µ ορφώνεται µ ε τους
ακόλουθους νόµους τη ς ΕΕ:
• Κανονισµ ός χαµ η λής τάση ς 2006/9 5/EC
• Κανονισµ ός EMC 89 /336/EEC συµ περιλ.
τροπ οπ οίη ση 9 2/31/EEC και 9 3/68/EEC
32
Page 33

33
Page 34

Page 35

Page 36

Electrolux H ausgeräte Vertriebs Gm bH
M uggenh ofer Str. 135
D– 9 0429 Nürnberg
h ttp://w w w .e lectrolux.de
© Copyrigh t by Electrolux
822 9 49 19 9 - 04 - 0807
Sh are m ore of our th ink ing at
w w w .ele ctrolux.com
 Loading...