

Page 1

FAVORIT EXPRESS
User manual Dishwasher
Benutzerinformation Geschirrspüler
Page 2

Contents
2
Thank you for choosing one of our high-quality products.
To ensure optimal and regular performance of your appliance please read this
instruction manual carefully. It will enable you to navigate all processes perfectly
and most efficiently. To refer to this manual any time you need to, we recommend
you to keep it in a safe plac e. An d p le as e pass it to any future owner of the appliance.
We wish you much joy with your new appliance.
Contents
Operating instructions 3
Safety information 3
Correct use 3
General safety 3
Child safety 3
Installation 4
Product description 4
Control panel 5
Cancel button 6
Programme selection buttons 6
Save energy button 6
Delay start button 7
Digital display 7
Function buttons 7
Setting mode 7
Use of the appliance 7
Setting the water softener 8
Manual adjustment 8
Electronic adjustment 9
Use of dishwasher salt 9
Use of rinse aid 10
Adjusting the rinse aid dosage 10
Loading cutlery and dishes 11
Helpful hints and tips 11
Lower basket 12
Cutlery basket 12
Upper basket 13
Adjustment of the height of the upper
basket 14
Use of detergent 15
Multitab function 16
Washing programmes 18
Setting and starting a washing programme
Interrupting a washing programme 19
Cancelling a washing programme 20
Setting and starting a washing programme
with delay start 20
Cancelling a delay start 20
End of the washing programme 20
Standby mode 20
Removing the load 21
Care and cleaning 21
Cleaning the filters 21
External cleaning 22
Frost precautions 22
What to do if… 22
Technical data 24
Installation instructions 24
Installation 24
Fitting under a counter 24
Do these steps to remove the appliance
worktop: 25
Adjusting the level of the appliance 25
Water connection 26
Water inlet hose 26
Water drain hose 26
Electrical connection 27
Environment concerns 27
Subject to change without notice
19
Page 3

Safety information
Operating instructions
Safety information
For your safety and correct operation of the appliance, read this manual carefully before
installation and use. Always keep these instructions with the appliance even if you move
or sell it. Users must fully know the operation and safety features of the appliance.
Correct use
• The appliance is designed exclusively for domestic use.
• Only use the appliance to clean household utensils that are applicable for dishwashers.
• Do not put solvents in the appliance. Risk of explosion.
• Put the knives and all items with sharp points in the cutlery basket with their points
down. If not, put in a horizontal position in the upper basket.
• Use only branded products for dishwashers (detergent, salt, rinse aid).
• If you open the door while the appliance is in operation, hot steam can escape. Risk of
skin burns.
• Do not remove dishes from the dishwasher before the end of the washing programme.
• When the washing programme is completed, disconnect the mains plug from the mains
socket and close the water tap.
• Only an authorised service engineer can repair this appliance. Use only original spare
parts.
• Do not do repairs yourself to prevent injury and damage to the appliance. Always contact
your local Service Force Centre.
3
General safety
• Persons (including children) with reduced physical sensory, mental capabilities or lack
of experience and knowledge must not use the appliance. They must have supervision
or instruction for the operation of the appliance by a person responsible for their safety.
• Obey the safety instructions from the manufacturer of the dishwasher detergent to
prevent burns to eyes, mouth and throat.
• Do not drink the water from the dishwasher. Detergent residues can stay in your appliance.
• Always close the door when you do not use the appliance to prevent injury and not to
stumble over the open door.
• Do not sit or stand on the open door.
Child safety
• Only adults can use this appliance. Children must get supervision to make sure that they
do not play with the appliance.
• Keep all the packaging away from children. There is a risk of suffocation.
• Keep all detergents in a safe area. Do not let children touch the detergents.
• Keep children away from the appliance when the door is open.
Page 4
Product description
4
Installation
• Make sure that the appliance is not damaged because of transport. Do not connect a
damaged appliance. If necessary, contact the supplier.
• Remove all packaging before first use.
• A qualified and competent person must do the electrical installation.
• A qualified and competent person must do the plumbing installation.
• Do not change the specifications or modify this product. Risk of injury and damage to
the appliance.
• Do not use the appliance:
– if the mains cable or water hoses are damaged,
– if the control panel, worktop or plinth area are damaged, that you can get access to
the inner side of the appliance.
Contact your local Service Force Centre.
• Do not drill into the sides of the appliance to prevent damage to hydraulic and electrical
components.
WARNING!
Carefully obey the instructions for electrical and water connections.
Product description
Page 5
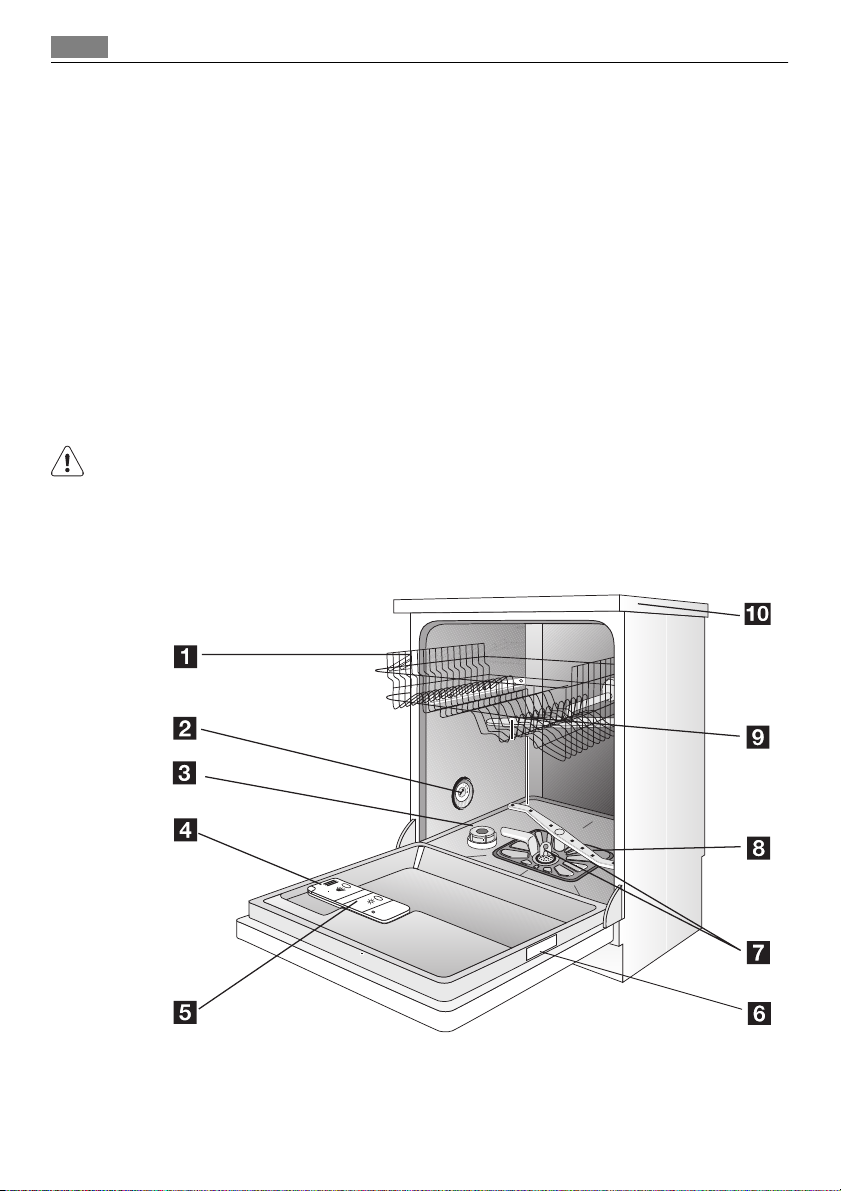
1 Upper basket
2 Water hardness dial
3 Salt container
4 Detergent dispenser
5 Rinse aid dispenser
6 Rating plate
7 Filters
8 Lower spray arm
9 Upper spray arm
10 Worktop
Control panel
Control panel
7
5
10
8
9
Page 6
Control panel
6
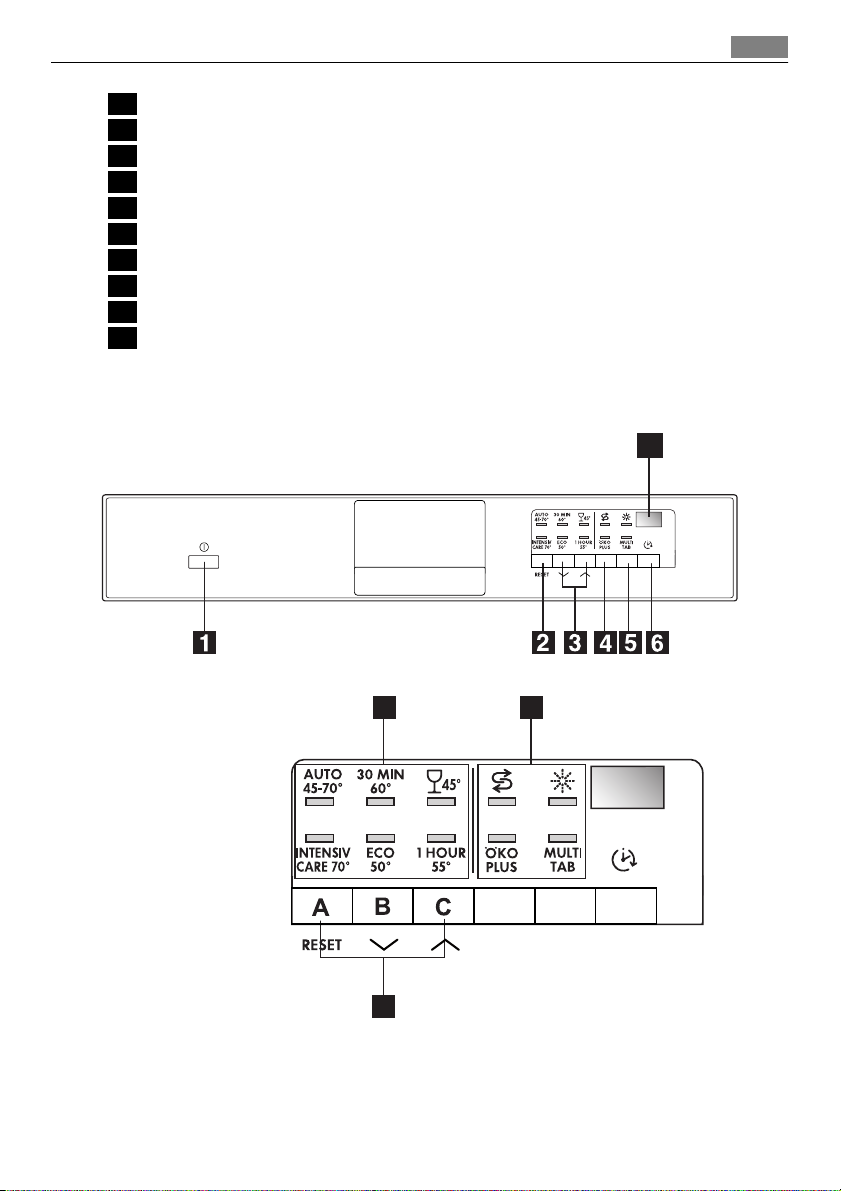
1 On/off button
2 Cancel button (RESET)
3 Programme selection buttons
4 Save energy button (ÖKO PLUS)
5 Multitab button (MULTITAB)
6 Delay start button
7 Digital display
8 Function buttons
9 Indicator lights
10 Programme indicator lights
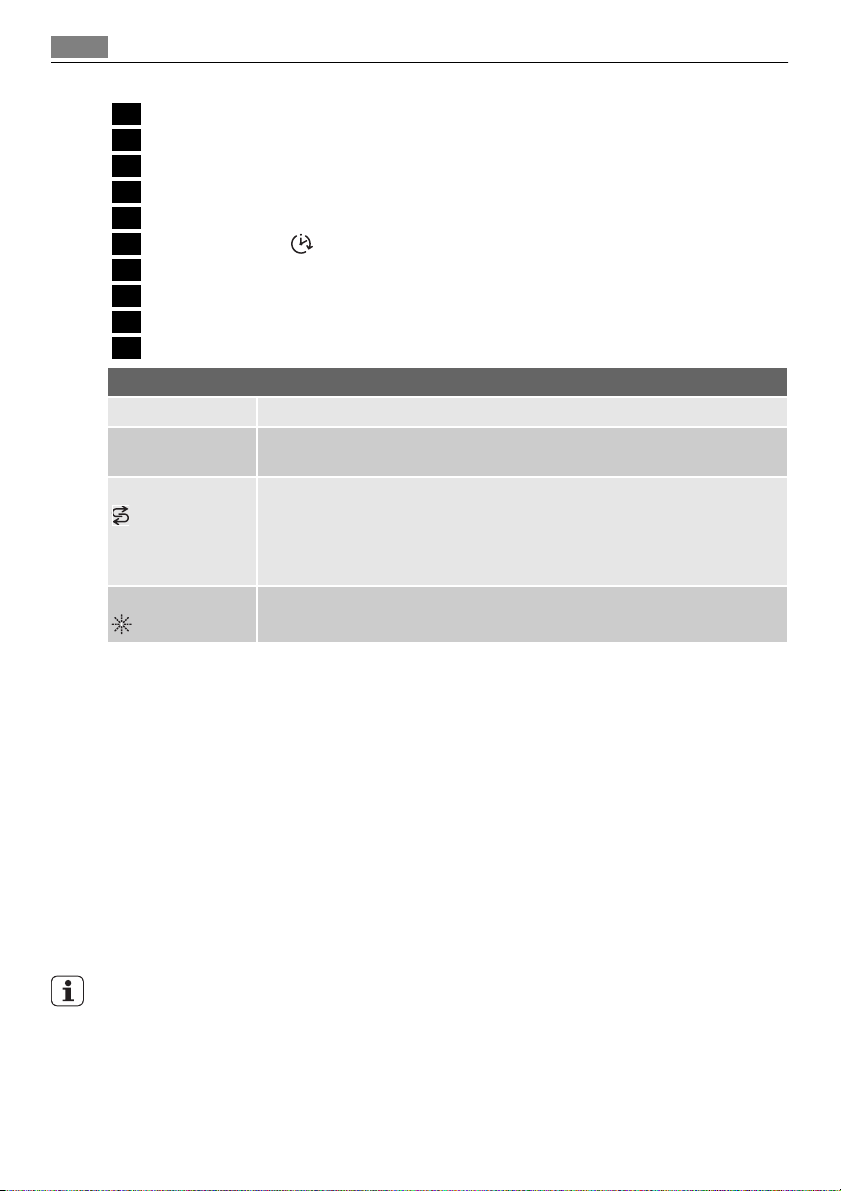
Indicator lights
ÖKO PLUS Comes on when the save energy function is active.
MULTITAB Comes on when you activate the multitab function. Refer to 'Multitab func-
1)
Salt
Rinse aid
1)
tion'.
Comes on when it is necessary to fill the salt container. Refer to 'Use of
dishwasher salt'.
After you fill the container, the salt indicator light can continue to stay on
for some hours. This does not have an unwanted effect on the operation of
the appliance.
Comes on when it is necessary to fill the rinse aid dispenser. Refer to 'Use of
rinse aid'.
1) When the salt and/or rinse aid containers are empty, the related indicator lights do not come on while a washing
programme operates.
Cancel button
With this button you can cancel a washing programme or a delay start. Refer to 'Setting
and starting a washing programme'.
Programme selection buttons
With these buttons you can select the washing programme. Press one of the buttons until
the indicator light of the necessary programme comes on. Refer to 'Washing programmes'
chapter for more data about the washing programmes.
Save energy button
This function decreases the temperature in the drying phase. Saved energy is between 10%
and 25%.
If dishes at the end of the programme are wet, keep the door ajar to let the dishes dry
naturally.
This function is available with all washing programmes. The related indicator light comes
on when you press the button.
The save energy function has no effect on some programmes. Refer to the chapter 'Washing
programmes' for the list of programmes where save energy has or not an effect.
Page 7

Use of the appliance
Delay start button
Use the delay start button to delay the start of the washing programme with an interval
between 1 and 19 hours. Refer to the chapter 'Setting and starting a washing programme'.
Digital display
The display shows:
• the set level of the water softener.
• Remaining time to the end of the programme.
• Activation/deactivation of the rinse aid dispenser (only with multitab function on).
• End of the washing programme. The display shows a zero.
• Number of hours in delay start.
•Fault codes.
Function buttons
Use the function buttons for these operations:
• To set the water softener. Refer to the chapter 'Setting the water softener'.
• To deactivate/activate the rinse aid dispenser, when multitab function is active. Refer to
the chapter 'Multitab function'.
Setting mode
The appliance must be in setting mode for these operations:
• To set a washing programme.
• To set the water softener level.
• To deactivate/activate the rinse aid dispenser.
Press the on/off button. The appliance is in setting mode when:
– All the programme indicator lights come on.
Press the on/off button. The appliance is not in setting mode when:
– Only one programme indicator light comes on
– A washing programme is set. It is necessary to cancel the programme to go back to the
setting mode. Refer to the chapter 'Setting and starting a washing programme'.
7
Use of the appliance
Refer to the following instructions for each step of procedure:
1. Make a check if the water softener level is correct for the water hardness in your area.
If necessary set the water softener.
2. Fill the salt container with dishwasher salt.
3. Fill the rinse aid dispenser with rinse aid.
4. Load cutlery and dishes into the dishwasher.
5. Set the correct washing programme for the type of load and soil.
6. Fill the detergent dispenser with the correct quantity of detergent.
7. Start the washing programme.
If you use combi detergent tablets ('3 in 1', '4 in 1', '5 in 1', etc.), refer to the chapter 'Multitab
function'.
Page 8
Setting the water softener
8
Setting the water softener
The water softener removes minerals and salts from the water supply. Minerals and salts
can have bad effect on the operation of the appliance.
Water hardness is measured in equivalent scales:
• German degrees (dH°).
• French degrees (°TH).
• mmol/l (millimol per litre - international unit for the hardness of water).
•Clarke.
Adjust the water softener to the water hardness in your area. If necessary, contact your
local water authority.
Water hardness Water hardness setting
°dH °TH mmol/l Clarke manually electronically
51 - 70 91 - 125 9,1 - 12,5 64 - 88 2 10
43 - 50 76 - 90 7,6 - 9,0 53 - 63 2 9
37 - 42 65 - 75 6,5 - 7,5 46 - 52 2 8
29 - 36 51 - 64 5,1 - 6,4 36 - 45 2 7
23 - 28 40 - 50 4,0 - 5,0 28 - 35 2 6
19 - 22 33 - 39 3,3 - 3,9 23 - 27 2 5
15 - 18 26 - 32 2,6 - 3,2 18 - 22 1 4
11 - 14 19 - 25 1,9 - 2,5 13 - 17 1 3
4 - 10 7 - 18 0,7 - 1,8 5 - 12 1 2
< 4 < 7 < 0,7 < 5
1) No use of salt required.
You must set the water softener manually and electronically.
1)
1
1)
1
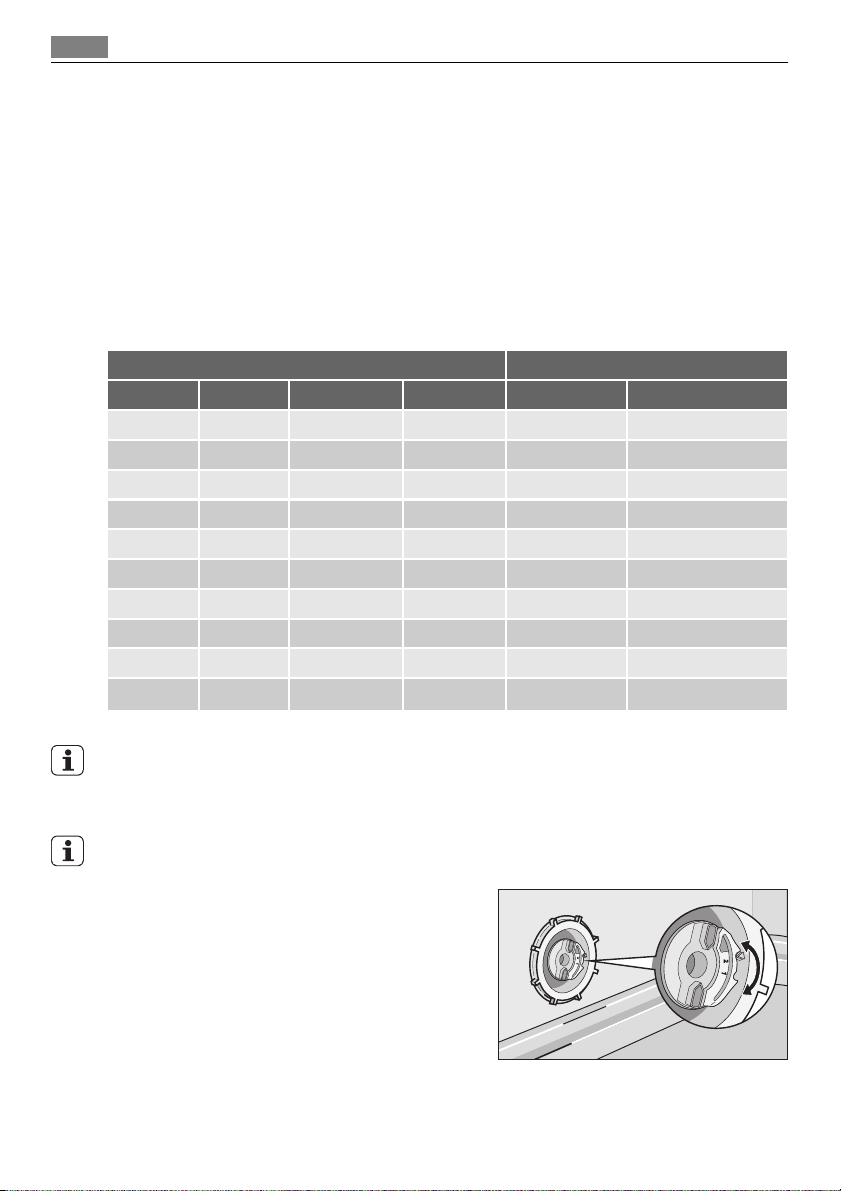
Manual adjustment
The appliance is set at the factory at position 2.
1. Open the door.
2. Remove the lower basket.
3. Turn the water hardness dial to position 1
or 2 (refer to the chart).
4. Install the lower basket.
5. Close the door.
Page 9
Use of dishwasher salt
Electronic adjustment
The water softener is set at the factory at level 5.
1. Switch on the appliance.
2. Make sure that the appliance is in setting mode.
3. Press and hold function buttons B and C until the programme indicator lights above
function buttons A, B and C start to flash.
4. Release function buttons B and C.
5. Press function button A.
– The programme indicator lights above function buttons B and C go off.
– The programme indicator light above function button A continues to flash.
– The digital display shows the current level.
Example: digital display shows
6. Press the function button A one time to increase the water softener level by one step.
7. Press the on/off button to save the operation.
= level 5.
Use of dishwasher salt
CAUTION!
Only use dishwashers salt. Types of salt that are not applicable for dishwashers cause damage to the water softener.
9
CAUTION!
Grains of salt and salty water on the bottom of the appliance can cause corrosion. Fill the
appliance with salt before you start a washing programme to prevent corrosion.
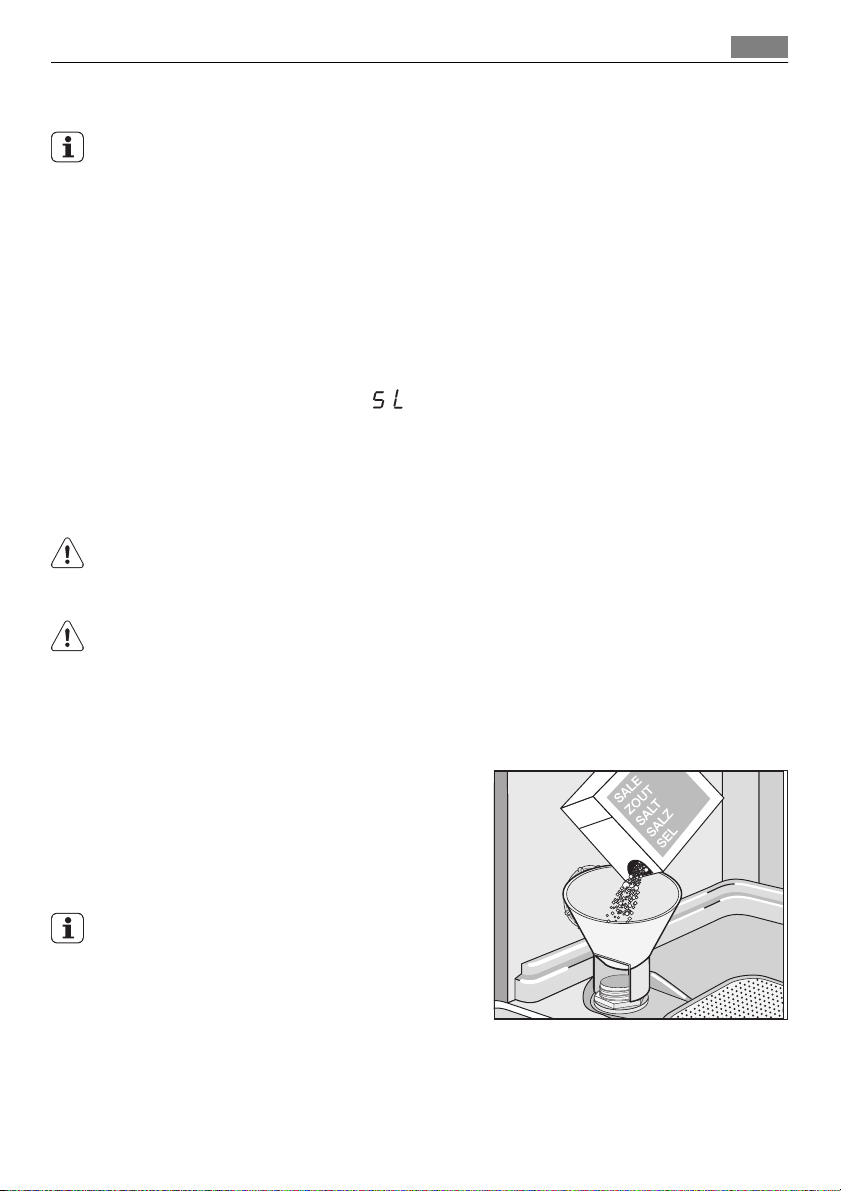
Do these steps to fill the salt container:
1. Turn the cap anticlockwise to open the salt container.
2. Fill the salt container with 1 litre of water (only the first operation).
3. Use the funnel to fill the salt container
with salt.
4. Remove the salt around the opening of
the salt container.
5. Turn the cap clockwise to close the salt
container.
It is normal that water overflows from the salt
container when you fill it with salt.
When you set electronically the water softener to level 1, the salt indicator light does not
stay on.
Page 10
Use of rinse aid
10
Use of rinse aid
CAUTION!
Only use branded rinse aid for dishwashers.
Do not fill the rinse aid dispenser with other products (e.g. dishwasher cleaning agent, liquid
detergent). This can cause damage to the appliance.
Rinse aid makes it possible to dry the dishes without streaks and stains.
Rinse aid is automatically added during the last rinsing phase.
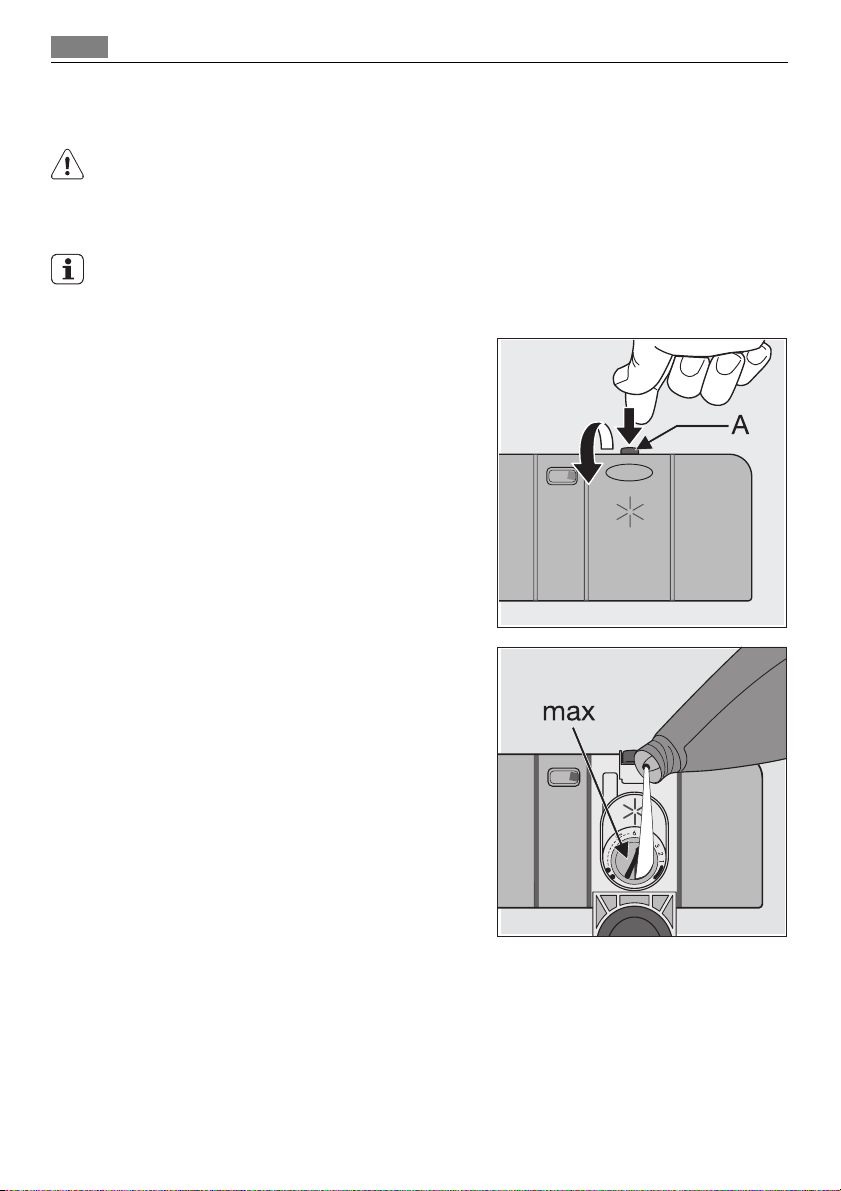
Do these steps to fill the rinse aid dispenser:
1. Press the release button (A) to open the
rinse aid dispenser.
2. Fill the rinse aid dispenser with rinse aid.
The mark 'max.' shows the maximum level.
3. Remove the spilled rinse aid with an absorbent cloth to prevent too much foam
during the subsequent washing programme.
4. Close the rinse aid dispenser.
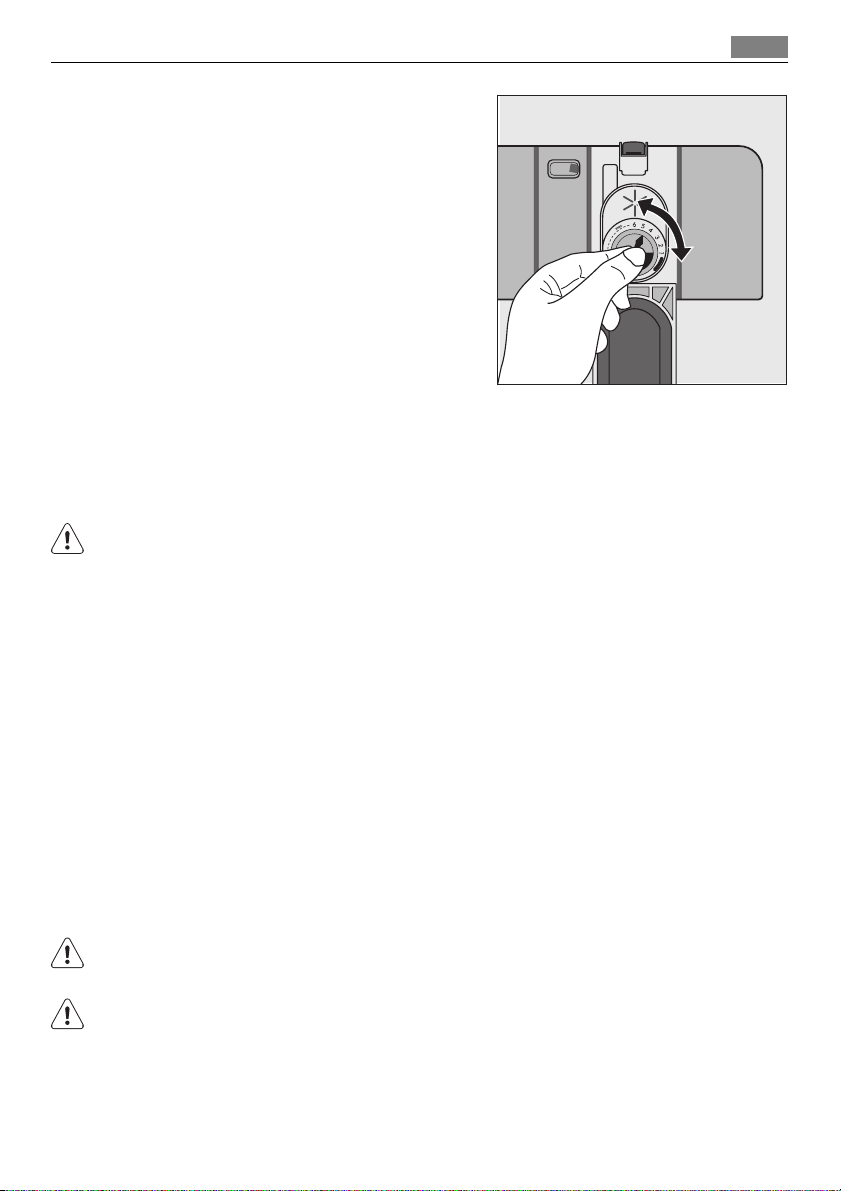
Adjusting the rinse aid dosage
The rinse aid is set at the factory at position 4.
You can set the rinse aid dosage between position 1 (lowest dosage) and position 6 (highest
dosage).
Page 11
Loading cutlery and dishes
Turn the rinse aid dial to increase or decrease the
dosage.
– Increase the dosage if there are water droplets
or limescale on the dishes.
– Decrease the dosage if there are streaks, whitish
stains or bluish layers on the dishes.
Loading cutlery and dishes
Helpful hints and tips
CAUTION!
Only use the appliance for household utensils that are applicable for dishwashers.
Do not use the appliance to clean objects that can absorb water (sponges, household cloths,
etc.).
• Before you load cutlery and dishes, do these steps:
– Remove all food remainings and debris.
– Make burnt, remaining food in pans soft.
• While you load cutlery and dishes, do these steps:
– Load hollow items (e.g. cups, glasses and pans) with the opening down.
– Make sure that water does not collect in the container or in a deep base.
– Make sure that cutlery and dishes do not lie inside one another.
– Make sure that cutlery and dishes do not cover other cutlery and dishes.
– Make sure that glasses do not touch other glasses.
– Put small objects in the cutlery basket.
• Plastic items and pans with non-stick coatings can keep water droplets. Plastic items do
not dry as well as porcelain and steel items.
• Put light items in the upper basket. Make sure that the items do not move.
CAUTION!
Make sure that the spray arms can move freely before you start a washing programme.
11
WARNING!
Always close the door after you load or unload the appliance. An open door can be dangerous.
Page 12
Loading cutlery and dishes
12
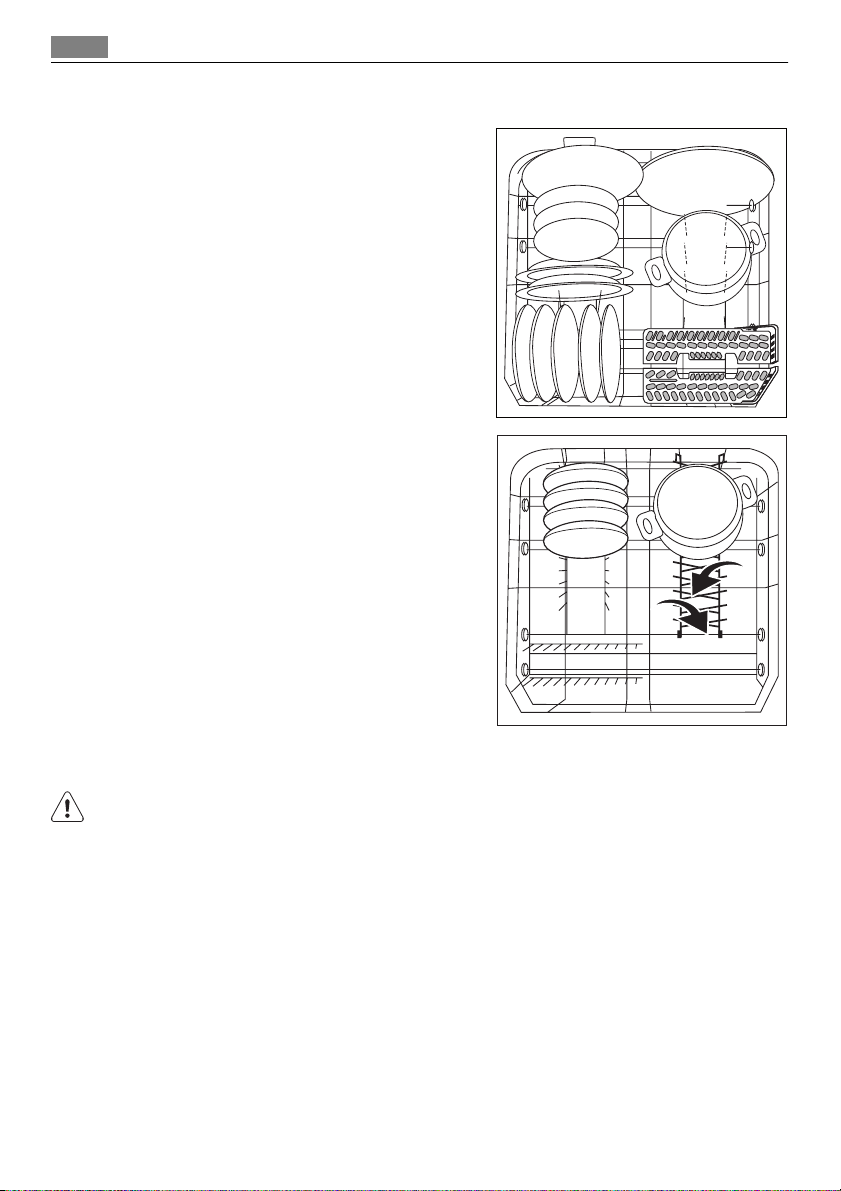
Lower basket
Put large and heavily soiled dishes and pans in the
lower basket.
The rows of prongs in the lower basket can be flat
to load large dishes, pots, pans and bowls.
Cutlery basket
WARNING!
Do not put long-bladed knives in a vertical position. Arrange long and sharp cutlery horizontally in the upper basket. Be careful with sharp items.
Page 13
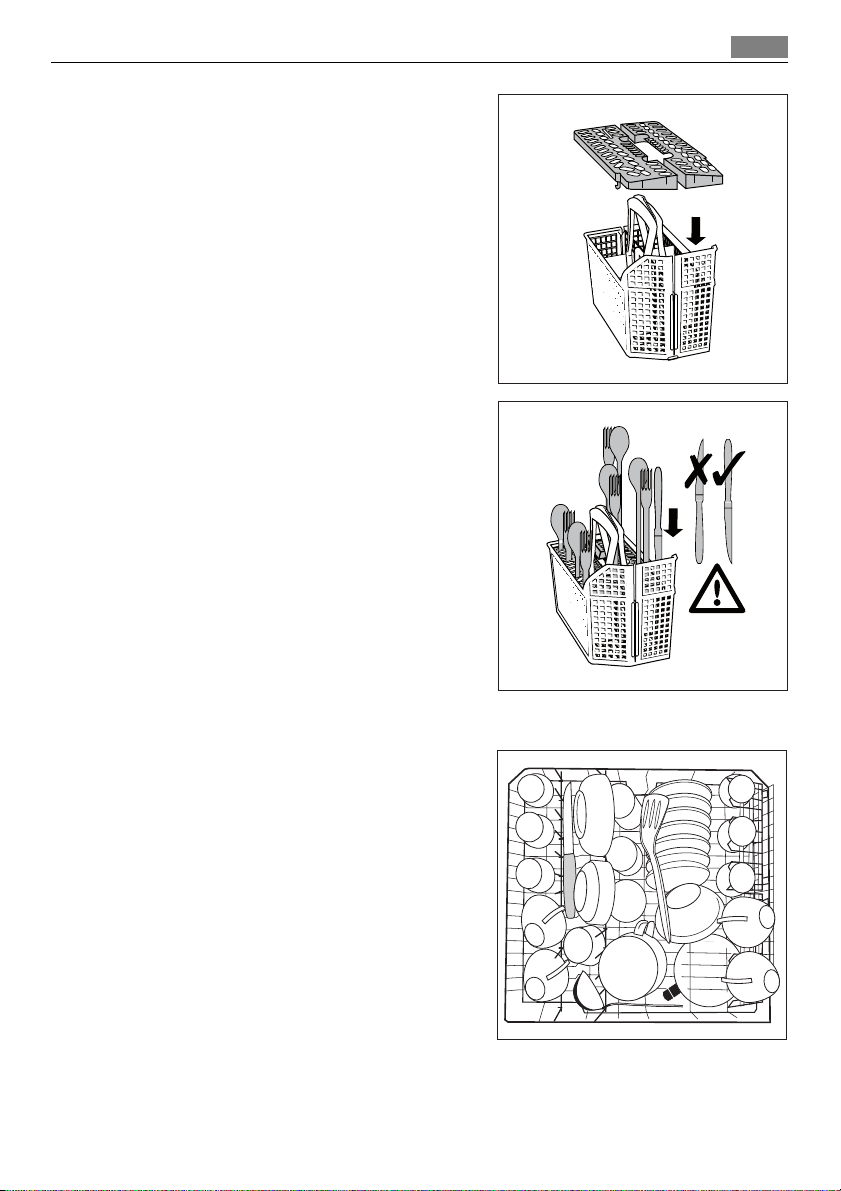
Use the cutlery grids.
• Put the grids on the cutlery basket.
• For larger items use only one of the cutlery grids.
• Put forks and spoons with the handles down.
• Put knives with the handles up.
• Mix spoons with other cutlery to prevent
them to bond together.
Loading cutlery and dishes
13
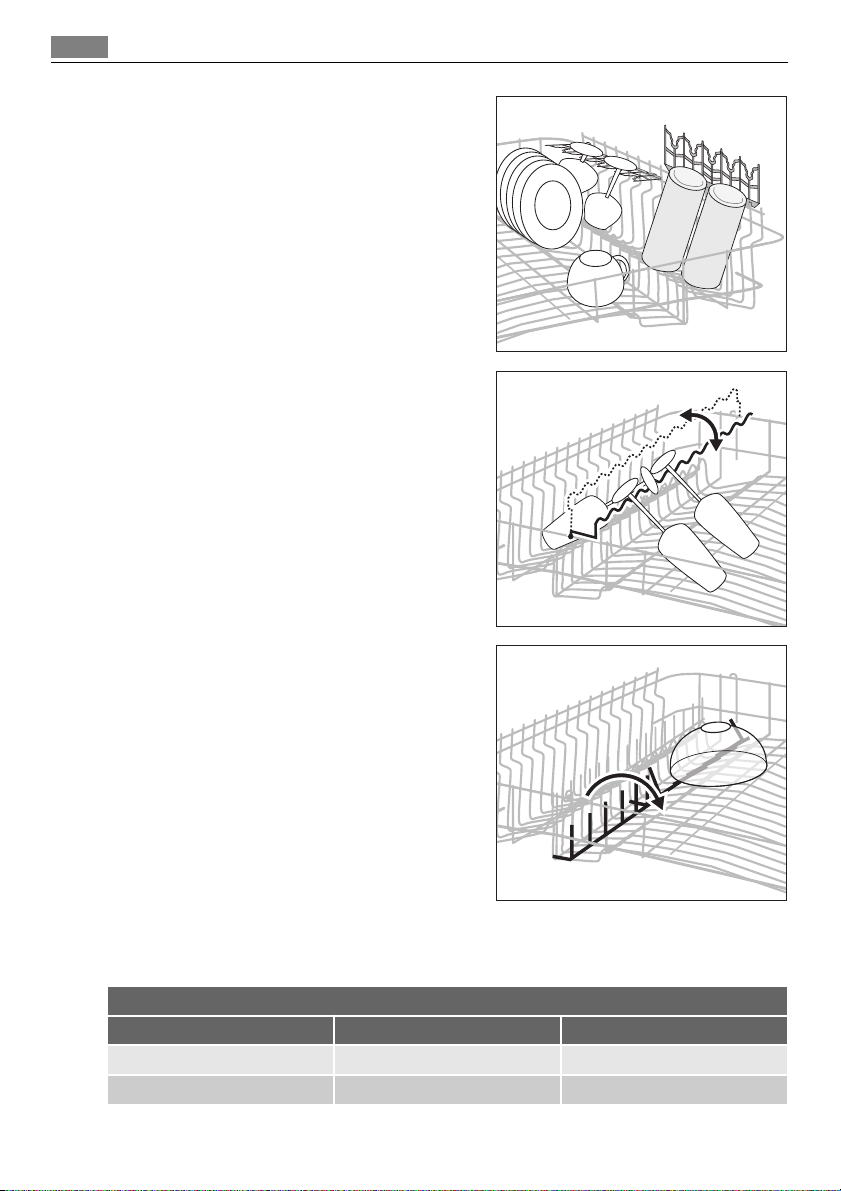
Upper basket
The upper basket is for saucers, salad bowls, cups,
glasses, pots and lids. Arrange the items to let water touch all surfaces.
Page 14
Loading cutlery and dishes
14
• For longer items fold the cup racks up.
• Put glasses with long stems in the cup racks
with the stems up.
• For glasses with long stems, turn the glass
holder to the left or to the right.
• You can fold up or down the row of prongs
on the left side of the upper basket to increase load flexibility.
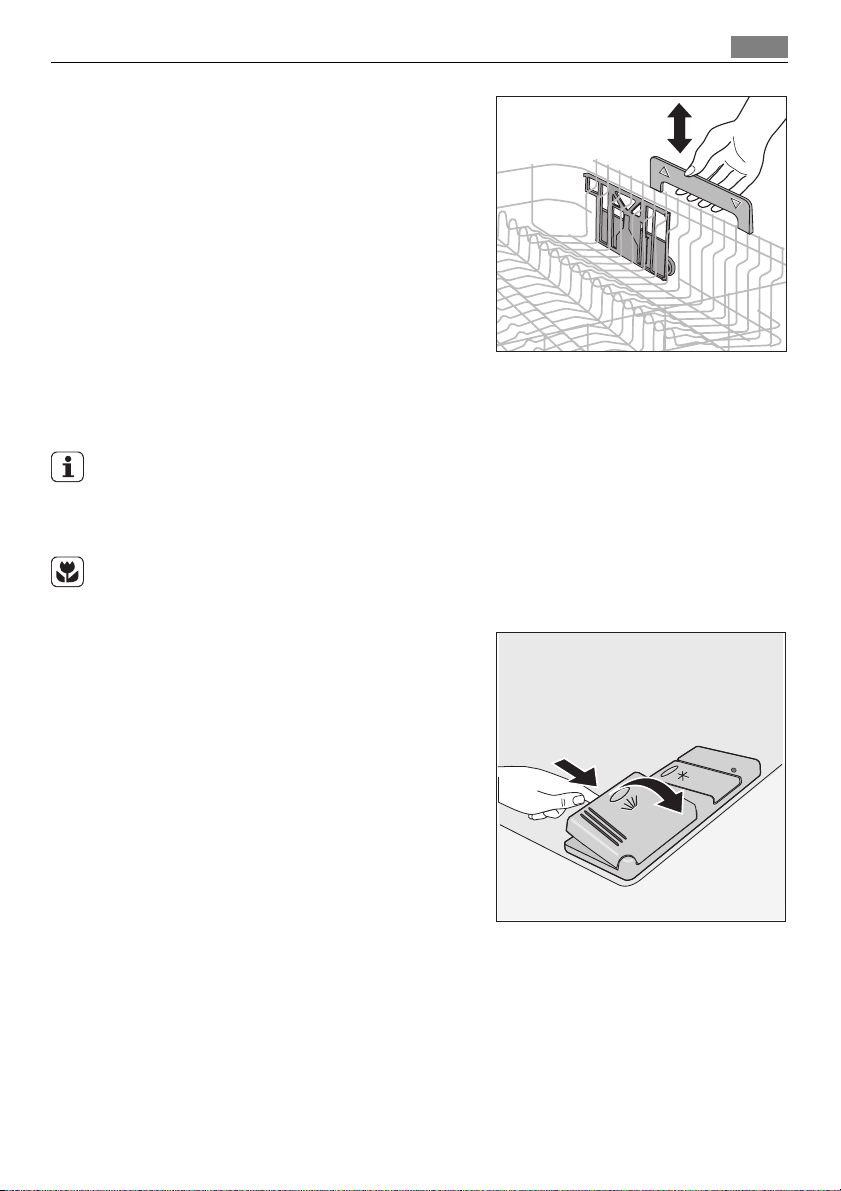
Adjustment of the height of the upper basket
You can put the upper basket in two positions to increase load flexibility.
Maximum height of the dishes in:
the upper basket the lower basket
Upper position 22 cm 30 cm
Lower position 24 cm 29 cm
Do these steps to move to the upper basket to the lower/upper position:
Page 15
Use of detergent
1. Pull out the upper basket until it stops.
2. Hold the upper basket by the handle, lift it
as far as possible and lower it vertically.
The upper basket latches into the lower or
the upper position.
Use of detergent
Only use detergents (powder, liquid or tablet) that are applicable for dishwashers.
Follow the data on the packaging:
• Dosage recommended by the manufacturer.
• Storage recommendations.
Do not use more than the correct quantity of detergent to save an environment.
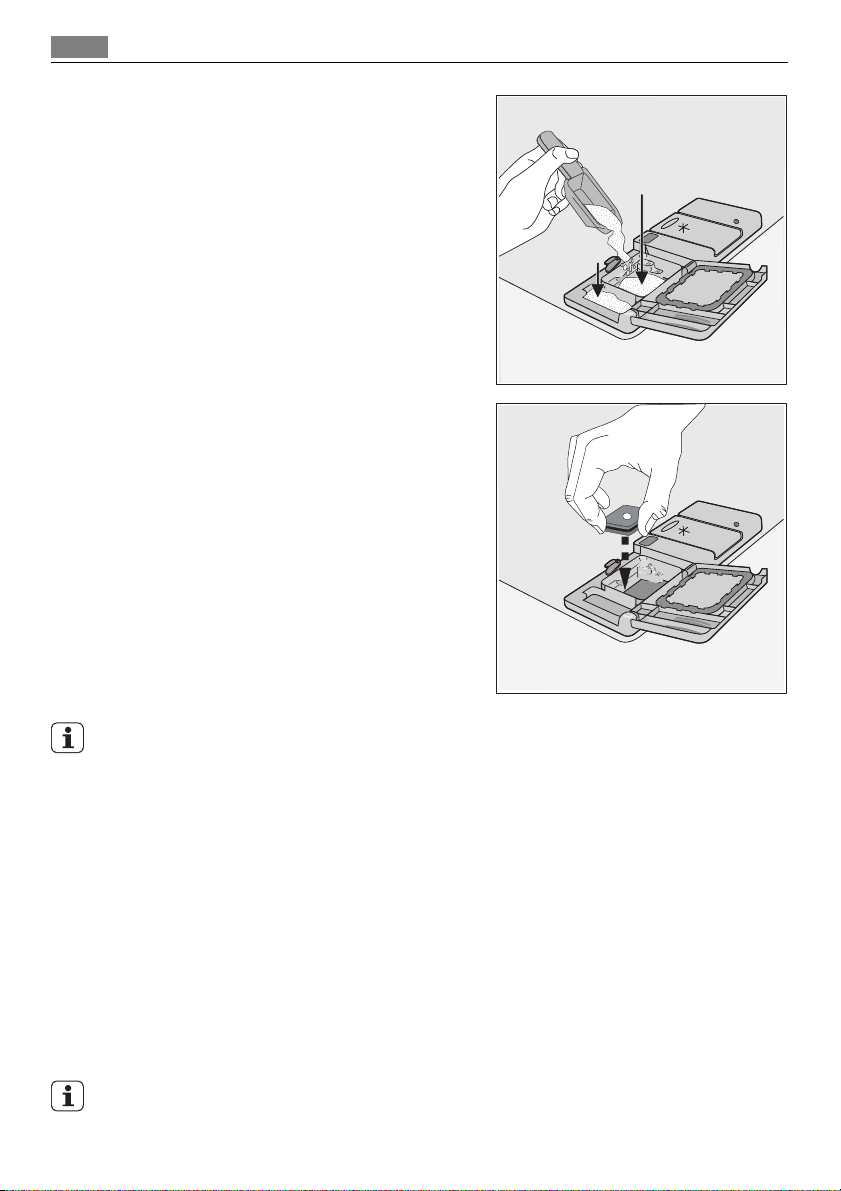
Do these steps to fill the detergent dispenser:
1. Open the lid of the detergent dispenser.
2. Fill the detergent dispenser (A) with detergent. The marking shows the dosage:
20 = approximately 20 g of detergent
30 = approximately 30 g of detergent.
15
Page 16
Multitab function
16
3. If you use a washing programme with prewash phase, put more detergent in the
prewash detergent compartment (B).
4. If you use detergent tablets, put the detergent tablet in the detergent dispenser
(A).
5. Close the lid of the detergent dispenser.
Press the lid until it locks into position.
A
B
Different brands of detergent dissolve in different times. Some detergent tablets do not
have the best cleaning results during short washing programmes. Use long washing programmes when you use detergent tablets to fully remove the detergent.
Multitab function
The multitab function is for combi detergent tablets.
These tablets contain agents such as detergent, rinse aid and dishwasher salt. Some types
of tablets can contain other agents.
Do a check if these tablets are applicable for the local water hardness. Refer to the instructions from the manufacturer.
When you set the multitab function, it stays on until you deactivate it.
The multitab function stops automatically the flow of rinse aid and salt. The rinse aid
indicator light and salt indicator light are deactivated.
The programme duration can increase if you use the multitab function.
Activate or deactivate the multitab function before the start of a washing programme.
You cannot activate or deactivate the multitab function when the programme operates.
Cancel the washing programme, then set the programme again.
Page 17
Multitab function
17
To activate the multitab function:
• Press the multitab button. The multitab indicator light comes on.
To deactivate the multitab function:
• Press the multitab button. The multitab indicator light goes off.
Do these steps if the drying results are not satisfactory:
1. Fill the rinse aid dispenser with rinse aid.
2. Activate the rinse aid dispenser.
3. Set the rinse aid dosage to position 2.
• You can only activate or deactivate the rinse aid dispenser when the multitab function
is activated.
To activate/deactivate the rinse aid dispenser:
1. Switch on the appliance.
2. Make sure that the appliance is in setting mode.
3. Press and hold function buttons B and C.
– The programme indicator lights above function buttons A, B, and C start to flash.
4. Press function button B.
– The programme indicator lights above function buttons A and C go off.
– The programme indicator light above function button B continues to flash.
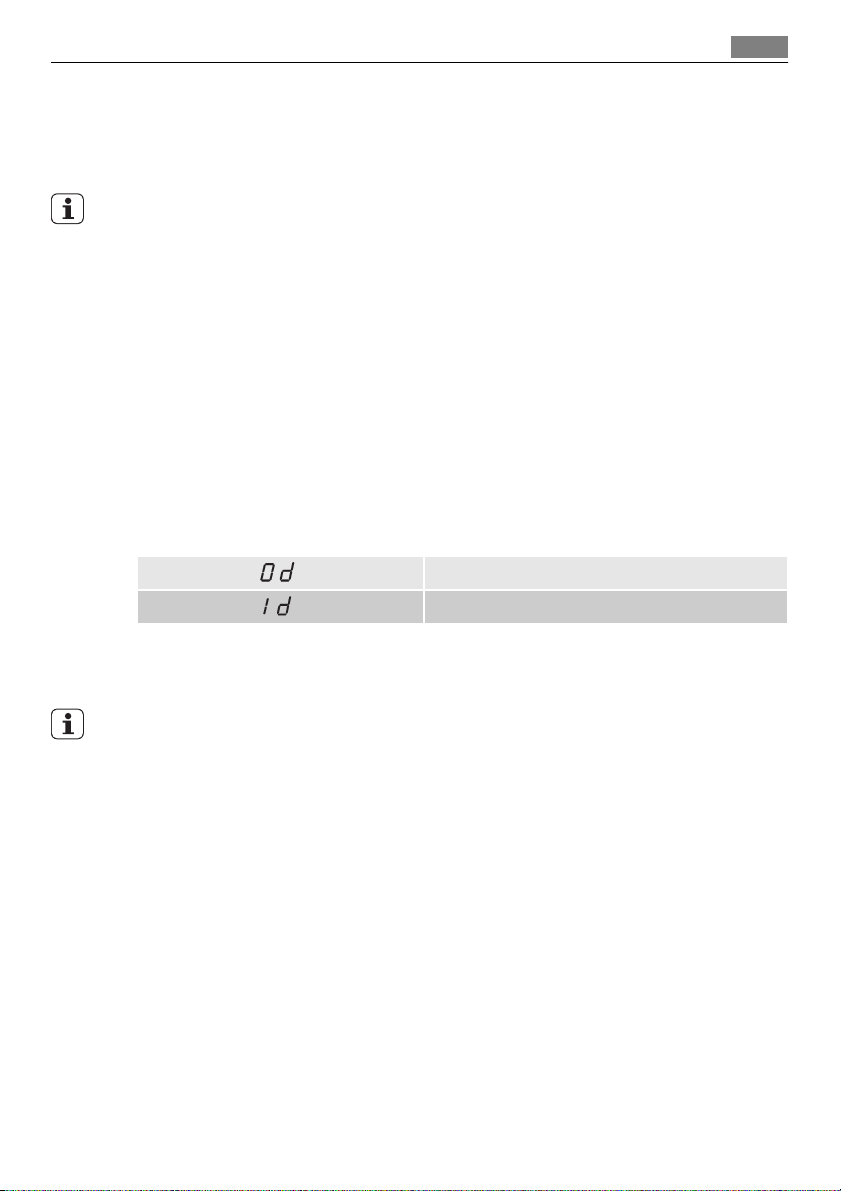
– The digital display shows the setting.
Rinse aid dispenser deactivated
Rinse aid dispenser activated
5. Press function button B again.
– The digital display shows the new setting.
6. Switch off the appliance to save the operation.
To use normal detergent again:
1. Deactivate the multitab function.
2. Fill the salt container and rinse aid dispenser.
3. Adjust the water hardness setting to the highest level.
4. Do a washing programme without dishes.
5. Adjust the water softener to the water hardness in your area.
6. Adjust the rinse aid dosage.
Page 18

Washing programmes
18
Washing programmes
Washing programmes
Programme Degree of
soil
AUTO
45-70°
INTENSIV
Any Crockery, cut-
2)
Heavy soil Crockery, cut-
CARE 70°
3)
30 MIN 60°
Normal or
light soil
4)
ECO 50°
Normal soil Crockery and
GLASS 45° Normal or
light soil
1 HOUR 55° Light soil Crockery and
1) For programmes where the option has an impact, the energy saving is between 10% and 25%.
2) During the Auto programme, the soil level of the dishes is given by how cloudy the water is. The programme
duration and consumptions can change. This depends if the appliance is fully or not and on the level of soil on
the dishes. The appliance adjusts automatically the temperature of the water during the main wash.
3) This is the perfect daily programme to clean a not fully load. Ideal for a family of 4 persons who only want to
load breakfast and dinner crockery and cutlery.
4) Test programme for test institutes. Please refer to separate leaflet supplied, for test data.
Consumption values
Programme
AUTO 45-70° - 1,1 - 1,7 12 - 23
INTENSIV CARE 70° - 1,5 - 1,7 16 - 18
30 MIN 60° - 0,9 9
ECO 50° - 1,0 - 1,1 12 - 13
Type of load Programme description
Prewash
lery, pots and
pans
M ai n wa sh u p t o 45 ° C o r
70°C
1 or 2 intermediate rin-
ses
Final rinse
Drying
Prewash
lery, pots and
pans
Main wash up to 70°C
1 intermediate rinse
Final rinse
Drying
Crockery and
cutlery
Main wash up to 60°C
Final rinse
Prewash
cutlery
Main wash up to 50°C
1 intermediate rinse
Final rinse
Drying
Delicate crock-
ery and glassware
Main wash up to 45°C
1 intermediate rinse
Final rinse
Drying
Main wash up to 55°C
cutlery
1 intermediate rinse
Final rinse
Duration (in minutes)
1)
Save energy
selectable, impact on
washing programme
selectable, impact on
washing programme
selectable, no impact on
washing programme
selectable, impact on
washing programme
selectable, impact on
washing programme
selectable, no impact on
washing programme
Energy (in kWh) Water (in litres)
1)
Page 19

Setting and starting a washing programme
19
Programme
GLASS 45° - 0,8 - 0,9 14 - 15
1 HOUR 55° - 1,0 - 1,2 11 - 12
1) The digital display shows the programme duration.
Duration (in minutes)
1)
Energy (in kWh) Water (in litres)
The pressure and temperature of the water, the variations of power supply and the quantity
of dishes can change these values.
Setting and starting a washing programme
Set the options before the start of a washing programme. You cannot set an option when
a washing programme operates. If it is necessary to set an option, cancel the washing
programme.
Set the washing programme with the door ajar. The washing programme only starts after
you close the door. Until then it is possible to modify the settings.
Do these steps to set and start a washing programme:
1. Switch on the appliance.
2. Make sure that the appliance is in setting mode.
3. Select a washing programme. Refer to the chapter 'Washing programmes'.
– The related programme indicator light comes on.
– All other programme indicator lights go off.
– The digital display shows in flashing the programme duration.
4. Close the door. The washing programme starts automatically.
You can select the washing programme and delay start also with the door closed. When
you press a programme button you have only 3 seconds to select a different washing
programme or a delay start. After these 3 seconds, the selected programme starts automatically.
When the washing programme operates, you cannot change the programme. Cancel the
washing programme.
WARNING!
Only interrupt or cancel a washing programme if necessary.
CAUTION!
Open the door carefully. Hot steam can come free.
Interrupting a washing programme
Open the door.
• The programme stops.
Close the door.
• The programme continues from the point of interruption.
Page 20

Setting and starting a washing programme
20
Cancelling a washing programme
1. Press and hold the cancel button until all programme indicator lights come on.
2. Release the cancel button.
At this time you can do these steps:
1. Switch off the appliance.
2. Set a new washing programme .
Fill the detergent dispenser with detergent before you set a new washing programme.
Setting and starting a washing programme with delay start
1. Press the on/off button.
2. Set a washing programme.
3. Press the delay start button until the display shows on flashing the necessary delay
start of the washing programme.
– The related indicator light comes on.
4. Close the door.
– The number on the display comes on with fixed light.
– The countdown of the delay start starts.
– The countdown of the delay start decreases with steps of 1 hour.
– When the countdown is completed, the washing programme starts automatically.
Do not open the door during the countdown to prevent interruption of the countdown.
When you close the door again, the countdown continues from the point of interruption.
Cancelling a delay start
1. Press and hold the cancel button until all programme indicator lights come on.
2. Release the cancel button. When you cancel a delay start, you also cancel the washing
programme.
3. Set a new washing programme.
End of the washing programme
• The appliance stops automatically.
• The audible signals for the end of the programme operate.
• The display shows 0.
• The indicator light of the ended programme stays on.
1. Switch off the appliance.
2. Open the door.
3. For better drying results, keep the door ajar for some minutes before you remove the
dishes.
Let the dishes cool down before you remove them from the appliance. Hot dishes are easily
damaged.
If the save energy function is set, dishes can be wet once the programme finished. We
recommend to leave the appliance door ajar so that dishes can dry naturally.
Standby mode
If you do not switch off the appliance at the end of the washing programme, the appliance
automatically goes into standby mode. The standby mode decreases energy consumption.
Page 21

Care and cleaning
Three minutes after the end of the programme, all indicator lights go off and the digital
display shows one horizontal bar.
Press one of the buttons (not the on/off button), to go back to end-of-programme mode.
Removing the load
• First remove items from the lower basket, then from the upper basket.
• There can be water on the sides and door of the appliance. Stainless steel becomes cool
more quickly than the dishes.
Care and cleaning
WARNING!
Switch the appliance off before you clean the filters.
Cleaning the filters
CAUTION!
Do not use the appliance without the filters. Make sure that the installation of the filters
is correct. Incorrect installation will cause unsatisfactory washing results and damage to
the appliance.
If necessary, clean the filters. Dirty filters decrease the washing results.
The dishwasher has three filters:
1. coarse filter (A)
2. microfilter (B)
3. flat filter (C)
Do these steps to clean the filters:
1. Open the door.
2. Remove the lower basket.
A
21
B
C
Page 22

What to do if…
22
3. To unlock the filter system, turn the han-
dle on the microfilter (B) approximately
1/4 anticlockwise.
4. Remove the filter system.
5. Hold the coarse filter (A) by the handle
with the hole.
6. Remove the coarse filter (A) from the
microfilter (B).
7. Remove the flat filter (C) from the bot-
tom of the appliance.
8. Clean the filters below running water.
9. Put the flat filter (C) in the bottom of the
appliance.
10. Put the coarse filter (A) in the microfilter
(B) and push the filters together.
11. Put the filter system in position.
12. To lock the filter system, turn the handle
on the microfilter (B) clockwise until it
lock in position.
13. Install the lower basket.
14. Close the door.
Do not remove the spray arms.
If the holes in the spray arms become clogged, remove remaining parts of soil with a cocktail
stick.
External cleaning
Clean the external surfaces of the appliance and control panel with a damp soft cloth. Only
use neutral detergents. Do not use abrasive products, scouring pads or solvents (acetone,
trichloroethylene etc...).
Frost precautions
CAUTION!
Do not install the appliance where the temperature is below 0 °C. The manufacturer is not
responsible for damage because of frost.
If not possible, empty the appliance and close the door. Disconnect the water inlet hose
and remove water from the water inlet hose.
What to do if…
The appliance does not start or stops during operation.
Page 23

What to do if…
23
If there is a fault, first try to find a solution to the problem yourself. If you cannot find a
solution to the problem yourself, contact the Service Force Centre.
CAUTION!
Switch off the appliance before you do the below suggested corrective actions.
Fault code and malfunction Possible cause and solution
• intermittent audible signal
•
digital display shows
The dishwasher does not fill with
water
• intermittent audible signal
•
digital display shows
The dishwasher will not drain
• intermittent audible signal
•
digital display shows
The anti-flood device operates
The programme does not start • The appliance door is not closed.
• The water tap is blocked or furred with limescale.
Clean the water tap.
• The water tap is closed.
Open the water tap.
• The filter in the water inlet hose is blocked.
Clean the filter.
• The connection of the water inlet hose is not correct. The
hose can be kinked or squashed.
Make sure that the connection is correct.
• There is a blockage in the sink spigot.
Clean the sink spigot.
• The connection of the water drain hose is not correct. The
hose can be kinked or squashed.
Make sure that the connection is correct.
• Close the water tap and contact your local Service Force
Centre.
Close the door.
• Mains plug is not connected in.
Put in the mains.
• The fuse has blown out in the household fuse box.
Replace the fuse.
• Delay start is set.
Cancel the delay start to start the programme immedi-
ately.
After the check, switch on the appliance. The programme continues from the point of
interruption. If the malfunction shows again, contact your Service Force Centre.
These data are necessary to help you quickly and correctly:
• Model (Mod.)
• Product number (PNC)
• Serial number (S.N.)
For these data, refer to the rating plate.
Write the necessary data here:
Model description : ..........
Product number : ..........
Serial number : ..........
Page 24

Technical data
24
The dishes are not clean • The selected washing programme is not applicable for the type
Limescales particles on the
dishes
The dishes are wet and dull • No rinse aid has been used.
There are streaks, milky spots
or a bluish coating on glasses
and dishes
Dry water drop signs on
glasses and dishes
Technical data
The cleaning results are not satisfactory
of load and soil.
• The baskets are loaded incorrectly so that water cannot reach all
surfaces.
• Spray arms do not turn freely because of incorrect arrangement
of the load.
• The filters are dirty or not correctly installed.
• The quantity of detergent is too little or missing.
• The salt container is empty.
• The water softener is adjusted on a wrong level.
• The salt container cap is not closed correctly.
• The rinse aid dispenser is empty.
• Decrease the rinse aid dosage.
• Increase rinse aid dosage.
• The detergent can be the cause.
Dimensions Width cm 59,6
Height cm 85
Depth cm 62,5
Electrical connection - Voltage
- Overall power - Fuse
Water supply pressure Minimum 0,5 bar (0,05 MPa)
Maximum 8 bar (0,8 MPa)
Capacity Place settings 12
Information on the electrical connection is given on the rating
plate on the inner edge of the dishwasher door.
Installation instructions
Installation
Fitting under a counter
WARNING!
Make sure that the mains plug is disconnected from the mains socket during installation.
Page 25

Put the appliance adjacent to a water tap and a
water drain. Remove the appliance worktop to
install it under a sink unit or a kitchen worktop.
Make sure that the dimensions of the recess
agree with the given dimensions.
Do these steps to remove the appliance worktop:
1. Remove the rear screws (1).
2. Pull the worktop from the behind the appliance.
Installation
25
3. Lift the worktop and move it from the
front slots.
4. Use the adjustable feet to adjust the level
of the appliance.
Install the appliance under the kitchen worktop. Make sure that there are no kinks in the
water hoses and that the water hoses are not
squashed.
If a repair is necessary, the appliance must be easily accessible for the engineer. Install the
appliance worktop to the appliance if you want to use the dishwasher as a freestanding
appliance.
The plinth on freestanding appliance is not adjustable.
Adjusting the level of the appliance
Make sure that the appliance is level to close and seal the door correctly. If the level of the
appliance is correct, the door does not catch on the sides of the cabinet. If the door does
not close correctly, loosen or tighten the adjustable feet until the appliance is level.
Page 26

Water connection
26
Water connection
Water inlet hose
Connected the appliance to a hot (max. 60°) or cold water supply.
If the hot water comes from alternative sources of energy that are more environmentally
friendly (e.g. solar or photovoltaic panels and aeolian), use a hot water supply to decrease
energy consumption.
Connect the inlet hose to a water tap with an external thread of 3/4”.
CAUTION!
Do not use connection hoses from an old appliance.
The water pressure must be in the limits (refer to 'Technical data'). Make sure that the local
water authority gives you the average mains pressure in your area.
Make sure that there are no kinks in the water inlet hose and that the water inlet hose is
not squashed or entangled.
Fit the locknut correctly to prevent water leaks.
CAUTION!
Do not connect the appliance to new pipes or pipes that are not used for a long time. Let
the water run for some minutes, then connect the inlet hose.
The water inlet hose is double-walled and has an inner mains cable and a safety valve. The
water inlet hose is under pressure only while the water is running. If there is a leak in the
water inlet hose, , the safety valve interrupts the running water.
Be careful when you connect the water inlet hose:
• Do not put the water inlet hose or the safety valve in water.
• If the water inlet hose or the safety valve is damaged, immediately disconnect the mains
plug from the mains socket.
• Only let the Service Force Centre replace the water inlet hose with safety valve.
WARNING!
Dangerous voltage
Water drain hose
1. Connect the water drain hose to the sink spigot and attach it under the work surface.
This prevents that the waste water from the sink goes back into the appliance.
Page 27

Electrical connection
27
2. Connect the water drain hose to a stand pipe with vent-hole (minimum internal diameter 4 cm).
Make sure that the drain hose is not bent or
squashed to prevent that the water drains does
max 85 cm
not drain correctly.
Remove the sink plug when the appliance drains
the water to prevent that the water goes back into
min 40 cm
the appliance.
A drain hose extension must not be longer than 2
max 400 cm
m. The internal diameter must not be smaller than
the diameter of the hose.
If you connect the water drain hose to a trap spigot under the sink, remove the plastic membrane
(A). If you do not remove the membrane, remaining food can cause a blockage in the drain hose
spigot
The appliance has a security feature to prevent
that dirty water goes back into the appliance. If,
the spigot of the sink has a 'non-return valve', this
valve can cause the appliance to drain incorrectly.
Remove the non-return valve.
CAUTION!
Make sure that the water couplings are tight to prevent water leakage.
Electrical connection
WARNING!
The manufacturer is not responsible if you do not follow these safety precautions.
Ground the appliance according to safety precautions.
Make sure that the rated voltage and type of power on the rating plate agree with the
voltage and the power of the local power supply.
Always use a correctly installed shockproof socket.
Do not use multi-way plugs, connectors and extension cables. There is a risk of fire.
Do not replace the mains cable yourself. Contact the Service Force Centre.
Make sure that the mains plug is accessible after installation.
Do not pull the mains cable to disconnect the appliance. Always pull the mains plug.
Environment concerns
The symbol on the product or on its packaging indicates that this product may not be
treated as household waste. Instead it should be taken to the appropriate collection point
for the recycling of electrical and electronic equipment. By ensuring this product is disposed
of correctly, you will help prevent potential negative consequences for the environment
Page 28

Environment concerns
28
and human health, which could otherwise be caused by inappropriate waste handling of
this product. For more detailed information about recycling of this product, please contact
your local council, your household waste disposal service or the shop where you purchased
the product.
The packaging materials are environmentally friendly and can be recycled. The plastic components are identified by markings, e.g. >PE<, >PS<, etc. Discard the packaging materials
in the applicable container at the community waste disposal facilities.
WARNING!
To discard the appliance, follow the procedure:
• Pull the mains plug out of the socket.
• Cut off the mains cable and mains plug and discard them.
• Discard the door catch. This prevents the children to close themselves inside the appliance
and endanger their lives.
Page 29

Danke, dass Sie sich für eines unserer hochqualitativen Produkte entschieden haben.
Lesen Sie für eine optimale und gleichmäßige Leistung Ihres Gerätes diese
Benutzerinformation bitte sorgfältig durch. Sie wird Ihnen helfen, alle Vorgänge
perfekt und äußerst effizient zu steuern. Damit Sie diese Benutzerinformation bei
Bedarf stets zur Hand haben, empfehlen wir Ihnen, sie an einem sicheren Ort
aufzubewahren. Und geben Sie diese Benutzerinformation bitte an einen
eventuellen neuen Besitzer dieses Gerätes weiter.
Wir wünschen Ihnen viel Freude mit Ihrem neuen Gerät.
Inhalt
Inhalt
29
Gebrauchsanweisung 30
Sicherheitshinweise 30
Bestimmungsgemäßer Gebrauch 30
Allgemeine Sicherheitshinweise 30
Kindersicherheit 30
Installation 31
Gerätebeschreibung 32
Bedienblende 33
Löschtaste 34
Programmwahltasten 34
Energiespar-Taste 34
Zeitvorwahl-Taste 34
Digital-Display 34
Funktionstasten 34
Einstellmodus 35
Vor der ersten Inbetriebnahme 35
Einstellen des Wasserenthärters 35
Manuelle Einstellung 36
Elektronische Einstellung 36
Gebrauch von Salz für Geschirrspüler 37
Gebrauch von Klarspülmittel 37
Einstellung des Klarspüldosierers 38
Laden von Besteck und Geschirr 39
Hilfreiche Hinweise und Tipps 39
Unterkorb 40
Besteckkorb 40
Oberkorb 41
Höhenverstellung des Oberkorbs 42
Gebrauch von Spülmittel 43
Funktion "Multitab" 44
Spülprogramme 46
Auswählen und Starten eines Spülprogramms
47
Unterbrechen eines Spülprogramms 48
Abbrechen eines Spülprogramms 48
Einstellung und Start eines Spülprogramms
mit Zeitvorwahl 48
So löschen Sie die Zeitvorwahl 48
Ende des Spülprogramms 48
Standby-Modus 49
Entnehmen des Spülguts 49
Reinigung und Pflege 49
Filterreinigung 49
Reinigung der Außenseiten 51
Frostschutzmaßnahmen 51
Was tun, wenn … 51
Technische Daten 53
Aufstellanweisung 53
Gerät aufstellen 53
Installation unter einer Arbeitsplatte 53
Gehen Sie wie folgt vor, um die Arbeitsplatte
des Gerätes zu entfernen: 54
Ausrichten des Geräts 54
Wasseranschluss 54
Wasserzulaufschlauch 54
Ablaufschlauch 55
Elektrischer Anschluss 56
Umwelttipps 57
Änderungen vorbehalten
117951570-00-072009
Page 30

Sicherheitshinweise
30
Gebrauchsanweisung
Sicherheitshinweise
Lesen Sie diese Bedienungsanleitung bitte sorgfältig durch, bevor Sie das Gerät anschließen
und benutzen, um Gefahren zu vermeiden und einen korrekten Betrieb des Geräts zu gewährleisten. Bewahren Sie diese Bedienungsanleitung in der Nähe des Geräts auf, auch
wenn Sie dieses anderswo aufstellen. Wenn Sie das Gerät verkaufen, geben Sie dem Käufer
die Bedienungsanleitung mit. Jeder, der dieses Gerät benutzt, sollte mit der Bedienung und
den Sicherheitsmerkmalen vertraut sein.
Bestimmungsgemäßer Gebrauch
• Dieses Gerät ist ausschließlich zur Verwendung im Haushalt bestimmt.
• Spülen Sie in diesem Gerät ausschließlich spülmaschinengeeignete Haushaltsutensilien.
• Geben Sie keine Lösungsmittel in das Gerät. Andernfalls besteht Explosionsgefahr.
• Ordnen Sie Messer und andere spitze Gegenstände mit der Spitze nach unten in den
Besteckkorb ein. Oder legen Sie sie horizontal in den Oberkorb.
• Verwenden Sie ausschließlich Markenreinigungsprodukte für Geschirrspüler (Spülmittel,
Salz, Klarspüler).
• Wenn Sie die Tür öffnen, während das Gerät in Betrieb ist, kann heißer Dampf austreten.
In diesem Fall besteht die Gefahr von Hautverbrennungen.
• Nehmen Sie vor dem Ende des Spülprogramms nichts aus dem Geschirrspüler.
• Wenn das Spülprogramm beendet ist, ziehen Sie den Netzstecker aus der Netzsteckdose
und schließen Sie den Wasserhahn.
• Das Gerät darf nur von einem Servicetechniker einer autorisierten Kundendienststelle
repariert werden. Dabei dürfen ausschließlich Originalersatzteile verwendet werden.
• Versuchen Sie nicht, selbst Reparaturen auszuführen. Andernfalls besteht Unfallgefahr
und das Gerät könnte beschädigt werden. Wenden Sie sich in jedem Fall an Ihren Kundendienst.
Allgemeine Sicherheitshinweise
• Das Gerät darf von Erwachsenen oder Kindern mit eingeschränkten physischen, senso-
rischen oder geistigen Fähigkeiten oder einem Mangel an Wissen und Erfahrung nicht
benutzt werden. Solche Personen müssen von einer Person beaufsichtigt oder bei der
Bedienung des Geräts angeleitet werden, die für ihre Sicherheit verantwortlich ist.
• Beachten Sie die Sicherheitsanweisungen des Reinigungsmittelherstellers, um Verät-
zungen an Augen, Mund oder Kehlkopf zu vermeiden.
• Trinken Sie kein Wasser aus dem Geschirrspüler. Es können Spülmittelrückstände darin
zurückbleiben.
• Wenn Sie das Gerät nicht benutzen, halten Sie die Tür geschlossen, damit es nicht zu
Unfällen kommt, weil jemand darüber stolpert.
• Setzen oder stellen Sie sich nie auf die offene Tür.
Kindersicherheit
• Nur Erwachsene dürfen dieses Gerät bedienen. Kinder müssen beaufsichtigt werden, so
dass sie nicht mit dem Gerät spielen können.
Page 31

Sicherheitshinweise
• Halten Sie das Verpackungsmaterial von Kindern fern. Andernfalls besteht Erstickungs-
gefahr.
• Bewahren Sie alle Reinigungsmittel an einem sicheren Ort auf. Achten Sie darauf, dass
Reinigungsmittel nicht in die Hände von Kindern gelangen.
• Halten Sie Kinder vom geöffneten Geschirrspüler fern.
Installation
• Vergewissern Sie sich, dass das Gerät beim Transport nicht beschädigt wurde. Schließen
Sie ein beschädigtes Gerät nicht an. Wenden Sie sich bei Bedarf an den Hersteller.
• Entfernen Sie vor dem ersten Gebrauch alle Verpackungsmaterialien.
• Der elektrische Anschluss muss von einer qualifizierten Fachkraft vorgenommen werden.
• Die Wasseranschlüsse müssen von einer qualifizierten Fachkraft vorgenommen werden.
• Nehmen Sie weder technische noch anderweitige Modifikationen am Gerät vor. An-
dernfalls besteht Unfallgefahr und das Gerät könnte beschädigt werden.
• Benutzen Sie das Gerät nicht:
– wenn das Netzkabel oder die Wasserschläuche beschädigt sind,
– wenn die Bedienblende, die Abdeckung oben oder der Sockel beschädigt sind, so dass
das Innere des Geräts freiliegt.
Wenden Sie sich in einem solchen Fall an Ihren Kundendienst.
• Bohren Sie keine Löcher ins Gehäuse des Geräts. Andernfalls könnten hydraulische oder
elektrische Bauteile beschädigt werden.
WARNUNG!
Beachten Sie genau sämtliche Anweisungen zu den elektrischen und den Wasseranschlüssen.
31
Page 32

Gerätebeschreibung
32
Gerätebeschreibung
1 Oberkorb
2 Anzeige der Wasserhärtestufe
3 Salzbehälter
4 Behälter für Reinigungsmittel
5 Dosiergerät für Klarspüler
6 Typenschild
7 Filter
8 Unterer Sprüharm
9 Oberer Sprüharm
10 Arbeitsplatte
Page 33

Bedienblende
Bedienblende
7
33
10
9
8
1 Ein/Aus-Taste
2 Lösch-Taste (RESET)
3 Programmwahltasten
4 Energiesparen-Taste (ÖKO PLUS)
5 Multitab-Taste (MULTITAB)
6 Zeitvorwahl-Taste
7 Digital-Display
8 Funktionstasten
9 Kontrolllampen
10 Programmkontrolllampen
Kontrolllampen
ÖKO PLUS Leuchtet auf, wenn die Funktion Energiesparen eingeschaltet ist.
MULTITAB Leuchtet auf, wenn Sie die Funktion Multitab einschalten. Siehe Abschnitt
"Funktion Multitab".
Page 34

Bedienblende
34
Kontrolllampen
1)
Salz
Klarspüler
1) Die Kontrolllampen für Salz und Klarspülmittel leuchten nie während eines laufenden Spülprogramms auf,
wenn die Salz- und Klarspülmittelbehälter leer sind.
1)
Leuchtet auf, wenn der Salzbehälter aufgefüllt werden muss. Siehe Abschnitt
"Verwendung von Geschirrspülsalz".
Die Kontrolllampe für Salz kann nach dem Nachfüllen von Salz noch einige
Stunden leuchten. Dies hat jedoch keine unerwünschte Auswirkung auf den
Gerätebetrieb.
Leuchtet auf, wenn Klarspüler nachgefüllt werden muss. Näheres hierzu siehe Abschnitt "Verwendung von Klarspüler".
Löschtaste
Mit dieser Taste können Sie ein Spülprogramm oder eine Zeitvorwahl löschen. Siehe Kapitel
"Auswahl und Start eines Spülprogramms".
Programmwahltasten
Mit diesen Tasten erfolgt die Auswahl des Spülprogramms. Drücken Sie eine der Tasten, bis
die Kontrolllampe des erforderlichen Programms aufleuchtet. Nähere Informationen über
die Spülprogramme siehe den Abschnitt "Spülprogramme".
Energiespar-Taste
Diese Funktion senkt die Temperatur in der Trockenphase. Die Energieeinsparung beträgt
zwischen 10 und 25 %.
Falls das Geschirr am Endes des Programms noch feucht ist, lassen Sie die Tür einen Spaltbreit geöffnet, damit es von selbst weiter trocknen kann.
Diese Funktion ist für alle Spülprogramme verfügbar. Die zugehörige Kontrolllampe leuchtet auf, wenn Sie die Taste drücken.
Die Energiespar-Funktion hat bei manchen Programmen keine Auswirkung. Unter "Spülprogramme" finden Sie eine Liste der Programme, auf die sich die Auswahl der EnergiesparFunktion auswirkt bzw. nicht auswirkt.
Zeitvorwahl-Taste
Benutzen Sie die Zeitvorwahl-Taste, um den Start des Spülprogramms zwischen 1 und 19
Stunden zu verzögern. Siehe den Abschnitt 'Einstellen und Starten eines Spülprogramms'.
Digital-Display
Das Display zeigt an:
• Härtegrad, auf den der Wasserenthärter eingestellt ist.
• Restlaufzeit bis zum Programmende.
• Ein-/Abschaltung des Klarspülmitteldosierers (nur bei aktiver Funktion Multitab).
• Ende des Spülprogramms. Das Display zeigt eine Null an.
• Anzahl der Stunden der Zeitvorwahl.
• Fehlercodes.
Funktionstasten
Benutzen Sie die Funktionstasten für folgende Vorgänge:
Page 35

Vor der ersten Inbetriebnahme
• Zum Einstellen des Wasserenthärters. Siehe den Abschnitt 'Einstellung des Wasserent-
härters.
• Zum Ein-/Abschalten des Klarspüldosierers, wenn die Funktion Multitab eingeschaltet
ist. Siehe den Abschnitt 'Funktion Multitab'.
Einstellmodus
Das Gerät muss sich für folgende Einstellungen im Einstellmodus befinden:
• Zum Einstellen eines Spülprogramms.
• Zum Einstellen des Wasserenthärter-Härtegrads.
• Zum Ein-/Ausschalten des Klarspüldosierers.
Drücken Sie die Ein/Aus-Taste. Das Gerät ist im Einstellmodus, wenn:
– Alle Programmkontrolllampen aufleuchten.
Drücken Sie die Ein/Aus-Taste. Das Gerät ist nicht im Einstellmodus, wenn:
– Nur eine Programmkontrolllampe aufleuchtet
– Ein Spülprogramm eingestellt ist. Löschen Sie das Programm, um in den Einstellmodus
zurückzukehren. Siehe Kapitel "Auswahl und Start eines Spülprogramms".
Vor der ersten Inbetriebnahme
Bitte halten Sie sich für die folgenden Schritte genau an die Anweisung:
1. Überprüfen Sie, ob der Wasserenthärter (Weichwasserbereiter) korrekt auf den Härte-
grad des Wassers in Ihrer Region eingestellt ist. Stellen Sie den Wasserenthärter bei
Bedarf auf die richtige Stufe ein.
2. Füllen Sie den Salzbehälter mit Geschirrspülsalz.
3. Füllen Sie den Klarspüldosierer mit Klarspüler.
4. Ordnen Sie Geschirr und Besteck in den Geschirrspüler ein.
5. Stellen Sie je nach Spülgut und Verschmutzungsgrad das passende Spülprogramm ein.
6. Füllen Sie den Spülmittelbehälter mit der passenden Menge an Spülmittel.
7. Starten Sie das Spülprogramm.
Wenn Sie Reinigertabletten ('3 in 1', '4 in 1', '5 in 1', etc.) verwenden, siehe das Kapitel
"Multitab-Funktion".
35
Einstellen des Wasserenthärters
Der Wasserenthärter entfernt Mineralien und Salze aus dem Spülwasser. Andernfalls könnten sich die Mineralien und Salze nachteilig auf die Funktion des Geräts auswirken.
Die Wasserhärte wird in unterschiedlichen, aber gleichwertigen Einheiten gemessen:
• Deutsche Wasserhärtegrade (dH°).
• Französische Wasserhärtegrade (°TH).
• mmol/l (Millimol pro Liter - internationale Einheit für Wasserhärtegrade).
• Clarke-Werte.
Stellen Sie den Wasserenthärter auf den Wasserhärtegrad in Ihrer Region ein. Bei Bedarf
erfahren Sie den Härtegrad bei Ihrem Wasserversorger.
Page 36

Einstellen des Wasserenthärters
36
Wasserhärte Einstellung des Wasserenthärters
°dH °TH mmol/l Clarke-Wer-
51 - 70 91 - 125 9,1 - 12,5 64 - 88 2 10
43 - 50 76 - 90 7,6 - 9,0 53 - 63 2 9
37 - 42 65 - 75 6,5 - 7,5 46 - 52 2 8
29 - 36 51 - 64 5,1 - 6,4 36 - 45 2 7
23 - 28 40 - 50 4,0 - 5,0 28 - 35 2 6
19 - 22 33 - 39 3,3 - 3,9 23 - 27 2 5
15 - 18 26 - 32 2,6 - 3,2 18 - 22 1 4
11 - 14 19 - 25 1,9 - 2,5 13 - 17 1 3
4 - 10 7 - 18 0,7 - 1,8 5 - 12 1 2
< 4 < 7 < 0,7 < 5
1) Kein Salz erforderlich.
te
Sie müssen den Wasserenthärter manuell und elektronisch einstellen.
Manuelle Einstellung
Werkseitig ist das Gerät auf Stufe 2 eingestellt.
Manuell Elektronisch
1)
1
1)
1
1. Öffnen Sie die Tür.
2. Entfernen Sie den Unterkorb.
3. Drehen Sie die Härtebereichsanzeige auf
Härtestufe 1 oder 2 (siehe die Tabelle).
4. Setzen Sie den Unterkorb ein.
5. Schließen Sie die Tür.
Elektronische Einstellung
Werkseitig ist der Wasserenthärter auf Stufe 5 eingestellt.
1. Schalten Sie das Gerät ein.
2. Achten Sie darauf, dass sich das Gerät im Einstellmodus befindet.
3. Drücken und halten Sie die Funktionstasten B und C, bis die Programmkontrolllampen
über den Funktionstasten A, B und C zu blinken beginnen.
4. Lassen Sie die Funktionstasten B und C los.
5. Drücken Sie Funktionstaste A.
– Die Programmkontrolllampen über den Funktionstasten B und C erlöschen.
– Die Programmkontrolllampe über der Funktionstaste A blinkt weiterhin.
– Das Digital-Display zeigt die aktuelle Stufe an.
Page 37

Gebrauch von Salz für Geschirrspüler
Beispiel: Digital-Display zeigt = Stufe 5 an.
6. Drücken Sie die Funktionstaste A einmal, um die Einstellung des Wasserenthärters um
jeweils eine Stufe zu erhöhen.
7. Drücken Sie die Ein-/Aus-Taste, um die Einstellung zu speichern.
Gebrauch von Salz für Geschirrspüler
VORSICHT!
Verwenden Sie ausschließlich Geschirrspülsalz. Andere Salzarten, die nicht auf Geschirrspüler ausgelegt sind, können den Wasserenthärter beschädigen.
VORSICHT!
Verschüttetes Salz oder Salzwasser auf dem Boden des Geräts kann Korrosion verursachen.
Wenn Sie Salz in den Salzbehälter gefüllt haben, starten Sie bitte ein Spülprogramm; so
bleibt kein verschüttetes Salz auf dem Geräteboden und Korrosion wird verhindert!
Gehen Sie wie folgt vor, um den Salzbehälter aufzufüllen:
1. Drehen Sie den Deckel gegen den Uhrzeigersinn, um den Salzbehälter zu öffnen.
2. Füllen Sie den Salzbehälter mit 1 Liter Wasser (nur bei der Erstinbetriebnahme).
3. Verwenden Sie den Trichter, um den Be-
hälter mit Salz zu füllen.
4. Entfernen Sie das Salz, das sich um die
Öffnung des Salzbehälters herum angesammelt hat.
5. Drehen Sie den Deckel im Uhrzeigersinn,
um den Salzbehälter zu schließen.
Es ist normal, dass das Wasser aus dem Salzbehälter beim Einfüllen von Salz überläuft.
Wenn Sie den Wasserenthärter auf Stufe 1
einstellen, leuchtet die Salzkontrolllampe
nicht mehr.
37
Gebrauch von Klarspülmittel
VORSICHT!
Verwenden Sie ausschließlich Markenklarspülmittel für Geschirrspüler.
Füllen Sie nie andere Produkte (Reinigungsmittel für Geschirrspüler, Flüssigreiniger) in den
Behälter für Klarspüler. Andernfalls kann das Gerät beschädigt werden.
Klarspüler macht es möglich, dass das Geschirr ohne Streifen und Flecken trocknet.
Der Klarspüler wird automatisch bei der letzten Spülphase zugesetzt.
Füllen Sie den Klarspüldosierer, wie im Folgenden gezeigt:
Page 38

Gebrauch von Klarspülmittel
38
1. Drücken Sie die Entriegelungstaste (A), um
den Klarspüldosierer zu öffnen.
2. Füllen Sie den Klarspüldosierer mit Klar-
spüler. Der maximale Füllstand wird durch
die Markierung "max".angezeigt.
3. Wischen Sie verschütteten Klarspüler mit
einem saugfähigen Tuch auf, um zu große
Schaumbildung beim nächsten Spülprogramm zu vermeiden.
4. Schließen Sie den Klarspülerdosierer.
Einstellung des Klarspüldosierers
Der Wasserenthärter ist werkseitig auf Härtestufe 4 eingestellt.
Sie können den Klarspüldosierer auf die Stufen 1 (niedrigste Dosierung) bis 6 (höchste
Dosierung) einstellen.
Drehen Sie die Klarspüldosieranzeige, um die Dosierung zu erhöhen oder zu senken.
– Erhöhen Sie die Dosierung, wenn auf dem Ge-
schirr Wassertropfen oder Kalkablagerungen
sind.
– Verringern Sie die Dosierung, wenn Streifen,
weißliche Flecken oder ein bläulicher Überzug
auf dem Geschirr zu sehen sind.
Page 39

Laden von Besteck und Geschirr
Laden von Besteck und Geschirr
Hilfreiche Hinweise und Tipps
VORSICHT!
Spülen Sie in diesem Gerät ausschließlich spülmaschinengeeignete Haushaltsutensilien.
Spülen Sie in diesem Gerät keine Wasser absorbierenden Gegenstände (Schwämme, Geschirrtücher usw.).
• Bevor Sie Geschirr und Besteck ins Gerät einordnen, gehen Sie folgendermaßen vor:
– Entfernen Sie alle Essensreste und sonstigen größeren Partikel.
– Weichen Sie angebrannte Reste in Pfannen, Töpfen usw. ein.
• Achten Sie beim Einordnen von Geschirr und Besteck auf Folgendes:
– Ordnen Sie Hohlgefäße (z. B. Tassen, Gläser, Pfannen) mit der Öffnung nach unten ein.
– Achten Sie darauf, dass sich kein Wasser in Höhlungen oder Vertiefungen sammeln
kann.
– Achten Sie darauf, dass Geschirr- und Besteckteile nicht ineinander zu liegen kommen.
– Achten Sie darauf, dass Geschirr- und Besteckteile nicht übereinander zu liegen kom-
men.
– Achten Sie darauf, dass Gläser einander nicht berühren.
– Ordnen Sie kleine Gegenstände in den Besteckkorb ein.
• Auf Kunststoffgegenständen und Pfannen mit Antihaftbeschichtung sammeln sich oftmals Wassertropfen. Diese Art Geschirr trocknet deshalb schlechter als Porzellan oder
Edelstahl.
• Ordnen Sie leichte Gegenstände in den Oberkorb ein. Achten Sie darauf, dass diese nicht
verrutschen können.
VORSICHT!
Vergewissern Sie sich, dass sich die Sprüharme ungehindert bewegen können, bevor Sie ein
Spülprogramm starten.
39
WARNUNG!
Schließen Sie immer die Tür, nachdem Sie etwas ins Gerät eingeordnet oder herausgenommen haben. Eine offene Tür stellt stets ein Unfallrisiko dar.
Page 40

Laden von Besteck und Geschirr
40
Unterkorb
Ordnen Sie größeres und stark verschmutztes Geschirr in den Unterkorb ein.
Die Stachelreihen am Unterkorb können flach umgeklappt werden, um Servierplatten, Töpfe, Pfannen und Schüsseln einzuordnen.
Besteckkorb
WARNUNG!
Stellen Sie keine Messer mit langen Klingen in aufrechter Stellung ein. Legen Sie langes
oder scharfes Besteck waagerecht in den Oberkorb. Gehen Sie vorsichtig mit scharfen Gegenständen um.
Page 41

Verwenden Sie das Besteckgitter.
• Setzen Sie die Gitter auf den Besteckkorb.
• Für größere Besteckteile benutzen Sie den Besteckkorb auf einer Seite ohne Besteckgitter.
• Stellen Sie Gabeln und Löffel mit den Griffen
nach unten ein.
• Stellen Sie Messer mit den Griffen nach oben
ein.
• Mischen Sie Löffel mit anderem Besteck, damit sie nicht zusammenkleben können.
Laden von Besteck und Geschirr
41
Oberkorb
Der Oberkorb ist zur Aufnahme von Untertassen,
Salatschüsseln, Tassen, Gläsern, Töpfen und Deckeln bestimmt. Ordnen Sie das Spülgut so ein,
dass das Wasser alle Oberflächen erreichen kann.
Page 42

Laden von Besteck und Geschirr
42
• Klappen Sie die Tassenablagen zum Einordnen höherer Gegenstände nach oben.
• Langstielige Gläser können mit dem Stiel
nach oben in die Tassenablagen gestellt werden.
• Klappen Sie den Glashalter für langstielige
Gläser nach links oder rechts.
• Die Stachelreihe auf der linken Seite des
Oberkorbs kann für eine flexiblere Beladung
umgeklappt werden.
Höhenverstellung des Oberkorbs
Der Oberkorb kann für eine flexiblere Beladung in zwei verschiedenen Höhen in den Geschirrspüler eingeschoben werden.
Maximale Geschirrhöhe im:
Oberkorb Unterkorb
Obere Position 22 cm 30 cm
Untere Position 24 cm 29 cm
Page 43

Gebrauch von Spülmittel
Gehen Sie folgendermaßen vor, um den Oberkorb in die untere/obere Position zu
bringen:
1. Ziehen Sie den Oberkorb bis zum Anschlag
heraus.
2. Halten Sie den Oberkorb am Griff, heben
Sie ihn bis zum Anschlag an und senken
Sie ihn dann senkrecht ab.
Der Oberkorb rastet in der unteren oder
oberen Position ein.
Gebrauch von Spülmittel
Verwenden Sie ausschließlich Spülmittel (Pulver, Flüssigspülmittel oder GeschirrspülerTabs) speziell für Geschirrspüler.
Richten Sie sich nach den Angaben auf der Verpackung:
• Vom Hersteller empfohlene Dosierung.
• Empfehlungen für die Lagerung.
43
Verwenden Sie nicht mehr als die angegebene Spülmittelmenge, um die Umweltbelastung
möglichst gering zu halten.
Gehen Sie wie folgt vor, um den Reinigungsmittelbehälter zu füllen:
1. Öffnen Sie den Deckel des Reinigungsmittelbehälters.
2. Füllen Sie den Reinigungsmittelbehälter
( A) mit Reinigungsmittel. Die Markierung
zeigt die Dosierung an:
20 = ca. 20 g Reinigungsmittel
30 = ca. 30 g Reinigungsmittel.
Page 44

Funktion "Multitab"
44
3. Geben Sie bei einem Spülprogramm mit
Vorspülgang zusätzlich etwas Spülmittel
ins Vorspülfach ( B).
4. Wenn Sie Geschirrspüler-Tabs verwenden,
legen Sie diese in den Reinigungsmittelbehälter ( A).
5. Schließen Sie den Deckel des Spülmittelbehälters. Drücken Sie auf den Deckel, bis
er einrastet.
A
B
Spülmittel unterschiedlicher Marken lösen sich unterschiedlich schnell auf. Einige Geschirrspüler-Tabs erbringen bei kurzen Spülprogrammen keine optimalen Ergebnisse. Wählen Sie lange Spülprogramme, wenn Sie Geschirrspüler-Tabs verwenden, damit sich das
Spülmittel vollständig auflösen kann.
Funktion "Multitab"
Die Funktion Multitab ermöglicht die Verwendung von Kombi-Reinigungstabletten.
Diese Tabs enthalten Mittel wie Reinigungsmittel, Klarspülmittel, und Geschirrspülersalz.
Einige Tab-Sorten können auch andere Zusätze enthalten.
Überprüfen Sie, ob diese Tabs für den Härtegrad des Wassers in Ihrer Region geeignet sind.
Beachten Sie dazu die Herstellerangaben.
Wenn Sie die Funktion Multitab einschalten, bleibt sie so lange aktiv, bis Sie sie wieder
abschalten.
Die Funktion Multitab sperrt den Zufluss von Klarspüler und Salz automatisch. Die Salzund Klarspülmittel-Kontrolllampen sind abgeschaltet.
Die Programmdauer kann sich erhöhen, wenn Sie die Funktion Multitab verwenden.
Page 45

Funktion "Multitab"
45
Schalten Sie die Funktion Multitab vor dem Beginn eines Spülprogramms ein oder aus.
Sie können die Funktion Multitab nicht ein- oder ausschalten, wenn das Programm angelaufen ist. Brechen Sie das Spülprogramm ab und stellen Sie das Programm dann erneut
ein.
Schalten Sie die Funktion Multitab wie folgt ein:
• Drücken Sie die Multitab-Taste. Die Multitab-Kontrolllampe leuchtet auf.
Schalten Sie die Funktion Multitab wie folgt aus:
• Drücken Sie die Multitab-Taste. Die Multitab-Kontrolllampe erlischt.
Gehen Sie bei nicht zufriedenstellenden Trocknungsergebnissen wie folgt vor:
1. Füllen Sie den Klarspüldosierer mit Klarspüler.
2. Schalten Sie den Klarspüldosierer ein.
3. Stellen Sie den Klarspüldosierer auf Stufe 2 ein.
• Das Ein- oder Abschalten des Klarspüldosierers ist nur bei aktivierter Funktion Multitab
möglich.
Zum Einschalten des Klarspüldosierers gehen Sie wie folgt vor:
1. Schalten Sie das Gerät ein.
2. Achten Sie darauf, dass sich das Gerät im Einstellmodus befindet.
3. Drücken und halten Sie gleichzeitig die beiden Funktionstasten B und C.
– Die Programmkontrolllampen über den Funktionstasten A, B und C beginnen zu
blinken.
4. Drücken Sie Funktionstaste B.
– Die Programmkontrolllampen über den Funktionstasten A und C erlöschen.
– Die Programmkontrolllampe über der Funktionstaste B blinkt weiterhin.
– Das Digital-Display zeigt die Einstellung an.
Klarspüldosierer abgeschaltet
Klarspüldosierer eingeschaltet
5. Drücken Sie Funktionstaste B erneut.
– Das Digital-Display zeigt die neue Einstellung an.
6. Schalten Sie das Gerät aus, damit die Einstellung gespeichert wird.
Um wieder normale Reinigungsmittel zu verwenden:
1. Schalten Sie die Funktion Multitab aus.
2. Füllen Sie den Salzbehälter und den Klarspüldosierer.
3. Stellen Sie die Wasserhärte auf die höchste Härtestufe ein.
4. Führen Sie ein Spülprogramm ohne Geschirr aus.
5. Stellen Sie den Wasserenthärter auf den Wasserhärtegrad in Ihrer Region ein.
6. Stellen Sie den Klarspüldosierer ein.
Page 46

Spülprogramme
46
Spülprogramme
Spülprogramme
Programm Grad der
Verschmut-
zung
AUTO
45-70°
INTENSIV
CARE 70°
30 MIN 60°
Beliebig Geschirr, Be-
2)
Stark verschmutzt
3)
Normal/
leicht verschmutzt
4)
ECO 50°
Normal
verschmutzt
45° GLAS Normal/
leicht verschmutzt
1 HOUR 55° Leicht ver-
schmutzt
1) Bei Programmen, auf die sich die Option auswirkt, liegt die Energieeinsparung zwischen 10 % und 25 %.
2) Während des Auto Programms wird der Verschmutzungsgrad des Geschirrs durch den Grad der Wassertrübung
bestimmt. Programmdauer, Wasser- und Stromverbrauch können unterschiedlich sein. Dies hängt vom
Verschmutzungsgrad des Geschirrs ab und davon, ob das Gerät ganz oder teilweise beladen ist. Das Gerät stellt
während des Hauptspülgangs automatisch die Wassertemperatur ein.
3) Dies ist das ideale tägliche Spülprogramm für eine 4-köpfige Familie, die lediglich das Frühstücks- und
Abendessensgeschirr samt Besteck spülen möchte.
4) Testprogramm für Testinstitute. Die Testdaten finden Sie auf dem mitgelieferten separaten Infoblatt.
Spülgut Programmbeschrei-
bung
Vorspülgang
steck, Töpfe,
Pfannen
Hauptspülgang bis zu
45 °C oder 70 °C
1 oder 2 Zwischenklar-
spülgänge
Klarspülgang
Trocknen
Geschirr, Be-
steck, Töpfe,
Pfannen
Vorspülgang
Hauptspülgang bis zu
70 °C
1 Zwischenspülgang
Klarspülgang
Trocknen
Geschirr und
Besteck
Hauptspülgang bis zu
60 °C
Klarspülgang
Geschirr und
Besteck
Vorspülgang
Hauptspülgang bis zu
50 °C
1 Zwischenspülgang
Klarspülgang
Trocknen
Empfindliches
Geschirr und
Gläser
Hauptspülgang bis zu
45 °C
1 Zwischenspülgang
Klarspülgang
Trocknen
Geschirr und
Besteck
Hauptspülgang bis zu
55 °C
1 Zwischenspülgang
Klarspülgang
Energiesparen
Wählbar, mit Auswirkung auf das Spülprogramm
Wählbar, mit Auswirkung auf das Spülprogramm
Wählbar, keine Auswirkung auf das Spülprogramm
Wählbar, mit Auswirkung auf das Spülprogramm
Wählbar, mit Auswirkung auf das Spülprogramm
Wählbar, keine Auswirkung auf das Spülprogramm
1)
Page 47

Auswählen und Starten eines Spülprogramms
Verbrauchswerte
Programm Programmdauer (in Minu-
AUTO 45-70° - 1,1 - 1,7 12 - 23
INTENSIV CARE 70° - 1,5 - 1,7 16 - 18
30 MIN 60° - 0,9 9
ECO 50° - 1,0 - 1,1 12 - 13
45° GLAS - 0,8 - 0,9 14 - 15
1 HOUR 55° - 1,0 - 1,2 11 - 12
1) Das Digital-Display zeigt die Programmdauer an.
ten)
1)
Energieverbrauch (in
kWh)
Wasser (in Liter)
Die Verbrauchswerte sind Richtwerte, die je nach dem Druck und der Temperatur des Wassers, den Schwankungen in der Stromversorgung und der Geschirrmenge variieren können.
Auswählen und Starten eines Spülprogramms
Stellen Sie die Optionen vor dem Beginn eines Spülprogramms ein. Wenn ein Spülprogramm
bereits läuft, können Sie keine Optionen einstellen. Wenn es erforderlich ist, eine Option
einzustellen, löschen Sie das Spülprogramm.
47
Wählen Sie das Spülprogramm bei geöffneter Tür. Das Spülprogramm startet erst nach dem
Schließen der Tür. Bis dahin können die Einstellungen noch geändert werden.
Gehen Sie zum Auswählen und Starten eines Spülprogramms folgendermaßen vor:
1. Schalten Sie das Gerät ein.
2. Achten Sie darauf, dass sich das Gerät im Einstellmodus befindet.
3. Wählen Sie ein Spülprogramm. Siehe den Abschnitt "Spülprogramme".
– Die entsprechende Kontrolllampe des Programms leuchtet auf.
– Alle anderen Programmkontrolllampen erlöschen.
– Die Zeitdauer des Programms blinkt im Digital-Display.
4. Schließen Sie die Tür. Das Spülprogramm beginnt automatisch.
Sie können das Spülprogramm und die Zeitvorwahl auch bei geschlossener Tür wählen.
Wenn Sie eine Programmtaste drücken, haben Sie nur 3 Sekunden Zeit, um ein anderes
Spülprogramm oder eine Zeitverzögerung zu wählen. Nach diesen 3 Sekunden beginnt das
ausgewählte Programm automatisch.
Wenn ein Spülprogramm bereits läuft, können Sie kein anderes Programm wählen. Brechen
Sie das Spülprogramm stattdessen ab.
WARNUNG!
Sie sollten ein Spülprogramm nur dann abbrechen oder unterbrechen, wenn es unbedingt
notwendig ist.
Page 48

Auswählen und Starten eines Spülprogramms
48
VORSICHT!
Öffnen Sie die Tür vorsichtig. Es könnte heißer Dampf austreten.
Unterbrechen eines Spülprogramms
Öffnen Sie die Tür.
• Das Programm stoppt.
Schließen Sie die Tür.
• Das Programm wird ab der Stelle fortgesetzt, an der es unterbrochen wurde.
Abbrechen eines Spülprogramms
1. Drücken und halten Sie die Löschtaste solange, bis alle Programm-Kontrolllampen aufleuchten.
2. Lassen Sie die Löschtaste los.
Nun haben Sie folgende Möglichkeiten:
1. Schalten Sie das Gerät aus.
2. Wählen Sie ein neues Spülprogramm.
Füllen Sie den Spülmittelbehälter mit Spülmittel, bevor Sie ein neues Spülprogramm einstellen.
Einstellung und Start eines Spülprogramms mit Zeitvorwahl
1. Die Ein-/Aus-Taste drücken.
2. Wählen Sie ein Programm.
3. Drücken Sie die Zeitvorwahltaste, bis im Display die gewünschte Zeitvorwahl des Spülprogramms blinkt.
– Die entsprechende Kontrolllampe leuchtet auf.
4. Schließen Sie die Tür.
– Die Zahl auf dem Display leuchtet kontinuierlich.
– Der Ablauf der Zeitvorwahl beginnt.
– Der Ablauf der Zeitvorwahl nimmt in Schritten von jeweils 1 Stunde ab.
– Nach dem Ablauf der Zeitvorwahl beginnt das Spülprogramm automatisch.
Öffnen Sie die Tür während des Ablaufs der Zeitvorwahl nicht, um eine Unterbrechung der
Zeitvorwahl zu verhindern. Nachdem Sie die Tür wieder geschlosssen haben, läuft die Zeitvorwahl ab dem Unterbrechungszeitpunkt weiter ab.
So löschen Sie die Zeitvorwahl
1. Drücken und halten Sie die Löschtaste solange, bis alle Programm-Kontrolllampen aufleuchten.
2. Lassen Sie die Löschtaste los. Wenn Sie eine Zeitvorwahl löschen, wird damit auch das
Spülprogramm gelöscht.
3. Wählen Sie ein neues Spülprogramm.
Ende des Spülprogramms
• Das Gerät stoppt automatisch.
• Nachdem die Signaltöne nach dem Ende des Programms ertönten.
• Das Display zeigt 0 an.
• Die Kontrolllampe für das beendete Programm leuchtet weiter.
Page 49

Reinigung und Pflege
1. Schalten Sie das Gerät aus.
2. Öffnen Sie die Tür.
3. Damit das Spülgut besser trocknet, öffnen Sie die Tür einen Spaltbreit und warten Sie
einige Minuten, bevor Sie das Spülgut entnehmen.
Lassen Sie das Spülgut abkühlen, bevor Sie es aus dem Gerät nehmen. Heißes Geschirr ist
leicht zu beschädigen.
Falls die Energiesparfunktion eingestellt ist, kann es sein, dass das Geschirr nach dem Ende
des Spülprogramms noch feucht ist. Wir empfehlen Ihnen, dann die Tür des Geschirrspülers
offenstehen zu lassen, so dass das Geschirr von selbst weiter trocknen kann.
Standby-Modus
Wird das Gerät am Ende des Spülprogramms nicht ausgeschaltet, geht es automatisch in
den Standby-Modus. Im Standby-Modus wird der Energieverbrauch reduziert.
Drei Minuten nach dem Ende des Programms erlöschen alle Kontrolllampen und auf dem
Digital-Display wird eine horizontale Leiste angezeigt.
Drücken Sie eine der Tasten (nicht die Ein/Aus-Taste), um in den Programmende-Modus
zurückzugehen.
Entnehmen des Spülguts
• Nehmen Sie erst das Spülgut aus dem Unterkorb, dann das aus dem Oberkorb heraus.
• An den Innenseiten und der Tür des Geräts kann sich Wasser niederschlagen, denn Edel-
stahl kühlt schneller ab als Geschirr.
49
Reinigung und Pflege
WARNUNG!
Schalten Sie das Gerät aus, bevor Sie die Filter reinigen.
Filterreinigung
VORSICHT!
Verwenden Sie das Gerät nicht ohne Filter. Achten Sie darauf, die Filter korrekt einzusetzen.
Sind die Filter falsch eingesetzt, spült das Gerät nicht zufriedenstellend und kann beschädigt
werden.
Reinigen Sie die Filter bei Bedarf. Schmutzige Filter beeinträchtigen das Spülergebnis.
Der Geschirrspüler hat 3 Filter:
1. Grobfilter (A)
2. Mikrofilter (B)
Page 50

Reinigung und Pflege
50
3. Flachfilter (C)
Gehen Sie wie folgt vor, um die Filter zu reinigen:
1. Öffnen Sie die Tür.
2. Entfernen Sie den Unterkorb.
3. Um das Filtersystem zu entriegeln, dre-
hen Sie den Griff des Mikrofilters (B) etwa
1/4 Drehung gegen den Uhrzeigersinn.
4. Nehmen Sie das Filtersystem heraus.
5. Fassen Sie den Grobfilter (A) am Hand-
griff.
6. Nehmen Sie den Grobfilter (A) aus dem
Mikrofilter (B).
A
B
C
7. Nehmen Sie den Flachfilter (C) unten aus
dem Gerät heraus.
8. Reinigen Sie die Filter unter fließendem
Wasser.
9. Setzen Sie den Flachfilter (C) unten in das
Gerät ein.
10. Setzen Sie den Grobfilter (A) in den Mik-
rofilter (B) und drücken Sie die Filter zusammen.
11. Setzen Sie das Filtersystem wieder ein.
12. Um das Filtersystem zu arretieren, dre-
hen Sie den Griff des Mikrofilters (B) im
Uhrzeigersinn, bis er einrastet.
13. Setzen Sie den Unterkorb ein.
14. Schließen Sie die Tür.
Nehmen Sie die Sprüharme nicht heraus.
Wenn die Löcher in den Sprüharmen verstopft sind, entfernen Sie Verschmutzungen mit
einem Cocktail-Stick.
Page 51

Was tun, wenn …
Reinigung der Außenseiten
Reinigen Sie die Außenseiten und die Bedienblende des Geräts mit einem weichen feuchten
Tuch. Verwenden Sie dazu ausschließlich Neutralreiniger. Verwenden Sie keine Scheuermittel, Scheuerschwämmchen oder Lösungsmittel (Azeton, Trichloräthylen usw.)
Frostschutzmaßnahmen
VORSICHT!
Stellen Sie das Gerät nicht an einer Stelle auf, an der die Temperatur unter 0 °C absinken
kann. Der Hersteller haftet nicht für Frostschäden.
Wenn eine Aufstellung in forstfreier Umgebung nicht möglich ist, entleeren Sie das Gerät
und schließen Sie die Tür. Lösen Sie den Wasserzulaufschlauch und lassen Sie das Wasser
aus diesem Schlauch ablaufen.
Was tun, wenn …
Das Gerät startet nicht oder stoppt während des Betriebs.
Versuchen Sie, die Ursache des Problems herauszufinden und das Problem selbst zu beheben. Wenn Sie das Problem nicht selbst lösen können, wenden Sie sich bitte an den Kundendienst.
VORSICHT!
Schalten Sie das Gerät ab, bevor Sie folgende Abhilfemaßnahmen durchführen.
51
Fehlercode und Störung Mögliche Ursachen und Abhilfe
• Akustische Signalabfolge
•
Das Digital-Display zeigt
Der Geschirrspüler füllt sich nicht
mit Wasser
• Akustische Signalabfolge
•
Das Digital-Display zeigt
Der Geschirrspüler pumpt nicht ab
• Akustische Signalabfolge
•
Das Digital-Display zeigt
Die Aquasafe-Einrichtung ist ausgelöst
• Der Wasserhahn ist blockiert oder durch Kalkablagerungen
verstopft.
an
Reinigen Sie den Wasserhahn.
• Der Wasserhahn ist zugedreht.
Drehen Sie den Wasserhahn auf.
• Der Filter im Wasserzulaufschlauch ist verstopft.
Reinigen Sie den Filter.
• Der Wasserzulaufschlauch ist falsch angeschlossen. Möglicherweise ist der Schlauch geknickt oder gequetscht.
Achten Sie auf einen korrekten Anschluss des Schlauchs.
• Der Siphon ist verstopft.
an
Reinigen Sie den Siphon.
• Der Wasserablaufschlauch ist falsch angeschlossen. Möglicherweise ist der Schlauch geknickt oder gequetscht.
Achten Sie auf einen korrekten Anschluss des Schlauchs.
• Schließen Sie den Wasserhahn und wenden Sie sich an den
lokalen Kundendienst.
an
Page 52

Was tun, wenn …
52
Fehlercode und Störung Mögliche Ursachen und Abhilfe
Das Programm startet nicht • Die Tür des Geräts ist nicht geschlossen.
Schließen Sie die Tür.
• Der Netzstecker ist nicht eingesteckt.
Stecken Sie den Netzstecker in die Netzsteckdose.
• Die Sicherung der Hausinstallation ist durchgebrannt.
Tauschen Sie die Sicherung aus.
• Die Zeitvorwahl ist eingestellt.
Brechen Sie die Zeitvorwahl ab, damit das Programm so-
fort gestartet wird.
Nachdem Sie das Problem behoben haben, schalten Sie das Gerät wieder ein. Das Programm
wird ab der Stelle fortgesetzt, an der es unterbrochen wurde. Tritt die Fehlfunktion erneut
auf, wenden Sie sich an den Kundendienst.
Halten Sie folgende Angaben bereit, damit man Ihnen schnell und korrekt helfen kann:
• Modell (Mod.)
• Produktnummer (PNC)
• Seriennummer (S.N.)
Sie finden diese Angaben auf dem Typenschild.
Tragen Sie die Angaben hier ein:
Modell : ..........
Produktnummer : ..........
Seriennummer : ..........
Das Spülergebnis ist nicht zufriedenstellend
Das Geschirr ist nicht sauber • Das ausgewählte Spülprogramm ist für das Spülgut und den Ver-
Auf dem Geschirr befinden
sich Kalkablagerungen
Das Geschirr ist nass und
glanzlos
Schlieren, Streifen, milchige
Flecken oder blau schimmernde Beläge befinden sich
auf Gläsern und Geschirr
Getrocknete Wassertropfen
befinden sich auf Gläsern
und Geschirr
schmutzungsgrad nicht geeignet.
• Die Körbe sind falsch beladen, so dass das Wasser nicht alle Oberflächen erreichen kann.
• Aufgrund falscher Beladung können sich die Sprüharme nicht
drehen.
• Die Filter sind verschmutzt oder nicht korrekt installiert.
• Das Spülmittel ist zu hoch oder zu niedrig dosiert.
• Der Salzbehälter ist leer.
• Der Wasserenthärter ist auf eine falsche Stufe eingestellt.
• Der Deckel des Salzbehälters ist nicht richtig geschlossen.
• Es wurde kein Klarspüler verwendet.
• Der Klarspüldosierer ist leer.
• Verwenden Sie weniger Klarspüler.
• Verwenden Sie mehr Klarspüler.
• Die Ursache kann beim Spülmittel liegen.
Page 53

Technische Daten
Technische Daten
Abmessungen Breite in cm 59,6
Höhe in cm 85
Tiefe in cm 62,5
Elektrischer Anschluss - An-
schlussspannung - Gesamtleistung - Sicherung
Wasserdruck Mindestdruck 0,5 bar (0,05 MPa)
Höchstdruck 8 bar (0,8 MPa)
Kapazität Maßgedecke 12
Die Daten der elektrischen Anschlusswerte befinden sich auf dem
Typenschild am Innenrand der Geschirrspülertür.
Aufstellanweisung
Gerät aufstellen
Installation unter einer Arbeitsplatte
WARNUNG!
Achten Sie darauf, dass der Netzstecker während der Installation nicht an eine Netzsteckdose angeschlossen ist.
53
Platzieren Sie das Gerät in der Nähe eines Wasserhahns und eines Wasserablaufs. Entfernen Sie
die obere Abdeckung des Geräts, wenn Sie es
unter einem Spülbecken oder einer Küchenarbeitsplatte installieren wollen. Achten Sie darauf,
dass die Einbaunische für das Gerät groß genug
ist.
Page 54

Wasseranschluss
54
Gehen Sie wie folgt vor, um die Arbeitsplatte des Gerätes zu entfernen:
1. Lösen Sie die hinteren Schrauben (1).
2. Ziehen Sie die Arbeitsplatte hinter dem
Gerät vor.
3. Heben Sie die Arbeitsplatte an und bewegen Sie sie aus den vorderen Schlitzen heraus.
4. Stellen Sie das Gerät mit dem Schraubfuß
korrekt eben.
Installieren Sie das Gerät unter der Arbeitsplatte. Achten Sie darauf, dass die Wasserschläuche nicht geknickt oder eingeklemmt werden.
Falls eine Reparatur erforderlich wird, muss das Gerät für den Kundendienst sofort zugänglich sein. Installieren Sie das Gerät mit seiner oberen Abdeckung, wenn Sie es als freistehendes Gerät verwenden wollen.
Der Sockel freistehender Geräte ist nicht einstellbar.
Ausrichten des Geräts
Achten Sie darauf, dass das Gerät waagrecht ausgerichtet ist, damit die Tür dicht und sicher
schließt. Ist das Gerät nicht waagrecht ausgerichtet, schließt die Tür an den Seiten nicht
richtig. Wenn die Tür nicht korrekt schließt, richten Sie das Gerät durch Anziehen oder
Lockern der Stellfüße waagrecht aus.
Wasseranschluss
Wasserzulaufschlauch
Schließen Sie das Gerät an einen Heißwasseranschluss (max. 60 °C) oder einen Kaltwasseranschluss an.
Wenn Sie Ihr Heißwasser mithilfe umweltfreundlicher, alternativer Energiequellen (z. B.
Solar- oder Photovoltaikanlagen oder Windkraft) aufbereiten, können Sie durch den Anschluss des Geräts an die Heißwasserversorgung Energie sparen.
Schließen Sie den Zulaufschlauch an einen Wasserhahn mit einem 3/4"-Außengewinde an.
VORSICHT!
Verwenden Sie keinen Zulaufschlauch von einem älteren Gerät.
Page 55

Wasseranschluss
Der Wasserdruck muss innerhalb des in den "Technischen Daten" aufgeführten Bereichs
liegen. Informieren Sie sich bei Ihrem Wasserversorger über den durchschnittlichen Wasserdruck in Ihrer Region.
Achten Sie darauf, dass der Wasserzulaufschlauch nicht geknickt oder gequetscht wird oder
sich irgendwo verfängt.
Achten Sie darauf, dass die Klemmmutter korrekt sitzt, damit kein Wasser austreten kann.
VORSICHT!
Schließen Sie das Gerät nicht an neue oder lange nicht mehr benutzte Leitungen an. Lassen
Sie das Wasser ein paar Minuten laufen und schließen Sie dann den Zulaufschlauch an.
Der Wasserzulaufschlauch ist doppelwandig und besitzt ein inneres Hauptkabel und ein
Sicherheitsventil. Der Wasserschlauch steht nur unter Druck, wenn Wasser durchläuft.
Wenn der Wasserzulaufschlauch eine undichte Stelle aufweist, unterbricht das Sicherheitsventil den Wasserzulauf.
Gehen Sie beim Anschluss des Wasserzulaufschlauchs vorsichtig vor:
• Tauchen Sie den Wasserzulaufschlauch oder das Sicherheitsventil nicht in Wasser.
• Ziehen Sie sofort den Netzstecker aus der Steckdose, wenn der Wasserzulaufschlauch
oder das Sicherheitsventil beschädigt sind.
• Ein Wasserzulaufschlauch mit Sicherheitsventil darf nur vom Kundendienst ausge-
tauscht werden.
WARNUNG!
Gefährliche Spannung
55
Ablaufschlauch
1. Schließen Sie den Ablaufschlauch an den Siphon an und befestigen Sie ihn an der
Unterseite der Arbeitsplatte. Dadurch wird verhindert, dass Abwasser aus dem Siphon
in das Gerät zurückfließen kann.
2. Schließen Sie den Ablaufschlauch an ein Standrohr mit Belüftungsöffnung an (Mindestdurchmesser des Innenrohres 4 cm).
Page 56

Elektrischer Anschluss
56
Achten Sie darauf, dass der Wasserablaufschlauch
nicht geknickt oder eingeklemmt wird, um sicher-
max 85 cm
zustellen, dass das Wasser stets gut ablaufen kann.
Nehmen Sie den Spülbeckenstöpsel aus dem Becken, während das Gerät das Wasser abpumpt, um
min 40 cm
zu verhindern, dass das Wasser wieder in das Gerät
zurückfließt.
max 400 cm
Ein Verlängerungs-Ablaufschlauch darf nicht länger als 2 Meter sein. Der Innendurchmesser des
Siphons muss mindestens genauso groß sein wie
der Durchmesser des Schlauchs.
Wenn der Ablaufschlauch an einen Siphon unter
einem Spülbecken angeschlossen wird, muss die
Kunststoffmembran (A) entfernt werden. Falls Sie
die Kunststoffmembran nicht entfernen, kann der
Siphon durch Nahrungsreste verstopfen
Das Gerät besitzt eine Sicherheitsfunktion, die
verhindert, dass Wasser ins Gerät zurückfließt.
Falls der Siphon Ihrer Spüle ein "Rücklaufventil"
hat, kann dieses Ventil den korrekten Wasserablauf Ihres Gerätes beeinträchtigen. Entfernen Sie
das Rücklaufventil.
VORSICHT!
Vergewissern Sie sich, dass alle Wasseranschlüsse vollkommen dicht sind, damit kein Wasser
austreten kann.
Elektrischer Anschluss
WARNUNG!
Der Hersteller haftet nicht für Schäden aufgrund der Nichtbeachtung folgender Sicherheitshinweise.
Erden Sie das Gerät gemäß den Sicherheitshinweisen.
Vergewissern Sie sich, dass die Netzspannung und -frequenz in Ihrer Region mit den auf
dem Typenschild angegebenen Anschlusswerten übereinstimmen.
Schließen Sie das Gerät unbedingt an eine sachgemäß installierte Schutzkontaktsteckdose
an.
Verwenden Sie keine Mehrfachsteckdosen, Steckverbinder oder Verlängerungskabel. Andernfalls besteht Feuergefahr.
Tauschen Sie das Netzkabel nicht selbst aus. Wenden Sie sich dafür an den Kundendienst.
Wählen Sie eine Netzsteckdose, die auch nach der Installation des Geräts noch zugänglich
ist.
Ziehen Sie nicht am Netzkabel, wenn Sie das Gerät vom Netzstrom trennen möchten. Ziehen
Sie dazu immer direkt am Netzstecker.
Page 57

Umwelttipps
Umwelttipps
Das Symbol auf dem Produkt oder seiner Verpackung weist darauf hin, dass dieses
Produkt nicht als normaler Haushaltsabfall zu behandeln ist, sondern an einem
Sammelpunkt für das Recycling von elektrischen und elektronischen Geräten abgegeben
werden muss. Durch Ihren Beitrag zum korrekten Entsorgen dieses Produkts schützen Sie
die Umwelt und die Gesundheit Ihrer Mitmenschen. Umwelt und Gesundheit werden durch
falsches Entsorgen gefährdet. Weitere Informationen über das Recycling dieses Produkts
erhalten Sie von Ihrem Rathaus, Ihrer Müllabfuhr oder dem Geschäft, in dem Sie das Produkt
gekauft haben.
Das Verpackungsmaterial ist umweltfreundlich und recycelbar. Kunststoffteile sind mit internationalen Abkürzungen wie z. B. >PE<, >PS< usw. gekennzeichnet. Entsorgen Sie das
Verpackungsmaterial bitte entsprechend seiner Kennzeichnung bei den kommunalen Entsorgungsstellen in den dafür vorgesehenen Sammelbehältern.
WARNUNG!
Gehen Sie zum Entsorgen des Geräts folgendermaßen vor:
• Ziehen Sie den Netzstecker aus der Netzsteckdose.
• Schneiden Sie Netzkabel und Netzstecker ab und entsorgen Sie beides.
• Entfernen Sie die Türverriegelung. Dadurch verhindern Sie, dass sich Kinder aus Versehen
im Inneren des Geräts einsperren und in Lebensgefahr geraten.
575859
Page 58

Page 59

Page 60

www.electrolux.com
Benötigen Sie Zubehör, Verbrauchsmaterial und Ersatzteile? Dann besuchen Sie bitte unseren
Onlineshop unter:
www.aeg-electrolux.at
www.aeg-electrolux.de
117951570-00-072009
 Loading...