

Page 1

FAVORIT 65402 VI
EN DISHWASHER USER MANUAL 2
FR LAVE-VAISSELLE NOTICE D'UTILISATION 21
ES LAVAVAJILLAS MANUAL DE INSTRUCCIONES 42
Page 2

www.aeg.com
2
CONTENTS
4 SAFETY INSTRUCTIONS
6 PRODUCT DESCRIPTION
7 CONTROL PANEL
8PROGRAMMES
10 OPTIONS
11 BEFORE FIRST USE
14 DAILY USE
16 CARE AND CLEANING
17 TROUBLESHOOTING
19 TECHNICAL INFORMATION
ENVIRONMENT CONCERNS
Recycle the materials with the symbol . Put the packaging in applicable containers to
recycle it.
Help protect the environment and human health and to recycle waste of electrical and
electronic appliances. Do not dispose appliances marked with the symbol
household waste. Return the product to your local recycling facility or contact your
municipal office.
with the
VISIT OUR WEBSITE FOR:
- Products
- Brochures
- User manuals
- Trouble shooter
- Service information
www.aeg.com
LEGEND
Warning - Important Safety information.
General information and tips
Environmental information
Subject to change without notice.
Page 3

FOR PERFECT RESULTS
Thank you for choosing this AEG product. We have created it to give you
impeccable performance for many years, with innovative technologies that help
make life simpler – features you might not find on ordinary appliances. Please spend
a few minutes reading to get the very best from it.
ACCESSORIES AND CONSUMABLES
In the AEG webshop, you’ll find everything you need to keep all your AEG
appliances looking spotless and working perfectly. Along with a wide range of
accessories designed and built to the high quality standards you would expect, from
specialist cookware to cutlery baskets, from bottle holders to delicate laundry bags…
ENGLISH
3
Visit the webshop at:
www.aeg.com/shop
CUSTOMER CARE AND SERVICE
We recommend the use of original spare parts.
When contacting Service, ensure that you have the following data available. The
information can be found on the rating plate.
Model
PNC
Serial Number
Page 4
www.aeg.com
4
SAFETY INSTRUCTIONS
Before the installation and use of the appliance, carefully read the supplied instructions. The manufacturer is not responsible if an incorrect installation and
use causes injuries and damages. Always
keep the instructions with the appliance
for future reference.
CHILDREN AND VULNERABLE
PEOPLE SAFETY
WARNING!
Risk of suffocation, injury or permanent disability.
• Do not let persons, children included,
with reduced physical sensory, reduced
mental functions or lack of experience
and knowledge use the appliance. They
must have supervision or instruction for
the operation of the appliance by a person who is responsible for their safety.
Do not let children play with the appliance.
• Keep all packaging away from children.
• Keep all detergents away from children.
• Keep children and pets away from the
appliance door when it is open.
INSTALLATION
• Remove all the packaging.
• Do not install or use a damaged appliance.
• Do not install or use the appliance
where the temperature is less than 0 °C.
• Obey the installation instruction supplied with the appliance.
• Make sure that the appliance is installed below and adjacent to safe structures.
Water connection
• Make sure not to cause damage to the
water hoses.
• Before you connect the appliance to
new pipes or pipes not used for a long
time, let the water flow until it is clean.
• The first time you use the appliance,
make sure that there is no leakage.
• The water inlet hose has a safety valve
and a sheath with an inner mains cable.
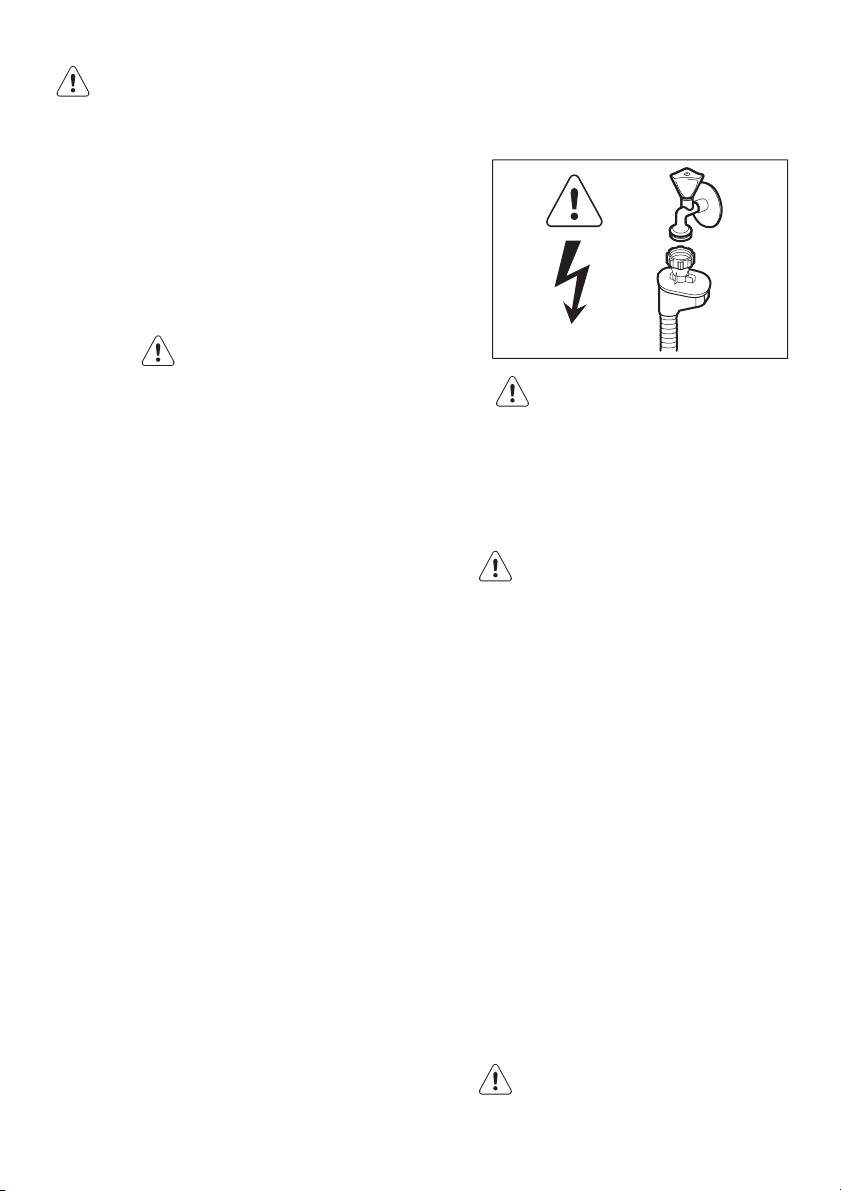
WARNING!
Dangerous voltage.
• If the water inlet hose is damaged, immediately disconnect the mains plug
from the mains socket. Contact the
service to replace the water inlet hose.
Electrical connection
WARNING!
Risk of fire and electrical shock.
• The appliance must be earthed.
• Make sure that the electrical information on the rating plate agrees with the
power supply. If not, contact an electrician.
• Always use a correctly installed shockproof socket.
• Do not use multi-plug adapters and extension cables.
• Make sure not to cause damage to the
mains plug and to the mains cable.
Contact the Service or an electrician to
change a damaged mains cable.
• Connect the mains plug to the mains
socket only at the end of the installation. Make sure that there is access to
the mains plug after the installation.
• Do not pull the mains cable to disconnect the appliance. Always pull the
mains plug.
USE
WARNING!
Risk of injury.
Page 5

• Use this appliance in a household environment.
• Do not change the specification of this
appliance.
• Put knives and cutlery with sharp points
in the cutlery basket with the points
down or in a horizontal position.
• Do not keep the appliance door open
without supervision to prevent to fall on
it.
• Do not sit or stand on the open door.
• Dishwasher detergents are dangerous.
Obey the safety instructions on the detergent packaging.
• Do not drink and play with the water in
the appliance.
• Do not remove the dishes from the appliance until the programme is completed. There can be detergent on the
dishes.
WARNING!
Risk of electrical shock, fire or
burns.
• Do not put flammable products or
items that are wet with flammable
products in, near or on the appliance.
• Do not use water spray and steam to
clean the appliance.
• The appliance can release hot steam if
you open the door while a programme
operates.
ENGLISH
5
DISPOSAL
WARNING!
Risk of injury or suffocation.
• Disconnect the appliance from the
mains supply.
• Cut off the mains cable and dispose of
it.
• Remove the door catch to prevent children and pets to get closed in the appliance.
Page 6
www.aeg.com
6
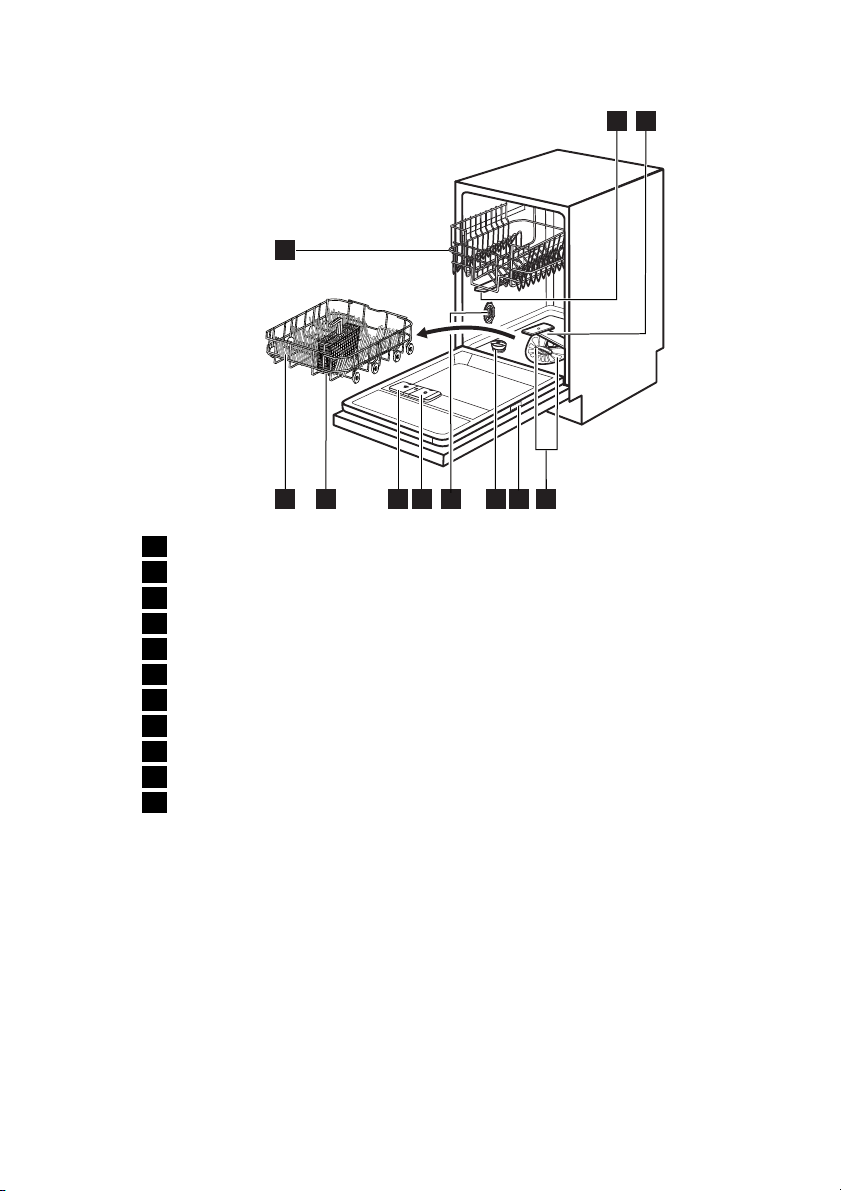
PRODUCT DESCRIPTION
11
1
2
8
7
Upper spray arm
1
Lower spray arm
2
Filters
3
Rating plate
4
Salt container
5
Water hardness dial
6
Rinse aid dispenser
7
Detergent dispenser
8
Cutlery basket
9
Lower basket
10
Upper basket
11
10
9
LIGHT BEAM
• When a programme operates, a red
light beam shows on the floor below
the appliance door. When the programme is completed, the red light
changes to a green light.
• When the appliance has a malfunction,
the red light beam flashes.
3
4
5
6
Page 7
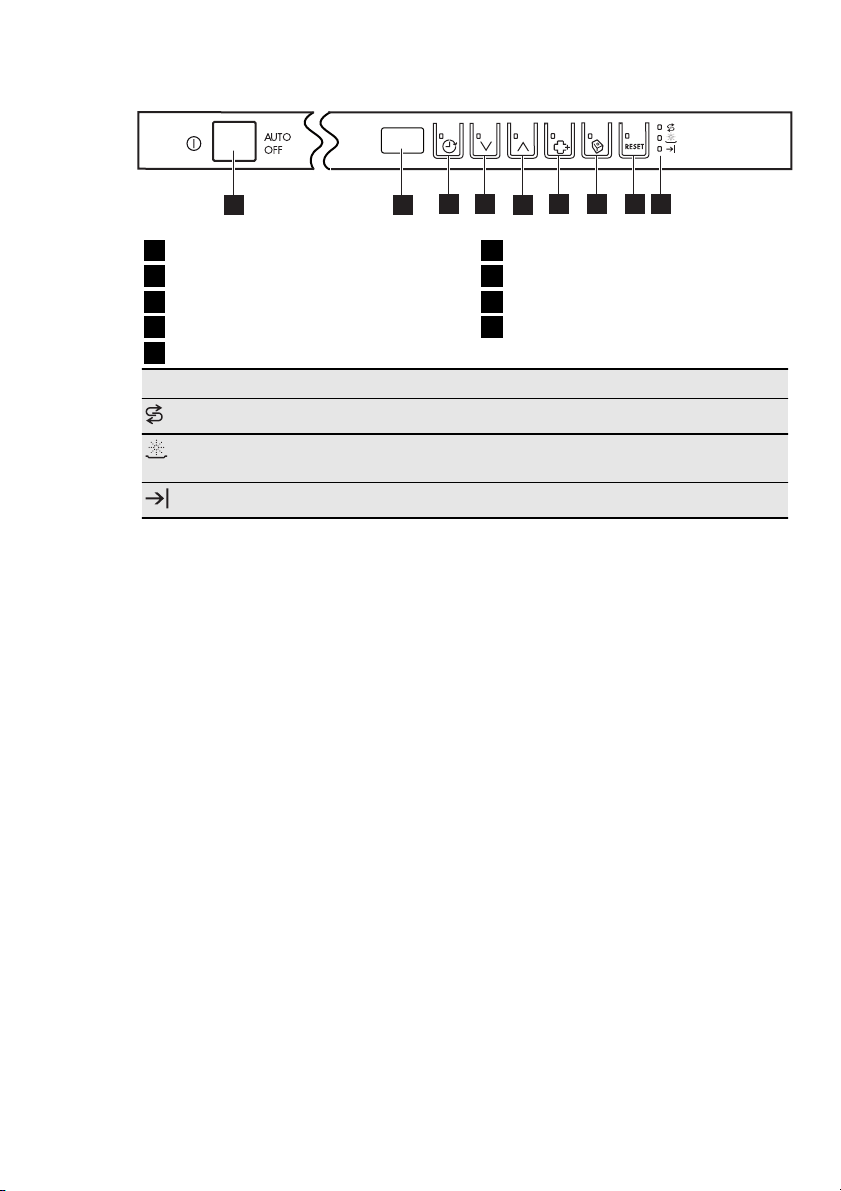
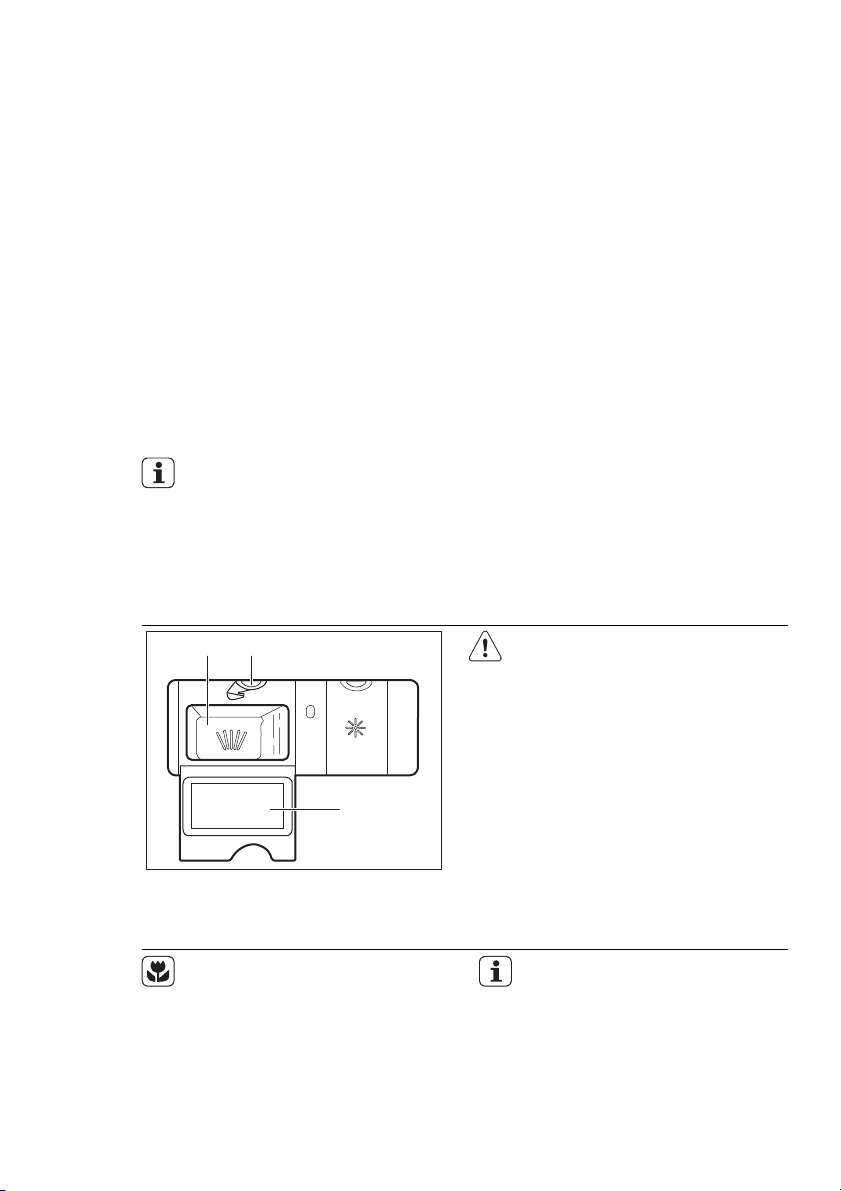
CONTROL PANEL
ENGLISH
7
1
On/off button
1
Display
2
Delay button
3
Programme button (down)
4
Programme button (up)
5
Indicators Description
Salt indicator. This indicator is off while the programme operates.
Rinse aid indicator. This indicator is off while the programme operates.
End indicator.
6
2
4
3
5
ExtraHygiene button
6
Multitab button
7
RESET button
8
Indicators
9
7 8
9
Page 8
www.aeg.com
8
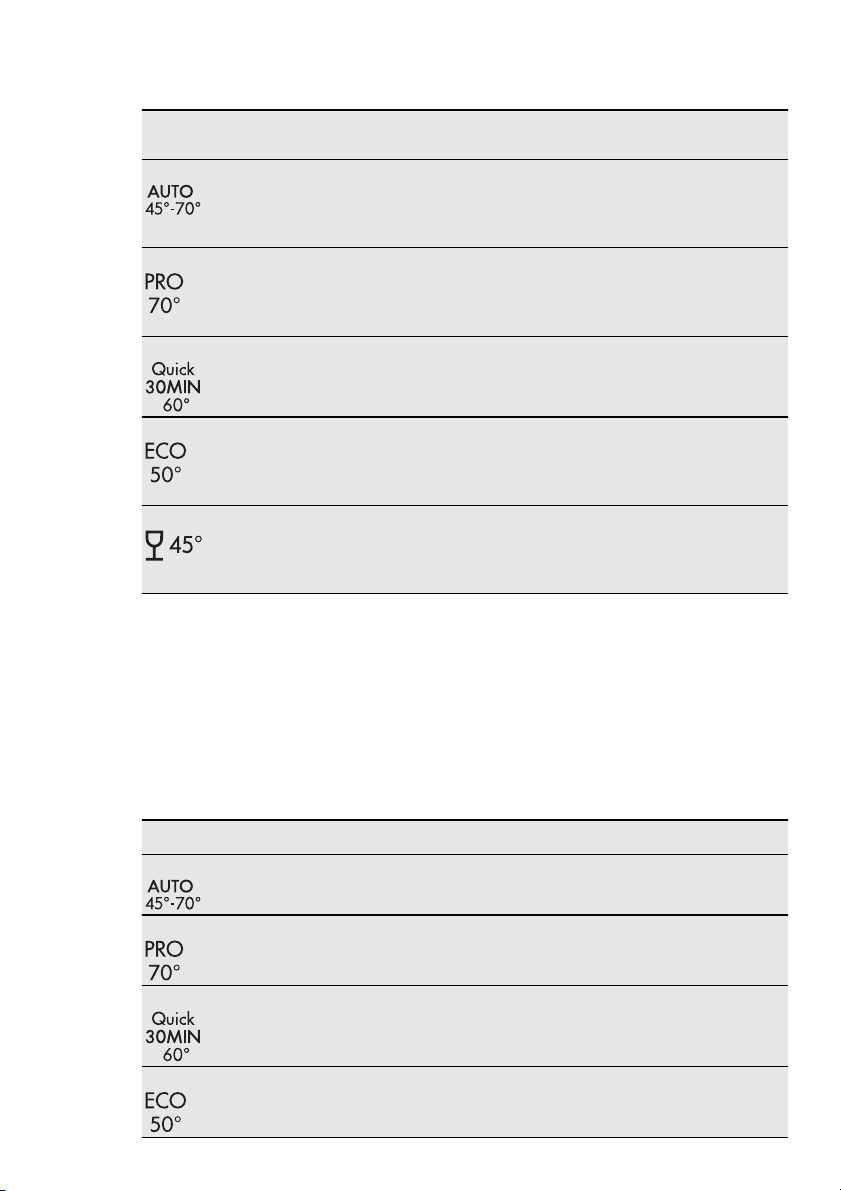
PROGRAMMES
Programme Degree of soil
Programme phases Options
Type of load
1
1)
All
Crockery, cutlery,
pots and pans
Prewash
Wash 45 °C or 70 °C
Rinses
ExtraHygiene
Dry
2
2)
Heavy soil
Crockery, cutlery,
pots and pans
Prewash
Wash 70 °C
Rinses
Dry
3
3)
4
4)
Fresh soil
Crockery and
cutlery
Normal soil
Crockery and
cutlery
Wash 60 °C
Rinse
Prewash
Wash 50 °C
Rinses
ExtraHygiene
ExtraHygiene
Dry
5 Normal or light
soil
Delicate crockery
Wash 45 °C
Rinses
Dry
and glassware
1)
The appliance senses the degree of soil and the quantity of items in the baskets. It
automatically adjusts the temperature and quantity of the water, the energy consumption
and the programme duration.
2)
This programme includes the ExtraHygiene option.
3)
With this programme you can wash a load with fresh soil. It gives good washing results in a
short time.
4)
This is the standard programme for test institutes. With this programme you have the most
efficient use of water and energy consumption for crockery and cutlery with normal soil.
Refer to the supplied leaflet for test information.
Consumption values
Programme
1)
Duration (min) Energy (kWh) Water (l)
1 80 - 140 0.7 - 1.3 8 - 14
2 130 - 150 1.1 - 1.2 10 - 11
3 30 0.8 7
4 170 - 190 0.7 - 0.8 8 - 9
Page 9

ENGLISH
9
Programme
1)
Duration (min) Energy (kWh) Water (l)
5 70 - 80 0.6 - 0.7 9 - 10
1)
The water pressure and temperature, the variations of the mains supply, the options and
the quantity of dishes can change the programme duration and the consumption values.
Page 10
www.aeg.com
10
OPTIONS
MULTITAB OPTION
Activate this option only when you use the
combi detergent tablets.
This option deactivates the flow of rinse
aid and salt. The related indicators are off.
The programme duration can increase.
Activating the multitab option
Activate or deactivate the multitab option before the start of a
programme. You cannot activate
or deactivate this option while a
programme operates.
1. Press the multitab button, the multitab
indicator comes on.
If you stop to use the combi detergent
tablets, before you start to use
separately detergent, rinse aid and
dishwasher salt, do these steps:
1. Set the water softener to the highest
level.
2. Make sure that the salt container and
the rinse aid dispenser are full.
3. Start the shortest programme with a
rinsing phase, without detergent and
without dishes.
4. Adjust the water softener to the water
hardness in your area.
5. Adjust the released quantity of rinse
aid.
Deactivating the acoustic signals
1. Press the on/off button to activate the
appliance. Make sure that the appliance is in setting mode. Refer to ‘SETTING AND STARTING A PROGRAMME’.
2. Press and hold buttons (4) and (5) at
the same time until the indicators of
buttons (3), (4) and (5) flash.
3. Press button (5),
• The indicators of buttons (3) and (4)
go off.
• The indicator of button (5) contin-
ues to flash.
• The display shows the setting of the
acoustic signals.
On
Off
4. Press button (5) to change the setting.
5. Deactivate the appliance to confirm.
EXTRAHYGIENE
This function gives better results for the
hygiene. During the rinsing phase, the
temperature stays at 70 °C for 10 to 14 minutes.
ACOUSTIC SIGNALS
The acoustic signals operate in these conditions:
• The programme is completed.
• The level of the water softener is adjusted electronically.
• The appliance has a malfunction.
Factory setting: on. You can deactivate the acoustic signals.
Page 11
BEFORE FIRST USE
ENGLISH
11
1. Make sure that the set level of the wa-
ter softener agrees with the water
hardness in your area. If not, adjust the
water softener. Contact your local water authority to know the water hardness in your area.
2. Fill the salt container.
3. Fill the rinse aid dispenser.
4. Open the water tap.
5. Processing residues can stay in the ap-
pliance. Start a programme to remove
them. Do not use detergent and do
not load the baskets.
If you use the combi detergent
tablets, activate the multitab function. These tablets contain detergent, rinse aid and other added
agents. Be sure that these tablets
are applicable to the water hardness in your area. Refer to the instructions on the packaging of the
products.
Water hardness
German
degrees
(°dH)
French
degrees
(°fH)
51 - 70 91 - 125 9.1 - 12.5 64 - 88
43 - 50 76 - 90 7.6 - 9.0 53 - 63
37 - 42 65 - 75 6.5 - 7.5 46 - 52
29 - 36 51 - 64 5.1 - 6.4 36 - 45
23 - 28 40 - 50 4.0 - 5.0 28 - 35
19 - 22 33 - 39 3.3 - 3.9 23 - 27
ADJUSTING THE WATER
SOFTENER
Hard water contains a high quantity of
minerals that can cause damage to the
appliance and bad washing results. The
water softener neutralises these minerals.
The dishwasher salt keeps the water softener clean and in good conditions. Refer
to the table to adjust the water softener
to the right level. It makes sure that the
water softener uses the correct quantity of
dishwasher salt and water.
You must adjust the water softener manually and electronically.
Water softener
adjustment
mmol/l Clarke
degrees
Manual Elec-
2
2
1)
2
1)
2
1)
2
1)
2
1)
1)
15 - 18 26 - 32 2.6 - 3.2 18 - 22 1 4
11 - 14 19 - 25 1.9 - 2.5 13 - 17 1 3
4 - 10 7 - 18 0.7 - 1.8 5 - 12 1 2
< 4 < 7 < 0.7 < 5
1)
Factory position.
2)
Do not use salt at this level.
2)
1
tronic
10
9
8
7
6
1)
5
2)
1
Page 12
www.aeg.com
12
Manual adjustment
Turn the water hardness dial to the position 1 or 2.
Electronic adjustment
1. Press the on/off button to activate the
appliance. Make sure that the appliance is in setting mode, refer to ‘SETTING AND STARTING A PROGRAMME’.
2. Press and hold buttons (4) and (5) at
the same time until the indicators of
buttons (3), (4) and (5) flash.
3. Press button (3).
• The indicators of buttons (4) and (5)
go off.
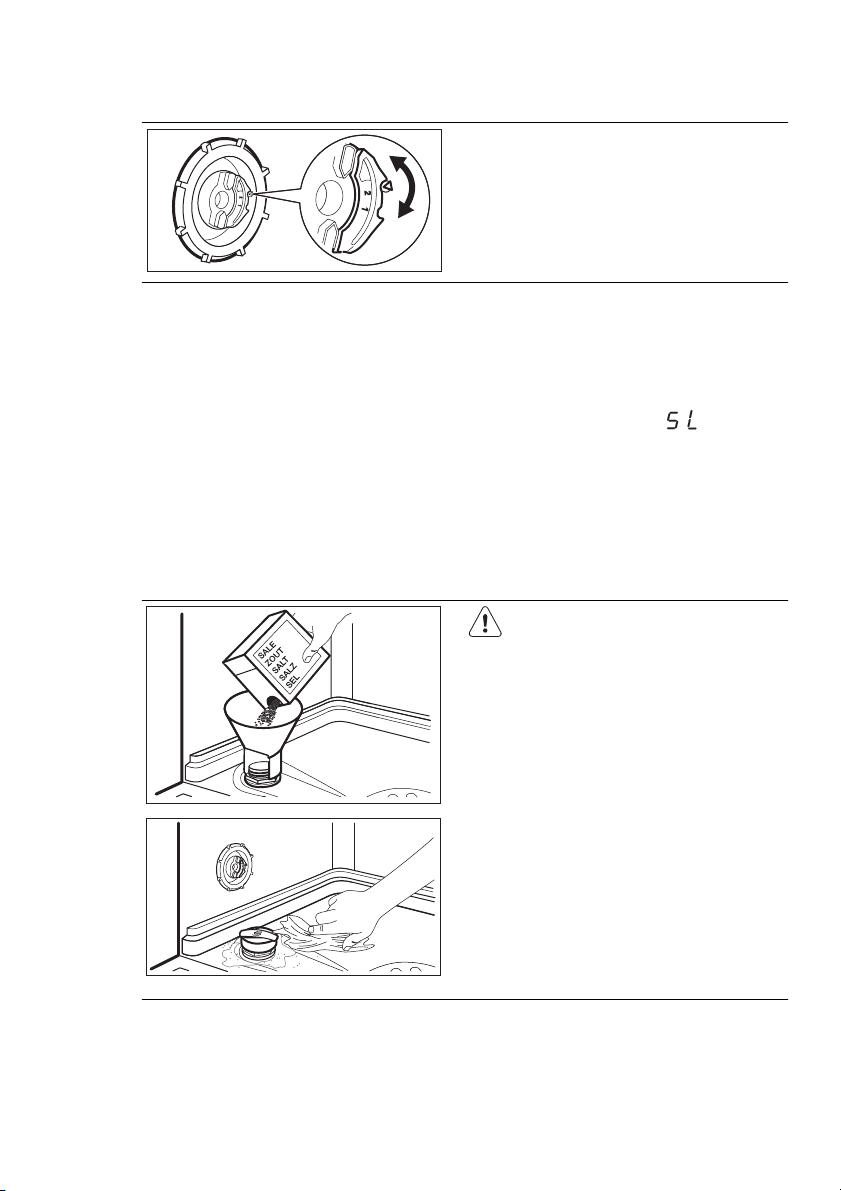
FILLING THE SALT CONTAINER
• The indicator of button (3) contin-
ues to flash.
• The acoustic signals operate, e.g.
five intermittent acoustic signals =
level 5.
• The display shows the setting of the
water softener, e.g.
4. Press button (3) again and again to
change the setting.
5. Deactivate the appliance to confirm
the setting.
CAUTION!
Only use dishwasher salt. Other
products can cause damage to
the appliance.
Water and salt can come out from
the salt container when you fill it.
Risk of corrosion. To prevent it, after you fill the salt container, start
a programme.
1.
Turn the cap counterclockwise and
open the salt container.
2.
Put 1 litre of water in the salt container (only for the first time).
3.
Fill the salt container with dishwasher
salt.
4.
Remove the salt around the opening
of the salt container.
5.
Turn the cap clockwise to close the
salt container.
= level 5.
Page 13
FILLING THE RINSE AID DISPENSER
ENGLISH
13
A
B
CAUTION!
Only use rinse aid for dishwashers.
Other products can cause damage to the appliance.
A
X
M
2
1
3
4
+
-
The rinse aid, during the last rinsing phase, helps to dry the dishes
without streaks and stains.
1.
Press the release button (D) to open
C
D
the lid (C).
2.
Fill the rinse aid dispenser (A), no
more than the mark 'max'.
3.
Remove the spilled rinse aid with an
absorbent cloth to prevent too much
foam.
4.
Close the lid. Make sure that the release button locks into position.
You can turn the selector of the
released quantity (B) between position 1 (lowest quantity) and position 4 (highest quantity).
Page 14
M
A
X
1
2
3
4
+
-
www.aeg.com
14
DAILY USE
1. Open the water tap.
2. Press the on/off button to activate the
appliance. Make sure that the appliance is in setting mode. Refer to ’SETTING AND STARTING A PROGRAMME’.
• If the salt indicator is on, fill the salt
container.
• If the rinse aid indicator is on, fill the
rinse aid dispenser.
3. Load the baskets.
4. Add the detergent.
5. Set and start the correct programme
for the type of load and soil.
LOADING THE BASKETS
Refer to the supplied leaflet with
examples of the load of the baskets.
• Only use the appliance to wash items
that are dishwasher-safe.
USING THE DETERGENT
B
A
• Do not put in the appliance items made
of wood, horn, aluminium, pewter and
copper.
• Do not put in the appliance items that
can absorb water (sponges, household
cloths).
• Remove remaining food from the items.
• Make soft the remaining burned food
on the items.
• Put hollow items (cups, glasses and
pans) with the opening down.
• Make sure that cutlery and dishes do
not bond together. Mix spoons with
other cutlery.
• Make sure that glasses do not touch
other glasses.
• Put small items in the cutlery basket.
• Put light items in the upper basket.
Make sure that the items do not move.
• Make sure that the spray arms can
move freely before you start a programme.
CAUTION!
Use only detergents for dishwashers.
30
20
C
Do not use more than the correct
quantity of detergent. Refer to the
instructions on the detergent
packaging.
1.
Press the release button (B) to open
the lid (C).
2.
Put the detergent in the compartment (A) .
3.
If the programme has a prewash
phase, put a small quantity of detergent on the inner part of the appliance door.
4.
If you use detergent tablets, put the
tablet in the compartment (A).
5.
Close the lid. Make sure that the release button locks into position.
Detergent tablets do not fully dissolve with short programmes and
detergent residues can stay on
the dishes.
We recommend that you use detergent tablets with long programmes.
Page 15
ENGLISH
15
SETTING AND STARTING A
PROGRAMME
Setting mode
The appliance must be in setting mode to
accept some operations.
The appliance is in setting mode when,
after the activation the display shows 2
horizontal status bars.
If the control panel shows other conditions, press RESET until the appliance is
in setting mode.
Starting a programme without
delay start
1. Open the water tap.
2. Press the on/off button to activate the
appliance. Make sure that the appliance is in setting mode.
3. Set the programme.
• The related programme number
flashes in the display.
4. If you want, you can set the options.
5. Close the appliance door. The pro-
gramme starts.
• If you open the door, the display
shows the programme duration that
decreases with steps of 1 minute.
Starting a programme with
delay start
1. Set the programme.
2. Press the delay button again and
again until the display shows the delay
time you want to set (from 1 to 24
hours).
• The delay time flashes in the display.
• The delay indicator is on.
3. Close the appliance door. The count-
down starts.
• If you open the door, the display
shows the countdown of the delay
start that decreases with steps of 1
hour.
When the countdown is completed, the
programme starts.
Opening the door while the
appliance operates
If you open the door, the appliance stops.
When you close the door, the appliance
continues from the point of interruption.
Cancelling the delay start while
the countdown operates
Press RESET until the display shows 2 horizontal status bars.
When you cancel a delay start, the
appliance goes back to setting
mode. You have to set the programme again.
Cancelling the programme
Press RESET until the display shows 2 horizontal status bars.
Make sure that there is detergent
in the detergent dispenser before
you start a new programme.
At the end of the programme
When the programme is completed, an
intermittent acoustic signal operates. The
display shows 0 and the end indicator
comes on.
1. Press the on/off button to deactivate
the appliance.
2. Close the water tap.
If you do not press the on/off button, the AUTO OFF device automatically deactivates the appliance after some minutes. This
helps to decrease the energy consumption.
Important
• Let the dishes become cold before you
remove them from the appliance. Hot
dishes can be easily damaged.
• First remove the items from the lower
basket, then from the upper basket.
• There can be water on the sides and on
the door of the appliance. Stainless
steel becomes cool more quickly than
the dishes.
Page 16
www.aeg.com
16
CARE AND CLEANING
WARNING!
Before maintenance, deactivate
the appliance and disconnect the
mains plug from the mains socket.
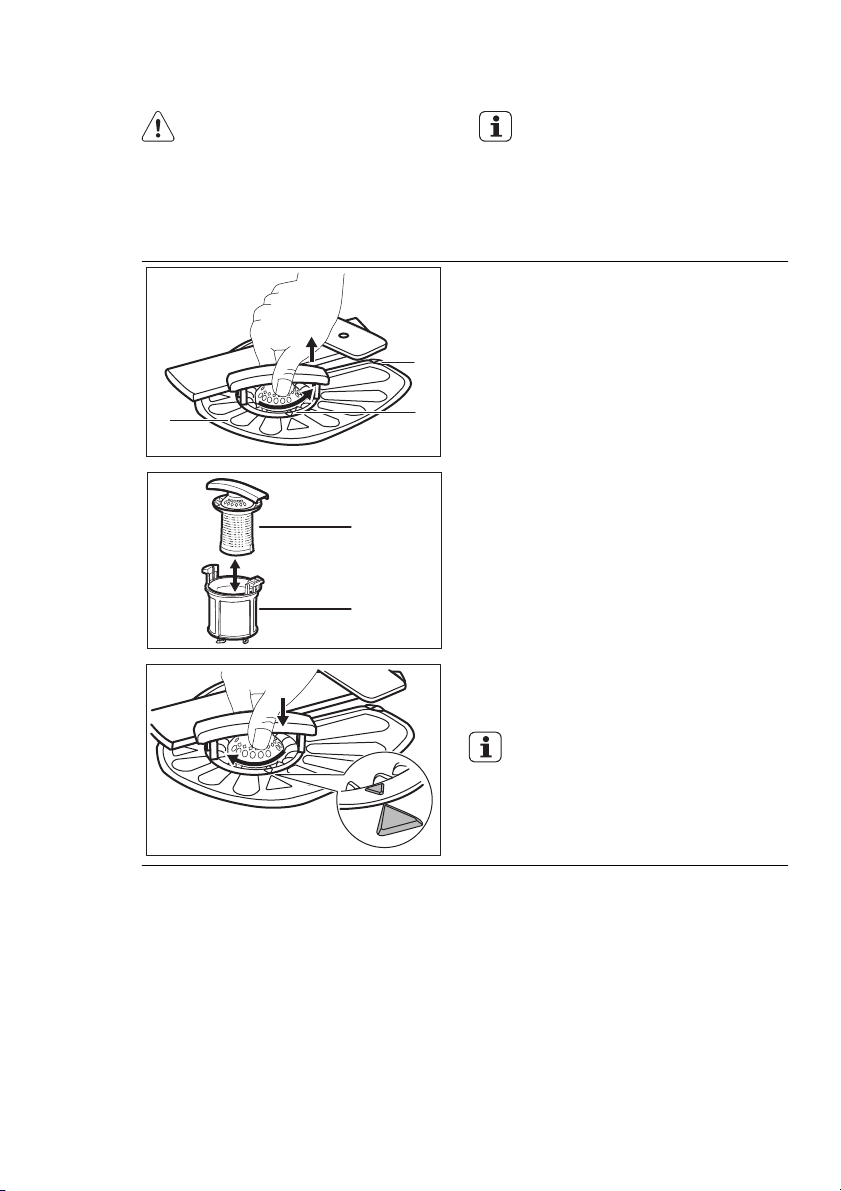
CLEANING THE FILTERS
B
A1
A2
Dirty filters and clogged spray
arms decrease the washing results.
Make a check regularly and, if
necessary, clean them.
1.
Turn the filter (A) counterclockwise
and remove it.
C
A
2.
To disassemble the filter (A), pull
apart (A1) and (A2).
3.
Remove the filter (B).
4.
Wash the filters with water.
5.
Put the filter (B) to its initial position.
Make sure that it assembles correctly
under the two guides (C).
6.
Assemble the filter (A) and put it into
position in filter (B). Turn it clockwise
until it locks.
An incorrect position of the filters
can cause bad washing results and
damage to the appliance.
CLEANING THE SPRAY ARMS
Do not remove the spray arms.
If the holes in the spray arms are clogged,
remove remaining parts of soil with a thin
pointed object.
EXTERNAL CLEANING
Clean the appliance with a moist soft
cloth.
Only use neutral detergents. Do not use
abrasive products, abrasive cleaning pads
or solvents.
Page 17
TROUBLESHOOTING
ENGLISH
17
The appliance does not start or it stops
during operation.
Before you contact the Service, refer to
the information that follows for a solution
to the problem.
With some problems, the display shows
an alarm code:
•
- The appliance does not fill with
water.
•
- The appliance does not drain the
water.
•
- The anti-flood device is on.
WARNING!
Deactivate the appliance before
you do the checks.
Problem Possible cause Possible solution
The programme
does not start.
The mains plug is not connected in the mains socket.
Connect the mains plug.
The appliance door is open. Close the appliance door.
The fuse in the fuse box is
Replace the fuse.
damaged.
The delay start is set. Cancel the delay start or
wait for the end of the
countdown.
The appliance does
The water tap is closed. Open the water tap.
not fill with water.
The water pressure is too
low.
The water tap is clogged or
Contact your local water authority.
Clean the water tap.
there is limescale on it.
The filter in the water inlet
Clean the filter.
hose is clogged.
The water inlet hose has a
kink or a bend.
The anti-flood device is on.
There are water leakages in
Make sure that the position
of the hose is correct.
Close the water tap and
contact the Service.
the appliance.
The appliance does
The sink spigot is clogged. Clean the sink spigot.
not drain the water.
The water drain hose has a
kink or a bend.
After the checks are completed, activate
the appliance. The programme continues
from the point of interruption.
If the problem occurs again, contact the
Service.
If the display shows other alarm codes,
contact the Service.
Make sure that the position
of the hose is correct.
Page 18

www.aeg.com
18
THE WASHING RESULTS AND DRYING RESULTS ARE NOT
SATISFACTORY
Problem Possible cause Possible solution
The dishes are not
clean.
The filters are not correctly
The spray arms are clog-
The programme was not
Incorrect position of the
The spray arms could not
The quantity of detergent
There was no detergent in
Limescale particles
on the dishes.
The set level of the water
The cap of the salt contain-
Whitish streaks and
stains or bluish layers on glasses and
dishes.
The filters are clogged. Clean the filters.
Make sure that the filters are
assembled and installed.
correctly assembled and installed.
Remove remaining soil with a
ged.
thin pointed object.
Make sure that the proapplicable for the type of
load and soil.
gramme is applicable for the
type of load and soil.
Make sure that the position
items in the baskets. Water
could not wash all items.
of the items in the baskets is
correct and that the water
can easily wash all items.
Make sure that the position
turn freely.
of the items in the baskets is
correct and does not cause
the blockage of the spray
arms.
Make sure that you add the
was not sufficient.
correct quantity of detergent
in the dispenser before you
start a programme.
Make sure that you add dethe detergent dispenser.
tergent in the dispenser be-
fore you start a programme.
The salt container is empty. Make sure that there is dish-
washer salt in the salt con-
tainer.
Make sure that the set level
softener is incorrect.
of the water softener agrees
with the water hardness in
your area.
Tighten the cap.
er is loose.
The released quantity of
rinse aid is too much.
Decrease the released quan-
tity of rinse aid
.
Page 19
Problem Possible cause Possible solution
The quantity of detergent
was too much.
Make sure that you add the
correct quantity of detergent
in the dispenser before you
start a programme.
Dry water drop
stains on glasses
The released quantity of
rinse aid was not sufficient .
Increase the released quanti-
ty of rinse aid.
and dishes.
The quality of the detergent
can be the cause.
The dishes are wet. The programme had no
drying phase.
The dishes are wet
and matt.
The rinse aid dispenser is
empty.
The quality of the rinse aid
can be the cause.
The quality of the combi
detergent tablets can be
the cause.
Try a different brand of de-
tergent.
Set a programme with the
drying phase.
Make sure that there is rinse
aid in the rinse aid dispenser.
Try a different brand of rinse
aid.
• Try a different brand of
combi detergent tablets.
• Activate the rinse aid dispenser and use the rinse
aid together with the combi detergent tablets.
HOW TO ACTIVATE THE
RINSE AID DISPENSER
The activation of the rinse aid dispenser
can occur only with the multitab option
activated.
1. Press the on/off button to activate the
appliance. Make sure that the appliance is in setting mode, refer to ‘Setting and starting a programme’.
2. Press and hold buttons (4) and (5) at
the same time until the indicators of
buttons (3), (4) and (5) start to flash.
3. Press button (4).
• The indicators of buttons (3) and (5)
go off.
• The indicator of button (4) contin-
ues to flash.
• The display shows the current setting of the rinse aid dispenser.
Off
On
4. Press button (4) to change the setting.
5. Deactivate the appliance to confirm
the setting.
6. Adjust the released quantity of rinse
aid.
7. Fill the rinse aid dispenser.
ENGLISH
19
TECHNICAL INFORMATION
Dimensions Width / Height / Depth (mm) 446 / 818 - 898 / 550
Electrical connection Refer to the rating plate.
Water supply pressure Min. / max. (bar / MPa) (0.5 / 0.05 ) / (8 / 0.8 )
Water supply
Capacity Place settings 9
1)
Cold water or hot water
2)
max. 60 °C
Page 20

www.aeg.com
20
1)
Connect the water inlet hose to a water tap with a 3/4'' thread.
2)
If the hot water comes from alternative sources of energy, (e.g. solar panels, aeolian
energy), use the hot water supply to decrease energy consumption.
Page 21

FRANÇAIS
SOMMAIRE
23 INSTRUCTIONS DE SÉCURITÉ
25 DESCRIPTION DE L'APPAREIL
26 BANDEAU DE COMMANDE
27 PROGRAMMES
29 OPTIONS
30 AVANT LA PREMIÈRE UTILISATION
34 UTILISATION QUOTIDIENNE
37 ENTRETIEN ET NETTOYAGE
38 EN CAS D'ANOMALIE DE FONCTIONNEMENT
41 CARACTERISTIQUES TECHNIQUES
EN MATIÈRE DE PROTECTION DE L'ENVIRONNEMENT
Recyclez les matériaux portant le symbole . Déposez les emballages dans les
conteneurs prévus à cet effet.
Contribuez à la protection de l'environnement et à votre sécurité, recyclez vos produits
électriques et électroniques. Ne jetez pas les appareils portant le symbole
ordures ménagères. Emmenez un tel produit dans votre centre local de recyclage ou
contactez vos services municipaux.
avec les
21
RENDEZ-VOUS SUR NOTRE SITE POUR CONSULTER:
- Produits
- Brochures
- Notices d'utilisation
- Dépannage
- Informations sur le service après-vente
www.aeg.com
LÉGENDE
Avertissement – Informations importantes sur la sécurité.
Informations générales et conseils
Informations écologiques
Sous réserve de modifications.
Page 22

www.aeg.com
22
POUR DES RÉSULTATS PARFAITS
Merci d'avoir choisi ce produit AEG. Nous l'avons conçu pour qu'il vous offre des
performances irréprochables pour longtemps, en intégrant des technologies
innovantes qui vous simplifient la vie grâce à des caractéristiques que vous ne
trouverez pas forcément sur des appareils ordinaires. Veuillez prendre quelques
instants pour lire cette notice afin d'utiliser au mieux votre appareil.
ACCESSOIRES ET CONSOMMABLES
Dans la boutique en ligne d'AEG, vous trouverez tout ce qu'il vous faut pour que vos
appareils AEG fonctionnent parfaitement. Sans oublier une vaste gamme
d'accessoires conçus et fabriqués selon les critères de qualité les plus élevés qui
soient, des articles de cuisine spécialisés aux range-couverts, des porte-bouteilles
aux sacs à linge délicats...
Visitez la boutique en ligne sur
www.aeg.com/shop
SERVICE APRÈS-VENTE
N'utilisez que des pièces de rechange d'origine.
Lorsque vous contactez le service après-vente, assurez-vous de disposer des
données suivantes. Ces informations se trouvent sur la plaque signalétique.
Modèle
PNC
Numéro de série
Page 23

INSTRUCTIONS DE SÉCURITÉ
FRANÇAIS
23
Avant d'installer et d'utiliser cet appareil,
lisez soigneusement les instructions fournies. Le fabricant ne peut être tenu pour
responsable des dommages et blessures
liés à une mauvaise installation ou utilisation. Conservez toujours cette notice avec
votre appareil pour vous y référer ultérieurement.
SÉCURITÉ DES ENFANTS ET
DES PERSONNES
VULNÉRABLES
AVERTISSEMENT
Risque d'asphyxie, de blessure ou
d'invalidité permanente.
• Cet appareil n'est pas conçu pour être
utilisé par des personnes (y compris des
enfants) dont les facultés physiques,
sensorielles ou mentales sont réduites,
ou qui manquent d'expérience et de
connaissances, à moins qu'une personne responsable de leur sécurité ne les
supervise ou leur donne des instructions sur la manière de l'utiliser. Ne laissez pas les enfants jouer avec l'appareil.
• Ne laissez pas les emballages à la portée des enfants.
• Ne laissez pas les détergents à la portée des enfants.
• Tenez les enfants et les animaux éloignés de la porte de l'appareil lorsque
celle-ci est ouverte.
• Avant de brancher l'appareil à des
tuyaux neufs ou n'ayant pas servi depuis longtemps, laissez couler l'eau jusqu'à ce qu'elle soit propre.
• Avant d'utiliser l'appareil pour la première fois, assurez-vous de l'absence
de fuites.
• Le tuyau d'arrivée d'eau comporte une
vanne de sécurité et une gaine avec un
câble d'alimentation intérieur.
AVERTISSEMENT
Tension dangereuse.
• Si le tuyau d'arrivée d'eau est endommagé, débranchez immédiatement la
fiche de la prise secteur. Contactez le
service après-vente pour remplacer le
tuyau d'arrivée d'eau.
Branchement électrique
AVERTISSEMENT
Risque d'incendie ou d'électrocution.
INSTALLATION
• Retirez l'intégralité de l'emballage.
• N'installez pas et ne branchez pas un
appareil endommagé.
• N'installez pas l'appareil ou ne l'utilisez
pas dans un endroit où la température
ambiante est inférieure à 0 °C.
• Suivez scrupuleusement les instructions
d'installation fournies avec l'appareil.
• Vérifiez que l'appareil est installé sous
et à proximité de structures sûres.
Raccordement à l'arrivée d'eau
• Veillez à ne pas endommager les
tuyaux de circulation d'eau.
• L'appareil doit être relié à la terre.
• Vérifiez que les données électriques figurant sur la plaque signalétique correspondent à celles de votre réseau. Si
ce n'est pas le cas, contactez un électricien.
• Utilisez toujours une prise de courant
de sécurité correctement installée.
• N'utilisez pas d'adaptateurs multiprises
ni de rallonges.
• Veillez à ne pas endommager la fiche
secteur ni le câble d'alimentation. Contactez le service après-vente ou un
électricien pour remplacer le câble
d'alimentation s'il est endommagé.
• Ne connectez la fiche d'alimentation à
la prise de courant qu'à la fin de l'instal-
Page 24

www.aeg.com
24
lation. Assurez-vous que la prise de
courant est accessible une fois l'appareil installé.
• Ne tirez pas sur le câble électrique pour
débrancher l'appareil. Tirez toujours sur
la prise.
UTILISATION
AVERTISSEMENT
Risque de blessure.
• Utilisez cet appareil dans un environnement domestique.
• Ne modifiez pas les caractéristiques de
cet appareil.
• Placez les couteaux et les couverts avec
des bouts pointus dans le panier à couverts avec les pointes tournées vers le
bas ou en position horizontale.
• Ne laissez pas la porte de l'appareil ouverte sans surveillance pour éviter tout
risque de chute.
• Ne montez pas sur la porte ouverte de
votre appareil ; ne vous asseyez pas
dessus.
• Les produits de lavage pour lave-vaisselle sont dangereux. Suivez les consignes de sécurité figurant sur l'emballage du produit de lavage.
• Ne buvez pas l'eau de l'appareil ; ne
jouez pas avec.
• N'enlevez pas la vaisselle de l'appareil
avant la fin du programme. Il peut rester du produit de lavage sur la vaisselle.
AVERTISSEMENT
Risque d'électrocution, d'incendie
ou de brûlures.
• Débranchez l'appareil de l'alimentation
électrique.
• Coupez le câble d'alimentation et mettez-le au rebut.
• Retirez le dispositif de verrouillage de
la porte pour empêcher les enfants et
les animaux de s'enfermer dans l'appareil.
• Ne placez pas de produits inflammables ou d'éléments imbibés de produits
inflammables à l'intérieur, à proximité
ou sur l'appareil.
• Ne pulvérisez pas d'eau ni de vapeur
pour nettoyer l'appareil.
• De la vapeur chaude peut s'échapper
de l'appareil si vous ouvrez la porte
pendant le déroulement d'un programme.
MISE AU REBUT
AVERTISSEMENT
Risque de blessure ou d'asphyxie.
Page 25

DESCRIPTION DE L'APPAREIL
11
FRANÇAIS
1
2
25
10
9
Bras d'aspersion supérieur
1
Bras d'aspersion inférieur
2
Filtres
3
Plaque signalétique
4
Réservoir de sel régénérant
5
Sélecteur de dureté de l'eau
6
Distributeur de liquide de rinçage
7
Distributeur de produit de lavage
8
Panier à couverts
9
Panier inférieur
10
Panier supérieur
11
8
7
POINT LUMINEUX
• Lorsqu'un programme démarre, un
point lumineux rouge s'illumine sur le
sol, sous la porte de l'appareil. Lorsque
le programme est terminé, le point rouge devient vert.
• Lors d'un dysfonctionnement de l'appareil, le point lumineux rouge clignote.
3
4
5
6
Page 26

www.aeg.com
26
BANDEAU DE COMMANDE
1
Touche marche/arrêt
1
Ecran
2
Touche Départ différé
3
Touche Programme (moins)
4
Touche Programme (plus)
5
Voyants du cycle
Voyant du réservoir de sel régénérant. Ce voyant est éteint pendant le déroulement du programme.
Voyant du réservoir de liquide de rinçage. Ce voyant est éteint
pendant le déroulement du programme.
Voyant de fin.
6
2
4
3
5
Touche Extra Hygiène
6
Touche « Tout en 1 »
7
Touche RESET
8
Voyants
9
7 8
9
Page 27

PROGRAMMES
FRANÇAIS
27
Programme Degré de salis-
Phases du program-meOptions
sure
Type de vaisselle
1
1)
Tous
Vaisselle, couverts, plats et
casseroles
Prélavage
Lavage à 45 °C ou
70 °C
Rinçages
ExtraHygiene
Séchage
2
2)
3
3)
4
4)
5 Normalement ou
Très sale
Vaisselle, couverts, plats et
casseroles
Vaisselle fraîchement salie
Vaisselle et couverts
Normalement sale
Vaisselle et couverts
légèrement sale
Vaisselle fragile
Prélavage
Lavage à 70 °C
Rinçages
Séchage
Lavage à 60 °C
Rinçage
Prélavage
Lavage à 50 °C
Rinçages
Séchage
Lavage à 45 °C
Rinçages
Séchage
ExtraHygiene
ExtraHygiene
et verres
1)
L'appareil détecte le degré de salissure et la quantité de vaisselle dans les paniers. Il règle
automatiquement la température ainsi que le volume d'eau, la consommation d'énergie et
la durée du programme.
2)
Ce programme inclut l'option ExtraHygiene.
3)
Ce programme permet de laver une charge de vaisselle fraîchement salie. Il offre de bons
résultats de lavage en peu de temps.
4)
Il s'agit du programme standard pour les instituts de tests. Ce programme vous permet
d'optimiser votre consommation d'eau et d'énergie pour la vaisselle et les couverts
normalement sales. Reportez-vous à la brochure fournie pour en savoir plus sur ces tests.
Valeurs de consommation
Programme
1)
Durée (min) Consommation
électrique (KWh)
Eau (l)
1 80 - 140 0.7 - 1.3 8 - 14
2 130 - 150 1.1 - 1.2 10 - 11
Page 28

www.aeg.com
28
Programme
1)
Durée (min) Consommation
électrique (KWh)
Eau (l)
3 30 0.8 7
4 170 - 190 0.7 - 0.8 8 - 9
5 70 - 80 0.6 - 0.7 9 - 10
1)
La durée du programme et les valeurs de consommation peuvent changer en fonction de
la pression et de la température de l'eau, des variations de l'alimentation électrique, de la
quantité de vaisselle chargée ainsi que des options sélectionnées.
Page 29

OPTIONS
FRANÇAIS
29
OPTION « TOUT EN 1 »
Activez cette option uniquement si vous
utilisez des pastilles de détergent multifonctions.
Cette option désactive le débit du liquide
de rinçage et du sel régénérant. Les voyants correspondants sont éteints.
La durée du programme peut augmenter.
Activation de la fonction « Tout
en 1 »
Activez ou désactivez la fonction
« Tout en 1 » avant de démarrer
un programme. Vous ne pouvez
pas activer ni désactiver cette
fonction pendant le déroulement
d'un programme.
1. Appuyez sur la touche Marche/Arrêt
pour allumer l'appareil. Assurez-vous
que l'appareil est en mode Programmation. Reportez-vous au chapitre
« RÉGLAGE ET DÉPART D'UN PROGRAMME ».
2. Appuyez sur la touche « Tout en 1 » ;
le voyant « Tout en 1 » s'allume.
Cette fonction reste activée jusqu'à ce que vous la désactiviez.
Appuyez sur la touche « Tout en
1 » ; le voyant « Tout en 1 »
s'éteint.
Si vous arrêtez d'utiliser des pastilles
de détergent multifonctions, avant de
commencer à utiliser séparément du
produit de lavage, du liquide de
rinçage et du sel régénérant, effectuez
ces étapes :
1. Désactivez la fonction « Tout en 1 ».
2. Réglez l'adoucisseur d'eau au niveau
maximum.
3. Assurez-vous que le réservoir de sel
régénérant et le distributeur de liquide de rinçage sont pleins.
4. Démarrez le programme le plus court
par une phase de rinçage, sans produit de lavage ni vaisselle.
5. Réglez l'adoucisseur d'eau en fonction
de la dureté de l'eau de votre région.
6. Ajustez la quantité de liquide de rinça-
ge libérée.
EXTRAHYGIENE
Avec cette fonction, la vaisselle est plus
propre. Au cours de la phase de rinçage,
la température se maintient à 70 °C pendant 10 à 14 minutes.
SIGNAUX SONORES
Les signaux sonores retentissent dans les
conditions suivantes :
• Le programme est terminé.
• Le niveau de l'adoucisseur d'eau est réglé électroniquement.
• L'appareil présente une anomalie de
fonctionnement.
Réglage d'usine : activés. Vous
pouvez désactiver les signaux sonores.
Désactivation des signaux sonores
1. Appuyez sur la touche Marche/Arrêt
pour allumer l'appareil. Assurez-vous
que l'appareil est en mode Programmation. Reportez-vous au chapitre
« RÉGLAGE ET DÉPART D'UN PROGRAMME ».
2. Maintenez enfoncées les touches (4)
et (5) simultanément jusqu'à ce que
les voyants des touches (3), (4) et (5)
clignotent.
3. Appuyez sur la touche (5),
• Les voyants des touches (3) et (4)
s'éteignent.
• Le voyant de la touche (5) continue
à clignoter.
• L'affichage indique le réglage des
signaux sonores.
activés
désactivés
4. Appuyez sur la touche (5) pour modi-
fier le réglage.
5. Éteignez l'appareil pour confirmer.
Page 30

www.aeg.com
30
AVANT LA PREMIÈRE UTILISATION
1. Assurez-vous que le niveau réglé pour
l'adoucisseur d'eau est compatible
avec la dureté de l'eau de votre région. Dans le cas contraire, réglez
l'adoucisseur d'eau. Contactez votre
compagnie des eaux pour connaître la
dureté de l'eau de votre région.
2. Remplissez le réservoir de sel régéné-
rant.
3. Remplissez le distributeur de liquide
de rinçage.
4. Ouvrez le robinet d'eau.
5. Des résidus de traitement peuvent
subsister dans votre lave-vaisselle. Démarrez un programme pour les supprimer. N'utilisez pas de produit de lavage et ne chargez pas les paniers.
Si vous utilisez des pastilles de détergent multifonctions, activez la
fonction « Tout en 1 ». Ces pastilles contiennent du produit de lavage, du liquide de rinçage et
d'autres adjuvants. Assurez-vous
que ces pastilles sont adaptées à
la dureté de l'eau de votre région.
Reportez-vous aux instructions figurant sur l'emballage de ces produits.
Dureté de l'eau
Degrés
allemands
(°dH)
Degrés
français
(°fH)
51 - 70 91 - 125 9.1 - 12.5 64 - 88
43 - 50 76 - 90 7.6 - 9.0 53 - 63
37 - 42 65 - 75 6.5 - 7.5 46 - 52
29 - 36 51 - 64 5.1 - 6.4 36 - 45
23 - 28 40 - 50 4.0 - 5.0 28 - 35
19 - 22 33 - 39 3.3 - 3.9 23 - 27
RÉGLAGE DE L'ADOUCISSEUR
D'EAU
L'eau dure contient une grande quantité
de minéraux pouvant endommager l'appareil et donner de mauvais résultats de
lavage. L'adoucisseur d'eau neutralise ces
minéraux.
Le sel régénérant préserve la propreté et
le bon état de l'adoucisseur d'eau. Reportez-vous au tableau pour régler l'adoucisseur d'eau au niveau adapté. Il garantit
que l'adoucisseur d'eau utilise la quantité
correcte de sel régénérant et d'eau.
L'adoucisseur d'eau doit être réglé manuellement et électroniquement.
Adoucisseur d'eau
mmol/l Degrés
Clarke
Manuel Élec-
2
2
1)
2
1)
2
1)
2
1)
2
1)
1)
15 - 18 26 - 32 2.6 - 3.2 18 - 22 1 4
11 - 14 19 - 25 1.9 - 2.5 13 - 17 1 3
4 - 10 7 - 18 0.7 - 1.8 5 - 12 1 2
< 4 < 7 < 0.7 < 5
1)
Réglage d'usine.
2)
1
réglage
troni-
que
10
9
8
7
6
1)
5
2)
1
Page 31

2)
Ne pas utiliser de sel à ce niveau.
Réglage manuel
FRANÇAIS
Tournez le sélecteur de dureté de l'eau
sur la position 1 ou 2.
31
Réglage électronique
1. Appuyez sur la touche Marche/Arrêt
pour allumer l'appareil. Assurez-vous
que l'appareil est en mode Programmation ; reportez-vous au chapitre
« RÉGLAGE ET DÉPART D'UN PROGRAMME ».
2. Maintenez enfoncées les touches (4)
et (5) simultanément jusqu'à ce que
les voyants des touches (3), (4) et (5)
clignotent.
3. Appuyez sur la touche (3).
• Les voyants des touches (4) et (5)
s'éteignent.
• Le voyant de la touche (3) continue
à clignoter.
• Les signaux sonores retentissent,
par exemple cinq signaux sonores
intermittents = niveau 5.
• L'affichage indique le réglage de
l'adoucisseur d'eau, par exemple
= niveau 5.
4. Appuyez sur la touche (3) à plusieurs
reprises pour modifier le réglage.
5. Éteignez l'appareil pour confirmer le
réglage.
Page 32

www.aeg.com
32
REMPLISSAGE DU RÉSERVOIR DE SEL RÉGÉNÉRANT
ATTENTION
Utilisez uniquement du sel régénérant pour lave-vaisselle. D'autres produits peuvent endommager l'appareil.
De l'eau et du sel peuvent sortir
du réservoir de sel régénérant
lorsque vous le remplissez. Risque
de corrosion. Afin d'éviter cela,
après avoir rempli le réservoir de
sel régénérant, démarrez un programme.
1.
Tournez le couvercle vers la gauche
et ouvrez le réservoir de sel régénérant.
2.
Mettez 1 litre d'eau dans le réservoir
de sel régénérant (uniquement la première fois).
3.
Remplissez le réservoir avec du sel régénérant.
4.
Enlevez le sel qui se trouve autour de
l'ouverture du réservoir de sel régénérant.
5.
Tournez le couvercle vers la droite
pour fermer le réservoir de sel régénérant.
Page 33

FRANÇAIS
REMPLISSAGE DU DISTRIBUTEUR DE LIQUIDE DE RINÇAGE
33
A
B
ATTENTION
Utilisez uniquement du liquide de
rinçage pour lave-vaisselle. D'autres produits peuvent endomma-
A
X
M
2
1
3
4
+
-
ger l'appareil.
Lors de la dernière phase de rinçage, le liquide de rinçage permet
de sécher la vaisselle sans laisser
de traînées ni de taches.
C
1.
D
Appuyez sur le bouton d'ouverture
(D) pour ouvrir le couvercle (C).
2.
Remplissez le distributeur de liquide
de rinçage (A), en ne dépassant pas la
marque « max ».
3.
Si le liquide de rinçage déborde,
épongez-le avec un chiffon absorbant
pour éviter tout excès de mousse.
4.
Fermez le couvercle. Assurez-vous
que le bouton d'ouverture se verrouille correctement.
Vous pouvez tourner le sélecteur
de quantité délivrée (B) entre la
position 1 (quantité minimale) et
la position 4 (quantité maximale).
Page 34

M
A
X
1
2
3
4
+
-
www.aeg.com
34
UTILISATION QUOTIDIENNE
1. Ouvrez le robinet d'eau.
2. Appuyez sur la touche Marche/Arrêt
pour allumer l'appareil. Assurez-vous
que l'appareil est en mode Programmation. Reportez-vous au chapitre
« RÉGLAGE ET DÉPART D'UN PROGRAMME ».
• Si le voyant du réservoir de sel régénérant est allumé, remplissez celuici.
• Si le voyant du liquide de rinçage
est allumé, remplissez le distributeur de liquide de rinçage.
3. Chargez les paniers.
4. Ajoutez du produit de lavage.
5. Réglez et lancez le programme adapté
au type de vaisselle et au degré de salissure.
• Ne mettez pas dans le lave-vaisselle
des articles en bois, en corne, en aluminium, en étain et en cuivre.
• Ne placez pas dans l'appareil des objets pouvant absorber l'eau (éponges,
chiffons de nettoyage).
• Enlevez les restes d'aliments sur les articles.
• Laissez tremper les casseroles contenant des restes d'aliments brûlés.
• Chargez les articles creux (tasses, verres
et casseroles) en les retournant.
• La vaisselle et les couverts ne doivent
pas être insérés les uns dans les autres
ni se chevaucher. Mélangez les cuillères
avec d'autres couverts.
• Vérifiez que les verres ne se touchent
pas pour éviter qu'ils ne se brisent.
• Placez les petits articles dans le panier
CHARGEMENT DES PANIERS
Reportez-vous à la brochure fournie pour consulter des exemples
de charge des paniers.
• Utilisez uniquement cet appareil pour
laver des articles qui peuvent passer au
à couverts.
• Placez les objets légers dans le panier
supérieur. Disposez-les de façon à ce
qu'ils ne puissent pas se retourner.
• Assurez-vous que les bras d’aspersion
tournent librement avant de lancer un
programme.
lave-vaisselle.
UTILISATION DU PRODUIT DE LAVAGE
B
A
30
20
C
N'utilisez que la quantité nécessaire de produit de lavage. Reportez-vous aux instructions figurant
ATTENTION
Utilisez uniquement des produits
de lavage pour lave-vaisselle.
1.
Appuyez sur le bouton d'ouverture (B)
pour ouvrir le couvercle (C).
2.
Versez du produit de lavage dans le
compartiment (A).
3.
Si le programme comporte une phase
de prélavage, versez une petite quantité de produit de lavage à l'intérieur
de la porte de l'appareil.
4.
Si vous utilisez des tablettes de détergent, placez une tablette dans le
compartiment (A).
5.
Fermez le couvercle. Assurez-vous
que le bouton d'ouverture se verrouille correctement.
sur l'emballage du produit de lavage.
Page 35

Les pastilles de détergent ne se
dissolvent pas complètement
avec des programmes courts et
des résidus de détergent peuvent
apparaître sur la vaisselle.
Nous recommandons d'utiliser
des pastilles de détergent avec
des programmes longs.
RÉGLAGE ET DÉPART D'UN
PROGRAMME
FRANÇAIS
• La durée du départ différé clignote
sur l'écran.
• Le voyant correspondant au départ
différé s'allume.
3. Fermez la porte de l'appareil. Le dé-
compte démarre.
• Si vous ouvrez la porte, l'affichage
indique le décompte du départ différé par intervalles d'une heure.
Lorsque le décompte est terminé, le programme démarre.
35
Mode Programmation
L'appareil doit être en mode Programmation pour effectuer certaines opérations.
L'appareil est en mode Programmation
lorsque, après sa mise en marche, 2 barres d'état horizontales sont affichées.
Si le bandeau de commande indique
d'autres conditions, maintenez la touche
RESET enfoncée jusqu'à ce que l'appareil
se mette en mode Programmation.
Démarrage d'un programme
sans départ différé
1. Ouvrez le robinet d'eau.
2. Appuyez sur la touche Marche/Arrêt
pour allumer l'appareil. Assurez-vous
que l'appareil est en mode Programmation.
3. Sélectionnez le programme.
• Le numéro du programme correspondant clignote sur l'écran.
4. Si vous le souhaitez, vous pouvez défi-
nir des options.
5. Fermez la porte de l'appareil. Le pro-
gramme démarre.
• Si vous ouvrez la porte, l'écran indique le décompte de la durée du
programme par intervalles d'une
minute.
Démarrage d'un programme
avec départ différé
1. Sélectionnez le programme.
2. Appuyez sur la touche de départ diffé-
ré à plusieurs reprises jusqu'à ce que
l'affichage indique la durée du départ
différé que vous souhaitez régler (de 1
à 24 heures).
Ouverture de la porte au cours
du fonctionnement de
l'appareil
Si vous ouvrez la porte, l'appareil s'arrête.
Lorsque vous refermez la porte, l'appareil
reprend là où il a été interrompu.
Annulation du départ différé au
cours du décompte
Appuyez sur la touche RESET jusqu'à ce
que 2 lignes horizontales s'affichent.
Lorsque vous annulez un départ
différé, l'appareil revient en mode
Programmation. Vous devez définir de nouveau le programme.
Annulation du programme
Appuyez sur la touche RESET jusqu'à ce
que 2 lignes horizontales s'affichent.
Assurez-vous que le distributeur
de produit de lavage n'est pas vide avant de démarrer un nouveau
programme de lavage.
À la fin du programme
Lorsque le programme est terminé, un signal sonore intermittent retentit. 0 s'affiche et le voyant de fin s'allume.
1. Appuyez sur la touche Marche/Arrêt
pour éteindre l'appareil.
2. Fermez le robinet d'eau.
Si vous n'appuyez pas sur la touche Marche/Arrêt, la fonction AU-
TO OFF met à l'arrêt automatiquement l'appareil au bout de
quelques minutes. Cela permet
Page 36

www.aeg.com
36
de diminuer la consommation
d'énergie.
Important
• Attendez que la vaisselle refroidisse
avant de la retirer du lave-vaisselle. La
vaisselle encore chaude est sensible
aux chocs.
• Déchargez d'abord le panier inférieur,
puis le panier supérieur.
• Les côtés et la porte de l'appareil peuvent être mouillés. L'acier inoxydable
refroidit plus rapidement que la vaisselle.
Page 37

ENTRETIEN ET NETTOYAGE
FRANÇAIS
37
AVERTISSEMENT
Avant toute opération d'entretien,
éteignez l'appareil et débranchez
la prise secteur.
NETTOYAGE DES FILTRES
B
A1
A2
Les filtres sales et les bras d'aspersion obstrués diminuent les résultats de lavage.
Contrôlez-les régulièrement et
nettoyez-les si nécessaire.
1.
Tournez le filtre (A) vers la gauche et
sortez-le.
C
A
2.
Pour démonter le filtre (A), détachez
(A1) et (A2).
3.
Retirez le filtre (B).
4.
Lavez les filtres à l'eau courante.
5.
Replacez le filtre (B) dans sa position
initiale. Vérifiez qu'il est correctement
placé sous les deux guides (C).
6.
Assemblez le filtre (A) et mettez-le en
place dans le filtre (B). Tournez-le
vers la droite jusqu'à la butée.
Une position incorrecte des filtres
peut donner de mauvais résultats
de lavage et endommager l'appareil.
NETTOYAGE DES BRAS
D'ASPERSION
Ne retirez pas les bras d’aspersion.
Si des résidus ont bouché les orifices des
bras d'aspersion, éliminez ceux-ci à l'aide
d'un objet fin et pointu.
NETTOYAGE EXTÉRIEUR
Nettoyez l'appareil avec un chiffon doux
humide.
Utilisez uniquement des produits de lavage neutres. N'utilisez pas de produits
abrasifs, de tampons à récurer ni de solvants.
Page 38

www.aeg.com
38
EN CAS D'ANOMALIE DE FONCTIONNEMENT
L'appareil ne démarre pas ou s'arrête en
cours de programme.
Veuillez vous reporter aux informations
suivantes avant de contacter le service
après-vente pour résoudre un problème.
Pour certaines anomalies, l'écran affiche un code d’alarme :
•
- L'appareil n'est pas approvision-
né en eau.
•
- L'appareil ne se vidange pas.
•
- Le système de sécurité anti-dé-
bordement s'est déclenché.
AVERTISSEMENT
Éteignez l'appareil avant de procéder aux vérifications.
Problème Cause possible Solution possible
Le programme ne
démarre pas.
La porte de l'appareil est
Le fusible de la boîte à fusi-
La fiche n'est pas branchée
à la prise murale.
ouverte.
Branchez la prise d'alimentation.
Fermez la porte de l'appareil.
Remplacez le fusible.
bles a grillé.
Le départ différé est sélec-
tionné.
Annulez le départ différé ou
attendez la fin du décompte.
L'appareil ne se
remplit pas d'eau.
La pression de l'eau est trop
Le robinet d'eau est bouché
Le robinet d'arrivée d'eau
est fermé.
faible.
Ouvrez le robinet d'eau.
Contactez votre compagnie
des eaux.
Nettoyez le robinet d'eau.
ou entartré.
Le filtre du tuyau d'arrivée
Nettoyez le filtre.
d'eau est bouché.
Le tuyau d'arrivée d'eau est
plié ou tordu.
Le système de sécurité anti-
débordement s'est déclenché. Il y a des fuites d'eau
Vérifiez que la position du
tuyau est correcte.
Fermez le robinet d'eau et
contactez le service aprèsvente.
dans l'appareil.
L'appareil ne vidange pas l'eau.
Vérifiez que la position du
Après les vérifications, mettez l'appareil
en fonctionnement. Le programme reprend là où il s'était interrompu.
Si le problème persiste, contactez le service après-vente.
Le siphon de l'évier est bouché.
tuyau est correcte.
Si l'écran affiche d'autres codes d'alarme,
contactez le service après-vente.
Nettoyez le siphon de
l'évier.
Vérifiez que la position du
tuyau est correcte.
Page 39

FRANÇAIS
LES RÉSULTATS DE LAVAGE ET DE SÉCHAGE NE SONT PAS
SATISFAISANTS
Problème Cause possible Solution possible
La vaisselle n'est pas
propre.
Les filtres sont mal montés
Les bras d'aspersion sont
Le programme n'était pas
La vaisselle est mal posi-
Les bras d'aspersion ne
La quantité de produit de
Il n'y avait pas de produit
Traces de calcaire
sur la vaisselle.
Le niveau réglé pour
Le bouchon du réservoir de
Traînées et taches
blanchâtres ou pellicules bleuâtres sur
les verres et la vaisselle.
Les filtres sont obstrués. Nettoyez les filtres.
Assurez-vous que les filtres
et installés.
sont montés et installés correctement.
Enlevez les résidus à l'aide
obstrués.
d'un objet fin et pointu.
Assurez-vous que le proadapté au type de charge
et au degré de salissure.
gramme est adapté au type
de charge et au degré de sa-
lissure.
Vérifiez que la vaisselle est
tionnée dans les paniers.
L'eau n'a pas pu laver toute
la vaisselle.
bien placée dans les paniers
et que l'eau peut facilement
laver toute la vaisselle.
Vérifiez que la vaisselle est
pouvaient pas tourner librement.
bien placée dans les paniers
et qu'elle ne bloque pas les
bras d'aspersion.
Vérifiez que vous ajoutez la
lavage n'était pas suffisante.
bonne quantité de produit
de lavage dans le distribu-
teur avant de démarrer un
programme.
Vérifiez que vous ajoutez du
de lavage dans le distributeur de produit de lavage.
produit de lavage dans le
distributeur avant de démar-
rer un programme.
Le réservoir de sel régéné-
rant est vide.
Vérifiez qu'il y a du sel régé-
nérant dans le réservoir de
sel régénérant.
Assurez-vous que le niveau
l'adoucisseur d'eau est incorrect.
réglé pour l'adoucisseur
d'eau correspond à la dureté
de l'eau de votre région.
Serrez le bouchon.
sel régénérant est dévissé.
La quantité de liquide de
rinçage libérée est trop importante.
Diminuez la quantité de li-
quide de rinçage libérée
.
39
Page 40

www.aeg.com
40
Problème Cause possible Solution possible
La quantité de produit de
lavage était excessive.
Vérifiez que vous ajoutez la
bonne quantité de produit
de lavage dans le distribu-
teur avant de démarrer un
programme.
Traces de gouttes
d'eau séchées sur
les verres et la vais-
La quantité de liquide de
rinçage libérée n'était pas
suffisante.
Augmentez la quantité de li-
quide de rinçage libérée.
selle.
Il se peut que la qualité du
produit de lavage soit en
Utilisez une autre marque de
produit de lavage.
cause.
La vaisselle est
mouillée.
Le programme n'a pas de
phase de séchage.
Réglez un programme com-
prenant une phase de sécha-
ge.
La vaisselle est
mouillée et terne.
Le distributeur de liquide
de rinçage est vide.
Vérifiez qu'il y a du liquide
de rinçage dans le distribu-
teur de liquide de rinçage.
Il se peut que la qualité du
liquide de rinçage soit en
Utilisez une autre marque de
liquide de rinçage.
cause.
Il se peut que la qualité des
pastilles de détergent multifonctions soit en cause.
• Utilisez une autre marque
de pastilles de détergent
multifonctions.
• Activez le distributeur de
liquide de rinçage et utilisez du liquide de rinçage
avec les pastilles de détergent multifonctions.
Activation du distributeur de
liquide de rinçage lorsque la
fonction « Tout en 1 » est
activée
1. Appuyez sur la touche Marche/Arrêt
pour allumer l'appareil. Assurez-vous
que l'appareil est en mode Programmation ; reportez-vous au chapitre
« RÉGLAGE ET DÉPART D'UN PROGRAMME ».
2. Maintenez enfoncées les touches (4)
et (5) simultanément jusqu'à ce que
les voyants des touches (3), (4) et (5)
clignotent.
3. Appuyez sur la touche (4).
• Les voyants des touches (3) et (5)
s'éteignent.
• Le voyant de la touche (4) continue
à clignoter.
• L'affichage indique le réglage choisi
pour le distributeur de liquide de
rinçage.
désactivé
activé
4. Appuyez sur la touche (4) pour modi-
fier le réglage.
5. Éteignez l'appareil pour confirmer le
réglage.
6. Ajustez la quantité de liquide de rinça-
ge libérée.
7. Remplissez le distributeur de liquide
de rinçage.
Page 41

CARACTERISTIQUES TECHNIQUES
FRANÇAIS
41
Dimensions Largeur / Hauteur / Profon-
446 / 818 - 898 / 550
deur (mm)
Branchement électrique Reportez-vous à la plaque signalétique.
Pression de l'arrivée
Min. / max. (bar / MPa) (0.5 / 0.05 ) / (8 / 0.8 )
d'eau
Arrivée d'eau
1)
Eau froide ou eau chaude
2)
max. 60 °C
Capacité Couverts 9
1)
Raccordez le tuyau d'arrivée d'eau à un robinet fileté (3/4 pouce).
2)
Si l'eau chaude est produite à partir de sources d'énergie respectueuses de
l'environnement (par exemple, panneaux solaires ou énergie éolienne), utilisez une arrivée
d'eau chaude afin de réduire la consommation d'énergie.
Page 42

www.aeg.com
42
ÍNDICE DE MATERIAS
44 INSTRUCCIONES DE SEGURIDAD
46 DESCRIPCIÓN DEL PRODUCTO
47 PANEL DE MANDOS
48 PROGRAMAS
50 OPCIONES
51 ANTES DEL PRIMER USO
54 USO DIARIO
57 MANTENIMIENTO Y LIMPIEZA
58 SOLUCIÓN DE PROBLEMAS
60 INFORMACIÓN TÉCNICA
ASPECTOS MEDIOAMBIENTALES
Recicle los materiales con el símbolo . Coloque el material de embalaje en los
contenedores adecuados para su reciclaje.
Ayude a proteger el medio ambiente y la salud pública, así como a reciclar residuos de
aparatos eléctricos y electrónicos. No deseche los aparatos marcados con el símbolo
junto con los residuos domésticos. Lleve el producto a su centro de reciclaje local o
póngase en contacto con su oficina municipal.
CONSULTE EN NUESTRO SITIO WEB:
- Productos
- Folletos
- Manuales del usuario
- Solución de problemas
- Información sobre servicios
www.aeg.com
NOTAS
Advertencia - Información importante sobre seguridad.
Datos y recomendaciones generales
Información medioambiental
Salvo modificaciones.
Page 43

PARA OBTENER RESULTADOS PERFECTOS
Gracias por escoger este producto AEG. Este artículo ha sido creado para ofrecer un
rendimiento impecable durante muchos años, con innovadoras tecnologías que
facilitarán su vida y prestaciones que probablemente no encuentre en
electrodomésticos corrientes. Por favor, dedique algunos minutos a la lectura para
disfrutar de todas sus ventajas.
ACCESORIOS Y CONSUMIBLES
En la página web de AEG, encontrará todo lo necesario para la perfecta limpieza y
funcionamiento de todos sus electrodomésticos AEG. Junto con una amplia gama
de accesorios diseñados y fabricados conforme a los elevados estándares de calidad
característicos de la marca, desde utensilios de cocina especializados a cestos de
cubiertos, desde portabotellas a bolsas para el lavado de prendas delicadas...
ESPAÑOL
43
Visite la tienda web en
www.aeg.com/shop
ATENCIÓN Y SERVICIO AL CLIENTE
Le recomendamos que utilice recambios originales.
Cuando se ponga en contacto con el servicio técnico, asegúrese de tener a
mano los siguientes datos. Puede encontrar la información en la placa de
características.
Modelo
PNC
Número de serie
Page 44

www.aeg.com
44
INSTRUCCIONES DE SEGURIDAD
Antes de instalar y utilizar el aparato, lea
atentamente las instrucciones facilitadas.
El fabricante no se hace responsable de
los daños y lesiones causados por una instalación y uso incorrectos. Guarde siempre las instrucciones junto con el aparato
para futuras consultas.
SEGURIDAD DE NIÑOS Y
PERSONAS VULNERABLES
ADVERTENCIA
Existe riesgo de sufrir asfixia, lesiones o incapacidad permanente.
• Este electrodoméstico no debe ser usado por niños, ni por personas con capacidades físicas o mentales reducidas, ni
por personas sin experiencia en el manejo del aparato, a menos que lo hagan
bajo las instrucciones o la supervisión
de la persona responsable de su seguridad. No deje que los niños jueguen
con el aparato.
• Mantenga los materiales de embalaje
alejados de los niños.
• Mantenga todos los detergentes fuera
del alcance de los niños.
• Mantenga a los niños y mascotas alejados del aparato cuando la puerta se encuentre abierta.
• La primera vez que utilice el aparato,
asegúrese de que no hay fugas.
• La manguera de entrada de agua tiene
una válvula de seguridad y un revestimiento con un cable interno de conexión a la red.
ADVERTENCIA
Voltaje peligroso.
• Si la manguera de entrada de agua está
dañada, desconecte el aparato inmediatamente de la toma de corriente.
Póngase en contacto con el servicio
técnico para cambiar la manguera de
entrada de agua.
Conexión eléctrica
ADVERTENCIA
Riesgo de incendios y descargas
eléctricas.
INSTALACIÓN
• Retire todo el embalaje.
• No instale ni utilice un aparato dañado.
• No instale ni utilice el aparato en lugares con temperaturas inferiores a 0 ºC.
• Siga las instrucciones de instalación suministradas con el aparato.
• Asegúrese de que el aparato se instala
debajo y junto a estructuras seguras.
Conexión de agua
• Asegúrese de no provocar daños en los
tubos de agua.
• Antes de conectar el aparato a las nuevas tuberías o a tuberías que no se hayan usado durante mucho tiempo, deje
correr el agua hasta que esté limpia.
• El aparato debe quedar conectado a
tierra.
• Asegúrese de que las especificaciones
eléctricas de la placa coinciden con las
del suministro eléctrico de su hogar. En
caso contrario, póngase en contacto
con un electricista.
• Utilice siempre una toma con aislamiento de conexión a tierra correctamente
instalada.
• No utilice adaptadores de enchufes
múltiples ni cables prolongadores.
• Asegúrese de no provocar daños en el
enchufe ni en el cable de red. Póngase
en contacto con un electricista o con el
servicio técnico para cambiar un cable
de red dañado.
• Conecte el enchufe a la toma de corriente únicamente cuando haya terminado la instalación. Asegúrese de tener
Page 45

acceso al enchufe del suministro de red
una vez instalado el aparato.
• No desconecte el aparato tirando del
cable de conexión a la red. Tire siempre del enchufe.
USO
ADVERTENCIA
Existe riesgo de lesiones.
• Utilice este aparato en entornos domésticos.
• No cambie las especificaciones de este
aparato.
• Los cuchillos y otros objetos con puntas
afiladas deben colocarse en el cesto
para cubiertos con las puntas hacia
abajo o en posición horizontal.
• No deje la puerta del aparato abierta
sin supervisión para evitar caídas sobre
él.
• No se siente ni se ponga de pie sobre
la puerta abierta.
• Los detergentes para lavavajillas son
peligrosos. Siga las instrucciones de seguridad del envase de detergente.
• No beba agua procedente del aparato
ni juegue con ella.
• No retire la vajilla del aparato hasta que
finalice el programa. Puede quedar detergente en los platos.
ADVERTENCIA
Riesgo de incendios, descargas
eléctricas o quemaduras.
ESPAÑOL
• Retire el pestillo de la puerta para evitar que los niños y las mascotas queden
encerrados en el aparato.
45
• No coloque productos inflamables ni
objetos mojados con productos inflamables, dentro, cerca o encima del
aparato.
• No utilice pulverizadores ni vapor de
agua para limpiar el aparato.
• El aparato puede liberar vapor caliente
si abre la puerta durante un programa.
ELIMINACIÓN
ADVERTENCIA
Existe riesgo de lesiones o asfixia.
• Desconecte el aparato de la toma de
red.
• Corte el cable y el enchufe, y deséchelos.
Page 46

www.aeg.com
46
DESCRIPCIÓN DEL PRODUCTO
11
1
2
10
Brazo aspersor intermedio
1
Brazo aspersor inferior
2
Filtros
3
Placa de características
4
Depósito de sal
5
Selector de dureza del agua
6
Dosificador de abrillantador
7
Dosificador de detergente
8
Cesto para cubiertos
9
Cesto inferior
10
Cesto superior
11
9
8
7
HAZ LUMINOSO
• Al iniciarse un programa, aparece un
haz luminoso rojo en el suelo debajo
de la puerta del aparato. Cuando termina el programa, la luz roja cambia a una
luz verde.
• Cuando el aparato presenta una avería,
el haz luminoso rojo parpadea.
3
4
5
6
Page 47

PANEL DE MANDOS
ESPAÑOL
47
1
Tecla de encendido/apagado
1
Pantalla
2
Tecla Inicio diferido
3
Tecla de programa (descendente)
4
Tecla de programa (ascendente)
5
Indicadores Descripción
Indicador de sal. Este indicador está apagado mientras el programa está en curso.
Indicador de abrillantador. Este indicador está apagado mientras
el programa está en curso.
Indicador de fin.
6
2
4
3
5
Tecla ExtraHygiene
6
Tecla Multitab
7
Tecla RESET
8
Indicadores
9
7 8
9
Page 48

www.aeg.com
48
PROGRAMAS
Programa Grado de sucie-
Fases del programa Opciones
dad
Tipo de carga
1
1)
2
2)
3
3)
4
4)
Todo
Vajilla, cubiertos,
cacerolas y sartenes
Suciedad intensa
Vajilla, cubiertos,
cacerolas y sartenes
Suciedad reciente
Vajilla y cubiertos
Suciedad normal
Vajilla y cubiertos
Prelavado
Lavado 45 °C o 70 °C
Aclarados
Secado
Prelavado
Lavado 70 °C
Aclarados
Secado
Lavado 60 °C
Aclarado
Prelavado
Lavado 50 °C
Aclarados
ExtraHygiene
ExtraHygiene
ExtraHygiene
Secado
5 Suciedad normal
o ligera
Vajilla y cristale-
Lavado 45 °C
Aclarados
Secado
ría finas
1)
El aparato detecta el tipo de suciedad y la cantidad de objetos que hay en los cestos.
Ajusta automáticamente la temperatura y la cantidad del agua, el consumo de energía y la
duración del programa.
2)
Este programa incluye la opción ExtraHygiene.
3)
Con este programa puede lavar una carga con suciedad reciente. Ofrece buenos
resultados de lavado en poco tiempo.
4)
Este es el programa estándar para institutos de pruebas. Con este programa se consigue
el uso más eficaz del agua y consumo de energía para vajillas y cubiertos con suciedad
normal. Para conocer los datos de las pruebas, consulte el folleto suministrado.
Valores de consumo
Programa
1)
Duración (min) Energía (kWh) Agua (l)
1 80 - 140 0.7 - 1.3 8 - 14
2 130 - 150 1.1 - 1.2 10 - 11
3 30 0.8 7
Page 49

ESPAÑOL
49
Programa
1)
Duración (min) Energía (kWh) Agua (l)
4 170 - 190 0.7 - 0.8 8 - 9
5 70 - 80 0.6 - 0.7 9 - 10
1)
La presión y temperatura del agua, las variaciones del suministro de energía, las opciones y
la cantidad de platos pueden alterar la duración del programa y los valores de consumo.
Page 50

www.aeg.com
50
OPCIONES
OPCIÓN MULTITAB
Seleccione esta opción únicamente si utiliza pastillas de detergente combinadas.
Esta opción desactiva la entrada de abrillantador y sal. Los indicadores correspondientes están desactivados.
La duración del programa puede aumentar.
Activación de la función
Multitab
Active o desactive la función Multitab antes de poner en marcha un
programa. No es posible activar ni
desactivar esta función con el programa en marcha.
1. Pulse la tecla de encendido/apagado
para encender el aparato. Asegúrese
de que el aparato se encuentra en
modo de ajuste. Consulte “AJUSTE E
INICIO DE UN PROGRAMA”.
2. Pulse la tecla multitab y se encenderá
el indicador luminoso de multitab.
La función permanece encendida
hasta que se desactiva. Pulse la
tecla multitab, tras lo que se apaga el indicador de esta función.
Si deja de usar pastillas de detergente
combinado, antes de empezar a utilizar
por separado detergente, abrillantador
y sal para lavavajillas, siga estos pasos:
1. Desactive la función Multitab
2. Ajuste el descalcificador en el nivel
más alto.
3. Asegúrese de llenar los recipientes de
sal y de abrillantador.
4. Inicie el programa más corto con una
fase de aclarado, sin detergente y sin
platos.
5. Ajuste el descalcificador de agua en
función de la dureza del agua de su
zona.
6. Ajuste la cantidad de abrillantador.
temperatura se mantiene a 70 °C durante
10-14 minutos.
SEÑALES ACÚSTICAS
Las señales acústicas se producen en estas situaciones:
• El programa se termina.
• El nivel del descalcificador se ajusta
electrónicamente.
• Se ha producido algún fallo en el aparato.
Ajuste de fábrica: activado. Puede
desactivar las señales acústicas.
Desactivación de las señales acústicas
1. Pulse la tecla de encendido/apagado
para encender el aparato. Asegúrese
de que el aparato se encuentra en
modo de ajuste. Consulte “AJUSTE E
INICIO DE UN PROGRAMA”.
2. Mantenga pulsadas las teclas (4) y (5)
simultáneamente hasta que parpadeen los indicadores de las teclas (3),
(4) y (5).
3. Pulse la tecla (5):
• Los indicadores de las teclas (3) y (4)
se apagan.
• El indicador de la tecla (5) continúa
parpadeando.
• En la pantalla aparece el ajuste de
las señales acústicas.
On
Off
4. Pulse la tecla (5) para cambiar el ajus-
te.
5. Apague el aparato para confirmar.
EXTRAHYGIENE
Esta función ofrece un mejor resultado de
higiene. Durante la fase de aclarado, la
Page 51

ANTES DEL PRIMER USO
ESPAÑOL
51
1. Asegúrese de que el ajuste del descal-
cificador coincide con la dureza del
agua de su zona. De no ser así, ajuste
el descalcificador de agua. Póngase
en comunicación con las autoridades
correspondientes para conocer la dureza del agua de su zona.
2. Llene el depósito de sal.
3. Llene el dosificador de abrillantador.
4. Abra el grifo.
5. El interior del aparato puede tener
restos. Inicie un programa para eliminarlos. No utilice detergente ni cargue
los cestos.
Si utiliza pastillas de detergente
combinadas, active la función
multitab. Estas pastillas contienen
detergente, abrillantador y otros
productos añadidos. Compruebe
que las pastillas son adecuadas
para la dureza del agua de su zona. Consulte las instrucciones del
paquete de los productos.
AJUSTE EL
DESCALCIFICADOR DE AGUA
El agua dura contiene gran cantidad de
minerales que pueden dañar el aparato y
provocar resultados de lavado no satisfactorios. El descalcificador de agua neutraliza estos minerales.
La sal para lavavajillas mantiene el descalcificador limpio y en buen estado. Consulte la tabla para ajustar el descalcificador
de agua en el nivel adecuado. De esta
forma se asegura de que el descalcificador utilice la cantidad correcta de sal y
agua.
El descalcificador de agua se debe ajustar manual o electrónicamente.
Ajuste del descalci-
Dureza agua
Grados
alemanes
(°dH)
51 - 70 91 - 125 9.1 - 12.5 64 - 88
43 - 50 76 - 90 7.6 - 9.0 53 - 63
37 - 42 65 - 75 6.5 - 7.5 46 - 52
29 - 36 51 - 64 5.1 - 6.4 36 - 45
23 - 28 40 - 50 4.0 - 5.0 28 - 35
19 - 22 33 - 39 3.3 - 3.9 23 - 27
Grados
franceses
(°fH)
mmol/l Grados
Clarke
Manual Elec-
1)
2
1)
2
1)
2
1)
2
1)
2
1)
2
15 - 18 26 - 32 2.6 - 3.2 18 - 22 1 4
11 - 14 19 - 25 1.9 - 2.5 13 - 17 1 3
4 - 10 7 - 18 0.7 - 1.8 5 - 12 1 2
< 4 < 7 < 0.7 < 5
1)
Posición de fábrica.
2)
No utilice sal en este nivel.
2)
1
ficador
de agua
tróni-
co
10
9
8
7
6
1)
5
2)
1
Page 52

www.aeg.com
52
Ajuste manual
Coloque el selector de dureza del agua
en la posición 1 o 2.
Ajuste electrónico
1. Pulse la tecla de encendido/apagado
para encender el aparato. Asegúrese
de que el aparato se encuentra en
modo de ajuste; consulte "AJUSTE E
INICIO DE UN PROGRAMA".
2. Mantenga pulsadas las teclas (4) y (5)
simultáneamente hasta que parpadeen los indicadores de las teclas (3),
(4) y (5).
3. Pulse la tecla (3).
• Los indicadores de las teclas (4) y (5)
se apagan.
LLENAR EL DEPÓSITO DE SAL
• El indicador de la tecla (3) continúa
parpadeando.
• Las señales acústicas funcionan, p.
ej., cinco señales intermitentes = nivel 5.
• En la pantalla aparece el ajuste del
descalcificador, p. ej.,
4. Pulse la tecla (3) repetidamente para
cambiar el ajuste.
5. Desactive el aparato para confirmar el
ajuste.
PRECAUCIÓN
Utilice exclusivamente sal específica para lavavajillas. El aparato podría dañarse con otros productos.
El agua y la sal pueden salirse del
depósito de sal cuando lo llena.
Riesgo de corrosión. Para evitarlo,
después de llenar el depósito, inicie un programa.
1.
Abra el depósito de sal girando la tapa hacia la izquierda.
2.
Vierta un litro de agua en el depósito
de sal (sólo la primera vez).
3.
Llene el depósito con sal para lavavajillas.
4.
Elimine los restos de sal que puedan
haber quedado en la entrada del depósito.
5.
Cierre el depósito girando la tapa hacia la derecha.
= nivel 5.
Page 53

LLENADO DEL DISTRIBUIDOR DE ABRILLANTADOR
ESPAÑOL
53
A
B
PRECAUCIÓN
Utilice exclusivamente abrillantador para lavavajillas. El aparato
podría dañarse con otros produc-
A
X
M
2
1
3
4
+
-
tos.
El abrillantador ayuda a secar la
vajilla sin dejar rayas ni manchas
durante la última fase de aclarado.
1.
C
D
Pulse el botón de apertura (D) para
abrir la tapa (C).
2.
Llene el dosificador de abrillantador
(A) hasta la marca "max" como máximo.
3.
Limpie las salpicaduras de abrillantador con un paño absorbente para evitar que se forme demasiada espuma.
4.
Cierre la tapa. Asegúrese de que el
botón de apertura se encaja en su sitio.
Puede girar el selector de la cantidad (B) entre la posición 1 (menor
cantidad) y la posición 4 (mayor
cantidad).
Page 54

M
A
X
1
2
3
4
+
-
www.aeg.com
54
USO DIARIO
1. Abra el grifo.
2. Pulse la tecla de encendido/apagado
para encender el aparato. Asegúrese
de que el aparato se encuentra en
modo de ajuste. Consulte "AJUSTE E
INICIO DE UN PROGRAMA".
• Si el indicador de sal está encendido, llene el depósito.
• Si el indicador de abrillantador está
encendido, llene el dosificador de
abrillantador.
3. Cargue los cestos.
4. Añada el detergente.
5. Ajuste e inicie el programa correcto
para el tipo de carga y suciedad.
CARGA DE LOS CESTOS
Consulte el folleto suministrado
con ejemplos de carga de los cestos.
• Utilice el aparato exclusivamente para
lavar utensilios aptos para lavavajillas.
• No coloque en el aparato utensilios de
madera, cuerno, aluminio, peltre o cobre.
USO DEL DETERGENTE
• No coloque en el aparato objetos que
puedan absorber agua (esponjas, paños de limpieza, etc.).
• Elimine los restos de comida de los platos.
• Ablande los restos de comida adheridos a la vajilla.
• Coloque los objetos huecos (por ejemplo, tazas, vasos, cazuelas) boca abajo.
• Asegúrese de que los cubiertos y los
platos no se adhieran entre sí. Mezcle
las cucharas con otros cubiertos.
• Asegúrese de que los vasos no chocan
entre sí
• Coloque los objetos pequeños en el
cesto de cubiertos.
• Coloque los objetos ligeros en el cesto
superior. Asegúrese de que los objetos
no se mueven.
• Antes de iniciar un programa, compruebe que los brazos aspersores giran sin
obstrucción.
B
A
30
20
C
No utilice más cantidad de detergente que la recomendada. Consulte las instrucciones del envase
del detergente.
PRECAUCIÓN
Utilice sólo detergentes adecuados para lavavajillas.
1.
Pulse el botón de apertura (B) para
abrir la tapa (C).
2.
Coloque el detergente en el compartimento (A).
3.
Si el programa tiene una fase de prelavado, inserte una pequeña cantidad
de detergente en la parte interior de
la puerta del aparato.
4.
Si utiliza pastillas de detergente, coloque la pastilla en el compartimento
(A).
5.
Cierre la tapa. Asegúrese de que el
botón de apertura se encaja en su sitio.
Page 55

Las pastillas de detergente no se
disuelven completamente con
programas cortos, por lo que pueden quedar restos de detergente
en la vajilla.
Se recomienda usar pastillas de
detergente con los programas largos.
AJUSTE E INICIO DE UN
PROGRAMA
Modo de ajuste
El aparato debe estar en modo de ajuste
para realizar algunas operaciones.
El aparato se encuentra en modo de ajuste cuando, tras la activación, la pantalla
muestra dos barras de estado horizontales.
Si el panel de control muestra otras condiciones, pulse RESET hasta que el aparato se encuentre en el modo de ajuste.
Inicio de un programa sin inicio
diferido
1. Abra el grifo.
2. Pulse la tecla de encendido/apagado
para encender el aparato. Asegúrese
de que el aparato se encuentra en
modo de ajuste.
3. Ajuste el programa.
• El número del programa correspondiente parpadea en la pantalla.
4. Si lo desea, puede ajustar las opcio-
nes.
5. Cierre la puerta del aparato. Se inicia
el programa.
• Si abre la puerta, la pantalla muestra la duración del programa que
disminuye a intervalos de 1 minuto.
Inicio de un programa con
inicio diferido
1. Ajuste el programa.
2. Pulse la tecla de inicio diferido varias
veces hasta que la pantalla muestre el
tiempo de inicio diferido que desee
ajustar (entre 1 y 24 horas).
• El tiempo de inicio diferido parpadea en la pantalla.
ESPAÑOL
• Se ilumina el indicador de inicio diferido.
3. Cierre la puerta del aparato. La cuenta
atrás se inicia.
• Si abre la puerta, la pantalla muestra la cuenta atrás del inicio diferido
que disminuye a intervalos de 1 hora.
El programa de lavado se pone en marcha cuando termina la cuenta atrás.
55
Apertura de la puerta mientras
está funcionando el aparato
Si abre la puerta, se detiene el aparato.
Cuando cierra la puerta, el aparato continúa a partir del punto en que se interrumpió.
Cancelación del inicio diferido
mientras está en curso la
cuenta atrás
Pulse RESET hasta que aparezcan 2 barras de estado horizontales en la pantalla.
Al cancelar el inicio diferido, el
aparato vuelve al modo de ajuste.
En tal caso tendrá que ajustar el
programa de nuevo.
Cancelación de un programa
Pulse RESET hasta que aparezcan 2 barras de estado horizontales en la pantalla.
Compruebe que hay detergente
en el dosificador antes de iniciar
un nuevo programa.
Al final del programa
Al terminar el programa, se oye una señal
acústica intermitente. La pantalla muestra
0 y el indicador de fin de programa se enciende.
1. Pulse la tecla de encendido/apagado
para apagar el aparato.
2. Cierre el grifo.
Si no se pulsa la tecla de encendido/apagado, el dispositivo AUTO
OFF desactiva el aparato automáticamente transcurridos unos minutos. Esto ayuda a reducir el consumo de energía.
Page 56

www.aeg.com
56
Importante
• Deje enfriar la vajilla antes de retirarla
del aparato. Los platos calientes son
sensibles a los golpes.
• Vacíe primero el cesto inferior y, a continuación, el superior.
• Puede haber restos de agua en los laterales y en la puerta del aparato. El acero inoxidable se enfría con mayor rapidez que los platos.
Page 57

MANTENIMIENTO Y LIMPIEZA
ESPAÑOL
57
ADVERTENCIA
Antes de proceder con el mantenimiento, apague el aparato y
desconecte el enchufe de la red.
LIMPIEZA DE LOS FILTROS
B
A1
A2
Los filtros sucios y los brazos aspersores obstruidos reducen la
calidad del lavado.
Revíselos periódicamente y, si es
necesario, límpielos.
1.
Gire el filtro (A) hacia la izquierda y
extráigalo.
C
A
2.
Para desmontar el filtro (A), separe
(A1) y (A2).
3.
Extraiga el filtro (B).
4.
Lave los filtros con agua.
5.
Coloque el filtro (B) en su posición
inicial. Asegúrese de montarlo correctamente bajo las dos guías (C).
6.
Coloque el filtro (A) en su posición
en el filtro (B). Gírelo hacia la derecha
hasta que encaje.
Una posición incorrecta de los filtros puede dañar el aparato y provocar resultados de lavado no satisfactorios.
LIMPIEZA DE LOS BRAZOS
ASPERSORES
No retire los brazos aspersores.
Si los orificios de los brazos aspersores se
taponan, retire la suciedad restante con
un objeto afilado.
LIMPIEZA DEL EXTERIOR
Limpie el aparato con un paño suave humedecido.
Utilice sólo detergentes neutros. No utilice productos abrasivos, estropajos duros
ni disolventes.
Page 58

www.aeg.com
58
SOLUCIÓN DE PROBLEMAS
El aparato no se pone en marcha ni se detiene durante el funcionamiento.
Antes de ponerse en contacto con el servicio técnico, consulte la información siguiente para solucionar el problema.
Algunos fallos de funcionamiento se indican en la pantalla con un código de
alarma:
•
- El aparato no carga agua.
•
- El aparato no desagua.
•
- El dispositivo anti inundación se
ha puesto en marcha.
ADVERTENCIA
Apague el aparato antes de realizar las comprobaciones.
Problema Posible causa Posible solución
El programa no se
pone en marcha.
El aparato no está bien enchufado a la toma de co-
Enchufe el aparato correctamente.
rriente.
La puerta del aparato está
Cierre la puerta del aparato.
abierta.
Se ha fundido un fusible de
Cambie el fusible.
la instalación doméstica.
Está ajustado el inicio diferi-
do.
Cancelación del inicio diferido o espera hasta el final de
la cuenta atrás.
El aparato no carga
agua.
La presión de agua es insu-
El grifo de agua está cerrado.
ficiente.
Abra el grifo.
Póngase en contacto con la
empresa de suministro de
agua.
El grifo está obstruido o tie-
Limpie el grifo.
ne incrustaciones calcáreas.
El filtro de la manguera de
Limpie el filtro.
entrada de agua está obstruido.
La manguera de entrada de
agua está doblada o retorcida.
El dispositivo anti inunda-
ción se ha puesto en marcha. Hay fugas de agua en
Compruebe que la mangue-
ra está instalada correcta-
mente.
Cierre el grifo y póngase en
contacto con el servicio téc-
nico.
el aparato.
El aparato no desa-
El desagüe está obstruido. Desatásquelo.
gua.
La manguera de desagüe
está doblada o retorcida.
Compruebe que la mangue-
ra está instalada correcta-
mente.
Una vez finalizada la revisión, encienda el
aparato. El programa continuará a partir
del punto en que se haya interrumpido.
Si el problema se vuelve a producir, póngase en contacto con el servicio técnico.
Si la pantalla muestra otros códigos de
alarma, diríjase al servicio técnico.
Page 59

ESPAÑOL
LOS RESULTADOS DEL LAVADO Y EL SECADO NO SON
SATISFACTORIOS
Problema Posible causa Posible solución
La vajilla no está
limpia.
Los filtros no están bien
Los brazos aspersores están
El programa no es el ade-
Posición incorrecta de los
Los brazos aspersores no
La cantidad de detergente
No hay detergente en el
Se observan restos
de cal en la vajilla.
El nivel de descalcificador
La tapa del depósito de sal
Se ven rayas, puntos
blancos o películas
azuladas en vasos y
platos.
Los filtros están obstruidos. Limpie los filtros.
Compruebe que los filtros
montados o instalados.
están correctamente montados e instalados.
Retire la suciedad restante
obstruidos.
con un objeto afilado.
Asegúrese de que el progracuado para el tipo de carga
y el grado de suciedad de
la vajilla.
ma seleccionado es el ade-
cuado para el tipo de carga y
el grado de suciedad de la
vajilla.
Asegúrese de que la posiobjetos en los cestos. El
agua no puede lavar todos
los utensilios.
ción de los elementos de los
cestos es correcta y de que
el agua puede lavar fácil-
mente todos ellos.
Asegúrese de que la posigiran correctamente.
ción de los elementos de los
cestos es correcta y de que
no obstruyen los brazos as-
persores.
Asegúrese de que añade la
es insuficiente.
cantidad correcta de deter-
gente en el dosificador antes
de iniciar un programa.
Asegúrese de que añade el
dosificador.
detergente en el dosificador
antes de iniciar un programa.
El depósito de sal está va-
cío.
Asegúrese de que hay sal en
el depósito.
Asegúrese de que el ajuste
seleccionado no es correcto.
del descalcificador coincide
con la dureza del agua de su
zona.
Apriete la tapa.
está suelta.
La dosificación del abrillantador es demasiado alta.
Reduzca la cantidad de abri-
llantador.
.
59
Page 60

www.aeg.com
60
Problema Posible causa Posible solución
La cantidad de detergente
es demasiada.
Asegúrese de que añade la
cantidad correcta de deter-
gente en el dosificador antes
de iniciar un programa.
Se observan gotas
de agua en vajilla y
La dosificación del abrillantador es insuficiente.
Aumente la cantidad de abri-
llantador.
cristalería.
La calidad del detergente
podría ser la causa.
La vajilla está mojada.
La vajilla aparece
mojada y sin brillo.
El programa no tenía fase
de secado.
El dosificador de abrillantador está vacío.
La calidad del abrillantador
podría ser la causa.
La calidad de las pastillas
de detergente combinado
podría ser la causa.
Utilice otra marca de deter-
gente.
Ajuste un programa con fase
de secado.
Asegúrese de que hay abri-
llantador en el dosificador.
Utilice otra marca de abri-
llantador.
• Utilice otra marca de pastillas de detergente combinado.
• Active el dosificador del
abrillantador y utilice éste
junto con las pastillas de
detergente combinado.
Activación del dosificador del
abrillantador con la función
multitab activada
1. Pulse la tecla de encendido/apagado
para encender el aparato. Asegúrese
de que el aparato se encuentra en
modo de ajuste; consulte “AJUSTE E
INICIO DE UN PROGRAMA”.
2. Mantenga pulsadas las teclas (4) y (5)
simultáneamente hasta que parpadeen los indicadores de las teclas (3),
(4) y (5).
3. Pulse la tecla (4).
• Los indicadores de las teclas (3) y (5)
se apagan.
• El indicador de la tecla (4) continúa
parpadeando.
• La pantalla muestra el ajuste del dosificador de abrillantador.
Off
On
4. Pulse la tecla (4) para cambiar el ajus-
te.
5. Apague el aparato para confirmar el
ajuste.
6. Ajuste la cantidad de abrillantador.
7. Llene el dosificador de abrillantador.
INFORMACIÓN TÉCNICA
Medidas Ancho / Alto / Fondo (mm) 446 / 818 - 898 / 550
Conexión eléctrica Consulte la placa de características.
Presión del suministro
de agua
Suministro de agua
Mín. / máx. (bares / MPa) (0.5 / 0.05 ) / (8 / 0.8 )
1)
Agua fría o caliente
2)
máx. 60 °C
Page 61

ESPAÑOL
Capacidad Cubiertos 9
1)
Conecte la manguera de entrada de agua a un grifo con rosca de 3/4 pulgadas.
2)
Si el agua caliente procede de fuentes de energía alternativas (por ejemplo, paneles
solares, energía eólica), utilice la toma de agua caliente para reducir el consumo de
energía.
61
Page 62

www.aeg.com
62
Page 63

ESPAÑOL
63
Page 64

www.aeg.com/shop 117911580-A-432012
 Loading...