

AEG-Electrolux FAVORIT5041 User Manual
FAVORIT 5041
Dishwasher
Operating instructions
Dear Customer
Please read these user instructions carefully.
Above all please observe the safety instructions on the first few pages of
these user instructions! Please keep these user instructions for later reference.
Pass them on to any subsequent owner of the appliance.
The warning triangle and/or specific words (Warning!, Caution!, Important!)
are used to highlight instructions that are important for your safety or for the
function of the appliance. It is imperative that these instructions are
observed.
The numbered instruction steps lead you step by step through the operation
of the appliance.
Next to this symbol you receive additional information and practical tips on
using the appliance.
Tips and instructions for the economical and environmentally friendly use of
the appliance are marked with a clover leaf.
In the event of a malfunction, these operating instructions contain
information on how to rectify faults yourself, see "What to do, if..." section.
For further assistance contact your local AEG Service Force Centre, see the
chapter "Service & Spare Parts".
Printed on paper manufactured with environmentally sound processes.
2
He who thinks ecologically acts accordingly...

Contents
Safety instructions 4
Disposing of packaging and old machines 6
Disposing of the packaging 6
Disposing of your old machine 6
Economical and ecological dishwashing 6
Description of the appliance 7
The inside of the appliance 7
Control panel 7
Before use 8
Before using your dishwasher for the first time 8
Setting the water hardness range 8
Filling with special salt 9
The rinse aid 10
Loading cutlery and dishes 12
The cutlery basket 13
The lower basket 13
The upper basket 14
Adjusting the height of the upper basket 15
Use of detergent 16
Bio programmes and compact powders 17
Washing programmes 18
Operating instructions 20
Maintenance and cleaning 22
Internal and external cleaning 22
Cleaning the filters 22
What do do, if... 24
Service & Spare Parts 26
Guarantee Conditions 27
European Guarantee 28
Hints for test centres 29
Technical data 30
Installation and connection instructions 31
Fitting under a counter 31
Levelling 31
Connecting to the water supply 32
Water outlet connection 32
Protection against flooding 33
Electrical connection 34
3

Safety instructions
The safety of AEG electrical appliances conforms to accepted rules of technology and
the Appliance Safety Act. We as manufacturers, however, see ourselves as being
obliged to familiarise you with the following safety instructions.
Using your dishwasher for its intended purpose
● Only use your dishwasher for machine washing of household crockery. If your
machine is misused or used for any purposes other than that for which it is
intended, the manufacturer cannot be held liable for any damage caused.
● For safety reasons, you should not convert or modify your dishwasher in any way.
Before using your dishwasher for the first time
● Check your dishwasher for any transport damage. Never connect a damaged
machine. If your dishwasher is damaged, you should contact your supplier.
● Your dishwasher must be correctly installed and connected. Please read the
section on "Installation" to make sure you know all about this.
● Before using your dishwasher for the first time, do not forget that the nominal
voltage and current type indicated on the rating plate of your machine must be
the same as the nominal voltage and current type at the installation site. The
necessary electrical fusing is also given on the rating plate.
Child safety
● Packaging parts (e.g. foils, styrene foam) may be dangerous for children, who
could be suffocated! You should therefore keep all packaging well away from
children.
● Children may not recognise the dangers of improper use of electrical appliances.
You should therefore ensure proper supervision during operation and not allow
your children to play with your dishwasher.
● Detergents may have a caustic effect on eyes, mouth and throat and may even
cause suffocation! Keep all detergents in a safe place out of children’s reach.
● The water in your dishwasher should not be used for drinking. Detergent residues
may still be present in your machine. Keep children well away from your
dishwasher when its door is open.
4

Your dishwasher in day-to-day use
● Never operate your dishwasher if the electrical supply lead, inlet hose or drain
hose, control panel, worktop or plinth are damaged.
● If there is a fault, first turn the water tap off. Then switch off your machine and
pull the plug out of the socket. If there is a fixed connection, switch off or
unscrew the fuse(s).
● Never pull the plug out of the socket by the cable - always hold the plug.
● Dishwasher repairs should only be performed by trained personnel.
Improper repairs may seriously endanger the user. If your dishwasher needs to be
repaired, you should contact your local AEG Service Force Centre or your retailer.
● Never place any solvents in your dishwasher or you may cause an explosion!
● Do not rest or sit on the open door as the machine could tilt.
● Before using special dishwasher salt, detergent or rinse-aid, make sure that the
manufacturer of these products expressly specifies their use in domestic
dishwashers.
● Always turn off the water tap when your dishwasher is left unattended for any
length of time, e.g. when you are away on holiday.
● Only transport the dishwasher in an upright position. Tipping it upside down
during transport could cause salty water to leak into the internal compartment
and lead to the formation of rust.
5

Disposing of packaging and old machines
Disposing of the packaging
Our dishwashers require effective protective packaging in transit, though we always
confine ourselves to what is absolutely necessary.
Warning! Packaging parts (e.g. foils, styrene foam) may be dangerous for
children and can cause suffocation. You should therefore keep all
packaging well away from children.
All packaging materials used are environmentally compatible and reusable.
The cardboard parts are produced from recycled paper, and the wood is untreated.
The plastics are marked as follows:
>PE< for polyethylene, e.g. packaging foils.
>PS< for polystyrene, e.g. padding (essentially CFC-Free).
>POM< for polyoxymethylene, e.g. plastic clamps.
Give the packaging for reuse to your local recycling centre. Your local Council will
give you its address.
Disposing of your old machine
When your machine finally reaches the end of its life and you withdraw it from
service, you should render it unserviceable before having it disposed of.
Warning! Children at play could lock themselves in your machine (and
suffocate) or otherwise endanger their lives. Therefore pull out the main
plug and detach and discard the electrical supply lead.
Disable the door lock so that the door no longer closes.
Marking of plastic parts for graded recycling: all plastic parts in your machine are
marked with internationally standardised abbreviations (e.g. <PS> for polystyrene).
When your machine is disposed of, this enables plastic waste to be sorted into
individual types for environmentally conscious recycling.
Check with your local Council or Environmental Health Office to see if there are
facilities in your area for recycling the appliance.
Economical and ecological dishwashing
● Ensure that the water softener is correctly adjusted.
● Do not pre-rinse under running water.
● Select the wash programme to suit the nature and degree of the soiling on the
dishes.
● Do not use more detergent, special salt or rinse aid than is recommended in these
operating instructions and by the manufacturer of the respective product.
6
Description of the appliance
1
2
3
4
5
6
7
8
9
10
11
12
13
14
IN68
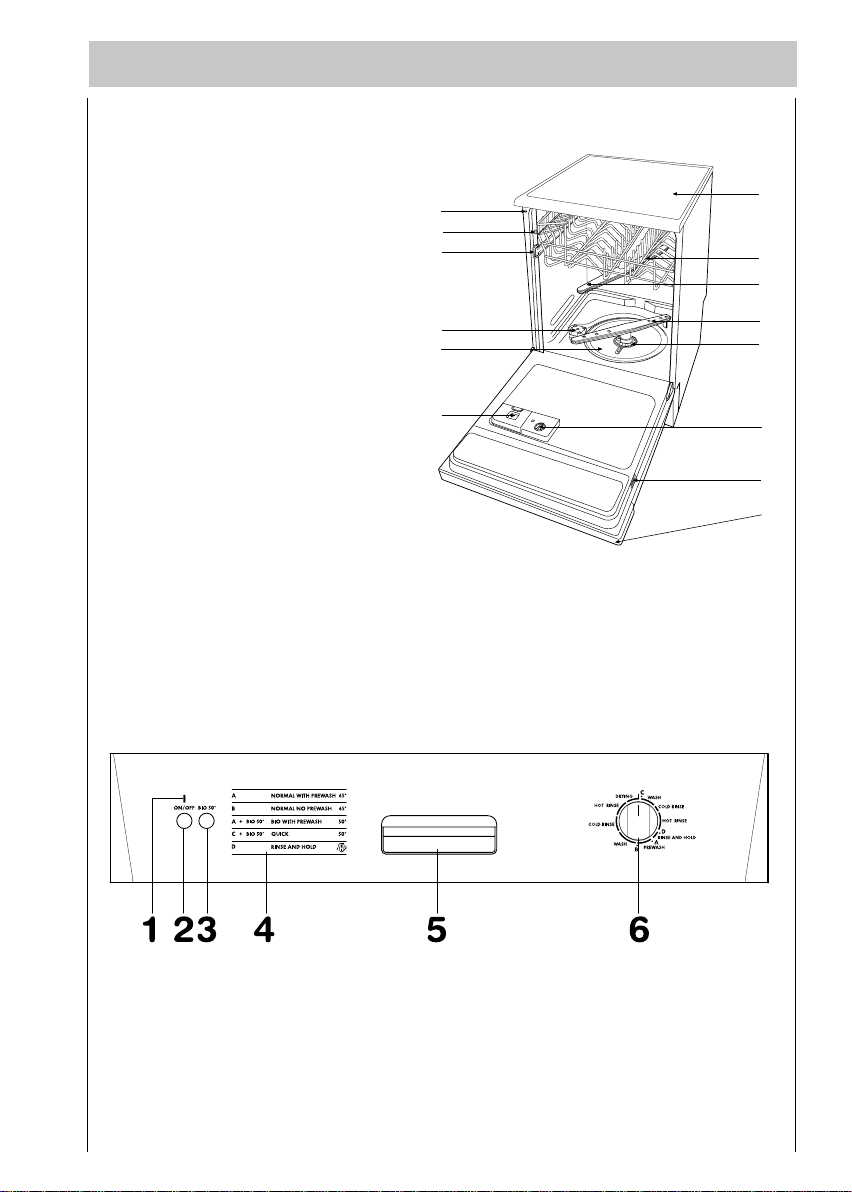
The inside of the appliance
1. Water hardness adjustment
2. Levelling spacers
3. Upper basket stop
4. Salt container
5. Large filter
6. Detergent dispenser
7. Control panel
8. Rating plate
9. Rinse aid dispenser
10. Central filter
11. Lower spray arm
12. Upper spray arm
13. Upper basket
14. Worktop
Control panel
1. ON/OFF indicator light
2. ON/OFF push button
3. BIO 50° push button
4. Programme guide
5. Door handle
6. Programme selector dial
7
Before use
Before using your dishwasher for the first time
1. Ensure that the electrical and water connections comply with the installation
instructions.
2. Remove all packaging from inside the appliance.
3. Set the water softener.
4. Pour 1 litre of water inside the salt container and then fill with salt.
5. Fill the rinse-aid dispenser.
6. Run a "Rinse and Hold" programme.
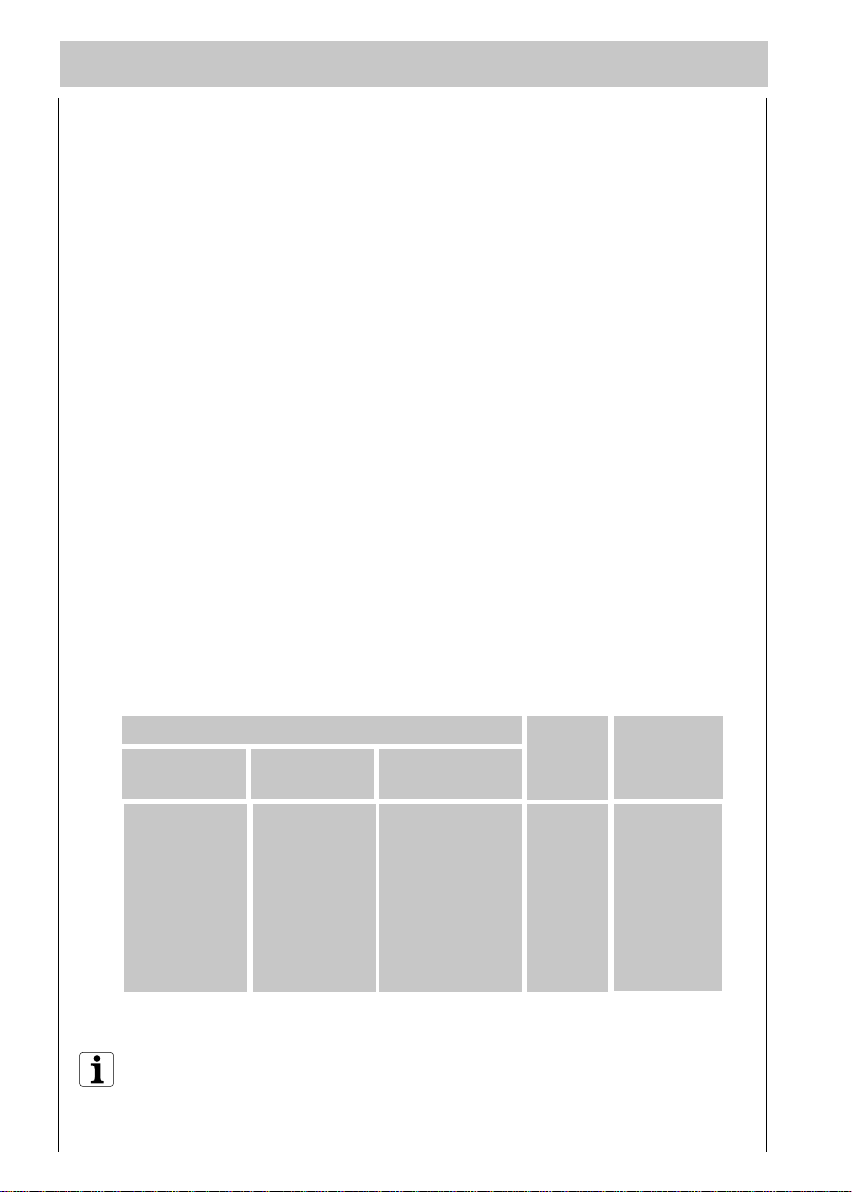
Setting the water hardness range
The dishwasher is equipped with a water softener designed to remove minerals and
salts from the water supply, which would have a detrimental or adverse effect on the
operation of the appliance.
The higher the content of these salts, the harder your water is.
Water hardness is measured in equivalent scales, German, French degrees and PPM
(parts per Million).
The softener should be adjusted according to the hardness of the water in your area.
Your local Water Authority can advise you on the hardness of the water in your area.
The dishwasher is factory set at level 2.
If this level is not suitable for your area the softener should be adjusted.
Water hardness
°dH
(german degrees)
0 - 4
5 - 11
12 - 22
23 - 34
35 - 45
46 - 50
If your water hardness is level 0 it is already soft and therefore there is
no need to use salt.
In this case adjust the water softener on level 1 without using salt.
8
°TH
(french degrees)
0 - 8
9 - 20
21 - 40
41 - 60
61 - 80
81 - 90
PPM
(parts per million)
0 - 80
81 - 200
201 - 400
401 - 600
601 - 800
801 - 900
0
1
2
3
4
5
Use of saltLevel
NO
YES
YES
YES
YES
YES
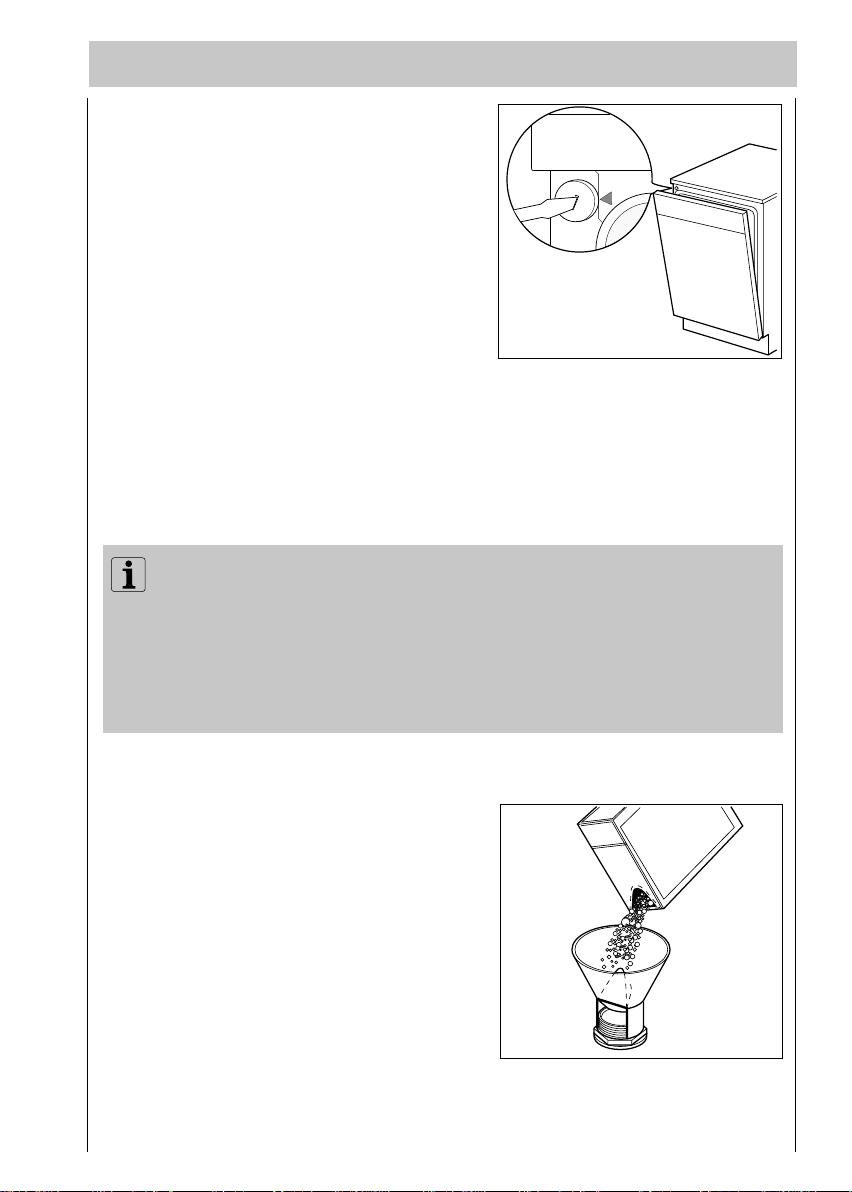
To adjust the water softener
With a screwdriver turn the selector on the
upper front corner of the machine until the
level required corresponds with the marker.
AA05
3
4
5
2
1
2
Filling with special salt
Caution! The packaging of dishwasher salt and detergents are often very similar. The
accidental filling of the salt compartment with detergent would ruin the water
softener. Each time you add salt, make sure the carton you have in your hand really
is salt.
Only use salt specifically designed for use in dishwashers.
All other types of salt not specifically designed for use in a dishwasher,
especially table salt, will damage the water softener.
Only fill with salt just before starting one of the washing programmes.
This will prevent any grains of salt or salty water, which may have been
spilled, remaining on the bottom of the machine for any period of
time, which may cause corrosion.
To fill:
1. To fill with salt, unscrew the cap of
the salt container.
2. Pour 1 litre of water inside the container
(this is necessary only before filling with
salt for the first time).
3. Using the funnel provided, pour in the salt
until the container is full.
Do not worry if water overflows from the
unit when filling with salt, this is quite
normal.
4. Replace the cap making sure that there is
no trace of salt on the screw thread or on the gasket.
5. Screw on the cap tightly.
SR14
SALE
SALT
SALZ
SEL
9

When this has been done, all that is required is
to periodically top up the container with salt.
The salt cap has a refill indicator window in
the centre.
A green float is clearly visible when there is
salt inside the container and almost disappears
when the salt has finished reminding you to
add salt.
SR11
The rinse-aid
The rinse-aid ensures brilliant crockery and also helps it to dry. It is automatically
dosed in during the hot rinsing cycle. The storage compartment built in to the inside
of the door can hold about 110 ml of rinse-aid, which will be sufficient for between
16 and 40 dishwashing programmes, according to the dosage setting.
Filling up the rinse-aid
1. Open the container by turning the
lid (A) anticlockwise.
2. Add the rinse aid until the
container is completely full. The
indicator (B) will be completely
dark.
Ensure that the lid is closed after every refill.
Top up with rinse aid when the indicator (B)
becomes clear.
Clean up any rinse aid spilt during filling with
an absorbent cloth to avoid excess foaming
during the next wash.
Attention! Do not put liquid detergent in
the rinse aid compartment.
10
BR01
BR03
B
A
5
4
6
x
3
a
2
m
1

Adjusting the dose
The correct dosage of the rinse-aid should be regulated on the basis of the shine and
drying results.
For this purpose, set the quantity of liquid by
means of the six-position selector (C) located
on the inside of the filler opening (minimum
quantity is position 1, maximum quantity is
position 6).
C
Use the tip of a screwdriver to rotate the
selector. If drops of water or white marks
remain on the crockery after it has been
washed, increase the dosage. If the crockery
comes out with whitish, sticky streaks, reduce
the dosage.
BR02
5
4
6
x
3
a
2
m
1
11
 Loading...