

Page 1

FAVORIT 78000 VI
OPVASKEMASKINE BRUGSANVISNING 2
DA
DISHWASHER USER MANUAL 24
EN
PL
ZMYWARKA INSTRUKCJA OBSŁUGI
46
Page 2

2
FOR PERFEKTE RESULTATER
Tak fordi du valgte dette produkt fra AEG. Vi har skabt
det, så du kan nyde en ulastelig funktionsevne i mange
år med nyskabende teknologi, der gør livet lettere –
funktioner, som du ikke finder i almindelige apparater.
Brug et par minutter på at læse mere – så du kan få det
bedste ud af det.
TILBEHØR OG FORBRUGSVARER
I AEG's webbutik kan du finde alt, hvad du har brug for,
til at holde alle dine AEG-apparater flotte og perfekt
fungerende. Sammen med et stort udvalg af tilbehør,
der er designet og udviklet til de høje
kvalitetsstandarder, du ville forvente – fra
specialkogegrej og bestikkurve til flaskeholdere og fine
vaskeposer ...
Besøg webbutikken på
www.aeg-electrolux.com/shop
Page 3

INDHOLD
Indhold
4 Om sikkerhed
8 Produktbeskrivelse
9Betjeningspanel
11 Brug af apparatet
11 Indstilling af blødgøringsanlæg
13 Brug af filtersalt
13 Brug af vaske- og
afspændingsmiddel
14 Multitab-funktion
15 Placering af bestik og service
16 Tørreprogrammer
17 Valg og start af opvaskeprogram
19 Vedligeholdelse og rengøring
20 Hvis noget går galt
23 Tekniske data
23 Miljøhensyn
3
Der er anvendt følgende symboler i
denne brugervejledning:
Vigtige oplysninger om din egen
sikkerhed, samt oplysninger om,
hvordan du undgår skader på
apparatet.
Generelle oplysninger og tips
Miljøoplysninger
Ret til ændringer uden varsel
forbeholdes
Page 4

Om sikkerhed
4
OM SIKKERHED
Læs denne brugervejledning grundigt før installation og ibrugtagning af maskinen :
• Af hensyn til din og din ejendoms sikkerhed.
• Af hensyn til miljøet.
• For korrekt betjening og brug af opvaskemaskinen.
Opbevar altid brugervejledningen sammen med opvaskemaskinen, og lad den følge med,
hvis du flytter eller giver den til en anden.
Producenten kan ikke drages til ansvar, hvis apparatet installeres forkert og eller anvendelsen forårsager skade.
Sikkerhed for børn og andre udsatte personer
• Lad ikke personer, herunder børn, med nedsat fysisk mobilitet, nedsatte mentale evner
eller manglende erfaring og viden betjene apparatet. De skal være under opsyn af en
person, der har ansvaret for deres sikkerhed, eller instrueres i at bruge apparatet.
• Opbevar al emballage utilgængeligt for børn. Der er fare for kvælning eller personskade.
• Opbevar alle opvaskemidler et sikkert sted. Lad ikke børn røre opvaskemidlerne.
• Lad ikke børn og husdyr komme tæt på apparatet, mens døren er åben.
Generelt om sikkerhed
• Apparatets specifikationer må ikke ændres. Dette kan medføre risiko for personskade
samt beskadigelse af apparatet.
• Overhold sikkerhedsanvisningerne på pakken med opvaskemidlet for at undgå ætsning
af øjne, mund og hals.
• Drik ikke vandet fra opvaskemaskinen. Der kan være rester af opvaskemiddel i maskinen.
• Lad ikke lågen stå åben uden opsyn. Dette er for at forhindre personskade, eller at nogen falder over en åben låge.
• Undgå at sidde eller stå på den åbne låge.
Anvendelse
• Dette apparat er kun til husholdningsbrug. Undlad at bruge opvaskemaskinen til andre
formål for at forhindre eller skade på ejendom.
• Brug kun maskinen til tilbehør, der egner sig til maskinopvask.
• Undlad at bruge brændbare produkter eller genstande, der er fugtet med brændbare
produkter, i maskinen eller i nærheden af eller på denne. Der er fare for eksplosion
eller brand.
• Sæt knive og andre ting med skarpe spidser i bestikkurven med spidsen nedad. De kan
evt. også lægges vandret i den øverste kurv eller i kurven til knive (ikke alle modeller
har en kurv til knive).
• Brug kun foreskrevne produkter til opvaskemaskiner (opvaskemiddel, filtersalt, afspændingsmiddel).
• Blødgøringsanlægget kan tage skade af salttyper, der ikke er beregnet til opvaskemaskiner.
Page 5

Om sikkerhed
• Påfyld salt i maskinen, inden du starter et opvaskeprogram. Saltrester i opvaskemaskinen kan forårsage rust eller lave hul i bunden af maskinen.
• Fyld aldrig andre midler (afkalkningsmiddel til opvaskemaskine, flydende opvaskemiddel) i beholderen til afspændingsmiddel. Det kan skade maskinen.
• Sørg for, at spulearmene kan bevæge sig frit, før du starter et opvaskeprogram.
• Der kan komme meget varm damp ud af opvaskemaskinen, hvis du åbner lågen, mens
maskinen er i gang. Dette kan medføre skoldningsfare.
• Tag ikke opvasken ud af maskinen, før opvaskeprogrammet er slut.
Vedligeholdelse og rengøring
• Sluk for maskinen, og tag stikket ud af kontakten inden rengøring.
• Undlad at bruge brændbare produkter eller produkter, der kan forårsage rust.
• Brug ikke maskinen uden filtrene. Sørg for at sætte filtrene rigtigt i. En forkert isættelse resulterer i, at opvasken bliver utilfredsstillende, og maskinen tager skade.
• Undlad at bruge højtryksrenser eller damp til at rengøre maskinen. Der er risiko for
elektrisk stød og skader på apparatet.
Installation
• Kontrollér, at apparatet ikke er beskadiget. Du må ikke installere et tilslutte et beskadiget apparat. Kontakt forhandleren.
• Fjern al emballage, før opvaskemaskinen installeres og tages i brug.
• El- og blikkenslagerarbejde samt installation må kun udføres af en faguddannet person. Dermed forhindrer du materiel skade eller personskade.
• Sørg for, at elstikket er taget ud af stikkontakten under installationen.
• Undgå at bore huller i apparatets sider, så der opstår fare for at beskadige de hydrauliske og elektriske dele.
•
Vigtigt! Følg instruktionerne i skabelonen, som leveres sammen med apparatet:
– Installation af apparatet.
– Montering af dørpanel.
– Tilslutning til vandsyning og afløb.
• Sørg for, apparatet er installeret under og opad stabile køkkenelementer.
5
Forholdsregler mod frost
• Stil ikke maskinen et sted, hvor temperaturen kommer under 0 °C.
• Producenten påtager sig intet ansvar for frostskader.
Tilslutning, vand
• Brug nye slanger ved tilslutning af maskinen til vandforsyningen. Brug ikke brugte slanger.
• Tilslut ikke apparatet til nye rør eller rør, der ikke har været brugt i længere tid. Lad
vandet løbe i nogle minutter, og forbind så tilløbsslangen.
• Undgå at mase eller forårsage skade på vandslangerne, når apparatet installeres.
• Kontrollér, at samlingerne er tætte, så der ikke kan sive vand ud.
• Sørg for, at slangerne er tætte inden ibrugtagning af apparatet.
Page 6
Om sikkerhed
6
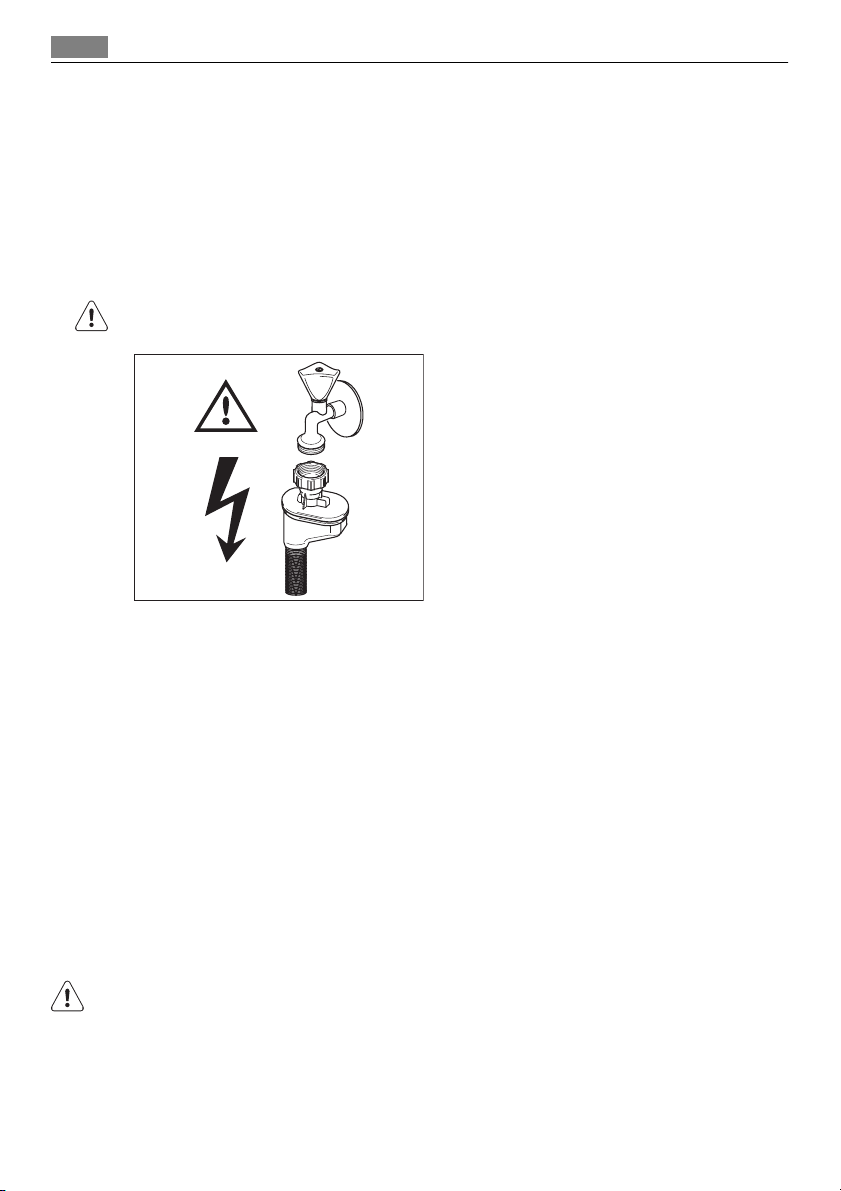
• Tilløbsslangen har en sikkerhedsventil og en dobbelt kappe med et indvendigt elkabel.
Der er kun tryk i indløbsslangen, når vandet løber. Hvis der er en lækage i tilløbsslangen, afbryder sikkerhedsventilen det løbende vand.
– Pas på, når du tilslutter tilløbsslangen:
– Undlad at lægge tilløbsslangen eller sikkerhedsventilen i vand.
– Tag straks stikket ud af stikkontakten, hvis tilløbsslangen eller sikkerhedsventilen
beskadiges.
– Tilløbsslangen med sikkerhedsventil må kun udskiftes af servicecentret.
ADVARSEL
Højspænding.
Tilslutning, el
• Maskinen skal tilsluttes strøm m/jord, jvf. Stærkstrømsreglementet.
• Sørg for, at de elektriske data på typeskiltet svarer til strømforsyningen.
• Brug altid en korrekt monteret lovlig stikkontakt.
• Brug ikke multistik og forlængerledninger. Der er risiko for brand.
• Udskift ikke elledningen. Kontakt servicecentret.
• Undgå at mase eller forårsage skade på stikket og ledningen bag apparatet.
• Sørg for, at der er adgang til netstikket efter installationen.
• Undgå at slukke for maskinen ved at trække i ledningen. Tag altid selve netstikket ud
af kontakten.
Indvendig belysning
Dette apparat er udstyret med indvendig belysning, der tænder, når lågen åbnes, og slukker, når lågen lukkes.
ADVARSEL
Lysstråle fra diode. Se ikke direkte ind i lysstrålen.
Lampens LED er CLASS 2 og er i overensstemmelse med IEC 60825-1: 1993 + A1:1997 +
A2:2001.
Bølgelængde for udsendt lys: 450 nm
Maks. afgivet effekt: 548 μW
Page 7
Om sikkerhed
Ved nødvendig udskiftning af den indvendige belysning: Kontakt vores servicecenter.
Tag ledningen ud af stikkontakten, inden den indvendige belysning udskiftes.
Servicecenter
• Reparation eller arbejde på apparatet må kun udføres af en godkendt tekniker. Kontakt servicecentret.
• Brug kun originale reservedele.
Kassering af apparatet
• Sådan undgås risiko for personskade eller beskadigelse:
– Tag stikket ud af kontakten.
– Klip elledningen af, og kassér den.
– Fjern lugelåsen. Det forhindrer, at børn eller dyr kan smække sig inde i apparatet.
Der er fare for kvælning.
– Kassér apparatet på kommunens genbrugsstation.
ADVARSEL
Opvaskemidler er farlige og kan forårsage ætsning!
• Kontakt straks en læge, hvis der sker et uheld med disse opvaskemidler.
• Kontakt straks en læge, hvis opvaskemidlet kommer ind i munden.
• Kommer vaskemidlerne i øjnene, skylles straks grundigt med vand, og læge kontaktes.
• Opbevar opvaskemidlerne på et sikkert sted og utilgængeligt for børn.
• Lad ikke vaskemaskinens låge stå åben, når der er opvaskemiddel i beholderen til opvaskemiddel.
• Fyld først beholderen til opvaskemiddel op, lige inden du starter et opvaskeprogram.
7
Page 8
Produktbeskrivelse
8
PRODUKTBESKRIVELSE
1
2
10
9
3
4
5
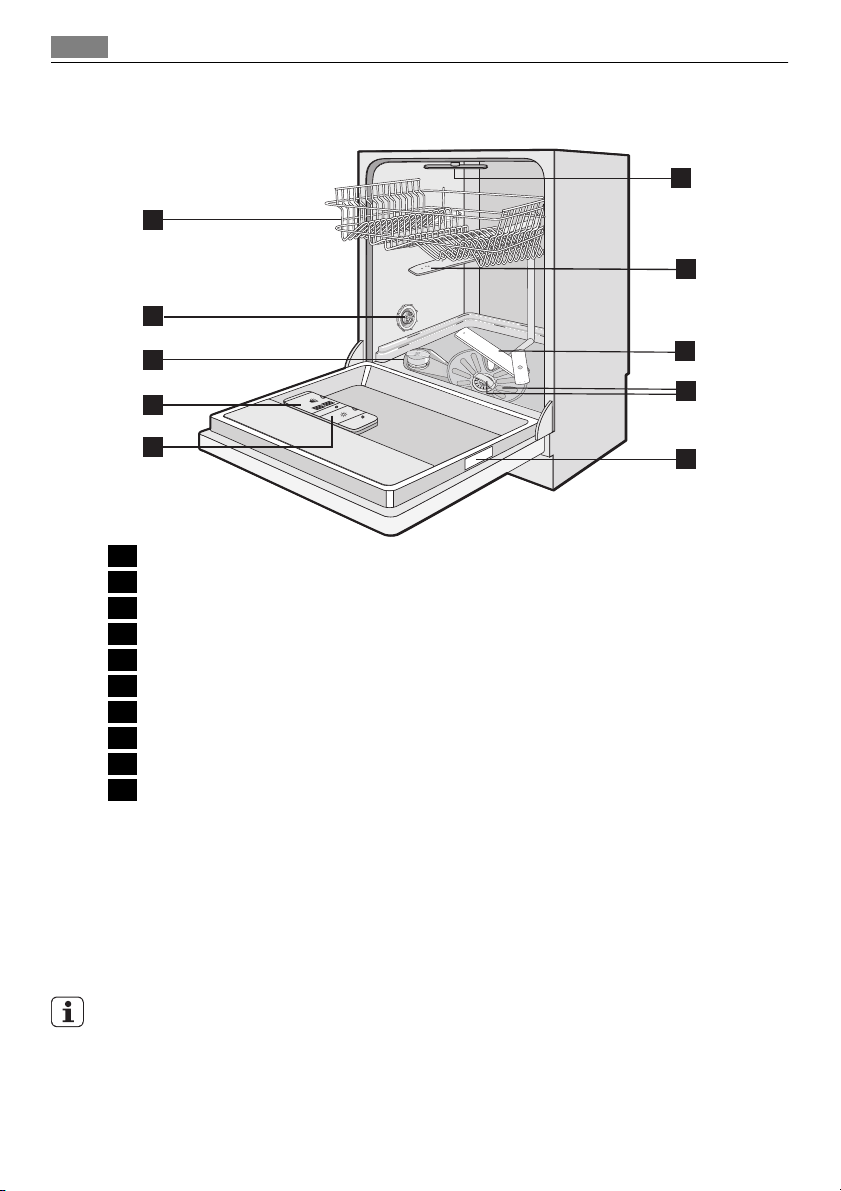
1 Den øverste kurv
2 Justering af vandets hårdhedsgrad
3 Saltbeholder
4 Beholder til opvaskemiddel
5 Beholder til afspændingsmiddel
6 Typeskilt
7 Filtre
8 Nederste spulearm
9 Mellemste spulearm
10 Øverste spulearm
Visuelt signal
• Når programmet starter, fremkommer der et rødt visuelt signal på gulvet under maskinens låge. Det røde signal forbliver tændt, indtil programmet er færdigt.
• Når programmet er færdigt, fremkommer der et grønt visuelt signal på gulvet under
maskinens låge.
• Når maskinen har en fejlfunktion, blinker et rødt visuelt signal på gulvet under maskinens låge.
Hvis maskinen er installeret højt og flugter med en køkkenlåge, kan det visuelle signal
ikke ses.
8
7
6
Page 9
Betjeningspanel
BETJENINGSPANEL
Betjeningsknapperne er placeret øverst på betjeningspanelet. Apparatets låge skal stå på
klem for at betjene knapperne.
9
1
2
4
3
6
5
7 8
9
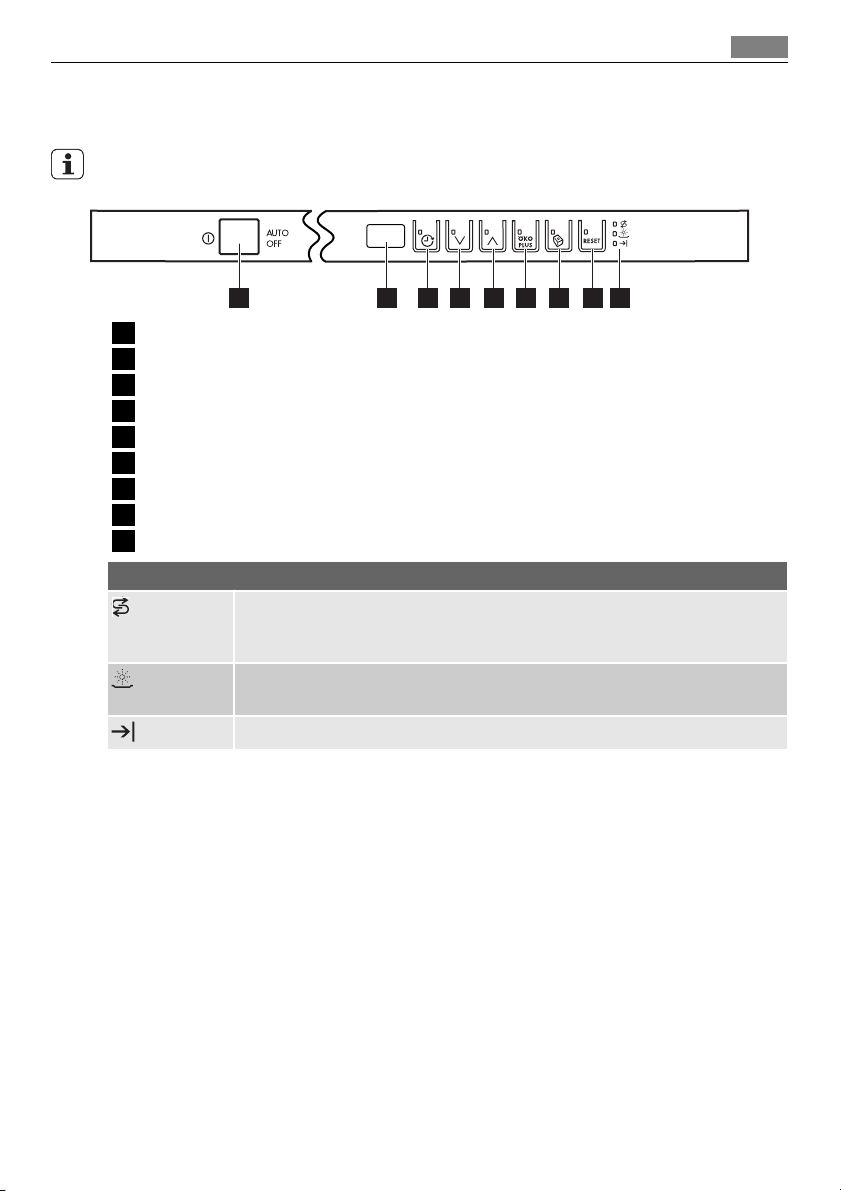
1 Tænd-/sluk-knap
2 Visning
3 Knap til udskudt start
4 Programknap (ned)
5 Programknap (op)
6 ÖKO PLUS-knap
7 Multitabs-knap
8 RESET-knap
9 Kontrollamper
Kontrollamper
Salt-lampe. Tændes, når der skal påfyldes salt i beholderen.
Når beholderen er fyldt, kan Salt-lampen fortsætte med at lyse i nogle timer.
Det påvirker ikke apparatets funktion i øvrigt.
Afspændingsmiddel-lampe Tændes, når beholderen til afspændingsmiddel skal
påfyldes.
Slut-lampe. Tændes, når et opvaskeprogram er slut.
1) Når beholderne til salt og/eller afspændingsmiddel er tomme, lyser de tilhørende kontrollamper ikke, hvis et
opvaskeprogram er i gang.
1)
1)
Tænd-/sluk-knap
Tryk på denne knap for at tænde eller slukke for apparatet.
Ti minutter efter afslutningen af vaskeprogrammet slukker AUTO OFF-funktionen automatisk for maskinen. Dette hjælper med at reducere energiforbruget.
Visning
Displayet viser:
• Den elektroniske indstilling af blødgøringsanlægget
• Om tilsætning af afspændingsmiddel er slået til/fra (kun når Multitab-funktionen er
slået til)
• Opvaskeprogrammets nummer
• Resttid, indtil opvaskeprogrammet er slut.
• Afslutning af et opvaskeprogram (displayet viser nul)
•Tiden til Senere start
Page 10

Betjeningspanel
10
•Alarmkoderne
• Aktivering/deaktivering af lydsignaler.
Knap til senere start
Tryk på denne knap gentagne gange for at udskyde starten af opvaskeprogrammet med
1 til 24 timer.
Programvalgsknapper
Tryk på en af disse knapper gentagne gange for at vælge et opvaskeprogram. Hver gang
du trykker på en knap, viser displayet et nummer, der hører til et opvaskeprogram. Se
under "Opvaskeprogrammer".
ÖKO PLUS-knap
Denne funktion reducerer temperaturen under tørringen. Energiforbruget nedsættes
med 25 %.
Tallerkenerne kan være våde ved slutningen af programmet, når du åbner apparatets låge. Vi anbefaler, at du lader lågen stå på klem og lader tallerkenerne tørre.
Tryk på denne knap for at slå funktionen til. Kontrollampen giver sig til at lyse.
Multitab-knap
Tryk på denne knap for at slå multitab-funktionen til eller fra (se 'Multitab-funktion').
RESET-knap
Tryk på denne knap for at annullere:
• Et igangværende opvaskeprogram
• Nedtællingen til Senere start.
Indstillingsfunktion
Ved følgende operationer skal apparatet stå på indstillingsfunktion:
• Valg og start af et opvaskeprogram.
• Valg og start af en Senere start.
• Ved elektronisk indstilling af niveauet for blødgøringsniveau.
• Aktivering eller deaktivering af tilsætning af afspændingsmiddel (kun når Multitabfunktionen er valgt.
• Slå lyd til/fra.
Tænd for apparatet. Apparatet står i indstillingsfunktion, når:
•Displayet viser to vandrette statuslinjer.
Tænd for apparatet. Apparatet står ikke i indstillingsfunktion, når:
• Displayet viser tiden af opvaskeprogrammet eller den senere start.
– For at gå tilbage til indstillingsfunktion er det nødvendigt at afbryde programmet
eller afbryde senere start. Se under "Valg og start af vaskeprogram".
Lydsignaler
Du kan høre lydsignalerne, hvis:
• Opvaskeprogrammet er afsluttet.
Page 11
Brug af apparatet
• Niveauet af blødgøringsanlægget justeres elekronisk.
• Der er en funktionsfejl.
Fabriksindstilling: til.
Deaktivering af lydsignalerne
1. Tænd for apparatet.
2. Sørg for, at apparatet står på indstillingsfunktionen.
3. Tryk på knap (4) og knap (5) på samme tid, og hold dem ned, indtil kontrollamperne
for knap (3), (4) og (5) blinker.
4. Giv slip på knap (4) og knap (5).
5. Tryk på knap (5),
• Kontrollamperne for knap (3) og (4) slukkes.
• Kontrollampen for knap (5) fortsætter med at blinke.
• Displayet viser indstillingen af lydsignalerne.
Lydsignalerne er slået til.
Lydsignalerne er slået fra.
6. Tryk på knap (5) for at ændre indstillingen.
7. Sluk for apparatet for at bekræfte.
Udfør trin (1) til (7) for at slå lydsignalerne til igen.
11
BRUG AF APPARATET
1. Kontrollér, om det indstillede niveau for blødgøringsanlægget passer til det lokale
vands hårdhedsgrad. Hvis ikke, skal blødgøringsanlægget indstilles.
2. Fyld saltbeholderen op med filtersalt.
3. Fyld beholderen til afspændingsmiddel op.
4. Sæt bestik og tallerkener i opvaskemaskinen.
5. Vælg det opvaskeprogram, der passer til opvaskens art og graden af snavs.
6. Fyld den rette mængde opvaskemiddel i beholderen til opvaskemiddel.
7. Start opvaskeprogrammet.
Brug multitab-funktionen, hvis du bruger Multitabs ("3 i 1", "4 i 1", "5 i 1" osv.) (Se "Multitabfunktion").
INDSTILLING AF BLØDGØRINGSANLÆG
Blødgøringsanlægget fjerner salte og mineraler fra ledningsvandet. Disse mineraler og salte kan skade maskinen.
Justér blødgøringsanlægget, hvis det ikke passer til det lokale vands hårdhed.
Kontakt det lokale vandværk angående det lokale vands hårdhed.
Page 12
Indstilling af blødgøringsanlæg
12
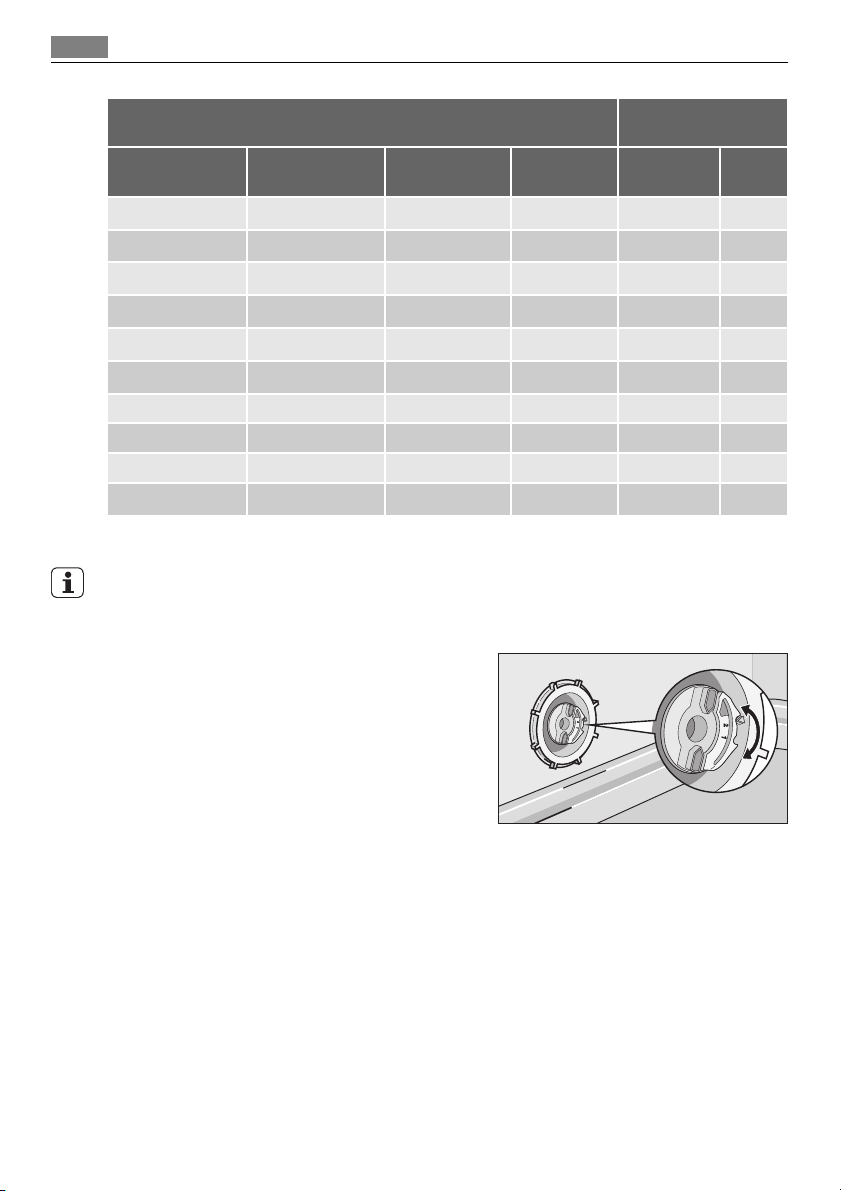
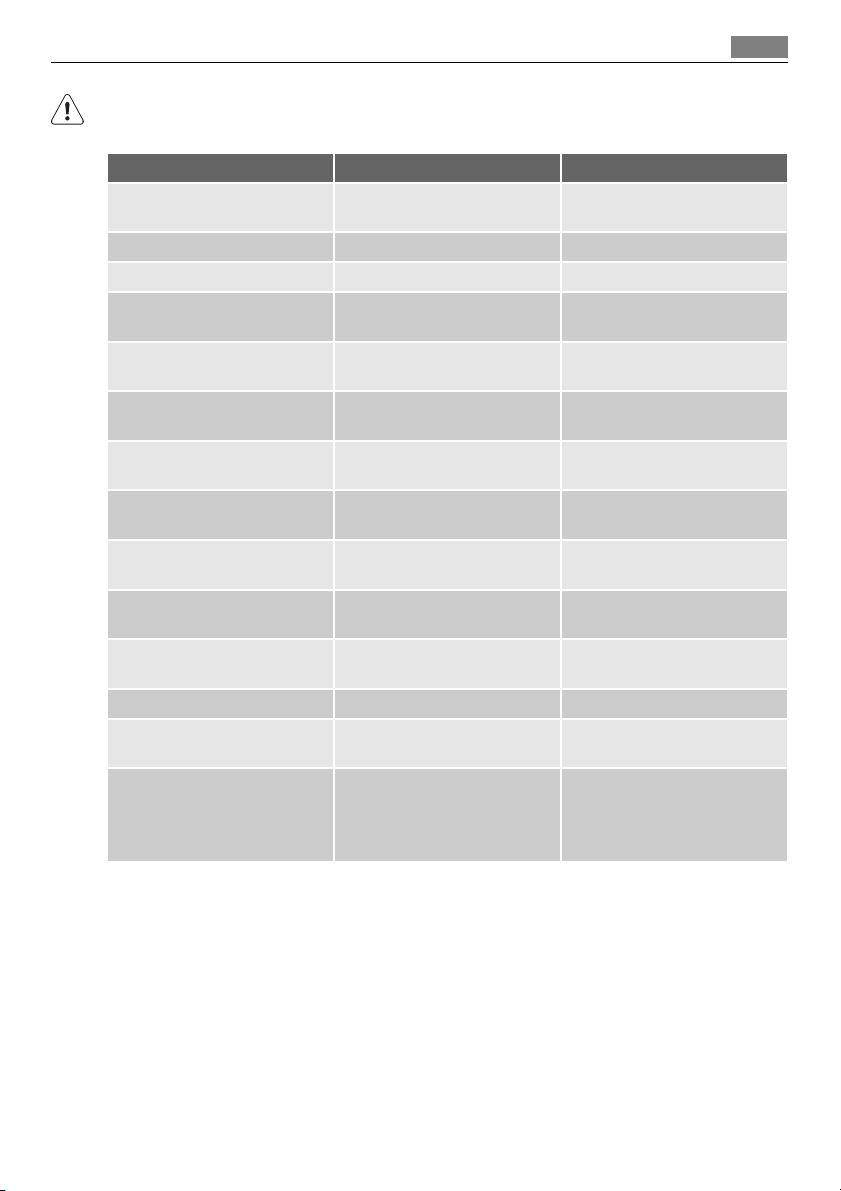
Vandets hårdhedsgrad
Tyske grader (°dH) Franske grader
(TH°)
51 - 70 91 - 125 9,1 - 12,5 64 - 88
43 - 50 76 - 90 7,6 - 9,0 53 - 63
37 - 42 65 - 75 6,5 - 7,5 46 - 52
29 - 36 51 - 64 5,1 - 6,4 36 - 45
23 - 28 40 - 50 4,0 - 5,0 28 - 35
19 - 22 33 - 39 3,3 - 3,9 23 - 27
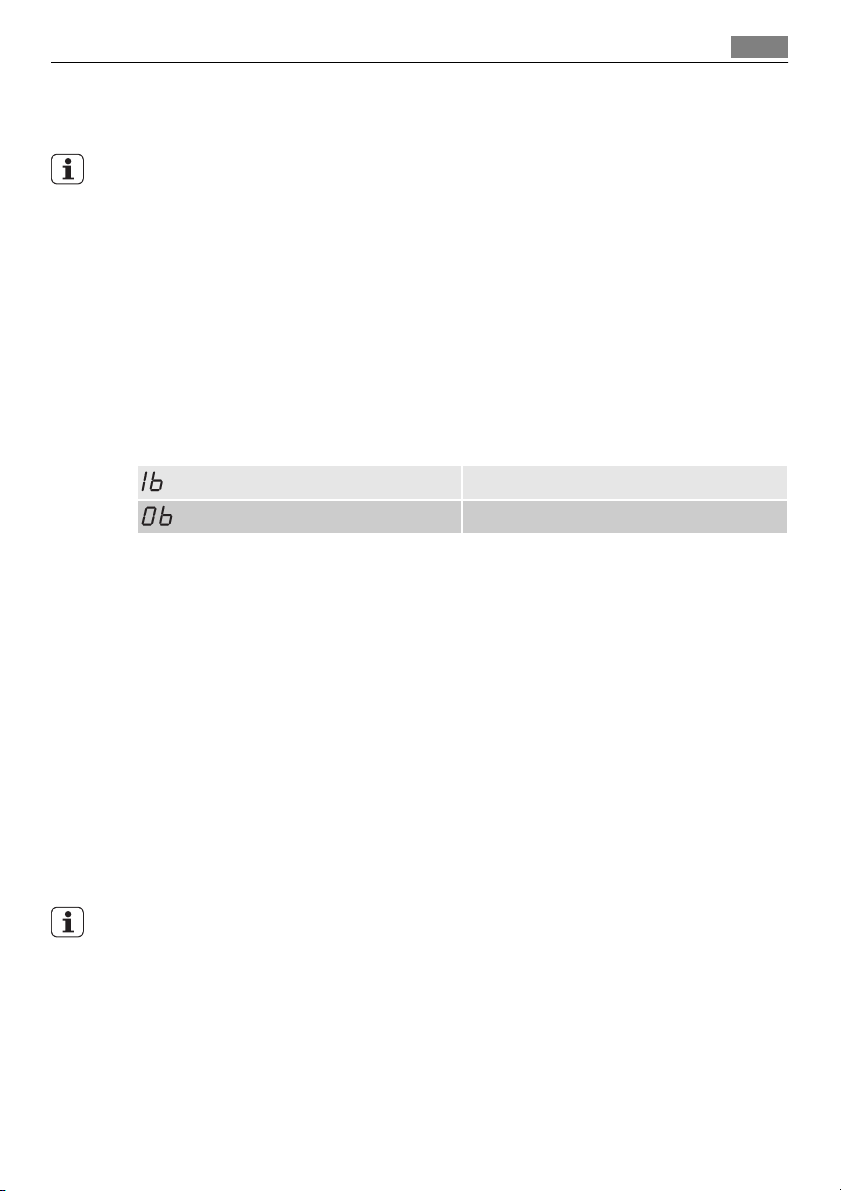
15 - 18 26 - 32 2,6 - 3,2 18 - 22 1 4
11 - 14 19 - 25 1,9 - 2,5 13 - 17 1 3
4 - 10 7 - 18 0,7 - 1,8 5 - 12 1 2
< 4 < 7 < 0,7 < 5
1) Fabriksindstilling.
2) Brug ikke salt på dette niveau.
mmol/l Clarke-gra-
Blødgøringsanlægget skal både indstilles manuelt og elektronisk.
Manuel indstilling
Sæt knappen til indstilling af hårdhedsgrad i position 1 eller 2 (se tabel).
der
Indstilling af vandets
hårdhed
manuelt elek-
1)
2
1)
2
1)
2
1)
2
1)
2
1)
2
2)
1
tronisk
10
9
8
7
6
1)
5
2)
1
Elektronisk indstilling
1. Tænd for apparatet.
2. Sørg for, at apparatet står på indstillingsfunktionen.
3. Tryk på knap (4) og knap (5) på samme tid, og hold dem ned, indtil kontrollamperne
for knap (3), (4) og (5) blinker.
4. Giv slip på knap (4) og knap (5).
5. Tryk på knap (3),
• Kontrollamperne for knap (4) og (5) slukkes.
• Kontrollampen for knap (3) fortsætter med at blinke.
• Lydsignalet høres.
Page 13
20
30
M
A
X
1
2
3
4
+
-
Brug af filtersalt
• Displayet viser indstillingen af blødgøringsanlægget (f.eks.: og du hører fem
lydsignaler = niveau 5).
6. Tryk på knap (3) gentagne gange for at ændre indstillingen.
7. Sluk for apparatet for at bekræfte.
Hvis blødgøringsanlægget indstilles elektronisk til niveau 1, forbliver salt-lampen slukket.
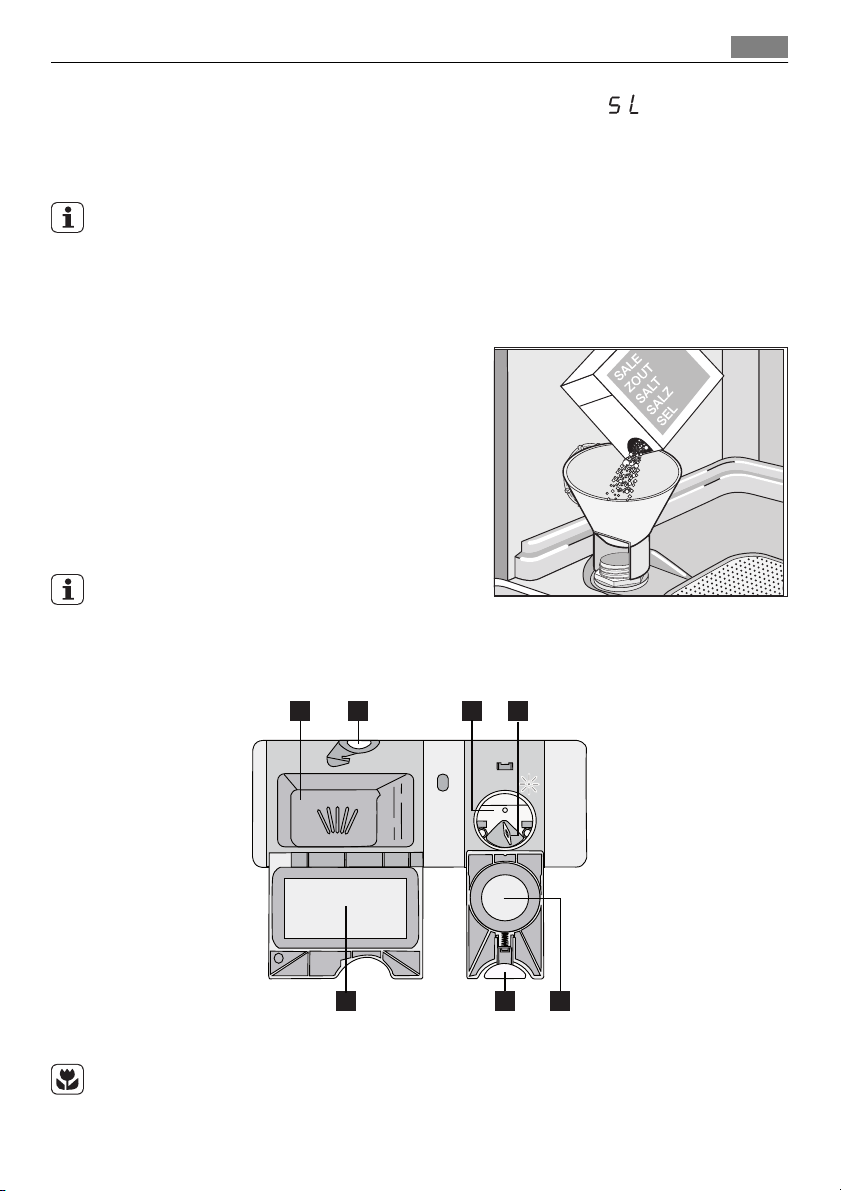
BRUG AF FILTERSALT
Hvordan du fylder saltbeholderen
1. Drej hætten mod uret for at åbne saltbeholderen.
2. Hæld 1 liter vand i saltbeholderen (kun
første gang, du påfylder salt).
3. Brug tragten til at fylde salt i beholderen.
4. Fjern salt rundt om saltbeholderens åbning.
5. Luk saltbeholderen ved at dreje hætten
med uret.
Det er normalt, at vandet i saltbeholderen løber over, når der påfyldes salt.
13
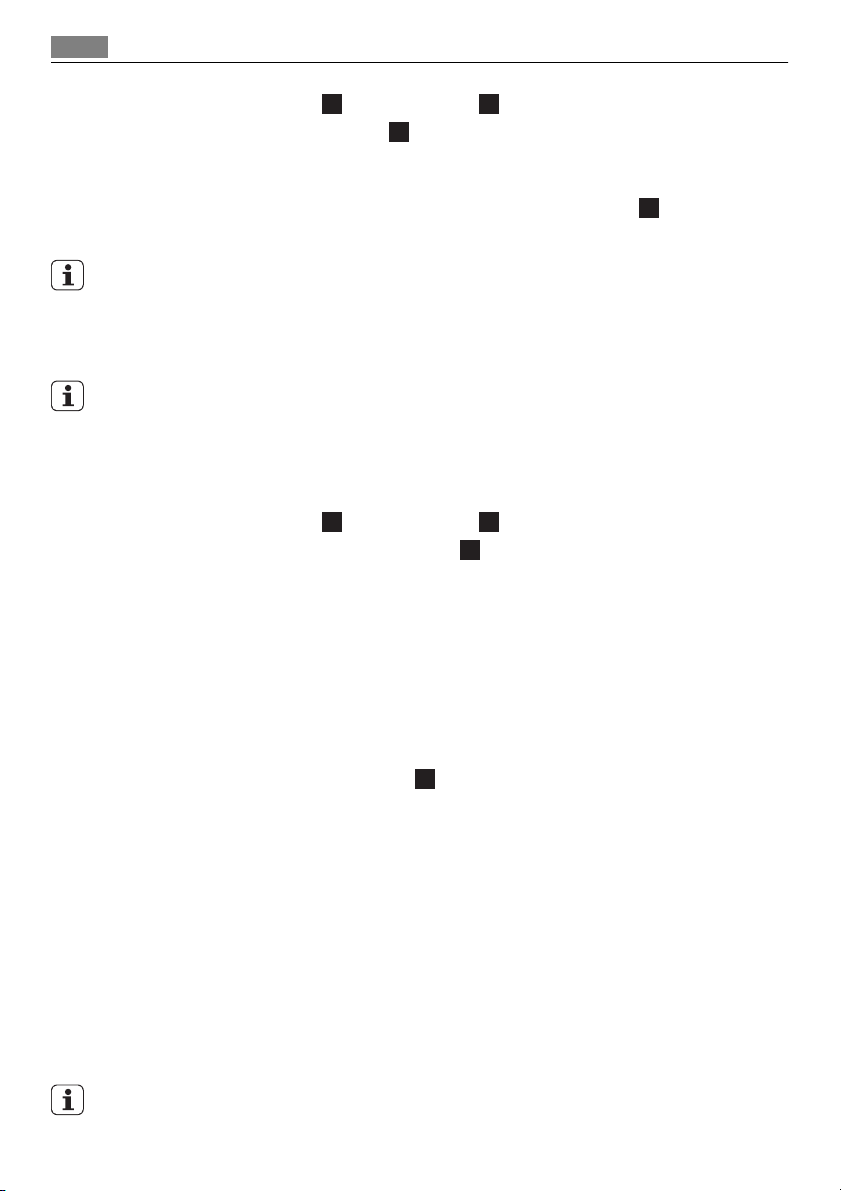
BRUG AF VASKE- OG AFSPÆNDINGSMIDDEL
1
2
7
Brug af opvaskemiddel
Brug ikke mere end den korrekte mængde opvaskemiddel af hensyn til miljøet.
Følg anbefalingerne fra producenten af opvaskemidlet på pakningen.
Sådan fyldes beholderen til opvaskemiddel:
3
4
6
5
Page 14
Multitab-funktion
14
1.
Tryk på udløserknappen
2.
Fyld opvaskemiddel i beholderen
3. Hvis opvaskeprogrammet har et trin med forvask, anbringes en lille mængde opvaskemiddel i hulningen udvendig på låget til opvaskemiddel.
4.
Læg tabletten i beholderen til opvaskemiddel, hvis du bruger tabs
5. Luk beholderen til opvaskemiddel. Tryk på låget, indtil det låses fast.
Brug lange opvaskeprogrammer, når du bruger opvaskemidler i tabletform (tabs). Disse
kan ikke blive helt opløst med korte opvaskeprogrammer og kan forringe opvaskeresultaterne.
2
for at åbne låget 7 til beholderen til opvaskemiddel.
1
.
1
Brug af afspændingsmiddel
Afspændingsmiddel gør det muligt at tørre tallerkener og fade, uden at de får pletter og
striber.
Beholderen til afspændingsmiddel tilfører automatisk afspændingsmiddel under det sidste skylletrin.
Fremgangsmåde for påfyldning af beholderen til afspændingsmiddel:
1.
Tryk på udløserknappen
2.
Fyld beholderen til afspændingsmiddel op
"Max"-mærket.
3. Tør spildt afspændingsmiddel op med en sugende klud, så der ikke dannes for meget
skum under det næste program.
4. Luk beholderen til afspændingsmiddel. Tryk på låget, indtil det låses fast.
6
for at åbne låget 5 til beholderen til afspændingsmiddel.
3
med afspændingsmiddel. Påfyld kun til
.
Indstil dosering af afspændingsmiddel
Fabriksindstilling: Position 3.
Doseringen af afspændingsmiddel kan indstilles fra position 1 (laveste dosering) til position 4 (højeste dosering).
Drej på vælgeren til afspændingsmiddel
4
for at øge eller reducere doseringen.
MULTITAB-FUNKTION
Multitab-funktionen er til kombinerede opvaskemidler i tabletform (tabs).
Disse tabletter indeholder vaskemiddel, afspændingsmiddel og opvaskesalt. Nogle typer
af tabletter kan indeholde andre midler.
Kontroller, at disse tabletter er velegnede til blødgøringsanlægget i dit område (se instruktionerne på produktets emballage).
Multitab-funktionen stopper automatisk tilsætning af afspændingsmiddel og salt.
Multitab-funktionen deaktiverer automatisk kontrollamperne til afspændingsmiddel og
salt.
Programmets varighed kan blive forlænget, hvis du bruger Multitab-funktionen.
Slå Multitab-funktionen fra eller til, før opvaskeprogrammet starter. Du kan ikke slå funktionen til eller fra, mens et opvaskeprogram kører.
Page 15

Placering af bestik og service
Sådan aktiveres Multitab-funktionen
• Tryk på multitab-knappen, og multitab-kontrollampen bliver tændt. Funktionen aktive-
ret.
– Når Multitab-funktionen aktiveres, er den aktiveret, indtil du slår den fra.
Sådan deaktiveres multitab-funktionen ved brug af separat opvaskemiddel, salt og
afspændingsmiddel
1. Tryk på multitab-knappen, og multitab-kontrollampen bliver slukket. Funktionen er
deaktiveret.
2. Fyld saltbeholderen og beholderen til afspændingsmiddel op.
3. Indstil blødgøringsanlægget til højeste niveau.
4. Start et opvaskeprogram med tom maskine.
5. Når opvaskeprogrammet er færdigt, skal blødgøringsanlægget justeres til dit områdes hårhedsniveau.
6. Indstille dosering af afspændingsmiddel.
PLACERING AF BESTIK OG SERVICE
Se folderen "Eksempler på ProClean påfyldninger".
Råd
• Anbring ikke andre ting i opvaskemaskinen, som kan opsuge vand (svampe, klude).
• Fjern tiloversbleven mad fra tingene.
• Blødgør tiloversbleven brændt mad på disse ting.
• Stil hule ting (f.eks. kopper, glas og gryder) med åbningen nedad.
• Sørg for, at vandet ikke samler sig i beholdere eller skåle.
• Sørg for, at bestik og tallerkener m.m. ikke ligger sammen.
• Sørg for, at glas ikke rører andre glas.
• Læg små ting i bestikkurven.
• Bland skeer med andet bestik, så de ikke sætter sig sammen.
• Sørg for, at vandet kan komme til alle overflader, når du stiller tingene i kurvene.
• Læg de lette ting i øverste kurv. Sørg for, at tingene ikke kan flytte sig.
• Vanddråber kan samle sig på ting i plast og på "slip-let"-pander og gryder.
15
Page 16
Tørreprogrammer
16
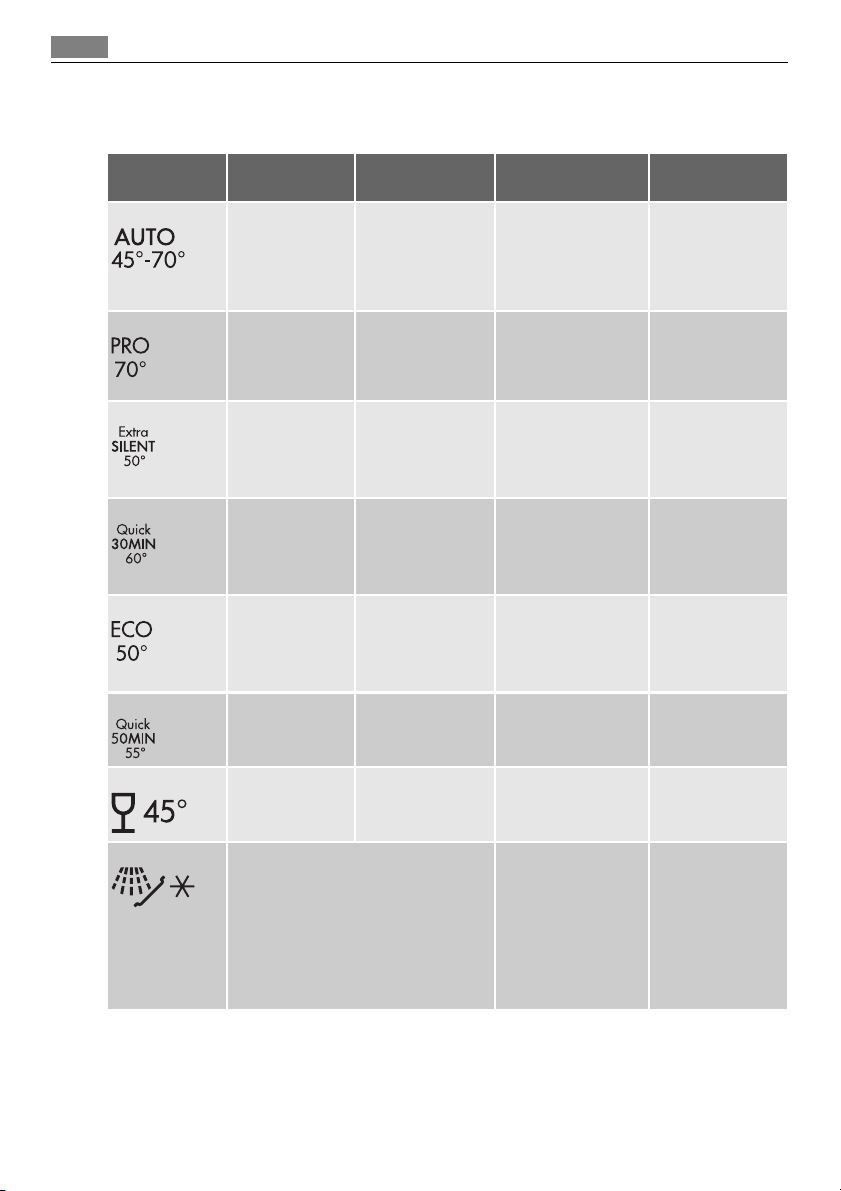
TØRREPROGRAMMER
Program Graden af snavs Type af opvask Beskrivelse af pro-
grammet
1
Alle Service, bestik,
gryder og pander
Forskyl
Opvask 45 °C eller
70 °C
1)
Skylninger
Tørring
2
Meget snavset Service, bestik,
gryder og pander
Forskyl
Opvask 70 °C
Skylninger
Tørring
3
Normalt snavset Service og bestik Forskyl
Opvask 50 °C
Skylninger
2)
4
Frisk snavset Service og bestik Opvask 60 °C
Tørring
Skylning
3)
5
Normalt snavset Service og bestik Forskyl
Opvask 50 °C
Skylninger
4)
6
Let snavset Service og bestik Opvask 55 °C
Tørring
Skylninger
ÖKO PLUS-funkti-
onen
Ja, med varme
Ja, med varme
Ja, uden varme
Ja, uden varme
Ja, med varme
Ja, uden varme
7
Normalt eller let
snavset
Finere porcelæn
og glas
Opvask 45 °C
Skylninger
Ja, med varme
Tørring
8
Brug dette program til hurtig skyl-
Skylning Ja, uden varme
ning af tallerkener. Det forhindrer,
at tiloversbleven mad sætter sig fast
på tallerkenerne, og at der trænger
ubehagelig lugt ud fra opvaskemaskinen.
Brug ikke opvaskemidler til dette program.
1) Apparatet registrerer typen af snavs og antallet af genstande i kurvene. Temperaturen, mængden af vand,
energiforbruget og programtiden justeres automatisk.
2) Dette er det mest støjfri opvaskeprogram. Pumpen arbejder ved meget lav hastighed for at nedsætte
støjniveauet. På grund af den lave hastighed varer programmet længe.
3) Med dette program kan du vaske en opvask med frisk snavs. Det giver gode opvaskeresultater i løbet af kort
tid.
Page 17
Valg og start af opvaskeprogram
4) Dette er standardprogrammet til prøveanstalter. Med dette program får du den mest effektive brug af vand
og energiforbrug til service og bestik med normalt snavs. Se den medfølgende folder med testinformation.
17
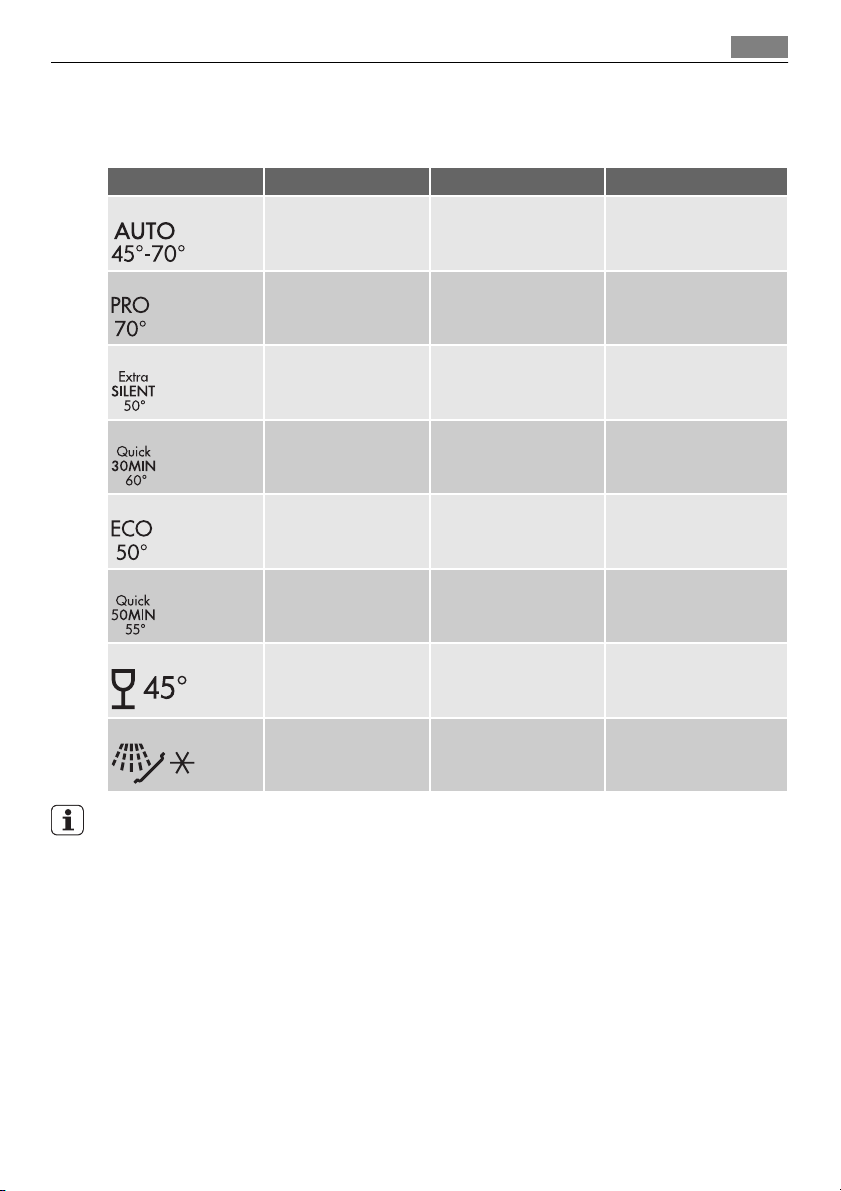
Forbrugsværdier
Program Programtid (minut) Energi (kWh) Vand (liter)
1
90 - 160 0,9 - 1,7 8 - 15
2
3
4
5
6
7
8
140 - 160 1,5 - 1,6 13 - 14
200 - 220 1,1 - 1,2 9 - 11
30 0,9 9
160 - 170 0,9 - 1,0 9 - 11
50 - 60 1,0 - 1,2 10 - 11
65 - 75 0,8 - 0,9 11 - 12
14 0,1 4
Energiforbruget kan variere, alt efter vandtemperatur og -tryk, udsving i netspænding og
opvaskens størrelse.
VALG OG START AF OPVASKEPROGRAM
Start af opvaskeprogrammet uden udskudt start
1. Tænd for apparatet.
2. Sørg for, at apparatet står på indstillingsfunktionen.
3. Vælg et opvaskeprogram.
• Nummeret for opvaskeprogrammet blinker i displayet.
4. Indstil om nødvendigt ÖKO PLUS-funktionen.
5. Luk opvaskemaskinens låge. Opvaskeprogrammet starter automatisk.
Page 18

Valg og start af opvaskeprogram
18
Start af opvaskeprogrammet med udskudt start
1. Tænd for apparatet.
2. Sørg for, at apparatet står på indstillingsfunktionen.
3. Indstil opvaskeprogrammet, og indstil om nødvendigt ÖKO PLUS-funktionen.
4. Tryk gentagne gange på knappen for udskudt start, indtil displayet viser tiden til den
udskudte start.
• Tiden til den udskudte start blinker i displayet.
• Lampen for udskudt start er tændt.
5. Luk opvaskemaskinens låge. Programmet starter automatisk.
Når nedtællingen er slut, starter opvaskeprogrammet automatisk.
Hvis lågen åbnes, standser nedtællingen. Når lågen lukkes igen, fortsætter nedtællingen
det sted, hvor den blev afbrudt.
Annullering af Senere start
Hvis maskinens låge er åben, og nedtællingen endnu ikke er startet
1. Tryk på knappen for Senere start gentagne gange, indtil displayet viser nummeret på
opvaskeprogrammet.
• Nummeret blinker på displayet.
2. Luk opvaskemaskinens låge. Programmet starter automatisk.
Hvis maskinens låg er lukket, og nedtællingen er i gang
1. Åbn lågen.
2. Tryk på knappen for Senere start gentagne gange, indtil displayet viser nummeret på
opvaskeprogrammet.
• Nummeret blinker i nogle sekunder, og derefter vises tiden for opvaskeprogrammet på displayet.
3. Luk opvaskemaskinens låge. Programmet starter automatisk.
Afslutning på opvaskeprogrammerne
•Åbn lågen.
– Opvaskeprogrammet stopper.
• Luk lågen til opvaskemaskinen.
– Programmet fortsætter det sted, hvor det blev afbrudt.
Annullering af opvaskeprogrammet.
Hvis opvaskeprogrammet ikke er startet, kan du ændre valget.
For at ændre valget, mens opvaskeprogrammet er i gang, er det nødvendigt at annullere
programmet.
• Tryk på RESET-knappen, indtil displayet viser de to vandrette statuslinjer.
Sørg for, at der er opvaskemiddel i beholderen til opvaskemiddel, inden der startes et nyt
opvaskeprogram.
Page 19
Vedligeholdelse og rengøring
Afslutning på opvaskeprogrammet
Når opvaskeprogrammet er færdigt, udsendes der et lydsignal.
1. Åbn lågen.
• Slut-lampen er tændt
• Displayet viser et nul.
2. Sluk for apparatet.
3. Lad maskinens låge stå på klem i nogle minutter for at opnå bedre tørring.
Fjern tingene fra kurvene
• Lad opvasken køle af, før du tager den ud af maskinen. Tallerkener m.m. er skrøbelige,
når de er meget varme.
• Tøm først nederste kurv og derefter øverste kurv.
• Der kan være vand på maskinens sider og låge. Rustfrit stål køler hurtigere af end tallerkener.
VEDLIGEHOLDELSE OG RENGØRING
Sådan fjernes og renses filtre
Snavsede filtre forringer opvaskeresultatet.
Selvom vedligeholdelsen er meget begrænset med disse filtre, bør du jævnligt efterse maskinen og om nødvendigt rense filtrene.
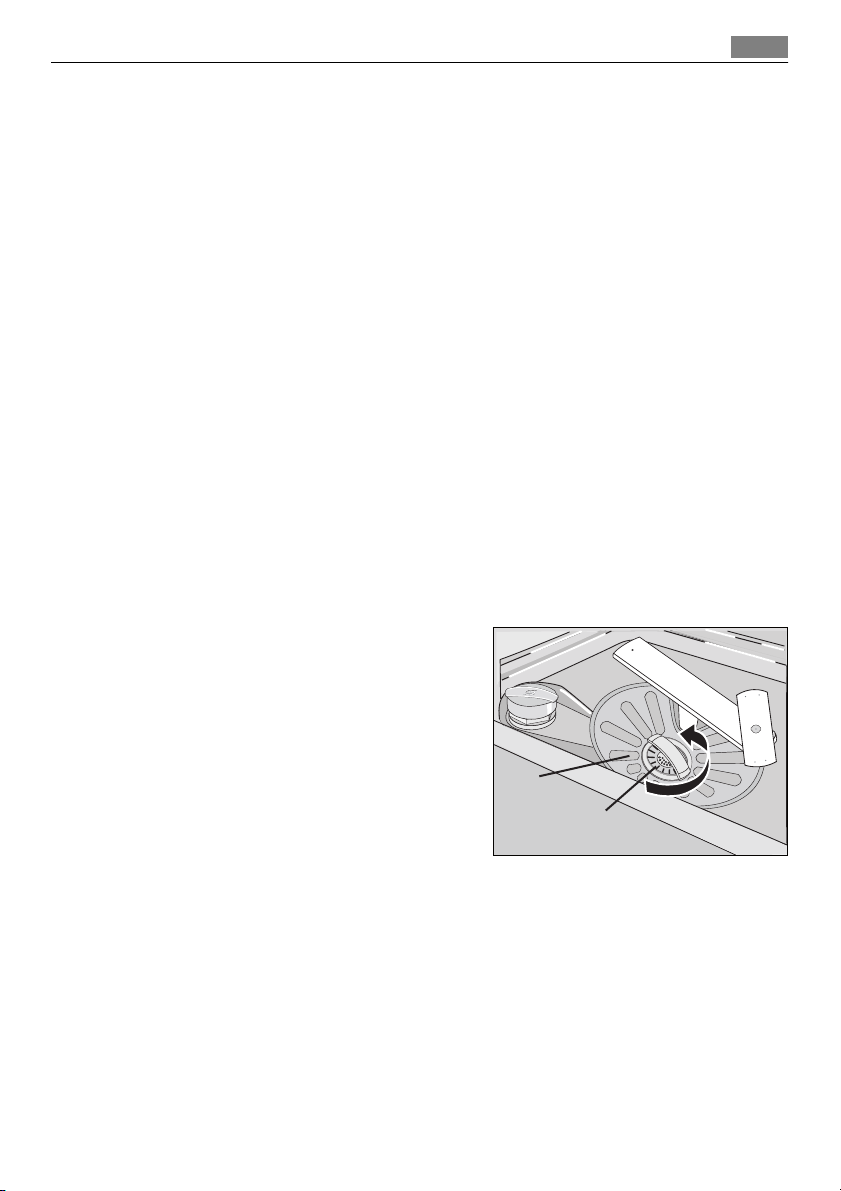
1. Drej filteret (A) mod uret og fjern det fra
filteret (B).
19
B
A
Page 20
Hvis noget går galt
20
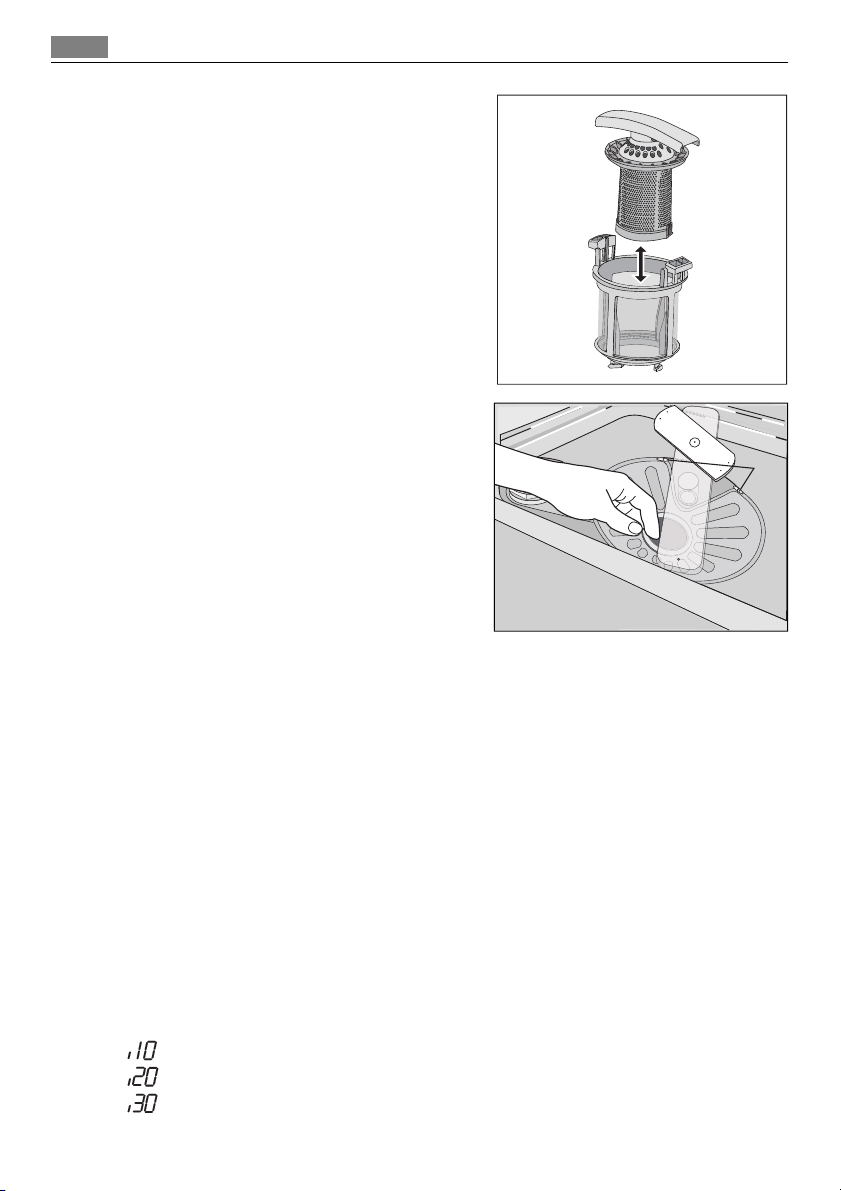
2. Filteret (A) består af to dele. Filteret ad-
skilles ved at trække delene fra hinanden.
3. Rens delene grundigt med vand.
4. Sæt det todelte filter (A) sammen, og
pres. Sørg for, at delene samles korrekt.
5. Fjern filteret (B).
6. Rens filteret (B) grundigt med vand.
7. Sæt filteret (B) på plads igen. Sørg for, at
det samles korrekt i de to skinner (C).
8. Sæt filteret (A) på plads i filteret (B). Drej
filteret (A) med uret, indtil det låses fast.
C
Sådan rengøres spulearmene:
Fjern ikke spulearmene.
Hvis hullerne i spulearmene tilstoppes, kan det tiloversblevne snavs fjernes med en spids
genstand.
Sådan renses de ydre overflader:
Rengør opvaskemaskinens udvendige sider og betjeningspanelet med en blød, fugtig klud.
Brug kun et neutralt rengøringsmiddel.
Brug ikke slibende midler, skuresvampe eller opløsningsmidler (f.eks. acetone).
HVIS NOGET GÅR GALT
Maskinen starter ikke, eller den stopper midt i et program.
Forsøg først at finde en løsning på problemet (se tabel). Kontakt servicecentret, hvis dette
ikke hjælper.
Ved visse fejlfunktioner viser displayet en alarmkode:
- Maskinen tager ikke vand ind
•
- Maskinen tømmes ikke
•
- Overløbssikringen er tændt
•
Page 21
Hvis noget går galt
21
ADVARSEL
Sluk for maskinen, inden du udfører eftersynet.
Fejl Mulig årsag Mulig løsning
Maskinen tager ikke vand ind. Vandtilslutningen er blokeret
Vandtrykket er for lavt. Kontakt det lokale vandværk.
Der er lukket for vandet. Åbn for vandhanen.
Filteret i tilløbsslangen er stop-
Tilløbsslangen er ikke tilsluttet
Tilløbsslangen er beskadiget. Sørg for, at tilløbsslangen er in-
Maskinen tømmes ikke for
vand.
Afløbsslangen er ikke tilsluttet
Afløbsslangen er beskadiget. Sørg for, at afløbsslangen er in-
Overløbssikringen er tændt. Luk for vandhanen, og kontakt
Opvaskeprogrammet går ikke i
gang.
Stikket er ikke sat i kontakten. Sæt stikket i stikkontakten.
Sikringen på husets eltavle er
Senere start er indstillet. • Annullér Senere start.
eller kalket til.
pet.
korrekt.
Køkkenvaskens vandlås er tilstoppet.
korrekt.
Lågen er åben. Luk lågen til opvaskemaskinen.
beskadiget.
Rengør vandtilslutningen.
Rens filteret.
Kontroller, at tilslutningen er i
orden.
takt.
Rens vandlåsen.
Kontroller, at tilslutningen er i
orden.
takt.
servicecentret.
Udskift sikringen.
• Når nedtællingen er slut,
starter opvaskeprogrammet
automatisk.
Tænd for maskinen, når den er kontrolleret. Programmet fortsætter det sted, hvor det
blev afbrudt.
Kontakt det lokale servicecenter, hvis den samme fejl opstår igen.
Kontakt det lokale servicecenter, hvis displayet viser andre alarmkoder.
De nødvendige oplysninger til servicecenteret er angivet på maskinens typeskilt.
Nedskriv disse oplysninger:
– Model (MOD.) ........................................................
– Produktnummer (PNC) ..........................................
– Serienummer (S.N.) ..............................................
Page 22

Hvis noget går galt
22
Opvaske- og tørringsresultaterne er utilfredsstillende
Fejl Mulig årsag Mulig løsning
Opvasken er ikke ren. Opvaskeprogrammet passer ik-
Du lagde ikke gestandene kor-
Spulearmene kunne ikke dreje
Filtrene er snavsede eller mon-
Der er brugt for lidt eller intet
Der er kalkaflejringer på servicet.
Forkert hårdhedsgrad for blød-
Dækslet på saltbeholderen er
Der er striber, hvide pletter eller en blålig belægning på glas
og service.
Der er spor efter indtørrede
vanddråber på glas og service.
Det kan skyldes opvaskemidlet. Brug en anden type opvaske-
Opvasken er våd. Opvaskeprogrammet var uden
Opvasken er våd og mat. Beholderen til afspændings-
Multitab-funktionen er tændt
ke til opvaskens art og graden
af snavs.
rekt i kurvene, og vandet rørte
ikke ved alle overflader.
frit. Genstandene var lagt forkert i kurvene.
teret forkert.
opvaskemiddel.
Saltbeholderen er tom. Fyld saltbeholderen op med fil-
gøringsanlægget.
ikke lukket korrekt.
Der er brugt for meget afspæn-
dingsmiddel.
Der er brugt for lidt afspændingsmiddel.
en tørrefase eller med en nedsat tørrefase.
middel er tom.
(denne funktion slår automatisk beholderen til afspændingsmiddel fra).
Sørg for, det valgte opvaskeprogram passer til opvaskens
art og graden af snavs.
Læg gentandene korrekt i kurvene.
Kontroller, at en ukorrekt placering af genstandene ikke blokerer for spulearmene.
Sørg for, at filtrene er rene og
korrekt monteret.
Sørg for, der er tilstrækkeligt
med opvaskemiddel.
tersalt.
Justér blødgøringsanlægget
med det korrekte niveau.
Sørg for, at saltbeholderens
hætte er lukket korrekt.
Nedsæt mængden af afspæn-
dingsmiddel.
Øg mængden af afspændingsmiddel.
middel.
Lad lågen stå på klem i nogle
minutter for at opnå bedre tørring.
Fyld beholderen til afspændingsmiddel op.
Aktiver beholderen til afspændingsmiddel.
Aktivering af beholderen til afspændingsmiddel
1. Tænd for apparatet.
2. Sørg for, at apparatet står på indstillingsfunktionen.
3. Tryk på knap (4) og knap (5) på samme tid, og hold dem ned, indtil kontrollamperne
for knap (3), (4) og (5) blinker.
Page 23

Tekniske data
4. Giv slip på knap (4) og knap (5).
5. Tryk på knap (4).
• Kontrollamperne for knap (3) og (5) slukkes
• Kontrollampen for knap (4) fortsætter med at blinke
• Displayet viser indstillingen for beholderen til afspændingsmiddel.
Beholderen til afspændingsmiddel er slået fra.
Beholderen til afspændingsmiddel er slået til.
6. Tryk på knap (4) for at ændre indstillingen.
7. Sluk for apparatet for at bekræfte.
TEKNISKE DATA
Mål Bredde 596 mm
Højde 818 - 898 mm
Dybde 550 mm
Vandtilførslens tryk Minimum 0,5 bar (0,05 MPa)
Maksimum 8 bar (0,8 MPa)
Vandtilførsel
Kapacitet Antal kuverter 12
1) Forbind tilførselsslangen til en vandtilslutning/lukkeventil med et 3/4"-gevind.
1)
Typeskiltet på lågens indvendige kant på apparatet viser data for den elektriske forbindelse.
Koldt vand eller varmt vand Maksimalt 60 °C
23
Hvis det varme vand leveres af alternative energikilder (f.eks. solfangere, solceller eller vindenergi), bruges tilslutning til varmt vand for at spare på energien.
MILJØHENSYN
Symbolet på produktet eller på pakken angiver, at dette produkt ikke må behandles
som husholdningsaffald. Det skal i stedet overgives til en affaldsstation for behandling af
elektrisk og elektronisk udstyr. Ved at sørge for at dette produkt bliver bortskaffet på den
rette måde, hjælper du med til at forebygge eventuelle negative påvirkninger af miljøet
og af personers helbred, der ellers kunne forårsages af forkert bortskaffelse af dette
produkt. Kontakt det lokale kommunekontor, affaldsselskab eller den forretning, hvor
produktet er købt, for yderligere oplysninger om genanvendelse af dette produkt.
Genbrug materialer med symbolet
genbruge den.
. Anbring indpakningen i passende beholdere for at
Page 24

24
FOR PERFECT RESULTS
Thank you for choosing this AEG product. We have
created it to give you impeccable performance for many
years, with innovative technologies that help make life
simpler – features you might not find on ordinary
appliances. Please spend a few minutes reading to get
the very best from it.
ACCESSORIES AND CONSUMABLES
In the AEG webshop, you’ll find everything you need to
keep all your AEG appliances looking spotless and
working perfectly. Along with a wide range of
accessories designed and built to the high quality
standards you would expect, from specialist cookware
to cutlery baskets, from bottle holders to delicate
laundry bags…
Visit the webshop at:
www.aeg-electrolux.com/shop
Page 25

CONTENTS
Contents
26 Safety information
30 Product description
31 Control panel
33 Use of the appliance
33 Setting the water softener
35 Use of dishwasher salt
35 Use of detergent and rinse aid
36 Multitab function
37 Loading cutlery and dishes
37 Washing programmes
39 Select and start a washing
programme
41 Care and cleaning
42 What to do if…
45 Technical data
45 Environment concerns
25
The following symbols are used in this
user manual:
Important information concerning
your personal safety and information
on how to avoid damaging the
appliance.
General information and tips
Environmental information
Subject to change without notice
Page 26

Safety information
26
SAFETY INFORMATION
Before the installation and use, read this manual carefully:
• For your safety and the safety of your property.
• To help the environment.
• For the correct operation of the appliance.
Always keep these instructions with the appliance also if you move or give it to a different person.
The manufacturer is not responsible if an incorrect installation and use causes damage.
Children and vulnerable persons safety
• Do not let persons, children included, with reduced physical sensory, reduced mental
functions or lack of experience and knowledge to use the appliance. They must have
supervision or instruction for the operation of the appliance by a person who is responsible for their safety.
• Keep all packaging away from children. There is the risk of suffocation or injury.
• Keep all detergents in a safe area. Do not let the children touch the detergents.
• Keep children and pets away from the appliance when the door is open.
General safety
• Do not change the specifications of this appliance. There is the risk of injury and damage to the appliance.
• Obey the safety instructions from the detergent manufacturer to prevent burns to
eyes, mouth and throat.
• Do not drink the water from the appliance. Particles of detergent can stay in your appliance.
• Do not keep the appliance door open without supervision. This to prevent injury and
to fall on an open door.
• Do not sit or stand on the open door.
Use
• The appliance is only for domestic use. Do not use the appliance for other uses to prevent injury to persons and damage to property.
• Only use the appliance to clean accessories that are applicable for dishwashers.
• Do not put flammable products or items that are wet with flammable products in,
near or on the appliance. Risk of explosion or fire.
• Put the knives and all items with sharp points in the cutlery basket with their points
down. If not, put in a horizontal position in the upper basket or in the knife basket.
(Not all models have the knife basket).
• Use only specified products for dishwashers (detergent, salt, rinse aid).
• Types of salt that are not specified for dishwashers can cause damage to the water
softener.
• Fill the appliance with salt before you start a washing programme. Remaining salt in
the appliance can cause corrosion or make a hole in the bottom of the appliance.
Page 27

Safety information
• Do not fill the rinse aid dispenser with other products than the rinse aid, (dishwasher
cleaning agent, liquid detergent). This can cause damage to the appliance.
• Make sure that the spray arms can move freely before you start a washing programme.
• The appliance can release hot steam if you open the door while a washing programme
operates. There is a risk of skin burns.
• Do not remove the dishes from the appliance until the washing programme is completed.
Care and cleaning
• Before you clean the appliance, deactivate it and disconnect the mains plug from the
mains socket.
• Do not use flammable products or products that can cause corrosion.
• Do not use the appliance without the filters. Make sure that the installation of the
filters is correct. An incorrect installation causes unsatisfactory washing results and
damage to the appliance.
• Do not use spray water or steam to clean the appliance. Risk of electrical shock and
damage to the appliance.
Installation
• Make sure that the appliance is not damaged. Do not install or connect a damaged
appliance, contact the supplier.
• Remove all packaging before you install and use the appliance.
• Only a qualified person must do the electrical connection, the plumbing and the installation of the appliance. This to prevent the risks of structural damage or injury.
• Make sure that the mains plug is disconnected from the mains socket during installation.
• Do not drill into the sides of the appliance to prevent damage to hydraulic components and electrical components.
•
Important! Obey the instructions in the template supplied with the appliance:
– To install the appliance.
– To assemble the door panel.
– To connect to the water supply and drain.
• Make sure that the appliance is installed below and adjacent to safe structures.
27
Frost precautions
• Do not install the appliance where the temperature is less than 0 °C.
• The manufacturer is not responsible for frost damage.
Water connection
• Use new hoses to connect the appliance to the water supply. Do not use used hoses.
• Do not connect the appliance to new pipes or pipes not used for a long time. Let the
water flow for some minutes, then connect the inlet hose.
• Make sure not to squash or cause damage to the water hoses when you install the
appliance.
• Make sure that the water couplings are tight to prevent a water leakage.
• The first time you use the appliance, make sure that the hoses do not have water leaks.
Page 28

Safety information
28
• The water inlet hose has a safety valve and a double sheath with an inner mains cable.
There is pressure in the water inlet hose only when the water flows. If there is a leak in
the water inlet hose, the safety valve interrupts the flow of water.
– Be careful when you connect the water inlet hose:
– Do not put the water inlet hose or the safety valve in water.
– If the water inlet hose or the safety valve are damaged, immediately disconnect
the mains plug from the mains socket.
– Contact the service centre to replace the water inlet hose with safety valve.
WARNING!
Dangerous voltage.
Electrical connection
• The appliance must be earthed.
• Make sure that the electrical information on the rating plate agrees with the power
supply.
• Always use a correctly installed shockproof socket.
• Do not use multiple plugs and extension cables. There is a risk of fire.
• Do not replace or change the mains cable. Contact the service centre.
• Make sure not to squash or cause damage to the mains plug and cable behind the
appliance.
• Make sure that there is access to the mains plug after the installation.
• Do not pull the mains cable to disconnect the appliance. Always pull the mains plug.
Internal lamp
This appliance has an internal lamp that comes on when you open the door and goes off
when the door is closed.
WARNING!
Visible led radiation, do not look directly into the beam.
The LED of the lamp is CLASS 2 and agrees with IEC 60825-1: 1993 + A1:1997 + A2:2001.
Emission wave length: 450 nm
Maximum emitted power: 548 μW
Page 29

Safety information
To replace the internal lamp, contact the service centre.
Disconnect the mains plug from the mains socket before the replacement of the internal
lamp.
Service centre
• Only a qualified person can repair or work on the appliance. Contact the service centre.
• Use only original spare parts.
To discard the appliance
• To prevent the risk of injury or damage:
– Disconnect the mains plug from the mains socket.
– Cut off the mains cable and discard it.
– Remove the door catch. This prevents children or pets to be closed in the appliance.
There is a risk of suffocation.
– Discard the appliance at the local waste disposal centre.
WARNING!
The dishwasher detergents are dangerous and can cause corrosion !
• If an accident occurs with these detergents, contact immediately a physician.
• If the detergent gets into the mouth, contact immediately a physician.
• If the detergent gets into the eyes, contact immediately a physician and clean the eyes
with water.
• Keep dishwasher detergents in a safe area and out of children touch.
• Do not keep the appliance door open when there is detergent in the detergent dispenser.
• Fill the detergent dispenser only before you start a washing programme.
29
Page 30

Product description
30
PRODUCT DESCRIPTION
1
2
10
9
3
4
5
1 Upper basket
2 Water hardness dial
3 Salt container
4 Detergent dispenser
5 Rinse aid dispenser
6 Rating plate
7 Filters
8 Lower spray arm
9 Upper spray arm
10 Top spray arm
Visual signal
• When the washing programme starts, a red visual signal shows on the floor below the
appliance door. This red signal stays on until the washing programme is completed.
• When the washing programme is completed , a green visual signal shows on the floor
below the appliance door.
• When the appliance has a malfunction, a red visual signal flashes on the floor below
the appliance door.
If the appliance is installed in height, with a flush kitchen furniture door, the visual signal does not show.
8
7
6
Page 31

Control panel
CONTROL PANEL
The controls are on the top on the control panel. To operate with the controls, keep the
appliance door ajar.
31
1
2
4
3
6
5
7 8
9
1 On/off button
2 Display
3 Delay button
4 Programme button (down)
5 Programme button (up)
6 ÖKO PLUS button
7 Multitab button
8 RESET button
9 Indicators
Indicators
Salt indicator. It comes on when it is necessary to fill the salt container.
After you fill the container, the salt indicator can stay on for some hours. This
does not have an unwanted effect on the operation of the appliance.
Rinse aid indicator. It comes on when it is necessary to fill the rinse aid dis-
1)
penser.
End indicator. It comes on when the washing programme is completed.
1) When the salt container and/or the rinse aid dispenser are empty, the related indicators do not come on
while a washing programme operates.
On/off button
Press this button to activate or deactivate the appliance.
After ten minutes from the end of the washing programme, the AUTO OFF function automatically deactivates the appliance. This helps to decrease energy consumption.
1)
Display
The display shows:
• The electronic adjustment of the level of the water softener
• The activation and deactivation of the rinse aid dispenser (only with the multitab function on)
• The number of the washing programme
• The remaining time to the end of the washing programme
• The end of a washing programme (the display shows a zero)
• The time of the delay start
Page 32

Control panel
32
• The alarm codes
• The activation and deactivation of the acoustic signals.
Delay button
Press this button again and again to delay the start of the washing programme from 1 to
24 hours.
Programme buttons
Press one of these buttons again and again to set a washing programme. Each time you
press a button, the display shows a number that is related to a washing programme. Refer to 'Washing programmes'.
ÖKO PLUS button
This function decreases the temperature in the drying phase. The power consumption decreases by 25%.
The dishes can be wet at the end of the programme when you open the appliance door.
We recommend that you keep the door ajar and let the dishes dry.
Press this button to activate the function. The related indicator comes on.
Multitab button
Press this button to activate or deactivate the multitab function (refer to 'Multitab function').
RESET button
Press this button to cancel:
• A washing programme in operation
• The countdown of the delay start.
Setting mode
The appliance must be in setting mode for these operations:
• To set and start a washing programme.
• To set and start a delay start.
• To adjust electronically the level of the water softener.
• To activate or deactivate the rinse aid dispenser (only with the multitab function on.
• To deactivate or activate the acoustic signals.
Activate the appliance. The appliance is in setting mode when:
• The display shows two horizontal status bars.
Activate the appliance. The appliance is not in setting mode when:
• The display shows the time of the washing programme or of the delay start.
– It is necessary to cancel the programme or the delay start to go back to the setting
mode. Refer to 'Select and start a washing programme'.
Acoustic signals
You can hear the acoustic signals in these conditions:
• The washing programme is completed.
Page 33

Use of the appliance
• The level of the water softener is adjusted electronically.
• The appliance has a malfunction.
Factory setting: on.
Deactivating the acoustic signals
1. Activate the appliance.
2. Make sure that the appliance is in setting mode.
3. Press and hold button (4) and button (5) at the same time until the indicators of but-
tons (3), (4) and (5) flash.
4. Release button (4) and button (5).
5. Press button (5),
• The indicators of buttons (3) and (4) go off.
• The indicator of button (5) continues to flash.
• The display shows the setting of the acoustic signals.
The acoustic signals are on.
The acoustic signals are off.
6. Press button (5) to change the setting.
7. Deactivate the appliance to confirm.
To activate the acoustic signals again, do steps (1) through (7).
33
USE OF THE APPLIANCE
1. Be sure that the set level of the water softener agrees with the water hardness in
your area. If not, adjust the water softener.
2. Fill the salt container with dishwasher salt.
3. Fill the rinse aid dispenser with rinse aid.
4. Load cutlery and dishes into the appliance.
5. Set the correct washing programme for the type of load and soil.
6. Fill the detergent dispenser with the correct quantity of detergent.
7. Start the washing programme.
If you use the combi detergent tablets ('3 in 1', '4 in 1', '5 in 1'), use the multitab function
(refer to 'Multitab function').
SETTING THE WATER SOFTENER
The water softener removes minerals and salts from the water supply. These minerals and
salts can cause damage to the appliance.
Adjust the level of the water softener if this does not agree with the water hardness in
your area.
Contact your local water authority to know the water hardness in your area.
Page 34

Setting the water softener
34
Water hardness
German degrees
(°dH)
51 - 70 91 - 125 9,1 - 12,5 64 - 88
43 - 50 76 - 90 7,6 - 9,0 53 - 63
37 - 42 65 - 75 6,5 - 7,5 46 - 52
29 - 36 51 - 64 5,1 - 6,4 36 - 45
23 - 28 40 - 50 4,0 - 5,0 28 - 35
19 - 22 33 - 39 3,3 - 3,9 23 - 27
15 - 18 26 - 32 2,6 - 3,2 18 - 22 1 4
11 - 14 19 - 25 1,9 - 2,5 13 - 17 1 3
4 - 10 7 - 18 0,7 - 1,8 5 - 12 1 2
< 4 < 7 < 0,7 < 5
1) Factory position.
2) Do not use salt at this level.
French degrees
(TH°)
mmol/l Clarke de-
You must adjust the water softener manually and electronically.
Manual adjustment
Turn the water hardness dial to the position 1 or
2 (refer to the table).
grees
Water hardness ad-
justment
manually elec-
1)
2
1)
2
1)
2
1)
2
1)
2
1)
2
2)
1
troni-
cally
10
9
8
7
6
1)
5
2)
1
Electronic adjustment
1. Activate the appliance.
2. Make sure that the appliance is in setting mode.
3. Press and hold buttons (4) and (5) at the same time until the indicators of buttons
(3), (4) and (5) flash.
4. Release buttons (4) and (5).
5. Press button (3),
• The indicators of buttons (4) and (5) go off.
• The indicator of button (3) continues to flash.
• The acoustic signals sound.
Page 35

20
30
M
A
X
1
2
3
4
+
-
Use of dishwasher salt
• The display shows the setting of the water softener (example: and you hear
five acoustic signals = level 5).
6. Press button (3) again and again to change the setting.
7. Deactivate the appliance to confirm.
If the water softener is set electronically to the level 1, the salt indicator stays off.
USE OF DISHWASHER SALT
How to fill the salt container
1. Turn the cap counterclockwise and open
the salt container.
2. Fill the salt container with 1 litre of water (only for the first time you fill with
salt).
3. Use the funnel to fill the salt container
with salt.
4. Remove the salt around the opening of
the salt container.
5. Turn the cap clockwise to close the salt
container.
It is correct that water comes out from the salt container when you fill it with salt.
35
USE OF DETERGENT AND RINSE AID
1
2
7
Use of detergent
To help the environment, do not use more than the correct quantity of detergent.
Obey the instructions on the detergent packaging.
3
4
6
5
Page 36

Multitab function
36
How to fill the detergent dispenser:
1.
Press the release button
2.
Put the detergent in the dispenser
3. If the washing programme has a prewash phase, put a small quantity of detergent
on the inner part of the appliance door.
4.
If you use the detergent tablets, put the tablet in the detergent dispenser
5. Close the detergent dispenser. Press the lid until it locks into position.
Use long washing programmes when you use the detergent tablets. These cannot fully
dissolve with short washing programmes and can decrease the washing results.
2
to open the lid 7 of the detergent dispenser.
1
.
Use of rinse aid
Rinse aid makes it possible to dry the dishes without streaks and stains.
The rinse aid dispenser automatically adds rinse aid during the last rinsing phase.
Do these steps to fill the rinse aid dispenser:
1.
Press the release button
2.
Fill the rinse aid dispenser
3. Remove the spilled rinse aid with an absorbent cloth to prevent too much foam during the washing programme.
4. Close the rinse aid dispenser. Press the lid until it locks into position.
6
to open the lid 5 of the rinse aid dispenser.
3
with rinse aid. The mark 'max' shows the maximum level.
Adjust the rinse aid dosage
Factory set: position 3.
You can set the rinse aid dosage between position 1 (lowest dosage) and position 4 (highest dosage).
Turn the rinse aid selector
4
to increase or decrease the dosage.
1
.
MULTITAB FUNCTION
The multitab function is for combi detergent tablets.
These tablets contain agents as detergent, rinse aid and dishwasher salt. Some types of
tablets can contain other agents.
Be sure that these tablets are applicable for the water hardness in your area (refer to the
instructions on the packaging of the products).
The multitab function deactivates the flow of rinse aid and salt.
The multitab function deactivates the indicators of salt and rinse aid.
The programme duration can increase if you use the multitab function.
Activate or deactivate the multitab function before the start of a washing programme.
You cannot activate or deactivate the function when a washing programme operates.
To activate the multitab function
• Press the multitab button, the multitab indicator comes on. The function is activated.
– When you activate the multitab function, it stays on until you deactivate it.
Page 37

Loading cutlery and dishes
To deactivate the multitab function and use separately detergent, salt and rinse aid
1. Press the multitab button, the multitab indicator goes off. The function is deactivated.
2. Fill the salt container and the rinse aid dispenser.
3. Adjust the water hardness to the highest level.
4. Start a washing programme without dishes.
5. When the washing programme is completed, adjust the water softener to the water
hardness in your area.
6. Adjust the quantity of rinse aid.
LOADING CUTLERY AND DISHES
Refer to the leaflet 'Examples of ProClean loads'.
Hints and tips
• Do not put in the appliance items that can absorb water (sponges, household cloths).
• Remove the remaining food from the items.
• Make soft the remaining burned food on the items.
• Put hollow items (cups, glasses and pans) with the opening down.
• Make sure that water does not collect in containers or in bowls.
• Make sure that cutlery and dishes do not bond together.
• Make sure that the glasses do not touch other glasses.
• Put small items in the cutlery basket.
• Mix the spoons with other cutlery to prevent them to bond together.
• When you put the items in the baskets, make sure that the water can touch all surfaces.
• Put light items in the upper basket. Make sure that the items do not move.
• Water droplets can collect on plastic items and non-stick pans.
37
WASHING PROGRAMMES
Programme Type of soil Type of load Programme de-
1
1)
2
All Crockery, cutlery,
Heavy soil Crockery, cutlery,
pots and pans
pots and pans
scription
Prewash
Wash 45 °C or 70 °C
Rinses
Dry
Prewash
Wash 70 °C
Rinses
Dry
ÖKO PLUS func-
tion
Yes, with effect
Yes, with effect
Page 38

Washing programmes
38
Programme Type of soil Type of load Programme de-
scription
3
Normal soil Crockery and cut-
lery
Prewash
Wash 50 °C
ÖKO PLUS func-
tion
Yes, without effect
Rinses
2)
4
Fresh soil Crockery and cut-
lery
3)
5
Normal soil Crockery and cut-
lery
Dry
Wash 60 °C
Rinse
Prewash
Wash 50 °C
Yes, without effect
Yes, with effect
Rinses
4)
6
Light soil Crockery and cut-
lery
7
Normal or light
soil
Delicate crockery
and glassware
Dry
Wash 55 °C
Rinses
Wash 45 °C
Rinses
Yes, without effect
Yes, with effect
Dry
8
Use this programme to quickly rinse
the dishes. This prevents the remain-
Rinse Yes, without ef-
fect
ing food to bond on the dishes and
bad odours to come out from the appliance.
Do not use detergent with this programme.
1) The appliance senses the type of soil and the quantity of items in the baskets. It automatically adjusts the
temperature and quantity of the water, the energy consumption and the programme time.
2) This is the most silent washing programme. The pump works at a very low speed to decrease the level of
noise. Because of the low speed, the programme time is long.
3) With this programme you can wash a load with fresh soil. It gives good washing results in a short time.
4) This is the standard programme for test institutes. With this programme you have the most efficient use of
water and energy consumption for crockery and cutlery with normal soil. Refer to the supplied leaflet for
test information.
Consumption values
Programme Programme time (mi-
nute)
1
90 - 160 0,9 - 1,7 8 - 15
Energy (kWh) Water (litre)
2
140 - 160 1,5 - 1,6 13 - 14
Page 39

Select and start a washing programme
39
Programme Programme time (mi-
3
4
5
6
7
8
nute)
200 - 220 1,1 - 1,2 9 - 11
30 0,9 9
160 - 170 0,9 - 1,0 9 - 11
50 - 60 1,0 - 1,2 10 - 11
65 - 75 0,8 - 0,9 11 - 12
14 0,1 4
Energy (kWh) Water (litre)
The water pressure and temperature, the variations of the mains supply and the quantity
of dishes can change the consumption values.
SELECT AND START A WASHING PROGRAMME
Starting the washing programme without delay start
1. Activate the appliance.
2. Make sure that the appliance is in setting mode.
3. Set the washing programme.
• The number related to the washing programme flashes in the display.
4. If necessary, set the ÖKO PLUS function.
5. Close the appliance door, the washing programme starts automatically.
Starting the washing programme with delay start
1. Activate the appliance.
2. Make sure that the appliance is in setting mode.
3. Set the washing programme and, if necessary, set the ÖKO PLUS function.
4. Press the delay touchpad again and again until the display shows the time of the
delay start.
• The time of the delay start flashes in the display.
• The delay indicator is on.
Page 40

Select and start a washing programme
40
5. Close the appliance door, the countdown starts automatically.
When the countdown is completed, the washing programme starts automatically.
The opening of the appliance door stops the countdown. When you close the door, the
countdown continues from the point of interruption.
Cancelling the delay start
If the appliance door is open, and the countdown has not started
1. Press the delay button again and again until the display shows the number of the
washing programme.
• The number flashes in the display.
2. Close the appliance door, the washing programme starts automatically.
If the appliance door is closed, and the countdown operates
1. Open the appliance door.
2. Press the delay button again and again until the display shows the number of the
washing programme.
• The number flashes for some seconds and then the time of the washing programme shows in the display.
3. Close the appliance door, the washing programme starts automatically.
Interruption of a washing programme
• Open the appliance door.
– The washing programme stops.
• Close the appliance door.
– The washing programme continues from the point of interruption.
Cancelling the washing programme
If the washing programme has not started, you can change the selection.
To change the selection while the washing programme operates, it is necessary to cancel
the programme.
• Press the RESET button until the display shows two horizontal status bars.
Make sure that there is detergent in the detergent dispenser before you start a new washing programme.
End of the washing programme
When the washing programme is completed, an intermittent acoustic signal sounds.
1. Open the appliance door.
• The end indicator is on
• The display shows a zero.
2. Deactivate the appliance.
3. For better drying results, keep the appliance door ajar for some minutes.
Page 41

Care and cleaning
Remove the items from the baskets
• Let the dishes become cold before you remove them from the appliance. Hot dishes
can be easily damaged.
• First remove the items from the lower basket, then from the upper basket.
• There can be water on the sides and on the door of the appliance. Stainless steel becomes cool more quickly than the dishes.
CARE AND CLEANING
To remove and clean the filters
Dirty filters decrease the washing results.
Although the maintenance is very low with these filters, make a check at intervals and if
necessary, clean them.
1. Turn the filter (A) counterclockwise and
remove it out from filter (B).
B
A
41
2. Filter (A) has two parts. To disassemble
the filter, pull them apart.
3. Fully clean the parts with water.
4. Put the two parts of the filter (A) togeth-
er and push. Make sure that they assemble correctly in each other.
5. Remove the filter (B).
6. Fully clean the filter (B) with water.
Page 42

What to do if…
42
7. Put the filter (B) to its initial position.
Make sure that it assembles correctly in
the two guides (C).
8. Put the filter (A) into position in filter
(B). Turn the filter (A) clockwise until it
locks.
To clean the spray arms
Do not remove the spray arms.
If the holes in the spray arms become clogged, remove remaining parts of soil with a
thin pointed object.
To clean the external surfaces
Clean the external surfaces of the appliance and control panel with a moist soft cloth.
Only use neutral detergents.
Do not use abrasive products, abrasive cleaning pads or solvents (acetone).
WHAT TO DO IF…
C
The start of the appliance does not occur or it stops during operation.
First try to find a solution to the problem (refer to the table). If not, contact the service
centre.
With some malfunctions, the display shows an alarm code:
- The appliance does not fill with water
•
- The appliance does not drain the water
•
- The anti-flood device is on.
•
WARNING!
Deactivate the appliance before you do the checks.
Malfunction Possible cause Possible solution
The appliance does not fill
with water.
The water pressure is too low. Contact your local water au-
The water tap is closed. Open the water tap.
The filter in the water inlet
The connection of the water in-
The water tap is blocked or
there is limescale on it.
hose is blocked.
let hose is not correct.
Clean the water tap.
thority.
Clean the filter.
Make sure that the connection
is correct.
Page 43

What to do if…
Malfunction Possible cause Possible solution
The water inlet hose is dam-
The appliance does not drain
the water.
The connection of the water
The water drain hose is dam-
The anti-flood device is on. Close the water tap and con-
The start of the washing programme does not occur.
The mains plug is not connec-
The fuse in the fuse box is dam-
The delay start is set. • Cancel the delay start.
aged.
There is a blockage in the sink
spigot.
drain hose is not correct.
aged.
The appliance door is open. Close the appliance door.
ted in the mains socket.
aged.
Make sure that the water inlet
hose has no damages.
Clean the sink spigot.
Make sure that the connection
is correct.
Make sure that the water
drain hose has no damages.
tact the service centre.
Connect the mains plug.
Replace the fuse.
• When the countdown is
completed, the washing programme starts automatically.
43
After the check, activate the appliance. The programme continues from the point of interruption.
If the malfunction occurs again, contact the service centre.
If the display shows other alarm codes, contact the service centre.
The necessary information for the service centre is on the rating plate.
Record this information:
– Model (MOD.) ........................................................
– Product number (PNC) ..........................................
– Serial number (S.N.) ..............................................
The washing results and drying results are not satisfactory
Problem Possible cause Possible solution
The dishes are not clean. The washing programme was
not applicable for the type of
load and soil.
You did not put the items cor-
rectly in the baskets, water did
not touch all surfaces.
Make sure that the washing
programme is applicable for
the type of load and soil.
Put the items correctly in the
baskets.
Page 44

What to do if…
44
Problem Possible cause Possible solution
The spray arms could not turn
The filters are dirty or not as-
The quantity of detergent was
Limescale particles on the
dishes.
Incorrect level of the water
The salt container cap is not
There are streaks, whitish
stains, or a bluish layer on
glasses and dishes.
Dry water drop stains on
glasses and dishes.
The detergent can be the cause. Use a different brand of deter-
The dishes are wet. The washing programme was
The dishes are wet and matt. The rinse aid dispenser is emp-
The multitab function is on
freely. Incorrect position of
the items in the baskets.
sembled and installed correctly.
not sufficient or missing.
The salt container is empty. Fill the salt container with dish-
softener adjustment.
closed correctly.
The rinse aid quantity is too
high.
The rinse aid quantity is too
low.
without a drying phase or
with a decreased drying phase.
ty.
(this function automatically
deactivates the rinse aid dispenser).
Make sure that an incorrect position of the items do not
cause the blockage of the
spray arms.
Make sure that the filters are
clean and correctly assembled
and installed.
Make sure that the quantity of
detergent is sufficient.
washer salt.
Adjust the water softener with
the correct level.
Make sure that the salt con-
tainer cap is closed correctly.
Decrease the rinse aid quantity.
Increase the rinse aid quantity.
gent.
For better drying results, keep
the door ajar for some minutes.
Fill the rinse aid dispenser with
rinse aid.
Activate the rinse aid dispenser.
Activating the rinse aid dispenser
1. Activate the appliance.
2. Make sure that the appliance is in setting mode.
3. Press and hold buttons (4) and (5) at the same time until the indicators of buttons
(3), (4) and (5) flash.
4. Release buttons (4) and (5).
5. Press button (4).
• The indicators of buttons (3) and (5) go off
• The indicator of button (4) continues to flash
• The display shows the setting of the rinse aid dispenser.
Page 45

Technical data
Rinse aid dispenser is off.
Rinse aid dispenser is on.
6. Press button (4) to change the setting.
7. Deactivate the appliance to confirm.
TECHNICAL DATA
Dimensions Width 596 mm
Height 818 - 898 mm
Depth 550 mm
Water supply pressure Minimum 0,5 bar (0,05 MPa)
Maximum 8 bar (0,8 MPa)
Water supply
Capacity Place settings 12
1) Connect the water inlet hose to a water tap with a 3/4'' thread.
1)
The rating plate on the inner edge of the appliance door shows the electrical connection
data.
If the hot water comes from alternative sources of energy, (e.g. solar panels, photovoltaic
panels and aeolian), use a hot water supply to decrease energy consumption.
Cold water or hot water maximum 60 °C
45
ENVIRONMENT CONCERNS
The symbol on the product or on its packaging indicates that this product may not
be treated as household waste. Instead it should be taken to the appropriate collection
point for the recycling of electrical and electronic equipment. By ensuring this product is
disposed of correctly, you will help prevent potential negative consequences for the
environment and human health, which could otherwise be caused by inappropriate
waste handling of this product. For more detailed information about recycling of this
product, please contact your local council, your household waste disposal service or the
shop where you purchased the product.
Recycle the materials with the symbol
recycle it.
. Put the packaging in applicable containers to
Page 46

46
Z MYŚLĄ O PERFEKCYJNYCH REZULTATACH
Dziękujemy za wybór tego produktu AEG.
Zaprojektowaliśmy go z myślą o wieloletniej bezawaryjnej
pracy i wyposażyliśmy w innowacyjne technologie, które
ułatwiają życie — nie wszystkie te funkcje można znaleźć
w zwykłych urządzeniach. Prosimy o poświęcenie kilku
minut na lekturę w celu zapewnienia najlepszego
wykorzystania urządzenia.
AKCESORIA I MATERIAŁY EKSPLOATACYJNE
W sklepie internetowym AEG można znaleźć wszystko co
niezbędne do utrzymania urządzeń AEG w doskonałym
stanie technicznym i wizualnym. Wśród szerokiej gamy
akcesoriów, zaprojektowanych i wyprodukowanych
zgodnie z wysokimi standardami jakości, oferujemy
specjalistyczne naczynia kuchenne, kosze na sztućce,
półki na butelki oraz torby do delikatnego prania...
Odwiedź sklep internetowy pod adresem
www.aeg-electrolux.com/shop
Page 47

SPIS TREŚCI
Spis treści
48 Informacje dotyczące
bezpieczeństwa
52 Opis urządzenia
53 Panel sterowania
55 Eksploatacja urządzenia
56 Ustawianie zmiękczacza wody
57 Wsypywanie soli do zmywarki
58 Używanie detergentu i płynu
nabłyszczającego
59 Uniwersalna tabletka do zmywarki
60 Wkładanie sztućców i naczyń
60 Programy zmywania
62 Wybór i uruchamianie programu
zmywania
64 Konserwacja i czyszczenie
65 Co zrobić, gdy…
68 Dane techniczne
68 Ochrona środowiska
47
W niniejszej instrukcji użyte zostały
następujące symbole:
Ważne informacje dotyczące
bezpieczeństwa użytkownika oraz
prawidłowej eksploatacji urządzenia.
Informacje i wskazówki ogólne
Informacje dot. ochrony środowiska
Producent zastrzega sobie możliwość
wprowadzenia zmian bez
wcześniejszego powiadomienia
Page 48

48
Informacje dotyczące bezpieczeństwa
INFORMACJE DOTYCZĄCE BEZPIECZEŃSTWA
Przed instalacją i eksploatacją urządzenia należy uważnie przeczytać tę instrukcję obsługi:
• Ze względu na własne bezpieczeństwo oraz bezpieczeństwo mienia.
• Mając na uwadze ochronę środowiska.
• Aby zapewnić prawidłowe działanie urządzenia.
Instrukcję należy przechowywać wraz z urządzeniem, również w przypadku przeprowadzki
lub odstąpienia urządzenia innemu użytkownikowi.
Producent nie ponosi odpowiedzialności za uszkodzenia spowodowane nieprawidłową insta‐
lacją i eksploatacją.
Bezpieczeństwo dzieci i osób o ograniczonych zdolnościach ruchowych,
sensorycznych lub umysłowych
• Urządzenia nie powinny używać osoby (w tym dzieci) o ograniczonych zdolnościach ru‐
chowych, sensorycznych lub umysłowych, a także nieposiadające doświadczenia i wie‐
dzy niezbędnej do jego obsługi. Osoby te mogą obsługiwać urządzenie wyłącznie pod nad‐
zorem lub po odpowiednim poinstruowaniu przez osobę odpowiedzialną za ich bezpie‐
czeństwo.
• Wszystkie opakowania należy przechowywać poza zasięgiem dzieci. Istnieje ryzyko udu‐
szenia lub odniesienia obrażeń.
• Przechowywać detergenty w bezpiecznym miejscu. Nie dopuszczać do kontaktu dzieci z
detergentami.
• Dzieci i zwierzęta domowe nie powinny znajdować się w pobliżu urządzenia, gdy jego
drzwi są otwarte.
Ogólne zasady bezpieczeństwa
• Nie zmieniać parametrów technicznych urządzenia. Istnieje ryzyko odniesienia obrażeń i
uszkodzenia urządzenia.
• Aby uniknąć poparzenia oczu, ust i gardła, należy przestrzegać instrukcji bezpieczeństwa
dostarczonych przez producenta detergentu.
• Nie pić wody z urządzenia. W urządzeniu mogą być obecne cząsteczki detergentów.
• Nie pozostawiać drzwi urządzenia otwartych bez nadzoru. Pozwoli to uniknąć potknięcia
się o otwarte drzwi i potencjalnych obrażeń.
• Nie wolno siadać ani stawać na otwartych drzwiach urządzenia.
Użytkowanie
• Urządzenie jest przeznaczone wyłącznie do użytku w gospodarstwie domowym. Aby unik‐
nąć obrażeń ciała i szkód materialnych, nie należy używać urządzenia do innych celów.
• Urządzenie służy wyłącznie do zmywania naczyń i sprzętów domowych nadających się
do mycia w zmywarce.
• Nie umieszczać łatwopalnych produktów lub przedmiotów nasączonych łatwopalnymi pro‐
duktami w urządzeniu, na nim lub w jego pobliżu. Występuje ryzyko wybuchu lub pożaru.
Page 49

Informacje dotyczące bezpieczeństwa
• Noże i wszystkie przedmioty z ostrymi końcówkami umieszczać w koszu na sztućce, os‐
trym końcem skierowanym w dół. Można je również układać w pozycji poziomej w gór‐
nym koszu lub koszyku na noże. (nie wszystkie modele są wyposażone w kosz na noże).
• Używać wyłącznie produktów przeznaczonych do zmywarek (detergentu, soli oraz płynu
nabłyszczającego).
• Sól, która nie jest przeznaczona do zmywarek może spowodować uszkodzenie zmiękcza‐
cza wody.
• Sól w urządzeniu należy uzupełniać bezpośrednio przed uruchomieniem programu zmy‐
wania. Resztki soli pozostające w urządzeniu mogą spowodować korozję lub perforację
dna urządzenia.
• Nie należy wlewać do dozownika płynu nabłyszczającego żadnych innych substancji (środ‐
ków do czyszczenia zmywarek, detergentów w płynie). Może to spowodować uszkodze‐
nie urządzenia.
• Przed uruchomieniem programu zmywania upewnić się, że ramiona spryskujące mogą
się swobodnie obracać.
• W przypadku otwarcia drzwi podczas cyklu zmywania może dojść do uwolnienia gorącej
pary. Istnieje ryzyko poparzenia ciała.
• Nie wyjmować naczyń z urządzenia przed zakończeniem programu zmywania.
Konserwacja i czyszczenie
• Przed przystąpieniem do czyszczenia urządzenia należy je wyłączyć i wyjąć wtyczkę prze‐
wodu zasilającego z gniazdka.
• Nie stosować łatwopalnych produktów lub produktów powodujących korozję.
• Nie używać urządzenia bez filtrów. Należy upewnić się, że filtry są prawidłowo zainstalo‐
wane. Nieprawidłowa instalacja filtrów spowoduje niezadowalające rezultaty mycia oraz
może spowodować uszkodzenie urządzenia.
• Do czyszczenia urządzenia nie wolno używać wody pod ciśnieniem ani pary wodnej. Ist‐
nieje zagrożenie porażenia prądem lub uszkodzenia urządzenia.
49
Instalacja
• Upewnić się, czy urządzenie nie jest uszkodzone. Nie instalować ani nie podłączać uszko‐
dzonego urządzenia; skontaktować się z dostawcą.
• Przed zainstalowaniem i rozpoczęciem użytkowania urządzenia należy je całkowicie roz‐
pakować.
• Podłączenie do sieci elektrycznej, instalacji wodnej oraz instalacja urządzenia muszą być
wykonane przez wykwalifikowaną osobę. Pozwoli to uniknąć ryzyka istotnych uszkodzeń
lub obrażeń ciała.
• Upewnić się, że podczas instalacji wtyczka przewodu zasilającego jest wyjęta z gniazdka.
• Nie wolno nawiercać ścian bocznych urządzenia, ponieważ może dojść do uszkodzenia
części hydraulicznych lub elektrycznych.
• Ważne! Należy przestrzegać instrukcji podanych na szablonie dostarczonym wraz z urzą‐
dzeniem:
– Aby zainstalować urządzenie.
– Aby zamontować panel drzwiowy.
Page 50

50
Informacje dotyczące bezpieczeństwa
– Aby podłączyć doprowadzenie i spust wody.
• Należy zadbać o zainstalowanie urządzenia w meblach spełniających odpowiednie wymo‐
gi bezpieczeństwa.
Środki ostrożności w przypadku mrozu
• Nie instalować urządzenia w miejscach, w których temperatura jest niższa niż 0°C.
• Producent nie ponosi odpowiedzialności za uszkodzenia spowodowane przez mróz.
Podłączenie do sieci wodociągowej
• W celu podłączenia doprowadzenia wody należy użyć nowych węży. Nie stosować uży‐
wanych węży.
• Nie podłączać urządzenia do nowych rur lub rur, które nie były używane przez długi czas.
Odkręcić wodę na kilka minut, a następnie podłączyć wąż dopływowy.
• Podczas instalacji urządzenia należy zwrócić uwagę, aby nie przygnieść ani nie uszko‐
dzić węży wodnych.
• Aby zapobiec wyciekom wody, po zainstalowaniu należy sprawdzić szczelność połączeń
hydraulicznych.
• Podczas pierwszego uruchomienia urządzenia należy sprawdzić, czy węże nie przeciekają.
• Wąż dopływowy jest wyposażony w zawór bezpieczeństwa i podwójne ścianki z wewnętrz‐
nym przewodem zasilającym. Ciśnienie w wężu dopływowym jest obecne tylko podczas
przepływu wody. W razie wycieku z węża dopływowego zawór bezpieczeństwa zatrzymu‐
je przepływ.
– Należy zachować ostrożność podczas podłączania węża dopływowego:
– Nie wkładać węża dopływowego ani zaworu bezpieczeństwa do wody.
– W razie uszkodzenia węża dopływowego lub zaworu bezpieczeństwa, natychmiast
wyjąć wtyczkę z gniazdka.
– Wąż dopływowy z zaworem bezpieczeństwa może być wymieniany wyłącznie przez
autoryzowany serwis.
OSTRZEŻENIE!
Niebezpieczne napięcie.
Podłączenie do sieci elektrycznej
• Urządzenie musi być uziemione.
Page 51

Informacje dotyczące bezpieczeństwa
• Należy upewnić się, że informacje o podłączeniu elektrycznym podane na tabliczce zna‐
mionowej są zgodne z parametrami instalacji zasilającej.
• Należy zawsze używać prawidłowo zamontowanych gniazd sieciowych z uziemieniem.
• Nie używać rozdzielaczy ani przedłużaczy. Istnieje ryzyko pożaru.
• Nie zmieniać ani nie wymieniać samodzielnie przewodu zasilającego. Skontaktować się z
punktem serwisowym.
• Należy zwrócić uwagę, aby nie przygnieść ani nie uszkodzić wtyczki oraz przewodu zasi‐
lającego za urządzeniem.
• Należy zadbać o to, aby po zakończeniu instalacji urządzenia wtyczka przewodu zasilają‐
cego była łatwo dostępna.
• Przy odłączaniu urządzenia nigdy nie ciągnąć za przewód zasilający. Należy zawsze ciąg‐
nąć za wtyczkę sieciową.
Oświetlenie wewnętrzne
Urządzenie posiada oświetlenie wewnętrzne, które włącza się w momencie otwarcia drzwi‐
czek i wyłącza po ich zamknięciu.
OSTRZEŻENIE!
Widoczne promieniowanie LED – nie wpatrywać się bezpośrednio w wiązkę światła.
Dioda świecąca to urządzenie KLASY 2 i jest zgodna z normą IEC 60825-1: 1993 +
A1:1997 + A2:2001.
Długość emitowanej fali: 450 nm
Maksymalna moc emisji: 548 µW
Aby wymienić oświetlenie wewnętrzne, należy skontaktować się z autoryzowanym serwisem.
Przed wymianą oświetlenia wewnętrznego odłączyć wtyczkę przewodu zasilającego z gniazd‐
ka.
51
Autoryzowany serwis
• Naprawy urządzenia mogą wykonywać tylko wykwalifikowane osoby. Skontaktować się z
punktem serwisowym.
• Używać wyłącznie oryginalnych części zamiennych.
Utylizacja urządzenia
• Aby uniknąć ryzyka obrażeń lub uszkodzeń:
– Wyjąć wtyczkę z gniazdka.
– Odciąć przewód zasilający i wyrzucić.
– Wymontować zatrzask zamka drzwi. Zapobiega to ryzyku zamknięcia się dzieci lub
zwierząt domowych we wnętrzu urządzenia. Istnieje ryzyko uduszenia.
– Oddać urządzenie do złomowania w lokalnym punkcie utylizacji odpadów.
Page 52

52
Opis urządzenia
OSTRZEŻENIE!
Detergenty stosowane w zmywarce są niebezpieczne i mogą powodować korozję!
• Jeśli dojdzie do wypadku związanego z detergentami należy natychmiast skontaktować
się z lekarzem.
• W przypadku dostania się detergentu do ust, należy natychmiast skontaktować się z leka‐
rzem.
• W przypadku dostania się detergentu do oczu, należy natychmiast skontaktować się z
lekarzem i przemyć oczy wodą.
• Detergenty do zmywarki należy przechowywać w bezpiecznym miejscu poza zasięgiem
dzieci.
• Nie pozostawiać otwartych drzwi urządzenia, gdy w dozowniku znajduje się detergent.
• Napełniać dozownik detergentu bezpośrednio przed uruchomieniem programu zmywania.
OPIS URZĄDZENIA
1
10
9
2
3
4
5
1 Kosz górny
2 Regulacja ustawienia twardości wody
3 Pojemnik na sól
4 Dozownik detergentu
5 Dozownik płynu nabłyszczającego
6 Tabliczka znamionowa
7 Filtry
8 Dolne ramię spryskujące
9 Górne ramię spryskujące
10 Sufitowe ramię spryskujące
8
7
6
Page 53

Panel sterowania
Wskaźnik wizualny
• Po rozpoczęciu programu zmywania na podłodze pod drzwiami urządzenia pojawia się
czerwony wskaźnik wizualny. Wskaźnik ten pozostaje widoczny do zakończenia progra‐
mu zmywania.
• Po zakończeniu programu zmywania na podłodze pod drzwiami urządzenia pojawia się
zielony wskaźnik wizualny.
• W razie wystąpienia usterki urządzenia na podłodze pod drzwiami urządzenia miga czer‐
wony wskaźnik wizualny.
Jeśli urządzenie jest zainstalowane w wysokiej zabudowie, z cokołem wyrównanym na lico
z frontami meblowymi, wskaźnik wizualny nie jest widoczny.
PANEL STEROWANIA
Elementy sterowania znajdują się w górnej części, na panelu sterowania. W celu obsługi
elementów sterowania należy uchylić drzwi urządzenia.
53
1
2
4
3
6
5
7 8
9
1 Przycisk Wł./Wył.
2 Wyświetlacz
3 Przycisk opóźnienia rozpoczęcia programu
4 Przycisk wyboru programów (w dół)
5 Przycisk wyboru programów (w górę)
6 Przycisk funkcji ÖKO PLUS
7 Przycisk funkcji Multitab
8 Przycisk RESET
9 Wskaźniki
Wskaźniki
Wskaźnik soli. Włącza się, gdy należy napełnić zbiornik soli.
Po napełnieniu zbiornika wskaźnik soli może nadal być włączony przez kilka go‐
dzin. Nie ma to negatywnego wpływu na działanie urządzenia.
Wskaźnik płynu nabłyszczającego. Włącza się, gdy należy uzupełnić płyn nabły‐
szczający.
Wskaźnik zakończenia programu. Włącza się, gdy skończy się program zmywania.
1) Gdy zbiornik soli oraz/lub dozownik płynu nabłyszczającego są puste, ich wskaźniki nie włączają się podczas
programu zmywania.
1)
Przycisk Wł./Wył.
Nacisnąć ten przycisk, aby włączyć lub wyłączyć urządzenie.
1)
Page 54

54
Panel sterowania
Po upływie dziesięciu minut od momentu zakończenia programu zmywania funkcja AUTO
OFF powoduje automatyczne wyłączenie urządzenia. Pomaga to zmniejszyć zużycie energii.
Wyświetlacz
Na wyświetlaczu widoczne są:
• Ustawienie elektronicznej regulacji poziomu zmiękczania wody.
• Włączenie i wyłączenie dozownika płynu nabłyszczającego (tylko przy włączonej funkcji
Multitab).
• Numer programu zmywania.
• Czas pozostały do zakończenia programu zmywania.
• Zakończenie programu zmywania (na wyświetlaczu pojawi się zero).
• Czas opóźnienia rozpoczęcia programu.
• Kody alarmowe.
• Włączenie lub wyłączenie sygnałów dźwiękowych.
Przycisk opóźnienia rozpoczęcia programu
Naciskać ten przycisk, aby ustawić opóźnienie rozpoczęcia programu zmywania w zakresie
od 1 do 24 godzin.
Przyciski wyboru programów
Naciskać jeden z tych przycisków, aby ustawić program zmywania. Po każdym naciśnięciu
jednego z przycisków na wyświetlaczu pojawia się numer danego programu zmywania.
Patrz „Programy zmywania”.
Przycisk funkcji ÖKO PLUS
Funkcja ta zmniejsza temperaturę w fazie suszenia. Zużycie energii spada o 25%.
Po zakończeniu programu i po otwarciu drzwi urządzenia naczynia mogą być mokre. Zaleca
się pozostawienie uchylonych drzwi urządzenia do czasu wyschnięcia naczyń.
Nacisnąć ten przycisk, aby włączyć opisywaną funkcję. Włączy się odpowiedni wskaźnik.
Przycisk Multitab
Nacisnąć ten przycisk, aby włączyć lub wyłączyć funkcję Multitab (patrz „Funkcja Multitab”).
Przycisk RESET
Nacisnąć ten przycisk, aby anulować:
• Trwający program zmywania.
• Odliczanie czasu opóźnienia rozpoczęcia programu.
Tryb ustawiania
Tryb ustawiania jest wymagany, aby wykonać następujące czynności:
• Ustawić i uruchomić program zmywania.
• Ustawić i włączyć opóźnienie rozpoczęcia programu.
• Dokonać elektronicznej regulacji poziomu zmiękczania wody.
• Włączyć lub wyłączyć dozownik płynu nabłyszczającego (tylko przy włączonej funkcji Mul‐
titab).
Page 55

Eksploatacja urządzenia
• Wyłączyć lub włączyć sygnały dźwiękowe.
Włączyć urządzenie. Urządzenie znajduje się w trybie ustawiania, gdy:
• Na wyświetlaczu widoczne są dwa poziome paski stanu.
Włączyć urządzenie. Urządzenie nie znajduje się w trybie ustawiania, gdy:
• Wyświetlacz pokazuje czas trwania programu zmywania lub opóźnienia rozpoczęcia pro‐
gramu.
– Aby powrócić do trybu ustawiania, należy anulować program lub opóźnienie rozpoczę‐
cia programu. Patrz „Wybór i uruchamianie programu zmywania”.
Sygnały dźwiękowe
Sygnały dźwiękowe są słyszalne w następujących sytuacjach:
• Zakończenie programu zmywania.
• Elektroniczna regulacja poziomu zmiękczania wody.
• Nieprawidłowe działanie urządzenia.
Ustawienie fabryczne: wł.
Wyłączanie sygnałów dźwiękowych:
1. Włączyć urządzenie.
2. Upewnić się, że urządzenie jest w trybie ustawiania.
3. Jednocześnie wcisnąć i przytrzymać przyciski (4) i (5) aż zaczną migać wskaźniki przy‐
cisków (3), (4) i (5).
4. Zwolnić przyciski (4) i (5).
5. Nacisnąć przycisk (5),
• Wskaźniki przycisków (3) i (4) wyłączą się.
• Wskaźnik przycisku (5) nadal miga.
• Na wyświetlaczu widoczne jest ustawienie sygnałów dźwiękowych.
Sygnały dźwiękowe są włączone.
Sygnały dźwiękowe są wyłączone.
55
6. Nacisnąć przycisk (5), aby zmienić ustawienie.
7. Wyłączyć urządzenie, aby potwierdzić.
Aby włączyć sygnały dźwiękowe, należy wykonać czynności opisane w krokach od (1) do (7).
EKSPLOATACJA URZĄDZENIA
1. Sprawdzić, czy ustawiony poziom zmiękczania wody odpowiada twardości wody dopro‐
wadzanej do urządzenia. Jeśli nie, ustawić poziom zmiękczania wody.
2. Napełnić zbiornik soli solą do zmywarek.
3. Napełnić dozownik płynu nabłyszczającego płynem nabłyszczającym.
4. Włożyć naczynia i sztućce do urządzenia.
5. Ustawić program zmywania odpowiedni do rodzaju naczyń i stopnia zabrudzenia.
Page 56

56
Ustawianie zmiękczacza wody
6. Napełnić dozownik detergentu odpowiednią ilością detergentu.
7. Uruchomić program zmywania.
W przypadku stosowania tabletek do zmywarek („3 w 1”, „4 w 1”, „5 w 1” itp.) należy wybrać
funkcję Multitab (patrz „Funkcja Multitab”).
USTAWIANIE ZMIĘKCZACZA WODY
Zmiękczacz wody usuwa minerały i sole z doprowadzanej wody. Minerały te i sole mogą
spowodować uszkodzenie urządzenia.
Odpowiednio ustawić poziom zmiękczania wody, jeśli nie odpowiada on twardości wody do‐
prowadzanej do urządzenia.
Skontaktować się z miejscowym zakładem wodociągowym, aby ustalić stopień twardości wo‐
dy doprowadzanej do urządzenia.
Twardość wody
Stopnie niemiec‐
kie (°dH)
51 - 70 91 - 125 9,1 - 12,5 64 - 88
43 - 50 76 - 90 7,6 - 9,0 53 - 63
37 - 42 65 - 75 6,5 - 7,5 46 - 52
29 - 36 51 - 64 5,1 - 6,4 36 - 45
23 - 28 40 - 50 4,0 - 5,0 28 - 35
19 - 22 33 - 39 3,3 - 3,9 23 - 27
15 - 18 26 - 32 2,6 - 3,2 18 - 22 1 4
11 - 14 19 - 25 1,9 - 2,5 13 - 17 1 3
4 - 10 7 - 18 0,7 - 1,8 5 - 12 1 2
< 4 < 7 < 0,7 < 5
1) Ustawienie fabryczne.
2) Przy tym poziomie nie stosować soli.
Stopnie francu‐
skie (°TH)
mmol/l Stopnie Clar‐karęczne elektro‐
Poziom zmiękczania wody należy ustawić ręcznie oraz elektronicznie.
Ustawienie poziomu
zmiękczania wody
2
2
2
2
2
2
1
niczne
1)
1)
1)
1)
1)
1)
2)
5
1
10
9
8
7
6
1)
2)
Page 57

Wsypywanie soli do zmywarki
Regulacja ręczna
Obrócić pokrętło ustawienia twardości wody w po‐
łożenie 1 lub 2 (patrz tabela).
Regulacja elektroniczna
1. Włączyć urządzenie.
2. Upewnić się, że urządzenie jest w trybie ustawiania.
3. Jednocześnie wcisnąć i przytrzymać przyciski (4) i (5) aż zaczną migać wskaźniki przy‐
cisków (3), (4) i (5).
4. Zwolnić przyciski (4) i (5).
5. Nacisnąć przycisk (3),
• Wskaźniki przycisków (4) i (5) wyłączą się.
• Wskaźnik przycisku (3) nadal miga.
• Emitowany jest sygnał dźwiękowy.
• Na wyświetlaczu widoczne jest ustawienie zmiękczacza wody (przykład: wyświetlane
jest
6. Naciskać przycisk (3), aby zmienić ustawienie.
7. Wyłączyć urządzenie, aby potwierdzić.
Jeśli funkcja zmiękczania wody jest ustawiona elektronicznie na poziomie 1, wskaźnik soli
nie włącza się.
i słychać pięć sygnałów dźwiękowych = poziom 5).
57
WSYPYWANIE SOLI DO ZMYWARKI
Napełnianie zbiornika soli
1. Obrócić pokrywkę w kierunku przeciwnym
do ruchu wskazówek zegara i otworzyć
zbiornik soli.
2. Wlać do zbiornika soli 1 litr wody (tylko pod‐
czas pierwszego wsypywania soli).
3. Do napełnienia zbiornika solą należy użyć
lejka.
4. Usunąć sól rozsypaną wokół otworu zbior‐
nika soli.
5. Obrócić pokrywkę w kierunku zgodnym z
ruchem wskazówek zegara, aby zamknąć
zbiornik soli.
Page 58

20
30
M
A
X
1
2
3
4
+
-
58
Używanie detergentu i płynu nabłyszczającego
Normalnym zjawiskiem jest wypływanie wody ze zbiornika podczas napełniania go solą.
UŻYWANIE DETERGENTU I PŁYNU NABŁYSZCZAJĄCEGO
1
2
7
3
4
6
5
Stosowanie detergentu
Aby chronić środowisko, nie należy używać większych ilości detergentu niż zalecane.
Należy przestrzegać zaleceń producenta podanych na opakowaniu detergentu.
Napełnianie dozownika detergentu:
1.
Nacisnąć przycisk zwalniający
2.
Umieścić detergent w dozowniku
3. Jeśli program zmywania przewiduje fazę zmywania wstępnego, umieścić niewielką ilość
detergentu na wewnętrznej stronie drzwi urządzenia.
4. W przypadku używania detergentu w tabletkach, umieścić tabletkę w dozowniku deter‐
1
gentu
.
5. Zamknąć dozownik detergentu. Docisnąć pokrywę, aż zaskoczy na swoje miejsce.
W przypadku używania tabletek do zmywarek zaleca się korzystanie z długich programów
zmywania. Wynika to z faktu, że w krótkich programach zmywania tabletki mogą nie rozpusz‐
czać się całkowicie, co może niekorzystnie wpływać na wyniki zmywania.
2
w celu otwarcia pokrywy 7 dozownika detergentu.
1
.
Wlewanie płynu nabłyszczającego
Płyn nabłyszczający umożliwia wysuszenie naczyń bez smug i plam.
Płyn nabłyszczający jest automatycznie podawany przez dozownik podczas ostatniej fazy
płukania.
Aby napełnić dozownik płynu nabłyszczającego, należy wykonać następujące czynności:
1.
Nacisnąć przycisk zwalniający
szczającego.
6
w celu otwarcia pokrywy 5 dozownika płynu nabły‐
Page 59

Uniwersalna tabletka do zmywarki
59
2.
Napełnić odpowiedni dozownik
je maksymalny poziom.
3. Rozlany płyn nabłyszczający należy usunąć za pomocą chłonnej szmatki, aby zapobiec
powstaniu zbyt dużej ilości piany podczas programu zmywania.
4. Zamknąć dozownik płynu nabłyszczającego. Docisnąć pokrywę, aż zaskoczy na swoje
miejsce.
3
płynem nabłyszczającym. Oznaczenie „max” wskazu‐
Regulacja dozowania płynu nabłyszczającego
Ustawienie fabryczne: położenie 3.
Dozowanie płynu nabłyszczającego można ustawić w zakresie od 1 (najmniejsze dozowa‐
nie) do 4 (największe dozowanie).
4
Obrócić pokrętło regulacji dozowania płynu nabłyszczającego
szyć dozowanie.
, aby zwiększyć lub zmniej‐
UNIWERSALNA TABLETKA DO ZMYWARKI
Funkcja Multitab jest przeznaczona dla tabletek do zmywarek.
Tabletki te zawierają takie składniki jak: detergent, środek nabłyszczający i sól do zmywa‐
rek. Niektóre typy tabletek mogą zawierać również inne środki.
Należy sprawdzić, czy dane tabletki są odpowiednie do stopnia twardości wody doprowadza‐
nej do zmywarki (patrz instrukcje podane na opakowaniu produktu).
Włączenie funkcji Multitab powoduje zatrzymanie dozowania płynu nabłyszczającego i soli.
Włączenie funkcji Multitab powoduje wyłączenie wskaźników soli i płynu nabłyszczającego.
Po wybraniu funkcji Multitab czas trwania programu może ulec wydłużeniu.
Włączyć lub wyłączyć funkcję Multitab przed rozpoczęciem programu zmywania. Funkcji Mul‐
titab nie można włączyć ani wyłączyć w czasie trwania programu zmywania.
Włączanie funkcji Multitab
• Nacisnąć przycisk funkcji Multitab; włączy się wskaźnik funkcji Multitab. Funkcja jest włą‐
czona.
– Po włączeniu funkcja Multitab jest aktywna, dopóki nie zostanie wyłączona.
Aby wyłączyć funkcję Multitab i stosować oddzielnie detergent, sól i płyn nabłyszczający:
1. Nacisnąć przycisk funkcji Multitab; wskaźnik funkcji Multitab wyłączy się. Funkcja jest
wyłączona.
2. Uzupełnić zbiornik soli i dozownik płynu nabłyszczającego.
3. Ustawić najwyższy poziom zmiękczania wody.
4. Uruchomić program zmywania bez naczyń.
5. Po zakończeniu programu zmywania ustawić poziom zmiękczania wody odpowiednio
do twardości wody doprowadzanej do urządzenia.
6. Dokonać regulacji dozowanej ilości płynu nabłyszczającego.
Page 60

60
Wkładanie sztućców i naczyń
WKŁADANIE SZTUĆCÓW I NACZYŃ
Patrz ulotka „Przykładowe rozmieszczenia naczyń ProClean”.
Porady i wskazówki
• Nie wkładać do urządzenia przedmiotów, które mogą pochłaniać wodę (gąbki, ściereczki).
• Usunąć z naczyń resztki jedzenia.
• Namoczyć przypalone resztki potraw.
• Wydrążone elementy (kubki, szklanki i miski) układać otworami w dół.
• Upewnić się, że woda nie zbiera się w pojemnikach lub miskach.
• Upewnić się, że naczynia i sztućce nie przylegają do siebie.
• Szklanki nie mogą stykać się ze sobą.
• Małe elementy umieścić w koszu na sztućce.
• Wymieszać łyżki z innymi sztućcami, aby nie przylegały do siebie.
• Naczynia należy wkładać do koszy w taki sposób, aby woda miała dostęp do wszystkich
powierzchni.
• Lekkie elementy umieścić w koszu górnym. Upewnić się, że naczynia się nie przemie‐
szczają.
• Na elementach plastikowych i miskach z powłoką zapobiegającą przywieraniu mogą za‐
trzymywać się krople wody.
PROGRAMY ZMYWANIA
Program Rodzaj zabru‐
1
1)
2 Bardzo zabru‐
3
2)
dzenia
Wszystkie Naczynia stołowe,
dzone
Średnio zabru‐
dzone
Rodzaj załadunku Opis programu Funkcja ÖKO
sztućce, garnki i
patelnie
Naczynia stołowe,
sztućce, garnki i
patelnie
Naczynia stołowe i
sztućce
Zmywanie wstępne
Zmywanie w tempe‐
raturze 45°C lub
70°C
Płukania
Suszenie
Zmywanie wstępne
Zmywanie w tempe‐
raturze 70°C
Płukania
Suszenie
Zmywanie wstępne
Zmywanie 50°C
Płukania
Suszenie
PLUS
Tak, ma wpływ
Tak, ma wpływ
Tak, nie ma wpły‐
wu
Page 61

Programy zmywania
61
Program Rodzaj zabru‐
dzenia
4
Świeżo zabru‐
dzone
3)
5
Średnio zabru‐
dzone
Rodzaj załadunku Opis programu Funkcja ÖKO
PLUS
Naczynia stołowe i
sztućce
Naczynia stołowe i
sztućce
Zmywanie 60°C
Płukanie
Zmywanie wstępne
Zmywanie 50°C
Tak, nie ma wpły‐
wu
Tak, ma wpływ
Płukania
4)
6 Lekko zabrudzo‐neNaczynia stołowe i
sztućce
7 Średnio lub lek‐
ko zabrudzone
Delikatne naczy‐
nia i szkło
Suszenie
Zmywanie 55°C
Płukania
Zmywanie 45°C
Płukania
Tak, nie ma wpły‐
wu
Tak, ma wpływ
Suszenie
8 Program ten służy do szybkiego płu‐
kania naczyń. Zapobiega to zasycha‐
Płukanie Tak, nie ma wpły‐
wu
niu resztek jedzenia na naczyniach i
powstawaniu przykrych zapachów.
W przypadku tego programu nie nale‐
ży stosować detergentu.
1) Urządzenie rozpoznaje stopień zabrudzenia oraz ilość naczyń znajdujących się w koszach. Automatycznie
reguluje temperaturę i ilość wody, a także pobór prądu oraz czas trwania programu.
2) Jest to najcichszy program zmywania. Pompa pracuje na bardzo niskich obrotach, co pozwala obniżyć poziom
hałasu. Ze względu na niskie obroty program trwa długo.
3) Program ten umożliwia zmywanie świeżo zabrudzonych naczyń. Pozwala w krótkim czasie uzyskać dobre efekty
zmywania.
4) Standardowy program dla ośrodków przeprowadzających testy. W tym programie uzyskuje się największą
efektywność zużycia wody i energii elektrycznej podczas zmywania średnio zabrudzonych naczyń i sztućców.
Dane z testów są przedstawione na osobnej, dołączonej do urządzenia naklejce.
Parametry eksploatacyjne
Program Czas trwania progra‐
mu (minuty)
1 90 - 160 0,9 - 1,7 8 - 15
Zużycie energii (kWh) Zużycie wody (litry)
2 140 - 160 1,5 - 1,6 13 - 14
3 200 - 220 1,1 - 1,2 9 - 11
Page 62

62
Wybór i uruchamianie programu zmywania
Program Czas trwania progra‐
mu (minuty)
4 30 0,9 9
5 160 - 170 0,9 - 1,0 9 - 11
6 50 - 60 1,0 - 1,2 10 - 11
7 65 - 75 0,8 - 0,9 11 - 12
8 14 0,1 4
Zużycie energii (kWh) Zużycie wody (litry)
Podane parametry eksploatacyjne mogą ulec zmianie w zależności od ciśnienia i temperatu‐
ry wody, zmian w napięciu zasilania oraz ilości naczyń.
WYBÓR I URUCHAMIANIE PROGRAMU ZMYWANIA
Uruchamianie programu zmywania bez opóźnienia
1. Włączyć urządzenie.
2. Upewnić się, że urządzenie jest w trybie ustawiania.
3. Ustawić program zmywania.
• Na wyświetlaczu miga numer odpowiadający wybranemu programowi zmywania.
4. Jeśli to wymagane, ustawić funkcję ÖKO PLUS.
5. Zamknąć drzwi urządzenia. Program zmywania rozpocznie się automatycznie.
Uruchamianie programu zmywania z opóźnieniem
1. Włączyć urządzenie.
2. Upewnić się, że urządzenie jest w trybie ustawiania.
3. Wybrać program zmywania i w razie potrzeby ustawić funkcję ÖKO PLUS.
4. Dotknąć kilkakrotnie pola dotykowego opóźnienia rozpoczęcia programu, aż na wyświet‐
laczu pojawi się czas opóźnienia.
• Na wyświetlaczu miga czas opóźnienia rozpoczęcia programu.
• Wskaźnik opóźnienia rozpoczęcia programu jest włączony.
5. Zamknąć drzwi urządzenia. Odliczanie czasu rozpocznie się automatycznie.
Po zakończeniu odliczania czasu opóźnienia program zmywania rozpocznie się automatycz‐
nie.
Page 63

Wybór i uruchamianie programu zmywania
Otwarcie drzwi urządzenia zatrzymuje odliczanie. Po ponownym zamknięciu drzwi odlicza‐
nie jest kontynuowane od momentu przerwania.
Anulowanie funkcji opóźnienia rozpoczęcia programu
Jeśli drzwi urządzenia są otwarte oraz nie rozpoczęło się jeszcze odliczanie czasu:
1. Nacisnąć kilkakrotnie przycisk opóźnienia rozpoczęcia programu, aż na wyświetlaczu po‐
jawi się numer programu zmywania.
• Numer miga na wyświetlaczu.
2. Zamknąć drzwi urządzenia. Program zmywania rozpocznie się automatycznie.
Jeśli drzwi urządzenia są zamknięte oraz rozpoczęło się już odliczanie czasu:
1. Otworzyć drzwi urządzenia.
2. Nacisnąć kilkakrotnie przycisk opóźnienia rozpoczęcia programu, aż na wyświetlaczu po‐
jawi się numer programu zmywania.
• Numer miga przez kilka sekund, a następnie na wyświetlaczu pojawia się czas trwa‐
nia programu zmywania.
3. Zamknąć drzwi urządzenia. Program zmywania rozpocznie się automatycznie.
Przerwanie programu zmywania
• Otworzyć drzwi urządzenia.
– Program zmywania zostanie zatrzymany.
• Zamknąć drzwi urządzenia.
– Program zmywania zostanie wznowiony od momentu, w którym został przerwany.
63
Anulowanie programu zmywania
Jeśli program zmywania nie rozpoczął się, istnieje możliwość zmiany ustawień.
Aby dokonać zmiany ustawień po rozpoczęciu programu, należy anulować program.
• Nacisnąć i przytrzymać przycisk RESET, dopóki na wyświetlaczu nie pojawią się dwa po‐
ziome paski stanu.
Przed uruchomieniem nowego programu zmywania należy upewnić się, że w dozowniku znaj‐
duje się detergent.
Zakończenie programu zmywania
Po zakończeniu programu zmywania rozlega się przerywany sygnał dźwiękowy.
1. Otworzyć drzwi urządzenia.
• Wskaźnik zakończenia programu jest włączony.
• Wyświetlacz pokazuje zero.
2. Wyłączyć urządzenie.
3. Aby naczynia lepiej wyschły, drzwi urządzenia należy pozostawić na kilka minut uchylone.
Opróżnianie koszy
• Należy odczekać aż naczynia wystygną przed ich wyjęciem z urządzenia. Gorące naczy‐
nia łatwo ulegają uszkodzeniu.
Page 64

64
Konserwacja i czyszczenie
• Najpierw wyjmować naczynia z dolnego kosza, a następnie z górnego.
• Na ścianach i na drzwiach urządzenia może występować woda. Stal nierdzewna stygnie
szybciej niż naczynia.
KONSERWACJA I CZYSZCZENIE
Wyjmowanie i czyszczenie filtrów
Brudne filtry pogarszają wyniki zmywania.
Mimo że tego typu filtry nie wymagają częstej konserwacji, zaleca się ich okresowe spraw‐
dzanie i w razie potrzeby oczyszczanie.
1. Obrócić filtr (A) w kierunku przeciwnym do
ruchu wskazówek zegara, a następnie wy‐
jąć go z filtra (B).
B
A
2. Filtr (A) składa się z dwóch części. Aby ro‐
zebrać filtr, części te należy odciągnąć od
siebie.
3. Dokładnie wyczyścić części filtra wodą.
4. Złożyć dwie części filtra (A) ze sobą i docis‐
nąć. Sprawdzić, czy elementy odpowied‐
nio połączyły się ze sobą.
5. Wyjąć filtr (B).
6. Dokładnie umyć filtr (B) wodą.
7. Umieścić filtr (B) w pierwotnym położeniu.
Sprawdzić, czy jest prawidłowo zamonto‐
wany w dwóch zaczepach (C).
8. Umieścić filtr (A) na swoim miejscu w fil‐
trze (B). Obrócić filtr (A) w kierunku zgod‐
nym z ruchem wskazówek zegara aż do za‐
blokowania.
C
Page 65

Co zrobić, gdy…
Czyszczenie ramion spryskujących
Nie demontować ramion spryskujących.
Jeżeli otwory w ramionach spryskujących ulegną zatkaniu, zabrudzenia należy usunąć przy
pomocy cienkiego i zaostrzonego przedmiotu.
Czyszczenie zewnętrznych powierzchni
Oczyścić zewnętrzne powierzchnie urządzenia oraz panel sterowania wilgotną miękką ście‐
reczką.
Używać wyłącznie neutralnych środków do czyszczenia.
Nie używać produktów ściernych, myjek do szorowania ani rozpuszczalników (np. acetonu).
CO ZROBIĆ, GDY…
Urządzenie nie daje się uruchomić lub przestaje działać podczas pracy.
W pierwszej kolejności należy spróbować ustalić przyczynę problemu (patrz tabela). Jeśli
nie można rozwiązać problemu, należy skontaktować się z autoryzowanym serwisem.
W przypadku niektórych usterek na wyświetlaczu pojawia się kod alarmowy:
- Urządzenie nie napełnia się wodą.
•
- Urządzenie nie wypompowuje wody.
•
- Włączyło się zabezpieczenie przed zalaniem.
•
OSTRZEŻENIE!
Przed przystąpieniem do sprawdzenia urządzenie należy wyłączyć.
65
Nieprawidłowe działanie Możliwa przyczyna Możliwe rozwiązanie
Urządzenie nie napełnia się wo‐
dą.
Ciśnienie wody jest zbyt niskie. Skontaktować się z miejsco‐
Zamknięty zawór wody. Otworzyć zawór wody.
Zablokowany filtr w wężu dopły‐
Nieprawidłowe podłączenie
Wąż dopływowy jest uszkodzo‐
Urządzenie nie wypompowuje
wody.
Nieprawidłowe podłączenie
Wąż spustowy jest uszkodzony. Sprawdzić, czy wąż spustowy
Zawór wody jest zablokowany
lub pokryty osadem z kamienia.
wowym.
węża dopływowego.
ny.
Zatkane rozgałęzienie syfonu
zlewozmywaka.
węża spustowego.
Oczyścić zawór wody.
wym zakładem wodociągowym.
Oczyścić filtr.
Sprawdzić, czy podłączenie
jest prawidłowe.
Sprawdzić, czy wąż dopływowy
nie jest uszkodzony.
Oczyścić rozgałęzienie syfonu
zlewozmywaka.
Sprawdzić, czy podłączenie
jest prawidłowe.
nie jest uszkodzony.
Page 66

66
Co zrobić, gdy…
Nieprawidłowe działanie Możliwa przyczyna Możliwe rozwiązanie
Włączyło się zabezpieczenie
przed zalaniem.
Program zmywania nie urucha‐
mia się.
Wtyczka przewodu zasilające‐
Uszkodzony bezpiecznik w
Ustawiono opóźnienie rozpo‐
Zamknąć zawór wody i skontak‐
Drzwi urządzenia są otwarte. Zamknąć drzwi urządzenia.
go nie została prawidłowo wło‐
żona do gniazdka.
skrzynce bezpieczników.
częcia programu.
tować się z punktem serwiso‐
wym.
Włożyć prawidłowo wtyczkę
przewodu zasilającego do
gniazdka.
Wymienić bezpiecznik.
• Anulować opóźnienia rozpo‐
częcia programu.
• Po zakończeniu odliczania
czasu opóźnienia program
zmywania rozpocznie się au‐
tomatycznie.
Po sprawdzeniu urządzenie należy włączyć. Program zostanie wznowiony od momentu, w
którym został przerwany.
W razie ponownego wystąpienia problemu należy skontaktować się z punktem serwisowym.
Jeśli wyświetlacz pokazuje inne kody alarmowe, należy skontaktować się z serwisem.
Informacje niezbędne dla serwisu znajdują się na tabliczce znamionowej.
Należy zanotować:
– Model (MOD.) ........................................................
– Numer produktu (PNC) ........................................
– Numer seryjny (S.N.) ...............................................
Rezultaty zmywania i suszenia są niezadowalające
Problem Możliwa przyczyna Możliwe rozwiązanie
Naczynia nie są czyste. Wybrany program zmywania
nie jest odpowiedni dla danego
rodzaju załadunku lub stopnia
zabrudzenia.
Kosze nie zostały załadowane
prawidłowo, w wyniku czego wo‐
da nie mogła dotrzeć do wszyst‐
kich powierzchni.
Ramiona spryskujące nie mogą
się swobodnie obracać. Niepra‐
widłowe ułożenie naczyń i przy‐
borów kuchennych w koszach.
Filtry są zabrudzone lub niepra‐
widłowo złożone i zamontowa‐
ne.
Należy upewnić się, czy wybra‐
ny program zmywania jest odpo‐
wiedni dla danego rodzaju zała‐
dunku oraz stopnia zabrudzenia.
Umieścić naczynia i przybory ku‐
chenne prawidłowo w koszach.
Sprawdzić, czy niewłaściwe uło‐
żenie naczyń nie powoduje za‐
blokowania ramion spryskują‐
cych.
Upewnić się, że filtry są czyste
oraz prawidłowo złożone i za‐
montowane.
Page 67

Co zrobić, gdy…
Problem Możliwa przyczyna Możliwe rozwiązanie
Użyto za mało detergentu lub
Ślady kamienia na naczyniach. Zbiornik soli jest pusty. Napełnić zbiornik soli solą do
Nieprawidłowa regulacja pozio‐
Nieprawidłowe zamknięcie po‐
Na szklankach i naczyniach wi‐
dać smugi, białawe plamy lub
niebieskawy nalot.
Ślady kropel wody na kielisz‐
kach i na naczyniach.
Przyczyną może być rodzaj uży‐
Naczynia są mokre. Włączono program zmywania
Naczynia są wilgotne i matowe. Dozownik płynu nabłyszczają‐
Włączona funkcja Multitab (po‐
nie użyto go w ogóle.
mu zmiękczacza wody.
krywy zbiornika soli.
Zbyt duże dozowanie płynu na‐
błyszczającego.
Zbyt małe dozowanie płynu na‐
błyszczającego.
tego detergentu.
bez fazy suszenia lub ze skró‐
coną fazą suszenia.
cego jest pusty.
woduje ona automatyczne wy‐
łączenie dozownika płynu nabły‐
szczającego).
Upewnić się, że użyto wystar‐
czającej ilości detergentu.
zmywarek.
Prawidłowo ustawić poziom
zmiękczania wody.
Upewnić się, czy zbiornik soli
jest prawidłowo zamknięty.
Zmniejszyć dozowanie płynu na‐
błyszczającego.
Zwiększyć dozowanie płynu na‐
błyszczającego.
Użyć detergentu innej marki.
Aby naczynia lepiej wyschły,
drzwi urządzenia należy pozos‐
tawić na kilka minut uchylone.
Napełnić dozownik płynu nabły‐
szczającego płynem nabły‐
szczającym.
Włączyć dozownik płynu nabły‐
szczającego.
67
Włączanie dozownika płynu nabłyszczającego
1. Włączyć urządzenie.
2. Upewnić się, że urządzenie jest w trybie ustawiania.
3. Jednocześnie wcisnąć i przytrzymać przyciski (4) i (5) aż zaczną migać wskaźniki przy‐
cisków (3), (4) i (5).
4. Zwolnić przyciski (4) i (5).
5. Nacisnąć przycisk (4).
• Wskaźniki przycisków (3) i (5) wyłączą się.
• Wskaźnik przycisku (4) nadal miga.
• Na wyświetlaczu widoczne będzie ustawienie dozownika płynu nabłyszczającego.
Dozownik płynu nabłyszczającego wyłączony.
Dozownik płynu nabłyszczającego włączony.
6. Nacisnąć przycisk (4), aby zmienić ustawienie.
7. Wyłączyć urządzenie, aby potwierdzić.
Page 68

68
Dane techniczne
DANE TECHNICZNE
Wymiary Szerokość 596 mm
Wysokość 818 - 898 mm
Głębokość 550 mm
Ciśnienie doprowadzanej wody Wartość minimalna 0,5 bara (0,05 MPa)
Wartość maksymalna 8 barów (0,8 MPa)
Dopływ wody
Pojemność Liczba standardowych nakryć 12
1) Podłączyć wąż doprowadzający wodę do zaworu z gwintem 3/4".
1)
Zimna lub ciepła woda maksimum 60°C
Informacje dotyczące podłączenia elektrycznego znajdują się na tabliczce znamionowej umie‐
szczonej na wewnętrznej krawędzi drzwi urządzenia.
Jeżeli ciepła woda jest wytwarzana przy pomocy alternatywnych źródeł energii (np. kolekto‐
ry słoneczne, ogniwa słoneczne lub elektrownie wiatrowe), można użyć jej do zasilania urzą‐
dzenia, aby zmniejszyć zużycie energii.
OCHRONA ŚRODOWISKA
Symbol na produkcie lub na opakowaniu oznacza, że tego produktu nie wolno
traktować tak, jak innych odpadów domowych. Należy oddać go do właściwego punktu
skupu surowców wtórnych zajmującego się złomowanym sprzętem elektrycznym i
elektronicznym. Właściwa utylizacja i złomowanie pomaga w eliminacji niekorzystnego
wpływu złomowanych produktów na środowisko naturalne oraz zdrowie. Aby uzyskać
szczegółowe dane dotyczące możliwości recyklingu niniejszego urządzenia, należy
skontaktować się z lokalnym urzędem miasta, służbami oczyszczania miasta lub sklepem,
w którym produkt został zakupiony.
Materiały oznaczone symbolem
rzucić elementy opakowania do odpowiednich pojemników, aby zostały poddane recyklingowi.
powinny być poddane ponownemu przetworzeniu. Wy‐
Page 69

697071
Page 70

Page 71

Page 72

www.aeg-electrolux.com/shop 117941340-A-282010
 Loading...