

Page 1

FAVORIT 65000 I
DISHWASHER USER MANUAL 2
EN
HU
MOSOGATÓGÉP HASZNÁLATI ÚTMUTATÓ
PL
ZMYWARKA INSTRUKCJA OBSŁUGI
23
45
Page 2

2
FOR PERFECT RESULTS
Thank you for choosing this AEG product. We have
created it to give you impeccable performance for many
years, with innovative technologies that help make life
simpler – features you might not find on ordinary
appliances. Please spend a few minutes reading to get
the very best from it.
ACCESSORIES AND CONSUMABLES
In the AEG webshop, you’ll find everything you need to
keep all your AEG appliances looking spotless and
working perfectly. Along with a wide range of
accessories designed and built to the high quality
standards you would expect, from specialist cookware
to cutlery baskets, from bottle holders to delicate
laundry bags…
Visit the webshop at:
www.aeg-electrolux.com/shop
Page 3

CONTENTS
Contents
4 Safety information
7 Product description
8 Control panel
10 Use of the appliance
11 Setting the water softener
12 Use of dishwasher salt
13 Use of detergent and rinse aid
14 Multitab function
14 Loading cutlery and dishes
15 Washing programmes
16 Select and start a washing
programme
18 Care and cleaning
19 What to do if…
21 Technical data
22 Environment concerns
3
The following symbols are used in this
user manual:
Important information concerning
your personal safety and information
on how to avoid damaging the
appliance.
General information and tips
Environmental information
Subject to change without notice
Page 4

Safety information
4
SAFETY INFORMATION
Before the installation and use, read this manual carefully:
• For your safety and the safety of your property.
• To help the environment.
• For the correct operation of the appliance.
Always keep these instructions with the appliance also if you move or give it to a different person.
The manufacturer is not responsible if an incorrect installation and use causes damage.
Children and vulnerable persons safety
• Do not let persons, children included, with reduced physical sensory, reduced mental
functions or lack of experience and knowledge to use the appliance. They must have
supervision or instruction for the operation of the appliance by a person who is responsible for their safety.
• Keep all packaging away from children. There is the risk of suffocation or injury.
• Keep all detergents in a safe area. Do not let the children touch the detergents.
• Keep children and pets away from the appliance when the door is open.
General safety
• Do not change the specifications of this appliance. There is the risk of injury and damage to the appliance.
• Obey the safety instructions from the detergent manufacturer to prevent burns to
eyes, mouth and throat.
• Do not drink the water from the appliance. Particles of detergent can stay in your appliance.
• Do not keep the appliance door open without supervision. This to prevent injury and
to fall on an open door.
• Do not sit or stand on the open door.
Use
• The appliance is only for domestic use. Do not use the appliance for other uses to prevent injury to persons and damage to property.
• Only use the appliance to clean accessories that are applicable for dishwashers.
• Do not put flammable products or items that are wet with flammable products in,
near or on the appliance. Risk of explosion or fire.
• Put the knives and all items with sharp points in the cutlery basket with their points
down. If not, put in a horizontal position in the upper basket or in the knife basket.
(Not all models have the knife basket).
• Use only specified products for dishwashers (detergent, salt, rinse aid).
• Types of salt that are not specified for dishwashers can cause damage to the water
softener.
• Fill the appliance with salt before you start a washing programme. Remaining salt in
the appliance can cause corrosion or make a hole in the bottom of the appliance.
Page 5

Safety information
• Do not fill the rinse aid dispenser with other products than the rinse aid, (dishwasher
cleaning agent, liquid detergent). This can cause damage to the appliance.
• Make sure that the spray arms can move freely before you start a washing programme.
• The appliance can release hot steam if you open the door while a washing programme
operates. There is a risk of skin burns.
• Do not remove the dishes from the appliance until the washing programme is completed.
Care and cleaning
• Before you clean the appliance, deactivate it and disconnect the mains plug from the
mains socket.
• Do not use flammable products or products that can cause corrosion.
• Do not use the appliance without the filters. Make sure that the installation of the
filters is correct. An incorrect installation causes unsatisfactory washing results and
damage to the appliance.
• Do not use spray water or steam to clean the appliance. Risk of electrical shock and
damage to the appliance.
Installation
• Make sure that the appliance is not damaged. Do not install or connect a damaged
appliance, contact the supplier.
• Remove all packaging before you install and use the appliance.
• Only a qualified person must do the electrical connection, the plumbing and the installation of the appliance. This to prevent the risks of structural damage or injury.
• Make sure that the mains plug is disconnected from the mains socket during installation.
• Do not drill into the sides of the appliance to prevent damage to hydraulic components and electrical components.
•
Important! Obey the instructions in the template supplied with the appliance:
– To install the appliance.
– To assemble the door panel.
– To connect to the water supply and drain.
• Make sure that the appliance is installed below and adjacent to safe structures.
5
Frost precautions
• Do not install the appliance where the temperature is less than 0 °C.
• The manufacturer is not responsible for frost damage.
Water connection
• Use new hoses to connect the appliance to the water supply. Do not use used hoses.
• Do not connect the appliance to new pipes or pipes not used for a long time. Let the
water flow for some minutes, then connect the inlet hose.
• Make sure not to squash or cause damage to the water hoses when you install the
appliance.
• Make sure that the water couplings are tight to prevent a water leakage.
• The first time you use the appliance, make sure that the hoses do not have water leaks.
Page 6
Safety information
6
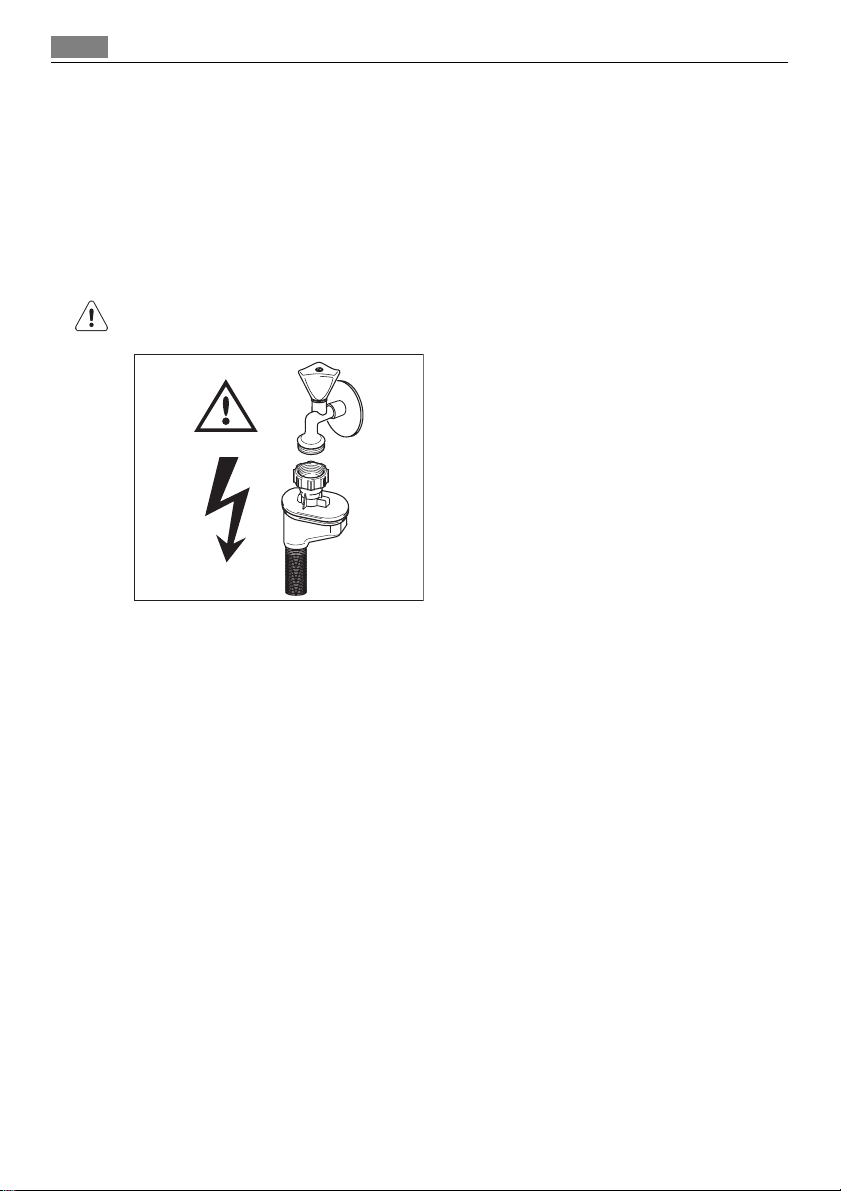
• The water inlet hose has a safety valve and a double sheath with an inner mains cable.
There is pressure in the water inlet hose only when the water flows. If there is a leak in
the water inlet hose, the safety valve interrupts the flow of water.
– Be careful when you connect the water inlet hose:
– Do not put the water inlet hose or the safety valve in water.
– If the water inlet hose or the safety valve are damaged, immediately disconnect
the mains plug from the mains socket.
– Contact the service centre to replace the water inlet hose with safety valve.
WARNING!
Dangerous voltage.
Electrical connection
• The appliance must be earthed.
• Make sure that the electrical information on the rating plate agrees with the power
supply.
• Always use a correctly installed shockproof socket.
• Do not use multiple plugs and extension cables. There is a risk of fire.
• Do not replace or change the mains cable. Contact the service centre.
• Make sure not to squash or cause damage to the mains plug and cable behind the
appliance.
• Make sure that there is access to the mains plug after the installation.
• Do not pull the mains cable to disconnect the appliance. Always pull the mains plug.
Service centre
• Only a qualified person can repair or work on the appliance. Contact the service centre.
• Use only original spare parts.
To discard the appliance
• To prevent the risk of injury or damage:
– Disconnect the mains plug from the mains socket.
– Cut off the mains cable and discard it.
Page 7
Product description
– Remove the door catch. This prevents children or pets to be closed in the appliance.
There is a risk of suffocation.
– Discard the appliance at the local waste disposal centre.
WARNING!
The dishwasher detergents are dangerous and can cause corrosion !
• If an accident occurs with these detergents, contact immediately a physician.
• If the detergent gets into the mouth, contact immediately a physician.
• If the detergent gets into the eyes, contact immediately a physician and clean the eyes
with water.
• Keep dishwasher detergents in a safe area and out of children touch.
• Do not keep the appliance door open when there is detergent in the detergent dispenser.
• Fill the detergent dispenser only before you start a washing programme.
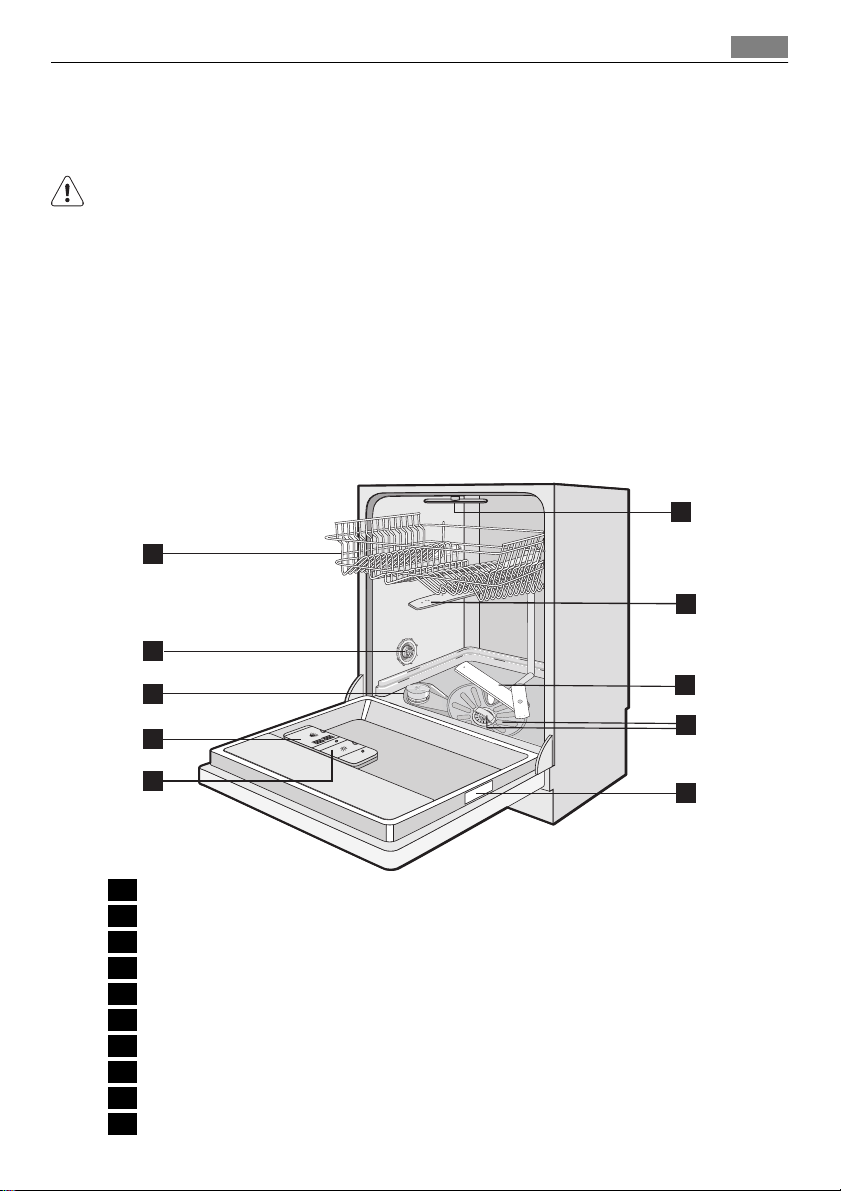
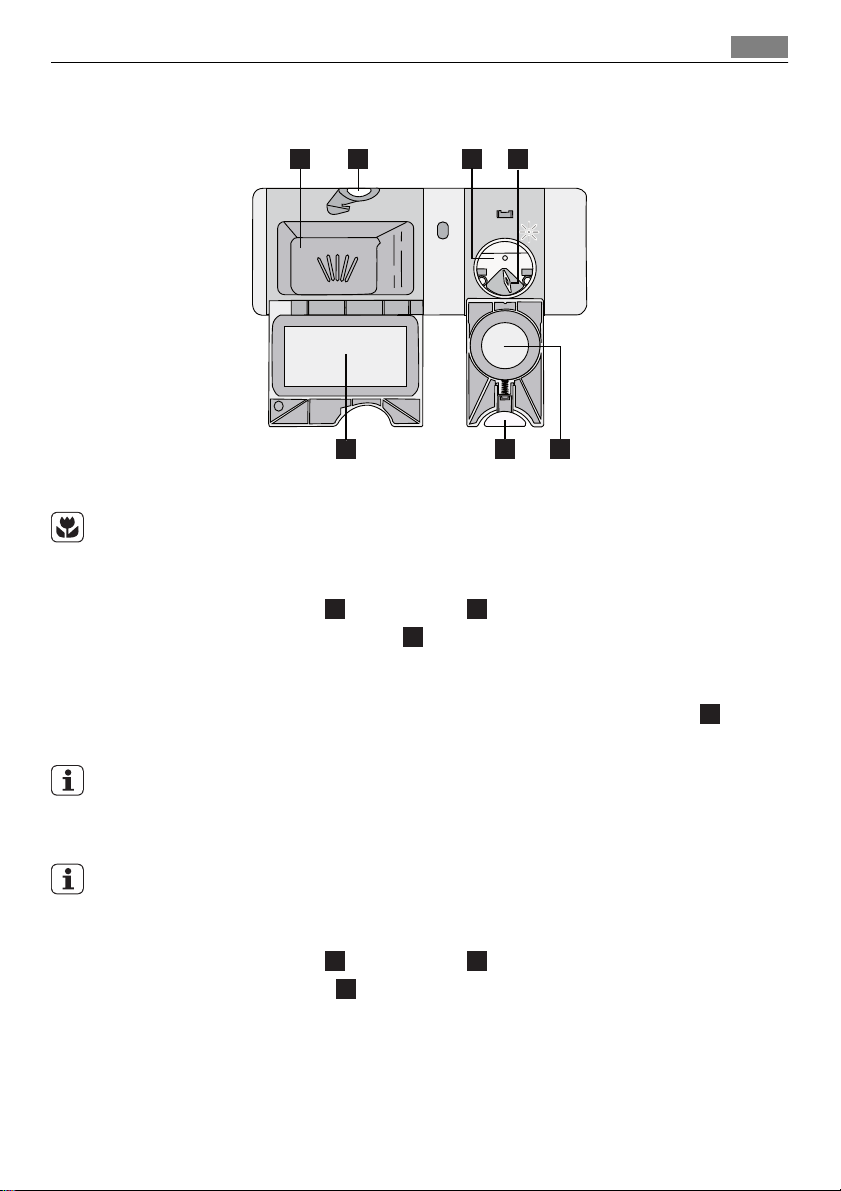
PRODUCT DESCRIPTION
1
7
10
9
2
3
4
5
1 Upper basket
2 Water hardness dial
3 Salt container
4 Detergent dispenser
5 Rinse aid dispenser
6 Rating plate
7 Filters
8 Lower spray arm
9 Upper spray arm
10 Top spray arm
8
7
6
Page 8
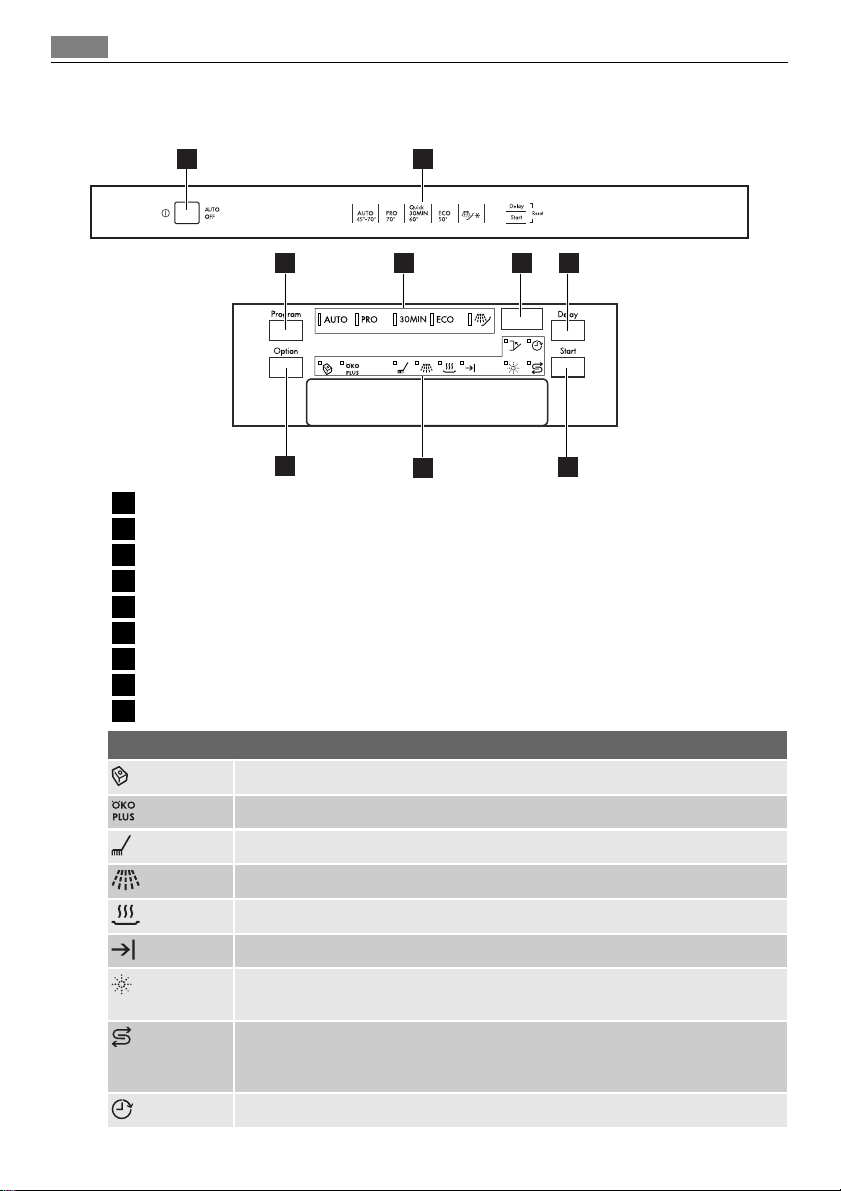
Control panel
8
CONTROL PANEL
1
3
9
1 On/off button
2 Programme guide
3 Program button
4 Programme indicators
5 Display
6 Delay button
7 Start button
8 Indicators
9 Option button
Multitab indicator. It comes on when you activate the function.
2
4
8
Indicators
5 6
7
ÖKO PLUS indicator. It comes on when you activate the function.
Washing phase indicator. It comes on when the washing phase operates.
Rinsing phase indicator. It comes on when the rinsing phases operate.
Drying phase indicator. It comes on when the drying phase operates.
End indicator. It comes on when the washing programme is completed.
Rinse aid indicator. It comes on when it is necessary to fill the rinse aid dis-
1)
penser.
Salt indicator. It comes on when it is necessary to fill the salt container.
After you fill the container, the salt indicator can stay on for some hours. This
does not have an unwanted effect on the operation of the appliance.
Delay indicator. It comes on when you activate the delay start.
1)
Page 9

Control panel
Indicators
Door indicator. It comes on when the door is open or not closed correctly.
1) When the salt container and/or the rinse aid dispenser are empty, the related indicators do not come on
while a washing programme operates.
On/off button
Press this button to activate or deactivate the appliance.
After ten minutes from the end of the washing programme, the AUTO OFF function automatically deactivates the appliance. This helps to decrease energy consumption.
Programme guide
This guide helps you in the selection of the washing programme.
Program button
Press this button again and again until the indicator of the washing programme comes
on. Refer to 'Washing programmes'.
Display
The display shows:
• The electronic adjustment of the level of the water softener
• The activation and deactivation of the rinse aid dispenser (only with the multitab function on)
• The washing programme time
• The remaining time to the end of the washing programme
• The end of a washing programme (the display shows a zero)
• The delay start time
• The alarm codes.
9
Delay button
Press this button again and again to delay the start of the washing programme from 1 to
24 hours.
Start button
Press this button to start:
• The washing programme
• The countdown of the delay start.
Option button
Press this button to set the functions.
When a function is activated, the related indicator comes on.
Option button Multitab ÖKO PLUS
Press one time ACTIVATED DEACTIVATED
Press two times DEACTIVATED ACTIVATED
Page 10

Use of the appliance
10
Option button Multitab ÖKO PLUS
Press three times ACTIVATED ACTIVATED
Press four times DEACTIVATED DEACTIVATED
Functions
Multitab
If you use the combi detergent tablets ('3 in 1', '4 in 1', '5 in 1'), use the multitab function. Refer to 'Multitab function'.
ÖKO PLUS
This function decreases the temperature in the drying phase. The power consumption decreases by 25%.
The dishes can be wet at the end of the programme when you open the appliance door.
We recommend that you keep the door ajar and let the dishes dry.
Setting mode
The appliance must be in setting mode for these operations:
• To set and start a washing programme.
• To set and start a delay start.
• To adjust electronically the level of the water softener.
• To deactivate or activate the rinse aid dispenser (only with the multitab function on).
Activate the appliance. The appliance is in setting mode when:
• All the programme indicators come on.
• The display shows two horizontal status bars.
Activate the appliance. The appliance is not in setting mode when:
• Only one programme indicator comes on.
• The display shows the time of the washing programme or of the delay start.
– It is necessary to cancel the programme or the delay start to go back to the setting
mode. Refer to 'Select and start a washing programme'.
USE OF THE APPLIANCE
1. Be sure that the set level of the water softener agrees with the water hardness in
your area. If not, adjust the water softener.
2. Fill the salt container with dishwasher salt.
3. Fill the rinse aid dispenser with rinse aid.
4. Load cutlery and dishes into the appliance.
5. Set the correct washing programme for the type of load and soil.
6. Fill the detergent dispenser with the correct quantity of detergent.
7. Start the washing programme.
Page 11
Setting the water softener
If you use the combi detergent tablets ('3 in 1', '4 in 1', '5 in 1'), use the multitab function
(refer to 'Multitab function').
SETTING THE WATER SOFTENER
The water softener removes minerals and salts from the water supply. These minerals and
salts can cause damage to the appliance.
Adjust the level of the water softener if this does not agree with the water hardness in
your area.
Contact your local water authority to know the water hardness in your area.
Water hardness
German degrees
(°dH)
51 - 70 91 - 125 9,1 - 12,5 64 - 88
43 - 50 76 - 90 7,6 - 9,0 53 - 63
37 - 42 65 - 75 6,5 - 7,5 46 - 52
29 - 36 51 - 64 5,1 - 6,4 36 - 45
23 - 28 40 - 50 4,0 - 5,0 28 - 35
19 - 22 33 - 39 3,3 - 3,9 23 - 27
15 - 18 26 - 32 2,6 - 3,2 18 - 22 1 4
11 - 14 19 - 25 1,9 - 2,5 13 - 17 1 3
4 - 10 7 - 18 0,7 - 1,8 5 - 12 1 2
< 4 < 7 < 0,7 < 5
1) Factory position.
2) Do not use salt at this level.
French degrees
(TH°)
mmol/l Clarke de-
grees
You must adjust the water softener manually and electronically.
Water hardness ad-
manually elec-
2
2
2
2
2
2
1
justment
1)
1)
1)
1)
1)
1)
2)
11
troni-
cally
10
9
8
7
6
1)
5
2)
1
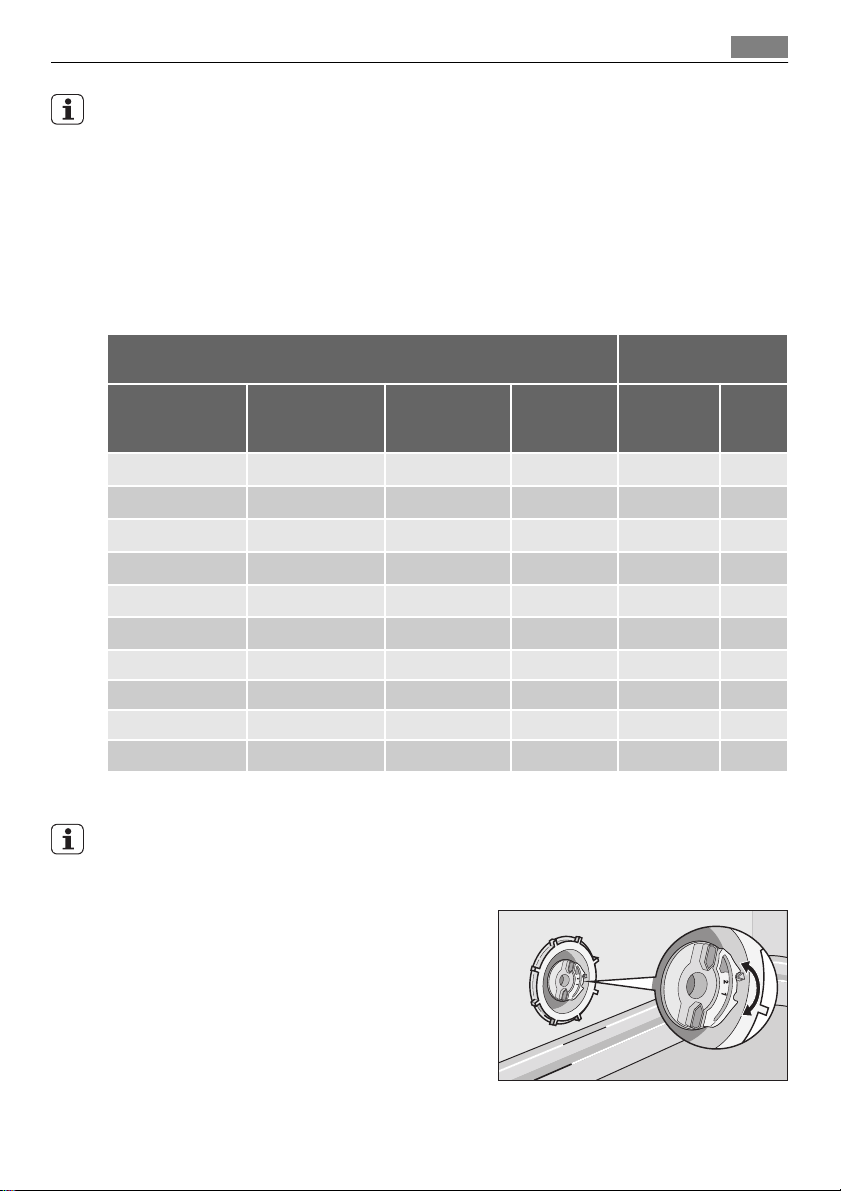
Manual adjustment
Turn the water hardness dial to the position 1 or
2 (refer to the table).
Page 12
Use of dishwasher salt
12
Electronic adjustment
1. Activate the appliance.
2. Make sure that the appliance is in setting mode.
3. Press and hold the Delay button and the Start button at the same time until the pro-
gramme indicators AUTO, PRO and 30MIN flash.
4. Release the Delay button and the Start button.
5. Press the Program button,
• The programme indicators PRO and 30MIN go off.
• The programme indicator AUTO continues to flash.
• The display shows the setting of the water softener (example:
6. Press the Program button again and again to change the setting.
7. Deactivate the appliance to confirm.
If the water softener is set electronically to the level 1, the salt indicator stays off.
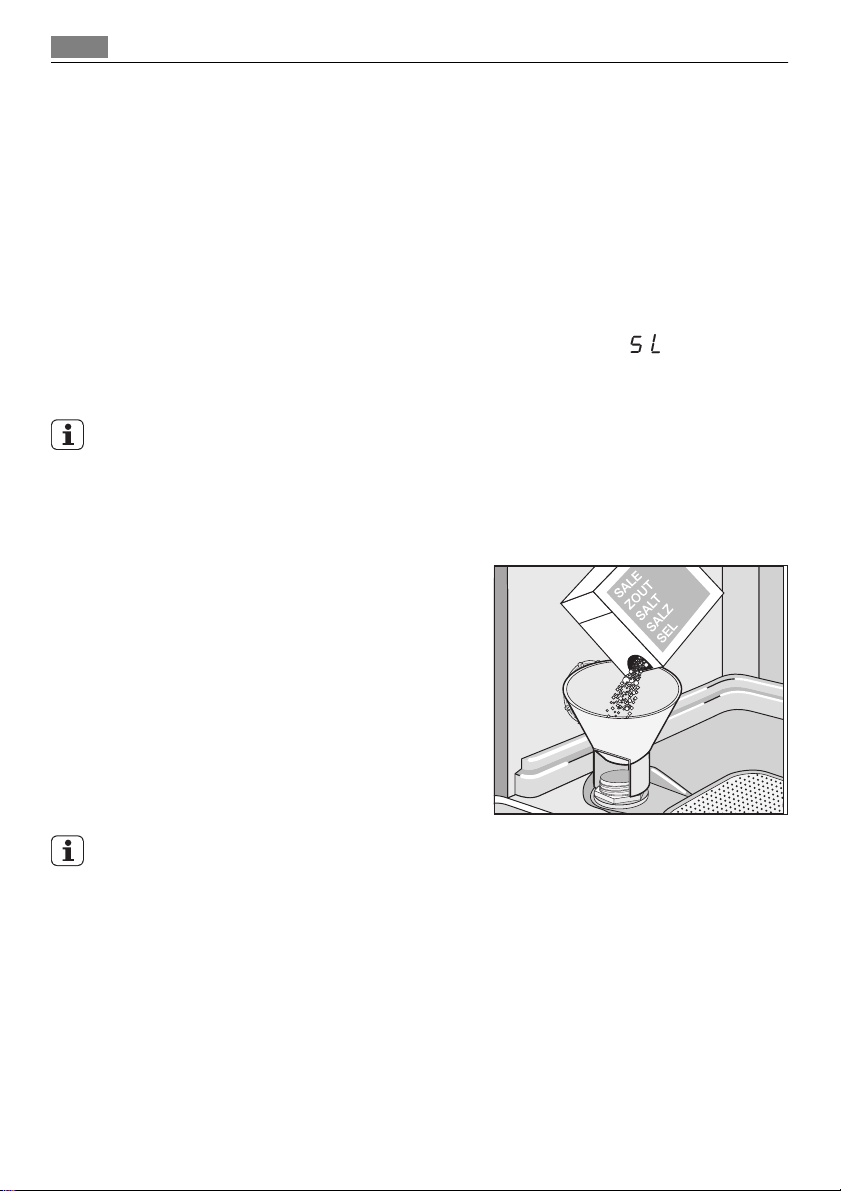
USE OF DISHWASHER SALT
How to fill the salt container
1. Turn the cap counterclockwise and open
the salt container.
2. Fill the salt container with 1 litre of wa-
ter (only for the first time you fill with
salt).
3. Use the funnel to fill the salt container
with salt.
4. Remove the salt around the opening of
the salt container.
5. Turn the cap clockwise to close the salt
container.
It is correct that water comes out from the salt container when you fill it with salt.
= level 5).
Page 13
USE OF DETERGENT AND RINSE AID
20
30
M
A
X
1
2
3
4
+
-
Use of detergent and rinse aid
13
1
2
7
3
4
6
5
Use of detergent
To help the environment, do not use more than the correct quantity of detergent.
Obey the instructions on the detergent packaging.
How to fill the detergent dispenser:
1.
Press the release button
2.
Put the detergent in the dispenser
3. If the washing programme has a prewash phase, put a small quantity of detergent
on the inner part of the appliance door.
4.
If you use the detergent tablets, put the tablet in the detergent dispenser
5. Close the detergent dispenser. Press the lid until it locks into position.
Use long washing programmes when you use the detergent tablets. These cannot fully
dissolve with short washing programmes and can decrease the washing results.
2
to open the lid 7 of the detergent dispenser.
1
.
1
.
Use of rinse aid
Rinse aid makes it possible to dry the dishes without streaks and stains.
The rinse aid dispenser automatically adds rinse aid during the last rinsing phase.
Do these steps to fill the rinse aid dispenser:
1.
Press the release button
2.
Fill the rinse aid dispenser
6
to open the lid 5 of the rinse aid dispenser.
3
with rinse aid. The mark 'max' shows the maximum level.
3. Remove the spilled rinse aid with an absorbent cloth to prevent too much foam dur-
ing the washing programme.
4. Close the rinse aid dispenser. Press the lid until it locks into position.
Adjust the rinse aid dosage
Factory set: position 3.
Page 14
Multitab function
14
You can set the rinse aid dosage between position 1 (lowest dosage) and position 4 (highest dosage).
Turn the rinse aid selector
4
to increase or decrease the dosage.
MULTITAB FUNCTION
The multitab function is for combi detergent tablets.
These tablets contain agents as detergent, rinse aid and dishwasher salt. Some types of
tablets can contain other agents.
Be sure that these tablets are applicable for the water hardness in your area (refer to the
instructions on the packaging of the products).
The multitab function deactivates the flow of rinse aid and salt.
The multitab function deactivates the indicators of salt and rinse aid.
The programme duration can increase if you use the multitab function.
Activate or deactivate the multitab function before the start of a washing programme.
You cannot activate or deactivate the function when a washing programme operates.
Before the start of a washing programme, always make sure that the multitab function is
on.
To deactivate the multitab function and use separately detergent, salt and rinse aid
1. Press the Option button until the multitab indicator goes off. The function is deacti-
vated.
2. Fill the salt container and the rinse aid dispenser.
3. Adjust the water hardness to the highest level.
4. Start a washing programme without dishes.
5. When the washing programme is completed, adjust the water softener to the water
hardness in your area.
6. Adjust the quantity of rinse aid.
LOADING CUTLERY AND DISHES
Refer to the leaflet 'Examples of ProClean loads'.
Hints and tips
• Do not put in the appliance items that can absorb water (sponges, household cloths).
• Remove the remaining food from the items.
• Make soft the remaining burned food on the items.
• Put hollow items (cups, glasses and pans) with the opening down.
• Make sure that water does not collect in containers or in bowls.
• Make sure that cutlery and dishes do not bond together.
• Make sure that the glasses do not touch other glasses.
• Put small items in the cutlery basket.
Page 15
Washing programmes
• Mix the spoons with other cutlery to prevent them to bond together.
• When you put the items in the baskets, make sure that the water can touch all surfaces.
• Put light items in the upper basket. Make sure that the items do not move.
• Water droplets can collect on plastic items and non-stick pans.
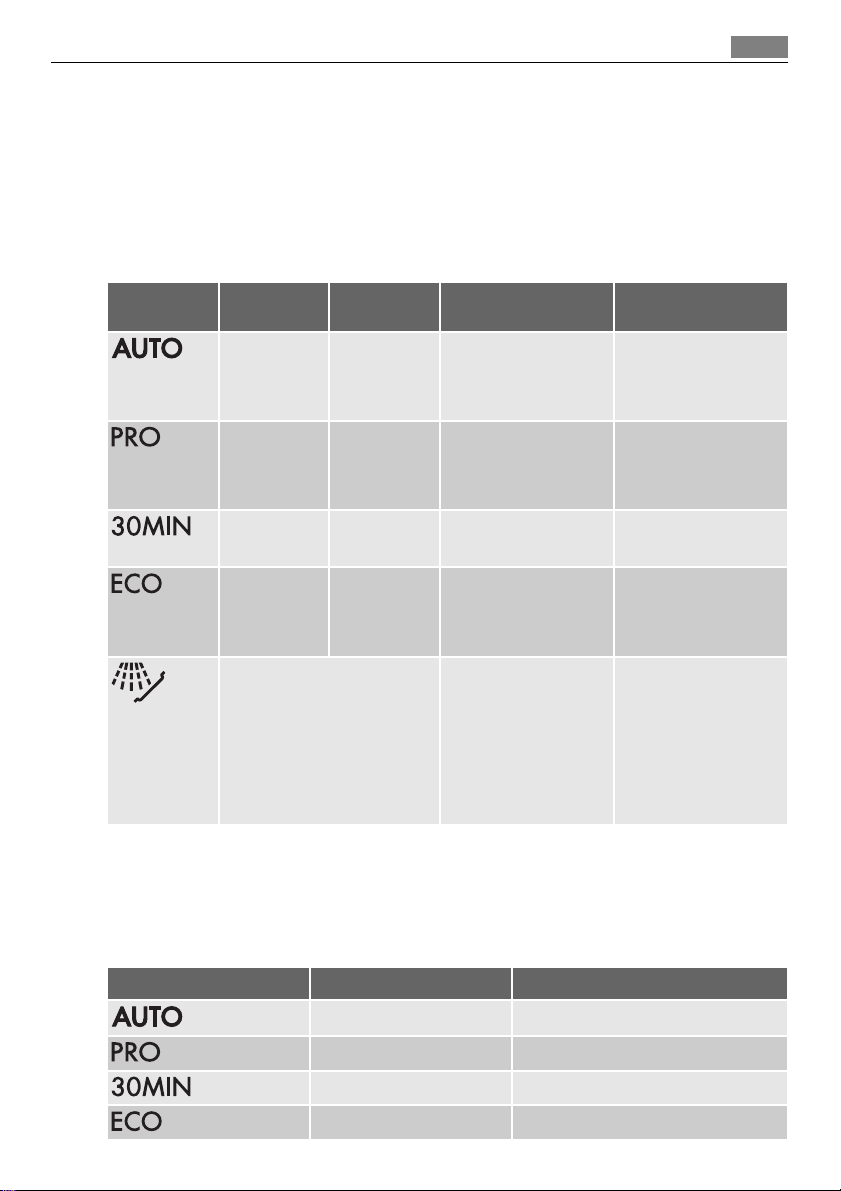
WASHING PROGRAMMES
15
Programme Type of soil Type of load Programme descrip-
ÖKO PLUS function
tion
All Crockery, cut-
1)
lery, pots and
pans
Prewash
Wash 45 °C or 70 °C
Rinses
Yes, with effect
Dry
Heavy soil Crockery, cut-
lery, pots and
pans
Prewash
Wash 70 °C
Rinses
Yes, with effect
Dry
Normal or
2)
light soil
Normal soil Crockery and
3)
Crockery and
cutlery
cutlery
Wash 60°C
Rinse
Prewash
Wash 50 °C
Yes, without effect
Yes, with effect
Rinses
Dry
Use this programme to quick-
Rinse Yes, without effect
ly rinse the dishes. This prevents the remaining food to
bond on the dishes and bad
odours to come out from the
appliance.
Do not use detergent with
this programme.
1) The appliance senses the type of soil and the quantity of items in the baskets. It automatically adjusts the
temperature and quantity of the water, the energy consumption and the programme time.
2) With this programme you can wash a load with fresh soil. It gives good washing results in a short time.
3) This is the standard programme for test institutes. With this programme you have the most efficient use of
water and energy consumption for crockery and cutlery with normal soil. Refer to the supplied leaflet for
test information.
Consumption values
Programme
1)
Energy (kWh) Water (litre)
0,9 - 1,7 8 - 17
1,5 - 1,7 15 - 16
0,9 9
1,0 - 1,1 10 - 11
Page 16
Select and start a washing programme
16
Programme
1) The display shows the programme time.
The water pressure and temperature, the variations of the mains supply and the quantity
of dishes can change the consumption values.
1)
Energy (kWh) Water (litre)
0,1 4
SELECT AND START A WASHING PROGRAMME
Starting the washing programme without delay start
1. Close the appliance door.
2. Activate the appliance.
3. Make sure that the appliance is in setting mode.
4. Set the washing programme.
• The related programme indicator comes on.
• The programme time flashes in the display.
• The phase indicators of the set washing programme come on.
5. If necessary, set the ÖKO PLUS function.
• The selection of the function must always occur after the set of the washing programme.
6. Press the Start button, the washing programme starts automatically.
• The phase indicators go off but the indicator of the phase in operation stays on.
Starting the washing programme with delay start
1. Close the appliance door.
2. Activate the appliance.
3. Make sure that the appliance is in setting mode.
4. Set the washing programme and functions.
5. Press the Delay button again and again until the display shows the time of the delay
start.
• The time of the delay start flashes in the display.
• The delay indicator is on.
6. Press the Start button, the countdown starts automatically.
• The delay start time flashes no more in the display.
• The phase indicators of the set washing programme go off.
• When the countdown is completed, the washing programme starts automatically.
– The indicator of the phase in operation is on.
The opening of the appliance door stops the countdown. When you close the door, the
countdown continues from the point of interruption.
Page 17
Select and start a washing programme
Cancelling the delay start
The countdown is not operating
1. Press the Delay button again and again until:
• The display shows the time of the washing programme.
• The phase indicators come on.
2. Press the Start button to start the washing programme.
The countdown is operating
1. Press the Delay button again and again until:
• The display shows the time of the washing programme.
• The phase indicators come on.
• The washing programme starts automatically.
Interruption of a washing programme
• Open the appliance door.
– The washing programme stops.
• Close the appliance door.
– The washing programme continues from the point of interruption.
Cancelling the washing programme
If the washing programme has not started, you can change the selection.
To change the selection while the washing programme operates, it is necessary to cancel
the programme.
• At the same time press and hold the Delay button and the Start button until:
– All the programme indicators come on.
– The display shows two horizontal status bars.
Make sure that there is detergent in the detergent dispenser before you start a new washing programme.
17
End of the washing programme
When the washing programme is completed, the display shows a zero and the end indicator is on.
1. Deactivate the appliance.
2. Open the appliance door.
3. For better drying results, keep the appliance door ajar for some minutes.
Remove the items from the baskets
• Let the dishes become cold before you remove them from the appliance. Hot dishes
can be easily damaged.
• First remove the items from the lower basket, then from the upper basket.
• There can be water on the sides and on the door of the appliance. Stainless steel be-
comes cool more quickly than the dishes.
Page 18
Care and cleaning
18
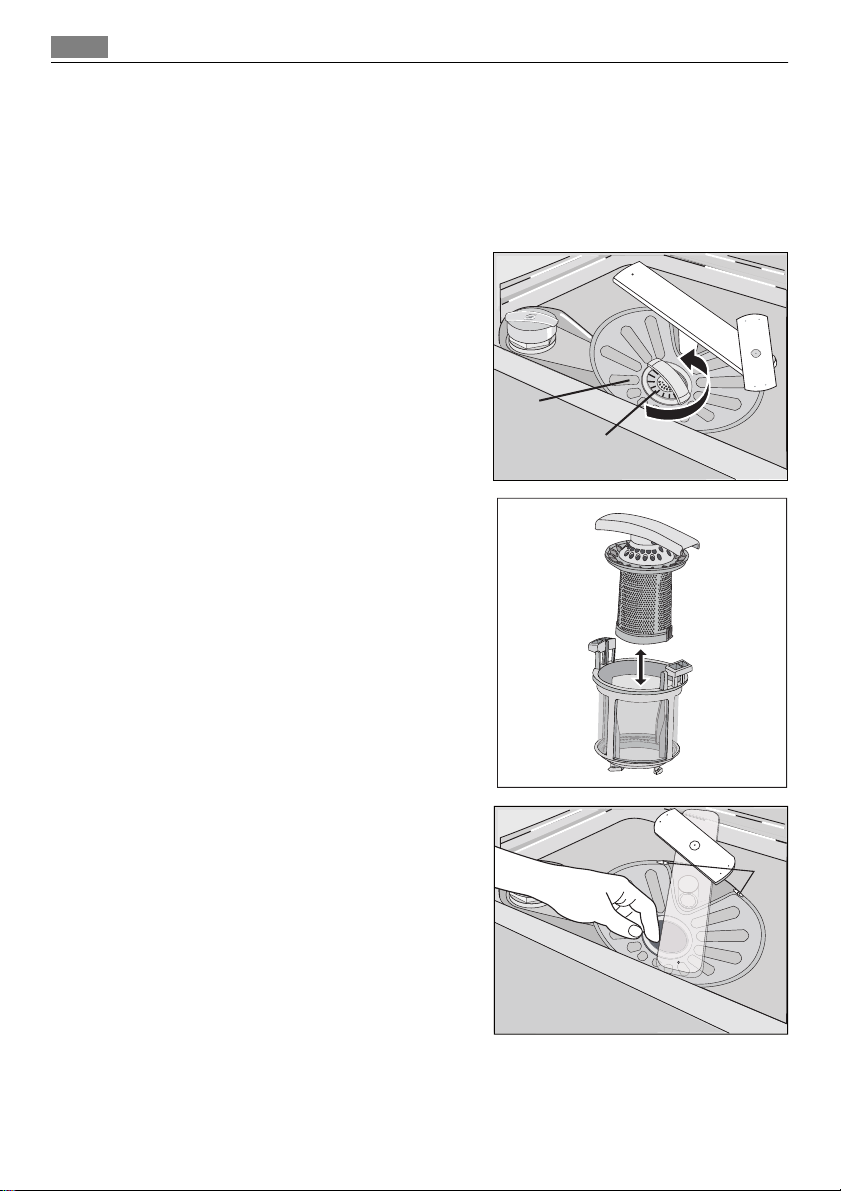
CARE AND CLEANING
To remove and clean the filters
Dirty filters decrease the washing results.
Although the maintenance is very low with these filters, make a check at intervals and if
necessary, clean them.
1. Turn the filter (A) counterclockwise and
remove it out from filter (B).
B
A
2. Filter (A) has two parts. To disassemble
the filter, pull them apart.
3. Fully clean the parts with water.
4. Put the two parts of the filter (A) together and push. Make sure that they assemble correctly in each other.
5. Remove the filter (B).
6. Fully clean the filter (B) with water.
7. Put the filter (B) to its initial position.
Make sure that it assembles correctly in
the two guides (C).
8. Put the filter (A) into position in filter
(B). Turn the filter (A) clockwise until it
locks.
To clean the spray arms
Do not remove the spray arms.
C
Page 19
What to do if…
If the holes in the spray arms become clogged, remove remaining parts of soil with a
thin pointed object.
To clean the external surfaces
Clean the external surfaces of the appliance and control panel with a moist soft cloth.
Only use neutral detergents.
Do not use abrasive products, abrasive cleaning pads or solvents (acetone).
WHAT TO DO IF…
The start of the appliance does not occur or it stops during operation.
First try to find a solution to the problem (refer to the table). If not, contact the service
centre.
With some malfunctions, the display shows an alarm code:
- The appliance does not fill with water
•
- The appliance does not drain the water
•
- The anti-flood device is on.
•
WARNING!
Deactivate the appliance before you do the checks.
Malfunction Possible cause Possible solution
The appliance does not fill
with water.
The water pressure is too low. Contact your local water au-
The water tap is closed. Open the water tap.
The filter in the water inlet
The connection of the water in-
The water inlet hose is dam-
The appliance does not drain
the water.
The connection of the water
The water drain hose is dam-
The anti-flood device is on. Close the water tap and con-
The start of the washing programme does not occur.
The water tap is blocked or
there is limescale on it.
hose is blocked.
let hose is not correct.
aged.
There is a blockage in the sink
spigot.
drain hose is not correct.
aged.
The appliance door is open.
The door indicator is on.
Clean the water tap.
thority.
Clean the filter.
Make sure that the connection
is correct.
Make sure that the water inlet
hose has no damages.
Clean the sink spigot.
Make sure that the connection
is correct.
Make sure that the water
drain hose has no damages.
tact the service centre.
Close the appliance door.
19
Page 20

What to do if…
20
Malfunction Possible cause Possible solution
You did not press the Start
touchpad or button.
The mains plug is not connec-
ted in the mains socket.
The fuse in the fuse box is dam-
aged.
The delay start is set. • Cancel the delay start.
Press the Start touchpad or
button.
Connect the mains plug.
Replace the fuse.
• When the countdown is
completed, the washing programme starts automatically.
After the check, activate the appliance. The programme continues from the point of interruption.
If the malfunction occurs again, contact the service centre.
If the display shows other alarm codes, contact the service centre.
The necessary information for the service centre is on the rating plate.
Record this information:
– Model (MOD.) ........................................................
– Product number (PNC) ..........................................
– Serial number (S.N.) ..............................................
The washing results and drying results are not satisfactory
Problem Possible cause Possible solution
The dishes are not clean. The washing programme was
You did not put the items cor-
The spray arms could not turn
The filters are dirty or not as-
The quantity of detergent was
Limescale particles on the
dishes.
Incorrect level of the water
not applicable for the type of
load and soil.
rectly in the baskets, water did
not touch all surfaces.
freely. Incorrect position of
the items in the baskets.
sembled and installed correctly.
not sufficient or missing.
The salt container is empty. Fill the salt container with dish-
softener adjustment.
Make sure that the washing
programme is applicable for
the type of load and soil.
Put the items correctly in the
baskets.
Make sure that an incorrect position of the items do not
cause the blockage of the
spray arms.
Make sure that the filters are
clean and correctly assembled
and installed.
Make sure that the quantity of
detergent is sufficient.
washer salt.
Adjust the water softener with
the correct level.
Page 21
Technical data
Problem Possible cause Possible solution
The salt container cap is not
There are streaks, whitish
stains, or a bluish layer on
glasses and dishes.
Dry water drop stains on
glasses and dishes.
The detergent can be the cause. Use a different brand of deter-
The dishes are wet. The washing programme was
The dishes are wet and matt. The rinse aid dispenser is emp-
The multitab function is on
closed correctly.
The rinse aid quantity is too
high.
The rinse aid quantity is too
low.
without a drying phase or
with a decreased drying phase.
ty.
(this function automatically
deactivates the rinse aid dispenser).
Make sure that the salt container cap is closed correctly.
Decrease the rinse aid quantity.
Increase the rinse aid quantity.
gent.
For better drying results, keep
the door ajar for some minutes.
Fill the rinse aid dispenser with
rinse aid.
Activate the rinse aid dispenser.
Activating the rinse aid dispenser
1. Activate the appliance.
2. Make sure that the appliance is in setting mode.
3. Press and hold button Delayand button Start at the same time until the programme
indicators AUTO, PRO and 30MIN flash.
4. Release button Delayand button Start.
5. Press button Option.
• The programme indicators AUTO and 30MIN go off.
• The programme indicator PRO continues to flash.
• The display shows the setting of the rinse aid dispenser.
The rinse aid dispenser is off.
21
6. Press button Option to change the setting.
7. Deactivate the appliance to confirm
TECHNICAL DATA
Dimensions Width 596 mm
Height 818 - 898 mm
Depth 575 mm
The rinse aid dispenser is on.
Page 22

Environment concerns
22
Water supply pressure Minimum 0,5 bar (0,05 MPa)
Maximum 8 bar (0,8 MPa)
Water supply
Capacity Place settings 12
1) Connect the water inlet hose to a water tap with a 3/4'' thread.
1)
Cold water or hot water maximum 60 °C
The rating plate on the inner edge of the appliance door shows the electrical connection
data.
If the hot water comes from alternative sources of energy, (e.g. solar panels, photovoltaic
panels and aeolian), use a hot water supply to decrease energy consumption.
ENVIRONMENT CONCERNS
The symbol on the product or on its packaging indicates that this product may not
be treated as household waste. Instead it should be taken to the appropriate collection
point for the recycling of electrical and electronic equipment. By ensuring this product is
disposed of correctly, you will help prevent potential negative consequences for the
environment and human health, which could otherwise be caused by inappropriate
waste handling of this product. For more detailed information about recycling of this
product, please contact your local council, your household waste disposal service or the
shop where you purchased the product.
Recycle the materials with the symbol
recycle it.
. Put the packaging in applicable containers to
Page 23

AZ ÖN ELÉGEDETTSÉGE ÉRDEKÉBEN
Köszönjük, hogy megvásárolta ezt az AEG készüléket.
Reméljük, hogy készülékünk kifogástalan teljesítményével
hosszú éveken át elégedett lesz. Pontosan ezért
alkalmaztunk olyan innovatív technológiákat és
jellemzőket, melyek a mindennapi teendőket
nagymértékben megkönnyítik, és amelyeket más
készülékeken nem talál meg. Kérjük, szánjon néhány
percet az útmutató végigolvasására, hogy a maximumot
hozhassa ki készülékéből.
KIEGÉSZÍTŐ TARTOZÉKOK ÉS SEGÉDANYAGOK
23
Az AEG webáruházban mindent megtalál, ami ahhoz
szükséges, hogy AEG készülékeinek ragyogó külsejét és
tökéletes működését fenntartsa. Ezzel együtt széles
választékban kínáljuk a legszigorúbb szabványoknak és
az Ön minőségi igényeinek megfelelően tervezett és
kivitelezett egyéb kiegészítő tartozékokat - a különleges
főzőedényektől az evőeszköz kosarakig, az
edénytartóktól a fehérnemű-zsákokig...
Látogassa meg webáruházunkat az alábbi címen:
www.aeg-electrolux.com/shop
Page 24

24
Tartalomjegyzék
TARTALOMJEGYZÉK
25 Biztonsági információk
28 Termékleírás
29 Kezelőpanel
31 A készülék használata
32 A vízlágyító beállítása
33 Speciális só használata
34 A mosogatószer és az öblítőszer
használata
35 Multitab funkció
35 Evőeszközök és edények
bepakolása
36 Mosogatóprogramok
37 Mosogatóprogram kiválasztása és
elindítása
39 Ápolás és tisztítás
40 Mit tegyek, ha...
43 Műszaki adatok
44 Környezetvédelmi tudnivalók
A felhasználói kézikönyvben az alábbi
szimbólumokat használjuk:
Fontos információk, amelyek
személyes biztonságát szolgálják,
illetve információk arra vonatkozóan,
hogyan elõzheti meg a készülék
károsodását.
Általános információk és tanácsok
Környezetvédelmi információk
A változtatások jogát fenntartjuk
Page 25

Biztonsági információk
BIZTONSÁGI INFORMÁCIÓK
A mosogatógép üzembe helyezése és használata előtt olvassa el figyelmesen a használati
útmutatót:
• Személyes és vagyontárgyai biztonsága érdekében.
• A környezet védelme érdekében.
• a készülék helyes használata érdekében.
Tartsa az útmutatót a készülék közelében, akkor is, ha a készüléket másnak átadja.
A nem megfelelő üzembe helyezés vagy használat okozta károkért a gyártó nem vállal fel‐
elősséget.
Gyermekek és fogyatékkal élő személyek biztonsága
• Ne bízza a készülék használatát csökkent fizikai, értelmi vagy mentális képességű, illetve
megfelelő tapasztalatok és ismeretek híján lévő személyre, beleértve a gyermekeket. A
biztonságukért felelős személy felügyelje őket, illetve a készülék használatára vonatkozó‐
an biztosítson útmutatást számukra.
• Minden csomagolóanyagot tartson a gyermekektől távol. Fulladás vagy sérülés veszélye
áll fel.
• Minden mosogatószert tartson biztonságos helyen. Ne engedje, hogy gyermekek a moso‐
gatószerekhez nyúljanak.
• A gyermekeket és kisállatokat tartsa távol a készüléktől, amikor az ajtaja nyitva van.
Általános biztonsági tudnivalók
• Ne változtassa meg a készülék műszaki jellemzőit. Ez sérülést okozhat, és kárt tehet a
készülékben.
• A szem, száj és torok sérülések elkerülése érdekében tartsa be a mosogatószer-gyártó
biztonsági utasításait.
• Ne igyon a mosogatógépből származó vízből. A készülékben mosogatószer-maradvá‐
nyok lehetnek.
• Ne hagyja a készüléket nyitott ajtóval felügyelet nélkül. Így elkerülhetők a sérülések vagy
a nyitott ajtónak való ütközés.
• Ne üljön vagy álljon a nyitott ajtóra.
25
Használat
• A gépet háztartási célú használatra tervezték. A személyi sérülések és vagyoni károk el‐
kerülése érdekében a készüléket kizárólag erre a célra használja.
• A készüléket csak mosogatógépben tisztítható edények tisztítására használja.
• Ne tegyen gyúlékony anyagot, vagy gyúlékony anyaggal szennyezett tárgyat a készülék‐
be, annak közelébe, illetve annak tetejére. Ez tűz- és robbanásveszélyt okozhat.
• A késeket és minden más, szúrós hegyű eszközt hegyével lefele az evőeszközkosárba
helyezze. Ha nem, vízszintes helyzetben a felső kosárba vagy a késtartó kosárba helyez‐
ze. (Nem minden típus rendelkezik késtartó kosárral.)
• Csak gépi mosogatáshoz alkalmas termékeket (mosogatószer, só, öblítőszer) használjon.
• A nem gépi mosogatáshoz előírt sótípusok használata kárt tehet a vízlágyítóban.
Page 26

26
Biztonsági információk
• A mosogatóprogram elindítása előtt töltse fel speciális sóval a készüléket. A készülékben
maradó só kimarhatja a felületeket vagy meglyukaszthatja a készülék alját.
• Az öblítőszeren kívül más terméket soha ne töltsön az öblítőszer-adagolóba (pl. mosoga‐
tógép-tisztító szert, folyékony mosogatószert). Ez kárt tehet a készülékben.
• A mosogatóprogram elindítása előtt győződjön meg arról, hogy a szórókarok szabadon
mozoghatnak.
• A készülékből forró gőz szabadulhat ki, ha az ajtót mosogatóprogram futtatása közben
kinyitja. Égési sérülés veszélye áll fenn.
• Az edényeket a mosogatógépből csak a mosogatóprogram lejárta után vegye ki.
Ápolás és tisztítás
• Tisztítás előtt kapcsolja ki a készüléket és húzza ki a hálózati csatlakozódugót a hálózati
csatlakozóaljzatból.
• Ne használjon gyúlékony vagy rozsdásodást okozó anyagokat.
• Ne használja a készüléket a szűrők nélkül. Ügyeljen arra, hogy a szűrők beszerelése he‐
lyes legyen. A szűrők nem megfelelő beszerelése csökkenti a mosogatás hatásfokát, és
a készülék károsodását okozhatja.
• A készülék tisztításához ne használjon vízsugarat vagy gőzt. Áramütést és a készülék
károsodását okozhatja.
Üzembe helyezés
• Ellenőrizze, hogy a készülék sértetlen. Ne helyezzen üzembe és ne csatlakoztasson egy
sérült készüléket, képjen kapcsolatba a kereskedővel.
• A készülék üzembe helyezése és használata előtt távolítsa el a csomagolást.
• Az elektromos- és a vízvezeték csatlakoztatását és a készülék üzembe helyezését kizáró‐
lag szakember végezze. Ezzel megelőzhetők a szerkezeti károk és személyi sérülések.
• Ügyeljen arra, hogy az üzembe helyezés során a hálózati dugasz le legyen választva a
fali aljzatról.
• Ne fúrja ki a készülék oldalait, nehogy megsérüljenek a hidraulikus és elektromos alkatré‐
szek.
• Fontos! Tartsa be a készülékhez mellékelt sablon utasításait:
– A készülék üzembe helyezéséhez.
– Az ajtópanel felszereléséhez.
– A vízvezeték és a lefolyó csatlakoztatásához.
• A készüléket biztonságos szerkezet alá és mellé helyezze.
Fagyveszély
• Ne helyezze üzembe a készüléket olyan helyen, ahol a hőmérséklet 0°C alatt van.
• A gyártó nem felel a fagy okozta kárért.
Vízhálózatra csatlakoztatás
• A készülék vízhálózatra történő csatlakoztatásához használjon új csöveket. Ne alkalmaz‐
zon használt csöveket.
Page 27

Biztonsági információk
• Ne csatlakoztassa a készüléket új vízvezetékekre vagy hosszú ideig nem használt veze‐
tékekre. Hagyja folyni a vizet néhány percig, majd ezt követően csatlakoztassa a befolyó‐
csövet.
• Vigyázzon, hogy a készülék üzembe helyezésekor ne nyomja össze vagy ne károsítsa a
vízcsöveket.
• A vízszivárgás elkerülése érdekében biztosítsa, hogy a vízcsatlakoztatások szorosan
meg legyenek húzva.
• A készülék első használata során győződjön meg arról, hogy a csövek nem szivárognake.
• A befolyócső dupla dupla bevonattal ellátott belső vezetékkel, valamint biztonsági szelep‐
pel rendelkezik. A befolyócső akkor van nyomás alatt, amikor víz áramlik rajta keresztül.
Ha szivárgás van a befolyócsövön, a biztonsági szelep megszakítja a vízáramlást.
– Legyen körültekintő a befolyócső csatlakoztatásakor:
– A befolyócsövet vagy a biztonsági szelepet ne merítse vízbe.
– Ha a befolyócső vagy a biztonsági szelep megsérül, azonnal válassza le a csatlako‐
zódugót a hálózati aljzatról.
– A biztonsági szeleppel ellátott befolyócső cseréjével forduljon szakszervizhez.
VIGYÁZAT
Veszélyes feszültség.
27
Elektromos csatlakozás
• A készüléket kötelező földelni.
• Ellenőrizze, hogy az adattáblán szereplő elektromossági adatok megfelelnek-e a háztartá‐
si hálózati áram paramétereinek.
• Mindig megfelelően felszerelt, érintésbiztos aljzatot használjon.
• Ne használjon több helyes csatlakozókat és hosszabbítókat. Ezek használata tűzveszélyes.
• Ne cserélje vagy módosítsa a hálózati kábelt. Forduljon szakszervizhez.
• Ügyeljen rá, hogy ne tegyen kárt a készülék hátulján található hálózati dugaszban és ká‐
belben, illetve ne nyomja össze azokat.
• Beszerelés után biztosítsa a hálózati dugasz könnyű elérhetőségét.
• A készüléket ne a hálózati kábelnél fogva válassza le. Mindig a hálózati dugaszt húzza.
Page 28
28
Termékleírás
Szakszerviz
• A készüléken javítási, vagy egyéb munkákat kizárólag erre felhatalmazott szakember vé‐
gezhet. Forduljon szakszervizhez.
• Csak eredeti pótalkatrészeket használjon.
A készülék hulladékba helyezése
• A személyi sérülések vagy vagyoni károk megelőzése érdekében:
– Húzza ki a dugaszt a hálózati aljzatból.
– Vágja el a hálózati tápkábelt, és helyezze a hulladékba.
– Vegye le az ajtózárat. Így a gyermekek vagy kisállatok nem záródhatnak be a készülék‐
be. A bezáródás fulladásveszélyes.
– A készüléket a helyi hulladéklerakó központban helyezze a hulladékba.
VIGYÁZAT
A mosogatógépbe való mosogatószerek veszélyesek, és korróziót okozhatnak!
• Ha a mosószerekkel baleset történik, azonnal forduljon orvoshoz.
• Ha a mosószer szájba kerül, azonnal forduljon orvoshoz.
• Ha szembe kerül a mosogatószer, akkor azonnal forduljon orvoshoz, és öblítse ki a sze‐
meket vízzel.
• A mosogatógépbe való mosogatószereket biztonságos és gyermekek által el nem érhető
helyen tárolja.
• Ne hagyja nyitva a készülék ajtaját, amikor mosogatószer van a mosogatószer-adagolóban.
• Csak egy mosogatóprogram indítása előtt töltse fel a mosogatószer-adagolót.
TERMÉKLEÍRÁS
1
2
3
4
5
1 Felső kosár
10
9
8
7
6
Page 29

2 Vízkeménység-tárcsa
3 Sótartály
4 Mosogatószer-adagoló
5 Öblítőszer-adagoló
6 Adattábla
7 Szűrők
8 Alsó szórókar
9 Középső szórókar
10 Felső szórókar
KEZELŐPANEL
Kezelőpanel
29
1
1 Be/ki gomb
2 Program mutató
3 Program gomb
4 Programkijelzők
5 Kijelzés
6 Delay gomb
7 Start gomb
8 Jelzőfények
9 Option gomb
Multitab jelzőfénye. Felgyullad, amikor aktiválja a funkciót.
ÖKO PLUS jelzőfénye. Felgyullad, amikor aktiválja a funkciót.
Mosogatási fázis jelzőfénye. Felgyullad, amikor a mosogatási fázis fut.
2
3
9
4
8
Jelzőfények
5 6
7
Page 30

30
Kezelőpanel
Jelzőfények
Öblítési fázis jelzőfénye. Felgyullad, amikor az öblítési program fut.
Szárítási fázis jelzőfénye. Felgyullad, amikor a szárítási fázis fut.
Vége jelzőfény. Felgyullad, amikor a mosogatóprogram lejárt.
Öblítőszer jelzőfénye. Felgyullad, amikor az öblítőszer-adagolót fel kell tölteni.
Só jelzőfénye. Felgyullad, amikor a sótartályt fel kell tölteni.
Miután a tartályt feltöltötte, a só jelzőfénye néhány órán keresztül még tovább
világíthat. Ez nincs káros hatással a készülék működésére.
Delay jelzőfénye. Felgyullad, amikor a késleltetett indítást aktiválja.
Ajtó jelzőfénye. Akkor gyullad fel, ha az ajtó nyitva van, vagy nincs megfelelően
becsukva.
1) Amikor a sótartály és/vagy az öblítőszer-adagoló üres, a megfelelő jelzőfények nem gyulladnak fel, amíg a
mosogatóprogram üzemel.
1)
Be/ki gomb
Nyomja meg a gombot a készülék ki- és bekapcsolásához.
A program lejárta után tíz perccel az AUTO OFF funkció automatikusan kikapcsolja a készü‐
léket. Ez segít az energiafogyasztás csökkentésében.
Programmutató
Ezen útmutató segít a mosóprogram kiválasztásában.
1)
Program gomb
Nyomja meg ismételten a gombot, amíg a mosogatóprogram jelzőfénye fel nem gyullad.
Lásd a „Mosogatóprogramok” c. részt.
Kijelző
A kijelző a következőket mutatja:
• A vízlágyító szintjének elektronikus beállítása.
• Az öblítőszer-adagoló be-/kikapcsolása (csak, ha a multitab funkció be van kapcsolva)
• A mosogatóprogram ideje
• A mosogatóprogram befejezéséig hátralévő idő
• A mosogatóprogram vége (a kijelzőn nulla látható)
• A késleltetett indítás ideje
• A riasztási kódok.
Delay gomb
Nyomja meg ismételten a gombot, hogy a mosogatóprogram indítását 1 és 24 óra közötti
időtartammal késleltesse.
Start gomb
A gomb megnyomásával elindíthatja:
• a mosogatóprogramot
Page 31

A készülék használata
• a késleltetett indítás visszaszámlálását.
Option gomb
A gomb megnyomásával beállíthatja a funkciókat.
Ha egy funkció aktív, a megfelelő jelzőfény felgyullad.
Option gomb Multitab ÖKO PLUS
Egyszeri megnyomás BEKAPCSOL KIKAPCSOL
Kétszeri megnyomás KIKAPCSOL BEKAPCSOL
Háromszori megnyomás BEKAPCSOL BEKAPCSOL
Négyszeri megnyomás KIKAPCSOL KIKAPCSOL
Funkciók
Multitab
Ha kombinált mosogatószer-tablettát használ („3 az 1-ben”, „4 az 1-ben”, „5 az 1-ben”), hasz‐
nálja a multitab funkciót. Lásd a „Multitab funkció” c. fejezetet.
ÖKO PLUS
Ez a funkció csökkenti a hőmérsékletet a szárítási szakaszban. Az áramfogyasztás 25%-kal
csökken.
A program végén, amikor kinyitja a készülék ajtaját, az edények nedvesek lehetnek. Azt ja‐
vasoljuk, hogy hagyja nyitva az ajtót, és hagyja megszáradni az edényeket.
Beállítás üzemmód
A következő műveletek esetében a készülék legyen beállítás üzemmódban:
• Mosogatóprogram beállítása és elindítása.
• Mosogatóprogram beállítása és késleltetett indítása.
• A vízlágyító szintjének elektronikus beállítása.
• Az öblítőszer-adagoló be-/kikapcsolása (csak, ha a multitab funkció be van kapcsolva).
Kapcsolja be a készüléket. A készülék akkor van beállítás üzemmódban, ha:
• Az összes program kijelző világít.
• Két vízszintes állapotsáv jelenik meg a kijelzőn.
Kapcsolja be a készüléket. A készülék nincs beállítás üzemmódban, ha:
• Csak egy program kijelző világít.
• A kijelzőn látható a mosogatóprogram vagy a késleltetett indítás ideje.
– A beállítási üzemmódba való visszatéréshez törölni kell a programot vagy a késleltetett
indítást. Lásd a "Mosogatóprogram kiválasztása és elindítása" c. részt.
31
A KÉSZÜLÉK HASZNÁLATA
1. Ellenőrizze, hogy a vízlágyító szintje megfelel-e lakóhelyén használt víz keménységé‐
nek. Szükség esetén módosítsa a vízlágyító beállítását.
2. Töltse fel a sótartályt mosogatógéphez használatos sóval.
Page 32

32
A vízlágyító beállítása
3. Töltse fel az öblítőszer-adagolót öblítőszerrel.
4. Helyezze be az evőeszközöket és edényeket a készülékbe.
5. Állítsa be a töltet és a szennyeződés típusának megfelelő mosogatóprogramot.
6. Töltse fel a mosogatószer-adagolót a megfelelő mennyiségű mosogatószerrel.
7. Indítsa el a mosogatóprogramot.
Ha kombinált mosogatószer-tablettát használ („3 az 1-ben”, „4 az 1-ben”, „5 az 1-ben”' stb.),
használja a multitab funkciót (lásd a „Multi-tab funkció” c. részt).
A VÍZLÁGYÍTÓ BEÁLLÍTÁSA
A vízlágyító eltávolítja a csapvízből az ásványi anyagokat és sókat. Ezek az ásványi anyag‐
ok és sók károsíthatják a készüléket.
Állítsa be a vízlágyító szintet, ha az nem felel meg a lakóhelyén használt víz keménységének.
A használt víz keménységére vonatkozó tájékoztatásért lépjen kapcsolatba a helyi vízügyi
hatóságokkal.
Vízkeménység
Német fok (dH°) Francia fok (°TH) mmol/l Clarke fok kézzel elektro‐
51–70 91–125 9,1–12,5 64–88
43 – 50 76 – 90 7,6 – 9,0 53 – 63
37 – 42 65 – 75 6,5 – 7,5 46 – 52
29 – 36 51 – 64 5,1 – 6,4 36 – 45
23 – 28 40 – 50 4,0 – 5,0 28 – 35
19 – 22 33 – 39 3,3 – 3,9 23 – 27
15 – 18 26 – 32 2,6 – 3,2 18 – 22 1 4
11 – 14 19 – 25 1,9 – 2,5 13 – 17 1 3
4 – 10 7 – 18 0,7 – 1,8 5 – 12 1 2
< 4 < 7 < 0,7 < 5
1) Gyári helyzet.
2) Ezen a szinten ne használjon sót.
Manuálisan és elektronikusan kell beállítania a vízlágyítót.
Vízkeménység beállítá‐
2
2
2
2
2
2
1
sa
nikusan
1)
1)
1)
1)
1)
1)
2)
5
1
10
9
8
7
6
1)
2)
Page 33

Speciális só használata
Manuális beállítás
A vízkeménység-tárcsát forgassa el az 1. vagy 2.
állásba (lásd a táblázatot).
Elektronikus beállítás
1. Kapcsolja be a készüléket.
2. Győződjön meg arról, hogy a készülék beállítási módban van.
3. Egyszerre nyomja meg, és tartsa lenyomva a Delay és a Start gombokat, amíg az AU‐
TO, PRO és a 30MIN villogni nem kezdenek.
4. Engedje el a Delay és a Start gombokat.
5. Nyomja meg a Program gombot,
• A PRO és a 30MIN programkijelzők kialszanak.
• Az AUTO programkijelző továbbra is villog.
• A kijelző a vízlágyító beállítását mutatja (például:
6. A beállítás módosításához nyomja meg ismételten a Program gombot.
7. A megerősítéshez kapcsolja ki a készüléket.
Ha a vízlágyító elektronikusan az 1. szintre van beállítva, akkor a só visszajelző nem kap‐
csol be.
= 5.-ös szint).
33
SPECIÁLIS SÓ HASZNÁLATA
A sótartály feltöltése
1. Csavarja le a kupakot az óramutató járásá‐
val ellenkező irányban, és nyissa ki a só‐
tartályt.
2. Töltse meg a sótartályt 1 liter vízzel (első
feltöltéskor).
3. A tölcsér segítségével töltse fel a sótar‐
tályt sóval.
4. Távolítsa el a sótartály nyílása körül lévő
sót.
5. A sótartály visszazárásához tekerje a ku‐
pakot az óramutató járásával megegyező
irányba.
Normális jelenség, ha a só betöltésekor víz folyik ki a sótartályból.
Page 34

20
30
M
A
X
1
2
3
4
+
-
34
A mosogatószer és az öblítőszer használata
A MOSOGATÓSZER ÉS AZ ÖBLÍTŐSZER HASZNÁLATA
1
2
7
3
4
6
5
Mosogatószer használata
A környezet védelme érdekében ne használjon a szükségesnél több mosogatószert.
Kövesse a mosogatószer gyártójának a csomagoláson található utasításait.
A mosogatószer-adagoló feltöltése:
1.
Nyomja meg a kioldógombot
2.
Tegye a mosogatószert az adagolóba
3. Ha előmosogatási fázissal rendelkező mosogatóprogramot használ, tegyen egy kevés
mosogatószert a készülék ajtajának belsejébe.
4.
Ha mosogatószer-tablettát használ, tegye a mosogatószer-adagolóba
5. Zárja be a mosogatószer-adagolót. Nyomja le a fedelet, amíg a helyére nem kattan.
Mosogatószer-tabletta használata esetén használja a hosszú mosogatóprogramokat. Ezek
a rövid programok során nem oldódnak fel teljesen, így csökkenthetik a mosás eredményét.
2
fedelének felnyitásához 7 a mosogatószer-adagoló
1
.
1
.
Az öblítőszer használata
Az öblítőszer lehetővé teszi, hogy az edények folt- és csíkmentesen száradjanak.
Az öblítőszer-adagoló az utolsó öblítéskor automatikusan adagolja az öblítőszert.
Az öblítőszer-adagoló feltöltéséhez kövesse az alábbi lépéseket:
1.
Nyomja meg a kioldógombot
2.
Töltse fel az öblítőszer-adagolót
tatja.
3. A kilöttyent öblítőszert nedvszívó törlőkendővel távolítsa el, hogy a mosogatóprogram
alatt megakadályozza a túlzott habképződést.
4. Zárja be az öblítőszer-adagolót. Nyomja le a fedelet, amíg a helyére nem kattan.
6
fedelének kinyitásához. 5 az öblítőszer-adagoló
3
öblítőszerrel. A "max" jelzés a maximális szintet mu‐
Page 35
Multitab funkció
Állítsa be az öblítőszer adagolását
Gyári beállítás: 3. állás
Az adagolás 1. (legalacsonyabb adagolás) és 4. (legmagasabb adagolás) pozíció között ál‐
lítható be.
Forgassa el az öblítőszer-adagoló kiválasztógombját
téséhez.
4
az adag növeléséhez vagy csökken‐
MULTITAB FUNKCIÓ
A multitab funkció kombinált mosogatószer-tablettáknál alkalmazható.
Ezek a tabletták mosogatószert, öblítőszert és mosogatógéphez használandó sót tartalmaz‐
nak. A tabletták bizonyos típusai más adalékanyagokat is tartalmazhatnak.
Győződjön meg arról, hogy a tabletták megfeleljenek lakóhelye vízkeménységének (tekintse
meg a termék csomagolásán lévő információkat).
A multitab funkció leállítja az öblítőszer és a só betöltését.
A multitab funkció automatikusan kikapcsolja az öblítőszer és a só jelzőfényeit.
A multitab funkció használatakor a program időtartama megnövekedhet.
A multitab funkciót a mosogatóprogram indítása előtt kapcsolja be vagy ki. A funkciót a prog‐
ram működése közben nem lehet be- vagy kikapcsolni.
A mosogatóprogram kezdete előtt mindig győződjön meg róla, hogy a multitab funkció be vane kapcsolva.
A multitab funkció kikapcsolásához és külön mosogatószer, só és öblítőszer használatához
1. Nyomja meg az Option gombot, amíg a multitab jelzőfény ki nem alszik. A funkciót kikap‐
csolta.
2. Töltse fel a sótartályt és az öblítőszer-adagolót.
3. Állítsa a vízkeménységet a legmagasabb szintre.
4. Futtasson le egy mosogatóprogramot edények nélkül.
5. Amikor a mosogatóprogram befejeződött, állítsa be a vízlágyító szintjét a lakóhelyének
megfelelő értékre.
6. Állítsa be az öblítőszer mennyiségét.
35
EVŐESZKÖZÖK ÉS EDÉNYEK BEPAKOLÁSA
Lásd a " ProClean töltetek példái" c. kiadványt.
Javaslatok és tanácsok
• Ne helyezzen a készülékbe a vizet felszívó darabokat (szivacsot, rongyot).
• Az edényekről távolítsa el az ételmaradékot.
• Áztassa fel az edényekre égett ételt.
• Az üreges tárgyakat (pl. csészék, poharak és lábasok) nyílásukkal lefele tegye be.
• Vigyázzon, hogy a víz ne gyűlhessen bele az edényekbe vagy csészékbe.
Page 36
36
Mosogatóprogramok
• Fontos, hogy az edények és evőeszközök ne legyenek egymásba csúszva.
• Győződjön meg arról, hogy a poharak nem érnek egymáshoz.
• A kisebb tárgyakat helyezze az evőeszközkosárba.
• A kanalakat más evőeszközökkel vegyesen pakolja be, hogy ne tapadjanak össze.
• Az edényeket úgy helyezze a kosárba, hogy a víz az összes felületet érje.
• A könnyű darabokat helyezze a felső kosárba. Ügyeljen arra, hogy az eszközök ne moz‐
dulhassanak el.
• A műanyag darabokra és tapadásmentes bevonatú serpenyőkre vízcseppek gyűlhetnek.
MOSOGATÓPROGRAMOK
Program Szennyező‐
1)
2)
3)
1) A készülék érzékeli a szennyeződés típusát és a kosarakban lévő edények mennyiségét. A víz hőmérsékletét és
mennyiségét, az energiafogyasztást és a program idejét automatikusan beállítja.
2) A programmal frissen szennyezett edényeket mosogathat el. Jó mosogatási eredményt nyújt rövid idő alatt.
3) Ez a laboratóriumok számára készült szabványos program. A program segítségével normál szennyezettségű
edények és evőeszközök esetén a leghatékonyabb víz- és energiafelhasználást érheti el. A vizsgálati
információk megtalálhatók a mellékelt tájékoztatón.
dés típusa
Valamennyi Edények,
Erős szennye‐
zettség
Normál vagy
enyhe szen‐
nyezettség
Normál szen‐
nyezettség
A program segítségével gyor‐
san elöblítheti az edényeket.
Megelőzi, hogy az ételmaradé‐
kok rászáradjanak az edények‐
re, és a készülékből kellemet‐
len szag áradjon.
A programhoz ne használjon
mosogatószert.
Töltet típusa Program leírása ÖKO PLUS funkció
evőeszközök,
lábasok és fa‐
zekak
Edények,
evőeszközök,
lábasok és fa‐
zekak
Edények és
evőeszközök
Edények és
evőeszközök
Előmosogatás
Mosogatás 45°C vagy
70°C
Öblítések
Szárítás
Előmosogatás
Mosogatás 70 °C
Öblítések
Szárítás
Mosogatás 60 °C
Öblítések
Előmosogatás
Mosogatás 50 °C
Öblítések
Szárítás
Öblítések Igen, de nincs hatása
Igen, hatással van
Igen, hatással van
Igen, de nincs hatása
Igen, hatással van
Page 37

Mosogatóprogram kiválasztása és elindítása
Fogyasztási értékek
1)
Program
1) A kijelző a programidőt mutatja.
Energia (kWh) Víz (liter)
0,9 - 1,7 8 - 17
1,5 - 1,7 15 - 16
0,9 9
1,0 - 1,1 10 - 11
0,1 4
A nyomás és a hőmérséklet, az áramszolgáltatás ingadozásai és az edények mennyisége
módosíthatják a fogyasztási értékeket.
MOSOGATÓPROGRAM KIVÁLASZTÁSA ÉS ELINDÍTÁSA
Mosogatóprogram indítása késleltetett indítás nélkül
1. Zárja be a készülék ajtaját.
2. Kapcsolja be a készüléket.
3. Győződjön meg arról, hogy a készülék beállítási módban van.
4. Állítsa be a mosogatóprogramot.
• A megfelelő program jelzőfénye felgyullad.
• A programidő villog a kijelzőn.
• A beállított mosogatóprogram fázisjelzőfénye felgyullad.
5. Ha szükséges, állítsa be az ÖKO PLUS funkciót.
• A funkciók kiválasztását mindig a mosogatóprogram beállítása után kell végezni.
6. Nyomja meg a Start gombot, a mosogatóprogram automatikusan elindul.
• A fázisjelzők kialszanak, de az éppen futó fázis kijelzője égve marad.
37
Mosogatóprogram indítása késleltetett indítással
1. Zárja be a készülék ajtaját.
2. Kapcsolja be a készüléket.
3. Győződjön meg arról, hogy a készülék beállítási módban van.
4. Állítsa be a mosogatóprogramot és a funkciókat.
5. Nyomja meg ismételten a Delay gombot, amíg a kijelző a késleltetett indítás idejét mutatja.
• A késleltetett indítás ideje villog a kijelzőn.
• A késleltetés kijelzője bekapcsolt.
6. Nyomja meg a Start gombot, a visszaszámlálás automatikusan elindul.
• A késleltetett indítás ideje már nem villog a kijelzőn.
• A beállított mosogatóprogram fázisjelzőfénye kialszik.
Page 38

38
Mosogatóprogram kiválasztása és elindítása
• Amikor a visszaszámlálás befejeződött, a mosogatóprogram automatikusan elindul.
– A futó fázis kijelzője bekapcsolt.
Az ajtó kinyitása leállítja a visszaszámlálást. Amikor ismét becsukja az ajtót, a visszaszámlá‐
lás a megszakítási ponttól folytatódik.
A késleltetett indítás törlése
A visszaszámlálás nem működik
1. Nyomja meg ismételten a Delay gombot, amíg
• a kijelzőn a mosogatóprogram ideje nem látható.
• a fázisjelzők fel nem gyulladnak.
2. A mosogatóprogram elindításához nyomja meg a Start gombot.
A visszaszámlálás működik
1. Nyomja meg ismételten a Delay gombot, amíg
• a kijelzőn a mosogatóprogram ideje nem látható.
• a fázisjelzők fel nem gyulladnak.
• A mosogatóprogram automatikusan elindul.
Mosogatóprogram megszakítása
• Nyissa ki a mosogatógép ajtaját.
– A program leáll.
• Zárja be a készülék ajtaját.
– A program a megszakítási ponttól folytatódik.
A mosogatóprogram törlése
Ha a mosogatóprogram nem indult el, módosíthatja a kiválasztását.
Ha a mosogatóprogram működése közben szeretné a kiválasztást módosítani, törölni kell a
programot.
• Nyomja meg egyszerre és tartsa lenyomva a Delay és a Start gombokat, amíg
– az összes programkijelző fel nem gyullad.
– a kijelző két vízszintes sávot meg nem jelenít.
Új mosogatóprogram elindítása előtt ellenőrizze, hogy van-e mosogatószer a mosogatószeradagolóban.
A mosogatóprogram vége
Amikor a mosogatóprogram befejeződött, a kijelző nullát mutat, és a vége jelzőfény felgyullad.
1. Kapcsolja ki a készüléket.
2. Nyissa ki a mosogatógép ajtaját.
3. Jobb szárítási eredmény eléréséhez tartsa nyitva a készülék ajtaját néhány percig.
Távolítsa el az edényeket a kosarakból
• A kipakolás előtt várja meg, amíg az edények kihűlnek. A forró edények könnyebben meg‐
sérülnek.
Page 39

Ápolás és tisztítás
• Először az alsó kosarat, majd a felső kosarat ürítse ki.
• Lehetséges, hogy víz van a készülék oldalfalain és ajtaján. A rozsdamentes acél hama‐
rabb lehűl, mint az edények.
ÁPOLÁS ÉS TISZTÍTÁS
A szűrők eltávolítása és tisztítása
A piszkos szűrők rontják a mosogatás hatékonyságát.
Annak ellenére, hogy a szűrők nem igényelnek különösebb karbantartást, rendszeres ellen‐
őrzésük, és szükség esetén tisztításuk ajánlott.
1. Az (A) szűrő kivételéhez forgassa az óra‐
mutató járásával ellentétes irányba, és ve‐
gye ki a (B) szűrőből.
B
A
2. Az (A) szűrő két részből áll. A szűrő szét‐
szereléséhez húzza szét a részeket.
3. Mindkét részt mossa tisztára folyó víz alatt.
4. Illessze egymáshoz az (A) szűrő két részét
és nyomja össze. Ügyeljen rá, hogy megfe‐
lelően illeszkedjenek.
5. Vegye ki a (B) szűrőt.
6. Alaposan tisztítsa meg a (B) szűrőt folyó
víz alatt.
39
7. Tegye az eredeti helyére a (B) szűrőt. El‐
lenőrizze, hogy a két vezetősínben (C)
megfelelően illeszkedik-e.
8. Helyezze az (A) szűrőt a helyére a (B) szű‐
rőben. Fordítsa el az (A) szűrőt az óramu‐
tató járásával megegyező irányba, amíg
rögzül.
C
Page 40

40
Mit tegyek, ha...
Szórókarok tisztítása
Ne távolítsa el a szórókarokat.
Ha a szórókarok furatai eltömődnének, a szennyeződés megmaradó részét egy hegyes vé‐
gű pálcával távolítsa el.
Külső felületek tisztítása
A mosogatógép és a kezelőpanel külső felületét törölje át egy puha, nedves ruhával.
Csak semleges tisztítószert használjon.
Ne használjon súrolószert, súrolószivacsot vagy oldószereket (pl.: acetont).
MIT TEGYEK, HA...
A készülék nem indul el, vagy működés közben leáll.
Először próbálja meg kiküszöbölni a problémát (lásd a táblázatot). Ha nem sikerül, forduljon
szakszervizhez.
Bizonyos meghibásodások esetén a kijelzőn egy riasztási kód látható:
- A készülék nem tölt be vizet.
•
- A készülék nem ereszti le a vizet.
•
- A túlcsordulás-gátló bekapcsolt.
•
VIGYÁZAT
Az ellenőrzés előtt a készüléket kapcsolja ki.
Hibás működés Lehetséges ok Lehetséges megoldás
A készülék nem tölt be vizet. A vízcsap eltömődött vagy víz‐
köves.
A víznyomás túl alacsony. Forduljon a helyi vízszolgáltató‐
A vízcsap zárva van. Nyissa ki a vízcsapot
Eltömődött a befolyócső szűrő‐
je.
A befolyócső csatlakozása nem
megfelelő.
A befolyócső sérült. Ügyeljen rá, hogy a befolyócsö‐
A készülék nem ereszti le a vizet. A szifon eltömődött. Tisztítsa ki a szifont.
A kifolyócső csatlakozása nem
megfelelő.
Megsérült a kifolyócső. Ügyeljen rá, hogy a kifolyócsö‐
A túlcsordulás-gátló bekapcsolt. Zárja el a vízcsapot, és fordul‐
Tisztítsa ki a vízcsapot.
hoz.
Tisztítsa meg a szűrőt.
Ügyeljen arra, hogy a csatlako‐
zás megfelelő legyen.
vön ne legyen sérülés.
Ügyeljen arra, hogy a csatlako‐
zás megfelelő legyen.
vön ne legyen sérülés.
jon a szakszervizhez.
Page 41

Mit tegyek, ha...
Hibás működés Lehetséges ok Lehetséges megoldás
Nem történt meg a mosogató‐
program indítása.
Nem nyomta meg a Start érintő‐
A hálózati csatlakozódugó
Kiégett a biztosítódobozban a
Késleltetett indítás van beállítva. • Törölje a késleltetett indítást.
A készülék ajtaja nyitva van. Vi‐
lágít az ajtó visszajelző.
gombot vagy gombot.
nincs megfelelően a hálózati
csatlakozóaljzatba csatlakoztat‐
va.
biztosító.
Zárja be a készülék ajtaját.
Nyomja meg a Start érintőgom‐
bot vagy gombot
Csatlakoztassa megfelelően a
csatlakozódugót.
Cserélje ki a biztosítót.
• Amikor a visszaszámlálás be‐
fejeződött, a mosogatóprog‐
ram automatikusan elindul.
41
Az ellenőrzés után kapcsolja be a készüléket. A program a megszakítási ponttól folytatódik.
Ha a nem szűnik meg a hibás működés, akkor forduljon a szervizhez.
Ha a kijelzőn egyéb riasztási kódok láthatóak, akkor forduljon szervizhez.
A szerviz számára szükséges adatok az adattáblán találhatók.
Jegyezze fel ezen információt:
– Modell (MOD.) ........................................................
– Termékszám ("PNC") ........................................
– Sorozatszám (S.N) ...................
A mosogatás és a szárítás eredménye nem kielégítő.
Probléma Lehetséges ok Lehetséges megoldás
Az edények nem tiszták. A kiválasztott mosogatóprog‐
ram nem felel meg a töltet és a
szennyeződés típusának.
Az edényeket nem helyezte
megfelelően a kosarakba, a víz
nem érte el az összes felületet.
A szórókarok nem tudnak sza‐
badon mozogni. Az edények
nem megfelelően vannak a ko‐
sarakba helyezve.
A szűrők szennyezettek vagy
nincsenek megfelelően behe‐
lyezve.
Nem elegendő vagy hiányzik a
mosogatószer.
Győződjön meg arról, hogy meg‐
felelő-e a mosogatóprogram az
ilyen típusú töltet és a szennye‐
ződés esetében.
Helyezze az edényeket megfe‐
lelően a kosarakba.
Győződjön meg arról, hogy a töl‐
tet helytelen elrendezése miatt
nincsenek-e a szórókarok ela‐
kadva.
Győződjön meg arról, hogy tisz‐
ták-e a szűrők, és megfelelően
vannak-e összeszerelve és be‐
téve.
Győződjön meg arról, hogy ele‐
gendő mosogatószert töltött be.
Page 42

42
Mit tegyek, ha...
Probléma Lehetséges ok Lehetséges megoldás
Vízkőmaradványok vannak az
edényeken.
A vízlágyító szintje nincs meg‐
A sótartály kupakja nincs meg‐
A poharakon és az edényeken
csíkok, fehér foltok vagy kékes
bevonat látható.
Vízcseppek száradási nyomait
észleli a poharakon és az edé‐
nyeken.
Lehet, hogy a mosogatószer az
Nedvesek az edények. A mosogatóprogramnak nincs
Az edények nedvesek és homá‐
lyosak.
A multitab funkció be van kap‐
A sótartály üres. Töltse fel a sótartályt mosogató‐
felelően beállítva.
felelően visszazárva.
Túl sok öblítőszert adagolt. Csökkentse az öblítőszer men‐
Túl kevés öblítőszert adagolt. Növelje az öblítőszer mennyisé‐
oka.
szárítási, vagy rövid szárítási fá‐
zisa van.
Az öblítőszer-adagoló üres. Töltse fel az öblítőszer-adago‐
csolva (ez a funkció automatiku‐
san kikapcsolja az öblítőszeradagolást).
géphez használatos sóval.
Állítsa be a vízlágyító megfelelő
szintjét.
Győződjön meg arról, hogy a só‐
tartály kupakja megfelelően záre.
nyiségét.
gét.
Használjon másik márkájú mo‐
sogatószer.
Jobb szárítási eredmény eléré‐
séhez tartsa az ajtót nyitva né‐
hány percig.
lót öblítőszerrel.
Kapcsolja be az öblítőszer-ada‐
golót.
Az öblítőszer-adagoló bekapcsolása
1. Kapcsolja be a készüléket.
2. Győződjön meg arról, hogy a készülék beállítási módban van.
3. Egyszerre nyomja meg, és tartsa lenyomva a Delay és a Start gombokat, amíg az AU‐
TO, PRO és a 30MIN villogni nem kezdenek.
4. Engedje el a Delay és a Start gombot.
5. Nyomja meg az Option gombot.
• Az AUTO és a 30MIN programkijelzők kialszanak.
• A PRO programjelző lámpa továbbra is villog.
• A kijelző az öblítőszer-adagoló beállítását mutatja.
Az öblítőszer-adagoló ki van kapcsolva.
Az öblítőszer-adagoló be van kapcsolva.
6. A beállítás módosításához nyomja meg az Option gombot.
7. A megerősítéshez kapcsolja ki a készüléket
Page 43

MŰSZAKI ADATOK
Gyártó védjegye AEG
Forgalmazó Electrolux Lehel Kft. Háztartási
Típusazonosító FAVORIT 65000 I
Energiahatékonysági osztály (skála A-tól G-ig,
ahol A - hatékonyabb: G - kevésbé hatékony)
A szabvány ciklus gyártó általi megnevezése,
amelyre a címkén és az adatlapon található infor‐
máció vonatkozik
Energiafelhasználás a szabvány ciklust alapul vé‐
ve (a tényleges energiafelhasználás függ a ké‐
szülék használatának a módjától) (kWh)
Tisztítási hatékonyság (skála A-tól G-ig, ahol A magasabb: G - alacsonyabb)
Szárítási hatékonyság (skála A-tól G-ig, ahol A magasabb: G - alacsonyabb)
A mosogatógép befogadó képessége szabvá‐
nyos teríték esetén
Vízfelhasználás a szabvány ciklus alapján (liter) 11
Szabvány ciklus programideje (perc) 160
Átlagos becsült évi energia- és vízfelhasználás
220 ciklusra kifejezve (kWh / liter)
Szabvány ciklus alatti zajszint Db(A) 46
Méretek Szélesség (mm)
Magasság munkafelülettel (mm)
Max. mélység (mm)
Összteljesítmény (W) 2200
Hálózati víznyomás
Minimum (bar) - Maximum (bar)
Műszaki adatok
Készülékek,
1142 Budapest, Erzsébet kir.-né út 87.
A
1
A
A
12 személyes
220 / 2420
596
818 - 898
575
0,5
8
43
Az elektromos csatlakoztatásra vonatkozó adatok a készülék ajtajának belső szélén lévő
adattáblán láthatók.
Ha a meleg víz alternatív energiaforrásokból származik (pl. napelemek, fotovoltaikus pane‐
lek vagy szélenergia), akkor használja a melegvíz-vezetéket az energiafogyasztás csökken‐
tése érdekében.
Page 44
44
Környezetvédelmi tudnivalók
KÖRNYEZETVÉDELMI TUDNIVALÓK
A terméken vagy a csomagoláson található szimbólum azt jelzi, hogy a termék nem
kezelhető háztartási hulladékként. Ehelyett a terméket el kell szállítani az elektromos és
elektronikai készülékek újrahasznosítására szakosodott megfelelő begyűjtő helyre. Azzal,
hogy gondoskodik ezen termék helyes hulladékba helyezéséről, segít megelőzni azokat, a
környezetre és az emberi egészségre gyakorolt potenciális kedvezőtlen következményeket,
amelyeket ellenkező esetben a termék nem megfelelő hulladékkezelése okozhatna. Ha
részletesebb tájékoztatásra van szüksége a termék újrahasznosítására vonatkozóan,
kérjük, lépjen kapcsolatba a helyi önkormányzattal, a háztartási hulladékok kezelését végző
szolgálattal vagy azzal a bolttal, ahol a terméket vásárolta.
A következő jelzéssel ellátott anyagokat hasznosítsa újra:
megfelelő konténerekbe.
. A csomagolást helyezze a
Page 45

Z MYŚLĄ O PERFEKCYJNYCH REZULTATACH
Dziękujemy za wybór tego produktu AEG.
Zaprojektowaliśmy go z myślą o wieloletniej bezawaryjnej
pracy i wyposażyliśmy w innowacyjne technologie, które
ułatwiają życie — nie wszystkie te funkcje można znaleźć
w zwykłych urządzeniach. Prosimy o poświęcenie kilku
minut na lekturę w celu zapewnienia najlepszego
wykorzystania urządzenia.
AKCESORIA I MATERIAŁY EKSPLOATACYJNE
W sklepie internetowym AEG można znaleźć wszystko co
niezbędne do utrzymania urządzeń AEG w doskonałym
stanie technicznym i wizualnym. Wśród szerokiej gamy
akcesoriów, zaprojektowanych i wyprodukowanych
zgodnie z wysokimi standardami jakości, oferujemy
specjalistyczne naczynia kuchenne, kosze na sztućce,
półki na butelki oraz torby do delikatnego prania...
45
Odwiedź sklep internetowy pod adresem
www.aeg-electrolux.com/shop
Page 46

46
Spis treści
SPIS TREŚCI
47 Informacje dotyczące
bezpieczeństwa
51 Opis urządzenia
52 Panel sterowania
54 Eksploatacja urządzenia
55 Ustawianie zmiękczacza wody
56 Wsypywanie soli do zmywarki
57 Używanie detergentu i płynu
nabłyszczającego
58 Uniwersalna tabletka do zmywarki
58 Wkładanie sztućców i naczyń
59 Programy zmywania
60 Wybór i uruchamianie programu
zmywania
62 Konserwacja i czyszczenie
63 Co zrobić, gdy…
66 Dane techniczne
67 Ochrona środowiska
W niniejszej instrukcji użyte zostały
następujące symbole:
Ważne informacje dotyczące
bezpieczeństwa użytkownika oraz
prawidłowej eksploatacji urządzenia.
Informacje i wskazówki ogólne
Informacje dot. ochrony środowiska
Producent zastrzega sobie możliwość
wprowadzenia zmian bez
wcześniejszego powiadomienia
Page 47

Informacje dotyczące bezpieczeństwa
INFORMACJE DOTYCZĄCE BEZPIECZEŃSTWA
Przed instalacją i eksploatacją urządzenia należy uważnie przeczytać tę instrukcję obsługi:
• Ze względu na własne bezpieczeństwo oraz bezpieczeństwo mienia.
• Mając na uwadze ochronę środowiska.
• Aby zapewnić prawidłowe działanie urządzenia.
Instrukcję należy przechowywać wraz z urządzeniem, również w przypadku przeprowadzki
lub odstąpienia urządzenia innemu użytkownikowi.
Producent nie ponosi odpowiedzialności za uszkodzenia spowodowane nieprawidłową insta‐
lacją i eksploatacją.
Bezpieczeństwo dzieci i osób o ograniczonych zdolnościach ruchowych,
sensorycznych lub umysłowych
• Urządzenia nie powinny używać osoby (w tym dzieci) o ograniczonych zdolnościach ru‐
chowych, sensorycznych lub umysłowych, a także nieposiadające doświadczenia i wie‐
dzy niezbędnej do jego obsługi. Osoby te mogą obsługiwać urządzenie wyłącznie pod nad‐
zorem lub po odpowiednim poinstruowaniu przez osobę odpowiedzialną za ich bezpie‐
czeństwo.
• Wszystkie opakowania należy przechowywać poza zasięgiem dzieci. Istnieje ryzyko udu‐
szenia lub odniesienia obrażeń.
• Przechowywać detergenty w bezpiecznym miejscu. Nie dopuszczać do kontaktu dzieci z
detergentami.
• Dzieci i zwierzęta domowe nie powinny znajdować się w pobliżu urządzenia, gdy jego
drzwi są otwarte.
47
Ogólne zasady bezpieczeństwa
• Nie zmieniać parametrów technicznych urządzenia. Istnieje ryzyko odniesienia obrażeń i
uszkodzenia urządzenia.
• Aby uniknąć poparzenia oczu, ust i gardła, należy przestrzegać instrukcji bezpieczeństwa
dostarczonych przez producenta detergentu.
• Nie pić wody z urządzenia. W urządzeniu mogą być obecne cząsteczki detergentów.
• Nie pozostawiać drzwi urządzenia otwartych bez nadzoru. Pozwoli to uniknąć potknięcia
się o otwarte drzwi i potencjalnych obrażeń.
• Nie wolno siadać ani stawać na otwartych drzwiach urządzenia.
Użytkowanie
• Urządzenie jest przeznaczone wyłącznie do użytku w gospodarstwie domowym. Aby unik‐
nąć obrażeń ciała i szkód materialnych, nie należy używać urządzenia do innych celów.
• Urządzenie służy wyłącznie do zmywania naczyń i sprzętów domowych nadających się
do mycia w zmywarce.
• Nie umieszczać łatwopalnych produktów lub przedmiotów nasączonych łatwopalnymi pro‐
duktami w urządzeniu, na nim lub w jego pobliżu. Występuje ryzyko wybuchu lub pożaru.
Page 48

48
Informacje dotyczące bezpieczeństwa
• Noże i wszystkie przedmioty z ostrymi końcówkami umieszczać w koszu na sztućce, os‐
trym końcem skierowanym w dół. Można je również układać w pozycji poziomej w gór‐
nym koszu lub koszyku na noże. (nie wszystkie modele są wyposażone w kosz na noże).
• Używać wyłącznie produktów przeznaczonych do zmywarek (detergentu, soli oraz płynu
nabłyszczającego).
• Sól, która nie jest przeznaczona do zmywarek może spowodować uszkodzenie zmiękcza‐
cza wody.
• Sól w urządzeniu należy uzupełniać bezpośrednio przed uruchomieniem programu zmy‐
wania. Resztki soli pozostające w urządzeniu mogą spowodować korozję lub perforację
dna urządzenia.
• Nie należy wlewać do dozownika płynu nabłyszczającego żadnych innych substancji (środ‐
ków do czyszczenia zmywarek, detergentów w płynie). Może to spowodować uszkodze‐
nie urządzenia.
• Przed uruchomieniem programu zmywania upewnić się, że ramiona spryskujące mogą
się swobodnie obracać.
• W przypadku otwarcia drzwi podczas cyklu zmywania może dojść do uwolnienia gorącej
pary. Istnieje ryzyko poparzenia ciała.
• Nie wyjmować naczyń z urządzenia przed zakończeniem programu zmywania.
Konserwacja i czyszczenie
• Przed przystąpieniem do czyszczenia urządzenia należy je wyłączyć i wyjąć wtyczkę prze‐
wodu zasilającego z gniazdka.
• Nie stosować łatwopalnych produktów lub produktów powodujących korozję.
• Nie używać urządzenia bez filtrów. Należy upewnić się, że filtry są prawidłowo zainstalo‐
wane. Nieprawidłowa instalacja filtrów spowoduje niezadowalające rezultaty mycia oraz
może spowodować uszkodzenie urządzenia.
• Do czyszczenia urządzenia nie wolno używać wody pod ciśnieniem ani pary wodnej. Ist‐
nieje zagrożenie porażenia prądem lub uszkodzenia urządzenia.
Instalacja
• Upewnić się, czy urządzenie nie jest uszkodzone. Nie instalować ani nie podłączać uszko‐
dzonego urządzenia; skontaktować się z dostawcą.
• Przed zainstalowaniem i rozpoczęciem użytkowania urządzenia należy je całkowicie roz‐
pakować.
• Podłączenie do sieci elektrycznej, instalacji wodnej oraz instalacja urządzenia muszą być
wykonane przez wykwalifikowaną osobę. Pozwoli to uniknąć ryzyka istotnych uszkodzeń
lub obrażeń ciała.
• Upewnić się, że podczas instalacji wtyczka przewodu zasilającego jest wyjęta z gniazdka.
• Nie wolno nawiercać ścian bocznych urządzenia, ponieważ może dojść do uszkodzenia
części hydraulicznych lub elektrycznych.
• Ważne! Należy przestrzegać instrukcji podanych na szablonie dostarczonym wraz z urzą‐
dzeniem:
– Aby zainstalować urządzenie.
– Aby zamontować panel drzwiowy.
Page 49

Informacje dotyczące bezpieczeństwa
– Aby podłączyć doprowadzenie i spust wody.
• Należy zadbać o zainstalowanie urządzenia w meblach spełniających odpowiednie wymo‐
gi bezpieczeństwa.
Środki ostrożności w przypadku mrozu
• Nie instalować urządzenia w miejscach, w których temperatura jest niższa niż 0°C.
• Producent nie ponosi odpowiedzialności za uszkodzenia spowodowane przez mróz.
Podłączenie do sieci wodociągowej
• W celu podłączenia doprowadzenia wody należy użyć nowych węży. Nie stosować uży‐
wanych węży.
• Nie podłączać urządzenia do nowych rur lub rur, które nie były używane przez długi czas.
Odkręcić wodę na kilka minut, a następnie podłączyć wąż dopływowy.
• Podczas instalacji urządzenia należy zwrócić uwagę, aby nie przygnieść ani nie uszko‐
dzić węży wodnych.
• Aby zapobiec wyciekom wody, po zainstalowaniu należy sprawdzić szczelność połączeń
hydraulicznych.
• Podczas pierwszego uruchomienia urządzenia należy sprawdzić, czy węże nie przeciekają.
• Wąż dopływowy jest wyposażony w zawór bezpieczeństwa i podwójne ścianki z wewnętrz‐
nym przewodem zasilającym. Ciśnienie w wężu dopływowym jest obecne tylko podczas
przepływu wody. W razie wycieku z węża dopływowego zawór bezpieczeństwa zatrzymu‐
je przepływ.
– Należy zachować ostrożność podczas podłączania węża dopływowego:
– Nie wkładać węża dopływowego ani zaworu bezpieczeństwa do wody.
– W razie uszkodzenia węża dopływowego lub zaworu bezpieczeństwa, natychmiast
wyjąć wtyczkę z gniazdka.
– Wąż dopływowy z zaworem bezpieczeństwa może być wymieniany wyłącznie przez
autoryzowany serwis.
OSTRZEŻENIE!
Niebezpieczne napięcie.
49
Podłączenie do sieci elektrycznej
• Urządzenie musi być uziemione.
Page 50

50
Informacje dotyczące bezpieczeństwa
• Należy upewnić się, że informacje o podłączeniu elektrycznym podane na tabliczce zna‐
mionowej są zgodne z parametrami instalacji zasilającej.
• Należy zawsze używać prawidłowo zamontowanych gniazd sieciowych z uziemieniem.
• Nie używać rozdzielaczy ani przedłużaczy. Istnieje ryzyko pożaru.
• Nie zmieniać ani nie wymieniać samodzielnie przewodu zasilającego. Skontaktować się z
punktem serwisowym.
• Należy zwrócić uwagę, aby nie przygnieść ani nie uszkodzić wtyczki oraz przewodu zasi‐
lającego za urządzeniem.
• Należy zadbać o to, aby po zakończeniu instalacji urządzenia wtyczka przewodu zasilają‐
cego była łatwo dostępna.
• Przy odłączaniu urządzenia nigdy nie ciągnąć za przewód zasilający. Należy zawsze ciąg‐
nąć za wtyczkę sieciową.
Autoryzowany serwis
• Naprawy urządzenia mogą wykonywać tylko wykwalifikowane osoby. Skontaktować się z
punktem serwisowym.
• Używać wyłącznie oryginalnych części zamiennych.
Utylizacja urządzenia
• Aby uniknąć ryzyka obrażeń lub uszkodzeń:
– Wyjąć wtyczkę z gniazdka.
– Odciąć przewód zasilający i wyrzucić.
– Wymontować zatrzask zamka drzwi. Zapobiega to ryzyku zamknięcia się dzieci lub
zwierząt domowych we wnętrzu urządzenia. Istnieje ryzyko uduszenia.
– Oddać urządzenie do złomowania w lokalnym punkcie utylizacji odpadów.
OSTRZEŻENIE!
Detergenty stosowane w zmywarce są niebezpieczne i mogą powodować korozję!
• Jeśli dojdzie do wypadku związanego z detergentami należy natychmiast skontaktować
się z lekarzem.
• W przypadku dostania się detergentu do ust, należy natychmiast skontaktować się z leka‐
rzem.
• W przypadku dostania się detergentu do oczu, należy natychmiast skontaktować się z
lekarzem i przemyć oczy wodą.
• Detergenty do zmywarki należy przechowywać w bezpiecznym miejscu poza zasięgiem
dzieci.
• Nie pozostawiać otwartych drzwi urządzenia, gdy w dozowniku znajduje się detergent.
• Napełniać dozownik detergentu bezpośrednio przed uruchomieniem programu zmywania.
Page 51

OPIS URZĄDZENIA
1
2
Opis urządzenia
10
9
51
3
4
5
1 Kosz górny
2 Regulacja ustawienia twardości wody
3 Pojemnik na sól
4 Dozownik detergentu
5 Dozownik płynu nabłyszczającego
6 Tabliczka znamionowa
7 Filtry
8 Dolne ramię spryskujące
9 Górne ramię spryskujące
10 Sufitowe ramię spryskujące
8
7
6
Page 52

52
Panel sterowania
PANEL STEROWANIA
1
3
9
1 Przycisk Wł./Wył.
2 Przewodnik po programach
3 Przycisk Program
4 Wskaźniki programów
5 Wyświetlacz
6 Przycisk Delay
7 Przycisk Start
8 Wskaźniki
9 Przycisk Option
Wskaźnik funkcji Multitab. Włącza się w momencie włączenia funkcji.
Wskaźnik ÖKO PLUS. Włącza się w momencie włączenia funkcji.
Wskaźnik fazy zmywania. Włącza się podczas fazy zmywania.
Wskaźnik fazy płukania. Włącza się podczas fazy płukania.
Wskaźnik fazy suszenia. Włącza się podczas fazy suszenia.
Wskaźnik zakończenia programu. Włącza się, gdy skończy się program zmywania.
Wskaźnik płynu nabłyszczającego. Włącza się, gdy należy uzupełnić płyn nabły‐
szczający.
Wskaźnik soli. Zapala się, gdy należy uzupełnić sól.
Po napełnieniu zbiornika wskaźnik soli może nadal być włączony przez kilka go‐
dzin. Nie ma to negatywnego wpływu na działanie urządzenia.
Wskaźnik Delay. Włącza się w momencie włączenia funkcji opóźnienia rozpoczę‐
cia programu.
1)
2
4
8
Wskaźniki
5 6
7
1)
Page 53

Panel sterowania
Wskaźniki
Wskaźnik drzwi. Włącza się w razie otwarcia lub nieprawidłowego zamknięcia
drzwi.
1) Gdy zbiornik soli oraz/lub dozownik płynu nabłyszczającego są puste, ich wskaźniki nie włączają się podczas
programu zmywania.
Przycisk Wł./Wył.
Nacisnąć ten przycisk, aby włączyć lub wyłączyć urządzenie.
Po upływie dziesięciu minut od momentu zakończenia programu zmywania funkcja AUTO
OFF powoduje automatyczne wyłączenie urządzenia. Pomaga to zmniejszyć zużycie energii.
Przewodnik po programach
Przewodnik ten jest pomocny w wyborze odpowiedniego programu zmywania.
Przycisk Program
Naciskać ten przycisk, dopóki nie włączy się wskaźnik programu zmywania. Patrz „Progra‐
my zmywania”.
Wyświetlacz
Na wyświetlaczu widoczne są:
• Ustawienie elektronicznej regulacji poziomu zmiękczania wody.
• Włączenie i wyłączenie dozownika płynu nabłyszczającego (tylko przy włączonej funkcji
Multitab)
• Długość programu zmywania
• Czas pozostały do zakończenia programu zmywania
• Zakończenie programu zmywania (na wyświetlaczu pojawi się zero)
• Czas opóźnienia rozpoczęcia programu
• Kody alarmowe.
53
Przycisk Delay
Naciskać ten przycisk, aby ustawić opóźnienie rozpoczęcia programu zmywania w zakresie
od 1 do 24 godzin.
Przycisk Start
Nacisnąć ten przycisk, aby rozpocząć:
• Program zmywania.
• Odliczanie czasu opóźnienia rozpoczęcia programu.
Przycisk Option
Nacisnąć ten przycisk, aby ustawić funkcje.
Po włączeniu danej funkcji włączy się odpowiedni wskaźnik.
Przycisk Option Funkcja Multitab ÖKO PLUS
Nacisnąć jeden raz WŁĄCZONA WYŁĄCZONA
Nacisnąć dwa razy WYŁĄCZONA WŁĄCZONA
Page 54

54
Eksploatacja urządzenia
Przycisk Option Funkcja Multitab ÖKO PLUS
Nacisnąć trzy razy WŁĄCZONA WŁĄCZONA
Nacisnąć cztery razy WYŁĄCZONA WYŁĄCZONA
Funkcje
Funkcja Multitab
W przypadku używania tabletek do zmywarek („3 w 1”, „4 w 1”, „5 w 1”) należy wybrać funk‐
cję Multitab. Patrz „Funkcja Multitab”.
Funkcja ÖKO PLUS
Funkcja ta zmniejsza temperaturę w fazie suszenia. Zużycie energii spada o 25%.
Po zakończeniu programu i otwarciu drzwi urządzenia naczynia mogą być mokre. Zaleca
się pozostawienie uchylonych drzwi urządzenia do czasu wyschnięcia naczyń.
Tryb ustawiania
Tryb ustawiania jest wymagany, aby wykonać następujące czynności:
• Ustawić i uruchomić program zmywania.
• Ustawić i włączyć opóźnienie rozpoczęcia programu.
• Dokonać elektronicznej regulacji poziomu zmiękczania wody.
• Wyłączyć lub włączyć dozownik płynu nabłyszczającego (tylko przy włączonej funkcji Mul‐
titab).
Włączyć urządzenie. Urządzenie znajduje się w trybie ustawiania, gdy:
• Wskaźniki wszystkich programów są włączone.
• Na wyświetlaczu widoczne są dwa poziome paski stanu.
Włączyć urządzenie. Urządzenie nie znajduje się w trybie ustawiania, gdy:
• Włączony jest wskaźnik tylko jednego programu.
• Wyświetlacz pokazuje czas trwania programu zmywania lub opóźnienia rozpoczęcia pro‐
gramu.
– Aby powrócić do trybu ustawiania, należy anulować program lub opóźnienie rozpoczę‐
cia programu. Patrz „Wybór i uruchamianie programu zmywania”.
EKSPLOATACJA URZĄDZENIA
1. Sprawdzić, czy ustawiony poziom zmiękczania wody odpowiada twardości wody dopro‐
wadzanej do urządzenia. Jeśli nie, ustawić poziom zmiękczania wody.
2. Napełnić zbiornik soli solą do zmywarek.
3. Napełnić dozownik płynu nabłyszczającego płynem nabłyszczającym.
4. Włożyć naczynia i sztućce do urządzenia.
5. Ustawić program zmywania odpowiedni do rodzaju naczyń i stopnia zabrudzenia.
6. Napełnić dozownik detergentu odpowiednią ilością detergentu.
7. Uruchomić program zmywania.
Page 55

Ustawianie zmiękczacza wody
W przypadku stosowania tabletek do zmywarek („3 w 1”, „4 w 1”, „5 w 1” itp.) należy wybrać
funkcję Multitab (patrz „Funkcja Multitab”).
USTAWIANIE ZMIĘKCZACZA WODY
Zmiękczacz wody usuwa minerały i sole z doprowadzanej wody. Minerały te i sole mogą
spowodować uszkodzenie urządzenia.
Odpowiednio ustawić poziom zmiękczania wody, jeśli nie odpowiada on twardości wody do‐
prowadzanej do urządzenia.
Skontaktować się z miejscowym zakładem wodociągowym, aby ustalić stopień twardości wo‐
dy doprowadzanej do urządzenia.
Twardość wody
Stopnie niemiec‐
kie (°dH)
51 - 70 91 - 125 9,1 - 12,5 64 - 88
43 - 50 76 - 90 7,6 - 9,0 53 - 63
37 - 42 65 - 75 6,5 - 7,5 46 - 52
29 - 36 51 - 64 5,1 - 6,4 36 - 45
23 - 28 40 - 50 4,0 - 5,0 28 - 35
19 - 22 33 - 39 3,3 - 3,9 23 - 27
15 - 18 26 - 32 2,6 - 3,2 18 - 22 1 4
11 - 14 19 - 25 1,9 - 2,5 13 - 17 1 3
4 - 10 7 - 18 0,7 - 1,8 5 - 12 1 2
< 4 < 7 < 0,7 < 5
1) Ustawienie fabryczne.
2) Przy tym poziomie nie stosować soli.
Stopnie francu‐
skie (°TH)
mmol/l Stopnie Clar‐karęczne elektro‐
Poziom zmiękczania wody należy ustawić ręcznie oraz elektronicznie.
Ustawienie poziomu
zmiękczania wody
2
2
2
2
2
2
1
55
niczne
1)
1)
1)
1)
1)
1)
2)
5
1
10
9
8
7
6
1)
2)
Regulacja ręczna
Obrócić pokrętło ustawienia twardości wody w po‐
łożenie 1 lub 2 (patrz tabela).
Page 56

56
Wsypywanie soli do zmywarki
Ustawienie elektroniczne
1. Włączyć urządzenie.
2. Upewnić się, że urządzenie znajduje się w trybie ustawiania.
3. Jednocześnie nacisnąć i przytrzymać przyciski Delayoraz Start, dopóki nie zaczną mi‐
gać wskaźniki programów AUTO, PRO i 30MIN.
4. Zwolnić przyciski Delay i Start.
5. Nacisnąć przycisk Program.
• Wskaźniki programów PRO i 30MIN wyłączą się.
• Wskaźnik programu AUTO nadal będzie migał.
• Na wyświetlaczu widoczne jest ustawienie zmiękczacza wody (przykład:
ziom 5).
6. Naciskać przycisk Program, aby zmienić ustawienie.
7. Wyłączyć urządzenie w celu potwierdzenia.
Jeśli funkcja zmiękczania wody jest ustawiona elektronicznie na poziomie 1, wskaźnik soli
nie włącza się.
WSYPYWANIE SOLI DO ZMYWARKI
Napełnianie zbiornika soli
1. Obrócić pokrywkę w kierunku przeciwnym
do ruchu wskazówek zegara i otworzyć
zbiornik soli.
2. Wlać do zbiornika soli 1 litr wody (tylko pod‐
czas pierwszego wsypywania soli).
3. Do napełnienia zbiornika solą należy użyć
lejka.
4. Usunąć sól rozsypaną wokół otworu zbior‐
nika soli.
5. Obrócić pokrywkę w kierunku zgodnym z
ruchem wskazówek zegara, aby zamknąć
zbiornik soli.
Normalnym zjawiskiem jest wypływanie wody ze zbiornika podczas napełniania go solą.
= po‐
Page 57

20
30
M
A
X
1
2
3
4
+
-
Używanie detergentu i płynu nabłyszczającego
UŻYWANIE DETERGENTU I PŁYNU NABŁYSZCZAJĄCEGO
57
1
2
7
3
4
6
5
Stosowanie detergentu
Aby chronić środowisko, nie należy używać większych ilości detergentu niż zalecane.
Należy przestrzegać zaleceń producenta podanych na opakowaniu detergentu.
Napełnianie dozownika detergentu:
1.
Nacisnąć przycisk zwalniający
2.
Umieścić detergent w dozowniku
3. Jeśli program zmywania przewiduje fazę zmywania wstępnego, umieścić niewielką ilość
detergentu na wewnętrznej stronie drzwi urządzenia.
4. W przypadku używania detergentu w tabletkach, umieścić tabletkę w dozowniku deter‐
1
gentu
.
5. Zamknąć dozownik detergentu. Docisnąć pokrywę, aż zaskoczy na swoje miejsce.
W przypadku używania tabletek do zmywarek zaleca się korzystanie z długich programów
zmywania. Wynika to z faktu, że w krótkich programach zmywania tabletki mogą nie rozpusz‐
czać się całkowicie, co może niekorzystnie wpływać na wyniki zmywania.
2
w celu otwarcia pokrywy 7 dozownika detergentu.
1
.
Wlewanie płynu nabłyszczającego
Płyn nabłyszczający umożliwia wysuszenie naczyń bez smug i plam.
Płyn nabłyszczający jest automatycznie podawany przez dozownik podczas ostatniej fazy
płukania.
Aby napełnić dozownik płynu nabłyszczającego, należy wykonać następujące czynności:
1.
Nacisnąć przycisk zwalniający
szczającego.
2.
Napełnić odpowiedni dozownik
je maksymalny poziom.
6
w celu otwarcia pokrywy 5 dozownika płynu nabły‐
3
płynem nabłyszczającym. Oznaczenie „max” wskazu‐
Page 58

58
Uniwersalna tabletka do zmywarki
3. Rozlany płyn nabłyszczający należy usunąć za pomocą chłonnej szmatki, aby zapobiec
powstaniu zbyt dużej ilości piany podczas programu zmywania.
4. Zamknąć dozownik płynu nabłyszczającego. Docisnąć pokrywę, aż zaskoczy na swoje
miejsce.
Regulacja dozowania płynu nabłyszczającego
Ustawienie fabryczne: położenie 3.
Dozowanie płynu nabłyszczającego można ustawić w zakresie od 1 (najmniejsze dozowa‐
nie) do 4 (największe dozowanie).
4
Obrócić pokrętło regulacji dozowania płynu nabłyszczającego
szyć dozowanie.
, aby zwiększyć lub zmniej‐
UNIWERSALNA TABLETKA DO ZMYWARKI
Funkcja Multitab jest przeznaczona dla tabletek do zmywarek.
Tabletki te zawierają takie składniki jak: detergent, środek nabłyszczający i sól do zmywa‐
rek. Niektóre typy tabletek mogą zawierać również inne środki.
Należy sprawdzić, czy dane tabletki są odpowiednie do stopnia twardości wody doprowadza‐
nej do zmywarki (patrz instrukcje podane na opakowaniu produktu).
Włączenie funkcji Multitab powoduje zatrzymanie dozowania płynu nabłyszczającego i soli.
Włączenie funkcji Multitab powoduje wyłączenie wskaźników soli i płynu nabłyszczającego.
Po wybraniu funkcji Multitab czas trwania programu może ulec wydłużeniu.
Włączyć lub wyłączyć funkcję Multitab przed rozpoczęciem programu zmywania. Funkcji Mul‐
titab nie można włączyć ani wyłączyć w czasie trwania programu zmywania.
Funkcję Multitab należy zawsze włączać przed uruchomieniem programu zmywania.
Aby wyłączyć funkcję Multitab i stosować oddzielnie detergent, sól i płyn nabłyszczający:
1. Nacisnąć i przytrzymać przycisk Option, dopóki nie wyłączy się wskaźnik funkcji Multi‐
tab. Funkcja jest wyłączona.
2. Uzupełnić zbiornik soli i dozownik płynu nabłyszczającego.
3. Ustawić najwyższy poziom zmiękczania wody.
4. Uruchomić program zmywania bez naczyń.
5. Po zakończeniu programu zmywania ustawić poziom zmiękczania wody odpowiednio
do twardości wody doprowadzanej do urządzenia.
6. Wyregulować dozowanie płynu nabłyszczającego.
WKŁADANIE SZTUĆCÓW I NACZYŃ
Patrz ulotka „Przykładowe rozmieszczenia naczyń ProClean”.
Porady i wskazówki
• Nie wkładać do urządzenia przedmiotów, które mogą pochłaniać wodę (gąbki, ściereczki).
• Usunąć z naczyń resztki jedzenia.
Page 59

Programy zmywania
• Namoczyć przypalone resztki potraw.
• Wydrążone elementy (kubki, szklanki i miski) układać otworami w dół.
• Upewnić się, że woda nie zbiera się w pojemnikach lub miskach.
• Upewnić się, że naczynia i sztućce nie przylegają do siebie.
• Szklanki nie mogą stykać się ze sobą.
• Małe elementy umieścić w koszu na sztućce.
• Wymieszać łyżki z innymi sztućcami, aby nie przylegały do siebie.
• Naczynia należy wkładać do koszy w taki sposób, aby woda miała dostęp do wszystkich
powierzchni.
• Lekkie elementy umieścić w koszu górnym. Upewnić się, że naczynia się nie przemie‐
szczają.
• Na elementach plastikowych i miskach z powłoką zapobiegającą przywieraniu mogą za‐
trzymywać się krople wody.
PROGRAMY ZMYWANIA
59
Program Rodzaj zabru‐
1)
2)
3)
dzenia
Wszystkie Naczynia sto‐
Duże Naczynia sto‐
Średnie lub
lekkie
Średnie Naczynia sto‐
Rodzaj zała‐
dunku
łowe, sztućce,
garnki i patel‐
nie
łowe, sztućce,
garnki i patel‐
nie
Naczynia sto‐
łowe i sztućce
łowe i sztućce
Opis programu Funkcja ÖKO PLUS
Zmywanie wstępne
Zmywanie w temperatu‐
rze 45°C lub 70°C
Płukania
Suszenie
Zmywanie wstępne
Zmywanie w temperatu‐
rze 70°C
Płukania
Suszenie
Zmywanie w temperatu‐
rze 60°C
Płukanie
Zmywanie wstępne
Zmywanie w temperatu‐
rze 50°C
Płukania
Suszenie
Tak, ma wpływ
Tak, ma wpływ
Tak, nie ma wpływu
Tak, ma wpływ
Page 60
60
Wybór i uruchamianie programu zmywania
Program Rodzaj zabru‐
dzenia
Program ten służy do szybkie‐
go płukania naczyń. Zapobie‐
ga to zasychaniu resztek jedze‐
nia na naczyniach i powstawa‐
niu przykrych zapachów.
W przypadku tego programu
nie należy stosować detergen‐
tu.
1) Urządzenie wykrywa rodzaj zabrudzenia oraz ilość naczyń i przyborów kuchennych włożonych do koszy.
Automatycznie reguluje temperaturę i ilość wody, a także pobór prądu oraz czas trwania programu.
2) Program ten umożliwia zmywanie świeżo zabrudzonych naczyń. Zapewnia on dobre wyniki zmywania w krótkim
czasie.
3) Standardowy program dla ośrodków przeprowadzających testy. W tym programie uzyskuje się największą
efektywność zużycia wody i energii elektrycznej podczas zmywania średnio zabrudzonych naczyń i sztućców.
Dane z testów przedstawiono w ulotce dołączonej do urządzenia.
Rodzaj zała‐
dunku
Opis programu Funkcja ÖKO PLUS
Płukanie Tak, nie ma wpływu
Parametry eksploatacyjne
Program
1)
Zużycie energii (kWh) Zużycie wody (litry)
0,9 - 1,7 8 - 17
1,5 - 1,7 15 - 16
0,9 9
1,0 - 1,1 10 - 11
0,1 4
1) Na wyświetlaczu widoczny jest czas trwania programu.
Podane parametry eksploatacyjne mogą ulec zmianie w zależności od ciśnienia i temperatu‐
ry wody, zmian w napięciu zasilania oraz ilości naczyń.
WYBÓR I URUCHAMIANIE PROGRAMU ZMYWANIA
Uruchamianie programu zmywania bez opóźnienia
1. Zamknąć drzwi urządzenia.
2. Włączyć urządzenie.
3. Upewnić się, że urządzenie znajduje się w trybie ustawiania.
4. Ustawić program zmywania.
• Włączy się wskaźnik odpowiedniego programu.
• Na wyświetlaczu zacznie migać czas trwania programu.
• Włączą się wskaźniki ustawionego programu zmywania.
5. Jeśli to konieczne, ustawić funkcję ÖKO PLUS.
• Funkcję tę można wybrać dopiero po ustawieniu programu zmywania.
6. Nacisnąć przycisk Start – ustawiony program zmywania rozpocznie się automatycznie.
Page 61
Wybór i uruchamianie programu zmywania
• Wskaźniki faz programu wyłączą się, ale wskaźnik aktualnej fazy będzie nadal włą‐
czony.
Uruchamianie programu zmywania z opóźnieniem
1. Zamknąć drzwi urządzenia.
2. Włączyć urządzenie.
3. Upewnić się, że urządzenie jest w trybie ustawiania.
4. Ustawić program zmywania i funkcje.
5. Naciskać przycisk Delay, dopóki na wyświetlaczu nie pojawi się czas opóźnienia.
• Na wyświetlaczu miga czas opóźnienia rozpoczęcia programu.
• Wskaźnik opóźnienia rozpoczęcia programu jest włączony.
6. Nacisnąć przycisk Start; odliczanie rozpocznie się automatycznie.
• Czas opóźnienia rozpoczęcia programu przestanie migać na wyświetlaczu.
• Wyłączą się wskaźniki faz ustawionego programu zmywania.
• Po zakończeniu odliczania czasu opóźnienia program zmywania rozpocznie się automa‐
tycznie.
– Wskaźnik aktualnej fazy programu jest włączony.
Otwarcie drzwi urządzenia zatrzymuje odliczanie. Po ponownym zamknięciu drzwi odlicza‐
nie jest kontynuowane od momentu przerwania.
Anulowanie funkcji opóźnienia rozpoczęcia programu
Odliczanie nie działa
1. Naciskać przycisk Delay aż:
• Na wyświetlaczu pojawi się czas trwania programu zmywania.
• Włączą się wskaźniki faz programów.
2. Nacisnąć przycisk Start, aby rozpocząć program zmywania.
Odliczanie działa
1. Naciskać przycisk Delay aż:
• Na wyświetlaczu pojawi się czas trwania programu zmywania.
• Włączą się wskaźniki faz programów.
• Program zmywania rozpocznie się automatyczne.
61
Przerwanie programu zmywania
• Otworzyć drzwi urządzenia.
– Program zmywania zostanie zatrzymany.
• Zamknąć drzwi urządzenia.
– Program zmywania zostanie wznowiony od momentu, w którym został przerwany.
Anulowanie programu zmywania
Jeśli program zmywania nie rozpoczął się, istnieje możliwość zmiany ustawień.
Aby dokonać zmiany ustawień po rozpoczęciu programu, należy anulować program.
• Jednocześnie nacisnąć i przytrzymać przyciski Delay i Start aż:
Page 62

62
Konserwacja i czyszczenie
– Włączą się wskaźniki wszystkich programów.
– Na wyświetlaczu widoczne będą dwa poziome paski stanu.
Przed uruchomieniem nowego programu zmywania należy upewnić się, że w dozowniku znaj‐
duje się detergent.
Zakończenie programu zmywania
Po zakończeniu programu zmywania na wyświetlaczu pojawia się zero i włącza się wskaź‐
nik zakończenia programu.
1. Wyłączyć urządzenie.
2. Otworzyć drzwi urządzenia.
3. Aby naczynia lepiej wyschły, drzwi urządzenia należy pozostawić na kilka minut uchylone.
Opróżnianie koszy
• Należy odczekać aż naczynia wystygną przed ich wyjęciem z urządzenia. Gorące naczy‐
nia łatwo ulegają uszkodzeniu.
• Najpierw wyjmować naczynia z dolnego kosza, a następnie z górnego.
• Na ścianach i na drzwiach urządzenia może występować woda. Stal nierdzewna stygnie
szybciej niż naczynia.
KONSERWACJA I CZYSZCZENIE
Wyjmowanie i czyszczenie filtrów
Brudne filtry pogarszają wyniki zmywania.
Mimo że tego typu filtry nie wymagają częstej konserwacji, zaleca się ich okresowe spraw‐
dzanie i w razie potrzeby oczyszczanie.
1. Obrócić filtr (A) w kierunku przeciwnym do
ruchu wskazówek zegara, a następnie wy‐
jąć go z filtra (B).
B
A
Page 63

2. Filtr (A) składa się z dwóch części. Aby ro‐
zebrać filtr, części te należy odciągnąć od
siebie.
3. Dokładnie wyczyścić części filtra wodą.
4. Złożyć dwie części filtra (A) ze sobą i docis‐
nąć. Sprawdzić, czy elementy odpowied‐
nio połączyły się ze sobą.
5. Wyjąć filtr (B).
6. Dokładnie umyć filtr (B) wodą.
7. Umieścić filtr (B) w pierwotnym położeniu.
Sprawdzić, czy jest prawidłowo zamonto‐
wany w dwóch zaczepach (C).
8. Umieścić filtr (A) na swoim miejscu w fil‐
trze (B). Obrócić filtr (A) w kierunku zgod‐
nym z ruchem wskazówek zegara aż do za‐
blokowania.
Co zrobić, gdy…
63
C
Czyszczenie ramion spryskujących
Nie demontować ramion spryskujących.
Jeżeli otwory w ramionach spryskujących ulegną zatkaniu, zabrudzenia należy usunąć przy
pomocy cienkiego i zaostrzonego przedmiotu.
Czyszczenie zewnętrznych powierzchni
Oczyścić zewnętrzne powierzchnie urządzenia oraz panel sterowania wilgotną miękką ście‐
reczką.
Używać wyłącznie neutralnych środków do czyszczenia.
Nie używać produktów ściernych, myjek do szorowania ani rozpuszczalników (np. acetonu).
CO ZROBIĆ, GDY…
Urządzenie nie daje się uruchomić lub przestaje działać podczas pracy.
W pierwszej kolejności należy spróbować ustalić przyczynę problemu (patrz tabela). Jeśli
nie można rozwiązać problemu, należy skontaktować się z autoryzowanym serwisem.
W przypadku niektórych usterek na wyświetlaczu pojawia się kod alarmowy:
- Urządzenie nie napełnia się wodą.
•
- Urządzenie nie wypompowuje wody.
•
- Włączyło się zabezpieczenie przed zalaniem.
•
Page 64
64
Co zrobić, gdy…
OSTRZEŻENIE!
Przed przystąpieniem do sprawdzenia urządzenie należy wyłączyć.
Nieprawidłowe działanie Możliwa przyczyna Możliwe rozwiązanie
Urządzenie nie napełnia się wo‐
dą.
Ciśnienie wody jest zbyt niskie. Skontaktować się z miejsco‐
Zamknięty zawór wody. Otworzyć zawór wody.
Zablokowany filtr w wężu dopły‐
Nieprawidłowe podłączenie
Wąż dopływowy jest uszkodzo‐
Urządzenie nie wypompowuje
wody.
Nieprawidłowe podłączenie
Wąż spustowy jest uszkodzony. Sprawdzić, czy wąż spustowy
Włączyło się zabezpieczenie
przed zalaniem.
Program zmywania nie urucha‐
mia się.
Nie zostało dotknięte pole doty‐
Wtyczka przewodu zasilające‐
Uszkodzony bezpiecznik w
Ustawiono opóźnienie rozpo‐
Zawór wody jest zablokowany
lub pokryty osadem z kamienia.
wowym.
węża dopływowego.
ny.
Zatkane rozgałęzienie syfonu
zlewozmywaka.
węża spustowego.
Zamknąć zawór wody i skontak‐
Drzwi urządzenia są otwarte.
Włączony jest wskaźnik drzwi.
kowe lub nie został naciśnięty
przycisk Start.
go nie została prawidłowo wło‐
żona do gniazdka.
skrzynce bezpieczników.
częcia programu.
Oczyścić zawór wody.
wym zakładem wodociągowym.
Oczyścić filtr.
Sprawdzić, czy podłączenie
jest prawidłowe.
Sprawdzić, czy wąż dopływowy
nie jest uszkodzony.
Oczyścić rozgałęzienie syfonu
zlewozmywaka.
Sprawdzić, czy podłączenie
jest prawidłowe.
nie jest uszkodzony.
tować się z punktem serwiso‐
wym.
Zamknąć drzwi urządzenia.
Dotknąć pola dotykowego lub
nacisnąć przycisk Start.
Włożyć prawidłowo wtyczkę
przewodu zasilającego do
gniazdka.
Wymienić bezpiecznik.
• Anulować opóźnienia rozpo‐
częcia programu.
• Po zakończeniu odliczania
czasu opóźnienia program
zmywania rozpocznie się au‐
tomatycznie.
Po sprawdzeniu urządzenie należy włączyć. Program zostanie wznowiony od momentu, w
którym został przerwany.
W razie ponownego wystąpienia problemu należy skontaktować się z punktem serwisowym.
Jeśli wyświetlacz pokazuje inne kody alarmowe, należy skontaktować się z serwisem.
Page 65

Informacje niezbędne dla serwisu znajdują się na tabliczce znamionowej.
Należy zanotować:
– Model (MOD.) ........................................................
– Numer produktu (PNC) ........................................
– Numer seryjny (S.N.) ...............................................
Rezultaty zmywania i suszenia są niezadowalające
Problem Możliwa przyczyna Możliwe rozwiązanie
Naczynia nie są czyste. Wybrany program zmywania
Kosze nie zostały załadowane
Ramiona spryskujące nie mogą
Filtry są zabrudzone lub niepra‐
Użyto za mało detergentu lub
Ślady kamienia na naczyniach. Zbiornik soli jest pusty. Napełnić zbiornik soli solą do
Nieprawidłowa regulacja pozio‐
Nieprawidłowe zamknięcie po‐
Na szklankach i naczyniach wi‐
dać smugi, białawe plamy lub
niebieskawy nalot.
Ślady kropel wody na kielisz‐
kach i na naczyniach.
Przyczyną może być rodzaj uży‐
Naczynia są mokre. Włączono program zmywania
Naczynia są wilgotne i matowe. Dozownik płynu nabłyszczają‐
nie jest odpowiedni dla danego
rodzaju załadunku lub stopnia
zabrudzenia.
prawidłowo, w wyniku czego wo‐
da nie mogła dotrzeć do wszyst‐
kich powierzchni.
się swobodnie obracać. Niepra‐
widłowe ułożenie naczyń i przy‐
borów kuchennych w koszach.
widłowo złożone i zamontowa‐
ne.
nie użyto go w ogóle.
mu zmiękczacza wody.
krywy zbiornika soli.
Zbyt duże dozowanie płynu na‐
błyszczającego.
Zbyt małe dozowanie płynu na‐
błyszczającego.
tego detergentu.
bez fazy suszenia lub ze skró‐
coną fazą suszenia.
cego jest pusty.
Co zrobić, gdy…
Należy upewnić się, czy wybra‐
ny program zmywania jest odpo‐
wiedni dla danego rodzaju zała‐
dunku oraz stopnia zabrudzenia.
Umieścić naczynia i przybory ku‐
chenne prawidłowo w koszach.
Sprawdzić, czy niewłaściwe uło‐
żenie naczyń nie powoduje za‐
blokowania ramion spryskują‐
cych.
Upewnić się, że filtry są czyste
oraz prawidłowo złożone i za‐
montowane.
Upewnić się, że użyto wystar‐
czającej ilości detergentu.
zmywarek.
Prawidłowo ustawić poziom
zmiękczania wody.
Upewnić się, czy zbiornik soli
jest prawidłowo zamknięty.
Zmniejszyć dozowanie płynu na‐
błyszczającego.
Zwiększyć dozowanie płynu na‐
błyszczającego.
Użyć detergentu innej marki.
Aby naczynia lepiej wyschły,
drzwi urządzenia należy pozos‐
tawić na kilka minut uchylone.
Napełnić dozownik płynu nabły‐
szczającego płynem nabły‐
szczającym.
65
Page 66

66
Dane techniczne
Problem Możliwa przyczyna Możliwe rozwiązanie
Włączona funkcja Multitab (po‐
woduje ona automatyczne wy‐
łączenie dozownika płynu nabły‐
szczającego).
Włączyć dozownik płynu nabły‐
szczającego.
Włączanie dozownika płynu nabłyszczającego
1. Włączyć urządzenie.
2. Upewnić się, że urządzenie znajduje się w trybie ustawiania.
3. Jednocześnie nacisnąć i przytrzymać przyciski Delay oraz Start, dopóki nie zaczną mi‐
gać wskaźniki programów AUTO, PRO i 30MIN.
4. Zwolnić przyciski Delay i Start.
5. Nacisnąć przycisk Option.
• Wskaźniki programów AUTO i 30MIN wyłączą się.
• Wskaźnik programu PRO nadal będzie migał.
• Na wyświetlaczu widoczne będzie ustawienie dozownika płynu nabłyszczającego.
Dozownik płynu nabłyszczającego jest wyłączony.
Dozownik płynu nabłyszczającego jest włączony.
6. Nacisnąć przycisk Option, aby zmienić ustawienie.
7. Wyłączyć urządzenie w celu potwierdzenia.
DANE TECHNICZNE
Wymiary Szerokość 596 mm
Wysokość 818 - 898 mm
Głębokość 575 mm
Ciśnienie doprowadzanej wody Wartość minimalna 0,5 bara (0,05 MPa)
Wartość maksymalna 8 barów (0,8 MPa)
Dopływ wody
Pojemność Liczba standardowych nakryć 12
1) Podłączyć wąż doprowadzający wodę do zaworu z gwintem 3/4".
1)
Informacje dotyczące podłączenia elektrycznego znajdują się na tabliczce znamionowej umie‐
szczonej na wewnętrznej krawędzi drzwi urządzenia.
Jeżeli ciepła woda jest wytwarzana przy pomocy alternatywnych źródeł energii (np. kolekto‐
ry słoneczne, ogniwa słoneczne lub elektrownie wiatrowe), można użyć jej do zasilania urzą‐
dzenia, aby zmniejszyć zużycie energii.
Zimna lub ciepła woda maksimum 60°C
Page 67

Ochrona środowiska
OCHRONA ŚRODOWISKA
Symbol na produkcie lub na opakowaniu oznacza, że tego produktu nie wolno
traktować tak, jak innych odpadów domowych. Należy oddać go do właściwego punktu
skupu surowców wtórnych zajmującego się złomowanym sprzętem elektrycznym i
elektronicznym. Właściwa utylizacja i złomowanie pomaga w eliminacji niekorzystnego
wpływu złomowanych produktów na środowisko naturalne oraz zdrowie. Aby uzyskać
szczegółowe dane dotyczące możliwości recyklingu niniejszego urządzenia, należy
skontaktować się z lokalnym urzędem miasta, służbami oczyszczania miasta lub sklepem,
w którym produkt został zakupiony.
Materiały oznaczone symbolem
rzucić elementy opakowania do odpowiednich pojemników, aby zostały poddane recyklingowi.
powinny być poddane ponownemu przetworzeniu. Wy‐
67
Page 68

www.aeg-electrolux.com/shop 117941960-A-292010
 Loading...