

Page 1

FAVORIT 65000 I
AFWASMACHINE GEBRUIKSAANWIJZING 2
NL
LAVE-VAISSELLE NOTICE D'UTILISATION 25
FR
DISHWASHER USER MANUAL 48
EN
Page 2
2
VOOR PERFECTE RESULTATEN
Bedankt dat u voor dit AEG product heeft gekozen. Dit
apparaat is ontworpen om vele jaren uitstekend te
presteren, met innovatieve technologieën die het leven
gemakkelijker helpen maken – functies die gewone
apparaten wellicht niet hebben. Neem een paar
minuten de tijd om het door te lezen zodat u er
optimaal van kunt profiteren.
ACCESSOIRES EN VERBRUIKSARTIKELEN
In de AEG webshop vindt u alles wat u nodig heeft om
al uw apparaten van AEG mooi te houden en perfect te
laten functioneren. Ook vindt u hier een groot aantal
accessoires die zijn ontworpen en gebouwd volgens de
hoge kwaliteitsnormen die u verwacht, van speciaal
kookgerei tot bestekmandjes en van flessenhouders tot
waszakken…
Bezoek onze webshop op
www.aeg-electrolux.com/shop
Page 3

INHOUD
Inhoud
4 Veiligheidsinformatie
8 Beschrijving van het product
9 Bedieningspaneel
11 Bediening van het apparaat
12 De waterontharder instellen
13 Gebruik van zout voor de
vaatwasser
14 Gebruik van afwasmiddel en
glansmiddel
15 De Multitabfunctie
15 De vaatwasser inruimen
16 Wasprogramma's
17 Een afwasprogramma selecteren
en starten
19 Onderhoud en reiniging
20 Problemen oplossen
23 Technische gegevens
23 Milieubescherming
3
In deze gebruiksaanwijzing worden de
volgende symbolen gebruikt:
Belangrijke informatie over uw
persoonlijke veiligheid en informatie
over het voorkomen van schade aan
het apparaat.
Algemene informatie en tips
Milieu-informatie
Wijzigingen voorbehouden
Page 4

Veiligheidsinformatie
4
VEILIGHEIDSINFORMATIE
Lees deze handleiding zorgvuldig alvorens het apparaat te installeren of te gebruiken:
• Voor uw veiligheid en de veiligheid van uw eigendommen.
• Om het milieu te helpen.
• voor de correcte werking van het apparaat.
Houd deze instructies altijd in de buurt van het apparaat, ook als u verhuist of het apparaat aan iemand anders geeft.
De fabrikant is niet verantwoordelijk voor schade veroorzaakt door een foutieve installatie.
Veiligheid van kinderen en kwetsbare mensen
• Mensen, met inbegrip van kinderen, met beperkte lichamelijke, zintuiglijke of verstandelijke vermogens of gebrek aan ervaring en kennis, mogen dit apparaat niet gebruiken. Zij moeten onder toezicht staan of instructies krijgen over het gebruik van dit apparaat van iemand die verantwoordelijk is voor hun veiligheid.
• Houd alle verpakkingsmaterialen uit de buurt van kinderen. Gevaar voor verstikking of
lichamelijk letsel.
• Bewaar alle afwasmiddelen op een veilige plaats. Laat kinderen de afwasmiddelen niet
aanraken.
• Houd kinderen en huisdieren uit de buurt van het apparaat als de deur open is.
Algemene veiligheid
• De specificaties van het apparaat mogen niet worden veranderd. Risico op letsel en
beschadiging van het apparaat.
• Volg de veiligheidsinstructies van de afwasmiddelfabrikant om brandwonden aan
ogen, mond en keel te voorkomen.
• Drink geen water uit het apparaat. Er kan afwasmiddel in uw apparaat achtergebleven
zijn.
• Houd de deur van het apparaat niet open zonder toezicht. Hierdoor voorkomt u persoonlijk letsel en vallen op een open deur.
• Ga niet op de open deur zitten of staan.
Gebruik
• Dit apparaat is uitsluitend bestemd voor huishoudelijk gebruik. Gebruik het apparaat
niet voor andere doeleinden om persoonlijk letsel en schade aan uw eigendommen te
voorkomen.
• Gebruik het apparaat alleen om accessoires dat geschikt is voor afwasmachines,
schoon te maken.
• Plaats geen ontvlambare producten of items die vochtig zijn door ontvlambare producten in, bij of op het apparaat. Risico op explosie of brand.
• Plaats de messen en alle voorwerpen met scherpe punten met de punt naar beneden
in de bestekmand. Als dat niet past, leg ze dan horizontaal op het bovenrek of in het
messenrek. (Niet alle modellen hebben een messenrek).
Page 5

Veiligheidsinformatie
• Gebruik alleen gespecificeerde producten voor afwasmachines (afwasmiddel, zout,
glansspoelmiddel).
• Zout dat niet gespecificeerd is voor afwasmachines, veroorzaakt schade aan de waterontharder.
• Vul het apparaat met zout voordat u een afwasprogramma start. Zout dat in het apparaat is achtergebleven, kan roest veroorzaken of een gat in de onderkant van het apparaat maken.
• Vul het glansmiddeldoseerbakje nooit met andere middelen dan glansspoelmiddel
(bijv. afwasmachinereinigingsmiddel, vloeibaar afwasmiddel). Dit kan het apparaat beschadigen.
• Zorg er voor dat de sproeiarmen vrij kunnen ronddraaien voordat u een afwasprogramma start.
• Het apparaat kan hete stoom laten ontsnappen als u de deur opent terwijl er een wasprogramma wordt uitgevoerd. Hierdoor ontstaat een risico op brandwonden.
• Verwijder pas borden uit het apparaat als het wasprogramma is voltooid.
Onderhoud en reiniging
• Schakel het apparaat uit en trek de stekker uit het stopcontact voordat u het apparaat
gaat schoonmaken.
• Gebruik geen ontvlambare producten of producten die corrosie kunnen veroorzaken.
• Gebruik het apparaat niet zonder filters. Zorg dat de filters op de juiste wijze worden
geïnstalleerd. Een onjuiste installatie levert onbevredigende wasresultaten en schade
aan het apparaat op.
• Gebruik geen waterstralen of stoom om het apparaat te reinigen. Gevaar op een elektrische schok en schade aan het apparaat.
5
Montage
• Zorg ervoor dat het apparaat niet is beschadigd. Installeer een beschadigd apparaat
niet en sluit een beschadigd apparaat niet aan. Neem contact op met de leverancier.
• Verwijder alle verpakking voordat u het apparaat installeert en gebruikt.
• Alleen een erkende persoon mag de elektrische installatie, het loodgieterswerk en de
installatie van het apparaat uitvoeren. Dit om het risico op structurele schade of lichamelijk letsel te voorkomen.
• Zorg er tijdens de installatie voor dat de stekker uit het stopcontact is gehaald.
• Boor niet in de zijkanten van het apparaat om schade aan de hydraulische en elektrische onderdelen te voorkomen.
•
Belangrijk! Houd u aan de instructies in de sjabloon die met het apparaat zijn meegeleverd:
– Installatie van het apparaat.
– Voor het in elkaar zetten van de deur.
– Het aansluiten van de watertoevoer en -afvoer.
• Zorg ervoor dat het apparaat onder en naast veilige installaties wordt geïnstalleerd.
Page 6
Veiligheidsinformatie
6
Voorzorgsmaatregelen bij vorst
• Installeer het apparaat niet op een plek waar de temperatuur onder de 0°C komt.
• De fabrikant is niet aansprakelijk voor enige schade door bevriezing.
Wateraansluiting
• Gebruik nieuwe slangen om het apparaat aan te sluiten op de watertoevoer. Gebruik
geen gebruikte slangen.
• Sluit het apparaat niet op nieuwe leidingen aan of op leidingen die lang niet zijn gebruikt. Laat het water enkele minuten stromen en sluit dan de toevoerslang pas aan.
• Zorg ervoor dat de waterslangen niet knakken of beschadigd raken bij installatie van
het apparaat.
• Zorg er voor dat de waterkoppelingen stevig vast zitten om waterlekkage te voorkomen.
• Let er bij het eerste gebruik op dat de watertoevoerslangen niet lek zijn.
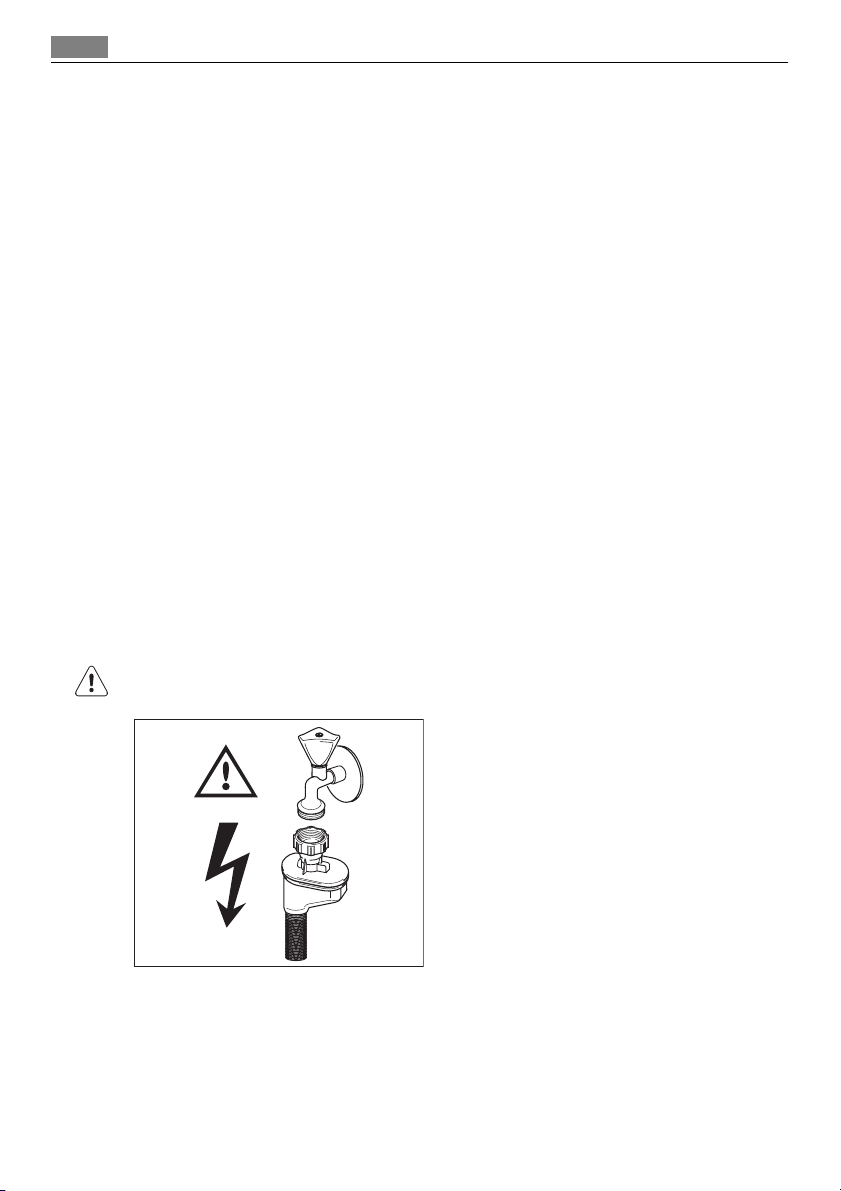
• De watertoevoerslang heeft een veiligheidsventiel en een dubbel omhulsel met een
hoofdkabel aan de binnenkant. De watertoevoerslang staat alleen onder druk wanneer
er water stroomt. Als er een lek in de watertoevoerslang aanwezig is, onderbreekt de
veiligheidsklep de stroom van het water.
– Wees voorzichtig als u de watertoevoerslang aansluit:
– Laat de watertoevoerslang of de veiligheidsklep niet in het water komen.
– Als de watertoevoerslang of de veiligheidsklep beschadigd is, haal dan onmiddel-
lijk de stekker uit het stopcontact.
– Laat alleen de service-afdeling de watertoevoerslang met de veiligheidsklep repa-
reren.
WAARSCHUWING!
Gevaarlijke spanning.
Elektrische aansluiting
• Dit apparaat moet worden geaard.
• Zorg er voor dat de elektrische informatie op het typeplaatje overeenkomt met de
stroomtoevoer.
• Gebruik altijd een correct geïnstalleerd, schokbestendig stopcontact.
• Gebruik geen meerwegspluggen en verlengsnoeren. Er kan brand ontstaan.
Page 7

Veiligheidsinformatie
• Vervang of verander het netsnoer niet zelf. Neem contact op met het servicecentrum.
• Zorg ervoor dat de stroomsnoeren en kabel niet knakken of beschadigd raken achter
het apparaat.
• Zorg ervoor dat het netsnoer na installatie bereikbaar is.
• Trek niet aan het netsnoer om het apparaat los te koppelen. Trek altijd aan de stekker.
Service-afdeling
• Alleen een erkende persoon mag dit apparaat repareren. Neem contact op met het servicecentrum.
• Gebruik alleen originele reserveonderdelen.
Het apparaat wegdoen
• Om lichamelijk letsel of schade te voorkomen:
– Trek de stekker uit het stopcontact.
– Snij het netsnoer van het apparaat af en gooi dit weg.
– Verwijder de deurvergrendeling. Dit voorkomt dat er kinderen of huisdieren in het
apparaat vast komen te zitten. Er bestaat gevaar voor verstikking.
– Gooi het apparaat weg bij uw lokale afvalverwerkingsbedrijf.
WAARSCHUWING!
Het afwasmiddel is gevaarlijk en kan corrosie veroorzaken!
• Als er een ongeval met deze afwasmiddelen optreedt, neemt u onmiddellijk contact op
met een arts.
• Als het afwasmiddel in iemands mond komt, neemt u onmiddellijk contact op met een
arts.
• Als het afwasmiddel in iemands ogen komt, neemt u onmiddellijk contact op met een
arts en maakt u de ogen schoon met water.
• Berg alle wasmiddelen op een veilige plaats, buiten het bereik van kinderen, op.
• Laat de deur van het apparaat niet open staan als er afwasmiddel in het afwasmiddelbakje zit.
• Vul het afwasmiddelbakje alleen voordat u een wasprogramma start.
7
Page 8
Beschrijving van het product
8
BESCHRIJVING VAN HET PRODUCT
1
2
10
9
3
4
5
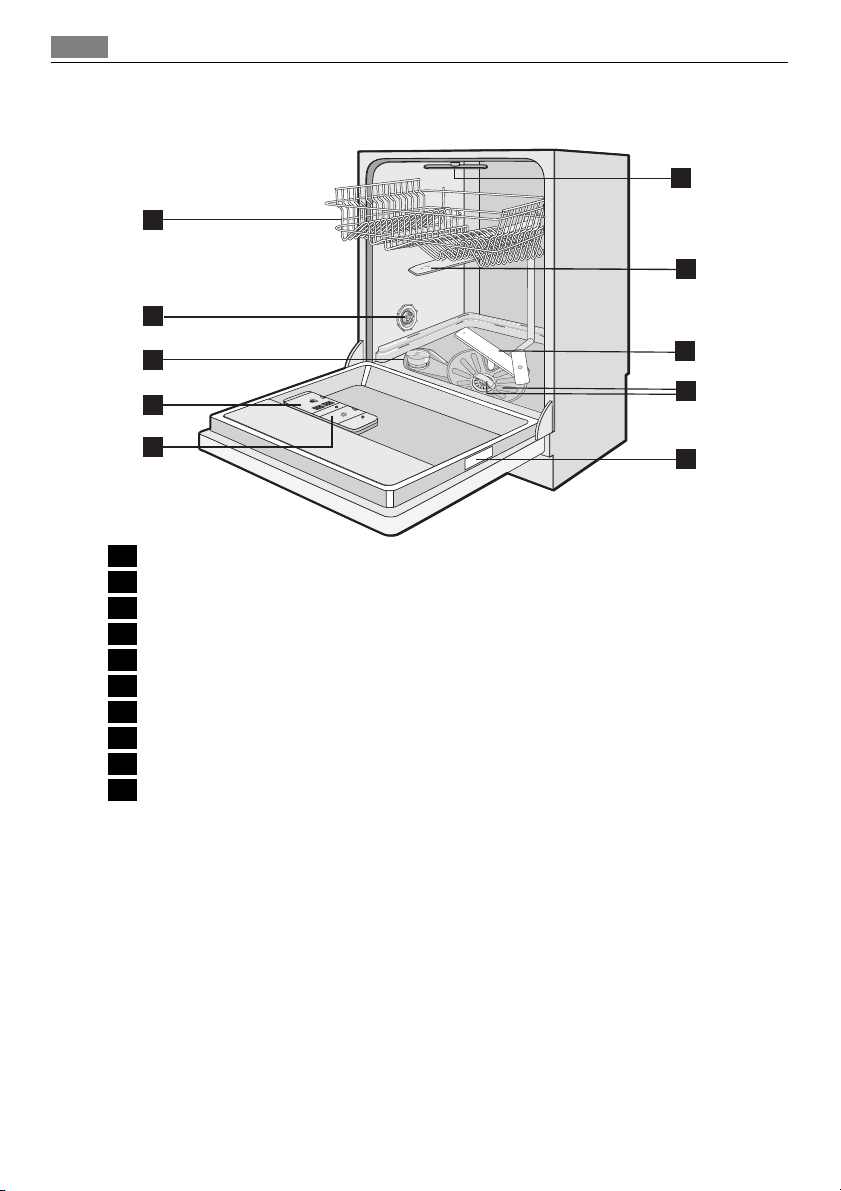
1 Bovenrek
2 Aanpassen van de instelling van de waterhardheid
3 Zoutreservoir
4 Afwasmiddeldoseerbakje
5 Glansmiddeldoseerbakje
6 Typeplaatje
7 Filters
8 Onderste sproeiarm
9 Bovenste sproeiarm
10 Top sproeiarm
8
7
6
Page 9
BEDIENINGSPANEEL
Bedieningspaneel
9
1
3
9
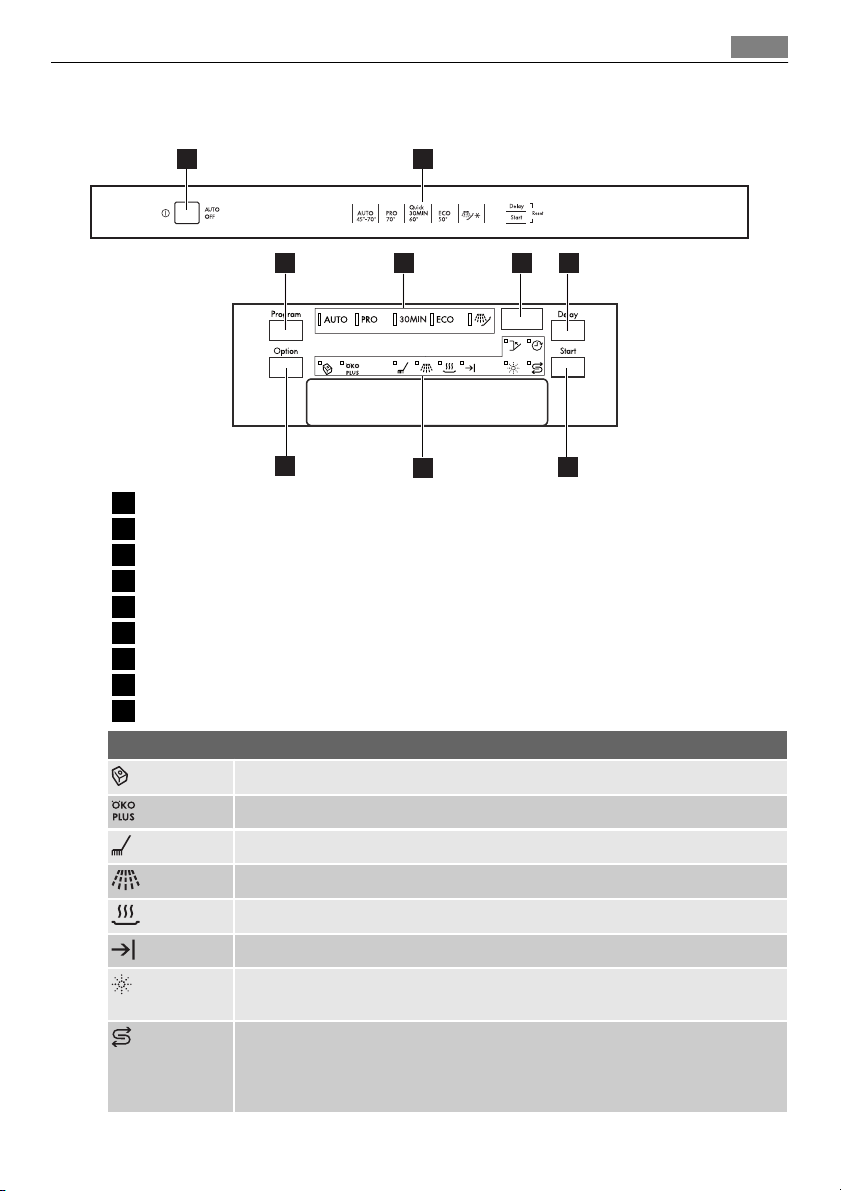
1 Aan-/uit-toets
2 Programmagids
3 Program-toets
4 Programma-indicatielampjes
5 Display
6 Delay-toets
7 Start-toets
8 Indicatielampjes
9 Option-toets
Multitab-indicatielampje. Gaat aan als u de functie inschakelt.
2
4
8
Indicatielampjes
5 6
7
ÖKO PLUS-indicatielampje. Gaat aan als u de functie inschakelt.
Wasfase-indicatielampje. Gaat aan wanneer de wasfase loopt.
Spoelfase-indicatielampje. Gaat aan wanneer de spoelfase loopt.
Droogfase-indicatielampje. Gaat aan wanneer de droogfase loopt.
Einde-indicatielampje. Gaat branden als het afwasprogramma is afgelopen.
Glansmiddelindicatielampje. Gaat aan wanneer het glansmiddeldoseerbakje bijgevuld moet worden.
Zoutindicatielampje. Gaat aan wanneer het zoutreservoir bijgevuld moet wor-
1)
den.
Het indicatielampje voor zout blijft enkele uren aan nadat u het reservoir hebt
bijgevuld. Dit heeft geen ongewenst effect op de werking van het apparaat.
1)
Page 10
Bedieningspaneel
10
Indicatielampjes
Delay-indicatielampje. Gaat aan als u de uitgestelde start ingeschakeld heeft.
Deur-indicatielampje. Gaat aan als de deur open staat of niet goed is gesloten.
1) Wanneer het zoutreservoir en/of het glansmiddeldoseerbakje leeg zijn, gaan de bijbehorende
indicatielampjes niet aan als er een wasprogramma loopt.
Aan-/uit-toets
Druk op deze toets om het apparaat in of uit te schakelen.
Tien minuten na het einde van het afwasprogramma, wordt het apparaat automatisch
via de AUTO OFF-functie uitgeschakeld. Dit helpt bij het beperken van het energieverbruik.
Programmagids
Deze gids helpt bij de selectie van het wasprogramma.
Program-toets
Blijf op deze toets drukken totdat het indicatielampje van het wasprogramma aan gaat.
Zie 'Afwasprogramma's'.
Display
Op de display verschijnt:
• De elektronische instelling van het niveau van de waterontharder
• Het in/uitschakelen van het glansmiddeldoseerbakje (alleen als de multitabfunctie ingeschakeld is)
• De tijd van het afwasprogramma
• De resterende tijd tot het einde van het afwasprogramma
• Het einde van een afwasprogramma (op de display verschijnt een nul)
• De uitgestelde starttijd
• De alarmcodes
Delay-toets
Druk herhaaldelijk op deze toets om de start van het afwasprogramma 1 tot 24 uur uit te
stellen.
Start-toets
Druk op deze toets voor het starten van:
• Het afwasprogramma
• Het aftellen van de uitgestelde start.
Option-toets
Druk op deze toets om de functies in te stellen.
Wanneer een functie wordt ingeschakeld, gaan de bijbehorende indicatielampjes branden.
Option-toets Multitabfunctie ÖKO PLUS
Eén keer drukken INGESCHAKELD UITGESCHAKELD
Page 11

Bediening van het apparaat
Option-toets Multitabfunctie ÖKO PLUS
Twee keer indrukken UITGESCHAKELD INGESCHAKELD
Drie keer indrukken INGESCHAKELD INGESCHAKELD
Vier keer indrukken UITGESCHAKELD UITGESCHAKELD
Functies
Multitabfunctie
Als u gecombineerde afwasmiddeltabletten gebruikt ('3 in 1', '4 in 1', '5 in 1', enz.), gebruikt u de multitab-functie. Zie 'Multitabfunctie'.
ÖKO PLUS
Met deze functie wordt de temperatuur in de droogfase verlaagd. Het stroomverbruik
daalt met 25%.
De vaat is mogelijk nog vochtig wanneer u aan het eind van het programma de deur van
het apparaat opent. We raden u aan de deur op een kier te houden totdat de vaat droog
is.
Instelmodus
Het apparaat moet in de instelmodus staan voor de volgende bewerkingen:
• Het instellen en starten van een afwasprogramma.
• Het instellen en starten van een uitgestelde start.
• Het niveau van de waterontharder elektronisch instellen.
• Het glansmiddeldoseerbakje in-/uitschakelen (alleen als de multitab-functie is ingeschakeld)
Schakel het apparaat in. Het apparaat staat in de instelmodus als:
• Alle programmalampjes aan gaan.
• de display twee horizontale statusstreepjes weergeeft.
Schakel het apparaat in. Het apparaat staat niet in de instelmodus als:
• Slechts één programma-indicatielampje aan gaat.
• de display de duur van een afwasprogramma of van een uitgestelde start weergeeft.
– Het programma of de uitgestelde start moet worden geannuleerd om terug te ke-
ren naar de instelmodus. Zie 'Een afwasprogramma selecteren en starten'.
11
BEDIENING VAN HET APPARAAT
1. Controleer of het ingestelde niveau van de waterontharder juist is voor de waterhard-
heid in uw omgeving. Als dat niet het geval is, dan stelt u de waterontharder in.
2. Vul het zoutreservoir met zout voor afwasmachines.
3. Vul het glansmiddeldoseerbakje met glansmiddel.
4. Plaats bestek en serviesgoed in de afwasmachine.
5. Stel het juiste programma in voor het type lading en de mate van vervuiling.
6. Vul het afwasmiddeldoseerbakje met de juiste hoeveelheid afwasmiddel.
Page 12
De waterontharder instellen
12
7. Start het afwasprogramma.
Als u gecombineerde afwasmiddeltabletten gebruikt ('3 in 1', '4 in 1', '5 in 1' enz.), gebruikt u de multitabfunctie (zie 'De Multitabfunctie').
DE WATERONTHARDER INSTELLEN
De waterontharder verwijdert mineralen en zouten van de watertoevoer. Deze mineralen
en zouten kunnen schade aan het apparaat toebrengen.
Pas het niveau van de waterontharder aan als dit niveau niet overeenstemt met de hardheid van het water in uw omgeving.
Neem contact op met uw plaatselijke waterinstantie voor informatie over de hardheid
van het water in uw omgeving.
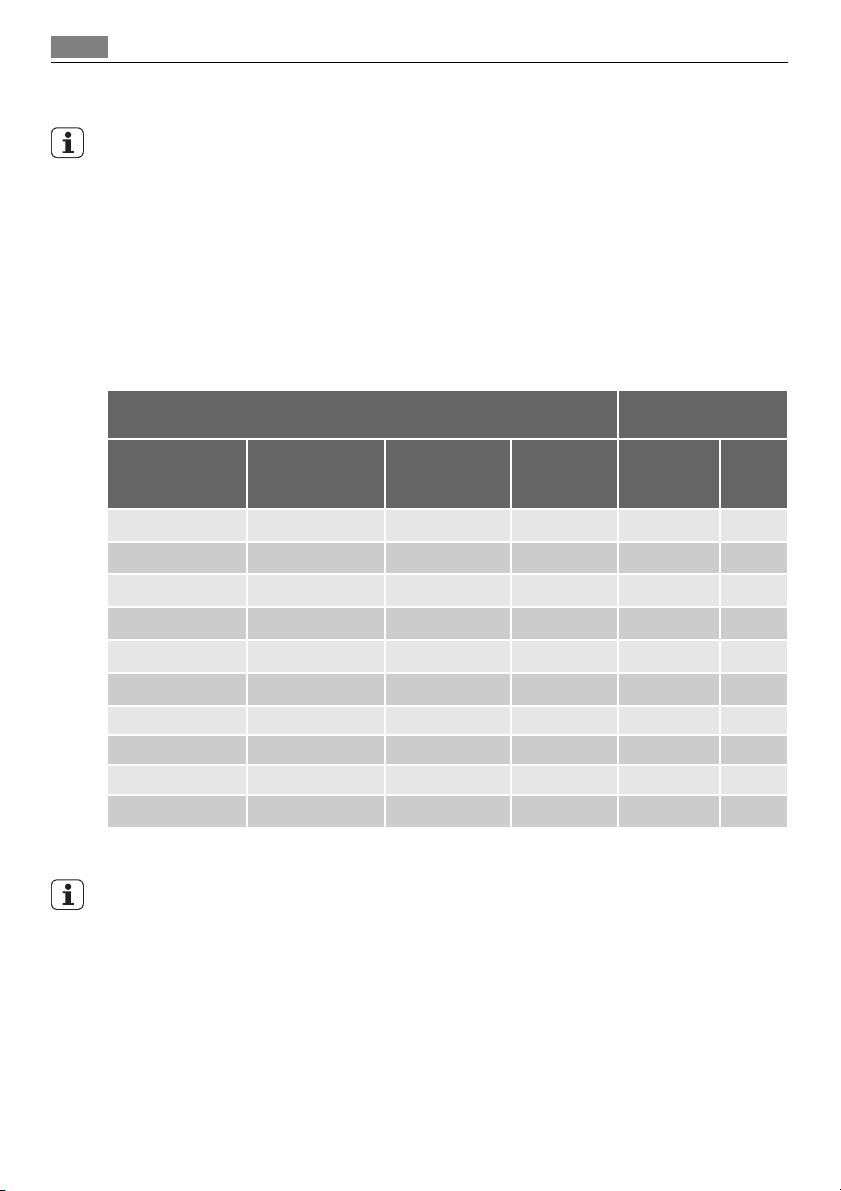
Waterhardheid
Duitse graden
(°dH)
Franse graden (TH
°)
mmol/l Clarke-gra-
den
51 - 70 91 - 125 9,1 - 12,5 64 - 88
43 - 50 76 - 90 7,6 - 9,0 53 - 63
37 - 42 65 - 75 6,5 - 7,5 46 - 52
29 - 36 51 - 64 5,1 - 6,4 36 - 45
23 - 28 40 - 50 4,0 - 5,0 28 - 35
19 - 22 33 - 39 3,3 - 3,9 23 - 27
15 - 18 26 - 32 2,6 - 3,2 18 - 22 1 4
11 - 14 19 - 25 1,9 - 2,5 13 - 17 1 3
4 - 10 7 - 18 0,7 - 1,8 5 - 12 1 2
< 4 < 7 < 0,7 < 5
1) Fabrieksinstelling.
2) Gebruik geen zout op dit niveau.
U moet de waterontharder handmatig en elektronisch instellen.
Instelling waterhard-
handmatig elek-
2
2
2
2
2
2
1
heid
tro-
nisch
1)
1)
1)
1)
1)
1)
2)
10
9
8
7
6
1)
5
2)
1
Page 13
Gebruik van zout voor de vaatwasser
Handmatig instellen
Zet de schijf voor de waterhardheid in stand 1 of
2 (zie de tabel).
Elektronische instelling
1. Schakel het apparaat in.
2. Zorg dat het apparaat in de instelmodus staat.
3. Druk tegelijkertijd op de Delay-toets en de Start-toets en houd deze toetsen inge-
drukt totdat de programma-indicatielampjes AUTO, PRO en 30MIN gaan knipperen.
4. Laat de Delay-toets en de Start-toets los.
5. Als u op de Program-toets drukt,
• gaan de programma-indicatielampjes PRO en 30MIN uit.
• Het programma-indicatielampje AUTO blijft knipperen.
• Wordt de instelling van de waterontharder op de display weergegeven (bijvoorbeeld:
6. Druk herhaaldelijk op de Program-toets om de instelling te wijzigen.
7. Schakel het apparaat uit om te bevestigen.
Wanneer u de waterontharder elektronisch instelt op niveau 1, blijft het indicatielampje
voor zout uit.
= niveau 5).
13
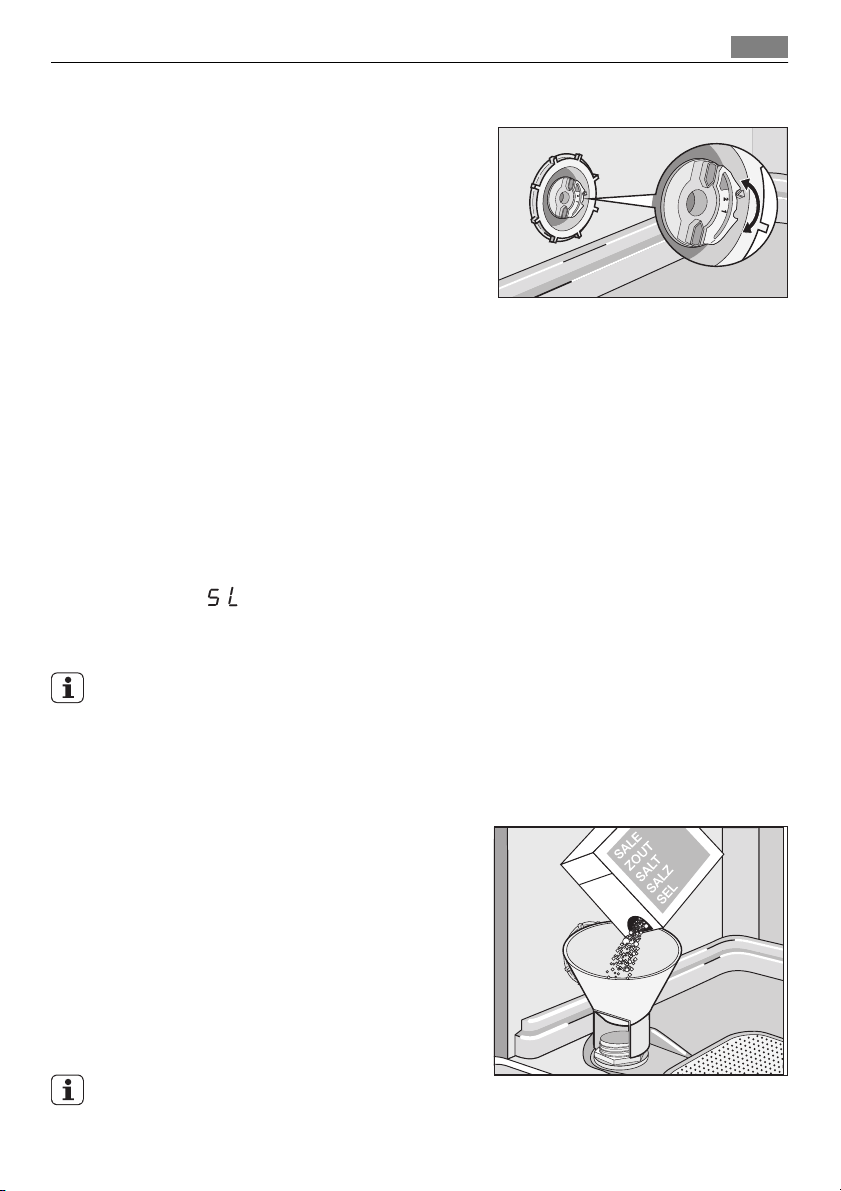
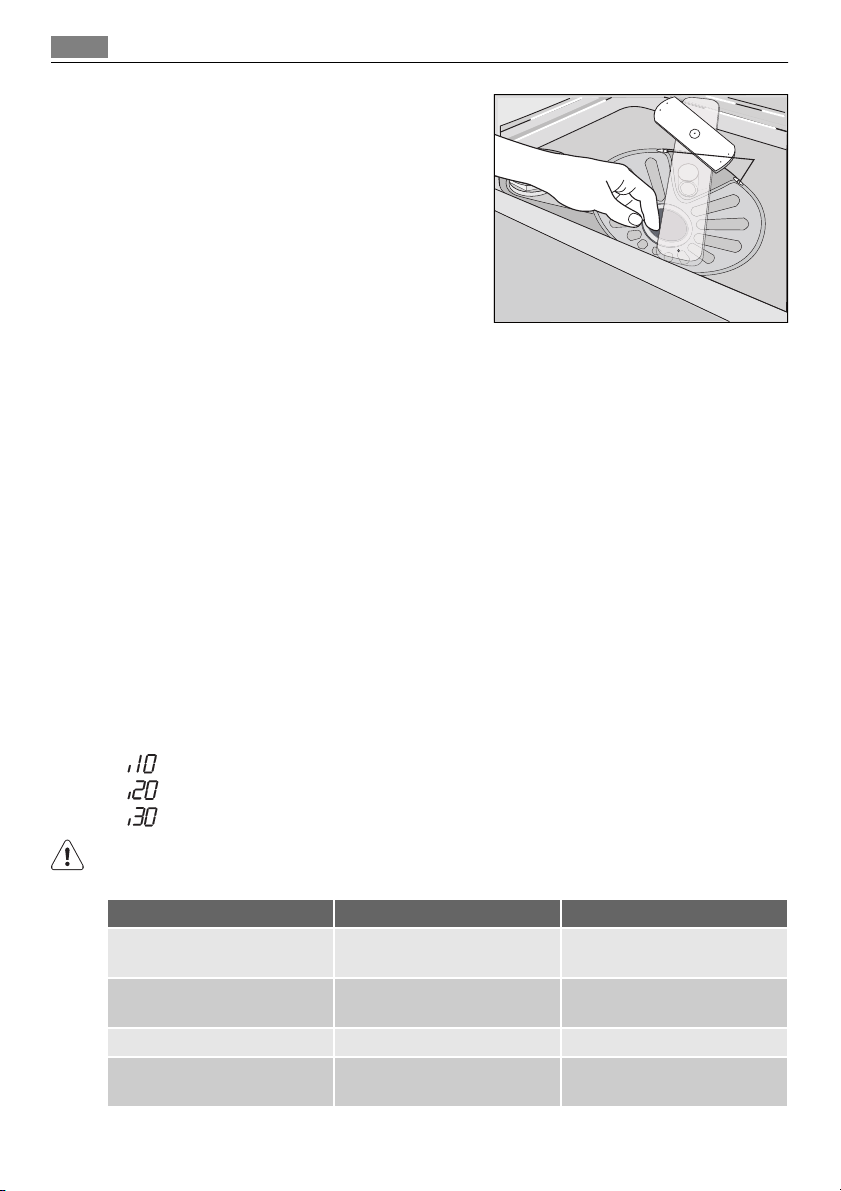
GEBRUIK VAN ZOUT VOOR DE VAATWASSER
Het zoutreservoir vullen:
1. Draai de dop linksom om het zoutreservoir te openen.
2. Vul het zoutreservoir met 1 liter water (u
vult alleen bij het eerste gebruik zout bij).
3. Gebruik de trechter om het zoutreservoir
te vullen met zout.
4. Verwijder het zout rond de opening van
het zoutreservoir.
5. Draai de dop rechtsom om het zoutreservoir te sluiten.
Het is normaal dat water uit het zoutreservoir stroomt wanneer u dit vult met zout.
Page 14
20
30
M
A
X
1
2
3
4
+
-
Gebruik van afwasmiddel en glansmiddel
14
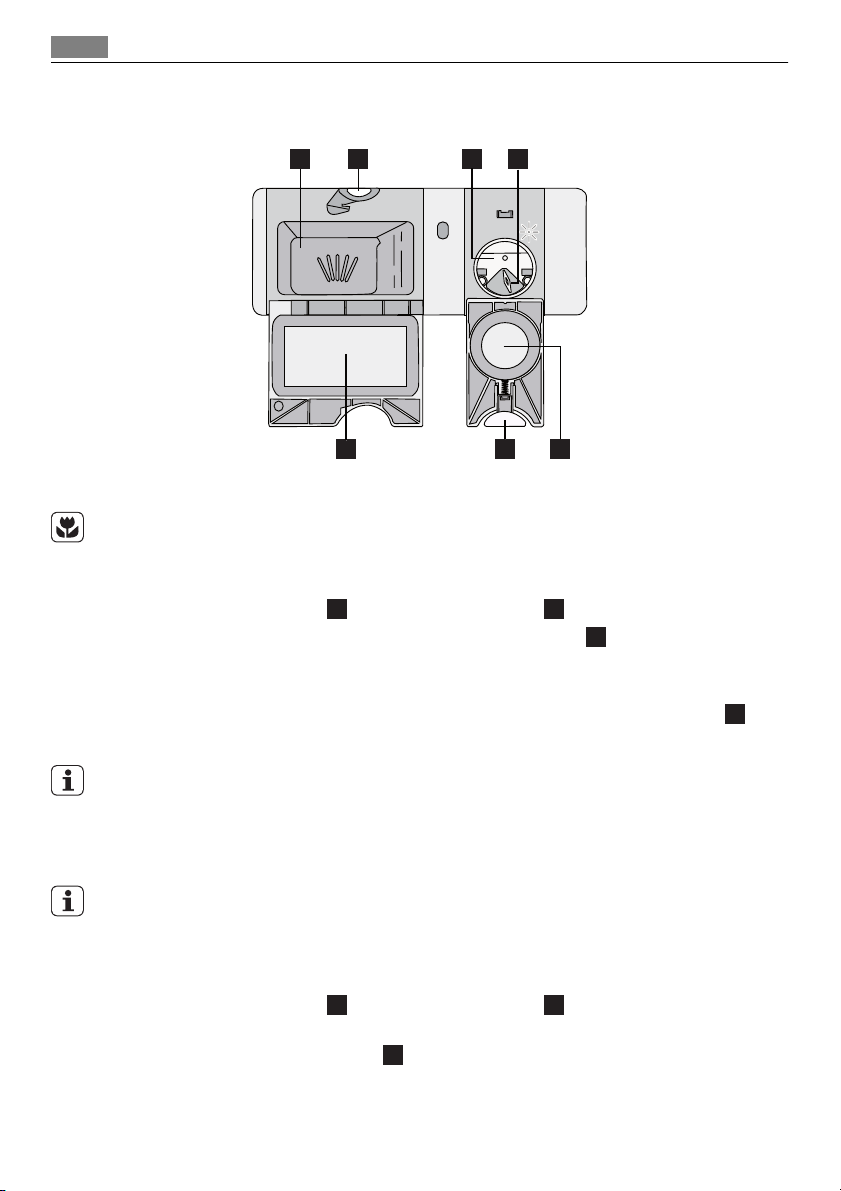
GEBRUIK VAN AFWASMIDDEL EN GLANSMIDDEL
1
2
7
3
4
6
5
Gebruik van afwasmiddel
Gebruik niet meer dan de juiste hoeveelheid afwasmiddel om het milieu te beschermen.
Volg het advies van de afwasmiddelfabrikant op de verpakking.
Het afwasmiddeldoseerbakje vullen:
1.
Druk op de vrijgaveknop
2.
Doe het afwasmiddeltablet in het afwasmiddeldoseerbakje
3. Plaats een kleine hoeveelheid van het afwasmiddel in de binnenkant van de deur van
het apparaat als het afwasprogramma een voorwasfase heeft.
4.
Als u afwasmiddeltabletten gebruikt, plaatst u deze in het afwasmiddelbakje.
5. Sluit het afwasmiddelbakje. Druk op het deksel totdat het op zijn plaats klikt.
Gebruik lange wasprogramma's wanneer u vaatwastabletten gebruikt. Deze tabletten kunnen bij korte wasprogramma's niet helemaal oplossen, waardoor de afwasresultaten afnemen.
2
om het deksel te openen 7 van het afwasmiddelbakje.
1
.
1
.
Gebruik van glansmiddel
Met glansmiddel wordt het serviesgoed zonder vlekken of strepen gedroogd.
Het glansmiddeldoseerbakje voegt automatisch glansmiddel toe tijdens de laatste keer
spoelen.
Voer deze stappen uit om het glansmiddeldoseerbakje bij te vullen:
1.
Druk op de vrijgaveknop
bakje.
2.
Vul het glansmiddeldoseerbakje
het maximale niveau.
3. Verwijder gemorst glansmiddel met een absorberend doekje om te voorkomen dat er
te veel schuim ontstaat tijdens het afwassen.
6
om het deksel te openen 5 van het spoelmiddeldoseer-
3
met glansspoelmiddel. De markering 'max' toont
Page 15

De Multitabfunctie
4. Sluit het glansmiddeldoseerbakje. Druk op het deksel totdat het op zijn plaats klikt.
Stel de glansmiddeldosering in
Fabrieksinstelling: stand 3.
U kunt de dosering van het glansmiddel instellen tussen stand 1 (laagste dosering) en
stand 4 (hoogste dosering).
Draai de glansmiddelknop
4
om de dosering te vergroten of te verkleinen.
DE MULTITABFUNCTIE
De multitabfunctie is voor gecombineerde afwastabletten.
Deze tabletten bevatten middelen zoals afwasmiddel, glansmiddel en regenereerzout.
Sommige soorten tabletten kunnen andere middelen bevatten.
Zorg dat deze tabletten geschikt zijn voor de waterhardheid in uw omgeving (raadpleeg
de instructies op de verpakking van de producten).
De multitabfunctie stopt de stroom van glansmiddel en zout.
De multitabfunctie schakelt de indicatielampjes voor zout en glansmiddel uit.
De programmaduur kan toenemen als u de multitabfunctie gebruikt.
Schakel de multitabfunctie in of uit, voordat u een afwasprogramma start. U kunt de functie niet inschakelen of uitschakelen als er een afwasprogramma bezig is.
Zorg er voor de start van een wasprogramma altijd voor dat de functie Multitab is ingeschakeld.
15
De multitabfunctie uitschakelen en apart afwasmiddel, zout en glansmiddel gebruiken
1. Druk op de Option-toets tot het multitab-indicatielampje uit gaat. De functie is uitgeschakeld.
2. Vul het zoutreservoir en het glansmiddeldoseerbakje.
3. Stel de waterontharder op het hoogste niveau in.
4. Start een afwasprogramma zonder serviesgoed.
5. Als het afwasprogramma is voltooid, wijzigt u de waterontharder in de waterhardheid van uw omgeving.
6. Stel de hoeveelheid glansmiddel in.
DE VAATWASSER INRUIMEN
Raadpleeg de brochure 'Voorbeelden van ProClean-beladingen'.
Adviezen
• Plaats geen voorwerpen in het apparaat die water kunnen absorberen (sponzen, keu-
kenhanddoeken).
• Verwijder alle voedselresten van de voorwerpen.
• Maak aangebrande voedselresten op de voorwerpen zachter.
• Plaats holle voorwerpen (bijv. kopjes, glazen en pannen) met de opening naar beneden.
Page 16
Wasprogramma's
16
• Zorg ervoor dat zich geen water kan ophopen in opbergdozen of kommen.
• Zorg ervoor dat serviesgoed en bestek niet in elkaar liggen.
• Zorg ervoor dat glazen andere glazen niet aanraken.
• Leg kleine voorwerpen in de bestekmand.
• Meng lepels met ander bestek om te voorkomen dat ze aan elkaar kleven.
• Als u de voorwerpen in de manden plaatst, zorg er dan voor dat het water alle opper-
vlakken kan bereiken.
• Leg lichte voorwerpen in het bovenrek. Zorg ervoor dat de voorwerpen niet verschuiven.
• Waterdruppels kunnen zich ophopen op plastic voorwerpen en antiaanbakpannen.
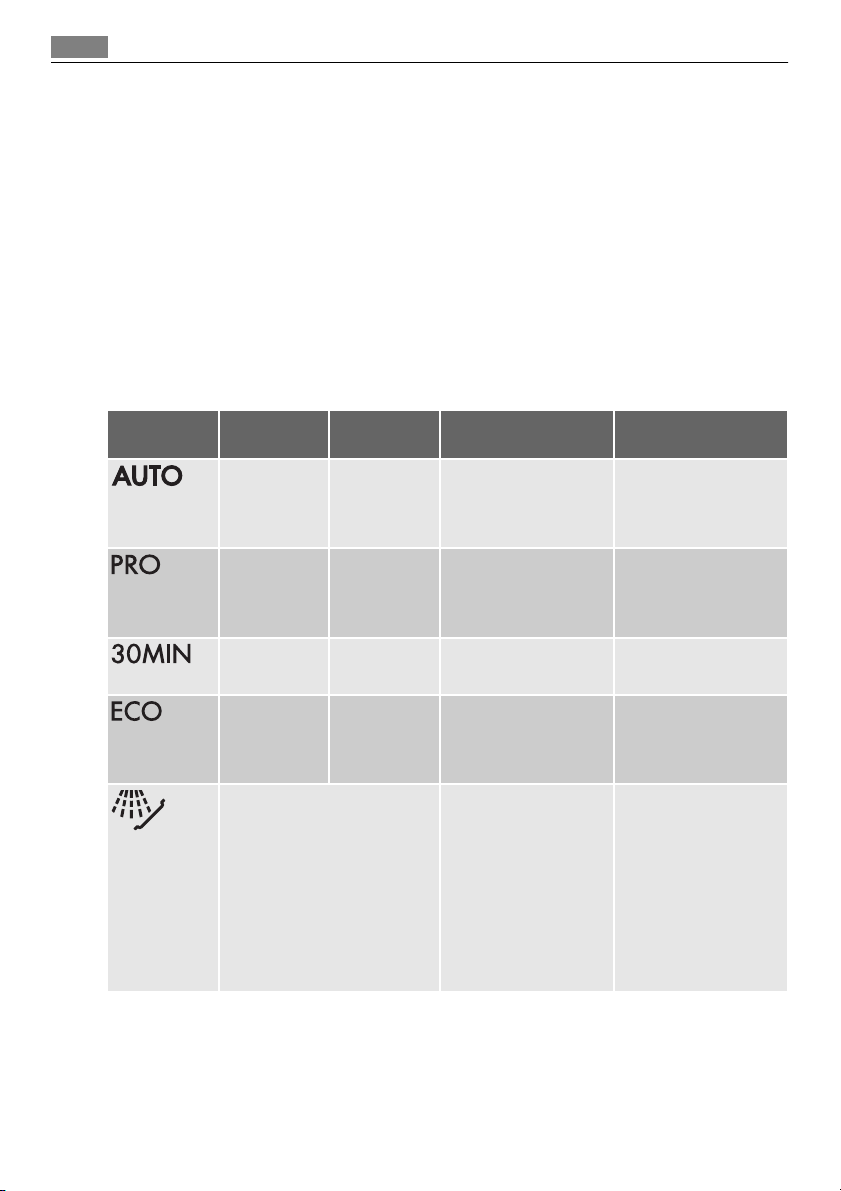
WASPROGRAMMA'S
Programma Soort vuil Type lading Programmabeschrij-
Alles Serviesgoed,
1)
Sterk vervuild Serviesgoed,
Normaal of
2)
3)
1) Het apparaat detecteert het soort vuil en de hoeveelheid serviesgoed in de mandjes. De temperatuur en
hoeveelheid water, het energieverbruik en de programmatijd worden automatisch aangepast.
2) Met dit programma kunt u een net bevuilde lading wassen. Het biedt goede wasresultaten in een korte tijd.
3) Dit is het standaard programma voor testinstituten. Met dit programma hebt u de meest efficiënte water-
en energieconsumptie voor normaal bevuild serviesgoed en bestek. Raadpleeg de apart bijgeleverde
documentatie voor testgegevens.
licht bevuild
Normaal bevuild
Gebruik dit programma om
het serviesgoed snel te spoelen. Hierdoor kunnen voedselresten niet aan het serviesgoed vastkoeken en ontstaan
er geen vieze geurtjes in het
apparaat.
U hoeft voor dit programma
geen afwasmiddel te gebruiken.
bestek en
pannen
bestek en
pannen
Serviesgoed
en bestek
Serviesgoed
en bestek
Voorspoelen
Wassen 45°C of 70°C
Spoelgangen
Drogen
Voorspoelen
Wassen 70 °C
Spoelgangen
Drogen
Wassen 60 °C
Spoelgang
Voorspoelen
Wassen 50 °C
Spoelgangen
Drogen
Spoelgang Ja, zonder effect.
ving
ÖKO PLUS-functie
Ja, met effect.
Ja, met effect.
Ja, zonder effect.
Ja, met effect.
Page 17
Een afwasprogramma selecteren en starten
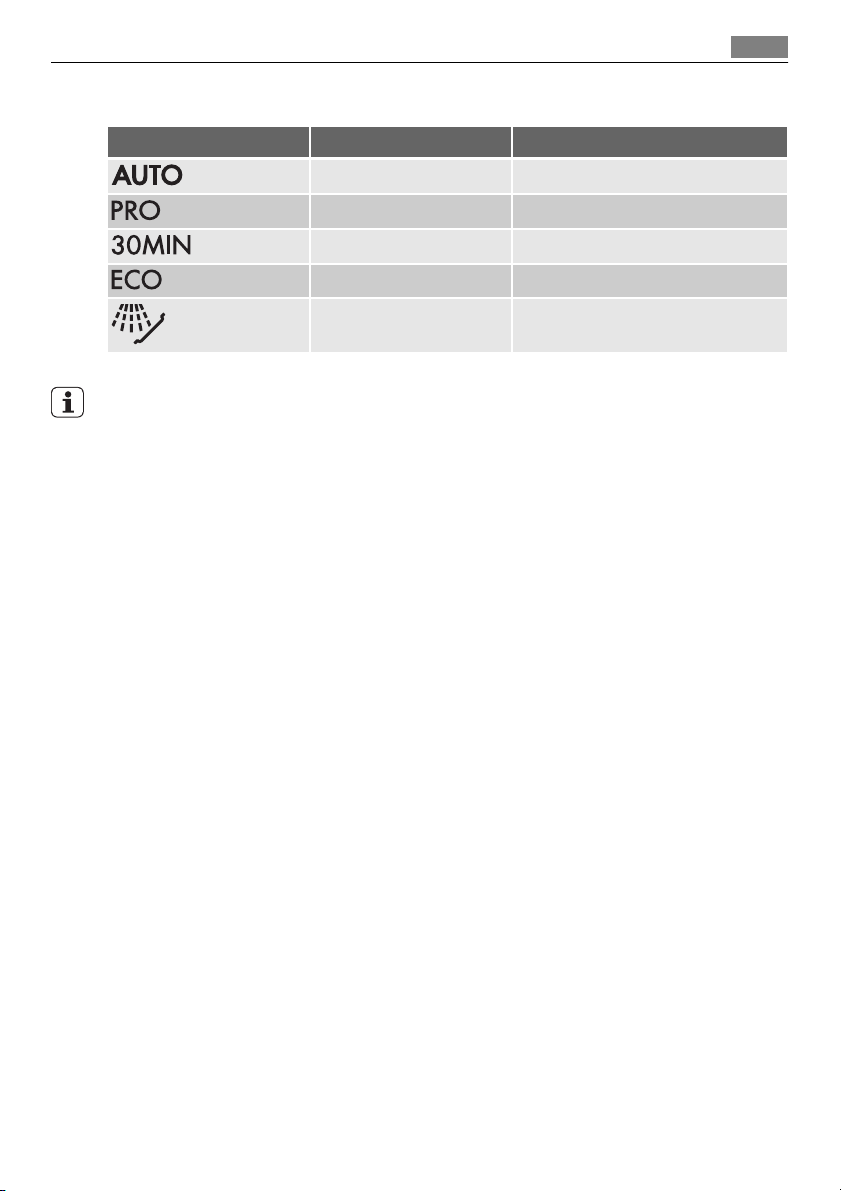
Verbruikswaarden
Programma
1) Op de display verschijnt de tijd van het programma.
1)
Energie (kWh) Water (liter)
0,9 - 1,7 8 - 17
1,5 - 1,7 15 - 16
0,9 9
1,0 - 1,1 10 - 11
0,1 4
De druk en temperatuur van het water, de variaties in stroomtoevoer en de hoeveelheid
vaat kan deze waarden veranderen.
EEN AFWASPROGRAMMA SELECTEREN EN STARTEN
Het afwasprogramma starten zonder uitgestelde start
1. Sluit de deur van het apparaat.
2. Schakel het apparaat in.
3. Zorg dat het apparaat in de instelmodus staat.
4. Stel het afwasprogramma in.
• Het bijbehorende programma-indicatielampje gaat branden.
• De tijd van het programma knippert op de display.
• De fase-indicatielampjes van het ingestelde afwasprogramma gaan branden.
5. Stel zo nodig de ÖKO PLUS-functie in.
• De functie moet altijd na het instellen van het afwasprogramma worden geselec-
teerd.
6. Druk op de Start-toets. Het afwasprogramma start automatisch.
• De fase-indicatielampjes gaan uit, maar het indicatielampje van de fase die op dit
moment in werking is, blijft aan.
17
Het afwasprogramma starten met uitgestelde start
1. Sluit de deur van het apparaat.
2. Schakel het apparaat in.
3. Zorg dat het apparaat in de instelmodus staat.
4. Stel het afwasprogramma en de functies in.
5. Druk herhaaldelijk op de Delay-toets totdat de tijd van de uitgestelde start op het
display wordt weergegeven.
• De tijd van de uitgestelde start knippert op de display.
• Het indicatielampje van de uitgestelde start staat aan.
6. Druk op de Start-toets. Het aftellen start automatisch.
Page 18
Een afwasprogramma selecteren en starten
18
• De uitgestelde starttijd knippert niet meer in het display.
• De fase-indicatielampjes van het ingestelde afwasprogramma gaan uit.
• Nadat het aftelproces voltooid is, wordt het wasprogramma automatisch gestart.
– Het indicatielampje van de lopende fase gaat aan.
Als de deur van het apparaat wordt geopend, wordt de aftelling onderbroken. Als u de
deur weer sluit, gaat het aftellen verder vanaf het punt van de onderbreking.
De uitgestelde start annuleren
Het aftellen werkt niet.
1. Druk herhaaldelijk op de Delay-toets totdat:
• Op het display wordt de duur van het wasprogramma weergegeven.
• De fase-indicatielampjes aan gaan.
2. Druk op de Start-toets om het afwasprogramma te starten.
Het aftellen werkt niet
1. Druk herhaaldelijk op de Delay-toets totdat:
• Op het display wordt de duur van het wasprogramma weergegeven.
• De fase-indicatielampjes aan gaan.
• Het wasprogramma start automatisch.
Het afwasprogramma onderbreken
• Open de deur van het apparaat.
– Het afwasprogramma stopt.
• Sluit de deur van het apparaat.
– Het afwasprogramma gaat verder vanaf het punt waar het werd onderbroken.
Het afwasprogramma annuleren
Als het afwasprogramma nog niet is begonnen, kunt u de selectie veranderen.
Als u de selectie wilt veranderen terwijl een afwasprogramma in werking is, moet u het
programma annuleren.
• Druk tegelijkertijd op de toetsen Delay en Start en houdt deze toetsen ingedrukt totdat:
– Alle programmalampjes aan gaan.
– de display twee horizontale statusstreepjes weergeeft.
Controleer of er afwasmiddel in het afwasmiddeldoseerbakje aanwezig is voordat u een
nieuw afwasprogramma start.
Einde van het afwasprogramma
Als het wasprogramma voltooid is, toont het display een nul en is het indicatielampje
einde programma aan.
1. Schakel het apparaat uit.
2. Open de deur van het apparaat.
Page 19
Onderhoud en reiniging
3. Laat de deur van het apparaat een paar minuten op een kier staan, voor betere droogresultaten.
Verwijder de voorwerpen uit de manden.
• Laat de borden afkoelen voordat u deze uit het apparaat neemt. Hete borden zijn ge-
voelig voor beschadigingen.
• Ruim eerst het onderrek en dan het bovenrek uit.
• Er kan water liggen aan de zijkanten en op de deur van het apparaat. Roestvrij staal
koelt sneller af dan borden.
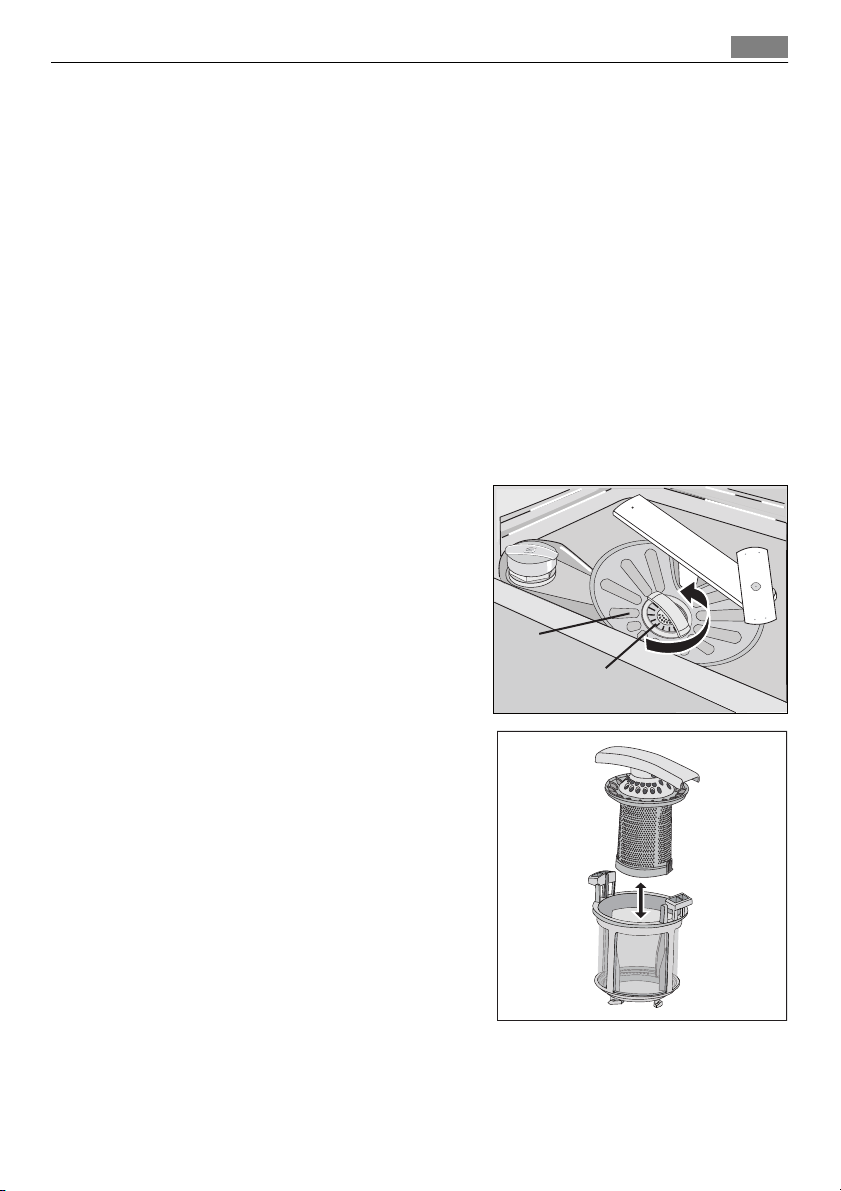
ONDERHOUD EN REINIGING
De filters verwijderen en reinigen
Vuile filters verminderen de wasresultaten.
Hoewel deze filters maar weinig onderhoud vergen, kunt u de filters het beste regelmatig
controleren en zo nodig reinigen.
1. Draai het filter (A) tegen de klok in (linksom) en verwijder het uit filter (B).
19
2. Filter (A) heeft twee delen. Haal de twee
delen uit elkaar om het filter te demonteren.
3. Maak de onderdelen schoon onder stromend water.
4. Plaats de twee delen van filter (A) tegen
elkaar en druk ze samen. Zorg ervoor dat
ze goed worden gemonteerd.
5. Verwijder filter (B).
6. Maak filter (B) schoon onder stromend
water.
B
A
Page 20
Problemen oplossen
20
7. Zet filter (B) op de oorspronkelijke plaats
terug. Zorg ervoor dat het filter goed
wordt gemonteerd in de twee geleiders
(C).
8. Zet filter (A) in filter (B) op zijn plaats.
Draai filter (A) met de klok mee (rechtsom) totdat het filter wordt vergrendeld.
De sproeiarmen reinigen
Probeer niet de sproeiarmen te verwijderen.
Als etensresten de openingen in de sproeiarmen hebben verstopt, verwijder deze dan met
een smal en puntig voorwerp.
De buitenoppervlakken reinigen
Reinig de buitenoppervlakken van het apparaat en het bedieningspaneel met een vochtige zachte doek.
Gebruik alleen neutrale schoonmaakmiddelen.
Gebruik geen schuurmiddelen, schuursponsjes of oplosmiddelen (bijv. aceton).
PROBLEMEN OPLOSSEN
C
Het apparaat start niet of stopt tijdens de werking.
Probeer eerst het probleem zelf op te lossen (zie tabel). Neem als dit niet lukt contact op
met de service-afdeling.
Bij sommige storingen wordt er op de display een alarmcode weergegeven:
- Het apparaat wordt niet gevuld met water
•
- Het apparaat pompt geen water weg
•
- De anti-overstromingsinrichting is ingeschakeld.
•
WAARSCHUWING!
Schakel het apparaat uit voordat u de controles uitvoert.
Storing Mogelijke oorzaak Mogelijke oplossing
Het apparaat wordt niet gevuld met water.
De waterdruk is te laag. Neem contact op met de wa-
De waterkraan is dicht. Draai de waterkraan open.
Het filter in de wateraanvoers-
De waterkraan is verstopt of
aangezet met kalkaanslag.
lang is verstopt.
Maak de waterkraan schoon.
terleidingsmaatschappij.
Maak het filter schoon.
Page 21

Problemen oplossen
Storing Mogelijke oorzaak Mogelijke oplossing
De aansluiting van de water-
De watertoevoerslang is be-
Het apparaat pompt geen water weg.
De aansluiting van de wateraf-
De waterafvoerslang is bescha-
De anti-overstromingsinrichting is ingeschakeld.
Het afwasprogramma start
niet.
U hebt niet op Start gedrukt. Druk op Start.
De stekker zit niet in het stop-
De zekering in de zekeringkast
De uitgestelde start is inge-
aanvoerslang is niet correct.
schadigd.
De gootsteenafvoer is geblokkeerd.
voerslang is niet correct.
digd.
Draai de waterkraan dicht en
De deur van het apparaat is
open. Het indicatielampje van
de deur staat aan.
contact.
is doorgebrand.
steld.
Zorg dat de aansluiting altijd
correct is.
Verzeker u ervan dat de watertoevoerslang niet is beschadigd.
Ontstop de gootsteenafvoer.
Zorg dat de aansluiting altijd
correct is.
Verzeker u ervan dat de waterafvoerslang niet is beschadigd.
neem contact op met de service-afdeling.
Sluit de deur van het apparaat.
Sluit de stekker aan.
Vervang de zekering.
• Annuleer de uitgestelde
start.
• Nadat het aftelproces voltooid is, wordt het wasprogramma automatisch gestart.
21
Schakel het apparaat na de controle in. Het programma gaat verder vanaf het punt waar
het werd onderbroken.
Als het probleem opnieuw optreedt, neem dan contact op met onze service-afdeling.
Als de display andere alarmcodes meldt, neem dan contact op met onze service-afdeling.
De benodigde informatie voor de service-afdeling staan op het typeplaatje.
Leg deze informatie vast:
– Model (MOD.) ........................................................
– Productnummer (PNC) ..........................................
– Serienummer (S.N.) ..............................................
Page 22
Problemen oplossen
22
De afwas- en droogresultaten zijn niet bevredigend
Probleem Mogelijke oorzaak Mogelijke oplossing
De borden zijn niet schoon. Het afwasprogramma is niet
U heeft de items niet goed in
De sproeiarmen konden niet
De filters zijn vuil of niet juist
Er is te weinig of geen afwas-
Er zitten kalkresten op de borden.
Verkeerde instelling van ni-
De dop van het zoutreservoir
De glazen en borden vertonen
strepen, witachtige vlekken of
een blauwzweem.
Opgedroogde waterdruppels
op de glazen en de borden.
Het afwasmiddel kan de oor-
Het serviesgoed is nat. Het afwasprogramma bevatte
Het serviesgoed is nat en mat. Het glansmiddeldoseerbakje is
De multitabfunctie is inge-
geschikt voor het type lading
en de mate van vervuiling.
de mandjes geplaatst. Het water heeft niet alle oppervlakken aangeraakt.
vrij draaien. Onjuiste positie
van de items in de mandjes.
gemonteerd en geplaatst.
middel gebruikt.
Het zoutreservoir is leeg. Vul het zoutreservoir met zout
veau waterontharder.
is niet goed gesloten.
Er wordt teveel glansmiddel
gebruikt.
Er wordt te weinig glansmiddel gebruikt.
zaak zijn.
geen droogfase of een kortere
droogfase.
leeg.
schakeld (deze functie schakelt het glansmiddeldoseerbakje automatisch uit).
Zorg ervoor dat het afwasprogramma geschikt is voor het type lading en de mate van vervuiling.
Plaats de items correct in de
mandjes.
Controleer of een verkeerde
plaatsing van de items geen
blokkering van de sproeiarmen
veroorzaakt.
Zorg ervoor dat de filters
schoon zijn en op de juiste manier zijn gemonteerd en geïnstalleerd.
Zorg voor voldoende afwasmiddel.
voor afwasmachines.
Stel de waterontharder in op
het correcte niveau.
Zorg ervoor dat de dop van
het zoutreservoir goed gesloten is.
Verminder de hoeveelheid
glansmiddel.
Verhoog de hoeveelheid glansmiddel.
Gebruik een ander merk afwasmiddel.
Laat de deur een paar minuten
op een kier staan voor betere
droogresultaten.
Vul het glansmiddeldoseerbakje met glansmiddel.
Schakel het glansmiddeldoseerbakje in.
Page 23

Technische gegevens
Het glansmiddeldoseerbakje inschakelen
1. Schakel het apparaat in.
2. Zorg dat het apparaat in de instelmodus staat.
3. Druk tegelijkertijd op de Delay-toets en de Start-toets en houd deze toetsen ingedrukt totdat de programma-indicatielampjes AUTO, PRO en 30MIN gaan knipperen.
4. Laat de toets Delay en Start los.
5. Druk op toets Option.
• gaan de programma-indicatielampjes AUTO en 30MIN uit.
• Het programma-indicatielampje PRO blijft knipperen.
• Op de display wordt de instelling van het glansmiddeldoseerbakje weergegeven.
De glansmiddeldosering is uitgeschakeld.
De glansmiddeldosering is ingeschakeld.
6. Druk op toets Option om de instelling te wijzigen.
7. Schakel het apparaat uit om te bevestigen.
TECHNISCHE GEGEVENS
Afmeting Breedte 596 mm
Hoogte 818 - 898 mm
Diepte 575 mm
Leidingwaterdruk Minimaal 0.5 bar (0.05 MPa)
Maximaal 8 bar (0,8 MPa)
Watertoevoer
Capaciteit Couverts 12
1) Sluit de slang aan op een kraan met 3/4”-schroefdraad.
1)
Informatie over de elektrische aansluiting staat op het typeplaatje op de binnenrand van
de deur van het apparaat.
Koud water of warm water maximaal 60 °C
23
Gebruik een heet watervoorziening om het energieverbruik te verminderen, als het hete
water door alternatieve, milieuvriendelijkere energiebronnen geproduceerd wordt (bijv.
zonne- of fotovoltaïsche panelen en wind).
MILIEUBESCHERMING
Het symbool op het product of op de verpakking wijst erop dat dit product niet als
huishoudafval mag worden behandeld, maar moet worden afgegeven bij een
verzamelpunt waar elektrische en elektronische apparatuur wordt gerecycled. Als u
ervoor zorgt dat dit product op de juiste manier wordt verwijderd, voorkomt u mogelijke
negatieve gevolgen voor mens en milieu die zich zouden kunnen voordoen in geval van
Page 24

Milieubescherming
24
verkeerde afvalverwerking. Voor gedetailleerdere informatie over het recyclen van dit
product, kunt u contact opnemen met de gemeente, de gemeentereiniging of de winkel
waar u het product hebt gekocht.
Recycle de materialen met het symbool
melcontainer om het te recyclen.
. Gooi de verpakking in een geschikte verza-
Page 25

POUR DES RÉSULTATS PARFAITS
Merci d'avoir choisi ce produit AEG. Nous l'avons créé
pour vous offrir la meilleure performance pour une
longue durée, avec des technologies innovantes qui
vous simplifient la vie - autant de caractéristiques que
vous ne trouverez pas sûrement pas sur d'autres
appareils. Veuillez prendre quelques instants pour lire
cette notice afin d'utiliser au mieux votre appareil.
ACCESSOIRES ET CONSOMMABLES
Dans la boutique en ligne d'AEG, vous trouverez tout ce
qu'il vous faut pour que vos appareils AEG fonctionnent
parfaitement. Sans oublier une vaste gamme
d'accessoires conçus et fabriqués selon les critères de
qualité les plus élevés qui soient, des articles de cuisine
spécialisés aux range-couverts, des porte-bouteilles aux
sacs à linge délicats...
25
Visitez la boutique en ligne sur
www.aeg-electrolux.com/shop
Page 26

Sommaire
26
SOMMAIRE
27 Consignes de sécurité
31 Description de l'appareil
32 Bandeau de commande
34 Utilisation de l'appareil
35 Réglage de l'adoucisseur d'eau
36 Utilisation du sel régénérant
37 Utilisation du produit de lavage
et du liquide de rinçage
38 Fonction "Tout en 1"
38 Rangement des couverts et de la
vaisselle
39 Programmes de lavage
40 Sélection et départ d'un
programme de lavage
42 Entretien et nettoyage
43 En cas d'anomalie de
fonctionnement
46 Caractéristiques techniques
47 En matière de protection de
l'environnement
Les symboles suivants sont utilisés
dans ce manuel:
Informations importantes pour votre
sécurité et pour éviter d’abîmer
l’appareil.
Informations générales et conseils
Informations écologiques
Sous réserve de modifications
Page 27

Consignes de sécurité
CONSIGNES DE SÉCURITÉ
Lire attentivement cette notice d'utilisation avant l'installation et l'utilisation de l'appareil :
• Pour votre sécurité et la sécurité de votre appareil.
• Pour protéger l'environnement.
• Pour le bon fonctionnement de l’appareil.
Conservez cette notice d'utilisation avec l'appareil. Si vous déménagez ou si l'appareil est
cédé à une autre personne, assurez-vous que la notice d'utilisation l'accompagne.
Le fabricant n'est pas responsable des dommages liés à une mauvaise installation ou utilisation.
Sécurité des enfants et des personnes vulnérables
• Cet appareil n'est pas destiné aux enfants et aux personnes dont les capacités physiques, sensorielles ou mentales, ou le manque d'expérience et de connaissance les empêchent d'utiliser l'appareil sans risque lorsqu'ils sont sans surveillance, ou en l'absence d'instruction d'une personne responsable qui puisse leur assurer une utilisation de
l'appareil sans danger.
• Ne laissez jamais les emballages à la portée des enfants. Risque d'asphyxie ou de blessure.
• Conservez tous les produits de lavage dans un endroit sûr. Ne laissez pas les enfants
toucher les produits de lavage.
• Tenez les enfants et les animaux éloignés de l’appareil lorsque la porte est ouverte.
Consignes générales de sécurité
• Ne modifiez jamais les caractéristiques de cet appareil. Vous risqueriez de vous blesser
et d'endommager l'appareil.
• Les produits de lavage pour lave-vaisselle peuvent occasionner des brûlures chimiques
au niveau des yeux, de la bouche et de la gorge. Respectez les instructions de sécurité
du fabricant des produits.
• L'eau de votre lave-vaisselle n'est pas potable. Des résidus de produits de lavage peuvent subsister dans votre lave-vaisselle.
• Ne laissez pas la porte de l'appareil ouverte sans supervision. Vous éviterez ainsi les
blessures et les chutes sur une porte ouverte.
• Ne montez pas ou ne vous asseyez pas sur la porte ouverte de votre appareil.
27
Utilisation de l'appareil
• Cet appareil est destiné à un usage domestique normal. Ne l'utilisez jamais à d'autres
fins, pour éviter les dommages corporels et les dégâts matériels.
• Ce lave-vaisselle est conçu pour laver la vaisselle et les ustensiles pouvant être lavés
en machine.
• Ne placez pas de produits inflammables ou d'éléments imbibés de produits inflammables à l'intérieur, à proximité ou sur l'appareil. Risque d'explosion ou d'incendie.
• Les couteaux et autres ustensiles pointus ou tranchants doivent être placés dans le panier à couverts avec la pointe vers le bas, ou placez-les en position horizontale dans le
Page 28

Consignes de sécurité
28
panier supérieur ou dans le panier à couteaux (tous les modèles ne sont pas équipés
d'un panier à couteaux).
• N'utilisez que des produits (sel, produit de lavage, liquide de rinçage) spécifiques pour
lave-vaisselle.
• Tout autre type de sel non spécialement étudié pour être utilisé dans un lave-vaisselle,
en particulier le sel de cuisine, peut endommager l'adoucisseur d'eau.
• Approvisionnez en sel juste avant de démarrer un programme de lavage. Les restes de
sel dans l'appareil peuvent provoquer de la corrosion ou perforer la cuve de l'appareil.
• Ne remplissez jamais le distributeur de liquide de rinçage avec d'autres produits (agent
de nettoyage pour lave-vaisselle, produit de lavage liquide). Vous risqueriez d'endommager l'appareil.
• Assurez-vous que les bras d'aspersion tournent librement avant de lancer le programme de lavage.
• De la vapeur chaude peut s'échapper de l'appareil si vous ouvrez la porte pendant le
déroulement d'un programme de lavage. Risque de brûlures cutanées.
• N'enlevez pas la vaisselle de l'appareil avant la fin du programme de lavage.
Entretien et nettoyage
• Avant de nettoyer l'appareil, arrêtez-le et débranchez-le du secteur.
• N'utilisez pas de produits inflammables ou corrosifs.
• N’utilisez pas l'appareil sans les filtres. Contrôlez que les filtres sont correctement installés. Si les filtres ne sont pas correctement installés, les performances de lavage pourraient être compromises et l'appareil endommagé.
• Ne projetez pas d'eau ou de vapeur sur l'appareil pour son nettoyage. Cela créerait un
risque de choc électrique et pourrait endommager l'appareil.
Installation
• Vérifiez que l'appareil n'a subi aucun dommage au cours du transport. Ne branchez
jamais un appareil endommagé. Si l'appareil est endommagé, contactez votre magasin
vendeur.
• Retirez tous les emballages avant la première utilisation.
• Seul un professionnel qualifié doit effectuer l'installation, le raccordement électrique
et hydraulique, la mise en service et la maintenance de l'appareil. Vous éviterez ainsi
des risques mobiliers, immobiliers et corporels.
• Pendant l'installation et avant toute intervention sur le lave-vaisselle, il est nécessaire
de débrancher l'appareil.
• Les parois de votre lave-vaisselle ne doivent jamais être percées pour éviter d'endommager les composants hydrauliques et électriques.
•
Important ! Respectez les consignes données sur le gabarit fourni avec l'appareil :
– Pour installer l'appareil.
– Pour monter la porte du meuble.
– Pour raccorder les tuyaux d'arrivée d'eau et de vidange.
• Vérifiez que l'appareil est installé sous et à proximité de structures sûres.
Page 29

Consignes de sécurité
Précautions contre le gel
• N'installez pas l'appareil dans un endroit où la température ambiante est inférieure à 0
°C.
• Le fabricant ne pourra être tenu responsable en cas de dommages dus au gel.
Tuyau d’arrivée d’eau
• Utilisez des tuyaux neufs pour raccorder l'appareil à l'arrivée d'eau. N’utilisez pas de
tuyaux usagés.
• Ne raccordez pas l’appareil à des conduites neuves ou qui n’ont pas été utilisées depuis longtemps. Laissez couler l’eau pendant quelques minutes avant de brancher le
tuyau d’arrivée d’eau.
• Veillez à ne pas écraser ou endommager les tuyaux d'eau lorsque vous installez l'appareil.
• Assurez-vous que tous les raccords de tuyaux d’eau sont bien serrés afin d’éviter les
fuites.
• Lorsque vous utilisez l'appareil pour la première fois, vérifiez que les tuyaux ne fuient
pas.
• Le tuyau d'arrivée est à double paroi et comporte un câble d'alimentation intérieur ainsi qu'une soupape de sécurité. Le tuyau d'arrivée d'eau est sous pression uniquement
lorsque l'eau s'écoule Si le tuyau d'arrivée d'eau fuit, la soupape de sécurité coupe automatiquement l'eau.
– Faites attention au moment de raccorder le tuyau d'arrivée d'eau :
– N'immergez pas le tuyau d'arrivée d'eau ou la soupape de sécurité dans l'eau.
– Si le tuyau d'arrivée d'eau ou la soupape de sécurité est endommagé, débranchez
immédiatement la prise secteur.
– Contactez le service après-vente de votre magasin vendeur pour remplacer le
tuyau d'arrivée d'eau avec soupape de sécurité.
AVERTISSEMENT
Tension dangereuse
29
Raccordement électrique
• L'appareil doit être relié à la terre.
Page 30

Consignes de sécurité
30
• Vérifiez que les données électriques figurant sur la plaque signalétique correspondent
à celles de votre réseau.
• Utilisez toujours une prise correctement installée, protégée contre les chocs.
• L'appareil ne doit pas être raccordé à l'aide d'un prolongateur ou d'une prise multiple.
Risque d'incendie.
• Ne remplacez et ne modifiez jamais le câble d'alimentation. Contactez votre service
après-vente.
• Attention à ne pas écraser ou endommager la prise et le câble d'alimentation situés à
l'arrière de l'appareil.
• Assurez-vous que la prise principale est accessible une fois l'appareil installé.
• Ne tirez jamais sur le câble d'alimentation électrique pour débrancher l'appareil. Détachez, pour ce faire, la fiche de la prise secteur.
Service après-vente
• Toute intervention ou réparation sur votre appareil doit uniquement être effectuée
par une personne qualifiée. Contactez votre service après-vente.
• Utilisez exclusivement des pièces d'origine.
Pour mettre l'appareil au rebut
• Pour éviter tout risque corporel ou matériel :
– Débranchez l'appareil.
– Coupez le câble d'alimentation au ras de l'appareil et mettez-le au rebut.
– Retirez le loquet de la porte. Ceci évite d'enfermer un enfant ou un animal dans
l'appareil par accident. Risque d'asphyxie.
– Mettez l'appareil au rebut dans un centre local agréé.
AVERTISSEMENT
Les produits de lavage pour lave-vaisselle sont dangereux et peuvent être corrosifs !
• En cas d'accident impliquant ces produits, contactez immédiatement un médecin.
• En cas d'ingestion du produit, contactez immédiatement un médecin.
• En cas de projection de produit de lavage dans les yeux, contactez immédiatement un
médecin et rincez abondamment à l'eau.
• Conservez les produits de lavage pour lave-vaisselle dans un endroit sûr et hors de portée des enfants.
• Ne laissez pas la porte de l'appareil ouverte quand celui-ci contient du produit de lavage.
• Remplissez le distributeur de produit de lavage juste avant de démarrer un programme de lavage.
Page 31

DESCRIPTION DE L'APPAREIL
1
2
Description de l'appareil
10
9
31
3
4
5
1 Panier supérieur
2 Sélecteur de dureté de l'eau
3 Réservoir de sel régénérant
4 Distributeur de produit de lavage
5 Distributeur de liquide de rinçage
6 Plaque signalétique
7 Filtres
8 Bras d'aspersion inférieur
9 Bras d'aspersion supérieur
10 Bras d'aspersion supérieur
8
7
6
Page 32

Bandeau de commande
32
BANDEAU DE COMMANDE
1
3
9
1 Touche Marche/Arrêt
2 Guide des programmes
3 Touche Program
4 Voyants de programme
5 Écran
6 Touche Delay
7 Touche Start
8 Voyants
9 Touche Option
Voyant Tout en 1 Il s'allume lorsque la fonction est activée.
2
4
8
Voyants
5 6
7
Voyant ÖKO PLUS Il s'allume lorsque la fonction est activée.
Symboles de déroulement du lavage Il s'allume quand la phase de lavage est
en cours.
Voyant de déroulement du rinçage Il s'allume quand la phase de rinçage est
en cours.
Voyant de déroulement du séchage Il s'allume quand la phase de séchage est
en cours.
Voyant de fin Il s'allume quand un cycle de lavage est terminé.
Voyant du liquide de rinçage Il s'allume lorsque le distributeur de liquide de
rinçage doit être rempli.
1)
Page 33

Bandeau de commande
Voyants
Voyant du réservoir à sel Il s'allume lorsque le réservoir de sel régénérant doit
être rempli.
Le voyant de réapprovisionnement en sel régénérant peut rester allumé plusieurs heures après le remplissage du réservoir à sel. Cela n'affecte pas le fonctionnement de l'appareil.
Voyant Delay Il s'allume lorsque la fonction de départ différé est activée.
Voyant de porte Il s'allume quand la porte est ouverte ou n'a pas été fermée
correctement.
1) Lorsque les réservoirs à sel et à liquide de rinçage sont vides, les voyants ne s'allument pas pendant qu'un
programme est en cours.
1)
Touche Marche/Arrêt
Appuyez sur cette touche pour activer ou désactiver l’appareil.
La fonction AUTO OFF met automatiquement l'appareil à l'arrêt 10 minutes après la fin
du programme de lavage. Cela permet de diminuer la consommation d'énergie.
Guide des programmes
Permet la sélection du programme de lavage.
Touche Program
Appuyez sur cette touche à plusieurs reprises jusqu'à ce que le voyant du programme de
lavage s'allume. Reportez-vous au chapitre « Programmes de lavage ».
33
Indicateur
L'affichage indique :
• Le réglage électronique du niveau d'adoucisseur d'eau.
• L'activation et la désactivation du distributeur de liquide de rinçage (uniquement si la
fonction « Tout en 1 » est activée)
• La durée du programme de lavage
• Le temps restant avant la fin du programme de lavage
• La fin d'un programme de lavage (affichage d'un zéro)
• L'heure du départ différé
• Les codes d'alarme.
Touche Delay
Appuyez sur cette touche à plusieurs reprises pour retarder le départ du programme de
lavage de 1 à 24 heures.
Touche Start
Appuyez sur cette touche pour démarrer :
• Le programme de lavage
• Le décompte du départ différé.
Page 34

Utilisation de l'appareil
34
Touche Option
Appuyez sur cette touche pour régler les fonctions.
Si la fonction est activée, le voyant correspondant s'allume.
Touche Option Tout en 1 ÖKO PLUS
Appuyez une fois. ACTIVÉ DÉSACTIVÉ
Appuyez deux fois. DÉSACTIVÉ ACTIVÉ
Appuyez trois fois. ACTIVÉ ACTIVÉ
Appuyez quatre fois. DÉSACTIVÉ DÉSACTIVÉ
Fonctions
Tout en 1
Si vous utilisez des pastilles de détergent multifonctions (« 3 en 1 », « 4 en 1 » « 5 en 1 »,
etc.), utilisez la fonction Tout en 1. Reportez-vous à la fonction « Tout en 1 ».
ÖKO PLUS
Cette fonction diminue la température pendant la phase de séchage. La consommation
électrique diminue de 25 %.
Il se peut que la vaisselle soit encore mouillée, si vous ouvrez la porte de l'appareil dès
que le programme de lavage est terminé. Nous recommandons d'ouvrir la porte de l'appareil et de la laisser entrouverte pour laisser sécher la vaisselle.
Mode Programmation
L'appareil doit être en mode Programmation pour effectuer les opérations suivantes :
• Régler et lancer un programme de lavage
• Régler et lancer un départ différé
• Régler électroniquement le niveau de l'adoucisseur d'eau
• Activer ou désactiver le distributeur de liquide de rinçage (seulement si la fonction
« Tout en 1 » est activée).
Mettez en marche l'appareil. L'appareil se trouve en mode Programmation lorsque :
• Tous les voyants du programme s'allument.
• Deux lignes horizontales apparaissent sur l'affichage.
Mettez en marche l'appareil. L'appareil n'est pas en mode Programmation lorsque :
• Un seul voyant de programme s'allume.
• L'affichage indique la durée d'un programme de lavage ou d'un départ différé.
– Pour revenir au mode Programmation, annulez le programme ou le départ différé.
Reportez-vous au chapitre « Sélection et départ d'un programme de lavage ».
UTILISATION DE L'APPAREIL
1. Vérifiez si le réglage de dureté de l'adoucisseur d'eau correspond à la dureté de l'eau
de votre région. Sinon, ajustez le niveau de l'adoucisseur d'eau.
2. Remplissez le réservoir de sel régénérant avec du sel spécial pour lave-vaisselle.
Page 35

Réglage de l'adoucisseur d'eau
3. Remplissez le distributeur de liquide de rinçage.
4. Rangez les couverts et la vaisselle dans le lave-vaisselle.
5. Sélectionnez le programme de lavage en fonction de la charge et du degré de salissure.
6. Remplissez le réservoir avec la quantité nécessaire de produit de lavage.
7. Démarrez le programme de lavage.
Si vous utilisez des pastilles de détergent multifonctions (« 3 en 1 », « 4 en 1 » « 5 en 1 »,
etc.), utilisez la fonction « Tout en 1 » (reportez-vous au chapitre Fonction « Tout en 1 »).
RÉGLAGE DE L'ADOUCISSEUR D'EAU
Le lave-vaisselle est équipé d'un adoucisseur d'eau conçu pour éliminer les minéraux et
les sels de l'eau d'alimentation. Ces minéraux et sels peuvent endommager l'appareil.
Réglez le niveau de l'adoucisseur d'eau s'il ne correspond pas à la dureté de l'eau de votre
région.
Contactez votre compagnie des eaux pour connaître la dureté de l'eau de votre région.
Dureté eau
Degrés allemands
(dH°)
51 - 70 91 - 125 9,1 - 12,5 64 - 88
43 - 50 76 - 90 7,6 - 9,0 53 - 63
37 - 42 65 - 75 6,5 - 7,5 46 - 52
29 - 36 51 - 64 5,1 - 6,4 36 - 45
23 - 28 40 - 50 4,0 - 5,0 28 - 35
19 - 22 33 - 39 3,3 - 3,9 23 - 27
15 - 18 26 - 32 2,6 - 3,2 18 - 22 1 4
11 - 14 19 - 25 1,9 - 2,5 13 - 17 1 3
4 - 10 7 - 18 0,7 - 1,8 5 - 12 1 2
< 4 < 7 < 0,7 < 5
1) Réglage d'usine
2) Ne pas utiliser de sel à ce niveau.
Degrés français
(°TH)
mmol/l Degrés Clar-kemanuel élec-
L’adoucisseur d’eau doit être réglé manuellement et électroniquement.
Réglage de la dureté
2
2
2
2
2
2
1
de l'eau
1)
1)
1)
1)
1)
1)
2)
35
troni-
que
10
9
8
7
6
1)
5
2)
1
Page 36

Utilisation du sel régénérant
36
Réglage manuel
Tournez le sélecteur de dureté de l'eau sur 1 ou 2
(reportez-vous au tableau).
Réglage électronique
1. Mettez en fonctionnement l'appareil.
2. Contrôlez que l'appareil est en mode Programmation.
3. Appuyez simultanément sur les touches Delay et Start, jusqu'à ce que les voyants des
touches AUTO, PRO et 30MIN commencent à clignoter.
4. Relâchez les touches Delay et Start.
5. Appuyez sur la touche Program.
• Les voyants de programme PRO et 30MIN s'éteignent.
• Le voyant du programme AUTO continue de clignoter.
• L'afficheur indique le réglage de l'adoucisseur d'eau (par exemple :
6. Appuyez plusieurs fois sur la touche Program pour modifier le réglage.
7. Mettez à l'arrêt l'appareil pour confirmer.
Si l'adoucisseur d'eau est réglé électroniquement au niveau 1, le voyant de réapprovisionnement de sel restera éteint.
= niveau 5).
UTILISATION DU SEL RÉGÉNÉRANT
Pour remplir le réservoir de sel
1. Dévissez le bouchon du réservoir à sel ré-
générant en le tournant dans le sens inverse des aiguilles d'une montre.
2. Versez 1 litre d'eau à l'intérieur du réser-
voir (uniquement lorsque vous remplissez le réservoir pour la première fois).
3. Versez le sel à l'aide de l'entonnoir jus-
qu'à ce que le réservoir soit rempli.
4. Éliminez toute trace de sel autour de l'ou-
verture du réservoir de sel régénérant.
5. Remettez le bouchon en place et serrez-
le en le tournant dans le sens des aiguilles d'une montre pour fermer le réservoir de sel régénérant.
Page 37

20
30
M
A
X
1
2
3
4
+
-
Utilisation du produit de lavage et du liquide de rinçage
37
Il est normal que de l'eau s'écoule du réservoir lorsque vous le remplissez de sel.
UTILISATION DU PRODUIT DE LAVAGE ET DU LIQUIDE DE RINÇAGE
1
2
7
3
4
6
5
Utilisation du produit de lavage
Afin de préserver l'environnement, n'utilisez que la quantité nécessaire de produit de lavage.
Respectez les recommandations fournies par le fabricant du produit de lavage qui figurent sur l'emballage du produit.
Pour remplir le réservoir de produit de lavage :
1.
Appuyez sur la touche de déverrouillage
du produit de lavage.
2.
Introduisez le produit de lavage dans le réservoir
3. Si le programme de lavage comporte une phase de prélavage, versez une petite quan-
tité de produit de lavage à l'intérieur de la porte de l'appareil.
4.
Si vous utilisez des pastilles de détergent, placez-les dans le distributeur.
5. Fermez le réservoir du produit de lavage. Appuyez sur le couvercle jusqu'à ce qu'il
soit verrouillé.
Utilisez des programmes de lavage longs quand vous utilisez des pastilles de détergent.
En effet, elles ne se dissolvent pas entièrement pendant les programmes courts et peuvent donner de mauvais résultats.
Utilisation du liquide de rinçage
Le liquide de rinçage assure un rinçage optimal et un séchage sans taches ni striures.
Le distributeur de liquide de rinçage libère automatiquement le liquide de rinçage durant
la dernière phase de rinçage.
2
afin d'ouvrir le couvercle 7 du réservoir
1
.
1
.
Pour remplir le distributeur de liquide de rinçage, procédez comme suit :
Page 38

Fonction "Tout en 1"
38
1.
Appuyez sur la touche de déverrouillage
teur de liquide de rinçage.
2.
Remplissez le distributeur de liquide de rinçage
'max.' indique le niveau maximum.
3. Essuyez tout débordement de liquide de rinçage à l'aide de papier absorbant, afin
d'éviter une formation excessive de mousse lors du lavage.
4. Vérifiez que le couvercle est fermé après chaque remplissage. Appuyez sur le couver-
cle jusqu'à ce qu'il soit verrouillé.
6
afin d'ouvrir le couvercle 5 du distribu-
3
de liquide de rinçage. Le repère
Réglez le dosage du liquide de rinçage
Réglage d'usine : position 3.
Vous pouvez régler le dosage du liquide de rinçage entre 1 (minimum) et 4 (maximum).
Tournez le sélecteur de liquide de rinçage
4
afin d'augmenter ou diminuer le dosage.
FONCTION "TOUT EN 1"
La fonction «Tout en 1 » utilise les pastilles de détergent multifonctions.
Ces produits combinent les fonctions de produit de lavage, de liquide de rinçage et de sel
régénérant. Certains types de pastilles contiennent d'autres agents.
Assurez-vous que ces pastilles conviennent à la dureté de l'eau de votre localité (reportezvous aux instructions accompagnant l'emballage des produits).
La fonction « Tout en 1 » désactive le débit du liquide de rinçage et du sel.
La fonction « Tout en 1 » désactive les voyants du sel régénérant et du liquide de rinçage.
La durée du programme peut augmenter si vous utilisez la fonction « Tout en 1 ».
Activez ou désactivez la fonction « Tout en 1 » avant de lancer un programme de lavage.
Vous ne pouvez pas activer ou désactiver cette fonction quand un programme de lavage
est en cours.
Veillez à activer la fonction « Tout en 1 » avant de lancer un programme de lavage.
Pour désactiver la fonction « Tout en 1 » et utiliser le produit de lavage, le sel
régénérant et le liquide de rinçage séparément
1. Appuyez sur la touche Option, jusqu'à ce que le voyant « Tout en 1» s’éteigne. La fonc-
tion est désactivée.
2. Approvisionnez de nouveau le réservoir de sel et le distributeur de liquide de rinçage.
3. Réglez la position maximale du degré de dureté de l'eau.
4. Lancez un programme de lavage sans charger l'appareil.
5. Dès que le programme de lavage est terminé, réglez l'adoucisseur d'eau en fonction
de la dureté de l'eau de votre région.
6. Réglez la quantité de liquide de rinçage.
RANGEMENT DES COUVERTS ET DE LA VAISSELLE
Reportez-vous à la brochure « Exemples de charges ProClean ».
Page 39

Programmes de lavage
Conseils et astuces
• Les éponges, les chiffons de nettoyage et tout autre objet absorbant l'eau ne doivent
pas être lavés au lave-vaisselle.
• Enlevez tous les restes d'aliments.
• Laissez tremper les casseroles au fond desquelles adhèrent des restes d'aliments brûlés
ou attachés.
• Chargez les articles creux, tels que tasses, verres, casseroles, etc. en les retournant,
• de manière à ce que l'eau ne s'accumule pas dans le creux ou dans un fond bombé.
• La vaisselle et les couverts ne doivent pas être insérés les uns dans les autres ou se
chevaucher.
• Pour éviter que les verres ne se brisent, évitez qu'ils se touchent.
• Placez les petites pièces dans le panier à couverts.
• Intercalez les cuillères aux autres couverts, afin d'éviter qu'elles ne s'emboîtent.
• Lorsque vous placez des articles dans les paniers, veillez à ce que l'eau puisse accéder à
toutes les surfaces.
• Placez les objets légers dans le panier supérieur. Disposez-les de façon à ce qu'ils ne
puissent pas se retourner.
• La vaisselle en plastique et les poêles en matériau antiadhésif tendent à retenir les gouttes d'eau.
PROGRAMMES DE LAVAGE
39
Programme Niveau de sa-
1)
2)
3)
lissure
Tout Plats, casse-
Très sale Plats, casse-
Normalement
ou légèrement sale
Normalement
sale
Type de char-geDescription du pro-
roles, couverts et vaisselle
roles, couverts et vaisselle
Vaisselle et
couverts
Vaisselle et
couverts
gramme
Prélavage
Lavage à 45°C ou 70°C
Rinçages
Séchage
Prélavage
Lavage 70 °C
Rinçages
Séchage
Lavage 60 °C
Rinçage
Prélavage
Lavage 50 °C
Rinçages
Séchage
Fonction ÖKO PLUS
Oui, avec impact
Oui, avec impact
Oui, sans impact.
Oui, avec impact.
Page 40

Sélection et départ d'un programme de lavage
40
Programme Niveau de sa-
lissure
Ce programme permet de rincer les plats rapidement. Cela
empêche les restes de nourriture de coller sur les plats et
évite les mauvaises odeurs.
N'utilisez pas de produit de lavage avec ce programme.
1) L'appareil réagit différemment suivant le degré de salissure et la quantité d'articles insérés dans les paniers. Il
ajuste automatiquement la température et la quantité d'eau, la consommation d'énergie et la durée du
programme.
2) Ce programme vous permet de laver votre vaisselle utilisée récemment. Il donne de bons résultats de lavage
en peu de temps.
3) Il s'agit du programme standard pour les instituts de test. Ce programme vous permet d'utiliser le plus
efficacement votre consommation d'eau et d'énergie pour les plats et couverts avec un niveau normal de
salissure. Reportez-vous au livret fourni pour les informations de test.
Type de char-geDescription du pro-
gramme
Rinçage Oui, sans impact.
Fonction ÖKO PLUS
Valeurs de consommation
Programme
1)
Énergie (kWh) Eau (litres)
0,9 - 1,7 8 - 17
1,5 - 1,7 15 - 16
0,9 9
1,0 - 1,1 10 - 11
0,1 4
1) L'affichage indique la durée du programme.
Ces valeurs de consommation peuvent changer en fonction de la pression et de la température de l'eau, des variations d'alimentation électrique et de la quantité de vaisselle.
SÉLECTION ET DÉPART D'UN PROGRAMME DE LAVAGE
Lancement du programme de lavage sans départ différé
1. Fermez la porte de l'appareil.
2. Mettez en fonctionnement l'appareil.
3. Contrôlez que l'appareil est en mode Programmation.
4. Sélectionnez un programme de lavage.
• Le voyant correspondant s'allume.
• La durée du programme clignote sur l'affichage numérique.
• Le voyant de phase correspondant au programme de lavage choisi s'allume.
5. Si nécessaire, réglez la fonction ÖKO PLUS.
• La sélection de ces fonctions ne s'effectuera qu'après avoir réglé le programme de
lavage.
Page 41

Sélection et départ d'un programme de lavage
6. Appuyez sur la touche Start, le programme de lavage sélectionné démarre automatiquement.
• Les voyants de phase s'éteignent, mais le voyant de la phase en cours reste allumé.
Lancement du programme de lavage avec départ différé
1. Fermez la porte de l'appareil.
2. Mettez en fonctionnement l'appareil.
3. Contrôlez que l'appareil est en mode Programmation.
4. Sélectionnez un programme et les fonctions de lavage.
5. Appuyez plusieurs fois sur la touche Delay jusqu'à ce que l'affichage indique l'heure
du départ différé.
• L'heure du départ différé clignote sur l'affichage.
• Le symbole correspondant au Départ différé s'allume.
6. Appuyez sur la touche Start, le décompte commence automatiquement.
• L'heure du départ différé ne clignote plus sur l'affichage.
• Le voyant de phase correspondant au programme de lavage choisi s'éteint.
• Lorsque le décompte est terminé, le programme de lavage démarre automatiquement.
– Le voyant de la phase en cours s'allume.
L'ouverture de la porte de l'appareil stoppe le décompte. Lorsque vous refermez la porte,
le décompte reprend là où il a été interrompu.
41
Annulation du départ différé
Le décompte ne démarre pas
1. Appuyez sur la touche Delay à plusieurs reprises jusqu'à ce que :
• l'affichage indique la durée du programme de lavage.
• Les voyants de phase s'allument.
2. Appuyez sur la touche Start pour lancer le programme de lavage.
Le décompte démarre.
1. Appuyez sur la touche Delay à plusieurs reprises jusqu'à ce que :
• l'affichage indique la durée du programme de lavage.
• les voyants de phase s'allument.
• le programme de lavage démarre automatiquement.
Interruption d'un programme de lavage
• Ouvrez la porte de l'appareil.
– Le programme de lavage s'arrête.
• Fermez la porte de l'appareil.
– Le programme de lavage reprend là où il a été interrompu.
Annulation du programme de lavage
Si le programme de lavage ou un départ différé n'a pas encore démarré, vous pouvez
changer la sélection.
Page 42

Entretien et nettoyage
42
Pour modifier la sélection lorsque le programme a démarré, vous devez annuler le programme.
• Appuyez simultanément sur les touches Delay et Start jusqu'à ce que :
– Tous les voyants du programme s'allument.
– Deux lignes horizontales apparaissent sur l'affichage.
Avant de démarrer un nouveau programme de lavage, vérifiez qu'il y a du produit de lavage dans le distributeur correspondant.
Fin du programme de lavage
Lorsque le programme de lavage est terminé, l'écran affiche zéro et le voyant de fin s'est
allumé.
1. Mettez à l'arrêt l'appareil.
2. Ouvrez la porte de l'appareil.
3. Pour de meilleurs résultats de séchage, entrouvrez la porte pendant quelques minutes.
Retirez les articles des paniers
• Attendez que la vaisselle refroidisse avant de la retirer du lave-vaisselle. La vaisselle
encore chaude est sensible aux chocs.
• Déchargez d'abord le panier inférieur, puis le panier supérieur.
• Les côtés et la porte de l'appareil peuvent être mouillés. L’acier inox refroidit plus rapi-
dement que la vaisselle.
ENTRETIEN ET NETTOYAGE
Pour retirer et nettoyer les filtres
Avec des filtres sales les résultats du lavage sont inférieurs.
Bien que ces filtres ne nécessitent pas beaucoup d'entretien, nous vous recommandons
de les vérifier à intervalles réguliers et, si besoin, de les nettoyer.
1. Pour retirer le filtre (A), tournez-le dans
le sens inverse des aiguilles d'une montre
et retirez-le du filtre (B).
B
A
Page 43

En cas d'anomalie de fonctionnement
2. Le filtre (A) est constitué de 2 pièces.
Pour démonter le filtre, séparez-les.
3. Nettoyez soigneusement les filtres avec
de l’eau.
4. Rassemblez les 2 pièces du filtre (A) et
poussez. Vérifiez qu'elles s'emboîtent correctement.
5. Retirez le filtre (B).
6. Nettoyez soigneusement le filtre (B) avec
de l’eau.
7. Replacez le filtre (B) dans sa position initiale. Vérifiez qu'il est correctement placé
dans les deux guides (C).
8. Mettez les filtres (A) en place dans le (B).
Bloquez le filtre (A) en tournant la poignée dans le sens des aiguilles d'une montre jusqu'à la butée.
43
C
Pour nettoyer les bras d'aspersion
Ne retirez pas les bras d’aspersion.
Si des résidus ont bouché les orifices des bras d'aspersion, éliminez ceux-ci à l'aide d'un
objet pointu.
Nettoyage des surfaces externes
Nettoyez les surfaces externes de l'appareil, de même que le bandeau de commandes, à
l'aide d'un chiffon doux humide.
Utilisez uniquement un peu d'eau savonneuse.
N'utilisez en aucun cas des substances abrasives, des tampons à récurer ou des solvants
(acétone).
EN CAS D'ANOMALIE DE FONCTIONNEMENT
L'appareil ne démarre pas ou se met à l'arrêt en cours de programme.
Dans un premier temps, essayez de trouver une solution au problème (reportez-vous au
tableau). Si vous n'y parvenez pas, contactez votre service après-vente.
Pour certaines anomalies, l'écran affiche un code d’alarme :
- L'appareil n'est pas approvisionné en eau.
•
- L'appareil ne vidange pas
•
Page 44

En cas d'anomalie de fonctionnement
44
• - Le système de sécurité anti-débordement s'est déclenché.
AVERTISSEMENT
Mettez à l'arrêt l'appareil avant d'effectuer les contrôles.
Anomalie de fonctionnement Cause possible Solution possible
L'appareil n'est pas approvisionné en eau.
La pression d'eau est trop basse. Contactez votre compagnie lo-
Le robinet d'arrivée d’eau est
Le filtre situé dans le tuyau
Le tuyau d'arrivée d'eau n'a
Le tuyau d'arrivée d'eau est en-
L'appareil ne vidange pas. Le robinet de l'évier est bouché. Nettoyez le robinet de l'évier.
Le tuyau de vidange n'a pas
Le tuyau de vidange est en-
Le système de sécurité anti-débordement s'est déclenché.
Le programme de lavage ne démarre pas.
Vous n'avez pas appuyé sur la
La fiche du câble d’alimenta-
Le fusible de la boîte à fusibles
La fonction Départ différé est
Le robinet d'arrivée d'eau est
obstrué ou incrusté de tartre.
fermé.
d'arrivée d'eau est bouché.
pas été installé correctement.
dommagé.
été raccordé correctement.
dommagé.
Fermez le robinet d'eau et con-
La porte de l'appareil est ouverte. Le voyant de la porte est
allumé.
touche ou l'écran Start.
tion n'est pas branchée à la prise de courant.
a disjoncté.
sélectionnée.
Nettoyez le robinet d'arrivée
d'eau.
cale de distribution des eaux.
Ouvrez le robinet d'arrivée
d'eau.
Nettoyez le filtre.
Vérifiez que le tuyau est bien
raccordé.
Assurez-vous que le tuyau d'arrivée d'eau n'est pas endommagé.
Vérifiez que le tuyau est bien
raccordé.
Assurez-vous que le tuyau de
vidange n'est pas endommagé.
tactez votre service après-vente.
Fermez la porte de l'appareil.
Appuyez sur la touche ou
l'écran Start.
Branchez le câble d'alimentation.
Remplacez le fusible.
• Annulez le départ différé.
• Lorsque le décompte est terminé, le programme de lavage démarre automatiquement.
Après avoir effectué ces contrôles, mettez l'appareil en fonctionnement. Le programme
reprend là où il a été interrompu.
Page 45

En cas d'anomalie de fonctionnement
Si l'anomalie persiste, contactez le service après-vente.
Si d'autres codes d'alarme s'affichent, contactez le service après-vente.
Les informations nécessaires au service après-vente figurent sur la plaque signalétique.
Inscrivez les éléments suivants :
– Modèle (MOD.) ........................................................
– Référence produit (PNC) ..........................................
– Numéro de série (S.N.) ..............................................
Les résultats de lavage et de séchage ne sont pas satisfaisants
Problème Cause possible Solution possible
La vaisselle n’est pas propre. Vous n'avez pas sélectionné le
Vous n'avez pas placé les arti-
Les bras d’aspersion ne pou-
Les filtres sont encrassés ou
Vous avez utilisé trop peu de
Traces de tartre sur la vaisselle. Le réservoir de sel régénérant
Réglage incorrect du niveau
Le bouchon du réservoir de sel
Les verres et la vaisselle présentent des rayures, des taches
blanches ou un film bleuâtre.
Traces de gouttes d'eau séchée
sur les verres et la vaisselle
Il se peut que le produit de la-
programme approprié pour ce
type de vaisselle et de salissure.
cles dans les paniers de façon
à ce que l'eau puisse accéder à
toutes les surfaces.
vaient pas tourner librement.
La vaisselle est mal positionnée dans les paniers.
mal montés et installés.
produit de lavage ou avez oublié d'approvisionner le distributeur de produit de lavage.
est vide.
de l'adoucisseur d'eau.
régénérant n'a pas été vissé
correctement.
La quantité de liquide de rinçage est trop élevée.
La quantité de liquide de rinçage est trop basse.
vage soit en cause.
Vérifiez que ce programme de
lavage est approprié pour ce type de vaisselle et de salissure.
Placez les articles correctement dans les paniers.
Vérifiez qu'une disposition incorrecte de la vaisselle ne bloque pas les bras d'aspersion.
Assurez-vous que les filtres
sont propres et correctement
montés et installés.
Vérifiez que la quantité de produit de lavage est suffisante.
Remplissez le réservoir de sel
régénérant avec du sel spécial
pour lave-vaisselle.
Ajustez l'adoucisseur d'eau au
niveau correct.
Assurez-vous que le bouchon
du réservoir de sel est correctement fermé.
Réduisez la quantité du liquide
de rinçage.
Augmentez la quantité du liquide de rinçage.
Utilisez une autre marque de
produit de lavage.
45
Page 46

Caractéristiques techniques
46
Problème Cause possible Solution possible
La vaisselle est mouillée. Le programme de lavage choi-
La vaisselle est mouillée et terne.
La fonction « Tout en 1 » est ac-
si n'avait pas de phase de séchage ou avait une phase de
séchage courte.
Le distributeur de liquide de
rinçage est vide.
tivée (cette fonction désactive
automatiquement le distributeur de liquide de rinçage).
Pour de meilleurs résultats de
séchage, entrouvrez la porte
pendant quelques minutes.
Remplissez le distributeur de liquide de rinçage.
Activez le distributeur de liquide de rinçage.
Activation du distributeur de liquide de rinçage
1. Mettez en fonctionnement l'appareil.
2. Contrôlez que l'appareil est en mode Programmation.
3. Appuyez simultanément sur les touches Delay et Start et maintenez-les appuyées jusqu'à ce que les voyants des programmes AUTO, PRO et 30MIN commencent à clignoter.
4. Relâchez les touches Delay et Start.
5. Appuyez sur la touche Option.
• Les voyants de programme AUTO et 30MIN s'éteignent.
• Le voyant du programme PRO continue à clignoter.
• L'écran numérique affiche le réglage choisi du distributeur de liquide de rinçage.
Le distributeur de liquide de rinçage est désactivé.
Le distributeur de liquide de rinçage est activé.
6. Appuyez sur la touche Option pour modifier le réglage.
7. Mettez à l'arrêt l'appareil pour confirmer.
CARACTÉRISTIQUES TECHNIQUES
Dimensions Largeur 596 mm
Hauteur 818 - 898 mm
Profondeur 575 mm
Pression de l'eau d'alimenta-
tion
Maximale 8 bars (0,8 MPa)
Arrivée d'eau
Capacité Couverts 12
1) Raccordez le tuyau d'arrivée d'eau à un robinet fileté (3/4 po).
1)
La plaque signalétique située sur le bord intérieur de la porte de l'appareil donne des informations sur le branchement électrique.
Minimale 0,5 bars (0,05 MPa)
Eau froide ou eau chaude maximum 60 °C
Page 47

En matière de protection de l'environnement
Si l'eau chaude est produite à partir de sources énergétiques alternatives plus respectueuses de l'environnement (par ex. panneaux solaires ou photovoltaïques et énergie éolienne), utilisez un raccordement à l'eau chaude pour réduire la consommation énergétique.
EN MATIÈRE DE PROTECTION DE L'ENVIRONNEMENT
Le symbole sur le produit ou son emballage indique que ce produit ne peut être traité
comme déchet ménager. Il doit être remis au point de collecte dédié à cet effet (collecte
et recyclage du matériel électrique et électronique).
En procédant à la mise au rebut de l'appareil dans les règles de l’art, nous préservons
l'environnement et notre sécurité, s’assurant ainsi que les déchets seront traités dans des
conditions optimum.
Pour obtenir plus de détails sur le recyclage de ce produit, veuillez prendre contact avec
les services de votre commune ou le magasin où vous avez effectué l'achat.
Recyclez les matériaux portant le symbole
recyclage prévus à cet effet.
. Déposez les emballages dans les bacs de
47
Page 48

48
FOR PERFECT RESULTS
Thank you for choosing this AEG product. We have
created it to give you impeccable performance for many
years, with innovative technologies that help make life
simpler – features you might not find on ordinary
appliances. Please spend a few minutes reading to get
the very best from it.
ACCESSORIES AND CONSUMABLES
In the AEG webshop, you’ll find everything you need to
keep all your AEG appliances looking spotless and
working perfectly. Along with a wide range of
accessories designed and built to the high quality
standards you would expect, from specialist cookware
to cutlery baskets, from bottle holders to delicate
laundry bags…
Visit the webshop at:
www.aeg-electrolux.com/shop
Page 49

CONTENTS
Contents
50 Safety information
53 Product description
54 Control panel
56 Use of the appliance
57 Setting the water softener
58 Use of dishwasher salt
59 Use of detergent and rinse aid
60 Multitab function
60 Loading cutlery and dishes
61 Washing programmes
62 Select and start a washing
programme
64 Care and cleaning
65 What to do if…
67 Technical data
68 Environment concerns
49
The following symbols are used in this
user manual:
Important information concerning
your personal safety and information
on how to avoid damaging the
appliance.
General information and tips
Environmental information
Subject to change without notice
Page 50

Safety information
50
SAFETY INFORMATION
Before the installation and use, read this manual carefully:
• For your safety and the safety of your property.
• To help the environment.
• For the correct operation of the appliance.
Always keep these instructions with the appliance also if you move or give it to a different person.
The manufacturer is not responsible if an incorrect installation and use causes damage.
Children and vulnerable persons safety
• Do not let persons, children included, with reduced physical sensory, reduced mental
functions or lack of experience and knowledge to use the appliance. They must have
supervision or instruction for the operation of the appliance by a person who is responsible for their safety.
• Keep all packaging away from children. There is the risk of suffocation or injury.
• Keep all detergents in a safe area. Do not let the children touch the detergents.
• Keep children and pets away from the appliance when the door is open.
General safety
• Do not change the specifications of this appliance. There is the risk of injury and damage to the appliance.
• Obey the safety instructions from the detergent manufacturer to prevent burns to
eyes, mouth and throat.
• Do not drink the water from the appliance. Particles of detergent can stay in your appliance.
• Do not keep the appliance door open without supervision. This to prevent injury and
to fall on an open door.
• Do not sit or stand on the open door.
Use
• The appliance is only for domestic use. Do not use the appliance for other uses to prevent injury to persons and damage to property.
• Only use the appliance to clean accessories that are applicable for dishwashers.
• Do not put flammable products or items that are wet with flammable products in,
near or on the appliance. Risk of explosion or fire.
• Put the knives and all items with sharp points in the cutlery basket with their points
down. If not, put in a horizontal position in the upper basket or in the knife basket.
(Not all models have the knife basket).
• Use only specified products for dishwashers (detergent, salt, rinse aid).
• Types of salt that are not specified for dishwashers can cause damage to the water
softener.
• Fill the appliance with salt before you start a washing programme. Remaining salt in
the appliance can cause corrosion or make a hole in the bottom of the appliance.
Page 51

Safety information
• Do not fill the rinse aid dispenser with other products than the rinse aid, (dishwasher
cleaning agent, liquid detergent). This can cause damage to the appliance.
• Make sure that the spray arms can move freely before you start a washing programme.
• The appliance can release hot steam if you open the door while a washing programme
operates. There is a risk of skin burns.
• Do not remove the dishes from the appliance until the washing programme is completed.
Care and cleaning
• Before you clean the appliance, deactivate it and disconnect the mains plug from the
mains socket.
• Do not use flammable products or products that can cause corrosion.
• Do not use the appliance without the filters. Make sure that the installation of the
filters is correct. An incorrect installation causes unsatisfactory washing results and
damage to the appliance.
• Do not use spray water or steam to clean the appliance. Risk of electrical shock and
damage to the appliance.
Installation
• Make sure that the appliance is not damaged. Do not install or connect a damaged
appliance, contact the supplier.
• Remove all packaging before you install and use the appliance.
• Only a qualified person must do the electrical connection, the plumbing and the installation of the appliance. This to prevent the risks of structural damage or injury.
• Make sure that the mains plug is disconnected from the mains socket during installation.
• Do not drill into the sides of the appliance to prevent damage to hydraulic components and electrical components.
•
Important! Obey the instructions in the template supplied with the appliance:
– To install the appliance.
– To assemble the door panel.
– To connect to the water supply and drain.
• Make sure that the appliance is installed below and adjacent to safe structures.
51
Frost precautions
• Do not install the appliance where the temperature is less than 0 °C.
• The manufacturer is not responsible for frost damage.
Water connection
• Use new hoses to connect the appliance to the water supply. Do not use used hoses.
• Do not connect the appliance to new pipes or pipes not used for a long time. Let the
water flow for some minutes, then connect the inlet hose.
• Make sure not to squash or cause damage to the water hoses when you install the
appliance.
• Make sure that the water couplings are tight to prevent a water leakage.
• The first time you use the appliance, make sure that the hoses do not have water leaks.
Page 52

Safety information
52
• The water inlet hose has a safety valve and a double sheath with an inner mains cable.
There is pressure in the water inlet hose only when the water flows. If there is a leak in
the water inlet hose, the safety valve interrupts the flow of water.
– Be careful when you connect the water inlet hose:
– Do not put the water inlet hose or the safety valve in water.
– If the water inlet hose or the safety valve are damaged, immediately disconnect
the mains plug from the mains socket.
– Contact the service centre to replace the water inlet hose with safety valve.
WARNING!
Dangerous voltage.
Electrical connection
• The appliance must be earthed.
• Make sure that the electrical information on the rating plate agrees with the power
supply.
• Always use a correctly installed shockproof socket.
• Do not use multiple plugs and extension cables. There is a risk of fire.
• Do not replace or change the mains cable. Contact the service centre.
• Make sure not to squash or cause damage to the mains plug and cable behind the
appliance.
• Make sure that there is access to the mains plug after the installation.
• Do not pull the mains cable to disconnect the appliance. Always pull the mains plug.
Service centre
• Only a qualified person can repair or work on the appliance. Contact the service centre.
• Use only original spare parts.
To discard the appliance
• To prevent the risk of injury or damage:
– Disconnect the mains plug from the mains socket.
– Cut off the mains cable and discard it.
Page 53

Product description
– Remove the door catch. This prevents children or pets to be closed in the appliance.
There is a risk of suffocation.
– Discard the appliance at the local waste disposal centre.
WARNING!
The dishwasher detergents are dangerous and can cause corrosion !
• If an accident occurs with these detergents, contact immediately a physician.
• If the detergent gets into the mouth, contact immediately a physician.
• If the detergent gets into the eyes, contact immediately a physician and clean the eyes
with water.
• Keep dishwasher detergents in a safe area and out of children touch.
• Do not keep the appliance door open when there is detergent in the detergent dispenser.
• Fill the detergent dispenser only before you start a washing programme.
PRODUCT DESCRIPTION
1
53
10
9
2
3
4
5
1 Upper basket
2 Water hardness dial
3 Salt container
4 Detergent dispenser
5 Rinse aid dispenser
6 Rating plate
7 Filters
8 Lower spray arm
9 Upper spray arm
10 Top spray arm
8
7
6
Page 54

Control panel
54
CONTROL PANEL
1
3
9
1 On/off button
2 Programme guide
3 Program button
4 Programme indicators
5 Display
6 Delay button
7 Start button
8 Indicators
9 Option button
Multitab indicator. It comes on when you activate the function.
2
4
8
Indicators
5 6
7
ÖKO PLUS indicator. It comes on when you activate the function.
Washing phase indicator. It comes on when the washing phase operates.
Rinsing phase indicator. It comes on when the rinsing phases operate.
Drying phase indicator. It comes on when the drying phase operates.
End indicator. It comes on when the washing programme is completed.
Rinse aid indicator. It comes on when it is necessary to fill the rinse aid dis-
1)
penser.
Salt indicator. It comes on when it is necessary to fill the salt container.
After you fill the container, the salt indicator can stay on for some hours. This
does not have an unwanted effect on the operation of the appliance.
Delay indicator. It comes on when you activate the delay start.
1)
Page 55

Control panel
Indicators
Door indicator. It comes on when the door is open or not closed correctly.
1) When the salt container and/or the rinse aid dispenser are empty, the related indicators do not come on
while a washing programme operates.
On/off button
Press this button to activate or deactivate the appliance.
After ten minutes from the end of the washing programme, the AUTO OFF function automatically deactivates the appliance. This helps to decrease energy consumption.
Programme guide
This guide helps you in the selection of the washing programme.
Program button
Press this button again and again until the indicator of the washing programme comes
on. Refer to 'Washing programmes'.
Display
The display shows:
• The electronic adjustment of the level of the water softener
• The activation and deactivation of the rinse aid dispenser (only with the multitab function on)
• The washing programme time
• The remaining time to the end of the washing programme
• The end of a washing programme (the display shows a zero)
• The delay start time
• The alarm codes.
55
Delay button
Press this button again and again to delay the start of the washing programme from 1 to
24 hours.
Start button
Press this button to start:
• The washing programme
• The countdown of the delay start.
Option button
Press this button to set the functions.
When a function is activated, the related indicator comes on.
Option button Multitab ÖKO PLUS
Press one time ACTIVATED DEACTIVATED
Press two times DEACTIVATED ACTIVATED
Page 56

Use of the appliance
56
Option button Multitab ÖKO PLUS
Press three times ACTIVATED ACTIVATED
Press four times DEACTIVATED DEACTIVATED
Functions
Multitab
If you use the combi detergent tablets ('3 in 1', '4 in 1', '5 in 1'), use the multitab function. Refer to 'Multitab function'.
ÖKO PLUS
This function decreases the temperature in the drying phase. The power consumption decreases by 25%.
The dishes can be wet at the end of the programme when you open the appliance door.
We recommend that you keep the door ajar and let the dishes dry.
Setting mode
The appliance must be in setting mode for these operations:
• To set and start a washing programme.
• To set and start a delay start.
• To adjust electronically the level of the water softener.
• To deactivate or activate the rinse aid dispenser (only with the multitab function on).
Activate the appliance. The appliance is in setting mode when:
• All the programme indicators come on.
• The display shows two horizontal status bars.
Activate the appliance. The appliance is not in setting mode when:
• Only one programme indicator comes on.
• The display shows the time of the washing programme or of the delay start.
– It is necessary to cancel the programme or the delay start to go back to the setting
mode. Refer to 'Select and start a washing programme'.
USE OF THE APPLIANCE
1. Be sure that the set level of the water softener agrees with the water hardness in
your area. If not, adjust the water softener.
2. Fill the salt container with dishwasher salt.
3. Fill the rinse aid dispenser with rinse aid.
4. Load cutlery and dishes into the appliance.
5. Set the correct washing programme for the type of load and soil.
6. Fill the detergent dispenser with the correct quantity of detergent.
7. Start the washing programme.
Page 57

Setting the water softener
If you use the combi detergent tablets ('3 in 1', '4 in 1', '5 in 1'), use the multitab function
(refer to 'Multitab function').
SETTING THE WATER SOFTENER
The water softener removes minerals and salts from the water supply. These minerals and
salts can cause damage to the appliance.
Adjust the level of the water softener if this does not agree with the water hardness in
your area.
Contact your local water authority to know the water hardness in your area.
Water hardness
German degrees
(°dH)
51 - 70 91 - 125 9,1 - 12,5 64 - 88
43 - 50 76 - 90 7,6 - 9,0 53 - 63
37 - 42 65 - 75 6,5 - 7,5 46 - 52
29 - 36 51 - 64 5,1 - 6,4 36 - 45
23 - 28 40 - 50 4,0 - 5,0 28 - 35
19 - 22 33 - 39 3,3 - 3,9 23 - 27
15 - 18 26 - 32 2,6 - 3,2 18 - 22 1 4
11 - 14 19 - 25 1,9 - 2,5 13 - 17 1 3
4 - 10 7 - 18 0,7 - 1,8 5 - 12 1 2
< 4 < 7 < 0,7 < 5
1) Factory position.
2) Do not use salt at this level.
French degrees
(TH°)
mmol/l Clarke de-
grees
You must adjust the water softener manually and electronically.
Water hardness ad-
manually elec-
2
2
2
2
2
2
1
justment
1)
1)
1)
1)
1)
1)
2)
57
troni-
cally
10
9
8
7
6
1)
5
2)
1
Manual adjustment
Turn the water hardness dial to the position 1 or
2 (refer to the table).
Page 58

Use of dishwasher salt
58
Electronic adjustment
1. Activate the appliance.
2. Make sure that the appliance is in setting mode.
3. Press and hold the Delay button and the Start button at the same time until the pro-
gramme indicators AUTO, PRO and 30MIN flash.
4. Release the Delay button and the Start button.
5. Press the Program button,
• The programme indicators PRO and 30MIN go off.
• The programme indicator AUTO continues to flash.
• The display shows the setting of the water softener (example:
6. Press the Program button again and again to change the setting.
7. Deactivate the appliance to confirm.
If the water softener is set electronically to the level 1, the salt indicator stays off.
USE OF DISHWASHER SALT
How to fill the salt container
1. Turn the cap counterclockwise and open
the salt container.
2. Fill the salt container with 1 litre of wa-
ter (only for the first time you fill with
salt).
3. Use the funnel to fill the salt container
with salt.
4. Remove the salt around the opening of
the salt container.
5. Turn the cap clockwise to close the salt
container.
It is correct that water comes out from the salt container when you fill it with salt.
= level 5).
Page 59

USE OF DETERGENT AND RINSE AID
20
30
M
A
X
1
2
3
4
+
-
Use of detergent and rinse aid
59
1
2
7
3
4
6
5
Use of detergent
To help the environment, do not use more than the correct quantity of detergent.
Obey the instructions on the detergent packaging.
How to fill the detergent dispenser:
1.
Press the release button
2.
Put the detergent in the dispenser
3. If the washing programme has a prewash phase, put a small quantity of detergent
on the inner part of the appliance door.
4.
If you use the detergent tablets, put the tablet in the detergent dispenser
5. Close the detergent dispenser. Press the lid until it locks into position.
Use long washing programmes when you use the detergent tablets. These cannot fully
dissolve with short washing programmes and can decrease the washing results.
2
to open the lid 7 of the detergent dispenser.
1
.
1
.
Use of rinse aid
Rinse aid makes it possible to dry the dishes without streaks and stains.
The rinse aid dispenser automatically adds rinse aid during the last rinsing phase.
Do these steps to fill the rinse aid dispenser:
1.
Press the release button
2.
Fill the rinse aid dispenser
6
to open the lid 5 of the rinse aid dispenser.
3
with rinse aid. The mark 'max' shows the maximum level.
3. Remove the spilled rinse aid with an absorbent cloth to prevent too much foam dur-
ing the washing programme.
4. Close the rinse aid dispenser. Press the lid until it locks into position.
Adjust the rinse aid dosage
Factory set: position 3.
Page 60

Multitab function
60
You can set the rinse aid dosage between position 1 (lowest dosage) and position 4 (highest dosage).
Turn the rinse aid selector
4
to increase or decrease the dosage.
MULTITAB FUNCTION
The multitab function is for combi detergent tablets.
These tablets contain agents as detergent, rinse aid and dishwasher salt. Some types of
tablets can contain other agents.
Be sure that these tablets are applicable for the water hardness in your area (refer to the
instructions on the packaging of the products).
The multitab function deactivates the flow of rinse aid and salt.
The multitab function deactivates the indicators of salt and rinse aid.
The programme duration can increase if you use the multitab function.
Activate or deactivate the multitab function before the start of a washing programme.
You cannot activate or deactivate the function when a washing programme operates.
Before the start of a washing programme, always make sure that the multitab function is
on.
To deactivate the multitab function and use separately detergent, salt and rinse aid
1. Press the Option button until the multitab indicator goes off. The function is deacti-
vated.
2. Fill the salt container and the rinse aid dispenser.
3. Adjust the water hardness to the highest level.
4. Start a washing programme without dishes.
5. When the washing programme is completed, adjust the water softener to the water
hardness in your area.
6. Adjust the quantity of rinse aid.
LOADING CUTLERY AND DISHES
Refer to the leaflet 'Examples of ProClean loads'.
Hints and tips
• Do not put in the appliance items that can absorb water (sponges, household cloths).
• Remove the remaining food from the items.
• Make soft the remaining burned food on the items.
• Put hollow items (cups, glasses and pans) with the opening down.
• Make sure that water does not collect in containers or in bowls.
• Make sure that cutlery and dishes do not bond together.
• Make sure that the glasses do not touch other glasses.
• Put small items in the cutlery basket.
Page 61

Washing programmes
• Mix the spoons with other cutlery to prevent them to bond together.
• When you put the items in the baskets, make sure that the water can touch all surfaces.
• Put light items in the upper basket. Make sure that the items do not move.
• Water droplets can collect on plastic items and non-stick pans.
WASHING PROGRAMMES
61
Programme Type of soil Type of load Programme descrip-
ÖKO PLUS function
tion
All Crockery, cut-
1)
lery, pots and
pans
Prewash
Wash 45 °C or 70 °C
Rinses
Yes, with effect
Dry
Heavy soil Crockery, cut-
lery, pots and
pans
Prewash
Wash 70 °C
Rinses
Yes, with effect
Dry
Normal or
2)
light soil
Normal soil Crockery and
3)
Crockery and
cutlery
cutlery
Wash 60°C
Rinse
Prewash
Wash 50 °C
Yes, without effect
Yes, with effect
Rinses
Dry
Use this programme to quick-
Rinse Yes, without effect
ly rinse the dishes. This prevents the remaining food to
bond on the dishes and bad
odours to come out from the
appliance.
Do not use detergent with
this programme.
1) The appliance senses the type of soil and the quantity of items in the baskets. It automatically adjusts the
temperature and quantity of the water, the energy consumption and the programme time.
2) With this programme you can wash a load with fresh soil. It gives good washing results in a short time.
3) This is the standard programme for test institutes. With this programme you have the most efficient use of
water and energy consumption for crockery and cutlery with normal soil. Refer to the supplied leaflet for
test information.
Consumption values
Programme
1)
Energy (kWh) Water (litre)
0,9 - 1,7 8 - 17
1,5 - 1,7 15 - 16
0,9 9
1,0 - 1,1 10 - 11
Page 62

Select and start a washing programme
62
Programme
1) The display shows the programme time.
The water pressure and temperature, the variations of the mains supply and the quantity
of dishes can change the consumption values.
1)
Energy (kWh) Water (litre)
0,1 4
SELECT AND START A WASHING PROGRAMME
Starting the washing programme without delay start
1. Close the appliance door.
2. Activate the appliance.
3. Make sure that the appliance is in setting mode.
4. Set the washing programme.
• The related programme indicator comes on.
• The programme time flashes in the display.
• The phase indicators of the set washing programme come on.
5. If necessary, set the ÖKO PLUS function.
• The selection of the function must always occur after the set of the washing programme.
6. Press the Start button, the washing programme starts automatically.
• The phase indicators go off but the indicator of the phase in operation stays on.
Starting the washing programme with delay start
1. Close the appliance door.
2. Activate the appliance.
3. Make sure that the appliance is in setting mode.
4. Set the washing programme and functions.
5. Press the Delay button again and again until the display shows the time of the delay
start.
• The time of the delay start flashes in the display.
• The delay indicator is on.
6. Press the Start button, the countdown starts automatically.
• The delay start time flashes no more in the display.
• The phase indicators of the set washing programme go off.
• When the countdown is completed, the washing programme starts automatically.
– The indicator of the phase in operation is on.
The opening of the appliance door stops the countdown. When you close the door, the
countdown continues from the point of interruption.
Page 63

Select and start a washing programme
Cancelling the delay start
The countdown is not operating
1. Press the Delay button again and again until:
• The display shows the time of the washing programme.
• The phase indicators come on.
2. Press the Start button to start the washing programme.
The countdown is operating
1. Press the Delay button again and again until:
• The display shows the time of the washing programme.
• The phase indicators come on.
• The washing programme starts automatically.
Interruption of a washing programme
• Open the appliance door.
– The washing programme stops.
• Close the appliance door.
– The washing programme continues from the point of interruption.
Cancelling the washing programme
If the washing programme has not started, you can change the selection.
To change the selection while the washing programme operates, it is necessary to cancel
the programme.
• At the same time press and hold the Delay button and the Start button until:
– All the programme indicators come on.
– The display shows two horizontal status bars.
Make sure that there is detergent in the detergent dispenser before you start a new washing programme.
63
End of the washing programme
When the washing programme is completed, the display shows a zero and the end indicator is on.
1. Deactivate the appliance.
2. Open the appliance door.
3. For better drying results, keep the appliance door ajar for some minutes.
Remove the items from the baskets
• Let the dishes become cold before you remove them from the appliance. Hot dishes
can be easily damaged.
• First remove the items from the lower basket, then from the upper basket.
• There can be water on the sides and on the door of the appliance. Stainless steel be-
comes cool more quickly than the dishes.
Page 64

Care and cleaning
64
CARE AND CLEANING
To remove and clean the filters
Dirty filters decrease the washing results.
Although the maintenance is very low with these filters, make a check at intervals and if
necessary, clean them.
1. Turn the filter (A) counterclockwise and
remove it out from filter (B).
B
A
2. Filter (A) has two parts. To disassemble
the filter, pull them apart.
3. Fully clean the parts with water.
4. Put the two parts of the filter (A) together and push. Make sure that they assemble correctly in each other.
5. Remove the filter (B).
6. Fully clean the filter (B) with water.
7. Put the filter (B) to its initial position.
Make sure that it assembles correctly in
the two guides (C).
8. Put the filter (A) into position in filter
(B). Turn the filter (A) clockwise until it
locks.
To clean the spray arms
Do not remove the spray arms.
C
Page 65

What to do if…
If the holes in the spray arms become clogged, remove remaining parts of soil with a
thin pointed object.
To clean the external surfaces
Clean the external surfaces of the appliance and control panel with a moist soft cloth.
Only use neutral detergents.
Do not use abrasive products, abrasive cleaning pads or solvents (acetone).
WHAT TO DO IF…
The start of the appliance does not occur or it stops during operation.
First try to find a solution to the problem (refer to the table). If not, contact the service
centre.
With some malfunctions, the display shows an alarm code:
- The appliance does not fill with water
•
- The appliance does not drain the water
•
- The anti-flood device is on.
•
WARNING!
Deactivate the appliance before you do the checks.
Malfunction Possible cause Possible solution
The appliance does not fill
with water.
The water pressure is too low. Contact your local water au-
The water tap is closed. Open the water tap.
The filter in the water inlet
The connection of the water in-
The water inlet hose is dam-
The appliance does not drain
the water.
The connection of the water
The water drain hose is dam-
The anti-flood device is on. Close the water tap and con-
The start of the washing programme does not occur.
The water tap is blocked or
there is limescale on it.
hose is blocked.
let hose is not correct.
aged.
There is a blockage in the sink
spigot.
drain hose is not correct.
aged.
The appliance door is open.
The door indicator is on.
Clean the water tap.
thority.
Clean the filter.
Make sure that the connection
is correct.
Make sure that the water inlet
hose has no damages.
Clean the sink spigot.
Make sure that the connection
is correct.
Make sure that the water
drain hose has no damages.
tact the service centre.
Close the appliance door.
65
Page 66

What to do if…
66
Malfunction Possible cause Possible solution
You did not press the Start
touchpad or button.
The mains plug is not connec-
ted in the mains socket.
The fuse in the fuse box is dam-
aged.
The delay start is set. • Cancel the delay start.
Press the Start touchpad or
button.
Connect the mains plug.
Replace the fuse.
• When the countdown is
completed, the washing programme starts automatically.
After the check, activate the appliance. The programme continues from the point of interruption.
If the malfunction occurs again, contact the service centre.
If the display shows other alarm codes, contact the service centre.
The necessary information for the service centre is on the rating plate.
Record this information:
– Model (MOD.) ........................................................
– Product number (PNC) ..........................................
– Serial number (S.N.) ..............................................
The washing results and drying results are not satisfactory
Problem Possible cause Possible solution
The dishes are not clean. The washing programme was
You did not put the items cor-
The spray arms could not turn
The filters are dirty or not as-
The quantity of detergent was
Limescale particles on the
dishes.
Incorrect level of the water
not applicable for the type of
load and soil.
rectly in the baskets, water did
not touch all surfaces.
freely. Incorrect position of
the items in the baskets.
sembled and installed correctly.
not sufficient or missing.
The salt container is empty. Fill the salt container with dish-
softener adjustment.
Make sure that the washing
programme is applicable for
the type of load and soil.
Put the items correctly in the
baskets.
Make sure that an incorrect position of the items do not
cause the blockage of the
spray arms.
Make sure that the filters are
clean and correctly assembled
and installed.
Make sure that the quantity of
detergent is sufficient.
washer salt.
Adjust the water softener with
the correct level.
Page 67

Technical data
Problem Possible cause Possible solution
The salt container cap is not
There are streaks, whitish
stains, or a bluish layer on
glasses and dishes.
Dry water drop stains on
glasses and dishes.
The detergent can be the cause. Use a different brand of deter-
The dishes are wet. The washing programme was
The dishes are wet and matt. The rinse aid dispenser is emp-
The multitab function is on
closed correctly.
The rinse aid quantity is too
high.
The rinse aid quantity is too
low.
without a drying phase or
with a decreased drying phase.
ty.
(this function automatically
deactivates the rinse aid dispenser).
Make sure that the salt container cap is closed correctly.
Decrease the rinse aid quantity.
Increase the rinse aid quantity.
gent.
For better drying results, keep
the door ajar for some minutes.
Fill the rinse aid dispenser with
rinse aid.
Activate the rinse aid dispenser.
Activating the rinse aid dispenser
1. Activate the appliance.
2. Make sure that the appliance is in setting mode.
3. Press and hold button Delayand button Start at the same time until the programme
indicators AUTO, PRO and 30MIN flash.
4. Release button Delayand button Start.
5. Press button Option.
• The programme indicators AUTO and 30MIN go off.
• The programme indicator PRO continues to flash.
• The display shows the setting of the rinse aid dispenser.
The rinse aid dispenser is off.
67
6. Press button Option to change the setting.
7. Deactivate the appliance to confirm
TECHNICAL DATA
Dimensions Width 596 mm
Height 818 - 898 mm
Depth 575 mm
The rinse aid dispenser is on.
Page 68

Environment concerns
68
Water supply pressure Minimum 0,5 bar (0,05 MPa)
Maximum 8 bar (0,8 MPa)
Water supply
Capacity Place settings 12
1) Connect the water inlet hose to a water tap with a 3/4'' thread.
1)
Cold water or hot water maximum 60 °C
The rating plate on the inner edge of the appliance door shows the electrical connection
data.
If the hot water comes from alternative sources of energy, (e.g. solar panels, photovoltaic
panels and aeolian), use a hot water supply to decrease energy consumption.
ENVIRONMENT CONCERNS
The symbol on the product or on its packaging indicates that this product may not
be treated as household waste. Instead it should be taken to the appropriate collection
point for the recycling of electrical and electronic equipment. By ensuring this product is
disposed of correctly, you will help prevent potential negative consequences for the
environment and human health, which could otherwise be caused by inappropriate
waste handling of this product. For more detailed information about recycling of this
product, please contact your local council, your household waste disposal service or the
shop where you purchased the product.
Recycle the materials with the symbol
recycle it.
. Put the packaging in applicable containers to
Page 69

697071
Page 70

Page 71

Page 72

www.aeg-electrolux.com/shop 117940210-A-292010
 Loading...