

Page 1

FAVORIT 45010
DISHWASHER USER MANUAL 2
EN
LAVE-VAISSELLE NOTICE D'UTILISATION 27
FR
Page 2
2
FOR PERFECT RESULTS
Thank you for choosing this AEG product. We have
created it to give you impeccable performance for many
years, with innovative technologies that help make life
simpler – features you might not find on ordinary
appliances. Please spend a few minutes reading to get
the very best from it.
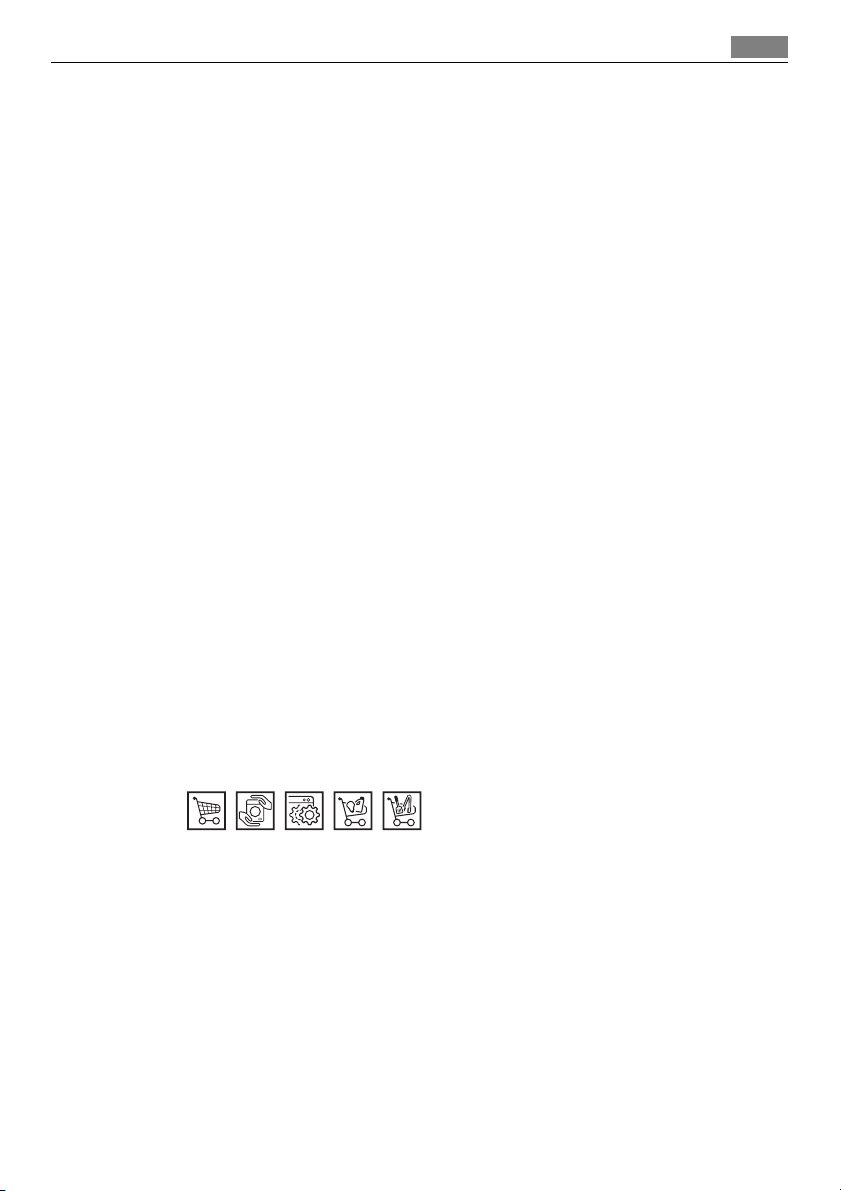
ACCESSORIES AND CONSUMABLES
In the AEG webshop, you’ll find everything you need to
keep all your AEG appliances looking spotless and
working perfectly. Along with a wide range of
accessories designed and built to the high quality
standards you would expect, from specialist cookware
to cutlery baskets, from bottle holders to delicate
laundry bags…
Visit the webshop at:
www.aeg-electrolux.com/shop
Page 3

CONTENTS
Contents
4 Safety information
7 Product description
8 Control panel
10 Use of the appliance
10 Setting the water softener
12 Use of dishwasher salt
12 Use of detergent and rinse aid
13 Multitab function
14 Loading cutlery and dishes
17 Washing programmes
18 Select and start a washing
programme
20 Care and cleaning
21 What to do if…
24 Technical data
24 Environment concerns
25 Installation
3
The following symbols are used in this
user manual:
Important information concerning
your personal safety and information
on how to avoid damaging the
appliance.
General information and tips
Environmental information
Subject to change without notice
Page 4

Safety information
4
SAFETY INFORMATION
Before the installation and use, read this manual carefully:
• For your safety and the safety of your property.
• To help the environment.
• For the correct operation of the appliance.
Always keep these instructions with the appliance also if you move or give it to a different person.
The manufacturer is not responsible if an incorrect installation and use causes damage.
Children and vulnerable persons safety
• Do not let persons, children included, with reduced physical sensory, reduced mental
functions or lack of experience and knowledge to use the appliance. They must have
supervision or instruction for the operation of the appliance by a person who is responsible for their safety.
• Keep all packaging away from children. There is the risk of suffocation or injury.
• Keep all detergents in a safe area. Do not let the children touch the detergents.
• Keep children and pets away from the appliance when the door is open.
General safety
• Do not change the specifications of this appliance. There is the risk of injury and damage to the appliance.
• Obey the safety instructions from the detergent manufacturer to prevent burns to
eyes, mouth and throat.
• Do not drink the water from the appliance. Particles of detergent can stay in your appliance.
• Do not keep the appliance door open without supervision. This to prevent injury and
to fall on an open door.
• Do not sit or stand on the open door.
Use
• The appliance is only for domestic use. Do not use the appliance for other uses to prevent injury to persons and damage to property.
• Only use the appliance to clean accessories that are applicable for dishwashers.
• Do not put flammable products or items that are wet with flammable products in,
near or on the appliance. Risk of explosion or fire.
• Put the knives and all items with sharp points in the cutlery basket with their points
down. If not, put in a horizontal position in the upper basket or in the knife basket.
(Not all models have the knife basket).
• Use only specified products for dishwashers (detergent, salt, rinse aid).
• Types of salt that are not specified for dishwashers can cause damage to the water
softener.
• Fill the appliance with salt before you start a washing programme. Remaining salt in
the appliance can cause corrosion or make a hole in the bottom of the appliance.
Page 5

Safety information
• Do not fill the rinse aid dispenser with other products than the rinse aid, (dishwasher
cleaning agent, liquid detergent). This can cause damage to the appliance.
• Make sure that the spray arms can move freely before you start a washing programme.
• The appliance can release hot steam if you open the door while a washing programme
operates. There is a risk of skin burns.
• Do not remove the dishes from the appliance until the washing programme is completed.
Care and cleaning
• Before you clean the appliance, deactivate it and disconnect the mains plug from the
mains socket.
• Do not use flammable products or products that can cause corrosion.
• Do not use the appliance without the filters. Make sure that the installation of the
filters is correct. An incorrect installation causes unsatisfactory washing results and
damage to the appliance.
• Do not use spray water or steam to clean the appliance. Risk of electrical shock and
damage to the appliance.
Installation
• Make sure that the appliance is not damaged. Do not install or connect a damaged
appliance, contact the supplier.
• Remove all packaging before you install and use the appliance.
• Only a qualified person must do the electrical connection, the plumbing and the installation of the appliance. This to prevent the risks of structural damage or injury.
• Make sure that the mains plug is disconnected from the mains socket during installation.
• Do not drill into the sides of the appliance to prevent damage to hydraulic components and electrical components.
5
Frost precautions
• Do not install the appliance where the temperature is less than 0 °C.
• The manufacturer is not responsible for frost damage.
Water connection
• Use new hoses to connect the appliance to the water supply. Do not use used hoses.
• Do not connect the appliance to new pipes or pipes not used for a long time. Let the
water flow for some minutes, then connect the inlet hose.
• Make sure not to squash or cause damage to the water hoses when you install the
appliance.
• Make sure that the water couplings are tight to prevent a water leakage.
• The first time you use the appliance, make sure that the hoses do not have water leaks.
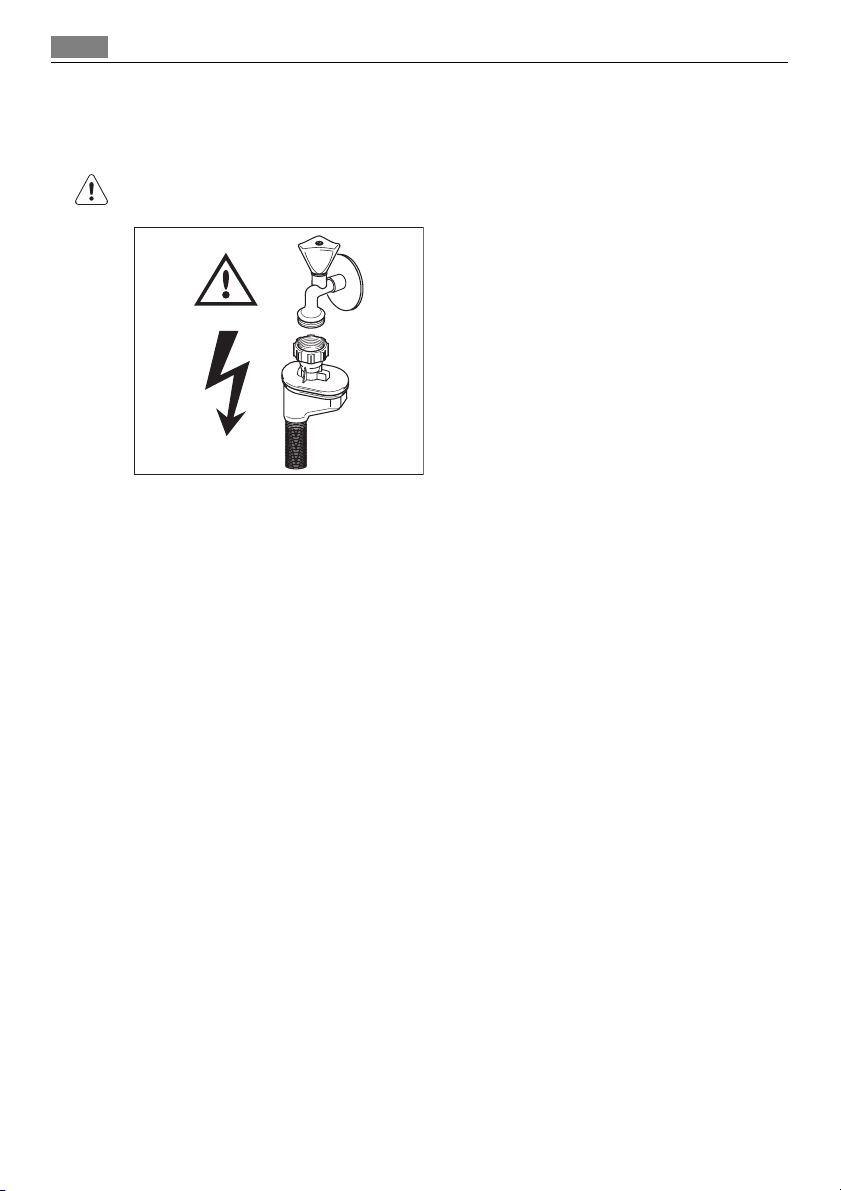
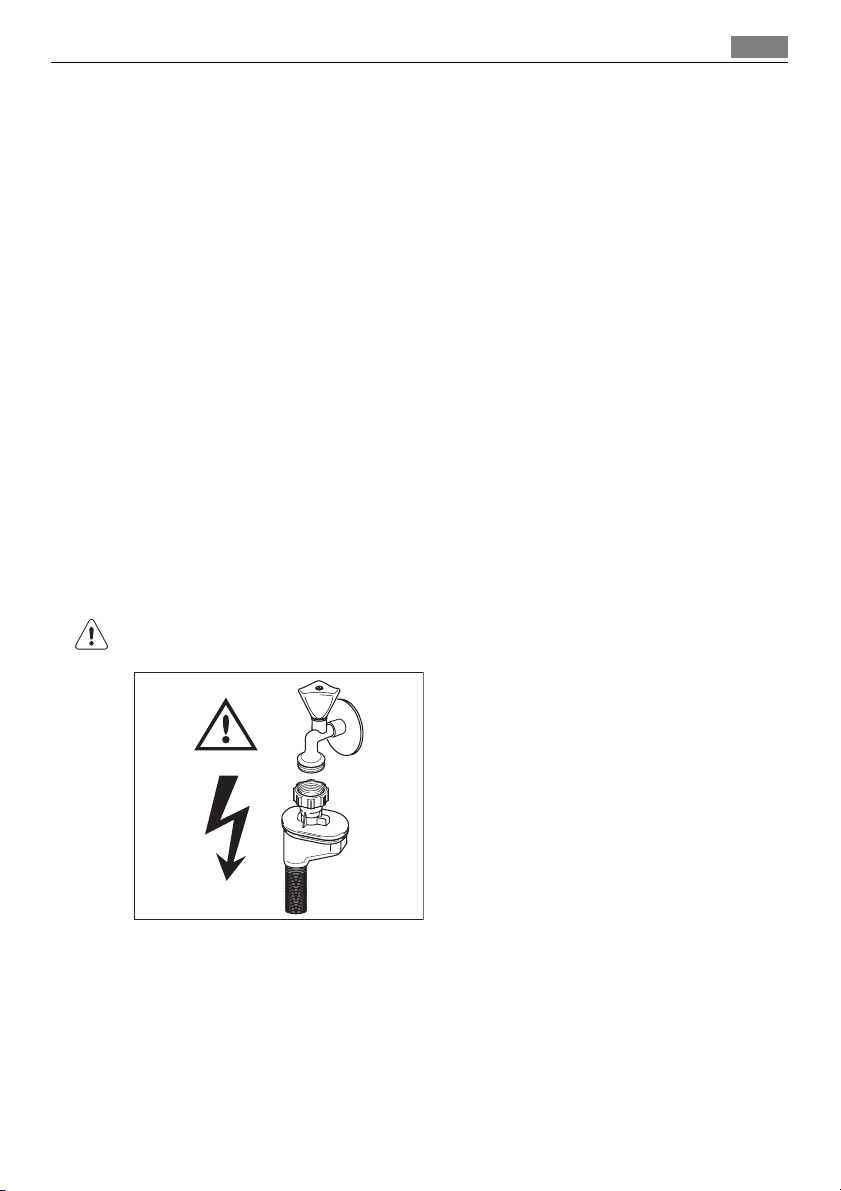
• The water inlet hose has a safety valve and a double sheath with an inner mains cable.
There is pressure in the water inlet hose only when the water flows. If there is a leak in
the water inlet hose, the safety valve interrupts the flow of water.
– Be careful when you connect the water inlet hose:
– Do not put the water inlet hose or the safety valve in water.
Page 6
Safety information
6
– If the water inlet hose or the safety valve are damaged, immediately disconnect
the mains plug from the mains socket.
– Contact the service centre to replace the water inlet hose with safety valve.
WARNING!
Dangerous voltage.
Electrical connection
• The appliance must be earthed.
• Make sure that the electrical information on the rating plate agrees with the power
supply.
• Always use a correctly installed shockproof socket.
• Do not use multiple plugs and extension cables. There is a risk of fire.
• Do not replace or change the mains cable. Contact the service centre.
• Make sure not to squash or cause damage to the mains plug and cable behind the
appliance.
• Make sure that there is access to the mains plug after the installation.
• Do not pull the mains cable to disconnect the appliance. Always pull the mains plug.
Service centre
• Only a qualified person can repair or work on the appliance. Contact the service centre.
• Use only original spare parts.
To discard the appliance
• To prevent the risk of injury or damage:
– Disconnect the mains plug from the mains socket.
– Cut off the mains cable and discard it.
– Remove the door catch. This prevents children or pets to be closed in the appliance.
There is a risk of suffocation.
– Discard the appliance at the local waste disposal centre.
Page 7
Product description
WARNING!
The dishwasher detergents are dangerous and can cause corrosion !
• If an accident occurs with these detergents, contact immediately a physician.
• If the detergent gets into the mouth, contact immediately a physician.
• If the detergent gets into the eyes, contact immediately a physician and clean the eyes
with water.
• Keep dishwasher detergents in a safe area and out of children touch.
• Do not keep the appliance door open when there is detergent in the detergent dispenser.
• Fill the detergent dispenser only before you start a washing programme.
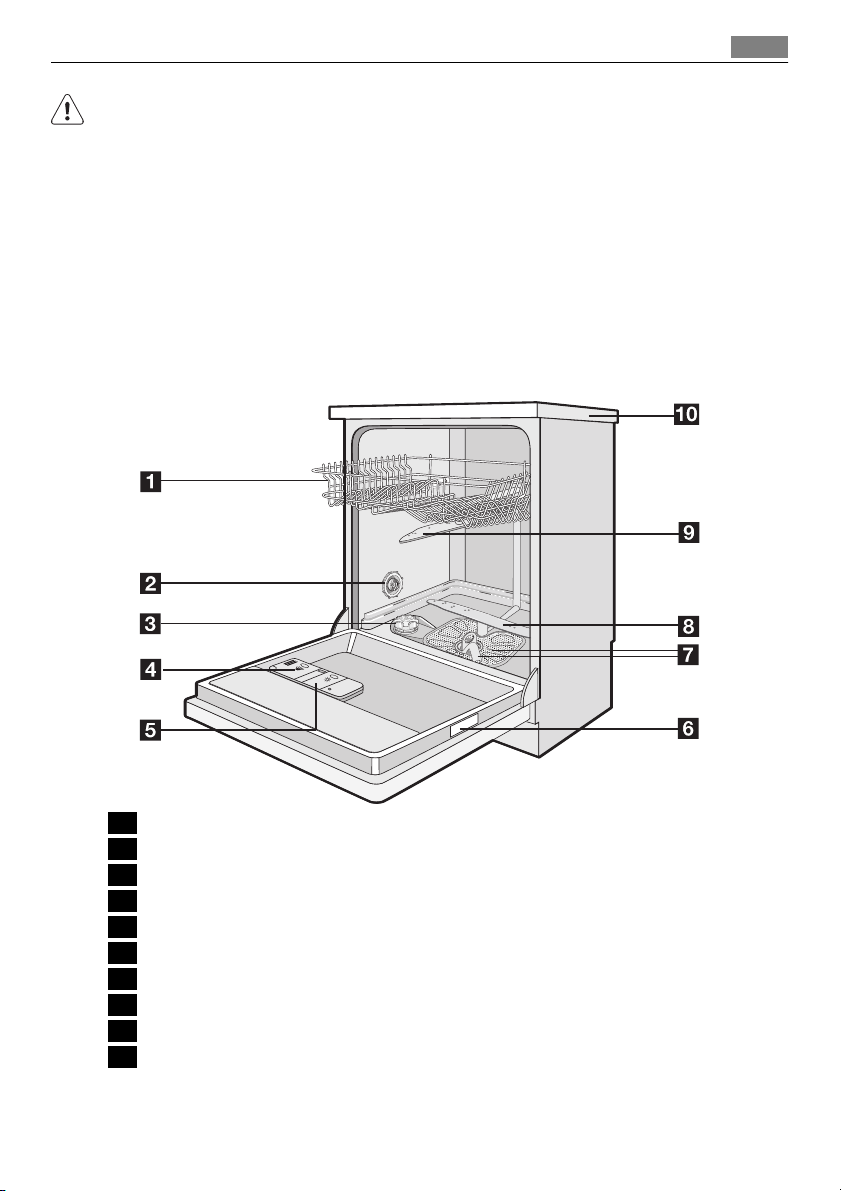
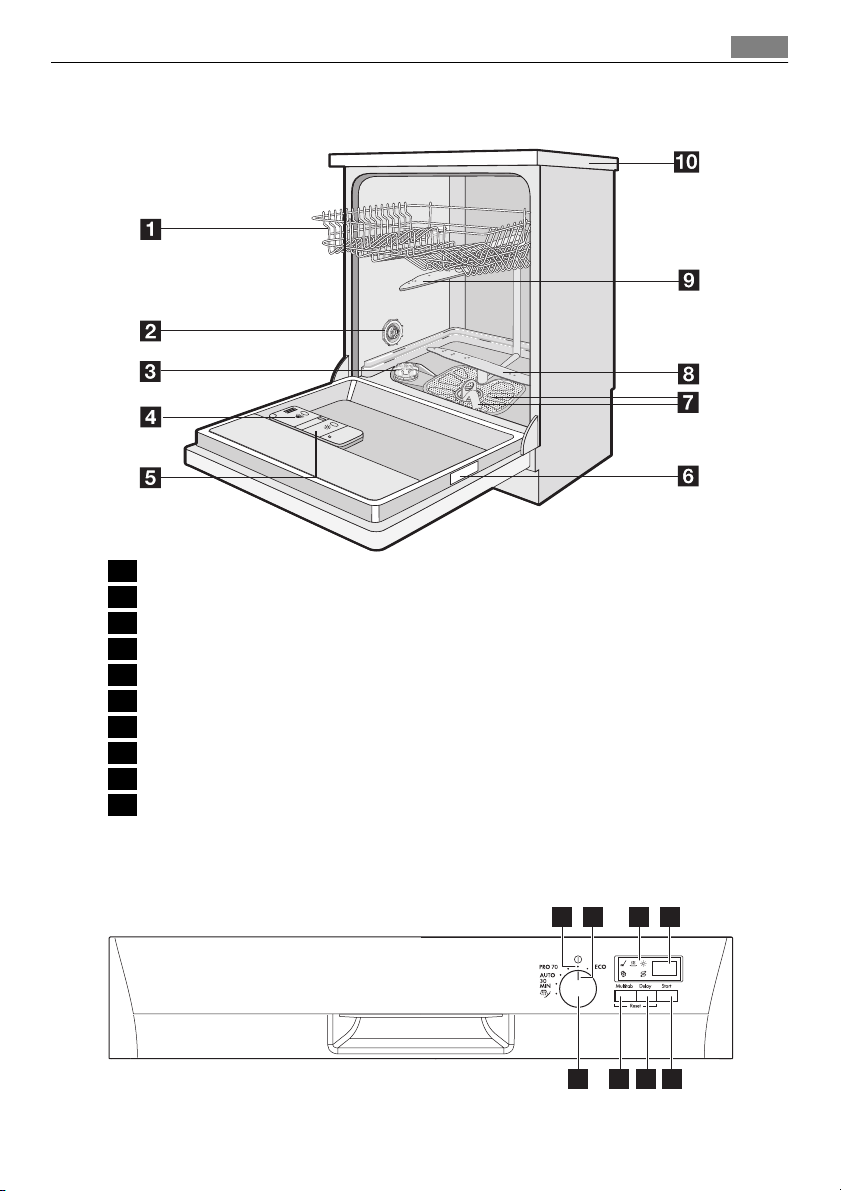
PRODUCT DESCRIPTION
7
1 Upper basket
2 Water hardness dial
3 Salt container
4 Detergent dispenser
5 Rinse aid dispenser
6 Rating plate
7 Filters
8 Lower spray arm
9 Upper spray arm
10 Worktop
Page 8
Control panel
8
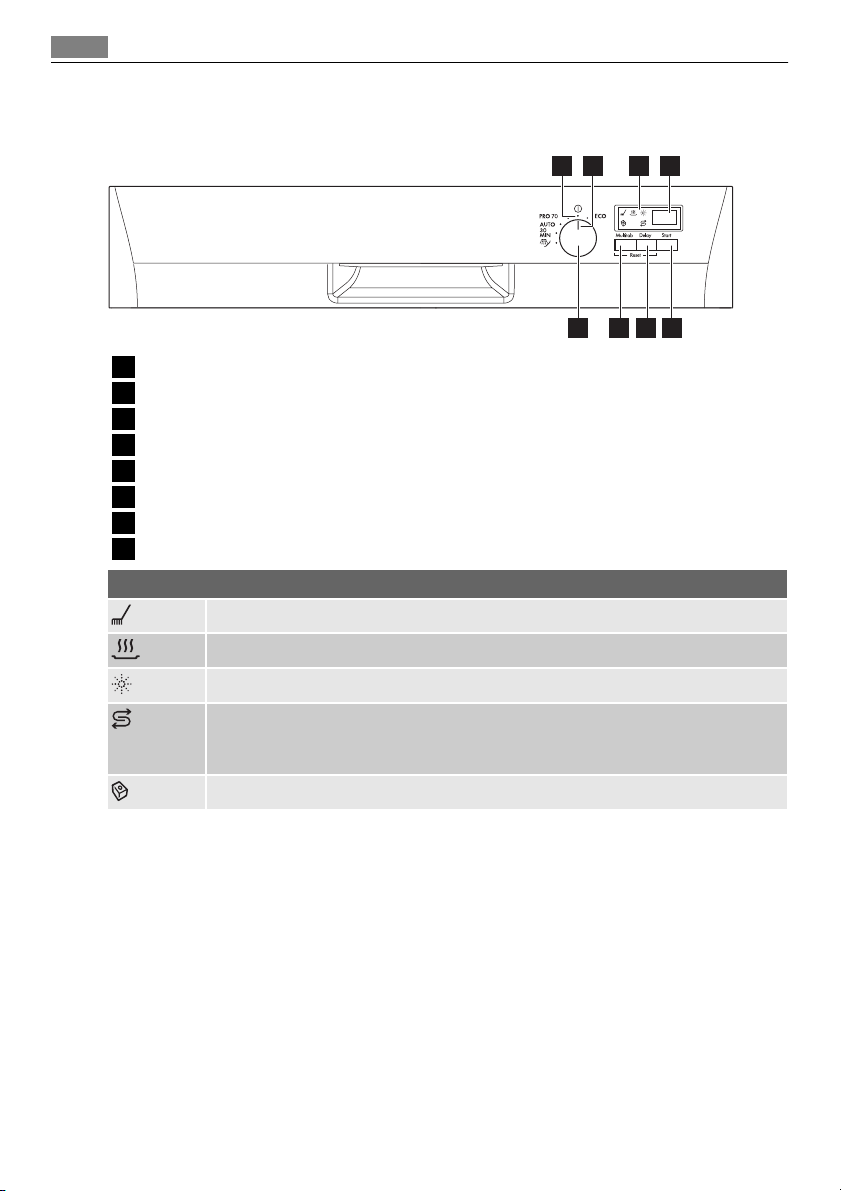
CONTROL PANEL
1 Off position
2 Programme marker
3 Indicators
4 Display
5 Start button
6 Delay button
7 Multitab button
8 Programme knob
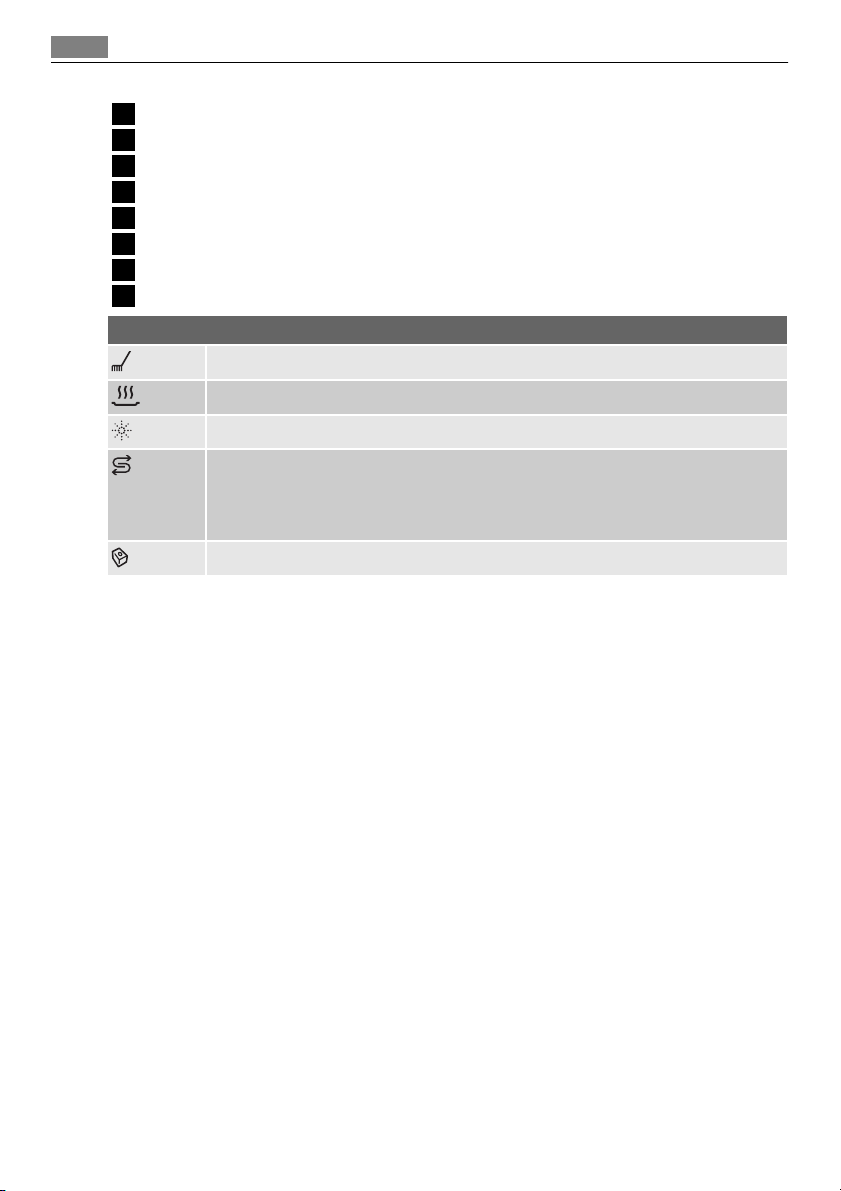
The indicator comes on when the washing and rinsing phases operate.
1 2 3 4
7 568
Indicators
The indicator comes on when the dry phase operates.
The indicator comes on when it is necessary to fill the rinse aid dispenser.
The indicator comes on when it is necessary to fill the salt container.
After you fill the container, the salt indicator can stay on for some hours. This
does not have an unwanted effect on the operation of the appliance.
The indicator comes on when you activate the multitab function.
1) When the salt and/or rinse aid containers are empty, the related indicator lights do not come on while a
washing programme operates.
Display
The display shows:
• The electronic adjustment of the level of the water softener
• The activation and deactivation of the rinse aid dispenser (only with the multitab function on)
• The time of the washing programme
• The remaining time to the end of the washing programme
• The end of a washing programme (the display shows a zero)
• The time of the delay start
• The alarm codes.
1)
1)
Page 9

Control panel
Start button
Press this button to start:
• The washing programme
• The countdown of the delay start.
Delay button
Press this button again and again to delay the start of the washing programme from 1 to
19 hours.
Multitab button
Press this button to activate or deactivate the multitab function (refer to 'Multitab function').
Programme knob
With the programme knob you can:
• Activate and deactivate the appliance
• Set a washing programme
• Adjust electronically the level of the water softener (refer to 'Setting the water softener')
• Activate or deactivate the rinse aid dispenser (only with the multitab function on).
To activate the appliance and set a washing programme
Turn the programme knob until the programme marker is aligned with one of the washing programmes on the control panel.
• If the programme marker is aligned with a washing programme, the digital display
shows the programme time.
• If the programme marker is not aligned with a washing programme, the display shows
two horizontal status bar.
To deactivate the appliance
Turn the programme knob until the programme marker is aligned with the off position.
9
Setting mode
The appliance must be in setting mode for these operations:
• To set and start a washing programme
• To set and start a delay start
• To adjust electronically the level of the water softener
• To deactivate or activate the rinse aid dispenser (only with the multitab function on).
Activate the appliance. The appliance is in setting mode when:
• The programme time flashes in the display
• One or more phase indicator lights come on.
Activate the appliance. The appliance is not in setting mode when:
• The washing programme time or the delay start time do not flash in the display
• One or more phase indicator lights come on.
Page 10
Use of the appliance
10
– It is necessary to cancel the programme or the delay start to go back to the setting
mode (refer to 'Select and start a washing programme').
USE OF THE APPLIANCE
1. Be sure that the set level of the water softener agrees with the water hardness in
your area. If not, adjust the water softener.
2. Fill the salt container with dishwasher salt.
3. Fill the rinse aid dispenser with rinse aid.
4. Load cutlery and dishes into the appliance.
5. Set the correct washing programme for the type of load and soil.
6. Fill the detergent dispenser with the correct quantity of detergent.
7. Start the washing programme.
If you use the combi detergent tablets ('3 in 1', '4 in 1', '5 in 1'), use the multitab function
(refer to 'Multitab function').
SETTING THE WATER SOFTENER
The water softener removes minerals and salts from the water supply. These minerals and
salts can cause damage to the appliance.
Adjust the level of the water softener if this does not agree with the water hardness in
your area.
Contact your local water authority to know the water hardness in your area.
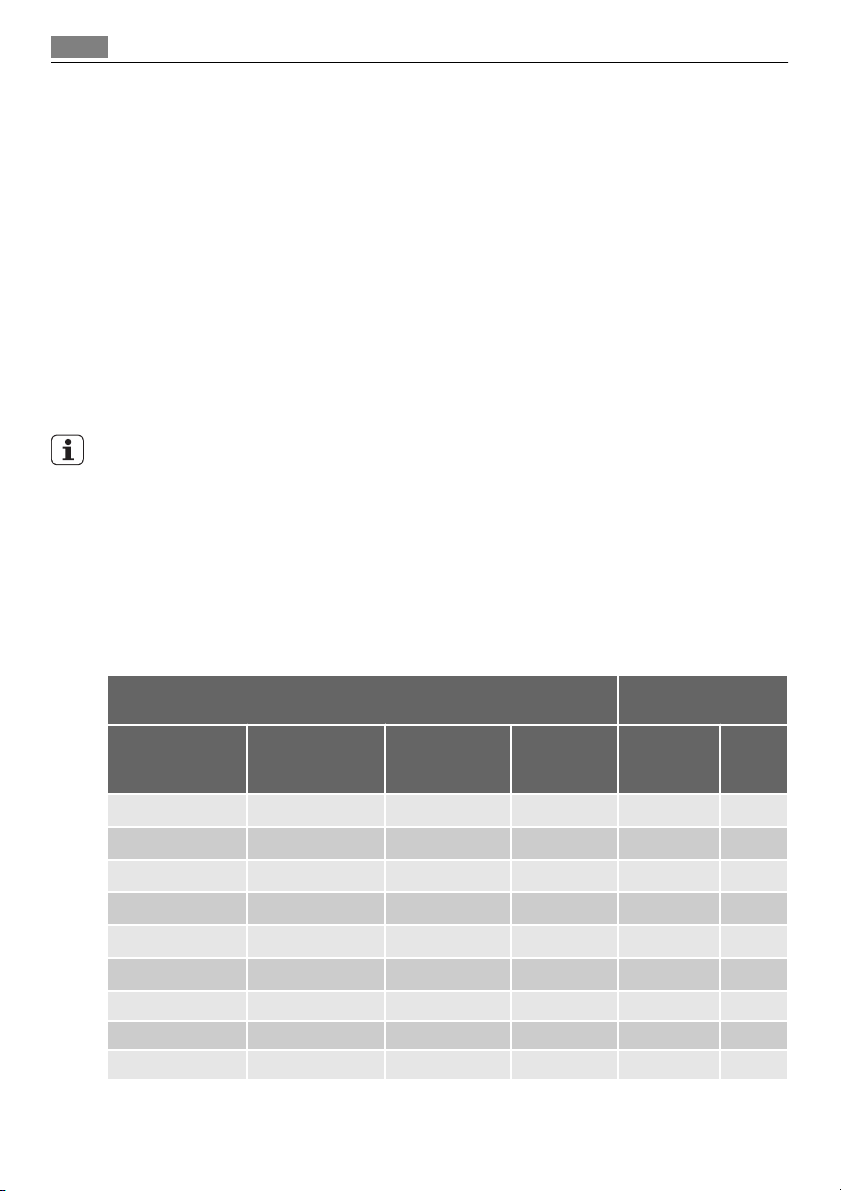
Water hardness
German degrees
(°dH)
51 - 70 91 - 125 9,1 - 12,5 64 - 88
43 - 50 76 - 90 7,6 - 9,0 53 - 63
37 - 42 65 - 75 6,5 - 7,5 46 - 52
29 - 36 51 - 64 5,1 - 6,4 36 - 45
23 - 28 40 - 50 4,0 - 5,0 28 - 35
19 - 22 33 - 39 3,3 - 3,9 23 - 27
15 - 18 26 - 32 2,6 - 3,2 18 - 22 1 4
11 - 14 19 - 25 1,9 - 2,5 13 - 17 1 3
4 - 10 7 - 18 0,7 - 1,8 5 - 12 1 2
French degrees
(TH°)
mmol/l Clarke de-
grees
Water hardness ad-
manually elec-
2
2
2
2
2
2
justment
1)
1)
1)
1)
1)
1)
troni-
cally
10
9
8
7
6
1)
5
Page 11
Setting the water softener
11
Water hardness
German degrees
(°dH)
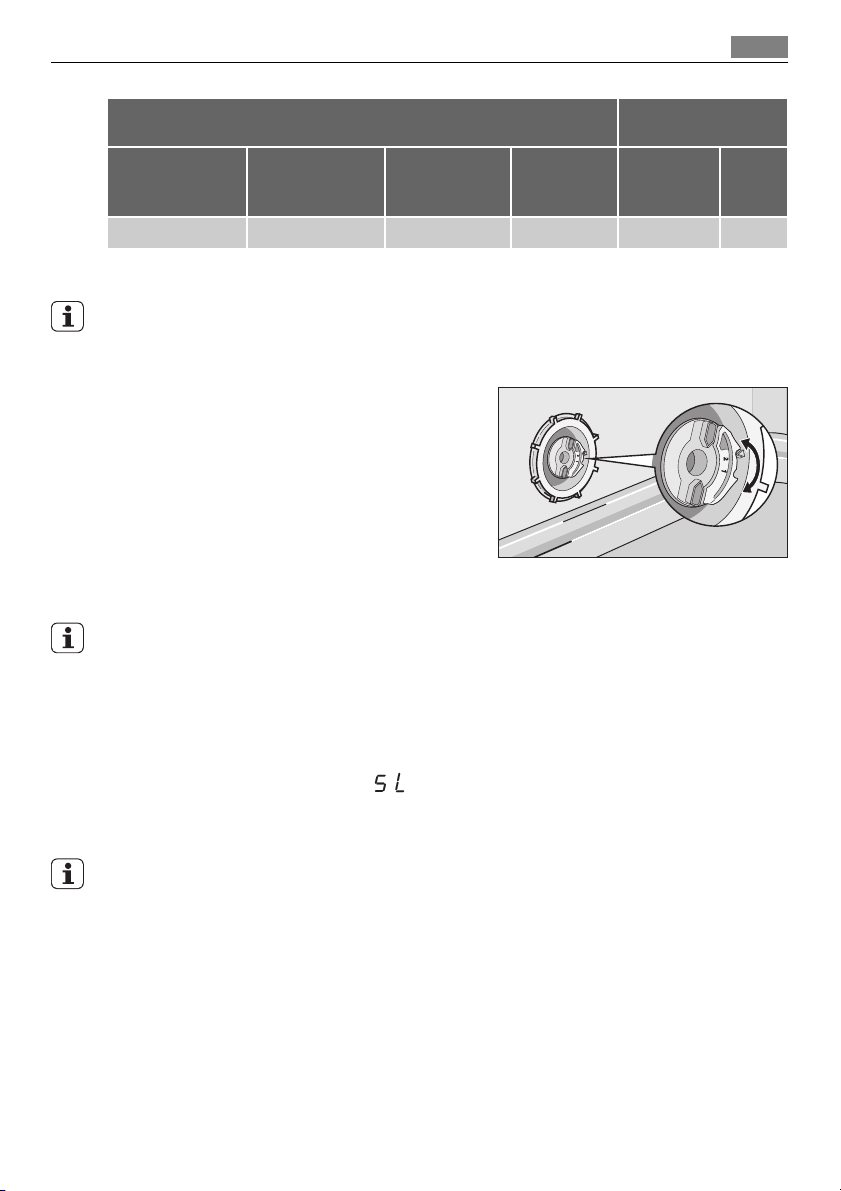
< 4 < 7 < 0,7 < 5
1) Factory position.
2) Do not use salt at this level.
French degrees
(TH°)
mmol/l Clarke de-
grees
Water hardness ad-
manually elec-
1
You must adjust the water softener manually and electronically.
Manual adjustment
Turn the water hardness dial to the position 1 or
2 (refer to the table).
Electronic adjustment
Make sure that the appliance is deactivated.
1. Press and hold the Multitab button .
2. Turn the programme knob counterclockwise until the programme marker is aligned
with the first washing programme on the control panel.
3. Release the Multitab button when the display shows the set level of the water soften-
er (example: the display shows
4. Press the Multitab button again and again until the display shows the new level.
5. Deactivate the appliance to confirm the adjustment.
If the water softener is set electronically to the level 1, the salt indicator light stays off.
= level 5.
justment
2)
troni-
cally
2)
1
Page 12
Use of dishwasher salt
12
USE OF DISHWASHER SALT
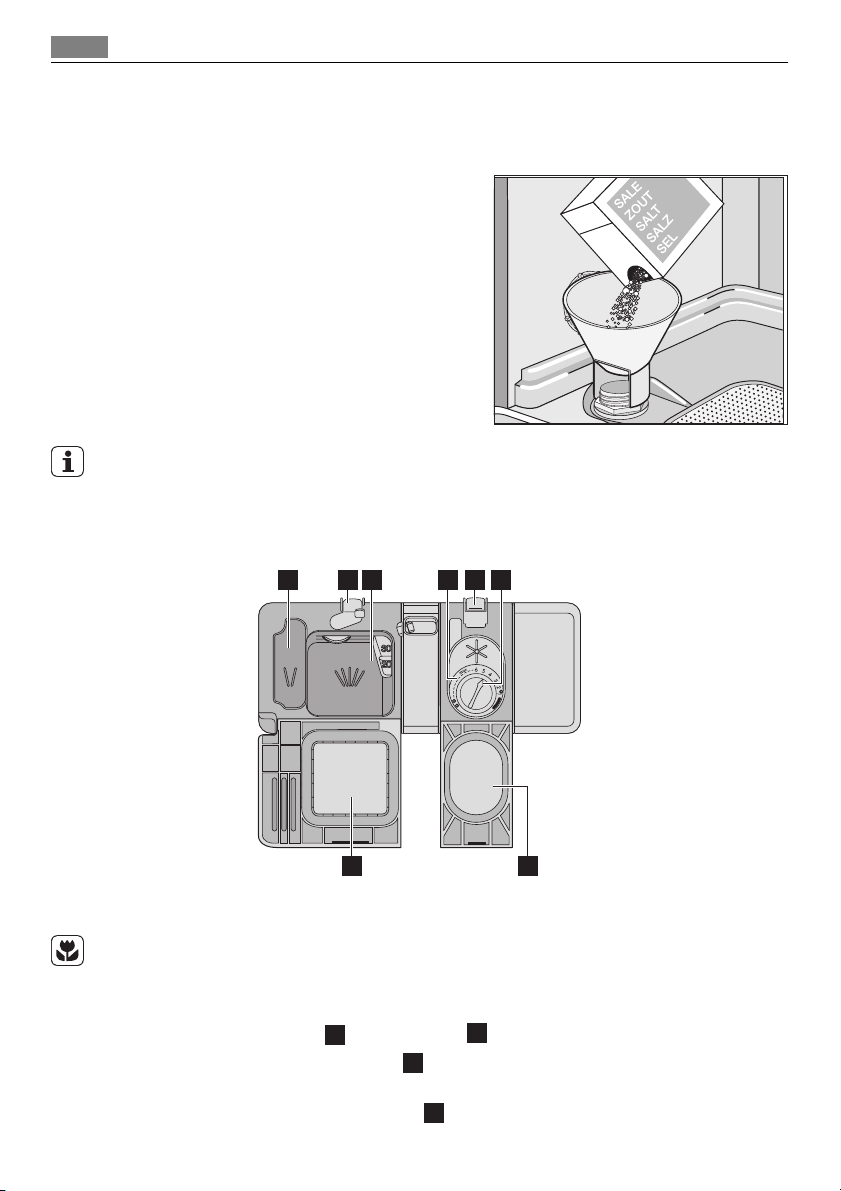
How to fill the salt container
1. Turn the cap counterclockwise and open
the salt container.
2. Fill the salt container with 1 litre of wa-
ter (only for the first time you fill with
salt).
3. Use the funnel to fill the salt container
with salt.
4. Remove the salt around the opening of
the salt container.
5. Turn the cap clockwise to close the salt
container.
It is correct that water comes out from the salt container when you fill it with salt.
USE OF DETERGENT AND RINSE AID
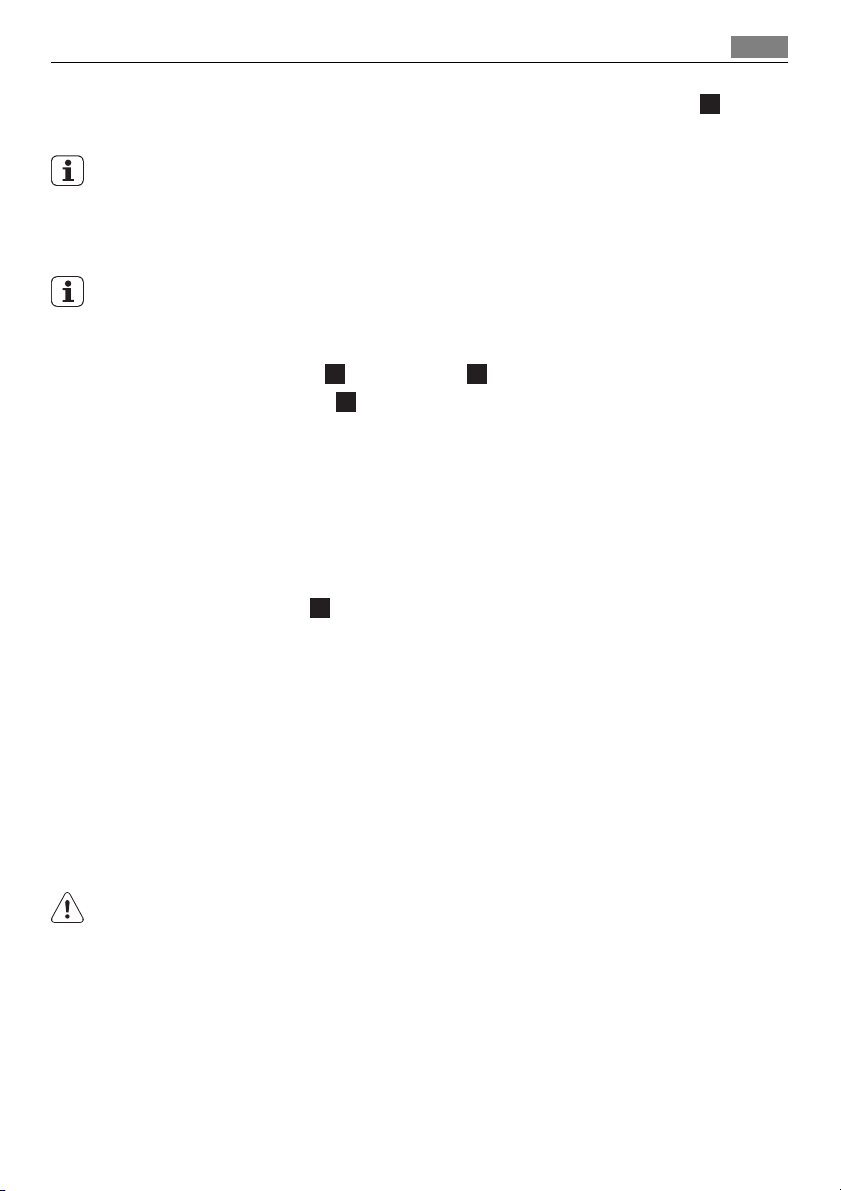
5
1
3
2
4
6
8
7
Use of detergent
To help the environment, do not use more than the correct quantity of detergent.
Follow the detergent manufacturer recommendations on the detergent packaging.
Do these steps to fill the detergent dispenser:
1.
Press the release button
2.
Put the detergent in the dispenser
3. If the washing programme has a prewash phase, put a small quantity of detergent in
the prewash detergent compartment
2
to open the lid 8 of the detergent dispenser.
3
.
1
.
Page 13
Multitab function
13
4.
If you use the detergent tablets, put the tablet in the detergent dispenser
5. Close the detergent dispenser. Press the lid until it locks into position.
Different brands of detergent dissolve in different times. Some detergent tablets do not
have the best cleaning results during short washing programmes. Use long washing programmes when you use the detergent tablets to fully remove the detergent.
Use of rinse aid
Rinse aid makes it possible to dry the dishes without streaks and stains.
The rinse aid dispenser automatically adds rinse aid during the last rinsing phase.
Do these steps to fill the rinse aid dispenser:
1.
Press the release button
2.
Fill the rinse aid dispenser
3. Remove the spilled rinse aid with an absorbent cloth to prevent too much foam dur-
ing the washing programme.
4. Close the rinse aid dispenser. Press the lid until it locks into position.
5
to open the lid 7 of the rinse aid dispenser.
4
with rinse aid. The mark 'max' shows the maximum level.
Adjust the rinse aid dosage
Factory set: position 4.
You can set the rinse aid dosage between position 1 (lowest dosage) and position 6 (highest dosage).
Turn the rinse aid selector
6
to increase or decrease the dosage.
MULTITAB FUNCTION
3
.
The multitab function is for combi detergent tablets.
These tablets contain agents as detergent, rinse aid and dishwasher salt. Some types of
tablets can contain other agents.
Be sure that these tablets are applicable for the water hardness in your area (refer to the
instructions on the packaging of the products).
The multitab function deactivates the flow of rinse aid and salt.
The multitab function deactivates the indicators of salt and rinse aid.
The programme duration can increase if you use the multitab function.
Activate the multitab function before the start of a washing programme. You cannot activate the function when a washing programme operates.
To activate the multitab function
• Press the Multitab button, the multitab indicator comes on. The function is activated.
– When you set the multitab function, it stays on until you deactivate it.
To deactivate the multitab function and use separately detergent, salt and rinse aid
1. Press the Multitab button, the multitab indicator goes off. The function is deactivated.
2. Fill the salt container and the rinse aid dispenser.
3. Adjust the water hardness to the highest level.
Page 14
Loading cutlery and dishes
14
4. Start a washing programme without dishes.
5. Adjust the water softener to the water hardness in your area.
6. Adjust the quantity of rinse aid.
LOADING CUTLERY AND DISHES
Hints and tips
• Do not put in the appliance items that can absorb water (sponges, household cloths).
• Remove the remaining food from the items.
• Make soft the remaining burned food on the items.
• Put hollow items (cups, glasses and pans) with the opening down.
• Make sure that water does not collect in containers or in bowls.
• Make sure that cutlery and dishes do not bond together.
• Make sure that the glasses do not touch other glasses.
• Put small items in the cutlery basket.
• Mix the spoons with other cutlery to prevent them to bond together.
• When you put the items in the baskets, make sure that the water can touch all surfaces.
• Put light items in the upper basket. Make sure that the items do not move.
• Water droplets can collect on plastic items and non-stick pans.
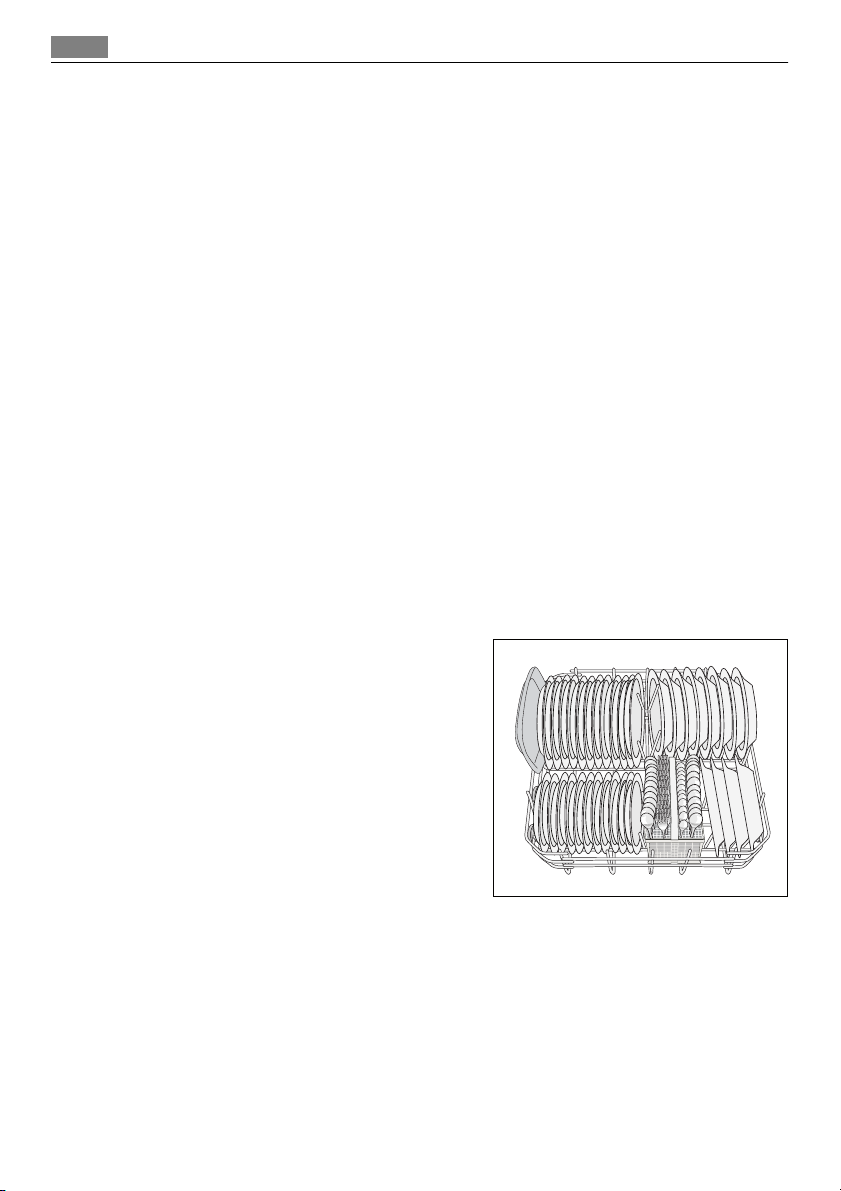
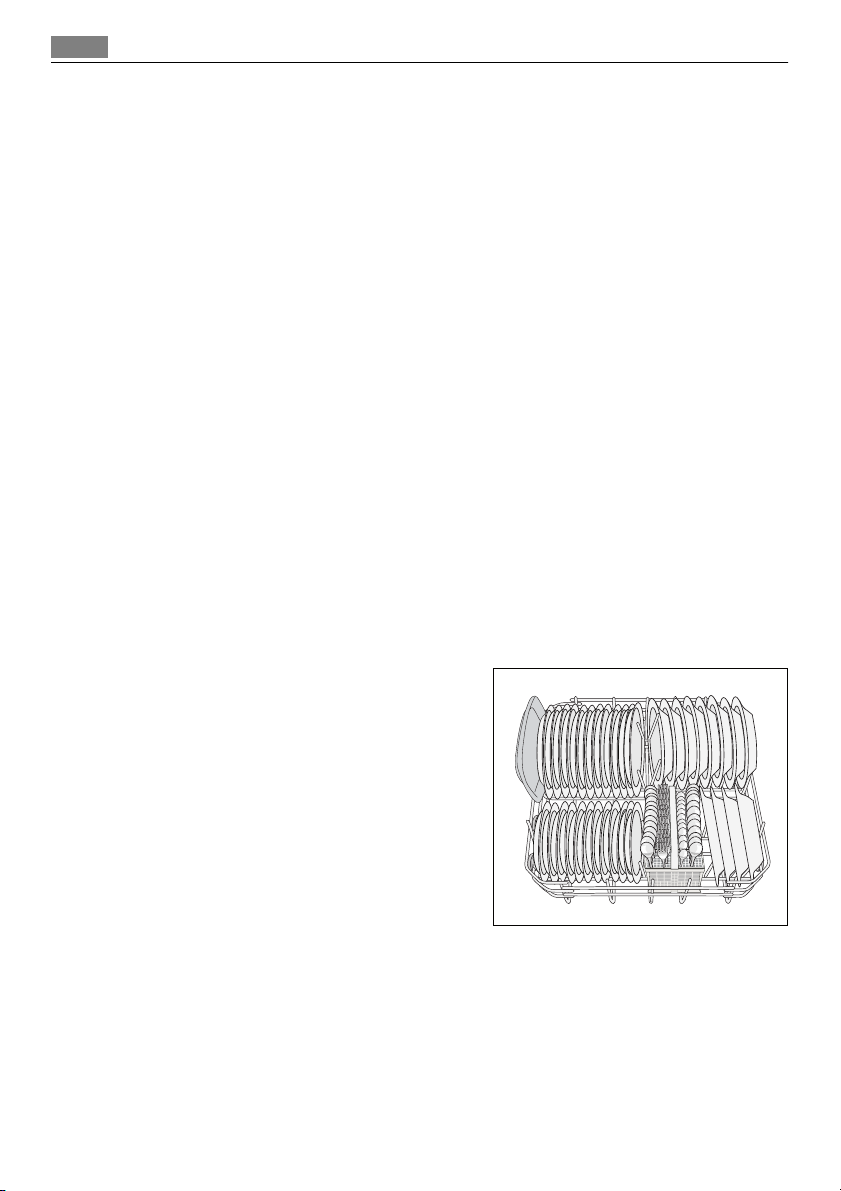
Lower basket
Put the saucepans, lids, plates, salad bowls and
cutlery in the lower basket. Put the service
dishes and large lids around the edge of the basket.
Page 15
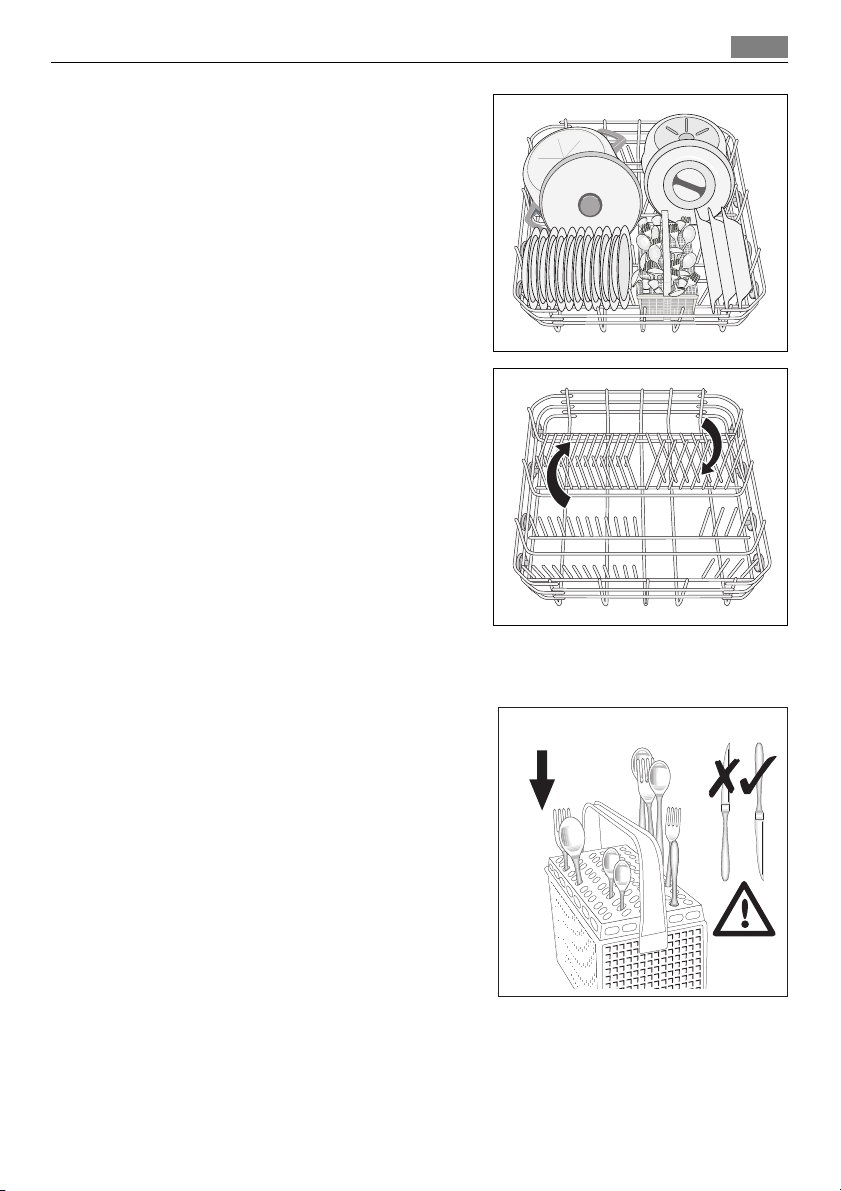
The rows of prongs in the lower basket can be
flat to load pots, pans and bowls.
Loading cutlery and dishes
15
The cutlery basket
Put the forks and spoons with the handles down.
Put the knives with the handles up.
Mix the spoons with other cutlery to prevent
them to bond together.
Use the cutlery grid. If the dimensions of the cutlery prevent use of the cutlery grid, you can easily remove it.
Page 16
Loading cutlery and dishes
16
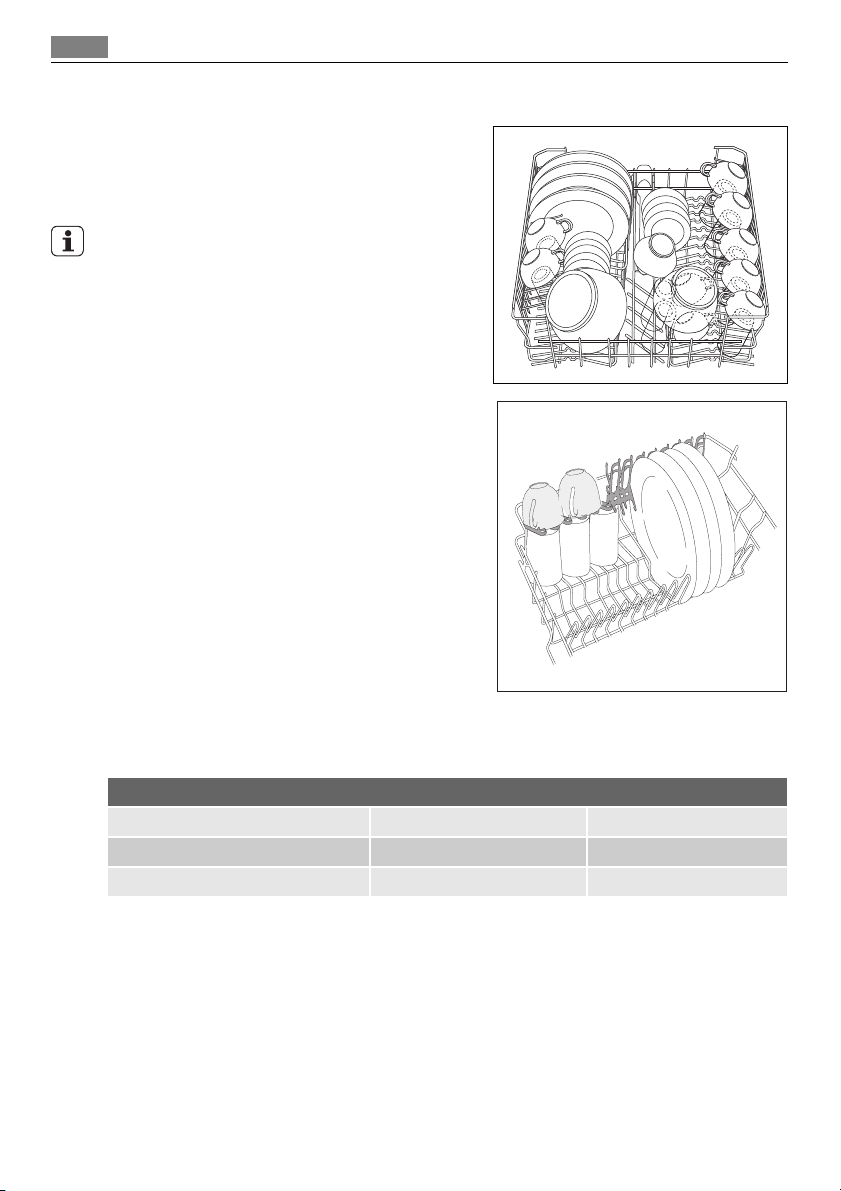
Upper basket
The upper basket is for plates (maximum 24 cm
in diameter), saucers, salad bowls, cups, glasses,
pots and lids. Arrange the items to let water
touch all surfaces.
Prevent to put plates in the first three sectors in
the front part of the basket. Make sure the
plates tilt forward.
Put the glasses with long stems in the cup racks
with the stems up. For longer items, fold the cup
racks up.
Adjustment of the height of the upper basket
You can put the upper basket in two positions to increase the load flexibility.
Maximum height of the dishes in:
the upper basket the lower basket
Higher position 20 cm 31 cm
Lower position 24 cm 27 cm
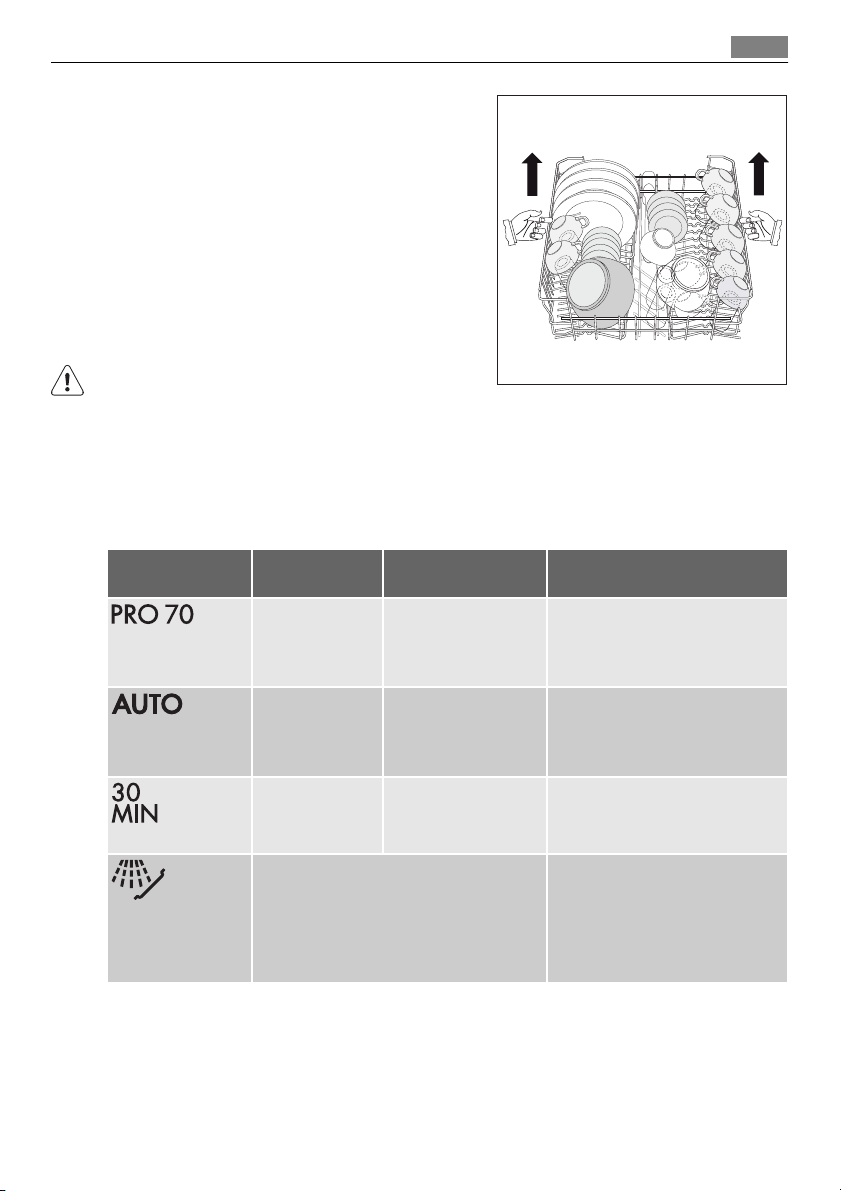
Do these steps to move the upper basket to the higher position:
Page 17
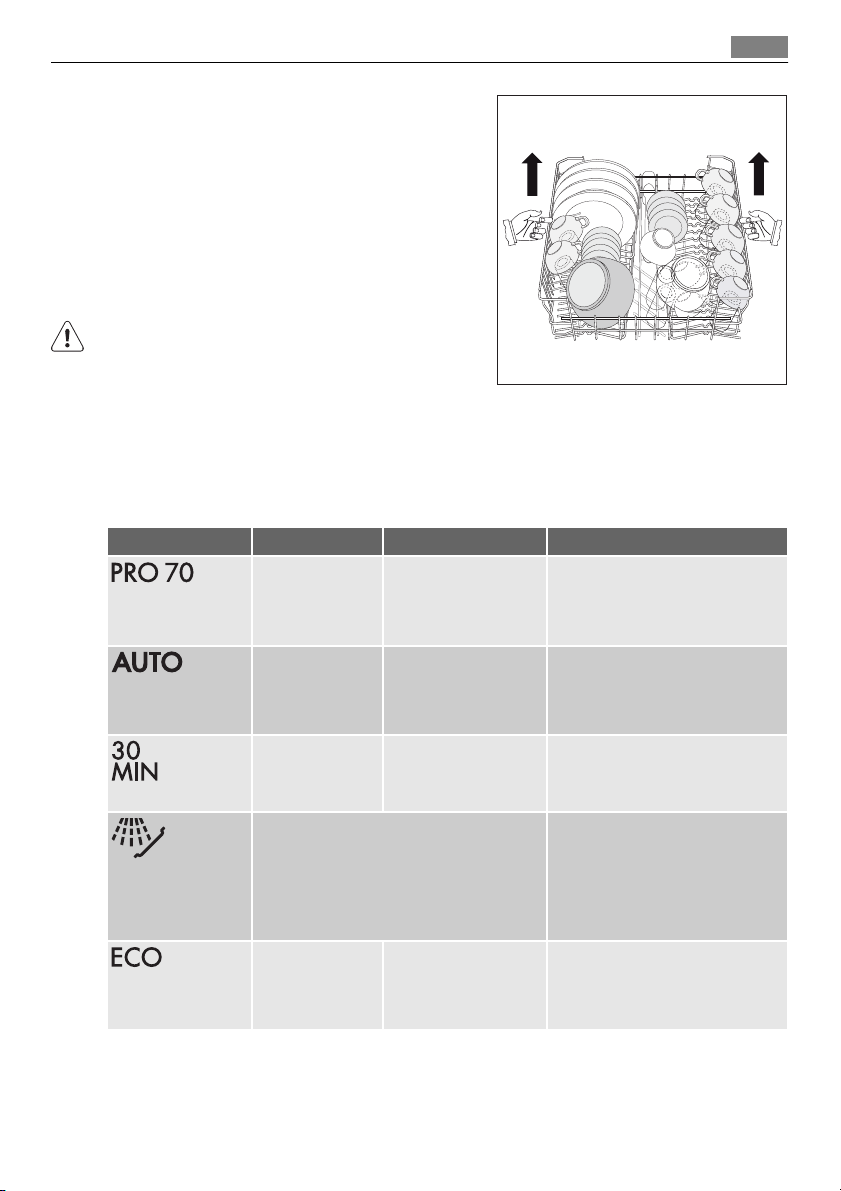
1. Pull the basket out until it stops.
2. Carefully lift the two sides until the mechanism is engaged and the basket is stable.
Do these steps to move the upper basket to
the lower position:
1. Pull the basket out until it stops.
2. Carefully lift up the two sides.
3. Hold the mechanism and let it fall back
down slowly.
CAUTION!
• Do not lift or lower the basket on one side
only.
• If the basket is in the upper position, do
not put cups on the cup racks.
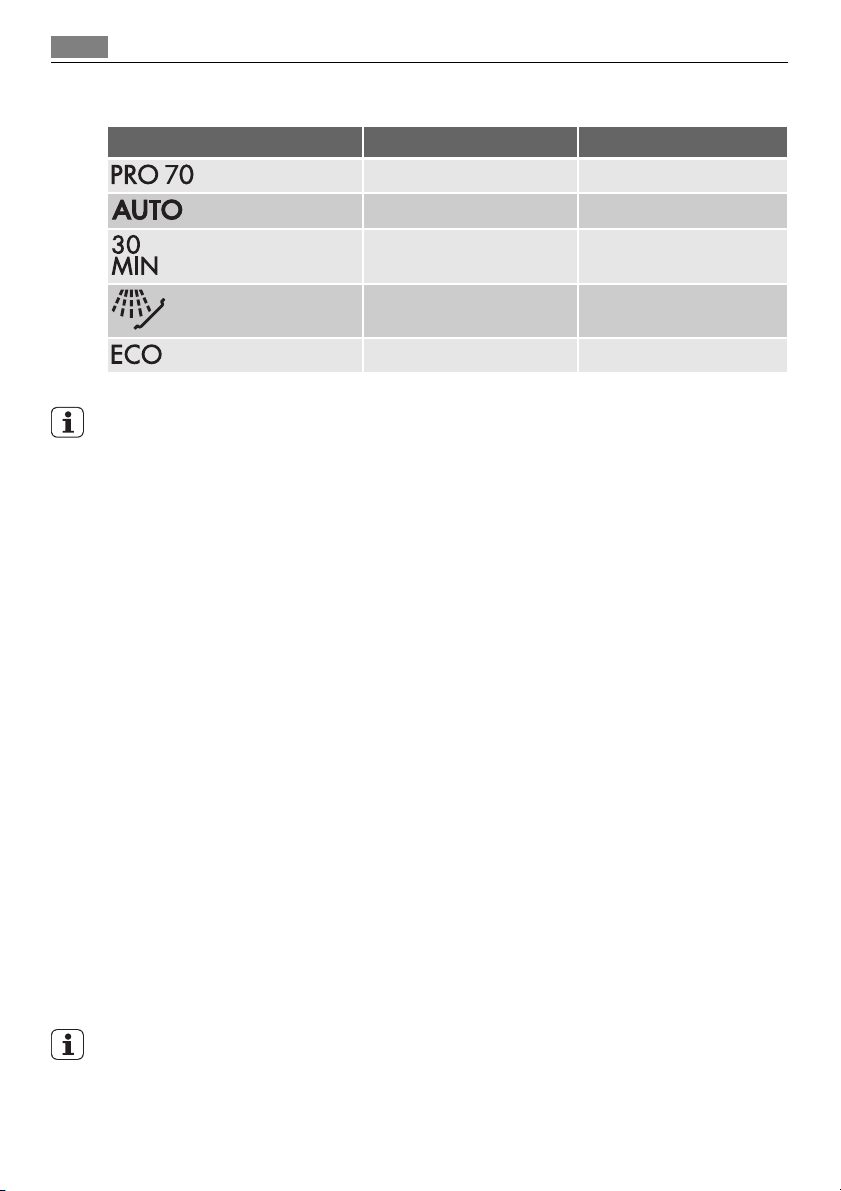
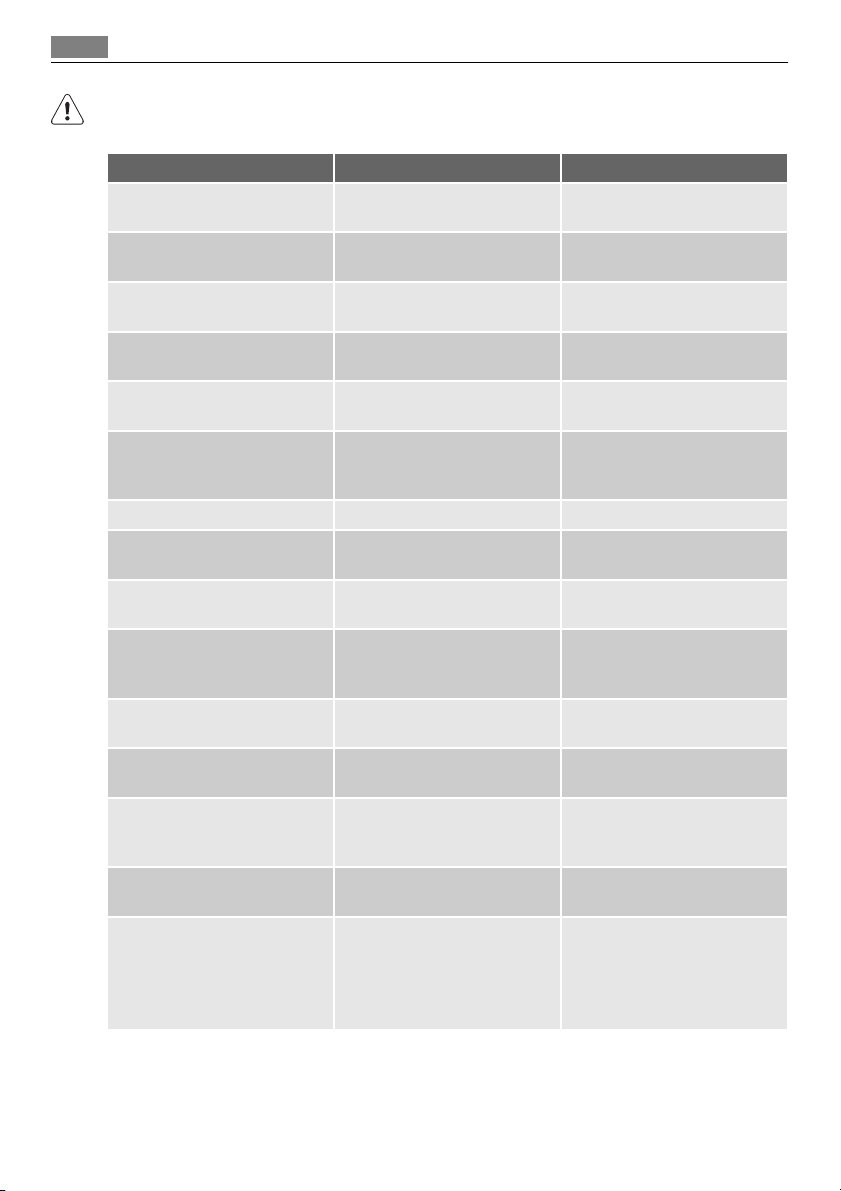
WASHING PROGRAMMES
Programme Type of soil Type of load Programme description
Heavy soil Crockery, cutlery,
All Crockery, cutlery,
1)
Fresh soil Crockery and cutlery Wash 60°C
2)
pots and pans
pots and pans
Washing programmes
Prewash
Wash 70 °C
Rinses
Dry
Prewash
Wash 45 °C or 70 °C
Rinses
Dry
Rinse
17
Use this programme to quickly rinse the
dishes. This prevents the remaining food
to bond on the dishes and bad odours
to come out from the appliance.
Do not use detergent with this programme
Normal soil Crockery and cutlery Prewash
3)
1) The appliance senses the type of soil and the quantity of items in the baskets. It automatically adjusts the
temperature and quantity of the water, the energy consumption and the programme time.
2) With this programme you can wash a load with fresh soil. It gives good washing results in a short time.
3) This is the standard programme for test institutes. With this programme you have the most efficient use of
water and energy consumption for crockery and cutlery with normal soil. Refer to the supplied leaflet for
test information.
Rinse
Wash 50 °C
Rinses
Dry
Page 18
Select and start a washing programme
18
Consumption values
Programme
1) The display shows the programme time.
1)
Energy (kWh) Water (litre)
1,5-1,7 15-17
1,1-1,7 11-22
0,9 9
0,1 4
1,0-1,1 13-15
The water pressure and temperature, the variations of the mains supply and the quantity
of dishes can change the consumption values.
SELECT AND START A WASHING PROGRAMME
Start the washing programme without delay start
1. Close the appliance door.
2. Set the washing programme (make sure that the appliance is in setting mode).
• The programme time flashes in the display
• The phase indicators of the set washing programme come on.
3. Press the Start button, the washing programme starts automatically.
• The phase indicators go off but the indicator of the phase in operation stays on.
Start the washing programme with delay start
1. Close the appliance door.
2. Set the washing programme (make sure that the appliance is in setting mode).
3. Press the Delay button again and again until the display shows the time of the delay
start.
• The time of the delay start flashes in the display.
4. Press the Start button, the countdown starts automatically.
• The delay start time flashes no more in the display
• The phase indicators of the set washing programme go off.
5. When the countdown is completed, the washing programme starts automatically.
• The indicator of the phase in operation comes on.
The opening of the appliance door stops the countdown. When you close the door, the
countdown continues from the point of interruption.
Page 19

Select and start a washing programme
Cancel the delay start
If you did not press the Start button, and the countdown is not in operation
1. Press the Delay button again and again until:
• The display shows the time of the set washing programme
• The phase indicators come on.
2. Press the Start button to start the washing programme.
If you did press the Start button, and the countdown is in operation
1. Press the Delay button again and again until:
• The display shows the time of the set washing programme
• The phase indicators come on.
The washing programme starts automatically.
Interruption of a washing programme
• Open the appliance door.
– The washing programme stops.
• Close the appliance door.
– The washing programme continues from the point of interruption.
Cancel the washing programme
If the washing programme has not started, you can change the selection.
To change the selection when the washing programme operates, it is necessary to cancel
the programme.
• At the same time press and hold the buttons Multitab and Delay until:
– The time of the last set washing programme flashes in the display
– The indicators of the phases of the washing programme come on.
Make sure that there is detergent in the detergent dispenser before you start a new washing programme.
19
End of the washing programme
The display shows a zero and the phase indicators are off when the washing programme
is completed.
1. Deactivate the appliance.
2. Open the appliance door.
3. For better drying results, keep the door ajar for some minutes.
If you do not deactivate the appliance at the end of the washing programme, the appli-
ance stays on standby.
• To decrease energy consumption during the standby, after three minutes from the end
of the washing programme:
– All indicators go off
– The display shows one horizontal bar.
Press one of the buttons, the display and the indicators come on again.
Page 20
Care and cleaning
20
Remove the items from the baskets
• Let the dishes become cold before you remove them from the appliance. Hot dishes
can be easily damaged.
• First remove the items from the lower basket, then from the upper basket.
• There can be water on the sides and on the door of the appliance. Stainless steel be-
comes cool more quickly than the dishes.
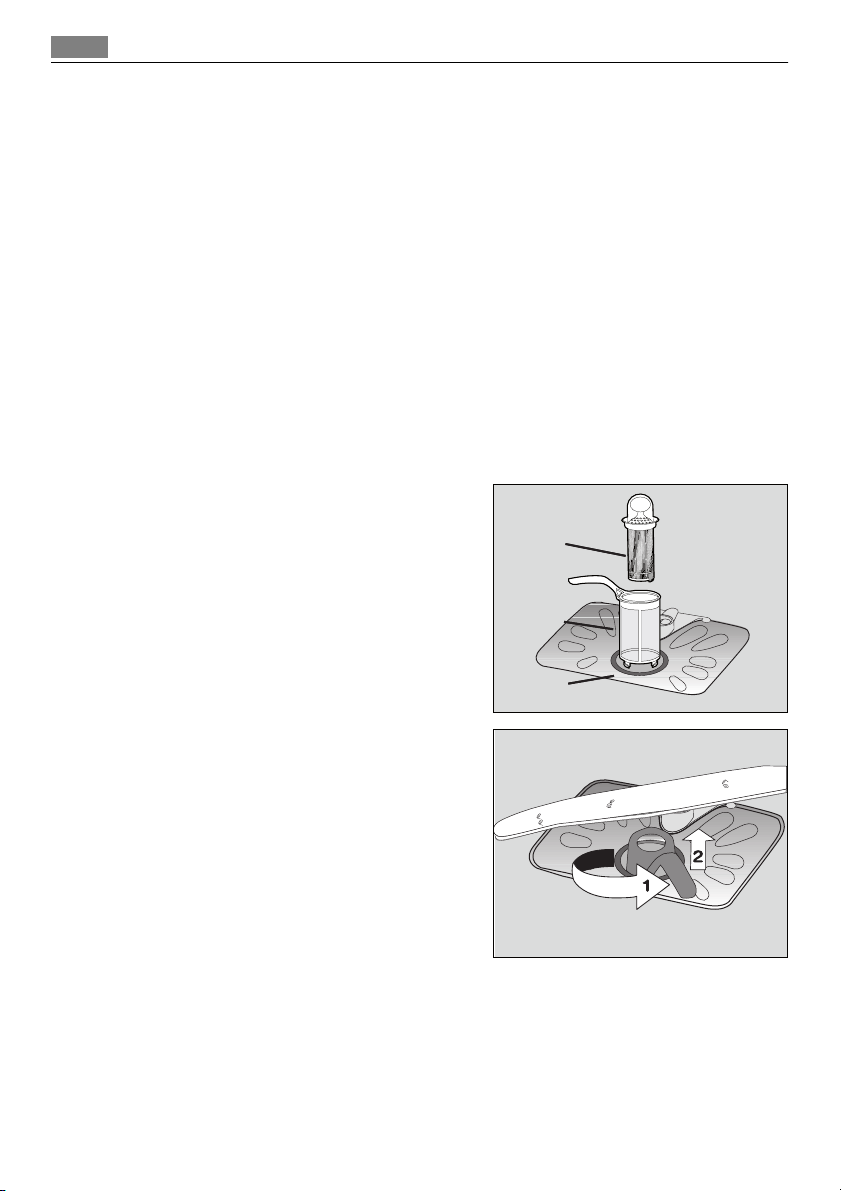
CARE AND CLEANING
To remove and clean the filters
Dirty filters decrease the washing results. Make a check at intervals and if necessary,
clean them.
The appliance has three filters:
• Coarse filter (A)
• Microfilter (B)
• Flat filter (C).
A
A
B
B
1. To unlock the filters (A) and (B), turn the
handle on the microfilter (B) approximately 1/4 counterclockwise and remove.
2. Hold the coarse filter (A) by the handle
and remove it from the microfilter (B).
C
C
Page 21
What to do if…
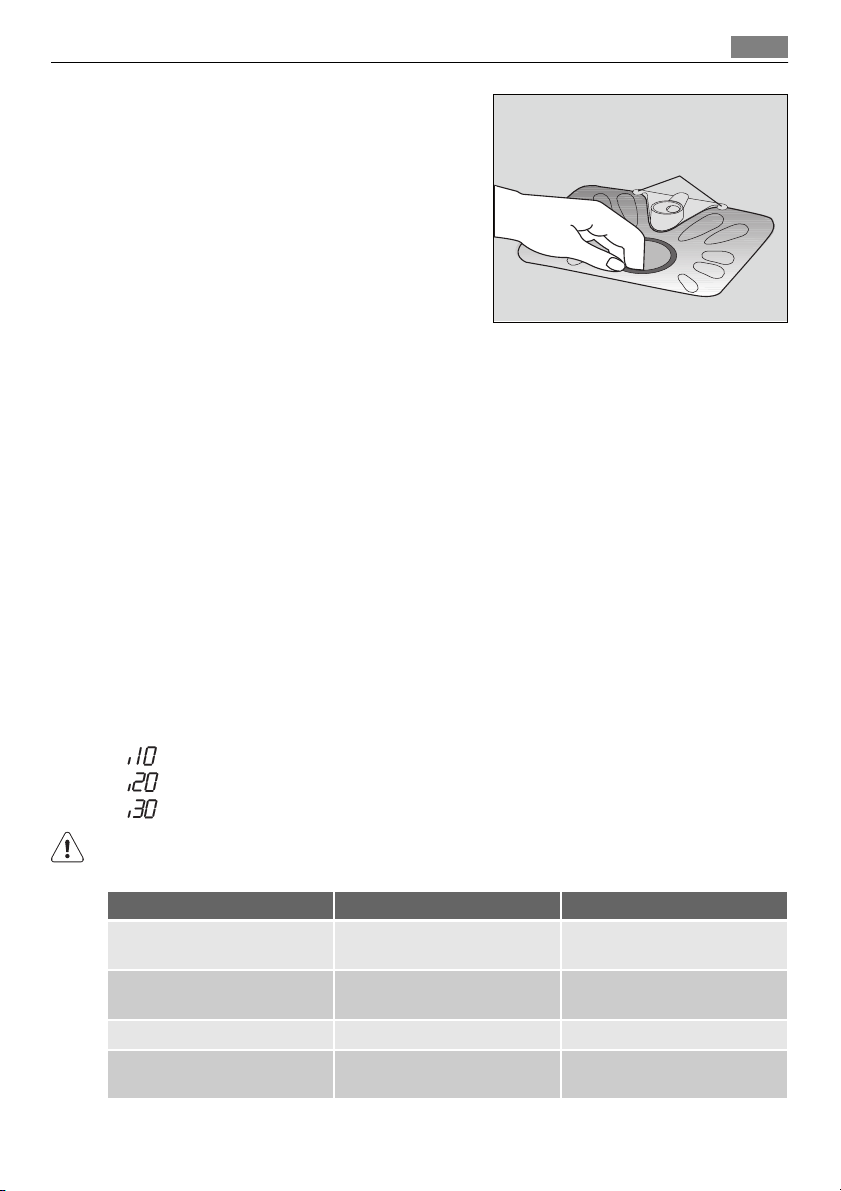
3. Remove the flat filter (C) from the bot-
tom of the appliance.
4. Fully clean the filters with water.
5. Put the flat filter (C) to its initial posi-
tion. Make sure that it assembles correctly in the two guides (D).
6. Put the coarse filter (A) in the microfilter
(B) and push the filters together.
7. Put the filters (A) and (B) in position.
Turn the handle on the microfilter (B)
clockwise until it locks in position.
To clean the spray arms
Do not remove the spray arms.
If the holes in the spray arms become clogged, remove remaining parts of soil with a
thin pointed object.
To clean the external surfaces
Clean the external surfaces of the appliance and control panel with a moist soft cloth.
Only use neutral detergents.
Do not use abrasive products, abrasive cleaning pads or solvents (acetone).
WHAT TO DO IF…
21
D
The start of the appliance does not occur or it stops during operation.
First try to find a solution to the problem (refer to the table). If not, contact the service
centre.
With some malfunctions, the display shows an alarm code:
- The appliance does not fill with water
•
- The appliance does not drain the water
•
- The anti-flood device is on.
•
WARNING!
Deactivate the appliance before you do the checks.
Malfunction Possible cause Possible solution
The appliance does not fill
with water.
The water pressure is too low. Contact your local water au-
The water tap is closed. Open the water tap.
The filter in the water inlet
The water tap is blocked or
there is limescale on it.
hose is blocked.
Clean the water tap.
thority.
Clean the filter.
Page 22

What to do if…
22
Malfunction Possible cause Possible solution
The connection of the water in-
The water inlet hose is dam-
The appliance does not drain
the water.
The connection of the water
The water drain hose is dam-
The anti-flood device is on. Close the water tap and con-
The start of the washing programme does not occur.
You did not press the Start
The mains plug is not connec-
The fuse in the fuse box is dam-
The delay start is set. • Cancel the delay start.
let hose is not correct.
aged.
There is a blockage in the sink
spigot.
drain hose is not correct.
aged.
The appliance door is open. Close the appliance door.
touchpad or button.
ted in the mains socket.
aged.
Make sure that the connection
is correct.
Make sure that the water inlet
hose has no damages.
Clean the sink spigot.
Make sure that the connection
is correct.
Make sure that the water
drain hose has no damages.
tact the service centre.
Press the Start touchpad or
button.
Connect the mains plug.
Replace the fuse.
• When the countdown is
completed, the washing programme starts automatically.
After the check, set the programme knob on the same washing programme before the
malfunction occurred. The programme continues from the point of interruption.
If the malfunction occurs again, contact the service centre.
If the display shows other alarm codes, contact the service centre.
The necessary information for the service centre is on the rating plate.
Record this information:
– Model (MOD.) ........................................................
– Product number (PNC) ..........................................
– Serial number (S.N.) ..............................................
The washing results and drying results are not satisfactory
Problem Possible cause Possible solution
The dishes are not clean. The washing programme was
not applicable for the type of
load and soil.
Make sure that the washing
programme is applicable for
the type of load and soil.
Page 23

What to do if…
Problem Possible cause Possible solution
You did not put the items cor-
The spray arms could not turn
The filters are dirty or not as-
The quantity of detergent was
Limescale particles on the
dishes.
Incorrect level of the water
The salt container cap is not
There are streaks, whitish
stains, or a bluish layer on
glasses and dishes.
Dry water drop stains on
glasses and dishes.
The detergent can be the cause. Use a different brand of deter-
The dishes are wet. The washing programme was
The dishes are wet and matt. The rinse aid dispenser is emp-
The multitab function is on
rectly in the baskets, water did
not touch all surfaces.
freely. Incorrect position of
the items in the baskets.
sembled and installed correctly.
not sufficient or missing.
The salt container is empty. Fill the salt container with dish-
softener adjustment.
closed correctly.
The rinse aid quantity is too
high.
The rinse aid quantity is too
low.
without a drying phase or
with a decreased drying phase.
ty.
(this function automatically
deactivates the rinse aid dispenser).
Put the items correctly in the
baskets.
Make sure that an incorrect position of the items do not
cause the blockage of the
spray arms.
Make sure that the filters are
clean and correctly assembled
and installed.
Make sure that the quantity of
detergent is sufficient.
washer salt.
Adjust the water softener with
the correct level.
Make sure that the salt con-
tainer cap is closed correctly.
Decrease the rinse aid quantity.
Increase the rinse aid quantity.
gent.
For better drying results, keep
the door ajar for some minutes.
Fill the rinse aid dispenser with
rinse aid.
Activate the rinse aid dispenser.
23
To activate the rinse aid dispenser
Make sure that the appliance is deactivated.
1. Press and hold the Multitab button.
2. Turn the programme knob counterclockwise until the programme marker is aligned
with the first washing programme on the control panel.
3. Release the Multitab button when the display shows the set level of the water softener.
Page 24

Technical data
24
4. Turn the programme knob counterclockwise until the programme marker is aligned
with the second washing programme on the control panel.
5. The display shows the set adjustment of the rinse aid dispenser.
The rinse aid dispenser is deactivated
The rinse aid dispenser is activated
6. Press the Multitab button, the display shows the new adjustment.
7. Deactivate the appliance to confirm the adjustment.
TECHNICAL DATA
Dimensions Width 600 mm
Height 850 mm
Depth 610 mm
Water supply pressure Minimum 0,5 bar (0,05 MPa)
Maximum 8 bar (0,8 MPa)
Water supply
Capacity Place settings 12
1) Connect the water inlet hose to a water tap with a 3/4'' thread.
1)
The rating plate on the inner edge of the appliance door shows the electrical connection
data.
Cold water or hot water maximum 60 °C
If the hot water comes from alternative sources of energy, (e.g. solar panels, photovoltaic
panels and aeolian), use a hot water supply to decrease energy consumption.
ENVIRONMENT CONCERNS
The symbol on the product or on its packaging indicates that this product may not
be treated as household waste. Instead it should be taken to the appropriate collection
point for the recycling of electrical and electronic equipment. By ensuring this product is
disposed of correctly, you will help prevent potential negative consequences for the
environment and human health, which could otherwise be caused by inappropriate
waste handling of this product. For more detailed information about recycling of this
product, please contact your local council, your household waste disposal service or the
shop where you purchased the product.
The packaging materials are environmentally friendly and can be recycled. The plastic components are identified by markings, e.g. >PE<, >PS<, etc. Discard the packaging materials
in the applicable container at the community waste disposal facilities.
Page 25

Installation
WARNING!
To discard the appliance, follow the procedure:
• Pull the mains plug out of the socket.
• Cut off the mains cable and mains plug and discard them.
• Discard the door catch. This prevents the children to close themselves inside the appli-
ance and endanger their lives.
INSTALLATION
Installation under a counter
Put the appliance adjacent to a water tap and a water drain.
Remove the appliance worktop to install it under a sink unit or a kitchen worktop.
Make sure that the dimensions of the recess
agree with the dimensions in the picture.
25
How to remove the appliance worktop
1. Remove the rear screws (1).
2. Pull the worktop from the behind of the
appliance (2).
Page 26

Installation
26
3. Lift the worktop and move it from the
front slots (3).
4. Use the adjustable feet to adjust the level
of the appliance.
5. Install the appliance under the kitchen
worktop. Do not squash or bend the water hoses during the installation.
To adjust the level of the appliance
A correct level of the appliance lets the door to close and seal correctly.
With an incorrect appliance level, the door does catches on the sides of the cabinet.
Loosen or tighten the adjustable feet to make the appliance level.
Water drain connection
Connect the water drain hose to:
• The sink spigot and attach it under the work surface. This prevents that the waste wa-
ter from the sink goes back into the appliance.
• A stand pipe with vent-hole. The internal di-
ameter must be minimum 4 cm.
Remove the sink plug when the appliance
drains the water to prevent that the water
goes back into the appliance.
The drain hose extension must not be longer
than 2 m. The internal diameter must not be
smaller than the diameter of the hose.
max 85 cm
min 40 cm
max 400 cm
If you connect the water drain hose to a trap spigot under the sink, remove the plastic membrane (A). If you do not remove the membrane,
remaining food can cause a blockage in the
drain hose spigot
A safety device impedes the dirty water to go
back into the appliance. If, the spigot of the sink
has a 'non-return valve', this can cause the appliance to drain incorrectly. Remove the non-return valve.
Page 27
POUR DES RÉSULTATS PARFAITS
Merci d'avoir choisi ce produit AEG. Nous l'avons créé
pour vous offrir la meilleure performance pour une
longue durée, avec des technologies innovantes qui
vous simplifient la vie - autant de caractéristiques que
vous ne trouverez pas sûrement pas sur d'autres
appareils. Veuillez prendre quelques instants pour lire
cette notice afin d'utiliser au mieux votre appareil.
ACCESSOIRES ET CONSOMMABLES
Dans la boutique en ligne d'AEG, vous trouverez tout ce
qu'il vous faut pour que vos appareils AEG fonctionnent
parfaitement. Sans oublier une vaste gamme
d'accessoires conçus et fabriqués selon les critères de
qualité les plus élevés qui soient, des articles de cuisine
spécialisés aux range-couverts, des porte-bouteilles aux
sacs à linge délicats...
27
Visitez la boutique en ligne sur
www.aeg-electrolux.com/shop
Page 28

Sommaire
28
SOMMAIRE
29 Consignes de sécurité
33 Description de l'appareil
33 Bandeau de commande
36 Utilisation de l'appareil
36 Réglage de l'adoucisseur d'eau
37 Utilisation du sel régénérant
38 Utilisation du produit de lavage
et du liquide de rinçage
39 Fonction "Tout en 1"
40 Rangement des couverts et de la
vaisselle
43 Programmes de lavage
44 Sélection et départ d'un
programme de lavage
46 Entretien et nettoyage
47 En cas d'anomalie de
fonctionnement
50 Caractéristiques techniques
51 En matière de protection de
l'environnement
51 Installation
Les symboles suivants sont utilisés
dans ce manuel:
Informations importantes pour votre
sécurité et pour éviter d’abîmer
l’appareil.
Informations générales et conseils
Informations écologiques
Sous réserve de modifications
Page 29

Consignes de sécurité
CONSIGNES DE SÉCURITÉ
Lire attentivement cette notice d'utilisation avant l'installation et l'utilisation de l'appareil :
• Pour votre sécurité et la sécurité de votre appareil.
• Pour protéger l'environnement.
• Pour le bon fonctionnement de l’appareil.
Conservez cette notice d'utilisation avec l'appareil. Si vous déménagez ou si l'appareil est
cédé à une autre personne, assurez-vous que la notice d'utilisation l'accompagne.
Le fabricant n'est pas responsable des dommages liés à une mauvaise installation ou utilisation.
Sécurité des enfants et des personnes vulnérables
• Cet appareil n'est pas destiné aux enfants et aux personnes dont les capacités physiques, sensorielles ou mentales, ou le manque d'expérience et de connaissance les empêchent d'utiliser l'appareil sans risque lorsqu'ils sont sans surveillance, ou en l'absence d'instruction d'une personne responsable qui puisse leur assurer une utilisation de
l'appareil sans danger.
• Ne laissez jamais les emballages à la portée des enfants. Risque d'asphyxie ou de blessure.
• Conservez tous les produits de lavage dans un endroit sûr. Ne laissez pas les enfants
toucher les produits de lavage.
• Tenez les enfants et les animaux éloignés de l’appareil lorsque la porte est ouverte.
Consignes générales de sécurité
• Ne modifiez jamais les caractéristiques de cet appareil. Vous risqueriez de vous blesser
et d'endommager l'appareil.
• Les produits de lavage pour lave-vaisselle peuvent occasionner des brûlures chimiques
au niveau des yeux, de la bouche et de la gorge. Respectez les instructions de sécurité
du fabricant des produits.
• L'eau de votre lave-vaisselle n'est pas potable. Des résidus de produits de lavage peuvent subsister dans votre lave-vaisselle.
• Ne laissez pas la porte de l'appareil ouverte sans supervision. Vous éviterez ainsi les
blessures et les chutes sur une porte ouverte.
• Ne montez pas ou ne vous asseyez pas sur la porte ouverte de votre appareil.
29
Utilisation de l'appareil
• Cet appareil est destiné à un usage domestique normal. Ne l'utilisez jamais à d'autres
fins, pour éviter les dommages corporels et les dégâts matériels.
• Ce lave-vaisselle est conçu pour laver la vaisselle et les ustensiles pouvant être lavés
en machine.
• Ne placez pas de produits inflammables ou d'éléments imbibés de produits inflammables à l'intérieur, à proximité ou sur l'appareil. Risque d'explosion ou d'incendie.
• Les couteaux et autres ustensiles pointus ou tranchants doivent être placés dans le panier à couverts avec la pointe vers le bas, ou placez-les en position horizontale dans le
Page 30

Consignes de sécurité
30
panier supérieur ou dans le panier à couteaux (tous les modèles ne sont pas équipés
d'un panier à couteaux).
• N'utilisez que des produits (sel, produit de lavage, liquide de rinçage) spécifiques pour
lave-vaisselle.
• Tout autre type de sel non spécialement étudié pour être utilisé dans un lave-vaisselle,
en particulier le sel de cuisine, peut endommager l'adoucisseur d'eau.
• Approvisionnez en sel juste avant de démarrer un programme de lavage. Les restes de
sel dans l'appareil peuvent provoquer de la corrosion ou perforer la cuve de l'appareil.
• Ne remplissez jamais le distributeur de liquide de rinçage avec d'autres produits (agent
de nettoyage pour lave-vaisselle, produit de lavage liquide). Vous risqueriez d'endommager l'appareil.
• Assurez-vous que les bras d'aspersion tournent librement avant de lancer le programme de lavage.
• De la vapeur chaude peut s'échapper de l'appareil si vous ouvrez la porte pendant le
déroulement d'un programme de lavage. Risque de brûlures cutanées.
• N'enlevez pas la vaisselle de l'appareil avant la fin du programme de lavage.
Entretien et nettoyage
• Avant de nettoyer l'appareil, arrêtez-le et débranchez-le du secteur.
• N'utilisez pas de produits inflammables ou corrosifs.
• N’utilisez pas l'appareil sans les filtres. Contrôlez que les filtres sont correctement installés. Si les filtres ne sont pas correctement installés, les performances de lavage pourraient être compromises et l'appareil endommagé.
• Ne projetez pas d'eau ou de vapeur sur l'appareil pour son nettoyage. Cela créerait un
risque de choc électrique et pourrait endommager l'appareil.
Installation
• Vérifiez que l'appareil n'a subi aucun dommage au cours du transport. Ne branchez
jamais un appareil endommagé. Si l'appareil est endommagé, contactez votre magasin
vendeur.
• Retirez tous les emballages avant la première utilisation.
• Seul un professionnel qualifié doit effectuer l'installation, le raccordement électrique
et hydraulique, la mise en service et la maintenance de l'appareil. Vous éviterez ainsi
des risques mobiliers, immobiliers et corporels.
• Pendant l'installation et avant toute intervention sur le lave-vaisselle, il est nécessaire
de débrancher l'appareil.
• Les parois de votre lave-vaisselle ne doivent jamais être percées pour éviter d'endommager les composants hydrauliques et électriques.
Précautions contre le gel
• N'installez pas l'appareil dans un endroit où la température ambiante est inférieure à 0
°C.
• Le fabricant ne pourra être tenu responsable en cas de dommages dus au gel.
Page 31
Consignes de sécurité
Tuyau d’arrivée d’eau
• Utilisez des tuyaux neufs pour raccorder l'appareil à l'arrivée d'eau. N’utilisez pas de
tuyaux usagés.
• Ne raccordez pas l’appareil à des conduites neuves ou qui n’ont pas été utilisées depuis longtemps. Laissez couler l’eau pendant quelques minutes avant de brancher le
tuyau d’arrivée d’eau.
• Veillez à ne pas écraser ou endommager les tuyaux d'eau lorsque vous installez l'appareil.
• Assurez-vous que tous les raccords de tuyaux d’eau sont bien serrés afin d’éviter les
fuites.
• Lorsque vous utilisez l'appareil pour la première fois, vérifiez que les tuyaux ne fuient
pas.
• Le tuyau d'arrivée est à double paroi et comporte un câble d'alimentation intérieur ainsi qu'une soupape de sécurité. Le tuyau d'arrivée d'eau est sous pression uniquement
lorsque l'eau s'écoule Si le tuyau d'arrivée d'eau fuit, la soupape de sécurité coupe automatiquement l'eau.
– Faites attention au moment de raccorder le tuyau d'arrivée d'eau :
– N'immergez pas le tuyau d'arrivée d'eau ou la soupape de sécurité dans l'eau.
– Si le tuyau d'arrivée d'eau ou la soupape de sécurité est endommagé, débranchez
immédiatement la prise secteur.
– Contactez le service après-vente de votre magasin vendeur pour remplacer le
tuyau d'arrivée d'eau avec soupape de sécurité.
AVERTISSEMENT
Tension dangereuse
31
Raccordement électrique
• L'appareil doit être relié à la terre.
• Vérifiez que les données électriques figurant sur la plaque signalétique correspondent
à celles de votre réseau.
• Utilisez toujours une prise correctement installée, protégée contre les chocs.
• L'appareil ne doit pas être raccordé à l'aide d'un prolongateur ou d'une prise multiple.
Risque d'incendie.
Page 32

Consignes de sécurité
32
• Ne remplacez et ne modifiez jamais le câble d'alimentation. Contactez votre service
après-vente.
• Attention à ne pas écraser ou endommager la prise et le câble d'alimentation situés à
l'arrière de l'appareil.
• Assurez-vous que la prise principale est accessible une fois l'appareil installé.
• Ne tirez jamais sur le câble d'alimentation électrique pour débrancher l'appareil. Détachez, pour ce faire, la fiche de la prise secteur.
Service après-vente
• Toute intervention ou réparation sur votre appareil doit uniquement être effectuée
par une personne qualifiée. Contactez votre service après-vente.
• Utilisez exclusivement des pièces d'origine.
Pour mettre l'appareil au rebut
• Pour éviter tout risque corporel ou matériel :
– Débranchez l'appareil.
– Coupez le câble d'alimentation au ras de l'appareil et mettez-le au rebut.
– Retirez le loquet de la porte. Ceci évite d'enfermer un enfant ou un animal dans
l'appareil par accident. Risque d'asphyxie.
– Mettez l'appareil au rebut dans un centre local agréé.
AVERTISSEMENT
Les produits de lavage pour lave-vaisselle sont dangereux et peuvent être corrosifs !
• En cas d'accident impliquant ces produits, contactez immédiatement un médecin.
• En cas d'ingestion du produit, contactez immédiatement un médecin.
• En cas de projection de produit de lavage dans les yeux, contactez immédiatement un
médecin et rincez abondamment à l'eau.
• Conservez les produits de lavage pour lave-vaisselle dans un endroit sûr et hors de portée des enfants.
• Ne laissez pas la porte de l'appareil ouverte quand celui-ci contient du produit de lavage.
• Remplissez le distributeur de produit de lavage juste avant de démarrer un programme de lavage.
Page 33
DESCRIPTION DE L'APPAREIL
1 Panier supérieur
2 Sélecteur de dureté de l'eau
3 Réservoir de sel régénérant
4 Distributeur de produit de lavage
5 Distributeur de liquide de rinçage
6 Plaque signalétique
7 Filtres
8 Bras d'aspersion inférieur
9 Bras d'aspersion intermédiaire
10 Plan de travail
Description de l'appareil
33
BANDEAU DE COMMANDE
1 2 3 4
7 568
Page 34
Bandeau de commande
34
1 Position Arrêt
2 Indicateur de programme
3 Voyants
4 Indicateur
5 Touche Start
6 Touche Delay
7 Touche Multitab
8 Sélecteur de programmes
Voyants
Ce voyant s'allume quand les phases de lavage et de rinçage sont en cours.
Ce voyant s'allume quand la phase de séchage est en cours.
Ce voyant s'allume lorsque le distributeur de liquide de rinçage doit être rempli.
Ce voyant s'allume lorsque le réservoir de sel régénérant doit être rempli.
Le voyant de réapprovisionnement en sel régénérant peut rester allumé plusieurs
heures après le remplissage du réservoir à sel. Cela n'affecte pas le fonctionnement de l'appareil.
Ce voyant s'allume lorsque vous activez la fonction « Tout en 1 ».
1) Lorsque les réservoirs à sel et/ou à liquide de rinçage sont vides, les voyants correspondants ne s'allument
pas pendant qu'un programme est en cours.
1)
1)
Écran
L'affichage indique :
• Le réglage électronique du niveau d'adoucisseur d'eau.
• L'activation et la désactivation du distributeur de liquide de rinçage (uniquement si la
fonction « Tout en 1 » est activée).
• La durée d'un programme de lavage
• Le temps restant avant la fin du programme de lavage
• La fin d'un programme de lavage (affichage d'un zéro)
• Le décompte du départ différé
• Les codes d'alarme.
Touche Start
Appuyez sur cette touche pour démarrer :
• Le programme de lavage
• Le décompte du départ différé.
Touche Delay
Appuyez sur cette touche à plusieurs reprises pour retarder le départ du programme de
lavage de 1 à 19 heures.
Page 35

Bandeau de commande
Bouton Multitab
Appuyez sur cette touche pour activer ou désactiver la fonction « Tout en 1 » (se référer à
la section Fonction « Tout en 1 »).
Sélecteur de programmes
Avec la touche de programme, vous pouvez :
• Activer et désactiver l'appareil
• Sélectionner un programme de lavage
• Régler électroniquement le niveau de l'adoucisseur d'eau (reportez-vous au chapitre
Réglage du niveau d'adoucisseur d'eau).
• Activer ou désactiver le distributeur de liquide de rinçage (seulement si la fonction
« Tout en 1 » est activée).
Activer l'appareil et sélectionner un programme de lavage
Tournez le sélecteur de programme jusqu'à ce que l'indicateur de programme soit aligné
avec l'un des programmes de lavage sur le bandeau de commande.
• Si l'indicateur de programme est aligné avec un programme de lavage, la durée du programme apparaît sur l'affichage numérique.
• Si l'indicateur de programme n'est pas aligné avec un programme de lavage, deux barres d'état horizontales apparaissent sur l'affichage numérique.
Désactivation de l'appareil
Tournez le sélecteur de programmes jusqu'à ce que l'indicateur de programme soit aligné
avec la position « off » (arrêt).
35
Mode Programmation
L'appareil doit être en mode Programmation pour effectuer les opérations suivantes :
• Réglage et lancement d'un programme de lavage
• Réglage et lancement d'un départ différé
• Réglage électronique du niveau d'adoucisseur d'eau
• Activation ou désactivation du distributeur de liquide de rinçage (seulement si la fonction « Tout en 1 » est activée).
Activez l'appareil. L'appareil se trouve en mode Programmation lorsque :
• La durée du programme clignote sur l'affichage numérique
• Un ou plusieurs voyants de phase s'allument.
Activez l'appareil. L'appareil n'est pas en mode Programmation lorsque :
• La durée du programme ou l'heure de départ différé ne clignotent pas sur l'affichage
numérique
• Un ou plusieurs voyants de phase s'allument.
– Pour revenir au mode Programmation, il est nécessaire d'annuler le programme ou
le départ différé (reportez-vous au chapitre Sélection et lancement d'un programme de lavage).
Page 36

Utilisation de l'appareil
36
UTILISATION DE L'APPAREIL
1. Vérifiez si le réglage de dureté de l'adoucisseur d'eau correspond à la dureté de l'eau
de votre région. Sinon, ajustez le niveau de l'adoucisseur d'eau.
2. Remplissez le réservoir de sel régénérant avec du sel spécial pour lave-vaisselle.
3. Remplissez le distributeur de liquide de rinçage.
4. Rangez les couverts et la vaisselle dans le lave-vaisselle.
5. Sélectionnez le programme de lavage en fonction de la charge et du degré de salissure.
6. Remplissez le réservoir avec la quantité nécessaire de produit de lavage.
7. Démarrez le programme de lavage.
Si vous utilisez des pastilles de détergent multifonctions (« 3 en 1 », « 4 en 1 » « 5 en 1 »,
etc.), utilisez la fonction « Tout en 1 » (reportez-vous au chapitre Fonction « Tout en 1 »).
RÉGLAGE DE L'ADOUCISSEUR D'EAU
Le lave-vaisselle est équipé d'un adoucisseur d'eau conçu pour éliminer les minéraux et
les sels de l'eau d'alimentation. Ces minéraux et sels peuvent endommager l'appareil.
Réglez le niveau de l'adoucisseur d'eau s'il ne correspond pas à la dureté de l'eau de votre
région.
Contactez votre compagnie des eaux pour connaître la dureté de l'eau de votre région.
Dureté eau
Degrés allemands
(dH°)
51 - 70 91 - 125 9,1 - 12,5 64 - 88
43 - 50 76 - 90 7,6 - 9,0 53 - 63
37 - 42 65 - 75 6,5 - 7,5 46 - 52
29 - 36 51 - 64 5,1 - 6,4 36 - 45
23 - 28 40 - 50 4,0 - 5,0 28 - 35
19 - 22 33 - 39 3,3 - 3,9 23 - 27
15 - 18 26 - 32 2,6 - 3,2 18 - 22 1 4
11 - 14 19 - 25 1,9 - 2,5 13 - 17 1 3
4 - 10 7 - 18 0,7 - 1,8 5 - 12 1 2
< 4 < 7 < 0,7 < 5
1) Réglage d'usine
2) Ne pas utiliser de sel à ce niveau.
Degrés français
(°TH)
mmol/l Degrés Clar-kemanuel élec-
L’adoucisseur d’eau doit être réglé manuellement et électroniquement.
Réglage de la dureté
2
2
2
2
2
2
1
de l'eau
1)
1)
1)
1)
1)
1)
2)
troni-
que
10
9
8
7
6
1)
5
2)
1
Page 37

Utilisation du sel régénérant
Réglage manuel
Tournez le sélecteur de dureté de l'eau sur 1 ou 2
(reportez-vous au tableau).
Réglage électronique
Vérifiez que l'appareil est désactivé.
1. Appuyez et maintenez appuyé la touche Multitab.
2. Tournez le sélecteur de programme vers la gauche jusqu’à ce que l'indicateur de pro-
gramme soit aligné avec le premier programme de lavage sur le bandeau de commande.
3. Relâchez la touche Multitab lorsque l'indicateur affiche le niveau de l'adoucisseur
d'eau sélectionné (exemple : l'affichage numérique indique
4. Appuyez sur la touche Multitab plusieurs fois jusqu' à ce que l'écran affiche le nou-
veau niveau.
5. Mettez l'appareil à l'arrêt pour confirmer le réglage.
Si l'adoucisseur d'eau est réglé électroniquement au niveau 1, le voyant de sel restera éteint.
= niveau 5)
37
UTILISATION DU SEL RÉGÉNÉRANT
Pour remplir le réservoir de sel
1. Dévissez le bouchon du réservoir à sel ré-
générant en le tournant dans le sens inverse des aiguilles d'une montre.
2. Versez 1 litre d'eau à l'intérieur du réser-
voir (uniquement lorsque vous remplissez le réservoir pour la première fois).
3. Versez le sel à l'aide de l'entonnoir jus-
qu'à ce que le réservoir soit rempli.
4. Éliminez toute trace de sel autour de l'ou-
verture du réservoir de sel régénérant.
5. Remettez le bouchon en place et serrez-
le en le tournant dans le sens des aiguilles d'une montre pour fermer le réservoir de sel régénérant.
Il est normal que de l'eau s'écoule du réservoir lorsque vous le remplissez de sel.
Page 38

Utilisation du produit de lavage et du liquide de rinçage
38
UTILISATION DU PRODUIT DE LAVAGE ET DU LIQUIDE DE RINÇAGE
5
1
3
2
4
6
8
7
Utilisation du produit de lavage
Afin de préserver l'environnement, n'utilisez que la quantité nécessaire de produit de lavage.
Respectez les recommandations fournies par le fabricant du produit de lavage qui figurent sur l'emballage du produit.
Pour remplir le distributeur de produit de lavage, procédez comme suit :
1.
Appuyez sur la touche de déverrouillage
2
afin d'ouvrir le couvercle 8 du distribu-
teur du produit de lavage.
2.
Introduisez le produit de lavage dans le distributeur.
3
.
3. Si le programme de lavage comporte une phase de prélavage, versez une petite quan-
1
tité de produit de lavage dans le compartiment de prélavage.
4.
Si vous utilisez des pastilles de détergent, placez-les dans le distributeur.
.
5. Fermez le distributeur du produit de lavage. Appuyez sur le couvercle jusqu'à ce qu'il
soit verrouillé.
Les produits de lavage de différents fabricants présentent un taux de dissolution variable.
Certains produits de lavage en pastilles n'atteignent pas leur pouvoir de nettoyage optimal au cours de programmes courts. Sélectionnez un programme de lavage long si vous
utilisez des produits de lavage en pastilles, afin d'éliminer complètement les résidus de
produit de lavage.
Utilisation du liquide de rinçage
Le liquide de rinçage assure un rinçage optimal et un séchage sans tâches ni striures.
Le distributeur de liquide de rinçage libère automatiquement le liquide de rinçage durant
la dernière phase de rinçage.
3
.
Pour remplir le distributeur de liquide de rinçage, procédez comme suit :
Page 39
Fonction "Tout en 1"
39
1.
Appuyez sur la touche de déverrouillage
teur de liquide de rinçage.
2.
Remplissez le distributeur de liquide de rinçage
'max.' indique le niveau maximum.
3. Essuyez tout débordement de liquide de rinçage à l'aide de papier absorbant, afin
d'éviter une formation excessive de mousse lors du lavage.
4. Vérifiez que le couvercle est fermé après chaque remplissage. Appuyez sur le couver-
cle jusqu'à ce qu'il soit verrouillé.
5
afin d'ouvrir le couvercle 7 du distribu-
4
de liquide de rinçage. Le repère
Régler le dosage du liquide de rinçage
Réglage d'usine : position 4.
Vous pouvez régler le dosage du liquide de rinçage entre 1 (minimum) et 6 (maximum).
Tournez le sélecteur de liquide de rinçage
6
afin d'augmenter ou diminuer le dosage.
FONCTION "TOUT EN 1"
La fonction « Tout en 1 » utilise les pastilles de détergent multifonctions.
Ces produits combinent les fonctions de produit de lavage, de liquide de rinçage et de sel
régénérant. Certains types de pastilles contiennent d'autres agents.
Assurez-vous que ces pastilles conviennent à la dureté de l'eau de votre localité (reportezvous aux instructions accompagnant l'emballage des produits).
La fonction « Tout en 1 » désactive le débit du liquide de rinçage et du sel.
La fonction « Tout en 1 » désactive les voyants du sel régénérant et du liquide de rinçage.
La durée du programme peut augmenter si vous utilisez la fonction « Tout en 1».
Activez la fonction « Tout en 1 » avant de lancer un programme de lavage. Vous ne pouvez pas activer cette fonction quand un programme de lavage est en cours.
Pour activer la fonction « Tout en 1»
• Appuyez sur la touche Multitab, le voyant « Tout en 1» s’allume. La fonction est activée.
– La fonction « Tout en 1» une fois sélectionnée reste allumée sauf si vous la désactivez.
Pour désactiver la fonction « Tout en 1 » et utiliser le produit de lavage, le sel
régénérant et le liquide de rinçage séparément
1. Appuyez sur la touche Multitab, le voyant « Tout en 1» s’éteint. La fonction est désac-
tivée.
2. Approvisionnez de nouveau le réservoir de sel et le distributeur de liquide de rinçage.
3. Réglez la position maximale du degré de dureté de l'eau.
4. Lancez un programme de lavage sans charger l'appareil.
5. Réglez l'adoucisseur d'eau en fonction de la dureté de l'eau de votre région.
6. Réglez la quantité de liquide de rinçage.
Page 40
Rangement des couverts et de la vaisselle
40
RANGEMENT DES COUVERTS ET DE LA VAISSELLE
Conseils et astuces
• Les éponges, les chiffons de nettoyage et tout autre objet absorbant l'eau ne doivent
pas être lavés au lave-vaisselle.
• Enlevez tous les restes d'aliments.
• Laissez tremper les casseroles au fond desquelles adhèrent des restes d'aliments brûlés
ou attachés.
• Chargez les articles creux, tels que tasses, verres, casseroles, etc. en les retournant,
• de manière à ce que l'eau ne s'accumule pas dans le creux ou dans un fond bombé.
• La vaisselle et les couverts ne doivent pas être insérés les uns dans les autres ou se
chevaucher.
• Pour éviter que les verres ne se brisent, évitez qu'ils se touchent.
• Placez les petites pièces dans le panier à couverts.
• Intercalez les cuillères aux autres couverts, afin d'éviter qu'elles ne s'emboîtent.
• Lorsque vous placez des articles dans les paniers, veillez à ce que l'eau puisse accéder à
toutes les surfaces.
• Placez les objets légers dans le panier supérieur. Disposez-les de façon à ce qu'ils ne
puissent pas se retourner.
• La vaisselle en plastique et les poêles en matériau antiadhésif tendent à retenir les gouttes d'eau.
Panier inférieur
Rangez les casseroles, les couvercles, les assiettes, les saladiers et les couverts dans le panier inférieur. Placez les plats et les grands couvercles
autour du panier.
Page 41

Rangement des couverts et de la vaisselle
Les rangées d'ergots du panier inférieur peuvent
être abaissées pour vous permettre de charger
des casseroles, des poêles et des saladiers.
41
Panier à couverts
Placez les fourchettes et les cuillères, manche tourné vers le bas.
Placez les couteaux, manche tourné vers le haut.
Intercalez les cuillères aux autres couverts, afin
d'éviter qu'elles ne s'emboîtent.
Utilisez le séparateur à couverts. Si la taille et la
forme des couverts ne le permettent pas, retirez
le séparateur.
Page 42

Rangement des couverts et de la vaisselle
42
Panier supérieur
Le panier supérieur est conçu pour des assiettes
(de 24 cm de diamètre maximum), sous-tasses,
saladiers, tasses, verres, casseroles et couvercles.
Placez les ustensiles dans l'appareil de façon à ce
que l’eau puisse accéder à toutes les surfaces.
Les assiettes ne doivent pas être placées dans les
trois premières sections situées à l'avant du panier. Vérifiez que les assiettes sont inclinées vers
l'avant.
Placez les verres à long pied dans les supports
pour tasses en les retournant. Pour les ustensiles
longs, rabattez les supports de tasses vers le haut.
Réglage de la hauteur du panier supérieur
Vous pouvez placer le panier supérieur dans deux positions pour faciliter le chargement.
Hauteur maximale de la vaisselle dans :
le panier supérieur le panier inférieur
Position haute 20 cm 31 cm
Position basse 24 cm 27 cm
Pour régler le panier supérieur en position haute, procédez comme suit :
Page 43
Programmes de lavage
1. Tirez le panier jusqu'à la butée.
2. Soulevez délicatement les deux côtés jusqu'à ce que le mécanisme s'enclenche et
que le panier soit stable.
Pour régler le panier supérieur en position basse, procédez comme suit :
1. Tirez le panier jusqu'à la butée.
2. Relevez doucement les deux parties latérales.
3. Tenez le mécanisme et laissez-le retomber lentement.
ATTENTION
• Ne soulevez ou n'abaissez jamais le panier
d'un seul côté uniquement.
• Si le panier est en position haute, ne placez pas de tasses sur les supports de tasses.
PROGRAMMES DE LAVAGE
43
Programme Niveau de salis-
sure
Très sale Plats, casseroles, cou-
Tout Plats, casseroles, cou-
1)
Salissures noncollées
2)
Ce programme permet de rincer les
plats rapidement. Cela empêche les restes de nourriture de coller sur les plats
et évite les mauvaises odeurs.
N'utilisez pas de produit de lavage avec
ce programme
Type de charge Description du programme
verts et vaisselle
verts et vaisselle
Vaisselle et couverts Lavage 60°C
Prélavage
Lavage 70 °C
Rinçages
Séchage
Prélavage
Lavage 45 °C ou 70 °C
Rinçages
Séchage
Rinçage
Rinçage
Page 44

Sélection et départ d'un programme de lavage
44
Programme Niveau de salis-
3)
1) L'appareil réagit différemment suivant le degré de salissure et la quantité d'articles insérés dans les paniers. Il
ajuste automatiquement la température et la quantité d'eau, la consommation d'énergie et la durée du
programme.
2) Ce programme vous permet de laver votre vaisselle utilisée récemment. Les résultats de lavage sont
satisfaisants après un court instant.
3) Programme de test des organismes de contrôle. Ce programme vous permet d'utiliser le plus efficacement
votre consommation d'eau et d'énergie pour les plats et couverts avec un niveau normal de salissure. Reportezvous au livret fourni traitant des données de test.
sure
Normalement
sale
Type de charge Description du programme
Vaisselle et couverts Prélavage
Lavage 50 °C
Rinçages
Séchage
Valeurs de consommation
Programme
1) L'affichage indique la durée du programme.
1)
Énergie (kWh) Eau (litres)
1,5-1,7 15-17
1,1-1,7 11-22
0,9 9
0,1 4
1,0-1,1 13-15
Ces valeurs de consommation peuvent changer en fonction de la pression et de la température de l'eau, des variations d'alimentation électrique et de la quantité de vaisselle.
SÉLECTION ET DÉPART D'UN PROGRAMME DE LAVAGE
Lancez le programme de lavage sans départ différé
1. Fermez la porte de l'appareil.
2. Réglez le programme de lavage (assurez-vous que l'appareil est en mode Programmation).
• La durée du programme clignote sur l'affichage numérique
• Le voyant de phase correspondant au programme de lavage choisi s'allume.
3. Appuyez sur la touche Start, le programme de lavage sélectionné démarre automatiquement.
• Les voyants de phase s'éteignent, mais le voyant de la phase en cours reste allumé.
Lancez le programme de lavage avec départ différé
1. Fermez la porte de l'appareil.
Page 45

Sélection et départ d'un programme de lavage
2. Réglez le programme de lavage (assurez-vous que l'appareil est en mode Programmation).
3. Appuyez plusieurs fois sur la touche Delay jusqu'à ce que l'affichage indique l'heure
du départ différé.
• L'heure du départ différé clignote sur l'affichage.
4. Appuyez sur la touche Start, le décompte commence automatiquement.
• L'heure du départ différé ne clignote plus sur l'affichage.
• Le voyant de phase correspondant au programme de lavage choisi s'éteint.
5. Lorsque le décompte est terminé, le programme de lavage démarre automatiquement.
• Le voyant de la phase en cours s'allume.
L'ouverture de la porte de l'appareil stoppe le décompte. Lorsque vous refermez la porte,
le décompte reprend là où il a été interrompu.
Annulez le départ différé.
Si vous n'avez pas appuyé sur la touche Start et que le décompte n'est pas lancé
1. Appuyez sur la touche Delay à plusieurs reprises jusqu'à ce que :
• L'affichage indique la durée du programme de lavage réglé
• Les voyants de phase s'allument.
2. Appuyez sur la touche Start pour lancer le programme de lavage.
Si vous n'avez pas appuyé sur la touche Start et que le décompte est lancé
1. Appuyez sur la touche Delay à plusieurs reprises jusqu'à ce que :
• L'affichage indique la durée du programme de lavage réglé
• Les voyants de phase s'allument.
Le programme de lavage démarre automatiquement.
45
Interruption d'un programme de lavage
• Ouvrez la porte de l'appareil.
– Le programme de lavage s'arrête.
• Fermez la porte de l'appareil.
– Le programme de lavage reprend là où il a été interrompu.
Vous devez pour cela, annuler le programme.
Si le programme de lavage ou un départ différé n'a pas encore démarré, vous pouvez
changer la sélection.
Pour modifier la sélection lorsque le programme a démarré, vous devez annuler le programme.
• Appuyez en même temps sur les touches Multitab et Delay et maintenez-les appuyées
jusqu'à ce que :
– La durée du dernier programme sélectionné clignote sur l'affichage
– Les voyants des phases du programme sélectionné s'allument.
Avant de démarrer un nouveau programme de lavage, vérifiez qu'il y a du produit de lavage dans le distributeur correspondant.
Page 46

Entretien et nettoyage
46
Fin du programme de lavage
Lorsque le programme de lavage est terminé, l'écran affiche zéro et les voyants des phases du programme sont éteints.
1. Mettez l'appareil à l'arrêt.
2. Ouvrez la porte de l'appareil.
3. Pour de meilleurs résultats de séchage, entrouvrez la porte pendant quelques minutes.
Si vous ne désactivez pas l'appareil à la fin du programme de lavage, l'appareil demeure
en état de veille.
• Pour diminuer la consommation d'énergie en état de veille, trois minutes après la fin
du programme de lavage :
– Tous les voyants s'éteignent
– Une barre horizontale apparaît sur l'affichage numérique.
Si l'on appuie sur une touche quelconque, l'affichage et les voyants se rallument.
Retirez les articles des paniers
• Attendez que la vaisselle refroidisse avant de la retirer du lave-vaisselle. La vaisselle
encore chaude est sensible aux chocs.
• Déchargez d'abord le panier inférieur, puis le panier supérieur.
• Les côtés et la porte de l'appareil peuvent être mouillés. L’acier inox refroidit plus rapi-
dement que la vaisselle.
ENTRETIEN ET NETTOYAGE
Pour retirer et nettoyer les filtres
Avec des filtres sales, les résultats du lavage sont moins satisfaisants. Contrôlez régulièrement les filtres et nettoyez-les si nécessaire.
Le lave-vaisselle possède 3 filtres :
• Filtre grossier (A)
• Micro-filtre (B)
• Filtre plat (C).
A
A
B
B
C
C
Page 47

En cas d'anomalie de fonctionnement
1. Pour déverrouiller les filtres (A) et (B),
tournez la poignée du microfiltre (B) d'environ 1/4 de tour vers la gauche.
2. Saisissez le filtre grossier ( A) par la poi-
gnée et retirez-le du microfiltre (B).
3. Retirez le filtre plat (C) du fond de la cuve.
4. Nettoyez soigneusement les filtres à l’eau.
5. Replacez le filtre plat (C) dans sa position
initiale. Vérifiez qu'il est correctement placé dans les deux guides (D).
6. Placez le filtre grossier (A) dans le micro-
filtre (B) et appuyez sur les deux filtres à
la fois.
7. Mettez les filtres (A) et (B) en place. Tour-
nez la poignée du microfiltre (B) dans le
sens des aiguilles d'une montre jusqu'à
ce qu'elle s'enclenche.
47
D
Pour nettoyer les bras d'aspersion
Ne retirez pas les bras d’aspersion.
Si des résidus ont bouché les orifices des bras d'aspersion, éliminez ceux-ci à l'aide d'un
objet pointu.
Nettoyage des surfaces externes
Nettoyez les surfaces externes de l'appareil, de même que le bandeau de commandes, à
l'aide d'un chiffon doux humide.
Utilisez uniquement un peu d'eau savonneuse.
N'utilisez en aucun cas des substances abrasives, des tampons à récurer ou des solvants
(acétone).
EN CAS D'ANOMALIE DE FONCTIONNEMENT
L'appareil ne démarre pas ou se met à l'arrêt en cours de programme.
Dans un premier temps, essayez de trouver une solution au problème (reportez-vous au
tableau). Si vous n'y parvenez pas, contactez votre service après-vente.
Pour certaines anomalies, l'écran affiche un code d’alarme :
- L'appareil n'est pas approvisionné en eau.
•
- L'appareil ne vidange pas
•
- Le système de sécurité anti-débordement s'est déclenché.
•
Page 48
En cas d'anomalie de fonctionnement
48
AVERTISSEMENT
Mettez à l'arrêt l'appareil avant d'effectuer les contrôles.
Anomalie de fonctionnement Cause possible Solution possible
L'appareil n'est pas approvisionné en eau.
La pression d'eau est trop basse. Contactez votre compagnie lo-
Le robinet d'arrivée d’eau est
Le filtre situé dans le tuyau
Le tuyau d'arrivée d'eau n'a
Le tuyau d'arrivée d'eau est en-
L'appareil ne vidange pas. Le robinet de l'évier est bouché. Nettoyez le robinet de l'évier.
Le tuyau de vidange n'a pas
Le tuyau de vidange est en-
Le système de sécurité anti-débordement s'est déclenché.
Le programme de lavage ne démarre pas.
Vous n'avez pas appuyé sur la
La fiche du câble d’alimenta-
Le fusible de la boîte à fusibles
La fonction Départ différé est
Le robinet d'arrivée d'eau est
obstrué ou incrusté de tartre.
fermé.
d'arrivée d'eau est bouché.
pas été installé correctement.
dommagé.
été raccordé correctement.
dommagé.
Fermez le robinet d'eau et con-
La porte de l'appareil est ouverte.
touche ou l'écran Start.
tion n'est pas branchée à la prise de courant.
a disjoncté.
sélectionnée.
Nettoyez le robinet d'arrivée
d'eau.
cale de distribution des eaux.
Ouvrez le robinet d'arrivée
d'eau.
Nettoyez le filtre.
Vérifiez que le tuyau est bien
raccordé.
Assurez-vous que le tuyau d'arrivée d'eau n'est pas endommagé.
Vérifiez que le tuyau est bien
raccordé.
Assurez-vous que le tuyau de
vidange n'est pas endommagé.
tactez votre service après-vente.
Fermez la porte de l'appareil.
Appuyez sur la touche ou
l'écran Start.
Branchez le câble d'alimentation.
Remplacez le fusible.
• Annulez le départ différé.
• Lorsque le décompte est terminé, le programme de lavage démarre automatiquement.
Après avoir effectué ces vérifications, positionnez le sélecteur sur le même programme
de lavage qu'avant que l'anomalie se produise. Le programme reprend là où il a été interrompu.
Si l'anomalie persiste, contactez le service après-vente.
Si d'autres codes d'alarme s'affichent, contactez le service après-vente.
Page 49

En cas d'anomalie de fonctionnement
Les informations nécessaires au service après-vente figurent sur la plaque signalétique.
Inscrivez les éléments suivants :
– Modèle (MOD.) ........................................................
– Référence produit (PNC) ..........................................
– Numéro de série (S.N.) ..............................................
Les résultats de lavage et de séchage ne sont pas satisfaisants
Problème Cause possible Solution possible
La vaisselle n’est pas propre. Vous n'avez pas sélectionné le
Vous n'avez pas placé les arti-
Les bras d’aspersion ne pou-
Les filtres sont encrassés ou
Vous avez utilisé trop peu de
Traces de tartre sur la vaisselle. Le réservoir de sel régénérant
Réglage incorrect du niveau
Le bouchon du réservoir de sel
Les verres et la vaisselle présentent des rayures, des taches
blanches ou un film bleuâtre.
Traces de gouttes d'eau séchée
sur les verres et la vaisselle
Il se peut que le produit de la-
La vaisselle est mouillée. Le programme de lavage choi-
programme approprié pour ce
type de vaisselle et de salissure.
cles dans les paniers de façon
à ce que l'eau puisse accéder à
toutes les surfaces.
vaient pas tourner librement.
La vaisselle est mal positionnée dans les paniers.
mal montés et installés.
produit de lavage ou avez oublié d'approvisionner le distributeur de produit de lavage.
est vide.
de l'adoucisseur d'eau.
régénérant n'a pas été vissé
correctement.
La quantité de liquide de rinçage est trop élevée.
La quantité de liquide de rinçage est trop basse.
vage soit en cause.
si n'avait pas de phase de séchage ou avait une phase de
séchage courte.
Vérifiez que ce programme de
lavage est approprié pour ce type de vaisselle et de salissure.
Placez les articles correctement dans les paniers.
Vérifiez qu'une disposition incorrecte de la vaisselle ne bloque pas les bras d'aspersion.
Assurez-vous que les filtres
sont propres et correctement
montés et installés.
Vérifiez que la quantité de produit de lavage est suffisante.
Remplissez le réservoir de sel
régénérant avec du sel spécial
pour lave-vaisselle.
Ajustez l'adoucisseur d'eau au
niveau correct.
Assurez-vous que le bouchon
du réservoir de sel est correctement fermé.
Réduisez la quantité du liquide
de rinçage.
Augmentez la quantité du liquide de rinçage.
Utilisez une autre marque de
produit de lavage.
Pour de meilleurs résultats de
séchage, entrouvrez la porte
pendant quelques minutes.
49
Page 50
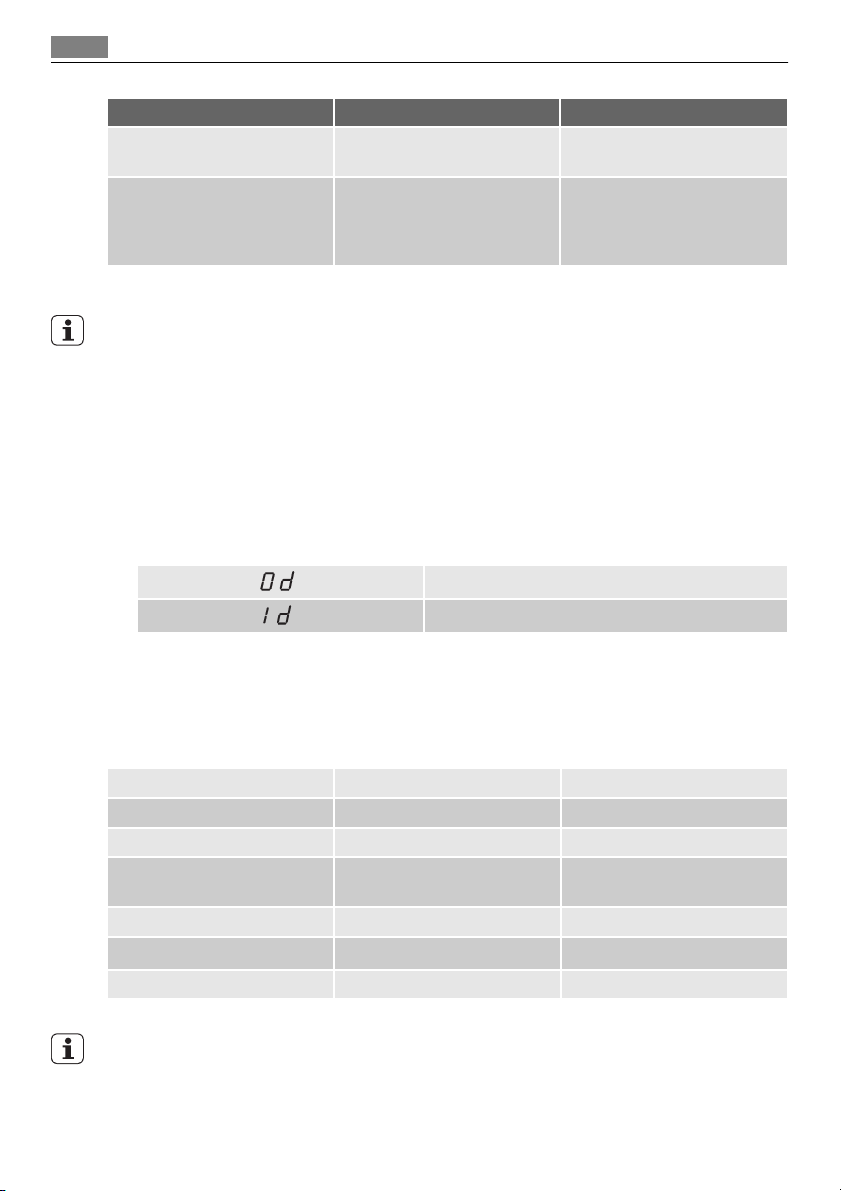
Caractéristiques techniques
50
Problème Cause possible Solution possible
La vaisselle est mouillée et terne.
La fonction « Tout en 1 » est ac-
Le distributeur de liquide de
rinçage est vide.
tivée (cette fonction désactive
automatiquement le distributeur de liquide de rinçage).
Remplissez le distributeur de liquide de rinçage.
Activez le distributeur de liquide de rinçage.
Pour activer le distributeur de liquide de rinçage
Vérifiez que l'appareil est désactivé.
1. Appuyez et maintenez appuyé la touche Multitab.
2. Tournez le sélecteur de programme vers la gauche jusqu’à ce que l'indicateur de programme soit aligné avec le premier programme de lavage sur le bandeau de commande.
3. Relâchez la touche Multitab lorsque l'indicateur affiche le niveau de l'adoucisseur
d'eau sélectionné.
4. Tournez le sélecteur de programme vers la gauche jusqu’à ce que l'indicateur de programme soit aligné avec le second programme de lavage sur le bandeau de commande.
5. L'écran numérique affiche le réglage choisi du distributeur de liquide de rinçage.
Le distributeur de liquide de rinçage est désactivé
Le distributeur de liquide de rinçage est activé
6. Appuyez sur la touche Multitab, l'écran affiche le nouveau réglage.
7. Mettez l'appareil à l'arrêt pour confirmer le réglage.
CARACTÉRISTIQUES TECHNIQUES
Dimensions Largeur 600 mm
Hauteur 850 mm
Profondeur 610 mm
Pression de l'eau d'alimenta-
tion
Maximale 8 bars (0,8 MPa)
Arrivée d'eau
Capacité Couverts 12
1) Raccordez le tuyau d'arrivée d'eau à un robinet fileté (3/4 po).
1)
La plaque signalétique située sur le bord intérieur de la porte de l'appareil donne des informations sur le branchement électrique.
Minimale 0,5 bars (0,05 MPa)
Eau froide ou eau chaude maximum 60 °C
Page 51

En matière de protection de l'environnement
Si l'eau chaude est produite à partir de sources énergétiques alternatives plus respectueuses de l'environnement (par ex. panneaux solaires ou photovoltaïques et énergie éolienne), utilisez un raccordement à l'eau chaude pour réduire la consommation énergétique.
EN MATIÈRE DE PROTECTION DE L'ENVIRONNEMENT
Le symbole sur le produit ou son emballage indique que ce produit ne peut être traité
comme déchet ménager. Il doit être remis au point de collecte dédié à cet effet (collecte
et recyclage du matériel électrique et électronique).
En procédant à la mise au rebut de l'appareil dans les règles de l’art, nous préservons
l'environnement et notre sécurité, s’assurant ainsi que les déchets seront traités dans des
conditions optimum.
Pour obtenir plus de détails sur le recyclage de ce produit, veuillez prendre contact avec
les services de votre commune ou le magasin où vous avez effectué l'achat.
Tous les matériaux d'emballage sont écologiques et recyclables. Les composants en plastique sont identifiables grâce aux sigles >PE<, >PS<, etc. Veuillez jeter les matériaux d'emballage dans le conteneur approprié du centre de collecte des déchets de votre commune.
AVERTISSEMENT
Le fabricant décline toute responsabilité en cas de non-respect des précautions de sécurité mentionnées dans ce chapitre.
• Retirez la fiche de la prise secteur.
• Coupez le câble d'alimentation et la prise et mettez-les au rebut.
• Éliminez le dispositif de bloquage de porte. Ceci pour empêcher que des enfants ne
restent enfermés à l'intérieur de l'appareil et ne mettent leur vie en danger.
51
INSTALLATION
Encastrement
Placez l’appareil à proximité d'un robinet d'arrivée d'eau et d'un dispositif d'évacuation
d'eau
Enlevez le dessus de l'appareil pour encastrer celui-ci sous un évier ou un plan de travail
de cuisine.
Page 52

Installation
52
Vérifiez que les dimensions de la niche correspondent aux dimensions de l'illustration.
Pour enlever le plan de travail de l'appareil
1. Dévissez les vis situées à l'arrière (1).
2. Tirez le plan de travail par l'arrière (2).
3. Soulevez le plan de travail et dégagez-le
des emboîtements avant (3).
4. Desserrez ou serrez les pieds jusqu'à ce
que l'appareil soit à niveau.
5. Installez l'appareil sous le plan de travail
de la cuisine. Veillez à ne pas écraser ni
tordre les tuyaux d'eau au cours de l'installation.
Pour mettre l'appareil à niveau
Le niveau de l'appareil est correct lorsque la porte ferme parfaitement.
Si l'appareil n'est pas correctement à niveau, la porte entre en contact avec les deux côtés du meuble.
Desserrez ou serrez les pieds jusqu'à ce que l'appareil soit parfaitement à niveau.
Page 53

Raccordement du tuyau de vidange
Raccordez le tuyau de vidange :
• Au robinet de sortie de l'évier et fixez-le sous le plan de travail. Cela empêche les eaux
usées de l'évier de repartir dans l'appareil.
• A une conduite fixe dotée d'une ventilation
spéciale. Le diamètre intérieur ne doit pas
être inférieur à 4 cm.
Enlevez le bouchon d'évier lorsque l'appareil
évacue l'eau pour empêcher tout reflux de
l'eau vers l'appareil.
La rallonge de tuyau ne doit pas dépasser 2 mètres. Son diamètre intérieur ne doit pas être inférieur au diamètre du tuyau.
Lorsque vous raccordez le tuyau de vidange à un
embout du siphon sous l'évier, n'oubliez pas d'enlever toute la membrane en plastique (A). Si vous
oubliez d'enlever la membrane, des particules
d'aliments risquent de s'accumuler avec le temps
et de boucher l'embout du tuyau de vidange du
lave-vaisselle.
Un dispositif de sécurité empêche l'eau sale de retourner dans l'appareil. Si le robinet de votre
évier est doté d'un clapet de retenue, cela risque
d'entraver la vidange correcte de l'appareil. Enlevez le clapet de retenue.
max 85 cm
min 40 cm
max 400 cm
535455
Page 54

Page 55

Page 56

www.aeg-electrolux.com/shop 156982930-A-282010
 Loading...