

AEG-Electrolux EWP106100W, EWP86100W, EWP126100W User Manual

user manual
Washing Machine
EWP 86100 W
EWP 106100 W
EWP 126100 W
2 electrolux
Electrolux. Thinking of you.
Share more of our thinking at www.electrolux.com
CONTENTS
Safety information 2
Frost precaution 4
Environment concerns 4
Product description 5
Technical data 5
Installation 6
SAFETY INFORMATION
Important! Read carefully and keep for
future reference.
• The safety of your appliance complies
with the industry standards and with legal
requirements on the safety of appliances.
However, as manufacturers, we feel it is
our duty to provide the following safety
notes.
• It is most important that this instruction
book should be retained with the appliance for future reference. Should the appliance be sold or transferred to another
owner, or should you move house and
leave the appliance, always ensure that
the book is supplied with the appliance in
order that the new owner can get to
know the functioning of the appliance
and the relevant warnings.
• You MUST read them carefully before installing or using the appliance.
• Before first starting up, check the appliance for any damage incurred during
transport. Never connect up a damaged
appliance . If parts are damaged, contact
your supplier.
• If the appliance is delivered in the winter
months when there are minus temperatures. Store it at room temperature for 24
hours before using for the first time.
• This appliance is made for use in a normal domestic situation. The manufacturer
is not responsible for freezing damages.
Read "Frost precaution".
General safety
• It is dangerous to alter the specifications
or attempt to modify this product in any
way.
First use 10
Daily use 10
Washing programmes 18
Consumption values 21
Care and cleaning 21
What to do if… 25
Subject to change without notice
• During high temperature wash programmes the door glass may get hot. Do
not touch it!
• Make sure that small children and pets
do not climb into the drum. To avoid this,
please check inside the drum before using.
• Any objects such as coins, safety pins,
nails, screws, stones or any other hard,
sharp material can cause extensive damage and must not be placed into the appliance.
• Only use the advised quantities of fabric
softener and detergent. Damage to the
fabric can ensue if you over-fill. Refer to
the manufacturer’s recommendations of
quantities.
• Wash small items such as socks, laces,
washable belts etc in a washing bag or pillow case as it is possible for such items
to slip down between the tub and the inner drum.
• Do not use your appliance to wash articles with whalebones, material without
hems or torn material.
• Always unplug the appliance and turn off
the water supply after use, cleaning and
maintenance.
• Under no circumstances should you attempt to repair the appliance yourself. Repairs carried out by inexperienced people
may cause injury or serious malfunctioning. Contact your local Service Centre. Always insist on genuine spare parts.
Installation
• This appliance is heavy. Care should be
taken when moving it.
• All packing and transit bolts must be removed before use. Serious damage can

electrolux 3
occur to the product and to property if
this is not adhered to. See relevant section in the user manual.
•
This appliance is free standing only. DO
NOT build it in under a counter and DO
NOT remove the worktop for any reason.
• After having installed the appliance,
check that it is not standing on the inlet
and drain hose and the worktop is not
pressing the electrical supply cable
against the wall.
• Install the appliance on a flat hard floor.
• Never place cardboard, wood or similar
materials under the appliance to compensate for any unevenness in the floor.
• If the appliance is situated on a carpeted
floor, please adjust the feet in order to allow air to circulate freely under the appliance.
• Check that the appliance does not touch
the wall or other kitchen units.
•
This appliance must be connected to
a cold water supply.
• Do not use the hose from your previous
appliance to connect to water supply. Always use the hose supplied with the appliance.
• The inlet hose must not be lengthened. If
it is too short and you do not wish to
move the tap, you will have to purchase a
new, longer hose specially designed for
this type of use.
• Always be sure, that there is no water leakage from hoses and their connections after the installation.
• If the appliance is installed in a location
subject to frost, please read the “Frost precaution” chapter. Manufacturer decline
any responsibility for freezing damages.
• Any plumbing work required to install this
appliance should be carried out by a qualified plumber or competent person.
• Any electrical work required to install this
appliance should be carried out by a qualified electrician or competent person.
Use
• This appliance is designed for domestic
use. It must not be used for purposes other than those for which it was designed.
• Only wash fabrics which are designed to
be machine washed. Follow the instructions on each garment label.
• Do not overload the appliance. See the
"Washing Programme Chart".
• Before washing, ensure that all pockets
are empty and buttons and zips are fastened. Avoid washing frayed or torn articles and treat stains such as paint, ink,
rust, and grass before washing. Underwired bras must NOT be machine washed.
• The detergent dispenser drawer is provided with an insert for liquid detergent. Do
not use the insert downwards for gelatinous detergents, with programmes including prewash, with the delay start option.
In all these cases you can use metering
balls or sachets provided with the detergent, Take out the metering aid at the
end of the washing cycle.
• Garments which have been in contact
with volatile petroleum products should
not be machine washed. If volatile cleaning fluids are used, care should be taken
to ensure that the fluid is removed from
the garment before placing in the appliance.
• Never pull the power supply cable to remove the plug from the socket; always
take hold of the plug itself.
• Never use the appliance if the power supply cable, the control panel, the working
surface or the base are damaged so that
the inside of the appliance is accessible.
Child safety
• This appliance is not intended for use by
persons (including children) with reduced
physical sensory or mental capabilities or
lack of experience and knowledge unless
they have been given supervision or instruction concerning use of the appliance
by a person responsible for their safety.
• Children should be supervised to ensure
that they do not play with the appliance.
• The packaging components (e.g. plastic
film, polystyrene) can be dangerous to children - danger of suffocation! Keep them
out of children’s reach.
• Keep all detergents in a safe place out of
children’s reach.
• Make sure that children or pets do not
climb inside the drum. To prevent children and pets becoming trapped inside
the drum this appliance incorporates a
special feature. To activate this device,
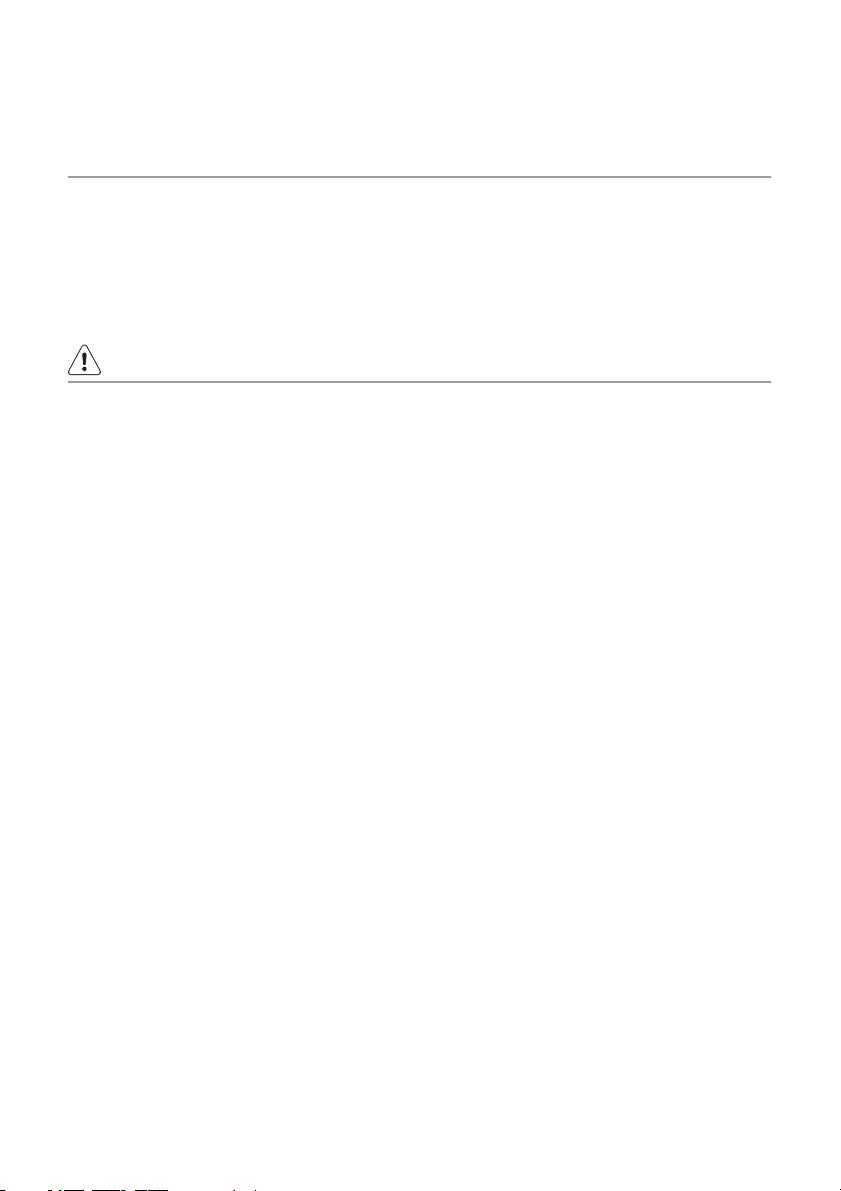
4 electrolux
rotate the button (without pressing it) inside the door clockwise until the groove
is horizontal. If necessary use a coin.
FROST PRECAUTION
If the appliance is installed in a place where
the temperature could drop below 0°C, proceed as follows to remove any water remaining inside the appliance:
1. unplug the appliance;
2. turn off the water tap;
3. unscrew the water inlet hose from the
tap;
4. unfasten the drain hose from the rear
support and unhook it from sink or spigot;
To disable this device and restore the
possibility of closing the door, rotate the
button anti-clockwise until the groove is
vertical.
5. place a bowl on the floor;
6. let the drain hose run along the floor,
place the external extremities of the
drain and inlet hoses in the bowl placed
on the floor and let water drain out completely;
7. screw the water inlet hose back on and
reposition drain hose again;
When you intend to start the appliance up
again, make sure that the room temperature is above 0°C.
ENVIRONMENT CONCERNS
The symbol on the product or on its
packaging indicates that this product may
not be treated as household waste. Instead
it should be taken to the appropriate
collection point for the recycling of electrical
and electronic equipment. By ensuring this
product is disposed of correctly, you will
help prevent potential negative
consequences for the environment and
human health, which could otherwise be
caused by inappropriate waste handling of
this product. For more detailed information
about recycling of this product, please
contact your local council, your household
waste disposal service or the shop where
you purchased the product.
Packaging materials
The materials marked with the symbol
are recyclable.
>PE<=polyethylene
>PS<=polystyrene
>PP<=polypropylene
electrolux 5
This means that they can be recycled by disposing of them properly in appropriate collection containers.
Ecological hints
To save water, energy and to help protect
the environment, we recommend that you
follow these tips:
• Normally soiled laundry may be washed
without prewashing in order to save detergent, water and time (the environment is
protected too!).
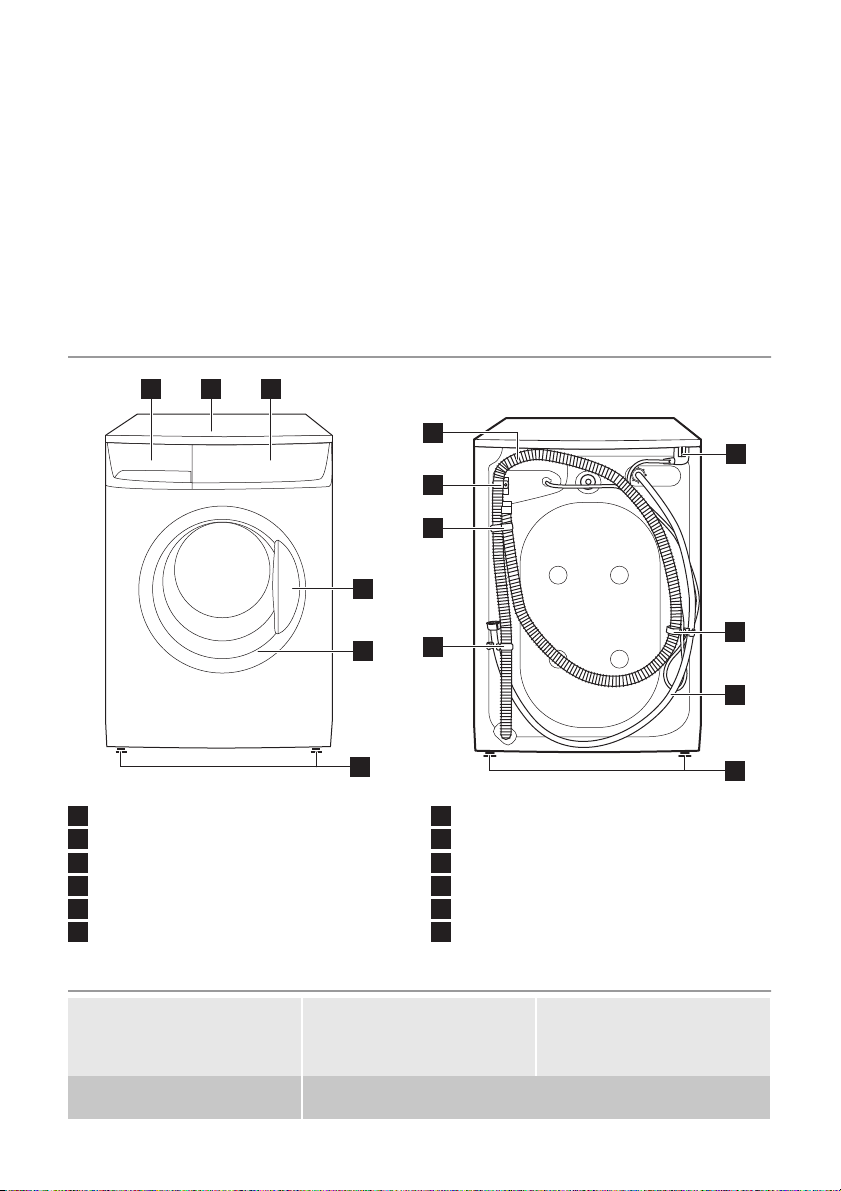
PRODUCT DESCRIPTION
1 2 3
4
5
• The machine works more economically if
it is fully loaded.
• With adequate pre-treatment, stains and
limited soiling can be removed; the laundry can then be washed at a lower temperature.
• Measure out detergent according to the
water hardness, the degree of soiling and
the quantity of laundry being washed.
7
11
8
9
9
9
1
Detergent dispenser drawer
2
Worktop
3
Control panel
4
Door opening handle
5
Rating plate (on the inner edge)
6
Front adjustable feet
TECHNICAL DATA
Dimensions Width
Electrical connection
Voltage - Overall power - Fuse
Height
Depth
Depth (Overall dimensions)
Information on the electrical connection is given on the rating
plate, on the inner edge of the appliance door.
10
6
7
Water drain hose
8
Drain hose support
9
Hose holders
10
Water inlet hose
11
Mains cable
12
Back feet
60 cm
85 cm
50 cm
55 cm
12
6 electrolux
Water supply pressure Minimum
Maximum
Maximum Load Cotton 6 kg
Spin Speed Maximum 800 rpm (EWP86100W)
0,05 MPa
0,8 MPa
1000 rpm (EWP106100W)
1200 rpm (EWP126100W)
INSTALLATION
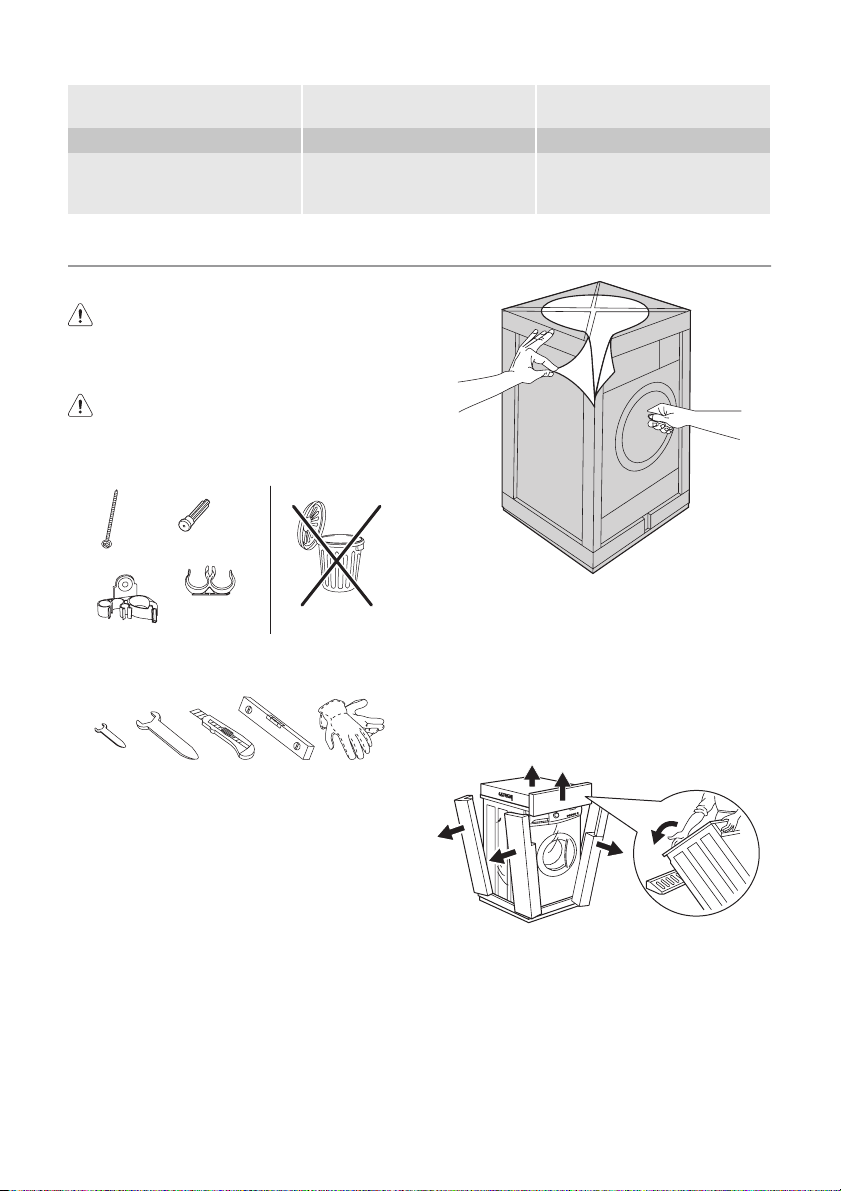
Unpacking
Warning!
• Read carefully the "Safety information" chapter before installing the appliance.
Warning! Remove and keep all
transit devices so that they can be
refitted if the appliance ever has to be
transported again.
x 3
A
C
Necessary tools
B
x 2
x 3
x 1
• Remove the cardboard top.
• Remove the polystyrene packaging materials.
1)
• Spread the front piece on the floor behind the appliance and then lay the appliance carefully rear side down on it. Make
sure that no hoses are crushed in the process.
10 mm 30 mm
• Remove the external film. Use a cutter, if
necessary.
1) These tools are not provided with the appliance.
• Remove the polystyrene base from the
bottom.
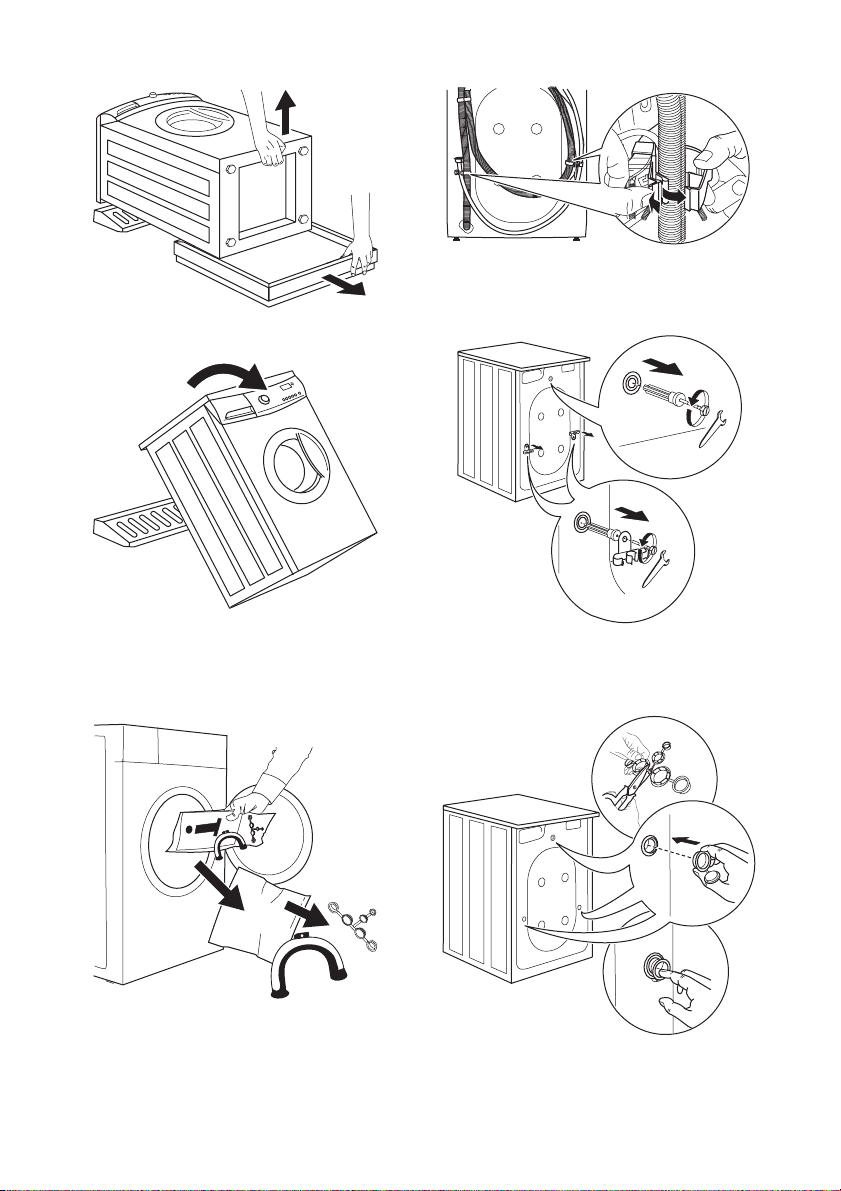
1
2
• Return appliance to the upright position.
electrolux 7
• Unscrew the three bolts ( A ) and remove
the hose holders ( C ).
•
Slide out the relevant plastic spacers ( B ).
• Open the door and remove the plastic
hose guide, the bag containing the instruction booklet and the plastic plug caps
from the drum.
• Remove the power supply cable and the
draining and inlet hose from the hose holders ( C ) on the rear of the appliance.
• Plug the smaller upper hole and the two
large ones with the corresponding plastic
plug caps.
Positioning and levelling
Level the appliance by raising or lowering
the feet. Depending on the model, the appli-
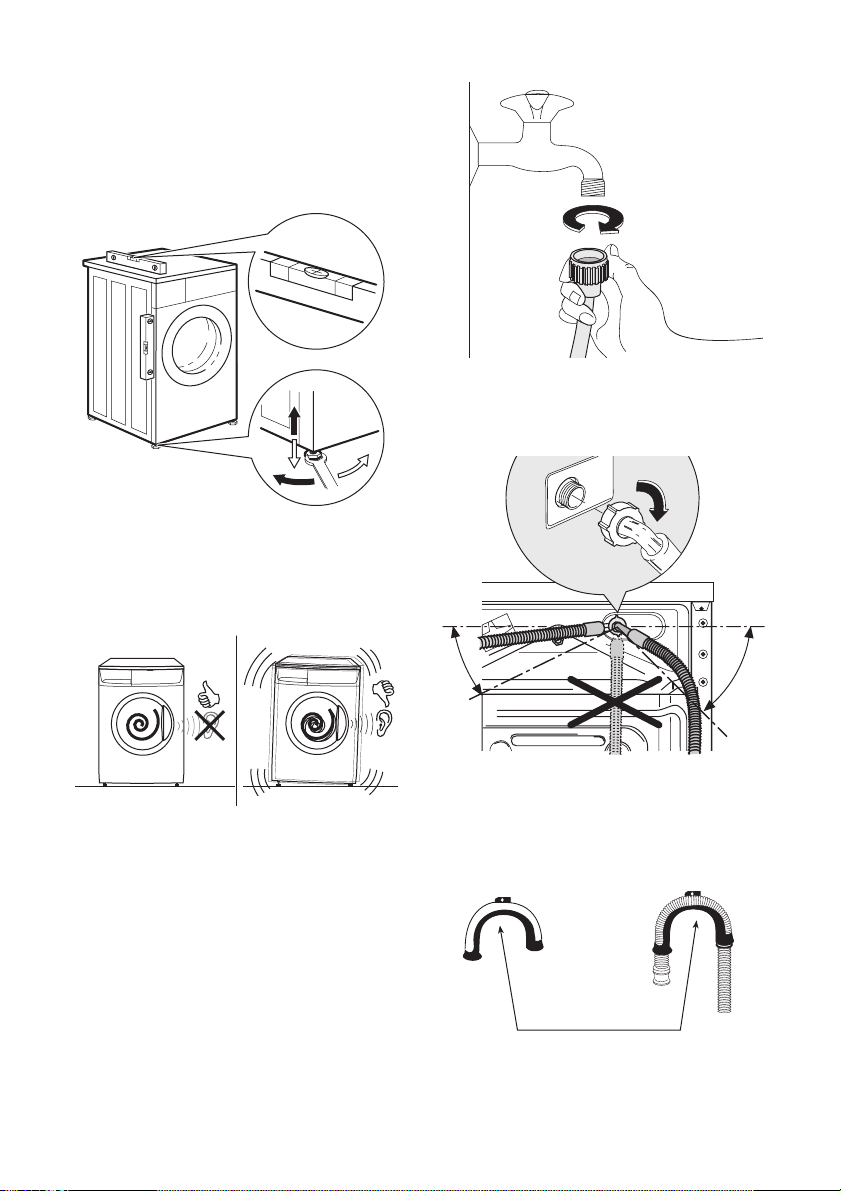
8 electrolux
ance can have four adjustable feet, or two
front-adjustable feet and two back fixed feet.
The appliance MUST be level and stable on
a flat hard floor. If necessary, check the setting with a spirit level. Any necessary adjustment can be made with a spanner.
Accurate levelling prevents vibration, noise
and displacement of the appliance during
operation.
Repeat the levelling action, if the appliance
is not level and stable.
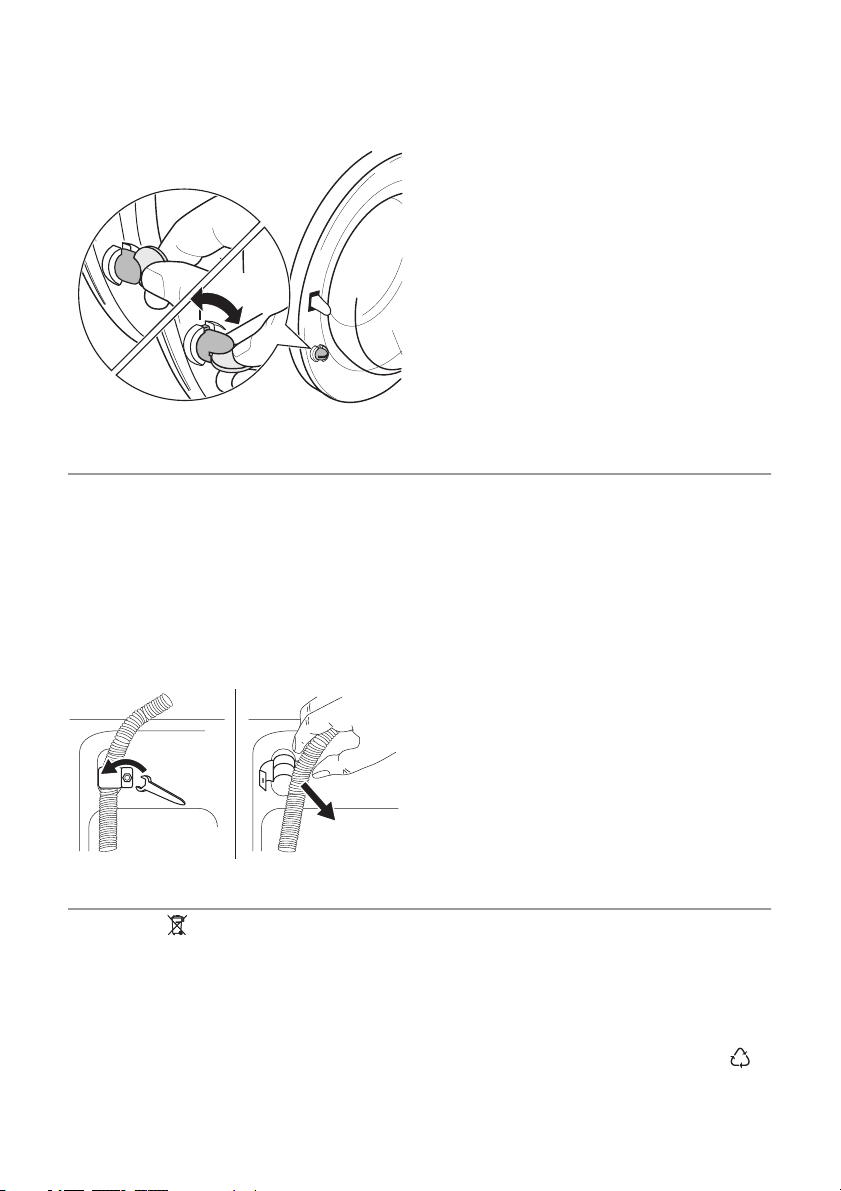
• Loosen the ring nut to angle the hose to
the left or right depending on the position
of your water tap. Do not place the in-
let hose downwards.
Water inlet
• Connect the hose to a tap with a 3/4”
thread.
35°
45°
• After positioning the inlet hose, be sure to
tighten the ring nut again to prevent leaks.
Water drainage
Form a hook at the end of the drain hose using the plastic hose guide, if necessary.
The end of the drain hose can be positioned in four ways:
• Hooked over the edge of a sink using
the plastic hose guide.
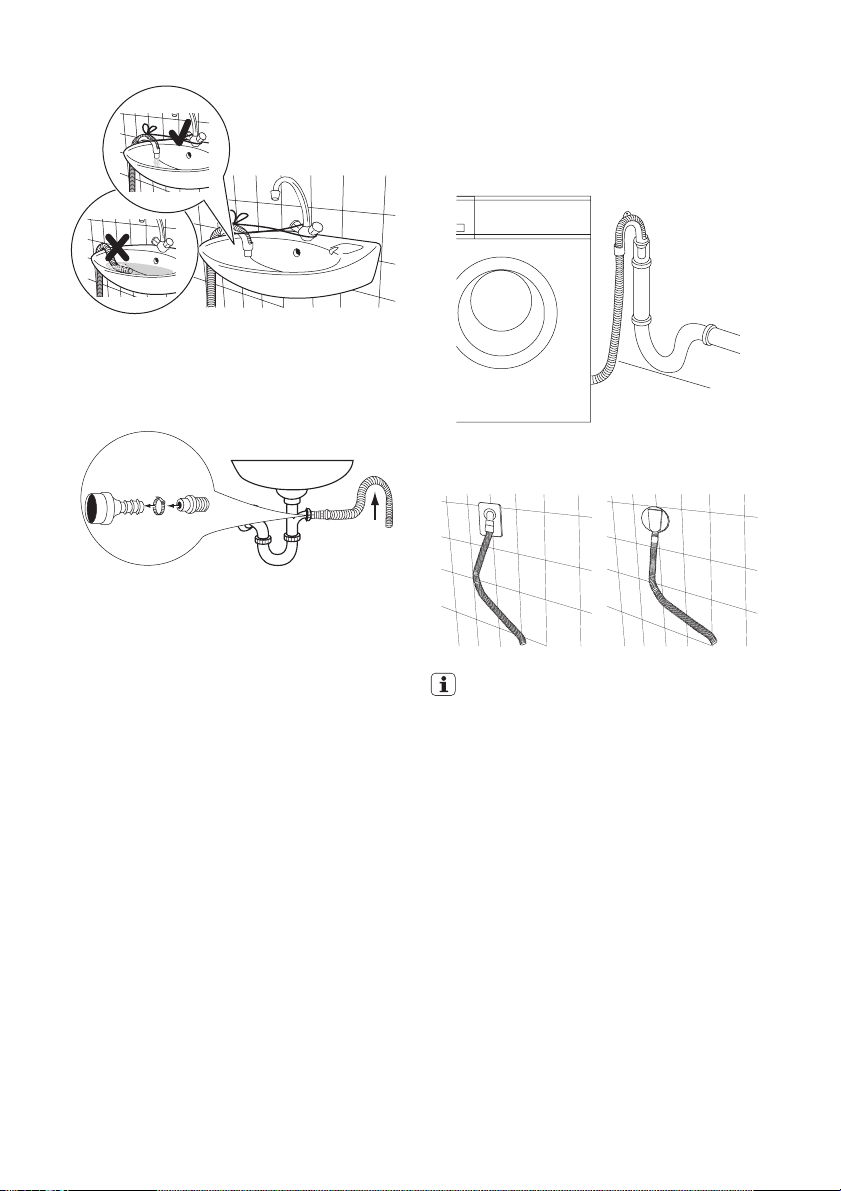
Tie the plastic hose guide to the tap with
a string to prevent that the drain hose unhooks when the appliance is emptying.
• Onto a sink outlet spigot.
Push the drain hose onto the spigot and
secure with a clip, ensure a loop is
formed in the drain hose to prevent
waste from the sink entering the appliance.
If the outlet spigot has not been used before, remove any blanking plug that may
be in place.
• Directly into a drain pipe at a height
of not less than 60 cm and not more than
electrolux 9
100 cm. The end of the drain hose must
always be ventilated , i.e. the inside diameter of the drain pipe must be larger
than the outside diameter of the drain
hose. The drain hose must not be kinked.
• Directly to a built-in drain pipe in the
room wall.
The drain hose may be extended to a
maximum of 4 metres. An additional
drain hose and joining piece is available
from your Local Centre.
10 electrolux
Connections overview
max 100 cm
min. 60 cm
115 cm 140 cm
mc9 0 mc115
mc150mc100
max 100 cm
min. 60 cm
Electrical connection
• The appliance must be earthed.
• Make sure that the electrical information
on the rating plate agree with your domestic power supply.
• Always use a correctly installed shockproof socket.
• Do not use multi-way plugs, connectors
and extension cables. There is a risk of fire.
• Do not replace or modify the mains cable
yourself. Contact the After Sales Service.
FIRST USE
• Ensure that the electrical and water
connections comply with the installation instructions.
• Ensure that the drum is empty.
• Before the first wash, run a cotton cycle at the highest temperature with-
DAILY USE
Sort out the laundry
Follow the wash code symbols on each garment label and the manufacturer’s washing
instructions. Sort the laundry as follows:
whites, coloureds, synthetics, delicates,
woollens.
• Make sure that the mains plug and cable
is not squashed or damaged by the back
of the appliance.
• Make sure that the mains plug is accessible after installation.
• Do not pull the mains cable to disconnect
the appliance. Always pull the mains plug.
• This appliance complies with the E.E.C.
Directives.
out any laundry in the machine, to remove any manufacturing residue
from the drum and tub. Pour 1/2 a
measure of detergent into the main
wash compartment and start the machine.
Before Loading The Laundry
Important! Make sure that no metal
objects are left in the laundry (e.g. hair clips,
safety pins, pins). Button up pillowcases,
close zip fasteners, hooks and poppers. Tie
any belts or long tapes. Remove any hooks
(e.g curtains).
 Loading...