

Page 1

user manual
benutzerinformation
Washing Machine
Waschmaschine
EWN 148640 W
Page 2

2 electrolux
Electrolux. Thinking of you.
Share more of our thinking at www.electrolux.com
CONTENTS
Safety information 2
Product description 4
Control panel 5
First use 6
Personalisation 6
Daily use 7
Helpful hints and tips 13
Washing programmes 15
SAFETY INFORMATION
Important! Read carefully & keep for future
reference.
• The safety of Your appliance complies
with the industry standards and with legal
requirements on the safety of appliances.
However, as manufacturers, we feel it is
our duty to provide the following safety
notes.
• It is most important that this instruction
book should be retained with the appliance for future reference. Should the appliance be sold or transferred to another
owner, or should you move house and
leave the appliance, always ensure that
the book is supplied with the appliance in
order that the new owner can get to
know the functioning of the appliance
and the relevant warnings.
• You MUST read them carefully before installing or using the appliance.
• Before first starting up, check the appliance for any damage incurred during
transport. Never connect up a damaged
appliance . If parts are damaged, contact
your supplier.
• If the appliance is delivered in the winter
months when there are minus temperatures. Store it at room temperature for 24
hours before using for the first time.
General safety
• It is dangerous to alter the specifications
or attempt to modify this product in any
way.
Care and cleaning 17
What to do if… 22
Technical data 24
Consumption values 25
Installation 25
Electrical connection 28
Environment concerns 29
Subject to change without notice
• During high temperature wash programmes the door glass may get hot. Do
not touch it!
• Make sure that small pets and children
do not climb into the drum. To avoid this,
please check into the drum before using.
• Any objects such as coins, safety pins,
nails, screws, stones or any other hard,
sharp material can cause extensive damage and must not be placed into the machine.
• Only use the advised quantities of fabric
softener and detergent. Damage to the
fabric can ensue if you over-fill. Refer to
the manufacturer’s recommendations of
quantities.
• Wash small items such as socks, laces,
washable belts etc in a washing bag or pillow case as it is possible for such items
to slip down between the tub and the inner drum.
• Do not use your washing machine to
wash articles with whalebones, material
without hems or torn material.
• Always unplug the appliance and turn off
the water supply after use, cleaning and
maintenance.
• Under no circumstances should you attempt to repair the machine yourself. Repairs carried out by inexperienced people
may cause injury or serious malfunctioning. Contact your local Service Centre. Always insist on genuine spare parts.
Installation
• This appliance is heavy. Care should be
taken when moving it.
Page 3
electrolux 3
• When unpacking the appliance, check
that it is not damaged. If in doubt, do not
use it and contact the Service Centre.
• All packing and transit bolts must be removed before use. Serious damage can
occur to the product and to property if
this is not adhered to. See relevant section in the user manual.
• After having installed the appliance,
check that it is not standing on the inlet
and drain hose and the worktop is not
pressing the electrical supply cable
against the wall.
• If the machine is situated on a carpeted
floor, please adjust the feet in order to allow air to circulate freely under the appliance.
• Always be sure, that there is no water leakage from hoses and their connections after the installation.
• If the appliance is installed in a location
subject to frost, please read the “dangers
of freezing” chapter.
• Any plumbing work required to install this
appliance should be carried out by a qualified plumber or competent person.
• Any electrical work required to install this
appliance should be carried out by a qualified electrician or competent person.
Use
• This appliance is designed for domestic
use. It must not be used for purposes other than those for which it was designed.
• Only wash fabrics which are designed to
be machine washed. Follow the instructions on each garment label.
• Do not overload the appliance. See the
Washing Programme Table.
• Before washing, ensure that all pockets
are empty and buttons and zips are fastened. Avoid washing frayed or torn articles and treat stains such as paint, ink,
rust, and grass before washing. Underwired bras must NOT be machine washed.
• Garments which have been in contact
with volatile petroleum products should
not be machine washed. If volatile cleaning fluids are used, care should be taken
to ensure that the fluid is removed from
the garment before placing in the machine.
• Never pull the power supply cable to remove the plug from the socket; always
take hold of the plug itself.
• Never use the appliance if the power supply cable, the control panel, the working
surface or the base are damaged so that
the inside of the washing machine is accessible.
Child Safety
• This appliance is not intended for use by
person (including children) with reduced
physical sensory or mental capabilities or
lack of experience and knowledge unless
they have been given supervision or instruction concerning use of the appliance
by a person responsible for their safety.
• Children should be supervised to ensure
that they do not play with the appliance.
• The packaging components (e.g. plastic
film, polystyrene) can be dangerous to children - danger of suffocation! Keep them
out of children's reach.
• Keep all detergents in a safe place out of
children’s reach.
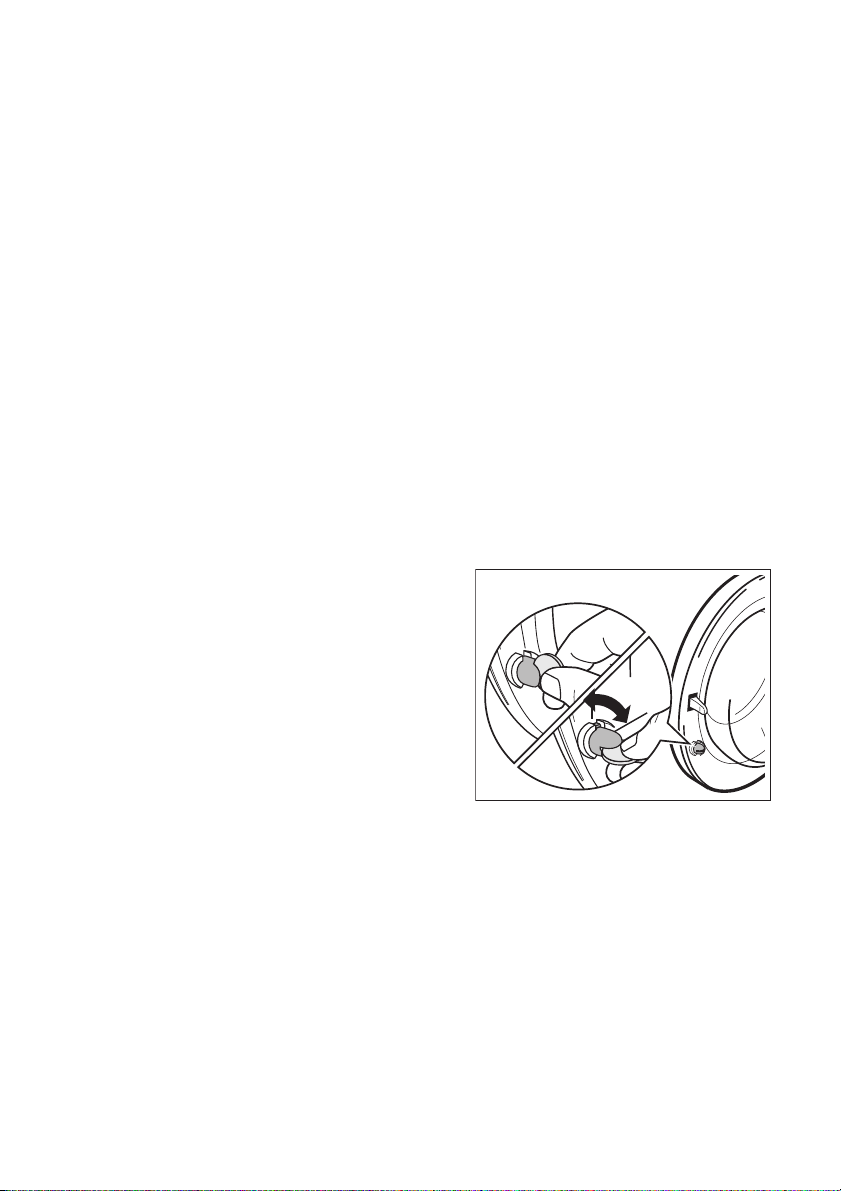
•
Make sure that children or pets do not
climb inside the drum. To prevent children or pets becoming trapped inside the
drum the machine incorporates a special
feature. To activate this device, rotate the
button (without pressing it) inside the
door clockwise until the groove is horizontal. If necessary use a coin. To disable
this device and restore the possibility of
closing the door, rotate the button anticlockwise until the groove is vertical.
Page 4

4 electrolux
PRODUCT DESCRIPTION
Your new appliance meets all modern requirements for effective treatment of laundry
with low water, energy and detergent consumption. Its new washing system allows total use of detergent and reduces water consumption so saving energy.
1 2
3
4
5
6
7
1 Detergent dispenser drawer
2 Control panel
3 Drum light
4 Door opening handle
5 Rating plate
6 Drain pump
7 Adjustable feet
Page 5
electrolux 5
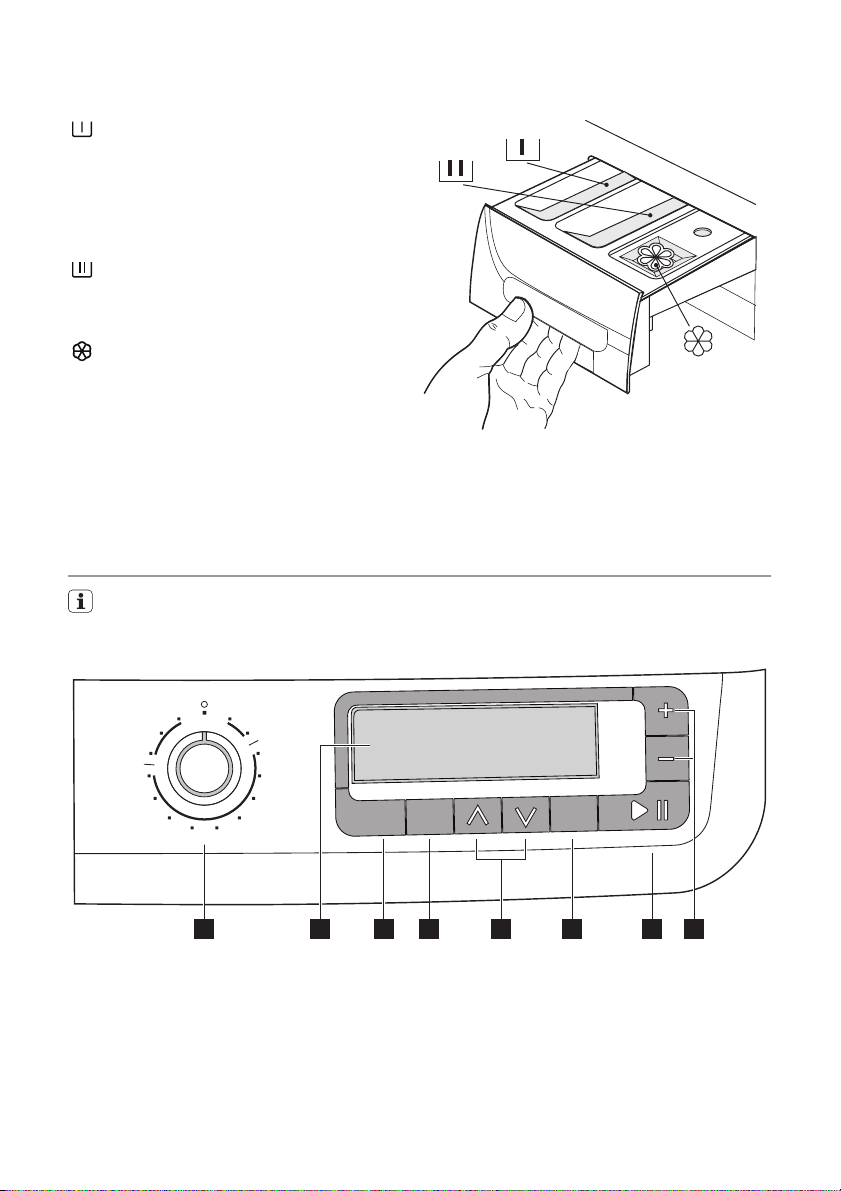
Detergent dispenser drawer
Compartment for detergent used for prewash and soak phase or for stain remover
used during the stain action phase (if available). The prewash and soak detergent is
added at the beginning of the wash programme. The stain remover is added during the stain action phase.
Compartment for powder or liquid detergent used for main wash. If using liquid detergent pour it just before starting the programme.
Compartment for liquid additives (fabric
softener, starch).
Follow the product manufacturer’s recommendations on quantities to use and do not
exceed the «MAX» mark in the detergent
dispenser drawer. Any fabric softener or
starching additives must be poured into the
compartment before starting the wash programme.
CONTROL PANEL
Below is a picture of the control panel. It shows the programme selector dial as well as
the buttons, pilot lights and the display. These are presented by relevant numbers on
the following pages.
1
1. Programme selector dial
2. Display
3. Temperature button
4. Spin reduction button
2
3 4 5 6 7 8
5. Option buttons
6. Confirm button
7. Start/Pause button
8. Time manger buttons
Page 6

6 electrolux
FIRST USE
• Ensure that the electrical and water
connections comply with the installation instructions.
• Remove the polystyrene block and
any material from the drum.
• Before the first wash, run a cotton cycle at the highest temperature with-
PERSONALISATION
Choose the language
When switching on the appliance for the
first time, by turning the programme selector dial ( 1 ), you must set the desired lan-
guage. When you switch the appliance on
again all messages appear in this language.
Important!
If the display doesn’t show any language,
the appliance has already been switched on
once. In such case, if you want to change
the language setting, press at the same
time the buttons 3 and 4 for about 6 seconds to activate the menu language. Press
the buttons 5 (Up
all the available languages. Press the button
6 twice to confirm your choice.
Set the time ( Time )
After the desired language you must set the
time before the first wash.
Remember to change the setting time in accordance with daylight-savings time or solar
time.
The clock setting permits you to modify/set
up the current time. It is important to keep it
updated as the current END Cycle Time depends on it.
With a short/single time pressure of the buttons 5 , the time varies minute by minute.
With a continue pressure of the same buttons, the time varies 10 minutes by 10 minutes. Press the button 6 to fix the current
time.
Important!
If the appliance has already been switched
on once, press the buttons 5 to activate the
Option menu.
By pressing again the same buttons you
can move through all the available options
till when you locate the setting menu ( Settings ).
Press the button 6 to have access in the
menu. Press the buttons 5 to scroll all the
or Down ) to scroll
out any laundry in the machine, to remove any manufacturing residue
from the drum and tub. Pour 1/2 a
measure of detergent into the main
wash compartment and start the machine.
settings till time setting position appears
and press button 6 to confirm your choice
and then set the clock.
Customize your appliance
This appliance is provided with a setting
menu that allows you to modify the factory
settings as you want.
When you switch the appliance on, by turning the programme selector dial ( 1 ), press
the buttons 5 to activate the Options menu.
By pressing again the same buttons you
can move through all the available options
till when you locate the setting menu. Press
the button 6 to have access in the menu.
Press again buttons 5 to scroll all the settings and press the button 6 to confirm
your choice.
Set the sound volume ( Volume )
The volume setting permits you to modify
the volume of the sound. Press the buttons
5 to choose between different volume levels
from 0 to 9 (0 = no sound; 9 = max.).
Press the button 6 to confirm your choice.
Enable the child safety lock ( Child Lock )
Your appliance is provided with a CHILD
SAFETY LOCK, which allows you to leave
the appliance not supervised with the door
closed without having the worry that children might be injured by or cause damage
to the appliance.
Set this option before pressing the button 7
and after having selected the required washing programme.
This function remains enable also when the
appliance is not working.
Set the child safety lock:
•press the buttons 5 to activate the op-
tions menu
•press the buttons 5 up or down to set
the child safety lock
Page 7

•
press the button 6 to enable this option.
The corresponding icon changes your status from Off to On and the display asks
to press
onds to unlock machine .
•
press the button 3 or 4 the display re-
turns the default status.
If you press any key after the programme
has started with child safety lock enabled,
the display says that the machine is locked
and suggests to use key combination to unlock it .
At the end of the programme it is necessary
to press simultaneously both buttons 5 for
some seconds until the display says that
the machine is unlocked to select a new programme.
Set the brightness ( Brightness )
The brightness setting allows you to modify
the backlight intensity of the display.
Press the buttons 5 to increase or decrease
the brightness.
and together for 5 sec-
electrolux 7
You can choose between different levels
from 0 to 9 ( 0 = min. - 9 = max.).
Press the button 6 to confirm your choice.
Set the contrast ( Contrast )
The contrast setting allows you to modify
the optical characteristic of the display.
Press the buttons 5 to increase or decrease
the contrast.
You can choose between different levels
from 0 to 9 ( 0 = min. - 9 = max.).
Reset all settings ( Reset settings )
This function allows you to apply the factory
settings again
Press the button 6 to activate this function.
Press the button 6 to confirm your choice.
Return to main menu ( Back )
To return to the option menu, locate the
back
Press the button 6 to confirm your choice.
Acoustic signals
The machine is provided with an acoustic
device, which sounds in the following cases:
• at the end of the cycle ;
• in the event of operating problems.
If you need to disable the acoustic signals,
except for the event of operating problems ,
please refer to the previous chapter «Set
the sound volume».
option by pressing the buttons 5 .
DAILY USE
Load the laundry
Open the door by carefully pulling the door
handle outwards. Place the laundry in the
drum, one item at a time, shaking them out
as much as possible. Close the door.
Measure out the detergent and the fabric softener
Page 8

8 electrolux
Pull out the dispenser drawer until it stops.
Measure out the amount of detergent required, pour it into the main wash compartment
or in the appropriate compartment
if the selected programme/option it requires
(see more details in «Detergent dispenser
drawer»).
pears on the display and, for few seconds,
a short description of the selected programme is shown in last 2 rows of the display.
After having selected the programme, the
appliance will propose on the display ( 2 )
the following information:
2.1 temperature
2.2 spin speed
2.3 selectable option icons
2.4 soil degree
2.5 washing programme duration
2.6 the estimated time end of washing cycle
The button 7 starts blinking.
The selector dial can be turned either clockwise or anticlockwise. Position O to Reset
If required, pour fabric softener into the compartment marked
(the amount used
must not exceed the «MAX» mark in the
drawer). Close the drawer gently.
programme/ Switching OFF of the machine.
At the end of the programme the selector dial must be turned to position O, to
switch the machine off.
Important! If you turn the programme
selector dial to another programme when
the machine is working, the display says to
turn programme selector in the last used
position.
The machine will not perform the new selected programme.
Display
Select the required programme
Turn the programme selector dial ( 1 ) to
the required programme. When the appliance is switched on, a friendly jingle can be
heard, at the same time the brand logo ap-
1) With Cottons , Synthetics and Delicates programmes only.
1)
2.5
2.1 2.2 2.3 2.4 2.6
The DISPLAY is used for setting a large
number of functions and combine them
with each other using only a few control elements (1 programme selector dial and 8 buttons). This simple control
method is made easy thanks to the interactive display. Interactive means that
the appliance display changes to reflect
each step you have entered. This ensures to set the possible settings only.
You are able to see the current settings
at any time in the information panel and
in the option rows.
Page 9

electrolux 9
The display shows the following information:
•
Duration of the selected programme
After selecting a programme, the duration
of the washing programme ( 2.5 ) and the
extimated end of cycle ( 2.6 ) are displayed in hours and minutes (for example
20:33 ).
The duration is calculated automatically
on the basis of the maximum recommended load for each type of fabric.
After the programme has started, the
time remaining is updated every minute.
•
Programme progress display
After you have pressed the button 7 , the
display shows the running phase. On the
display you can see the symbol of the selected type of fabric, the current phase,
the duration of the wash programme and
the end of cycle. When the machine performs the washing phase the display
shows also some animated bubbles that
simulate the moving of the water.
See the below picture:
•
Delay
The selected delay time value (up to 20
hours max.) appears in the position 2.5 of
the display (when the appliance start operating) close to the relevant icon
that
it is lighted-on. The delay time value decreases every minute.
• Alarm codes
In the event of operating problems, some
alarm codes can be displayed, for example « Cannot fill water. Please check that
the tap is open and then press START/
PAUSE » (see the chapter «What to do
if...»).
• End of programme
When the programme has finished the display says that the door is unlocked and
the washing cycle is finished appear alter-
natively. The door
icon remains on to
inform that the wash cycle has finished
and the door can be opened.
Programme Option buttons
Depending on the programme, different
functions can be combined. These
must be selected after choosing the desired programme and before pressing
the button 7 .
Important! For the compatibility among the
washing programmes and options, refer to
«Washing programmes».
Select the temperature (button 3)
Press the button 3 repeatedly to increase or decrease the temperature, if
you want your laundry to be washed at
a temperature different from the one
proposed by the appliance (position
2.1 in the display).
Important! To see the maximum and
minimum temperatures allowed for each
washing programmes, refer to «Washing
programmes».
= Cold Wash.
Select the spin speed or the available
options (button 4)
Press the button 4 repeatedly to change
the spin speed, if you want your laundry to
be spun at a speed different from the one
proposed by the appliance.
Important! The maximum spin speed
provided for the selected washing
programme appears in the display ( 2.2 ).
By pressing the button 4 it is also possible
to select one of the following options:
No spin : option eliminates all the spin
phases and increases the number of rinses
in some programmes.
Rinse Hold ( Rinse Hold ) : by select-
ing this option the water of the last rinse is
not emptied out to prevent the fabrics from
creasing. When the programme has finished the display shows the icon of the selected programme and the message « Finished », while on the display ( 2.5 and 2.6 ) the
end cycle and the current time appear. The
buzzer sounds a short jingle (if it’s activated), the pilot light of the button 7 is off and
the door is locked to indicate that the water
must be emptied out.
Page 10
10 electrolux
To empty out the water, please read
the paragraph «At the end of the programme».
Night Cycle ( Night Cycle ) : by select-
ing this option, the machine will not drain
the water of the last rinse, so as not to wrinkle the laundry.
As all spinning phases are suppressed, this
washing cycle is very noiseless and it can
be performed at night or in times with a
more economical power rate. In some programmes the rinses will be performed with
more water.
When the programme has finished the display shows the icon of the selected programme, below the icon of the selected programme and the message « Finished »,
while on display ( 2.5 and 2.6 ) the end cycle and the current time appear. The pilot
light of the button 7 is off and the door is
locked to indicate that the water must be
emptied out.
To empty out the water, please read
the paragraph «At the end of the programme».
Select the options
Depending on the selected programme only
certain options are available and shown during the selection phase on the display ( 2.3
and 2.4 ).
Note: Not all the options are compatible
among themselves. The not compatible option icons will disappear.
Important! For the compatibility among the
washing programmes and options, refer to
«Washing programmes».
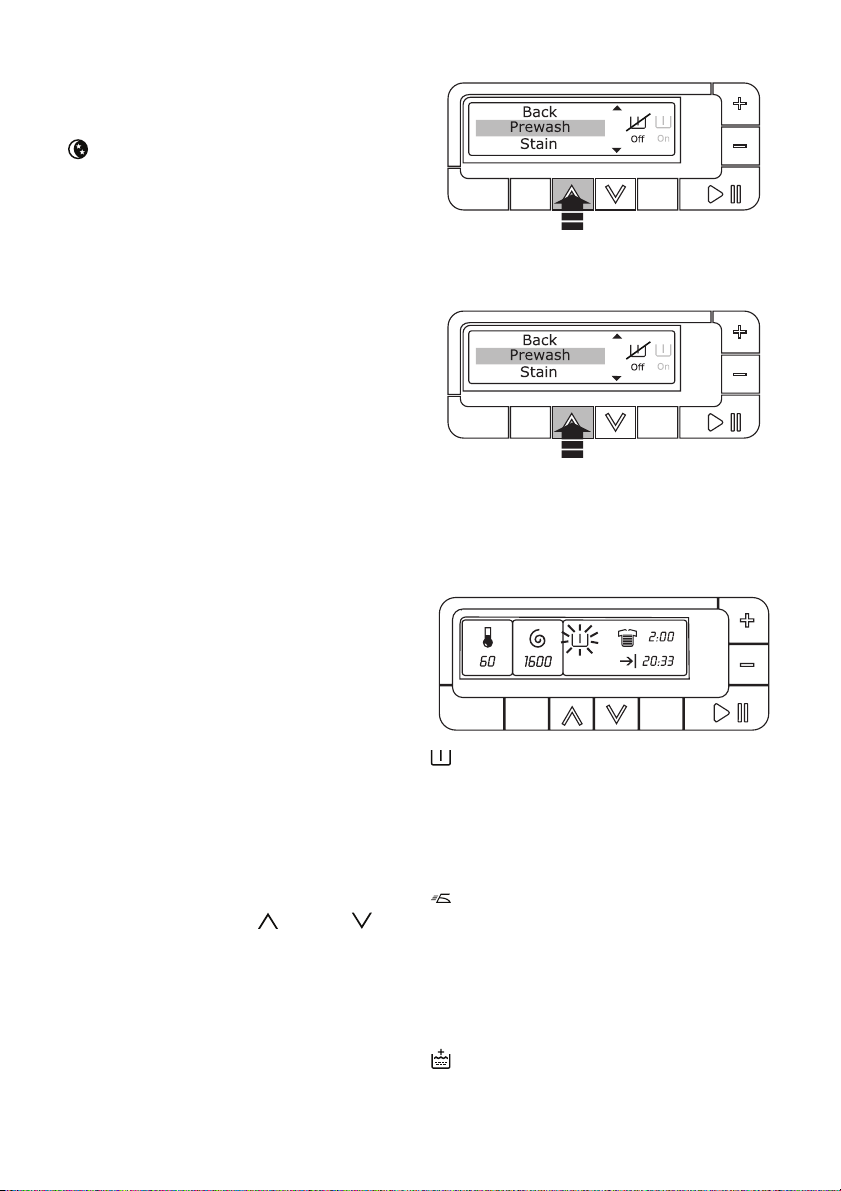
To select the desired options, first turn the
selector dial ( 1 ) to desired programme and
don’t press the button 7 .
Press the buttons 5 , you can activate the
options menu. Using Up
or Down button you can move through all the available
options.
The display will show, using all the visible
area, the selected option in highlighted
mode. The corresponding icon will appear
on the right side of the display and just below it, a short message describes the status of the option («Off» or «On»). See the below example:
Press the button 6 to activate and confirm
your choice, press it again to deactivate the
selected option.
Once you have completed the selection of
the options, press the buttons 3 or 4 or simply wait 10 seconds to return the display in
the default status.
The selected icons will be shown on the display.
Prewashing phase ( Prewash ) : se-
lect this option if you wish your laundry to
be prewashed before the main wash.
The Prewash ends with a short spin at 650
rpm in programmes for cotton and synthetic fabrics, whereas in the program for delicate fabrics the water is drained only .
Easier ironing ( Easy Iron ) : selecting
this option the laundry is gently washed and
spun to avoid any creasing. In this way ironing is easier. Furthermore the machine will
perform some additional rinses. If this option is selected for cotton programmes, the
spin speed automatically will reduce to 900
rpm.
Additional rinse ( Extra Rinse ) : this
option is recommended for people who are
allergic to detergents, and in areas where
the water is very soft. The machine performs some additional rinses.
Page 11

electrolux 11
Delayed start ( End Time ) : this op-
tion allows to delay the starting of the washing program by 30 min - 60 min - 90 min, 2
hours and then by 1 hour till 20 hours. The
delay you have selected is indicated on the
display. The end time will increase in order
to show you the selected delay.
You must select this option after you have
set the programme and before you press
the button 7 .
If you wish to add laundry in the machine
during the delay time you will press the button 7 to put the machine in pause.
Add the laundry, close the door and press
the button 7 again.
You can cancel the delay time at any moment, before you press the button 7 .
Selecting the delayed start
•
by pressing Up
or Down button
you can move through the options menu
till you locate the delayed start
• press the button 6 to activate this option
(the visualized time starts blinking)
•
by pressing Up
or Down button
you can increase or decrease the delay
time
• press button 6 to confirm your delay
• press the buttons 3 or 4 to return the dis-
play to the default status
• press the button 7 to start the pro-
gramme. The programme will start after
the selected delay has expired
Cancelling the delayed start
• press the button 7 to pause the appliance
•
press Up
or Down button to move
through the options menu till you locate
the delayed start
• press 6 button to activate this option (the
visualized time starts to flash)
•
by pressing Down
button you can decrease the delayed start to the current
time.
• press the button 6 to confirm your choice
•
press the button 3 or 4 to return the display to the default status
•
press the button 7 to start the programme immediately.
The delayed start cannot be selected with
Drain
programme.
Favourite programme ( Favourite ) :
programme settings that are frequently
used can be saved (e.g. cotton, 60°C,
1200 rpm, with Prewash and Extra Rinse).
There are 2 memory spaces available for
this purpose in the last 2 positions of the programme selector dial ( 1 ). The saved programme can be selected in the same way
as any other wash programme by means of
the selector dial.
Saving favourite programme:
• select the desired programme and required options
•press the buttons 5 to activate the options menu
•
press the Up
or Down button to locate the position for memorizing favourite
programme ( Save Favourite ) option and
press the button 6
•
press the Up
or Down button to select one of the favourite position (1-2) to
memorize your customized programme
•press the button 6 to save the selected
programme. The display says that the programme has been saved in highlighted
mode.
•
by pressing the button 3 or 4 the display
returns the default status.
To change the memorized programme setting repeat the procedure from the beginning.
Note
If the memory space is already used by a
programme previously selected, the display
says that the favourite position is already
used. Press the button 6 to over write it or
buttons
or to cancel, then press the
button 6 to memorize the new programme.
The favourite programmes cannot be
erased, but you can over write them by selecting a different programme.
Washing guide ( Wash Guide ) : this
appliance is provided with a washing guide
menu that allows you to select the most suitable temperature, spin speed and options
to wash your laundry.
In the washing guide menu you can also locate a stain guide ( Stain Guide ), that contains important information on how to remove the most rappresentative stains, and
a «Demo Mode» ideal for shop floor demonstrations (not suitable for the customer).
Select the washing guide:
•press the buttons 5 to activate the op-
tions menu
Page 12
12 electrolux
•
press the Up
or Down button to lo-
cate the washing guide
•
press the button 6 to enter into the washing guide
•
by pressing the Up
or Down button you can move through the different
guides ( Temperature Guide , Spin Speed
Guide , Demo Mode ...)
• press the button 6 to enter into the selec-
ted guide and by pressing the Up
Down
you can read all the explana-
or
tions of the selected one
• to consult another guide you must return
to the washing guide menu selecting the
«Back»
symbol and repeat the proce-
dure starting from the 4th point
• by pressing the button 3 or 4 the display
returns to the default status.
Select the «Time Manager» option
(buttons 8)
Time Manager
01:50
18:05
Press this button twice to activate the time
manger option.
This function allows you to modify the washing time, automatically proposed by the appliance. By pressing the «Time Manager»
buttons « +/- » repeatedly, the duration of
the washing cycle can be increased or decreased.
The Time Manager option cannot be selected with Economy programme.
The soil level icon
play and it changes according to soil degree you have chosen.
Soil Level Icon Type of fabric
Intensive For heavy soiled
Normal For normal soiled
Daily For daily soiled
Light For slightly soiled
Quick For very slightly
appears on the dis-
items
items
items
items
soiled items
Soil Level Icon Type of fabric
Super Quick
Refresh
(Super) Refresh
1) We recommend you to reduce the load sizes (see
«Washing Programmes» table).
1)
1)
1)
For items used or
worn for a short
time
For refreshing
items only
For refreshing a
very few items only
Press the button 7 to start the
programme
To start the selected programme, press the
button 7 ; the green pilot light stops blinking.
On the display will appear the icon, and alternatively the name and the running phase
of the selected programme to indicate that
the appliance starts operating and the door
is locked.
To interrupt a programme which is running,
press the button 7 : the green pilot light
starts blinking and the icon of the selected
programme appears on the display, the display says to press the button 7 to continue
for some seconds and then that the appliance is pause setting. To restart the programme from the point at which it was interrupted, press the button 7 again .
If you have chosen a delayed start, the appliance will begin the countdown.
Altering an option or a running
programme
It is possible to change only the options vizualised on the display by pressing the buttons 5 ( Up or Down ) before the programme carries them out. Before you make
any change, you must pause the appliance
by pressing the button 7 .
Changing a running programme is possible
only by resetting it . Turn the programme
selector dial to O and then to the new programme position, press the button 6 to cancel the previous washing programme. Start
the new programme by pressing the button
7 again. The washing water in the tub will
not emptied out.
Interrupting a programme
Press the button 7 to interrupt a programme which is running, the corresponding light starts blinking. Press the button
again to restart the programme.
Page 13

electrolux 13
Cancelling a programme
Turn the selector dial to O and then in the
new selected programme. Press the button
6 to cancel the programme which is running. Now press the button 7 to start the
new programme.
Opening the door after the programme
has started
Press the button 7 to set the machine to
pause. The corresponding message will appear on the display.
If the door cannot be opened, this means
that the appliance is already heating, that
the water level is above the bottom edge of
the door.
In this case the door can not be opened.
If you cannot open the door but you need
to open it you have to switch the machine
off by turning the selector dial to O . After
some minutes the door can be opened
( pay attention to the water level and
temperature! ).
At the end of the programme
The machine stops automatically.
If the Rinse Hold or Night Cycle options have been selected, the pilot light of
Stand by : once the programme has finished after a few minutes the energy saving system will be enabled. The brightness of the
button 7 goes off, the icon of the selected
programme and the message « Finished »
appears on the display and the door remains locked to indicate that the water
must be emptied out before opening the
door.
To empty out the water :
• select the draining or spinning programme
• reduce the spin speed if needed, by
means of the relevant button
•
press button 7
• at the end of the programme, the display
shows the
says that the door is unlocked and that
the door is finished. The door can be
opened.
Turn the programme selector dial to O to
switch the appliance off. Remove the laundry from the drum and carefully check that
the drum is empty.
If you do not intend to carry out another
wash, close the water tap. Leave the door
open to prevent the formation of mildew
and unpleasant smells.
display is reduced. By pressing any button
the appliance will come out of the energy
saving status.
(Door) icon and alternately
HELPFUL HINTS AND TIPS
Sorting out the laundry
Follow the wash code symbols on each garment label and the manufacturer’s washing
instructions. Sort the laundry as follows:
whites, coloureds, synthetics, delicates,
woollens.
Before loading the laundry
Never wash whites and coloureds together.
Whites may lose their «whiteness» in the
wash.
New coloured items may run in the first
wash; they should therefore be washed separately the first time.
Button up pillowcases, close zip fasteners,
hooks and poppers. Tie any belts or long
tapes.
Remove persistent stains before washing.
Rub particularly soiled areas with a special
detergent or detergent paste.
Treat curtains with special care. Remove
hooks or tie them up in a bag or net.
Removing stains
Stubborn stains may not be removed by
just water and detergent. It is therefore advisable to treat them prior to washing.
Blood: treat fresh stains with cold water.
For dried stains, soak overnight in water
with a special detergent then rub in the
soap and water.
Oil based paint: moisten with benzine
stain remover, lay the garment on a soft
cloth and dab the stain; treat several times.
Dried grease stains: moisten with turpentine, lay the garment on a soft surface and
Page 14

14 electrolux
dab the stain with the fingertips and a cotton cloth.
Rust: oxalic acid dissolved in hot water or a
rust removing product used cold. Be careful
with rust stains which are not recent since
the cellulose structure will already have
been damaged and the fabric tends to hole.
Mould stains: treat with bleach, rinse well
(whites and fast coloureds only).
Grass: soap lightly and treat with bleach
(whites and fast coloureds only).
Ball point pen and glue: moisten with ace-
2)
tone
, lay the garment on a soft cloth and
dab the stain.
Lipstick: moisten with acetone as above,
then treat stains with methylated spirits.
Treat any residual marks with bleach.
Red wine: soak in water and detergent,
rinse and treat with acetic or citric acid,
then rinse. Treat any residual marks with
bleach.
Ink: depending on the type of ink, moisten
the fabric first with acetone
2)
, then with acetic acid; treat any residual marks on white
fabrics with bleach and then rinse thoroughly.
Tar stains: first treat with stain remover, methylated spirits or benzine, then rub with detergent paste.
Detergents and additives
Good washing results also depend on the
choice of detergent and use of the correct
quantities to avoid waste and protect the environment.
Although biodegradable, detergents contain
substances which, in large quantities, can
upset the delicate balance of nature.
The choice of detergent will depend on the
type of fabric (delicates, woollens, cottons,
etc.), the colour, washing temperature and
degree of soiling.
All commonly available washing machine detergents may be used in this appliance:
• powder detergents for all types of fabric
• powder detergents for delicate fabrics
(60°C max) and woollens
• liquid detergents, preferably for low temperature wash programmes (60°C max)
for all types of fabric, or special for woollens only.
The detergent and any additives must be
placed in the appropriate compartments of
the dispenser drawer before starting the
wash programme.
If using liquid detergents, a programme
without prewash must be selected.
Your appliance incorporates a recirculation
system which allows an optimal use of the
concentrated detergent.
Follow the product manufacturer’s recommendations on quantities to use and do
not exceed the «MAX» mark in the detergent dispenser drawer .
Quantity of detergent to be used
The type and quantity of detergent will depend on the type of fabric, load size, degree of soiling and hardness of the water
used.
Follow the product manufacturers’ instructions on quantities to use.
Use less detergent if:
• you are washing a small load
• the laundry is lightly soiled
• large amounts of foam form during washing.
Degrees of water hardness
Water hardness is classified in so-called “degrees” of hardness. Information on hardness of the water in your area can be obtained from the relevant water supply company, or from your local authority. If the water hardness degree is medium or high we
suggest you to add a water softener following always the manufacturer’s instructions.
When the degree of hardness is soft, readjust the quantity of the detergent.
2) do not use acetone on artificial silk
Page 15
WASHING PROGRAMMES
Programme
Maximum and Minimum Temperature
Cycle Description
Maximum Spin Speed
Maximum Fabrics Load
Type of Laundry
COTTONS
90 °- Cold
Main wash - Rinses
Maximum spin speed 1400 rpm
Max. load 8 kg - Reduced load 4 kg
For white and coloured cotton (normally soiled
items).
SYNTHETICS
60° - Cold
Main wash - Rinses
Maximum spin speed 900 rpm
Max. load 4 kg - Reduced load 2 kg
Synthetic or mixed fabrics: underwear, coloured garments, non-shrink shirts, blouses.
DELICATES
40° - Cold
Main wash - Rinses
Maximum spin speed 900 rpm
Max. load 4 kg - Reduced load 2 kg
Delicate fabrics: acrylics, viscose, polyester.
WOOL / HANDWASH
40° - Cold
Main wash - Rinses
Maximum spin speed 1000 rpm
Max. load 2 kg
Washing programme for machine washable wool as
well as for hand washable woollens and delicate fabrics with «hand washing» care symbol. Note : A single
or bulky item may cause imbalance. If the appliance
doesn’t perform the final spin phase, add more items,
redistribute the load manually and then select the spinning programme.
LINGERIE
40° - Cold
Main wash - Rinses
Maximum spin speed 1000 rpm
Max. load 1 kg
This programme is suitable for very delicate items
such a lingerie, bras and underwear. The maximum
spin speed is automatically reduced.
1)
1)
1)
Options
SPIN REDUCTION
NO SPIN
RINSE HOLD
NIGHT CYCLE
PREWASH
2)
EASY IRON
EXTRA RINSE
TIME MANAGER
SPIN REDUCTION
NO SPIN
RINSE HOLD
NIGHT CYCLE
PREWASH
2)
EASY IRON
EXTRA RINSE
TIME MANAGER
SPIN REDUCTION
NO SPIN
RINSE HOLD
NIGHT CYCLE
PREWASH
2)
EXTRA RINSE
TIME MANAGER
SPIN REDUCTION
NO SPIN
RINSE HOLD
NIGHT CYCLE
SPIN REDUCTION
NO SPIN
RINSE HOLD
NIGHT CYCLE
electrolux 15
Detergent
Compartment
Page 16
16 electrolux
Programme
Maximum and Minimum Temperature
Cycle Description
Maximum Spin Speed
Maximum Fabrics Load
Type of Laundry
SILK
30° - Cold
Main wash - Rinses
Maximum spin speed 900 rpm
Max. load 1 kg
Delicate washing programme suitable for silk and
mixed synthetic items.
RINSE
Rinse - Long spin
Maximum spin speed 1400 rpm
Max. load 8 kg
With this programme it is possible to rinse and spin cotton garments which have been washed by hand. To intensify the rinsing action, select the option EXTRA
RINSE. The appliance will add some additional rinses.
DRAIN
Draining of water
Max. load 8 kg
For emptying out the water of the last rinse in programmes with the option selected, which ends with
water left in the tub.
SPIN
Drain and long spin
Maximum spin speed 1400 rpm
Max. load 8 kg
Separate spin for hand washed garments and after programmes with the Rinse Hold and Night Cycle option
selected. You can choose the spin speed by pressing
the relevant button to adapt it to the fabrics to be spun.
COTTONS ECONOMY
90° - 40°
Main wash - Rinses
Maximum spin speed 1400 rpm
Max. load 8 kg
White and fast coloured cotton
This programme can be selected for slightly or normally soiled cotton items. The temperature will decrease
and the washing time will be extended. This allows to
obtain a good washing efficiency so saving energy.
14 MIN.
30°
Main wash - Rinses
Maximum spin speed 900 rpm
Max. load 2 kg
Ideal for laundry which needs freshening up only .
Options
Detergent
Compartment
SPIN REDUCTION
NO SPIN
RINSE HOLD
NIGHT CYCLE
SPIN REDUCTION
NO SPIN
RINSE HOLD
NIGHT CYCLE
EASY IRON
EXTRA RINSE
SPIN REDUCTION
SPIN REDUCTION
NO SPIN
RINSE HOLD
NIGHT CYCLE
PREWASH
2)
EASY IRON
EXTRA RINSE
SPIN REDUCTION
NO SPIN
RINSE HOLD
Page 17

electrolux 17
Programme
Maximum and Minimum Temperature
Cycle Description
Maximum Spin Speed
Maximum Fabrics Load
Type of Laundry
BLANKET
40° - 30°
Main wash - Rinses
Maximum spin speed 900 rpm
Max. load 2,5 kg
For a single washable synthetic blanket or duvet.
/OFF
For cancelling the programme which is running or to
switch the machine off .
1) If you select the Quick or Super Quick option by pressing button 8 , we recommend that you reduce the maximum
load as indicated. Full loading is possible however with somewhat reduced cleaning results. If you select the
Refresh or Super Refresh option, we recommend that you reduce the load even more.
2) If using liquid detergents, a programme without PREWASH must be selected.
Options
SPIN REDUCTION
Detergent
Compartment
CARE AND CLEANING
Warning! You must disconnect the
appliance from the electricity supply,
before you can carry out any cleaning
or maintenance work.
Descaling
The water we use normally contains lime. It
is a good idea to periodically use a water
softening powder in the machine. Do this
separately from any laundry washing, and
according to the softening powder manufacturer's instructions. This will help to prevent
the formation of lime deposits.
After each wash
Leave the door open for a while. This helps
to prevent mould and stagnant smells forming inside the appliance. Keeping the door
open after a wash will also help to preserve
the door seal.
Maintenance wash
With the use of low temperature washes it
is possible to get a build up of residues inside the drum.
We recommend that a maintenance wash
be performed on a regular basis.
To run a maintenance wash:
• The drum should be empty of laundry.
• Select the hottest cotton wash pro-
gramme.
• Use a normal measure of detergent,
must be a powder with biological properties.
External cleaning
Clean the exterior cabinet of the appliance
with soap and water only, and then dry thoroughly.
Important! Do not use methylated spirits,
solvents or similar products to clean the
cabinet.
Cleaning the dispenser drawer
The detergent dispenser drawer should be
cleaned regularly.
The washing powder and additive dispenser drawer should be cleaned regularly.
Remove the drawer by pressing the catch
downwards and by pulling it out.
Page 18

18 electrolux
Flush it out under a tap, to remove any
traces of accumulated powder.
To aid cleaning, the top part of the additive
compartment should be removed. Clean all
parts with water.
Washing drum
Rust deposits in the drum may occur due
to rusting foreign bodies in the washing or
tap water containing iron.
Important! Do not clean the drum with
acidic descaling agents, scouring agents
containing chlorine or iron or steel wool.
1. Remove any rust deposits on the drum
with a cleaning agent for stainless steel.
2. Run a washing cycle without any wash-
ing to clean off any cleaning agent residues.
Programme: Short Cotton Programme
at maximum temperature and add approx. 1/4 measuring cup of detergent.
Door seal
Check from time to time the door seal and
eliminate eventual possible objects that
could be trapped in the fold.
Clean the chamber of dispenser drawer
with a brush.
Page 19

electrolux 19
Drain pump
The pump should be inspected regularly
and particularly if:
• the appliance does not empty and/or spin;
• the appliance makes an unusual noise during draining due to objects such as safety
pins, coins etc. blocking the pump;
• a problem with water draining is detected
(see chapter “What to do if...” for more details).
Warning! Before opening the pump
door, switch the appliance off and
remove the mains plug from the socket.
Proceed as follows:
1. Unplug the appliance.
2. If necessary wait until the water has
cooled down.
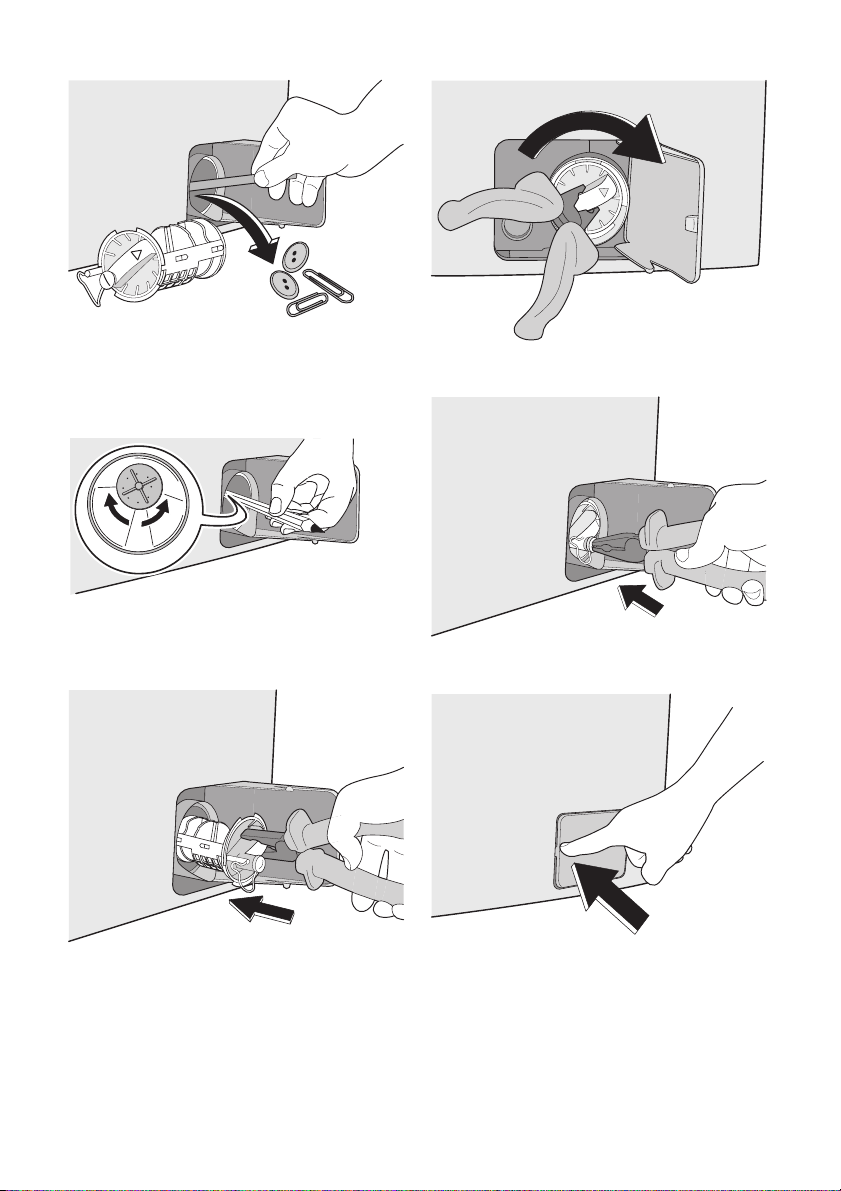
3. Open the pump door levering on the
groove with a coin (or with the suitable
tool, that you can find in the bag containing the instruction booklet, depending on the model).
1
5. Pull out the emergency emptying cap
from the filter cover, using pliers.
6. When no more water comes out, unscrew the pump cover by turning it anticlockwise, using pliers, and remove the
filter. Always keep a rag nearby to dry
up any water spillages when removing
the cover.
Clean the filter under a tap, to remove
any traces of fluff.
2
2
4. Place a bowl with a small edge close to
the pump to collect any spillage.
1
7. Remove foreign bodies and fluff from
the pump seat and from the pump impeller.
Page 20
20 electrolux
8. Check carefully whether the pump impeller rotates (it rotates jerkily). If it
doesn’t rotate, please contact your
Service Centre.
9. Replace the filter into the pump by inserting it correctly into the special
guides. Screw the pump cover firmly by
turning it clockwise.
10. Replace the emergency emptying cap
into the filter cover and fix it firmly.
11. Close the pump door.
Page 21

Warning! When the appliance is in use
and depending on the programme
selected there can be hot water in the
pump. Never remove the pump cover
during a wash cycle, always wait until
the appliance has finished the cycle,
and is empty. When refitting the pump
cover , ensure it is securely retightened so as to stop leaks and
young children being able to remove it.
Cleaning the water inlet filters
If you notice that the machine is taking longer to fill, check that the filter in the water inlet hose is not blocked.
1. Turn off the water tap.
2. Unscrew the water inlet hose.
3. Clean the filter in the hose using a hard
bristle brush.
4. Screw the hose back onto the tap.
5. Unscrew the hose from the machine.
Keep a rug nearby because some water
may flow.
6. Clean the filter in the valve with a stiff
brush or with the piece of cloth.
electrolux 21
7. Screw the hose back to the machine
and make sure the connection is tight.
8. Turn on the water tap.
Emergency emptying out
If the water is not discharged, proceed as
follows to empty out the machine:
1. pull out the plug from the power socket;
2. close the water tap;
3. if necessary, wait until the water has
cooled down;
4. open the pump door;
5. place a bowl on the floor. Remove the
emergency emptying cap from the filter.
The water should drain by gravity into
the bowl. When the bowl is full, refit the
cap into the filter. Empty the bowl. Repeat the procedure until water stops flowing out;
6. clean the pump if necessary as previously described;
7. screw the pump again and close the
door.
Frost precautions
If the machine is installed in a place where
the temperature could drop below 0°C, proceed as follows:
1. Pull out the plug from the power socket.
2. Turn off the water tap.
3. Unscrew the inlet hose.
4. Place the end of the inlet hose in a bowl
placed on the floor, open the emergency emptying cup of the filter and let water drain out.
5. Refit the emergency emptying cap into
the filter and screw the water inlet hose
back.
Page 22

22 electrolux
6. When you intend to start the machine
up again, make sure that the room temperature is above 0°C.
WHAT TO DO IF…
Certain problems are due to lack of simple
maintenance or oversights, which can be
solved easily without calling out an engineer. Before contacting your local Service
Centre, please carry out the checks listed
below.
During machine operation it is possible that
the red pilot light of button 7 blinks, one of
the following alarm codes appears on the
display and some acoustic signals sound every 20 seconds to indicate that the machine
is not working:
• Problem with the water supply: « Cannot
fill water. Please check that the tap is
open and then press START/PAUSE ».
Problem Possible cause/Solution
The door has not been closed. (« Please check that the door is
closed properly and then press START/PAUSE »)
•Close the door firmly.
The plug is not properly inserted in the power socket.
• Insert the plug into the power socket.
There is no power at the socket.
• Please check your domestic electrical installation.
The machine does not start:
The machine does not fill:
The main fuse has blown.
• Replace the fuse.
The selector dial is not correctly positioned and the button 7 has
not been pressed.
• Please turn the selector dial and press the button 7 again.
The delay start has been selected.
• If the laundry are to be washed immediately, cancel the delay start.
The Child Safety Lock has been activated.
• Deactivate the Child Safety Lock.
The water tap is closed. (« Cannot fill water. Please that the
tap is open and then press START/PAUSE »)
•Open the water tap.
The inlet hose is squashed or kinked. (« Cannot fill water.
Please that the tap is open and then press START/PAUSE »)
• Check the inlet hose connection.
The filter in the inlet hose is blocked. (« Cannot fill water. Please
that the tap is open and then press START/PAUSE »)
• Clean the water inlet hose filter.
The door is not properly closed. (« Cannot fill water. Please
that the tap is open and then press START/PAUSE ») (« Cannot fill water. Please that the tap is open and then press
START/PAUSE »)
•Close the door firmly.
• Problem with the water draining: « Cannot drain the water. Please check that
the filter is clean and then press START/
PAUSE ».
• Door open: « Please check that the door
is closed properly and then press START/
PAUSE
».
Once the problem has been eliminated,
press the button 7 to restart the programme. If after all checks, the problem persists, contact your local Service Centre.
Page 23

Problem Possible cause/Solution
The machine does not empty and/or does not spin:
There is water on the floor:
Unsatisfactory washing results:
The door will not open:
The machine vibrates is
noisy:
electrolux 23
The drain hose is squashed or kinked. (« Cannot drain the wa-
ter. Please check that the filter is clean and then press
START/PAUSE »)
• Check the drain hose connection.
The drain filter is clogged. (« Cannot drain the water. Please
check that the filter is clean and then press START/
PAUSE »)
• Clean the drain filter.
An option or a programme that ends with the water still in the tub
or a that eliminates all the spinning phases has been selected.
• Select the draining or spinning programme.
The laundry is not evenly distributed in the drum.
• Redistribute the laundry.
Too much detergent or unsuitable detergent (creates too much
foam) has been used.
• Reduce the detergent quantity or use another one.
Check whether there are any leaks from one of the inlet hose fittings. It is not always easy to see this as the water runs down the
hose; check to see if it is damp.
• Check the water inlet hose connection.
The drain or inlet hose is damaged.
• Replace it with a new one.
The emergency emptying cap has not been replaced into the filter
or the filter has not been properly screwed in after cleaning action.
• Refit the emergency emptying cap or screw the filter fully in.
Too little detergent or unsuitable detergent has been used.
• Increase the detergent quantity or use another one.
Stubborn stains have not been treated prior to washing.
• Use commercial products to treat the stubborn stains.
The correct temperature was not selected.
• Check if you have selected the correct temperature.
Excessive laundry load.
• Reduce the laundry load.
The programme is still running.
• Wait the end of washing cycle.
The door lock has not been released.
•
Wait for the Door icon
and the corresponding message ap-
pearing.
There is water in the drum.
• Select drain or spin programme to empty out the water.
The transit bolts and packing have not been removed.
• Check the correct installation of the appliance.
The support feet have not been adjusted
• Check the correct levelling of the appliance.
The laundry is not evenly distributed in the drum.
• Redistribute the laundry.
Maybe there is very little laundry in the drum.
• Load more laundry.
Page 24

24 electrolux
Problem Possible cause/Solution
The electronic unbalance detection device has cut in because the
laundry is not evenly distributed in the drum. The laundry is redistributed by reverse rotation of the drum. This may happen several
times before the unbalance disappears and normal spinning can re-
Spinning starts late or the
machine does not spin:
The machine makes an unusual noise:
No water is visible in the
drum:
sume. If, after 10 minutes, the laundry is still not evenly distributed
in the drum, the machine will not spin. In this case, redistribute the
load manually and select the spin programme.
• Redistribute the laundry.
The load is too small.
• Add more items, redistribute the load manually and then select
the spinning programme.
The machine is fitted with a type of motor which makes an unusual
noise compared with other traditional motors. This new motor ensures a softer start and more even distribution of the laundry in the
drum when spinning, as well as increased stability of the machine.
Machines based on modern technology operate very economically
using very little water without affecting performance.
If you are unable to identify or solve the problem, contact our service centre. Before telephoning, make a note of the model, serial
number and purchase date of your machine: the Service Centre will require this information.
TECHNICAL DATA
Dimensions Width
Electrical connection
Voltage - Overall power - Fuse
Water supply pressure Minimum
Maximum Load Cotton 8 kg
Spin Speed Maximum 1400 rpm
Height
Depth
Information on the electrical connection is given on the rating
plate, on the inner edge of the appliance door.
Maximum
60 cm
85 cm
63 cm
0,05 MPa
0,8 MPa
Page 25

electrolux 25
CONSUMPTION VALUES
Programme Energy consumption
White Cottons 90° 2.50 62
Cottons 60° 1.70 63
Cotton ECO 60°
Cottons 40° 0.97 62
Synthetics 40° 0.55 52
Delicates 40° 0.53 68
Wool 30° 0.32 64
1) «Cottons Eco» at 60°C with a load of 8 kg is the reference programme for the data entered in the energy label, in
compliance with EEC 92/75 standards.
1)
(KWh)
1.36 64
The consumption data shown on this
chart is to be considered purely indicative, as it may vary depending on the
Water consumption
(litres)
Programme duration
(Minutes)
For the duration of
the programmes,
please refer to the
display on the con-
trol panel.
quantity and type of laundry, on the inlet water temperature and on the ambient temperature.
INSTALLATION
Unpacking
All transit bolts and packing must be removed before using the appliance.
You are advised to keep all transit devices
so that they can be refitted if the machine
ever has to be transported again.
1. After removing all the packaging, careful-
ly lay machine on it’s back to remove
the polystyrene base from the bottom.
2. Remove the power supply cable and the
draining hose from the hose holders on
the rear of the appliance.
3. With a suitable spanner unscrew and re-
move the central rear bolt A . Slide out
the relevant plastic spacer.
Page 26

26 electrolux
A
4. Unscrew and remove the two large rear
bolts B and the six smaller bolts C .
C
C
6. Open the porthole, take out the inlet
hose from the drum and remove the polystyrene block fitted on the door seal.
B
C
5.
Remove the bracket D and tighten up
the six smaller bolts C .
D
C
B
7. Fill the smaller upper hole and the two
large ones with the corresponding plastic plug caps supplied in the bag containing the instruction booklet.
Page 27

Positioning
Install the machine on a flat hard floor.
Make sure that air circulation around the machine is not impeded by carpets, rugs etc.
Check that the machine does not touch the
wall or other kitchen units. Level the washing machine by raising or lowering the feet.
The feet may be tight to adjust as they incorporate a self locking nut, but the machine
MUST be level and stable. If necessary,
check the setting with a spirit level. Any necessary adjustment can be made with a spanner. Accurate levelling prevents vibration,
noise and displacement of the machine during operation.
Caution! Never place cardboard,
wood or similar materials under the
machine to compensate for any
unevenness in the floor.
electrolux 27
Water inlet
An inlet hose is supplied and can been
found inside the machine drum. Do not use
the hose from your previous machine to connect to the water supply.
Important! This appliance must be connected to a cold water supply.
1. Open the porthole and extract the inlet
hose.
2. Connect the hose with the angled connection to the machine. Do not place
the inlet hose downwards. Angle the
hose to the left or right depending on
the position of your water tap.
35°
3. Set the hose correctly by loosening the
ring nut. After positioning the inlet hose,
be sure to tighten the ring nut again to
prevent leaks.
45°
Page 28

28 electrolux
4. Connect the hose to a tap with a 3/4”
thread. Always use the hose supplied
with the appliance.
The inlet hose must not be lengthened. If it
is too short and you do not wish to move
the tap, you will have to purchase a new,
longer hose specially designed for this type
of use.
Water drainage
The end of the drain hose can be positioned in three ways.
• Hooked over the edge of a sink using
the plastic hose guide supplied with the
machine. In this case, make sure the end
cannot come unhooked when the ma-
chine is emptying. This could be done by
tying it to the tap with a piece of string or
attaching it to the wall.
• In a sink drain pipe branch. This
branch must be above the trap so that
the bend is at least 60 cm above the
ground.
•
Directly into a drain pipe at a height of
not less than 60 cm and not more than
90 cm. The end of the drain hose must always be ventilated, i.e. the inside diameter of the drain pipe must be larger than
the outside diameter of the drain hose.
The drain hose must not be kinked.
The drain hose may be extended to a maximum of 4 metres. An additional drain hose
and joining piece is available from your local Service Centre.
ELECTRICAL CONNECTION
Information on the electrical connection is
given on the rating plate on the inner edge
of the appliance door.
Check that your domestic electrical installation can take the maximum load required, also taking into account any other appliances
in use.
Page 29

electrolux 29
Connect the machine to an earthed
socket.
The manufacturer does not accept
any responsibility for damage or
injury through failure to comply
with the above safety precaution.
The power supply cable must be
easily accessible after installing the
machine.
ENVIRONMENT CONCERNS
The symbol on the product or on its
packaging indicates that this product may
not be treated as household waste. Instead
it should be taken to the appropriate
collection point for the recycling of electrical
and electronic equipment. By ensuring this
product is disposed of correctly, you will
help prevent potential negative
consequences for the environment and
human health, which could otherwise be
caused by inappropriate waste handling of
this product. For more detailed information
about recycling of this product, please
contact your local council, your household
waste disposal service or the shop where
you purchased the product.
Packaging materials
The materials marked with the symbol
are recyclable.
>PE<=polyethylene
>PS<=polystyrene
Should the appliance power supply
cable need to be replaced, this
must be carried out by a Service
Centre.
>PP<=polypropylene
This means that they can be recycled by disposing of them properly in appropriate collection containers.
Ecological hints
To save water, energy and to help protect
the environment, we recommend that you
follow these tips:
• Normally soiled laundry may be washed
without prewashing in order to save detergent, water and time (the environment is
protected too!).
• The machine works more economically if
it is fully loaded.
• With adequate pre-treatment, stains and
limited soiling can be removed; the laundry can then be washed at a lower temperature.
• Measure out detergent according to the
water hardness, the degree of soiling and
the quantity of laundry being washed.
Page 30

30 electrolux
Electrolux. Thinking of you.
Mehr zu unserem Denken finden Sie unter www.electrolux.com
INHALT
Sicherheitshinweise 30
Gerätebeschreibung 32
Bedienblende 33
Erste Inbetriebnahme 34
Persönliche Einstellungen 34
Täglicher Gebrauch 36
Praktische Tipps und Hinweise 42
Spülprogramme 44
SICHERHEITSHINWEISE
Wichtig! Bitte sorgfältig lesen und für
zukünftige Verwendung aufbewahren.
• Die Sicherheit Ihres Gerätes entspricht
den Industriestandards und den gesetzlichen Vorschriften zur Gerätesicherheit.
Dennoch sehen wir uns als Hersteller verpflichtet, Sie mit den folgenden Sicherheitshinweisen vertraut zu machen.
• Bewahren Sie die Bedienungsanleitung
zum Nachschlagen immer in der Nähe
des Gerätes auf. Wird das Gerät verkauft,
einem anderen Besitzer übergeben oder
bei einem Umzug zurückgelassen, muss
die Bedienungsanleitung zusammen mit
dem Gerät übergeben werden, damit der
neue Besitzer sich über die Funktionsweise des Gerätes und wichtige Warnhinweise informieren kann.
• Sie MÜSSEN sie vor der Installation oder
der Benutzung des Geräts gründlich lesen.
• Überprüfen Sie das Gerät vor der Inbetriebnahme auf Transportschäden.
Schließen Sie niemals ein beschädigtes
Gerät an. Sind Teile beschädigt, kontaktieren Sie Ihren Lieferanten.
• Wird das Gerät während der Wintermonate bei Minustemperaturen ausgeliefert.
Stellen Sie das Gerät zunächst für 24 Stunden bei Raumtemperatur auf, bevor Sie
es das erste Mal benutzen.
Allgemeine Sicherheitshinweise
• Aus Sicherheitsgründen dürfen keine Änderungen am Gerät vorgenommen werden.
Reinigung und Pflege 46
Was tun, wenn … 51
Technische Daten 54
Verbrauchswerte 55
Montage 55
Elektrischer Anschluss 59
Umwelttipps 59
Änderungen vorbehalten
• Während des Waschens mit hohen Temperaturen kann das Glas der Tür heiß werden. Berühren Sie es daher nicht!
• Stellen Sie sicher, dass keine kleinen
Haustiere in die Trommel klettern. Kontrollieren Sie daher vor dem Gebrauch die
Trommel.
• Alle harten und scharfen Gegenstände
wie Münzen, Sicherheitsnadeln, Nägel,
Schrauben usw. können das Gerät
schwer beschädigen und gehören nicht
in die Maschine.
• Verwenden Sie nur die empfohlenen
Waschmittel- und Weichspülermengen.
Zu viel Waschmittel kann die Textilien
schädigen. Beachten Sie die vom Hersteller empfohlenen Mengenangaben.
• Kleine Gegenstände wie z.B. Socken,
Schnürsenkel oder Gürtel können zwischen Behälter und Trommel rutschen.
Stecken Sie daher solche kleinen Gegenstände vor dem Waschen in ein Wäschenetz oder einen Kopfkissenbezug.
• Benutzen Sie Ihre Waschmaschine nicht
zum Waschen von Materialien ohne
Saum oder zerrissenen Stoffen.
• Nach dem Waschen und zum Reinigen
und Warten der Maschine sollten Sie immer den Netzstecker ziehen und den Wasserhahn zudrehen.
• Versuchen Sie unter keinen Umständen,
das Gerät selbst zu reparieren. Reparaturen durch unerfahrene Personen können
zu Verletzungen und schweren Funktionsstörungen führen. Wenden Sie sich an Ih-
Page 31

electrolux 31
ren Kundendienst. Bestehen Sie immer
auf Original-Ersatzteilen.
Montage
• Dieses Gerät ist schwer. Vorsicht beim
Transport.
• Überprüfen Sie beim Auspacken, dass
das Gerät nicht beschädigt ist. In Zweifelsfällen benutzen Sie es nicht, sondern wenden Sie sich an den Kundendienst.
• Alle Transportsicherungen und Verpackungsmaterialien müssen entfernt werden. Bei Missachtung dieser Anweisung
können ernsthafte Schäden am Produkt
und in der Wohnung entstehen. Siehe
den entsprechenden Abschnitt in der Gebrauchsanweisung.
• Vergewissern Sie sich nach dem Aufstellen, dass das Gerät nicht auf dem Wasserzulauf- oder Ablaufschlauch steht und
dass das Netzkabel nicht zwischen Gerät
und Wand eingeklemmt wird.
• Wird das Gerät auf einem Teppichboden
aufgestellt, stellen Sie mit den Füßen die
Höhe so ein, dass auch unter dem Gerät
eine ausreichende Luftzirkulation gewährleistet ist.
• Überprüfen Sie nach dem Aufstellen der
Maschine sämtliche Schläuche und Anschlüsse auf Dichtheit.
• Wenn das Gerät an einer frostgefährdeten Stelle aufgestellt wird, lesen Sie bitte
das Kapitel "Frostschutzmaßnahmen".
• Installationsarbeiten zum Aufstellen dieses Gerätes dürfen nur von einem qualifizierten Installateur oder einer kompetenten Fachkraft ausgeführt werden.
• Der elektrische Anschluss des Gerätes
darf nur von qualifizierten Elektrikern oder
einer Fachkraft ausgeführt werden.
Gebrauch
• Dieses Gerät ist zur Verwendung im Haushalt bestimmt. Es darf nicht für andere
Zwecke benutzt werden.
• Waschen Sie nur Textilien, die für Maschinenwäsche geeignet sind. Beachten Sie
die Pflegekennzeichen auf den Textiletiketten.
• Überfüllen Sie das Gerät nicht. Siehe hierzu die Waschprogramm-Tabelle.
• Kontrollieren Sie vor dem Waschen, dass
alle Taschen leer sind und dass alle Knöp-
fe und Reißverschlüsse geschlossen
sind. Waschen Sie keine ausgefransten
oder zerrissenen Textilien und behandeln
Sie Farb-, Tinten-, Rost- und Grasflecken
vor dem Waschen separat. Bügel-BHs
dürfen nicht in der Maschine gewaschen
werden.
• Textilien, die mit flüchtigen Erdölerzeugnissen in Kontakt gekommen sind, dürfen
nicht in der Maschine gewaschen werden. Wenn flüchtige Reinigungsflüssigkeiten verwendet wurden, müssen diese
Flüssigkeiten ausgewaschen werden, bevor das Kleidungsstück in das Gerät gegeben wird.
• Ziehen Sie niemals am Netzkabel, um
den Stecker aus der Steckdose zu ziehen; sondern immer am Stecker.
• Benutzen Sie die Waschmaschine niemals, wenn das Netzkabel beschädigt ist,
oder die Bedienblende, die Arbeitsplatte
oder der Sockel so beschädigt sind, dass
das Innere der Waschmaschine frei liegt.
Sicherheit von Kindern
• Personen (einschließlich Kinder), die aufgrund ihrer eingeschränkten physischen,
sensorischen oder geistigen Fähigkeiten
oder ihrer Unerfahrenheit oder Unkenntnis nicht in der Lage sind, das Gerät sicher zu benutzen, dürfen dieses Gerät
nicht ohne Aufsicht oder Anweisung
durch eine für ihre Sicherheit verantwortliche Person benutzen.
• Kinder sind sorgsam zu beaufsichtigten,
so dass sie nicht mit dem Gerät spielen
können.
• Verpackungen (z.B. Folien, Polystyrol)
können eine Gefahr für Kinder darstellen Erstickungsgefahr! Halten Sie solche Materialien von Kindern fern.
• Bewahren Sie Waschmittel außerhalb der
Reichweite von Kindern auf.
Page 32

32 electrolux
•
Stellen Sie sicher, dass Kinder oder Haustiere nicht in die Trommel klettern. Damit
sich kleine Kinder oder Haustiere nicht in
der Trommel einschließen können, ist dieses Gerät mit einer speziellen Sicherung
ausgestattet. Zum Aktivieren der Kindersicherung drehen Sie den Knopf in der Tür
(ohne Druck) nach rechts, bis sich die Kerbe in horizontaler Position befindet. Falls
nötig, benutzen Sie hierzu eine Münze.
Um diese Funktion zu deaktivieren und
die Tür wieder schließen zu können, drehen Sie den Knopf nach links, bis die Kerbe wieder in vertikaler Position ist.
GERÄTEBESCHREIBUNG
Ihr neues Gerät erfüllt alle Anforderungen moderner Wäschepflege, mit großen Einsparungen von Wasser, Waschmittel und Energie. Das neue Waschsystem ermöglicht die
volle Ausnutzung des Waschmittels und reduziert den Wasser- und Energieverbrauch.
1 2
3
1 Waschmittelschublade
2 Bedienfeld
3 Trommelbeleuchtung
4 Türgriff
4
5
6
7
5 Typenschild
6 Ablaufpumpe
7 Schraubfüße
Page 33

Waschmittelschublade
Fach für Waschmittel für die Vorwäsche
und Einweichphase oder für Fleckentferner
während der Flecken-Behandlungsphase
(falls verfügbar). Vorwasch- und Einweichmittel werden zu Beginn des Waschprogramms eingespült. Der Fleckentferner wird
während der Flecken-Behandlungsphase
zugegeben.
Fach für Pulver- oder flüssige Waschmittel, die für die Hauptwäsche verwendet werden. Wenn Sie flüssiges Waschmittel verwenden, füllen Sie es erst kurz vor dem
Programmstart ein.
Fach für flüssige Pflegemittel (Weichspüler, Stärke).
Beachten Sie bezüglich der Waschmittelmengen die Empfehlungen des Waschmittelherstellers und füllen Sie die Waschmittelschublade höchstens bis zur Markierung «MAX» . Füllen Sie Weichspüler oder
Stärkezusätze in die Kammer, bevor Sie
das Waschprogramm starten.
BEDIENBLENDE
electrolux 33
Nachstehend ist die Bedienleiste abgebildet. Auf dem Bedienfeld sind der Programmwahlschalter, Tasten, Kontrolllampen und das Display angebracht. Auf diese wird auf
den folgenden Seiten durch die entsprechenden Nummern Bezug genommen.
1
1. Programmwahlschalter
2.
Display
3. Temperatur-Taste
4. Drehzahlreduzierungstaste
2
3 4 5 6 7 8
5. Zusatzfunktionen
6.
Bestätigungstaste
7. Start/Pause-Taste
8. Time Manager (Zeiteinstellung)
Page 34

34 electrolux
ERSTE INBETRIEBNAHME
• Achten Sie darauf, dass der elektrische Anschluss und der Wasseranschluss der Installationsanweisung
entsprechen.
• Entfernen Sie den Polystyrolblock
und alles andere Material aus der
Trommel.
• Starten Sie vor dem ersten Waschgang ein Programm für Koch-/Bunt-
PERSÖNLICHE EINSTELLUNGEN
Auswählen der Sprache
Beim ersten Einschalten des Geräts müssen Sie den Programmwahlschalter auf 1
drehen und die gewünschte Sprache auswählen. Beim erneuten Einschalten des Geräts werden alle Bedienungshinweise in der
gewählten Sprache angezeigt.
Wichtig!
Falls das Display keine Sprache anzeigt, wurde das Gerät bereits einmal eingeschaltet.
Wenn Sie die Spracheinstellung ändern
möchten, drücken Sie die Tasten 3 und 4
gleichzeitig 6 Sekunden lang, um das
Sprachmenü zu aktivieren. Drücken Sie die
Tasten 5 („Nach oben“
ten“
), um alle verfügbaren Sprachen zu
durchlaufen. Drücken Sie die Taste 6 zweimal zur Bestätigung Ihrer Auswahl.
Einstellen der Uhrzeit ( Zeit )
Nach Auswahl der Sprache müssen Sie vor
dem ersten Waschen die Uhrzeit einstellen.
Denken Sie daran, diese Einstellung bei jeder Umstellung auf Sommer-/Winterzeit anzupassen.
Mithilfe der Uhrzeiteinstellung können Sie
die aktuelle Uhrzeit ändern/einstellen. Die
Uhrzeit muss immer aktualisiert werden, da
von ihr das ENDE der laufenden Programmdauer abhängt.
Mit einem kurzen/einfachen Druck der Tasten 5 lässt sich die Uhrzeit minutenweise ändern. Wenn Sie diese Tasten länger gedrückt halten, wird die Uhrzeit in 10-MinutenSchritten geändert. Drücken Sie die Taste
6 , um die aktuelle Uhrzeit anzupassen.
Wichtig!
Wenn das Gerät bereits einmal eingeschaltet wurde, drücken Sie die Tasten 5 , um
das Optionsmenü zu aktivieren.
oder „Nach un-
wäsche mit der höchsten Temperatur ohne Wäsche, um alle fertigungsbedingten Rückstände aus der Trommel und der Wanne zu entfernen. Füllen Sie einen halben Messbecher
Waschmittel in das Hauptfach der
Waschmittelschublade und starten
Sie das Gerät.
Drücken Sie erneut dieselben Tasten, um alle verfügbaren Optionen bis zum Menü „Einstellungen“ zu durchlaufen ( Einstellungen ).
Drücken Sie die Taste 6 , um das Menü aufzurufen. Drücken Sie die Tasten 5 , um alle
Einstellungen zu durchlaufen, bis die Position zum Einstellen der Uhrzeit angezeigt
wird. Drücken Sie die Taste 6 , um Ihre Auswahl zu bestätigen, und stellen Sie dann die
Uhrzeit ein.
Anpassen der Werkseinstellungen des
Geräts
Das Gerät verfügt über ein Menü mit Einstellungen, die es Ihnen ermöglichen, die Werkseinstellungen nach Belieben zu ändern.
Drücken Sie nach dem Einschalten des Geräts (durch Drehen des Programmwahlschalters auf die Position 1 ) die Tasten 5 , um
das Menü „Optionen“ zu aktivieren. Drücken Sie erneut dieselben Tasten, um alle
verfügbaren Optionen bis zum Menü „Einstellungen“ zu durchlaufen. Drücken Sie die
Taste 6 , um das Menü aufzurufen. Drücken
Sie erneut die Tasten 5 , um alle Einstellungen zu durchlaufen, und drücken Sie dann
die Taste 6 , um Ihre Auswahl zu bestätigen.
Einstellen der Lautstärke ( Lautstärke )
Mithilfe der Lautstärkeneinstellung können
Sie die Lautstärke des Tons beeinflussen.
Drücken Sie die Tasten 5 , um eine Lautstärkenstufe zwischen 0 und 9 (0 = kein Ton; 9
= maximale Lautstärke) zu wählen.
Drücken Sie die Taste 6 , um Ihre Auswahl
zu bestätigen.
Aktivieren der Kindersicherung
( Kindersicherung )
Ihr Gerät ist mit einer KINDERSICHERUNG
versehen, die es Ihnen ermöglicht, das Ge-
Page 35

electrolux 35
rät mit geschlossener Tür unbeaufsichtigt
zu lassen, ohne Gefahr zu laufen, dass sich
Kinder verletzen oder die Waschmaschine
beschädigen können.
Stellen Sie diese Option ein, bevor Sie die
Taste 7 drücken und nachdem Sie das gewünschte Waschprogramm ausgewählt haben.
Diese Funktion bleibt auch nach dem Abschalten des Geräts aktiv.
So stellen Sie die Kindersicherung ein:
• drücken Sie die Tasten 5 , um das Menü
„Optionen“ zu aktivieren.
• drücken Sie die nach oben oder nach un-
ten zeigenden Tasten 5 , um die Kindersicherung einzustellen
• drücken Sie die Taste 6 , um diese Opti-
on zu aktivieren. Für das entsprechende
Symbol wird der Status von „Aus“ in „Ein“
geändert, und Sie werden aufgefordert, 5
Sekunden lang gleichzeitig
und zu
drücken, um das Gerät freizuschalten.
• wenn Sie die Taste 3 oder 4 drücken,
wird auf dem Display wieder der Standard-
status angezeigt.
Wenn Sie nach dem Programmstart mit aktivierter Kindersicherung eine beliebige Taste drücken, wird auf dem Display der Hinweis angezeigt, dass die Maschine gesperrt
ist und mit der Tastenkombination freigeschaltet werden kann.
Um nach Ablauf des Programms ein neues
Programm auswählen zu können, müssen
Sie gleichzeitig mehrere Sekunden lang die
Tasten 5 drücken, bis auf dem Display der
Hinweis zu sehen ist, dass die Maschine freigeschaltet ist.
Einstellen der Helligkeit ( Helligkeit )
Mit der Helligkeitsregelung können Sie die
Stärke der Hintergrundbeleuchtung des Displays ändern.
Drücken Sie die Tasten 5 , um die Helligkeit
zu erhöhen oder zu mindern.
Sie können zwischen den Helligkeitsstufen
0 bis 9 wählen ( 0 = Minimum – 9 = Maximum).
Drücken Sie die Taste 6 , um Ihre Auswahl
zu bestätigen.
Einstellen des Kontrasts ( Kontrast )
Mit der Kontrasteinstellung können Sie die
optischen Eigenschaften des Displays ändern.
Drücken Sie die Tasten 5 , um den Kontrast
zu verstärken oder zu reduzieren.
Sie können zwischen den Kontraststufen 0
bis 9 wählen ( 0 = Minimum – 9 = Maximum).
Zurücksetzen sämtlicher Einstellungen
( Zurücksetzen der Einstellungen )
Mit dieser Funktion können Sie die Werkseinstellungen wiederherstellen.
Drücken Sie die Taste 6 , um diese Funktion zu aktivieren.
Drücken Sie die Taste 6 , um Ihre Auswahl
zu bestätigen.
Rückkehr zum Hauptmenü ( Zurück )
Für die Rückkehr zum Optionsmenü suchen Sie die Option
, indem Sie die Tas-
ten 5 drücken.
Drücken Sie die Taste 6 , um Ihre Auswahl
zu bestätigen.
Akustische Signale
Das Gerät gibt in folgenden Fällen ein akustisches Signal aus:
• am Ende des Programms
• im Fall einer Betriebsstörung
Wenn Sie die akustischen Signale mit Ausnahme des Warnsignals für Betriebsstörungen abstellen möchten, halten Sie sich an
die Anweisungen im vorangehenden Kapitel
„Einstellung der Lautstärke“.
Page 36

36 electrolux
TÄGLICHER GEBRAUCH
Wäsche einfüllen
Öffnen Sie die Tür, indem Sie den Türgriff behutsam nach außen ziehen. Legen Sie die
Wäsche Stück für Stück lose in die Trommel. Die Tür schließen.
der Schublade darf nicht überschritten werden). Schließen Sie die Waschmittelschublade vorsichtig.
Messen Sie Waschmittel und Weichspüler ab
Ziehen Sie die Waschmittelschublade bis
zum Anschlag heraus. Messen Sie die benötigte Waschmittelmenge ab und schütten
Sie das Waschmittel in die Kammer für den
Hauptwaschgang
oder in das entsprechende Fach, wenn das ausgewählte Programm/Option dies verlangt (Näheres hierzu siehe "Waschmittelschublade").
Wählen des gewünschten Programms
Drehen Sie den Programmwahlschalter ( 1 )
auf das gewünschte Programm. Nach dem
Einschalten des Geräts ist ein Jingle zu hören; gleichzeitig wird auf dem Display das
Markenlogo eingeblendet und in den beiden
letzten Displayzeilen erscheint für einige Sekunden eine Kurzbeschreibung des gewählten Programms
Nach der Programmauswahl zeigt das Gerät auf dem Display ( 2 ) folgende Informationen an:
2.1 Temperatur
2.2 Schleuderdrehzahl
2.3 wählbare Optionssymbole
2.4 Verschmutzungsgrad
2.5 Dauer des Waschprogramms
2.6 das voraussichtliche Ende des Wasch-
programms
2.1 2.2 2.3 2.4 2.6
Füllen Sie bei Bedarf Pflegemittel in die markierte Kammer
3) Nur bei Programmen für Koch-/Buntwäsche , Pflegeleichtes und Feinwäsche .
(die Markierung "MAX" in
Die Taste 7 beginnt zu blinken.
3)
2.5
Page 37

electrolux 37
Der Programmwahlschalter lässt sich nach
rechts oder links drehen. Drehen Sie den
Programmwahlschalter auf O , um ein Programm abzubrechen bzw. das Gerät auszuschalten
Nach Ablauf des Programms muss der
Programmwahlschalter zum Ausschalten des Geräts wieder auf O gedreht
werden.
Wichtig! Wird der Programmwahlschalter
auf ein anderes Programm gestellt,
während das Gerät arbeitet, erscheint die
Meldung im Display, dass der
Programmwahlschalter in die zuletzt
verwendete Stellung gebracht werden soll.
Die Maschine führt das neu gewählte Programm nicht aus.
Display
Mit dem DISPLAY können mit nur wenigen Bedienelementen (1 Programmwahlschalter und 8 Tasten) eine Vielzahl von Funktionen eingestellt und miteinander kombiniert werden. Die Bedienung ist dank des interaktiven Displays
denkbar einfach. Interaktiv bedeutet,
dass das Display der Waschmaschine
jede von Ihnen getroffene Wahl widerspiegelt. Damit wird gewährleistet,
dass nur die möglichen Einstellungen
gewählt werden. Die aktuellen Einstellungen werden zu jeder Zeit auf dem
Display und in den Optionszeilen angezeigt.
Auf dem Display werden folgende Informationen angezeigt:
•
Dauer des gewählten Programms
Nach Auswahl eines Programms wird die
Dauer des Waschprogramms ( 2.5 ) und
das voraussichtliche Ende des Waschgangs ( 2.6 ) in Stunden und Minuten
(zum Beispiel 20:33 ) angezeigt.
Die Dauer wird automatisch aufgrund der
maximal empfohlenen Beladung für jede
Wäscheart errechnet.
Nach dem Programmstart wird die verbleibende Zeit im Minutentakt aktualisiert.
• Programmablaufanzeige
Nachdem Sie die Taste 7 gedrückt haben, wird auf dem Display die laufende
Phase angezeigt. Auf dem Display wird
das Symbol der gewählten Wäscheart,
die aktuelle Waschphase, die Dauer des
Waschprogramms und das Ende des
Waschgangs eingeblendet. Während der
Waschphase werden auf dem Display zudem einige Blasen angezeigt, die die Bewegung des Wassers simulieren.
Siehe nachstehende Abbildung:
•
Start-/Pause
Der gewählte Verzögerungswert (max. 20
Stunden) wird (sobald das Gerät den Betrieb aufnimmt) auf dem Display ( 2.5 ) neben dem relevanten aufleuchtenden Symbol
angezeigt. Der Verzögerungswert
nimmt minütlich ab.
• Alarmcodes
Bei Betriebsstörungen kann die Maschine
verschiedene Alarmcodes ausgeben,
zum Beispiel „ Wassereinlauf nicht möglich. Prüfen, ob der Wasserhahn geöffnet
ist und dann Taste START/PAUSE drücken. “ (siehe Abschnitt „Was tun,
wenn...“).
• Programmende
Nach Ablauf des Programms werden auf
dem Display abwechselnd die Hinweise
angezeigt, dass die Tür entriegelt und der
Waschgang beendet ist. Das Türsymbol
leuchtet weiterhin auf, um zu signalisieren, dass der Waschgang beendet ist
und die Tür geöffnet werden kann.
Zusatzfunktionstasten
Je nach Programm lassen sich mehrere Zusatzfunktionen kombinieren. Diese
müssen nach der Wahl des gewünschten Programms und vor dem Drücken
von Taste 7 gewählt werden.
Wichtig! Hinweise zur Kombinierbarkeit der
Waschprogramme mit den Optionen finden
Sie im Abschnitt „Waschprogramme“.
Page 38

38 electrolux
Wählen Sie die Temperatur (Taste 3)
Drücken Sie wiederholt die Taste 3 ,
um die Temperatur zu erhöhen oder zu
senken, wenn Sie mit einer anderen
Temperatur als der vom Gerät vorgeschlagenen waschen möchten (Position 2.1 im Display).
Wichtig! Weitere Informationen zu den
maximal zulässigen Temperaturen und
Mindesttemperaturen für die einzelnen
Waschprogramme finden Sie unter
„Waschprogramme“.
= Kaltwäsche.
Wählen Sie die Schleuderdrehzahl oder
die verfügbaren Optionen (Taste 4)
Drücken Sie die Taste 4 wiederholt, um die
Schleuderdrehzahl zu ändern, wenn Sie mit
einer anderen Schleuderdrehzahl als der
vom Gerät vorgeschlagenen schleudern
möchten.
Wichtig! Die maximale Schleuderdrehzahl
für das gewählte Waschprogramm wird im
Display ( 2.2 ) angezeigt.
Durch Drücken der Taste 4 können Sie
auch eine der folgenden Optionen wählen:
Kein Schleudergang : Diese Option un-
terdrückt alle Schleuderphasen und erhöht
in einigen Programmen die Anzahl der Spülgänge.
Spül-Stopp ( Spül-Stopp ) : Bei Aus-
wahl dieser Option wird das Wasser des letzten Spülgangs nicht abgepumpt, so dass
die Wäschestücke möglichst wenig knittern.
Nach Abschluss des Waschprogramms
zeigt das Display das Symbol des gewählten Programms und die Meldung „ Beendet “ an, während gleichzeitig das Zyklusende und die aktuelle Uhrzeit eingeblendet werden ( 2.5 und 2.6 ). Der Summer (sofern aktiviert) ertönt kurzzeitig, die Kontrolllampe
der Taste 7 ist erloschen und die Tür ist verriegelt, um zu signalisieren, dass das Wasser abgepumpt werden muss.
Zum Abpumpen des Wassers lesen Sie
bitte den Abschnitt „Am Programmende“.
Nachtprogramm ( Nachtpro-
gramm ) : Bei Auswahl des Nachtpro-
gramms pumpt die Waschmaschine das
Wasser des letzten Spülgangs nicht ab, damit die Wäsche nicht knittert.
Da bei diesem Waschgang nicht geschleudert wird, ist er besonders geräuscharm
und kann nachts oder zu Tageszeiten mit
günstigeren Stromkosten ausgeführt werden. Bei einigen Programmen werden die
Spülgänge mit mehr Wasser durchgeführt.
Nach Abschluss des Waschprogramms
zeigt das Display das Symbol des gewählten Programms und (unter dem Symbol des
gewählten Programms und unter der Meldung „ Beendet “) das Zyklusende und die
aktuelle Uhrzeit an ( 2.5 und 2.6 ). Die Kontrolllampe der Taste 7 ist erloschen und die
Tür ist verriegelt, um zu signalisieren, dass
das Wasser abgepumpt werden muss.
Zum Abpumpen des Wassers lesen Sie
bitte den Abschnitt „Am Programmende“.
Auswahl der Optionen
Je nach ausgewähltem Programm werden
nur bestimmte Optionen zur Verfügung gestellt und während der Programmwahl auf
dem Display eingeblendet ( 2.3 und 2.4 ).
Anmerkung: Nicht alle Optionen sind untereinander kombinierbar. Die Symbole für
nicht miteinander kombinierbare Optionen
werden ausgeblendet.
Wichtig! Hinweise zur Kombinierbarkeit der
Waschprogramme mit den Optionen finden
Sie im Abschnitt „Waschprogramme“.
Drehen Sie zum Wählen der gewünschten
Optionen den Programmwahlschalter ( 1 )
zunächst auf das gewünschte Programm
und drücken Sie nicht die Taste 7 .
Drücken Sie die Tasten 5 , um das Menü
„Optionen“ zu aktivieren. Mit der Taste
„Nach oben“ ,
oder „Nach unten“ können Sie alle verfügbaren Optionen durchlaufen.
Das Display zeigt die gewählte Option großflächig hell hinterlegt an. Das entsprechende Symbol wird auf der rechten Seite des
Displays eingeblendet und unmittelbar darunter erscheint eine Kurzbeschreibung des
Optionsstatus („Aus“ oder „Ein“). Siehe
nachstehendes Beispiel:
Page 39

Drücken Sie die Taste 6 , um Ihre Wahl zu
aktivieren und zu bestätigen, drücken Sie
sie erneut, um die gewählte Option wieder
zu deaktivieren.
Nachdem Sie alle gewünschten Optionen
ausgewählt haben, drücken Sie die Tasten
3 oder 4 , oder warten Sie einfach 10 Sekunden, bis wieder der Standardstatus des
Displays aktiviert wird.
Die ausgewählten Symbole werden auf
dem Display angezeigt.
Vorwaschphase ( Vorwäsche ) : Wäh-
len Sie diese Option, wenn die Wäsche vor
dem Hauptwaschgang vorgewaschen werden soll.
Die Vorwäsche endet bei Baumwolle und
synthetischen Stoffen mit einem kurzen
Schleudergang von 650 U/min, während
beim Feinwaschprogramm das Wasser nur
abgepumpt wird.
Leichteres Bügeln ( Bügelquick ) :
Bei Auswahl dieser Option wird die Wäsche
sanft gewaschen und geschleudert, um Knitterbildung zu vermeiden. Somit wird das Bügeln einfacher. Das Gerät führt darüber hinaus zusätzliche Spülgänge aus. Wenn Sie
diese Option für Baumwollprogramme wäh-
electrolux 39
len, wird die Schleuderdrehzahl automatisch auf 900 U/min reduziert
Zusätzliche Spülgänge ( Extra Spü-
len ) : Dies ist zu empfehlen in Gebieten mit
besonders weichem Wasser und für Menschen, die unter Waschmittelallergien leiden. Bei Auswahl dieser Funktion werden
mehrere zusätzliche Spülgänge durchgeführt.
Zeitvorwahl ( Ende-Zeit ) : Mit dieser
Option können Sie den Start des Waschprogramms um 30 - 60 - 90 Minuten, 2 Stunden und dann jeweils um 1 Stunde bis 20
Stunden verzögern. Die gewählte Verzögerung wird auf dem Display angezeigt. Die angezeigte Ende-Zeit erhöht sich und gibt damit die gewählte Startverzögerung an.
Wählen Sie zuerst das Programm, dann diese Option und drücken Sie anschließend
die Taste 7 .
Wenn Sie während der laufenden Zeitvorwahl noch zusätzliche Wäsche in die Maschine füllen möchten, drücken Sie bitte die
Taste 7 , um das Gerät auf Pause zu stellen
Füllen Sie Wäsche ein, schließen Sie die Tür
und drücken Sie die Taste 7 erneut.
Sie können die Zeitvorwahl vor dem Drücken der Taste 7 jederzeit abbrechen.
Auswahl der Zeitvorwahl
•
mit der Taste „Nach oben“
„Nach unten“
können Sie das Menü
oder
„Optionen“ durchlaufen, bis die Zeitvorwahl angezeigt wird
• drücken Sie die Taste 6 , um diese Opti-
on zu aktivieren (die angezeigte Zeit beginnt zu blinken)
•
mit der Taste „Nach oben“
„Nach unten“
können Sie die Verzöge-
oder
rungszeit erhöhen oder reduzieren
•
drücken Sie die Taste 6 , um die Verzögerung zu bestätigen
• wenn Sie die Taste 3 oder 4 drücken,
wird auf dem Display wieder der Standardstatus angezeigt
•
drücken Sie die Taste 7 , um das Programm zu starten. Das Programm beginnt, sobald die Zeitvorwahl abgelaufen
ist.
Löschen der Zeitvorwahl
•
drücken Sie die Taste 7 , um den Waschgang zu unterbrechen
Page 40

40 electrolux
•
mit der Taste „Nach oben“
„Nach unten“
können Sie das Menü
oder
„Optionen“ durchlaufen, bis die Zeitvorwahl angezeigt wird
• drücken Sie die Taste 6 , um diese Opti-
on zu aktivieren (die angezeigte Zeit beginnt zu blinken)
•
mit der Taste „Nach unten“
können
Sie die Startverzögerung bis auf die aktuelle Uhrzeit reduzieren.
• drücken Sie die Taste 6 , um Ihre Aus-
wahl zu bestätigen
• wenn Sie die Taste 3 oder 4 drücken,
wird auf dem Display wieder der Standardstatus angezeigt
• drücken Sie die Taste 7 , um das Pro-
gramm sofort zu starten.
Die Zeitvorwahl kann nicht zusammen mit
dem Programm
„Abpumpen“ gewählt
werden.
Häufig verwendete Programme ( Me-
mory ) : Programmeinstellungen können gespeichert werden (z. B. Baumwolle, 60 °C,
1200 U/min, mit Vorwasch- und Extraspülgang). Es stehen dafür 2 Speicherplätze auf
den letzten 2 Positionen des Programmwahlschalters zur Verfügung ( 1 ). Das gespeicherte Programm kann wie jedes andere
Waschprogramm mit dem Programmwahlschalter gewählt werden.
Speichern des am häufigsten verwendeten
Waschprogramms:
• Wählen Sie das Programm mit den gewünschten Optionen
• drücken Sie die Tasten 5 , um das Menü
„Optionen“ zu aktivieren
•
drücken Sie die Taste „Nach oben“
oder „Nach unten“ , um die Position
zum Speichern des am häufigsten verwendeten Waschprogramms ( Memory speichern ) anzuzeigen, und drücken Sie die
Taste 6
•
drücken Sie die Taste „Nach oben“
oder „Nach unten“ , um eine der Memory-Positionen (1-2) zum Speichern Ihres Waschprogramms auszuwählen
•
drücken Sie die Taste 6 , um das ausgewählte Programm zu speichern. Das Display meldet in einem hervorgehobenen
Modus, dass das Programm gespeichert
wurde.
•
wenn Sie die Taste 3 oder 4 drücken,
wird auf dem Display wieder der Standard-
status angezeigt.
Wiederholen Sie die beschriebenen Schritte
von Anfang an, um das gespeicherte Programm zu ändern.
Hinweis
Ist der Speicherplatz bereits durch ein zuvor
ausgewähltes Programm besetzt, meldet
das Display, dass die Memory-Position bereits belegt ist. Drücken Sie die Taste 6 ,
um die Belegung zu überschreiben, oder
drücken Sie die Tasten
oder , um
den Vorgang abzubrechen. Drücken Sie anschließend die Taste 6 , um das neue Programm zu speichern.
Die Memory-Programme können nicht gelöscht werden. Sie können jedoch durch
Auswählen eines anderen Programms überschrieben werden.
Waschleitfaden ( Leitfaden Wa-
schen ) : Das Gerät verfügt über einen
Waschleitfaden, der Sie bei der Auswahl
der am besten geeigneten Temperatur, der
Schleuderdrehzahl und Waschoptionen für
Ihre Wäsche unterstützt.
Der Waschleitfaden enthält u. a. eine Fleckenhilfe mit wichtigen Ratschlägen zur Entfernung der am häufigsten auftretenden Flecken ( Leitfaden Flecken ) und einen „DemoModus“ für Vorführungen in Geschäften
(nicht für den Kunden bestimmt).
Auswahl des Waschleitfadens:
•
drücken Sie die Tasten 5 , um das Menü
„Optionen“ zu aktivieren.
•
drücken Sie die Taste „Nach oben“
oder „Nach unten“ , um den Wasch-
leitfaden einzublenden.
• drücken Sie die Taste 6 , um den Wasch-
leitfaden zu öffnen
•
wenn Sie die Taste „Nach oben“
„Nach unten“
drücken, können Sie je-
oder
den einzelnen Leitfaden ( Leitfaden Tem-
peratur , Leitfaden Schleuderdrehzahl ,
Leitfaden Demo ...) anzeigen
• drücken Sie die Taste 6 , um den ausge-
wählten Leitfaden zu öffnen, und drücken
Sie dann „Nach oben“
, um die Erläuterungen zum aus-
ten“
oder „Nach un-
gewählten Leitfaden anzuzeigen
• um einen anderen Leitfaden zu Rate zu
ziehen, müssen Sie mit dem Symbol „Zu-
rück“
zum Waschleitfaden zurückkeh-
Page 41

electrolux 41
ren und den Vorgang ab Punkt 4 wiederholen
• wenn Sie die Taste 3 oder 4 drücken,
wird auf dem Display wieder der Standardstatus angezeigt.
Auswahl der Option „Time
Manager“ (Taste 8)
Time Manager
01:50
18:05
Drücken Sie diese Taste zweimal, um die
Option Time Manager zu aktivieren.
Mit dieser Funktion können Sie die Dauer
des Waschprogramms, die Ihnen automatisch vom Gerät vorgeschlagen wird, ändern. Durch wiederholtes Drücken der TimeManager-Tasten +/- können Sie die Dauer
des Waschzyklus verlängern oder abkürzen.
Die Time Manager-Option kann nicht zusammen mit dem Energiesparprogramm gewählt werden.
Das Symbol für den Verschmutzungsgrad
(
) wird auf dem Display angezeigt. Dieses Symbol ändert sein Aussehen in Abhängigkeit mit dem von Ihnen gewählten Verschmutzungsgrad.
Verschmut-
zungsgrad
Intensiv Für stark ver-
Normal Für normal ver-
Täglich Für leicht ver-
Leicht Für leicht ver-
Kurz Für kaum ver-
Extra Kurz
Auffrischen
Symbol Gewebetyp
schmutzte Wäsche
schmutzte Wäsche
schmutzte Wäsche
schmutzte Wäsche
schmutzte Wäsche
1)
1)
Für Wäsche, die
nur sehr kurz benutzt oder getragen wurde
Nur zum Auffrischen der Wäsche
Verschmut-
zungsgrad
(Super) Auffri-
1)
schen
1) Wir empfehlen Ihnen, die Beladung zu reduzieren
(siehe Tabelle „Waschprogramme“).
Symbol Gewebetyp
Zum Auffrischen
einiger weniger
Wäschestücke
Drücken Sie die Taste 7, um das
Programm zu starten.
Zum Starten des ausgewählten Programms
drücken Sie die Taste 7 ; die grüne Kontrolllampe hört auf zu blinken.
Auf dem Display wird das Symbol und abwechselnd der Name und der laufende
Waschgang des gewählten Programms eingeblendet, um damit zu signalisieren, dass
die Maschine in Betrieb und die Tür verriegelt ist.
Zur Unterbrechung eines laufenden Programms drücken Sie die Taste 7 : die grüne
Kontrolllampe beginnt zu blinken und das
Symbol des ausgewählten Programms wird
auf dem Display angezeigt. Eine Meldung
auf dem Display fordert Sie auf, die Taste 7
zu drücken, um den Betrieb des Geräts
noch einige Sekunden fortzusetzen und
dann zu unterbrechen. Um das Programm
an der Stelle fortzusetzen, an der es unterbrochen wurde, drücken Sie erneut die
Taste 7 .
Wenn Sie eine Zeitvorwahl ausgewählt haben, beginnt das Gerät jetzt mit dem Herunterzählen.
Ändern einer Option oder eines
laufenden Programms
Sie haben die Möglichkeit, nur die auf dem
Display angezeigten Optionen zu ändern, indem Sie die Tasten 5 ( „Nach oben“ oder
„Nach unten“ ) drücken, bevor das Programm die Optionen ausführt. Bevor Sie Änderungen vornehmen können, müssen Sie
den Waschgang unterbrechen. Drücken Sie
dazu die Taste 7 .
Ein laufendes Programm können Sie nur ändern, indem Sie es zurücksetzen . Drehen Sie den Programmwahlschalter auf O
und anschließend auf die Position des neuen Programms; drücken Sie die Taste 6 ,
um das alte Waschprogramm zu löschen.
Starten Sie das neue Programm, indem Sie
die Taste 7 erneut drücken. Das Waschwas-
Page 42

42 electrolux
ser in der Trommel wird dabei nicht abgepumpt.
Unterbrechen eines Programms
Drücken Sie die Taste 7 , um ein laufendes
Programm zu unterbrechen. Die entsprechende Kontrolllampe beginnt zu blinken.
Um das Programm fortzusetzen, drücken
Sie die Taste erneut.
Abbrechen eines Programms
Drehen Sie den Programmwahlschalter auf
O und anschließend auf das neu gewählte
Programm. Drücken Sie die Taste 6 , um
das laufende Programm zu unterbrechen.
Drücken Sie jetzt die Taste 7 zum Starten
des neuen Programms.
Öffnen der Tür nach dem
Programmstart
Drücken Sie die Taste 7 , um den Waschgang zu unterbrechen. Die entsprechende
Meldung wird auf dem Display angezeigt.
Wenn die Tür nicht geöffnet werden kann,
bedeutet dies, dass die Maschine bereits
aufheizt oder der Wasserstand bereits über
den Türrand reicht.
In diesem Fall lässt sich die Tür nicht öffnen.
Wenn Sie die Tür trotzdem öffnen müssen,
müssen Sie das Gerät ausschalten, indem
Sie den Programm-Wahlschalter auf O drehen. Nach einigen Minuten kann die Tür geöffnet werden ( Achten Sie auf Wasser-
stand und Temperatur! ).
Am Programmende
Das Gerät schaltet automatisch ab.
Wenn die Optionen Spül-Stopp oder
Nachtprogramm gewählt wurden, erlischt
die Kontrolllampe der Taste 7 , ist das Symbol des gewählten Programms und die Meldung Beendet auf dem Display zu sehen
und bleibt die Tür gesperrt, um zu signalisieren, dass das Wasser abgepumpt werden
muss, bevor die Tür geöffnet wird.
Abpumpen des Wassers :
• Wählen Sie ein Abpump- oder Schleuder-
programm.
• Verringern Sie bei Bedarf die Schleuder-
drehzahl durch entsprechendes Drücken
der Taste
• drücken Sie die Taste 7
• nach Abschluss des Programms wird auf
dem Display das Symbol
wechselnd die Meldung angezeigt, dass
die Tür entriegelt und das Programm beendet ist. Die Tür kann geöffnet werden.
Drehen Sie den Programmwahlschalter auf
O , um das Gerät abzuschalten. Nehmen
Sie die Wäsche heraus und prüfen Sie sorgfältig, ob die Trommel leer ist.
Wenn Sie keinen weiteren Waschgang starten möchten, schließen Sie den Wasserhahn. Lassen Sie die Tür offen, damit sich
kein Schimmel und keine unangenehmen
Gerüche bilden.
(Tür) und ab-
Standby : sobald das Programm einige Minuten beendet ist, wird der Energiesparmodus aktiviert. Die Display-Helligkeit wird re-
duziert. Wenn Sie jetzt eine beliebige Taste
drücken, können Sie den Energiesparmodus verlassen.
PRAKTISCHE TIPPS UND HINWEISE
Sortieren der Wäsche
Beachten Sie die Textilpflegesymbole auf jedem Kleidungsetikett und die Waschhinweise des Herstellers. Sortieren Sie die Wäsche nach: Kochwäsche, Buntwäsche, Synthetik, Feinwäsche, Wolle.
Vor dem Einfüllen der Wäsche
Waschen Sie niemals weiße Wäsche und
Buntwäsche zusammen. Die weiße Wäsche
könnte sich verfärben oder vergrauen.
Neue gefärbte Wäschestücke können beim
ersten Waschen färben; daher sollten sie
das erste Mal getrennt gewaschen werden.
Knöpfen Sie Kopfkissen zu und schließen
Sie Reißverschlüsse, Haken und Druckknöpfe. Binden Sie Gürtel und lange Bänder zusammen.
Entfernen Sie hartnäckige Flecken vor dem
Waschen.
Reinigen Sie besonders verschmutzte Stellen mit einem speziellen Waschmittel oder
Waschmittelpaste vor.
Behandeln Sie Gardinen besonders sorgsam. Entfernen Sie Haken oder stecken Sie
diese Wäschestücke in eine Tasche oder
ein Wäschenetz.
Page 43

electrolux 43
Entfernen von Flecken
Hartnäckige Flecken lassen sich möglicherweise nicht allein mit Wasser und Waschmittel entfernen. Sie sollten daher vor dem Waschen vorbehandelt werden.
Blut: Behandeln Sie frische Flecken mit kaltem Wasser. Bereits getrocknete Flecken
lassen Sie über Nacht in Wasser mit einem
Spezialwaschmittel einweichen.
Farben auf Ölbasis: Befeuchten Sie die Flecken mit Benzin-Fleckentferner, legen Sie
das Kleidungsstück auf ein weiches Tuch
und tupfen Sie den Fleck ab; wiederholen
Sie diesen Vorgang mehrere Male.
Getrocknetes Schmierfett: Feuchten Sie
den Fleck mit Terpentin an, legen Sie das
Kleidungsstück auf eine weiche Oberfläche
und tupfen Sie den Fleck mit einem Baumwolltuch ab.
Rost: Verwenden Sie in heißem Wasser gelöste Oxalsäure oder einen Rostentferner im
kalten Zustand. Bei älteren Rostflecken wurde wahrscheinlich bereits die Gewebestruktur beschädigt und es können sich leicht Löcher bilden.
Schimmelflecken: Behandeln Sie Schimmelflecken mit Bleichmittel und spülen Sie
das Gewebe gründlich aus (nur Kochwäsche und farbechte Buntwäsche).
Gras: Behandeln Sie Grasflecken leicht mit
Seife und Bleichmittel (nur Kochwäsche
und farbechte Buntwäsche).
Kugelschreiber und Klebstoff: Befeuch-
ten mit Aceton
4)
Legen Sie das Kleidungsstück auf ein weiches Tuch und tupfen Sie
den Fleck ab.
Lippenstift: Befeuchten Sie den Fleck mit
Aceton, dann behandeln Sie ihn mit Brennspiritus. Behandeln Sie Rückstände mit
Bleichmittel.
Rotwein: Weichen Sie das Wäschestück in
Wasser und Waschmittel ein, spülen und behandeln Sie es mit Essig- oder Zitronensäure und spülen Sie es dann erneut. Behandeln Sie Rückstände mit Bleichmittel.
Tinte: Je nach Tintensorte das Gewebe zu-
nächst mit Aceton
4)
, dann mit Essigsäure
anfeuchten; Behandeln Sie Rückstände in
weißer Wäsche mit Bleichmittel und spülen
Sie anschließend gründlich aus.
4) verwenden Sie Aceton nicht für Kunstseide
Teerflecken: Behandeln Sie die Flecken zunächst mit Fleckentferner, Brennspiritus
oder Benzin und reiben Sie dann mit Waschmittelpaste.
Wasch- und Zusatzmittel
Gute Waschergebnisse sind auch von der
Wahl des Waschmittels und der richtigen
Füllmenge abhängig. Dies trägt auch zur Vermeidung von Abfall und zum Umweltschutz
bei.
Obwohl Waschmittel biologisch abbaubar
sind, enthalten sie Substanzen, die in größeren Mengen das empfindliche Gleichgewicht der Natur stören können.
Die Wahl des Waschmittels hängt von der
Gewebeart (Feinwäsche, Wolle, Baumwolle,
usw.), der Farbe, der Waschtemperatur und
dem Verschmutzungsgrad ab.
In diesem Gerät können alle gebräuchlichen
Waschmaschinen-Waschmittel verwendet
werden:
• Waschpulver für alle Gewebearten
• Waschpulver für Schonwäsche (höchstens 60 °C) und Wolle
• Flüssigwaschmittel, vorzugsweise für Programme mit niedrigen Temperaturen
(max. 60 °C) für alle Gewebearten oder
nur speziell für Wolle.
Waschmittel und Pflegemittel müssen vor
dem Start des Waschprogramms in die entsprechenden Fächer der Waschmittelschublade eingefüllt werden.
Bei der Verwendung von Waschmittelkonzentraten oder Flüssigwaschmitteln muss
ein Programm ohne Vorwäsche ausgewählt werden.
Die Waschmaschine verfügt über ein Umwälzsystem, welches eine optimale Ausnutzung des Waschmittels ermöglicht.
Befolgen Sie die Mengenempfehlungen des
Waschmittelherstellers und überschreiten
Sie nicht die «MAX»-Markierung in der
Waschmittelschublade .
Empfohlene Waschmittelmenge
Art und Menge des Waschmittels sind abhängig von der Gewebeart, der Füllmenge,
dem Verschmutzungsgrad und der Härte
des verwendeten Wassers.
Beachten Sie die Anweisungen der Waschmittelhersteller bezüglich der Waschmittelmengen.
Page 44

44 electrolux
Verwenden Sie weniger Waschmittel, wenn:
• Sie nur eine kleine Wäschemenge waschen
• die Wäsche nur leicht verschmutzt ist
• sich während des Waschvorgangs große
Mengen Schaum bilden.
Wasserhärte
Die Wasserhärte ist in sogenannte "Wasserhärtebereiche" eingeteilt. Informationen zur
SPÜLPROGRAMME
Programme
Höchst- und Mindesttemperatur
Programmbeschreibung
Max. Schleuderdrehzahl
Max. Wäschemenge
Wäscheart
KOCH-/BUNTWÄSCHE
90° - Kalt
Hauptwaschgang - Spülgänge
Maximale Schleuderdrehzahl 1400 U/min
Max. Beladung 8 kg - Reduzierte Beladung 4 kg
Für weiße und bunte Baumwolle (normal verschmutzte Wäsche).
PFLEGELEICHT
60°C - Kalt
Hauptwaschgang - Spülgänge
Maximale Schleuderdrehzahl 900 U/min
Max. Beladung 4 kg - Reduzierte Beladung 2 kg
Pflegeleichte Wäsche oder Mischgewebe: Unterwäsche, farbige Textilien, nicht einlaufende Hemden,
Blusen.
FEINWÄSCHE
40 °C - Kalt
Hauptwaschgang - Spülgänge
Maximale Schleuderdrehzahl 900 U/min
Max. Beladung 4 kg - Reduzierte Beladung 2 kg
Feinwäsche: Acryl, Viskose, Polyester.
1)
1)
1)
Wasserhärte an Ihrem Wohnort erhalten Sie
beim Wasserwerk oder bei Ihrer Gemeindeverwaltung. Wenn der Wasserhärtegrad mittel oder hoch ist, empfehlen wir Ihnen, nach
den Angaben des Herstellers einen Weichspüler zu verwenden. Wenn Sie weiches
Wasser haben, reduzieren Sie die Menge
des Waschmittels entsprechend.
Optionen
U/MIN.
NICHT SCHLEU-
DERN
SPÜLSTOPP
NACHTPROGRAMM
VORWÄSCHE
BÜGELFIX
EXTRA SPÜLEN
ZEITMANAGER
U/MIN.
NICHT SCHLEU-
DERN
SPÜLSTOPP
NACHTPROGRAMM
VORWÄSCHE
BÜGELFIX
EXTRA SPÜLEN
ZEITMANAGER
U/MIN.
NICHT SCHLEU-
DERN
SPÜLSTOPP
NACHTPROGRAMM
VORWÄSCHE
EXTRA SPÜLEN
ZEITMANAGER
2)
2)
2)
Waschmittel-
fach
Page 45

Programme
Höchst- und Mindesttemperatur
Programmbeschreibung
Max. Schleuderdrehzahl
Max. Wäschemenge
Wäscheart
WOLLE/HANDWÄSCHE
40 °C - Kalt
Hauptwaschgang - Spülgänge
Maximale Schleuderdrehzahl 1000 U/min
Max. Beladung 2 kg
Waschprogramm für maschinen- und handwaschbare
Wolltextilien und Feinwäsche mit dem „Handwäsche“Pflegesymbol. Hinweis : Ein einzelnes oder ein sehr
großes Wäschestück kann zu einer Unwucht führen.
Wenn das Gerät die letzte Schleuderphase nicht ausführt, geben Sie noch weitere Wäschestücke dazu, verteilen Sie die Beladung mit der Hand neu und wählen
Sie dann das Schleuderprogramm.
DESSOUS
40 °C - Kalt
Hauptwaschgang - Spülgänge
Maximale Schleuderdrehzahl 1000 U/min
Max. Beladung 1 kg
Dieses Programm eignet sich zum Waschen sehr empfindlicher Wäschestücke, wie z.B. Dessous, Unterwäsche, Spitzen-BHs usw. Die maximale Schleuderdrehzahl wird automatisch reduziert.
SEIDE
30 °C - Kalt
Hauptwaschgang - Spülgänge
Maximale Schleuderdrehzahl 900 U/min
Max. Beladung 1 kg
Ein Feinwaschprogramm, das besonders für Wäschestücke aus Seide und gemischten Synthetikfasern geeignet ist.
SPÜLGANG
Spülgang - Langer Schleudergang
Maximale Schleuderdrehzahl 1400 U/min
Max. Beladung 8 kg
Mit diesem Programm lassen sich Koch-/Buntwäschestücke spülen und schleudern, die mit der Hand gewaschen wurden. Wählen Sie die Zusatzfunktion EXTRA
SPÜLEN, um die Spülwirkung zu verstärken. Das Gerät führt zusätzliche Spülgänge aus.
ABPUMPEN
Wasser abpumpen
Max. Beladung 8 kg
Zum Abpumpen des Wassers aus dem letzten Spülgang eines Programms, für das die Option gewählt
wurde, das Wasser nicht abzupumpen.
Optionen
U/MIN.
NICHT SCHLEU-
DERN
SPÜLSTOPP
NACHTPROGRAMM
U/MIN.
NICHT SCHLEU-
DERN
SPÜLSTOPP
NACHTPROGRAMM
U/MIN.
NICHT SCHLEU-
DERN
SPÜLSTOPP
NACHTPROGRAMM
U/MIN.
NICHT SCHLEU-
DERN
SPÜLSTOPP
NACHTPROGRAMM
BÜGELFIX
EXTRA SPÜLEN
electrolux 45
Waschmittel-
fach
Page 46

46 electrolux
Programme
Höchst- und Mindesttemperatur
Programmbeschreibung
Max. Schleuderdrehzahl
Max. Wäschemenge
Wäscheart
SCHLEUDERN
Abpumpen und langer Schleudergang
Maximale Schleuderdrehzahl 1400 U/min
Max. Beladung 8 kg
Separater Schleudergang für handgewaschene Kleidungsstücke und nach Programmen mit der ausgewählten Option Spülstopp oder Nachtprogramm. Sie
können die Schleuderdrehzahl mit der entsprechenden Taste passend zu der zu schleudernden Wäsche
einstellen.
ECO
90° - 40°
Hauptwaschgang - Spülgänge
Maximale Schleuderdrehzahl 1400 U/min
Max. Beladung 8 kg
Weiße und farbechte Buntwäsche
Dieses Programm kann für leicht bis normal verschmutzte Baumwollwäsche gewählt werden. Das Programm reduziert die Wassertemperatur und verlängert
die Waschzeit. Dies ermöglicht ein wirtschaftliches Waschen, um Energie zu sparen.
14 MIN.
30°
Hauptwaschgang - Spülgänge
Maximale Schleuderdrehzahl 900 U/min
Max. Beladung 2 kg
Optimales Programm für Wäsche, die nur aufgefrischt
werden muss.
BETTLAKEN/DECKE
40° - 30°
Hauptwaschgang - Spülgänge
Maximale Schleuderdrehzahl 900 U/min
Max. Beladung 2,5 kg
Für eine separat zu waschende Decke aus Synthetikfasern oder eine Daunendecke.
/AUS
Zum Abbrechen des laufenden Programms und zum
Ausschalten des Geräts.
1) Wenn Sie die Option „Kurz“ oder „Extra Kurz“ durch Drücken der Taste 8 wählen, empfehlen wir die maximale
Beladung wie angegeben zu verringern. Die volle Beladung ist mit leicht geminderten Reinigungsergebnissen
dennoch möglich. Falls Sie die Option Auffrischen oder Super Auffrischen auswählen, ist es empfehlenswert, die
Beladung noch weiter zu verringern.
2) Bei der Verwendung von Flüssigwaschmittel muss ein Programm ohne VORWÄSCHE ausgewählt werden.
Optionen
U/MIN.
U/MIN.
NICHT SCHLEU-
DERN
SPÜLSTOPP
NACHTPROGRAMM
VORWÄSCHE
BÜGELFIX
EXTRA SPÜLEN
U/MIN.
NICHT SCHLEU-
DERN
SPÜLSTOPP
U/MIN.
2)
Waschmittel-
fach
REINIGUNG UND PFLEGE
Warnung! Vor Reinigungs- und
Wartungsarbeiten muss das Gerät
immer vom Stromnetz getrennt werden.
Entkalken
Unser normales Leitungswasser enthält
Kalk. Daher sollte in regelmäßigen Abständen ein Wasserenthärter benutzt werden.
Lassen Sie den Wasserenthärter in einem
Page 47

separaten Waschgang ohne Wäsche wirken und befolgen Sie die Anweisungen des
Herstellers des Wasserenthärters. Dies hilft,
Kalkablagerungen zu verhindern.
Nach jedem Waschgang
Lassen Sie die Tür eine Weile offen stehen.
Dies trägt dazu bei, Schimmelbildung und
muffigen Geruch im Geräteinneren zu vermeiden. Lässt man die Tür nach dem Waschen offen, schont dies die Gummidichtung.
Waschgang zur Pflege der Maschine
Wenn Sie beim Waschen überwiegend niedrige Temperaturen benutzen, können sich
Rückstände in der Trommel ansammeln.
Wir empfehlen daher die regelmäßige Durchführung eines Waschgangs zum Reinigen
der Maschine.
Hierzu gehen Sie wie folgt vor:
• In der Trommel darf sich keine Wäsche
befinden.
• Wählen Sie das heißeste Baumwollwaschprogramm.
• Verwenden Sie eine normale Menge Pulverwaschmittel mit Bleichmittel.
Reinigung der Außenseiten
Reinigen Sie die Außenseiten des Geräts
nur mit Seifenlauge und trocknen Sie sie anschließend gründlich.
Wichtig! Verwenden Sie zum Reinigen des
Gehäuses keinen Brennspiritus, keine
Lösungsmittel oder ähnliche Produkte.
Reinigung der Waschmittelschublade
Die Schublade für das Waschmittel muss regelmäßig gereinigt werden.
Die Schublade für Waschpulver und Pflegemittel muss regelmäßig gereinigt werden.
Entnehmen Sie die Schublade, indem Sie
die Arretierung herunterdrücken und die
Schublade herausziehen.
electrolux 47
Spülen Sie die Schublade unter einem Wasserhahn aus, um alle Waschmittelrückstände zu entfernen.
Um die Reinigung zu vereinfachen, können
Sie den oberen Teil des Pflegemittelfachs abnehmen. Alle Teile mit Wasser reinigen.
Die Kammer der Waschmittelschublade mit
einer Bürste reinigen.
Page 48

48 electrolux
Wäschetrommel
Rostablagerungen in der Trommel können
durch Fremdkörper in der Waschmaschine
oder durch eisenhaltiges Wasser entstehen.
Wichtig! Benutzen Sie keine
Reinigungsmittel auf Säurebasis, keine
chlorierten Scheuermittel und keine
Metallschwämmchen oder Stahlwolle zum
Reinigen der Trommel.
1. Rostrückstände auf der Innenfläche der
Trommel mit einem Edelstahl-Reinigungsmittel entfernen.
2. Zum Entfernen von Reinigungsmittel-
rückständen lassen Sie einen Waschgang ohne Wäsche durchlaufen.
Programm: Kurzprogramm Koch-/Buntwäsche bei maximaler Temperatur, geben Sie ca. 1/4 Messbecher Waschmittel dazu.
Türdichtung
Kontrollieren Sie regelmäßig die Türdichtung und entfernen Sie eventuelle Fremdkörper aus den Falten.
Ablaufpumpe
Die Pumpe sollte regelmäßig überprüft werden, insbesondere, wenn:
• Das Gerät nicht abpumpt und/oder
schleudert;
• Das Gerät beim Abpumpen ungewöhnliche Geräusche macht, weil Sicherheitsnadeln, Münzen o.Ä. die Pumpe blockieren;
• Ein Problem beim Wasserabpumpen festgestellt wird (weitere Einzelheiten finden
Sie im Kapitel „Was tun, wenn...“).
Warnung! Schalten Sie das Gerät aus
und ziehen Sie den Netzstecker aus
der Netzsteckdose, bevor sie die
Pumpenklappe öffnen.
Gehen Sie hierzu folgendermaßen vor:
1. Ziehen Sie den Netzstecker aus der
Netzsteckdose.
2. Falls nötig, warten Sie, bis das Wasser
abgekühlt ist.
3. Öffnen Sie die Pumpenklappe, indem
Sie eine Münze (oder das geeignete
Werkzeug, das je nach Modell in der Tasche mit der Betriebsanleitung ist) in die
Aussparung stecken und kippen.
Page 49

electrolux 49
reit, um austretendes Wasser aufzuwischen.
Reinigen Sie den Filter unter fließendem
Wasser, um sämtliche Flusen zu entfer-
1
nen.
2
4. Stellen Sie eine Auffangschale mit einer
kleinen Kante direkt neben die Pumpe,
um auslaufendes Wasser aufzufangen.
5. Ziehen Sie mit einer Zange die Kappe
für Notentleerung vom Filterdeckel.
2
1
7. Entfernen Sie alle Fremdkörper und Flusen aus der Pumpenaufnahme und
dem Pumpenflügelrad.
8. Prüfen Sie nach, ob sich das Pumpenflügelrad dreht (es dreht sich ruckartig).
Wenn es sich nicht dreht, wenden Sie
sich bitte an Ihren Kundendienst.
6. Tritt kein Wasser mehr aus, schrauben
Sie den Pumpendeckel los, indem Sie
ihn mit einer Zange gegen den Uhrzeigersinn drehen, und entnehmen Sie
den Filter. Halten Sie einen Lappen be-
9. Setzen Sie den Filter wieder in die dafür
vorgesehenen Führungen in der Pumpe
ein. Schrauben Sie den Pumpendeckel
Page 50

50 electrolux
wieder fest, indem Sie ihn im Uhrzeigersinn drehen.
10. Stecken Sie die Kappe für Notentleerung in den Filterdeckel und drehen Sie
diese fest hinein.
Warnung! Wenn das Gerät in Betrieb
ist, kann sich je nach gewähltem
Programm heißes Wasser in der
Pumpe befinden. Entfernen Sie den
Pumpendeckel niemals während eines
Waschprogramms. Warten Sie immer,
bis das Gerät den Waschgang beendet
hat und leer ist. Achten Sie beim
Aufsetzen des Pumpendeckels auf
einen festen Sitz, um zu verhindern,
dass Wasser austritt oder dass Kinder
den Deckel entfernen können.
Reinigung des Wasserzulauffilters
Wenn Sie den Eindruck haben, dass das Füllen der Maschine länger als üblich dauert,
überprüfen Sie, ob der Filter im Wasserzulaufschlauch verstopft ist.
1. Schließen Sie den Wasserhahn.
2. Schrauben Sie den Wasserzulaufschlauch ab.
3. Reinigen Sie den Filter im Schlauch mit
einer harten Bürste.
11. Schließen Sie die Pumpenklappe.
Page 51

electrolux 51
4. Schrauben Sie den Schlauch wieder an
den Hahn an.
5. Schrauben Sie den Schlauch vom Gerät
ab. Halten Sie ein Tuch bereit, da möglicherweise etwas Wasser herausfließt.
6. Reinigen Sie den Filter im Ventil mit einer
harten Bürste oder einem Stück Stoff.
7. Schrauben Sie den Schlauch wieder an
das Gerät an und achten Sie darauf,
dass er fest angeschlossen ist.
8. Drehen Sie den Wasserhahn auf.
Notentleerung
Wenn das Wasser nicht abgepumpt wird,
lassen Sie es wie folgt aus der Maschine ab:
1. Ziehen Sie den Netzstecker aus der Netzsteckdose.
2. Schließen Sie den Wasserhahn.
3. Falls nötig, warten Sie, bis das Wasser
abgekühlt ist.
4. Öffnen Sie die Pumpenklappe.
5. Stellen Sie einen Behälter auf den Fußboden. Ziehen Sie die Kappe für Notentleerung vom Filterdeckel. Das Wasser
fließt in den Behälter. Ist der Behälter
voll, setzen Sie die Kappe wieder in den
Pumpendeckel ein. Entleeren Sie den Behälter. Wiederholen Sie den Vorgang,
bis kein Wasser mehr herausfließt.
6. Falls nötig, reinigen Sie die Pumpe wie
zuvor beschrieben.
7. Schrauben Sie den Pumpendeckel erneut ein und schließen Sie die Klappe.
Frostschutzmaßnahmen
Wenn die Waschmaschine in einem Raum
aufgestellt ist, in dem die Temperatur unter
0°C abfallen kann, ergreifen Sie folgende
Vorsichtsmaßnahmen:
1. Ziehen Sie den Netzstecker aus der Netzsteckdose.
2. Schließen Sie den Wasserhahn.
3. Schrauben Sie den Zulaufschlauch ab.
4. Legen Sie das Ende des Zulaufschlauchs in ein ausreichend großes Gefäß, das auf dem Boden steht, ziehen
Sie die Kappe für Notentleerung vom Filterdeckel und lassen Sie das Wasser ablaufen.
5. Stecken Sie die Kappe für Notentleerung wieder auf den Filterdeckel und
schrauben Sie den Wasserzulaufschlauch wieder fest an.
6. Wenn Sie die Maschine wieder starten
möchten, kontrollieren Sie, dass die
Raumtemperatur mehr als 0°C beträgt.
WAS TUN, WENN …
Einige Probleme lassen sich auf Wartungsfehler oder Versehen zurückführen und können leicht gelöst werden, ohne den Kundendienst zu rufen. Bevor Sie den Kundendienst rufen, sollten Sie die nachstehenden
Punkte überprüfen.
Während des Gerätebetriebs ist es möglich,
dass die rote Kontrolllampe der Taste 7
blinkt, einer der folgenden Alarmcodes angezeigt wird und gleichzeitig alle 20 Sekunden ein akustisches Signal ausgegeben
wird, um anzuzeigen, dass das Gerät nicht
ordnungsgemäß funktioniert:
• Störung bei der Wasserversorgung: «
Wasser Abpumpen nicht möglich. Prü-
fen, ob der Wasserhahn geöffnet ist und
dann Taste START/PAUSE drücken .
• Störung beim Wasserablauf: « Wasser Abpumpen nicht möglich. Prüfen, ob Filter
sauber ist und dann Taste START/PAUSE drücken .
• Tür geöffnet: « Bitte überprüfen, ob die
Tür vollständig geschlossen ist und dann
die Taste START/PAUSE drücken
».
Beheben Sie die Ursache und drücken Sie
dann die Taste 7 , um das Gerät neu zu starten. Wenn nach allen Prüfungen das Problem weiterhin besteht, wenden Sie sich bitte
an Ihren Kundendienst.
Page 52

52 electrolux
Problem Mögliche Ursache/Abhilfe
Das Gerät startet nicht:
Es läuft kein Wasser in das
Gerät:
Das Gerät pumpt nicht ab
und/oder schleudert nicht:
Die Tür wurde nicht geschlossen. ( Bitte überprüfen, ob die Tür
vollständig geschlossen und dann die Taste START/PAUSE
drücken )
• Drücken Sie die Tür fest zu.
Der Stecker ist nicht richtig in die Steckdose eingesteckt.
• Stecken Sie den Stecker richtig in die Steckdose.
Die Steckdose wird nicht mit Strom versorgt.
• Überprüfen Sie bitte die Elektroinstallation in Ihrem Haus.
Die Hauptsicherung ist durchgebrannt.
• Wechseln Sie die Sicherung aus.
Der Programm-Wahlschalter ist nicht richtig eingestellt und die Taste 7 wurde nicht gedrückt.
• Drehen Sie bitte den Programmwahlschalter und drücken Sie er-
neut die Taste 7 .
Die Zeitvorwahl wurde gewählt.
• Falls der Waschgang sofort gestartet werden soll, brechen Sie
die Zeitvorwahl ab.
Die Kindersicherung wurde aktiviert.
• Schalten Sie die Kindersicherung aus.
Der Wasserhahn ist geschlossen. ( Wassereinlauf nicht mög-
lich. Prüfen, ob der Wasserhahn geöffnet ist und dann Taste
START/PAUSE drücken )
• Drehen Sie den Wasserhahn auf.
Der Zulaufschlauch ist eingeklemmt oder geknickt. ( Wasserein-
lauf nicht möglich. Prüfen, ob der Wasserhahn geöffnet ist
und dann Taste START/PAUSE drücken )
• Überprüfen Sie den Anschluss des Zulaufschlauchs.
Der Filter im Zulaufschlauch ist verstopft. ( Wassereinlauf nicht
möglich. Prüfen, ob der Wasserhahn geöffnet ist und dann
Taste START/PAUSE drücken )
• Reinigen Sie den Filter im Wasserzulaufschlauch.
Die Tür ist nicht richtig geschlossen. ( Wassereinlauf nicht mög-
lich. Prüfen, ob der Wasserhahn geöffnet ist und dann Taste
START/PAUSE drücken ) ( Wassereinlauf nicht möglich. Prüfen, ob der Wasserhahn geöffnet ist und dann Taste START/
PAUSE drücken )
• Drücken Sie die Tür fest zu.
Der Ablaufschlauch ist eingeklemmt oder geknickt. ( Wasser Ab-
pumpen nicht möglich. Prüfen, ob Filter sauber ist und dann
Taste START/PAUSE drücken )
• Überprüfen Sie den Anschluss des Ablaufschlauchs.
Der Ablauffilter ist verstopft. ( Wasser Abpumpen nicht mög-
lich. Prüfen, ob Filter sauber ist und dann Taste START/PAUSE drücken )
• Reinigen Sie den Ablauffilter.
Es wurde eine Option oder ein Programm gewählt, das damit endet, dass noch Wasser in der Trommel steht, oder das auf alle
Schleudergänge verzichtet.
• Wählen Sie das Abpump- oder das Schleuderprogramm.
Die Wäsche ist nicht gleichmäßig in der Trommel verteilt.
• Verteilen Sie die Wäsche neu.
Page 53

Problem Mögliche Ursache/Abhilfe
Es befindet sich Wasser auf
dem Boden:
Die Waschergebnisse sind
unbefriedigend:
Die Tür lässt sich nicht öffnen:
Die Maschine vibriert oder
läuft sehr laut:
electrolux 53
Sie haben zu viel Waschmittel oder ein ungeeignetes Waschmittel
verwendet (zu starke Schaumbildung).
• Reduzieren Sie die Waschmittelmenge oder benutzen Sie ein anderes Waschmittel.
Überprüfen Sie die Anschlüsse des Zulaufschlauchs auf Dichtheit.
Undichtigkeiten sind nicht immer leicht zu erkennen. Da das Wasser den Schlauch hinabläuft, prüfen Sie, ob er feucht ist.
• Kontrollieren Sie den Anschluss des Zulaufschlauchs.
Der Ablauf- oder Zulaufschlauch ist beschädigt.
• Tauschen Sie den Schlauch gegen einen neuen aus.
Der Verschlussstopfen des Notentleerungsschlauchs wurde nach
der Pumpenreinigung nicht wieder aufgesteckt oder der Filter wurde nicht korrekt eingeschraubt.
• Stecken Sie die Kappe für Notentleerung wieder in den Filterdeckel, oder schrauben Sie den Filter wieder ordnungsgemäß ein.
Sie haben zu wenig Waschmittel oder ein ungeeignetes Waschmittel benutzt.
• Erhöhen Sie die Waschmittelmenge oder benutzen Sie ein anderes Waschmittel.
Hartnäckige Flecken wurden nicht vorbehandelt.
• Verwenden Sie zur Behandlung hartnäckiger Flecken handelsübliche Produkte.
Falsche Temperatur ausgewählt.
• Überprüfen Sie, ob Sie die korrekte Temperatur gewählt haben.
Das Gerät ist überladen.
• Verringern Sie die Wäschemenge.
Das Programm läuft noch.
• Warten Sie das Ende des Waschprogramms ab.
Die Tür wurde noch nicht entriegelt.
•
Warten Sie, bis das Türsymbol
und die entsprechende Mel-
dung angezeigt werden.
Es befindet sich Wasser in der Trommel.
• Wählen Sie das Programm Abpumpen oder Schleudern, um
das Wasser abzupumpen.
Transportsicherungen und Verpackungsteile wurden nicht entfernt.
• Überprüfen Sie, ob das Gerät richtig aufgestellt ist.
Das Gerät wurde nicht mit den Schraubfüßen ausgerichtet.
• Überprüfen Sie, ob das Gerät waagerecht steht.
Die Wäsche ist nicht gleichmäßig in der Trommel verteilt.
• Verteilen Sie die Wäsche neu.
Möglicherweise befindet sich nur sehr wenig Wäsche in der Trommel.
• Füllen Sie mehr Wäsche ein.
Page 54

54 electrolux
Problem Mögliche Ursache/Abhilfe
Die elektronische Unwuchterkennung hat eingegriffen, weil die Wäsche nicht gleichmäßig in der Trommel verteilt ist. Die Wäsche
wird neu verteilt, indem die Trommel in die entgegengesetzte Richtung gedreht wird. Dieser Vorgang kann sich einige Male wiederholen, bevor die Unwucht verschwunden ist und das Schleudern fortgesetzt werden kann. Falls die Wäsche nach 10 Minuten immer
Das Schleudern beginnt
erst spät oder gar nicht:
Das Gerät macht ungewöhnliche Geräusche:
In der Trommel ist kein Wasser zu sehen:
noch nicht gleichmäßig in der Trommel verteilt ist, bricht die Maschine den Schleudergang ab. Verteilen Sie in diesem Fall die Wäsche manuell neu und wählen Sie das Schleuderprogramm.
• Verteilen Sie die Wäsche neu.
Die Beladung ist zu gering.
• Geben Sie noch weitere Wäschestücke dazu, verteilen Sie die
Beladung mit der Hand neu und wählen Sie dann das Schleuderprogramm.
Dieses Gerät ist mit einem Motor ausgestattet, der im Vergleich zu
anderen herkömmlichen Motoren ungewöhnliche Geräusche
macht. Dieser neue Motor sorgt für einen sanfteren Anlauf und eine gleichmäßigere Verteilung der Wäsche in der Trommel während
des Schleuderns sowie für eine bessere Stabilität der Maschine.
Moderne Geräte arbeiten sehr wirtschaftlich und verbrauchen sehr
wenig Wasser, ohne dabei ein schlechteres Waschergebnis zu erzielen.
Wenn Sie das Problem nicht genau bestimmen oder lösen können, wenden Sie sich
an unseren Kundendienst. Beim Anruf sollten Sie Angaben zum Modell, die Produktnummer, die Seriennummer und das Kaufdatum Ihrer Maschine zur Hand haben: Der
Kundendienst benötigt diese Informationen.
TECHNISCHE DATEN
Abmessungen Breite
Elektrischer Anschluss
Spannung - Gesamtleistung Sicherung
Wasserdruck Mindestens
Max. Wäschemenge Koch-/Buntwäsche 8 kg
Schleuderdrehzahl Maximal 1400 U/min
Höhe
Tiefe
Die Daten der elektrischen Anschlusswerte finden sich auf dem Typenschild innen an der Gerätetür.
Maximal
60 cm
85 cm
63 cm
0,05 MPa
0,8 MPa
Page 55

electrolux 55
VERBRAUCHSWERTE
Programme Energieverbrauch
Kochwäsche 90° 2.50 62
Koch-/Buntwäsche
60°
Koch-/Buntwä-
sche ECO 60°
Koch-/Buntwäsche
40°
Pflegeleicht 40° 0.55 52
Feinwäsche 40° 0.53 68
Wolle 30° 0.32 64
1) „Eco“ bei 60 °C mit einer Füllmenge von 8 kg ist in Übereinstimmung mit EEC 92/75 das Referenzprogramm für
die im Energielabel eingetragenen Werte.
1)
(kWh)
1.70 63
1.36 64
0.97 62
Die Verbrauchswerte weichen je nach
Druck, Härte, Einlauftemperatur des
Wassers, Raumtemperatur, Wäscheart
und -menge, verwendetem Waschmit-
Wasserverbrauch (in
Litern)
Programmdauer (in
Minuten)
Die Dauer der einzelnen Programme entnehmen Sie bitte der
Anzeige an der Be-
dienblende.
tel, Schwankungen in der Netzspannung und gewählten Zusatzfunktionen
von den in der Tabelle angegebenen
Werten ab.
MONTAGE
Auspacken
Bevor das Gerät verwendet werden kann,
müssen alle Transportsicherungen und Verpackungsmaterialien entfernt werden.
Es empfiehlt sich, alle Transportsicherungen
für eventuelle zukünftige Transporte des Geräts aufzubewahren.
1. Legen Sie die Maschine nach Entfernen
der Verpackung vorsichtig auf die Rückseite, um die Polystyrolplatte unter der
Maschine zu entfernen.
2. Entnehmen Sie das Stromkabel und
den Ablaufschlauch aus den Schlauchhalterungen auf der Geräterückseite.
Page 56

56 electrolux
3. Lösen Sie mit einem entsprechenden
Schraubenschlüssel die mittlere hintere
Schraube A . Schieben Sie das entsprechende Kunststoff-Distanzstück heraus.
A
4. Lösen Sie die beiden hinteren großen
Schrauben B und die sechs kleineren
Schrauben C .
D
C
C
B
B
C
5. Entfernen Sie die Halterung D und ziehen Sie die sechs kleineren Schrauben C
fest.
C
6. Öffnen Sie die Tür und entnehmen Sie
den Zulaufschlauch aus der Trommel sowie den Polystyrolblock, der mit Klebeband an der Türdichtung befestigt ist.
Page 57

7. Verschließen Sie das kleinere obere
Loch und die beiden größeren Löcher
mit den entsprechenden Kunststoffkappen, die sich im Beutel mit der Benutzerinformation befinden.
electrolux 57
rührt. Das Gerät kann mit den verstellbaren
Schraubfüßen waagerecht ausgerichtet werden. Die Schraubfüße sind mit selbstsichernden Muttern ausgestattet, wodurch sie sich
eventuell nur schwer drehen lassen. Jedoch
MUSS die Maschine einen waagerechten
und festen Stand haben. Falls notwendig,
überprüfen Sie die waagerechte Aufstellung
mit einer Wasserwaage. Sämtliche Einstellungen können mit einem Schraubenschlüssel vorgenommen werden. Durch eine genaue waagerechte Aufstellung lassen sich
Vibrationen, Geräusche und ein Verschieben der Maschine während des Betriebs verhindern.
Vorsicht! Legen Sie zum Ausgleichen
von Bodenunebenheiten auf keinen Fall
Karton, Holzstücke oder ähnliche
Materialien unter das Gerät.
Aufstellung
Stellen Sie das Gerät auf einem ebenen, harten Boden auf. Stellen Sie sicher, dass die
Luftzirkulation um die Maschine herum nicht
durch Teppiche, Vorleger usw. behindert
wird. Kontrollieren Sie, dass die Maschine
weder die Wand noch andere Geräte be-
Wasserzulauf
Ein Zulaufschlauch wird mitgeliefert und befindet sich im Inneren der Trommel. Benutzen Sie keine Anschlussschläuche von Altgeräten für den Wasseranschluss.
Wichtig! Dieses Gerät muss an eine Kalt-
wasserleitung angeschlossen werden.
1. Öffnen Sie die Tür und ziehen Sie den Zulaufschlauch heraus.
2. Schließen Sie den Schlauch mit dem
Winkelverbindungsstück an die Maschine an. Richten Sie den Zulaufschlauch
nicht nach unten. Führen Sie den
Schlauch in einem Winkel nach links
Page 58

58 electrolux
oder rechts, je nach der Position des
Wasserhahns.
35°
45°
3. Schließen Sie den Schlauch korrekt
durch Lösen der Ringmutter an. Ziehen
Sie die Ringmutter nach dem Positionieren des Zulaufschlauchs wieder fest, um
Wasseraustritt zu vermeiden.
4. Schließen Sie den Schlauch an einen
Wasserhahn mit einer 3/4" Schlauchverschraubung an. Verwenden Sie stets
den mit dem Gerät mitgelieferten
Schlauch.
Der Zulaufschlauch darf nicht verlängert werden. Ist er zu kurz und möchten Sie den
Wasserhahn nicht verlegen, müssen Sie einen neuen, längeren Schlauch speziell zur
Verwendung für Waschmaschinen kaufen.
Wasserablauf
Das Ende des Ablaufschlauchs kann auf
drei Weisen angeschlossen werden.
• Das Ende des Schlauchs wird mit der mit
der Maschine mitgelieferten Plastikschlauchführung über die Beckenkante
gehängt . Achten Sie in diesem Fall darauf, dass das Schlauchende nicht abrutschen kann, während Wasser aus dem
Gerät abläuft. Fixieren Sie es mit einem
Stück Schnur am Hahn oder befestigen
Sie es an der Wand.
• Sie können den Schlauch an den Was-
serablauf eines Waschbeckens anschließen. Das Verzweigungsstück
muss sich oberhalb des Siphons befinden. Der Anschluss muss einen Abstand
von mindestens 60 cm vom Fußboden haben.
•
Direkte Einleitung in ein Ablaufrohr
bei einer Höhe nicht unter 60 cm und
nicht über 90 cm. Das Ende des Ablaufschlauchs muss stets belüftet sein, d.h.
der Innendurchmesser des Ablaufrohres
muss größer sein als der Außendurchmesser des Ablaufschlauchs. Der Ablaufschlauch darf nicht geknickt werden.
Page 59

electrolux 59
Der Ablaufschlauch darf auf max. 4 Meter verlängert werden. Einen Verlängerungsschlauch und ein Verbindungsstück erhalten Sie bei Ihrem Kundendienst.
ELEKTRISCHER ANSCHLUSS
Die Daten der elektrischen Anschlusswerte
finden sich auf dem Typenschild innen an
der Gerätetür.
Vergewissern Sie sich, dass die Stromversorgung in Ihrem Haus für die erforderliche
Maximallast geeignet ist. Berücksichtigen
Sie dabei auch die anderen Elektrogeräte,
die Sie verwenden.
Das Gerät an eine geerdete
Steckdose anschließen.
Der Hersteller übernimmt keinerlei
Haftung für Schäden oder
Verletzungen, die durch
Missachtung der
Sicherheitshinweise entstehen
sollten.
Nach der Installation des Geräts
muss das Netzkabel leicht
zugänglich sein.
Falls das Netzkabel des Geräts
ersetzt werden muss, muss dies
durch unseren Kundendienst
durchgeführt werden.
UMWELTTIPPS
Das Symbol auf dem Produkt oder
seiner Verpackung weist darauf hin, dass
dieses Produkt nicht als normaler
Haushaltsabfall zu behandeln ist, sondern
an einem Sammelpunkt für das Recycling
von elektrischen und elektronischen
Geräten abgegeben werden muss. Durch
Ihren Beitrag zum korrekten Entsorgen
dieses Produkts schützen Sie die Umwelt
und die Gesundheit Ihrer Mitmenschen.
Umwelt und Gesundheit werden durch
falsches Entsorgen gefährdet. Weitere
Informationen über das Recycling dieses
Produkts erhalten Sie von Ihrem Rathaus,
Ihrer Müllabfuhr oder dem Geschäft, in dem
Sie das Produkt gekauft haben.
Verpackungsmaterial
Materialien mit dem Symbol
verwertbar.
>PE<=Polyethylen
>PS<=Polystyrol
>PP<=Polypropylen
Solche Materialien können der Wiederverwertung zugeführt werden, indem sie ordnungsgemäß in den entsprechenden Sammelbehältern entsorgt werden.
Umwelttipps
Um Wasser und Energie zu sparen und die
Umwelt nicht unnötig zu belasten, beachten
Sie bitte folgende Tipps:
• Normal verschmutzte Wäsche kann ohne
Vorwäsche gewaschen werden. Dies
sind wieder-
Page 60

60 electrolux
spart Waschmittel, Wasser und Energie
(und die Umwelt wird weniger belastet).
• Die Maschine arbeitet wirtschaftlicher,
wenn sie ganz gefüllt ist.
• Mit einer entsprechenden Vorbehandlung
lassen sich Flecken und gewisse Ver-
schmutzungen entfernen; danach kann
die Wäsche bei niedrigerer Temperatur gewaschen werden.
• Dosieren Sie das Waschmittel entsprechend der Wasserhärte, dem Verschmutzungsgrad und der Wäschemenge.
Page 61

electrolux 61
Page 62

62 electrolux
Page 63

electrolux 63
Page 64

www.electrolux.com/shop
132942230 - 00 - 242010
 Loading...