

AEG-Electrolux EWL105415W User Manual

user manual
Washing Machine
EWL 105415 W
2 electrolux
Control panel
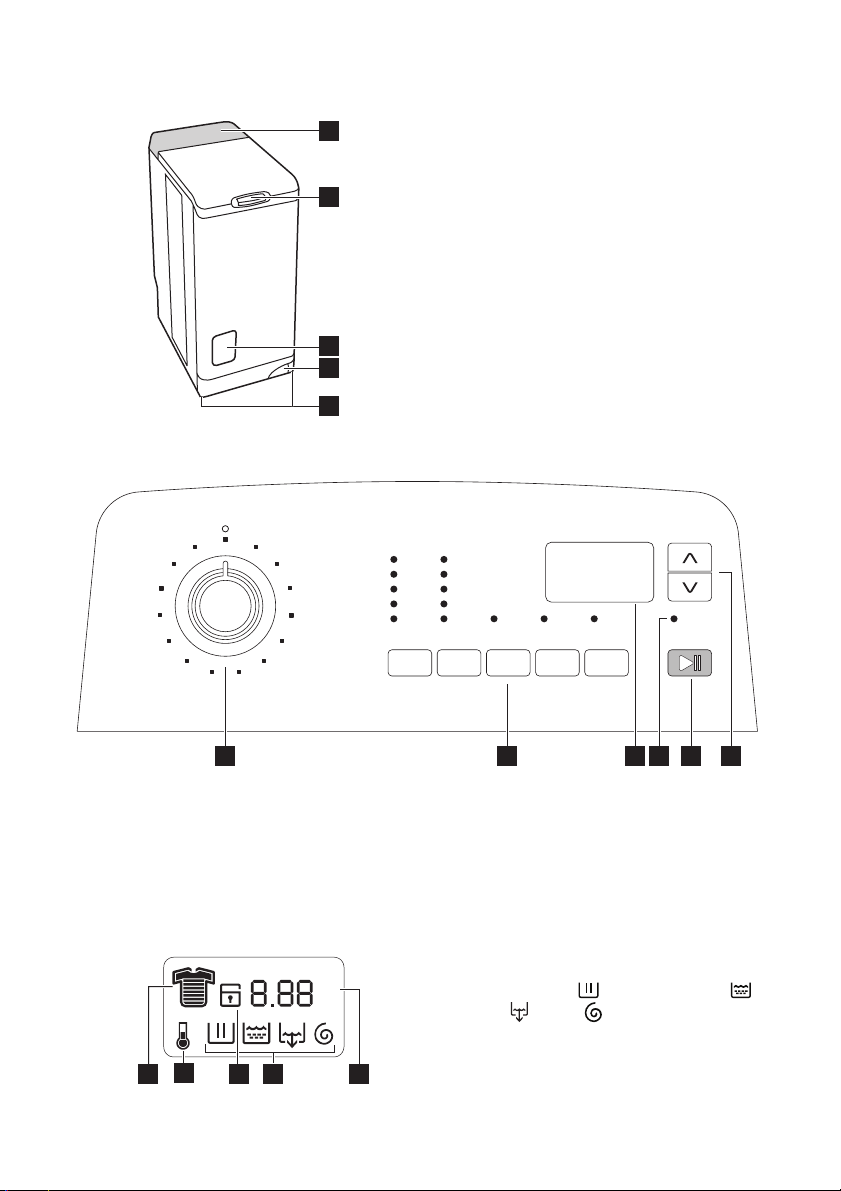
1. The control panel
2. Lid button
1
3. Filter access cover
4. Lever for moving the appliance
5. Adjustable levelling feet
2
3
4
5
1 2 3 4 5 6
1. Programme selector
2. Pushbuttons and their functions
3. Display
4. "Rinse plus" light
5. "Start/Pause" pushbutton
6. "Time manager" pushbuttons
The symbols
12 34 5
1. Time manager
2. Temperature
3. Child safety
4.
Cycle running :
Prewash/Wash,
Rinse, Drain, Spin
5. Length of cycle or Timer delay countdown

Dispenser box
Prewash
Wash
Softener (do not fill above the MAX symbol M )
SAFETY INFORMATION
Please read these points carefully before installing and using your appliance. Keep this
user manual with your appliance.
General safety
• Do not modify or attempt to modify this
appliance. This would put yourself in danger.
• Ensure that all coins, safety pins, brooches, screws etc have been removed before starting a washing programme. If left
in washing, they can seriously damage
the appliance.
• Use the recommended quantity of detergent.
• Put small items together (socks, belts
etc.) in a small linen bag or pillow case.
• Unplug and close inlet hose tap after using appliance.
• Always disconnect the power supply
from the appliance before cleaning or
maintenance.
•Do not machine wash clothes with ribbing, unfinished or torn material.
Installation
• Unpack or ask for the appliance to be
unpacked immediately upon delivery.
Check the outside of the appliance is not
damaged in any way. Report all transit
damage to your retailer.
• Remove all transit bolts and packaging
before installing the appliance.
• Connection to the water supply must be
carried out by a qualified plumber.
• If your domestic electrical circuit needs
adapting to allow the appliance to be
plugged in, use a qualified electrician.
• Ensure that, after installation, the power
cable is not trapped under the appliance.
electrolux 3
• If the appliance is installed on carpeted
floor, ensure that the carpet does not obstruct any ventilation ducts located at the
base of the appliance.
• The appliance must be equipped with an
earthed power plug which conforms to
regulations.
• Before connecting your appliance to the
power supply, carefully read the instructions in the chapter entitled “Electrical
connection”.
• Replacing the power cable should only
be carried out by an authorised service
engineer.
• The manufacturer cannot be held responsible for any damage resulting from
incorrect installation.
Precautions to be taken against frost
If your appliance is exposed to temperatures below 0°C, the following precautions
must be taken:
• Close the tap and disconnect the inlet
hose.
• Place the end of this hose and the drain
hose in a basin on the floor.
• Select the Drain programme let it run until
the end of the cycle.
• Disconnect the appliance from the power
supply by turning the programme selector to “Stop”
• Unplug the appliance.
• Replace the inlet hose and drain hose.
This way, the water remaining in the hoses
will be drained away, avoiding any ice formation which would damage your appliance.
Before turning your appliance on again, ensure that it is installed in an area where the
temperature will not fall below freezing.
.
4 electrolux
Use
• Your appliance is intended for normal domestic use. Do not use the appliance for
commercial or industrial purposes or for
any other purpose.
• Refer to the instructions on the label of
each item before washing.
• Do not put items into the washing machine which have had stains removed
with petrol, alcohol, trichlorethylen etc. If
such stain removers have been used,
wait until the product has evaporated before putting these items into the drum.
• Empty pockets and unfold items.
PERSONALISATION
Child safety
This option provides two types of locking :
• if the option is activated after the cycle
has started, no changes to the options or
programme is possible.
The cycle runs and you must deactivate
the option to run a new cycle.
• if the option is activated before the cycle
has started, the appliance cannot be
started.
HOW TO RUN A WASH CYCLE?
Using for the first time
• Ensure the electrical and water connections comply with the installation
instructions.
• Remove the polystyrene insert and
all other items inside the drum.
• This appliance is not intended for use by
persons (including children) with reduced
physical, sensory or mental capabilities,
or lack of experience and knowledge, unless they have been given supervision or
instruction concerning use of the appliance by a person responsible for their
safety.
Children should be supervised to ensure
that they do not play with the appliance.
• Not well maintained boilers can generate
rust which could damage your appliance
or your laundry.
To activate child safety, turn appliance on
and press “Hot water connection”
“Delay start”
confirmation symbol
display. The appliance memorises the selection of this option. To deactivate child
safety, repeat the process.
• Run an initial wash cycle at 90°C,
without any washing but with detergent to clean the water tank.
simultaneously until the
shows on in the
and
DAILY USE
Loading washing
A
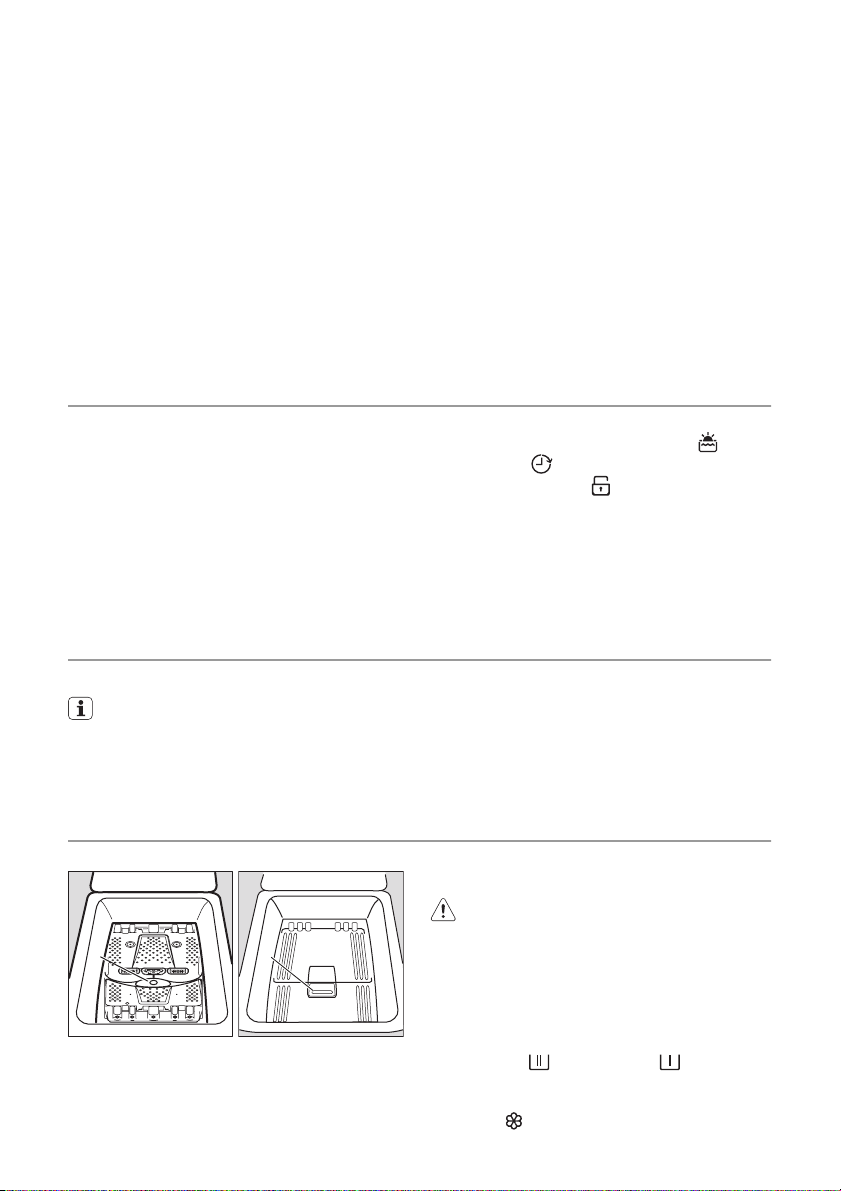
• Open the lid of the appliance.
• Open the drum by depressing the locking
button A
tomatically.
1) Depending on model.
1)
: The two shutters unlock au-
A
• Load the washing, close the drum and
the lid of your washing machine.
Warning! Before closing the lid of your
appliance, ensure that the drum is
properly closed :
• When the two shutters are closed,
• locking button A released.
Proportioning of detergents
Pour the amount of washing powder into
the washing
ments if you have selected the “prewash”
option. Pour fabric softener into the compartment
and prewash compart-
if necessary.

electrolux 5
Selection of desired programme
Turn the programme selector to the required programme. The “Start/Pause”
pushbutton flashes green.
If you turn the programme selector to another programme while a cycle is in progress, the appliance will ignore the new selected programme. “Err” flashes and the
“Start/Pause” pushbutton flashes red for a
few seconds.
Selecting the temperature
Press the “Temperature”
pushbutton repeatedly to increase or decrease the temperature (see “Programmes table”). The
symbol means a cold wash.
Selecting the spin speed
Press the “Spin”
pushbutton to change
the spin speed.
The maximum spin speeds are :
for Cottons, Wool, Lingerie, Eco, Jeans :
1000 rpm, for Synthetics, Easy iron, Intensive sport : 900 rpm, for Delicates, Silk,
Sport : 700 rpm.
At the end of the programme, if you have
selected “Rinse hold”
plus”
, you then need to select a “Spin”
or “Night cycle
or “Drain” programme to finish the cy-
cle and empty the water.
Selecting options
You must select the different options after
selecting the programme and before pressing the “Start/Pause” pushbutton (see “Programme table”). Press the desired button(s) ; the corresponding lights come on. If
pressed again, the lights go out. If one of
the options is not compatible with the selected programme, “Err” flashes on the display and the “Start/Pause” pushbutton
flashes red.
“Prewash” option
The appliance runs a prewash at 30°C
max.
"Hot water connection" option
This appliance is provided with two inlet hoses : one for the cold water and one for the
hot water.
By default, the Cottons and Synthetics programmes benefit to the connection to the
available hot water of your domestic installation. The "Hot water connection"
light
illuminates.
Press the "Hot water connection" pushbut-
to interrupt the hot water loading :
ton
the corresponding light s'éteint goes off.
The machine will only load then cold water,
which will be warmed up by the heating element of the appliance.
“Rinse plus” option
The washing machine will add one or more
rinses during the cycle. This option is recommended for people with sensitive skin
and in soft water areas.
Hold down the “Prewash”
Start”
The “Rinse plus”
pushbuttons for a few seconds.
light illuminates. The
and “Delay
option is permanently activated, even if the
appliance is switched off. To deactivate it,
repeat the process.
“Delay start”
This option allows you to delay the start of a
wash programme by 30, 60, 90, 2 hours to
20 hours. The selected time appears on the
display for a few seconds.
You can change or cancel the delayed start
time at any time before you press the
“Start/Pause” pushbutton, by pressing the
“Delay start”
pushbutton again (0’ indicates immediate start).
If you have already pressed the “Start/
Pause” pushbutton and you want to
change or cancel the delayed start, proceed as follows :
• To cancel the delayed start and start the
cycle immediately, press “Start/Pause”
and then “Delay start”
. Press “Start/
Pause” to start the cycle.
• To change the timer delay period, you
must go through the “Stop”
position
and reprogramme your cycle.
The lid will be locked during the delayed
start time. If you need to open it, you must
first pause the appliance by pressing the
“Start/Pause” pushbutton. After closing the
lid again, press the “Start/Pause” pushbutton.
Time Manager
The cycle can be made longer or shorter by
using the “ Time Manager ”
pushbut-
 Loading...