

Page 1
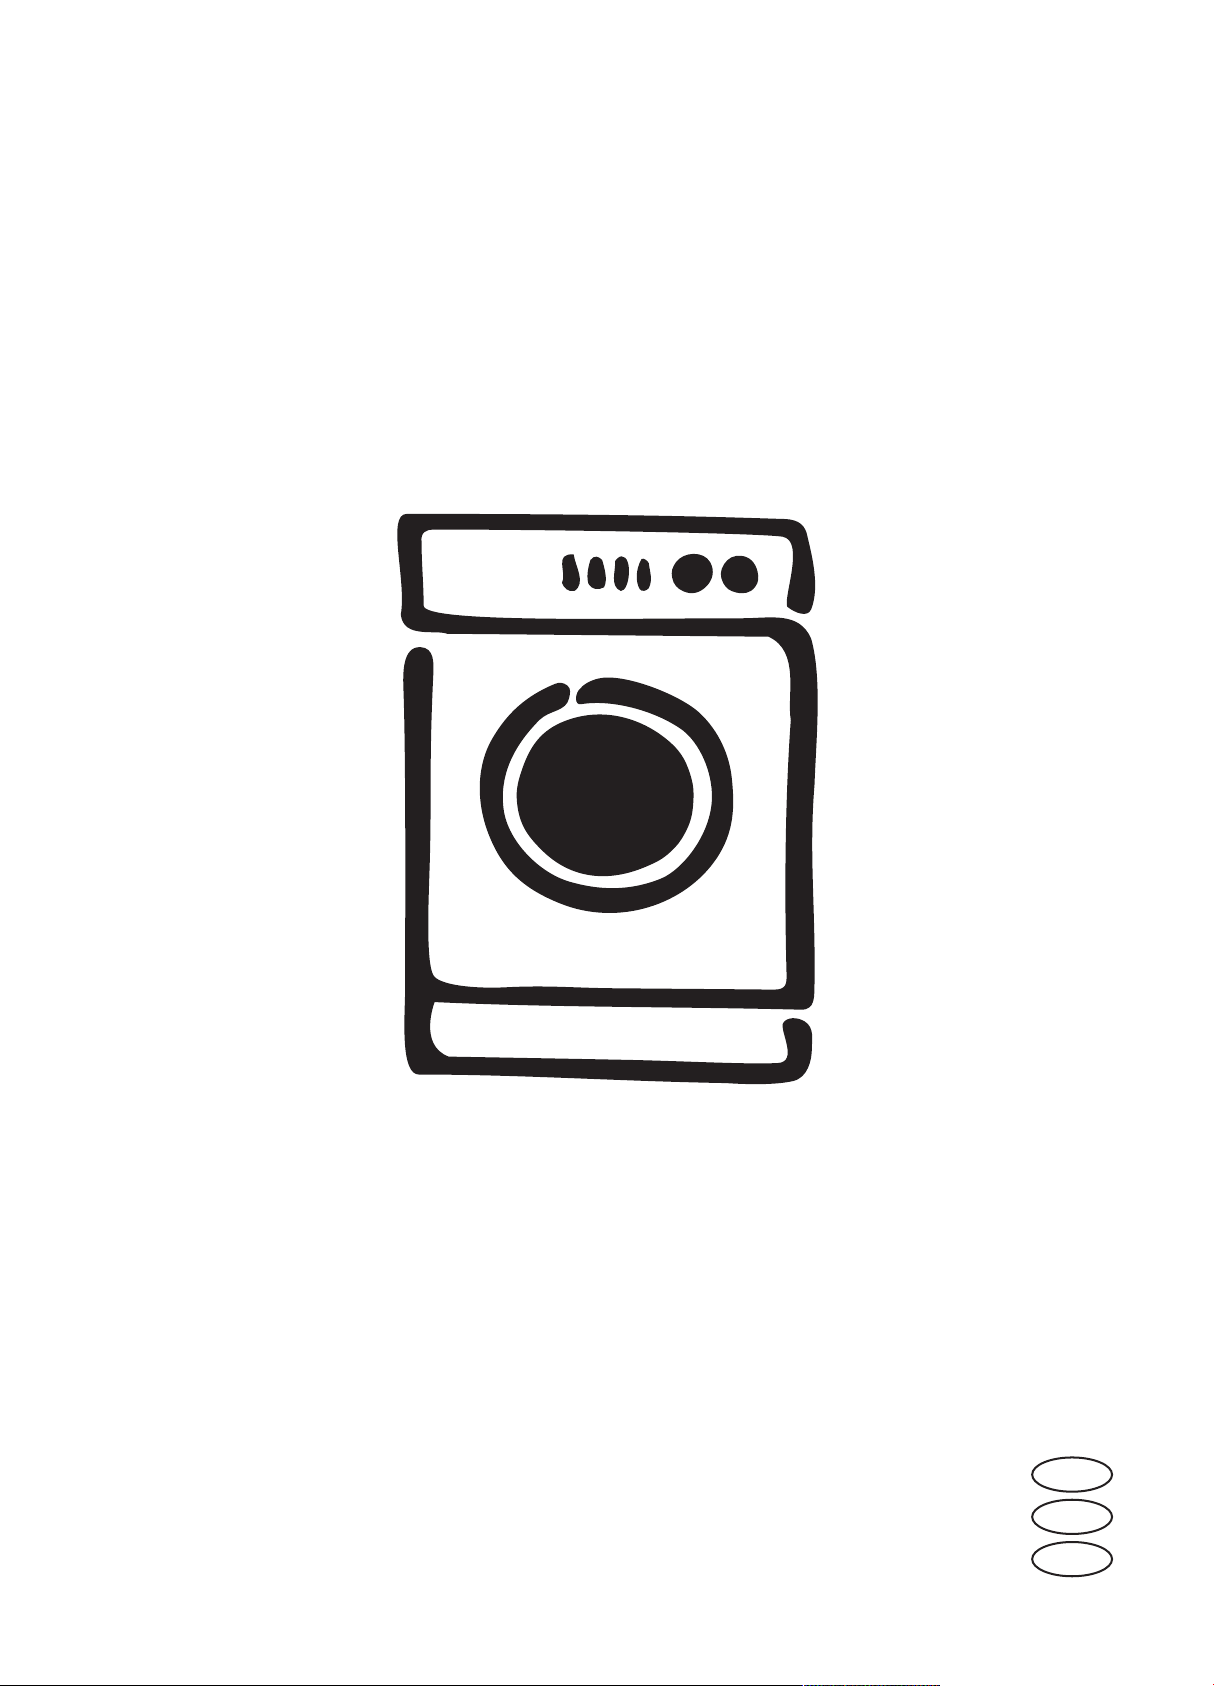
WASHING MACHINE
MÁQUINA DE LAVAR ROUPA
РЛХНФЗСЙП СПХЧЩН
INSTRUCTION BOOKLET
MANUAL DE UTILIZAÇÃO
ЕГЧЕЙСЙДЙП ПДЗГЙЩН
132 982 340
EWF 735
GB
P
GR
Page 2
2
Dear customer,
Please read these operating instructions carefully
and pay particular attention to the safety notes
indicated in the first pages. We recommend that you
keep this instruction booklet for future reference and
pass it on to any future owners.
Transport damages
When unpacking the appliance, check that it is not
damaged. If in doubt, do not use it and contact the
Service Centre.
The symbols you will see on some paragraphs of this booklet have the following meaning:
The warning triangle and/or the key words (Warning!, Caution!) emphasize information that is particularly
important for your safety or correct functioning of the appliance.
The information marked with this symbol provides additional instructions and practical tips on the use of
the appliance.
Tips and information about economical and ecological use of the machine are marked with this symbol.
Our contribution to the protection of the
environment: we use recycled paper.
Page 3

ENGLISH
3
Maintenance 23-24
Bodywork 23
Door seal 23
Detergent dispenser drawer 23
Drain pump 23-24
Water inlet filter 24
Emergency emptying out 24
Frost precautions 24
Something not working? 25-26
Warnings 4-5
Disposal 5
Tips for environmental protection 5
Technical specifications 6
Installation 7
Unpacking 7
Positioning 7
Water inlet 7-8
Assembly upon a stand kit 8
Water drainage 8
Electrical connection 8
Your new washing machine 9
Description of the appliance 9
Detergent dispenser drawer 9
Use 10
Control panel 10
Controls 10-13
Washing hints 14-15
Sorting the laundry 14
Temperatures 14
Before loading the laundry 14
Maximum loads 14
Laundry weights 14
Removing stains 14-15
Detergents and additives 15
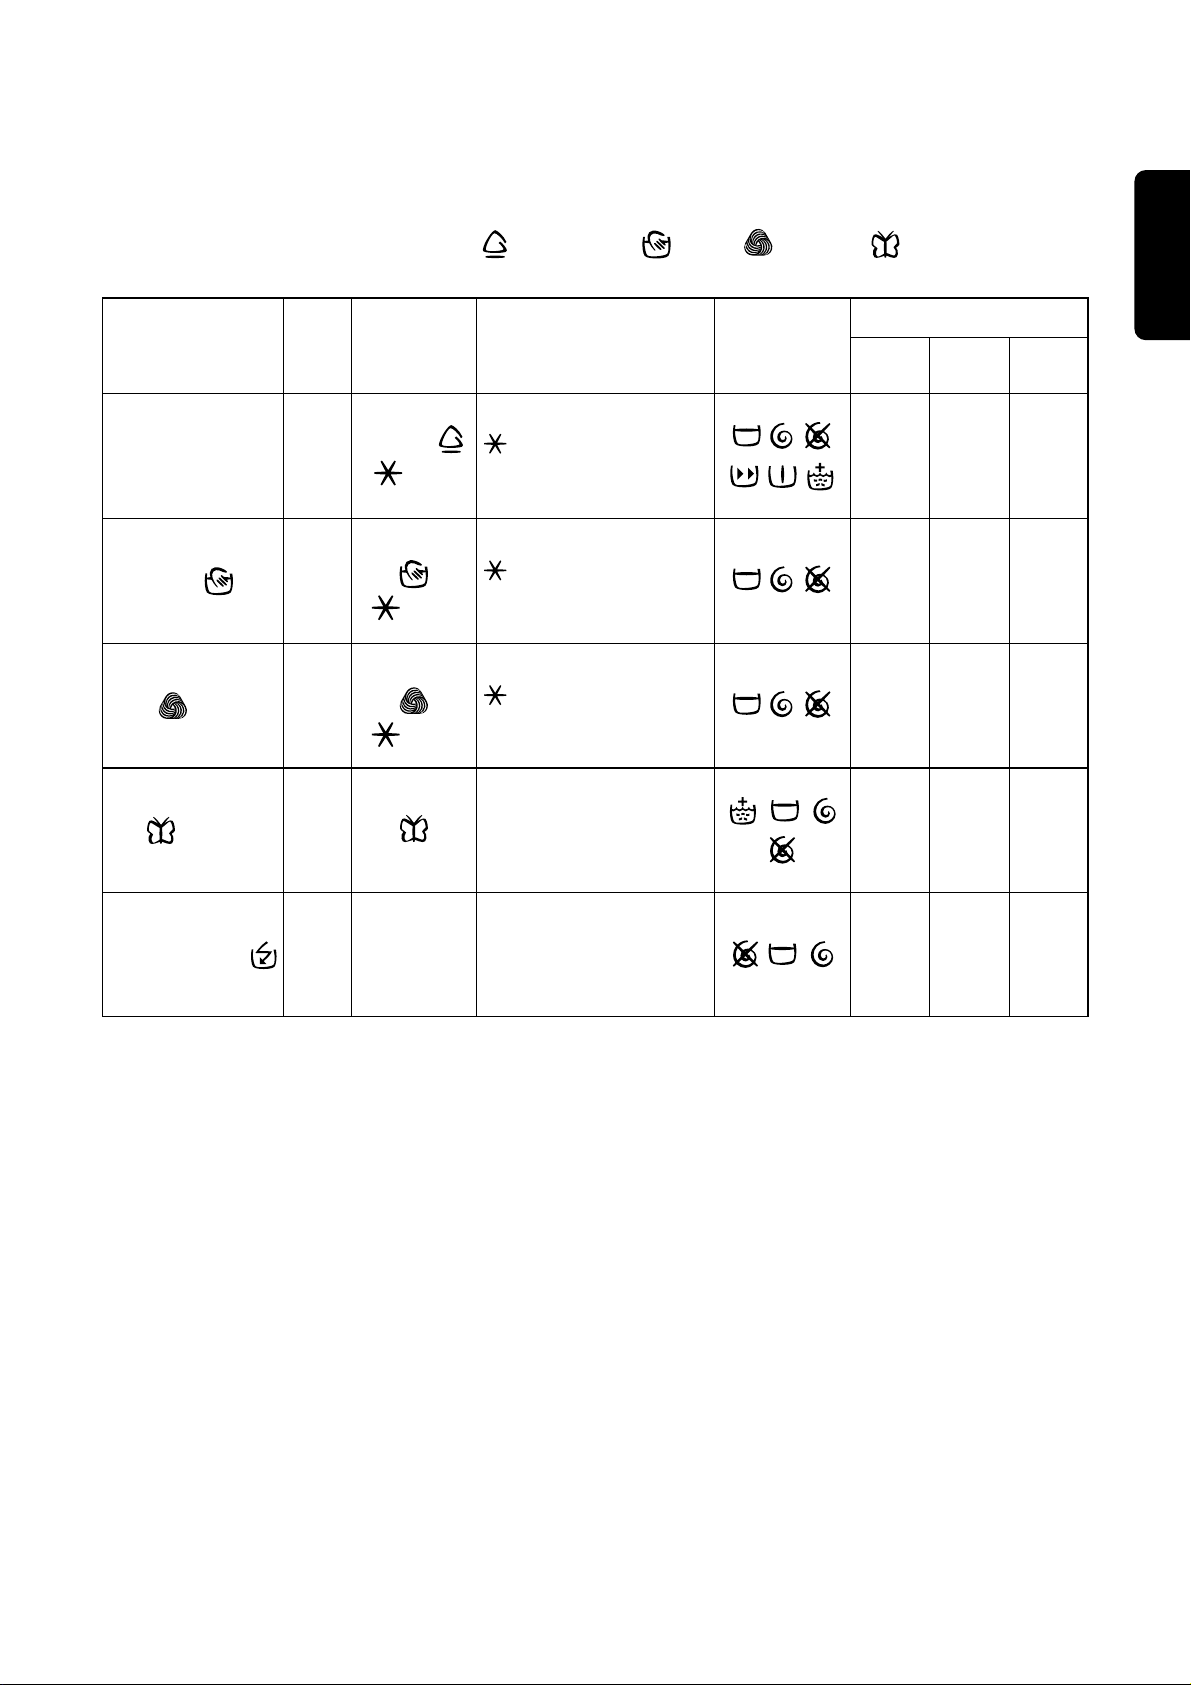
International wash code symbols 16
Operating sequence 17-19
Washing programmes 20-22
Contents
Page 4

4
Installation
• All internal packing must be removed before using
the appliance. Serious damage may be caused to
the machine or adjacent furniture if the protective
transit devices are not removed or are not
completely removed. Refer to the relevant
paragraph in the instruction book.
• Any electrical work required to install this appliance
must be carried out by a qualified electrician.
• Any plumbing work required to install this
appliance must be carried out by a qualified
plumber.
• After having installed the machine, check that it is
not standing on its electrical supply cable.
• If the appliance is placed on a carpeted floor,
ensure that air can circulate freely between the
feet and the floor.
Use
• This appliance is designed for domestic use. It
must not be used for purposes other than those for
which it was designed.
• Only wash fabrics which are designed to be
machine washed. Follow the instructions on each
garment label.
• Do not overload the appliance. Follow the
instructions in the instruction book.
• Make sure that all pockets are empty. Objects such
as coins, safety pins, pins and screws can cause
extensive damage.
• Do not machine wash garments saturated with
petroleum, methylated spirits, trichlorethylene, etc.
If such fluids have been used to remove stains
prior to washing, wait until they have completely
evaporated from the fabric before placing
garments in the appliance.
• Place small items such as socks, belts, etc. in a
cloth bag or pillowcase to prevent them getting
trapped between the drum and the tub.
• Use only the recommended quantities of fabric
softener. An excessive amount could damage the
laundry.
Warnings
• Leave the porthole door slightly ajar when the
appliance is not in use. This preserves the door
seal and prevents the formation of musty smells.
• Always check that water has emptied out before
opening the door. If not, drain the water following
the instructions in the instruction book.
• Always unplug the appliance and shut the water
tap after use.
General safety
• Repairs to the machine must be carried out only by
qualified personnel. Repairs carried out by
inexperienced persons could cause serious
danger. Contact your local Service Centre.
• Never pull the power supply cable to remove the
plug from the socket; always take hold of the plug
itself.
• During high temperature wash programmes the
door glass may get hot. Do not touch it!
The following warnings are provided in the interests of overall safety. You must read them carefully before
installing or using the appliance.
Page 5
ENGLISH
5
Disposal
Tips for environmental protection
Packaging materials
The materials marked with the symbol are
recyclable.
>PE<=polyethylene
>PS<=polystyrene
>PP<=polypropylene
This means that they can be recycled by disposing of
them properly in appropriate collection containers.
Machine
Use authorised disposal sites for your old appliance.
Help to keep your country tidy!
The symbol on the product or on its packaging
indicates that this product may not be treated as
household waste. Instead it shall be handed over to
the applicable collection point for the recycling of
electrical and electronic equipment. By ensuring this
product is disposed of correctly, you will help prevent
potential negative consequences for the environment
and human health, which could otherwise be caused
by inappropriate waste handling of this product. For
more detailed information about recycling of this
product, please contact your local city office, your
household waste disposal service or the shop where
you purchased the product.
To save water, energy and to help protect the
environment, we recommend that you follow these
tips:
• Normally soiled laundry may be washed without
prewashing in order to save detergent, water and
time (the environment is protected too!).
• The machine works more economically if it is fully
loaded.
• With adequate pre-treatment, stains and limited
soiling can be removed; the laundry can then be
washed at a lower temperature.
• Measure out detergent according to the water
hardness, the degree of soiling and the quantity of
laundry being washed.
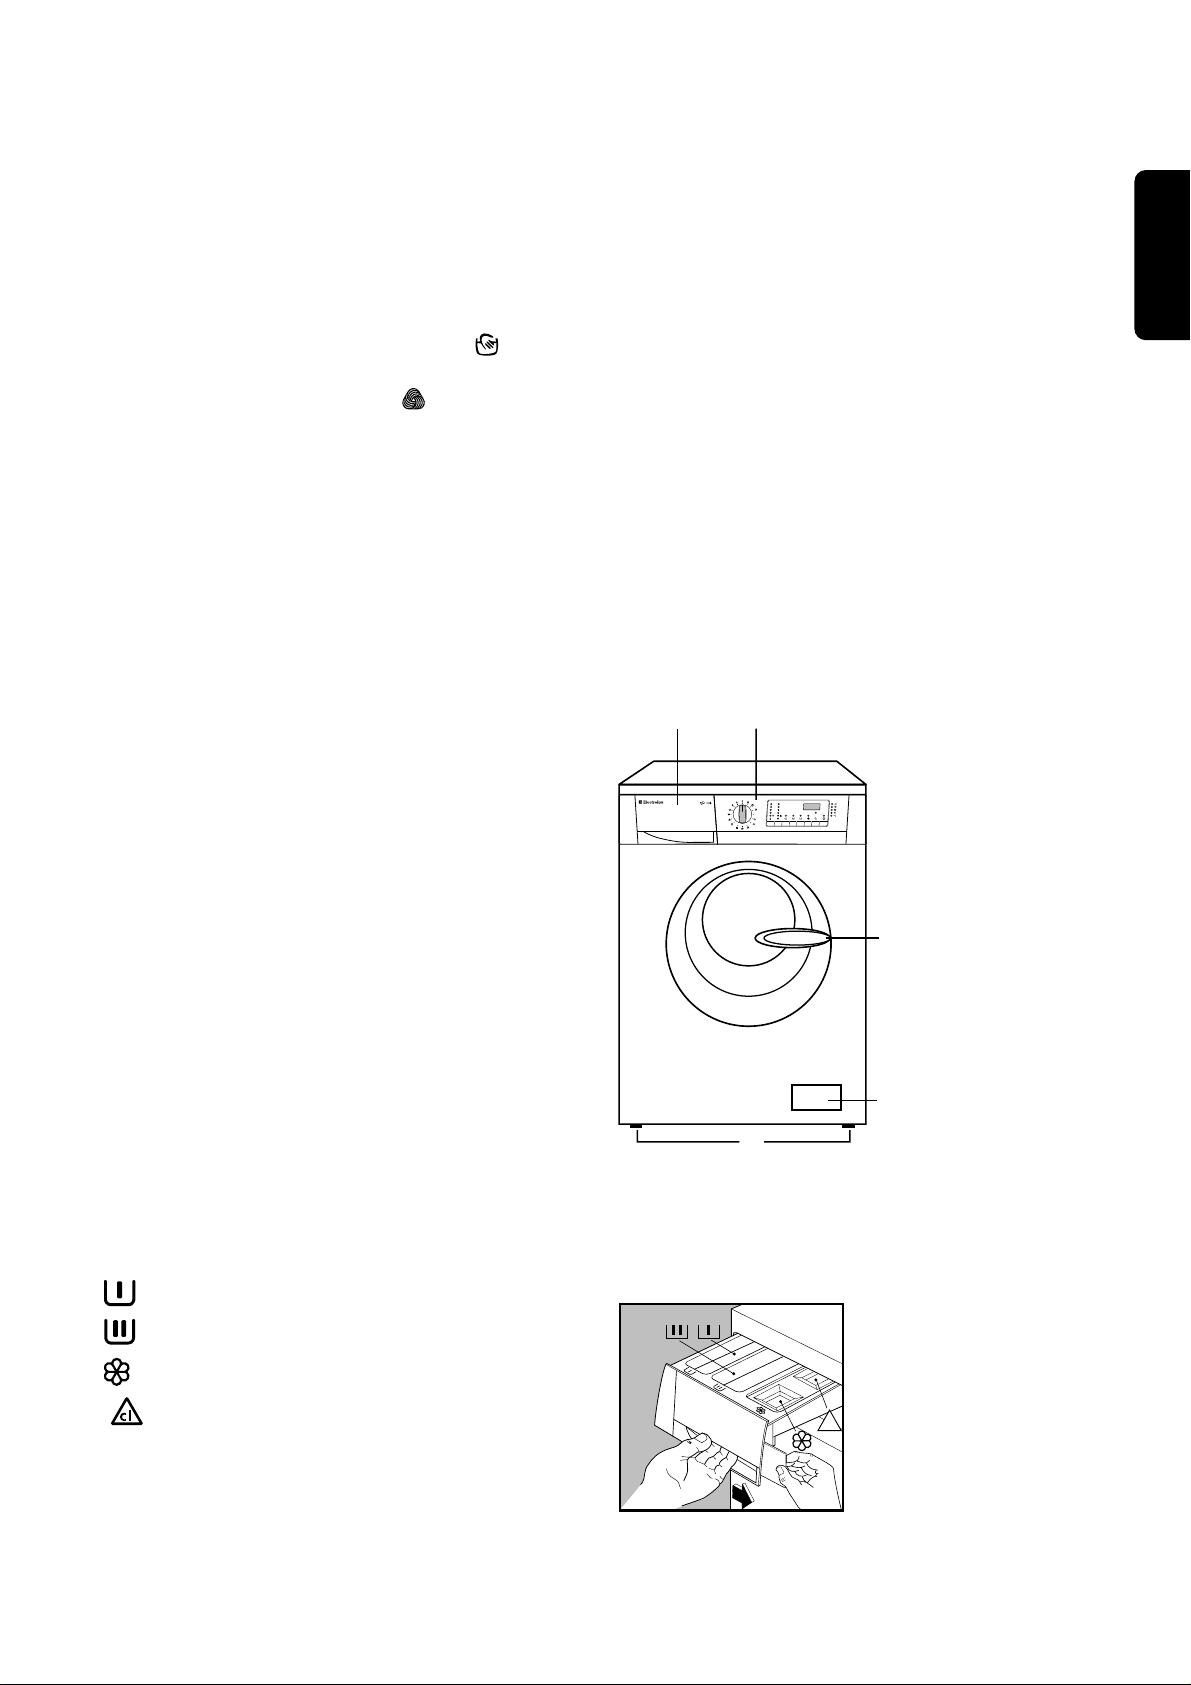
Child safety
• Children are often not aware of how dangerous
electrical appliances can be. When the machine is
working, children should be carefully supervised
and not be allowed to play with the appliance.
• The packaging components (e.g. plastic film,
polystyrene) can be dangerous to children - danger
of suffocation! Keep them out of children’s reach.
• Keep all detergents in a safe place out of children’s
reach.
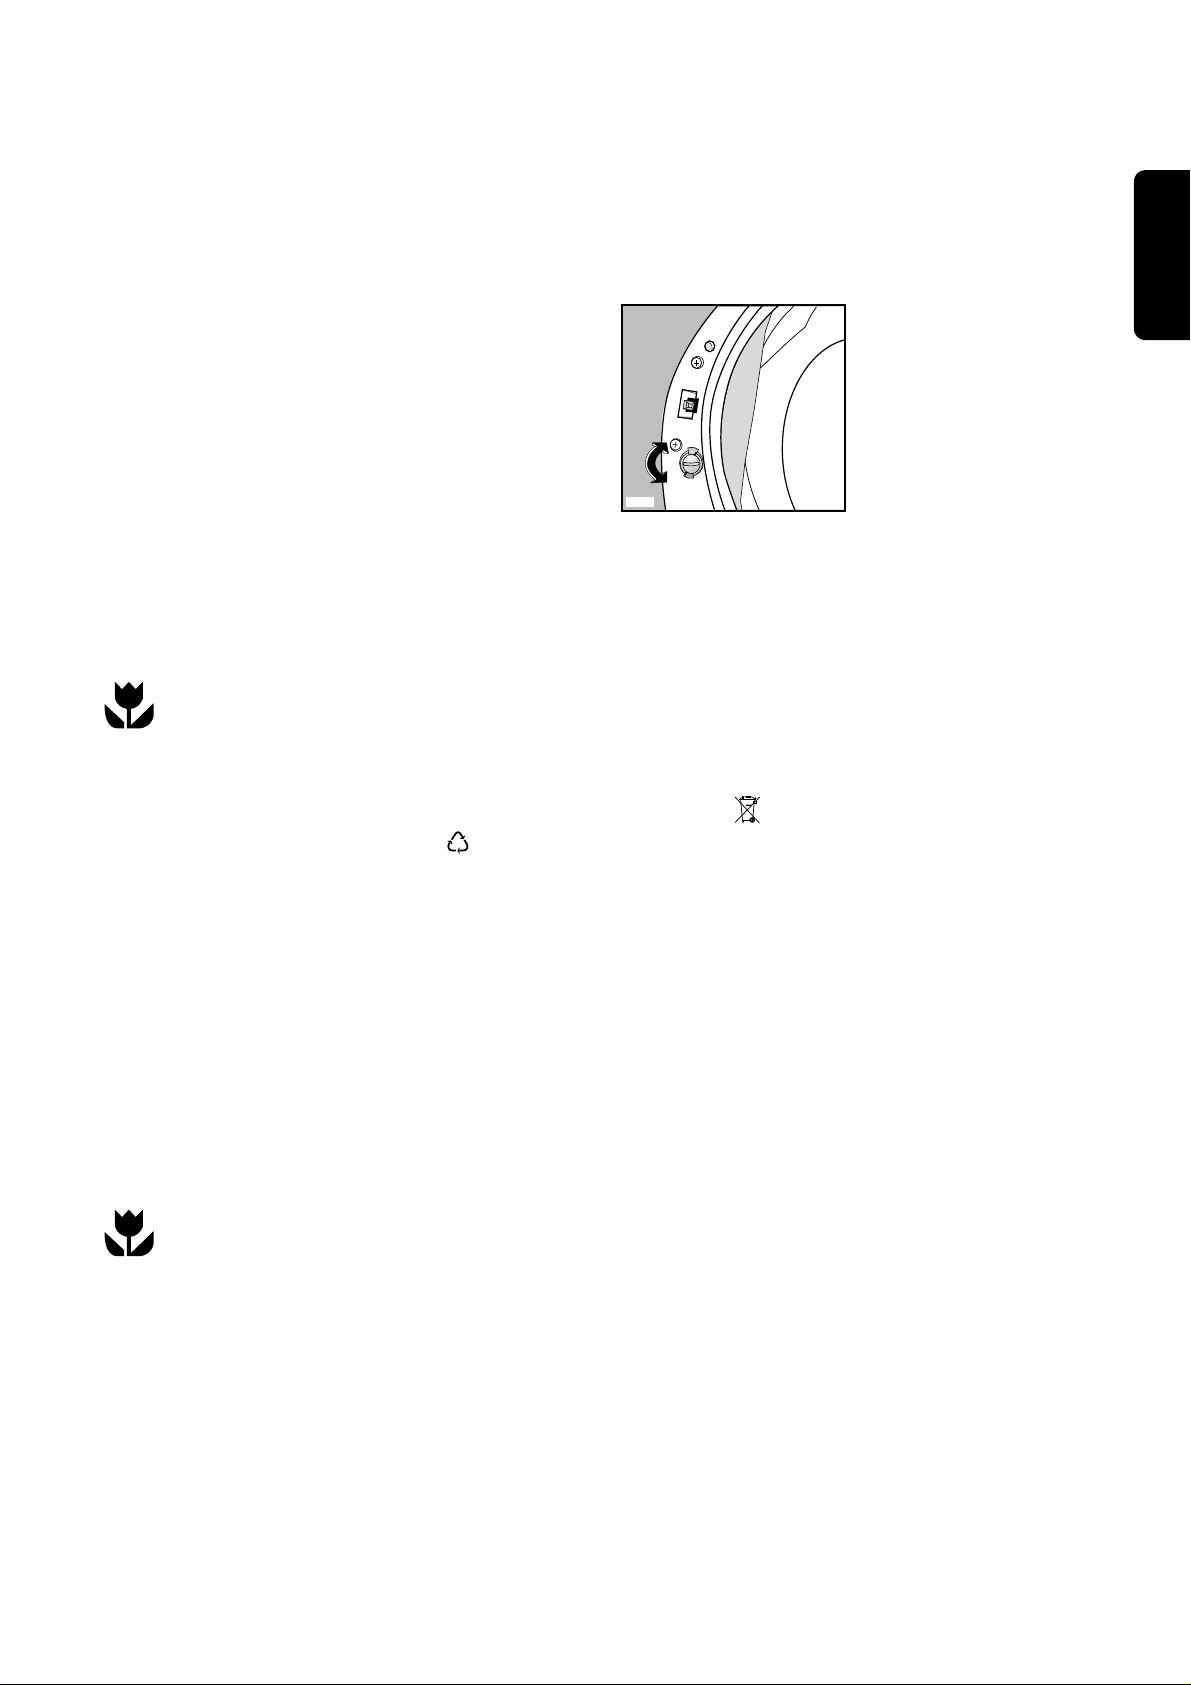
• Make sure that children or pets do not climb into
the drum. To avoid this the machine incorporates a
special feature. To activate this device, rotate the
button (without pressing it) inside the door
clockwise until the groove is horizontal. If
necessary use a coin.
To disable this device and restore the possibility of
closing the door, rotate the button anti-clockwise
until the groove is vertical.
• When the appliance is to be scrapped, cut off the
electrical supply cable and destroy the plug with
the remaining cable. Disable the door catch in
order to prevent children from becoming trapped
inside while playing.
P1131
Page 6
6
DIMENSIONS Height 85 cm
Width 60 cm
Depth 59 cm
MAXIMUM LOAD Cotton 6 kg
Synthetics 2,5 kg
Delicates and miniprogramme 2,5 kg
Woollens and handwash 2 kg
Silk 1 kg
SPIN SPEED 700 rpm max
POWER SUPPLY VOLTAGE/FREQUENCY 220-230 V/50 Hz
TOTAL POWER ABSORBED 2200 W
MINIMUM FUSE PROTECTION 10 A
WATER PRESSURE Minimum 0,05 MPa
Maximum 0,8 MPa
This appliance complies with the following EEC Directives:
73/23/EEC of 19/02/73 relating to low voltage
89/336/EEC of 03/05/89 relating to electromagnetic compatibility.
Technical specifications
Page 7
ENGLISH
7
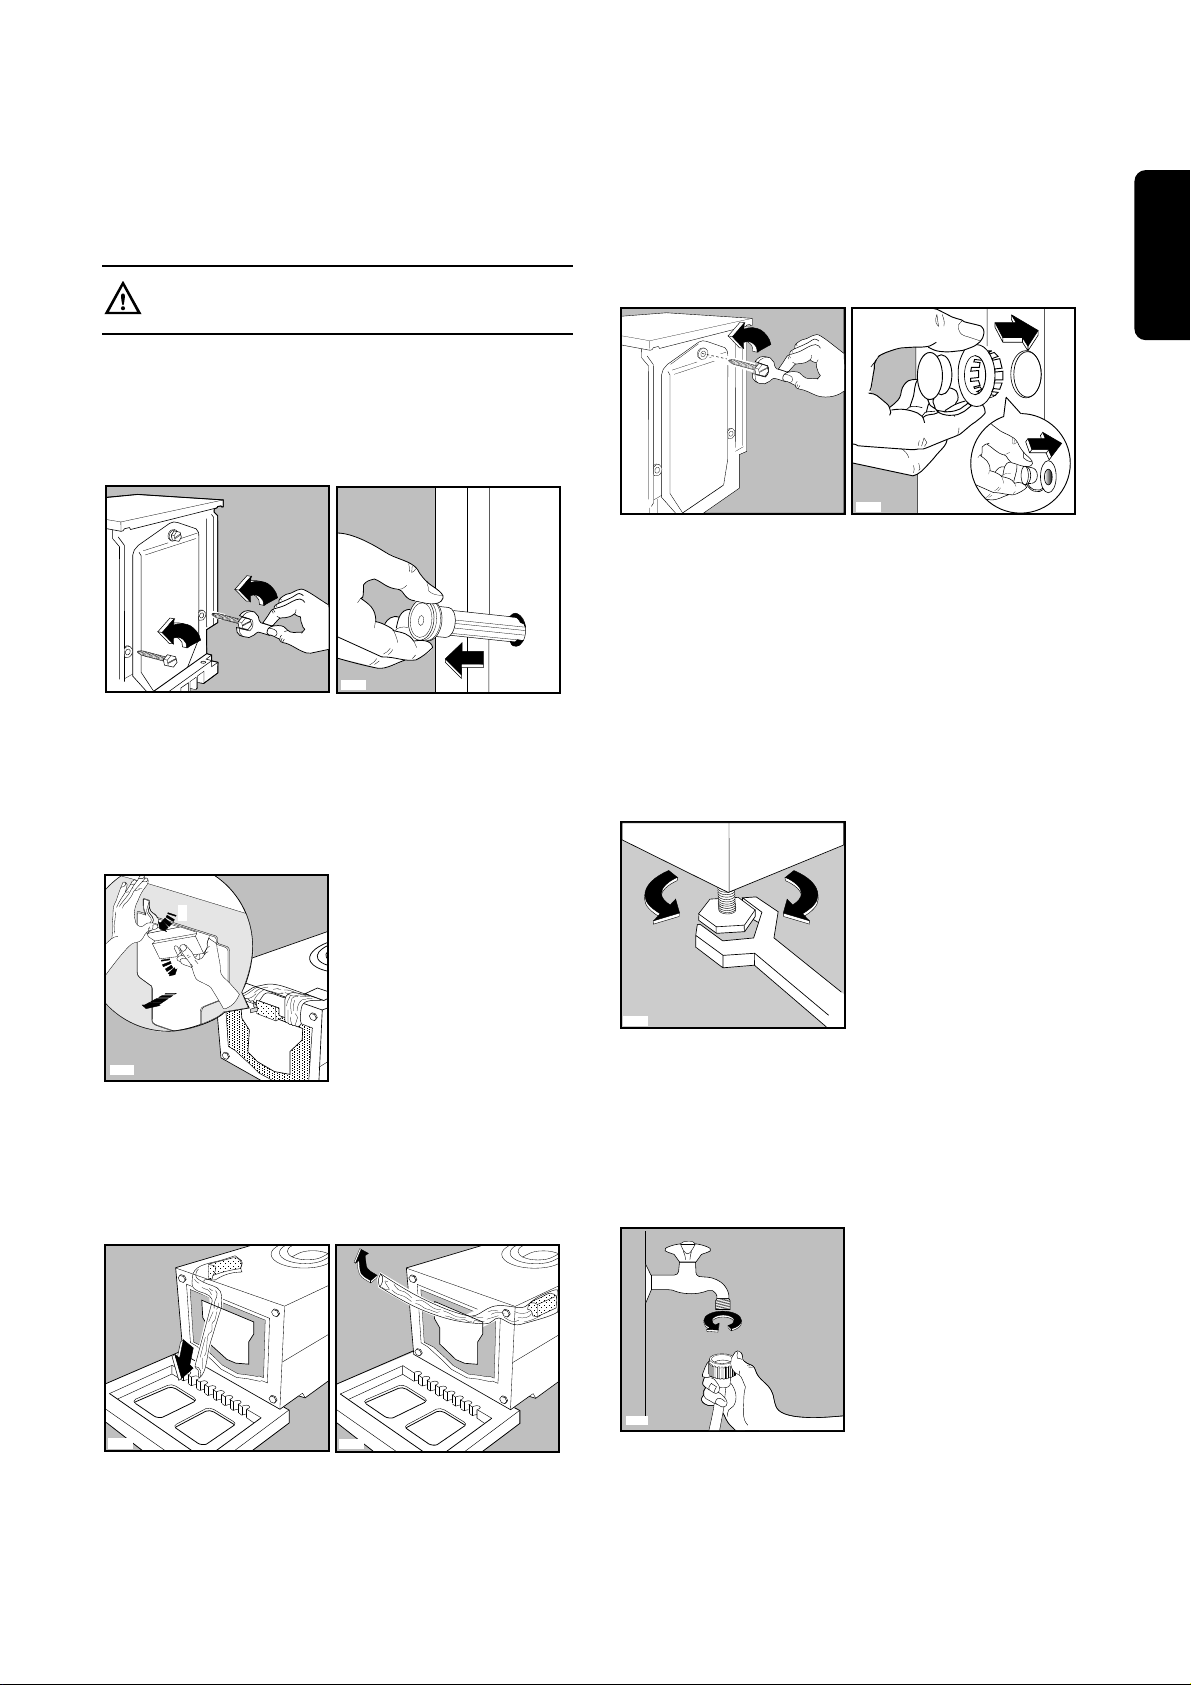
Unpacking
All transit bolts and packing must be removed
before using the appliance.
You are advised to keep all transit devices so that
they can be refitted if the machine ever has to be
transported again.
1. Using a spanner, unscrew and remove the two
rear bottom screws. Slide out the two plastic pins.
2. Lay the machine on its back, taking care not to
squash the hoses. This can be avoided by
placing one of the corner packing pieces between
the machine and the floor.
3. Remove the polystyrene block from the bottom of
the machine and release the two plastic bags.
4. Very carefully slide out the left polythene bag,
removing it towards the right and then
downwards.
5. Very carefully slide out the right polythene bag,
removing it towards the left and then upwards.
6. Set the machine upright and remove the
remaining rear screw. Slide out the relevant pin.
P1127
P1126
P1124
2
3
1
P0001
P1129
7. Plug all the holes with the plugs which you will
find in the envelope containing the instruction
booklet.
Positioning
Install the machine on a flat hard floor.
Make sure that air circulation around the machine is
not impeded by carpets, rugs etc. Check that the
machine does not touch the wall or other kitchen
units.
Carefully level by screwing the adjustable feet in or
out. Never place cardboard, wood or similar
materials under the machine to compensate for any
unevenness in the floor.
Water inlet
Connect the water inlet hose to a tap with a 3/4"
thread.
Do not use already employed hoses for water
connection.
The other end of the inlet hose which connects to the
machine can be turned in any direction. Simply
loosen the fitting, rotate the hose and retighten the
fitting, making sure there are no water leaks.
P1088
P1051
P0002
P1128
Installation
Page 8
8
The inlet hose must not be lengthened. If it is too
short and you do not wish to move the tap, you will
have to purchase a new, longer hose specially
designed for this type of use.
Important!
Before connecting up the machine to new pipework
or to pipework that has not been used for some time,
run off a reasonable amount of water to flush out any
debris that may have collected in the pipes.
Assembly upon a stand kit
Stand Dimension:
Height: 30 cm.
Width: 60 cm.
Depth: 60 cm.
This appliance can be installed upon a steel stand
with drawer to make the loading and unloading of
your laundry easier.
Please ask to authorized dealer the suitable stand
kit.
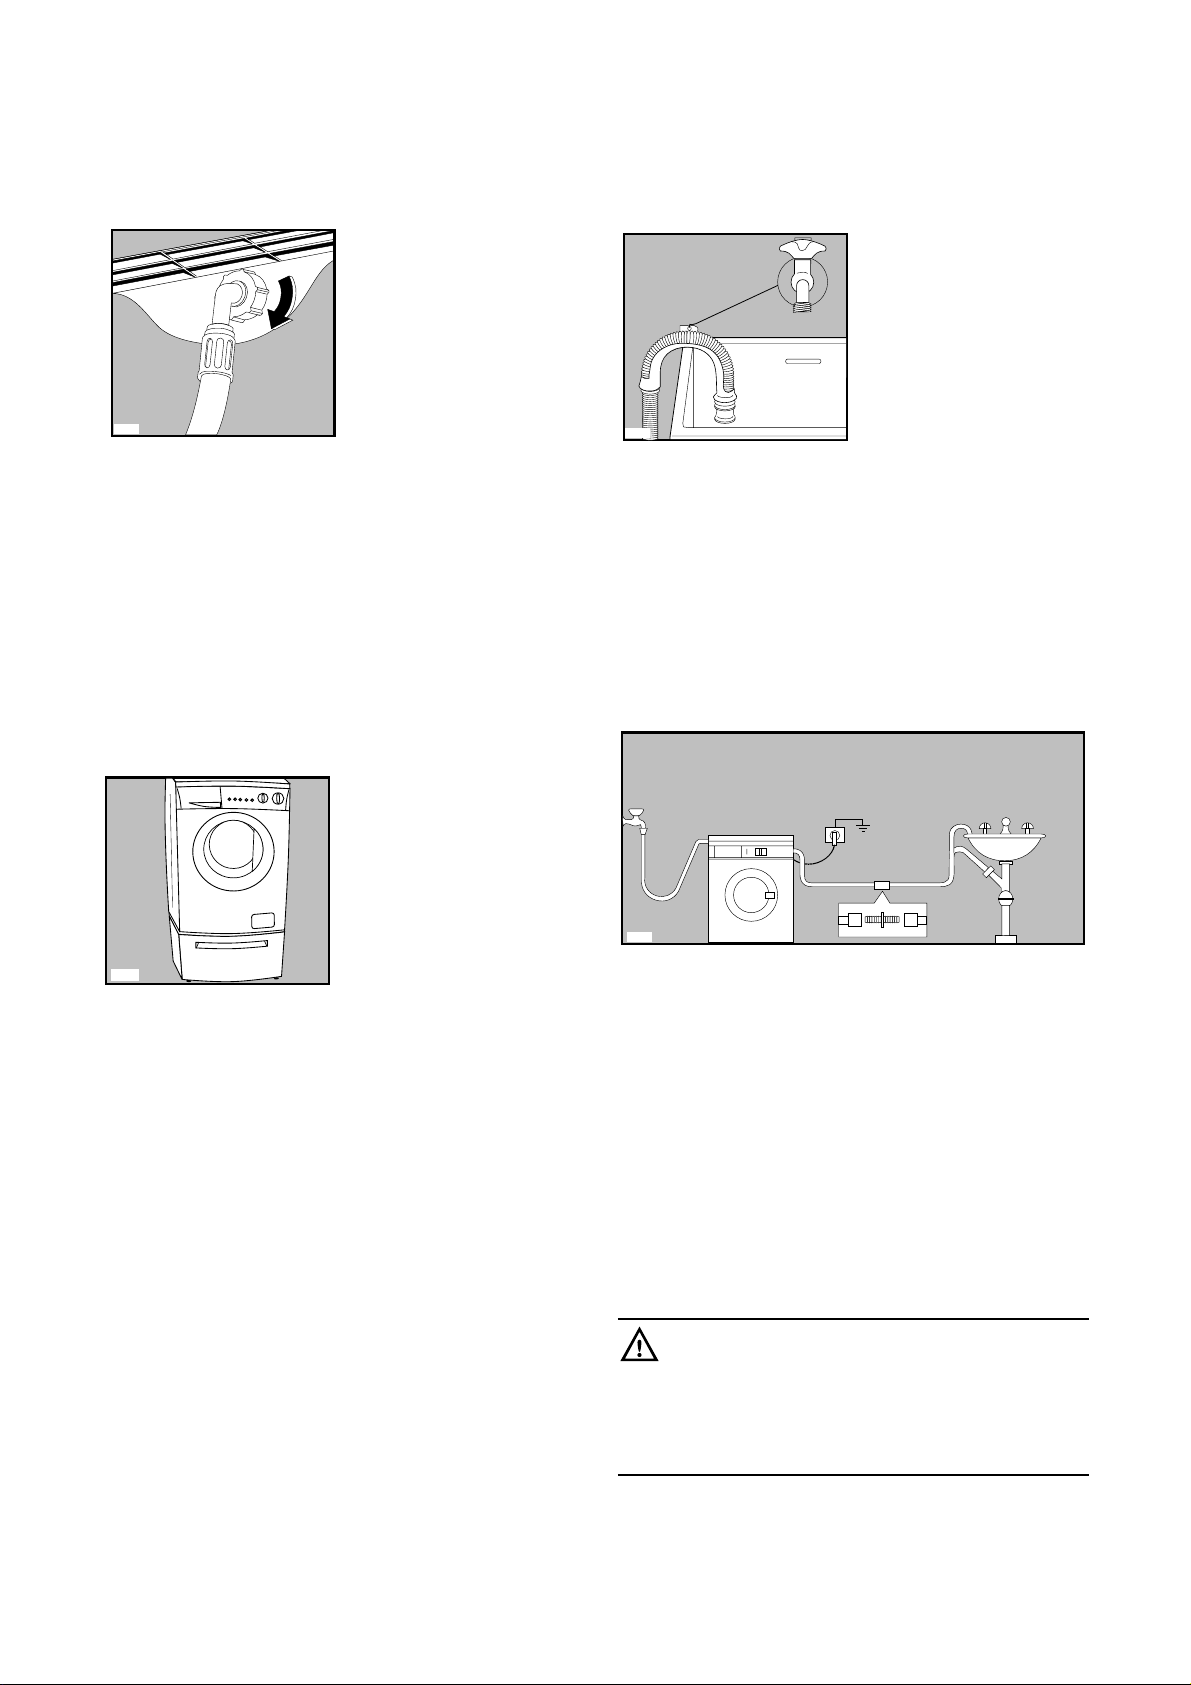
Water drainage
The end of the drain hose can be positioned in three
ways:
Hooked over the edge of a sink using the plastic
hose guide supplied with the machine. In this
case, make sure the end cannot come unhooked
when the machine is emptying.
This could be done by tying it to the tap with a piece
of string or attaching it to the wall.
P1216
P0021
In a sink drain pipe branch. This branch must be
above the trap so that the bend is at least 60 cm
above the ground.
Directly into a drain pipe at a height of not less
than 60 cm and not more than 90 cm.
The end of the drain hose must always be
ventilated, i.e. the inside diameter of the drain pipe
must be larger than the outside diameter of the drain
hose.
The drain hose must not be kinked.
For a correct functioning of the machine the
drain hose must remain hooked on the proper
support piece situated on the top part of the back
side of the appliance.
Electrical connection
This machine is designed to operate on a 220-230 V,
single-phase, 50 Hz supply.
Check that your domestic electrical installation can
take the maximum load required (2.2 kW), also
taking into account any other appliances in use.
Connect the machine to an earthed socket.
The manufacturer declines any responsibility
for damage or injury through failure to comply
with the above safety precaution.
Should the appliance power supply cable
need to be replaced, this must be carried out
by our Service Centre.
Important!
When the appliance is installed the power supply
cable must be easily accessible.
P1118
P0022
Page 9
ENGLISH
9
This new machine meets all modern requirements for effective treatment of laundry with low water, energy and
detergent consumption.
• The DELAY START option allows you to delay starting of the wash programme, so allowing you for instance
to make use of overnight economy electricity tariffs.
• The special HANDWASH programme with its new delicate wash system treats your delicate items with
extreme care.
• The special wool programme with its new delicate wash system treats your woollens with extreme care.
• The automatic cooling of the washing water from 90° to 60°C before draining will prevent old drain pipes
from being deformed.
• The balance control device ensures the machine is stable during the spin.
• The ECO valve allows total use of detergent and reduces water consumption so saving energy.
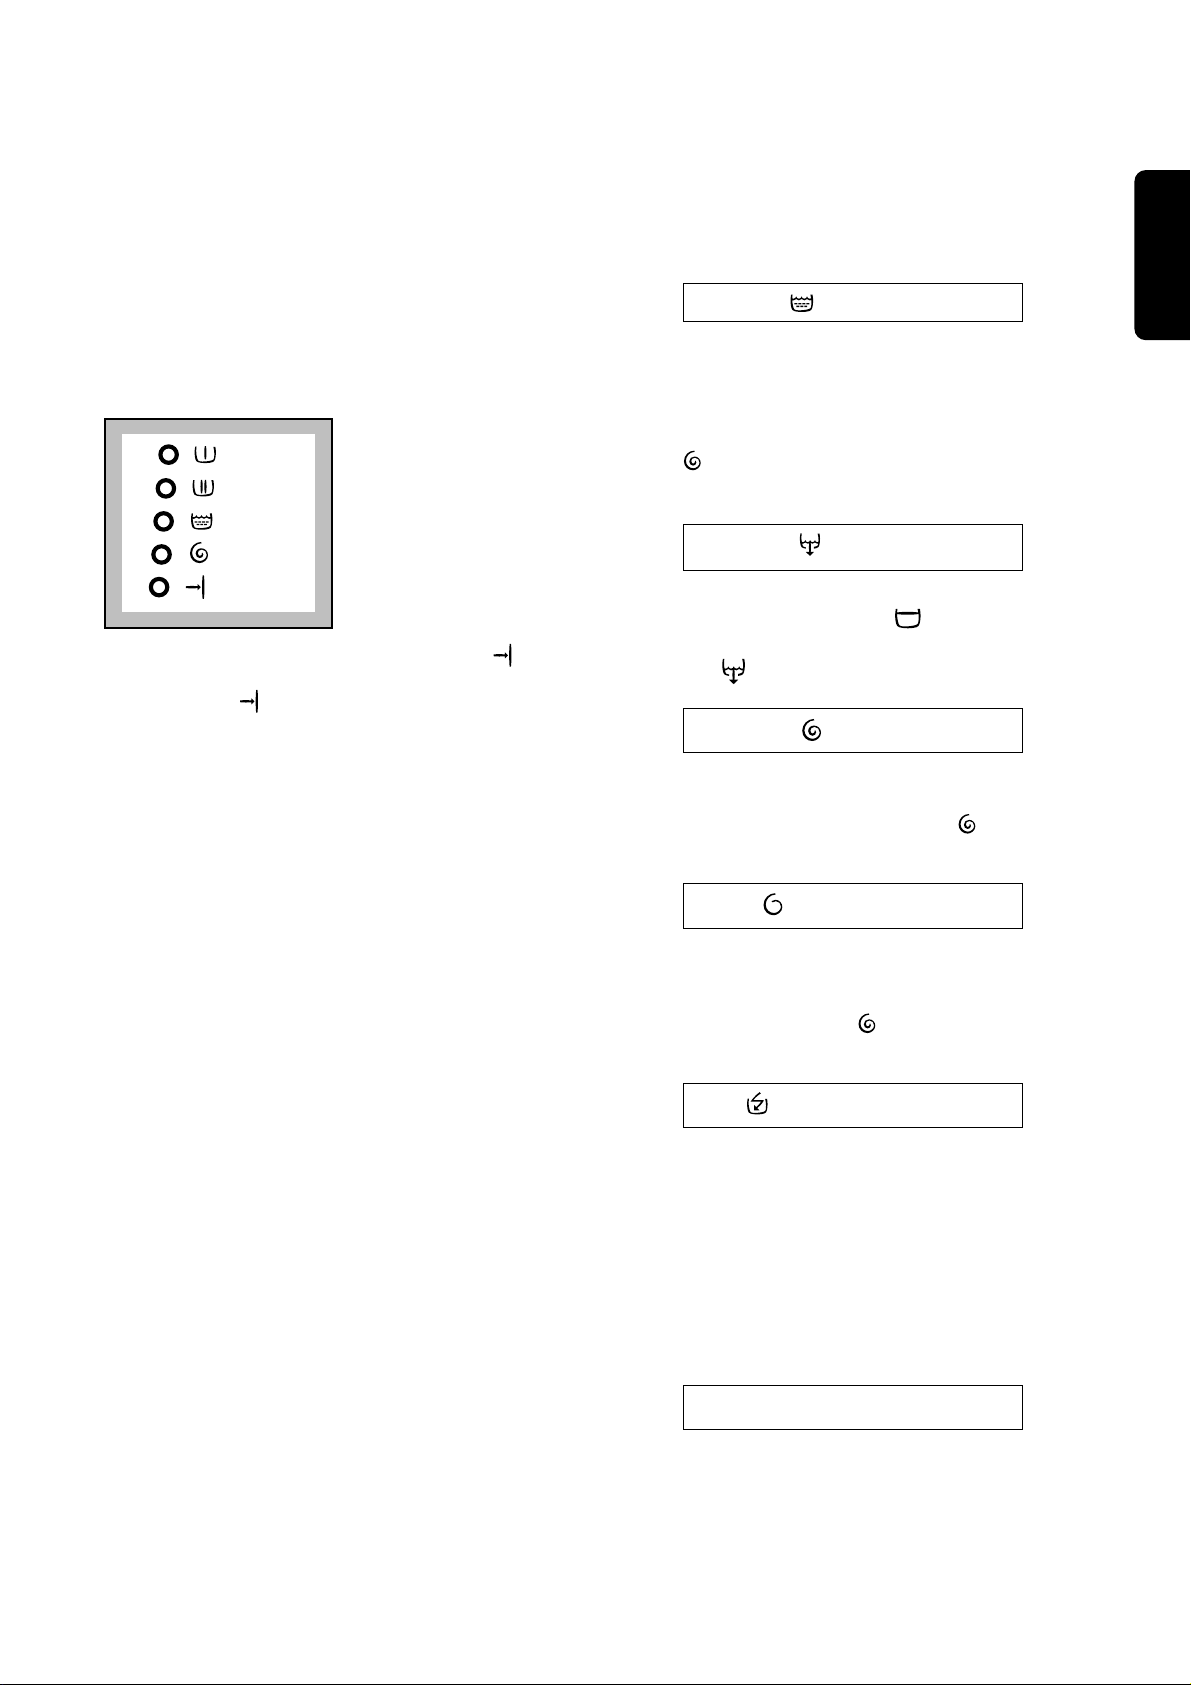
1 Detergent dispenser drawer
2 Control panel
3 Door handle
4 Drain pump
5 Adjustable feet
Detergent dispenser drawer
Prewash
Main wash
Fabric softener, starch
Bleaching agent
Your new washing machine
Description of the appliance
5
2
1
4
3
9
0
°
6
0
°
4
0
°
3
0
°
EWF 735
E
E
40° AA
7
0
0
6
0
0
4
5
0
5
0
0
C0115
Cl
Page 10
10
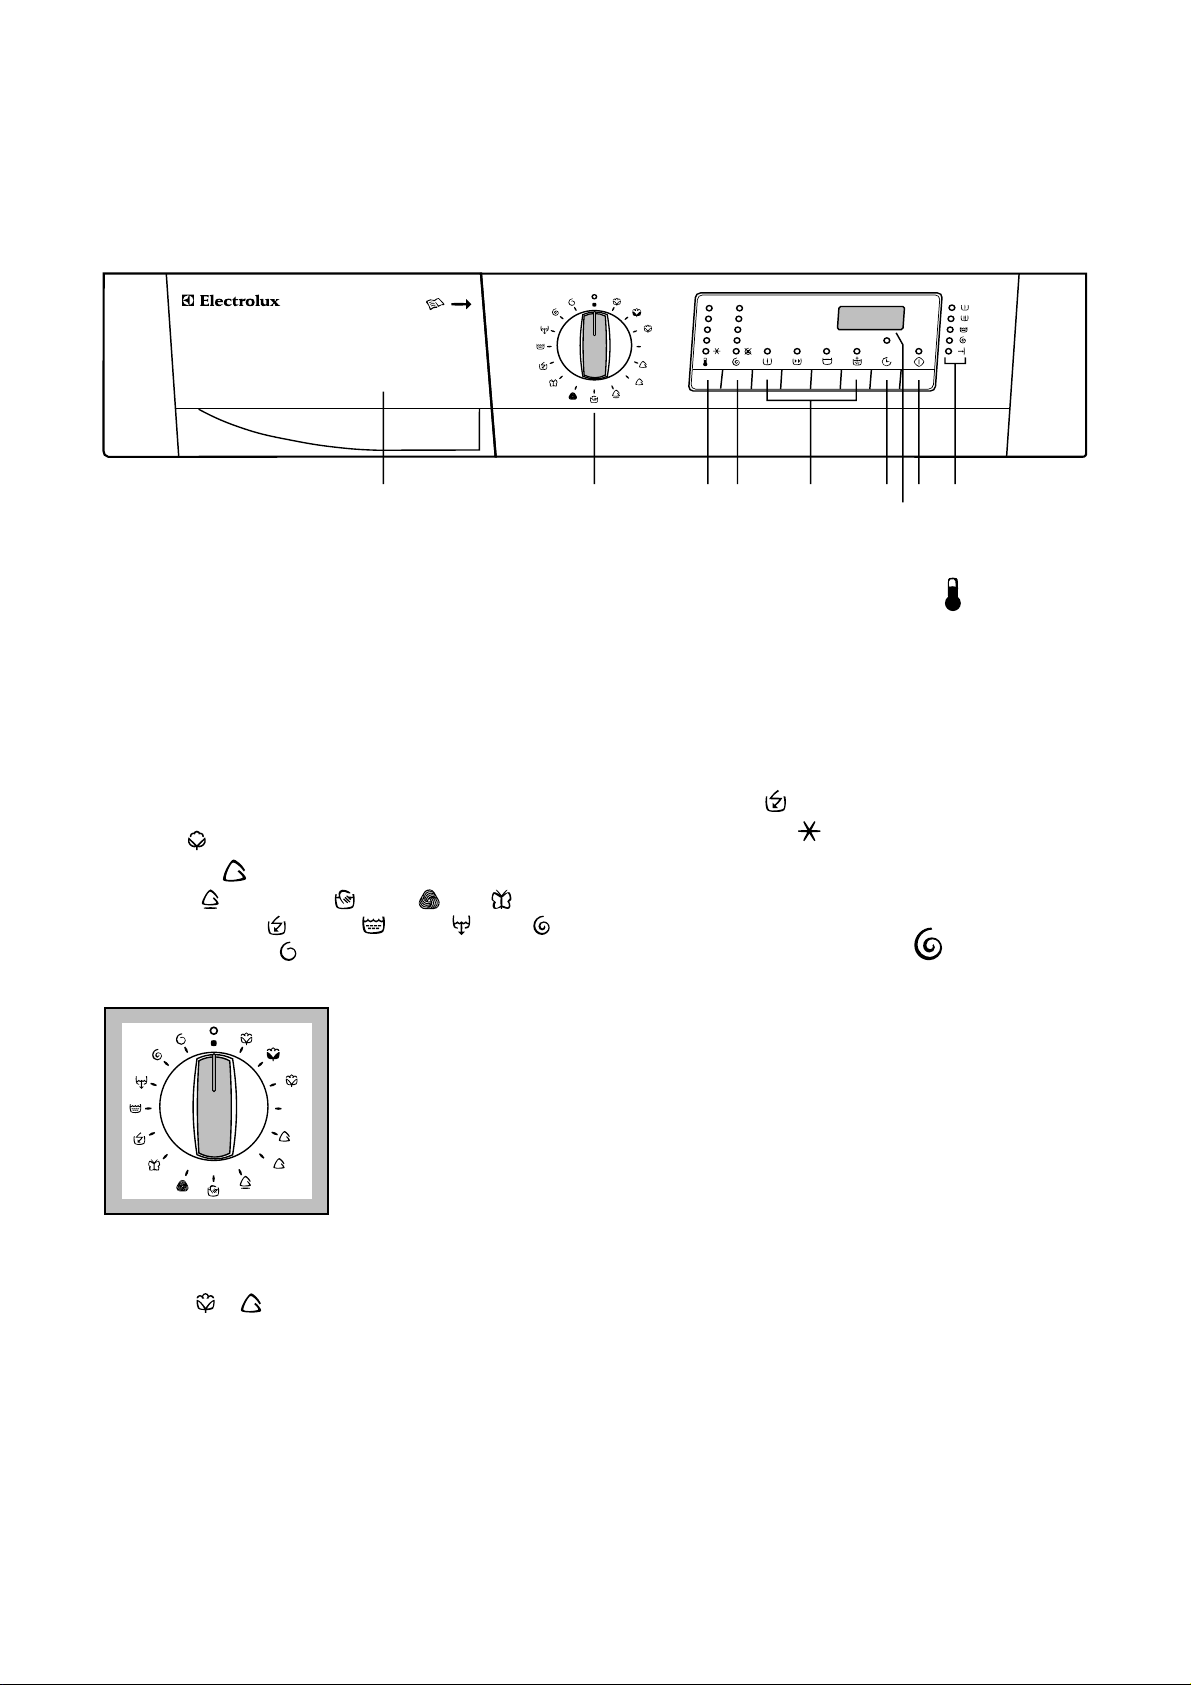
Use
1 Detergent dispenser drawer and
programme chart
A programme chart in Portuguese is provided with
the instruction booklet. Insert it in the interior part of
the detergent dispenser drawer.
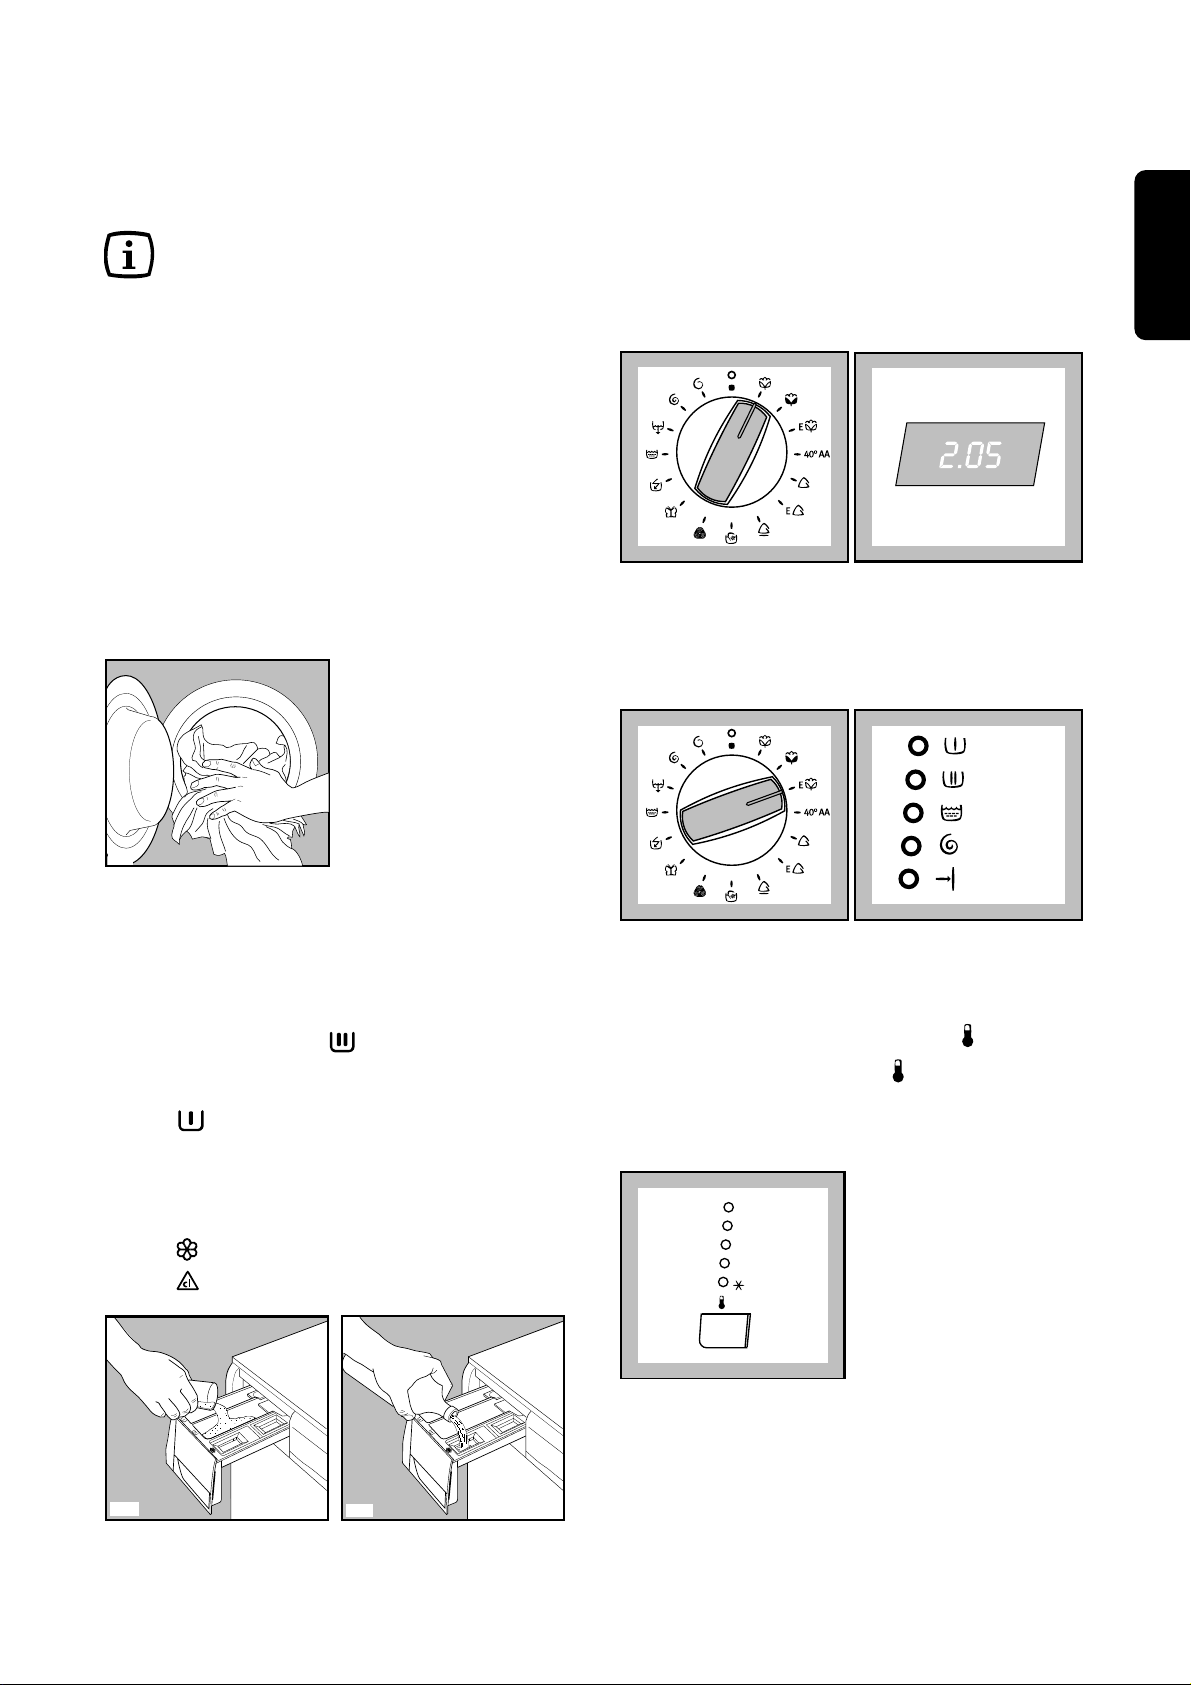
2 Programme selector dial
The selector is divided into 4 sections:
• Cotton
• Synthetics
• Delicate , handwash , wool , silk ,
miniprogramme , rinses , drain , spin
and delicate spin
O Reset programme/OFF
The selector dial can be turned either clockwise or
anticlockwise.
Position E/E corresponds to the ENERGY
SAVING programme.
At the end of the programme the selector dial
must be turned to position O.
E
E
40° AA
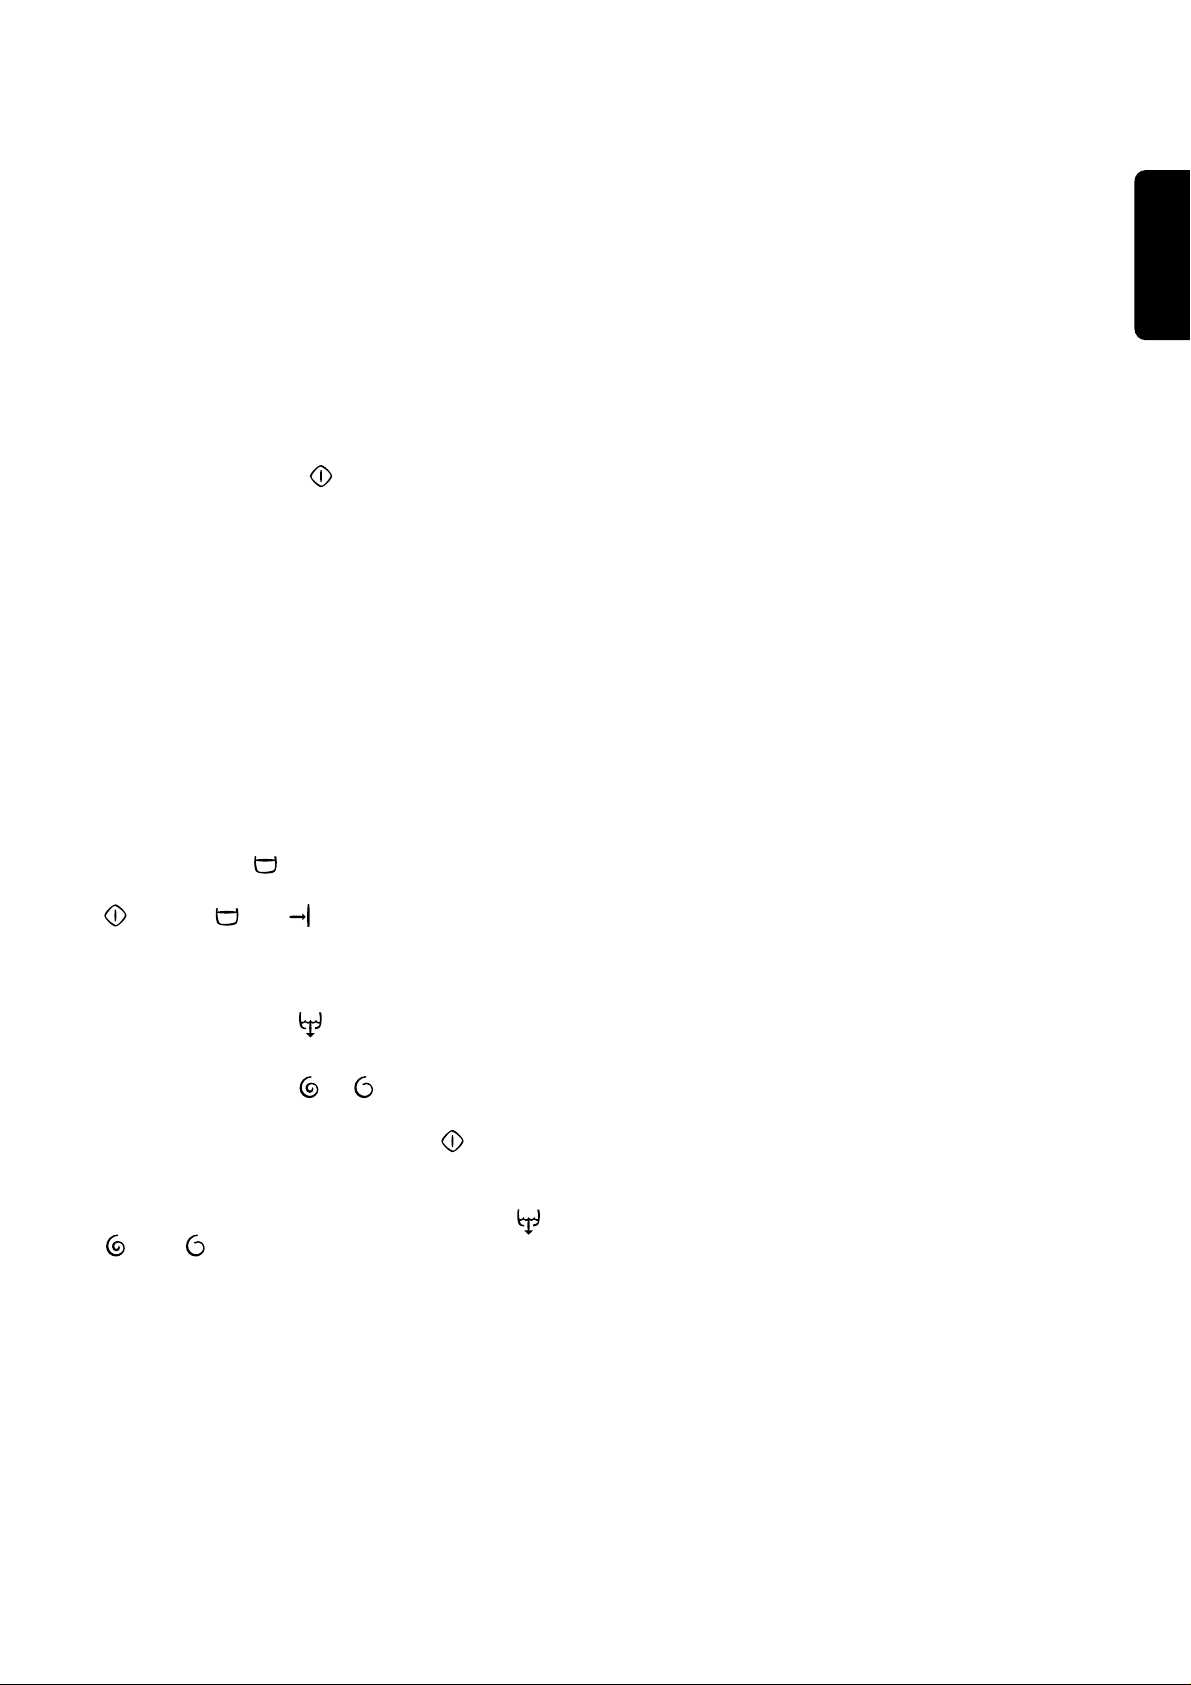
3 TEMPERA TURE button
Press this button repeatedly to increase or decrease
the temperature, if you want your laundry to be washed
at a temperature different from the one proposed by the
washing machine. The relevant light will light up.
Maximum temperatures are 90°C for cotton, 60°C for
synthetic fabrics, 40°C for delicate fabrics, wool and
fabrics to be hand-washed (HANDWASH programme),
30°C for silk and .
By selecting position the machine will wash with
cold water. To be used for extremely delicate items,
such as curtains.
4 SPIN SPEED button
Press this button repeatedly to change the spin
speed, if you want your laundry to be spun at a
speed different from the one proposed by the
washing machine. The relevant light will light up.
Maximum speed is 700 rpm for all fabrics.
123456
7
8
9
90°
60°
40°
30°
EWF 735
E
E
40° AA
700
600
450
500
Control panel
Page 11
ENGLISH
• NO SPIN : by selecting this option all the
spinning phases are suppressed. To be used for
extremely delicate items.
The machine will add 3 rinses on cotton
programmes and 1 rinse on synthetic programme.
5 Programme option buttons
Depending on the program, different functions can be
combined. These must be selected after choosing the
desired program and before depressing the
START/PAUSE button .
When these buttons are pressed, the corresponding
pilot lights come on. When they are pressed again,
the pilot lights go out.
If an incorrect option is selected, the pilot lights flash
for about 2 seconds and the message Err is
displayed.
Press these buttons to select the following options:
PREWASH: select this option if you wish your
laundry to be prewashed before the main wash (not
available for wool and handwash cycle,
miniprogramme and silk).
The Prewash ends with a short spin at 650 rpm in
programmes for cotton and synthetic fabrics, whereas
in the program for delicate fabrics the water is only
drained.
QUICK WASH: this option can be used for lightly
soiled (not for wool, hand wash, silk and
miniprogramme) in order to obtain a good washing
program in a short time. The washing time will be
reduced according to the type of fabric and the
selected temperature.
Quick wash cannot be used with E , 40° AA,
E program.
RINSE HOLD: by selecting this option the water of
the last rinse is not emptied out to prevent the fabrics
from creasing. When the programme has finished the
light of the START/PAUSE goes off, the light,
the light are on and the door is blocked to
indicate that the water must be emptied out.
There are 2 possibilities to empty out water:
• Select programme (draining):
The water is emptied out without spinning.
• Select programme or . Select the spin
speed by means of the relevant button and then
depress the START/PAUSE button . The water
is emptied out and the laundry is spun at the
selected spin speed.
Attention! Before selecting programme ,
and the selector dial has to be
positioned on «O» (cancelling).
EXTRA RINSE: this option can be selected with
all programmes except the wool, miniprogramme
and handwash programme. The machine will
perform 2 additional rinses.
To be used in areas where the water is very soft or
for people allergic to detergents or who have very
delicate skin.
6 DELAY START button
The wash programme can be delayed from 30 min 60 min - 90 min, 2 hours and then by 1 hour up to a
maximum of 23 hours by means of this button.
Selecting the delayed start
• Select the programme and the required options.
• Select the delay start.
• Depress START/PAUSE button : the machine
starts its hourly countdown.
The programme will start after the selected delay has
expired.
Altering the delayed start
• Depress START/PAUSE button .
• Depress DELAY START button until “
0’”is
displayed.
• Depress START/PAUSE button again .
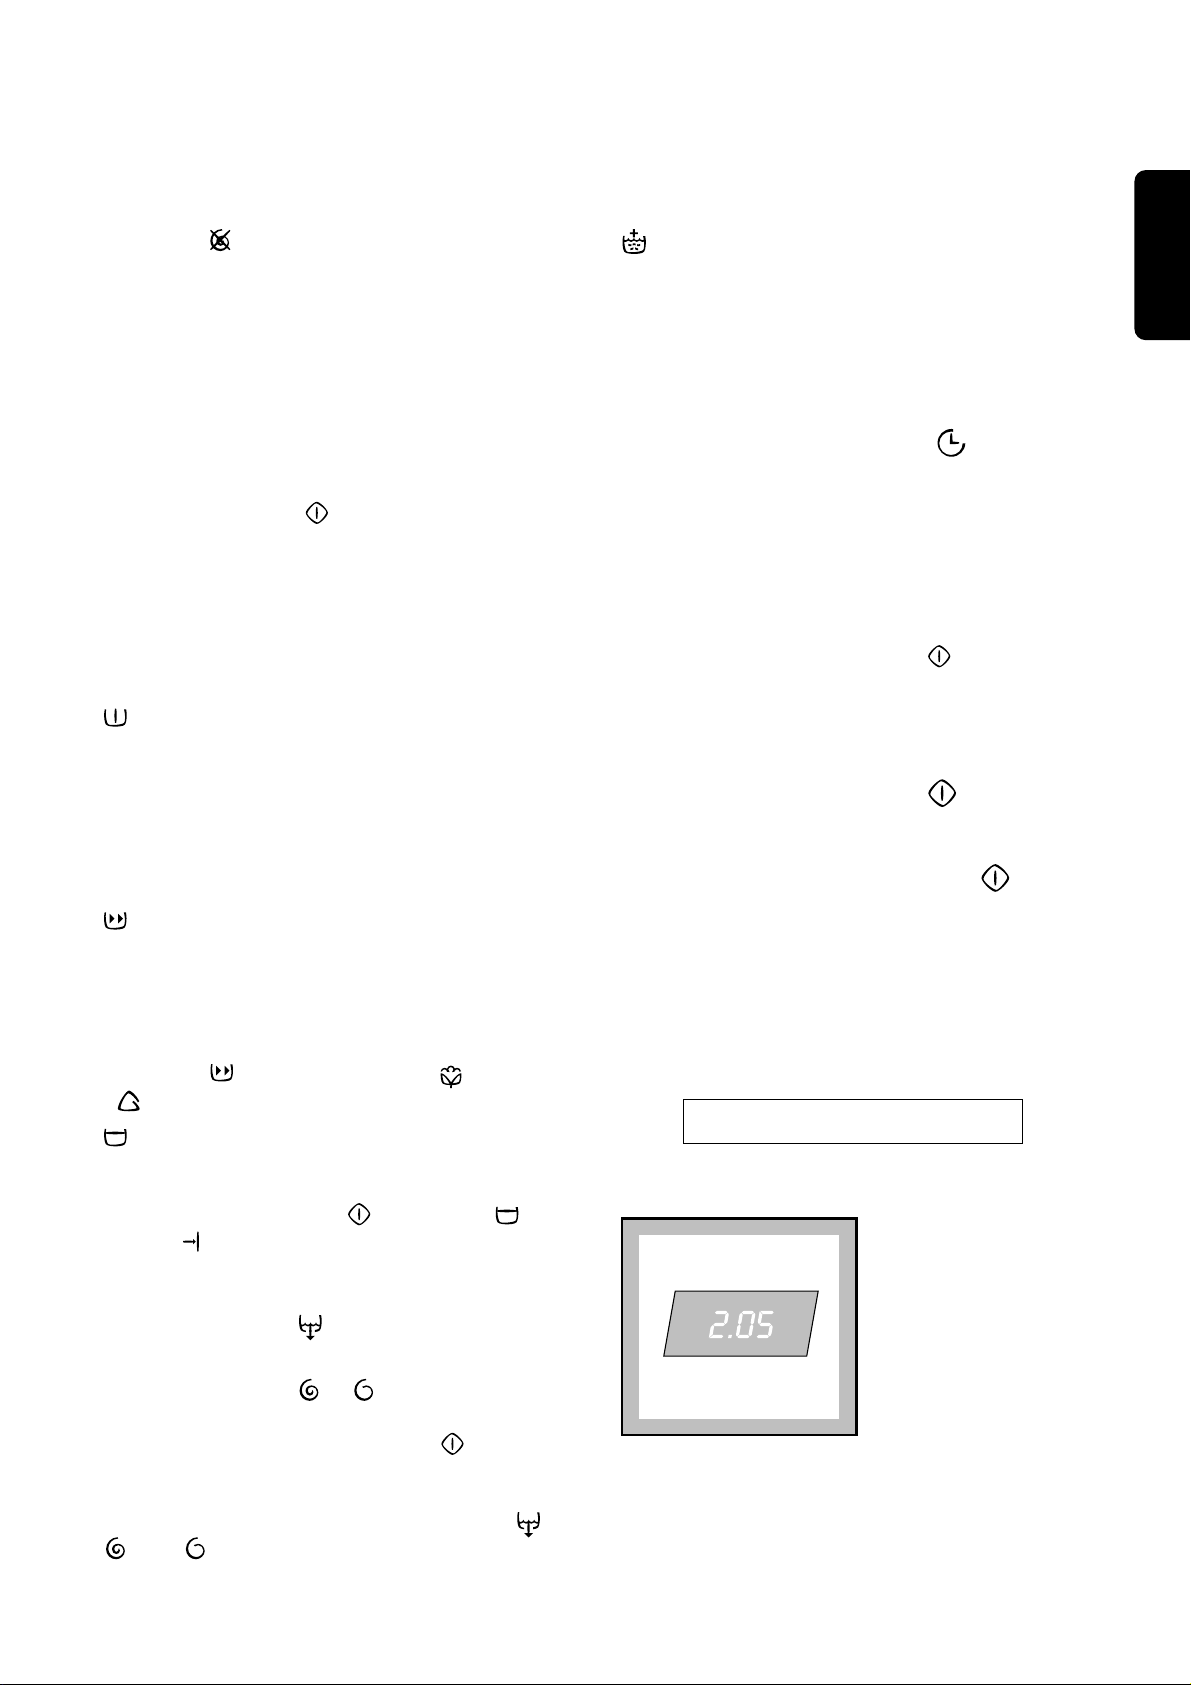
7 DISPLAY
The display shows the following information:
Duration of the programme - Delayed start Incorrect option selection - Alarm code - End of
programme.
After selecting a programme, the duration is
displayed in hours and minutes ( for example 2.05).
The duration is calculated automatically on the basis of
the maximum recommended load for each type of fabric.
After the programme has started, the time remaining
is updated every minute
Duration of the selected
programme
11
Page 12

The selected delay (23 hours max) set by means of
the relevant button appears on the display for 3
seconds, then the duration of the previously selected
programme is displayed.
The countdown is updated every hour and when
remain the last 2 hours each 30 min.
If an option which is not compatible with the set wash
programme is selected, the message Err is
displayed for 2 seconds.
In the event of operating problems, some alarm
codes can be displayed, for example E20 (see
paragraph “Something not working”).
Alarm codes
Incorrect option selection
Delayed start
When the programme has finished a flashing zero
is displayed.
8 START/PAUSE button
This button has two functions: Start - Pause.
• Start:
After having selected the required programme, press
this button to start the machine; the corresponding
pilot light stops flashing.
If you have selected the delayed start, the machine
begins its countdown. The duration of the
programme or the delay appears on the display.
• Pause
To interrupt a programme which is running, depress
the Start/Pause button: the corresponding pilot light
starts start to flash.
To restart the programme from the point at which it
was interrupted, press the START/PAUSE button
again.
End of programme
12
Page 13
ENGLISH
9 Programme progress display
By selecting the wash programme, the pilot lights
corresponding to the various phases making up the
programme come on.
After the machine has started, only the running
phase pilot light stays on.
At the end of the programme the pilot light
illuminates.
The pilot light flashes in the event of operating
problems and the relative alarm code appears on the
display:
- E40 = the door has not been closed
- E20 = the machine does not empty
- E10 = the machine does not fill
To eliminate the problem, see paragraph “Something
not working”.
PREWASH
WASH
RINSES
DRAIN
END
Programme information
With this programme it is possible to rinse and spin
cotton garments which have been washed by hand.
The machine performs 3 rinses, followed by a final
spin at maximum speed.
The spin speed can be reduced by depressing
button . The final spin is foreseen only for cotton
items as in the spin programme.
For emptying out the water of the last rinse in
programmes with the Rinse hold option.
Turn first the programme selector dial to O, then select
programme and depress the START/PAUSEbutton.
Separate long spin at max.speed for hand washed
garments. It has to be used for cotton items. You can
reduce the speed by means of button to adapt it
to the fabrics to be spun.
Separate short spin at 700 rpm for hand washed
garments. It has to be used for synthetic, delicate,
wool/handwashed, silk items. You can reduce the
speed by means of button to adapt it to the
fabrics to be spun.
This is a complete programme that can be
combined with the following options: spin speed
reduction, no spin, rinse hold and delayed start.
To be used for laundry which is lightly soiled or
which needs freshening up.
Max load 2.5 kg;
Washing temperature 30°C
Programme duration 30 minutes
Final spin speed 700 r.p.m.
To reset a programme and to switch off the machine
turn the selector dial to O. Now can a new
programme be selected.
O = Cancelling/OFF
Mini programme
Delicate Spin
Spin
Drain
Rinses
13
Page 14

14
Washing hints
Sorting the laundry
Follow the wash code symbols on each garment
label and the manufacturer’s washing instructions.
Sort the laundry as follows:
whites, coloureds, synthetics, delicates, woollens.
Temperatures
90° for normally soiled white cottons and linen
(e.g. tea cloths, towels, tablecloths,
sheets...)
60° for normally soiled, colour fast garments
(e.g. shirts, night dresses, pyjamas....) in
linen, cotton or synthetic fibres and for
lightly soiled white cotton (e.g. underwear).
(cold)for delicate items (e.g. net curtains), mixed
30°-40° laundry including synthetic fibres and
woollens bearing the label «pure new
wool, machine washable, non-shrink».
Before loading the laundry
Never wash whites and coloureds together. Whites
may lose their “whiteness” in the wash.
New coloured items may run in the first wash; they
should therefore be washed separately the first time.
Make sure that no metal objects are left in the
laundry (e.g. hair clips, safety pins, pins).
Button up pillowcases, close zip fasteners, hooks
and poppers. Tie any belts or long tapes.
Remove persistent stains before washing. Rub
particularly soiled areas with a special detergent or
detergent paste.
Treat curtains with special care. Remove hooks or tie
them up in a bag or net.
Maximum loads
Recommended loads are indicated in the
programme charts.
General rules:
Cotton, linen: drum full but not too tightly packed;
Synthetics: drum no more than half full;
Delicate fabrics and woollens: drum no more than
one third full.
Washing a maximum load makes the most efficient
use of water and energy.
For heavily soiled laundry, reduce the load size.
Laundry weights
The following weights are indicative:
bathrobe 1200 g
napkin 100 g
quilt cover 700 g
sheet 500 g
pillow case 200 g
tablecloth 250 g
towelling towel 200 g
tea cloth 100 g
night dress 200 g
ladies’ briefs 100 g
man’s work shirt 600 g
man’s shirt 200 g
man’s pyjamas 500 g
blouse 100 g
men’s underpants 100 g
Removing stains
Stubborn stains may not be removed by just water
and detergent. It is therefore advisable to treat them
prior to washing.
Blood: treat fresh stains with cold water. For dried
stains, soak overnight in water with a special
detergent then rub in the soap and water.
Oil based paint: moisten with benzine stain
remover, lay the garment on a soft cloth and dab the
stain; treat several times.
Dried grease stains: moisten with turpentine, lay
the garment on a soft surface and dab the stain with
the fingertips and a cotton cloth.
Rust: oxalic acid dissolved in hot water or a rust
removing product used cold. Be careful with rust
stains which are not recent since the cellulose
structure will already have been damaged and the
fabric tends to hole.
Mould stains: treat with bleach, rinse well (whites
and fast coloureds only).
Grass: soap lightly and treat with bleach (whites and
fast coloureds only).
Ball point pen and glue: moisten with acetone (*),
lay the garment on a soft cloth and dab the stain.
Lipstick: moisten with acetone as above, then treat
stains with methylated spirits. Remove any residual
marks from white fabrics with bleach.
Red wine: soak in water and detergent, rinse and
treat with acetic or citric acid, then rinse. Treat any
Page 15
ENGLISH
15
residual marks with bleach.
Ink: depending on the type of ink, moisten the fabric
first with acetone (*), then with acetic acid; treat any
residual marks on white fabrics with bleach and then
rinse thoroughly.
Tar stains: first treat with stain remover, methylated
spirits or benzine, then rub with detergent paste.
(*) do not use acetone on artificial silk.
Detergents and additives
Good washing results also depend on the choice of
detergent and use of the correct quantities to avoid
waste and protect the environment. Although
biodegradable, detergents contain substances
which, in large quantities, can upset the delicate
balance of nature.
The choice of detergent will depend on the type of
fabric (delicates, woollens, cottons, etc.), the colour,
washing temperature and degree of soiling.
All commonly available washing machine detergents
may be used in this appliance:
– powder detergents for all types of fabric,
– powder detergents for delicate fabrics (60°C max)
and woollens,
– liquid detergents, preferably for low temperature
wash programmes (60°C max) for all types of
fabric, or special for woollens only.
The detergent and any additives must be placed in
the appropriate compartments of the dispenser
drawer before starting the wash programme.
If using concentrated powder or liquid detergents, a
programme without prewash must be selected.
The washing machine incorporates a recirculation
system which allows an optimal use of the
concentrated detergent.
Pour liquid detergent into the dispenser drawer
compartment marked just before starting the
programme.
Any fabric softener or starching additives must be
poured into the compartment marked before
starting the wash programme.
The bleaching agent (chlorine) can be used only for
white or fast coloured cotton and linen items.
Pour it into the compartment marked .
Follow the product manufacturer’s recommendations
on quantities to use and do not exceed the «MAX»
mark in the detergent dispenser drawer.
Quantity of detergent to be used
The type and quantity of detergent will depend on
the type of fabric, load size, degree of soiling and
hardness of the water used.
Water hardness is classified in so-called “degrees” of
hardness. Information on hardness of the water in
your area can be obtained from the relevant water
supply company, or from your local authority.
Follow the product manufacturers’ instructions on
quantities to use.
Use less detergent if:
– you are washing a small load,
– the laundry is lightly soiled,
– large amounts of foam form during washing.
Degrees of water hardness
Level Characteristic
Degrees
German
°dH
French
°T.H.
soft
medium
hard
very hard
0- 7
8-14
15-21
more than
21
0-15
16-25
26-37
more than
37
1
2
3
4
Page 16
16
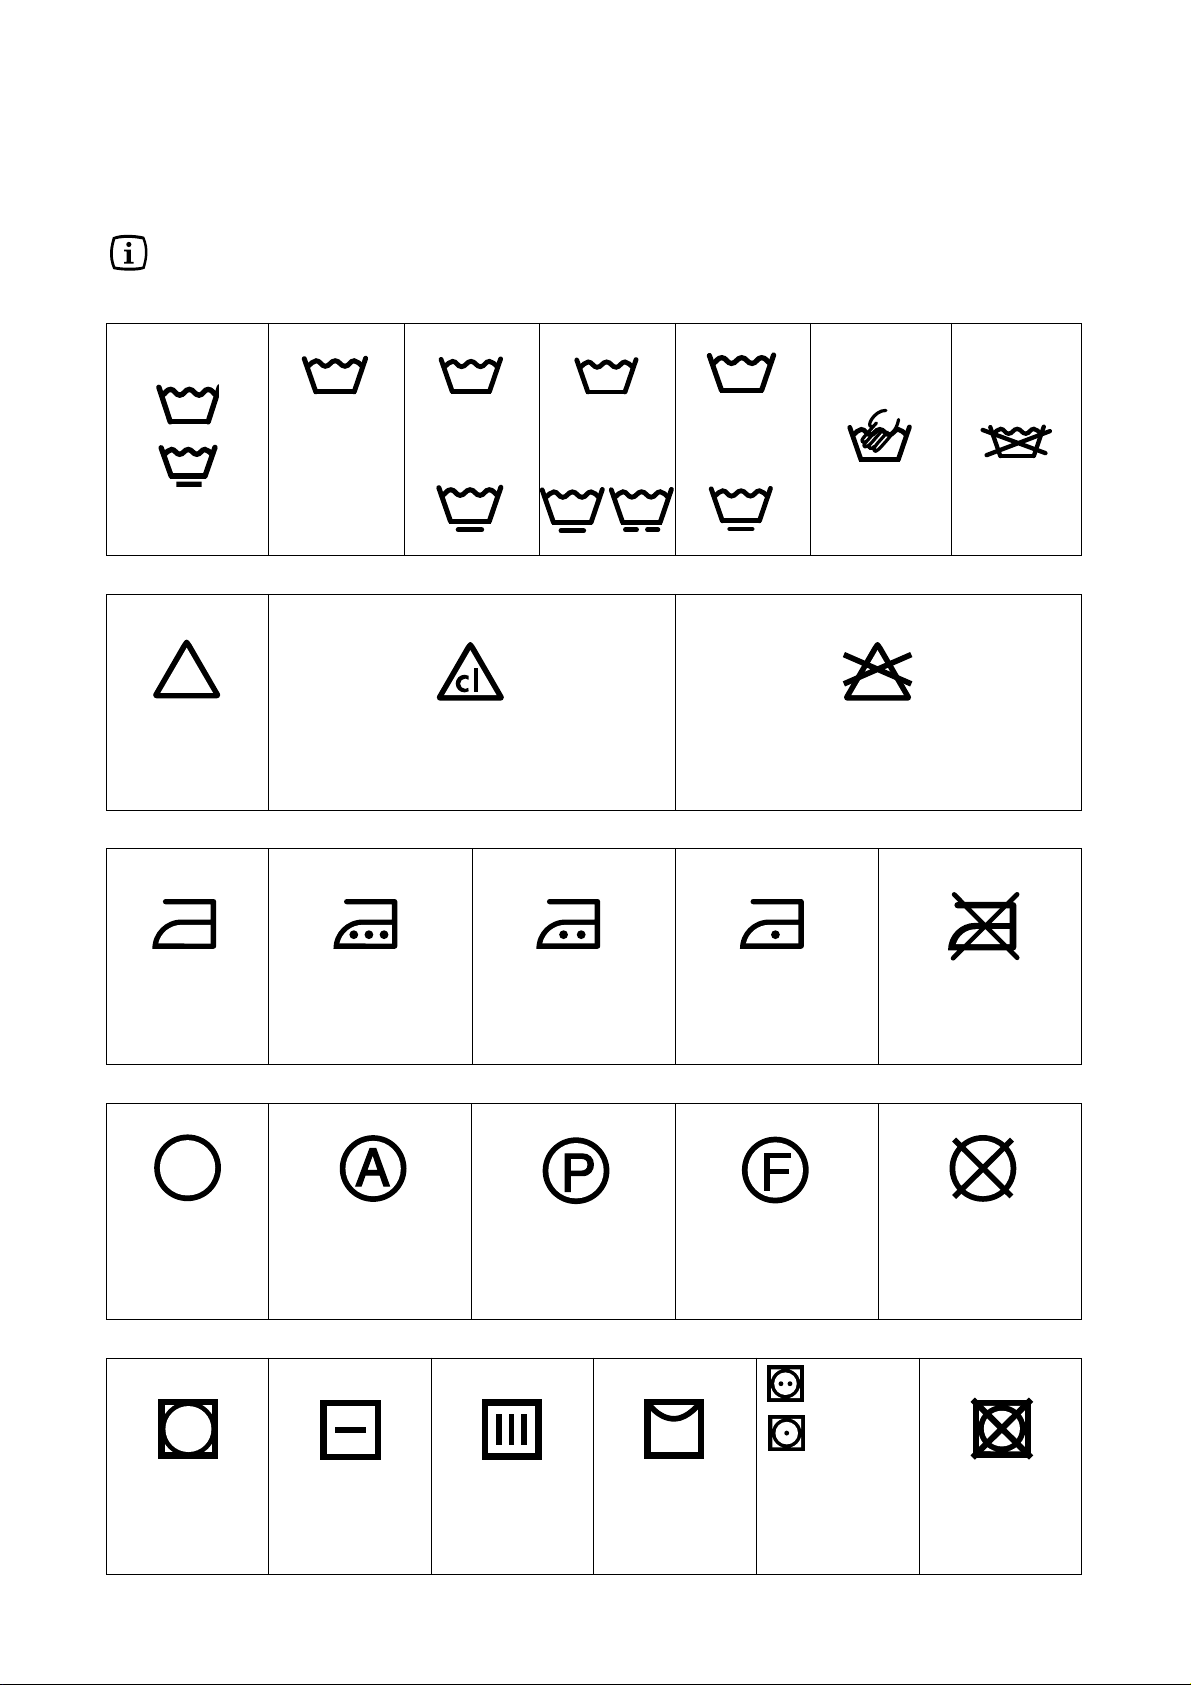
International wash code symbols
These symbols appear on fabric labels, in order to help you choose the best way to treat your laundry.
Energetic wash
Delicate wash
Max. wash
temperature
95°C
Max. wash
temperature
60°C
Max. wash
temperature
40°C
Max. wash
temperature
30°C
Hand wash Do not
wash
at all
Bleaching Bleach in cold water Do not bleach
Ironing Hot iron
max 200°C
Warm iron
max 150°C
Lukewarm iron
max 110°C
Do not iron
Dry cleaning Dr y cleaning
in all solvents
Dry cleaning in
perchlorethylene,
petrol, pure alcohol,
R 111 & R 113
Dry cleaning
in petrol,
pure alcohol
and R 113
Do not
dry clean
Drying Flat On the line On clothes
hanger
Tumble dr y
high
temperature
low
temperature
Do not
tumble dry
95
60
60
40
40
40
30
30
Page 17
ENGLISH
17
4. Switch the machine ON
Turn the selector dial to the desired programme to
switch the appliance on.
To switch the appliance off turn it to «O».
5. Select the desired programme
Turn the selector dial to the desired position: the
lights corresponding to the different phases making
up the selected programme light on.
The duration of the programme appears in the
display.
6. Select the temperature
Press the Temperature button if you wish to select
a temperature value different
from the one proposed by the washing machine. The
relevant light will light up.
90
°
60
°
40
°
30
°
PREWASH
WASH
RINSES
DRAIN
END
Operating sequence
Before washing your first load of laundry, we
recommend that you run a cotton cycle at 90°C, with
the machine empty, in order to remove any
manufacturing residue from the drum and tub.
Pour half a measure of detergent into the main wash
compartment and start up the machine.
1.Place the laundry in the drum
Open the door.
Place the laundry in the drum, one item at a time,
shaking them out as much as possible.
Close the door.
2.Measure out the detergent
Pull out the dispenser drawer until it stops. Measure
out the amount of detergent recommended by the
manufacturer in a graduated cup and pour it into the
main wash compartment .
If you wish to carry out a programme with prewash,
pour detergent into the appropriate compartment
marked .
3.Measure out the additives
If required, pour fabric softener into the compartment
marked and the bleach into the compartement
marked , without exceeding the «MAX» mark.
C0117
C0116
P0004
Page 18
During this period it is possible to load other laundry:
• depress START/PAUSE button ;
• open the door;
• load the laundry;
• close the door and depress START/PAUSE button
again.
10. Start the programme
Press the START/PAUSE button . The relevant
light will stop flashing and only
the light relevant to the phase that is in progress will
remain lit.
If you have chosen a delayed start, the washing
machine will begin the countdown.
The display will show the duration of the programme
or the selected delay.
11. How to change an option or a
programme during its cycle
Before you make any change, you must pause the
machine by pressing the START/PAUSE button .
It is possible to change the temperature or any
phase before the programme carries it out.
Changing a running programme is possible only by
cancelling it and selecting a new programme.
The machine will resume the cycle from the
beginning and the washing water in the tub will not
emptied out.
If it is necessary to drain the water in order to change
the programme in progress, proceed as follows:
• turn the programme selector dial to «O»;
• select programme ;
• press the START/PAUSE button again.
When the water has been drained, the display shows
a blinking zero and the light light on.
You may now select a new programme and press
the START/PAUSE button to start it.
12. Interrupting a programme
Depress the START/PAUSE button to interrupt a
programme which is running, the
corresponding light starts to flash. Depress the same
button again to restart the programme.
18
7.Select the Spin Speed or the
NO SPIN option.
Press the SPIN SPEED button repeatedly, in
order to select the desired spin speed or the No spin
option. The relevant light will light up.
8. Select the desired options
The light corresponding to the depressed button
illuminates.
If you select the Rinse hold option, the machine
will stop at the end of the programme with the water
still in the tub.
9. Select the DELAY START
To delay starting of the programme, press the
DELAY start button. The figures corresponding to the
selected delay will be displayed for about 3 seconds,
after which the duration of the selected programme
will appear on the display.
700
600
450
500
Page 19
ENGLISH
13. Cancelling a programme
Turn the selector dial to «O» to cancel a programme
which is running. Now you can select a new
programme.
14.How to open the door after the
programme has started
First set the machine to PAUSE by pressing the
START/PAUSE button .
If the door does not open, this means that the
machine is already heating, that the water level is
above the bottom edge of the door or that the drum
is turning.
If you cannot open the door but you need to open it
you have to switch the machine off turning the
selector dial to «O» . After about 3 minutes the door
can be opened (pay attention to the water level and
temperature!). To restart the programme switch on
the machine and select again the desired
programme and options.
15. At the end of the programme
The washing machine stops automatically.
If the Rinse hold option has been selected, the
door is blocked, the light of the START/PAUSE button
goes off, and remain lit, to indicate that the
water must be drained before opening the door. The
display shows a flashing zero.
There are 2 possibilities to empty out water:
• Select programme (draining):
The water is emptied out without spinning.
• Select programme or . Select the spin
speed by means of the relevant button and then
depress the START/PAUSE button . The water
is emptied out and the laundry is spun at the
selected spin speed.
Attention! Before selecting programme ,
and the selector dial has to be
positioned on 0 (cancelling).
Turn the programme selector dial to Reset «O» to
switch the machine off.
Remove the laundry from the drum and carefully
check that the drum is empty so as to avoid any
forgotten items being damaged in a subsequent
wash (e.g. shrinking) or their colour running into a
load of whites.
If you do not intend to carry out another wash, close
the water tap.
Leave the door open to prevent the formation of
mildew and unpleasant smells.
19
Page 20
20
Programme table
* The consumption data shown on this chart is to be considered purely indicative, as it may vary depending
on the quantity and type of laundry, on the inlet water temperature and on the ambient temperature. It refers
to the highest temperature for each wash programme.
** In compliance with EC directive 92/75 the consumption figures indicated on the Energy label refer to this
programme E at 60°C.
*** Fabrics washed with this programme have a washing efficiency result of AA.
The wool wash cycle of this machine has been approved by Woolmark for the washing of machine washable
Woolmark products provided that the garments are washed according to the instructions on the garment label
and those issued by the manufacturer of this machine. Licence No. M9604.
Type of laundry
2.0 53 2.25
1.2 49 2.00
1.14 49 2.21
0.95 49 2.20
0.45 54 1.24
0.9 54 1.33
White cotton: e.g.
sheets, tablecloths,
household linen
Coloured cotton:
e.g. shirts, blouses,
underwear, towels,
house-hold linen
Cottons
ECONOMY**: e.g.
shirts, blouses,
underwear
White/Coloured
Cottons 40°AA***
Synthetics
ECONOMY
Synthetics: e.g.
shirts, blouses,
underwear
5 kg
5 kg
6 kg
5 kg
2.5 kg
2.5 kg
Max
load
Programme/
temperature
Available options
Consumption*
Energy
kWh
Water
litres
Time
h/min.
White cotton
(cold)-90°C
Coloured
Cotton
(cold)-60°C
Cottons
ECONOMY
E 60°/40°C
E
White/coloured
cotton
40°AA
Synthetics
ECONOMY
E E40°C
Synthetics
(cold)-60°C
Description of
programme
Main wash at
(cold)-90°C
3 rinses
Long spin
Main wash at
(cold)-60°C
3 rinses
Long spin
Main wash at
E 60°/40°C
2 rinses
Long spin
Main wash at
40°C
3 rinses
Long spin
Main wash at
E 40°C
3 rinses
Short spin
Main wash at
(cold)-40°C
3 rinses
Short spin
Washing Programmes for cottons and synthetics
Page 21
ENGLISH
21
Programme table
Washing programmes for delicates , handwash , wool and silk
Type of laundry
Energy
kWh
Water
litres
Time
h/min.
Consumption
Delicates: e.g.
acrylic fabrics,
viscose, polyester,
synthetic blends
Max
load
2,5 kg
Programme/
temperature
Delicates
-40°C
Description of
programme
Main wash at
(cold)-40°C
3 rinses
Short spin
Available
options
0.5 55 1.00
Handwash
2 kg
Handwash
- 40°C
Main wash at
(cold)-40°C
3 rinses
Short spin
0.35 55 56
Wool
2 kg
Wool
- 40°C
Main wash at
(cold)-40°C
3 rinses
Short spin
0.35 55 55
Silk
1 kg
Silk
30°C
Main wash at 30°C
3 rinses
Short spin
0.30 53 40
Miniprogramme
2,5 kg
Mini-
programme
30°C
Main wash at 30°C
2 rinses
Short spin
0.3 40 30
Page 22
Programme table
22
Programme
selector dial
position
0.08 45 45
--2
--10
--6
---
Rinses
Drain
Spin
Delicate Spin
O
Reset/Off
5 kg
/
5 kg
5 kg
/
Wash
load
max.
Programme
Addictional
functions
Consumption*
Energy
kWh
Water
litres
Time
min.
For rinsing items
For empting out the
water of the last
rinses of programmes with option
Separate spin for
cottons
Separate spin for
synthetics, delicates,
wool/handwash and
silk
For cancelling the
programme which is
running or to switch
the machine off.
Programme
description
3 rinses with
liquid additive,
if required.
Long spin at
max. speed
Water draining
Drain and spin
at the max.
speed
Drain and
delicate spin
Special Programmes
Page 23
ENGLISH
23
1.Bodywork
Clean the outside of the machine with soap and
water only. Rinse with clean water and dry with a soft
cloth.
Important: do not use methylated spirits, solvents or
similar products to clean the bodywork.
2.Door seal
Check from time to time the door seal and eliminate
eventual possible objects that could be trapped in
the fold.
3.Detergent dispenser drawer
After a while, detergents and fabric softeners leave
deposits in the drawer.
Clean the drawer from time to time by rinsing it under
a running tap. To remove the drawer from the
machine, press the button in the rear left-hand
corner.
To facilitate cleaning, the top part of the additive
compartments can be removed.
C0119
C0118
P1050
Detergent can also accumulate inside the drawer
recess: clean it with an old toothbrush. Refit the
drawer after cleaning.
4.Drain pump
The pump should be inspected if
• the machine does not empty and/or spin
• the machine makes an unusual noise during
draining due to objects such as safety pins, coins
etc. blocking the pump.
Proceed as follows:
• Disconnect the appliance.
• If necessary wait until the water has cooled down.
• Open the pump door.
• Place a container close to the pump to collect any
spillage.
• Release the emergency emptying hose, place it in
the container and remove its cap.
• When no more water comes out, unscrew the
pump cover and remove the pump. Always keep a
rag nearby to dry up spillage of water when
removing the pump.
P1115
P1114
P0038
Maintenance
Page 24
24
• Remove any objects from the pump impeller by
rotating it.
• Put the cap back on the emergency emptying hose
and place the latter back in its seat.
• Screw the pump cover fully in.
• Close the pump door.
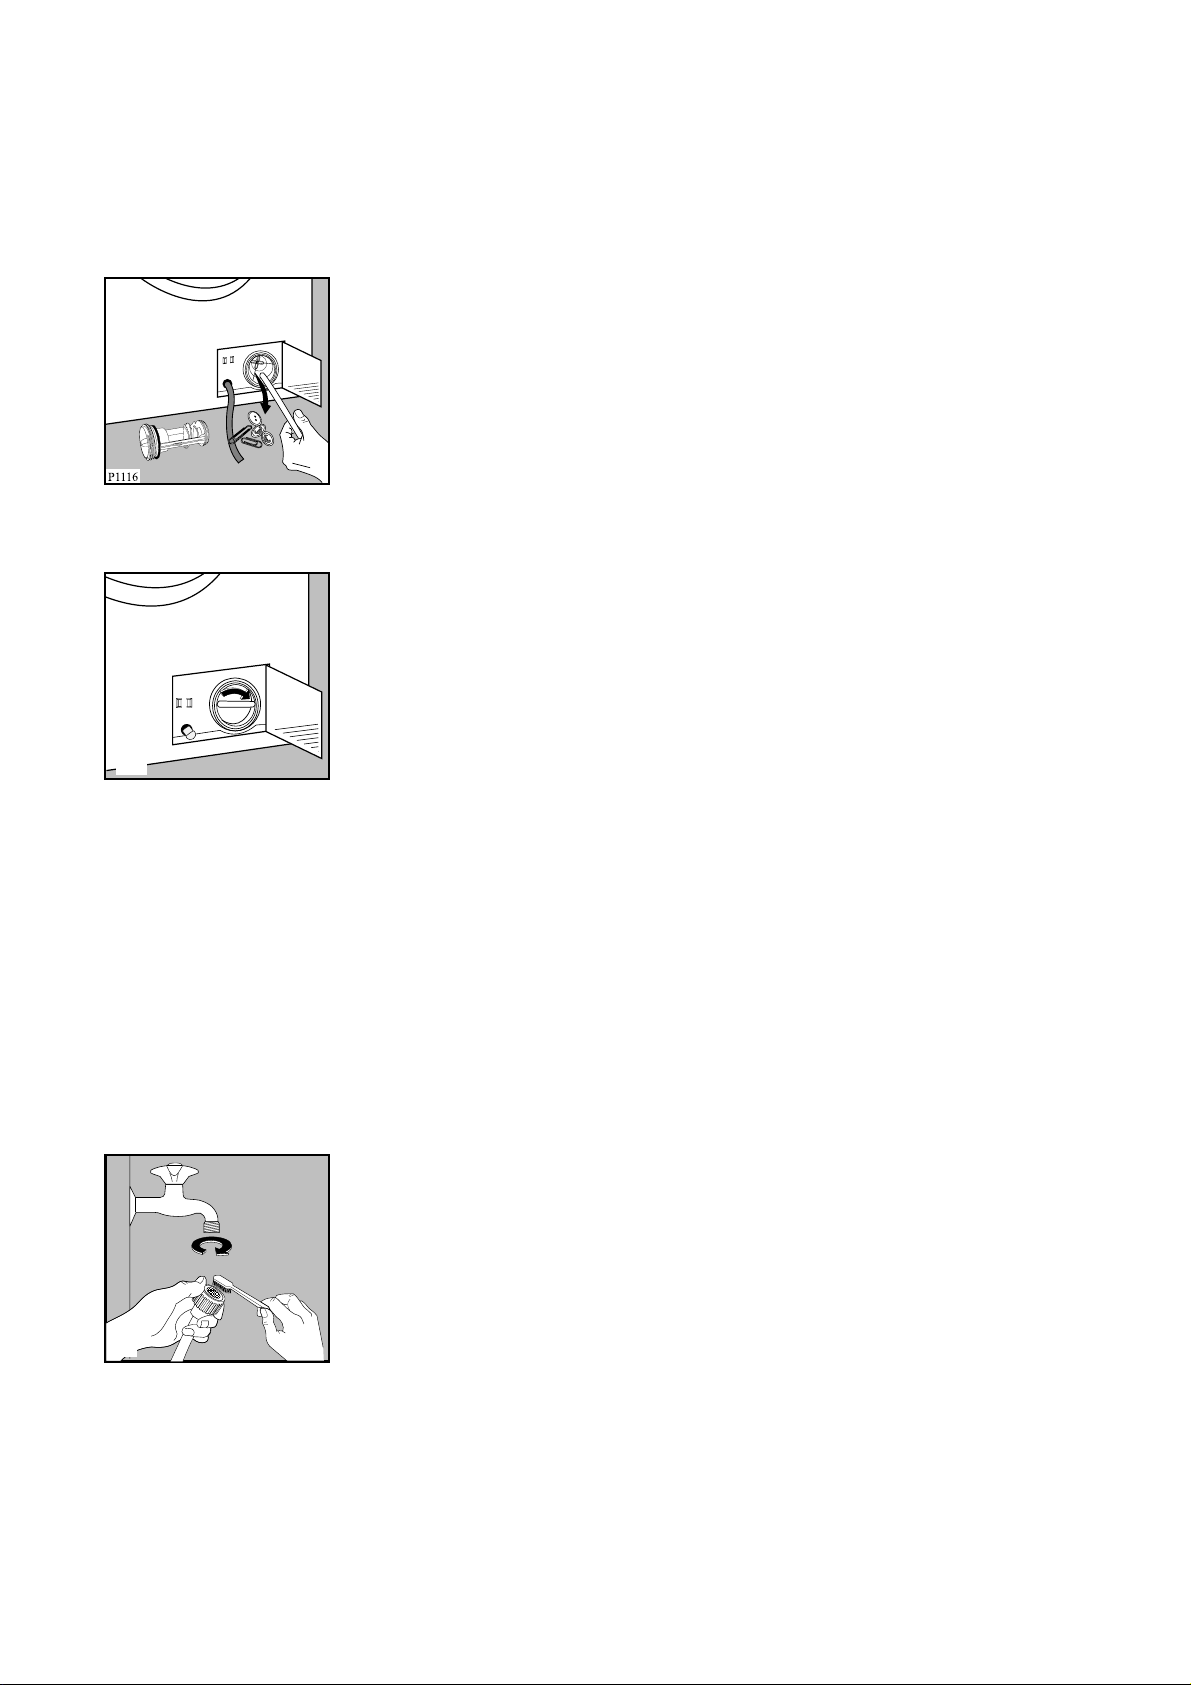
5.Water inlet filter
If you notice that the machine is taking longer to fill,
check that the filter in the water inlet hose is not
blocked.
Turn off the water tap.
Unscrew the hose from the tap.
Clean the filter with a stiff brush.
Screw the hose back onto the tap.
P1090
P1117
6.Emergency emptying out
If the water is not discharged, proceed as follows to
empty out the machine:
• pull out the plug from the power socket;
• close the water tap;
• if necessary, wait until the water has cooled down;
• open the pump door;
• place a bowl on the floor and place the end of the
emergency emptying hose into the bowl. Remove
its cap. The water should drain by gravity into the
bowl. Whe the bowl is full, put the cap back on the
hose. Empty the bowl. Repeat the procedure until
water stops flowing out;
• clean the pump if necessary as previously
described;
• replace the emergency emptying hose in its seat
after having plugged it;
• screw the pump cover again and close the door.
7.Frost precautions
If the machine is installed in a place where the
temperature could drop below 0°C, proceed as
follows:
• Remove the plug from the socket.
• Close the water tap and unscrew the water inlet
hose from the tap.
• Place the end of the emergency emptying hose
and that of the inlet hose in a bowl placed on the
floor and let water drain out.
• Screw the water inlet hose back on and reposition
the emergency emptying hose after having put the
cap on again.
By doing this, any water remaining in the machine is
removed, avoiding the formation of ice and,
consequently, breakage of the affected parts.
When you use the machine again, make sure that
the ambient temperature is above 0°C.
Important!
Every time you drain the water through the
emergency emptying hose you must pour 2 litres of
water into the main wash compartment of the
detergent drawer and then run the drain programme.
This will activate the ECO VALVE device avoiding
that part of the detergent remains unused at next
washing.
Page 25

ENGLISH
25
Something not working?
Problems which you can resolve yourself.
During machine operation it is possible that one of the following alarm codes appears on the display and at the
same time the light starts to flash:
- E10: problem with the water supply
- E20: problem with water draining
- E40: door open
Once the problem has been eliminated, press the START/PAUSE button to restart the programme. If after
all checks, the problem persists, contact your local Service Centre.
Problem Possible cause
• The machine does not start up:
• The door is not firmly closed. (E40)
• The machine is not plugged in or there is no power
at the socket.
• The main fuse has blown.
• The START/PAUSE button has not been
depressed.
• The DELAY START option has been selected.
• The programme selector dial is not positioned.
• The machine does not fill:
• The water tap is closed. (E10)
• The inlet hose is squashed or kinked. (E10)
• The filter in the inlet hose is blocked. (E10)
• The door is not properly closed. (E40)
• The machine fills then empties
immediately:
• The end of the drain hose is too low. Refer to
relevant paragraph in “water drainage” section.
• The machine does not empty
and/or does not spin:
• The drain hose is squashed or kinked. (E20)
• The option or has been selected.
• The laundry is not evenly distributed in the drum.
• The drain pump is clogged. (E20)
• There is water on the floor:
• Too much detergent or unsuitable detergent
(creates too much foam) has been used.
• Check whether there are any leaks from one of the
inlet hose fittings. It is not always easy to see this
as the water runs down the hose; check to see if it
is damp.
• The drain hose is damaged.
• The cap on the emergency emptying hose has not
been replaced after cleaning the pump.
• Unsatisfactory washing results:
• Too little detergent or unsuitable detergent has
been used.
• Stubborn stains have not been treated prior to
washing.
• The correct temperature was not selected.
• Excessive laundry load.
Page 26

26
If you are unable to identify or solve the problem,
contact our service centre. Before telephoning, make
a note of the model, serial number and purchase
date of your machine: the Service Centre will require
this information.
Mod. ..........
Prod. No. ...........
Ser. No. .........
M
o
d
. ..........
Pr
od
. N
o
. ...........
Se
r
. N
o
. .........
P0042 BD
P1035UK
Water is not
visible in the machine. Th e machine,
which is the result of modern technology, runs
in a very economical way with low water
consumption. Performance is
nevertheless excellent.
The machine makes an unusual
noise. The machine is fitted with a commutator
motor which improves machine
performance.
P1034UK
Problem Possible cause
• Spinning starts late or the
machine does not spin:
• The electronic unbalance detection device has cut
in because the laundry is not evenly distributed in
the drum. The laundry is redistributed by reverse
rotation of the drum. This may happen several
times before the unbalance disappears and normal
spinning can resume. If, after 10 minutes, the
laundry is still not evenly distributed in the drum,
the machine will not spin. In this case, redistribute
the load manually and select the spin programme.
• The door will not open:
• The programme is still running.
• The door lock has not been released.
• There is water in the drum.
• The machine vibrates or is
noisy:
• The transit bolts and packing have not been
removed.
• The support feet have not been adjusted.
• The laundry is not evenly distributed in the drum.
• Maybe there is very little laundry in the drum.
Page 27

PORTUGUÊS
27
Prezado cliente,
Leia com atenção este manual de instruções e
preste especial atenção às normas de segurança
indicadas nas primeiras páginas. Aconselhamos a
guardar este manual para consultas futuras e a
entregá-lo ao novo proprietário caso vender a
máquina.
Danos de transporte
Controle, ao desembalar, se a máquina está
danificada. Em caso de dúvidas, não a ponha em
funcionamento, mas dirija-se ao serviço de
assistência técnica.
Alguns parágrafos deste manual de instruções foram marcados com alguns símbolos que têm o
seguinte significado:
Com o triângulo de aviso e/ou através de palavras de sinalização (Atenção!, Advertência!), são
evidenciadas instruções particularmente importantes para a Sua segurança ou para o bom
funcionamento do aparelho. Por favor, cumpra-as.
As informações precedidas por este símbolo servem para completar as instruções de uso e utilização
prática da máquina.
Este símbolo indica conselhos e instruções para um emprego económico da máquina, respeitando o
ambiente.
A nossa contribuição para o ambiente:
utilizamos papel reciclado.
Page 28

28
Advertências 29-30
Eliminação 30
Conselhos para a protecção do
ambiente 30
Características técnicas 30
Instalação 31
Dispositivos de segurança para o transporte 31-32
Colocação 32
Alimentação de água 32
Montagem num kit de pedestal 33
Descarga 33
Ligação eléctrica 33
Sua nova máquina de lavar
roupa 34
Descrição da máquina 34
Gaveta do detergente 34
Utilização 35
Painel dos comandos 35
Descrição dos comandos 35-38
Conselhos para a lavagem 39
Escolha 39
Temperaturas 39
Antes de carregar a roupa 39
Carga máxima de roupa 39
Pesos da roupa 39
Eliminação das nódoas 39
Detergentes e aditivos 40
Símbolos internacionais para o tratamento dos
tecidos 41
Sequência das operações 42-44
Programas de lavagem 45-47
Manutenção 48
Corpo da máquina 48
Óculo 48
Gaveta do detergente 48
Limpeza de zona de descarga 48-49
Filtro do tubo de alimentação 49
Esvaziamento de emergência 49
Precauções contra o gelo 49
Anomalias de funcionamento 50-51
Índice
Page 29

PORTUGUÊS
29
Instalação
• É preciso retirar a embalagem interior da máquina
antes de utilizá-la. Não eliminando, ou eliminando
de maneira incompleta, os dispositivos de
protecção utilizados para o transporte, podem
derivar danos para a máquina ou para os móveis.
Consultar o parágrafo relativo no manual de
utilização.
• Ao verificar-se a necessidade de uma modificação
da instalação eléctrica de casa para poder instalar
a máquina, este trabalho terá de ser efectuado por
pessoal qualificado.
• Qualquer trabalho de tipo hidráulico necessário
para a instalação terá de ser efectuado por um
técnico qualificado.
• Depois de instalada a máquina verifique que não
esteja colocada sobre o cabo de alimentação.
• Se a máquina for posicionada sobre piso com
alcatifa, controle se entre os pés de apoio e o piso
há livre circulação de ar.
Utilização
• Esta máquina é destinada a um uso doméstico.
Não a utilize para finalidades diferentes daquelas
para as quais foi projectada.
• Lave somente artigos previstos para a lavagem na
máquina. Siga as instruções indicadas na etiqueta
de cada peça.
• Não sobrecarregue a máquina. Siga as instruções
proporcionadas pelo manual.
• As moedas, os alfinetes de segurança, os
alfinetes, os parafusos, etc., esquecidos na roupa,
podem provocar graves prejuízos.
• Não ponha na máquina roupa em que foram
utilizados tira-nódoas com gasolina, álcool,
tricloretilena, etc. Tendo utilizado esses produtos
antes da lavagem, é preciso esperar que o produto
evapore, antes de introduzir as peças na máquina.
• Junte as peças de pequenas dimensões , como
peúgas, cintos, etc., numa pequena bolsa de
pano, ou numa fronha. Isto para evitar que as
peças caiam entre o cesto e o tambor.
• Utilize somente a quantidade de amaciador
indicada pelo produtor. Uma quantidade excessiva
de produto pode danificar a roupa.
Advertências
• Deixe o óculo entreaberto quando não utilizar a
máquina. Isto permite uma melhor conservação
das vedações do óculo e previne os cheiros a
mofo.
• Antes de abrir o óculo, controle sempre se a água
foi descarregada. Em caso contrário, efectue a
descarga seguindo as instruções proporcionadas
pelo manual.
• Retire sempre a ficha da tomada de corrente e
feche a torneira da água depois da utilização.
Segurança em geral
• As reparações da máquina devem ser realizadas
exclusivamente por pessoal especializado.
Reparações não idóneas podem causar graves
perigos. Para as reparações, contacte o serviço de
assistência técnica autorizado.
• Nunca retire a ficha da tomada puxando-a pelo
cabo, mas sim pegue-a pelo corpo.
• Durante a lavagem a temperaturas elevadas o
vidro do óculo aquece. Não lhe toque!
Estas advertências foram previstas para a Sua segurança e a dos outros. Pedimos o favor, portanto, de as ler
com atenção antes de instalar e utilizar a máquina.
Page 30

30
Eliminação
Conselhos p ara a protecção do ambiente
Materiais de embalagem
Os materiais marcados pelo símbolo são
recicláveis.
>PE<=polietileno
>PS<=poliestireno
>PP<=polipropileno
Para poderem ser recuperados devem ser
colocados nos espaços (ou contentores) especiais.
Máquina
Para uma eliminação correcta, utilize os lugares
autorizados. Ajude-nos a manter limpa a Sua cidade!
O símbolo no produto ou na embalagem indica que
este produto não pode ser tratado como lixo doméstico.
Em vez disso, deve ser entregue ao centro de recolha
selectiva para a reciclagem de equipamento eléctrico e
electrónico.
Ao garantir uma eliminação adequada deste produto, irá
ajudar a evitar eventuais consequências negativas para
o meio ambiente e para a saúde pública, que, de outra
forma, poderiam ser provocadas por um tratamento
incorrecto do produto.
Para obter informações mais pormenorizadas sobre a
reciclagem deste produto, contacte os serviços
municipalizados locais, o centro de recolha selectiva da
sua área de residência ou o estabelecimento onde
adquiriu o produto.
Para poupar água e energia, e para contribuir à
salvaguarda do ambiente, recomendamos a cumprir
as seguintes indicações:
• A roupa normalmente suja pode ser lavada sem
pré-lavagem; dessa forma poupam-se detergente,
água e tempo (e protege-se o ambiente!).
• A máquina é mais económica se se utilizarem as
cargas máximas recomendadas.
• Com um adequado tratamento prévio, é possível
eliminar as nódoas e as zonas sujas limitadas; a
seguir será possível efectuar a lavagem com uma
temperatura inferior.
• Adapte a dose de detergente à dureza da água da
rede, à quantidade de roupa e ao grau de sujidade
desta.
Segurança para as crianças
• As crianças muitas vezes não reconhecem os
perigos ligados aos aparelhos eléctricos. Durante
o funcionamento da máquina é necessário vigiálas com atenção e não as deixar brincar com o
aparelho.
• Os componentes da embalagem (por ex.,
películas, poliestireno) podem ser perigosos para
as crianças. Perigo de sufocamento! Mantenha-os
fora do alcance das crianças.
• Guarde os detergentes num lugar seguro fora do
alcance das crianças.
• Certifique-se de que crianças ou pequenos
animais não entrem no tambor da máquina.
Há na máquina um dispositivo específico para
evitar que a porta feche-se. Para activar este
dispositivo, rode o botão (sem carregá-lo) dentro
da porta, na direcção horária, até a fenda chegar à
horizontal. Se for necessário use uma moeda.
Para desactivar este dispositivo e restabelecer a
possibilidade de fechar a porta, rode o botão na
direcção antiorária, até a fenda estar na vertical.
• Em caso de eliminação do aparelho, retire a ficha
da tomada, corte o cabo de alimentação e elimine
a ficha com o cabo restante. Inutilize a fechadura
do óculo: dessa maneira as crianças, brincando,
não conseguirão fechar-se dentro do aparelho,
com o risco de ficar presos nele.
P1131
Page 31

PORTUGUÊS
31
DIMENSÕES Altura 85 cm
Largura 60 cm
Profundidade 59 cm
CAPACIDADE DE CARGA Algodão 6 kg
Sintéticos 2,5 kg
Delicados e Ciclo Breve 2,5 kg
Lã e lavagem à mão 2 kg
Seda 1 kg
VELOCIDADE DE CENTRIFUGAÇÃO 700 r.p.m. máx.
TENSÃO / FREQUÊNCIA 220-230V/50 Hz
POTÊNCIA MÁXIMA ABSORVIDA 2200 W
POTÊNCIA MÍNIMA DO DISJUNTOR 10 A
PRESSÃO DA ÁGUA Mín. 0.05 MPa
Máx. 0.8 MPa
Esta máquina está conforme as seguintes directivas CEE:
73/23/CEE de 19/02/73 relativa à baixa tensão
89/336/CEE de 03/05/89 relativa à compatibilidade electromagnética.
Características técnicas
Instalação
Dispositivos de segurança para o
transporte
Antes de pôr em funcionamento a máquina,
verifique se foram retirados todos os
dispositivos de segurança previstos para o
transporte.
Guarde todos os dispositivos usados para o transporte
para os poder utilizar em caso de futura mudança.
1. Desaparafuse e tire com uma chave de fenda os
dois parafusos posteriores de baixo. Remova os
dois pernos de plástico.
P0001
P1129
2. Deite a máquina de costas evitando esmagar os
tubos. Para isso coloque entre a máquina e o
chão um dos angulares da embalagem.
P1124
2
3
1
Page 32

3. Retire a peça central de poliestireno do fundo da
máquina e solte os dois sacos de plástico.
4. Tire, com muito cuidado, o saco esquerdo, a
puxá-lo à direita e para baixo.
5. Tire, sempre com muito cuidado, o saco direito, a
puxá-lo à esquerda e para cima.
6. Remova a base de poliestireno, volte a endireitar
a máquina e desaparafuse o outro parafuso .
7. Tape todos os furos com as tampas de plástico
fornecidas com o manual de instruções.
Colocação
Instale a máquina sobre um piso nivelado e firme.
Preste atenção para que a circulação do ar ao redor
da máquina não seja dificultada por tapetes,
alcatifas, etc. Controle se a máquina não toca a
parede ou outros móveis da cozinha.
Nivele minuciosamente a máquina apertando ou
desapertando os pés reguláveis. Não corrija
eventuais desnivelamentos do piso interpondo
pedaços de madeira, papelão ou semelhantes.
P1051
P0002
P1128
P1127
P1126
Alimentação de água
Atarraxe o tubo de alimentação a uma torneira com
rosca de 3/4".
Não use um tubo usado previamente.
A parte final do tubo de alimentação, do lado da
máquina, pode ser rodada em todas as direcções.
Desaperte levemente a bucha de fixação, posicione
correctamente o tubo e volte a apertar a bucha,
controlando se não há perdas de água.
Não se pode prolongar o tubo de alimentação. Se o
tubo é demasiado curto e não se deseja deslocar a
torneira, é preciso comprar um tubo completo mais
comprido, adequado para este tipo de utilização.
Importante!
Se a ligação for feita a uma tubagem nova ou não
utilizada há muito tempo, é aconselhável deixar
escorrer uma certa quantidade de água, antes de
ligar o tubo de alimentação. Desta maneira
eliminam-se os eventuais depósitos de areia ou
ferrugem presentes nos tubos.
P0021
P1088
32
Page 33

PORTUGUÊS
33
Montagem num kit de pedestal
Dimensões do pedestal:
Altura: 30 cm.
Largura: 60 cm.
Largura: 60 cm.
Este aparelho pode ser instalado num Pedestal de
aço com Gaveta para facilitar a introdução e
remoção da roupa.
Solicite o kit de pedestal adequado a um distribuidor
autorizado.
Descarga
O tubo de descarga pode ser posicionado de três
maneiras diferentes:
No rebordo do lavatório, utilizando o suporte de
plástico entregue com a máquina. Neste caso, é
importante verificar que a parte curva do tubo não
escorregue do bordo do lavatório durante a fase de
descarga. Pode fixá-la, por exemplo, à torneira ou à
parede com um cordão.
Numa derivação da descarga do lavatório. A
derivação do tubo de descarga deve encontrar-se
acima do sifão e a uma altura de, pelo menos, 60 cm
do chão.
Num esgoto colocado a uma altura não inferior a
60 cm nem superior a 90 cm.
A extremidade do tubo de descarga deve ser
sempre ventilada, quer dizer que o diâmetro interno
do esgoto deve ser mais largo que o diâmetro
externo do tubo de descarga.
P0022
P1216
O tubo de descarga não deve ser estrangulado.
Importante!
Para a máquina funcionar correctamente, o tubo de
descarga deve ficar enganchado no suporto para
esta finalidade, na parte superior traseira da
máquina.
Ligação eléctrica
A máquina é prevista para funcionar a 220-230 V
monofásica, 50 Hz.
Controle se a instalação doméstica está em condição
de suportar a carga máxima exigida (2,2 kW), também
levando em conta os outros aparelhos a serem
utilizados.
Ligue a máquina a uma tomada de corrente
provida de ligação à terra e conforme as normas
em vigor.
O fabricante declina toda e qualquer
responsabilidade por danos ou lesões
causados pelo não cumprimento de dita
norma de segurança.
Uma eventual substituição do cabo de
alimentação só pode ser realizada pelo nosso
Centro de Assistência Técnica.
Uma vez instalada a máquina, certifique-se de
que o cabo de alimentação seja facilmente
acessível.
P1118
Page 34

34
Sua nova máquina de lavar roupa
Esta nova máquina satisfaz todas as exigências da lavagem moderna da roupa, pois permite poupar água,
energia e detergente.
• A opção INÍCIO RETARDADO permite retardar o início da programação de lavagem, possibilitando, por
exemplo, o aproveitamento da tarifa eléctrica nocturna.
• O especial programa LAVAGEM À MÃO com o seu novo sistema de lavagem delicada trata os tecidos
delicados com extrema cura.
• O programa especial para lã com um novo sistema de lavagem delicada trata as peças de lã com
extremo cuidado.
• O arrefecimento automático da água de lavagem de 90° a 60°C antes da descarga evita que os velhos
tubos de descarga se deformen.
• O sistema de controlo do desequilíbrio do tambor permite uma posição segura e o funcionamento
silencioso da máquina.
• A válvula ECO possibilita uma utilização óptima do detergente pela máquina e reduz o consumo de água e,
portanto, também o de energia eléctrica.
1 Gaveta do detergente
2 Painel dos comandos
3 Puxador do óculo
4 Zona de descarga
5 Pés ajustáveis
Gaveta do detergente
Pré-lavagem
Lavagem
Amaciador, amido
Lixívia
Descrição da máquina
5
2
1
4
3
9
0
°
6
0
°
4
0
°
3
0
°
EWF 735
E
E
40° AA
7
0
0
6
0
0
4
5
0
5
0
0
C0115
Cl
Page 35

PORTUGUÊS
35
Utilização
1 Gaveta do detergente e gráfico
com o programa
Um gráfico com o programa em português é
fornecido com o folheto de instruções. Coloque-o na
parte interna da gaveta de fornecimento de
detergente.
2 Selector dos programas
O selector está dividido em sectores:
• Algodão
• Sintéticos
• Delicados , lavagem à mão , lã , seda ,
Ciclo breve , enxaguamentos , descarga ,
centrifugação , centrifugação delicado
• Programa de Anulação O
O selector pode ser rodado quer em sentido horário
quer em sentido anti-horário.
A posição E /E corresponde ao programa de
poupança de energia.
No fim do programa o selector deve ser rodado
para a posição O.
E
E
40° AA
3 Botão TEMPERATURA
Carregue neste botão várias vezes para aumentar ou
baixar a temperatura, se desejar lavar roupa com
temperatura diferente da proposta pela máquina.
A respectiva luz acender-se-á.
As temperaturas máximas são 90° C para algodão,
60° C para tecidos sintéticos e 40° C para tecidos
delicados, lã e tecidos a serem lavados a mão
(programa LAVAR À MÃO), 30° C para seda e
.
Se for seleccionada a posição , a máquina lavará
com água fria. Utilize-a para peças extremamente
delicadas, como por exemplo cortinas e estores.
4 Botão VELOCIDADES DE
CENTRIFUGAÇÃO
Carregue neste botão várias vezes para mudar a
velocidade de centrifugação, se desejar que a roupa
seja centrifugada numa velocidade diferente da
proposta pela máquina. A respectiva luz acender-se-á.
As velocidade máxima é para cada tecido: 700 rpm;
123456
7
8
9
90°
60°
40°
30°
EWF 735
E
E
40° AA
700
600
450
500
Painel dos comandos
Page 36

5 Botãos opçãos
Dependendo do programa, será possível associar
diferentes funções; que devem ser seleccionadas
depois de ter escolhido o programa que desejar e
antes de carregar na tecla START/PAUSE
INICIAR/PAUSA .
Quando estas teclas forem premidas, as respectivas
luzes piloto acendem-se. Se forem premidas outra
vez, a luz piloto apaga-se.
Se uma opção incorrecta for seleccionada, a luz
piloto acende-se intermitente aproximadamente 2
segundos e é mostrada a mensagem 'Err'.
PRÉ-LAVAGEM: seleccione esta opção se
desejar realizar uma pré-lavagem antes da lavagem
principal (não disponível para ciclo de lã nem de
lavar à mão, seda e ).
A pré-lavagem termina com uma breve
centrifugação nos programas para algodão e tecidos
sintéticos; por outro lado, no programa para tecidos
delicados, a água é somente descarregada.
LAVAGEM RÁPIDA: Este botão permite
seleccionar a função LAVAGEM RÁPIDA, em caso
de roupas pouco sujas (não nos programas Lã,
Lavagem à mão, seda e ).
A duração da lavagem é reduzida em função do tipo
de tecido e da temperatura seleccionada.
A lavagem rápida não pode ser escolhida com os
programas E , 40°AA e E .
ÁGUA NA CUBA (anti-rugas): Escolhendo esta
opção a água do último enxaguamento não é
descarregada para evitar a formação de rugas nos
tecidos: no fim do programa o indicador luminoso da
tecla INICIAR/PAUSA apaga-se, a luz e a luz
permanecem acesas para indicar que a água
deve ser descarregada.
Há duas maneiras para descarregar a água:
• Se seleccionar o programa (descarga) :
A água será descarregada sem centrifugação.
• Se seleccionar o programa ou . Seleccione a
velocidade de
centrifugação mediante as respectivas teclas e, em
seguida, carregue na tecla INICIAR/PAUSA . A
água será descarregada e a roupa lavada será
centrifugada na velocidade seleccionada.
Atenção! Antes de seleccionar um programa ,
ou , o selector deve estar colocado na posição O
(cancelamento) .
ENXAGUAMENTO EXTRA:a opção
ENXAGUAMENTO EXTRA pode ser seleccionada
para todos os programas excepto para os
programas lã, Ciclo breve e lavagem à mão.
A máquina de lavar efectuará 2 enxaguamentos
adicionais.
Deve ser utilizado naquelas regiões onde a dureza
da água é muito baixa ou para pessoas com alergias
aos detergentes ou com a pele muito delicada.
6 Botão "INÍCIO RETARDADO"
O início do programa de lavagem pode ser adiado
de 30 min. - 60 min, - 90 min ou 2 horas e, em
seguida, em passos de 1 hora, até 23 horas no
máximo, mediante esta tecla.
Como seleccionar um início posterior
• Seleccione o programa e as opções necessárias.
• Seleccione o início posterior.
• Carregue na tecla INICIAR/PAUSA : a máquina
começará a contagem regressiva das horas.
O programa iniciará quando o adiamento
seleccionado terminar.
Como mudar um início posterior
• Carregue na tecla INICIAR/PAUSA .
• Carregue na tecla INÍCIO RETARDADO até ser
mostrado «0’».
• Carregue na tecla INICIAR/PAUSA novamente.
7 Visor
No display aparecem as seguintes informações:
Duração do programa - Início posterior Selecção de opção incorrecta - Código do alarme
- Final do programa.
Depois de ter seleccionado um programa, a duração
é mostrada em horas e minutos ( por exemplo:
2.05).
A duração é calculada automaticamente em base à arga
máxima recomendada para cada tipo de tecido.
Depois do programa ter começado, o tempo restante
será actualizado a cada minuto.
Duração do programa
36
Page 37

PORTUGUÊS
O início posterior seleccionado (23 horas no máx.)
definido mediante as respectivas teclas, será
mostrado 3 segundos no display e, em seguida, a
duração do programa anteriormente seleccionado
será mostrada.
A contagem regressiva é actualizada a cada hora e,
quando faltarem as últimas 2 horas, a cada 30
minutos.
Se tiver sido seleccionada uma opção não
compatível com o programa configurado, a
mensagem: Err será mostrada durante 2 segundos.
Se houver problemas no funcionamento, podem ser
mostrados códigos de alarmes, por exemplo: E20
(veja o parágrafo: "Algo não está a funcionar") .
Código do alarme
Selecção de opção incorrecta
Início posterior
Quando o programa tiver terminado, aparecerá um
'zero' a piscar.
8 Botão INICIAR PAUSA
Este botão desempenha três funções:
• Arranque: depois que tiver seleccionado o
programa e as opções desejadas, carregue neste
botão para a máquina de lavar começar a
funcionar. A luz acima do botão pára de piscar
mas permanecerá acesa.
Se tiver sido seleccionado um prazo para início
retardado, mediante o botão 11, começará a
contagem regressiva no visor.
• Pausa: se carregar novamente neste botão, o
programa em progresso será interrompido. A luz
acima do botão começará a piscar. Para reiniciar o
programa, carregue novamente no botão.
Final do programa
37
Page 38

9 Luzes indicadoras da fase do
programa
Quando seleccionar um programa, as luzes
correspondentes ao programa acender-se-ão.
Depois que o programa tiver iniciado, somente a luz
correspondente à fase que estiver a ser executada
no momento permanecerá acesa.
Quando o programa tiver terminado, a luz piloto ….
acende-se.
A luz piloto “fim” piscará no caso de problemas; e
o código de alarme correspondente aparecerá no
display.
E10 = a máquina não enche d'água.
E20 = a máquina não se esvazia d'água
E40 = a porta não foi fechada
Para eliminar o problema, veja o parágrafo: "Algo
não está a funcionar".
É um programa completo que pode ser associado
com as seguintes funções: selecção ou exclusão da
centrifugação, água na cuba.
Este programa pode ser utilizado para roupa não
especialmente suja ou para refrescar algumas
peças.
Carga máx. 2,5 kg.
A temperatura de lavagem é de 30°C.
A duração do programa é de 30 minutos.
A velocidade de centrifugação é de 700 r.p.m.
Ciclo breve a 30°C
É possível tratar os tecidos lavados à mão com um
amaciador.
A máquina efectua 1 enxaguamento e centrifuga a
roupa à velocidade máxima, que pode ser reduzida
com a tecla de centrifugação . A centrifugação
final é realizada somente para peças de algodão,
como no programa de centrifugação.
É possível utilizar o programa separado de descarga
no fim dos programas com água na cuba (opção )
para descarregar a água do último
enxaguamento.
Coloque primeiro o selector dos programas na
posição O, então escolha o programa
(descarga). Carregue na tecla INICIAR/PAUSA.
Este programa centrifuga a roupa à velocidade
máxima.
De acordo com o tipo de tecido, é possível escolher
uma velocidade de centrifugação diferente com a
tecla .
Centrifugação curta separada a 700 rpm para peças
lavadas à mão. Também deve ser utilizada para
peças sintéticas, delicadas, lã/lavada à mão e seda.
É possível diminuir a velocidade mediante a tecla,
para adaptá-la aos tecidos a serem centrifugados
Se desejar anular um programa já escolhido,
coloque o selector dos programas na posição O.
Então pode escolher um outro programa.
O = Anulação
Centrifugação delicada
Centrifugação
Descarga
Enxaguamento
38
Page 39

PORTUGUÊS
39
Conselhos para a lavagem
Escolha
Siga os símbolos para o tratamento dos tecidos nas
etiquetas das várias peças e as instruções do
fabricante para a lavagem.
Divida a roupa da maneira seguinte:
roupa branca, de cor, sintética, delicada, de lã.
Temperaturas
90° para roupa branca de linho ou algodão
normalmente suja (por ex. panos de
cozinha, toalhas de banho, toalhas,
lençóis, etc.)
60° para roupa de cor que não desbota,
normalmente suja (por ex., camisas,
camisas de noite, pijamas, etc.) de linho,
algodão ou fibras sintéticas e para roupa
branca de algodão pouco suja (por ex.
roupa interior).
(frio) para roupa delicada (por ex. cortinas),
30°-40°roupa mista com fibras sintéticas, e lã com
a indicação na etiqueta “pura lã virgem,
lavável, não encolhe”.
Antes de carregar a roupa
A roupa branca e de cor não pode ser lavada em
conjunto. A roupa branca pode perder a brancura
com a lavagem.
A roupa nova de cor pode desbotar na primeira
lavagem; portanto, é aconselhável lavá-la
separadamente a primeira vez.
Verifique que na roupa não fiquem objectos de
metal (por ex. colchetes, alfinetes de segurança,
alfinetes, etc.).
Aperte as fronhas, feche os fechos de correr, os
ganchos e os botões. Faça um nó aos cintos e às
fitas dos aventais.
Elimine as nódoas persistentes antes da lavagem.
Eventualmente esfregue os pontos particularmente
sujos com um detergente especial ou com uma
pasta detergente.
Trate as cortinas com um cuidado especial. Retire
os ganchos das cortinas ou recolha-os numa
pequena rede ou saco.
Carga máxima de roupa
As indicações sobre as cargas de roupa encontramse nas tabelas dos programas.
Regras gerais:
Algodão, linho: encha o tambor, mas sem
sobrecarregá-lo.
Sintéticos: não mais de metade do tambor.
Tecidos delicados e lã: não mais de um terço do
tambor.
Com uma carga máxima obtém-se sempre um
aproveitamento óptimo de água e energia.
Em caso de roupa muito suja, reduza a quantidade
da carga.
Pesos da roupa
Os pesos que seguem têm um valor indicativo:
roupão 1200 g
guardanapo 100 g
lençóis para édredons 700 g
lençol 500 g
fronha 200 g
toalha 250 g
toalha de mãos 200 g
pano de cozinha 100 g
camisa de noite 200 g
cueca de senhora 100 g
bata de trabalho para homem 600 g
camisa de homem 200 g
pijama de homem 500 g
camisola 100 g
slip para homem 100 g
Eliminação das nódoas
É possível que determinadas nódoas não se
eliminem somente com água e detergente.
Aconselhamos, portanto, a tratá-las antes da
lavagem.
Sangue: as nódoas ainda frescas devem ser
tratadas com água fria. Em caso de nódoas já
secas, deixe de molho a roupa por uma noite com
um detergente especial e a seguir esfregue-a con
água e sabão.
Tinta a óleo: humedeça com um tira-nódoas à base
de benzina, esfregue as nódoas depois de colocada
a peça sobre um pano macio; repita a operação
várias vezes.
Page 40

40
Nódoas secas de gordura: humedeça com
terebintina, esfregue as nódoas com a ponta dos
dedos e um pano de algodão, depois de pousada a
peça sobre um pano macio.
Ferrugem: sal oxálico dissolvido em água quente,
ou um produto contra a ferrugem a frio. Preste
atenção com as nódoas de ferrugem velhas, pois a
estrutura de celulose já foi atacada e pode abrir-se
um buraco no tecido.
Nódoas de mofo: trate-as com lixívia, enxague bem
(somente roupa branca e de cor resistente ao cloro).
Relva: ensaboe levemente e trate com lixívia diluída
(roupa branca, resistente ao cloro).
Esferográfica e cola: humedeça com acetona (*),
esfregue as nódoas depois de pousada a peça
sobre um pano macio.
Baton: humedeça com acetona como indicado
acima, a seguir trate as nódoas com álcool. Elimine
os resíduos dos tecidos brancos com lixívia.
Vinho tinto: deixe de molho com detergente,
enxague e trate com ácido acético ou ácido cítrico,
depois enxague. Trate eventuais resíduos com
lixívia.
Tinta: conforme a composição da tinta, humedeça o
tecido primeiro com acetona (*), a seguir com ácido
acético; trate eventuais resíduos nos tecidos
brancos com lixívia e enxague bem.
Nódoas de alcatrão: trate primeiro com tira-nódoas,
álcool ou gasolina, e por fim esfregue com pasta
detergente.
(*) não utilize a acetona com a seda artificial.
Detergentes e aditivos
Um bom resultado de lavagem também depende da
escolha do detergente e da sua correcta dosagem.
Dosear bem significa evitar desperdícios e proteger
o ambiente. Embora sejam biodegradáveis, os
detergentes contêm elementos que prejudicam o
delicado equilíbrio ecológico da natureza.
A escolha do detergente depende do tipo de tecido
(delicado, lã, algodão, etc.), da cor, da temperatura
de lavagem e do grau de sujidade.
Com esta máquina de lavar roupa podem ser
utilizados todos os detergentes para máquinas que
se encontram normalmente à venda:
– detergentes em pó para todos os tipos de tecido,
– detergentes em pó para tecidos delicados
(máximo 60°C) e lã,
– detergentes líquidos, de preferência para
programas de lavagem a baixa temperatura
(máximo 60°C) para todos os tipos de tecido, ou
especiais somente para a lã.
O detergente e o eventual aditivo devem ser
deitados nos compartimentos respectivos antes do
início do programa de lavagem.
Utilizando detergentes concentrados em pó ou
líquidos, deve ser seleccionado um programa sem
pré-lavagem.
Deite o detergente líquido imediatamente antes do
início do programa no compartimento da gaveta
do detergente.
Eventuais aditivos líquidos para amaciar ou engomar
a roupa têm que ser colocados na gaveta com o
símbolo antes de o programa de lavagem
começar.
A lixívia líquida só pode ser utilizada com tecidos de
algodão e linho brancos ou com cores resistentes.
Deve ser deitada no compartimento .
Para a dosagem, siga as indicações dos fabricantes
respectivos.
Para a dosagem, siga as indicações dos fabricantes.
Quantidade de detergente a utilizar
O tipo e a quantidade de detergente dependem do
tipo de tecido, da carga, do grau de sujidade e da
dureza da água utilizada.
A dureza da água é classificada nos chamados
níveis de dureza. Pode obter informações sobre
esses níveis junto do organismo competente ou nos
serviços municipalizados da área onde reside.
Siga as instruções para a dosagem indicadas pelo
fabricante.
Utilize uma quantidade menor de detergente
quando:
– lava pouca roupa,
– a roupa não está muito suja,
– se forma muita espuma durante a lavagem.
Graus de dureza da água
Nível Característica
Graus
Alemães
°dH
Franceses
°T.H.
macia
média
dura
muito dura
0- 7
8-14
15-21
mais de
21
0-15
16-25
26-37
mais de
37
1
2
3
4
Page 41

PORTUGUÊS
41
Símbolos internacionais para o tratamento dos tecidos
95
60
60
40
40
40
30
30
Estes símbolos são apresentados nas etiquetas da roupa, com o objectivo de a ajudar a seleccionar a
melhor maneira de cuidar da sua roupa.
Lavagem forte
Máxima
temperatura
de lavagem
95°C
Lavagem
delicada
Lixívia Lixívia com água fria Não utilizar lixívia
Passar a ferro Passar a ferro quente
temperatura máxima
200°C
Máxima
temperatura
de lavagem
60°C
Passar a ferro quente
temperatura máxima
Máxima
temperatura
de lavagem
40°C
150°C
Máxima
temperatura
de lavagem
30°C
Lavagem
à mão
Passar a ferro morno
temperatura máxima
110°C
Não
lavar
Não passar a ferro
Limpeza
a seco
Secar Secar
Limpeza a seco
com qualquer sol-
estendido
vente
Limpeza a seco
com percloreto
de etileno, gasolina,
álcool puro
R 111 e R 113
Secar
na corda
da roupa
Secar
pendurado
no cabide
Limpeza a seco
com gasolina,
álcool puro
R 113
a alta
temperatura
a baixa
temperatura
Secar em
secador rotativo
Não limpar
a seco
Não secar em
secador rotativo
Page 42

42
Sequência das
operações
Antes de efectuar a primeira lavagem aconselhamos
a efectuar um ciclo para algodão a 90°C, sem
roupa, para eliminar eventuais resíduos de fabrico
do tambor e da cuba.
Deite 1/2 dose de detergente no compartimento da
lavagem e ponha a máquina em funcionamento.
1 Introduza a roupa
Abra o óculo. Introduza a roupa no tambor, uma
peça de cada vez. Desdobre a roupa o mais
possível. Feche o óculo.
2 Doseie o detergente
Extraia a gaveta puxando até ao batente. Deite, por
meio de um dosador, a quantidade de detergente
aconselhada pelo fabricante no compartimento
correspondente à lavagem . Desejando efectuar
um programa com prélavagem, deite o detergente no compartimento
respectivo .
3 Doseie os aditivos
Deite, se desejar, o amaciador no compartimento
e a lixívia no compartimento sem ultrapassar o
nível “MAX”.
C0117
C0116
P0004
4.Ligue a máquina
Rode o disco de selecção do programa até
programa pretendido. Para desligar a máquina,
coloque o selector de programas na posição "O"
5.Seleccione o programa desejado
Seleccione o progrma que desejar. Acendem-se os
indicadores luminosos das fases que compõem o
programa.
6. Seleccione a temperatura
Carregue no botão da TEMPERATURA se desejar
seleccionar uma temperatura diferente da proposta
pela máquina de lavar.
A luz correspondente acender-se-á.
90
°
60
°
40
°
30
°
2.05
Page 43

PORTUGUÊS
10. Inicie o programa
Carregue no botão INICIAR/PAUSA . A luz
correspondente vai parar de piscar, e somente a luz
correspondente a fase a ser executada no momento
permanecerá acesa.
Se tiver seleccionado um início retardado, a
máquina começará a contagem regressiva.
O visor mostrará a duração do programa ou o prazo
de retardamento seleccionado.
10. Modificar o programa
Antes de efectuar qualquer modificação, é
necessário, para colocar a máquina de lavar em
pausa, carregar na tecla START/PAUSE.
É possível mudar qualquer fase, antes do programa
realizá-la.
Depois que o programa tiver iniciado, poderá ser
configurado somente se rodar o selector de
programa para "O", em seguida será possível
seleccionar o novo programa. A água de lavagem
permanece no tambor. Para iniciar o programa novo,
solte a tecla START/PAUSE.
Observação: Para descarregar a água, antes de
iniciar o novo ciclo, é necessário anular o programa
e seleccionar o ciclo de DESCARGA.
12.Interromper o programa
Para interromper um programa durante a sua
realização, carregar no botão INICIAR/PAUSA , o
indicador correspondente começará a piscar.
Carregar novamente no botão para dar início ao
programa.
13. Cancelar o programa
Para cancelar o programa durante a sua realização
girar o selector na posição O.
Agora será possível seleccionar um novo programa
43
7.Seleccionar a velocidade de
centrifugação ou a opção
(EXCLUSÃO CENTRIFUGAÇÃO)
Seleccionar a velocidade de centrifugação ou a
opção
8.Seleccione a opção desejada
A luz correspondente acender-se-á.
Carregar no botão de velocidade da centrifugação
desejada ou a opção .
O indicador correspondente irá acender-se.
9.Seleccione o INÍCIO
RETARDADO"
700
600
450
500
Page 44

14. Abertura da porta durante a
realização de um programa
Em primeiro lugar, colocar a máquina na situação de
PAUSA carregando no botão INICIAR/PAUSA .
Se a porta não se abrir, significa que a máquina já
está aquecendo a água, que o nível da água já
superou a margem da porta ou que a cuba está
girando.
Se a porta não abrir e é absolutamente necessário
abri-la, desligar a máquina de lavar roupas girando
os selector de programas no "O". Depois de
aproximadamente 3 minutos a porta pode ser aberta
(preste atenção ao nível e à temperatura da água!).
Para reiniciar o programa, ligue a máquina e
seleccione o programa e as opções que desejar.
15. Fim do programa
A máquina pára automaticamente.
Se a opção para enxaguar com paragem tiver
sido seleccionada, a luz da tecla INICIAR/PAUSA
apaga-se, e permanecem acesas, para
indicar que será necessário descarregar a água
antes de abrir a porta. No display aparece um 'zero'
a piscar.
Há duas maneiras para descarregar a água:
• Se seleccionar o programa (descarga) :
A água será descarregada sem centrifugação.
• Se seleccionar o programa ou . Seleccione a
velocidade de
centrifugação mediante as respectivas teclas e, em
seguida, carregue na tecla INICIAR/PAUSA . A
água será descarregada e a roupa lavada será
centrifugada na velocidade seleccionada.
Atenção! Antes de seleccionar um programa ,
ou , o selector deve estar colocado na posição O
(cancelamento) .
Retire a roupa.
Controle se o tambor está completamente vazio,
fazendo-o rodar com as mãos. Isto para evitar que a
roupa eventualmente esquecida possa ser danificada
numa lavagem sucessiva (por ex. encolhendo) ou que
desbote numa outra carga de roupa.
Solte a tecla eventualmente premida.
Feche a torneira da água e retire a ficha da tomada
de corrente.
Deixe o óculo entreaberto para ventilar a máquina.
44
Page 45

PORTUGUÊS
45
Tabela dos programas
Programas de lavagem para algodão e sintéticos
* Os dados referidos aqui têm um valor puramente indicativo e podem variar conforme a quantidade e o tipo de
roupa, a temperatura de alimentação da água e a temperatura ambiente. São relativos à temperatura mais
elevada prevista por cada programa.
PROGRAMA ECONOMÍA
**
De acordo com a norma CEE 92/75, os consumos indicados na etiqueta da energia são relativos ao
programa E .
O ciclo de lavagem de lã desta máquina de lavar foi aprovado pela 'Woolmark' para os produtos que puderem
ser lavados à máquina, segundo indicação da 'Woolmark', desde que estas peças sejam lavadas de acordo
com as instruções da própria etiqueta e as instruções fornecidas pelo fabricante desta máquina de lavar.
Licença N.° M9604.
Tecidos
Temp.
Tipo de tecido Opções possíveis
Carga
máx.
kg
Energia
kWh
Água
litros
Duração
hor./min.
Consumos*
Cores
delicadas
40°AA
Roupas normalmente
sujas, como por
exemplo roupa íntima,
blusas, camiseta
Cores
economía
E
40°-
60°C**
Programa
economía
Roupas normalmente
sujas, como por
exemplo, toalhas
pequenas, lençóis,
roupa íntima, toalhas
de mesa, blusas,
camisetas.
Sintéticos
Tecidos sintéticos
roupa interior, ruopa
de cor, camisas,
blusas
Brancos
Para roupas de
algodão muito sujas.
-90°
Cores
Lençóis, roupas de
casa, roupa íntima,
toalhas
-60°
40°AA
-60°
6 kg
2.5 kg
0.90 54 1.33
2.00 53 2.25
1.14 49 2.21
5 kg
0.95 49 2.20
5 kg
1.20 49 2.00
Sintéticos
E
Blusas e camisetas
pouco sujas
-40°
2.5 kg
0.45 54 1.24
5 kg
Page 46

46
Tabela dos programas
* Os dados referidos aqui têm um valor puramente indicativo e podem variar conforme a quantidade e o tipo de
roupa, a temperatura de alimentação da água e a temperatura ambiente.
Programas de lavagem para delicados lavagem à mão , lã
, seda
e
Tecidos
Programa/
Temp.
Tipo de tecido
Opções possíveis
Carga
máx.
kg
Energia
kWh
Água
litros
Duração
min.
Consumos*
Seda
Seda
Lavagem à
mão
-40°
Tecidos delicados
com etiqueta
Lã
Roupa em lã com
etiqueta
Delicados
Tecidos delicados,
por ex. cortinas, seda
-40°
30°
-40°
2 kg
2 kg
0.35 55 55
2.5 kg
0.50 55 1.00
0.35 55 56
2 kg
0.30 53 40
Ciclo breve
Roupas pouco sujas
30°
2 kg
0.30 40 30
Page 47

PORTUGUÊS
Tabela dos programas
47
Programas especiais
Posicion do
selector
Enxagua-
mentos
Programa
Realização do
programa
Opções
possíveis
Carga
máx.
kg
Energia
kWh
Água
litros
Duração
min.
Consumos*
Com este
programa é
possivel
enxaguar a roupa
lavada à mão
3 enxaguamentos
com aditivo líquido
Centrifugação breve
a velocidade
máxima
5 kg
0.08
45
45
/
-
-
2
5 kg
--10
Descarga
Descarga do
último
enxaguamento
nos programas
com opçao
Centrifugação
separada para
algodão
Descarga de água
Descarga e
centrifugação
a velocidade
máxima
Centrifugação
5 kg
--6
Centrifugação
separada para
algodão,
sintéticos,
delicados,
lavagem à mão e
lã
Descarga e
centrifugação
breve
Centrifugação
delicado
/
-
-
-
Anular o
programa en
curso, desligar a
máquina
O
Anulação
* Os dados referidos aqui têm um valor puramente indicativo e podem variar conforme a quantidade e o tipo de
roupa, a temperatura de alimentação da água e a temperatura ambiente.
Page 48

1.Corpo da máquina
Limpe o corpo da máquina com água morna e um
produto neutro não abrasivo. Enxague com água
limpa e seque com um pano macio.
Importante: Não utilize álcool, solventes ou
produtos parecidos para a limpeza do corpo da
máquina.
2.Óculo
Verifique periodicamente que não haja corpos
estranhos como agrafos, botões, palitos, na
guarnição do óculo.
3.Gaveta do detergente
Os detergentes e o amaciador com o tempo formam
incrustações.
De vez em quando limpe a gaveta do detergente
debaixo de um jacto de água. Para extrair
completamente a gaveta da máquina, prima o botão
no fundo à esquerda.
Para poder limpar mais facilmente a gaveta, é
possível retirar a parte superior da gaveta reservada
aos aditivos.
C0119
C0118
P1050
Com o tempo, o detergente também pode formar
incrustações na sede da gaveta: limpe com uma
escova de dentes velha. Volte a colocar a gaveta no
compartimento respectivo.
3.Limpeza da zona de descarga
A limpeza da zona de descarga da água é
necessária no caso de a bomba ter ficado bloqueada
por algum corpo estranho (por exemplo, botão, clip,
moeda, etc) ou se a máquina não descarregar e/ou
não realizar centrifugas.
Proceda da seguinte maneira:
• Retire o cabo de alimentação da corrente.
• Se necessário, aguarde que a água arrefeça.
• Abra a porta da zona de descarga.
• Coloque um recipiente para recolher a água.
• Retire o pequeno tubo de descarga, coloque-o no
recipiente e retire o tampão, quando o recipiente
estiver cheio, ponha o tampão.
• Esvazie o recipiente e repita a sequência de
operações anteriores até retirar por completo a
água contida na máquina.
Tenha à mão um trapo para eventualmente
enxugar a água que vier a vazar quando
desatarraxar o filtro.
P1115
P1114
P0038
Manutenção
48
Page 49

PORTUGUÊS
• coloque um recipiente para recolher a água que
saír para fora;
• tire o pequeno tubo de descarga, coloque-o junto
ao recipiente e retire-lhe o tampão;
• quando o recipiente estiver cheio, ponha o
tampão;
• esvazie o recipiente e repita a sequência de
operações anteriores até retirar por completo a
água contida na máquina;
• quando a água deixar de correr, ponha de novo o
tampão no pequeno tubo e coloque-o na sua
posicão original;
• limpe a bomba (se necessário);
• volte a colocar a bomba na sua posicão e feche a
porta da zona da descarga.
6.Precauções contra o gelo
Se a máquina estiver instalada num local em que a
temperatura possa descer abaixo de 0°C, proceda
da seguinte maneira:
• Retire a ficha da tomada.
• Feche a torneira da água e desatarraxe o tubo de
alimentação da torneira.
• Ponha a extremidade do pequeno tubo de
descarga e do tubo de alimentação numa bacia
posta no pavimento.
• Retire o tampão do pequeno tubo de descarga e
deixe sair toda a água.
• Volte a atarraxar o tubo de alimentação e coloque
novamente no seu lugar o pequeno tubo de
descarga, depois de tê-lo tampado.
Efectuando essas operações a água que ficara na
máquina é eliminada, evitando a formação de gelo e
por conseguinte a ruptura das partes interiores .
Antes de pôr novamente em funcionamento a
máquina, certifique-se de que a temperatura
ambiente seja superior a 0°C.
Importante!
Todas as vezes que se descarregar água através do
pequeno tubo de descarga, será necessário
posteriormente deitar aproximadamente 2 litros de
água no compartimento de lavagem da gaveta do
detergente e seleccionar o programa de descarga.
Desta maneira será activado o dispositivo a válvula
ECO e, portanto, será evitado que uma parte do
detergente fique inutilizada na máquina na seguinte
lavagem.
49
• Para continuar, desenrosque a tampa do filtro
rodando para o lado oposto ao sentido dos
ponteiros do relógio. Retire o filtro.
• Retire os corpos estranhos como moedas, botões
e eventual cotão que se tenha acumulado na zona
da bomba. Para facilitar, rode as pas da torbina.
• Ponha o tampão no pequeno tubo de descarga e
volte a colocá-lo na sua posição inicial.
• Enrosque a tampa do filtro rodando no sentido dos
ponteiros do relógio e certifique-se de que fica
bem apertada.
• Feche a porta da zona de descarga.
4.Filtro do tubo de alimentação
Se reparar que a máquina demora mais tempo para
admitir água, é preciso verificar se o pequeno filtro
do tubo de alimentação está entupido.
Feche a torneira da água.
Desaperte o tubo da torneira.
Limpe o filtro com uma escova de dentes.
Aperte novamente o tubo.
5.Esvaziamento de emergência
Se a máquina não descarregar (bomba de descarga
bloqueada ou tubo de descarga entupido), para
esvaziar a água proceda da seguinte forma:
• retire a ficha da tomada da corrente;
• feche a torneira da água;
• aguarde que a água arrefeça (se necessário);
• abra a porta da zona de descarga;
P1090
P1117
P1115
Page 50

50
Anomalias de funcionamento
Problemas que podem ser resolvidos pelo utilizador.
Durante o funcionamento da máquina pode acontecer que o indicador luminoso e um dos seguintes
indicadores começa a piscar:
E10
: problemas na alimentação hídrica
E20
: problemas na descarga da água
E40: óculo aberto
Uma vez resolvido o problema, carregue na tecla INICIAR/PAUSA para pôr novamente em funcionamento
o programa. Se depois de todos estes controlos, o problema persistir, contacte o Centro de Assistência
Técnica mais próximo.
Problema Causa possível
• A máquina não entra em
funcionamento:
• O óculo não está bem fechado. (E40)
• A máquina não está ligada à corrente.
• O disjuntor da instalação eléctrica da casa não
está em condições.
• A tecla Iniciar/Pausa
não está premida.
• Foi seleccionada o opção .
• O selector dos programas não está posicionado
correctamente.
• A máquina não admite água:
• A torneira da água está fechada. (E10)
• O tubo de alimentação está dobrado ou preso.(E10)
• O pequeno filtro no tubo de alimentação está
entupido. (E10)
• O óculo não está fechado.(E40)
• A máquina admite água e
esgota-a imediatamente:
• A extremidade do tubo de descarga está
demasiado baixa relativamente à máquina. Veja o
parágrafo relativo no capítulo “descarga”.
• A máquina não esgota e/ou não
centrifuga:
• O tubo de descarga está dobrado ou preso. (E20)
• Foi escolhido um programa com a opcão anti-rugas
ou exclusão centrifugação .
• A bomba está entupida.(E20)
• A carga de roupa não está bien distribuida no tambor.
• Há água no chão:
• Há demasiado detergente ou foi utilizado um
detergente não adequado (produz demasiada
espuma).
• Verifique se há perdas de uma das buchas do tubo
de alimentação. Mesmo sendo difícil ver a água
correr ao longo do tubo, controle se está húmido.
• O tubo de descarga não está em condições.
• O filtro de descarga não foi inserido correctamente
depois da limpeza.
• O resultado da lavagem não
satisfaz:
• Foi utilizado pouco detergente ou um detergente
não adequado.
• As nódoas “difíceis” não foram tratadas
previamente.
• Não foi escolhida a temperatura certa.
• Foi introduzida demasiada roupa.
Page 51

PORTUGUÊS
51
Problema Causa possível
Se não conseguir remediar o problema, ou não o
conseguir localizar, dirija-se ao Centro de
Assistência indicando o modelo da máquina, o
número de série e a data de compra.
Mod. ..........
Prod. No. ...........
Ser. No. .........
M
o
d
.
.
.
.
.
.
.
.
.
.
.
P
r
o
d
.
N
o
.
..
.
.
.
..
.
.
.
.
S
e
r
.
N
o
.
.
.
..
.
.
.
.
.
P0042 BD
• A máquina vibra ou é ruidosa:
• Não foram tiradas todas as protecções que serviam
para o transporte.
• Os pés não foram regulados
• A carga de roupa não está bem distribuída no tambor.
• Talvez haja pouca roupa no tambor.
• A centrifugação começa com
atraso ou não é realizada:
• Activou-se o sistema de controlo electrónico de
desequilíbrio, pois a roupa não está distribuída de
maneira uniforme no tambor. Com a inversão de
rotação do tambor, a roupa volta a distribuir-se. Isto
pode verificar-se várias vezes até o desequilíbrio
desaparecer e a centrifugação poder recomeçar
regularmente. Se depois de 10 minutos a roupa
ainda está emaranhada, a máquina não realiza a
centrifugação. Portanto, se no fim do ciclo a roupa
continua molhada, aconselhamos a distribui-la
novamente no interior do tambor e a seleccionar o
programa de centrifugação.
P1035P
Não se vê
água na máquina. As máquinas
resultado da tecnologia moderna, trabalham
de maneira económica com consumo reduzido
de água. Os rendimentos, de qualquer
modo, são excelentes.
A máquina faz um ruído insólito!
A máquina está equipada com um motor de
escovas que permite melhorar o
rendimento.
P1034P
• O óculo não se abre:
• O programa ainda não acabou.
• O óculo ainda está bloqueado.
• Há água no tambor.
Page 52

БгбрзфЭ релЬфз,
ДйбвЬуфе бхфЭт фйт пдзгЯет лейфпхсгЯбт рспуекфйкЬ кбй
дюуфе йдйбЯфесз рспупчЮ уфйт рбсбфзсЮуейт буцЬлейбт
рпх бнбцЭспнфбй уфйт рсюфет уелЯдет. УхуфЮнпхме нб
дйбфзсеЯфе бхфь фп егчейсЯдйп пдзгйюн чсЮузт гйб
меллпнфйкЮ бнбцпсЬ кбй нб фп дЯнефе уе прпйпндЮрпфе
меллпнфйкь йдйпкфЮфз.
ВлЬвет кбфЬ фз мефбцпсЬ
ВгЬжпнфбт фз ухукехЮ брь фз ухукехбуЯб фзт,
вевбйщиеЯфе ьфй ден рбспхуйЬжей ципсЭт. ЕЬн Эчефе
бмцйвплЯет, мзн фз чсзуймпрпйЮуефе кбй елЬфе уе
ербцЮ ме фп КЭнфсп УЭсвйт.
Фб уэмвплб рпх иб деЯфе уе псйумЭнет рбсбгсЬцпхт фпх егчейсйдЯпх Эчпхн фзн бкьлпхиз узмбуЯб:
Tп фсЯгщнп кбй/Ю пй лЭоейт (РспейдпрпЯзуз!, РспупчЮ!) фпнЯжпхн рлзспцпсЯет йдйбЯфесб узмбнфйкЭт гйб фзн
буцЬлейЬ убт Ю фп ущуфь фсьрп лейфпхсгЯбт фзт ухукехЮт.
Фп уэмвплп бхфь хрЬсчей дЯрлб уе рлзспцпсЯет рпх рбсЭчпхн ерйрлЭпн пдзгЯет кбй рсбкфйкЭт ухмвпхлЭт
учефйкЬ ме фз чсЮуз фзт ухукехЮт.
Фп уэмвплп бхфь хрЬсчей дЯрлб уе ухмвпхлЭт кбй рлзспцпсЯет учефйкЬ ме фзн пйкпнпмйкЮ кбй пйкплпгйкЮ
чсЮуз фзт ухукехЮт.
З ухнейуцпсЬ мбт уфзн рспуфбуЯб фпх
ресйвЬллпнфпт: Чсзуймпрпйпэме бнбкхклщмЭнп чбсфЯ.
52
Page 53

Ресйечьменб
РспцхлЬоейт 54-55
Брьссйшз 55
УхмвпхлЭт гйб фзн рспуфбуЯб
фпх ресйвЬллпнфпт 55
ФечнйкЬ чбсбкфзсйуфйкЬ 56
ЕгкбфЬуфбуз 57
БрпухукехбуЯб 57
ФпрпиЭфзуз 57
РбспчЮ неспэ 57-58
Ухнбсмпльгзуз уе кйф вЬузт 58
¸опдпт неспэ 58
ЗлекфсйкЭт ухндЭуейт 58
Фп нЭп убт рлхнфЮсйп спэчщн 59
РесйгсбцЮ фзт ухукехЮт 59
УхнфЮсзуз 73-74
ЕощфесйкЮ ерйцЬнейб 73
ЛЬуфйчп фзт рьсфбт 73
УхсфЬсй брпссхрбнфйкпэ 73
БнфлЯб бдейЬумбфпт 73-74
ЦЯлфсп фпх ущлЮнб рбспчЮт 74
¢дейбумб неспэ уе ресЯрфщуз Экфбкфзт бнЬгкзт 74
РспуфбуЯб брь фпн рЬгп 74
ДхулейфпхсгЯет; 75-76
ЕЛЛЗНЙКБ
УхсфЬсй брпссхрбнфйкпэ 59
ЧсЮуз 60
РЯнбкбт чейсйуфзсЯщн 60
ЧейсйуфЮсйб 60-63
УхмвпхлЭт гйб фп рлэуймп 64-65
ЧщсЯжпнфбт фб спэчб 64
ИесмпксбуЯб 64
Рсйн вЬлефе фб спэчб уфп рлхнфЮсйп 64
МЭгйуфп цпсфЯп спэчщн 64
ВЬспт спэчщн ьфбн еЯнбй уфегнЬ 64
БцбЯсеуз фщн лекЭдщн 64-65
БрпссхрбнфйкЬ кбй рспуиефйкЬ 65
ДйеинЮ уэмвплб гйб фп рлэуймп фщн хцбумЬфщн 66
ДйбдпчЮ енесгейюн 67-69
Рсьгсбммб рлэузт 70-72
53
Page 54

РспцхлЬоейт
Пй бкьлпхиет рспцхлЬоейт рбсЭчпнфбй гйб фзн буцЬлейб ьлщн. РсЭрей нб фйт дйбвЬуефе рспуекфйкЬ рсйн фзн
егкбфЬуфбуз Ю чсЮуз фзт ухукехЮт.
ЕгкбфЬуфбуз
¼лб фб хлйкЬ ухукехбуЯбт рсЭрей нб бцбйсеипэн
брь фп еущфесйкь фзт ухукехЮт рсйн фз чсЮуз фзт.
ЕЬн ден бцбйсЭуефе ьлет фйт дйбфЬоейт буцблеЯбт
кбфЬ фз мефбцпсЬ Ю еЬн ден фйт бцбйсЭуефе
енфелют, мрпсеЯ нб рспклзипэн упвбсЭт влЬвет уфп
рлхнфЮсйп Ю уфб Эрйрлб ме фб прпЯб Эсчефбй уе
ербцЮ. ДйбвЬуфе фз учефйкЮ рбсЬгсбцп уфп
егчейсЯдйп пдзгйюн чсЮузт.
Пй злекфсплпгйкЭт есгбуЯет рпх брбйфпэнфбй гйб фзн
егкбфЬуфбуз фзт рбспэубт ухукехЮт рсЭрей нб
екфелпэнфбй брь ербггелмбфЯб злекфспльгп.
Пй хдсбхлйкЭт есгбуЯет рпх брбйфпэнфбй гйб фзн
егкбфЬуфбуз фзт рбспэубт ухукехЮт рсЭрей нб
екфелпэнфбй брь ербггелмбфЯб хдсбхлйкь.
Бцпэ плпклзсюуефе фзн егкбфЬуфбуз фпх
рлхнфзсЯпх, вевбйщиеЯфе ьфй де уфзсЯжефбй рЬнщ уфп
кблюдйп фспцпдпуЯбт фпх.
ЕЬн фп рЬфщмб рЬнщ уфп прпЯп фпрпиефЮизке фп
рлхнфЮсйп еЯнбй кблхммЭнп ме мпкЭфб, вевбйщиеЯфе ьфй
еЯнбй дхнбфЮ з кхклпцпсЯб фпх бЭсб бнЬмеуб уфб
рпдбсЬкйб уфЮсйозт кбй уфп рЬфщмб.
ЧсЮуз
З рбспэуб ухукехЮ Эчей учедйбуфеЯ гйб пйкйбкЮ
чсЮуз. З чсЮуз фзт гйб Ьллпхт укпрпэт рЭсбн
бхфюн гйб фпхт прпЯпхт учедйЬуфзке ден
ерйфсЭрефбй.
Рлэнефе мьнп фб хцЬумбфб рпх мрпспэн нб рлхипэн
уфп рлхнфЮсйп. БкплпхиЮуфе фйт пдзгЯет уфзн ефйкЭфб
кЬие спэчпх.
Мзн хресцпсфюнефе фз ухукехЮ. БкплпхиЮуфе фйт
пдзгЯет уфп егчейсЯдйп пдзгйюн чсЮузт.
ВевбйщиеЯфе ьфй ьлет пй фуЭрет фщн спэчщн еЯнбй
Ьдейет. БнфйкеЯменб ьрщт нпмЯумбфб, рбсбмЬнет,
кбсцЯфует кбй вЯдет мрпспэн нб рспоенЮупхн
екфефбмЭнет влЬвет.
Мзн фпрпиефеЯфе уфп рлхнфЮсйп спэчб ме лекЭдет
брь венжЯнз, блкпьл, фсйчлщспбйихлЭнйп к.ф.л. ЕЬн
чсзуймпрпйЮубфе фб рспъьнфб бхфЬ гйб фзн бцбЯсеуз
лекЭдщн рсйн фп рлэуймп, ресймЭнефе мЭчсй нб
еобфмйуфпэн рлЮсщт рспфпэ вЬлефе фб спэчб уфп
рлхнфЮсйп.
ФпрпиефЮуфе фб мйксЬ бнфйкеЯменб ьрщт кЬлфует,
жюнет к.ф.л. уе Энбн хцбумЬфйнп уЬкп Ю мйб
мбойлбспиЮкз юуфе нб мзн рйбуфпэн кЬрпх уфпн
кЬдп.
ЧсзуймпрпйеЯфе брпклейуфйкЬ фйт ухнйуфюменет
рпуьфзфет мблбкфйкпэ. З хресвплйкЮ рпуьфзфб
мблбкфйкпэ ендЭчефбй нб кбфбуфсЭшей фб спэчб.
БцЮнефе елбцсют бнпйчфЮ фзн рьсфб ьфбн з ухукехЮ
де чсзуймпрпйеЯфбй. ¸фуй дйбфзсеЯфбй уе кблЮ
кбфЬуфбуз фп лЬуфйчп фзт рьсфбт кбй де
дзмйпхсгпэнфбй дхуЬсеуфет пумЭт.
ЕлЭгчефе рЬнфпфе еЬн фп несь Эчей бдейЬуей рсйн
бнпЯоефе фзн рьсфб. ЕЬн ьчй, бдейЬуфе фп несь
уэмцщнб ме фйт пдзгЯет уфп егчейсЯдйп пдзгйюн
чсЮузт.
БрпухндЭефе рЬнфпфе фз ухукехЮ кбй клеЯнефе фз
всэуз неспэ мефЬ фз чсЮуз.
Генйкьфесз буцЬлейб
Пй ерйдйпсиюуейт рсЭрей нб екфелпэнфбй мьнп брь
ейдйкехмЭнп рспущрйкь. Пй ерйдйпсиюуейт рпх
екфелпэнфбй брь Ьфпмб чщсЯт фзн кбфЬллзлз реЯсб
ендЭчефбй нб рспкблЭупхн упвбсь кЯндхнп.
ЕрйкпйнщнЮуфе ме фп КЭнфсп УЭсвйт фзт ресйпчЮт
убт.
РпфЭ мзн фсбвЬфе фп кблюдйп фспцпдпуЯбт гйб нб
вгЬлефе фп цйт брь фзн рсЯжб, рЬнфпфе нб фсбвЬфе
фп Ядйп фп цйт.
КбфЬ фз дйЬскейб фщн рспгсбммЬфщн рлэузт уе
хшзлЮ иесмпксбуЯб, фп гхблЯ фзт рьсфбт ендЭчефбй
нб иесмбниеЯ. Мзн фп бггЯжефе!
54
Page 55

БуцЬлейб гйб фб рбйдйЬ
P1131
Фб рбйдйЬ ухчнЬ ден бнфйлбмвЬнпнфбй рьупхт
кйндэнпхт егкхмпнпэн пй злекфсйкЭт ухукехЭт. ¼фбн
фп рлхнфЮсйп еЯнбй уе лейфпхсгЯб, фб рбйдйЬ рсЭрей нб
рбсбкплпхипэнфбй рспуекфйкЬ кбй нб мзн фпхт
ерйфсЭрефбй нб рбЯжпхн ме фз ухукехЮ.
Фб хлйкЬ фзт ухукехбуЯбт (р.ч. рлбуфйкЮ мемвсЬнз,
рплхуфхсьлйп) ендЭчефбй нб еЯнбй ерйкЯндхнб гйб фб
рбйдйЬ хрЬсчей кЯндхнпт буцхоЯбт! ЦхлЬууефЭ фб
мбксйЬ брь фб рбйдйЬ.
ЦхлЬууефе ьлб фб брпссхрбнфйкЬ уе буцблЭт
мЭспт, мбксйЬ брь фб рбйдйЬ.
ВевбйщиеЯфе ьфй фб рбйдйЬ Ю фб кбфпйкЯдйб ден
мрбЯнпхн мЭуб уфпн кЬдп. Гйб нб брпцэгефе кЬфй
фЭфпйп фп рлхнфЮсйп дйбиЭфей Энб ейдйкь
чбсбкфзсйуфйкь. Гйб нб енесгпрпйЮуефе бхфь фп
чбсбкфзсйуфйкь, ресйуфсЭшфе деойьуфспцб фп кпхмрЯ
(чщсЯт нб фп рйЭуефе) рпх хрЬсчей уфп еущфесйкь фзт
рьсфбт мЭчсй з учйумЮ нб Эсией уфзн псйжьнфйб иЭуз.
ЕЬн чсейбуфеЯ чсзуймпрпйЮуфе Энб ньмйумб.
Брьссйшз
Гйб нб бренесгпрпйЮуефе бхфь фп чбсбкфзсйуфйкь кбй
нб ербнбцЭсефе фз дхнбфьфзфб нб клеЯней з рьсфб,
ресйуфсЭшфе бсйуфесьуфспцб фп кпхмрЯ мЭчсй з
учйумЮ нб Эсией уфзн кбфбкьсхцз иЭуз.
Рсйн фзн брьссйшз фзт ухукехЮт, кьшфе фп кблюдйп
фспцпдпуЯбт кбй кбфбуфсЭшфе фп цйт кбй фп хрьлпйрп
кблюдйп. Бчсзуфеэубфе фп мЬнфблп фзт рьсфбт юуфе
нб мзн рбгйдехфпэн мЭуб фб рбйдйЬ еню рбЯжпхн.
ЕЛЛЗНЙКБ
ХлйкЬ ухукехбуЯбт
Фб хлйкЬ рпх цЭспхн бхфь фп уэмвплп еЯнбй
бнбкхклюуймб.
>PE<=рплхбйихлЭнйп
>PS<=рплхуфхсьлйп
>PP<=рплхрспрхлЭнйп
Бхфь узмбЯней ьфй мрпспэн нб бнбкхклщипэн бцпэ з
брьссйшз гЯней ме фп ущуфь фсьрп, уе кбфЬллзлб
дпчеЯб ресйухллпгЮт.
РлхнфЮсйп
З брьссйшз фзт рблйЬт ухукехЮт убт рсЭрей нб гЯнефбй
уе егкексймЭнпхт чюспхт брьссйшзт. ВпзиЮуфе нб
дйбфзсзиеЯ з чюсб убт кбибсЮ!
УхмвпхлЭт гйб фзн рспуфбуЯб фпх
ресйвЬллпнфпт
Гйб нб еопйкпнпмЮуефе несь, енЭсгейб кбй гйб нб
ухмвЬлефе уфзн рспуфбуЯб фпх ресйвЬллпнфпт,
бкплпхиЮуфе фйт еоЮт ухмвпхлЭт:
Фб цхуйплпгйкЬ лесщмЭнб спэчб мрпспэн нб рлхипэн
чщсЯт рсьрлхуз юуфе нб еопйкпнпмЮуефе
брпссхрбнфйкь, несь кбй чсьнп (ерЯузт, Эфуй
рспуфбфеэефе фп ресйвЬллпн!).
Фп рлхнфЮсйп лейфпхсгеЯ рйп брпфелеумбфйкЬ ьфбн
Эчефе гемЯуей фпн кЬдп.
Фп уэмвплп ерЯ фпх рспъьнфпт Ю фзт ухукехбуЯбт
фпх узмбЯней ьфй фп рспъьн бхфь де ухгкбфблЭгефбй уфб
ухнЮиз пйкйбкЬ брпссЯммбфб. БнфйиЭфщт, рсЭрей нб
мефбцесиеЯ уфп хрЬсчпн узмеЯп ресйухллпгЮт гйб
бнбкэклщуз фпх злекфсйкпэ кбй злекфспнйкпэ еопрлйумпэ
фпх. ДйбуцблЯжпнфбт фзн брьссйшз фпх рспъьнфпт ме фп
ущуфь фсьрп, ухмвЬллефе уфзн брпфспрЮ ендечьменщн
бснзфйкюн ерйрфюуещн гйб фп ресйвЬллпн кбй фзн хгеЯб
фзт кпйньфзфбт рпх иб мрпспэубн ейдЬллщт нб
рспклзипэн брь фпн еуцблмЭнп фсьрп брьссйшзт фпх
рспъьнфпт. Гйб ресйууьфесет рлзспцпсЯет учефйкЬ ме
фзн бнбкэклщуз фпх рспъьнфпт, ерйкпйнщнЮуфе ме фйт
дзмпфйкЭт хрзсеуЯет уфзн ресйпчЮ убт, фзн бсмьдйб
хрзсеуЯб брпкпмйдЮт Ю фп кбфЬуфзмб брь ьрпх
бгпсЬубфе фп рспъьн.
Ме фпн кбфЬллзлп кбибсйумь рсйн фп рлэуймп, пй
лекЭдет кбй з ресйпсйумЭнз всщмйЬ мрпспэн нб
бцбйсеипэн кбй фб спэчб рлЭнпнфбй уфз ухнЭчейб уе
чбмзльфесз иесмпксбуЯб.
МефсЮуфе фзн рпуьфзфб фпх брпссхрбнфйкпэ
уэмцщнб ме фз уклзсьфзфб фпх неспэ, фп рьуп
лесщмЭнб еЯнбй фб спэчб кбй фзн рпуьфзфЬ фпхт.
55
Page 56

ФечнйкЬ чбсбкфзсйуфйкЬ
ДЙБУФБУЕЙУ ¾øïò 85 cm
РлЬфпт 60 cm
ВЬипт 59 cm
ПНПМБУФЙКП ЦПСФЙП ВбмвбкесЬ 6 kg
УхниефйкЬ 2,5 kg
ЕхбЯуизфб кбй мйксь рсьгсбммб 2,5 kg
МЬллйнб кбй рлэуймп уфп чЭсй 2 kg
МефбощфЬ 1 kg
ФБЧХФЗФБ УФХШЙМБФПУ 700 óôñ/ëåð ìÝã.
ФБУЗ/УХЧНПФЗФБ 220-230 V/50 Hz
МЕГЙУФЗ КБФБНБЛЩУЗ ЙУЧХПУ 2.200 W
ЕЛБЧЙУФЗ ФЙМЗ БУЦБЛЕЙБУ 10 A
РЙЕУЗ НЕСПХ ЕлЬчйуфз 0,05 MPa
МЭгйуфз 0,8 MPa
З ухукехЮ ухммпсцюнефбй ме фйт бкьлпхиет ПдзгЯет фзт ЕПК:
73/23/EПК фзт 19/02/73 ресЯ чбмзлЮт фЬузт
89/336/EПК фзт 03/05/89 ресЯ злекфспмбгнзфйкЮт ухмвбфьфзфбт.
56
Page 57

P1127
P1126
P1124
2
3
1
P0001
P1129
P1088
P1051
P0002
P1128
ЕгкбфЬуфбуз
БрпухукехбуЯб
Рсйн иЭуефе уе лейфпхсгЯб фп рлхнфЮсйп,
бцбйсЭуфе ьлет фйт дйбфЬоейт буцблеЯбт кбфЬ
фз мефбцпсЬ.
Убт ухмвпхлеэпхме нб цхлЬоефе ьлет фйт
рспуфбфехфйкЭт дйбфЬоейт, рспкеймЭнпх нб фйт
чсзуймпрпйЮуефе уе ресЯрфщуз рпх иелЮуефе
меллпнфйкЬ нб мефбцЭсефе фп рлхнфЮсйп.
1. Ме Энб клейдЯ, оевйдюуфе кбй бцбйсЭуфе фйт дэп
вЯдет рпх всЯукпнфбй рЯущ кбй кЬфщ. ВгЬлфе фпхт
дэп рлбуфйкпэт реЯспхт.
2. УфзсЯофе фп рлхнфЮсйп уфп рЯущ мЭспт фпх,
рспуЭчпнфбт нб мзн кбфбуфсЭшефе фпхт ущлЮнет.
РспкеймЭнпх нб мз ухмвеЯ кЬфй фЭфпйп, фпрпиефЮуфе
мефбоэ фпх рбфюмбфпт кбй фпх рлхнфзсЯпх Энб
кпммЬфй брь фз ухукехбуЯб.
3. БцбйсЭуфе фп кЬлхммб рплхуфхсплЯпх брь фп кЬфщ
мЭспт фпх рлхнфзсЯпх кбй вгЬлфе фпхт дэп
рлбуфйкпэт уЬкпхт.
7. Кблэшфе ьлет фйт прЭт ме фйт фЬрет рпх иб всеЯфе
мЭуб уфп цЬкелп ме фп егчейсЯдйп пдзгйюн.
ФпрпиЭфзуз
ФпрпиефЮуфе фп рлхнфЮсйп уе ерЯредп кбй уфбиесь
дЬредп.
ВевбйщиеЯфе ьфй ден емрпдЯжефбй з кхклпцпсЯб бЭсб
гэсщ брь фп рлхнфЮсйп брь мпкЭфет, чблйЬ к.ф.л. кбй
ьфй фп рлхнфЮсйп ден Эсчефбй уе ербцЮ ме фпн фпЯчп Ю
фб Эрйрлб фзт кпхжЯнбт.
Псйжпнфйюуфе рспуекфйкЬ вйдюнпнфбт Ю оевйдюнпнфбт
фб схимйжьменб рпдбсЬкйб. РпфЭ мзн фпрпиефеЯфе кЬфщ
брь фп рлхнфЮсйп чбсфьнй, оэлп Ю рбсьмпйб хлйкЬ гйб нб
бнфйуфбимЯуефе фб бнйуьредб узмеЯб фпх рбфюмбфпт.
ЕЛЛЗНЙКБ
РбспчЮ неспэ
УхндЭуфе фп ущлЮнб рбспчЮт неспэ уе всэуз ме
хрпдпчЭт фщн 3/4.
4. Рплэ рспуекфйкЬ, вгЬлфе фпн бсйуфесь уЬкп брь
рплхбйихлЭнйп, фсбвюнфбт фпн деойЬ кбй рспт фб
кЬфщ.
5. Рплэ рспуекфйкЬ, вгЬлфе фп деоЯ уЬкп брь
рплхбйихлЭнйп, фсбвюнфбт фпн бсйуфесЬ кбй рспт фб
рЬнщ.
6. ФпрпиефЮуфе обнЬ ьсийп фп мзчЬнзмб кбй
бцбйсЭуфе фзн рЯущ вЯдб рпх брЭмейне. ВгЬлфе фпн
бнфЯуфпйчп реЯсп.
Мз чсзуймпрпйеЯфе Юдз чсзуймпрпйзмЭнпхт ущлЮнет гйб
фз уэндеуз.
Фп Ьллп Ьксп фпх ущлЮнб рбспчЮт рпх ухндЭефбй ме
фп рлхнфЮсйп мрпсеЯ нб еЯнбй уфсбммЭнп уе прпйбдЮрпфе
кбфеэихнуз. Брлют чблбсюуфе фп уфегбнпрпйзфйкь
еоЬсфзмб, гхсЯуфе фп ущлЮнб кбй обнбуцЯофе фп
уфегбнпрпйзфйкь еоЬсфзмб дйбуцблЯжпнфбт ьфй де иб
хрЬсчей дйбсспЮ неспэ.
57
Page 58

П ущлЮнбт рбспчЮт ден еЯнбй дхнбфьн нб ерймзкхниеЯ.
P1216
P0021
P1118
P0022
ЕЬн еЯнбй кпнфьт кбй ден ерйихмеЯфе нб мефбкйнЮуефе фз
всэуз, иб рсЭрей нб бгпсЬуефе Энбн енйбЯп, рйп ерймЮкз
ущлЮнб, ейдйкЬ кбфбукехбумЭнп гйб бхфЮ фз чсЮуз.
Узмбнфйкь!
ЕЬн з уэндеуз рсбгмбфпрпйзиеЯ ме нЭет ущлзнюуейт Ю
ме ущлзнюуейт рпх ден Эчпхн чсзуймпрпйзиеЯ гйб
бскефь кбйсь, ухнйуфЬфбй нб фсЭоей кЬрпйб рпуьфзфб
неспэ гйб нб брпмбксхнипэн прпйбдЮрпфе хрплеЯммбфб
Эчпхн ухгкенфсщиеЯ уфпхт ущлЮнет.
Ухнбсмпльгзуз уе кйф вЬузт
ДйбуфЬуейт вЬузт:
¾шпт: 30 cm.
РлЬфпт: 60 cm.
ВЬипт: 60 cm.
З ухукехЮ мрпсеЯ нб фпрпиефзиеЯ уе чблэвдйнз вЬуз
ме ухсфЬсй гйб нб еЯнбй ехкпльфесп фп цьсфщмб кбй фп
оецьсфщмб фщн спэчщн.
Рбсбкблпэме сщфЮуфе фпн еопхуйпдпфзмЭнп
бнфйрсьущрп гйб фп кбфЬллзлп кйф вЬузт.
¸опдпт неспэ
З кбмрэлз фпх ущлЮнб еоьдпх мрпсеЯ нб фпрпиефзиеЯ
ме фсейт дйбцпсефйкпэт фсьрпхт:
Уфп чеЯлпт фпх нйрфЮсб, чсзуймпрпйюнфбт фпн
рлбуфйкь бгкюнб рпх рбсЭчефбй мбжЯ ме фп
рлхнфЮсйп. Уфзн ресЯрфщуз бхфЮ, вевбйщиеЯфе ьфй п
ущлЮнбт ден мрпсеЯ нб брбгкйуфсщиеЯ брь фп чеЯлпт
фпх нйрфЮсб, ьфбн фп рлхнфЮсйп бдейЬжей фп несь.
МрпсеЯфе нб фп уфесеюуефе дЭнпнфЬт фпн брь фз всэуз
Ю фпн фпЯчп.
Уе мйб дйбклЬдщуз фзт брпчЭфехузт фпх нйрфЮсб.
З дйбклЬдщуз рсЭрей нб всЯукефбй рЬнщ брь фп уйцьнй,
кбфЬ фЭфпйп фсьрп юуфе з кбмрэлз фпх ущлЮнб нб
всЯукефбй фпхлЬчйуфпн 60 cm рЬнщ брь фп рЬфщмб.
БрехиеЯбт уе Энбн бгщгь брпчЭфехузт уе эшпт
ьчй мйксьфесп брь 60 cm кбй ьчй мегблэфесп брь
90 cm.
Фп Ьксп фпх ущлЮнб еоьдпх рсЭрей рЬнфпфе нб
бесЯжефбй, дзл. з еущфесйкЮ дйЬмефспт фпх бгщгпэ иб
рсЭрей нб еЯнбй мегблэфесз брь фзн еощфесйкЮ дйЬмефсп
фпх ущлЮнб еоьдпх.
П ущлЮнбт еоьдпх ден рсЭрей нб еЯнбй фубкйумЭнпт.
Гйб фз ущуфЮ лейфпхсгЯб фпх мзчбнЮмбфпт, п
ущлЮнбт еоьдпх рсЭрей нб уфесеюнефбй уфп
рспвлерьменп гйб фп укпрь бхфь хрпуфЮсйгмб уфп
ерЬнщ мЭспт фзт рлЬфзт фзт ухукехЮт.
ЗлекфсйкЭт ухндЭуейт
Фп рлхнфЮсйп бхфь лейфпхсгеЯ ме мпнпцбуйкь сеэмб, ме
фЬуз 220-230 V кбй ухчньфзфб 50 Hz.
ЕлЭгофе еЬн з злекфсплпгйкЮ егкбфЬуфбуз уфп урЯфй
убт мрпсеЯ нб узкюуей фп мЭгйуфп брбйфпэменп цпсфЯп
(2,2 kW), лбмвЬнпнфбт хрьшз кбй фзн фбхфьчспнз
чсЮуз Ьллщн ухукехюн.
УхндЭуфе фп кблюдйп фспцпдпуЯбт фпх рлхнфзсЯпх
уе мйб рсЯжб ме геЯщуз.
П кбфбукехбуфЮт де цЭсей ехиэнз гйб влЬвет Ю
фсбхмбфйумпэт рпх пцеЯлпнфбй уфзн рбсЬвлешз
фщн рбсбрЬнщ рспцхлЬоещн учефйкЬ ме фзн
буцЬлейб.
Уе ресЯрфщуз рпх рсЭрей нб бнфйкбфбуфбиеЯ фп
кблюдйп фспцпдпуЯбт фзт ухукехЮт, з
бнфйкбфЬуфбуз рсЭрей нб гЯней брь фп КЭнфсп
УЭсвйт мбт.
Узмбнфйкь!
МефЬ фзн егкбфЬуфбуз фпх рлхнфзсЯпх рсЭрей нб
хрЬсчей еэкплз рсьувбуз уфп кблюдйп фспцпдпуЯбт.
58
Page 59

Фп нЭп убт рлхнфЮсйп спэчщн
Бхфь фп нЭп рлхнфЮсйп фзсеЯ ьлет фйт уэгчспнет рспдйбгсбцЭт гйб брпфелеумбфйкь рлэуймп ме лЯгп несь, енЭсгейб
кбй кбфбнЬлщуз брпссхрбнфйкпэ.
З ерйлпгЮ КБИХУФЕСЗУЗ ЕНБСОЗУ ерйфсЭрей нб кбихуфесЮуей з еккЯнзуз фпх рспгсЬммбфпт, ерйфсЭрпнфбт
Эфуй гйб рбсЬдейгмб нб екмефбллехфеЯфе фп цизньфесп фймпльгйп фпх нхкфесйнпэ сеэмбфпт.
Фп ейдйкь рсьгсбммб РЛХУЙМП УФП ЧЕСЙ ме фп нЭп уэуфзмб брблпэ рлхуЯмбфпт чейсЯжефбй фб ехбЯуизфб
спэчб убт ме еобйсефйкЮ цспнфЯдб.
Фп ейдйкь рсьгсбммб мЬллйнщн ме фп нЭп уэуфзмб брблпэ рлхуЯмбфпт чейсЯжефбй фб мЬллйнб спэчб убт ме
еобйсефйкЮ цспнфЯдб.
Ç бхфьмбфз шэоз фпх неспэ рлхуЯмбфпт брь фпхт 90° уфпхт 60°C рсйн фп Ьдейбумб рсплбмвЬней фзн бллпЯщуз
кбй рбсбмьсцщуз фщн рблйюн ущлзнюуещн брпчЭфехузт.
Фп уэуфзмб елЭгчпх йупссьрзузт еобуцблЯжей ьфй фп рлхнфЮсйп еЯнбй уфбиесь кбфЬ фп уфэшймп.
З вблвЯдб ECO ерйфсЭрей фзн плпклзсщфйкЮ чсЮуз брпссхрбнфйкпэ кбй фз меЯщуз фзт кбфбнЬлщузт неспэ
еопйкпнпмюнфбт енЭсгейб.
РесйгсбцЮ фзт ухукехЮт
ЕЛЛЗНЙКБ
1 УхсфЬсй брпссхрбнфйкпэ
2 РЯнбкбт чейсйуфзсЯщн
3 ЧейсплбвЮ рьсфбт
4 БнфлЯб бдейЬумбфпт
5 Схимйжьменб рпдбсЬкйб
УхсфЬсй брпссхрбнфйкпэ
Рсьрлхуз
1
2
90°
700
600
60°
E
500
40°
450
30°
40° AA
E
EWF 735
3
4
5
Рлэуз
Мблбкфйкь, кьллб
Лехкбнфйкь
Cl
C0115
59
Page 60

ЧсЮуз
РЯнбкбт чейсйуфзсЯщн
°
0
9
0
0
7
°
0
6
0
6
0
0
0
E
40° AA
E
5
°
0
4
°
3
0
0
4
5
EWF 735
123456
1 УхсфЬсй брпссхрбнфйкпэ кбй
рЯнбкбт рспгсбммЬфщн
¸нбт рЯнбкбт рспгсбммЬфщн уфб рпсфпгблйкЬ
рбсЭчефбй ме фп егчейсЯдйп пдзгйюн. ЕйуЬгефЭ фпн уфп
еущфесйкь фмЮмб фпх ухсфбсйпэ брпссхрбнфйкпэ.
2 Дйбкьрфзт ерйлпгЮт
рспгсЬммбфпт
П ерйлпгЭбт еЯнбй дйбйсемЭнпт уе 4 фмЮмбфб:
ВбмвбкесЬ
УхниефйкЬ
ЕхбЯуизфб , рлэуймп уфп чЭсй , мЬллйнб ,
мефбощфЬ , мйксь рсьгсбммб , оевгЬлмбфб ,
Ьдейбумб , уфэшймп кбй уфэшймп гйб ехбЯуизфб
O Ербнбссэимйуз рспгсЬммбфпт/OFF
E
40° AA
9
8
7
3 РлЮкфсп ИЕСМПКСБУЙБ
РйЭуфе бхфь фп рлЮкфсп ербнейлзммЭнб гйб нб бхозиеЯ Ю
нб мейщиеЯ з иесмпксбуЯб, еЬн ерйихмеЯфе нб рлхипэн фб
спэчб убт уе иесмпксбуЯб дйбцпсефйкЮ брь екеЯнз рпх
рспфеЯней фп рлхнфЮсйп. Иб бнЬшей з бнфЯуфпйчз лхчнЯб.
Пй мЭгйуфет иесмпксбуЯет еЯнбй 90°C гйб вбмвбкесЬ, 60°C
гйб ухниефйкЬ, 40°C гйб ехбЯуизфб, мЬллйнб кбй
гйб хцЬумбфб рпх рлЭнпнфбй уфп чЭсй (рсьгсбммб
РЛХУЙМП УФП ЧЕСЙ), 30°C гйб мефбощфЬ кбй .
ЕрйлЭгпнфбт фз иЭуз фп рлхнфЮсйп иб рлэней ме ксэп
несь. Гйб чсЮуз уе еобйсефйкЬ ехбЯуизфб спэчб, ьрщт
кпхсфЯнет.
4 РлЮкфсп ФБЧХФЗФБ
УФХШЙМБФПУ
РйЭуфе бхфь фп рлЮкфсп ербнейлзммЭнб гйб нб
бллЬоефе фзн фбчэфзфб фпх уфхшЯмбфпт, еЬн ерйихмеЯфе
нб уфхцфпэн фб спэчб убт ме фбчэфзфб дйбцпсефйкЮ
брь екеЯнз рпх рспфеЯней фп рлхнфЮсйп. Иб бнЬшей з
бнфЯуфпйчз лхчнЯб.
З мЭгйуфз фбчэфзфб еЯнбй 700 уфспцЭт/лерфь гйб ьлб
фб хцЬумбфб.
E
П ерйлпгЭбт мрпсеЯ нб гхсЯуей еЯфе деойьуфспцб еЯфе
бсйуфесьуфспцб.
Ç èÝóç
E/E бнфйуфпйчеЯ уфп рсьгсбммб
ЕОПЙКПНПМЗУЗУ ЕНЕСГЕЙБУ.
Уфп фЭлпт фпх рспгсЬммбфпт п ерйлпгЭбт рсЭрей нб
уфсбцеЯ уфз иЭуз O.
60
Page 61

ЧЩСЙУ УФХШЙМП : ме фзн ерйлпгЮ бхфЮ ьлет пй
цЬуейт фпх уфхшЯмбфпт кбфбуфЭллпнфбй. Гйб чсЮуз
уе еобйсефйкЬ ехбЯуизфб спэчб.
Фп рлхнфЮсйп иб екфелЭуей 3 ерйрлЭпн оевгЬлмбфб
уфб рспгсЬммбфб вбмвбкесюн кбй 1 ерйрлЭпн
оЭвгблмб уфп рсьгсбммб ухниефйкюн.
5 РлЮкфсб Ерйлпгюн
БнЬлпгб ме фп рсьгсбммб рпх Эчефе ерйлЭоей, мрпсеЯфе
нб ерйлЭоефе кбй дйЬцпсет лейфпхсгЯет. МрпсеЯфе нб
ерйлЭоефе мефбоэ фщн лейфпхсгйюн, бцпэ рсюфб
ерйлЭоефе фп рсьгсбммб рпх иЭлефе кбй рсйн рбфЮуефе
фп рлЮкфсп ЕНБСОЗУ/РБХУЗУ .
Рбфюнфбт бхфЬ фб рлЮкфсб, бнЬвпхн пй бнфЯуфпйчет
ендейкфйкЭт лхчнЯет. Рбфюнфбт фб Ьллз мйб цпсЬ, пй
бнфЯуфпйчет лхчнЯет увЮнпхн.
ЕЬн кЬнефе кЬрпйп лЬипт кбфЬ фзн ерйлпгЮ, пй
ендейкфйкЭт лхчнЯет бнбвпувЮнпхн гйб 2 дехфесьлерфб
ресЯрпх кбй емцбнЯжефбй з Эндейоз Err.
Рбфюнфбт фб рлЮкфсб бхфЬ мрпсеЯфе нб ерйлЭоефе фйт
рбсбкЬфщ дхнбфьфзфет:
РСПРЛХУЗ: ерйлЭофе бхфЮ фзн ерйлпгЮ еЬн
ерйихмеЯфе нб кЬнефе мйб рсьрлхуз рсйн брь фзн кэсйб
рлэуз (ден еЯнбй дйбиЭуймп гйб фб мЬллйнб кбй фп рлэуймп
уфп чЭсй, фп мйксь рсьгсбммб кбй фб мефбощфЬ).
З рсьрлхуз фелейюней ме Энб уэнфпмп уфэшймп уфйт 650
уфспцЭт/лерфь гйб фб вбмвбкесЬ кбй фб ухниефйкЬ, еню
уфб рспгсЬммбфб гйб ехбЯуизфб хцЬумбфб фп несь
брлют брпуфсбггЯжефбй.
УХНФПМЗ РЛХУЗ: з дхнбфьфзфб бхфЮ мрпсеЯ нб
ерйлегеЯ гйб лЯгп всюмйкб спэчб (ьчй гйб мЬллйнб,
рлэуймп уфп чЭсй, мйксь рсьгсбммб кбй мефбощфЬ)
рспкеймЭнпх нб рефэчефе Энб кбль рсьгсбммб рлэузт
уе уэнфпмп чсьнп. П чсьнпт рлэузт иб мейщиеЯ бнЬлпгб
ме фп еЯдпт фщн спэчщн кбй фз иесмпксбуЯб рпх Эчей
ерйлечиеЯ.
З уэнфпмз рлэуз
фп рсьгсбммб E , 40° AA, E .
ден мрпсеЯ нб чсзуймпрпйзиеЯ ме
ЕРЙРЛЕПН ОЕВГБЛМБ: З дхнбфьфзфб бхфЮ
мрпсеЯ нб ерйлегеЯ ме ьлб фб рспгсЬммбфб екфьт брь
фб рспгсЬммбфб гйб мЬллйнб, мйксь рсьгсбммб кбй
рлхуЯмбфпт уфп чЭсй. З мзчбнЮ иб екфелЭуей 2
рсьуиефб оевгЬлмбфб.
Гйб чсЮуз уе ресйпчЭт ьрпх фп несь еЯнбй рплэ мблбкь
Ю гйб фпхт бллесгйкпэт уфб брпссхрбнфйкЬ Ю гйб Ьфпмб
ме рплэ ехбЯуизфз ерйдесмЯдб.
6 РлЮкфсп КБИХУФЕСЗУЗ
ЕККЙНЗУЗУ
Фп рсьгсбммб рлэузт мрпсеЯ нб кбихуфесЮуей кбфЬ
30 лерфЬ - 60 лерфЬ - 90 лерфЬ, 2 юсет кбй уфз
ухнЭчейб кбфЬ 1 юсб мЭчсй фп мЭгйуфп фщн 23 ме фп
рлЮкфсп бхфь.
ЕрйлпгЮ фзт кбихуфесзмЭнзт еккЯнзузт
ЕрйлЭофе фп рсьгсбммб кбй фйт брбйфпэменет
ерйлпгЭт.
ЕрйлЭофе фзн кбихуфесзмЭнз еккЯнзуз.
РбфЮуфе фп рлЮкфсп ЕНБСОЗУ/РБХУЗУ : ôï
рлхнфЮсйп оекйнЬ фзн бнфЯуфспцз мЭфсзуз фщн щсюн.
Фп рлхнфЮсйп иб оекйнЮуей мьлйт рбсЭлией з ерйлегмЭнз
кбихуфЭсзуз.
БллбгЮ фзт кбихуфесзмЭнзт еккЯнзузт
РбфЮуфе фп рлЮкфсп ЕНБСОЗУ/РБХУЗУ .
РбфЮуфе фп рлЮкфсп КБИХУФЕСЗУЗ ЕККЙНЗУЗУ
мЭчсй нб емцбнйуфеЯ
РбфЮуфе обнЬ фп рлЮкфсп ЕНБСОЗУ/РБХУЗУ .
0’.
7 ПИПНЗ
З пиьнз емцбнЯжей фйт рбсбкЬфщ рлзспцпсЯет:
ДйЬскейб фпх рспгсЬммбфпт - КбихуфЭсзуз
еккЯнзузт - ЛбнибумЭнз ерйлпгЮ - Кщдйкьт
уцЬлмбфпт - ФЭлпт рспгсЬммбфпт.
ЕЛЛЗНЙКБ
БКХСЩУЗ ОЕВГБЛМБФПУ: ерйлЭгпнфбт бхфЮ фз
дхнбфьфзфб, фп несь брь фп фелехфбЯп оЭвгблмб
рбсбмЭней мЭуб Эфуй юуфе нб мз жбсюупхн фб
хцЬумбфб. ¼фбн фп рсьгсбммб плпклзсщиеЯ, з
ендейкфйкЮ лхчнЯб фпх рлЮкфспх ЕНБСОЗУ/РБХУЗУ
увЮней, з лхчнЯб, з лхчнЯб еЯнбй бнбммЭнет
кбй з рьсфб еЯнбй мрлпкбсйумЭнз гйб нб хрпдеЯоей ьфй фп
несь рсЭрей нб бдейЬуей.
Гйб фп Ьдейбумб фпх неспэ хрЬсчпхн 2 дхнбфьфзфет:
ЕрйлЭофе фп рсьгсбммб
Фп несь бдейЬжей чщсЯт уфэшймп.
ЕрйлЭофе фп рсьгсбммб
фбчэфзфб уфхшЯмбфпт мЭущ фпх учефйкпэ дйбкьрфз
кбй уфз ухнЭчейб рбфЮуфе фп рлЮкфсп
ЕНБСОЗУ/РБХУЗУ . Фп несь бдейЬжей кбй фб
спэчб уфэвпнфбй ме фзн ерйлегмЭнз фбчэфзфб
уфхшЯмбфпт
РспупчЮ! Рсйн ерйлЭоефе фп рсьгсбммб
кбй
феиеЯ уфз иЭуз
п дйбкьрфзт ерйлпгЮт рсЭрей нб
«O»
(бкэсщуз).
(Ьдейбумб):
Þ . ЕрйлЭофе фзн
,
ДйЬскейб ерйлегмЭнпх рспгсЬммбфпт
МефЬ фзн ерйлпгЮ еньт рспгсЬммбфпт, з дйЬскейб
емцбнЯжефбй уе юсет кбй лерфЬ (гйб рбсЬдейгмб 2.05).
З дйЬскейб хрплпгЯжефбй бхфьмбфб ме вЬуз фп мЭгйуфп
ухнйуфюменп цпсфЯп гйб кЬие фэрп хцЬумбфпт.
МефЬ фзн еккЯнзуз фпх рспгсЬммбфпт, п хрплейрьменпт
чсьнпт ензмесюнефбй кЬие лерфь.
61
Page 62

КбихуфЭсзуз еккЯнзузт
ФЭлпт рспгсЬммбфпт
З ерйлегмЭнз кбихуфЭсзуз (мЭгйуфп 23 юсет) рпх
схимЯжефбй мЭущ фпх учефйкпэ рлЮкфспх емцбнЯжефбй
уфзн пиьнз гйб 3 дехфесьлерфб, уфз ухнЭчейб
емцбнЯжефбй з дйЬскейб фпх рспзгпэменб ерйлегмЭнпх
рспгсЬммбфпт.
З бнфЯуфспцз мЭфсзуз ензмесюнефбй кЬие юсб кбй
ьфбн брпмЭнпхн пй фелехфбЯет 2 юсет кЬие 30 лерфЬ.
ЛбнибумЭнз ерйлпгЮ
ЕЬн мйб ерйлпгЮ ден еЯнбй ухмвбфЮ ме фп схимйумЭнп
рсьгсбммб рлэузт, емцбнЯжефбй з Эндейоз Err ãéá 2
дехфесьлерфб.
¼фбн фп рсьгсбммб фелейюуей емцбнЯжефбй Энб мздЭн
рпх бнбвпувЮней.
8 РлЮкфсп ЕНБСОЗУ/РБХУЗУ
КщдйкпЯ уцЬлмбфпт
Уе ресЯрфщуз влЬвзт, емцбнЯжпнфбй кЬрпйпй кщдйкпЯ
влЬвзт, гйб рбсЬдейгмб Е20 (деЯфе фзн рбсЬгсбцп
ДхулейфпхсгЯет).
Фп рлЮкфсп бхфь дйбиЭфей дэп лейфпхсгЯет: ¸нбсоз Рбэуз.
¸нбсоз:
МефЬ фзн ерйлпгЮ фпх ерйихмзфпэ рспгсЬммбфпт,
рбфЮуфе бхфь фп рлЮкфсп гйб нб оекйнЮуей фп
рлхнфЮсйп, з бнфЯуфпйчз ендейкфйкЮ лхчнЯб иб
уфбмбфЮуей нб бнбвпувЮней.
ЕЬн Эчефе ерйлЭоей фзн кбихуфесзмЭнз еккЯнзуз, фп
рлхнфЮсйп оекйнЬ фзн бнфЯуфспцз мЭфсзуз. З дйЬскейб
фпх рспгсЬммбфпт Ю фзт кбихуфЭсзузт емцбнЯжефбй
уфзн пиьнз.
Рбэуз
Гйб нб дйбкьшефе фп рсьгсбммб рпх екфелеЯфбй, рйЭуфе
фп рлЮкфсп ¸нбсозт/Рбэузт: з бнфЯуфпйчз ендейкфйкЮ
лхчнЯб бсчЯжей нб бнбвпувЮней.
Гйб фзн ербнеккЯнзуз фпх рспгсЬммбфпт брь фп узмеЯп
уфп прпЯп дйбкьрзке, рбфЮуфе обнЬ фп рлЮкфсп
ЕНБСОЗУ/РБХУЗУ .
62
Page 63

9 Пиьнз спЮт рспгсЬммбфпт
¼фбн ерйлЭгефе фп рсьгсбммб рлэузт рпх ерйихмеЯфе,
пй ендейкфйкЭт лхчнЯет рпх бнфйуфпйчпэн уфйт дйЬцпсет
цЬуейт бнЬвпхн.
Бцпэ фп рлхнфЮсйп оекйнЮуей, мьнп з лхчнЯб фзт
фсЭчпхубт цЬузт рбсбмЭней бнбммЭнз.
PREWASH
WASH
RINSES
DRAIN
END
Уфп фЭлпт фпх рспгсЬммбфпт з ендейкфйкЮ лхчнЯб
бнЬвей.
З ендейкфйкЮ лхчнЯб бнбвпувЮней уе ресЯрфщуз
влЬвзт кбй емцбнЯжефбй уфзн пиьнз п бнфЯуфпйчпт
кщдйкьт уцЬлмбфпт:
- E40 = з рьсфб ден Эчей клеЯуей
- E20 = фп рлхнфЮсйп ден бдейЬжей
- E10 = фп рлхнфЮсйп де гемЯжей
Гйб нб лэуефе фп рсьвлзмб, деЯфе фзн рбсЬгсбцп
ДхулейфпхсгЯет.
РлзспцпсЯет рспгсбммЬфщн
ОевгЬлмбфб
Ме фп рсьгсбммб бхфь еЯнбй дхнбфь нб чсзуймпрпйзиеЯ
гйб оЭвгблмб кбй уфэшймп вбмвбкесюн спэчщн рпх
рлэизкбн уфп чЭсй.
Фп рлхнфЮсйп рсбгмбфпрпйеЯ 3 оевгЬлмбфб, кбй уфз
ухнЭчейб Энб фелйкь уфэшймп уфз мЭгйуфз фбчэфзфб.
З фбчэфзфб уфхшЯмбфпт мрпсеЯ нб мейщиеЯ рйЭжпнфбт фп
рлЮкфсп . Фп фелйкь оЭвгблмб рспвлЭрефбй мьнп гйб
фб вбмвбкесЬ спэчб ьрщт уфп рсьгсбммб уфхшЯмбфпт.
¢дейбумб
Гйб Ьдейбумб фпх неспэ фпх фелехфбЯпх оевгЬлмбфпт фщн
рспгсбммЬфщн ме фзн ерйлпгЮ бкэсщузт оевгЬлмбфпт .
ГхсЯуфе рсюфб фп дйбкьрфз ерйлпгЮт рспгсЬммбфпт уфз
иЭуз O, уфз ухнЭчейб ерйлЭофе рсьгсбммб кбй рйЭуфе
фп рлЮкфсп ЕНБСОЗУ/РБХУЗУ
Уфэшймп
Оечщсйуфь мегЬлп уфэшймп уфз мЭгйуфз фбчэфзфб гйб
спэчб рлхмЭнб уфп чЭсй. РсЭрей нб чсзуймпрпйзиеЯ уе
вбмвбкесЬ спэчб. МрпсеЯфе нб мейюуефе фзн фбчэфзфб ме
фп рлЮкфсп гйб нб рспубсмпуфеЯ уфб хцЬумбфб рпх иб
уфхцфпэн.
ЕЛЛЗНЙКБ
Уфэшймп гйб ехбЯуизфб
Оечщсйуфь уэнфпмп уфэшймп уе 700 уфспцЭт/лерфь гйб
спэчб рлхмЭнб уфп чЭсй. РсЭрей нб чсзуймпрпйзиеЯ уе
ухниефйкЬ, мЬллйнб/рлэуймп уфп чЭсй, мефбощфЬ спэчб.
МрпсеЯфе нб мейюуефе фзн фбчэфзфб ме фп рлЮкфсп гйб
нб рспубсмпуфеЯ уфб хцЬумбфб рпх иб уфхцфпэн.
Мйксь рсьгсбммб
Бхфь еЯнбй Энб рлЮсет рсьгсбммб фп прпЯп мрпсеЯ нб
ухндхбуфеЯ ме фйт рбсбкЬфщ ерйлпгЭт: меЯщуз
фбчэфзфбт уфхшЯмбфпт, чщсЯт уфэшймп, бкэсщуз
оевгЬлмбфпт кбй кбихуфесзмЭнз еккЯнзуз.
Гйб чсЮуз ме лЯгп всюмйкб вбмвбкесЬ Ю спэчб рпх
чсейЬжпнфбй цсеукЬсйумб.
МЭгйуфп цпсфЯп 2,5 kg.
ИесмпксбуЯб рлхуЯмбфпт 30°C
ДйЬскейб рспгсЬммбфпт 30 лерфЬ
Фбчэфзфб фелйкпэ уфхшЯмбфпт 700 уфс/лер.
O = Бкэсщуз/OFF
Гйб ербнбссэимйуз рспгсЬммбфпт кбй гйб
бренесгпрпЯзуз фпх рлхнфзсЯпх гхсЯуфе фп дйбкьрфз
ерйлпгЮт уфп O. Фюсб мрпсеЯфе нб ерйлЭоефе нЭп
рсьгсбммб.
63
Page 64

УхмвпхлЭт гйб фп
рлэуймп
ЧщсЯжпнфбт фб спэчб
БкплпхиеЯфе фб уэмвплб рпх хрЬсчпхн уфйт ефйкЭфет
фщн спэчщн кбй фйт пдзгЯет рлэузт рпх рбсЭчпнфбй
брь фпн кбфбукехбуфЮ.
ЧщсЯжефе фб спэчб ме фпн еоЮт фсьрп:
лехкЬ, чсщмбфйуфЬ, ухниефйкЬ, ехбЯуизфб, мЬллйнб.
ИесмпксбуЯб
90° гйб цхуйплпгйкЬ лесщмЭнб лехкЬ вбмвбкесЬ
кбй лйнЬ (р.ч. оеукпньрбнб, рефуЭфет,
фсбрежпмЬнфйлб, уенфьнйб)
60° гйб цхуйплпгйкЬ лесщмЭнб, чсщмбфйуфЬ рпх
ден оевЬцпхн (р.ч. рпхкЬмйуб, нхчфйкЬ,
рйфжЬмет) ме лйнЭт, вбмвбкесЭт Ю
ухниефйкЭт Янет кбй гйб елбцсют лесщмЭнб
лехкЬ вбмвбкесЬ (р.ч. еуюспхчб).
(êñýï)гйб ехбЯуизфб хцЬумбфб (р.ч. кпхсфЯнет),
бнЬмейкфб спэчб
30°-40°ме ухниефйкЭт Янет кбй мЬллйнб ме фзн
ефйкЭфб гнЮуйп нЭп мбллЯ, рлЭнефе уфп
рлхнфЮсйп, де мбжеэей.
Рсйн вЬлефе фб спэчб уфп
рлхнфЮсйп
РпфЭ мзн рлЭнефе лехкЬ кбй чсщмбфйуфЬ мбжЯ. Фб лехкЬ
спэчб мрпсеЯ ме фп рлэуймп нб гбсйЬупхн.
Фб кбйнпэсгйб чсщмбфйуфЬ мрпсеЯ уфп рсюфп рлэуймп
нб оевЬшпхн. Убт ухмвпхлеэпхме нб фб рлэнефе
оечщсйуфЬ фзн рсюфз цпсЬ.
ВевбйщиеЯфе ьфй ден хрЬсчпхн уфб спэчб
мефбллйкЬ бнфйкеЯменб (р.ч. фуймрйдЬкйб гйб фб
мбллйЬ, рбсбмЬнет, кбсцЯфует).
Кпхмрюнефе фйт мбойлбспиЮкет, фб цесмпхЬс, фйт
кьрйфует кбй фб кпхмрйЬ. ДЭнефе фйт жюнет Ю фйт
мбксйЭт кпсдЭлет.
БцбйсеЯфе фпхт ерЯмпнпхт лекЭдет рсйн фп рлэуймп.
ФсЯшфе фб рплэ лесщмЭнб узмеЯб ме ейдйкь
брпссхрбнфйкь Ю брпссхрбнфйкь уе мпсцЮ рЬуфбт.
ЙдйбЯфесб рспуекфйкпЯ рсЭрей нб еЯуфе ме фйт кпхсфЯнет.
ВгЬлефе фб гбнфжЬкйб брь фйт кпхсфЯнет Ю фпрпиефЮуфе
фйт уе Энб уЬкп Ю дЯчфх.
МЭгйуфп цпсфЯп спэчщн
Пй пдзгЯет учефйкЬ ме фп цпсфЯп фщн спэчщн всЯукпнфбй
уфпхт рЯнбкет фщн рспгсбммЬфщн.
ГенйкпЯ кбньнет:
ВбмвбкесЬ, лйнЬ: гемЯуфе фпн кЬдп, бллЬ мзн фпн
хресцпсфюуефе.
УхниефйкЬ: мз гемЯжефе ресйууьфесп брь мйуь кЬдп.
ЕхбЯуизфб кбй мЬллйнб хцЬумбфб: мз гемЯжефе
ресйууьфесп брь фп Энб фсЯфп фпх кЬдпх.
Фп мЭгйуфп цпсфЯп спэчщн еобуцблЯжей фзн рлЭпн
брпдпфйкЮ чсЮуз неспэ кбй енЭсгейбт.
ЕЬн фб спэчб еЯнбй рплэ лесщмЭнб, мейюуфе фп цпсфЯп.
ВЬспт спэчщн ьфбн еЯнбй уфегнЬ
Пй бкьлпхиет фймЭт еЯнбй ендейкфйкЭт:
мрпхснпэжй 1200 g
рефуЭфб цбгзфпэ 100 g
рбрлщмбфпиЮкз 700 g
уенфьнй 500 g
мбойлбспиЮкз 200 g
фсбрежпмЬнфйлп 250 g
рефуЭфб 200 g
оеукпньрбнп 100 g
нхчфйкь 200 g
гхнбйкеЯп улйр 100 g
бндсйкЮ мрлпэжб есгбуЯбт 600 g
бндсйкь рпхкЬмйуп 200 g
бндсйкЮ рйфжЬмб 500 g
мрлпэжб 100 g
бндсйкь еуюспхчп 100 g
БцбЯсеуз фщн лекЭдщн
Пй ерЯмпнпй лекЭдет Яущт ден бцбйсеипэн ме укЭфп несь
кбй брпссхрбнфйкь. Убт ухмвпхлеэпхме нб фпхт
бцбйсЭуефе рсйн фзн рлэуз.
Áßìá: ьфбн п лекЭт еЯнбй бкьмб нщрьт мрпсеЯфе нб фпн
рлэнефе ме ксэп несь. ЕЬн Эчей уфегнюуей, бцЮуфе фп
спэчп нб мпхлйЬуей уе ейдйкь брпссхрбнфйкь гйб ьлз фз
нэчфб кбй уфз ухнЭчейб фсЯшфе фп ме несь кбй убрпэнй.
ЛбдпмрпгйЬ: рпфЯуфе фп лекЭ ме венжЯнз, брлюуфе фп
спэчп ерЬнщ уе Энб мблбкь рбнЯ кбй фсЯшфе фп лекЭ
бскефЭт цпсЭт.
УфегнпЯ лекЭдет брь лЯрпт: рпфЯуфе ме нЭцфй,
брлюуфе фп спэчп ерЬнщ уе мйб мблбкЮ ерйцЬнейб кбй
фсЯшфе фп лекЭ ме фйт Ьксет фщн дбчфэлщн кбй Энб
вбмвбкесь рбнЯ.
УкпхсйЬ: чсзуймпрпйЮуфе поблйкь поэ дйблхмЭнп уе
жеуфь несь гйб чсЮуз ен иесмю Ю кЬрпйп бнфйукщсйбкь
рспъьн гйб чсЮуз ен шхчсю. Нб еЯуфе рспуекфйкпЯ ме
фпхт уфегнпэт лекЭдет брь укпхсйЬ, кбиют з
кхффбсЯнз Эчей Юдз дйбвсщиеЯ кбй фп эцбумб мрпсеЯ нб
фсхрЮуей.
ЛекЭдет брь мпэчлб: рлэнефе ме лехкбнфйкь кбй
оерлэнефе кблЬ (мьнп гйб фб лехкЬ кбй фб чсщмбфйуфЬ
рпх еЯнбй бниекфйкЬ уфп члюсйп).
Чьсфп: убрпхнЯуфе елбцсЬ кбй рлэнефе ме лехкбнфйкь
(мьнп гйб фб лехкЬ кбй фб чсщмбфйуфЬ рпх еЯнбй
бниекфйкЬ уфп члюсйп).
МелЬнй брь уфхль кбй кьллб: рпфЯуфе ме буефьн (*),
брлюуфе фп спэчп рЬнщ уе Энб мблбкь рбнЯ кбй фсЯшфе
фп лекЭ.
Ксбгйьн: рпфЯуфе ме буефьн, ьрщт уфзн рспзгпэменз
ресЯрфщуз, кбй уфз ухнЭчейб кбибсЯуфе фп лекЭ ме
пйньрнехмб. Уфб лехкЬ чсзуймпрпйЮуфе лехкбнфйкь гйб
фзн бцбЯсеуз фщн хрплейммЬфщн.
Кьккйнп ксбуЯ: бцЮуфе фп спэчп нб мпхлйЬуей уе несь
кбй брпссхрбнфйкь, оерлэнефе ме пойкь Ю кйфсйкь поэ
(оЯдй Ю лемьнй) кбй уфз ухнЭчейб оерлэнефе. Гйб фб
хрплеЯммбфб, чсзуймпрпйЮуфе лехкбнфйкь.
64
Page 65

МелЬнй: бнЬлпгб ме фз уэуфбуз фпх мелбнйпэ, рпфЯуфе
фп эцбумб бсчйкЬ ме буефьн (*) кбй уфз ухнЭчейб ме
пойкь поэ (оЯдй). Гйб нб бцбйсЭуефе фб хрплеЯммбфб брь
фб лехкЬ, чсзуймпрпйЮуфе лехкбнфйкь кбй уфз ухнЭчейб
оерлэнефе кблЬ.
ЛекЭдет брь рЯууб: чсзуймпрпйЮуфе рсюфб ейдйкь
рспъьн гйб фзн бцбЯсеуз лекЭдщн, пйньрнехмб Ю
венжЯнз, кбй уфз ухнЭчейб рлэнефе ме брпссхрбнфйкь уе
мпсцЮ рЬуфбт.
(*) Мз чсзуймпрпйЮуефе буефьн уе сегйьн.
БрпссхрбнфйкЬ кбй рспуиефйкЬ
Фп брпфЭлеумб фзт рлэузт еобсфЬфбй ерЯузт брь фзн
ерйлпгЮ фпх брпссхрбнфйкпэ кбй фз ущуфЮ дпуплпгЯб
гйб фзн брпцхгЮ фзт урбфЬлзт кбй гйб фзн рспуфбуЯб
фпх ресйвЬллпнфпт. Рбсьлп рпх еЯнбй вйпдйбурюменб,
фб брпссхрбнфйкЬ ресйЭчпхн пхуЯет пй прпЯет, уе
мегЬлет рпуьфзфет, ендЭчефбй нб дйбфбсЬопхн фзн
еэисбхуфз пйкплпгйкЮ йупсспрЯб фзт цэузт.
З ерйлпгЮ брпссхрбнфйкпэ еобсфЬфбй брь фпн фэрп фщн
хцбумЬфщн (ехбЯуизфб, мЬллйнб, вбмвбкесЬ к.ф.л.), фп
чсюмб, фз иесмпксбуЯб рлэузт кбй фп кбфЬ рьуп
лесщмЭнб еЯнбй фб спэчб.
Уфп ухгкексймЭнп рлхнфЮсйп мрпсеЯфе нб
чсзуймпрпйЮуефе ьлб фб брпссхрбнфйкЬ рпх дйбфЯиенфбй
уфп емрьсйп:
БрпссхрбнфйкЬ уе укьнз гйб кЬие фэрп хцЬумбфпт.
БрпссхрбнфйкЬ уе укьнз гйб ехбЯуизфб
(мЭг. иесмпксбуЯб 60°C) кбй мЬллйнб.
БрпссхрбнфйкЬ уе хгсЮ мпсцЮ, кбфЬ рспфЯмзуз гйб
рспгсЬммбфб рлэузт уе чбмзлЮ иесмпксбуЯб
(мЭг. иесмпксбуЯб 60°C) гйб кЬие фэрп хцЬумбфпт Ю
мьнп гйб фб мЬллйнб.
To брпссхрбнфйкь кбй прпйбдЮрпфе рспуиефйкЬ рсЭрей
нб фпрпиефпэнфбй уфйт бнфЯуфпйчет иЮкет уфп ухсфЬсй
брпссхрбнфйкпэ рсйн фзн Энбсоз фпх рспгсЬммбфпт
рлэузт.
ЕЬн чсзуймпрпйеЯфе брпссхрбнфйкь уе укьнз Ю хгсЮ
мпсцЮ, рсЭрей нб ерйлЭоефе рсьгсбммб чщсЯт
рсьрлхуз.
Фп рлхнфЮсйп ресйлбмвЬней Энб уэуфзмб бнбкэклщузт
фп прпЯп ерйфсЭрей фз вЭлфйуфз чсЮуз фпх
ухмрхкнщмЭнпх брпссхрбнфйкпэ.
ВЬлфе фп хгсь брпссхрбнфйкь уфз иЮкз ме фп уэмвплп
бмЭущт рсйн фзн еккЯнзуз фпх рспгсЬммбфпт.
Фб рспуиефйкЬ хгсЬ мблбкфйкЬ рспъьнфб Ю рспъьнфб
кпллбсЯумбфпт рсЭрей нб фпрпиефпэнфбй уфз иЮкз ме фп
уэмвплп
Фп лехкбнфйкь (члщсЯнз) мрпсеЯ нб чсзуймпрпйзиеЯ мьнп
уе лехкЬ Ю уе вбмвбкесЬ рпх ден оевЬцпхн кбй лйнЬ
спэчб.
РсЭрей нб фпрпиефеЯфбй уфз иЮкз ме фп уэмвплп
¼упн бцпсЬ уфз дпуплпгЯб фщн рспуиефйкюн,
бкплпхиЮуфе фйт пдзгЯет фпх кбфбукехбуфЮ кбй ìçí
хресвбЯнефе фп ьсйп фзт иЮкзт ме фзн Эндейоз
МБЧ.
рсйн фзн еккЯнзуз фпх рспгсЬммбфпт.
.
З уклзсьфзфб фпх неспэ дйбксЯнефбй уе вбимпэт.
РлзспцпсЯет учефйкЬ ме фз уклзсьфзфб фпх неспэ уфзн
ресйпчЮ убт мрпсеЯфе нб рЬсефе брь фзн бсмьдйб
ефбйсЯб эдсехузт Ю фзн фпрйкЮ бхфпдйпЯкзуз.
¼упн бцпсЬ уфз дпуплпгЯб, бкплпхиЮуфе фйт пдзгЯет
фпх кбфбукехбуфЮ.
ЧсзуймпрпйеЯфе мйксьфесз рпуьфзфб брпссхрбнфйкпэ,
еЬн:
Фб спэчб рпх иб рлэнефе еЯнбй лЯгб.
Фб спэчб ден еЯнбй рплэ лесщмЭнб.
ЕЬн дзмйпхсгеЯфбй мегЬлз рпуьфзфб бцспэ кбфЬ фз
дйЬскейб фпх рлхуЯмбфпт.
ВбимпЯ уклзсьфзфбт фпх неспэ
ВбимпЯ
ЕрЯредп ЧбсбкфзсйуфйкЬ
1
2
3
4
брбль
мЭфсйп
уклзсь
рплэ уклзсь
ГесмбнйкЮ
клЯмбкб
°dH
0- 7
8-14
15-21
Üíù ôùí 21
ГбллйкЮ
клЯмбкб
°T.H.
0-15
16-25
26-37
Üíù ôùí 37
ЕЛЛЗНЙКБ
З рпуьфзфб брпссхрбнфйкпэ рпх
рсЭрей нб чсзуймпрпйеЯфбй
Фп еЯдпт кбй з рпуьфзфб фпх брпссхрбнфйкпэ еобсфЬфбй
брь фпн фэрп фщн хцбумЬфщн, фпн ьгкп фщн спэчщн,
фп рьуп лесщмЭнб еЯнбй фб спэчб кбй фз уклзсьфзфб
фпх неспэ.
65
Page 66

66
Page 67

ДйбдпчЮ енесгейюн
C0117
C0116
P0004
Рсйн вЬлефе спэчб уфп рлхнфЮсйп гйб рсюфз цпсЬ
ухнйуфпэме нб екфелЭуефе Энб кэклп гйб вбмвбкесЬ
уфпхт 90°C, чщсЯт спэчб уфп рлхнфЮсйп, юуфе нб
бцбйсеипэн фб фхчьн кбфбукехбуфйкЬ хрплеЯммбфб брь
фпн кЬдп.
СЯофе мйуЮ межпэсб брпссхрбнфйкь уфз иЮкз кэсйбт
рлэузт кбй оекйнЮуфе фп рлхнфЮсйп.
1. Цпсфюуфе фб спэчб
БнпЯофе фзн рьсфб.
ФпрпиефЮуфе фб спэчб уфпн кЬдп, Энб спэчп фз цпсЬ,
фйнЬжпнфЬт фб ьуп рйп рплэ мрпсеЯфе.
КлеЯуфе фзн рьсфб.
4. ЕнесгпрпйЮуфе фп рлхнфЮсйп
ГхсЯуфе фп дйбкьрфз ерйлпгЮт уфп ерйихмзфь рсьгсбммб
гйб нб енесгпрпйзиеЯ фп рлхнфЮсйп.
Гйб нб бренесгпрпйзиеЯ з ухукехЮ ресйуфсЭшфе фп уфп
«O».
5. ЕрйлЭофе фп ерйихмзфь
рсьгсбммб
ГхсЯуфе фп дйбкьрфз ерйлпгЮт уфзн ерйихмзфЮ иЭуз: пй
лхчнЯет рпх бнфйуфпйчпэн уфйт дйЬцпсет цЬуейт фпх
ерйихмзфпэ рспгсЬммбфпт бнЬвпхн.
PREWASH
ЕЛЛЗНЙКБ
2.МефсЮуфе фп брпссхрбнфйкь
ФсбвЮофе рспт фб Эощ фп ухсфЬсй фпх брпссхрбнфйкпэ
мЭчсй нб уфбмбфЮуей. МефсЮуфе фз ухнйуфюменз брь
фпн кбфбукехбуфЮ рпуьфзфб брпссхрбнфйкпэ ме Энб
вбимпнпмзмЭнп кэреллп кбй сЯофе фз мЭуб уфз иЮкз
кхсЯщт рлэузт
.
ЕЬн ерйихмеЯфе нб екфелЭуефе Энб рсьгсбммб ме
рсьрлхуз, сЯофе брпссхрбнфйкь мЭуб уфзн кбфЬллзлз
иЮкз ме фп уэмвплп .
3.МефсЮуфе фб рспуиефйкЬ
ЕЬн чсейбуфеЯ, сЯофе мблбкфйкь мЭуб уфз иЮкз ме фп
уэмвплп , кбй лехкбнфйкь уфз иЮкз ме фп уэмвплп
, чщсЯт нб хресвбЯней фп ьсйп MAX.
WASH
RINSES
DRAIN
END
З дйЬскейб фпх рспгсЬммбфпт емцбнЯжефбй уфзн пиьнз.
6. ЕрйлЭофе фз иесмпксбуЯб
РйЭуфе фп рлЮкфсп иесмпксбуЯбт еЬн иЭлефе нб
ерйлЭоефе мйб фймЮ иесмпксбуЯбт дйбцпсефйкЮ брь
екеЯнз рпх рспфеЯней фп рлхнфЮсйп. Иб бнЬшей з
бнфЯуфпйчз лхчнЯб.
90
°
60
°
40
°
30
°
67
Page 68

7.ЕрйлЭофе фзн фбчэфзфб
уфхшЯмбфпт Ю фзн ерйлпгЮ
ЧЩСЙУ УФХШЙМП
РйЭуфе ербнейлзммЭнб фп рлЮкфсп ФБЧХФЗФБ
УФХШЙМБФПУ, гйб нб ерйлЭофе фзн ерйихмзфЮ фбчэфзфб
уфхшЯмбфпт Ю фзн ерйлпгЮ ЧщсЯт уфэшймп
з бнфЯуфпйчз лхчнЯб.
. Иб бнЬшей
КбфЬ фзн ресЯпдп бхфЮ еЯнбй дхнбфь нб цпсфюуефе кбй
Ьллб спэчб:
рбфЮуфе фп рлЮкфсп ЕНБСОЗУ/РБХУЗУ
бнпЯофе фзн рьсфб,
цпсфюуфе фб спэчб,
клеЯуфе фзн рьсфб кбй рбфЮуфе обнЬ фп рлЮкфсп
ЕНБСОЗУ/РБХУЗУ .
,
700
600
500
450
8. РсбгмбфпрпйЮуфе фйт ерйлпгЭт
óáò
З лхчнЯб рпх бнфйуфпйчеЯ уфп рбфзмЭнп рлЮкфсп бнЬвей.
ЕЬн ерйлЭоефе фзн Бкэсщуз оевгЬлмбфпт , фп
рлхнфЮсйп иб уфбмбфЮуей уфп фЭлпт фпх рспгсЬммбфпт
ме фп несь бкьмз уфпн кЬдп.
9. ЕрйлЭофе фзн КБИХУФЕСЗУЗ
ЕККЙНЗУЗУ
10. ОекйнЮуфе фп рсьгсбммб
РбфЮуфе фп рлЮкфсп ЕНБСОЗУ/РБХУЗУ .
З бнфЯуфпйчз лхчнЯб уфбмбфЬ нб бнбвпувЮней кбй
рбсбмЭней бнбммЭнз мьнп з лхчнЯб рпх бнфйуфпйчеЯ
уфзн фсЭчпхуб цЬуз.
ЕЬн Эчефе ерйлЭоей фзн кбихуфесзмЭнз еккЯнзуз, фп
рлхнфЮсйп оекйнЬ фзн бнфЯуфспцз мЭфсзуз.
З дйЬскейб фпх рспгсЬммбфпт Ю фзт кбихуфЭсзузт
емцбнЯжефбй уфзн пиьнз.
11. БллбгЮ ерйлпгЮт Ю
рспгсЬммбфпт кбфЬ фпн кэклп
фпх
Рсйн кЬнефе прпйбдЮрпфе бллбгЮ, рсЭрей нб
уфбмбфЮуефе фп рлхнфЮсйп рбфюнфбт фп рлЮкфсп
ENAСОЗУ/РБХУЗУ .
ЕЯнбй дхнбфь нб бллЬоефе фз иесмпксбуЯб Ю
прпйбдЮрпфе цЬуз рсйн екфелеуфеЯ брь фп рсьгсбммб.
З бллбгЮ еньт Юдз екфелпэменпх рспгсЬммбфпт еЯнбй
дхнбфЮ мьнп ме фзн бкэсщуЮ фпх кбй фзн ерйлпгЮ еньт
нЭпх рспгсЬммбфпт.
Фп рлхнфЮсйп иб оекйнЮуей фпн кэклп áðü ôçí áñ÷Þ кбй
фп несь уфпн кЬдп де иб бдейЬуей.
ЕЬн чсейЬжефбй нб бдейЬуей фп несь гйб нб бллЬоей фп
рсьгсбммб рпх еЯнбй уе еоЭлйоз, рспчщсЮуфе щт еоЮт:
гхсЯуфе фп дйбкьрфз ерйлпгЮт рспгсЬммбфпт уфз иЭуз
«O»,
Гйб нб кбихуфесЮуей з еккЯнзуз фпх рспгсЬммбфпт,
рйЭуфе фп рлЮкфсп КБИХУФЕСЗУЗ еккЯнзузт.
Пй бсйимпЯ рпх бнфйуфпйчпэн уфзн ерйлегмЭнз
кбихуфЭсзуз емцбнЯжпнфбй гйб ресЯрпх 3
дехфесьлерфб, уфз ухнЭчейб емцбнЯжефбй уфзн пиьнз з
дйЬскейб фпх ерйлегмЭнпх рспгсЬммбфпт.
ерйлЭофе рсьгсбммб ,
рбфЮуфе фп рлЮкфсп ЕНБСОЗУ/РБХУЗУ обнЬ.
¼фбн бдейЬуей фп несь, з пиьнз емцбнЯжей Энб мздЭн
рпх бнбвпувЮней кбй з лхчнЯб бнЬвей.
МрпсеЯфе фюсб нб ерйлЭоефе Энб нЭп рсьгсбммб кбй нб
рйЭуефе фп рлЮкфсп ЕНБСОЗУ/РБХУЗУ гйб нб
еккйнЮуефе.
12. ДйбкпрЮ рспгсЬммбфпт
РбфЮуфе фп рлЮкфсп ЕНБСОЗУ/РБХУЗУ гйб нб
дйбкьшефе фп рсьгсбммб рпх екфелеЯфбй, еню з
бнфЯуфпйчз лхчнЯб бсчЯжей нб бнбвпувЮней. РбфЮуфе
обнЬ фп Ядйп рлЮкфсп гйб фзн ербнеккЯнзуз фпх
рспгсЬммбфпт.
68
Page 69

13. Бкэсщуз рспгсЬммбфпт
ГхсЯуфе фп дйбкьрфз ерйлпгЮт уфп «O» гйб бкэсщуз
еньт рспгсЬммбфпт рпх екфелеЯфбй. Фюсб мрпсеЯфе нб
ерйлЭоефе нЭп рсьгсбммб.
14.Рщт бнпЯгей з рьсфб мефЬ фзн
Энбсоз еньт рспгсЬммбфпт
КбфбсчЬт фпрпиефЮуфе фп рлхнфЮсйп уе кбфЬуфбуз
РБХУЗУ рбфюнфбт фп рлЮкфсп ЕНБСОЗУ/РБХУЗУ .
ЕЬн з рьсфб ден бнпЯгей, бхфь узмбЯней ьфй
фп рлхнфЮсйп Юдз иесмбЯнефбй, ьфй з уфЬимз фпх неспэ
еЯнбй рЬнщ брь фп кЬфщ Ьксп фзт рьсфбт Ю ьфй п кЬдпт
ресйуфсЭцефбй.
ЕЬн ден мрпсеЯфе нб бнпЯоефе фзн рьсфб, щуфьуп еЯнбй
брбсбЯфзфп, увЮуфе фп рлхнфЮсйп гхснюнфбт фп
дйбкьрфз ерйлпгЮт уфз иЭуз
мрпсеЯфе нб бнпЯоефе фзн рьсфб (рспупчЮ уфз уфЬимз
кбй фз иесмпксбуЯб фпх неспэ!). Гйб фзн ербнеккЯнзуз
фпх рспгсЬммбфпт енесгпрпйЮуфе фп рлхнфЮсйп кбй
ерйлЭофе обнЬ фп рсьгсбммб кбй фйт ерйлпгЭт.
«O». МефЬ брь 3 лерфЬ
15. ФЭлпт фпх рспгсЬммбфпт
ЕЛЛЗНЙКБ
Фп рлхнфЮсйп уфбмбфЬ бхфьмбфб.
ЕЬн Эчей ерйлегеЯ Бкэсщуз ОевгЬлмбфпт , з рьсфб
еЯнбй мрлпкбсйумЭнз, з ендейкфйкЮ лхчнЯб фпх рлЮкфспх
ЕНБСОЗУ/РБХУЗУ увЮней, êáé рбсбмЭнпхн
бнбммЭнб, гйб нб убт хрпдеЯопхн ьфй фп несь рсЭрей нб
бдейЬуей рсйн бнпЯоефе фзн рьсфб. З пиьнз емцбнЯжей Энб
мздЭн рпх бнбвпувЮней.
Гйб фп Ьдейбумб фпх неспэ хрЬсчпхн 2 дхнбфьфзфет:
ЕрйлЭофе фп рсьгсбммб
Фп несь бдейЬжей чщсЯт уфэшймп.
ЕрйлЭофе фп рсьгсбммб
фбчэфзфб уфхшЯмбфпт мЭущ фпх учефйкпэ дйбкьрфз
кбй уфз ухнЭчейб рбфЮуфе фп рлЮкфсп
ЕНБСОЗУ/РБХУЗУ . Фп несь бдейЬжей кбй фб
спэчб уфэвпнфбй ме фзн ерйлегмЭнз фбчэфзфб
уфхшЯмбфпт.
РспупчЮ! Рсйн ерйлЭоефе фп рсьгсбммб
кбй
феиеЯ уфз иЭуз 0 (бкэсщуз).
ГхсЯуфе фп дйбкьрфз ерйлпгЮт рспгсбммЬфщн уфз иЭуз
Ербнбссэимйуз
рлхнфЮсйп.
ВгЬлфе фб спэчб брь фпн кЬдп кбй елЭгофе рспуекфйкЬ
еЬн еЯнбй енфелют Ьдейпт юуфе нб мзн рбсбмеЯнпхн
спэчб фб прпЯб мрпсеЯ нб кбфбуфсбцпэн уе мйб
ерьменз рлэуз (р.ч. нб мбжЭшпхн) Ю нб бцЮупхн чсюмб
уе мйб мрпхгЬдб ме лехкЬ.
ЕЬн де иЭлефе нб кЬнефе кй Ьллз рлэуз, клеЯуфе фзн
кЬнпхлб рбспчЮт неспэ.
БцЮуфе фзн рьсфб бнпйчфЮ гйб нб мз дзмйпхсгзиеЯ
мпэчлб кбй дхуЬсеуфет пумЭт.
п дйбкьрфзт ерйлпгЮт рсЭрей нб
«O» гйб нб бренесгпрпйзиеЯ фп
(Ьдейбумб):
Þ . ЕрйлЭофе фзн
,
69
Page 70

РЯнбкбт рспгсбммЬфщн
РспгсЬммбфб рлэузт гйб вбмвбкесЬ кбй ухниефйкЬ
Фэрпт мрпхгЬдбт
ЛехкЬ вбмвбкесЬ:
р.ч. уенфьнйб,
фсбрежпмЬнфйлб,
урйфйкЬ лйнЬ
МЭгйуфп
цпсфЯп
5 kg
Рсьгсбммб/
иесмпксбуЯб
ЛехкЬ
вбмвбкесЬ
(êñýï)-90°C
РесйгсбцЮ фпх
рспгсЬммбфпт
Рлэуз уфпхт
(ксэп)-90°C
3 оевгЬлмбфб
МегЬлп уфэшймп
ДйбиЭуймет
ерйлпгЭт
КбфбнЬлщуз*
ЕнЭсгейб
kWh
2.0 53 2.25
ЛЯфсб
неспэ
Чсьнпт
þñåò/
лерфЬ.
ЧсщмбфйуфЬ
вбмвбкесЬ: ð.÷.
рпхкЬмйуб, мрлпэжет,
еуюспхчб, рефуЭфет,
урйфйкЬ лйнЬ
ВбмвбкесЬ
ПЙКПНПМЙКП**: ð.÷.
рпхкЬмйуб, мрлпэжет,
еуюспхчб
ЛехкЬ/ЧсщмбфйфЬ
BбмвбкесЬ
40°AA***
УхниефйкЬ: ð.÷.
рпхкЬмйуб, мрлпэжет,
еуюспхчб
УхниефйкЬ
ПЙКПНПМЙКП
5 kg
6 kg
5 kg
2,5 kg
2,5 kg
ЧсщмбфйуфЬ
вбмвбкесЬ
(êñýï)-60°C
ВбмвбкесЬ
ПЙКПНПМЙКП
E 60°/40°C
E
ЛехкЬ/чсщмбфй-
уфЬ вбмвбкесЬ
40°AA
УхниефйкЬ
(êñýï)-60°C
УхниефйкЬ
ПЙКПНПМЙКП
E E40°C
Рлэуз уфпхт
(ксэп)-60°C
3 оевгЬлмбфб
МегЬлп уфэшймп
Рлэуз уфпхт
E 60°/40°C
2 оевгЬлмбфб
МегЬлп уфэшймп
Рлэуз уфпхт
40°C
3 оевгЬлмбфб
МегЬлп уфэшймп
Рлэуз уфпхт
(ксэп)-40°C
3 оевгЬлмбфб
Уэнфпмп уфэшймп
Рлэуз уфпхт
E 40°C
3 оевгЬлмбфб
Уэнфпмп уфэшймп
1.2 49 2.00
1.14 49 2.21
0.95 49 2.20
0.9 54 1.33
0.45 54 1.24
* Фб уфпйчеЯб кбфбнЬлщузт уе бхфь фп дйЬгсбммб еЯнбй кбибсЬ ендейкфйкЬ, дедпмЭнпх ьфй мрпсеЯ нб рпйкЯллпхн
бнЬлпгб ме фзн рпуьфзфб кбй фпн фэрп мрпхгЬдбт, фз иесмпксбуЯб неспэ кбй фз иесмпксбуЯб ресйвЬллпнфпт.
БнбцЭспнфбй уфзн хшзльфесз иесмпксбуЯб гйб кЬие рсьгсбммб рлэузт.
** Уэмцщнб ме фзн пдзгЯб ЕК 92/75, пй бсйимпЯ кбфбнЬлщузт рпх хрпдейкнэпнфбй уфзн ефйкЭфб енЭсгейбт
бнбцЭспнфбй уфп рсьгсбммб рлэузт E уфпхт 60°C.
*** Фб хцЬумбфб рпх рлЭнпнфбй ме бхфь фп рсьгсбммб Эчпхн брпфЭлеумб брпфелеумбфйкьфзфбт рлэузт AA.
П кэклпт рлхуЯмбфпт гйб мЬллйнб еЯнбй егкексймЭнпт брь фз Woolmark гйб фп рлэуймп рспъьнфщн Woolmark рпх
рлЭнпнфбй уфп рлхнфЮсйп, хрь фзн рспырьиеуз ьфй фб спэчб рлЭнпнфбй уэмцщнб ме фйт пдзгЯет уфзн ефйкЭфб фпхт кбй
ме фйт пдзгЯет рпх рбсЭчпнфбй брь фпн кбфбукехбуфЮ фпх рлхнфзсЯпх. Бс. БдеЯбт M9604.
70
Page 71

РЯнбкбт рспгсбммЬфщн
РспгсЬммбфб рлэузт гйб ехбЯуизфб , рлэуймп уфп чЭсй , мЬллйнб кбй мефбощфЬ
Фэрпт мрпхгЬдбт
ЕхбЯуизфб: ð.÷.
бксхлйкЬ, вйукьжз,
рплхеуфЭсбт,
ухниефйкЬ
Рлэуймп уфп чЭсй
МЬллйнб
МефбощфЬ
ÌÝãé-
óôï
цпсфЯп
2,5 kg
2 kg
2 kg
1 kg
Рсьгсбммб/
иесмпксбуЯб
ЕхбЯуизфб
-40°C
Рлэуймп уфп
÷Ýñé
- 40°C
МЬллйнб
- 40°C
МефбощфЬ
30°C
РесйгсбцЮ фпх
рспгсЬммбфпт
Рлэуз уфпхт
(ксэп)-40°C
3 оевгЬлмбфб
Уэнфпмп уфэшймп
Рлэуз уфпхт
(ксэп)-40°C
3 оевгЬлмбфб
Уэнфпмп уфэшймп
Рлэуз уфпхт
(ксэп)-40°C
3 оевгЬлмбфб
Уэнфпмп уфэшймп
Рлэуз уфпхт 30°C
3 оевгЬлмбфб
Уэнфпмп уфэшймп
ДйбиЭуймет
ерйлпгЭт
КбфбнЬлщуз
ЕнЭсгейб
kWh
0.5 55 1.00
0.35 55 56
0.35 55 55
0.30 53 40
ЛЯфсб
неспэ
Чсьнпт
þñåò/
лерфЬ.
ЕЛЛЗНЙКБ
Мйксь рсьгсбммб
2,5 kg
Мйксь
рсьгсбммб
30°C
Рлэуз уфпхт 30°C
2 оевгЬлмбфб
Уэнфпмп уфэшймп
0.3 40 30
71
Page 72

РЯнбкбт рспгсбммЬфщн
ЕйдйкЬ рспгсЬммбфб
ИЭуз фпх дйбкьрфз
ерйлпгЮт
рспгсЬммбфпт
ОевгЬлмбфб
¢дейбумб
Уфэшймп
Уфэшймп гйб
ехбЯуизфб
O
Reset/Off
Рсьгсбммб
Гйб оЭвгблмб спэчщн
Гйб Ьдейбумб фпх
неспэ фпх фелехфбЯпх
оевгЬлмбфпт уфб
рспгсЬммбфб ме фзн
ерйлпгЮ
Оечщсйуфь уфэшймп
гйб вбмвбкесЬ
Оечщсйуфь уфэшймп
гйб ухниефйкЬ,
ехбЯуизфб,
мЬллйнб/рлэуймп уфп
чЭсй, мефбощфЬ
Гйб бкэсщуз фпх Юдз
екфелпэменпх
рспгсЬммбфпт Ю гйб
увЮуймп фпх
рлхнфзсЯпх.
РесйгсбцЮ
рспгсЬммбфпт
3 оевгЬлмбфб ме
хгсь рспуиефйкь,
еЬн брбйфеЯфбй.
МегЬлп уфэшймп
уфз мЭгйуфз
фбчэфзфб
¢дейбумб
¢дейбумб кбй
уэнфпмп
уфэшймп уфз
мЭгйуфз
фбчэфзфб
¢дейбумб кбй
уфэшймп гйб
ехбЯуизфб
Рсьуиефет
лейфпхсгЯет
ЦпсфЯп
рлэузт
ìÝã.
5 kg
/
5 kg
5 kg
/
КбфбнЬлщуз*
ЕнЭсгейб
kWh
0.08 45 45
ЛЯфсб
неспэ
--2
--10
--6
---
Чсьнпт
þñåò/
лерфЬ.
72
Page 73

C0119
C0118
P1050
УхнфЮсзуз
1. ЕощфесйкЮ ерйцЬнейб
КбибсЯжефе фзн еощфесйкЮ ерйцЬнейб фпх рлхнфзсЯпх
мьнп ме убрпэнй кбй несь. ОерлЭнефе ме кбибсь несь
кбй укпхрЯжефе ме Энб мблбкь рбнЯ.
Узмбнфйкь: мз чсзуймпрпйеЯфе пйньрнехмб, дйблхфйкЬ Ю
Ьллб рбсьмпйб рспъьнфб гйб фпн кбибсйумь фзт
еощфесйкЮт ерйцЬнейбт.
2.ЛЬуфйчп фзт рьсфбт
ЕлЭгчефе ресйуфбуйбкЬ фп лЬуфйчп фзт рьсфбт кбй
бцбйсеЯфе рйибнЬ бнфйкеЯменб рпх Яущт рйЬуфзкбн уфйт
рфхчЭт фпх.
3.УхсфЬсй брпссхрбнфйкпэ
Ме фпн кбйсь, фб брпссхрбнфйкЬ кбй фб мблбкфйкЬ
бцЮнпхн хрплеЯммбфб уфп ухсфЬсй.
КбибсЯжефе ресйуфбуйбкЬ фп ухсфЬсй брпссхрбнфйкпэ
вЬжпнфЬт фп кЬфщ брь фз всэуз. Гйб нб вгЬлефе фп
ухсфЬсй брь фзн хрпдпчЮ, рбфЮуфе уфп бнфЯуфпйчп
узмеЯп бсйуфесЬ уфп вЬипт фпх ухсфбсйпэ.
Гйб нб фп кбибсЯуефе кблэфесб, мрпсеЯфе нб вгЬлефе
фйт иЮкет уфйт прпЯет фпрпиефпэнфбй фб рспуиефйкЬ.
Фп брпссхрбнфйкь мрпсеЯ ме фзн рЬспдп фпх чсьнпх нб
ухуущсехфеЯ кбй мЭуб уфзн хрпдпчЮ фпх ухсфбсйпэ:
КбибсЯуфе фзн хрпдпчЮ ме мйб рблйЬ пдпнфьвпхсфуб.
МефЬ фпн кбибсйумь, фпрпиефЮуфе обнЬ фп ухсфЬсй уфз
иЭуз фпх.
P0038
4.БнфлЯб бдейЬумбфпт
З бнфлЯб рсЭрей нб ерйиещсеЯфбй еЬн
фп рлхнфЮсйп ден бдейЬжей кбй/Ю де уфэвей
фп рлхнфЮсйп кЬней Энбн ресЯесгп иьсхвп еню
бдейЬжей фп несь льгщ бнфйкеймЭнщн ьрщт рбсбмЬнет,
нпмЯумбфб к.ф.л. рпх цсЬжпхн фзн бнфлЯб
бдейЬумбфпт.
РспчщсЮуфе щт еоЮт:
БрпухндЭуфе фз ухукехЮ.
ЕЬн еЯнбй брбсбЯфзфп, ресймЭнефе мЭчсй нб ксхюуей
фп несь.
БнпЯофе фп рпсфЬкй фзт бнфлЯбт.
P1114
ЕЛЛЗНЙКБ
ВЬлфе Энб дпчеЯп кпнфЬ уфзн бнфлЯб гйб фз ухллпгЮ
фпх неспэ рпх иб вгей брь фп рлхнфЮсйп.
Брелехиесюуфе фп ущлзнЬкй бдейЬумбфпт неспэ,
фпрпиефЮуфе фп уфп дпчеЯп кбй вгЬлфе фп рюмб фпх.
¼фбн фп несь уфбмбфЮуей нб вгбЯней, оевйдюуфе фп
кбрЬкй фзт бнфлЯбт кбй бцбйсЭуфе фзн бнфлЯб. ¼фбн
фп несь уфбмбфЮуей нб вгбЯней, оевйдюуфе фп кбрЬкй
фзт бнфлЯбт кбй бцбйсЭуфе фзн бнфлЯб.
P1115
73
Page 74

БцбйсЭуфе прпйбдЮрпфе бнфйкеЯменб брь фзн бнфлЯб,
P1090
уфсЭцпнфЬт фз ме фп чЭсй.
ОбнбвЬлфе фп рюмб уфп ущлзнЬкй бдейЬумбфпт кбй
фпрпиефЮуфе фп кбй рЬлй уфз иЭуз фпх.
P1117
Обнбвйдюуфе фп кбрЬкй фзт бнфлЯбт.
КлеЯуфе фп рпсфЬкй фзт бнфлЯбт.
5.ЦЯлфсп фпх ущлЮнб рбспчЮт
ЕЬн фп рлхнфЮсйп чсейЬжефбй ресйууьфесп чсьнп гйб нб
гемЯуей ме несь, елЭгофе мЮрщт фп цЯлфсп фпх ущлЮнб
рбспчЮт еЯнбй цсбгмЭнп.
КлеЯуфе фз всэуз фпх неспэ.
Оевйдюуфе фп ущлЮнб брь фз всэуз.
КбибсЯуфе фп цЯлфсп ме мйб уклзсЮ впэсфуб.
Обнбвйдюуфе фп ущлЮнб уфз всэуз.
6.¢дейбумб неспэ уе ресЯрфщуз
Экфбкфзт бнЬгкзт
ЕЬн фп рлхнфЮсйп ден бдейЬжей фп несь, бкплпхиЮуфе
фйт рбсбкЬфщ пдзгЯет гйб нб бдейЬуефе фп несь брь
фпн кЬдп:
ВгЬлфе фп цйт брь фзн рсЯжб.
КлеЯуфе фз всэуз фпх неспэ.
ЕЬн еЯнбй брбсбЯфзфп, ресймЭнефе мЭчсй нб ксхюуей
фп несь.
БнпЯофе фп рпсфЬкй фзт бнфлЯбт.
ВЬлфе мйб лекбнЯфуб уфп рЬфщмб кбй фпрпиефЮуфе фп
Ьксп брь фп ущлзнЬкй бдейЬумбфпт неспэ мЭуб уфз
лекбнЯфуб. ВгЬлфе фп рюмб фпх. Фп несь льгщ
вбсэфзфбт иб бдейЬуей уфз лекбнЯфуб. ¼фбн з
лекбнЯфуб гемЯуей, вЬлфе рЬлй фп рюмб уфп ущлзнЬкй.
БдейЬуфе фз лекбнЯфуб. ЕрбнблЬвефе фз дйбдйкбуЯб
мЭчсй фп несь нб уфбмбфЮуей нб фсЭчей.
КбибсЯуфе фзн бнфлЯб, еЬн еЯнбй брбсбЯфзфп, ьрщт
ресйгсЬцзке рспзгпхмЭнщт.
ОбнбвЬлфе фп ущлзнЬкй бдейЬумбфпт неспэ уфз иЭуз
фпх бцпэ фпх Эчефе вЬлей фп рюмб.
вйдюуфе обнЬ фп кбрЬкй фзт бнфлЯбт кбй клеЯуфе фп
рпсфЬкй.
7.РспуфбуЯб брь фпн рЬгп
ЕЬн фп рлхнфЮсйп еЯнбй егкбфеуфзмЭнп уе Энб чюсп
ьрпх з иесмпксбуЯб мрпсеЯ нб рЭуей кЬфщ брь фпхт
0°C, бкплпхиЮуфе фйт еоЮт пдзгЯет:
ВгЬлфе фп цйт брь фзн рсЯжб.
КлеЯуфе фз всэуз фпх неспэ кбй оевйдюуфе фп ущлЮнб
рбспчЮт брь фз всэуз.
ФпрпиефЮуфе фп Ьксп брь фп ущлзнЬкй бдейЬумбфпт,
ьрщт кбй фп Ьксп фпх ущлЮнб рбспчЮт, уе мйб
лекбнЯфуб фпрпиефзмЭнз уфп рЬфщмб кбй бдейЬуфе фп
несь.
Обнбвйдюуфе фп ущлЮнб рбспчЮт неспэ кбй вЬлфе
обнЬ уфз иЭуз фпх фп ущлзнЬкй бдейЬумбфпт бцпэ
обнбклеЯуефе фп Ьксп фпх ме фп бнфЯуфпйчп рюмб.
Екфелюнфбт фйт енЭсгейет бхфЭт, фп несь рпх
рбсЭмейне уфп рлхнфЮсйп иб бдейЬуей, брпупвюнфбт фп
учзмбфйумь рЬгпх кбй ухнерют фз исбэуз фщн
бнфЯуфпйчщн месюн.
¼фбн чсзуймпрпйЮуефе обнЬ фп рлхнфЮсйп, вевбйщиеЯфе
ьфй з иесмпксбуЯб ресйвЬллпнфпт еЯнбй Ьнщ фщн 0°C.
Узмбнфйкь!
КЬие цпсЬ рпх бдейЬжей фп несь брь фп ущлзнЬкй
бдейЬумбфпт, рсЭрей нб чэнефе 2 лЯфсб несь уфз иЮкз
кэсйбт рлэузт уфп ухсфЬсй брпссхрбнфйкпэ кбй уфз
ухнЭчейб нб ерйлЭгефе рсьгсбммб бдейЬумбфпт. ¸фуй
иб енесгпрпйЮуефе фз ухукехЮ ВБЛВЙДБ ECO юуфе нб
мзн рбсбмеЯней мЭспт фпх брпссхрбнфйкпэ
бчсзуймпрпЯзфп кбфЬ фзн ерьменз рлэуз.
74
Page 75

ДхулейфпхсгЯет;
ДхулейфпхсгЯет рпх мрпсеЯфе нб дйпсиюуефе мьнпй убт.
КбфЬ фз лейфпхсгЯб фпх рлхнфзсЯпх мрпсеЯ нб емцбнйуфеЯ Энбт брь фпхт рбсбкЬфщ кщдйкпэт ухнбгесмпэ уфзн пиьнз
кбй фбхфьчспнб нб бнбвпувЮней з лхчнЯб :
-E10: рсьвлзмб ме фзн рбспчЮ неспэ
-E20: рсьвлзмб ме фп Ьдейбумб неспэ
-E40: бнпйкфЮ рьсфб
Бцпэ фп рсьвлзмб лхиеЯ, рбфЮуфе фп рлЮкфсп ЕНБСОЗУ/РБХУЗУ гйб ербнеккЯнзуз фпх рспгсЬммбфпт. ЕЬн,
рбсЬ фпн Элегчп рпх кЬнбфе, фп рсьвлзмб рбсбмЭней, ерйкпйнщнЮуфе ме фп КЭнфсп УЭсвйт фзт ресйпчЮт убт.
ДхулейфпхсгЯб РйибнЮ бйфЯб
Фп рлхнфЮсйп ден фЯиефбй уе
лейфпхсгЯб:
З мзчбнЮ де гемЯжей:
Фп рлхнфЮсйп гемЯжей ме несь
кбй фп бдейЬжей бмЭущт мефЬ:
Фп рлхнфЮсйп ден бдейЬжей фп
несь кбй/Ю де уфэвей:
Фп несь фсЭчей уфп рЬфщмб:
Ден Эчей клеЯуей кблЬ з рьсфб. (E40)
Фп рлхнфЮсйп ден Эчей ухндеиеЯ уфзн рсЯжб Ю з рсЯжб
ден фп фспцпдпфеЯ ме сеэмб.
¸чей кбеЯ з кенфсйкЮ буцЬлейб фпх урйфйпэ.
Фп рлЮкфсп ЕНБСОЗУ/РБХУЗУ ден Эчей рйеуфеЯ.
¸чефе кЬней фзн ерйлпгЮ КБИХУФЕСЗУЗ
ЕККЙНЗУЗУ.
П дйбкьрфзт ерйлпгЮт рспгсЬммбфпт ден еЯнбй ущуфЬ
фпрпиефзмЭнпт.
ЕЯнбй клейуфЮ з всэуз фпх неспэ. (E10)
П ущлЮнбт рбспчЮт Эчей рбфзиеЯ Ю фубкЯуей. (E10)
ЕЯнбй цсбгмЭнп фп цЯлфсп фпх ущлЮнб рбспчЮт. (E10)
Ден Эчей клеЯуей кблЬ з рьсфб. (E40)
Фп Ьксп фпх ущлЮнб бдейЬумбфпт всЯукефбй рплэ чбмзлЬ
уе учЭуз ме фп рлхнфЮсйп. БнбфсЭофе уфз учефйкЮ
рбсЬгсбцп фзт еньфзфбт гйб фп Ьдейбумб неспэ.
П ущлЮнбт бдейЬумбфпт Эчей рбфзиеЯ Ю фубкЯуей. (E20)
¸чефе кЬней фзн ерйлпгЮ Ю
Фп цпсфЯп спэчщн ден еЯнбй пмпйьмпсцб кбфбнемзмЭнп
уфпн кЬдп.
З бнфлЯб бдейЬумбфпт еЯнбй цсбгмЭнз. (E20)
¸чефе чсзуймпрпйЮуей хресвплйкЮ рпуьфзфб
брпссхрбнфйкпэ Ю бкбфЬллзлп брпссхрбнфйкь
(кЬней рплэ бцсь).
ЕлЭгофе мЮрщт хрЬсчпхн дйбсспЭт брь кЬрпйп
уфегбнпрпйзфйкь дбкфэлйп фпх ущлЮнб рбспчЮт. ЕЬн
еЯнбй дэукплп нб дйбксЯнефе кбиют фп несь фсЭчей
брь фп ущлЮнб, елЭгофе еЬн еЯнбй хгсьт.
¸чей кбфбуфсбцеЯ п ущлЮнбт бдейЬумбфпт фпх
неспэ.
Де вЬлбфе фп рюмб уфп ущлзнЬкй бдейЬумбфпт фпх
неспэ мефЬ фпн кбибсйумь фзт бнфлЯбт.
.
ЕЛЛЗНЙКБ
Фп брпфЭлеумб фзт рлэузт ден
еЯнбй йкбнпрпйзфйкь:
¸чефе рплэ мйксЮ рпуьфзфб брпссхрбнфйкпэ Ю
бкбфЬллзлп брпссхрбнфйкь.
Ден кбибсЯубфе фпхт ерЯмпнпхт лекЭдет рсйн фзн
рлэуз.
Ден ерйлЭобфе фз ущуфЮ иесмпксбуЯб.
Хресцпсфюубфе фпн кЬдп.
75
Page 76

Mod. ..........
Prod. No. ...........
Ser. No. .........
M
o
d
.
..
..
.....
.
P
r
o
d
. N
o
. ...........
S
e
r
.
N
o
.
......
...
P0042 BD
ДхулейфпхсгЯб РйибнЮ бйфЯб
Фп рлхнфЮсйп дпнеЯфбй Ю кЬней
иьсхвп:
Ден бнпЯгей з рьсфб:
Фп уфэшймп оекйнЬ ме
кбихуфЭсзуз Ю ден оекйнЬ
кбиьлпх:
Ден Эчпхн бцбйсеиеЯ пй дйбфЬоейт буцблеЯбт кбй фб
хлйкЬ ухукехбуЯбт.
Фб рпдбсЬкйб уфЮсйозт ден Эчпхн кблЮ ербцЮ ме фп
рЬфщмб.
Фп цпсфЯп спэчщн ден еЯнбй пмпйьмпсцб кбфбнемзмЭнп
óôïí êÜäï.
ºущт хрЬсчпхн рплэ лЯгб спэчб мЭуб уфпн кЬдп.
Фп рсьгсбммб лейфпхсгеЯ бкьмз.
З рьсфб ден Эчей бкьмз брбуцблйуфеЯ.
ХрЬсчей несь уфпн кЬдп.
¸чей енесгпрпйзиеЯ фп злекфспнйкь уэуфзмб елЭгчпх
еойупссьрзузт дйьфй фп цпсфЯп спэчщн ден еЯнбй
пмпйьмпсцб кбфбнемзмЭнп уфпн кЬдп. Фп цпсфЯп спэчщн
бнбкбфбнЭмефбй ме бнфЯуфспцз ресйуфспцЮ фпх кЬдпх.
Бхфь ендЭчефбй нб ухмвеЯ бскефЭт цпсЭт рсйн
бренесгпрпйзиеЯ фп уэуфзмб еойупссьрзузт кбй
оекйнЮуей фп кбнпнйкь уфэшймп. ЕЬн, мефЬ брь 10 лерфЬ,
фп цпсфЯп спэчщн ден Эчей бкьмб кбфбнемзиеЯ
пмпйьмпсцб уфпн кЬдп, фп рлхнфЮсйп де иб оекйнЮуей фз
цЬуз уфхшЯмбфпт. Уе бхфЮ фзн ресЯрфщуз,
ербнбфпрпиефЮуфе фб спэчб уфпн кЬдп кбй ерйлЭофе фп
рсьгсбммб уфхшЯмбфпт.
ЕЬн ден мрпсеЯфе нб енфпрЯуефе Ю нб лэуефе фп
рсьвлзмб, брехихниеЯфе уфп кЭнфсп уЭсвйт убт.
Рсйн фзлецщнЮуефе, узмейюуфе фп мпнфЭлп, фпн бсйимь
уейсЬт кбй фзн змеспмзнЯб бгпсЬт фпх рлхнфзсЯпх убт
кбиют фп КЭнфсп УЭсвйт иб убт жзфЮуей бхфЬ фб
уфпйчеЯб.
76
Page 77

 Loading...