

AEG-Electrolux EW643F User Manual
РУКОВОДСТВО ПО УСТАНОВКЕ И
ИСПОЛЬЗОВАНИЮ
INSTRUCTION MANUAL
129 5805 01
EW 622 K
RU
GB
CONTENTS
Technical specifications ...................................................................................................................... Page 15
Warnings................................................................................................................................................ Page 16
Installation ............................................................................................................................................. Page 17
Unpacking ............................................................................................................................................... Page 17
Water connection ............................................................................................................... ..................... Page 17
Electrical connection ............................................................................................................................... Page 18
Levelling .................................................................................................................................................. Page 18
Positioning............................................................................................................................................... Page 18
Use.......................................................................................................................................................... Page 19
Control panel ........................................................................................................................................... Page 19
Washing hints.......................................................................................................................................... Pages 20-21
Wash programmes .................................................................................................................................. Page 22
Wash code symbols ................................................................................................................................ Page 23
Operating instructions ............................................................................................................................. Page 24
Maintenance .......................................................................................................................................... Page 25
Cleaning the machine.............................................................................................................................. Page 25
Cleaning the pump filter .......................................................................................................................... Page 25
Something not working ? ..................................................................................................................... Page 26
TECHNICAL SPECIFICATIONS
DIMENSIONS Height 650 mm
Width 450 mm
Depth 650 mm
POWER SUPPLY VOLTAGE / FREQUENCY 230 V / 50 Hz
TOTAL POWER ABSORBED 2300 W (10 A)
HEATER RATING 1950 W
WATER PRESSURE Minimum 5 N/cm²
Maximum 80 N/cm²
MAXIMUM RECOMMENDED LOAD Cotton, linen 4,5 kg
Synthetics,delicate fabrics 2,0 kg
Wool 1,0 kg
SPIN SPEED 600 rpm
This appliance complies with the following E.E.C. Directives:
- 73/23 EEC of 19.2.73 (Low Voltage Directive) and subsequent modifications;
- 89/336 EEC of 3.5.89 (Electromagnetic Compatibility Directive) and subsequent modifications.
- 14 -

WARNINGS
You must read the whole of this instruction book
before you use the appliance. Follow the advice
carefully.
Keep the book for future reference. If you sell or give
away the appliance, make sure that the book is passed
to the new owner.
The following warnings are provided in the interest of
overall safety. You must read them before the appliance
is installed or used.
This appliance is designed to be used by adults. Children
should not be allowed to touch the controls or play with
the product.
It is dangerous to modify the specifications of this
appliance in any way.
This appliance is heavy. Care should be taken when
moving it.
All packaging and transit bolts must be removed before
the appliance is used. Serious damage may occur if this
is not done.
Any plumbing work required to install this appliance
should be carried out by a qualified plumber or competent
person.
Use only the recommended quantities of fabric
conditioner.
Pets and small children may climb into washing machines. Check your appliance each time before use.
You should not attempt to repair the machine yourself.
Repairs carried out by inexperienced or unqualified
persons may cause injury and/or more serious faults to
the machine.
This product should be serviced by an authorized Service Center only, and only genuine spare parts should
be used.
Any electrical work required to install this appliance
should be carried out by a qualified electrician or
competent person.
Make sure that the appliance does not stand on its
electrical supply cable.
If the machine is situated on a carpeted floor, please
adjust the feet to ensure that air can circulate freely.
Always unplug the appliance and turn off the water after
use.
Do not overload the appliance.
Only wash fabrics which are designed to be machine
washed. If in doubt, follow the instructions you find on the
label of the item itself.
Make sure that all pockets are empty. Hard, sharp
objects such as coins, safety pins, nails, screws or
stones can cause extensive damage.
Do not machine wash fabrics which are saturated with
petroleum products. If volatile cleaning fluids have been
used, make sure that they are thoroughly removed from
- 15 -

INSTALLA TION
Unpacking
The parts protecting the inner components of the
machine during transit are red. They must all be removed
before using your machine for the first time. These
parts and their securing means should be kept in case
the machine has to be transported again.
Fig.1
1. Unpack the appliance. Open the lid of the appliance and
remove the polystyrene wedge which blocks the drum.
Close the lid (fig.1).
2. Tip the appliance backwards. Remove the two screws (A)
with red washers on the base of the washing machine with
the special spanner provided (fig.2).
Fig.2
A
If you want to keep the alignment of
your appliance with the adjacent
cupboards, you have the possibility
to cut the crossbar holding the hoses
located at the back of your washing
machine (fig.6).
Water connection
Water inlet hose :
Connect the water inlet hose to
a cold water tap with a 3/4" gas
threaded orifice, after having
inserted the rugger sealing
washer with incorporated filter
(supplied with the machine) into
the hose collar. If the water
connection is made onto new
pipes or onto pipes which have
not been used for a long time, it
is advisable to run off a certain amount of water before
connecting the machine. This will avoid foreign matter
blocking the filter placed at the end of the water inlet hose.
Fig.3
Fig.4
D
C
3. Remove the loosened spacers (C). Stand the appliance
upright again (fig.3).
4. On the back part and with the special spanner, remove
the two red loosened spacers (D) (fig.4).
Fig.6
Fig.5
F
Water outlet hose :
Place the curved end of the outlet hose into a drain pipe
having a height between 60 and 80 cm from floor level or
secure it to a sink or bath tub. Make sure that the drain hose
is firmly secured so that it will not slip out or fall down from
its position.
The water should drain freely and, consequently, the drain
hose should not be choked or placed in such a way as to
obstruct the normal water flow. If an extension hose is
required, remember that it might cause a malfunction in the
drain pump, particularly if the extension has a length in
excess of 1 meter or if the diameter of the extension is
smaller than the diameter of the original drain hose.
60 mm
80 mm
5. The holes which are now visible must be closed with the
plugs (F) provided with the appliance.
6. Please ensure that these parts have been removed from
the machine and keep them in case of next transport (fig.6).
Be careful : when the machine is installed on carpeted floor,
ensure that the carpet do not obstruct the openings, located
at the base of the machine, which are provided for ventilation.
- 16 -
Electrical connection
Before you fit the plug into the wall socket, check the
following points :
1) The supply voltage of the domestic wiring system does
not fluctuate by more that 10%, plus or minus, from 230 V.
2) The meter, the fuses, the supply line and the wall socket
are suitable to carry the maximum load required by the
machine (2,3 kW).
This appliance complies with the E.E.C. directive
No.87/308 of 2/6/87 relative to radio interference
suppression.
Very important :
The washing machine is provided with a feeding wire
with earth connection: it must be connected to a tap
like tat is provided with a good earth connection.
The manufacturer declines any responsibility where
the previous recommendations are not followed.
Note : the rating plate is situated on the internal side of the
drain filter.
Levelling
It is essential that your machine is
absolutely level. Raise or lower the
front feet of the machine : tighten
the nuts of the feet with an
adjustable wrench.
Also make sure that the machine
does not touch the wall, the
furnitures etc. during the
functioning. This in order to avoid vibrations, noise or
displacements of the appliance during operation.
Positioning
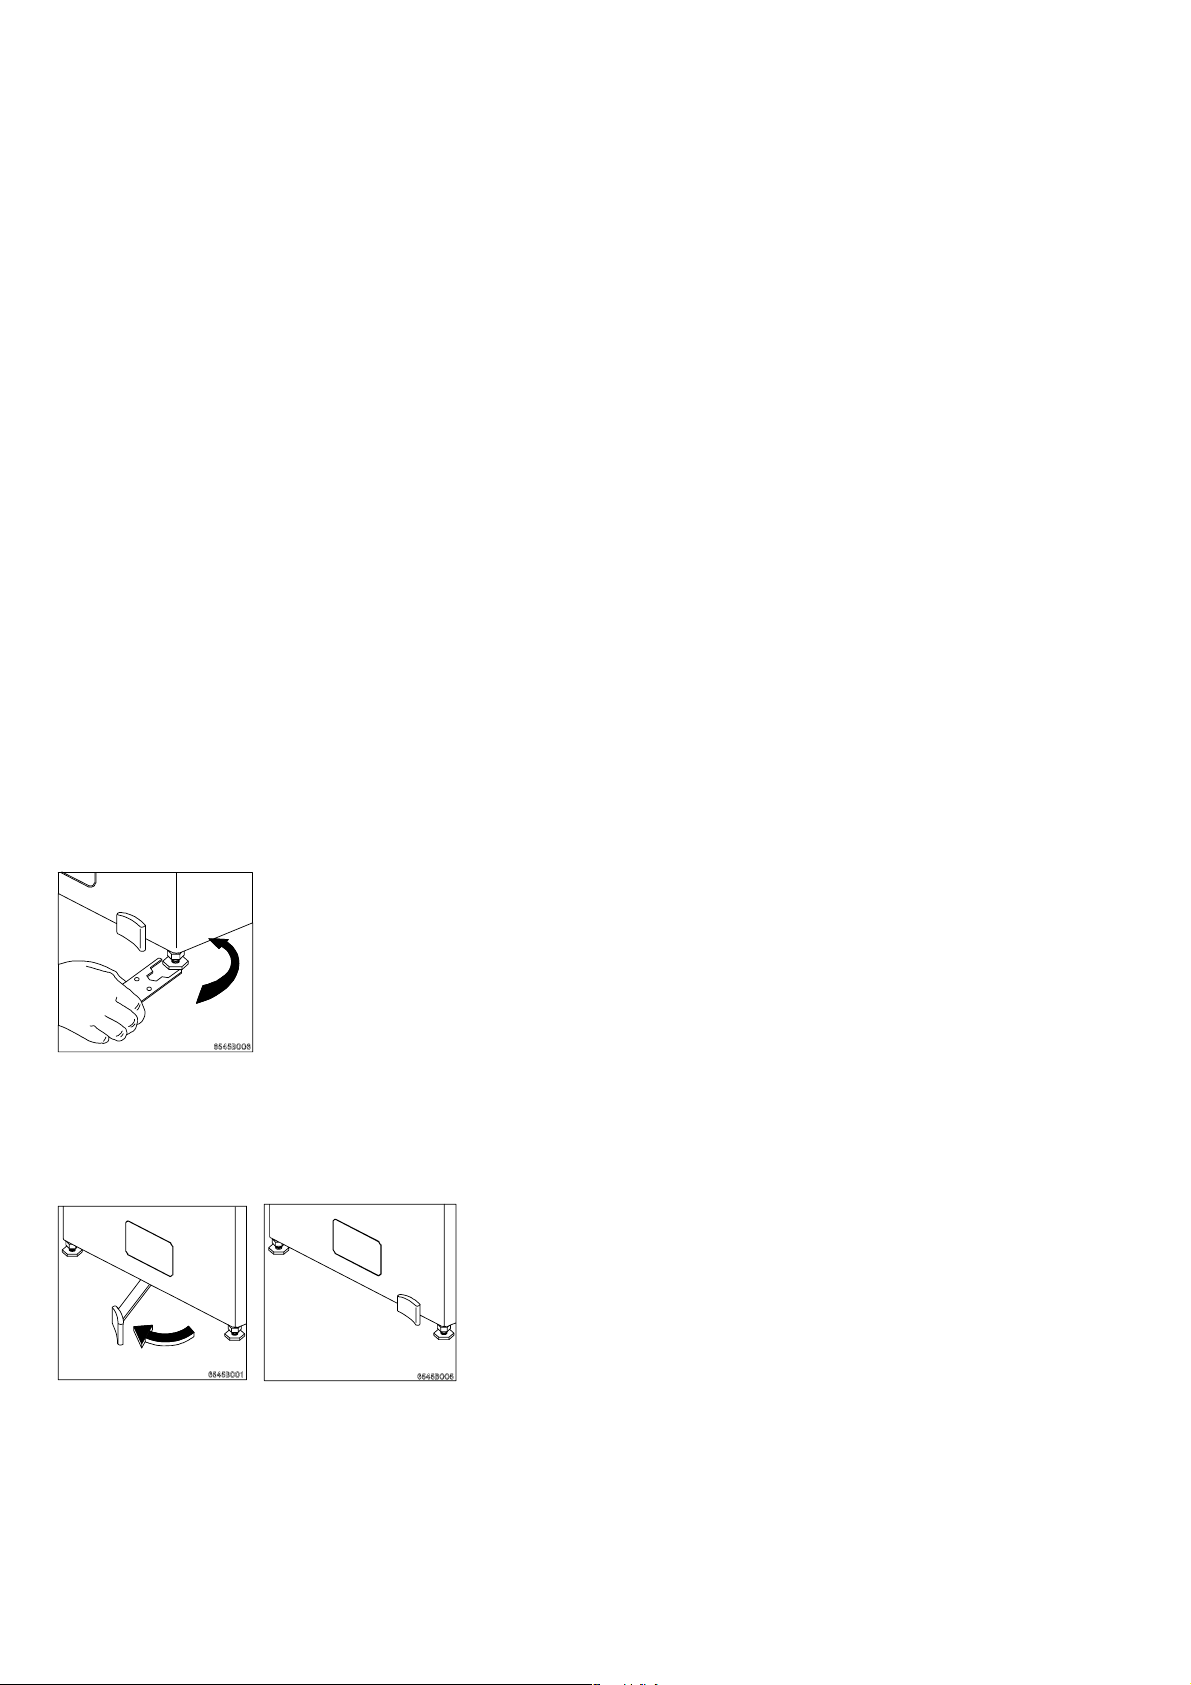
To move your washing machine, put it on its wheels by
turning from the right to the left the special lever situated at
the bottom of the machine. Once the machine placed at the
chosen place, bring back the lever to its initial original
position.
- 17 -
 Loading...