

AEG-Electrolux EW1034F User Manual

INFO
BEDIENUNGSANLEITUNG
GEBRUIKSAANWIJZING
NOTICE D'UTILISATION
INSTRUCCIONES PARA INSTALACION Y USO
INSTALLATION AND INSTRUCTION MANUAL
WASCHVOLLAUTOMAT E W
1034 F
WASAUTOMAAT EW 1034 F
LAVE-LINGE EW 1034 F
LAVADORA EW 1034 F
WASHING MACHINE EW 1034 F

CONTENTS
Warnings ..........................Page 65
Installation .........................Page 66
Unpacking..........................Page 66
Positioning..........................Page 66
Water inlet..........................Page 66
Water drainage ........................Page 67
Electrical connection .......................Page 67
Levelling ..........................Page 67
Use............................Page 68
Control panel .........................Page 68
Detergent dispenser drawer and programme card ..............Page 68
Symbols ..........................Page 68
Controls ..........................Page 68
Washing hints.........................Page 69
Detergents and additives .....................Page 70
Wash code symbols .......................Page 71
Washing programmes ......................Page 72-75
Operating sequence .......................Page 76
Maintenance .........................Page 77
Bodywork ..........................Page 77
Detergent dispenser drawer.....................Page 77
Drain filter ..........................Page 77
Water inlet filter ........................Page 77
Something not working? .....................Page 78
TECHNICAL SPECIFICATIONS
DIMENSIONS Height 85 cm
Width 60 cm
Depth 57 cm
POWER SUPPLY VOLTAGE/FREQUENCY 220-230V / 50 Hz
TOTAL POWER ABSORBED 2200 W (10A)
WATER PRESSURE Minimum 15 N/cm
Maximum 80 N/cm
2
2
MAXIMUM RECOMMENDED Cotton, linen 5 kg
LOAD Synthetics, delicate fabrics 2 kg
Wool 1 kg
SPIN SPEED Maximum 1000 rpm
This appliance complies with the following E.E.C. Directives:
- 73/23 EEC of 19.2.73 (Low Voltage Directive) and subsequent modifications;
- 89/336 EEC of 3.5.89 (Electromagnetic Compatibility Directive) and subsequent modifications.
64

ENGLISH
IMPORTANT INFORMATIONS
YOU MUST READ THE WHOLE OF THIS
INSTRUCTION BOOK BEFORE YOU USE THE
APPLIANCE. FOLLOW THE ADVICE CAREFULLY.
KEEP THE BOOK FOR FUTURE REFERENCE. IF
YOU SELL OR GIVE AWAY THE APPLIANCE,
MAKE SURE THAT THE BOOK IS PASSED TO
THE NEW OWNER.
WARNINGS
■
The following warnings are provided in the
interest of overall safety. You must read them
before the appliance is installed or used.
INSTALLATION
■
This appliance is heavy. Care should be taken
when moving it.
■
All packaging and transit bolts must be removed
before the appliance is used. Serious damage
may occur if this is not done.
■
Any plumbing work required to install this appliance should be carried out by a qualified plumber
or competent person.
■
Any electrical work required to install this appliance should be carried out by a qualified electrician
or competent person.
■
Make sure that the appliance does not stand on its
electrical supply cable.
■
If the machine is situated on a carpeted floor,
please adjust the feet to ensure that air can
circulate freely.
USE
■
Always unplug the appliance and turn off the water
after use.
■
Do not overload the appliance.
■
Only wash fabrics which are designed to be machine washed. If in doubt, follow the instructions
you find on the label of the item itself.
■
Make sure that all pockets are empty. Hard, sharp
objects such as coins, safety pins, nails, screws or
stones can cause extensive damage.
■
Use only the recommended quantities of fabric
conditioner.
■
Do not machine wash fabrics which are saturated
with petroleum products. If volatile cleaning fluids
have been used, make sure that they are thoroughly removed from the fabric before it is placed in the
appliance.
■
Leave the porthole door slightly ajar between
washes to preserve the door seal.
■
Before you open the door of the machine check
that the water has drained. Do not open the door if
you can still see water.
SERVICE/REPAIR
■
You should not attempt to repair the machine
yourself. Repairs carried out by inexperienced or
unqualified persons may cause injury and/or more
serious faults to the machine.
■
This product should only be serviced by an authorised Service Centre, and only genuine spare
parts should be used.
GENERAL SAFETY
■
It is dangerous to modify the specifications of this
appliance in any way.
■
This appliance is designed to be used by adults.
Children should not be allowed to touch the controls or play with the product.
■
Pets and small children may climb into washing
machines. Check your appliance each time before
use.
■
The glass door becomes very hot during the
washing cycle. Keep children away from the
appliance while it is in use.
■
When disposing of your old washing machine, the
electric cable must be cut off and the door catch
must be made unusable.
65

INSTALLATION
Unpacking
All transit bolts and packing must be removed before
using the machine.
You are advised to keep all packing for re-use in case
you move house and the machine has to be transported again.
Proceed as follows:
Using a spanner remove
the screw on the right at
the rear of the machine.
Carefully lay the machine
on its back making sure
that the hoses are not
squashed.
Place one of the polystyrene angle packings
P0255
between the machine
and bottom.
2
1
P0234
Remove the polystyrene block from underneath the
machine.
Release the two polythene bags by removing the
adhesive strip.
Carefully remove the right polythene bag (1) by pulling it towards the centre of the machine. Repeat the
operation for the left polythene bag (2).
P0256
Set the machine upright and unscrew the two remaining rear screws.
Slide out the 3 plastic spacers and plug the 3 holes
with the 3 plastic plugs which you can find on the
back of the machine.
P0233
P0020
Positioning
Position the machine on a firm level surface.
The machine must not touch the wall or other furni-
ture.
It is assumed that the tap, drainage point and socket
are within easy reach of the machine hoses and
power supply cable. If not, you are advised to call
your fitter in order to move the tap and/or drainage
point and/or socket.
P0023
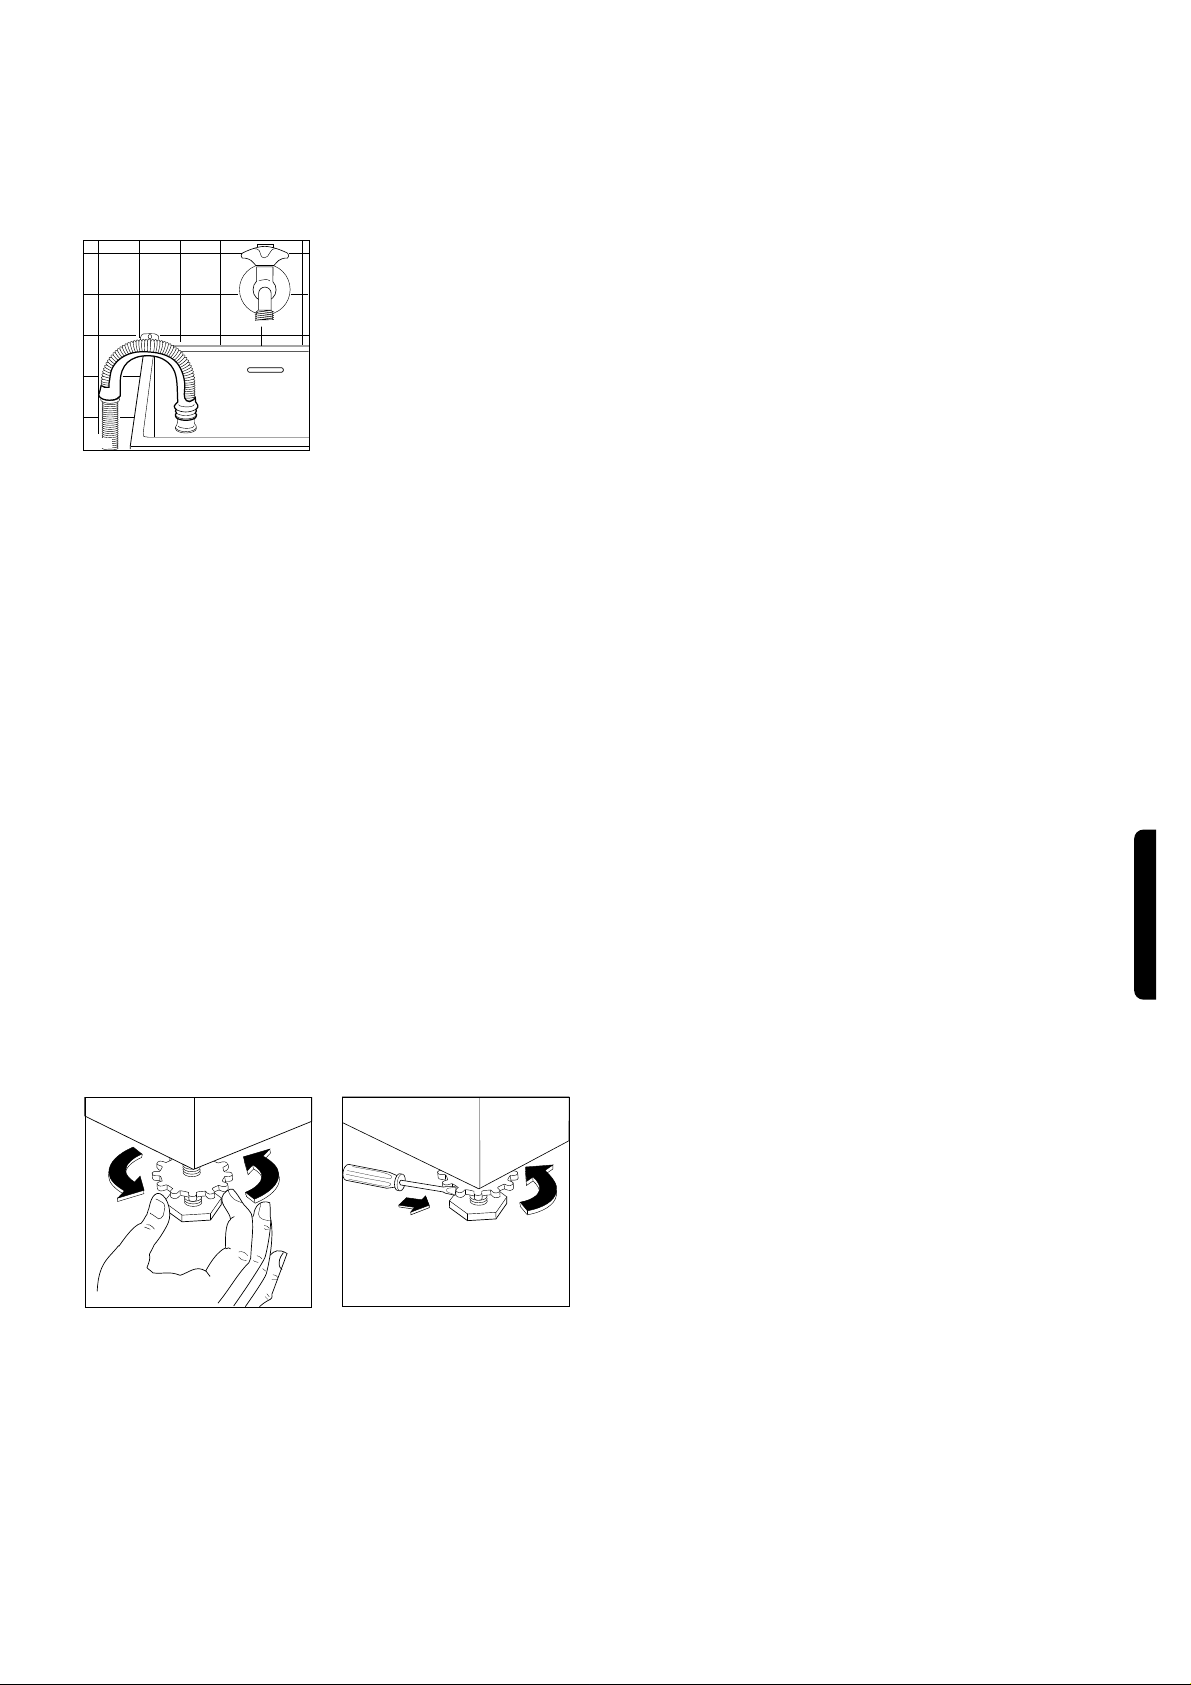
Water inlet
Connect the water inlet hose to a tap with a 3/4" gas
thread spout.
The inlet hose is provided with a water stop
device, which protects
against damage caused
by water leaks in the fill
hose which could develop due to natural ageing
A
P0271
Should this occur, turn the water tap off and refer to
your Service Agent to replace the hose.
P0021
a longer high pressure hose specifically designed to
solve problems of this type.
of the hose. This fault is
shown by a red sector in
the window «A».
The other end of the inlet
hose connected to the
machine can be turned
in any direction. Simply
loosen the fitting, rotate
the hose and retighten.
The inlet hose must not
be extended. If it is too
short and you do not
wish to move the tap,
replace it completely with
66
ENGLISH
Water drainage
The end of the drain hose can be positioned in three
ways:
Over the edge of a
basin at a height of
between 60 and 90 cm.
To keep the drain hose
spout bent, use the special plastic hose guide
supplied with the machine. Secure it to the wall
P0235
vent the drain hose moving during the rinsing cycle
thus causing floods.
Into a basin drainpipe branch: the branch must be
above the basin siphon so that the end of the hose is
at least 60 cm from ground level.
Directly into a drainpipe: you are advised to use a
vertical 65 cm high pipe; in any case it should never
be shorter than 60 cm or longer than 90 cm.
The end part of the drain hose must always be ventilated, i.e. the internal diameter of the pipe must be
wider than the external diameter of the drain hose.
The drain hose can be extended up to a maximum
length of 180 cm. Use an extension with an internal
diameter at least equal to the diameter of the original
hose and a suitable fitting. The hose extension will
run along the floor and only the part near the drainage point will be raised.
with a hook, for example,
or to the tap by means of
a piece of string, to pre-
Electrical connection
Before plugging the appliance into the wall socket,
make sure that:
1. the mains voltage corresponds to the voltage given
in the technical specifications;
2. the meter, fuses, mains power supply and wall
socket can all take the maximum load required.
Make sure that the socket and plug are compatible
without having to use any type of adapter. If necessary, have the domestic wiring system socket replaced.
The electric cable must not be extended. If it is too
short and you do not wish to move the socket, replace it completely with a longer cable.
Safety standards require the appliance to be
earthed.
The Manufacturer accepts no liability for failure to
observe the above safety precautions.
Levelling
Position the appliance and level it by tightening or
loosening one or two of the adjustable feet. Ensure
that the machine is resting securely with all four feet
on the ground. Once the machine has been levelled,
tighten up the lock nuts on all feet with the aid of a
screwdriver.
P0254
P0509
67

USE
Control panel
1 345
1 Detergent dispenser drawer and programme card
Symbols
Prewash
Wash
Fabric softener
P0874
Programme cards in various languages are supplied
with the machine. One of these cards is located on
the front of the dispenser drawer, the others are in the
document pack.
2 «Spin reduction» button
By depressing this button on programmes for cotton
and linen the spin speed will be reduced from 1000 to
850 rpm.
3 «Anti crease»button»
Press this button with the washing programmes for
synthetic or delicate fabrics in order to block the water
drainage of the last rinse. This avoids creasing when
the laundry is left inside the machine at the end of the
washing. To empty the machine, simply depress the
button again (the water will be drained and the
clothes will be gently spun) or select programme "M"
(drain).
4 «Quick wash» button
This option can be selected for cottons (prog. B) and
synthetics (prog.G). Since the washing time is reduced, this button should only be used for lightly soiled
laundry with temperatures from 30° to 60°C.
5 «Economy » button E
For normally or lightly soiled laundry you can select
programme A 60°C (cotton & linen) and programme F
40°C (synthetics) by depressing button E.
The reduction in temperature from 95° to 60° and
from 60° to 40° will save power consumption. Equally
good results will be obtained because the reduced
temperature is compensated by maintaining the full
washing time.
2
78
6
6 «Extra rinse» button
With programmes for cotton and linen an extra rinse
can be selected by pressing this button. To be used
in areas where the water is very soft or for persons
who are allergic to detergents or who have very delicate skin. The machine will carry out 5 rinses instead
of 4.
7 «Door open» button
Press this button to open the door.
8 «Door locked» light
This light (red) stays on whilst the door is locked. The
door cannot be opened until the light has gone out.
9 «Temperature selector/on-off knob
This knob has two functions: selection of the temperature and starting of the programme. Turn the knob
clockwise or anti-clockwise to the required position.
The operating light and «door locked» light come on
and the programme starts.
Before starting a programme or changing an
ongoing programme turn this knob to "0" to
disconnect the appliance.
It is also possible to perform a cold wash by turning
the knob to the «l» or symbol.
At the end of the programme, or to stop the appliance, turn the knob to position «O».
10 «Programme selector» knob
To select the required programme turn this knob
clockwise.
11 Operating pilot light
This light comes on when the programme starts and
goes out when the temperature selector knob is turned to position «O».
9
10
11
68
 Loading...