

Page 1

INSTRUCCIONES PARA INSTALACION Y USO
INSTALLATION AND INSTRUCTION MANUAL
LAVADORA-SECADORA EW 1000 W
WASHER-DRYER EW 1000 W
INFO
124982691
Page 2

21
YOUR NEW WASHER-DRYER
This new machine meets all requirements for a
modern washing of laundry with reduced
consumption of water, energy and detergent.
It will provide you with soft laundry in any
weather.
n
The temperature selector dial allows you to
choose personally the suitable washing
temperature for your laundry.
n
The automatic cooling of the washing water
from 90°C to 60°C before draining will prevent
plastic pipes of your drainage system from
being deformed.
n
The special wool programme will wash
your wool items safely without shrinking tanks
to the extremely gentle washing action.
Ecological hints
In order to obtain water and energy savings and
to protect the environment, we advice you to
follow these instructions:
n
Always wash full loads for maximum savings.
Do not overload the appliance.
n
Use a programme with prewash only for
heavy soiled items.
n
Measure out detergent according to the water
hardness, degree of soiling and quantity of
laundry being washed.
Protection of the environment
n
Materials marked with the symbol are
recyclable.
To enable them to be recycled, they must be
placed in the appropriate collection areas (or
containers). Check with your local authorities.
>PE<= polyethylene
>PS<= polystyrene
>PP<=polypropylene
n
When the appliance is to be scrapped, cut off
the power supply cable and make the door
closing device inoperative to avoid it
becoming a death trap for a child.
Page 3

CONTENTS
22
Important information ... 23
Description of the
appliance
........ 24
n Detergent dispenser drawer . . . 24
Technical specifications .. 24
Installation ........ 25
n Unpacking ........ 25
n Positioning ........ 25
n Water inlet ........ 26
n Water drainage ....... 26
n Levelling ......... 26
n Electrical connection ..... 26
Use ........... 27
n Control panel ........ 27
n Programme selection ..... 28
n Washing and drying hints . . . 29-30
Sorting the laundry ...... 29
Temperatures ........ 29
Before loading the laundry .... 29
Maximum load ....... 29
Laundry weights ....... 29
Removing stains ....... 29
Detergents and additives .... 30
Drying .......... 30
n Wash care symbols ...... 31
n Programmes for cotton and
linen .......... 32
n Programmes for synthetics,
delicates and wool ...... 33
n Operating sequence ..... 34-35
Maintenance and cleaning.. 36
n Bodywork ........ 36
n Detergent dispenser drawer . . . 36
n Cleaning the filter ...... 36
n The water inlet filter ..... 37
n The danger of freezing ..... 37
Servicing ........ 38-39
Page 4

IMPORTANT INFORMATION
23
Installation
n
When unpacking the appliance, check that it
is not damaged. If in doubt, do not use it and
contact the Service Centre.
n
All packing and transit bolts must be removed
before use.Serious damage can occur to the
product and to property if this is not adhered
to.See relevant section in instructions.
n
Any plumbing work required to install this
appliance should be carried out by a qualified
plumber or competent person.
n
Any electrical work required to install this
appliance should be carried out by a qualified
electrician or competent person.
n
Care must be taken to ensure that the
appliance does not stand on the electrical
supply cable.
n
If the machine is situated on a carpeted floor,
please adjust the feet in order to allow air to
circulate freely.
Use
n
This appliance is designed for domestic use.It
must not be used for purposes other than
those for which it was designed.
n
Do not overload the appliance.See relevant
section in instruction book.
n
Only wash and dry fabrics which are designed
to be machine washed dried. If in doubt,
consult the care label on the clothes.
n
Before washing, ensure that all pockets are
empty and buttons and zips are fastened.
n
Any objects such as coins, safety pins, nails,
screws, stones or any other hard, sharp
material can cause extensive damage and
must not be placed into the machine.
n
Garments which have been in contact with
volatile petroleum products should not be
machine washed.If volatile cleaning fluids are
used, care should be taken to ensure that the
fluid is removed from the garment before
placing in the machine.
n
Wash small items such as socks, laces,
washable belts etc in a washing bag or pillow
case as it is possible for such items to slip
down between the tub and the inner drum.
n
Only use the advised quantities of fabric
softener.Damage to the fabric can ensue if
you over-fill.Refer to the manufacturer’s
recommendations of quantities.
n
As some duvets and eiderdowns should be
washed in large commercial machines
because of their bulk, please check with the
manufacturer of the item before washing in a
domestic machine.
n
If you use a liquid detergent with a dispenser
which has to be placed directly in the drum,
remember to remove this dispenser before
drying.
n
Leave the porthole door slightly ajar between
washes to preserve the door seal.
n
Always unplug the appliance and turn off the
water after use.
Service/Repair
n
Under no circumstances should you attempt
to repair the machine yourself.Repairs carried
out by inexperienced persons may cause
injury or serious malfunctioning. Contact your
local Service Centre. Always insist on
genuine spare parts.
General Safety
n
It is dangerous to alter the specifications or
attempt to modify this product in any way.
n
This appliance is designed to be operated by
adults.Children should not be allowed to
tamper with the controls or play with the
product.
n
Pets and children have been known to climb
into washing machines.Please check your
drum before use.
n
The glass door becomes very hot during the
washing and drying cycles. Keep children
away from the vicinity of the appliance whilst it
is in operation.
It is most important that this instruction book should be retained with the appliance for future
reference.Should the appliance be sold or transferred to another owner, or should you move house
and leave the appliance, always ensure that the book is supplied with the appliance in order that the
new owner can get to know the functioning of the appliance and the relevant warnings.
These warnings have been provided in the interest of safety.You MUST read them carefully before
installing or using the appliance.
Page 5
24
DESCRIPTION OF THE APPLIANCE
TECHNICAL SPECIFICATIONS
DIMENSIONS Height 85 cm
Width 60 cm
Depth 61 cm
POWER SUPPLY VOL TAGE 220-230 V/50 Hz
TOTAL POWER ABSORBED 2200 W (10A)
WATER PRESSURE Minimum 5 N/cm2
Minimum 80 N/cm2
MAXIMUM LOAD Washing Drying
Cotton 5 kg 2.5 kg
Synthetics, delicate fabrics 2 kg 1 kg
Woollens 1 kg do not tumble dry
SPIN SPEED Maximum 1000 rpm
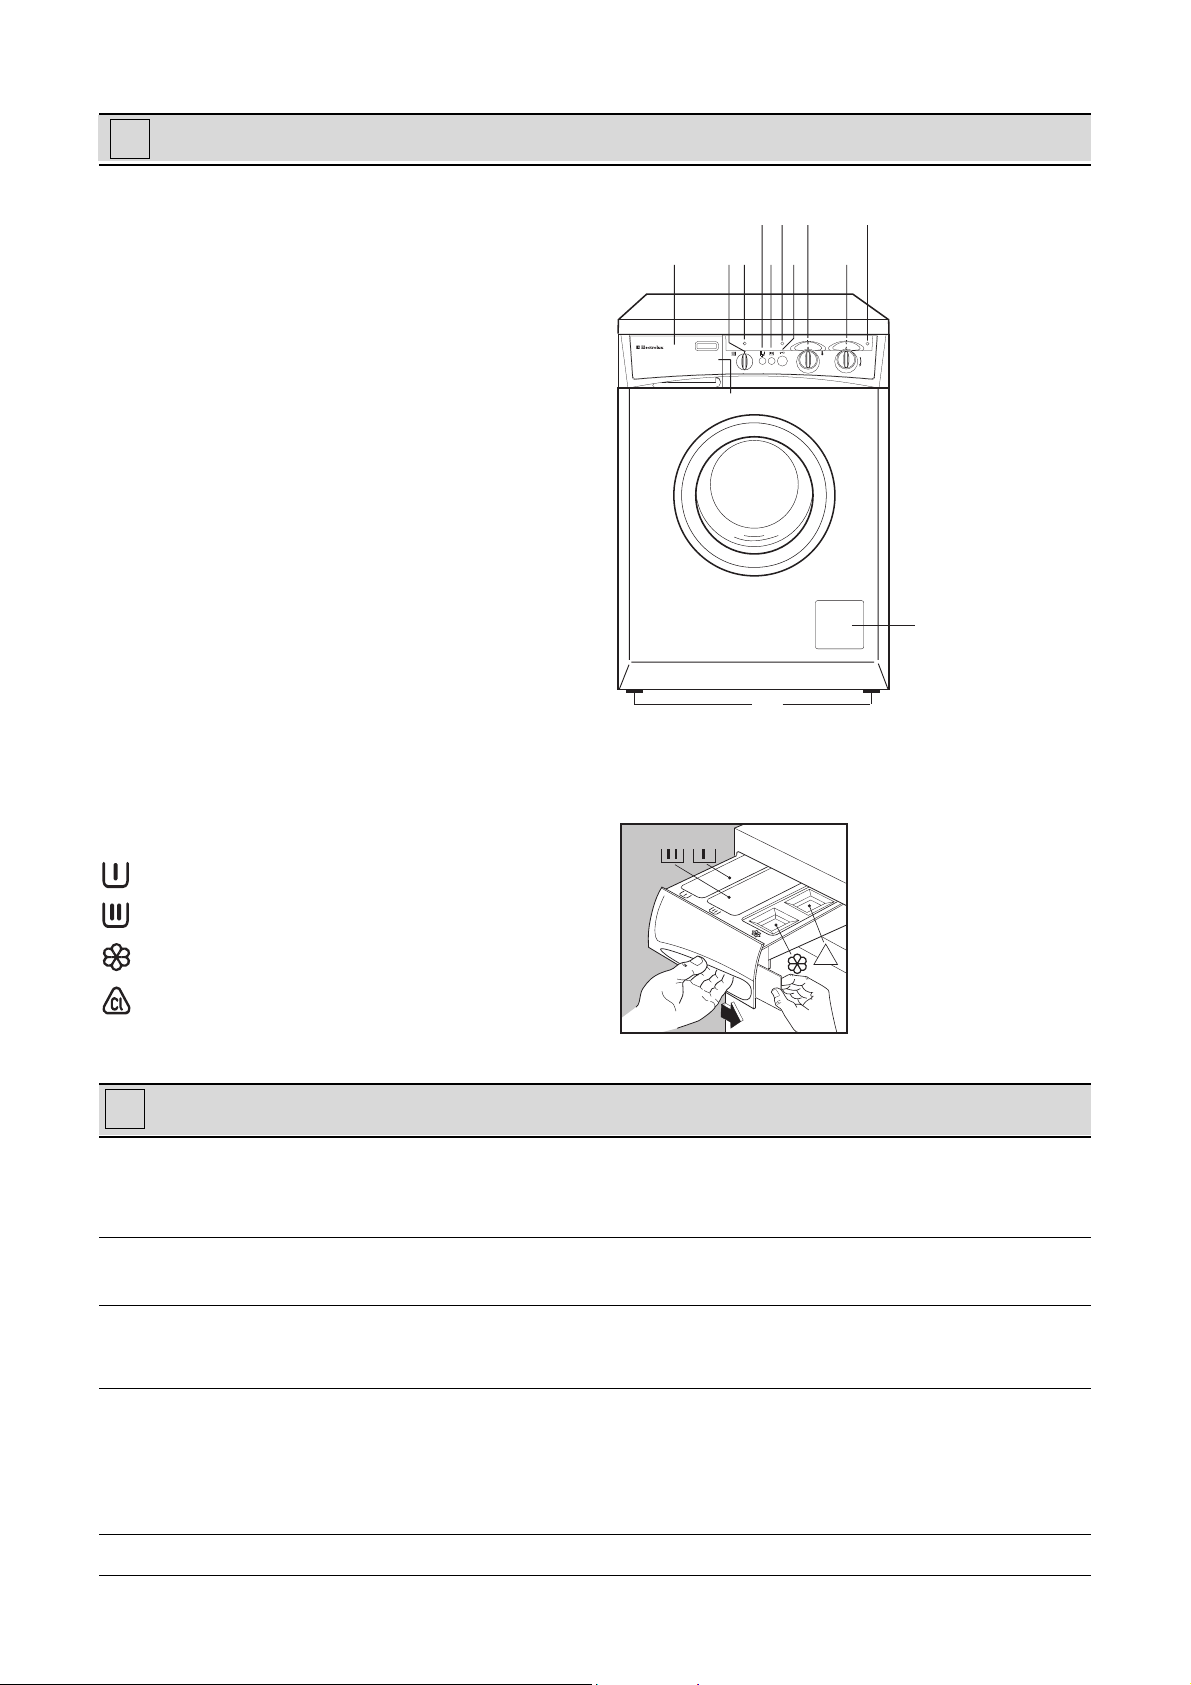
1 Detergent dispenser drawer
2 Programme guide
3 Drying time selector dial
4 Drying light
5 ON/OFF button
6 Half load button
7 Door locked light
8 Open door button
9 Temperature selector dial
10 Programme selector dial
11 Mains-on light
12 Drain filter
13 Adjustable feet
Detergent dispenser drawer
Symbols
Prewash
Wash
Fabric softener
Bleach
1000rpm
1
11
10
98765
43
2
13
12
i
i
P0909
Cl
Page 6
25
INSTALLATION
P0255
P0234
P0233
2
1
P0256
P0020
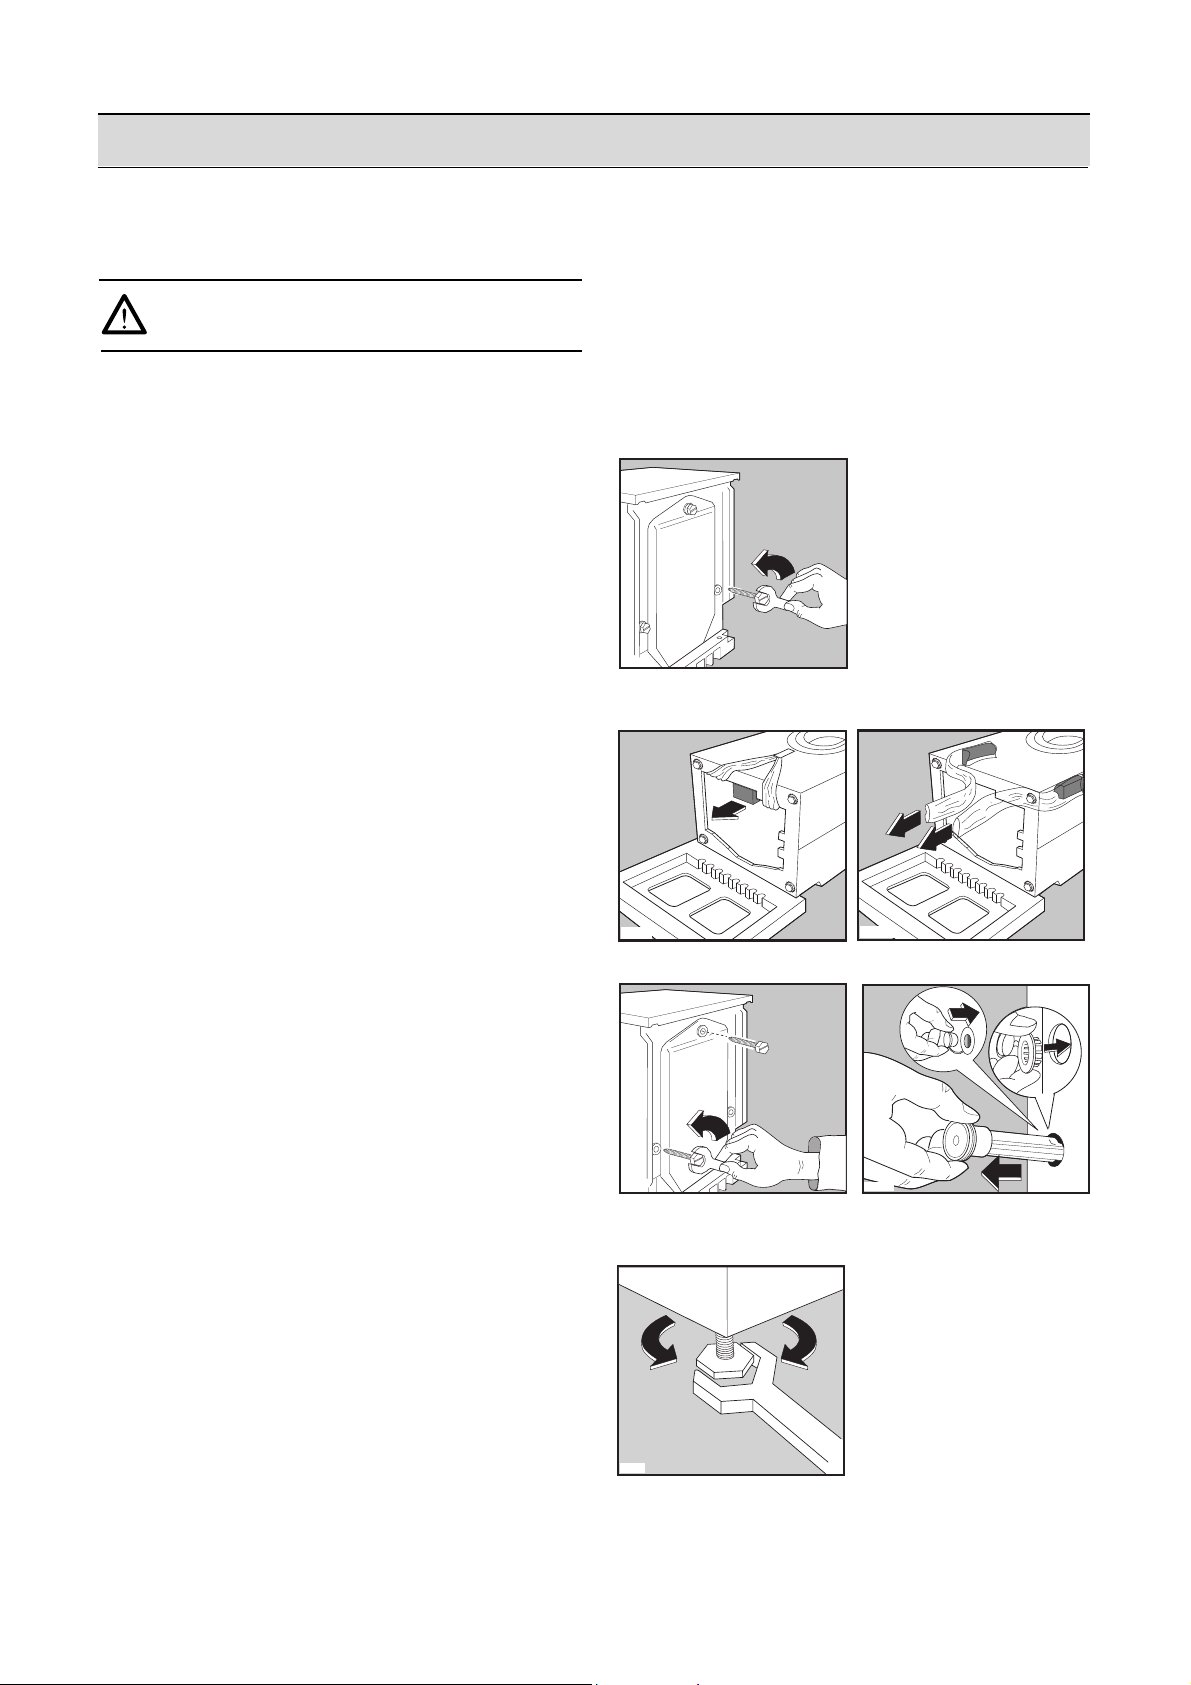
Unpacking
You are advised to keep all the packaging for
re-use in case the machine has to be
transported again.
1. Using a spanner unscrew and remove the
rear right bolt. Lay the machine gently on its
back, making sure that the hoses are not
squashed.
2. Remove the polystyrene block from
underneath the machine.
3. Release the two polythene bags by removing
the adhesive strip.
4. Carefully remove the right polythene bag (1)
by pulling it towards the centre of the
machine.Repeat the operation for the left
polythene bag (2).
5. Set the machine upright and remove the two
remaining bolts from the back.
6. Pull out the three plastic spacers from the
holes into which the bolts were fitted.
7. Plug the open holes with the plugs which you
will find in the bag containing the instruction
book.
Positioning
Install the machine on a flat hard floor.
Make sure that air circulation around the
machine is not impeded by carpets, rugs etc.
Check that the machine does not touch the wall
or other kitchen units.
Carefully level by screwing the adjustable feet in
or out. Never place cardboard, wood or similar
materials under the machine to compensate for
any unevenness in the floor.
Before starting the machine up, the
packing must be removed as follows.
P1051
Page 7
26
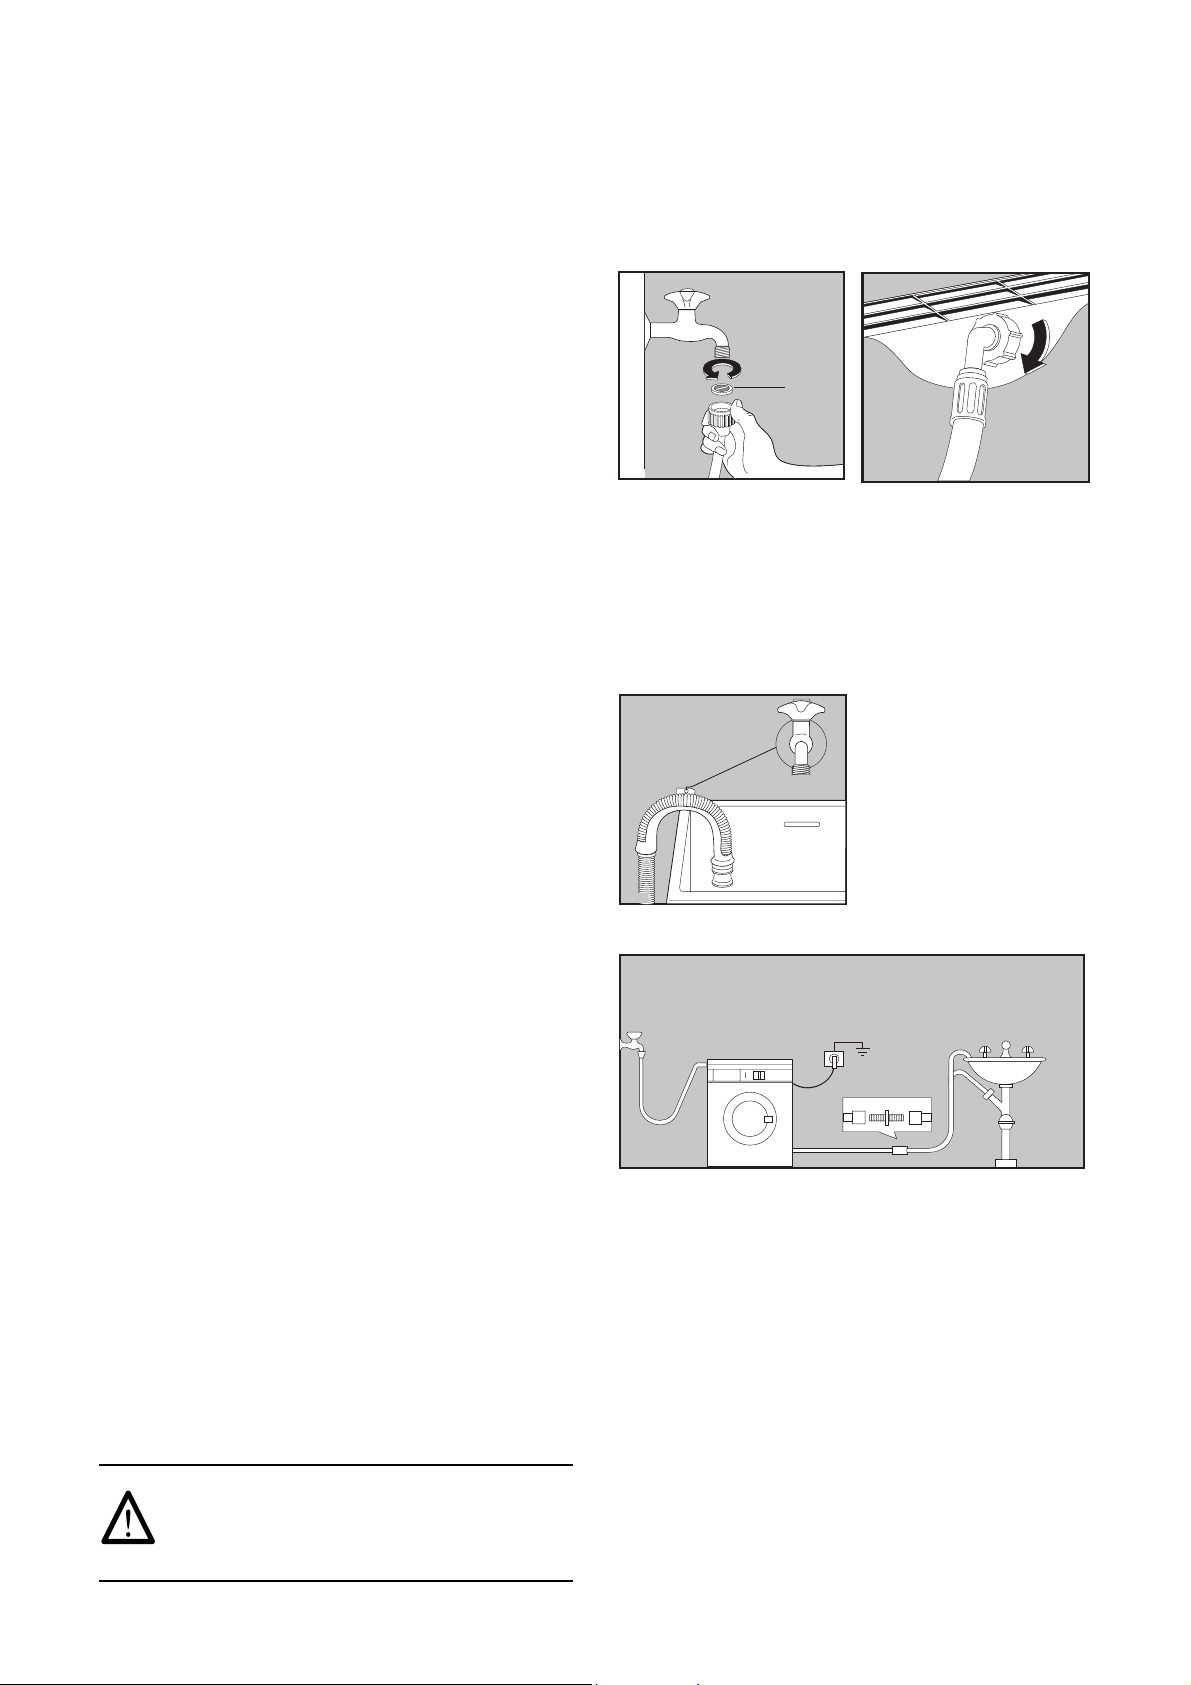
Water inlet
Connect the water inlet hose to a tap with a 3/4"
thread after having inserted the small filter “A”
supplied with the machine.
The other end of the inlet hose which connects
to the machine can be turned in any direction.
Simply loosen the fitting, rotate the hose and
retighten the fitting, making sure there are no
water leaks.
The inlet hose must not be lengthened.If it is
too short and you do not wish to move the tap,
you will have to purchase a new, longer hose
specially designed for this type of use.
Water drainage
The end of the drain hose can be positioned in
three ways:
Hooked over the edge of a sink using the
plastic hose guide supplied with the
machine. In this case, make sure the end
cannot come unhooked when the machine is
emptying.
This could be done by tying it to the tap with a
piece of string or attaching it to the wall.
In a sink drain pipe branch. This branch must
be above the trap so that the bend is at least
60 cm above the ground.
Directly into a drain pipe at a height of not
less than 60 cm and not more than 90 cm.
The end of the drain hose must always be
ventilated, i.e. the inside diameter of the drain
pipe must be larger than the outside diameter of
the drain hose.
The drain hose must not be kinked.Run it along
the floor; only the part near the drainage point
must be raised.
Electrical connection
This machine is designed to operate on a 230 V,
single-phase, 50 Hz supply.
Check that your domestic electrical installation
can take the maximum load required (2.2 kW),
also taking into account any other appliances in
use.
Connect the machine to an earthed socket.
A
P0003
P0021
P0022
P0023
The manufacturer declines any
responsibility for damage or injury
through failure to comply with the above
safety precaution.
Page 8

27
1 Programmes guide
You can find a programme card in English inside
the bag containing the instruction book.
2 Drying time selector dial
Graduated up to 120 minutes for both cottons
(red sector) and synthetics (blue sector), allows
drying time to be selected according to the type
and amount of laundry and the required degree
of dryness.
Turn the knob clockwise only.
Cooling phase
To allow the laundry to cool down, a cooling
phase starts automatically 10 minutes before the
end of drying and this phase must in no
circumstances be reduced or interrupted.
3 Drying indicator light
This light illuminates when drying starts.
4 Start/Stop button
Press this button to start the machine, press
again to interrupt a programme or switch off the
power supply to the machine.
5 Half load button
Select this button to reduce water consumption
on the rinse cycle when washing a smaller load of
cottons or linens (maximum load size = 2.5 kg).
6 Door open button
Press to open the door.
7 “Door locked” light
This light comes on when the programme starts,
indicating that the door is locked.
The door cannot be opened until the light goes
out.
8 Temperature selector dial
Turn this dial to select the washing temperature.
Position :cold wash.
9 Programme selector dial
To select the required programme, turn this dial
clockwise until the programme letter is exactly
opposite the pointer:
- red sector for cotton and linen
- blue sector for synthetics, delicate fabrics,
woollens
10 Operating pilot light
This light is on whilst the machine is operating
and goes out when the start/stop button is
pressed again.
1
2
3
45
6
7
8
910
Control panel
USE
Page 9

28
Programme selection
n
Washing only
Load size:
– cotton, linen max 5 kg
– synthetics, delicate fabrics 2 kg
– woollens 1 kg
– Place the detergent and additives in the
dispenser drawer.
– Press button if required.
– Select the temperature and the wash
programme.
– Press the start/stop button.
n
Drying only
Load size:
– cotton, linen max 2.5 kg
– synthetics 1.5 kg
– Select the drying time (red sector for cotton
and blue sector for synthetics).
– Select the drying programme H or L.
– Press the start/stop button.
n
Automatic washing and drying (NON-STOP
programme)
Automatic washing and drying is only
possible with linen, cotton and synthetics
programmes.
The maximum load size is 2.5 kg for cotton
and 1.5 kg for synthetics.
Do not exceed these quantities.
– Select the drying time
– Select the wash programme and the
temperature.
– Press the start/stop button .
The laundry will be washed and dried without any
further action by you.
Page 10

29
Washing and drying hints
Sorting the laundry
Follow the wash code symbols on each garment
label and the manufacturer’s washing
instructions.
Sort the laundry as follows:
whites, coloureds, synthetics, delicates, woollens.
Temperatures
90°
for normally soiled white cottons
and linen (e.g.tea cloths, towels,
tablecloths, sheets...)
60° for normally soiled, colour fast
garments (e.g. shirts, night
dresses, pyjamas....) in linen,
cotton or synthetic fibres and for
lightly soiled white cotton (e.g.
underwear).
30°-40
for delicate items (e.g.net curtains),
(cold)
mixed laundry including synthetic
fibres and woollens bearing the
label «pure new wool, machine
washable, non-shrink»
Before loading the laundry
Never wash whites and coloureds together.
Whites may lose their “whiteness”in the wash.
New coloured items may run in the first wash;
they should therefore be washed separately the
first time.
Make sure that no metal objects are left in the
laundry (e.g. hair clips, safety pins, pins).
Button up pillowcases, close zip fasteners, hooks
and poppers.Tie any belts or long tapes.
Remove persistent stains before washing. Rub
particularly soiled areas with a special detergent
or detergent paste.
Treat curtains with special care. Remove hooks or
tie them up in a bag or net.
Maximum loads
Recommended loads are indicated in the
programme charts.
General rules:
cotton, linen: drum full but not too tightly packed
synthetics: drum no more than half full
delicate fabrics and woollens: drum no more
than one third full
Washing a maximum load makes the most
efficient use of water and energy.
For heavily soiled laundry, reduce the load size.
Laundry weights
The following weights are indicative:
bathrobe 1200 g
napkin 0100 g
quilt cover 0700 g
sheet 0500 g
pillow case 0200 g
tablecloth 0250 g
towelling towel 0200 g
tea cloth 0100 g
night dress 0200 g
ladies’briefs 0100 g
man’s work shirt 0600 g
man’s shirt 0200 g
man’s pyjamas 0500 g
blouse 0100 g
men’s underpants 0100 g
Removing stains
Stubborn stains may not be removed by just
water and detergent.It is therefore advisable to
treat them prior to washing.
Blood: treat fresh stains with cold water. For
dried stains, soak overnight in water with a
special detergent then rub in the soap and water.
Oil based paint: moisten with benzine stain
remover, lay the garment on a soft cloth and dab
the stain; treat several times.
Dried grease stains: moisten with turpentine,
lay the garment on a soft surface and dab the
stain with the fingertips and a cotton cloth.
Rust: oxalic acid dissolved in hot water or a rust
removing product used cold.Be careful with rust
stains which are not recent since the cellulose
structure will already have been damaged and
the fabric tends to hole.
Mould stains: treat with bleach, rinse well
(whites and fast coloureds only).
Grass: soap lightly and treat with bleach (whites
and fast coloureds only).
Ball point pen and glue: moisten with
acetone (*), lay the garment on a soft cloth and
dab the stain.
Lipstick: moisten with acetone as above, then
treat stains with methylated spirits.Remove any
residual marks from white fabrics with bleach.
Page 11

30
Red wine: soak in water and detergent, rinse
and treat with acetic or citric acid, then rinse.
Treat any residual marks with bleach.
Ink: depending on the type of ink, moisten the
fabric first with acetone (*), then with acetic acid;
treat any residual marks on white fabrics with
bleach and then rinse thoroughly.
Tar stains: first treat with stain remover,
methylated spirits or benzine, then rub with
detergent paste.
(*) do not use acetone on artificial silk
Detergents and additives
Good washing results also depend on the choice
of detergent and use of the correct quantities to
avoid waste and protect the environment.
Although biodegradable, detergents contain
substances which, in large quantities, can upset
the delicate balance of nature.
The choice of detergent will depend on the type
of fabric (delicates, woollens, cottons, etc.), the
colour, washing temperature and degree of
soiling.
All commonly available washing machine
detergents may be used in this appliance:
– powder detergents for all types of fabric,
– powder detergents for delicate fabrics (60°C
max) and woollens,
– liquid detergents, preferably for low
temperature wash programmes (60°C max)
for all types of fabric, or special for woollens
only.
The detergent and any additives must be placed
in the appropriate compartments of the
dispenser drawer before starting the wash
programme.
If using concentrated powder or liquid
detergents, a programme without prewash must
be selected.
Pour liquid detergent into the dispenser drawer
compartment marked just before starting
the programme.
Any fabric softener or starching additives must
be poured into the compartment marked
before starting the wash programme.
Follow the product manufacturer’s
recommendations on quantities to use.
Quantity of detergent to be used
The type and quantity of detergent will depend
on the type of fabric, load size, degree of soiling
and hardness of the water used.
Water hardness is classified in so-called
“degrees” of hardness. Information on hardness
of the water in your area can be obtained from
the relevant water supply company, or from your
local authority.
Follow the product manufacturers’ instructions on
quantities to use.
Use less detergent if:
– you are washing a small load
– the laundry is lightly soiled
– large amounts of foam form during washing.
Drying
n All laundry to be dried must be thoroughly
spun.The higher the spin speed, the lower the
power consumption and the shorter the drying
time.
n Scrupulously follow the instructions on each
garment label, making sure that it is suitable
for tumble-drying.
n Do not tumble dry the following:
– wool, silk, synthetic curtains;
– articles with a plasticised finish, nylon
tights or stockings, sleeping bags, quilts,
articles made of foam rubber or containing
materials similar to foam rubber, fabrics
with metal inserts;
– fabrics which tend to fray.
Important: during the drying cycle, the water tap
must be left open and the drain hose must be
correctly positioned.
Page 12

31
i
A
P
F
95
60
60
40
40
40
30
30
International wash code symbols
These symbols appear on fabric labels, in order to help you choose the best way to treat your laundr y.
Energetic wash
Max. wash
temperature
95°C
Delicate wash
Bleaching Bleach in cold water Do not bleach
Ironing Hot iron
max 200°C
Max. wash
temperature
60°C
Max. wash
temperature
40°C
Warm iron
max 150°C
Max. wash
temperature
30°C
Hand wash Do not
Lukewarm iron
max 110°C
wash
at all
Do not iron
Dry cleaning Dry cleaning
in all solvents
Drying Flat On the line On clothes
Dry cleaning in
perchlorethylene,
petrol, pure alcohol,
R 111 & R 113
hanger
Dry cleaning
in petrol,
pure alcohol
and R 113
high
temperature
low
temperature
Tumble dry
Do not
dry clean
Do not
tumble dry
Page 13

32
Energetic programmes for cotton and linen
Washing : maximum load 5 kg
Washing + drying: maximum load 2.5 kg
Progr.ATemp. Type of laundry Cycle description
Possible
option
60°-90°
Whites without prewash,
normally soiled
Wash at 60°-90°C
Rinses
Spin
B
40°-60°
Coloureds,
normally soiled
Wash at 40°-60°C
Rinses
Spin
C
Rinses
Rinses with additives
Spin
D
Softeners
Rinse with softener
Spin
F
Long spin
Drain and long spin at 1000 rpm
The temperatures indicated are the optimum temperatures for each programme and depend on the type
of laundry and degree of soiling.
Drying: maximum load 2.5 kg (red sector)
G
Time
min.
Programme Type of laundry Degree of drying
Quantity
90
60
40
H
Cotton and linen spun
at 1000 rpm
Cupboard dry
2.5 kg
1.5 kg
0.5 kg
70
40
30
Iron dry
2.5 kg
1.5 kg
0.5 kg
60°-90°
Whites with prewash,
heavy soiled
Prewash at 40°C
Wash at 60°-90°C
Rinses
Spin
Page 14

33
N
Softeners
Progr. Temp. Type of laundry Cycle description
Possible
options
J
40°-60°
Synthetics with prewash,
heavy soiled
Prewash at 40°C
Wash at 40°-60°C
Rinses
Stop with water in drum
K
30°-40°
Delicates
Wash at 30°-40°C
Rinses
Stop with water in drum
M
30°-40°
Wool
Wash at 30°-40°C
Rinses
Stop with water in drum
P
Delicate rinses
Rinse with softener
Stop with water in drum
Q
Short spin
Drain and short spin
at 650 rpm
R
Drain Empty out water
Time
min
Programme Type of laundry Degree of drying
Quantity
100
60
40
L
Resistant synthetics,
spun at 650 rpm
Cupboard dry
1.5 kg
1.0 kg
0.5 kg
Delicate programmes for synthetics,mixed fibres, delicates and
woollens
Washing: maximum load 2 kg, woollens 1 kg
Washing + Drying: maximum load 1.5 kg
At the end of these programmes, the last rinse water is not emptied out, so as to avoid creasing of the
fabrics.To empty out the water, select programme R or S.
Important: When the automatic NON-STOP washing plus drying programme is used for synthetics, the
water is emptied out automatically and there is a short spin before drying starts.
The temperatures indicated are the optimum temperatures for each programme and depend on the type
of laundry and degree of soiling.
Drying: maximum load 1.5 kg (blue sector)
Rinses with softener
Stop with water in drum
Synthetics without prewash,
normally soiled
40°-60°
Wash at 40°-60°C
Rinses
Stop with water in drum
S
Page 15

34
Operating sequence
Before washing your first load of laundry, we
recommend that you run a cotton cycle at 60°C,
with the machine empty, in order to remove any
manufacturing residue from the drum and tub.
Pour half a measure of detergent into the main
wash compartment and start up the machine.
Automatic washing plus drying
(NON-STOP operation)
This option is only possible for cottons and
synthetics.
Maximum load:
– cotton, linen 2.5 kg
– synthetics 1.5 kg
1 Place the laundry in the drum
Open the door by pressing the button and
place the laundry in the drum, one item at a time,
shaking them out as much as possible.Close the
door.
2 Measure out the detergent
Pull out the dispenser drawer until it stops.
Measure out the amount of detergent
recommended by the manufacturer in a
graduated cup and pour it into the main wash
compartment . If you wish to carry out the
prewash, pour detergent into the appropriate
compartment marked .
3 Measure out the additives
If required, pour fabric softener into the
compartment marked and the bleaching
agent in the compartment marked without
exceeding the «MAX» mark.
4 Select the drying time
Turn the selector dial clockwise to the required
time (red or blue sector, according to the fabric).
i
P0910
Cl
P0911
Cl
Page 16

35
5 Select the required option
Select the HALF LOAD option if required.
6 Select the temperature
Turn the selector dial to the required
temperature setting.
7 Select the programme and start it
Turn the programme selector dial clockwise to
the required wash programme and press the
start/stop button: the operating light and the door
locked light come on and the machine starts to
operate.
8 At the end of the programme
The machine stops automatically.
It is normal to have to wait for about 2 minutes
before being able to open the door to allow the
safety lock to release.The door cannot be
opened until the door locked light on the control
panel goes out.
Press the start/stop button again and the
operating pilot light goes out.
Remove the laundry.
Turn the drum by hand to make sure it is
completely empty, so as to avoid any forgotten
items being damaged in a subsequent wash
(e.g.shrinking) or their colour running into a load
of whites.
Release any buttons which have been pressed.
Turn the water tap off and unplug the machine.
Leave the door ajar to air the machine.
P0917
B
P0966
90°
T0001
Page 17

36
MAINTENANCE AND CLEANING
Bodywork
Clean the outside of the machine with warm
water and a neutral, non-abrasive household
detergent. Rinse with clean water and dry with a
soft cloth.
Important: do not use methylated spirits,
solvents or similar products to clean the
bodywork.
Detergent dispenser drawer
After a while, detergents and fabric softeners
leave deposits in the drawer.
Clean the drawer from time to time by rinsing it
under a running tap.To remove the drawer from
the machine, press the button in the rear
left-hand corner.
To facilitate cleaning, the top part of the additive
compartments can be removed.
Detergent can also eventually accumulate inside
the drawer recess:clean it with an old
toothbrush. Refit the drawer after cleaning.
Cleaning the filter
The drain filter collects threads and small objects
inadvertently left in the laundry.Check regularly
that the filter is clean, especially after running
drying programmes.
Open the filter door.
Place a container under the filter and unscrew it.
Pull out the filter.
Clean the filter under a running tap, then refit it,
screwing it fully in.
P0915
P0038
P0916
Cl
P0861
P0860
P0859
P0040
Page 18

37
Water inlet filter
If you notice that the machine is taking longer to
fill, check that the filter in the water inlet hose is
not blocked.
Turn off the water tap.
Unscrew the hose from the tap and remove the
filter.
Clean it with a stiff brush.
Refit the filter and screw the hose back onto the
tap.
The dangers of freezing
If the machine is exposed to temperatures below
0°C, certain precautions should be taken.
n
Turn off the water tap.
n
Unscrew the inlet hose.
n
Unhook the drain hose from the rear support
and position the end of this hose and that of
the inlet hose in a bowl.Run the draining
programme until the selector dial is in the
“Stop” position.
n
Disconnect the appliance.
n
Screw the inlet hose and reposition the drain
hose.
n
When you intend to start the machine up
again, make sure that the room temperature
is above 0°C.
P0041
Page 19

SERVICING
38
Before contacting your local Service Centre, please make the following checks
n
The START/STOP button has not been
depressed
n
The door is not closed properly
n
No water is entering the machine (see: the
machine does not fill)
n
The selector dial is not correctly positioned
n
The machine does not start up
n
The machine does not fill
n
The water tap is not turned on
n
The water supply has been disconnected
n
The inlet hose is kinked
n
The water pressure is too low
n
The water inlet filter is clogged
n
The door is not closed properly
n
The machine empties as it fills
n
The end of the drain hose is too low
n
The end of the drain hose is submerged in
water
n
Drain pipe has no vent-hole
n
The machine does not drain or
spin
n
You have selected a gentle wash cycle which
stops with the water of the last rinse in the
tub
n
The drain filter is clogged
n
The drain hose is kinked
n
The drainage system pipes are blocked
n
The drain hose extension is incorrect
n
The wash load is unbalanced.Redistribute
the load inside the drum to allow the
machine to spin.
n
The machine leaks or overflows
n
Too much detergent
n
Unsuitable detergent
n
The inlet hose is loose
n
The detergent dispenser drawer or recess is
clogged
n
The end of the drain hose is not securely
positioned
n
The drainage system pipes are blocked
n
The machine vibrates or is noisy
n
The internal packing and transit bolts have
not been removed
n
The machine is not level
n
The machine is in contact with the wall or
furniture
n
The washing load is badly distributed
n
The machine is overloaded
Problem
Possible cause
Page 20

39
Problem Possible cause
n
The door does not open
n
The programme is still running.
n
The safety device has locked it.The door
cannot be opened until the door locked light
has gone out.
If, after the above checks, there is still a fault,
call your local Service Centre.
Please make sure you give the model and serial
number of the appliance.
This information can be found on the rating plate
Mod. ..........
Prod. No. ...........
Ser. No. .........
Mod.
..........
Ser.
P0042
n
The machine does not dry
n
The drying time has not been selected.
n
The tap is not open.
n
The filter is blocked.
n
The drum is overloaded.
n
A suitable drying time in the correct
sector has not been selected.
n
Unsatisfactory washing results
n
Too little detergent or unsuitable detergent
has been used.
n
Stubborn stains have not been treated prior
to washing.
n
The correct temperature and/or programme
was not selected.
Page 21

Z
 Loading...